This post originally appeared on the now-defunct Arcane Game Lore blog.
I think it is safe to say that we can blame this upcoming series of posts on Delta from the Delta’s D&D Hotspot blog. In 2013 he did a series of posts every Saturday that was usually about my favorite game, Star Frontiers, which got me following his blog. Specifically, the impetus for this particular series of blog posts all started with his Forging Fighters series of posts (part 1, part 2, part 3) where he detailed the design and crafting of a fighter miniature for Star Frontiers, something that doesn’t exist in the miniature sets released by TSR all those years ago. I like those articles so much that with Delta’s permission, we reprinted his blog posts as an article in issue 7 of the Frontier Explorer.
At the same time, I had just discovered that the library at the university where my wife is an astronomy professor had acquired a 3D printer that was available for the public to use at minimal cost. And so I thought to myself, “I wonder if I could make 3D starship models that I could print?” At that time I was also working on my write-up of the Sathar Destroyer that would later be published in the Sathar Destroyer Technical Manual. So this naturally became the first miniature that I would attempt.
Fast forward about a year and now I work at the university library as the Physical and Mathematical Sciences Librarian (covering physics, astronomy, math, and computer science) in the very department that has the 3D printer. It’s literally around the corner from my office. That has made it very easy for me to use and test models on the printer. I’ve been having a blast. I’ve learned a lot along the way and thought that I should share my experiences in this series of blog posts.
The answer to the question of whether or not I could make models to print is a definite “Yes!” and I’ll be taking you through that journey. I’m up to 10 different models and will cover one or two of them in each post showing pictures of the model, the printed miniature, and is some cases, the final painted versions (I’m in the process of painting many of them right now).
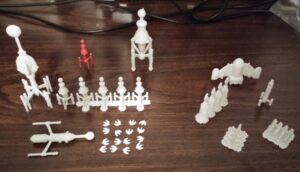
The picture at the right shows some of the first models printed and ready for painting. The one painted model is a prototype version of the Sathar Destroyer model that I printed and then painted as a test. Also pictured on the left are a lager version of the final destroyer model, the Sathar Heavy and Light Cruisers, more destroyers and some Sathar fighters. On the right we have a freighter, four UPF frigates, four Assault Scouts, and four pirate corvettes. Also pictured is a not to scale version of an exploration ship from a 3D model made by Jay Thruman. I’ll talk about all of these in future posts.
Software and Printer
As I was starting this process, I looked around for modeling software when I started this process, I was looking for something that was relatively simple to use and quick to learn. A lot of people use Blender but I’ve tried using it in the past and while quite powerful and versatile, the learning curve was just too steep for my tastes. In the end I settled on a program called OpenSCAD. It works much like a programming language in that instead of drawing and placing objects on the screen, you simply write a line or two of code telling the program what shape, how big, where, and how to rotate it. Then your code “compiles” into the 3D object. Being a programmer by profession and not any sort of an artist, this appealed to me immensely. There have definitely been some limitations and I think I’ll eventually have to change programs if I ever want to do anything besides the spaceships but it has served me well to date.
In addition to OpenSCAD for actually creating the models, I also use Autodesk’s Meshmixer to check the models and NetFabb’s cloud repair service (no defunct – link is to page on the Wayback Machine) to clean the models up. I’ve also used Inkscape to create a few shapes that I’ve then imported to use as parts of models. More about those in future articles as well.
The printer that I’ve been printing on is a Makerbot Replicator 2, printing at 200 micron (0.2mm) vertical resolution. I tried a few prints at the smaller 100 micron resolution but the printer just kept jamming. I’ll be talking about the joys and woes of using this printer as well. At the library we’re in the process of getting another printer or two of different brands and so when they arrive, I’ll also be talking about the differences and my experiences with the new printers.
Stay Tuned
That’s it for this introduction. I’ll be interspersing these modeling articles with my Designing Out Loud series in the coming weeks and months. It might be a little light on content over the next couple of weeks as we move through the holiday season but I’ll try to get something up each week. See you next time.
Comments
Delta – December 24, 2014 at 11:56 am
That’s awesome! Can’t wait to see what’s next!


One thought on “Starting a 3D Modeling Journey”