The Expanding Frontier

Creating Sci-fi RPG Resources

  • Home
  • Order Eclipse Glasses
  • Order a Map
  • Order Miniatures
  • Supporters
  • About
  • Bio

Category Archives: Locations

Sample Star System Data

I mentioned in my July State of the Frontier post that I was working on putting together a way to generate star systems. This is a sample of the data you can expect to see for each system. This particular system isn’t tied to any specific system on the map but is more for demonstration purposes. This is also not the final formatting or colors, but rather the default colors from the programs. Once I figure out exactly what I want, I’ll update the code to make the output match. So let’s look at what we have.

System Data

First up is the system data. This is generated using a program called StarGen. It’s a bit old and doesn’t work exactly for the smallest or largest stars but it is good start for most of the more interesting systems that might have habitable planets. I also don’t think it takes into account much of the new exoplanet data but we’re making system for a science fiction game so that’s okay. I’ll probably tweak things as I go along.

This generates a lot of data for each planet including thinks like average, min, and max temperatures, orbital characteristics, rotational characteristics, atmospheric composition (if present) and more.

Test System
12 Planets (size proportional to Sqrt(Radius))
Sun Rock Rock Venusian Terrestrial Sub-Jovian Sub-Jovian Jovian Sub-Jovian Jovian Rock Jovian Rock See
Key
Stellar characteristics
Stellar mass 1.08 solar masses
Stellar luminosity 1.48
Age 1.146 billion years
(6.183 billion left on main sequence)
Habitable ecosphere radius 1.216 AU (0.990 – 1.755 AU)

Planetary Overview
#TypeDist.MassRadius
1 Rock Rock 0.363 AU 0.353 EM 0.711 ER
2 Rock Rock 0.677 AU 0.151 EM 0.538 ER
3 Venusian Venusian 0.968 AU 0.582 EM 0.838 ER
4 Terrestrial Terrestrial 1.393 AU 1.114 EM 1.036 ER
5 Sub-Jovian Sub-Jovian 1.881 AU 5.356 EM 2.810 ER
6 Sub-Jovian Sub-Jovian 3.087 AU 3.734 EM 2.636 ER
7 Jovian Jovian 4.684 AU 626.589 EM 12.161 ER
8 Sub-Jovian Sub-Jovian 8.294 AU 8.347 EM 3.620 ER
9 Jovian Jovian 15.114 AU 54.383 EM 6.573 ER
10 Rock Rock 24.112 AU 0.293 EM 0.893 ER
11 Jovian Jovian 29.693 AU 26.864 EM 5.661 ER
12 Rock Rock 44.468 AU 0.218 EM 0.810 ER

Planet #1 Statistics
Planet typeRockRock
Resonant Spin Locked
Low-G, Hot, Airless, 1-Face
Distance from primary star5.4E+07 KM0.363 AU
Mass2.1E+24Kg0.353 Earth masses
Surface gravity685.0 cm/sec20.70 Earth gees
Surface pressure 0 millibars0.000 Earth atmospheres
Surface temperature217.9° Celcius
424.2° Fahrenheit
+203.9° C Earth temperature
+367.0° F Earth temperature
Normal temperature range
NightDay
-174.6° C
-282.3° F
– 426.4° C
799.5° F
MinMax
-188.9° C
-308.1° F
– 430.6° C
807.0° F
Equatorial radius4535.9 Km0.71 Earth radii
Density5.40 grams/cc0.98 Earth densities
Eccentricity of orbit0.215
Escape Velocity 7.9 Km/sec
Molecular weight retained136.8 and above
Axial tilt14°
Planetary albedo 0.07
Exospheric Temperature14259.02° K+12986.02° C Earth temperature
Length of year76.84 Earth days1.55 Local days
Length of day1191.81 hours
Boiling point of water-273.1° Celcius
-459.7° Fahrenheit
Hydrosphere percentage 0.0
Cloud cover percentage 0.0
Ice cover percentage 0.0


Planet #2 Statistics
Planet typeRockRock
Low-G, Hot, Airless
Distance from primary star1E+08 KM0.677 AU
Mass9.1E+23Kg0.151 Earth masses
Surface gravity513.8 cm/sec20.52 Earth gees
Surface pressure 0 millibars0.000 Earth atmospheres
Surface temperature 86.6° Celcius
187.9° Fahrenheit
+72.6° C Earth temperature
+130.7° F Earth temperature
Normal temperature range
NightDay
-23.5° C
-10.2° F
– 187.7° C
369.9° F
MinMax
-59.1° C
-74.4° F
– 217.4° C
423.3° F
Equatorial radius3428.6 Km0.54 Earth radii
Density5.36 grams/cc0.97 Earth densities
Eccentricity of orbit0.260
Escape Velocity 5.9 Km/sec
Molecular weight retained69.5 and aboveSO3, Kr, Xe
Axial tilt24°
Planetary albedo 0.07
Exospheric Temperature4108.54° K+2835.54° C Earth temperature
Length of year195.39 Earth days53.18 Local days
Length of day88.17 hours
Boiling point of water-273.1° Celcius
-459.7° Fahrenheit
Hydrosphere percentage 0.0
Cloud cover percentage 0.0
Ice cover percentage 0.0


Planet #3 Statistics
Planet typeVenusianVenusian
Hot, Arid, Cloudy, Boiling ocean, Unbreathably thick atmosphere
Distance from primary star1.4E+08 KM0.968 AU
Mass3.5E+24Kg0.582 Earth masses
Surface gravity812.6 cm/sec20.83 Earth gees
Surface pressure44300 millibars43.721 Earth atmospheres
Surface temperature288.7° Celcius
551.7° Fahrenheit
+274.7° C Earth temperature
+494.5° F Earth temperature
+210.0° C greenhouse effect (GH)
Normal temperature range
MinMax
281.3° C
538.4° F
– 295.1° C
563.2° F
Equatorial radius5344.0 Km0.84 Earth radii
Density5.44 grams/cc0.99 Earth densities
Eccentricity of orbit0.101
Escape Velocity 9.3 Km/sec
Molecular weight retained13.8 and aboveN, O, CH4, NH3, H2O, Ne, N2, CO…
Axial tilt21°
Planetary albedo 0.52
Exospheric Temperature2007.71° K+734.71° C Earth temperature
Length of year334.30 Earth days463.35 Local days
Length of day17.32 hours
Boiling point of water244.9° Celcius
472.8° Fahrenheit
Hydrosphere percentage 0.0
Cloud cover percentage100.0
Ice cover percentage 0.0


Planet #4 Statistics
Planet typeTerrestrialTerrestrial
Cold, Few clouds (N2, O2 – breathable)
Distance from primary star2.1E+08 KM1.393 AU
Mass6.7E+24Kg1.114 Earth masses
Surface gravity1018.0 cm/sec21.04 Earth gees
Surface pressure 1161 millibars1.145 Earth atmospheres
Surface temperature 6.2° Celcius
43.2° Fahrenheit
-7.8° C Earth temperature
-14.0° F Earth temperature
Normal temperature range
NightDay
2.1° C
35.8° F
– 10.1° C
50.1° F
MinMax
-20.1° C
-4.2° F
– 31.0° C
87.9° F
Equatorial radius6607.3 Km1 Earth radii
Density5.51 grams/cc1 Earth densities
Eccentricity of orbit0.108
Escape Velocity11.6 Km/sec
Molecular weight retained 4.3 and aboveN, O, CH4, NH3, H2O, Ne, N2, CO…
Nitrogen 63.0%  731 mb (ipp: 692) 
Oxygen 36.9%  428 mb (ipp: 405) 
Argon  0.1%  1 mb (ipp: 1) 
Axial tilt22°
Planetary albedo 0.20
Exospheric Temperature969.62° K-303.38° C Earth temperature
Length of year577.04 Earth days920.22 Local days
1.58 Earth years
Length of day15.05 hours
Boiling point of water104.0° Celcius
219.2° Fahrenheit
Hydrosphere percentage54.6
Cloud cover percentage24.2
Ice cover percentage 6.2


Planet #5 Statistics
Planet typeSub-JovianSub-Jovian
Distance from primary star2.8E+08 KM1.881 AU
Mass3.2E+25Kg5.356 Earth masses
3.464 Earth masses dust
1.891 Earth masses gas
Equatorial radius17923.5 Km2.8 Earth radii
Density1.33 grams/cc0.24 Earth densities
Eccentricity of orbit0.027
Escape Velocity15.4 Km/sec
Molecular weight retained 1.3 and aboveH2, He, N, O, CH4, NH3, H2O, Ne…
Axial tilt25°
Planetary albedo 0.50
Exospheric Temperature532.22° K-740.78° C Earth temperature
Length of year904.87 Earth days1369.98 Local days
2.48 Earth years
Length of day15.85 hours


Planet #6 Statistics
Planet typeSub-JovianSub-Jovian
Distance from primary star4.6E+08 KM3.087 AU
Mass2.2E+25Kg3.734 Earth masses
2.431 Earth masses dust
1.304 Earth masses gas
Equatorial radius16814.6 Km2.6 Earth radii
Density1.12 grams/cc0.2 Earth densities
Eccentricity of orbit0.057
Escape Velocity13.3 Km/sec
Molecular weight retained 0.7 and aboveH, H2, He, N, O, CH4, NH3, H2O…
Axial tilt32°
Planetary albedo 0.54
Exospheric Temperature197.52° K-1075.48° C Earth temperature
Length of year1903.08 Earth days2564.73 Local days
5.21 Earth years
Length of day17.81 hours


Planet #7 Statistics
Planet typeJovianJovian
Distance from primary star7E+08 KM4.684 AU
Mass3.7E+27Kg626.589 Earth masses
38.199 Earth masses dust
588.390 Earth masses gas
Equatorial radius77565.0 Km12 Earth radii
Density1.92 grams/cc0.35 Earth densities
Eccentricity of orbit0.014
Escape Velocity80.3 Km/sec
Molecular weight retained 0.0 and aboveH, H2, He, N, O, CH4, NH3, H2O…
Axial tilt20°
Planetary albedo 0.47
Exospheric Temperature 85.79° K-1187.21° C Earth temperature
Length of year3553.92 Earth days13449.13 Local days
9.73 Earth years
Length of day6.34 hours


Planet #8 Statistics
Planet typeSub-JovianSub-Jovian
Distance from primary star1.2E+09 KM8.294 AU
Mass5E+25Kg8.347 Earth masses
2.726 Earth masses dust
5.621 Earth masses gas
Equatorial radius23085.2 Km3.6 Earth radii
Density0.97 grams/cc0.18 Earth densities
Eccentricity of orbit0.177
Escape Velocity17.0 Km/sec
Molecular weight retained 0.1 and aboveH, H2, He, N, O, CH4, NH3, H2O…
Axial tilt48°
Planetary albedo 0.46
Exospheric Temperature 27.37° K-1245.63° C Earth temperature
Length of year8380.04 Earth days12298.07 Local days
22.94 Earth years
Length of day16.35 hours


Planet #9 Statistics
Planet typeJovianJovian
Distance from primary star2.3E+09 KM15.114 AU
Mass3.3E+26Kg54.383 Earth masses
6.375 Earth masses dust
48.009 Earth masses gas
Equatorial radius41923.0 Km6.6 Earth radii
Density1.05 grams/cc0.19 Earth densities
Eccentricity of orbit0.207
Escape Velocity32.2 Km/sec
Molecular weight retained 0.0 and aboveH, H2, He, N, O, CH4, NH3, H2O…
Axial tilt50°
Planetary albedo 0.51
Exospheric Temperature 8.24° K-1264.76° C Earth temperature
Length of year20614.27 Earth days42521.66 Local days
56.44 Earth years
Length of day11.64 hours


Planet #10 Statistics
Planet typeRockRock
Low-G, Cold, Airless
Distance from primary star3.6E+09 KM24.112 AU
Mass1.8E+24Kg0.293 Earth masses
Surface gravity360.2 cm/sec20.37 Earth gees
Surface pressure 0 millibars0.000 Earth atmospheres
Surface temperature-214.0° Celcius
-353.1° Fahrenheit
-228.0° C Earth temperature
-410.3° F Earth temperature
Normal temperature range
NightDay
-220.6° C
-365.0° F
– -207.3° C
-341.2° F
MinMax
-237.0° C
-394.6° F
– -191.8° C
-313.3° F
Equatorial radius5693.4 Km0.89 Earth radii
Density2.26 grams/cc0.41 Earth densities
Eccentricity of orbit0.161
Escape Velocity 6.4 Km/sec
Molecular weight retained 0.1 and aboveH, H2, He, N, O, CH4, NH3, H2O…
Axial tilt54°
Planetary albedo 0.15
Exospheric Temperature 3.24° K-1269.76° C Earth temperature
Length of year41539.68 Earth days39480.41 Local days
113.73 Earth years
Length of day25.25 hours
Boiling point of water-47.6° Celcius
-53.7° Fahrenheit
Hydrosphere percentage 0.0
Cloud cover percentage 0.0
Ice cover percentage 0.1


Planet #11 Statistics
Planet typeJovianJovian
Distance from primary star4.4E+09 KM29.693 AU
Mass1.6E+26Kg26.864 Earth masses
3.276 Earth masses dust
23.587 Earth masses gas
Equatorial radius36103.9 Km5.7 Earth radii
Density0.81 grams/cc0.15 Earth densities
Eccentricity of orbit0.089
Escape Velocity24.4 Km/sec
Molecular weight retained 0.0 and aboveH, H2, He, N, O, CH4, NH3, H2O…
Axial tilt60°
Planetary albedo 0.52
Exospheric Temperature 2.14° K-1270.86° C Earth temperature
Length of year56765.41 Earth days95559.79 Local days
155.41 Earth years
Length of day14.26 hours


Planet #12 Statistics
Planet typeRockRock
Low-G, Cold, Airless
Distance from primary star6.7E+09 KM44.468 AU
Mass1.3E+24Kg0.218 Earth masses
Surface gravity325.5 cm/sec20.33 Earth gees
Surface pressure 0 millibars0.000 Earth atmospheres
Surface temperature-229.6° Celcius
-381.3° Fahrenheit
-243.6° C Earth temperature
-438.5° F Earth temperature
Normal temperature range
NightDay
-234.6° C
-390.3° F
– -224.5° C
-372.1° F
MinMax
-249.8° C
-417.7° F
– -209.6° C
-345.2° F
Equatorial radius5165.8 Km0.81 Earth radii
Density2.25 grams/cc0.41 Earth densities
Eccentricity of orbit0.030
Escape Velocity 5.8 Km/sec
Molecular weight retained 0.0 and aboveH, H2, He, N, O, CH4, NH3, H2O…
Axial tilt39°
Planetary albedo 0.15
Exospheric Temperature 0.95° K-1272.05° C Earth temperature
Length of year104035.23 Earth days93990.83 Local days
284.83 Earth years
Length of day26.56 hours
Boiling point of water-53.4° Celcius
-64.1° Fahrenheit
Hydrosphere percentage 0.0
Cloud cover percentage 0.0
Ice cover percentage 0.1

There is an alternate output for the system view at the top. Instead of the images, it can make a simple system diagram that looks like this:

This shows the relative positions of the planets on a log scale as well as the range of their orbits (the gray bars) based on the generated eccentricities. The blue bar is the habitable zone for the system and the numbers above the gray bars are the masses of the planets in Earth masses. I’m leaning toward using this one. What do you think?

Planetary Maps

For each system, I want to do planetary maps for at least the habitable planets and possibly some of the ones classified as Venusian, Martian, Water, or Ice by StarGen. I haven’t found a program that will make good maps of the airless worlds (putting craters everywhere).

I also haven’t found a program that I’m completely happy with as far as generating the maps go. I have two that each do a bit of what I like.

Worldbuilder

The first is a program called Worldbuilder. It creates the world using plate tectonics it figure out mountain ranges, subduction zones, and the like and then has an atmospheric circuation model to figure out rainfall and temperatures and such. I like all that. It also can do a lot of different map projections, including on a globe and allow you to zoom in on any part of the map. Strangely, it only does a hex grid across the map and not lattitude and longitude lines.

It has a lot of knobs you can turn to adjust things like the water percentage, heat level, number of techtonic plates, and so on. And it does ice caps quite nicely.

One of the major downsides is that it is not supported anymore and the last development on it was in 2015. And while I have the code, it is in Lua, a languate I know nothing about so its a bit hard to read and edit. Another issue is that there is no key that I have been able to find to explain the colorings on the various maps (temperature, elevation, biomes). I’m sure its in the code but I’m still trying to figure it out.

Here are some maps for a sample world from that system. You might recognize the map style from other maps I’ve posted on the blog for locations and adventures on Pale. I used this program to generate the planetary map I used for that.
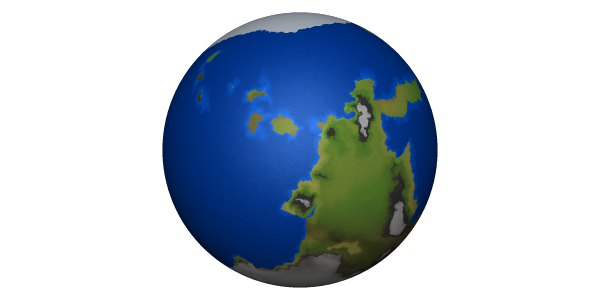
Globe view with the biomes selected
Biomes map
Elevation map
Tempurature map
And just for fun the tectonic plates.

I really like the way this program generates the worlds, I just wish there was a little more documentation on what the program knobs do, and a key to the maps. In looking at the code, the biomes seem to be fairly generic: ice, water, rock, sand, etc.

Planet Map Generator

The other program is just called Planet, although the web page calls it Planet Map Generator. This one doesn’t have as many things you can adjust in the planet generation and just make maps based on an algorithm that generates the elevations on the map. The maps can look very fractally or smoother depending on the coloring scheme you use. It is a fractal generation method so you can zoom in as much as you want and it has some projections that I like that Worldbuilder including an icosohedral projection that is great for gaming.

You can tweak the water level and colors used but not much else. Addtionally, the developer also just added biome generation based on a simple air flow and rain model for given terrains. And the biome list has 11 different biomes, so that is nice.

Here are a few maps from that program. These are all elevation maps.
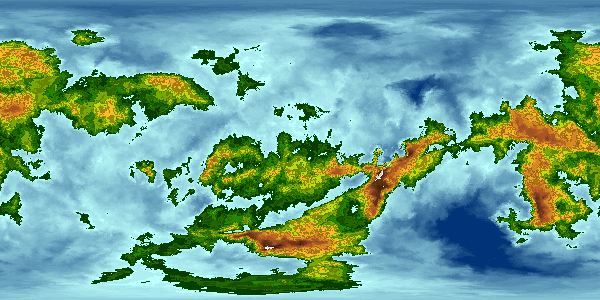
The default color scheme. I don’t like how jagged the elevation contours look with this scheme.
This is an alternate color scheme that I like a lot better as it makes things look smoother.
Same map as above but with biomes substituted for the elevation data. The oceans are a little intense on this one so it might be better to try a different color scheme for this.
Here’s the globe.
This is the Mollweide projection that I like as it shows the entire world but doesn’t distort the regions near the poles. Worldbuilder doesn’t have this projection (or any others like it).
Finally the icosahedral projection. This one is great becuase it is effectively equal area everywhere with minor distorations and works great for gaming by overlaying a hex grid on it.

I really like the look of these maps. The one thing it doesn’t do is show ice caps or really do any weather patterns.

Which to choose?

I want to be consistent so I probably need to choose one of the map programs over the other. While i love the look of the maps coming from the Planet Map Generator, it isn’t quite as versatile for creating different types of worlds with different characteristics and I’m leaning more toward the Worldbuilder program for that reason.

There is an interesting option. The Planetary Map builder does have the option to import a low resolution (24×12) map of symbols as a seed for it’s map generation. So if I take that sample elevation map from Worldbuilder and convert it into the format Planetary Map Builder needs for input, I get a map that looks like this (with the original map below it).
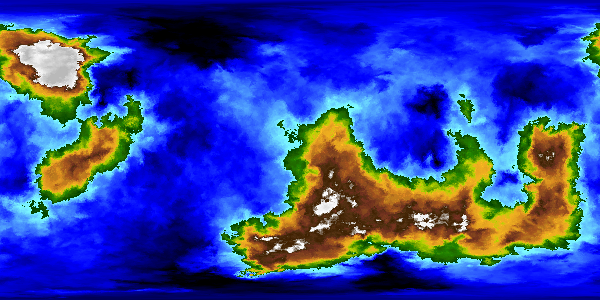
Some of the details are lost and the terrain is a bit different, the Planetary Map Builder tends to put the moutains in the middle of the contients while the Worldbuilder does it on tectonic boundaries.

I could also create the biome map in Planetary Map Builder.

So while I can make the nicer looking maps from the Worldbuilder seed maps, I don’t think I like the way that changes the terrain. So I’m leaning toward the Worldbuilder maps as I like the terrain features better. I just need to figure out how to color them like the Planetary Map Builder maps and get better biome information.

What I probably need to do is learn Lua and translate the Worldbuilder code into C/C++ and then merge it with the relevant code from Planetary Map Builder. But that’s a bit of work. We’ll see if I can find time. Until then, I think I’ll use the Worldbuilder maps as is. The nice thing is that it is reproduceable and if I do make code upgrades later, I can rerun the programs to produce the same worlds with upgraded maps.

Final Thoughts

I still haven’t decided how to format these or where to host them but that’s a small matter. I can always start as blog posts like this one and then move them somewhere later.

What do you think about the different maps and style? Which do you prefer? Share your thoughts in the comments below.

And if you like the things I’m working on and want to encource me to spend more time on it, consider supporting me on Patreon.

August 11, 2022 Tom 1 Comment

GODCo Bio-Lab

In the mountains, about five hours west of Navin’s Mill on Pale, the Greater Overall Development Corporation (GODCo) has a a semi-secret bio-lab. Everyone knows it there, or at least that it exists, if not its exact location, what is not known is exactly what type of research is done there.

And the truth isn’t all that exciting. As the Frontier’s preeminent terraforming company, GODCo has research labs all over the Frontier looking at adapting species, both flora and fauna, to the environments of the worlds inhabited by the Frontier races. And adapting the local flora and fauna for use by the Frontier races as well. This particular lab on Pale was looking at ways to better adapt some of the yaririan food crops to better live and thrive in Pale’s cooler climate with its yellower sun.

The secrecy around the bio-lab is institutional, not necessarily due to the work being done there. GODCo is always very secretive about its work as a way to avoid competition. Especially here on the Streel Corporation’s homeworld.

Location

Click for full-sized image

The lab is located in the mountains west of Navin’s Mill on Pale. Access is by paved roads and then a rough ground track (for the last 100 km). The total travel time from Navin’s Mill is about about five hours. While it’s possible to land an aircar at the facility, this form of access is rarely used.

The lab is built underground in the side of a mountain. Only a small structure is visible on the surface. This was done partially to take advantage of a geothermal power source discovered there, partially to make it easier to regulate the temperature in the labs, and partially to help maintain the secrecy of the lab by not having everything out in the open. The lab has been in operation for over 20 years.

Lab Staff

As part of GODCo’s veil of secrecy, all of the staff currently working at the lab live on-site. The non-science staff rotate in and out regularly while the scientists typically stay longer for the duration of there experimental work. The lab’s staff consists of:

  • Lab admin and assistant admin
  • 20 scientists
  • 8 security personnel
  • 2 power technicians
  • 2 roboticists
  • 2 computer technicians
  • 4 general technicians
  • 4 hospitality staff (cooks, recreation, etc)

In addition to the 44 staff members, there are 8 security, 12 maintenance, and 4 service robots at the facility.

Floor Plans

The lab itself consists of four levels. Except for the ground level, which is the only visible level on the surface, all of the levels are built into caverns that have been carved out of the mountain. The following sections give details on each level.

The various room descriptions are intentionally left fairly generic. Feel free to embellish or modify them to suit your game and campaign. Unless otherwise specified, all doors in the complex have level 1 locks that open to the staff ID badges.

Each of these maps are produce at 140 DPI, two squares to the inch with a scale of 1 meter per square. They should be able to be imported directly into your virtual table top of choice is you so desire.

Ground level

The only part of the complex visible on the surface, this level consists of the outer fence, a garage and storage facility, a security office, barracks for some of the security personnel, and an elevator and stairwell descending to the below-ground levels.

The contour lines on the following maps represent 1 meter elevation gains.

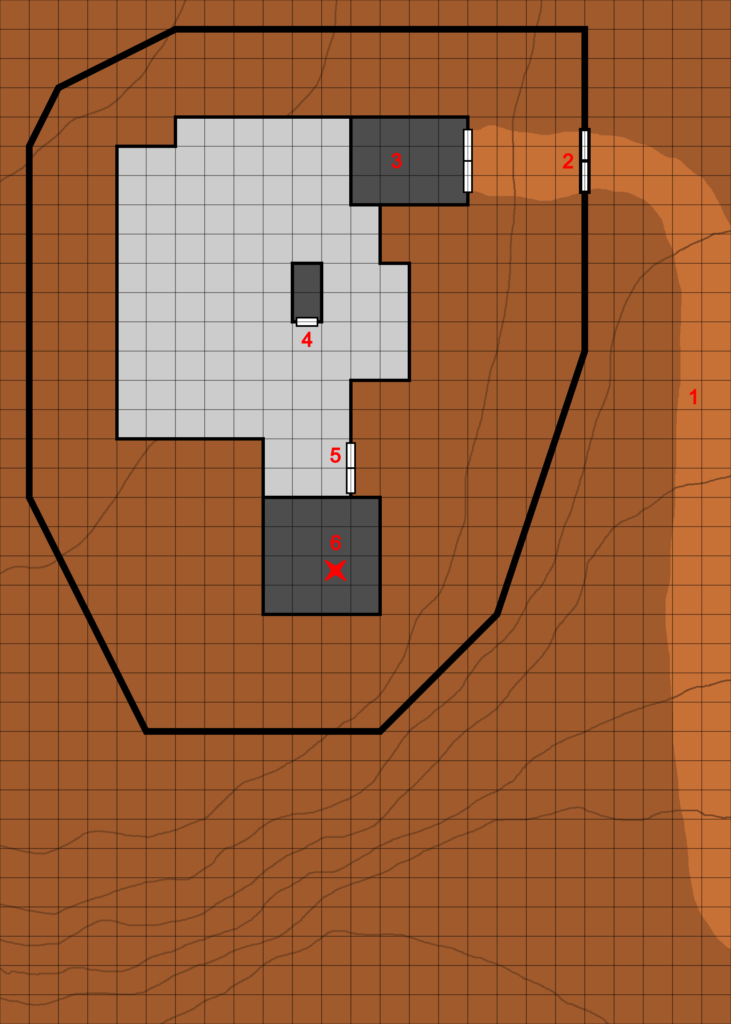
Exterior View

Exterior view. Click for full image. There is an unlabeled version as well.

This is the exterior view of the facility. The labeled items are:

  1. Access Road – This two meter wide access road is a gravel and pressed dirt road winding up the mountain.
  2. Wall and Gate – The wall surrounding the compound is 3 meters tall. The gate stands a little taller at 4 meters and can be opened (inward) to allow vehicular access.
  3. Garage – This garage is big enough to hold a ground truck for unloading when supplies are delivered (typically monthly). The roof here is 5 meters tall instead of the 4 meters of the rest of the building (the light gray area).
  4. Roof Access – This is a taller portion of the roof (total height 6 meters) that provides access to the roof from the stairwell below.
  5. Doors – Other than the garage, this is the only access into the building.
  6. Elevator Roof and Heavy Laser Mount – This is the roof of the elevator shaft. It extends an additional 4 meters above the lower roof and has a ladder to allow access. On top of this part of the building is a heavy laser that is connected to the complex’s power supply and computer.

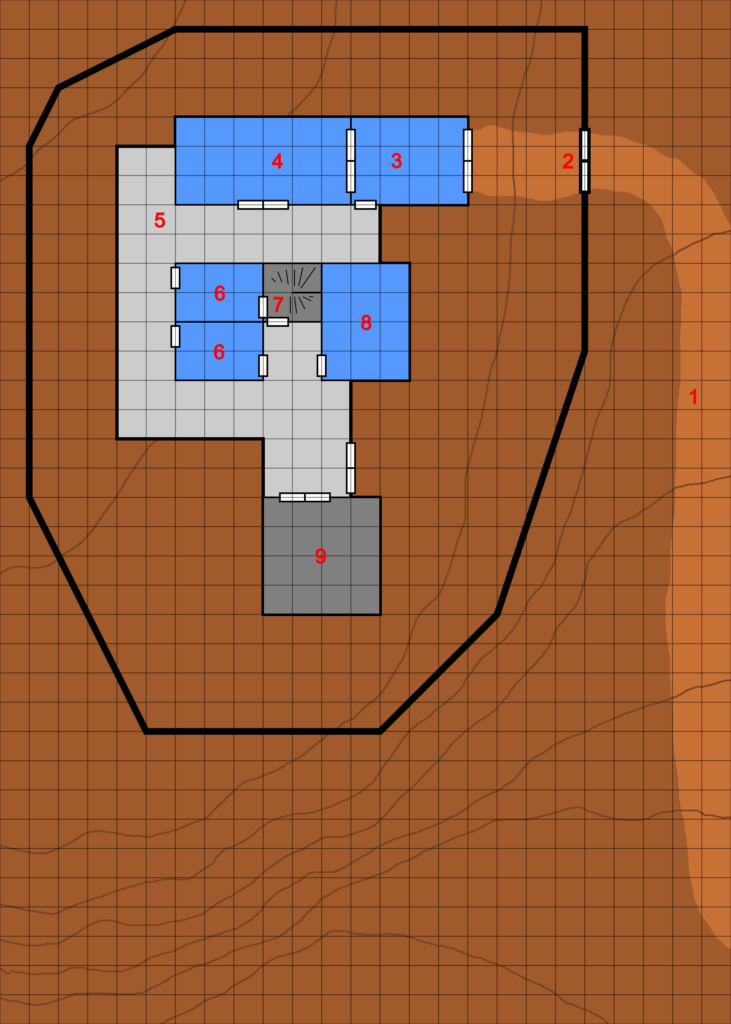
Interior View

Interior view. Click for full sized version. There is also an unlabeled version.

This is the inside of the ground level of the complex. The labeled rooms and areas are described below:

  1. Access Road – as described above
  2. Wall and Gate – as described above
  3. Garage – Large enough for a ground transport, there are some tools and a parabattery recharging station here.
  4. Storage – This room is used as storage to unload arrive ground transport and hold supplies for which there isn’t room in the main underground facility. There will be a variety of lab and medical supplies, as well as food and housekeeping supplies in this room at any given time
  5. Hallway – This is the main hall of this level.
  6. Barracks – These are double bunk room for the four security personnel currently working on this level.
  7. Stairwell – This is long helical stairwell that descends to the lower levels of the complex. The stairs also extend up to the roof access (#4 in the exterior view). There are small landings every 10 meters of decent going down. Primarily used only in emergencies.
  8. Security Office – This is the security office for this level with a computer terminal as well as video feeds from external and internal cameras. This room has a level 2 lock.
  9. Elevator – This large elevator is the main mode of travel between the various levels of the complex. It is capable of holding up to 16 beings at once or carrying large freight or pieces of equipment. It travels 10 meters every 6 seconds.

Level 1 – Housing and Recreation

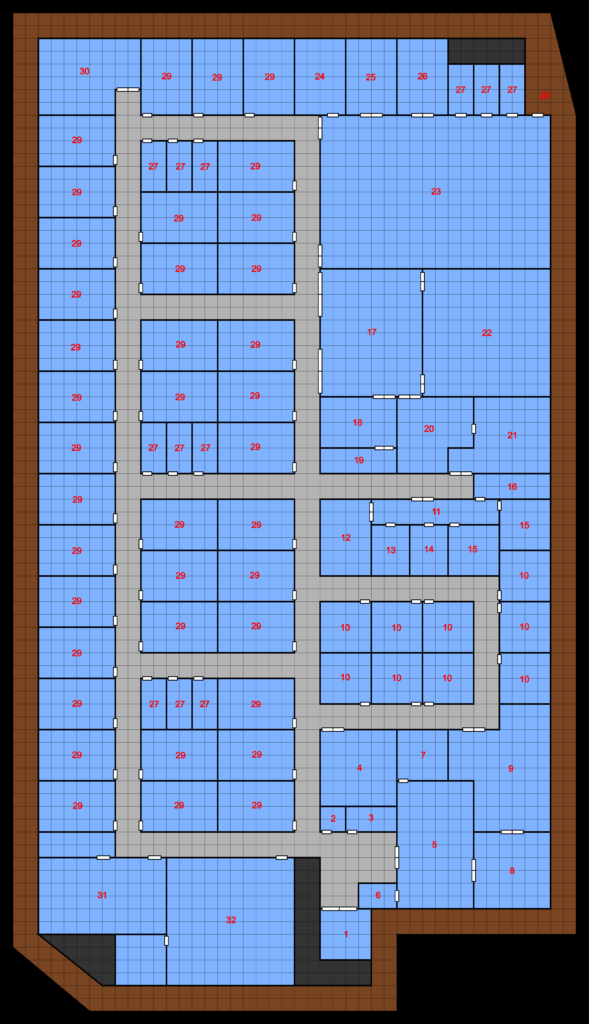
This level is located 20 meters below the surface. It extends deep into the mountain and houses all the housing, recreation, and office space of the facility along with things like the computer, tech shop, medical bays, and life support system.

Level 1. Click for full sized version. There is also a version without labels
  1. Elevator – This large elevator connects the various levels. It travels 10 meters every 6 seconds.
  2. Stairs – This is the stairwell that connects the levels of the complex.
  3. Security Office – This is the main security office for the entire complex. It has video feeds from security cameras on all levels of the complex as well as a computer terminal. This room has a level 2 lock.
  4. Administrator’s Office – This office is plushly decorated and has a small conference table and chairs in addition to the working desk. The desk contains reports of the work from the various labs as well as other administrative reports. This office has a level 3 lock.
  5. Tech/Robotics Shop – This is workshop for working on the complex’s computers, robots, and other mechanical items. It is well stocked and has high quality equipment. Any tech skill to work on machines, robots, or computers gains a +10% bonus when performed here.
  6. Storage – This room contains supplies and equipment for use in the repair shop.
  7. Main Computer – This room houses the main computer for the complex. There is an admin terminal here in the room. The room has a level 4 lock.
  8. Life Support Systems – This room houses the machinery that runs the life support system for this level and level 3. It contains water and air filtration and circulation systems.
  9. Garden – This room is filled with solar spectrum lamps and contains both hydroponic gardens growing food for the complex as well as just a relaxation garden with grass, flowers, and small shrubs.
  10. Offices – These rooms are offices for some of the higher ranked scientists. Each is decorated (and cluttered) according to the whims of the owner.
  11. Medical Bay Entrance – This small hallway provides access to the various rooms in the medical bay
  12. Operating Room – This room is a full surgical room. Any surgery skills performed here get a +10% bonus.
  13. Medical Office – This is the main office of the complex’s medical officer when they are not working down in the lab level.
  14. Exam Room – Typical doctor’s office exam room
  15. Sick Rooms – These two rooms are used to isolate sick members of the staff while they recover or away transport back to Navin’s Mill or Point True.
  16. Medical Storage – This room contains all the supplies needed by the medic for the exam room, sick rooms, and operating rooms. It contains the equivalent of 10 medkits plus any other supplies needed.
  17. Dining/Common Room – This room contains tables and chairs as well as a few couches and recliners There is a bay door/counter area between here and area 18 that can be opened for serving food in addition to the regular doors connecting the two areas.
  18. Kitchen – This is where all the food preparation is done
  19. Pantry – This is where most of the food for the complex is store. Part the room is a walk in freezer.
  20. Library – This room houses a collection of books as well as a computer terminal with access to the complex’s information storage program.
  21. Conference room – This room contains several tables and chairs. It also has a video screen for calls outside the facility as needed.
  22. Theater – This room is a large theater/lecture hall where the staff can watch movies or listen to presentations. Used for staff meetings and relaxation, the entire off-duty staff can fit in this room at once.
  23. Gym – This room contains a variety of mats and equipment for recreation.
  24. Sauna – This is a large sauna for use by the staff. Controls are in the wall by the door.
  25. Steam Room – Popular with the dralasite staff, this steam room allows for the addition of scents and other substances to be added to the steam system. Controls are by the door.
  26. Weight Room – This room contains a number of weights, weight machines and other exercise equipment for use by the staff.
  27. Restrooms/showers – Located throughout the facility, each of these rooms contains showers and lavatory facilities usable by the Frontier races.
  28. Cave/Running Track – Outside of the actual building, the residents have access to a running track that runs the perimeter of the cavern that the complex in built into. the floor has been smoothed and a track laid down but the walls and ceiling are still rough-hewn stone, although obviously cut and not natural. There is lighting along the entire length of the track.
  29. Living Quarters – These rooms are the living quarters for all of the staff. Each contains a bed, sofa, table and chairs. While the layout of each room is basically the same, each is decorated according to the taste of the tenant.
  30. Robot Storage – This is where the robots that work on this level and the ground level in the facility are kept when they are not working. It contains small bays for each robot that contain the recharging stations.
  31. Assistant Administrator Apartment – This is a luxury apartment for the assistant admin. It has it’s own private bathroom. This room has a level 2 lock.
  32. Administrator’s Apartment – This very luxurious apartment belongs to the administrator of the facility. It has it’s own private bath as part of the suite. This room has a level 3 lock.

Level 2 – Labs

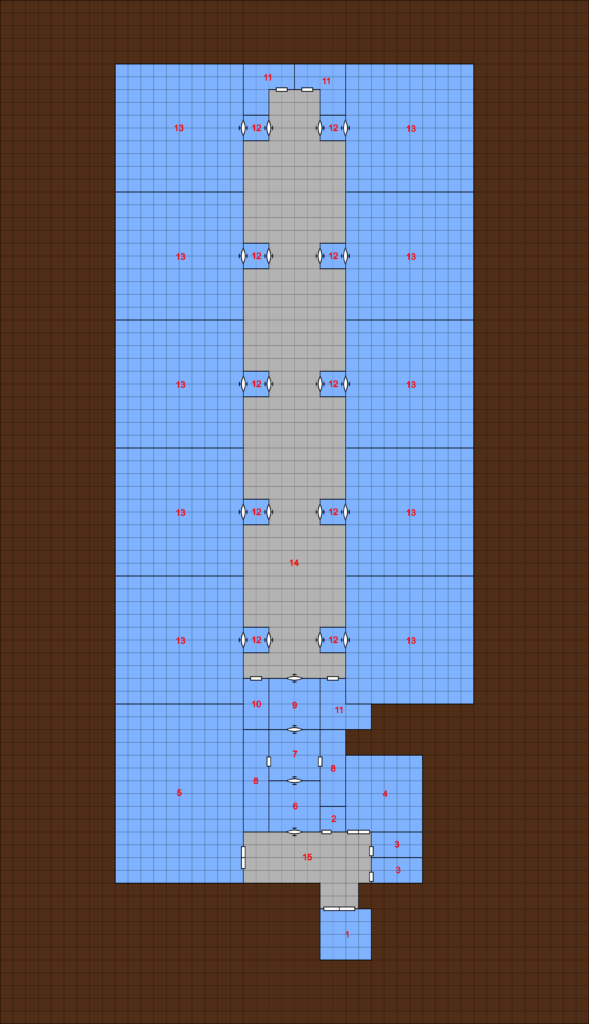
This level houses the labs where the actual work of the facility is done. It is located an additional 50 meters below level 1. There are a total of ten labs on the level. The entire lab area is accessed through a series of decontamination chambers and then each lab is accessed through a separate airlock.

Level 2. Click for full sized version. There is also a version without labels.
  1. Elevator – This is the location of the elevator on this level.
  2. Stairs – This is the location of the stairwell on this level.
  3. Restrooms – These are the restrooms for this level.
  4. Conference Room – A large conference room for this level so that those working don’t need to go up the upper level for meetings or as a second room if the first one is in use.
  5. Life Support Systems – This room houses the life support systems and air filtration systems for this level. There are 11 systems here. Ten are independent systems that handle the cleaning and filtering of the air for each of the 10 labs. The other system handles all the other rooms.
  6. Cleaning room – This room contains large fans and scrubbers to remove most loose dirt and other contaminants from those entering the lab area. The floor is covered with sticky tiles that pull dirt off the bottom of shoes as you walk through the room. The inner door will not open until a full cleaning cycle has been completed.
  7. Changing Room – This room is where those going into the lab change into their lab suits and other gear.
  8. Clean Room Suit Storage – These rooms contain the clean room suits, lab coats, and other gear to be worn in the labs.
  9. Decontamination Room – This room does a final cleaning of any one or anything entering the lab area to remove any final contaminates. The inner door will not open until a full cleaning cycle has occured.
  10. Storage – This room contains lab supplies and other equipment that has passed through the decontamination process for use in the various labs.
  11. Robot Storage – These rooms are the storage area and charging stations for the robots that work on this level.
  12. Lab Entrance – These rooms are mini airlocks that provide the final security lock to prevent material from traveling into or out of the labs. These rooms have transparent walls so that you can see those inside. These doors have level 5 locks and can only be opened by those scientists working in the specific lab.
  13. Labs – Each lab is set up to work on an individual experiment. The walls facing the hall (area 14) are glass so that you can see into each lab area.
  14. Lab Hall – This hallway is inside the clean area and allows access to each of the labs and to the robot storage areas.
  15. Outer Hall – This hallway is outside the clean area and allows access to the elevator, stairs, life support systems, and conference room.

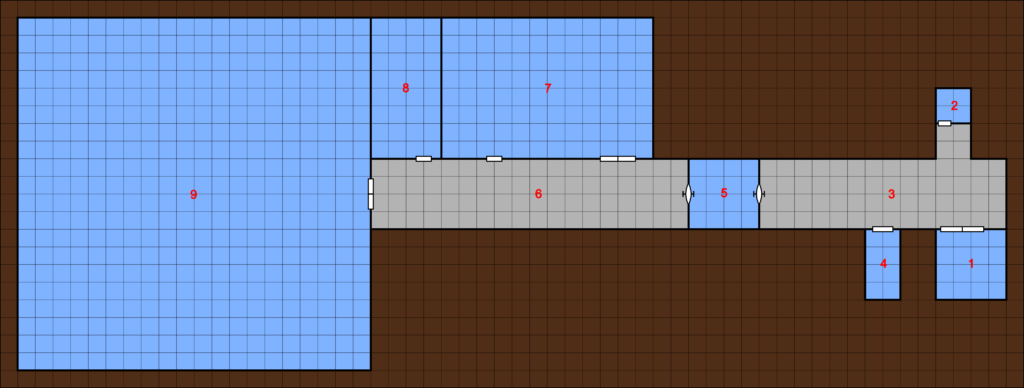
Level 3 – Power Generation

This level only houses the power generator. It is an additional 150 meters below the lab level. It’s quite a hike if you have to use the stairs.

Level 3. Click for full sized version. There is also a version without labels.
  1. Elevator – The location of the elevator on this level
  2. Stairs – The stair access on this level
  3. Outer Hall – Hallway connecting elevator and stairs with the robot storage area (#4) and the airlock into the generator area (#5).
  4. Robot Storage – This is the storage and charging area for robots working on this level.
  5. Airlock – Separates the power system from the access area to prevent anything crossing the boundary into the main facility. The locks on this door are level 4 and only open to the power techs.
  6. Inner Hall – Hallway connecting the airlock to the power generator
  7. Parabattery Bank – This room is full of racks of Type IV parabatteries. This is the backup power system for the facility that kicks in when there is not enough power being generated by the main generator or it is off-line for service. These parabatteries are charged when the generator is running.
  8. Control Room – A manual control room that allows for monitoring of the power generator in room 9 and the use of power throughout the facility.
  9. Power Generator. This is a Type III generator that is hooked in to a geothermal vent discovered in mountain. This rooms houses all the machinery, pumps, and transformers needed to power the facility.

Using The Lab In Game

That’s the basic write-up for the facility. I’ve left it fairly adaptable so that you can have whatever research you want going on. In my game, I had them working on yazirian food crops and a small yazirian pet, but you can have it be as innocent or sinister as you want GODCo to be in your campaign. And of course, you don’t have to leave this facility on Pale, you could move (or clone) it anywhere you need this type of facility on your game.

Next week I’ll do the write-up of how I actually used this lab for my Skills For Hire game. This is the “normal” operation. It was anything but normal when the players arrived.

How do you like the lab? What did I forget to include or what would make it a better location? Let me know in the comments below.

October 13, 2020 Tom 1 Comment

Brekstoone Manor

In my post on Myha’s Beach back in June, I had this little snippet:

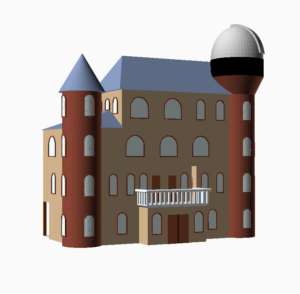
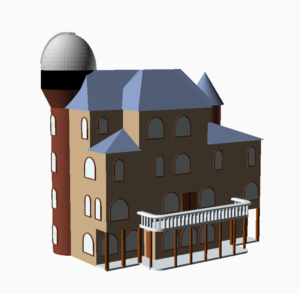
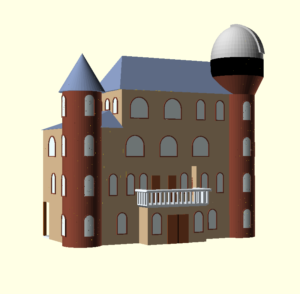
Front view of the manor (click for larger image)

The city’s growth northward was effectively halted in FY18 with the construction of Brekstoone Manor. The manor is simply referred to as Observatory Manor by the locals, due to the large observatory dome on the manor’s north tower. The Brekstoone family secured a large tract of land that ran from the sea several kilometers inland on which they built the manor. With no more room northward to grow, the town continued to grow southward.

This post is going to detail out that Manor.

I’ve had the maps done for a while, but I was waiting for the most recent adventure of my Skills for Hire game to finish as the Manor was where they had to go find the young lady they were rescuing. I didn’t want to give away the details of the manor to my players so it had to wait until the adventure was complete. They successfully rescued the prisoner and managed to do so without killing anyone. (Although that was a close thing as the humma in the group didn’t have a non-lethal weapon and almost blew someone’s chest out with his laser rifle. But now the adventure is done and I can post the details of the manor.

History

As mentioned above, the manor was built in FY18 by the Brekstoone family north of Myha’s beach. Their land included both beach-front property as well as some forested property back away from the beach.

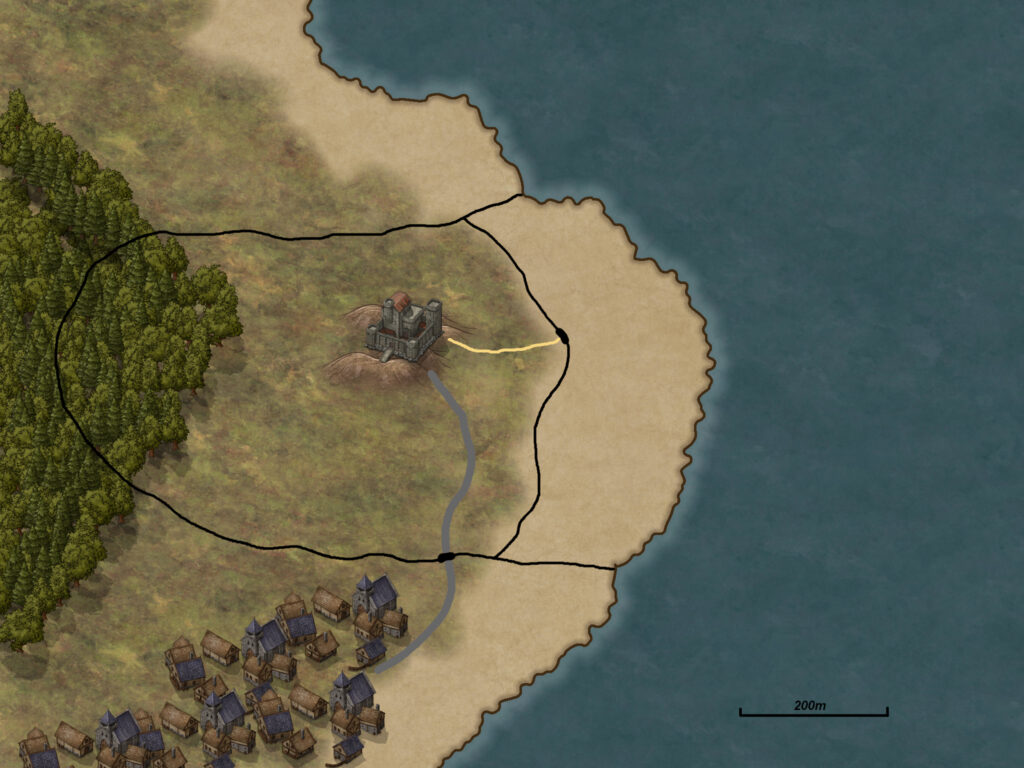
Manor Grounds. The black lines are 5m high walls around the property, grey is road, and yellow is a footpath. This was drawn with Inkarta which doesn’t have good sci-fi tokens in it’s free version.
Back view of the Manor (click for larger image)

In FY 41, the Brekstoone family decided to move their operations off of Pale to New Pale and sold the manor to a local businessman, a yazirian by the name of Gornar Welnat who you might remember from my post about the Tristars organization. He runs his commercial (both legal and illegal) enterprises from the offices in the Manor.

While Gornar has upgraded some of the features in the manor, most of it still retains the original systems and structures from its construction. The telescope dome still houses an operating 1 meter telescope that Gornar lets the local schools use for projects and star parties.

Floor Plans

Including the observatory dome, the manor has five levels above ground and a full basement. Each level (with the exception of the dome which is a little larger) is 4 meters high. Ceilings in the manor are just over 3m high with nearly a meter of space between the levels for ductwork, piping. and other infrastructure.

We’ll look at each of the levels in turn from the basement up. In these descriptions, I’ll be presenting the manor as I used it in my game. Feel free to adjust it as needed for your game.

All of the maps are 1 meter per square and 70 pixels per square for use in VTTs. At the end of the post will be a zip file with both labeled and unlabeled versions of the maps. Also, all the maps are on the same grid so that they overlay each other to show relative positions between layers.

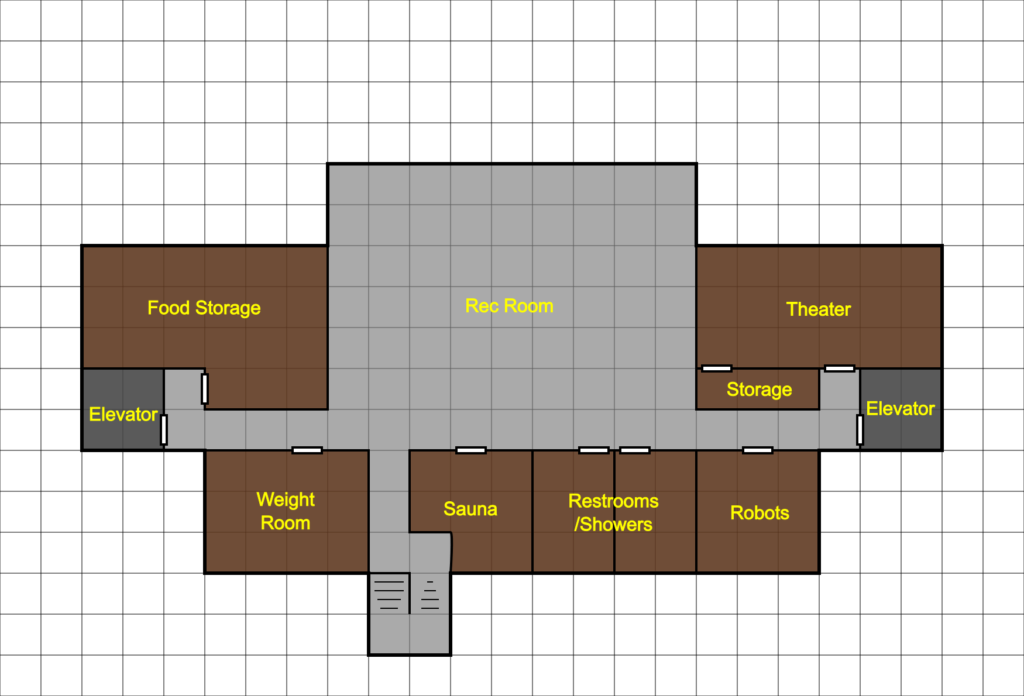
Basement

This level contains exercise and workout rooms, a small theater, a food storage area, and the robot storage area where they go to recharge when not working.

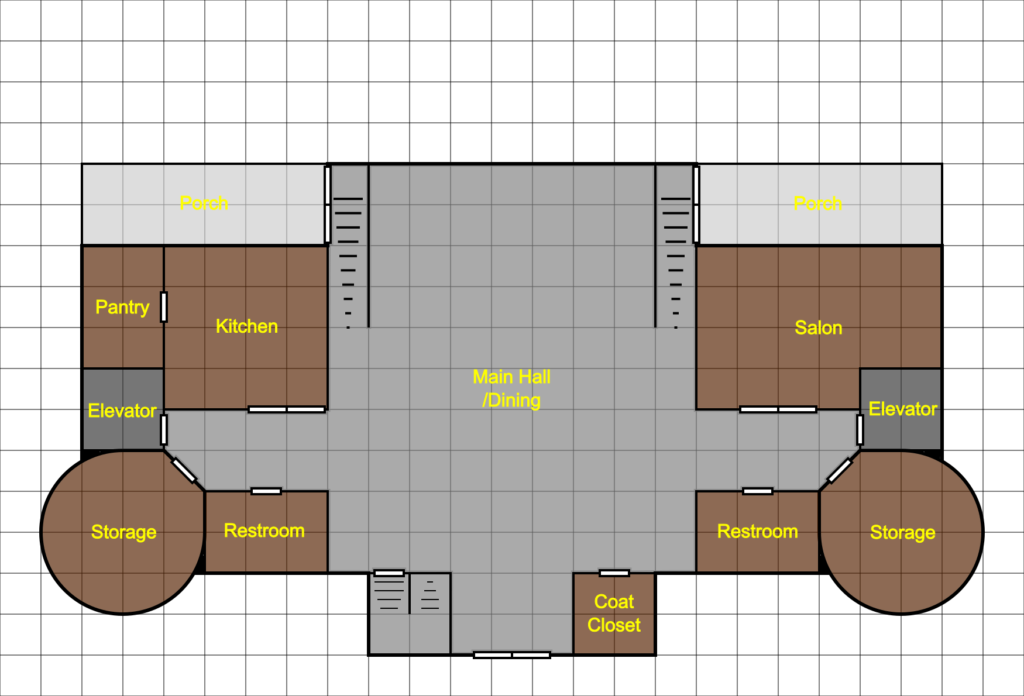
Ground Level

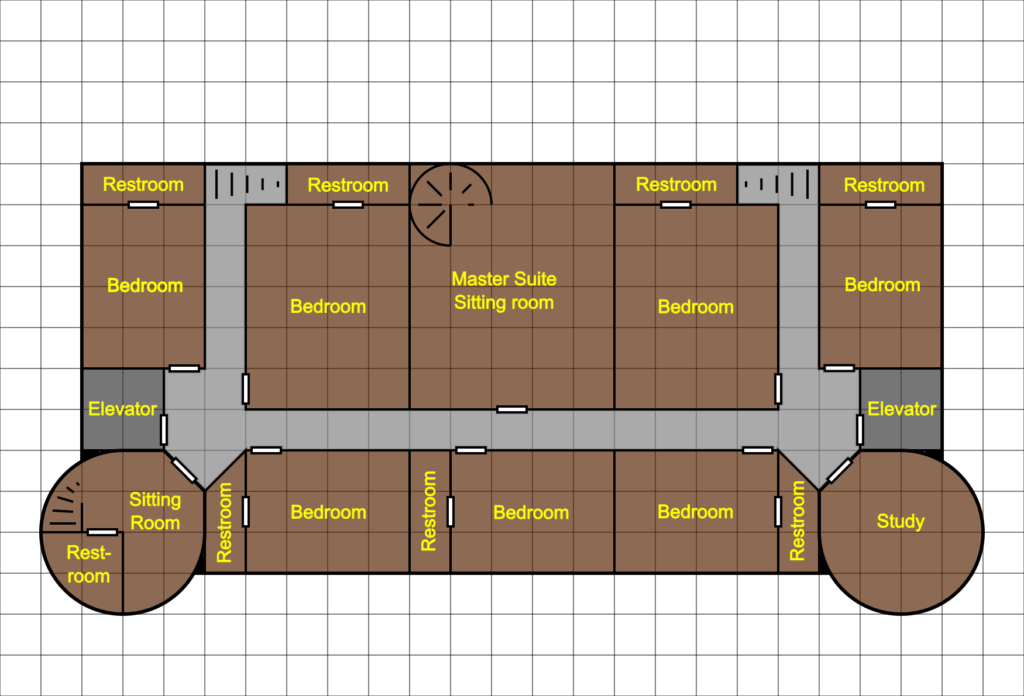
This is the main level of the Manor. Most of the space is taken up by a large open main hall that is also used as the dining room. The main doors are to the front of the house and there is a salon for discussions on this level. The bottom levels of the towers are used for storage of tables, chairs, and other furniture for the main hall. There is also a kitchen and pantry on this level. Stairs by the front door (behind a door) go down the basement, and a pair of stairwells on either side of the main hall ascend to the 1st floor.

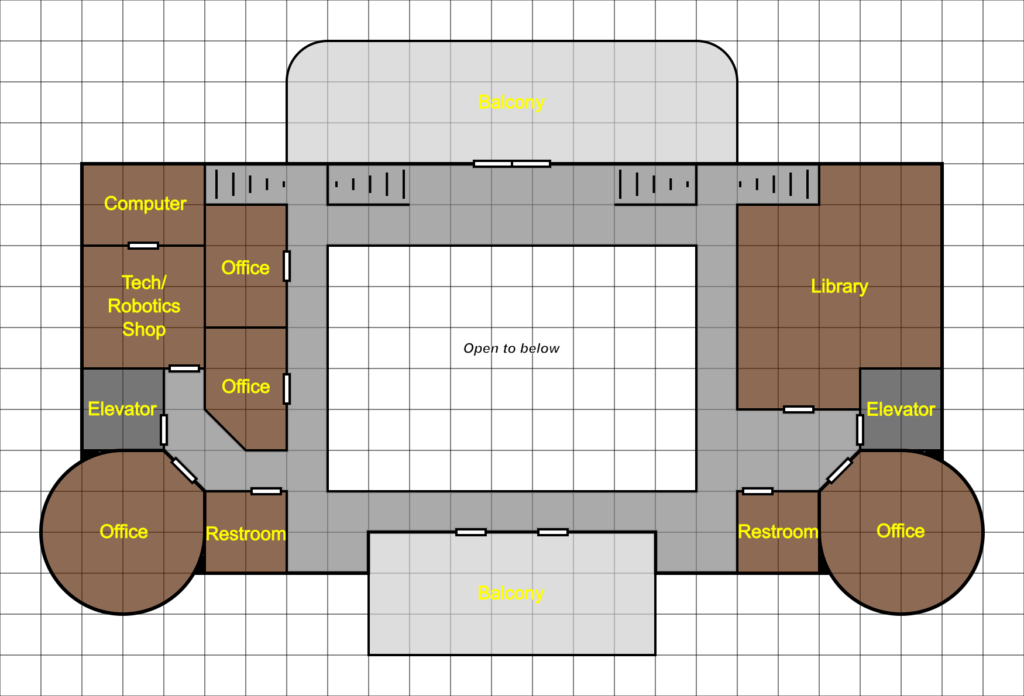
1st Floor

This is the main working level of the manor. The center of this level is open to the level below with a small balcony running around the main hall. This is also where one accesses the outdoor balconies in both the front and back of the house.

This level also houses the manor’s library, several offices, and a small tech/robotics shop and the manor’s computer system. There are stairs going up to the 2nd floor along the back of the house.

2nd Floor

This is the level with most of the bedrooms. Each room has its own small bathroom with a shower and toilet. Additionally, the room in the observatory tower is a small study. The center back of this level is the beginning of the master suite; on this level is a sitting room.

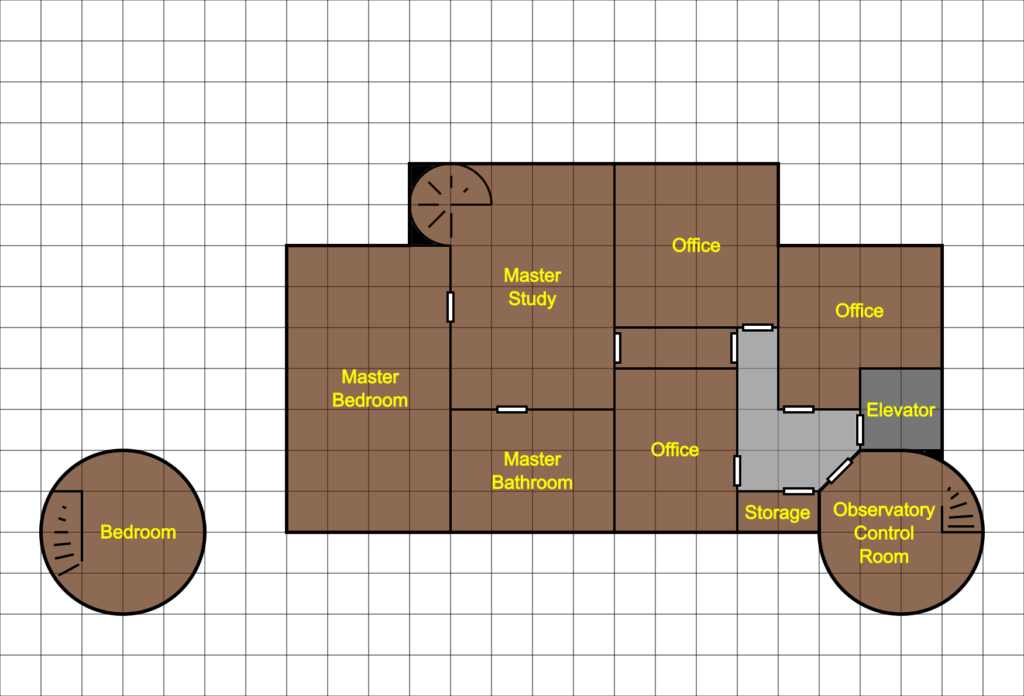
The room in the left tower is a sitting room and bathroom for a small bedroom suite that takes up the top two levels of that tower. There is no stair access to the 3rd floor in the public areas of this level but there is a spiral staircase in the master suite that goes up.

3rd Floor

There are three offices on this level that are accessible by the right (north) elevator. This is also how one accesses the observatory control room which is also on this level. On the top level of the left (south) tower is the bedroom for the small tower suite reached via a small staircase within the suite. The rest of the master suite is also on this level with a private study above the sitting room, and then a master bedroom and master bathroom only accessible from within the suite. Finally, there is a small secret passage connecting the Master Study to the public hallway on this level and the elevator. In both the Master Study and the Hallway, these doors are concealed as part of the wall.

Observatory Level

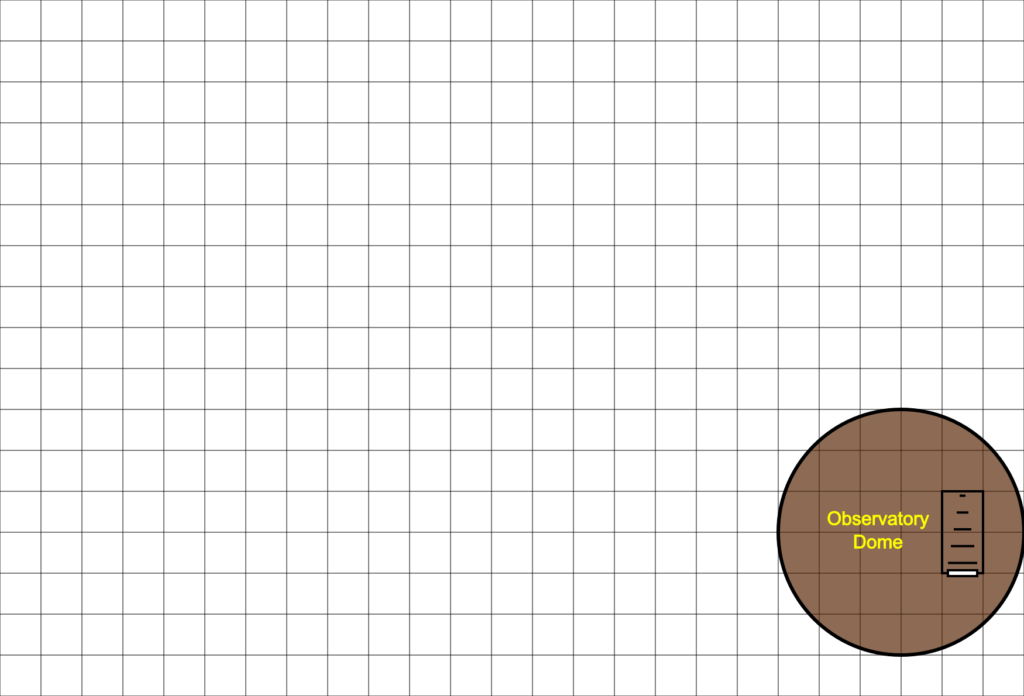
The only thing on this level is the observatory dome itself and the telescope. This room (and level) is accessed by a stairwell in the observatory control room on the floor below.

Things I Left Out

I realized after I made these maps and was creating this post, that I left a couple of things off.

One is a garage. That was actually intentional. The garage is a detached building (to the right and a bit behind as you look at the front of the Manor) that can house three vehicles. It has three garage style doors and one regular access door.

The other bit I realized that I forgot was a mechanical room for the buildings water heaters, furnaces, air conditioners, and other systems. I left room between the floors for the duct work but forgot a room for the equipment. The other was a laundry room. However, that oversight is fairly easy to fix. All that is needed is to convert the food storage room in the basement into two or three different rooms. One for the mechanical equipment, one for the laundry, and if a bit of storage is desired, reserving some of the space for that as well. You could also covert the weight room, sauna, or robot room on this level if you wanted to exclude those from the manor.

Details, Details, Details

I’ve left the exact details of the individual rooms unspecified to allow those using the manor to add the details that they want based on how the manor fits into their world. I also didn’t specify things like security systems, locks, alarms, etc. Again to allow flexibility in use. Feel free to fill in those details as they best fit in your particular game.

I’ll be posting a write-up of the adventure I used this manor in, probably next week. In that post I’ll give the details I used for my game, which was geared toward early level characters.

Wrapping Up

That’s it for the Brekstoone Manor. Here’s a zip file with all the maps and the front and back view of the manor: ObservatoryManorMaps.zip. (It’s about 650 kB).

What do you think about the manor? What other features did I forget to include? I’m always trying to build better maps and can use suggestions. Share your thoughts in the comments below.

August 11, 2020 Tom 1 Comment

Myha’s Beach

I had originally planned to do a post on the HSS History’s Hope this week but I’m not quite ready for that. Instead, I’m giving you the outlines of a small town on Pale, Myha’s Beach. While I developed this as part of my Star Frontiers campaign, you could easily drop this town on to any world in any game.

Location

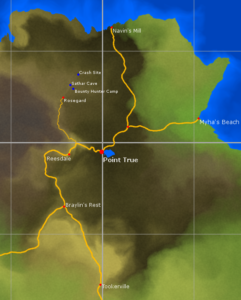
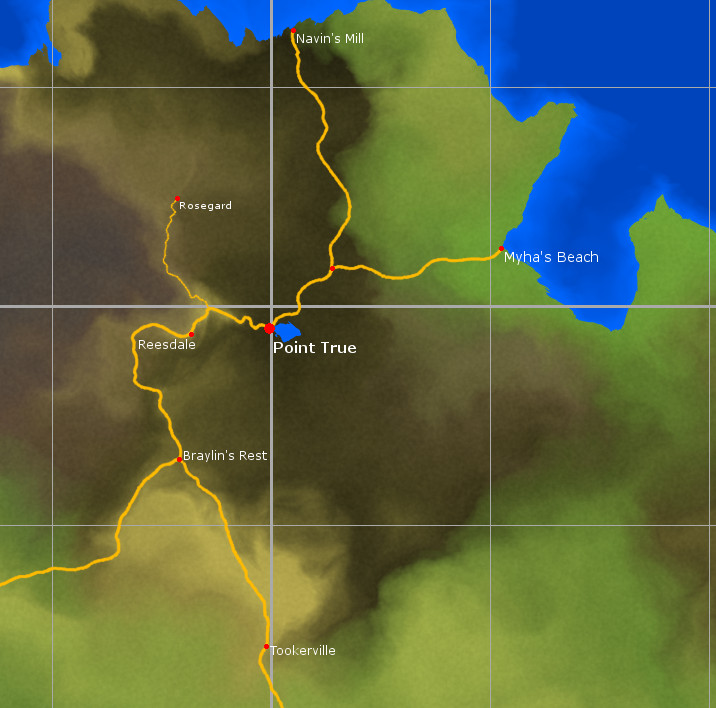
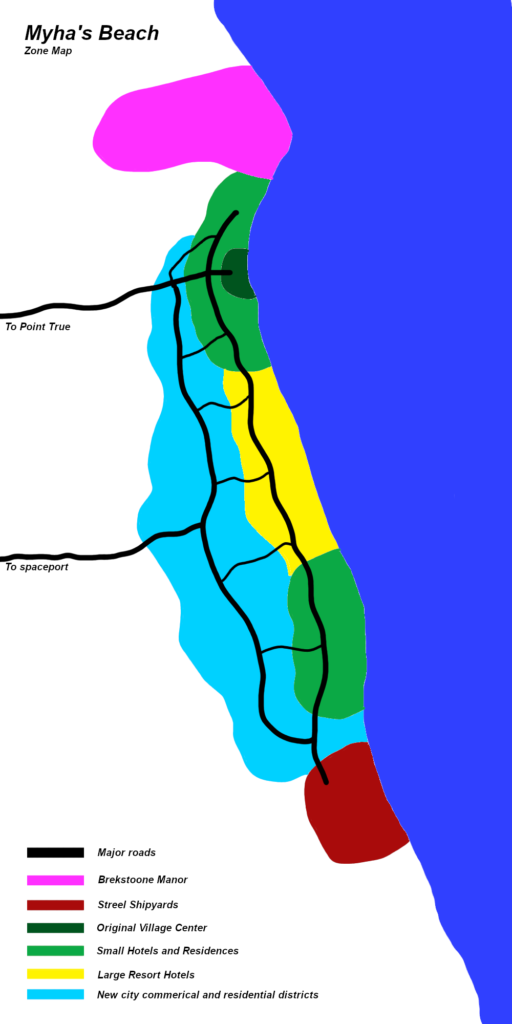
In my game, Myha’s Beach is located about 300-400km east of Point True on the sea coast. Here’s a map of the region around Point True.

regional map of area around Point True

I can’t seem to find where I recorded it, but I believe each of those grid boxes are either 300 or 350 km on a side.

History

Myha’s Beach started as a small fishing village founded shortly after the sathar were driven out of the Frontier.  The village was built about five kilometers south of the crater left from the sathar’s destruction of a former costal city.

Not long after the basic city infrastructure was in place, the small town became a favorite beach destination for vacationers wanting to get away from Point True.  The waters are warm and clear as the spur of land to the north keeps the cooler arctic waters from flowing into the bay.  The city has embraced this role and now tourism employs a major portion of the city’s workforce.

About a decade after the city was founded, Streel decided to get into the shipbuilding industry and brokered a deal with the city to open a shipyard some 10 kilometers to the south of the city proper.  This caused the city’s population to grow once again as the shipyard workers moved to Myha’ Beach and more services grew up to support the new citizens.

City Layout

Click for full sized version

Myha’s Beach is a long narrow city that sprawls out along the seacoast.  The original village lies toward the northern end of the current town.  The original marina is still in use.  As the tpwn began to grow, it was originally small, 4-10 room hotels that were built both north and south of the original village, with almost everything built with access to the beach.  This region of small hotels and private residences comprises the northern 3-4 kilometers of the town, centered on the now historic original village center and marina.

With the construction of the Streel shipyards to the south of the town, the town’s growth began to shift more in that direction with new residential and commercial districts being built southward with the residences on the beach and the commercial districts more inland.  While growth continued to the north, it slowed considerably.  At this same time, several large resort-style hotels were built on large swaths of the beach south of the existing city.

Front view of Observatory Manor

The city’s growth northward was effectively halted in FY18 with the construction of Brekstoone Manor.  The manor is simply referred to as Observatory Manor by the locals, due to the large observatory dome on the manor’s north tower.  The Brekstoone family secured a large tract of land that ran from the sea several kilometers inland on which they built the manor.  With no more room northward to grow, the town continued to grow southward.

The 3-4 kilometers around the initial resort hotels was zoned for more of the same while the area between these large hotels and the Streel shipyards was reserved for the smaller hotels and residences.  As this area filled in the city began to grow inland from the seashore with more commercial and residential areas to support the growing resident and tourist population.

In FY36 a small spaceport was built about 30 kilometers inland from the town to reduce the noise and air traffic impact on the town.  This allows offworld visitors to come straight to Myha’s Beach instead of having to go to Point True first. 

Current Population

The current resident population of Myha’s Beach is about 20,000.  It is about 55% human, 20% yazirian, 15% vrusk, 9% dralasite and the remaining 1% made up of Rim and other races.  In addition to the residents, the city supports between 20 to 40 thousand visitors, depending on the time of year.

About 5% of the resident population work at the Streel shipyards.  Another 10% work in the town’s still thriving fishing industry supplying fresh seafood to both the local residents and tourists but also to Point True.  A quarter of the resident population works directly in the tourist industry running shops, hotels, equipment rentals, and as guides both to the ocean and the inland areas.  The remaining population works all of the support industries including city services, maintenance, restaurants, and stores that keep the city running.

Your thoughts?

That’s the city of Myha’s Beach. What other details would you like to see in a city write-up like this? Do you have any suggestions for other things that should be included or discussed? Let me know in the comments below.

June 23, 2020 Tom 2 Comments

HSS History’s Hope and the Yazira Sector Map

HSS History’s Hope

As part of my Detailed Frontier Timeline, one of the threads I’ve introduced is the voyage of the Histran Starship (HSS) History’s Hope, registered out of Histran in the Scree Fron system. The goal of this voyage is to attempt to reach a star system that recent astronomical observations believe to be Yazira, the original homeworld of the yazirian species.

In my Yazirian History and Legends and Lore – Yazirians posts last month, I pointed out that most modern yazirians don’t know the location of their native world having fled some 150 years earlier to escape an astronomical disaster. Early in the Detailed Frontier Timeline I introduced the astronomical discovery of a system that matches the description of the yazirian homeworld, complete with a nearby brown dwarf. It is this system the HSS History’s Hope is trying to reach.

Of course there are some complications. First, the system is over 100 light years, in a straight line, from Scree Fron. Jumping from star to star, it’s even further. And all of those jumps are uncharted so each one carries the risk of a misjump and the crew getting lost along the way. They’ve had several misjumps in the timeline already and they aren’t even halfway there. In fact, they’ve just barely left the area covered by my Extended Frontier Map. This is additionally complicated by the fact that the ship is heading into the Vast Expanse, a region of space where the stars are further apart and thus the jumps are longer and more difficult to chart.

The second complication for their voyage is that the Family of One doesn’t really want them going out there and finding Yazira. And are willing to take measure to ensure that they won’t return. They have already been set upon by unknown assailants but managed to escape and continue their journey. They can expect more of the same in the days to come.

At some point I’ll probably do a write-up and timeline of the whole endeavor as a single post instead of having it spread out through the full timeline project for those that want to see how the mission played out and more of the background related to it’s organization and funding. If that is something you’d be interested in, let me know.

The Yazira Sector

As part of this project, I needed to place the yazirian homeworld. I chose to put it way off to the left of the Frontier, well beyond the area covered by the Extended Frontier Map (EFM). Since I didn’t have any maps of this area I had to create one.

For this map, instead of doing a large area, I chose to do a small, long strip. Enough to allow for multiple possible paths through the area, but not too big. I the end, I made it 90 light years wide (the same width as the EFM), and 20 light years tall (1/5 the EFM). However, I added in a new wrinkle. Unlike the EFM, which has all the stars in a single plane, I added a third dimension to this map making it 24 light years thick. So instead of all the stars being in the same plane, they have a z-coordinate as well.

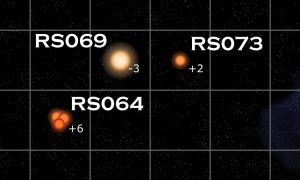
This is a feature that was already part of my star map generation program that I had turned off for the EFM. I talked a bit about this in my post on the Rael Core Sector map. The image to the right shows how this is represented on the map with the z-coordinate represented by the small number to the lower right of the stellar symbols. Those three systems look close to one another but are widely separate in actual space. RS069 and RS073 are actually 5.1 light years apart, RS069 and RS064 are 9.1 light years apart, and RS064 and RS073 are the closest to each other, separated by only 4.6 light years even though they appear to be the furthest apart on the map.

Additionally, the Yazira sector is part of the Vast Expanse, an area of low stellar density, i.e. not a lot of stars. So in addition to turning on the z-component of the position, I also dialed down the density parameter in the program by a factor of almost 3. So we now have 1/3 the number of stars spread over about 4 times the volume of space. This means that in this region, there are going to be fewer stars than in a comparable area on the EFM. It doesn’t look that sparse to the eye because of the projection on the the 2D plane of the map, but crunching the numbers (and assuming a thickness of 5 ly for the EFM even though they are all on a single plane) you get a density on the EFM of 1 system per 159 cubic light years and in the Yaziria Sector of 1 system per 645 cubic light years. A factor of almost exactly 4. If I strictly held the EFM to a thickness of one, it would be a factor of 20.

So what does this region look like? Well, here’s the map. You’re going to have to click on it to see the details. In fact, I recommend right clicking, downloading it, and opening it up in another window where you can zoom and pan around.

94x20 ly map of the Yazira Sector containing 67 star systems

The EFM is to the right of this map. OFS222 is shown on the far right (the blue star about 1/3 of the way from the top) so you can connect it up with the EFM if you want. (This map is actually 94 light years wide. I added on the extra 4 light years so that OFS222 would be on the map, showing the overlap). OFS215 should be on this map as well, but I forgot to add it in when making this draft version of the map. I’ll be sure it gets on there for the next iteration when the HSS History’s Hope gets a bit farther along on its voyage.

The first thing we notice, even without looking at the map at full resolution, is that there aren’t a lot of bright stars here. We see a few, but mostly we see small red dwarfs (M stars). There are a few blue stars and a few giants. This is why the yazirians had to go all the way to the Frontier sector to find a suitable planet. There just weren’t any around.

Also there aren’t any nebula. That’s intentional, this area of space is actually devoid of them. That is a part of it being more empty that the Frontier sector. I won’t be adding any in on the final version of the map once it is done (other than the one between OFS222 and OFS215).

Zooming in you can see that most of the star systems are unlabeled. The only ones I have labeled so far are those that the HSS History’s Hope have visited and the one they believe to be Yazira. Others will get named as they travel through the sector and the final map will be presented in a future update.

The system that the crew of the HSS History’s Hope believes to be Yazira (spoiler, it is) is located at the far left of the map above the legend. This system is represented as a K4 star with a brown dwarf companion. The brown dwarf that disrupted the planetary system is still very close the star, less than a light year away, so it is represented as a single system on the map.

Looking at the right side of the map, you can see the jump routes plotted by the HSS History’s Hope as of today (March 24, 2020) as posted in the timeline posts on Twitter. A new feature on this map that wasn’t on the EFM is the one-way jump, represented as a dashed line with an arrowhead on it. The arrow points in the direction that the jump can be considered “charted.” The jump from YS01 to YS02 is the most recent jump made; they are still slowing down to make the return jump. They had a misjump that took them to YS03 (so no charted jump there) and while trying to jump back to YS01, misjumped again and ended up in YS04 (again no charted jump between those two systems). They did successfully chart the jump from YS04 back to YS01 but did not try to go the other direction, hence that connection is only one way.

Right now the HSS History’s Hope is in the YS02 system slowing down and preparing to chart the jump back to YS01. They are somewhat hesitant about that as the ship that attacked them is probably still in that system and they may have another fight on their hands. We’ll see how it goes as the timeline unfolds.

Going Forward

The HSS History’s Hope still has a long way to go. From YS02 to Yazira is still another 80 light years in a straight line. It’s taken them over half a year to cover the 29 light years they’ve traveled so far. And their path forward is far from straight with lots of long difficult jumps ahead. Who knows what waits for them along the way.

If you want a fun exercise, you might try finding a path forward to Yazira and see how difficult the journey will be. Remember that the chance to plot a new route is 50% + 10% x astrogator’s skill level – 5% x jump distance in light years. They have a level 6 astrogator, plus deluxe astrogation equipment (which in my house rules gives a +10% bonus to astrogation checks). This means their base chance of success is 120% – 5% x distance. With a roll of 96-00 always being failure.

If the jump fails, they end up somewhere other than where they planned and then have to try to figure out where they are (30%+10% x level chance and takes 2d10 x 10 hours per attempt). Each jump takes 9 days (180 hours) unless it’s over 9 light years long. Then it takes a number of days equal to the number of light years. How long did it take you to get to Yazira?

What do you think about this sector map? Are there things you like to see added? Clarified? Share your thoughts in the comment section below.

March 24, 2020 Tom 2 Comments

Ship Dock – Crew Lounge Area

This is a common dock lounge found on most large (HS 5 or 6) civilian stations around the Frontier.  Located in the station hub, the gravity here is only about 0.1g. Just enough to keep you in your seat but light enough that you have to be careful with your movements.

This lounge area provides a place for crews to get off the ship without going into the station proper, mingle with crews in adjacent berths, and even conduct some semi-private business away from the hustle and bustle of the main station.

Each docking hub can accommodate up to four ships so there could be members of different crews here at any given time but no more than four at once. Depending on the size of the station and its central hub, there could be from 4 to 16 of these areas on any given station.

The Map

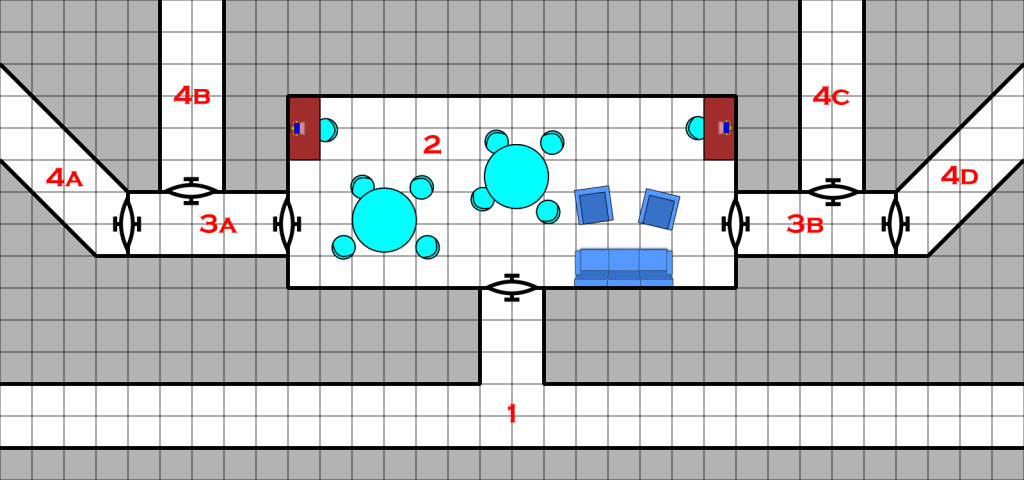
Click for the full resolution (50px per square/meter) image.

I’ve had this map kicking around in my sketch book for years. It’s actually part of a one-shot adventure I’ve run and will write up some day. This weekend I decided to give it the full, vector-graphic treatment and turn it into a usable map. I’ve used this location in a couple of different adventures over the years and it’s part of my concept of the design of the stations around the Frontier.

The map above is the labeled version at my standard 100 dpi resolution with each square representing 1 meter. If you want an unlabeled version, or either version at 70 pixels per square which is the default for Roll20’s map system, here are a few more versions of the map. The ones labeled 70ppm (pixels per meter) are the larger versions for VTT systems.

ShipDock-noLabelsDownload
ShipDock-70ppmDownload
ShipDock-noLabels-70ppmDownload

If your particular virtual table top uses a different default resolution, let me know and I’ll add in maps at that resolution as well.

Area Descriptions

Area 1 – Station Passageway

This is the main passageway through the hub of the station. I’ve drawn it here as a 2m wide passage with a small side passage going to the crew lounge. That’s how I originally drew it and described it the first time I used it. When I used it in the “A New Can of Worms” game, the hub corridor was much wider, like the terminal area in modern airports, and the crew lounge area was right up against it with glass walls. The PCs in that game tried several times, unsuccessfully, to get in.

Area 2 – Crew Lounge

This is the crew lounge proper. It has a couple of desks, some tables and chairs and a sofa and a couple of recliners. All in all, it’s a bit over 45 feet long and 20 feet wide.

The desks are fixed in the corners but all the other furniture is movable and can be positioned wherever the crews want. There are sensors that monitor the area in front of the doors and if they are blocked, the lights in the room flash and an alarm sounds until the offending item is moved. Since there is only 0.1g in the area, it’s fairly easy to move even the sofa but everything stays on the floor and doesn’t float around.

The door into the room from the hallway is locked with a level 4 security lock that opens only to beings who have been registered with the station as part of the crew of one of the ships assigned to these berths. The registration is typically done as part of the docking procedure so that the doors are working as soon as they arrive. The door itself is a pressure door and takes 3 turns (18 seconds) to cycle and move through: On the first turn the person wishing to pass through stops at the door and starts the process, on the second, the doors cycles and opens, and on the third, they can move through into the room. The door closes and seals automatically if not held open.

The roof of the room is a series of large windows, allowing those in the room to look up and out into the central hub of the station and see their ship and the other ships docked in the area. The ships attached to passages 4b & 4c are directly above the room while the other two are slightly higher up and off to the left and right.

Area 3 – Access Halls

These short passages provide access to the docking tunnels on either side of the crew lounge area. Like the door into area 2, these pressure doors have a level 4 lock on them that only allows the registered crews of the two ships docked off of the passageway through. Thus the crew of the ship docked in passage 4a could not open the door to 3b.

Area 4 -Docking Tunnels

Each of these passages ends at another pressure door (not shown) that opens into the docking collar connecting one of the ship’s airlocks to the station. For small ships this may be the only airlock and so all crew and passengers come out this way. On larger ships with more than one airlock, this is connected to the crew’s airlock with passengers typically going through a different part of the station. Alternately, for large ships, more than one of these docking tunnels may be connected to different airlocks on the same ship.

The tunnels move away from the lounge area, angling upward as they do, and then turn into a vertical shaft going up to the ship with ladders and hand holds along the walls. Gravity decreases from 0.1g to less than 0.05g by the time you reach any of the ships.

Tunnels 4b and 4c typically connect to smaller ships (up to hull sizes 8 and 6 respectively) although a single large ship could be connected to both of them. The other two tunnels extend farther out into the hub and can accommodate ships up to hull size 10 (4a) and 12 (4d). Even larger ships could take up 4a and 4b or 4c and 4d together or even three or all four of the tunnels (for a HS 20 ship).

The pressure doors to these docking tunnels are keyed only to the crew of the ship docked to that tunnel and use a level 6 security lock.

Some Thoughts on Station Sizes

The 0.1g gravity in this area only really works if you don’t allow very large ships into the station hub. That limitation goes a bit against the Star Frontiers setting as described in the rule books. There it says that a HS 6 station is 1200m in diameter. Assuming 1 g at the rim, that mean you hit 0.1g of gravity at just 60m from the center of the station. So the hub can only be 120m in diameter. The size given for a HS 20 ship is 100m in diameter so it could just squeeze in but would take up all the space. So you either have to limit the size of ships that can come in, or you have to make the hub bigger which means the gravity would be a bit higher in the lounge area probably up to 0.2g. It’s even worse on smaller stations. Because they are smaller, you hit that 0.1g even closer to the center of the station. Just something to keep in mind.

September 10, 2019 Tom 1 Comment

Maps from the Past

This post is going up a day late. Partially because I didn’t finish what I had wanted to post yesterday in time, and partially because time got away from me working on issue 24 of the Frontier Explorer (which is almost done). So I didn’t have a post ready yesterday

My original plan was to post my sketches of the Pursale ship entombed in the center of the Outpost Osiris asteroid. But in looking at those I realized a couple of things:

  1. I had used the wrong scale grid when building the original sketches. Interestingly enough when I applied the correct grid to the maps, all the corridors I had free-handed in that were off the original, wrong grid, matched up almost perfectly with the correct grid. I guess subconsciously I knew there was something wrong.
  2. I forgot a few fairly important parts of the ship, for example airlocks.

That means I need to rework the sketches before they are ready to present. That’s this week’s project.

In the mean time, I rooted around in my old folders and found some old location maps that I drew way back in the late 80’s as a teenager when I was actively playing Star Frontiers in high school. I’d probably draw them differently now, but they definitely hold a bit of nostalgia.

I’m presenting them in this post as-is. These are simply scans of the original hand-drawn maps that were created on 8.5×11 quad-ruled graph paper. (I even think I still have some of the original pads as I bought a big box of them back in the day.) I’ll be providing a little bit of commentary but not much. I actually have write-ups for some of them but I’ll hold that for a later post when I have a chance to review them and update them to remove any glaring errors I made as a teenager when I first concocted them. For all of the images, you can click on them to get the full 200dpi resolution version (each one is about 5 MB in size).

Conference Center

This one is a portion of a large area map. It is inside a clear, domed area which I think was supposed to be on an asteroid or moon but given the layout, needs some significant gravity. This location is the basis of a murder mystery adventure. I’ll definitely be updating and writing this one up at some point in the future.

Pirate Base

This location consists of three maps, and as far as I can tell, I don’t have any sort of write-up for this one. Although it is supposed to be in an asteroid. Probably inspired by the idea of the Planaron pirate base from Warrior of White Light. Do with it as you will.

Upper Level

This is the main level with the main entrance via the airlock in the lower left. I think this one has some serious scale issues. According to the scale at the bottom, one square is 10 meters. Which makes those passages large enough to drive trucks down. It probably should be 2m per square.

Lower Level

This is the officer level with private facilities, also two different escape routes, one via the airlock in the upper left to a tunnel through the asteroid and the secret exit in the upper right

Secret Escape Bay

The pirate officers have an assault scout stashed away in a hidden bunker. That ship is 21.5 squares long which gives more credence to the 1 square is 2m scale hypothesis. I vaguely remember painstakingly drawing that assault scout based on the image on the little Knight Hawks chit.

Sathar Training Base

Our last location is a set of two maps detailing a sathar training base. I’m pretty sure this one was inspired by the sathar training base in the Sundown on Starmist module. I have a write-up for this one as well that I will post in the future once I’ve had a chance to review it.

Surface Level

This is nestled in a forested area and has a number of features that stick up through the trees. I was also inspired to draw a profile view (lower right) that is looking from the bottom of the map towards the top.

Lower Level

This is the actual base and built completely underground. The defense turret is automated and has a magazine that feeds the rocket launcher and recoilless rifles mounted on the defense dome.

Other Locations

I have several other maps of other locations I developed back in the day, and even more recently. There are only one or two of the older ones that I would consider useful. Most of them were way too far fetched and fantastical for any game I’d run today but I guess made sense to my teen-aged self.

I hope you enjoyed this little walk down memory lane with me. Let me know what you think of these maps and which if any you’d like to see detailed out first. Feel free to use these maps in your own games if you want.

In the mean time, I need to get back to working on the alien ship for the Ghost Ship Osiris module. See you next week.

April 10, 2019 Tom Leave a comment

Sathar Cave System

I believe this is the last major piece of the of the Death at Rosegard adventure that I haven’t yet published so let’s get to it.

An old, abandoned mine

In my setting, the Streele Mining corporation is the forerunner of the Streel Corporation. Hilo Headrow did a lot for survivors and refugees, during and after the occupation, and quickly rose to take control of the company. As corporate interests widened from just mining, the company was renamed.

Located some 30-40 km northeast of Rosegard is an abandoned Streele Mining corporation mine. It has been abandoned since before the Great Sathar War. Sometime after the war, an enclave of sathar survivors found the mine and have set up shop. They mainly are lying very low but send out scouts into the surrounding area and are the ones that were controlling the operative at the Streel mine near Rosegard. In addition, they were in contact with Trey Mulden to do the cybernuk breeding.

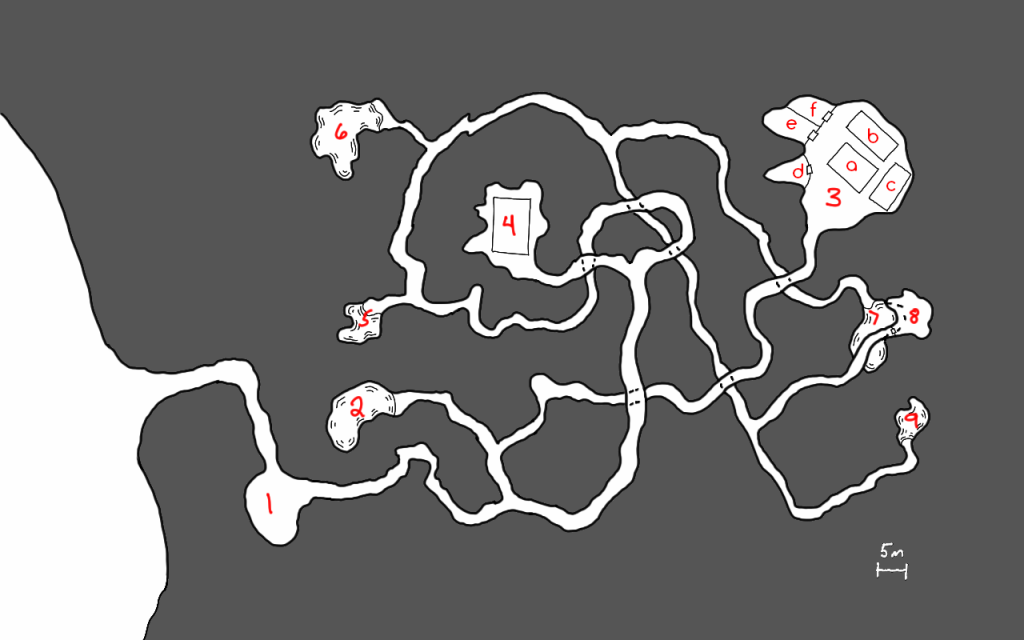
Let’s start with a map

This map was drawn by hand on my old Samsung Galaxy Note Pro 12.2 tablet. I added the shading and the letters (but not the numbers) in Gimp for this post.

In addition to the labeled locations which are described below, there is a mostly destroyed and overgrown mining complex just outside the entrance. Bits and pieces of walls and foundations still exist but there really isn’t much there.

Area Descriptions

  1. Aircar landing pad – while mainly filled with debris and rusted out vehicles from over 50 years ago when this mine was shut down, there is space for an aircar to land. The sathar have an old model aircar that may or may not currently be at the base. It was used by the sathar that was contacting the agent at Rosegard. If the PC’s captured or defeated that sathar, the aircar is not present.
  2. Pool – This is a clear water pool that the sathar sometimes use for swimming but is primarily a source of drinking water.
  3. Work area
    1. Food Production (a) – This building contains a series of terrarium-like containers that have a variety of small bugs and other creatures growing in them. Additionally there are some hydroponic vats growing plants. None of these seem to be native to Pale.  There is a single sathar working here.  The sathar does not have a weapon but does have a communicator.
    2. Tech lab (b) – This building contains what appears to be a technician or robotics lab although alien in nature. What appears to be a half assembled robot sits on one worktable and other tables contain various gadgets in various states of construction. One of the items looks like a nearly complete Cybernuk headset. There are 3 sathar technicians here.  Two of them are armed (laser pistol with 2 power clips) while the other has a communicator.
    3. Food Storage (c) – This is a climate controlled building with a freezer section.  It contains a large numbers the creatures and plants from the food production building but preserved for storage. There is several months’ worth of food here.
    4. Supply storage (d)- This area contains a wide variety of physical and technical materials ranging from various electronic parts to tubing, to wires, to chemicals. Most of the materials look to be frontier in origin but some are definitely alien in appearance.
    5. Nuk pen (e)- This pen contains three cybernuks with no cybernetic attachments.  It is locked with a level 1 lock simply to keep the nuks inside.  When opened, the nuks will charge out an attack the PCs.  An INT check will alert the PCs that something alive is inside.  Wall and door have 100 structure points.
    6. Nuk Pen (f) – This pen contains a single nuk with the cyber attachment.  It is locked with a level 1 lock to keep the nuk inside.  When opened, the nuk will charge out and attack the PCs.  An INT check will alert the PCs that something alive is inside.  If this cybernuk is released first, the other three will start bashing against the wall and door trying to get out to come to its aid (controlled by cyber implant).
  4. Power plant and water processing – This is a geothermal power generator (type II). Cabling runs from here back to area 3 that has been partially hidden by debris and rubble on the floor.  Additionally there is a large water processing facility here with fillers and processing system. Pipes run from here to areas 5, 6, 7, & 9 from here along the ceiling. There are two Sathar technician here.  One of the sathar is armed (laser pistol with 2 power clips) while the other has a communicator.
  5. Small Slime Pool – This pool houses four sathar.  There are small bins by the pool that hold the personal effects of the sathar that call this pool home.  Each has a backpack with a food jar, a small communicator, and two of them have laser pistols with two power packs each.  There are currently two sathar in the pool.
    1. backpack, communicator, food jar
    2. empty
    3. empty
    4. backpack, food jar, laser pistol with 2 power clips
  6. Large Slime Pool – Similar to area five, this larger pool houses eight sathar.  There are currently four in the pool. The contents of the bins are:
    1. Empty
    2. Backpack, food jar, laser pistol with 2 power clips
    3. Empty
    4. Empty
    5. Backpack, food jar, communicator
    6. Backpack, food jar, laser pistol with 2 power clips
    7. Empty
    8. Backpack, food jar, laser pistol with 2 power clips
  7. Large Slime Pool – Similar to area five, this larger pool houses eight sathar.  There are currently four in the pool.  The contents of the bins are:
    1. Empty
    2. Empty
    3. Backpack, food jar, laser pistol with 2 power clips
    4. Empty
    5. Backpack, food jar, communicator
    6. Empty
    7. Backpack, food jar, communicator
    8. Backpack, food jar, laser pistol with 2 power clips
  8. Robot storage – This storage area holds a dozen completed combat robots.  While the parts are Frontier sourced, the design is definitely alien. Characters have a –10% modifier to attempt any skills on these robots
  9. Leader Slime Pool – This is the personal slime pool of the compound’s leader.  This is a middle caste sathar.  There is a bin here with the leader’s personal belongings which contains a backpack, a laser pistol with 4 power clips, an inertia screen with a power beltpack, two food jars, a communicator, and a small computer.

Initial status of the mine

The mine is not on alert for intrusion.  It was fairly recently set up and does not have a lot of security features installed yet as the sathar began immediate production of the combat robots and food.

One of the residents is the controller for the agent at Rosegard and possibly was captured or killed by the PC’s.  If it wasn’t, add in another sathar to area 5 (small slime pool). Another is out returning from the Trey Mulden’s compound.  The second sathar will arrive back 5d10x10 minutes after the PCs enter the compound.

When the PCs first arrive, there are two sathar returning to area 7 from area 3 after being on duty that the PC will encounter in the passageway between those two areas when they first enter it. The next duty rotation is not scheduled to occur for another 1d5 hours at which point two of the sathar in area 6 will be headed to area 4.

None of the doors, except to the nuk pens, are locked. 

Sathar Reaction to PCs Arrival

Before the sathar are alerted

When the PCs enter one of the buildings with sathar in it, immediately start combat.  Those sathar that are armed will draw their weapon the first round but cannot fire until the second round.  They will begin to attack the PCs as soon as they are able.  Sathar with communicators will attempt to alert the rest of the compound.  It takes them one turn to open their backpack, one turn to grab the communicator, and the third turn to send the message.  The alert message will go out on the sathar’s action during the third turn.  If the PCs eliminate that sathar before then, no alert goes out.  Otherwise, consider the compound to be alerted going forward.

When the PCs enter one of the pool areas containing the lower caste sathar, there is only a 5% chance that one of the sathar is not in the water.  Regardless, the sathar will notice the PCs immediately and react.  The will start exiting the pool at the rate of 1d2 sathar per round (to represent different distances from the edge of the water) starting on round 2.  Once they have left the pool, it will take them one round to reach the bins and grab their backpacks unless the PCs block their way.  On the round after reaching the bins, those sathar that are armed may begin firing; those with communicators will simply grab their communication device and begin to activate it.  They can send an alert out as their action on their next turn (3rd after exiting the water).

Sathar with communicators will engage in melee combat (two attacks per round) with their bare tentacles once the alert has been sent or immediately if the alert has already gone out.

After the sathar are alerted

Once the alert has gone out, any sathar encountered will be ready and attack immediately upon seeing the PCs. 

Any sathar in the slime pools will immediate move toward area 8 where they will begin activating the combat robots at the rate of one every other turn.  They will remain there until all the robots are activated.  At that point they will proceed up through the cavern complex looking for the invaders.  The leader will hang back sending the robots and other sathar to engage the PCs.  If the PCs arrive at area 8 before all the robots are activated, the robots that are active and those sathar that are armed will engage them while the others continue to activate the remaining robots.  As the robots are activated, they will be sent to engage immediately.

The sathar in area 4 will take cover and immediately attack the PCs if they enter the generator and processing facility.  They will get one free round of attacks on the PCs before the PCs can react.

The sathar in the food processing facility will head across the cavern to the tech lab when the alert is sounded (if they are not the one sounding the alarm) and will either engage the PCs from behind if they are in the tech lab or wait with the sathar in the tech lab until the PCs or the main body of sathar arrives.

The sathar in the tech lab will be waiting for the PCs if they arrive before the main body of sathar and robots.  There is a 10% chance that they will have been able to reassemble the laser pistol being modified on the workbench.  The sathar using it will have a 10% penalty to hit as is hasn’t been fully converted.  If the PCs take a long time to get to the tech lab after the alert is sounded, raise the probability to 20%.

Sathar tactics

As the sathar are under-armed, they will try to attack from cover or ambush if at all possible.  If they have robots with them, they will send the robots in the fore to take damage from the PCs’ weapons.  If a sathar is in danger of being captured or thinks they will die, they will attempt to close with one or more of the PCs and trigger the self-destruct in their laser pistol (if they have one).  When the self-destruct goes off, treat it as a fragmentation grenade doing a number of d10 worth of damage equal to the SEU remaining in the clip.  If the clip is empty it will still do 1d10 points of damage.  PCs get a RS check to take half damage and intertia screens and skiensuits halve the damage as well.

Stats

Sathar Leader

STR/STA:  50/50
DEX/RS:  60/50
INT/LOG:  55/55
PER/LDR:  55/70
PS: 3
IM: 5
RW: 30
MW: 30

Skills:  Beam 4, Tech 3, Enviro 2, Unarmed 3, Robotics 2, Melee 1

Equipment:  backpack, a laser pistol with 4 power clips, an inertia screen with a power beltpack, two food jars, a communicator, and a small computer

Regular Sathar

STR/STA:  40/40
DEX/RS:  45/45
INT/LOG:  45/45
PER/LDR:  45/55
PS: 2
IM: 5
RW: 23
MW: 23

Skills:  Beam 2, Robotics or Technician or Environmental 2, Melee 1, Unarmed 1

Equipment: backpack, food jar, laser pistol with 2 power clips or communicator

Combat Robots

Type: Combat
Level: 2
STA: 100
Move: 120 m/turn
Attack: 50
Damage: 2d10 hands or 5d10 laser
Programs: Attack/Defense, Security Lock
Equipment: Laser pistol, power beltpack


March 12, 2019 Tom 3 Comments

Building a Star System – Fochrik

In a couple of my timeline posts at the end of last week, I mentioned an annual competition on Hum in the Fochrik system, the homeworld of the Humma race in Star Frontiers. The tweets were as follows:

FY60.032 – Contestants, spectators, and reporters gather on Hum (Fochrik) for the annual Humma Jump Competition. Speculation is high that the current record in the standing long jump event of 38.272 meters will be surpassed this year. #SFTimeline

— Star Frontiers RPG (@StarFrontiers) February 7, 2019

FY60.034 – After two days of competition, Zonuul Usu of Larg (Fochrik) wins the Humma Jump Competition jumping 38.275m, beating the previous species record by 3 millimeters. Two others beat the previous record in the final round of competition but lost to Zonuul. #SFTimeline

— Star Frontiers RPG (@StarFrontiers) February 9, 2019

This immediately got me thinking about how the Hum calendar interacts with the Galactic Standard calendar of the Frontier and if the Rim had a different standard calendar.

Since in my Clarion calendar system post, I mentioned that I would probably do more calendar systems for other planets and in my last State of the Frontier post I said I would write about creating a system map, I thought I’d roll all of these thoughts and ideas into a series of “how to” posts as I flesh out the Fochrik system.

I’m planning on dividing this into three parts. In this first article, I’ll be talking about generating the astrophysical description of the system. We’ll go over what we know from published material, adding a bit to that, refining the details, and trying to generate a stable star system.

In the next post, I’ll actually walk you through the process of creating a system map for Fochrik like I did for the Duergan’s Star system.

In the third post, I’ll generate a calendar for the Fochrick system. I don’t know yet if all three planets will have a unique calendar or if Larg and Forge will base their calendar off of Hum’s. We’ll see when we get there. I’m not planning to address a standard Rim calendar at this time as I need to look over the other Rim systems first. That may be a future post.

Anyway, let’s get started.

What We Know

Let’s start with what we know from published materials, both original with TSR and material from the fan magazines. There isn’t much, but let’s assemble what we have.

The Rim was introduced in TSR’s Zebulon’s Guide to Frontier Space, vol 1 as the area of space that the three new races introduced came from. It was specifically left vague in the supplement. Whether they intended to flesh it out more in later volumes that never were published we’ll never know. On page 50, in the “Planets of the Frontier” table we have the following entry for Fochrik:

For this series of posts, we’re interested in the stellar spectral type (F9), the number of known planets (three in this case) and their rotational period (the Day column which is given in hours). Also, the number of moons might be used in making the system map and we should probably consider them in making the calendars as well. The other information is not needed for this endeavor.

Beyond that, there is little said about the system in Zeb’s Guide. The worlds of the Frontier have little blurbs with interesting facts about each of them but there is nothing on any of the Rim worlds. We’re basically left with a blank slate.

In a Star Frontiersman article (issue 15), entitled Humma Hop Back, TheWebtroll talked about the race but gave no information on the star system. Tom Verrault did a little bit of work on the Humma in issue 13 of the Frontier Explorer were he fleshed out their racial description some more but again nothing was really mentioned about their star system. However in another article in that same issue, where he adds detail to the boon’sheh, a fan created race from the early Star Frontiersman issues, he places them with the humma in the Fochrik system with the humma forcibly relocating the boon’sheh to Larg from their mutual homeworld of Hum. But that’s all we have.

In the end, we just have the table entry for the system to work with. Which tells us we have three habitable planets, some moons, and their approximate rotation periods. We get to create everything else so let’s dive in.

Fochrik

We start with the star. It is given a spectral type of F9. That makes it a little more massive and brighter than the sun but not by much. I like to use the table on this page for my starting point of stellar masses and radii as it has broken the data down in to details for each spectral classification. Plus the author has gone through, and based on the spectral energy distribution, given you the RGB colors for the star. I’m a little leery of the radius data on that page but we won’t be using that in this analysis.

From that page we get a mass of the F9 star for 1.1 solar masses. Looking at the adjacent spectral types, F9 and G0, they have listed masses of 1.2 and 1.1 respectively so that gives us a range to work with and tells us that the F9 star is probably a bit heavier than 1.1 solar masses but within rounding errors. Plus there is scatter based on other factors as well so we have some room to wiggle about. Let’s do some quick calculations.

The mass of the sun is 1.989 × 1030 kg. so we have a range of 1.1 to 1.2 times that to work with or from 2.1879 × 1030 to 2.3868 × 1030 kg. Like I did for White Light, I want a few more decimal places so I’m going to roll some dice for the digits. I’ll keep the 2 before the decimal place, roll a d4 for the first digit, and then d10s for everything else. That will possibly let me go slightly outside the range but that’s fine. Here’s what we get:

I ended up rolling a d8 and dividing by 2 just so it was easier to see in the picture. I just rolled the dice and then went left to right as they fell on my desk to pick the order.

So we end up with a stellar mass of 2.21766549 × 1030 kg which probably has more decimal places than we need but that’s fine.

Size of the Habitable Zone

The next thing we need to know is the range of the habitable zone for an F9 star. We’ve got to squeeze three planets into that area. We don’t need to be exact, but we want some reference. For this Wikipedia has a good article on the habitable zone that you can read to determine the various factors that go into determining it. There is also a really great picture (reproduced here) that almost gives us what we need.

The only real problem with this image is that the x-axis is in relative flux on the planet rather than distance. But I can work with that to get values for Fochrik.

We start by getting the percentages for the edges of the habitable zones. This is done by drawing a line across at the temperature of Fochrik (6140 K) and then drawing lines down from those to the x axis like this (the blue lines)

This gives us a range of 178% to 34% for the optimistic habitable zone and a range of 115% to 36% for the conservative one. Now we just need to turn those into distances.

The amount of starlight on the planet is dependent on three things. The first is the temperature of the star (which we’re taking to be 6140K. We could figure it out exactly based on the mass but that is a close enough approximation). The second is the radius of the star. These two give us the total luminosity of the star, L, which is proportional to R2T4. The final bit, which we are trying to solve for, is the distance from the star. The amount of starlight received at a planet, F (flux), is proportional to the luminosity of the star divided by the distance squared, i.e. F~L/D2.

Combining those gives us that the amount of starlight at a planet, F, is proportional to R2T4 / D2. or D ~ sqrt(R2T4 / F). If we work in ratios to the solar temperature, solar radius, measure distances in AU (the distance from the earth to the sun), and enter fluxes as multiples of the flux at the earth (i.e. flux at earth =1, 200% = 2, 50% = 0.5, etc), everything works out.

For this exercise, we’re going to assume the radius of the star is the same as the sun. In reality, it’s probably a little bit larger but we’re not going to worry about that. So we can drop the R2 term. The ratio of the temperatures is just 6140/5780 = 1.062283737. That raised to the 4th power is 1.273392. Plugging in those number gives the following distances for the four flux percentages:

  • 178% = 0.8458 AU (inner edge of optimistic habitable zone)
  • 115% = 1.0523 AU (inner edge of conservative habitable zone)
  • 36% = 1.8807 AU (outer edge of conservative habitable zone)
  • 34% = 1.9353 AU (outer edge of optimistic habitable zone)

Those numbers seem about right. The star is brighter and hotter than the Sun so it makes sense that the habitable zone is a little further out than in the solar system.

Placing the Planets

Now that we know where the habitable zone is, we need to place the planets and add other details to the system. We start with the three known planets, Forge, Hum, and Larg.

The Habitable Worlds

Each of these planets is habitable, with fairly large populations. As such, they need to be at least somewhere within the habitable zone. Also, since they are relatively low gravity worlds, around 1g, they should probably be close to or in the conservative habitable zone as the optimistic one is more for “super earths” which these are not.

Forge is the innermost world of the three and the name itself implies that it’s a hot world. I’m going to place it just inside the conservative zone. It’s livable, but its a bit on the warm side. We’ll place it at 1.08 AU from Fochrik.

Hum is the humma homeworld. As such we’d expect it to have a relatively nice, comfortable climate. If we go back to the flux calculation from above and find the distance for 100% we get a distance of 1.13 AU. That’s a little too close to the 1.08 AU I picked for Forge so I’m going to move it out just a bit further than that and place it at 1.23 AU. It will be a bit cooler than Earth receiving only 84% the amount of starlight.

Finally, we have Larg. This has the smallest population, medium instead of heavy, so I’m taking that to mean that it probably has a less hospitable climate (in addition to the higher gravity). Plus, if we’re using the fan material from the Frontier Explorer, it’s where the humma deported the boon’sheh to. We’ll place this one out towards the outer edge of the conservative habitable zone at 1.61 AU.

Now that our habitable planets have been placed we need to fill the rest of the system. There are a number of ways you could do this. I have a really old program called StarGen that makes solar systems around F, G, & K type stars based on habitability ideas presented in a paper by the Rand corporation. It works pretty well but doesn’t take into account modern information as that paper is from the 60’s or 70’s if I remember correctly.

You could also use the star system creation system presented in the FrontierSpace Referee’s handbook. It’s a good system as well. However, for this system I’m just going to be arbitrary. I’ll roll some dice for distances but beyond that, I’m just going to pick what I want in the system.

The Inner Worlds

Let’s start close. What is inside the habitable planets? I’m going to place two small worlds in there. They are small, hot, and airless. They probably have mineable mineral resources but they are not very hospitable. We’ll place these worlds at .19 AU and 0.52 AU from Fochrick. To get those distances I simply rolled 4d10 and 9d10 respectively and divided the number by 100 to get the AU.

The Outer Worlds

Next let’s move out from the inner system and see what’s out in the outer reaches. We’re going to add in 6 more worlds outside the habitable zone. For now, I’m not planning on having an asteroid belt but that may change when we do some sanity checks below. We’re going to add the following planets to the system:

The truth is, it probably doesn’t matter how you generate the planets, their types and masses, and their distances. As long as you don’t repeat the same patterns over and over. The universe is vast and as modern exoplanet discoveries have shown, you can get all kinds of crazy systems. As a general rule, I allow anything to happen. Once. The more off the wall the idea is, the less likely I am to allow it to enter the setting twice but anything is possible once.

  • Jovian – 4.66 AU
  • Jovian – 10.59 AU
  • Ice dwarf – 16.58 AU
  • Ice giant – 18.13 AU
  • Ice dwarf – 20.53 AU
  • Ice giant – 26.01 AU

In each of these cases, to get the distance I created a number between 1 and 6.99 by rolling a d6 and two d10s. The d6 was the integer bit and the two d10s were the decimal bit. I then added that number on to the orbital distance of the previous planet. Like I said, this was going to be pretty arbitrary. Let’s keep going.

Orbital Periods

Now that the planets are all placed, we want to compute their orbital periods to know how long the length of their orbit is. While we don’t need this to create the map of the system. We want to do some sanity checks since the planetary placements were fairly arbitrary.

Orbital periods are given by Newton’s form of Kepler’s Third Law of Planetary motion, namely:

which I described in the Clarion Calendar post but P is the orbital period, a is the distance from the star, G is the gravitational constant, and M1 and M2 are the mass of the star and planet respectively. Since M1 >> M2, we’ll ignore M2 in our calculations.

You could do this by hand, or use a spreadsheet, or use an on-line calculator. I’m going to use this handy website that allows you to enter the values in a number of different units and does the math for you. I’m just going to leave the mass of the planet at 1 earth mass in the calculation. If I was going for full detail, I’d figure out the mass of each of the planets but this is really just an approximate sanity check. For example, if I set the mass of the first Jovian planet to 100 earth masses, it would lengthen the orbital period by only 10 hours, so it’s not something I’m going to worry about here.

Plugging in the values for the planetary orbital distance and the mass of the star we get the following data:

PlanetOrbital Distance (AU) Orbital Period (hours)
T10.19687.46
T20.523112.57
Forge1.139316.45
Hum1.2311323.3
Larg1.6116957.2
J14.6683501.4
J210.59286061
ID116.58560391
IG118.53662106
ID220.53772144
IG126.011101096

Planetary Names

I should really come up with names for the other planets but since this is the humma homeworld, the names should tie into their history and culture and I haven’t really thought too much about that yet. I’ll leave naming for a future post or as an exercise for the reader.

Mainly here I’m just looking to see that we don’t have any resonant periods with the two Jovian planets. With orbital periods in ratios such as 2:1, 3:2, & 3:1 we would have potential stability issues. My only concern is with the second jovian and the first ice dwarf. They are in a nearly 2:1 orbital resonance but that might actually be okay and why that planet is where it is. So I’m going to leave it alone. If I really wanted to check system stability, I’d generate the masses, starting positions and velocities, and then enter all of that into a simple n-body computer simulation and run it for a million years or so of simulated time to make sure nothing went crazy but I think this will be fine.

Planetary Sizes

Okay, while this isn’t strictly necessary to draw the system map, we might as well figure out how big each of the planets are (and their surface gravity. When I do the system map, I like to have both the distances to scale and the sizes of the planets to scale so if I want to do that, I need the sizes.

The equation we’ll be using for this is

where g is the acceleration due to gravity (m/s2), M is the mass of the planet (kg), r is the radius of the planet (m), and G is just the gravitational constant (6.67408 × 10⁻¹¹ m3 kg-1 s-2). Additionally we’ll want an equation relating the mass of the planet to its density which is just the volume of the sphere times the density or

where ρ is the density (kg/m3). While we could do this just with the mass, I like to make sure the physics work out for the type of planet so I like the densities to make sense and prefer to include it in the calculations. Combining those two equations gives us an equation that relates the gravity, the radius, and the density:

This is what we’ll be using to get the data we need.

Densities

As part of this we’ll need densities for the planets. We’ll just be picking those from reasonable ranges which are the following (in g/cm3):

  • Terrestrial (rocky) Planets – 3.5 – 5.7
  • Ice Dwarfs – 1.8 – 2.5
  • Ice Giants – 1.2 – 1.8
  • Jovians – 0.6 – 1.4+

To get it into the units we need (kg/m3 ) we just multiply by 1000. The Jovian planets may not have an upper density limit because once you get to be the size of Jupiter, adding more mass doesn’t change the radius much, it just increases the densities. Brown Dwarfs, which are 10-80 times Jupiter’s mass are still all about the same size.

We’ll use these density ranges to pick densities for the individual planets in the sections below.

The Habitable Planets

First up are the three habitable planets that we know the gravity on. In this case we need to rearrange the last equation to solve for r giving us:

A Note on Gravity

For Star Frontiers, I’ve adopted the conventions that 1g = 10 m/s2 rather than 9.8 m/s2 as on Earth.  It makes all the math in the end easier and there isn’t much difference.  I figure that if you have all the races coming from different worlds, it would make sense that they standardized on a round number instead of some arbitrary fraction.

All that’s left is to pick a density or each of the planets and start computing. Well, almost. I also want one more decimal place for the actual gravity of the planet. To get that I’ll roll d8-4 x 0.01 and add that to listed gravity to give me some variation that would round to the listed value.

The table below is what we ended up with. Interestingly, all the gravity adjustments I rolled were positive. I also selected the planets with the higher gravity to be a little more dense but modulated that somewhat due to the fact that planets that form closer to the star would have higher density as well. Thus the densities of these three planets are pretty close together.

NameGravity (g)Density (gm/cm3) Mass (Earth)Radius (km)
Forge0.815.320.60125,443.75
Hum0.915.430.81395,991.93
Larg1.125.551.46227,215.22

Hum turns out to be almost exactly the same size and mass as Venus, just a little further out in the system so it’s not as hot. Forge is smaller still by about 10% in radius and 75% in mass while Larg is about 13% larger in radius than the earth and almost 50% more massive.

Other Planets

Now lets due the rest of the planets in the system. In this case we have to pick two of the three values: radius, density (or mass), and surface gravity. I’m going to select the radius and density for each of these planets and then compute the mass and surface gravity. Surface gravity doesn’t exactly make sense for the giant planets (jovians and ice giants) but it is the gravity present if you were stopped at that radius at it’s upper atmosphere. Here’s the table:

Name Gravity (g)Density (gm/cm3)Mass (Earth)Radius (km)
T10.335.650.03492,064.55
T20.675.390.33734,468.50
J13.301.48525.8279,714.14
J21.550.92140.1460,108.51
ID10.142.220.01892,297.74
IG10.971.2119.90228,623.16
ID20.062.190.00181054.47
IG21.021.3518.47226,919.75

J1 is almost two times the mass of Jupiter while IG2 is a little smaller than Pluto. If you want to compare them exactly this Planetary Fact Sheet page gives the data for all the planets in the solar system.

Wrapping up for now

And that’s it for this entry. We have the number of planets in the system, mass data on the star, and orbital and size data on the planets. I’m fairly confident that we don’t have to worry about system stability issues (of course since I didn’t do a rigorous check, this will be the one time it doesn’t work 🙂 ).

In the next post, we’ll create a system map for Fochrik and walk through the process of doing so. If you have any questions or comments, let me know below.

February 12, 2019 Tom 3 Comments

Osiris Under Siege

This is section 4 of the the Ghost Ship Osiris module. In this section of the module, the PCs dock at Outpost Osiris and have to liberate it from the alien robots that have taken control and are exterminating the outpost’s staff. I’ve posted the maps and room descriptions already, this post fills in the rest of this section of the adventure. At the end you can find a PDF of the full adventure section that you can download.

While this section is basically done, it is just a draft for the final module. If you find any issues, or have questions, comments, or suggestions, feel free to let me know in the comments below.

Arrival

Approaching the outpost, there is no response to any attempt to contact or communicate with the miners at the outpost.  Power appears to be on and there is nothing preventing the PCs from simply approaching and docking with the outpost.

As you approach the asteroid, you see that it is slowly rotating.  It is about 1.4 km long and 1 km wide, one of the smaller asteroids in the Outer Belt.  The stream of ejected tailings from the mining operation that you followed in ends several kilometers before reaching the base, as if the ore processing has stopped.  The docking bay doors are wide open with light spilling out into the darkness of space. You also see some lights through a few small windows about 50m from the docking bay.

The docking bay is more than large enough to accommodate the Mirage and is located right on the rotation axis of the asteroid.  Unless they try some strange maneuver, docking is straightforward.  There is no gravity in the docking bay at the moment but it can be turned on by a control panel next to the airlock if desired.  Gravity is present in the rest of the base.

As the PCs open the airlock’s inner door, they are greeted by a member of the mine staff, covered in blood, running down the corridor toward them.  Rounding the corner at the far end, is a Pursale combat robot exactly like the one encountered on the Dawn’s Luck. (see this post)  It takes aim at the mine staff member and fires, hitting her squarely in the back.  She collapses to the floor at the PCs’ feet, wounded but not dead. The robot shifts its attention to the PCs still standing.

The robot has orders to eliminate the alien lifeforms and will fight until it is destroyed or has killed all the PCs.

After defeating the robot, the PCs can stabilize the miner.  They learn that she is Kella Rezal, one of the scientists at the outpost.  A few hours after the scavengers left, a number of alien robots emerged from the deeper mine area and began attacking the staff.  She and another staff member had been holed up in the sensor and communications office and when they saw the PCs’ ship approaching, decided to try to reach them.  Unfortunately, they were detected by one of the robots roaming the halls. Her companion was killed as they tried to escape.

She can lead them back to the sensor and communications nexus where they can begin the process of clearing the outpost of the robots.

Clearing the Complex

Pursale Combat Coordinator Warbot

STR:    100        BP:    500
AGL:    60         INIT:    3
CRD:    70         Move:    13, Walking
PER:    65         Frame:    Huge
INT:    65         Docking: 15CU

Programming:  Warrior +0, Marksman +0, Commander +10 (Violent Plan)

Equipment: A/V, IR, motion, vocal, & lifeform scanners, communicator, military grade reflec & ballistic screens, heavy laser rifle, devastator, grenade rifle, comm jammer, 800 EU powerpack, military grade armor, computer link, 4 EMP grenades, 4 tangler grenades, 8 smoke grenades, & 8 frag grenades.

Styled similarly to the combat robot, the coordinator warbot is about the same size as a full grown Pursale.  It has a short squat body with six legs and two arms extending from the sides of the body near the front. Extending up from the front of the body are two long slender stalks, about 1.2 m in length that end in sensor clusters.

The arms end in manipulator hands that have three fingers and a thumb.  The left arm has a built in heavy laser while the right one is sporting a devastator and grenade rifle. The powerpack is built into the body as is the magazine that feeds the grenades to the grenade launcher.

These robots are designed for both front line combat and controlling and coordinating squads of combat robots in independent actions while communicating with a central command if necessary.

The Pursale robots have effectively taken control of the mine complex and are attempting to eliminate the mine staff.  There are a total of 16 combat robots all controlled by a single Combat Coordinator Warbot (see sidebar for stats). The arrival of the PCs and elimination of the combat robot at the airlock  has alerted the warbot to the PCs’ presence and it will begin marshalling its forces to oppose the PCs.

Complete maps of Outpost Osiris can be found in the room descriptions post.  The following sections describe the complex, the initial location of the robots and mining staff, and tactics that they will use to capture and eliminate the PCs.

The PCs should quickly realize that the robots they encounter are not just working at random but are being directed.  A successful skill check (Technician or Scientist) with a -20 modifier for working with alien technology should allow them to identify the communication channel being used by the robots to communicate and track it back to the warbot.  If the PCs attempt to jam the communications, see the section Jamming the Robots’ Communications near the end of this section for details on that process.

Initial Locations of Robots and Mine Staff

Mine Staff

When the PCs arrive, the surviving mine staff are scattered throughout the complex attempting to hide from the robots that are trying to eliminate them.  Of the original 16 staff members only 12 are still alive. Three were killed in the initial foray of the combat robots into the complex and the fourth was killed as she and Kella attempted to reach the Docking Bay and the PCs.  The staff members (both surviving and dead) are in the following locations.

  • Dr. Jamis Grandt (Hm) – Overwhelmed by the situation, Dr. Grandt has hidden himself in the hydroponics lab where he has so far been undetected.  If rescued, he will be able to provide lots of information about the staff and operations but will not have any suggestions as to solutions for the current situation.
  • Kella Rezal (Hf) – Kella is with the PCs and will either accompany them as they move through the complex or will stay on the Mirage.  She doesn’t want to stay anywhere else until she knows that the robots have been eliminated.
  • F’Vothee (Yf) – F’Vothee is hiding out inside the nuclear reactor on the power level figuring that would be one of the last places the robots would search for her.  Unbeknownst to her, in her haste to get into the reactor, she tore a very small hole in her radiation suit and is taking radiation damage (1D/hour – currently has 12 BP left).  If she is not found and treated within a couple of hours she will succumb to radiation poisoning.
  • Hiloo (Nm) – Hiloo is hiding  out in the Mineral Processing Plant (Docking Level).  He has backed himself up into one of the little side maintenance passages and wedged himself under some of the machinery.  The robots are a little too big to enter the maintenance passages directly but are starting to dismantle and destroy the machinery in an attempt to get to him.
  • Reid Esperon (Hm) – Reid had ventured down to the alien ship after Thrawl’s crew left to investigate and was caught by the robots leaving the vessel.  His body is about 2/3rds of the way from the mine airlock on the docking level to the alien ship. He was able to get a warning back to the staff allowing them to attempt to defend themselves or hide.
  • Clese Whayeson (Hm) & Vothi (E) – These two were killed in the Ore Loading Area (Docking Level) trying to defend the airlock connecting the mines to the outpost against the advancing robots.  They managed to destroy one of the robots whose body is in that area with them before they were overwhelmed by the other robots.
  • Petoph Baker (Hm) – Petoph is hiding in one of the robot storage room.  He’s working on trying to activate and reprogram the spare mining robot in that room to use it to attack the invading robots.  If he is not found, he will have the robot ready to go in 2d10+10 minutes after the PCs dock at the outpost.
  • Donio Welley (Hm) – Donio grabbed the blankets off of his bed and is hiding out in the Freezer.  He’s been there for a while though and is starting to succumb to the cold.
  • K’Yuuxan (Yf)- K’Yuuxan is hiding in the gym.  She has turned the lights out and set the area to zero gravity.  She has hidden himself in one of the upper corners of the room. She has a laser rifle and a 50 EU power pack and will fire on any robot that discovers her.
  • Melni (Nf), G’Vorta (Ym), & Taxu (E) – These three are attempting to hid out in the mine shafts.  They have managed to evade the robots searching the shafts for now but are slowly being herded toward capture.
  • Yo’Viltri (Yf) – Her body is in the stairwell between the Crew and Docking levels.  She and Kella were attempting to reach the PCs’ ship when they were caught by one of the combat robots (the one destroyed by the PCs) she was killed as they made their way through the stairwell buying Kella time to escape.
  • Chofa (Nf) – Chofa is hiding in the largest of the mineral storage bays.  She has squeezed herself into one of the shipping containers by removing some of the refined material that was originally in there which is spilled out on the floor.
  • Yuror (E)- Yuror is hiding out in one of the currently unused housing units.  They has barricaded themself into the bathroom with the lights out.

Robots

There are 16 robots currently active and moving throughout the outpost.  They are initially in the following locations but will start converging on the PC’s location as directed by the Combat Coordinator Warbot.  These are the positions of the robots when the PCs dock at the outpost.

  • Mine shafts – there are 6 robots here working in three pairs to search the shafts for the miners hiding there.
  • Stairwell – There are two robots in the stairwell.  One is sitting in the area between the crew and power level.  It is currently just on station watching for anyone to traverse this area.  The second is descending the stairwell between the docking deck and crew deck and is enroute to start searching the recreational areas of the crew deck.
  • Life Support and Hydroponics – A robot has just entered this area to start searching it.  
  • Central housing corridor – There is a robot in the central corridor between the housing units.  It is at the end of the corridor and will break down the door to and enter each room in turn working it’s way up the corridor.  It has already searched the units off the left corridor.
  • Raw Ore Intake – There is one robot in this area that has started to smash and dismantle its way down the maintenance access corridors searching for crew members.
  • Processing Control Center – There are two robots here attempting to dismantle and work their way into the maintenance passages looking for Hiloo whom they know is in the area somewhere.
  • Mineral Storage Corridor – There is a robot about to enter the leftmost Mineral storage area.  
  • Robot Repair Shop and Storage Rooms – A single robot is in this area looking for Petoph Baker.
  • Airlock to Mines – A single robot is stationed in this location to prevent any of the staff moving between the outpost and the mine shafts.
  • Alien ship access tunnel – About half way down this tunnel from the airlock to the ship is where the Combat Coordinator Warbot has stationed itself allowing it to communicate with all of its robots and the ship.

Robot Tactics & Timeline

Tactics

The destruction of the combat robot at the airlock has alerted the Combat Coordinator Warbot to the presence of a potential threat.  1d5 turns after the robot is destroyed, it will begin marshalling its other combat robots to identify and eliminate the threat.

The warbot does not have access to the outpost’s camera and security system so it only knows where the PCs are when they encounter one of the combat robots.  It will start by sending the combat robot from the Mineral Storage area to the airlock to investigate the destruction of the combat robot there.

If the PCs are still at the airlock when the combat robot arrives, or it sees them in the corridor, it will engage them immediately.  Otherwise it has a 60% chance per turn to pick up their trail and pursue them.

If a robot encounters the PCs and is destroyed, the warbot will retask the closest robot to that position to resume the pursuit.  If the PCs are making short work of the robots, feel free to direct two or more robots to their location.

It should become quickly obvious to the PCs that the actions of the robots are coordinated and being controls from somewhere.  If they can jam the communications, then the robots will just go about their last assigned task.

If the communications are jammed, the warbot will come out of the access tunnel to deal with the threat directly.  If needed the warbot can summon up to eight additional combat robots from the ship embedded in the heart of the asteroid (provided communications haven’t been jammed).  This gives the referee some flexibility to provide the necessary challenge for the PCs.

Timeline

The PCs can’t afford to take their time once they enter the outpost.  The robots are looking for them and for the mining staff. The longer the PCs take to eliminate the threat, the more of the mining staff will be killed by the robots.  The referee should convey this sense of urgency through the actions of the robots and any NPCs encountered.

The following timeline assumes the PCs do nothing to intervene or are ineffective.  Adjust events appropriately based on the PCs’ actions. All times are given in minutes after the initial encounter at the airlock with the combat robot.

Time (min)Event
3Chofa found in Mineral Storage Bay and killed.
5Petoph Baker found in robot repair shop.
8Yuror found in housing unit and killed.
13Dr. Jamis Grandt will be discovered in the Hydroponics lab and killed.
18Donio Welley will be found in the freezer by the robot that killed Dr. Grandt.
22K’Yuuxan will be discovered in the gym by the robot originally traversing the stairwell.  A short fight will ensue before he is killed.
26The robots will have smashed their way through enough of the mineral processing machinery to capture and kill Hiloo.
35Donio Welley will exit the freezer due to the cold if not previously discovered and start looking for survivors or a new place to hide.
60Melni, G’Vorta, & Taxu finally cornered and killed in the mines.
74F’Vothee  will succumb to radiation induced damage if not found and treated.

Jamming the Robots’ Communications

One option the PCs have for dealing with the coordinated assault of the combat robots is to jam the communications between them and the warbot.  To do this, a successful skill check with a -40 modifier would allow them to jam the communications. However, this check would have to be performed either using the equipment on the Mirage or in the Sensors and Communications room.  PCs with the relevant skills would know where they would have to be to jam the communications. Setting this up takes 1d10 minutes.

If the PCs jam the communications, the warbot no longer has input from the combat robots as to the PCs’ location and can no longer task robots to intercept and pursue the PCs allowing them to move around more freely.

The combat robots themselves will pursue their last assigned task, i.e. searching whatever set of rooms they were in, and then go idle and assume a defensive posture.  They will attack anyone that approaches them them will not actively patrol or seek out engagements.

Even with communications jammed, the warbot will still be broadcasting attempting to contact its combat robots and the PCs can still follow this signal to the warbot if they have thought to do so.

Destroying the Warbot

The warbot is actively controlling the combat robots as an extension of itself during this encounter.  If it is destroyed or deactivated, all robots without a specific target (e.g. the combat robots pursuing s3 and m3 or engaging the PCs) will immediately stop all action.  They will defend themselves if attacked but will not initiate an attack or pursue anyone. Those robots who are already pursuing someone or engaged in a fight will continue their current task and then stop when it is completed.

This deactivation only occurs if communications between the robots are not jammed.  If the warbot is destroyed or deactivated while the communications are being jammed, the robots will not stand down until the communications jamming stops.

Aftermath

Once the PCs have secured the outpost and defeated the warbot, the surviving mine staff can fill them in on the events that occured before they arrived.  The PCs can also send a message back to Nova Vista appraising them of the situation and outcome. If they have not already decided to do so, NVC will direct them to explore the ship embedded in the asteroid (Section 5) and secure it for future study.

Here’s a PDF of the full adventure section including the room descriptions:

GhostShipOsiris-section4Download
January 22, 2019 Tom 1 Comment

Posts navigation

1 2 Next →
Become a Patron!

Recent Posts

  • State of the Frontier – January 2024
  • Detailed Frontier Timeline – FY62.069 to FY62.99
  • State of the Frontier – August 2022
  • Battle of Hargut (Gruna Garu) – FY62.098
  • Archived Arcane Game Lore Posts – May 2013 to Dec 2014
  • A Look at Yachts and Privateers
  • Homeworld Bound – A Campaign Concept
  • Second Battle of Fromeltar (Terledrom) – FY62.083
  • Sample Star System Data
  • Detailed Frontier Timeline – FY62.038 to FY62.068

Categories

  • 3D Models
  • Adventures
  • Background
  • Creatures/Races
  • Deck Plans
  • Equipment
  • Game Design
  • General
  • Locations
  • Maps
  • NPCs
  • Optional Rules
  • Patreon-only
  • Project Overviews
  • Reviews
  • Setting Material
  • Starships
  • System Brief
  • Vehicles
  • Writing

Recent Comments

  • Tom on State of the Frontier – January 2024
  • Tom on State of the Frontier – January 2024
  • Tom on Star Map Generator – GUI Edition
  • David on Star Map Generator – GUI Edition
  • DM_Shroud on Star Map Generator – GUI Edition
  • Tom on Fighter Miniatures
  • Rlaybeast on Fighter Miniatures
  • Loguar on Detailed Frontier Timeline – FY62.069 to FY62.99
  • Loguar on Detailed Frontier Timeline – FY62.069 to FY62.99
  • Tom on Detailed Frontier Timeline – FY62.069 to FY62.99

Archives

  • January 2024 (1)
  • September 2022 (1)
  • August 2022 (9)
  • July 2022 (3)
  • June 2022 (3)
  • May 2022 (3)
  • June 2021 (1)
  • April 2021 (1)
  • February 2021 (4)
  • January 2021 (6)
  • December 2020 (5)
  • November 2020 (11)
  • October 2020 (4)
  • September 2020 (5)
  • August 2020 (4)
  • July 2020 (6)
  • June 2020 (5)
  • May 2020 (8)
  • April 2020 (5)
  • March 2020 (5)
  • February 2020 (5)
  • January 2020 (5)
  • December 2019 (7)
  • November 2019 (4)
  • October 2019 (6)
  • September 2019 (5)
  • August 2019 (6)
  • July 2019 (7)
  • June 2019 (5)
  • May 2019 (6)
  • April 2019 (7)
  • March 2019 (4)
  • February 2019 (5)
  • January 2019 (7)
  • December 2018 (5)
  • November 2018 (10)
  • October 2018 (4)
  • September 2018 (4)
  • August 2018 (5)
  • July 2018 (4)
  • June 2018 (4)
  • May 2018 (12)
  • December 2015 (1)
  • November 2015 (2)
  • December 2014 (4)
  • November 2014 (3)
  • June 2014 (1)
  • January 2014 (1)
  • July 2013 (1)
  • June 2013 (2)
  • May 2013 (3)

Meta

  • Log in
  • Entries feed
  • Comments feed
  • WordPress.org

Recent Posts

  • State of the Frontier – January 2024
  • Detailed Frontier Timeline – FY62.069 to FY62.99
  • State of the Frontier – August 2022
  • Battle of Hargut (Gruna Garu) – FY62.098
  • Archived Arcane Game Lore Posts – May 2013 to Dec 2014

Recent Comments

  • Tom on State of the Frontier – January 2024
  • Tom on State of the Frontier – January 2024
  • Tom on Star Map Generator – GUI Edition
  • David on Star Map Generator – GUI Edition
  • DM_Shroud on Star Map Generator – GUI Edition

Archives

  • January 2024 (1)
  • September 2022 (1)
  • August 2022 (9)
  • July 2022 (3)
  • June 2022 (3)
  • May 2022 (3)
  • June 2021 (1)
  • April 2021 (1)
  • February 2021 (4)
  • January 2021 (6)
  • December 2020 (5)
  • November 2020 (11)
  • October 2020 (4)
  • September 2020 (5)
  • August 2020 (4)
  • July 2020 (6)
  • June 2020 (5)
  • May 2020 (8)
  • April 2020 (5)
  • March 2020 (5)
  • February 2020 (5)
  • January 2020 (5)
  • December 2019 (7)
  • November 2019 (4)
  • October 2019 (6)
  • September 2019 (5)
  • August 2019 (6)
  • July 2019 (7)
  • June 2019 (5)
  • May 2019 (6)
  • April 2019 (7)
  • March 2019 (4)
  • February 2019 (5)
  • January 2019 (7)
  • December 2018 (5)
  • November 2018 (10)
  • October 2018 (4)
  • September 2018 (4)
  • August 2018 (5)
  • July 2018 (4)
  • June 2018 (4)
  • May 2018 (12)
  • December 2015 (1)
  • November 2015 (2)
  • December 2014 (4)
  • November 2014 (3)
  • June 2014 (1)
  • January 2014 (1)
  • July 2013 (1)
  • June 2013 (2)
  • May 2013 (3)

Categories

  • 3D Models
  • Adventures
  • Background
  • Creatures/Races
  • Deck Plans
  • Equipment
  • Game Design
  • General
  • Locations
  • Maps
  • NPCs
  • Optional Rules
  • Patreon-only
  • Project Overviews
  • Reviews
  • Setting Material
  • Starships
  • System Brief
  • Vehicles
  • Writing

Meta

  • Log in
  • Entries feed
  • Comments feed
  • WordPress.org
Powered by WordPress | theme Layout Builder