The Expanding Frontier

Creating Sci-fi RPG Resources

  • Home
  • Order Eclipse Glasses
  • Order a Map
  • Order Miniatures
  • Supporters
  • About
  • Bio

Category Archives: Maps

Sample Star System Data

I mentioned in my July State of the Frontier post that I was working on putting together a way to generate star systems. This is a sample of the data you can expect to see for each system. This particular system isn’t tied to any specific system on the map but is more for demonstration purposes. This is also not the final formatting or colors, but rather the default colors from the programs. Once I figure out exactly what I want, I’ll update the code to make the output match. So let’s look at what we have.

System Data

First up is the system data. This is generated using a program called StarGen. It’s a bit old and doesn’t work exactly for the smallest or largest stars but it is good start for most of the more interesting systems that might have habitable planets. I also don’t think it takes into account much of the new exoplanet data but we’re making system for a science fiction game so that’s okay. I’ll probably tweak things as I go along.

This generates a lot of data for each planet including thinks like average, min, and max temperatures, orbital characteristics, rotational characteristics, atmospheric composition (if present) and more.

Test System
12 Planets (size proportional to Sqrt(Radius))
Sun Rock Rock Venusian Terrestrial Sub-Jovian Sub-Jovian Jovian Sub-Jovian Jovian Rock Jovian Rock See
Key
Stellar characteristics
Stellar mass 1.08 solar masses
Stellar luminosity 1.48
Age 1.146 billion years
(6.183 billion left on main sequence)
Habitable ecosphere radius 1.216 AU (0.990 – 1.755 AU)

Planetary Overview
#TypeDist.MassRadius
1 Rock Rock 0.363 AU 0.353 EM 0.711 ER
2 Rock Rock 0.677 AU 0.151 EM 0.538 ER
3 Venusian Venusian 0.968 AU 0.582 EM 0.838 ER
4 Terrestrial Terrestrial 1.393 AU 1.114 EM 1.036 ER
5 Sub-Jovian Sub-Jovian 1.881 AU 5.356 EM 2.810 ER
6 Sub-Jovian Sub-Jovian 3.087 AU 3.734 EM 2.636 ER
7 Jovian Jovian 4.684 AU 626.589 EM 12.161 ER
8 Sub-Jovian Sub-Jovian 8.294 AU 8.347 EM 3.620 ER
9 Jovian Jovian 15.114 AU 54.383 EM 6.573 ER
10 Rock Rock 24.112 AU 0.293 EM 0.893 ER
11 Jovian Jovian 29.693 AU 26.864 EM 5.661 ER
12 Rock Rock 44.468 AU 0.218 EM 0.810 ER

Planet #1 Statistics
Planet typeRockRock
Resonant Spin Locked
Low-G, Hot, Airless, 1-Face
Distance from primary star5.4E+07 KM0.363 AU
Mass2.1E+24Kg0.353 Earth masses
Surface gravity685.0 cm/sec20.70 Earth gees
Surface pressure 0 millibars0.000 Earth atmospheres
Surface temperature217.9° Celcius
424.2° Fahrenheit
+203.9° C Earth temperature
+367.0° F Earth temperature
Normal temperature range
NightDay
-174.6° C
-282.3° F
– 426.4° C
799.5° F
MinMax
-188.9° C
-308.1° F
– 430.6° C
807.0° F
Equatorial radius4535.9 Km0.71 Earth radii
Density5.40 grams/cc0.98 Earth densities
Eccentricity of orbit0.215
Escape Velocity 7.9 Km/sec
Molecular weight retained136.8 and above
Axial tilt14°
Planetary albedo 0.07
Exospheric Temperature14259.02° K+12986.02° C Earth temperature
Length of year76.84 Earth days1.55 Local days
Length of day1191.81 hours
Boiling point of water-273.1° Celcius
-459.7° Fahrenheit
Hydrosphere percentage 0.0
Cloud cover percentage 0.0
Ice cover percentage 0.0


Planet #2 Statistics
Planet typeRockRock
Low-G, Hot, Airless
Distance from primary star1E+08 KM0.677 AU
Mass9.1E+23Kg0.151 Earth masses
Surface gravity513.8 cm/sec20.52 Earth gees
Surface pressure 0 millibars0.000 Earth atmospheres
Surface temperature 86.6° Celcius
187.9° Fahrenheit
+72.6° C Earth temperature
+130.7° F Earth temperature
Normal temperature range
NightDay
-23.5° C
-10.2° F
– 187.7° C
369.9° F
MinMax
-59.1° C
-74.4° F
– 217.4° C
423.3° F
Equatorial radius3428.6 Km0.54 Earth radii
Density5.36 grams/cc0.97 Earth densities
Eccentricity of orbit0.260
Escape Velocity 5.9 Km/sec
Molecular weight retained69.5 and aboveSO3, Kr, Xe
Axial tilt24°
Planetary albedo 0.07
Exospheric Temperature4108.54° K+2835.54° C Earth temperature
Length of year195.39 Earth days53.18 Local days
Length of day88.17 hours
Boiling point of water-273.1° Celcius
-459.7° Fahrenheit
Hydrosphere percentage 0.0
Cloud cover percentage 0.0
Ice cover percentage 0.0


Planet #3 Statistics
Planet typeVenusianVenusian
Hot, Arid, Cloudy, Boiling ocean, Unbreathably thick atmosphere
Distance from primary star1.4E+08 KM0.968 AU
Mass3.5E+24Kg0.582 Earth masses
Surface gravity812.6 cm/sec20.83 Earth gees
Surface pressure44300 millibars43.721 Earth atmospheres
Surface temperature288.7° Celcius
551.7° Fahrenheit
+274.7° C Earth temperature
+494.5° F Earth temperature
+210.0° C greenhouse effect (GH)
Normal temperature range
MinMax
281.3° C
538.4° F
– 295.1° C
563.2° F
Equatorial radius5344.0 Km0.84 Earth radii
Density5.44 grams/cc0.99 Earth densities
Eccentricity of orbit0.101
Escape Velocity 9.3 Km/sec
Molecular weight retained13.8 and aboveN, O, CH4, NH3, H2O, Ne, N2, CO…
Axial tilt21°
Planetary albedo 0.52
Exospheric Temperature2007.71° K+734.71° C Earth temperature
Length of year334.30 Earth days463.35 Local days
Length of day17.32 hours
Boiling point of water244.9° Celcius
472.8° Fahrenheit
Hydrosphere percentage 0.0
Cloud cover percentage100.0
Ice cover percentage 0.0


Planet #4 Statistics
Planet typeTerrestrialTerrestrial
Cold, Few clouds (N2, O2 – breathable)
Distance from primary star2.1E+08 KM1.393 AU
Mass6.7E+24Kg1.114 Earth masses
Surface gravity1018.0 cm/sec21.04 Earth gees
Surface pressure 1161 millibars1.145 Earth atmospheres
Surface temperature 6.2° Celcius
43.2° Fahrenheit
-7.8° C Earth temperature
-14.0° F Earth temperature
Normal temperature range
NightDay
2.1° C
35.8° F
– 10.1° C
50.1° F
MinMax
-20.1° C
-4.2° F
– 31.0° C
87.9° F
Equatorial radius6607.3 Km1 Earth radii
Density5.51 grams/cc1 Earth densities
Eccentricity of orbit0.108
Escape Velocity11.6 Km/sec
Molecular weight retained 4.3 and aboveN, O, CH4, NH3, H2O, Ne, N2, CO…
Nitrogen 63.0%  731 mb (ipp: 692) 
Oxygen 36.9%  428 mb (ipp: 405) 
Argon  0.1%  1 mb (ipp: 1) 
Axial tilt22°
Planetary albedo 0.20
Exospheric Temperature969.62° K-303.38° C Earth temperature
Length of year577.04 Earth days920.22 Local days
1.58 Earth years
Length of day15.05 hours
Boiling point of water104.0° Celcius
219.2° Fahrenheit
Hydrosphere percentage54.6
Cloud cover percentage24.2
Ice cover percentage 6.2


Planet #5 Statistics
Planet typeSub-JovianSub-Jovian
Distance from primary star2.8E+08 KM1.881 AU
Mass3.2E+25Kg5.356 Earth masses
3.464 Earth masses dust
1.891 Earth masses gas
Equatorial radius17923.5 Km2.8 Earth radii
Density1.33 grams/cc0.24 Earth densities
Eccentricity of orbit0.027
Escape Velocity15.4 Km/sec
Molecular weight retained 1.3 and aboveH2, He, N, O, CH4, NH3, H2O, Ne…
Axial tilt25°
Planetary albedo 0.50
Exospheric Temperature532.22° K-740.78° C Earth temperature
Length of year904.87 Earth days1369.98 Local days
2.48 Earth years
Length of day15.85 hours


Planet #6 Statistics
Planet typeSub-JovianSub-Jovian
Distance from primary star4.6E+08 KM3.087 AU
Mass2.2E+25Kg3.734 Earth masses
2.431 Earth masses dust
1.304 Earth masses gas
Equatorial radius16814.6 Km2.6 Earth radii
Density1.12 grams/cc0.2 Earth densities
Eccentricity of orbit0.057
Escape Velocity13.3 Km/sec
Molecular weight retained 0.7 and aboveH, H2, He, N, O, CH4, NH3, H2O…
Axial tilt32°
Planetary albedo 0.54
Exospheric Temperature197.52° K-1075.48° C Earth temperature
Length of year1903.08 Earth days2564.73 Local days
5.21 Earth years
Length of day17.81 hours


Planet #7 Statistics
Planet typeJovianJovian
Distance from primary star7E+08 KM4.684 AU
Mass3.7E+27Kg626.589 Earth masses
38.199 Earth masses dust
588.390 Earth masses gas
Equatorial radius77565.0 Km12 Earth radii
Density1.92 grams/cc0.35 Earth densities
Eccentricity of orbit0.014
Escape Velocity80.3 Km/sec
Molecular weight retained 0.0 and aboveH, H2, He, N, O, CH4, NH3, H2O…
Axial tilt20°
Planetary albedo 0.47
Exospheric Temperature 85.79° K-1187.21° C Earth temperature
Length of year3553.92 Earth days13449.13 Local days
9.73 Earth years
Length of day6.34 hours


Planet #8 Statistics
Planet typeSub-JovianSub-Jovian
Distance from primary star1.2E+09 KM8.294 AU
Mass5E+25Kg8.347 Earth masses
2.726 Earth masses dust
5.621 Earth masses gas
Equatorial radius23085.2 Km3.6 Earth radii
Density0.97 grams/cc0.18 Earth densities
Eccentricity of orbit0.177
Escape Velocity17.0 Km/sec
Molecular weight retained 0.1 and aboveH, H2, He, N, O, CH4, NH3, H2O…
Axial tilt48°
Planetary albedo 0.46
Exospheric Temperature 27.37° K-1245.63° C Earth temperature
Length of year8380.04 Earth days12298.07 Local days
22.94 Earth years
Length of day16.35 hours


Planet #9 Statistics
Planet typeJovianJovian
Distance from primary star2.3E+09 KM15.114 AU
Mass3.3E+26Kg54.383 Earth masses
6.375 Earth masses dust
48.009 Earth masses gas
Equatorial radius41923.0 Km6.6 Earth radii
Density1.05 grams/cc0.19 Earth densities
Eccentricity of orbit0.207
Escape Velocity32.2 Km/sec
Molecular weight retained 0.0 and aboveH, H2, He, N, O, CH4, NH3, H2O…
Axial tilt50°
Planetary albedo 0.51
Exospheric Temperature 8.24° K-1264.76° C Earth temperature
Length of year20614.27 Earth days42521.66 Local days
56.44 Earth years
Length of day11.64 hours


Planet #10 Statistics
Planet typeRockRock
Low-G, Cold, Airless
Distance from primary star3.6E+09 KM24.112 AU
Mass1.8E+24Kg0.293 Earth masses
Surface gravity360.2 cm/sec20.37 Earth gees
Surface pressure 0 millibars0.000 Earth atmospheres
Surface temperature-214.0° Celcius
-353.1° Fahrenheit
-228.0° C Earth temperature
-410.3° F Earth temperature
Normal temperature range
NightDay
-220.6° C
-365.0° F
– -207.3° C
-341.2° F
MinMax
-237.0° C
-394.6° F
– -191.8° C
-313.3° F
Equatorial radius5693.4 Km0.89 Earth radii
Density2.26 grams/cc0.41 Earth densities
Eccentricity of orbit0.161
Escape Velocity 6.4 Km/sec
Molecular weight retained 0.1 and aboveH, H2, He, N, O, CH4, NH3, H2O…
Axial tilt54°
Planetary albedo 0.15
Exospheric Temperature 3.24° K-1269.76° C Earth temperature
Length of year41539.68 Earth days39480.41 Local days
113.73 Earth years
Length of day25.25 hours
Boiling point of water-47.6° Celcius
-53.7° Fahrenheit
Hydrosphere percentage 0.0
Cloud cover percentage 0.0
Ice cover percentage 0.1


Planet #11 Statistics
Planet typeJovianJovian
Distance from primary star4.4E+09 KM29.693 AU
Mass1.6E+26Kg26.864 Earth masses
3.276 Earth masses dust
23.587 Earth masses gas
Equatorial radius36103.9 Km5.7 Earth radii
Density0.81 grams/cc0.15 Earth densities
Eccentricity of orbit0.089
Escape Velocity24.4 Km/sec
Molecular weight retained 0.0 and aboveH, H2, He, N, O, CH4, NH3, H2O…
Axial tilt60°
Planetary albedo 0.52
Exospheric Temperature 2.14° K-1270.86° C Earth temperature
Length of year56765.41 Earth days95559.79 Local days
155.41 Earth years
Length of day14.26 hours


Planet #12 Statistics
Planet typeRockRock
Low-G, Cold, Airless
Distance from primary star6.7E+09 KM44.468 AU
Mass1.3E+24Kg0.218 Earth masses
Surface gravity325.5 cm/sec20.33 Earth gees
Surface pressure 0 millibars0.000 Earth atmospheres
Surface temperature-229.6° Celcius
-381.3° Fahrenheit
-243.6° C Earth temperature
-438.5° F Earth temperature
Normal temperature range
NightDay
-234.6° C
-390.3° F
– -224.5° C
-372.1° F
MinMax
-249.8° C
-417.7° F
– -209.6° C
-345.2° F
Equatorial radius5165.8 Km0.81 Earth radii
Density2.25 grams/cc0.41 Earth densities
Eccentricity of orbit0.030
Escape Velocity 5.8 Km/sec
Molecular weight retained 0.0 and aboveH, H2, He, N, O, CH4, NH3, H2O…
Axial tilt39°
Planetary albedo 0.15
Exospheric Temperature 0.95° K-1272.05° C Earth temperature
Length of year104035.23 Earth days93990.83 Local days
284.83 Earth years
Length of day26.56 hours
Boiling point of water-53.4° Celcius
-64.1° Fahrenheit
Hydrosphere percentage 0.0
Cloud cover percentage 0.0
Ice cover percentage 0.1

There is an alternate output for the system view at the top. Instead of the images, it can make a simple system diagram that looks like this:

This shows the relative positions of the planets on a log scale as well as the range of their orbits (the gray bars) based on the generated eccentricities. The blue bar is the habitable zone for the system and the numbers above the gray bars are the masses of the planets in Earth masses. I’m leaning toward using this one. What do you think?
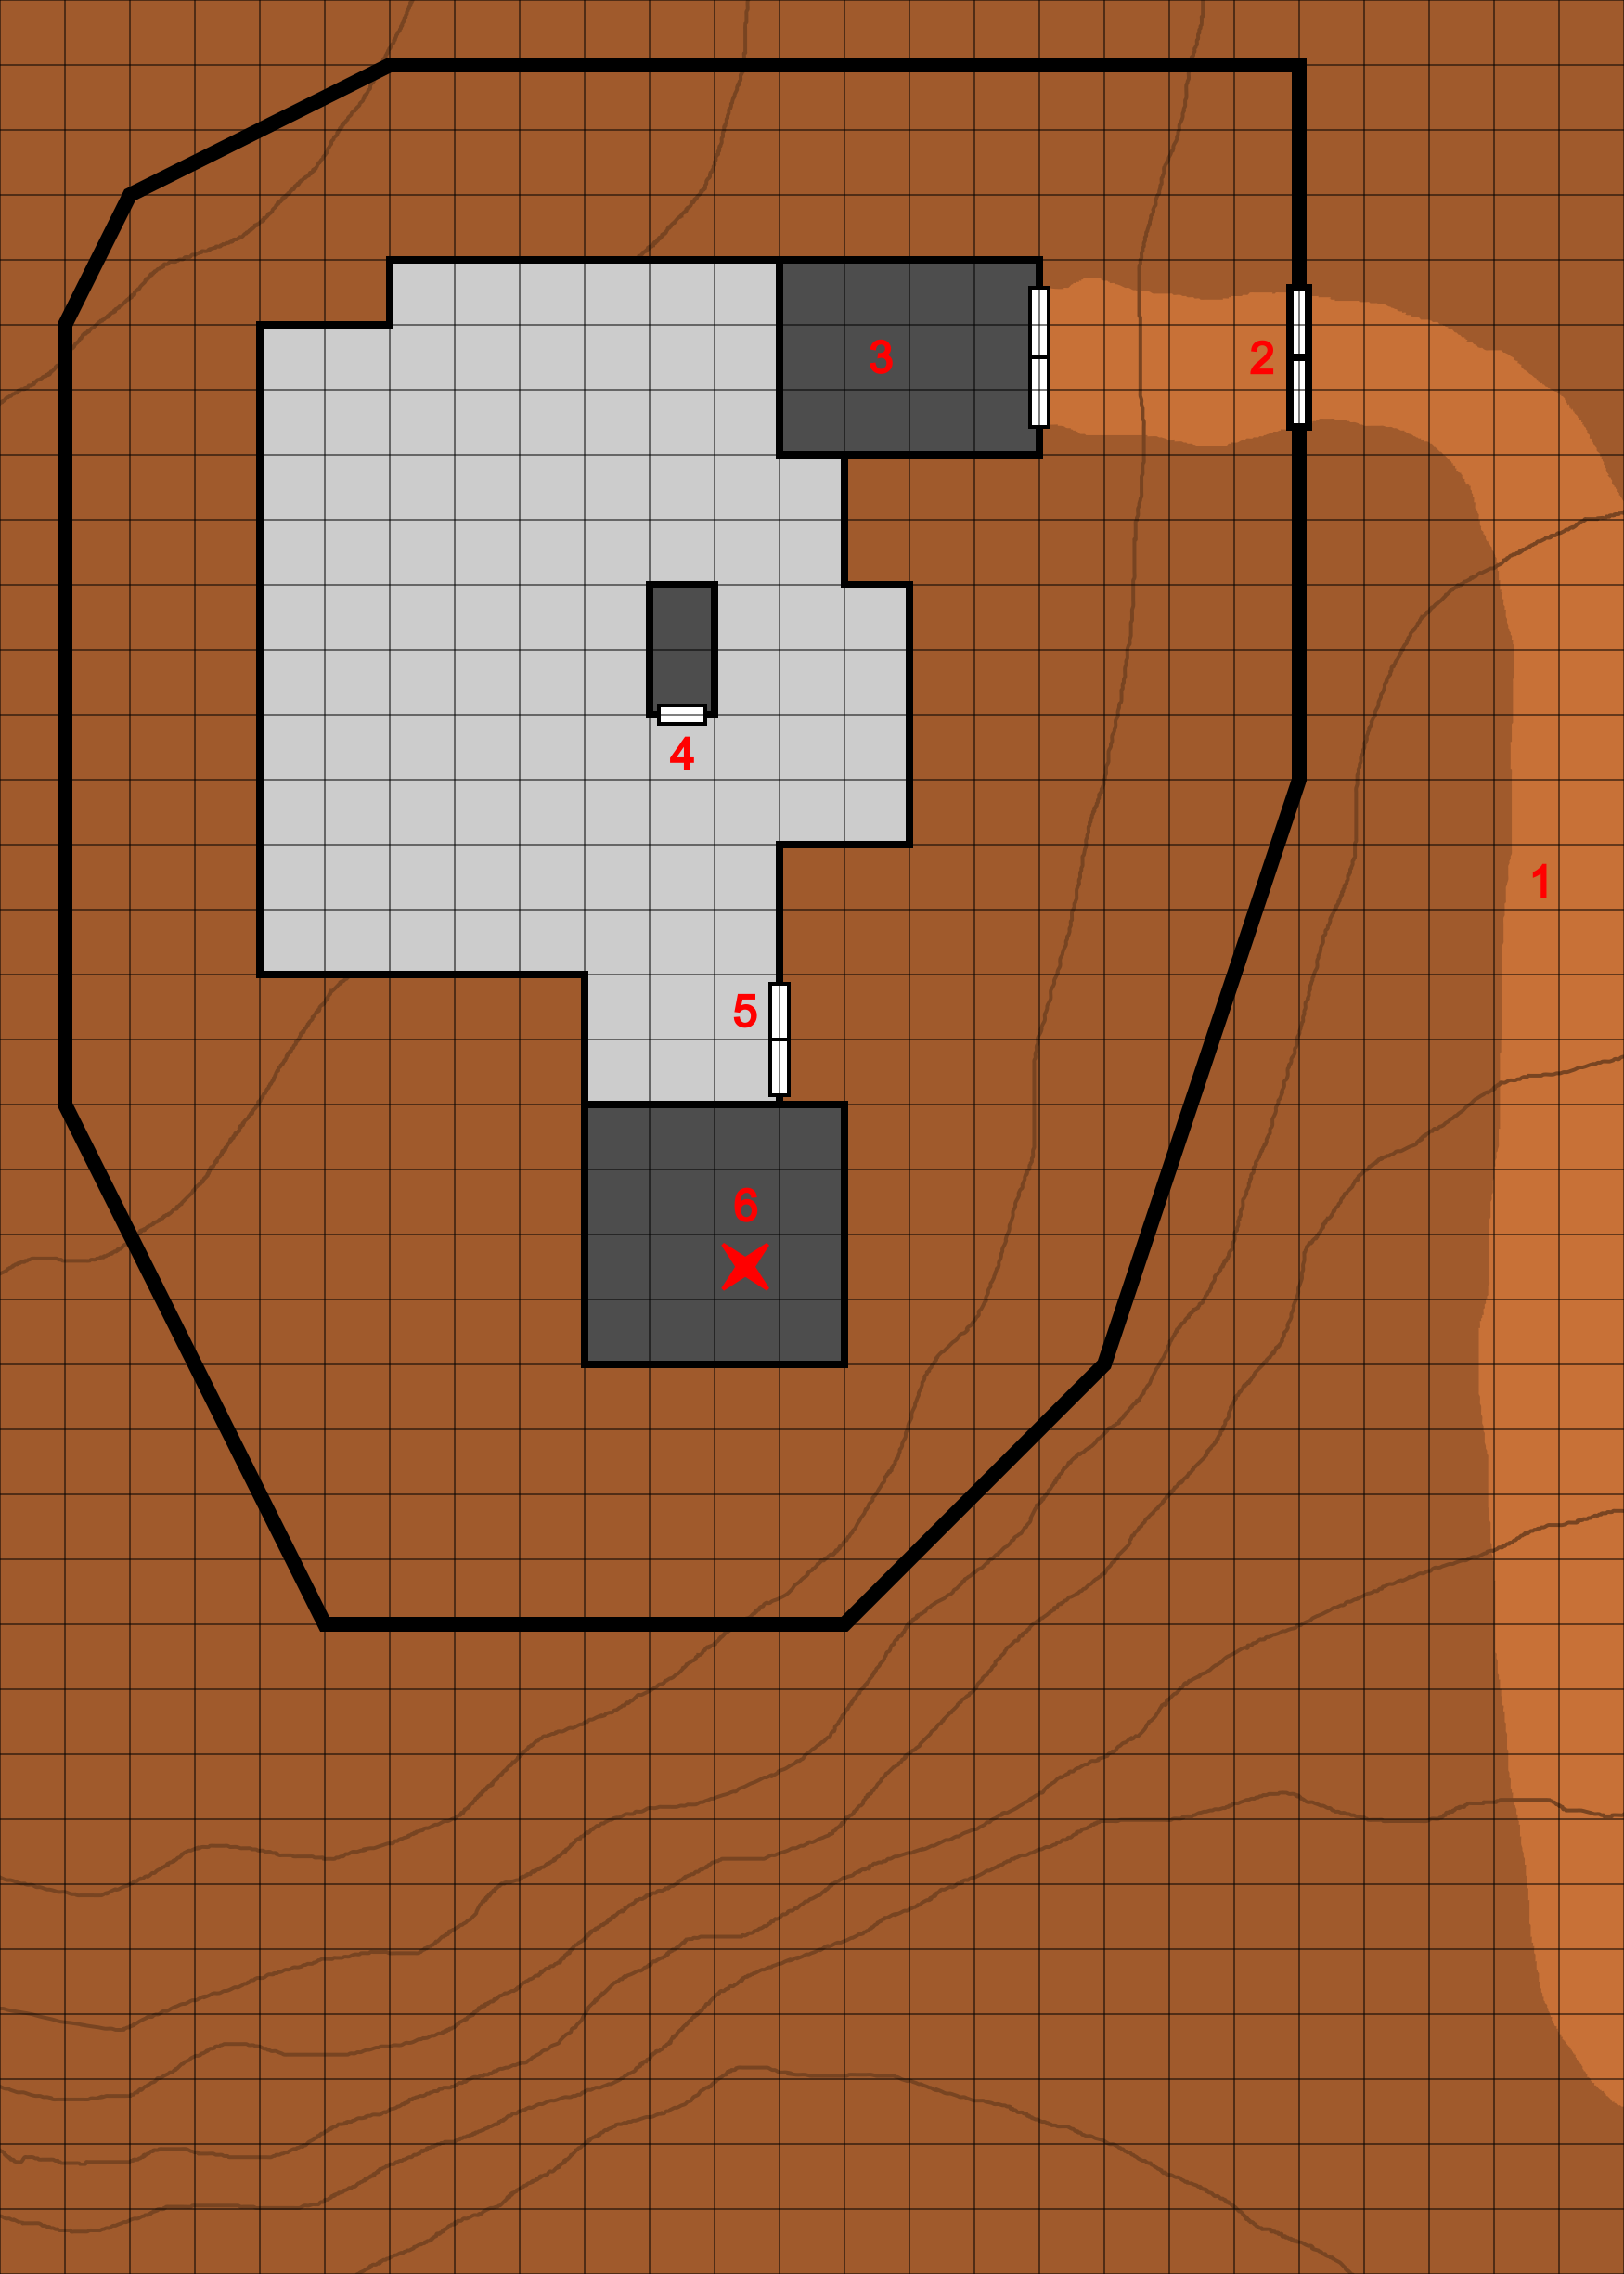
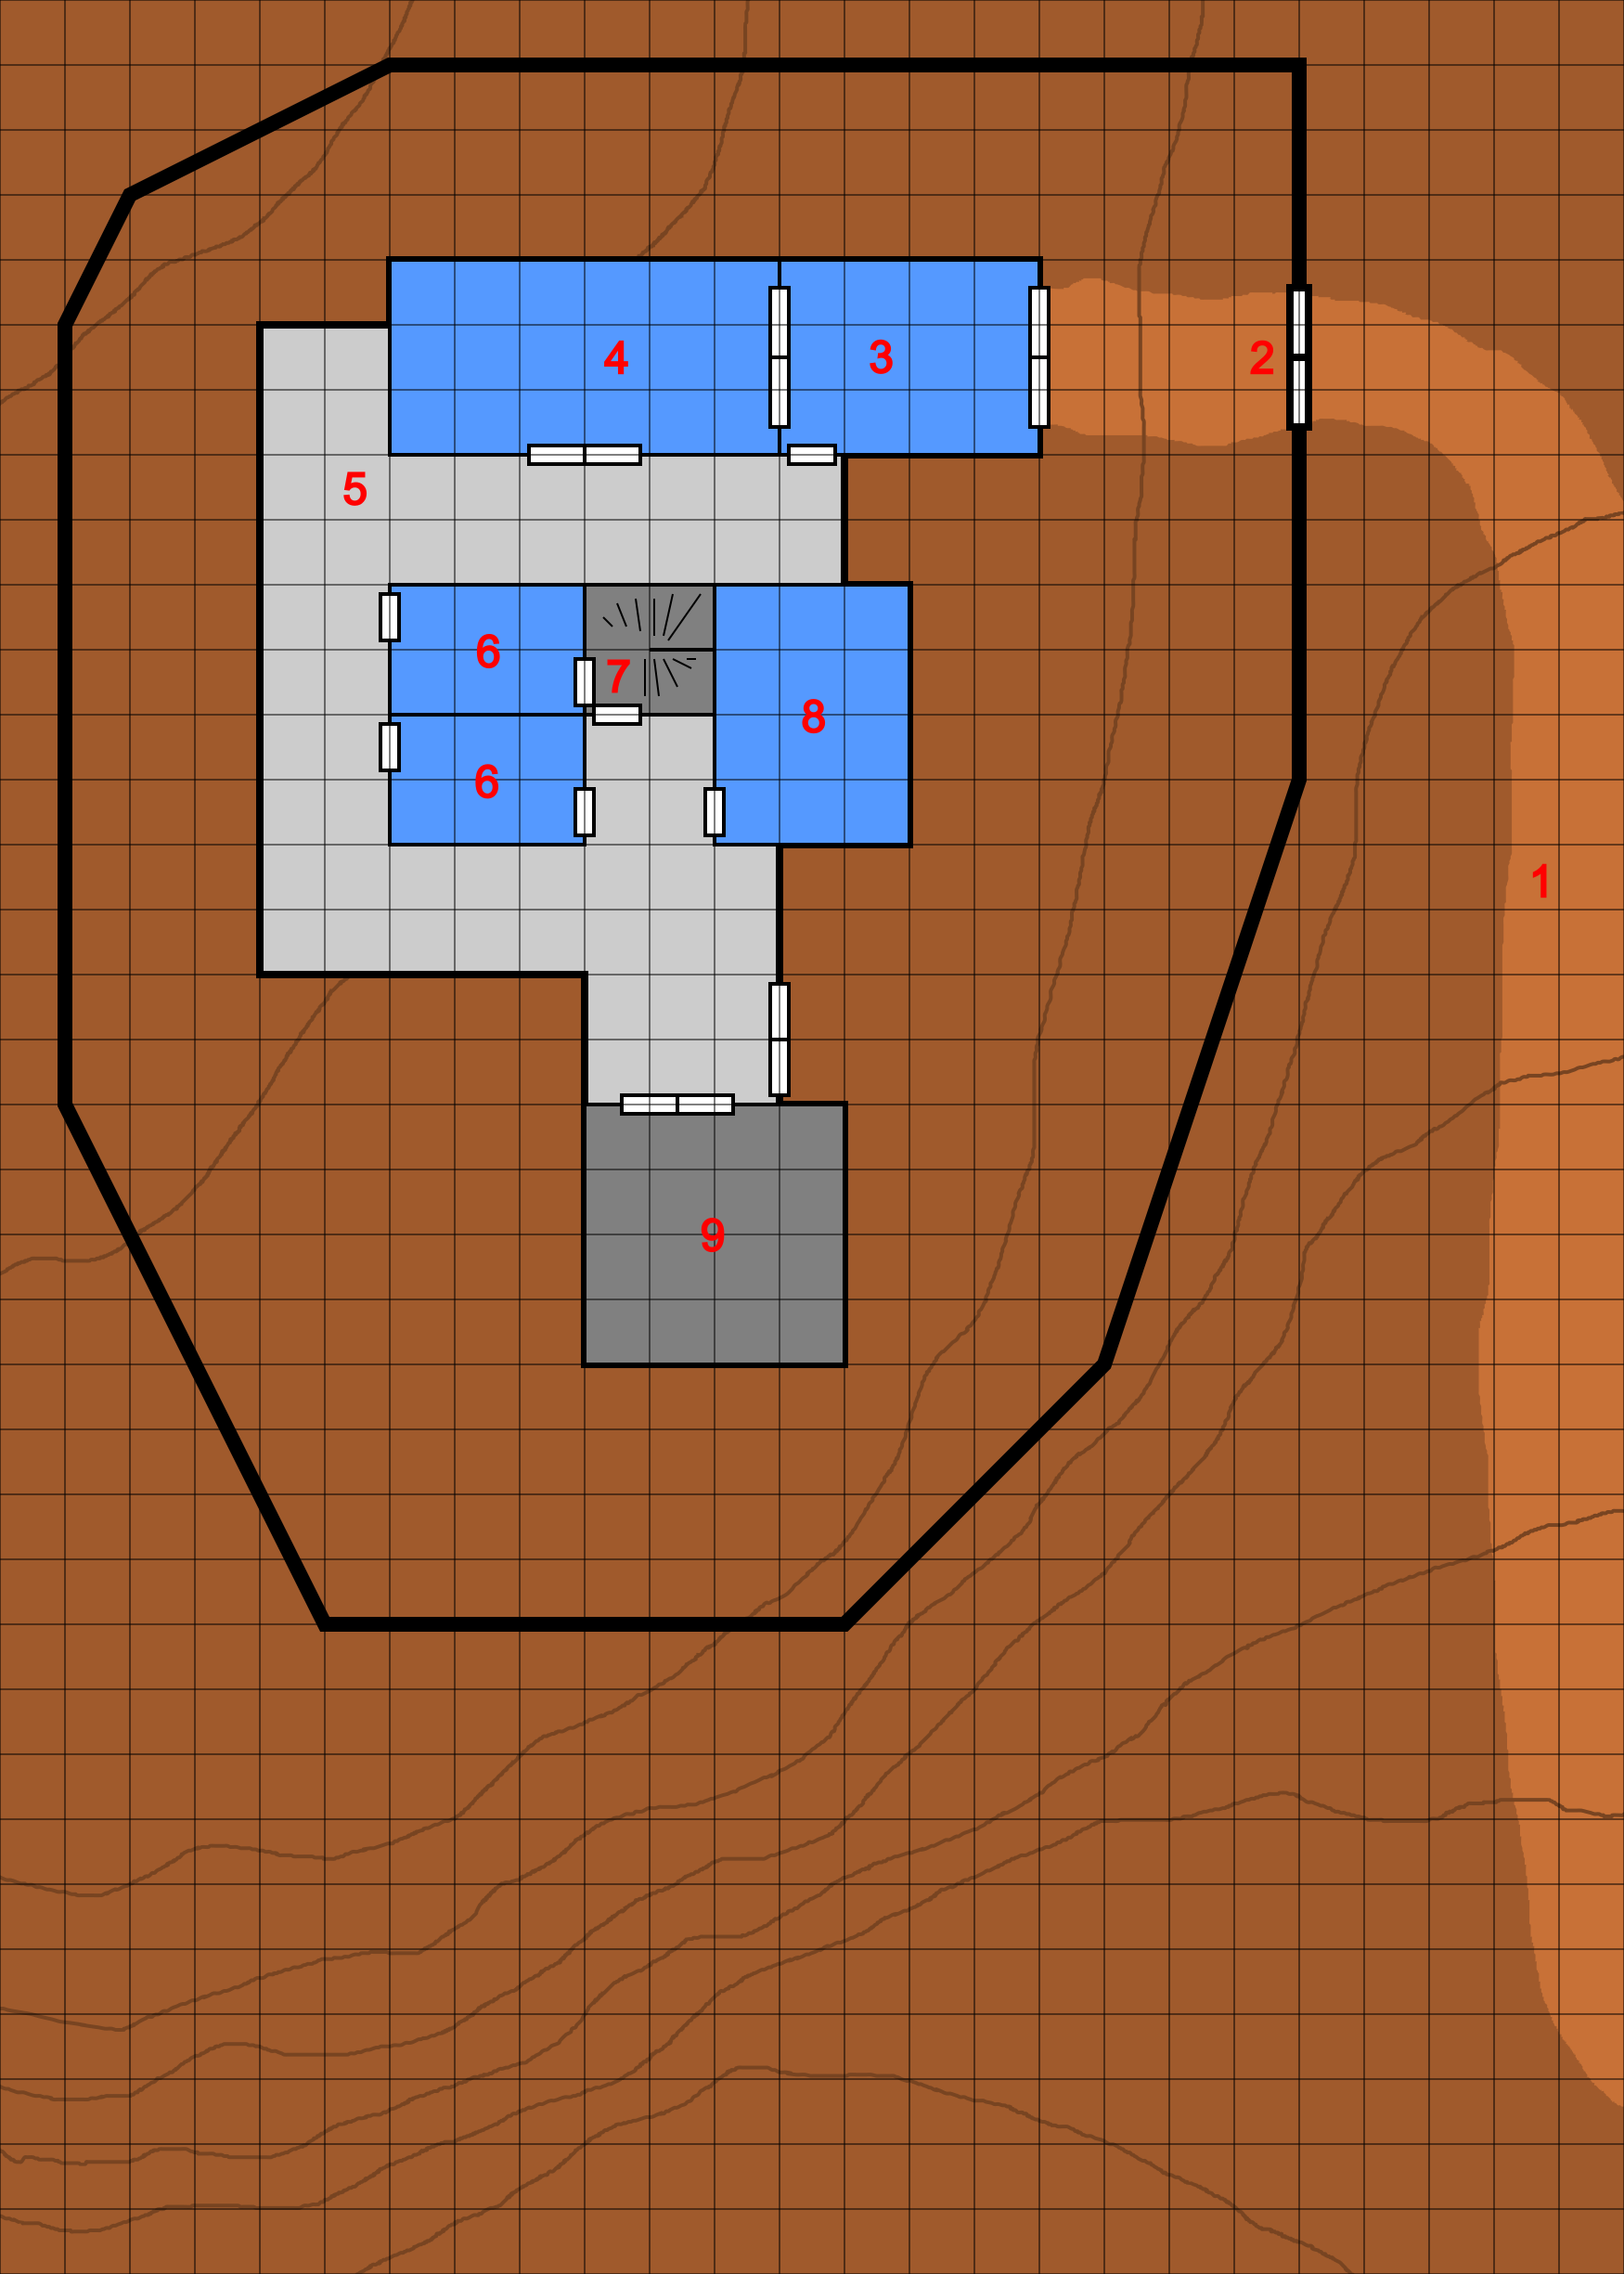
Planetary Maps

For each system, I want to do planetary maps for at least the habitable planets and possibly some of the ones classified as Venusian, Martian, Water, or Ice by StarGen. I haven’t found a program that will make good maps of the airless worlds (putting craters everywhere).

I also haven’t found a program that I’m completely happy with as far as generating the maps go. I have two that each do a bit of what I like.

Worldbuilder

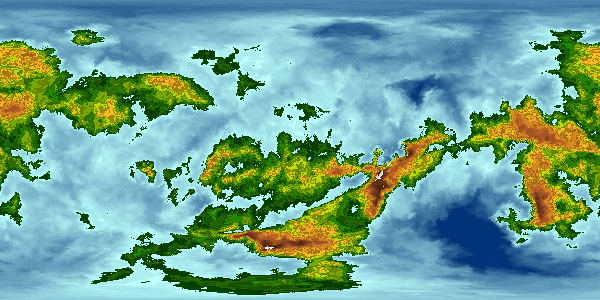
The first is a program called Worldbuilder. It creates the world using plate tectonics it figure out mountain ranges, subduction zones, and the like and then has an atmospheric circuation model to figure out rainfall and temperatures and such. I like all that. It also can do a lot of different map projections, including on a globe and allow you to zoom in on any part of the map. Strangely, it only does a hex grid across the map and not lattitude and longitude lines.

It has a lot of knobs you can turn to adjust things like the water percentage, heat level, number of techtonic plates, and so on. And it does ice caps quite nicely.

One of the major downsides is that it is not supported anymore and the last development on it was in 2015. And while I have the code, it is in Lua, a languate I know nothing about so its a bit hard to read and edit. Another issue is that there is no key that I have been able to find to explain the colorings on the various maps (temperature, elevation, biomes). I’m sure its in the code but I’m still trying to figure it out.

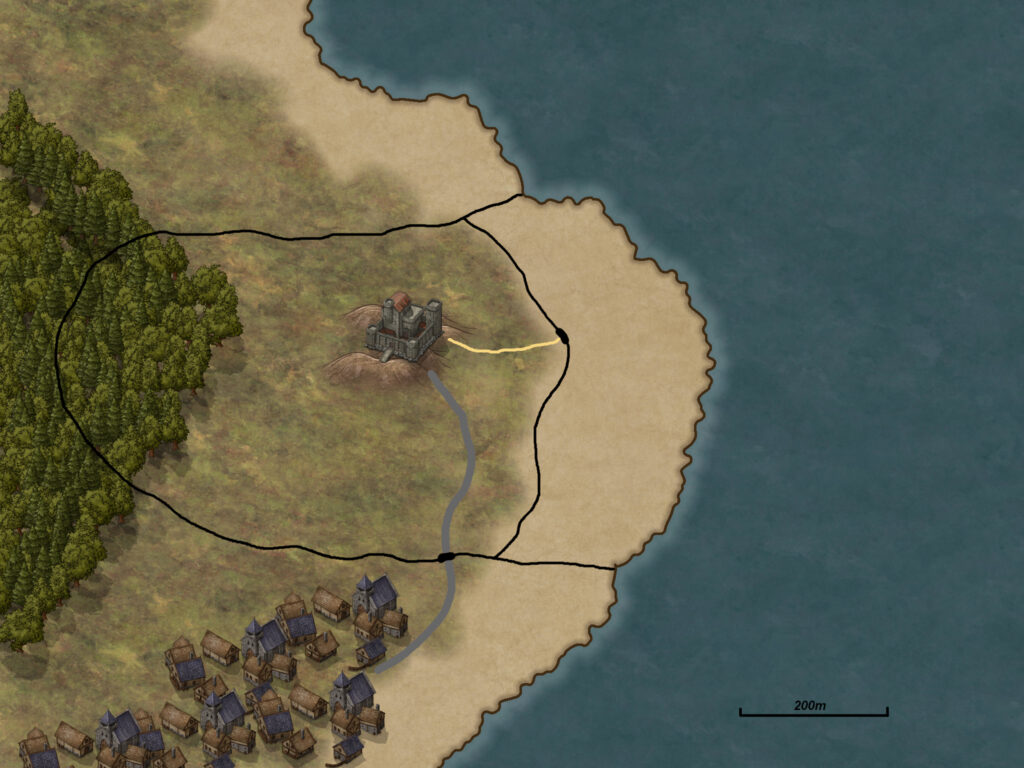
Here are some maps for a sample world from that system. You might recognize the map style from other maps I’ve posted on the blog for locations and adventures on Pale. I used this program to generate the planetary map I used for that.

Globe view with the biomes selected
Biomes map
Elevation map
Tempurature map
And just for fun the tectonic plates.

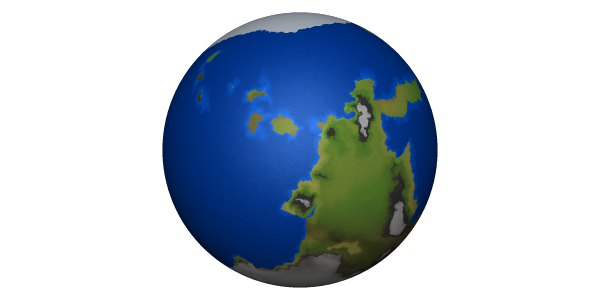
I really like the way this program generates the worlds, I just wish there was a little more documentation on what the program knobs do, and a key to the maps. In looking at the code, the biomes seem to be fairly generic: ice, water, rock, sand, etc.

Planet Map Generator

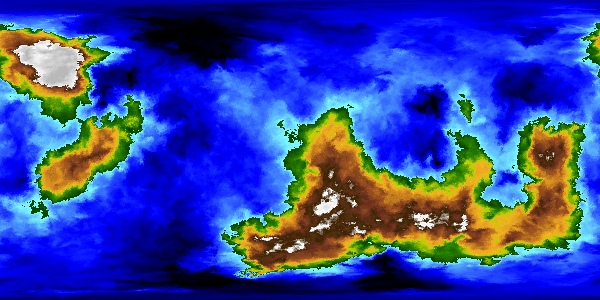
The other program is just called Planet, although the web page calls it Planet Map Generator. This one doesn’t have as many things you can adjust in the planet generation and just make maps based on an algorithm that generates the elevations on the map. The maps can look very fractally or smoother depending on the coloring scheme you use. It is a fractal generation method so you can zoom in as much as you want and it has some projections that I like that Worldbuilder including an icosohedral projection that is great for gaming.

You can tweak the water level and colors used but not much else. Addtionally, the developer also just added biome generation based on a simple air flow and rain model for given terrains. And the biome list has 11 different biomes, so that is nice.

Here are a few maps from that program. These are all elevation maps.

The default color scheme. I don’t like how jagged the elevation contours look with this scheme.
This is an alternate color scheme that I like a lot better as it makes things look smoother.
Same map as above but with biomes substituted for the elevation data. The oceans are a little intense on this one so it might be better to try a different color scheme for this.
Here’s the globe.
This is the Mollweide projection that I like as it shows the entire world but doesn’t distort the regions near the poles. Worldbuilder doesn’t have this projection (or any others like it).
Finally the icosahedral projection. This one is great becuase it is effectively equal area everywhere with minor distorations and works great for gaming by overlaying a hex grid on it.

I really like the look of these maps. The one thing it doesn’t do is show ice caps or really do any weather patterns.

Which to choose?

I want to be consistent so I probably need to choose one of the map programs over the other. While i love the look of the maps coming from the Planet Map Generator, it isn’t quite as versatile for creating different types of worlds with different characteristics and I’m leaning more toward the Worldbuilder program for that reason.

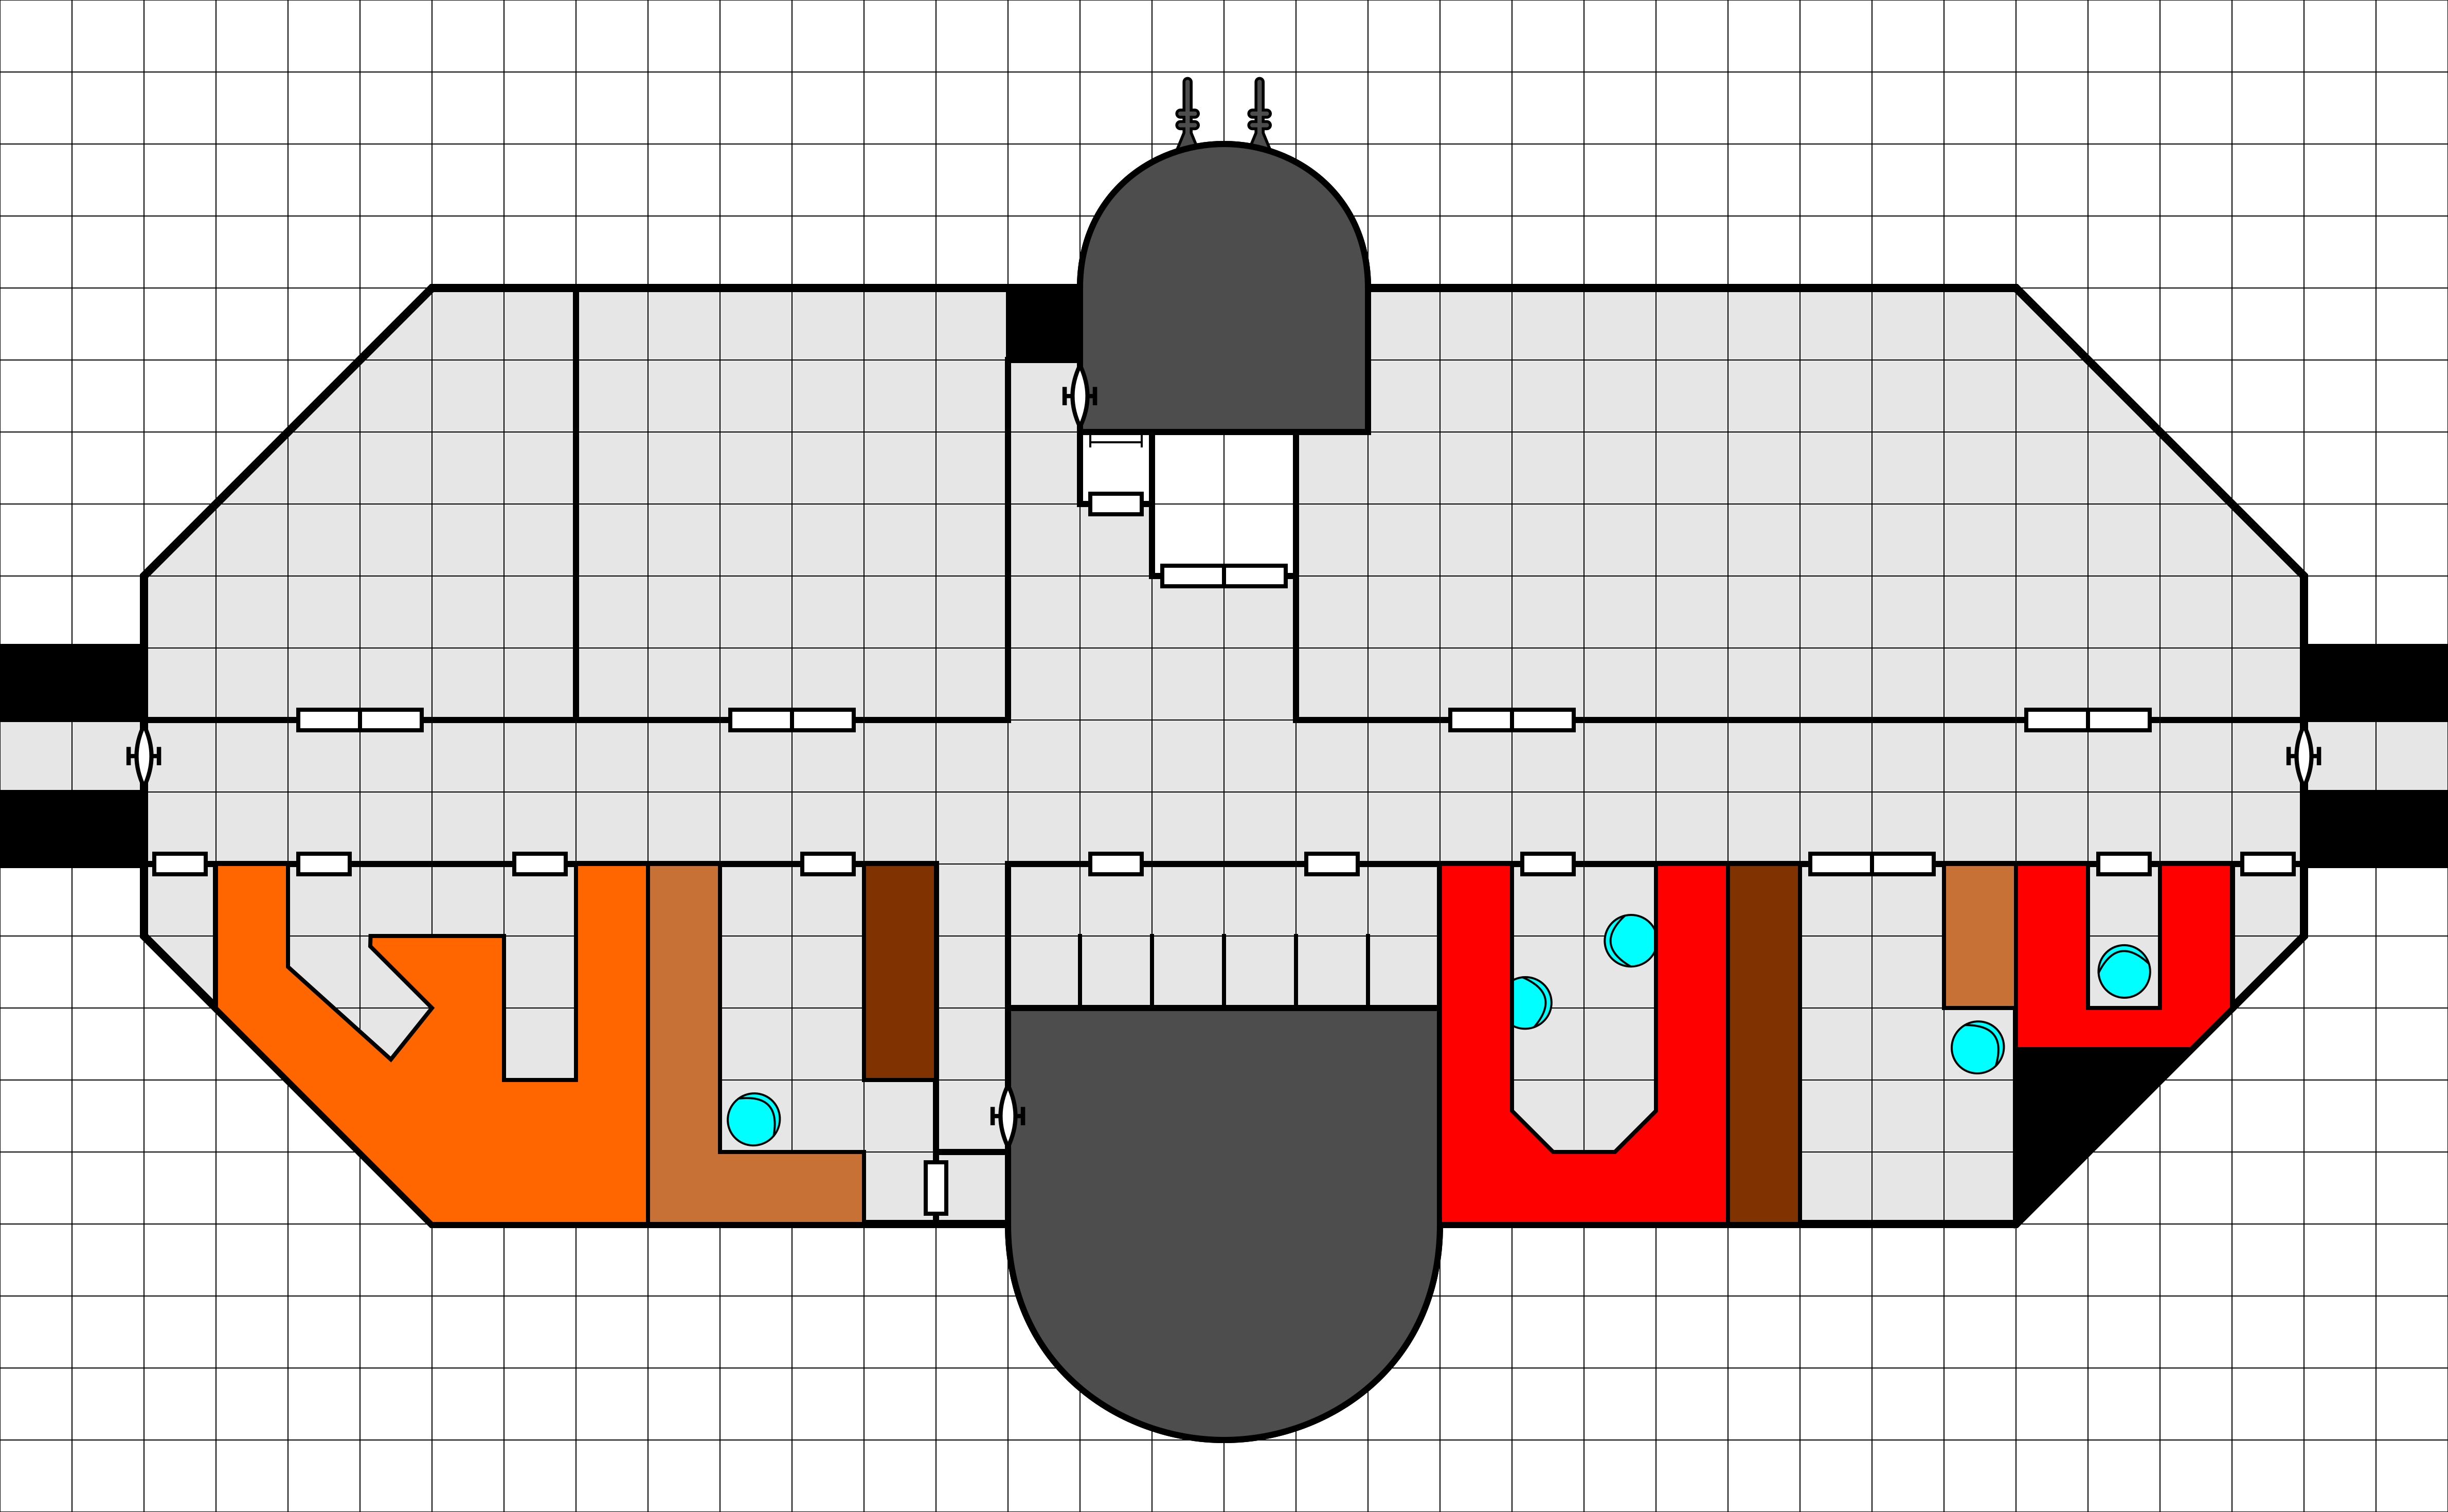
There is an interesting option. The Planetary Map builder does have the option to import a low resolution (24×12) map of symbols as a seed for it’s map generation. So if I take that sample elevation map from Worldbuilder and convert it into the format Planetary Map Builder needs for input, I get a map that looks like this (with the original map below it).

Some of the details are lost and the terrain is a bit different, the Planetary Map Builder tends to put the moutains in the middle of the contients while the Worldbuilder does it on tectonic boundaries.

I could also create the biome map in Planetary Map Builder.

So while I can make the nicer looking maps from the Worldbuilder seed maps, I don’t think I like the way that changes the terrain. So I’m leaning toward the Worldbuilder maps as I like the terrain features better. I just need to figure out how to color them like the Planetary Map Builder maps and get better biome information.

What I probably need to do is learn Lua and translate the Worldbuilder code into C/C++ and then merge it with the relevant code from Planetary Map Builder. But that’s a bit of work. We’ll see if I can find time. Until then, I think I’ll use the Worldbuilder maps as is. The nice thing is that it is reproduceable and if I do make code upgrades later, I can rerun the programs to produce the same worlds with upgraded maps.

Final Thoughts

I still haven’t decided how to format these or where to host them but that’s a small matter. I can always start as blog posts like this one and then move them somewhere later.

What do you think about the different maps and style? Which do you prefer? Share your thoughts in the comments below.

And if you like the things I’m working on and want to encource me to spend more time on it, consider supporting me on Patreon.

August 11, 2022 Tom 1 Comment

HSS History’s Hope Deck Plans – part 2

So 19 months ago (Dec 2020), I posted the part 1 of this pair of posts with the first decks of the HSS History’s Hope. In that post I was also making videos of how I create the deck plans. This post is just the completed deck plans for the rest of the ship, no videos. I didn’t do the videos for two reasons. Primarily, I just didn’t have the time to sit down and do the recordings. I worked on these 10 minutes here, 15 minutes there, until they were done. The second was that there really wasn’t anything new as far as map creation goes while making the maps for these decks so any videos would have been more of the same. That said, here are the remaining decks of the ship.

The Deck Plans

All of these decks are drawn at 1 square = 1 meter and the full resolution files are at 140 dpi so each square is 1/2″ in size (the size of the chits from the original game) and line up nicely with the grid sizes (70 pixels) of at least Roll20 and possibly other virtual tabletops.

Engineering Deck

First up is the engineering deck.

Engineering deck. Click for full sized image.

There’s actually a lot more there than just the engineering areas but we’ll start with those. Across the bottom of the map (left to right) we have the primary life support machinery that handles air and water filtration and circulation, a robotics shop, robot storage and the astrogation telescope dome, engineering and life support control, a machine shop, and the communication and scanner systems controls. The two little rooms on each end are storage.

The large rooms across the top are all life support food storage. The one on the left closest to the elevator is actually a freezer. At the top is the laser battery turret and on either end of the deck are the access passages to the engines.

Common Deck

Common deck. Not sure how I ended up with an extra row of squares across the top outside the ship. Click for full image.

This deck is the common area for the ship. It contains a theater (right side) for both entertainment and meetings/briefings. Along the bottom are some small offices where crew can study and/or work. This is also the dining hall with the galley and attached pantry.

Airlock & Medical Deck

Airlock & medbay deck. Actually I do know how there was an extra row at the top of this deck and the previous one. I started with the file for the Science Deck (from part 1) that has bays that stick out a bit so the map had to be bigger. Click for full image.

This deck has the ship’s airlock, along with storage for space suits for all the ship’s crew. Also on this deck is the ship’s medical bay with a small office, sickroom, and operating room. Finally, the deck houses the ship’s lifeboat (left) and a small launch (right).

Recreation Deck

Recreation deck. Click for full sized image.

The central feature of this deck is the gym area. That blue area is a mat, not a pool. Off of the gym is a sauna (left) and steam room (right). This deck also house the remaining four staterooms for the crew not housed on the crew decks from the previous posts.

Bridge

The bridge. Click for full size image.

The final deck is the bridge. It houses the main computer and stations for the pilot, astrogagor, gunner, and engineer. Access is by a ladder through a hatch in the floor from the officer’s deck.

HSS History’s Hope cutaway to show deck placement. Click for a larger image.

Deck Order

The decks are arranged as follows on the ship from bottom to top as shown in the image to the right. Most of the decks are 3m tall with 2m between decks although the cargo deck is nearly 5m tall and the engineering deck is 4m tall.

  1. Cargo Deck
  2. Science Deck
  3. Engineering Deck
  4. Common Deck
  5. Crew Deck
  6. Crew Deck
  7. Crew Deck
  8. Airlock/Medical Deck
  9. Recreation Deck
  10. Crew Deck
  11. Officer’s Deck
  12. Bridge

What’s Next?

It took me long enough to finish these deck plans but they are finally done. The next thing I have planned for this ship is to create a full technical manual for it. So the next step is for me to add annotations to each deck and write up the detailed descriptions for each room. There might be some tweaks as I start looking at it for the details but they will be small. These decks, plus the descriptions from earlier posts should be enough for anyone to use the ship in a game if they desire.

Some time soon I’ll be posting an updated map of the travels of the ship as recorded in the Detailed Frontier Timeline I’m creating. They are actually over halfway to their destination but I haven’t published a copy of that map recently.

Let me know your thoughts below.

July 12, 2022 Tom 1 Comment

GODCo Bio-Lab

In the mountains, about five hours west of Navin’s Mill on Pale, the Greater Overall Development Corporation (GODCo) has a a semi-secret bio-lab. Everyone knows it there, or at least that it exists, if not its exact location, what is not known is exactly what type of research is done there.

And the truth isn’t all that exciting. As the Frontier’s preeminent terraforming company, GODCo has research labs all over the Frontier looking at adapting species, both flora and fauna, to the environments of the worlds inhabited by the Frontier races. And adapting the local flora and fauna for use by the Frontier races as well. This particular lab on Pale was looking at ways to better adapt some of the yaririan food crops to better live and thrive in Pale’s cooler climate with its yellower sun.

The secrecy around the bio-lab is institutional, not necessarily due to the work being done there. GODCo is always very secretive about its work as a way to avoid competition. Especially here on the Streel Corporation’s homeworld.

Location

Click for full-sized image

The lab is located in the mountains west of Navin’s Mill on Pale. Access is by paved roads and then a rough ground track (for the last 100 km). The total travel time from Navin’s Mill is about about five hours. While it’s possible to land an aircar at the facility, this form of access is rarely used.

The lab is built underground in the side of a mountain. Only a small structure is visible on the surface. This was done partially to take advantage of a geothermal power source discovered there, partially to make it easier to regulate the temperature in the labs, and partially to help maintain the secrecy of the lab by not having everything out in the open. The lab has been in operation for over 20 years.

Lab Staff

As part of GODCo’s veil of secrecy, all of the staff currently working at the lab live on-site. The non-science staff rotate in and out regularly while the scientists typically stay longer for the duration of there experimental work. The lab’s staff consists of:

  • Lab admin and assistant admin
  • 20 scientists
  • 8 security personnel
  • 2 power technicians
  • 2 roboticists
  • 2 computer technicians
  • 4 general technicians
  • 4 hospitality staff (cooks, recreation, etc)

In addition to the 44 staff members, there are 8 security, 12 maintenance, and 4 service robots at the facility.

Floor Plans

The lab itself consists of four levels. Except for the ground level, which is the only visible level on the surface, all of the levels are built into caverns that have been carved out of the mountain. The following sections give details on each level.

The various room descriptions are intentionally left fairly generic. Feel free to embellish or modify them to suit your game and campaign. Unless otherwise specified, all doors in the complex have level 1 locks that open to the staff ID badges.

Each of these maps are produce at 140 DPI, two squares to the inch with a scale of 1 meter per square. They should be able to be imported directly into your virtual table top of choice is you so desire.

Ground level

The only part of the complex visible on the surface, this level consists of the outer fence, a garage and storage facility, a security office, barracks for some of the security personnel, and an elevator and stairwell descending to the below-ground levels.

The contour lines on the following maps represent 1 meter elevation gains.

Exterior View

Exterior view. Click for full image. There is an unlabeled version as well.

This is the exterior view of the facility. The labeled items are:

  1. Access Road – This two meter wide access road is a gravel and pressed dirt road winding up the mountain.
  2. Wall and Gate – The wall surrounding the compound is 3 meters tall. The gate stands a little taller at 4 meters and can be opened (inward) to allow vehicular access.
  3. Garage – This garage is big enough to hold a ground truck for unloading when supplies are delivered (typically monthly). The roof here is 5 meters tall instead of the 4 meters of the rest of the building (the light gray area).
  4. Roof Access – This is a taller portion of the roof (total height 6 meters) that provides access to the roof from the stairwell below.
  5. Doors – Other than the garage, this is the only access into the building.
  6. Elevator Roof and Heavy Laser Mount – This is the roof of the elevator shaft. It extends an additional 4 meters above the lower roof and has a ladder to allow access. On top of this part of the building is a heavy laser that is connected to the complex’s power supply and computer.

Interior View

Interior view. Click for full sized version. There is also an unlabeled version.

This is the inside of the ground level of the complex. The labeled rooms and areas are described below:

  1. Access Road – as described above
  2. Wall and Gate – as described above
  3. Garage – Large enough for a ground transport, there are some tools and a parabattery recharging station here.
  4. Storage – This room is used as storage to unload arrive ground transport and hold supplies for which there isn’t room in the main underground facility. There will be a variety of lab and medical supplies, as well as food and housekeeping supplies in this room at any given time
  5. Hallway – This is the main hall of this level.
  6. Barracks – These are double bunk room for the four security personnel currently working on this level.
  7. Stairwell – This is long helical stairwell that descends to the lower levels of the complex. The stairs also extend up to the roof access (#4 in the exterior view). There are small landings every 10 meters of decent going down. Primarily used only in emergencies.
  8. Security Office – This is the security office for this level with a computer terminal as well as video feeds from external and internal cameras. This room has a level 2 lock.
  9. Elevator – This large elevator is the main mode of travel between the various levels of the complex. It is capable of holding up to 16 beings at once or carrying large freight or pieces of equipment. It travels 10 meters every 6 seconds.

Level 1 – Housing and Recreation

This level is located 20 meters below the surface. It extends deep into the mountain and houses all the housing, recreation, and office space of the facility along with things like the computer, tech shop, medical bays, and life support system.

Level 1. Click for full sized version. There is also a version without labels
  1. Elevator – This large elevator connects the various levels. It travels 10 meters every 6 seconds.
  2. Stairs – This is the stairwell that connects the levels of the complex.
  3. Security Office – This is the main security office for the entire complex. It has video feeds from security cameras on all levels of the complex as well as a computer terminal. This room has a level 2 lock.
  4. Administrator’s Office – This office is plushly decorated and has a small conference table and chairs in addition to the working desk. The desk contains reports of the work from the various labs as well as other administrative reports. This office has a level 3 lock.
  5. Tech/Robotics Shop – This is workshop for working on the complex’s computers, robots, and other mechanical items. It is well stocked and has high quality equipment. Any tech skill to work on machines, robots, or computers gains a +10% bonus when performed here.
  6. Storage – This room contains supplies and equipment for use in the repair shop.
  7. Main Computer – This room houses the main computer for the complex. There is an admin terminal here in the room. The room has a level 4 lock.
  8. Life Support Systems – This room houses the machinery that runs the life support system for this level and level 3. It contains water and air filtration and circulation systems.
  9. Garden – This room is filled with solar spectrum lamps and contains both hydroponic gardens growing food for the complex as well as just a relaxation garden with grass, flowers, and small shrubs.
  10. Offices – These rooms are offices for some of the higher ranked scientists. Each is decorated (and cluttered) according to the whims of the owner.
  11. Medical Bay Entrance – This small hallway provides access to the various rooms in the medical bay
  12. Operating Room – This room is a full surgical room. Any surgery skills performed here get a +10% bonus.
  13. Medical Office – This is the main office of the complex’s medical officer when they are not working down in the lab level.
  14. Exam Room – Typical doctor’s office exam room
  15. Sick Rooms – These two rooms are used to isolate sick members of the staff while they recover or away transport back to Navin’s Mill or Point True.
  16. Medical Storage – This room contains all the supplies needed by the medic for the exam room, sick rooms, and operating rooms. It contains the equivalent of 10 medkits plus any other supplies needed.
  17. Dining/Common Room – This room contains tables and chairs as well as a few couches and recliners There is a bay door/counter area between here and area 18 that can be opened for serving food in addition to the regular doors connecting the two areas.
  18. Kitchen – This is where all the food preparation is done
  19. Pantry – This is where most of the food for the complex is store. Part the room is a walk in freezer.
  20. Library – This room houses a collection of books as well as a computer terminal with access to the complex’s information storage program.
  21. Conference room – This room contains several tables and chairs. It also has a video screen for calls outside the facility as needed.
  22. Theater – This room is a large theater/lecture hall where the staff can watch movies or listen to presentations. Used for staff meetings and relaxation, the entire off-duty staff can fit in this room at once.
  23. Gym – This room contains a variety of mats and equipment for recreation.
  24. Sauna – This is a large sauna for use by the staff. Controls are in the wall by the door.
  25. Steam Room – Popular with the dralasite staff, this steam room allows for the addition of scents and other substances to be added to the steam system. Controls are by the door.
  26. Weight Room – This room contains a number of weights, weight machines and other exercise equipment for use by the staff.
  27. Restrooms/showers – Located throughout the facility, each of these rooms contains showers and lavatory facilities usable by the Frontier races.
  28. Cave/Running Track – Outside of the actual building, the residents have access to a running track that runs the perimeter of the cavern that the complex in built into. the floor has been smoothed and a track laid down but the walls and ceiling are still rough-hewn stone, although obviously cut and not natural. There is lighting along the entire length of the track.
  29. Living Quarters – These rooms are the living quarters for all of the staff. Each contains a bed, sofa, table and chairs. While the layout of each room is basically the same, each is decorated according to the taste of the tenant.
  30. Robot Storage – This is where the robots that work on this level and the ground level in the facility are kept when they are not working. It contains small bays for each robot that contain the recharging stations.
  31. Assistant Administrator Apartment – This is a luxury apartment for the assistant admin. It has it’s own private bathroom. This room has a level 2 lock.
  32. Administrator’s Apartment – This very luxurious apartment belongs to the administrator of the facility. It has it’s own private bath as part of the suite. This room has a level 3 lock.

Level 2 – Labs

This level houses the labs where the actual work of the facility is done. It is located an additional 50 meters below level 1. There are a total of ten labs on the level. The entire lab area is accessed through a series of decontamination chambers and then each lab is accessed through a separate airlock.

Level 2. Click for full sized version. There is also a version without labels.
  1. Elevator – This is the location of the elevator on this level.
  2. Stairs – This is the location of the stairwell on this level.
  3. Restrooms – These are the restrooms for this level.
  4. Conference Room – A large conference room for this level so that those working don’t need to go up the upper level for meetings or as a second room if the first one is in use.
  5. Life Support Systems – This room houses the life support systems and air filtration systems for this level. There are 11 systems here. Ten are independent systems that handle the cleaning and filtering of the air for each of the 10 labs. The other system handles all the other rooms.
  6. Cleaning room – This room contains large fans and scrubbers to remove most loose dirt and other contaminants from those entering the lab area. The floor is covered with sticky tiles that pull dirt off the bottom of shoes as you walk through the room. The inner door will not open until a full cleaning cycle has been completed.
  7. Changing Room – This room is where those going into the lab change into their lab suits and other gear.
  8. Clean Room Suit Storage – These rooms contain the clean room suits, lab coats, and other gear to be worn in the labs.
  9. Decontamination Room – This room does a final cleaning of any one or anything entering the lab area to remove any final contaminates. The inner door will not open until a full cleaning cycle has occured.
  10. Storage – This room contains lab supplies and other equipment that has passed through the decontamination process for use in the various labs.
  11. Robot Storage – These rooms are the storage area and charging stations for the robots that work on this level.
  12. Lab Entrance – These rooms are mini airlocks that provide the final security lock to prevent material from traveling into or out of the labs. These rooms have transparent walls so that you can see those inside. These doors have level 5 locks and can only be opened by those scientists working in the specific lab.
  13. Labs – Each lab is set up to work on an individual experiment. The walls facing the hall (area 14) are glass so that you can see into each lab area.
  14. Lab Hall – This hallway is inside the clean area and allows access to each of the labs and to the robot storage areas.
  15. Outer Hall – This hallway is outside the clean area and allows access to the elevator, stairs, life support systems, and conference room.

Level 3 – Power Generation

This level only houses the power generator. It is an additional 150 meters below the lab level. It’s quite a hike if you have to use the stairs.

Level 3. Click for full sized version. There is also a version without labels.
  1. Elevator – The location of the elevator on this level
  2. Stairs – The stair access on this level
  3. Outer Hall – Hallway connecting elevator and stairs with the robot storage area (#4) and the airlock into the generator area (#5).
  4. Robot Storage – This is the storage and charging area for robots working on this level.
  5. Airlock – Separates the power system from the access area to prevent anything crossing the boundary into the main facility. The locks on this door are level 4 and only open to the power techs.
  6. Inner Hall – Hallway connecting the airlock to the power generator
  7. Parabattery Bank – This room is full of racks of Type IV parabatteries. This is the backup power system for the facility that kicks in when there is not enough power being generated by the main generator or it is off-line for service. These parabatteries are charged when the generator is running.
  8. Control Room – A manual control room that allows for monitoring of the power generator in room 9 and the use of power throughout the facility.
  9. Power Generator. This is a Type III generator that is hooked in to a geothermal vent discovered in mountain. This rooms houses all the machinery, pumps, and transformers needed to power the facility.

Using The Lab In Game

That’s the basic write-up for the facility. I’ve left it fairly adaptable so that you can have whatever research you want going on. In my game, I had them working on yazirian food crops and a small yazirian pet, but you can have it be as innocent or sinister as you want GODCo to be in your campaign. And of course, you don’t have to leave this facility on Pale, you could move (or clone) it anywhere you need this type of facility on your game.

Next week I’ll do the write-up of how I actually used this lab for my Skills For Hire game. This is the “normal” operation. It was anything but normal when the players arrived.

How do you like the lab? What did I forget to include or what would make it a better location? Let me know in the comments below.

October 13, 2020 Tom 1 Comment

Maps and Counters

It has been a crazy week and I’ve not had any time to sit down and work on anything new. That should change starting today (although I have the next Frontier Explorer next looming over me still). But that doesn’t help for today’s post.

As such, I thought I’d round up all the Star Frontiers maps and counter scans that I have and make them available at one central location (namely this post). Some of these were up before and I took off-line a couple of years ago when WotC had us put the Frontier Explorer on hiatus. Others are ones I’ve done for myself or others over the years. Many of these are linked from various places around the but I’ve never really made a centralized directory.

Counters

Let’s start with the counters. I have scans of both the Alpha Dawn Counters and the Knight Hawks counters at a number of different resolutions. You can download the ones you want to use. Most of these are saved as .PNG files which is a lossless compression format, as opposed to JPEG which is lossy. That means that the files are going to be fairly large, especially at the higher resolutions, and that you get all the detail from the original counters.

AD Counters

I’ve never really scanned in the AD counters. I found a good scan of them years ago and have always just used those. One of these days I’ll get around to making my own scans from like-new, unpunched counter sheet that I have. But until then, this one is quite good.

  • An older scan (by someone else) stored in JPG format (400 DPI – 2.7MB)

KH Counters

  • Full Sheet – 100 DPI (1.3 MB)
  • Full Sheet – 200 DPI (5.4 MB)
  • Full Sheet – 300 DPI (16 MB)
  • Full Sheet – 400 DPI (23 MB)
  • Full Sheet – 600 DPI (46 MB)

I’ve also made a zip file (1.1 MB) with all of the KH counters (and a few of the AD ones) cut out at 100 DPI that you can download. Additionally, you can get the individual counters from that zip file (and a link to the file as well) on this page.

Maps

That’s all the counters. Over the years I’ve done a number of maps as well. Some of them are already linked and shared here on this blog. Others, mostly recreations of the original maps from the game, I’ve posted in various locations around the web as I’ve created them.

Scans

First, let’s look at a couple of scanned maps. Namely the cover maps of SF0: Crash on Volturnus that give the deck plans of the Serena Dawn and the surface map of Volturnus. I have both of these as either PNG (full resolution) or JPG (smaller size).

  • Serena Dawn – full – PNG (3.8 MB)
  • Serena Dawn – full – JPG (492 kB)
  • Volturnus – full – PNG (3.9 MB)
  • Volturnus – full – JPG (607 kB)

I have scans of the Port Loren map from the Alpha Dawn rules and the station map from the Knight Hawks rules but I’ve also created remastered versions of those which are much better. We’ll look at those below.

I also have a scan of the Frontier Deployment Map which is the outside cover of the SFKH1: Warriors of White Light module and is used in the Second Sathar War strategic game from the Knight Hawks Campaign Book. This one is just saved as a JPG.

  • Frontier Deployment Map – JPG (360 kB) – Roughly 100 DPI

Finally, I have the two halves of the Zebulon’s Guide to Frontier Space map of the Frontier. I never actually stitched these two together. These are stored as BMP (bit map) files, another lossless compression algorithm. I don’t think I did the original scans and don’t remember where I got them from.

  • Zeb’s Guide map – left half (5.5 MB)
  • Zeb’s Guide map – right half (5.5 MB)

Remastered

Let’s look at my remastered maps. These are maps that I’ve recreated as original digital creations. Most of these maps were created as scalable vector graphics (SVG) files and then exported as PNGs at 100 DPI which was more than enough resolution for what was drawn. I can always re-export them at any resolution I want.

Let’s start with the big maps. These are all 50 pixels to the square and two squares to the inch. These are faithful recreations of the original maps matching colors, fonts, shapes, etc. as close as I could get them.

  • Port Loren map – (990 kB) – This is the big poster map from Alpha Dawn
  • Station map – (1.68 MB) – This is the big station complex on the back of the space map from the Knight Hawks set.
  • Station Commercial – no cut (1.7MB) – This is the left half of the station map including the bit of the zoo area cut off by the diagonal zig-zag.
  • Station Residential – no cut (175 kB) – This is the right half of the station map including the bit cut off by the diagonal zig-zag.
  • Port Loren Starport map (539 kB) – I created this remastered version to match the same colors and styling as the original Port Loren map, but the design of the map was done by someone else, whose name I can no longer find. If anyone knows the original creator, let me know.

Those are the main maps on the two posters. I’ve also done some of the smaller maps from the posters as well

  • Town map – (16 kB) – this was used for “Slave City One” from the module SF1: Volturnus, Planet of Mystery. I actually recreated it for an adventure we published in issue 1 of the Frontier Explorer.
  • Assault Scout Deck Plans – green (26 kB) – This is from the Knight Hawks poster map and is a remastered version of the original assault scout deck
  • Assault Scout Deck Plans – blue (29 kB) – The same as above but blue.
  • Knight Hawks battle map – black on white (40 kB) – A computer generated hex grid matching the KH battle map, including hex numbers. This one is black lines on a white background
  • Knight Hawks battle map – white on black (40 kB) – Same as above but with the colors inverted.

Finally, I have a set of maps that were created by Tom Verreault. One is a remastered version of the mountain terrain map from the back of the big AD poster map. The others are an expanded area that connect the first one and then a big map of all four together as a single file.

  • Mountain A map (31 kB)
  • Mountain B map (39 kB)
  • Mountain C map (45 kB) – this is the original from the AD map
  • Mountain D map (32 kB)
  • Full map (81 kB) – The four maps above combined

Final Thoughts

I hope you can find these useful. I probably have a few more that I’m not finding at the moment. If I do find others, I’ll update this post or make another one. I do have a number of other image and logos I’ve created over the years. I considered adding them here but decided they really deserve their own post so look for those in the future.

Some day I plan on remastering all the terrain maps from the back of the AD map but I’ve just never gotten around to it.

September 22, 2020 Tom 4 Comments

Brekstoone Manor

In my post on Myha’s Beach back in June, I had this little snippet:

Front view of the manor (click for larger image)

The city’s growth northward was effectively halted in FY18 with the construction of Brekstoone Manor. The manor is simply referred to as Observatory Manor by the locals, due to the large observatory dome on the manor’s north tower. The Brekstoone family secured a large tract of land that ran from the sea several kilometers inland on which they built the manor. With no more room northward to grow, the town continued to grow southward.

This post is going to detail out that Manor.

I’ve had the maps done for a while, but I was waiting for the most recent adventure of my Skills for Hire game to finish as the Manor was where they had to go find the young lady they were rescuing. I didn’t want to give away the details of the manor to my players so it had to wait until the adventure was complete. They successfully rescued the prisoner and managed to do so without killing anyone. (Although that was a close thing as the humma in the group didn’t have a non-lethal weapon and almost blew someone’s chest out with his laser rifle. But now the adventure is done and I can post the details of the manor.

History

As mentioned above, the manor was built in FY18 by the Brekstoone family north of Myha’s beach. Their land included both beach-front property as well as some forested property back away from the beach.

Manor Grounds. The black lines are 5m high walls around the property, grey is road, and yellow is a footpath. This was drawn with Inkarta which doesn’t have good sci-fi tokens in it’s free version.
Back view of the Manor (click for larger image)

In FY 41, the Brekstoone family decided to move their operations off of Pale to New Pale and sold the manor to a local businessman, a yazirian by the name of Gornar Welnat who you might remember from my post about the Tristars organization. He runs his commercial (both legal and illegal) enterprises from the offices in the Manor.

While Gornar has upgraded some of the features in the manor, most of it still retains the original systems and structures from its construction. The telescope dome still houses an operating 1 meter telescope that Gornar lets the local schools use for projects and star parties.

Floor Plans

Including the observatory dome, the manor has five levels above ground and a full basement. Each level (with the exception of the dome which is a little larger) is 4 meters high. Ceilings in the manor are just over 3m high with nearly a meter of space between the levels for ductwork, piping. and other infrastructure.

We’ll look at each of the levels in turn from the basement up. In these descriptions, I’ll be presenting the manor as I used it in my game. Feel free to adjust it as needed for your game.

All of the maps are 1 meter per square and 70 pixels per square for use in VTTs. At the end of the post will be a zip file with both labeled and unlabeled versions of the maps. Also, all the maps are on the same grid so that they overlay each other to show relative positions between layers.

Basement

This level contains exercise and workout rooms, a small theater, a food storage area, and the robot storage area where they go to recharge when not working.

Ground Level

This is the main level of the Manor. Most of the space is taken up by a large open main hall that is also used as the dining room. The main doors are to the front of the house and there is a salon for discussions on this level. The bottom levels of the towers are used for storage of tables, chairs, and other furniture for the main hall. There is also a kitchen and pantry on this level. Stairs by the front door (behind a door) go down the basement, and a pair of stairwells on either side of the main hall ascend to the 1st floor.

1st Floor

This is the main working level of the manor. The center of this level is open to the level below with a small balcony running around the main hall. This is also where one accesses the outdoor balconies in both the front and back of the house.

This level also houses the manor’s library, several offices, and a small tech/robotics shop and the manor’s computer system. There are stairs going up to the 2nd floor along the back of the house.

2nd Floor

This is the level with most of the bedrooms. Each room has its own small bathroom with a shower and toilet. Additionally, the room in the observatory tower is a small study. The center back of this level is the beginning of the master suite; on this level is a sitting room.

The room in the left tower is a sitting room and bathroom for a small bedroom suite that takes up the top two levels of that tower. There is no stair access to the 3rd floor in the public areas of this level but there is a spiral staircase in the master suite that goes up.

3rd Floor

There are three offices on this level that are accessible by the right (north) elevator. This is also how one accesses the observatory control room which is also on this level. On the top level of the left (south) tower is the bedroom for the small tower suite reached via a small staircase within the suite. The rest of the master suite is also on this level with a private study above the sitting room, and then a master bedroom and master bathroom only accessible from within the suite. Finally, there is a small secret passage connecting the Master Study to the public hallway on this level and the elevator. In both the Master Study and the Hallway, these doors are concealed as part of the wall.

Observatory Level

The only thing on this level is the observatory dome itself and the telescope. This room (and level) is accessed by a stairwell in the observatory control room on the floor below.

Things I Left Out

I realized after I made these maps and was creating this post, that I left a couple of things off.

One is a garage. That was actually intentional. The garage is a detached building (to the right and a bit behind as you look at the front of the Manor) that can house three vehicles. It has three garage style doors and one regular access door.

The other bit I realized that I forgot was a mechanical room for the buildings water heaters, furnaces, air conditioners, and other systems. I left room between the floors for the duct work but forgot a room for the equipment. The other was a laundry room. However, that oversight is fairly easy to fix. All that is needed is to convert the food storage room in the basement into two or three different rooms. One for the mechanical equipment, one for the laundry, and if a bit of storage is desired, reserving some of the space for that as well. You could also covert the weight room, sauna, or robot room on this level if you wanted to exclude those from the manor.

Details, Details, Details

I’ve left the exact details of the individual rooms unspecified to allow those using the manor to add the details that they want based on how the manor fits into their world. I also didn’t specify things like security systems, locks, alarms, etc. Again to allow flexibility in use. Feel free to fill in those details as they best fit in your particular game.

I’ll be posting a write-up of the adventure I used this manor in, probably next week. In that post I’ll give the details I used for my game, which was geared toward early level characters.

Wrapping Up

That’s it for the Brekstoone Manor. Here’s a zip file with all the maps and the front and back view of the manor: ObservatoryManorMaps.zip. (It’s about 650 kB).

What do you think about the manor? What other features did I forget to include? I’m always trying to build better maps and can use suggestions. Share your thoughts in the comments below.

August 11, 2020 Tom 1 Comment

Myha’s Beach

I had originally planned to do a post on the HSS History’s Hope this week but I’m not quite ready for that. Instead, I’m giving you the outlines of a small town on Pale, Myha’s Beach. While I developed this as part of my Star Frontiers campaign, you could easily drop this town on to any world in any game.

Location

In my game, Myha’s Beach is located about 300-400km east of Point True on the sea coast. Here’s a map of the region around Point True.

regional map of area around Point True

I can’t seem to find where I recorded it, but I believe each of those grid boxes are either 300 or 350 km on a side.

History

Myha’s Beach started as a small fishing village founded shortly after the sathar were driven out of the Frontier.  The village was built about five kilometers south of the crater left from the sathar’s destruction of a former costal city.

Not long after the basic city infrastructure was in place, the small town became a favorite beach destination for vacationers wanting to get away from Point True.  The waters are warm and clear as the spur of land to the north keeps the cooler arctic waters from flowing into the bay.  The city has embraced this role and now tourism employs a major portion of the city’s workforce.

About a decade after the city was founded, Streel decided to get into the shipbuilding industry and brokered a deal with the city to open a shipyard some 10 kilometers to the south of the city proper.  This caused the city’s population to grow once again as the shipyard workers moved to Myha’ Beach and more services grew up to support the new citizens.

City Layout

Click for full sized version

Myha’s Beach is a long narrow city that sprawls out along the seacoast.  The original village lies toward the northern end of the current town.  The original marina is still in use.  As the tpwn began to grow, it was originally small, 4-10 room hotels that were built both north and south of the original village, with almost everything built with access to the beach.  This region of small hotels and private residences comprises the northern 3-4 kilometers of the town, centered on the now historic original village center and marina.

With the construction of the Streel shipyards to the south of the town, the town’s growth began to shift more in that direction with new residential and commercial districts being built southward with the residences on the beach and the commercial districts more inland.  While growth continued to the north, it slowed considerably.  At this same time, several large resort-style hotels were built on large swaths of the beach south of the existing city.

Front view of Observatory Manor

The city’s growth northward was effectively halted in FY18 with the construction of Brekstoone Manor.  The manor is simply referred to as Observatory Manor by the locals, due to the large observatory dome on the manor’s north tower.  The Brekstoone family secured a large tract of land that ran from the sea several kilometers inland on which they built the manor.  With no more room northward to grow, the town continued to grow southward.

The 3-4 kilometers around the initial resort hotels was zoned for more of the same while the area between these large hotels and the Streel shipyards was reserved for the smaller hotels and residences.  As this area filled in the city began to grow inland from the seashore with more commercial and residential areas to support the growing resident and tourist population.

In FY36 a small spaceport was built about 30 kilometers inland from the town to reduce the noise and air traffic impact on the town.  This allows offworld visitors to come straight to Myha’s Beach instead of having to go to Point True first. 

Current Population

The current resident population of Myha’s Beach is about 20,000.  It is about 55% human, 20% yazirian, 15% vrusk, 9% dralasite and the remaining 1% made up of Rim and other races.  In addition to the residents, the city supports between 20 to 40 thousand visitors, depending on the time of year.

About 5% of the resident population work at the Streel shipyards.  Another 10% work in the town’s still thriving fishing industry supplying fresh seafood to both the local residents and tourists but also to Point True.  A quarter of the resident population works directly in the tourist industry running shops, hotels, equipment rentals, and as guides both to the ocean and the inland areas.  The remaining population works all of the support industries including city services, maintenance, restaurants, and stores that keep the city running.

Your thoughts?

That’s the city of Myha’s Beach. What other details would you like to see in a city write-up like this? Do you have any suggestions for other things that should be included or discussed? Let me know in the comments below.

June 23, 2020 Tom 2 Comments

Star Map Generator – GUI Edition

So I sat down last week with the intention of working on a new spaceship model but I just wasn’t feeling it. On the other hand, I’ve been doing a fair amount of coding at work and was in the programming mindset. I’ve been thinking about getting back to working on my Second Sathar War (SSW) game but wasn’t quite up to tackling that yet. So I decided to dust off the Star Map Generator that I’d been working on (and used to create the Extended Frontier Map) and add a graphical user interface (GUI) to it in order to make it a little more user friendly for non-programmers.

Since the code is written in Python, and I’m already familiar with the wxWidgets GUI framework from my work on the SSW game, it made sense for me to use the wxPython framework, which is just wxWidgets for Python. Since I’m seriously considering converting the SSW program over to Python, this would give me a bit of practice.

RPG Blog Carnival Logo

Also, this post is going to be my entry for the RPG Blog Carnival this month. The exact topic is “To Boldly Go” hosted by Codex Anathema and is on the topic of exploring the planes and other worlds. It’s couched in terms of Spelljamers and from a fantasy perspective (common with the blog carnival) but I thought, if you’re going to be exploring new worlds, you need a map. So I’m tossing this tool out there for people to use in making their maps.

Building the Basic GUI

The first step was to just implement a basic interface over top of the existing code. The main goal here was to allow the user to specify the various map parameters that up until now, I’ve had to write into the code whenever I wanted to run the program. I’ve never implemented a way to pass those parameters in when it starts. That ability is actually issues number 3 (Add command line parameters) and number 4 (add configuration file option) on my list of open issues. This interface doesn’t solve those issues, but it does provide a workaround.

Building an interface that just accepts some input and stores the values is pretty straightforward and in just a short time (after getting my development environment all set up), I had the basic interface.

It didn’t do anything yet, but could accept the input of all the parameters you need to set to generate a map. Let’s talk briefly about each of those parameters.

  • Map width – This is just the horizontal size of the map. If you’ve seen any of the maps I’ve made with the program, it’s just the number of boxes wide the map will be. The units are light years (this will be important shortly).
  • Map height – The vertical height of the map, again in light years
  • Map thickness – This is the z dimension of the map or how thick of a slice of space you are looking at, again in light years. This is the total dimension just like the width and height. The program will split that into a maximum positive and negative value for use in system generation.
  • Stellar density – This is a measure of the number of stars that should be placed on the map. The units are star systems per cubic light year, which is why the number is so small. The default value (0.004) is roughly the stellar density around the Sun. If you want your map to a parsec (3.26 ly) per square instead of light years, and keep the same approximate density, you’d use a value of 0.138 (a factor of almost 35). That will be a very crowded map.
  • Text scale – As I’m writing this I realized this is mislabeled. While the setting here does affect the text size that is printed on the map, it also affects the size of the stellar symbols printed as well. The default is 1 and that is what I used on the Yazira Sector map. However, I used a scale of 1.5 on the Extended Frontier Map.
  • Output map filename – This is the name of the output map image file. It will be an SVG file and should have .svg as its extension.
  • Output data filename – This is the output file that contains all the coordinates, names, and spectral types of the stars generated as well as the list of jump routes generated. It’s just a text file and you can call it anything you want. I typically use the same same as the map file but with a .dat extension so I can keep track of them together.
  • Input data filename – This field is left blank for a randomly generated map. If you specify a name here, the program will try to load that file and use it to generate the map. The file should be the same format as the output data file. This allows you to randomly generate a map, then tweak the data file and have the program redraw the map with your modifications. This is how I made both the Yazira Sector map and the Extended Frontier Map. If the file specified doesn’t exist, the program will probably crash. Or at least not do anything.
  • Print Z coordinate – This just tells the program whether is should print the z-coordinate (distance above or below the plane of the map) on the map itself. You can see what that looks like on the Yazira Sector Map. I had it turned off for the Extended Frontier Map.

I initially implemented those boxes as simple text boxes but realized that the first five really needed to read in values so I changed them in the code. I should probably change the Input data filename field to be an Open File dialog so that it guarantees that the file is actually there. I’ll need to add that to the open issues.

Finally I added the code to properly process the buttons. Clicking “Generate Map” will do exactly that and write the files to disk in the same directory where the program is located. Clicking “Reset Values” will change all the input values back to the defaults if you’ve made changes.

Making the Program Distributable

By adding the GUI to the program, you need even more setup to run it. Before, you just needed a Python installation as it was pretty vanilla code, but you still needed to install Python. Now, in addition to Python, you need to have installed the wxPython distribution as well. Since I wanted to make this easily usable by non-programmers, I wanted it to just look like another program you that click on and run. So I started looking for ways to package it up for distribution.

It turns out there is a great little Python program called pyInstaller. It takes your program and bundles it up with all the code and files it needs to run and puts it into either a single program file (.exe file) or a folder with all the bits you need and an .exe file to launch it. You can then just distribute it as a zip file, users can unpack the zip file, and run your program.

I tried it out and sure enough, it just worked. You could click on the .exe file and the program would run. Here’s that version of the program. Just download the zip file, extract it somewhere, and run the StarMapGen.exe file.

StarMapGen-initialGUI.zip (12.3MB)

It works fine, but everything is done behind the scenes and the files are created on disk in the directory where you launched the program.

Adding in the Map

The next step was to add in a map display. I mean, what good is having a graphical interface if you don’t get to see the map?

This is where I ran into the first snag. It turns out that the current release version of wxPython (4.0.7) doesn’t have the ability to read in an SVG file and display it. It can write one if you’ve created your image from it’s primitives, but in my case, I’m writing the SVG directly and just want a display. Luckily, the current development version of the package (4.1.0a) does have that capability.

Normally I try to stick with the released versions of packages, but after looking around, all the other options for displaying SVG files required more packages to to be added to the dependency list and in the end, used the same backend that I would have to install for wxWidgets. So I bit the bullet and upgraded to the head of the development channel. Since pyInstaller grabs everything you need and packages it up, I wasn’t too concerned.

So I wired everything up so that when you click that “Generate Map” button, in addition to creating the map and writing the files, it would then load up the file in to the panel on the right hand side of the GUI. Unfortunately, it ended up looking like this:

Initial map display in the program

Notice anything missing? It’s supposed to look like this:

Full map render in Inkscape

All of the stars and text were missing. Not very satisfying.

Fixing the Stars

For the stars, the SVG code uses a series of radial gradients to create the limb darkening and glow effects and maybe the default renderer just couldn’t handle those yet. After all, it was the development version of the software.

So I started digging. Since the default renderer wasn’t working, I looked for alternatives. The package gives a couple of other options for renderers, the best one being based on the Cairo package. This is the same package that I saw being recommended for rendering when I was searching around earlier. I didn’t really want to pull in another dependency but after trying everything else and failing, I added that in. Unfortunately, that didn’t work either.

However, after some testing, I was able to run the wxPython demos and found that it could render radial gradients. A lot of the sample images had them and the images were created by Inkscape, which I had based my code off of. So it had to be an issue in the code I was writing for the image.

After much experimenting with simple images and trying to render them, I finally discovered that the old Inkscape code I based the SVG data on just wasn’t up to snuff. I originally wrote that code in 2015 and things had moved on. Luckily, it didn’t take much to fix it, I just had to add two additional parameters to the gradient specification to get it to work (cx="0" cy="0" if you’re wondering).

When I next ran the program, the stars appeared!

Render with fixed gradient code. Notice I’m reading in the old data file so I get the same map. Also this renderer makes the grid lines finer so they don’t show up as easily in the small screen capture. They are there though.

Fixing the Text

Next up was to figure out why the text wasn’t rendering.

In the SVG file I’m writing, the labels are all rendered as <text> elements. You’d think that would just work but it wasn’t. After the experience with the gradients, the first thing I checked was my implementation. I went into the new Inkscape and exported a simple SVG with just a few characters. That wouldn’t render.

Next I tried some other on-line SVG code generators to create some <text> elements. Those wouldn’t render either.

I then went looking at the sample SVG files from the demos. In every case, it seems that the text in those files were not stored as <text> elements but rather had been converted from text to paths. In other words, they were no longer text but rather drawings.

It appears that the renderers don’t handle the <text> element. This is a bit of an issue because I want to be able to edit the text as needed. Mostly I’m just moving it around, but sometimes I want to be able to change it as well. And once it’s a path instead of text, you can’t edit the characters. Plus I eventually want to allow the user to specify the fonts used on the map (That’s even an open issue, number 5). I like the defaults I’m using but users should have options.

I could have the program write the paths for the text, it would just require hard coding in the paths for the various characters. Currently there are just 23 characters used across two fonts but I don’t really want to do that as that makes it harder to use different fonts or add in additional characters.

In the end, I decided to pass on this issue for now and revisit it at a later date. The full file written out by the program has the text in it, you just don’t see it in the preview at the moment. When I revisit this, I have several options from just building a library of character paths, writing code to do the conversion from text to paths, or even writing code for wxWidgets to do the text rendering natively. There is also the option to use the native wxWidgets primitives to generate the map and then using its ability to write SVG files to make the map file. All will probably be explored.

After taking a pass on generating text, I did make a banner image for the program to load that rendered the text as a path so you could see it. This now what you see when you load the program.

Program start up screen

Adjusting the Display

The last thing I wanted to tackle in this version was resizing the display. You may have noticed that all the maps I’ve shown so far have been square. But you don’t necessarily want a square map. Otherwise, why allow specification of both a height and a width?

By default you get the display shown in the pictures above. However, I wanted the user to be able to enlarge or reshape the window and have the map expand (or shrink) to fill as much of the space available as possible. This required playing a bit with the layout engine in wxWidgets.

If you notice, in the very first image, the region on the right has a little border around it with the “Map” label. I had intended to keep that border but the layout element that makes it will only resize in one direction and I couldn’t come up with a way to make it stretch in both. It may be possible but I wasn’t finding it and it wasn’t that important. In the end I went with a different element that did stretch the way I wanted, I just lost the border. Which really isn’t that big of a deal.

Now when you generate a map it will scale the map to fit in the available space and then you can resize the window and it will expand or shrink as needed to keep the whole map visible. Here are some examples.

First just a new square map. It fits just fine since the map area was already square.

Next, let’s make the map 30 light years wide. When we hit the “Generate Map” button, we get a view like this:

It’s all there, but has been shrunk down to fit in the space provided. But now we can grab the side of the window and stretch it out a bit to make everything fit.

Packaging Woes

At that point, I was going to package it up as a distributable program and add it to the blog post so you could grab it and play with it. Unfortunately, the addition of the extra dependencies for some reason caused pyInstaller to fail and not make a proper program that I could share. I think it’s just not finding the Cairo rendering library. It has tools to handle that, but I haven’t had time to sit down and figure it out. I finished this last night and am writing this post just an hour before it gets published. Look for an update later this week with the program once I figure it out.

UPDATE:

I got the packaging working. You can grab the version of the program that does the proper rendering of the stars from this link:

StarMapGen-v0.2.0.zip (MB)

Just download it, extract the contents of the folder, and run the StarMapGen.exe file.

Getting the Code

That said, if you’re comfortable installing Python and the dependencies, you can get the code from my StarMapGen GitHub repository. This version of the program is sitting on the master branch. You’ll need to also install the cairocffi Python package and follow the instructions on this page to get the development version of wxPython. Once you’ve done that, the StarMapGen.py script is the main file for the GUI version of the program. makeMap.py is still the command line main program.

What’s Next?

There are a lot of things still left to do and work on. Already identified is the issue of the text rendering in the preview and some of the existing open issues.

A bug that I noticed with the GUI is that if you specify a data file to load, if it’s not square, it doesn’t get scaled properly in the display when rendered and loaded. That will probably be the first issue I track down.

Other improvements include adding a parameter to allow you to turn on and off generation of the jump routes and if you are making them, another parameter that specifies the maximum distance that the program will use to connect systems (currently set to 15 light years).

I also want to add some features to the GUI to include instructions, the ability to save parameter sets, and specify a random seed for map reproducibility.

Finally, I need to do some refactoring of the code to clean it up and document it better.

I’ll be working on this more in the coming weeks so expect to see updates in the future. If you’d like to help out with the code, feel free to clone the repository, make changes and submit a pull request.

What do you think of the program as it now stands? Are there features you’d like to see? Let me know your thoughts in the comments below.

April 21, 2020 Tom 11 Comments

HSS History’s Hope and the Yazira Sector Map

HSS History’s Hope

As part of my Detailed Frontier Timeline, one of the threads I’ve introduced is the voyage of the Histran Starship (HSS) History’s Hope, registered out of Histran in the Scree Fron system. The goal of this voyage is to attempt to reach a star system that recent astronomical observations believe to be Yazira, the original homeworld of the yazirian species.

In my Yazirian History and Legends and Lore – Yazirians posts last month, I pointed out that most modern yazirians don’t know the location of their native world having fled some 150 years earlier to escape an astronomical disaster. Early in the Detailed Frontier Timeline I introduced the astronomical discovery of a system that matches the description of the yazirian homeworld, complete with a nearby brown dwarf. It is this system the HSS History’s Hope is trying to reach.

Of course there are some complications. First, the system is over 100 light years, in a straight line, from Scree Fron. Jumping from star to star, it’s even further. And all of those jumps are uncharted so each one carries the risk of a misjump and the crew getting lost along the way. They’ve had several misjumps in the timeline already and they aren’t even halfway there. In fact, they’ve just barely left the area covered by my Extended Frontier Map. This is additionally complicated by the fact that the ship is heading into the Vast Expanse, a region of space where the stars are further apart and thus the jumps are longer and more difficult to chart.

The second complication for their voyage is that the Family of One doesn’t really want them going out there and finding Yazira. And are willing to take measure to ensure that they won’t return. They have already been set upon by unknown assailants but managed to escape and continue their journey. They can expect more of the same in the days to come.

At some point I’ll probably do a write-up and timeline of the whole endeavor as a single post instead of having it spread out through the full timeline project for those that want to see how the mission played out and more of the background related to it’s organization and funding. If that is something you’d be interested in, let me know.

The Yazira Sector

As part of this project, I needed to place the yazirian homeworld. I chose to put it way off to the left of the Frontier, well beyond the area covered by the Extended Frontier Map (EFM). Since I didn’t have any maps of this area I had to create one.

For this map, instead of doing a large area, I chose to do a small, long strip. Enough to allow for multiple possible paths through the area, but not too big. I the end, I made it 90 light years wide (the same width as the EFM), and 20 light years tall (1/5 the EFM). However, I added in a new wrinkle. Unlike the EFM, which has all the stars in a single plane, I added a third dimension to this map making it 24 light years thick. So instead of all the stars being in the same plane, they have a z-coordinate as well.

This is a feature that was already part of my star map generation program that I had turned off for the EFM. I talked a bit about this in my post on the Rael Core Sector map. The image to the right shows how this is represented on the map with the z-coordinate represented by the small number to the lower right of the stellar symbols. Those three systems look close to one another but are widely separate in actual space. RS069 and RS073 are actually 5.1 light years apart, RS069 and RS064 are 9.1 light years apart, and RS064 and RS073 are the closest to each other, separated by only 4.6 light years even though they appear to be the furthest apart on the map.

Additionally, the Yazira sector is part of the Vast Expanse, an area of low stellar density, i.e. not a lot of stars. So in addition to turning on the z-component of the position, I also dialed down the density parameter in the program by a factor of almost 3. So we now have 1/3 the number of stars spread over about 4 times the volume of space. This means that in this region, there are going to be fewer stars than in a comparable area on the EFM. It doesn’t look that sparse to the eye because of the projection on the the 2D plane of the map, but crunching the numbers (and assuming a thickness of 5 ly for the EFM even though they are all on a single plane) you get a density on the EFM of 1 system per 159 cubic light years and in the Yaziria Sector of 1 system per 645 cubic light years. A factor of almost exactly 4. If I strictly held the EFM to a thickness of one, it would be a factor of 20.

So what does this region look like? Well, here’s the map. You’re going to have to click on it to see the details. In fact, I recommend right clicking, downloading it, and opening it up in another window where you can zoom and pan around.

94x20 ly map of the Yazira Sector containing 67 star systems

The EFM is to the right of this map. OFS222 is shown on the far right (the blue star about 1/3 of the way from the top) so you can connect it up with the EFM if you want. (This map is actually 94 light years wide. I added on the extra 4 light years so that OFS222 would be on the map, showing the overlap). OFS215 should be on this map as well, but I forgot to add it in when making this draft version of the map. I’ll be sure it gets on there for the next iteration when the HSS History’s Hope gets a bit farther along on its voyage.

The first thing we notice, even without looking at the map at full resolution, is that there aren’t a lot of bright stars here. We see a few, but mostly we see small red dwarfs (M stars). There are a few blue stars and a few giants. This is why the yazirians had to go all the way to the Frontier sector to find a suitable planet. There just weren’t any around.

Also there aren’t any nebula. That’s intentional, this area of space is actually devoid of them. That is a part of it being more empty that the Frontier sector. I won’t be adding any in on the final version of the map once it is done (other than the one between OFS222 and OFS215).

Zooming in you can see that most of the star systems are unlabeled. The only ones I have labeled so far are those that the HSS History’s Hope have visited and the one they believe to be Yazira. Others will get named as they travel through the sector and the final map will be presented in a future update.

The system that the crew of the HSS History’s Hope believes to be Yazira (spoiler, it is) is located at the far left of the map above the legend. This system is represented as a K4 star with a brown dwarf companion. The brown dwarf that disrupted the planetary system is still very close the star, less than a light year away, so it is represented as a single system on the map.

Looking at the right side of the map, you can see the jump routes plotted by the HSS History’s Hope as of today (March 24, 2020) as posted in the timeline posts on Twitter. A new feature on this map that wasn’t on the EFM is the one-way jump, represented as a dashed line with an arrowhead on it. The arrow points in the direction that the jump can be considered “charted.” The jump from YS01 to YS02 is the most recent jump made; they are still slowing down to make the return jump. They had a misjump that took them to YS03 (so no charted jump there) and while trying to jump back to YS01, misjumped again and ended up in YS04 (again no charted jump between those two systems). They did successfully chart the jump from YS04 back to YS01 but did not try to go the other direction, hence that connection is only one way.

Right now the HSS History’s Hope is in the YS02 system slowing down and preparing to chart the jump back to YS01. They are somewhat hesitant about that as the ship that attacked them is probably still in that system and they may have another fight on their hands. We’ll see how it goes as the timeline unfolds.

Going Forward

The HSS History’s Hope still has a long way to go. From YS02 to Yazira is still another 80 light years in a straight line. It’s taken them over half a year to cover the 29 light years they’ve traveled so far. And their path forward is far from straight with lots of long difficult jumps ahead. Who knows what waits for them along the way.

If you want a fun exercise, you might try finding a path forward to Yazira and see how difficult the journey will be. Remember that the chance to plot a new route is 50% + 10% x astrogator’s skill level – 5% x jump distance in light years. They have a level 6 astrogator, plus deluxe astrogation equipment (which in my house rules gives a +10% bonus to astrogation checks). This means their base chance of success is 120% – 5% x distance. With a roll of 96-00 always being failure.

If the jump fails, they end up somewhere other than where they planned and then have to try to figure out where they are (30%+10% x level chance and takes 2d10 x 10 hours per attempt). Each jump takes 9 days (180 hours) unless it’s over 9 light years long. Then it takes a number of days equal to the number of light years. How long did it take you to get to Yazira?

What do you think about this sector map? Are there things you like to see added? Clarified? Share your thoughts in the comment section below.

March 24, 2020 Tom 2 Comments

Extended Frontier Map Star Systems

This posts provides a table of all the systems on the Extended Frontier Map and provides the spectral types of the stars that were used to generate the images on the map. The named systems are listed first, in alphabetical order, followed by the FS designated systems and finally the OFS designated systems. The two latter sets are ordered by number

For the Frontier Sector systems (UPF & Rim), the spectral types were take from the following sources listed in decreasing order of importance. If a source higher up on the list conflicted with a source lower down, the higher sources was used.

  • Star Frontiers Expanded Rules book – this didn’t give exact spectral types but they could be inferred from the colors given.
  • Published modules – for most of the systems that were detailed in the modules, a spectral type was given although some just provided colors like the Expanded Rules book
  • Zebulon’s Guide to the Frontier: Volume 1 – This source provided spectral types for all the systems although some conflicted with the information from above.

With the exception of the neutron stars, all other spectral types were randomly generated and drawn from a realistic distribution of spectral types. The neutron stars were placed either where they appeared in the Expanded Rules or Zeb’s Guide maps or were specifically placed by me.

In addition to the spectral types, the table gives some notes and references for the various systems indicating features of the system and/or the source where the name/spectral type came from.

I realized after the fact that I never went through the Dragon and other “offical” magazine articles to find any systems listed there. I knew there was an Ebony Eyes system with a pair of binary black holes but I never put it on the map. Looking at that article, the FS38 system is almost in the position listed for Ebony Eyes so I put a note about that in the table below.

A quick perusal of all the other articles didn’t reveal any other star systems not already included so it turns out it wasn’t too much of an oversight. So with that, there’s the full table. At the end of the page is a link to a PDF of the table as well that you can download.

System Name Spectral Types Notes

Named Systems

Araks  G4  
Athor  K2  
Belnafar  A0 SFAD5: Bugs in the System
Capella  G6  
Cassidine  G8  
Cryxia  K5  
Dayzer  G4 FE004 – The Saurian Sector
Devco  F9  
Dixon’s Star  G0  
Dramune  K1  
Fochrik  F9  
Fromeltar  G5  
Gamma Hydrus  K6 FE016 – Phri’sk Anyone? Detailing the S’sessu Homeworlds
Gruna Garu  G8  
Imdali  G7 FE016 – Phri’sk Anyone? Detailing the S’sessu Homeworlds
K’aken-Kar  K8  
Kashra’sk  G4 FE016 – Phri’sk Anyone? Detailing the S’sessu Homeworlds
Kazak  G1  
Kizk-Kar  G2  
Klaeok  G8  
K’tsa-Kar  K0  
Liberty  G1 FS30, Sathar Starship Construction Center #2 – SFKH4: The War Machine
Lynchpin  NS  
Madderly’s Star  G3  
Mechan  K7  
Minan  K1 FE016 – Phri’sk Anyone? Detailing the S’sessu Homeworlds
New Streel  G2  
Osak  G4  
Padda  BD, M1 SFKH2: Mutiny on the Elanor Moraes
PanGal  G8  
Precipice  K4 FE004 – The Saurian Sector
Prenglar  F9  
Rhianna  G6 SF4: Mission to Alcazzar
Sauria  G8 Saurian home system – FE004 – The Saurian Sector
Scree Fron  K7  
Sessar  F1 FE004 – The Saurian Sector
Solar Major  F3  
Solar Minor  F8  
S’seuden  F9 S’sessu home system – FE016 – Phri’sk Anyone? Detailing the S’sessu Homeworlds
Sundown  K9 SF3: Sundown on Starmist
Theseus  G1  
Timeon  G5  
Tischen  G6 FE004 – The Saurian Sector
Tristkar  K0 SFAD6: Dark Side of the Moon
Truane’s Star  G7  
Waller Nexus  G0 SFKH2: Mutiny on the Elanor Moraes
White Light  K1  
Zebulon  G2  

Frontier Sector Systems

FS08  M6  
FS13  BD  
FS15  BD  
FS16  M2, M4  
FS18  A4, M0III  
FS19  G8, M1  
FS21  M1, M2  
FS22  BD  
FS26  K4, M9  
FS28  M7  
FS29  NS  
FS35  M2  
FS37  M3, K1  
FS38  M0, M3 This is in the approximate location given for the Ebony Eyes system (it should be down one and right two squares) so you could replace the two stars with black holes.
FS41  M2, M4  
FS42  M8  
FS43  BD  
FS44  K2, M3  
FS50  BD, M7  
FS53  NS  
FS56  M9, M4  
FS57  M3  

Outer Frontier Sector Systems

OFS001  M9, BD  
OFS002  M3, M3  
OFS003  M6, M0  
OFS004  M8  
OFS006  M9  
OFS007  M6  
OFS008  M4  
OFS009  M4  
OFS010  M9, M7  
OFS011  BD, M2, M9  
OFS012  M5  
OFS013  BD, BD  
OFS014  A6, G1  
OFS015  M4, M7  
OFS016  M3  
OFS017  BD, BD  
OFS018  M7  
OFS019  M1 Sathar Starship Construction Center #5
OFS020  F0, M4  
OFS021  M0  
OFS022  M1, M4  
OFS023  M9, M9  
OFS024  M4  
OFS025  M7  
OFS026  M4, M3  
OFS027  M6, K7, M2  
OFS028  M1  
OFS029  M4  
OFS030  M4, K3, BD  
OFS031  M6  
OFS032  M5, K6  
OFS033  K8, M7, M5  
OFS034  K2, M5, WD  
OFS035  M3  
OFS036  M2, M3, M1  
OFS037  M7  
OFS038  BD  
OFS039  WD  
OFS040  M3  
OFS041  M4, M8  
OFS042  M8  
OFS043  M0, M9  
OFS044  G8  
OFS045  M4, K4  
OFS046  M4, G2  
OFS047  M7, M7  
OFS048  M3  
OFS049  WD  
OFS050  BD, BD  
OFS051  F1  
OFS052  M6, M2  
OFS053  BD  
OFS054  M7  
OFS055  K9  
OFS056  BD  
OFS057  M1, BD  
OFS058  M8, M2  
OFS059  WD  
OFS060  M6  
OFS061  M7  
OFS062  M8  
OFS063  M4  
OFS064  M2 Sathar Starship Construction Center #9
OFS065  M6, M8  
OFS066  M1  
OFS067  K3, M7, M2  
OFS068  M0, M5, M0, BD, M7  
OFS069  K6, M8  
OFS070  M3 Tetrarch Complex (similar to one on Laco, Dixon’s Star)
OFS071  M3  
OFS072  M1  
OFS073  M4, K8  
OFS074  WD, M1, M4, M4  
OFS075  M8  
OFS076  M1, M9  
OFS077  M6, M4  
OFS078  M4  
OFS079  BD, M9  
OFS080  WD, M0  
OFS081  M9  
OFS082  M6, M4  
OFS083  K5  
OFS084  BD  
OFS085  M6, M8  
OFS086  M9, M7  
OFS087  M7, M6  
OFS088  K3, M8  
OFS089  M7, M3  
OFS090  M0  
OFS091  BD  
OFS092  K5  
OFS093  BD  
OFS094  BD  
OFS095  M8  
OFS096  M8, M3  
OFS097  M6 Sathar Starship Construction Center #8
OFS098  M2  
OFS099  M8  
OFS100  M8, M5, M7  
OFS101  F2 Sathar Starship Construction Center #7
OFS102  M5, K8  
OFS103  BD  
OFS104  M9  
OFS105  M4, M4  
OFS106  M2  
OFS107  M0  
OFS108  M1  
OFS109  K6  
OFS110  M4, M8, BD  
OFS111  BD Sathar Starship Construction Center #4
OFS112  M6, BD  
OFS113  M4, M0  
OFS114  M3  
OFS115  M7, M5  
OFS116  WD  
OFS117  K4 Sathar Homeworld, Sathar Starship Construction Center #6
OFS118  M8  
OFS119  M2, M4, M3  
OFS120  M7, M4  
OFS121  BD  
OFS122  M7, M5, BD  
OFS123  K6  
OFS124  M6, M5  
OFS125  M3, M7  
OFS126  M8, K5, M5  
OFS127  M5, M5  
OFS128  M6, M0  
OFS129  K9, M4  
OFS130  M5  
OFS131  M2  
OFS132  M2  
OFS133  M1, WD  
OFS134  BD, M7, M3  
OFS135  M4  
OFS136  F3  
OFS137  M2  
OFS138  M0 Sathar Starship Construction Center #3
OFS139  M4, M7  
OFS140  WD, M5  
OFS141  WD  
OFS142  M9, K8  
OFS143  M1  
OFS144  M5, M4  
OFS145  M6  
OFS146  BD  
OFS147  M1, M1  
OFS148  M9  
OFS149  M6, M8  
OFS150  G0  
OFS151  M2  
OFS152  K1, M0  
OFS153  G1  
OFS154  K6, M4  
OFS155  M8  
OFS156  M8  
OFS157  M0  
OFS158  M0  
OFS159  M9  
OFS160  F0  
OFS161  M1  
OFS162  G5, G1, M3  
OFS163  K5  
OFS164  M3, M8  
OFS165  M5, M6, M1  
OFS166  NS  
OFS167  G7  
OFS168  M7  
OFS169  BD  
OFS170  BD  
OFS171  M4, K5  
OFS172  M5  
OFS173  K9  
OFS174  M9, WD  
OFS175  M7  
OFS176  M8, K2  
OFS177  M9  
OFS179  M0  
OFS182  M1, K9, M4  
OFS183  M3, M5  
OFS184  BD  
OFS185  K4  
OFS186  M7  
OFS188  M2, M8  
OFS190  M8  
OFS191  F8, BD  
OFS192  NS  
OFS193  M1, M6, M2  
OFS194  BD, M8  
OFS195  M4  
OFS196  M2  
OFS198  WD  
OFS199  M1, M8, M7  
OFS201  M3  
OFS203  BD, M6, M3III, K3 Sathar Starship Construction Center #1
OFS203  NS  
OFS205  WD  
OFS206  M6  
OFS207  M7  
OFS210  M6, BD  
OFS211  M5  
OFS212  G0, M8  
OFS213  M9, BD  
OFS214  NS  
OFS215  K1, K6  
OFS216  M9  
OFS217  M1  
OFS218  M9, M9  
OFS219  M8  
OFS220  M2  
OFS221  NS  
OFS222  B8  
OFS223  M6  
OFS224  M6  
OFS225  WD, M7  
OFS226  BD  
OFS227  M2, M9  
OFS228  M9 Sathar Starship Construction Center #10

Here’s the PDF file to download:

ExtendedFrontierMapDataDownload
October 29, 2019 Tom Leave a comment

Ship Dock – Crew Lounge Area

This is a common dock lounge found on most large (HS 5 or 6) civilian stations around the Frontier.  Located in the station hub, the gravity here is only about 0.1g. Just enough to keep you in your seat but light enough that you have to be careful with your movements.

This lounge area provides a place for crews to get off the ship without going into the station proper, mingle with crews in adjacent berths, and even conduct some semi-private business away from the hustle and bustle of the main station.

Each docking hub can accommodate up to four ships so there could be members of different crews here at any given time but no more than four at once. Depending on the size of the station and its central hub, there could be from 4 to 16 of these areas on any given station.

The Map

Click for the full resolution (50px per square/meter) image.

I’ve had this map kicking around in my sketch book for years. It’s actually part of a one-shot adventure I’ve run and will write up some day. This weekend I decided to give it the full, vector-graphic treatment and turn it into a usable map. I’ve used this location in a couple of different adventures over the years and it’s part of my concept of the design of the stations around the Frontier.

The map above is the labeled version at my standard 100 dpi resolution with each square representing 1 meter. If you want an unlabeled version, or either version at 70 pixels per square which is the default for Roll20’s map system, here are a few more versions of the map. The ones labeled 70ppm (pixels per meter) are the larger versions for VTT systems.

ShipDock-noLabelsDownload
ShipDock-70ppmDownload
ShipDock-noLabels-70ppmDownload

If your particular virtual table top uses a different default resolution, let me know and I’ll add in maps at that resolution as well.

Area Descriptions

Area 1 – Station Passageway

This is the main passageway through the hub of the station. I’ve drawn it here as a 2m wide passage with a small side passage going to the crew lounge. That’s how I originally drew it and described it the first time I used it. When I used it in the “A New Can of Worms” game, the hub corridor was much wider, like the terminal area in modern airports, and the crew lounge area was right up against it with glass walls. The PCs in that game tried several times, unsuccessfully, to get in.

Area 2 – Crew Lounge

This is the crew lounge proper. It has a couple of desks, some tables and chairs and a sofa and a couple of recliners. All in all, it’s a bit over 45 feet long and 20 feet wide.

The desks are fixed in the corners but all the other furniture is movable and can be positioned wherever the crews want. There are sensors that monitor the area in front of the doors and if they are blocked, the lights in the room flash and an alarm sounds until the offending item is moved. Since there is only 0.1g in the area, it’s fairly easy to move even the sofa but everything stays on the floor and doesn’t float around.

The door into the room from the hallway is locked with a level 4 security lock that opens only to beings who have been registered with the station as part of the crew of one of the ships assigned to these berths. The registration is typically done as part of the docking procedure so that the doors are working as soon as they arrive. The door itself is a pressure door and takes 3 turns (18 seconds) to cycle and move through: On the first turn the person wishing to pass through stops at the door and starts the process, on the second, the doors cycles and opens, and on the third, they can move through into the room. The door closes and seals automatically if not held open.

The roof of the room is a series of large windows, allowing those in the room to look up and out into the central hub of the station and see their ship and the other ships docked in the area. The ships attached to passages 4b & 4c are directly above the room while the other two are slightly higher up and off to the left and right.

Area 3 – Access Halls

These short passages provide access to the docking tunnels on either side of the crew lounge area. Like the door into area 2, these pressure doors have a level 4 lock on them that only allows the registered crews of the two ships docked off of the passageway through. Thus the crew of the ship docked in passage 4a could not open the door to 3b.

Area 4 -Docking Tunnels

Each of these passages ends at another pressure door (not shown) that opens into the docking collar connecting one of the ship’s airlocks to the station. For small ships this may be the only airlock and so all crew and passengers come out this way. On larger ships with more than one airlock, this is connected to the crew’s airlock with passengers typically going through a different part of the station. Alternately, for large ships, more than one of these docking tunnels may be connected to different airlocks on the same ship.

The tunnels move away from the lounge area, angling upward as they do, and then turn into a vertical shaft going up to the ship with ladders and hand holds along the walls. Gravity decreases from 0.1g to less than 0.05g by the time you reach any of the ships.

Tunnels 4b and 4c typically connect to smaller ships (up to hull sizes 8 and 6 respectively) although a single large ship could be connected to both of them. The other two tunnels extend farther out into the hub and can accommodate ships up to hull size 10 (4a) and 12 (4d). Even larger ships could take up 4a and 4b or 4c and 4d together or even three or all four of the tunnels (for a HS 20 ship).

The pressure doors to these docking tunnels are keyed only to the crew of the ship docked to that tunnel and use a level 6 security lock.

Some Thoughts on Station Sizes

The 0.1g gravity in this area only really works if you don’t allow very large ships into the station hub. That limitation goes a bit against the Star Frontiers setting as described in the rule books. There it says that a HS 6 station is 1200m in diameter. Assuming 1 g at the rim, that mean you hit 0.1g of gravity at just 60m from the center of the station. So the hub can only be 120m in diameter. The size given for a HS 20 ship is 100m in diameter so it could just squeeze in but would take up all the space. So you either have to limit the size of ships that can come in, or you have to make the hub bigger which means the gravity would be a bit higher in the lounge area probably up to 0.2g. It’s even worse on smaller stations. Because they are smaller, you hit that 0.1g even closer to the center of the station. Just something to keep in mind.

September 10, 2019 Tom 1 Comment

Posts navigation

1 2 … 4 Next →
Become a Patron!

Recent Posts

  • State of the Frontier – January 2024
  • Detailed Frontier Timeline – FY62.069 to FY62.99
  • State of the Frontier – August 2022
  • Battle of Hargut (Gruna Garu) – FY62.098
  • Archived Arcane Game Lore Posts – May 2013 to Dec 2014
  • A Look at Yachts and Privateers
  • Homeworld Bound – A Campaign Concept
  • Second Battle of Fromeltar (Terledrom) – FY62.083
  • Sample Star System Data
  • Detailed Frontier Timeline – FY62.038 to FY62.068

Categories

  • 3D Models
  • Adventures
  • Background
  • Creatures/Races
  • Deck Plans
  • Equipment
  • Game Design
  • General
  • Locations
  • Maps
  • NPCs
  • Optional Rules
  • Patreon-only
  • Project Overviews
  • Reviews
  • Setting Material
  • Starships
  • System Brief
  • Vehicles
  • Writing

Recent Comments

  • Tom on State of the Frontier – January 2024
  • Tom on State of the Frontier – January 2024
  • Tom on Star Map Generator – GUI Edition
  • David on Star Map Generator – GUI Edition
  • DM_Shroud on Star Map Generator – GUI Edition
  • Tom on Fighter Miniatures
  • Rlaybeast on Fighter Miniatures
  • Loguar on Detailed Frontier Timeline – FY62.069 to FY62.99
  • Loguar on Detailed Frontier Timeline – FY62.069 to FY62.99
  • Tom on Detailed Frontier Timeline – FY62.069 to FY62.99

Archives

  • January 2024 (1)
  • September 2022 (1)
  • August 2022 (9)
  • July 2022 (3)
  • June 2022 (3)
  • May 2022 (3)
  • June 2021 (1)
  • April 2021 (1)
  • February 2021 (4)
  • January 2021 (6)
  • December 2020 (5)
  • November 2020 (11)
  • October 2020 (4)
  • September 2020 (5)
  • August 2020 (4)
  • July 2020 (6)
  • June 2020 (5)
  • May 2020 (8)
  • April 2020 (5)
  • March 2020 (5)
  • February 2020 (5)
  • January 2020 (5)
  • December 2019 (7)
  • November 2019 (4)
  • October 2019 (6)
  • September 2019 (5)
  • August 2019 (6)
  • July 2019 (7)
  • June 2019 (5)
  • May 2019 (6)
  • April 2019 (7)
  • March 2019 (4)
  • February 2019 (5)
  • January 2019 (7)
  • December 2018 (5)
  • November 2018 (10)
  • October 2018 (4)
  • September 2018 (4)
  • August 2018 (5)
  • July 2018 (4)
  • June 2018 (4)
  • May 2018 (12)
  • December 2015 (1)
  • November 2015 (2)
  • December 2014 (4)
  • November 2014 (3)
  • June 2014 (1)
  • January 2014 (1)
  • July 2013 (1)
  • June 2013 (2)
  • May 2013 (3)

Meta

  • Log in
  • Entries feed
  • Comments feed
  • WordPress.org

Recent Posts

  • State of the Frontier – January 2024
  • Detailed Frontier Timeline – FY62.069 to FY62.99
  • State of the Frontier – August 2022
  • Battle of Hargut (Gruna Garu) – FY62.098
  • Archived Arcane Game Lore Posts – May 2013 to Dec 2014

Recent Comments

  • Tom on State of the Frontier – January 2024
  • Tom on State of the Frontier – January 2024
  • Tom on Star Map Generator – GUI Edition
  • David on Star Map Generator – GUI Edition
  • DM_Shroud on Star Map Generator – GUI Edition

Archives

  • January 2024 (1)
  • September 2022 (1)
  • August 2022 (9)
  • July 2022 (3)
  • June 2022 (3)
  • May 2022 (3)
  • June 2021 (1)
  • April 2021 (1)
  • February 2021 (4)
  • January 2021 (6)
  • December 2020 (5)
  • November 2020 (11)
  • October 2020 (4)
  • September 2020 (5)
  • August 2020 (4)
  • July 2020 (6)
  • June 2020 (5)
  • May 2020 (8)
  • April 2020 (5)
  • March 2020 (5)
  • February 2020 (5)
  • January 2020 (5)
  • December 2019 (7)
  • November 2019 (4)
  • October 2019 (6)
  • September 2019 (5)
  • August 2019 (6)
  • July 2019 (7)
  • June 2019 (5)
  • May 2019 (6)
  • April 2019 (7)
  • March 2019 (4)
  • February 2019 (5)
  • January 2019 (7)
  • December 2018 (5)
  • November 2018 (10)
  • October 2018 (4)
  • September 2018 (4)
  • August 2018 (5)
  • July 2018 (4)
  • June 2018 (4)
  • May 2018 (12)
  • December 2015 (1)
  • November 2015 (2)
  • December 2014 (4)
  • November 2014 (3)
  • June 2014 (1)
  • January 2014 (1)
  • July 2013 (1)
  • June 2013 (2)
  • May 2013 (3)

Categories

  • 3D Models
  • Adventures
  • Background
  • Creatures/Races
  • Deck Plans
  • Equipment
  • Game Design
  • General
  • Locations
  • Maps
  • NPCs
  • Optional Rules
  • Patreon-only
  • Project Overviews
  • Reviews
  • Setting Material
  • Starships
  • System Brief
  • Vehicles
  • Writing

Meta

  • Log in
  • Entries feed
  • Comments feed
  • WordPress.org
Powered by WordPress | theme Layout Builder