There were some things going on behind the scenes as well. Most notably we were hard at work on Issue 26 of the Frontier Explorer, which was just released late last night. It took longer than I planned. I’m still struggling with the distributed workload. It just takes longer than when I was doing it all myself and I keep forgetting to account for that. Hopefully I’ll get that figured out for the January issue.
I also worked a bit more on my Star Frontiers novel. This was mostly at the beginning of the month before work on the Frontier Explorer and my current miniatures obsession took over. But I still managed to get ~5000 words added. Not as many as I wanted but creating the miniature models ate into the time I had planned to spend on writing.
Looking Forward
I’ll have to admit, I’m having a blast creating the miniatures and I don’t think it’s going to stop anytime soon. Although the rate will definitely slow down. I’m nearly halfway done with the UPF Battleship and will finish that here in the coming month so you can expect a post about that.
As I’ve mentioned in the posts this month, I’m working on filling in the gaps so that there are miniatures for all the ships in the Second Sathar War game. After the battleship, I’ll have recreated all the original UPF and sathar miniatures. With the destroyers and fighters done, the only ships left are the UPF Heavy Cruiser and the UPF and sathar assault carriers. Those builds will be completely from scratch and may take some time. I expect that those will be coming at the rate of one a month for the next little while. They may come faster if I really get bitten by the modeling bug but one a month is the plan.
I want to finish up the module campaign project so I’m going to force myself to write another post in that series this month and then finish it off in December. We’ll also have the regular Detailed Frontier Timeline post. As to the fourth post this month, I’m going to leave that open and not make any predictions or promises. We’ll have to see what project grabs me this time around.
Your Thoughts
What did you think about the overabundance of miniatures this month? Do you want to see more of those? Is there something you’re missing or you’d like to see more of? Is there a project or topic you’d like to see me tackle (or finish)? Let me know in the comments below. And Happy Halloween!
This posts provides a table of all the systems on the Extended Frontier Map and provides the spectral types of the stars that were used to generate the images on the map. The named systems are listed first, in alphabetical order, followed by the FS designated systems and finally the OFS designated systems. The two latter sets are ordered by number
For the Frontier Sector systems (UPF & Rim), the spectral types were take from the following sources listed in decreasing order of importance. If a source higher up on the list conflicted with a source lower down, the higher sources was used.
Star Frontiers Expanded Rules book – this didn’t give exact spectral types but they could be inferred from the colors given.
Published modules – for most of the systems that were detailed in the modules, a spectral type was given although some just provided colors like the Expanded Rules book
Zebulon’s Guide to the Frontier: Volume 1 – This source provided spectral types for all the systems although some conflicted with the information from above.
With the exception of the neutron stars, all other spectral types were randomly generated and drawn from a realistic distribution of spectral types. The neutron stars were placed either where they appeared in the Expanded Rules or Zeb’s Guide maps or were specifically placed by me.
In addition to the spectral types, the table gives some notes and references for the various systems indicating features of the system and/or the source where the name/spectral type came from.
I realized after the fact that I never went through the Dragon and other “offical” magazine articles to find any systems listed there. I knew there was an Ebony Eyes system with a pair of binary black holes but I never put it on the map. Looking at that article, the FS38 system is almost in the position listed for Ebony Eyes so I put a note about that in the table below.
A quick perusal of all the other articles didn’t reveal any other star systems not already included so it turns out it wasn’t too much of an oversight. So with that, there’s the full table. At the end of the page is a link to a PDF of the table as well that you can download.
System
Name
Spectral
Types
Notes
Named Systems
Araks
G4
Athor
K2
Belnafar
A0
SFAD5: Bugs in the System
Capella
G6
Cassidine
G8
Cryxia
K5
Dayzer
G4
FE004 – The Saurian Sector
Devco
F9
Dixon’s Star
G0
Dramune
K1
Fochrik
F9
Fromeltar
G5
Gamma Hydrus
K6
FE016 – Phri’sk Anyone? Detailing the S’sessu Homeworlds
Gruna
Garu
G8
Imdali
G7
FE016 – Phri’sk Anyone? Detailing the S’sessu Homeworlds
K’aken-Kar
K8
Kashra’sk
G4
FE016 – Phri’sk Anyone? Detailing the S’sessu Homeworlds
Kazak
G1
Kizk-Kar
G2
Klaeok
G8
K’tsa-Kar
K0
Liberty
G1
FS30,
Sathar Starship Construction Center #2 – SFKH4: The War Machine
Lynchpin
NS
Madderly’s
Star
G3
Mechan
K7
Minan
K1
FE016
– Phri’sk Anyone? Detailing the S’sessu Homeworlds
New Streel
G2
Osak
G4
Padda
BD, M1
SFKH2: Mutiny on the Elanor Moraes
PanGal
G8
Precipice
K4
FE004 – The Saurian Sector
Prenglar
F9
Rhianna
G6
SF4: Mission to Alcazzar
Sauria
G8
Saurian
home system – FE004 – The Saurian Sector
Scree Fron
K7
Sessar
F1
FE004
– The Saurian Sector
Solar Major
F3
Solar
Minor
F8
S’seuden
F9
S’sessu home system – FE016 – Phri’sk Anyone? Detailing the S’sessu
Homeworlds
Sundown
K9
SF3:
Sundown on Starmist
Theseus
G1
Timeon
G5
Tischen
G6
FE004 – The Saurian Sector
Tristkar
K0
SFAD6:
Dark Side of the Moon
Truane’s Star
G7
Waller
Nexus
G0
SFKH2:
Mutiny on the Elanor Moraes
White Light
K1
Zebulon
G2
Frontier Sector Systems
FS08
M6
FS13
BD
FS15
BD
FS16
M2, M4
FS18
A4, M0III
FS19
G8, M1
FS21
M1, M2
FS22
BD
FS26
K4, M9
FS28
M7
FS29
NS
FS35
M2
FS37
M3, K1
FS38
M0, M3
This is in the approximate location given for the Ebony Eyes system (it
should be down one and right two squares) so you could replace the two stars
with black holes.
FS41
M2, M4
FS42
M8
FS43
BD
FS44
K2, M3
FS50
BD, M7
FS53
NS
FS56
M9, M4
FS57
M3
Outer Frontier
Sector Systems
OFS001
M9, BD
OFS002
M3, M3
OFS003
M6, M0
OFS004
M8
OFS006
M9
OFS007
M6
OFS008
M4
OFS009
M4
OFS010
M9, M7
OFS011
BD, M2, M9
OFS012
M5
OFS013
BD, BD
OFS014
A6, G1
OFS015
M4, M7
OFS016
M3
OFS017
BD, BD
OFS018
M7
OFS019
M1
Sathar
Starship Construction Center #5
OFS020
F0, M4
OFS021
M0
OFS022
M1, M4
OFS023
M9, M9
OFS024
M4
OFS025
M7
OFS026
M4, M3
OFS027
M6, K7, M2
OFS028
M1
OFS029
M4
OFS030
M4, K3, BD
OFS031
M6
OFS032
M5, K6
OFS033
K8, M7, M5
OFS034
K2, M5, WD
OFS035
M3
OFS036
M2, M3, M1
OFS037
M7
OFS038
BD
OFS039
WD
OFS040
M3
OFS041
M4, M8
OFS042
M8
OFS043
M0, M9
OFS044
G8
OFS045
M4, K4
OFS046
M4, G2
OFS047
M7, M7
OFS048
M3
OFS049
WD
OFS050
BD, BD
OFS051
F1
OFS052
M6, M2
OFS053
BD
OFS054
M7
OFS055
K9
OFS056
BD
OFS057
M1, BD
OFS058
M8, M2
OFS059
WD
OFS060
M6
OFS061
M7
OFS062
M8
OFS063
M4
OFS064
M2
Sathar Starship Construction Center #9
OFS065
M6, M8
OFS066
M1
OFS067
K3, M7, M2
OFS068
M0, M5, M0, BD, M7
OFS069
K6, M8
OFS070
M3
Tetrarch Complex (similar to one on Laco, Dixon’s Star)
OFS071
M3
OFS072
M1
OFS073
M4, K8
OFS074
WD, M1, M4, M4
OFS075
M8
OFS076
M1, M9
OFS077
M6, M4
OFS078
M4
OFS079
BD, M9
OFS080
WD, M0
OFS081
M9
OFS082
M6, M4
OFS083
K5
OFS084
BD
OFS085
M6, M8
OFS086
M9, M7
OFS087
M7, M6
OFS088
K3, M8
OFS089
M7, M3
OFS090
M0
OFS091
BD
OFS092
K5
OFS093
BD
OFS094
BD
OFS095
M8
OFS096
M8, M3
OFS097
M6
Sathar
Starship Construction Center #8
OFS098
M2
OFS099
M8
OFS100
M8, M5, M7
OFS101
F2
Sathar
Starship Construction Center #7
OFS102
M5, K8
OFS103
BD
OFS104
M9
OFS105
M4, M4
OFS106
M2
OFS107
M0
OFS108
M1
OFS109
K6
OFS110
M4, M8, BD
OFS111
BD
Sathar
Starship Construction Center #4
OFS112
M6, BD
OFS113
M4, M0
OFS114
M3
OFS115
M7, M5
OFS116
WD
OFS117
K4
Sathar
Homeworld, Sathar Starship Construction Center #6
This post is a couple of days late as I was traveling and completely forgot to get a post queued up for Tuesday. And this is not what I had planned to post at all. I had not planned to do another model post this month. I was planning on putting together a table of all the star systems on the Extended Frontier Map to provide the spectral types of all the stars and notes about they systems. However, on my flight I had some time to kill and wasn’t completely decided on what I wanted to include in the table so I decided to do a bit of modeling. I’ll probably finish up that table for next week.
The UPF Destroyer
Since I didn’t have my battleship mini or calipers with me,
I couldn’t continue working on the battleship model. Instead, I thought I’d
take a look at the UPF destroyer and start working on that. Since there is no existing model for this
ship, this would be a scratch build.
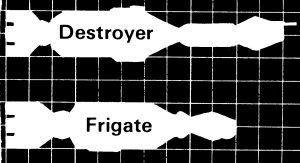
There are two references for this ship.
One in the Knight Hawks Campaign book on page 7 in the image showing the
silhouettes of the various ships and the small game counters.
The silhouette images for both the frigate and destroyer are
shown in the image to the right. As you
can see, the ships are fairly similar.
The destroyer is shown with a shorter engine block area, a longer neck,
and an obvious gun on the bow. The
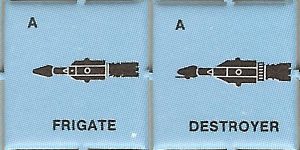
counters for the two ships are shown below.
These images also show a slightly smaller engine area and
noticeable gun on the bow, but here the neck area is about the same and the
main fuselage is longer. Also, the width
of the fuselage is a bit larger on the destroyer. Since there is some detail on the body of the
ships in the counters, you can notice that the main body of the destroyer is
very similar to the body of the frigate, mainly that it has that same cross
structure.
Since it’s always been in the back of my mind to make a set
of models that match the silhouettes in the book in the future, I chose to take
the counter as my guide for this project.
Especially since that meant that I could use a lot of the work done for the frigate on the destroyer.
Building the Model
The frigate is a HS 5 ship while the destroyer is a HS 6
ship so we expect in the end the destroyer will be a little larger. I started by pulling up the model for the
frigate. Since I’m using the original
mini model as the basis, this model, like my recreation models, are not
designed at an exact model scale but at their actual physical size.
Main Fuselage
I’m doing this design work in OpenSCAD which looks and acts very much like a programming language. I give it positions, sizes, and rotations of various primitive shapes and it places them on the model. I then “compile” it to get a render. For example, this is the code that draws the main body of the frigate with its crossed block structure:
Since I wanted that same block structure for the destroyer,
just bigger, I just needed to increase the length and width of the blocks and
shift the positions of some of them to make the body longer. Basically, I just change a few numbers and
re-render. If I wanted to just make it
bigger everywhere, I could wrap all of that in a scale() command and not change
anything. However, I wanted to keep the
core diameter (that first cylinder) the same size so I modified each of the
items. Overall, I increased the length
of this part of the ship by 2.6 mm and its width by 3 mm.
I kept the neck length nearly the same but stretched out the
spherical section of the upper body by 0.3 mm (10%).
I also lengthened slightly the area behind the crossed block
structure. In the counter image, this is
larger on the destroyer than the frigate and has a grilled structure, so I
added in a hull section to match that image.
This also helped to lengthen the entire body of the ship.
The Bow
For the “head” or bow of the ship, I decided to just reuse
wholesale the head of the frigate model.
I figure that since the ships are nearly the same size, the designers
would just reuse an existing design to save on design and fabrication
costs. However, I did make one
change. On the frigate, the main gun
extends out from the center of the head which means that the long lasing cavity
of the laser cannon runs through the center of the bow taking up space inside
the ship.
In both destroyer images from the game, this laser cannon is
very obviously mounted outside the ship and visible on the exterior. So I added an externally mounted cannon on
the model. This gives a bit more room inside the ship’s bow and helps to match
the profile on the counter better.
Engines
According to the rules, both the frigate and the destroyer
are supposed to have three Class B engines.
The original frigate mini just had a single engine mounted directly aft
of the ship. Since I’m building this
model from scratch, I decided to give it the three engines it is supposed to
have.
I started by shortening up the cylinder on the model that
was the actual engine on the frigate model.
I effectively just chopped off the nozzle portion and added a small
taper to the end. On the destroyer, this
is now part of the interior hull space instead of the engine itself.
Next, I created an engine model. It’s roughly the same size as the engine from
the frigate but I gave it my own set of surface details. I added an engine strut and then put three of
them on the model distributed symmetrically around the tail section of the
ship.
Finishing Touches
Finally, I went back and added a bit of surface detail to
the ship. Some of the bits were also
used on the frigate and some I added in just for the destroyer. That gave me the finished model.
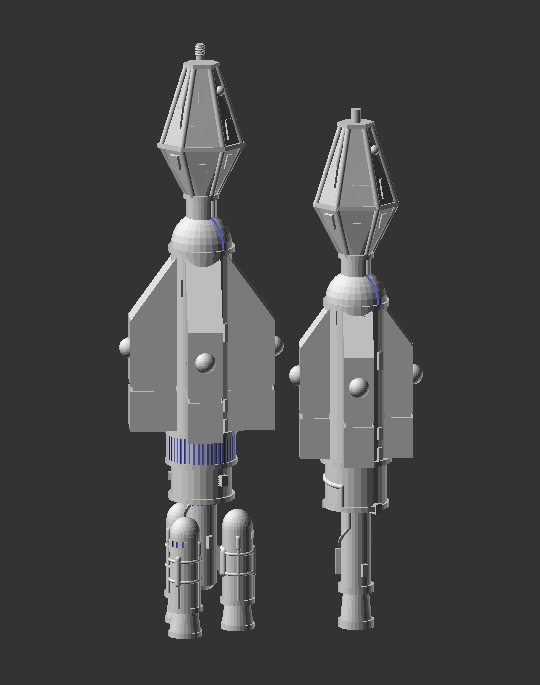
The image on the left shows the destroyer model alongside the frigate model for a size and feature comparison. The image on the right is the other side of the destroyer model so you can see the externally mounted laser cannon a little bit better. You can click on either image for a larger version.
All told, the destroyer is about 58mm long while the frigate
is about 52mm. I realized after the fact
that since the silhouettes on the counters are constrained in size, the actual
physical size of the destroyer might be a bit bigger than I made it but it’s
distinctive enough that I’m not going to worry about it. Also, I feel better about the engine area
being bigger, not smaller, than on the frigate.
When I do my complete custom builds, they’ll all be to the same scale.
Printing
I got home from my trip yesterday and fired up my printer to
try printing the model. It worked out
just fine with no issues. The image
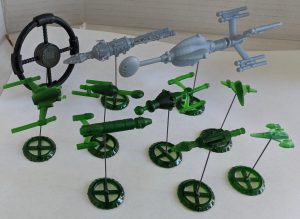
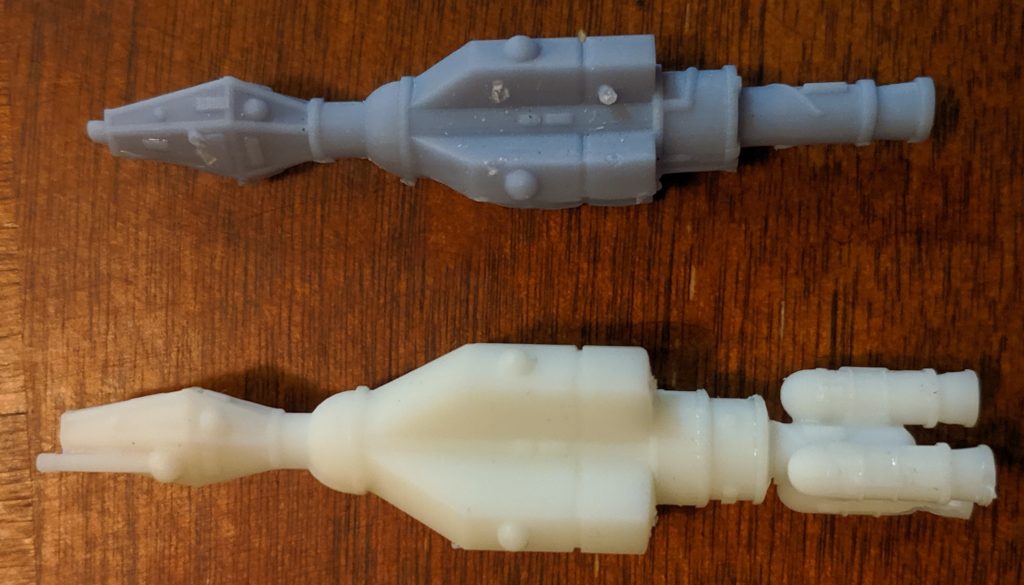
below shows the printed destroyer alongside a printed frigate.
I decided to print the destroyer with the white resin which
unfortunately doesn’t photograph well, so it’s kind of hard to see the details
on it. However, they are all there.
Ship Stands
In discussions about the models on the Star Frontiers
Facebook group, Jess Carver asked me about stands for the ships. I hadn’t really thought about that yet but
figured I’ve give it a go and see what I came up with. I actually did this build a couple weeks ago
before my trip.
Looking at the stands that came with the original minis,
they were just X shaped and designed to fit in a 1” square. And they came with a small, 2” long, 1/32”
diameter steel rod to mount the mini on.
If you’re playing on a 1” hex grid, that original model
stand is going to be a bit big and extend out of the hex the ship is in. This could be a problem if you have a bunch
of ships close together. If you’re
playing off a grid, that’s not so much of a problem but you then need a
protractor to measure turns and such. I
wanted to make a stand that solved both of those problems if possible.
I started by making the stand circular instead of square and
1” in diameter. I asked around a bit
about what size hexes people were using as I have actually never played with
minis, just the original counters from the game. The answers I got back were 1” and 1.5” so I
went with the 1” option. It’s easy
enough to scale the model up to 1.5 inches if someone wants that sized base and
a 1” base fits in a 1.5” hex but not the other way around.
The outer edge of the stand is slanted back toward the
center and I put tick marks all around it at 15-degree intervals. It took a couple of tries to get the sizing
right on these so that they showed up well on the print. The first tries were a little to small. You could see them, but you had to get close
and that defeated the purpose. I made
the 60-degree tick marks larger to help find them better and added a unique
tick mark at one position to represent the “front” of the ship or the direction
of travel. Here’s an image of the model.
You’ll notice that it is just the base. I made the decision to use a steel rod as the
vertical piece instead of printing a vertical bar. Printing it would require it to be a lot
thicker and I didn’t want that. Another
thing that I discovered in printing the bases is that the hole in the middle
that the rod is going to go into just doesn’t print well. It keeps filling up with resin that would
harden while printing. I made the hole
twice as large as the rod and it still didn’t work. In the end I had to just drill out the hole
for the rod. Since I had to drill the
models anyway, this wasn’t a big deal and probably better as the hole would be
exactly the right size. I did have to go
buy a 1/32” drill bit since the smallest one I had at the time was 1/16”.
I was a little concerned about stability, at least when
holding up the larger minis. One inch is
not that big when you compare it to a four- to six-inch miniature. So I gave it
a stress test. I grabbed one of my
sathar heavy cruiser model, the largest one I’ve created at 5.5 inches, and
mounted it on the stand. I used one of
the steel rods from my miniature boxed sets as I didn’t have any others.
It was surprisingly stable.
I gave it a tap and hit it harder than I intended. The mini tilted by 10-15 degrees and then
settled right back down on the base. I
deliberately tilted it in some different directions and it remained
upright. Obviously, you can tip it far
enough that it falls over, but it seems to survive accidental bumping. The plastic minis are much lighter than the
metal ones so I’m sure that helps. And
if you want, you can always use two stands just like you had to do with the
metal minis.
The only other issue was to find a source of steel
rods. I have the ones that came with my
sathar and Federation ships boxed sets, but I am going to need more. So I started looking around on-line. I found some on Amazon that were 1.1mm in
diameter (the ones from the boxed sets are 0.8mm) and 10cm long. I wasn’t worried about length as I can cut
them down to the 50mm size needed with my Dremel. They were reasonably priced (20 for $8) but
were shipping from Asia and would take a couple of weeks to arrive. I kept looking.
I figured a hobby/craft store might have something I could
use, especially if they sell model train supplies. Sure enough, looking at Hobby Lobby’s on-line
store they sold six 12” brass rods at 1/32” diameter for $4. That was an even better price even including
local sales tax. And I could just drive down and get them (about a 20-minute
drive as the Hobby Lobby is a couple towns away up the freeway). It took me a couple days to get over there
but when I did, I found that not only did they have the brass rods I was
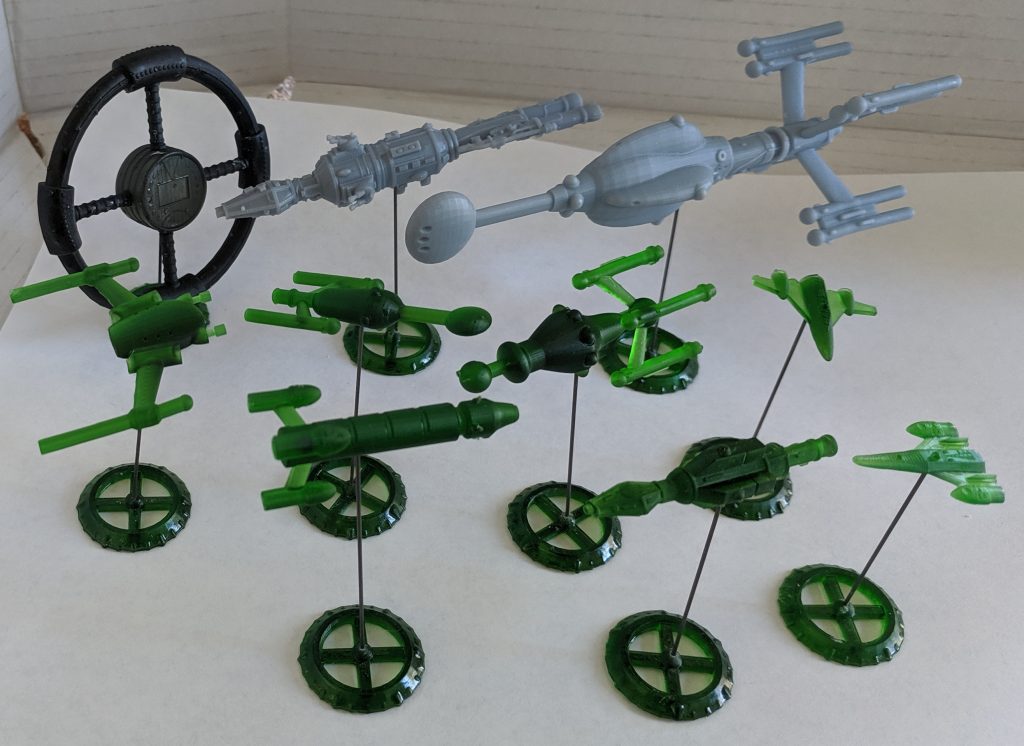
expecting, they sold a four-pack of 12” steel rods for just $2. An even better price. So I bought a pack, went home, chopped up one
with my Dremel, printed up a bunch of stands, and mounted up examples of some
of my models.
I’m starting to get the itch to print out enough of these
and run a big battle on my kitchen table.
Final Thoughts
The build of the destroyer went really fast, at least partially because I was reusing the basic design of the frigate. I completed it in just about four hours. For comparison, the light cruiser model took something between 8-12 hours (I wasn’t really tracking it at the time) and I’ve spent 6 hours on the battleship and probably have another 6-10 to go. Similarly, the stand build was really quick, maybe a half hour as it was a really simple construction and had minimal details.
The recreation models take a long time as I’m constantly
measuring, placing, remeasuring, and tweaking the features of the model to try
to match the original as closely as possible.
With a custom build, I don’t have that constraint and can just build the
model as I wish so it can go faster.
This was a fun build and fills in a gap in the order of
battle for the UPF. Once I finish the
battleship, the only remaining models will be the UPF heavy cruiser and assault
carriers for both the UPF and sathar. Since
the miniature labeled as the sathar cutter on the blister packs matches the
silhouette of the UPF minelayer on the counter, and I’ve already done that
model, that ship can be used as the UPF minelayer if desired. However, that ship definitely looks more like
a sathar vessel so I’ll design a new minelayer for the UPF as well.
I’ve added the destroyer model and the stands to my price list on the Order Miniatures page. Anyone that joins my Patreon as a supporter at the Crafter level will get all the models I’ve done this month (space station, light cruiser, destroyer, and a set of stands) mailed out to them in November.
Let me know your thoughts in the comment section below.
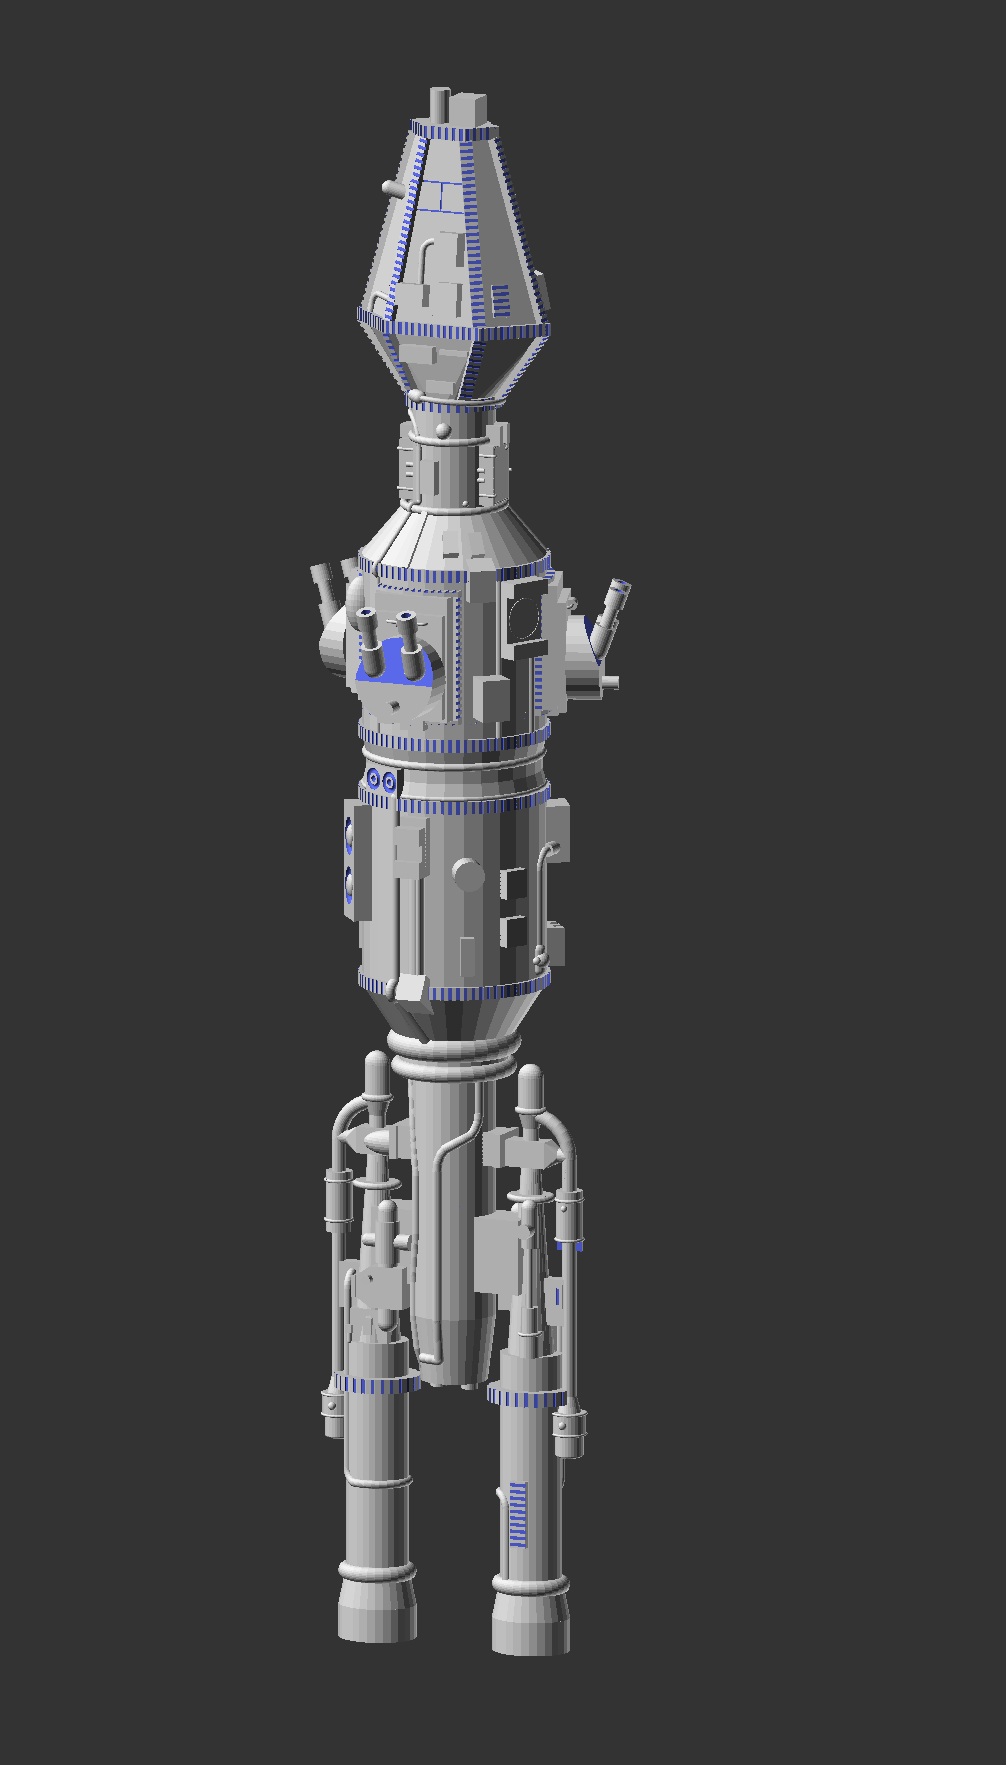
I didn’t think I would have this done by today but in a burst of fevered work, I finished up the light cruiser model so that’s what I’m writing about today. The image to the right shows the final model (click for the full-sized image). Let’s talk a bit about the ship.
First off, I’ve been calling this the light cruiser but on the Federation Ships boxed set of miniatures that the original came in, it is labeled as a Destroyer. However, it’s much too big to be a destroyer so I’ve always considered it a light cruiser, although it could arguably be a heavy cruiser also.
The frigate model is 2.25 inches long. Based on the size given for the frigate in the rules, this makes the model 1/2500th scale. The destroyer is only 30% longer and so at that scale should be about 2.9 inches long. This model is 3.75″ long. As a light cruiser it is a 1/3800th scale model which makes a little more sense to me. The battleship model is at 1/5900th scale so that would put it in between the scales of the frigate and the battleship and similar to the sathar light cruiser model which is at 1/3500th scale.
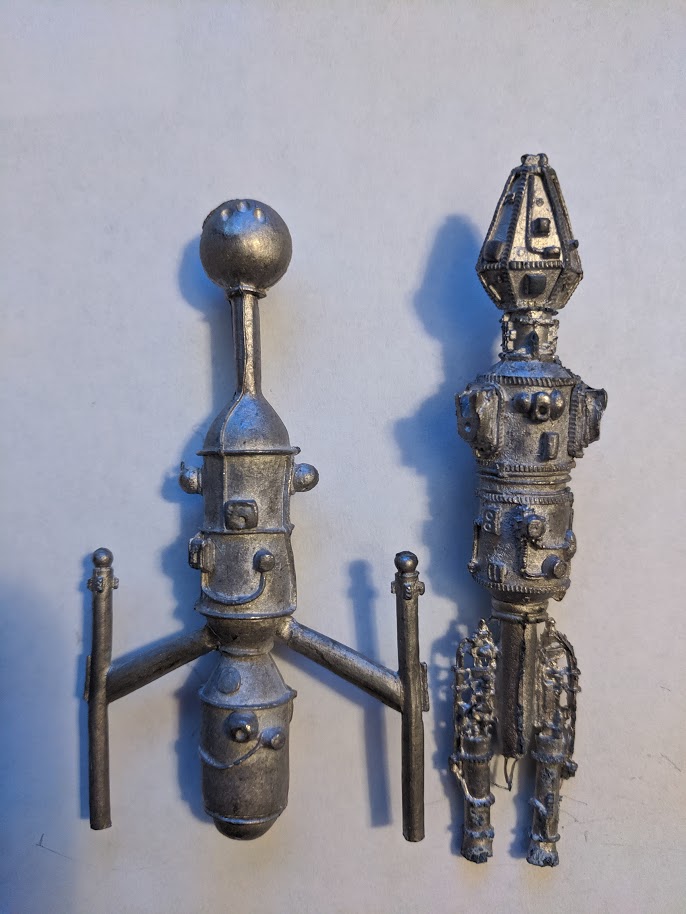
Here’s a picture of the two original miniatures side by side. They are roughly the same size (when I’m comparing them and quoting scales, I’m looking only at the fuselages and not counting the engines) and have basically the same volumes. So you’d expect the ships to be of similar sizes as well. So that’s why I’ve been calling this the light cruiser and not the destroyer despite what the box says.
With that out of the way, let’s look at creating the model.
The Fuselage
The first step was to build the basic fuselage that all the other bits would be attached to. This was fairly straight forward as it was mostly just some cylinders and cones hooked together. The calipers provided the lengths and diameters and that got us from the stern up to the neck just before the bow.
This is where I made my first deviation from the original miniature. On the mini, the bow is a hexagon from back to front so it extends out beyond the neck portion of the ship just a little on the sides. I decided to make if flush there and so used the software to smoothly transition from the circular neck to the hexagon, just like I had done on the frigate model.
At this point, I also added all the ridged trim to the edges of the model. I ended up making my trim a little more finely grooved than in the original miniatures. With that done, I had the basic fuselage and could start adding details.
The Engines
As you can see from the photo above, the engine structure on the UPF ship is much more complicated than the sathar one. That was part of the reason I started with the sathar ships several years ago when I first started making the reproduction models – it was simpler. However, I knew I was going to have to tackle this.
Then I got looking at the engines for the battleship model as well (they are not attached to the model like they are for the light cruiser). On closer inspection, I realized that they were exactly the same! Which meant that once I created a model of the engine, I could use it for the battleship as well.
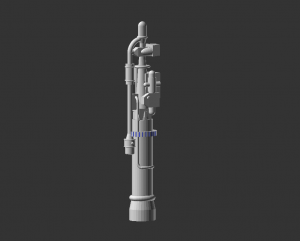
So I busted out my calipers and started measuring. I quickly realized that that wasn’t going to work too well as there were little bits and pieces that I couldn’t reach with my calipers to make measurements. So I also took a series of images of the engines from each side that I could pull up in a graphics program and measure the number of pixels across a given feature was and convert that to millimeters to use in making the model. The result was the model to the right.
If you look closely, it’s a little bit cleaner than that one on the model. That’s because I’ll be 3D printing these and don’t have to pour molten lead into a mold. That allows me to leave of features that on the miniature look like they are there just to get the lead to flow into all the right parts. So it’s not an exact replica, but rather a close match.
The Guns
The next bit was to do the gun turrets. They are all the same and not quite equally spaced around the body. This was another instance of being able to make a single model and reuse it. It was also at this point that I discovered that there are two slightly different versions of the light cruiser miniatures.
Over the years I have acquired four different Federation Ships boxed sets, primarily in an attempt to get one that didn’t suffer from lead rot. It seems that these ships were particularly succeptable to that, primarily the battleship model. I finally ended up with two good sets, one of which had a coat of primer applied. In looking at the light cruiser models from these two sets, I noticed that the gun turrets were different between the two. On of the minis (the painted one) had more details on the turret than the other. I pulled out my other two cruiser minis to check and there was one of each in that pair as well. The difference is minor but I chose to model the more detailed version.
Again, like the engine, there were some features, mainly material supporting the gun turrets, that were there to help the lead flow into the mold that I left off in my model.
Details, Details, Details
With the easy and repeatable parts out of the way, it was time to start adding in the individual details all along the surface of the ship. I simply started at the stern of the ship and worked my way forward using calipers, rulers, and my good, old-fashioned Mark I eyeball (assisted by a magnifying glass) to determine the size and position of each of the features on the model.
The boxes, cylinders, and spheres were easy enough to add in as those are native shapes the modeling software I use produces. The really tricky part was all the piping along the body of the ship. Getting those shapes created and positions was a bit trick but by the time I got to the bow of the ship I was getting pretty good at the process and had built up some tools that simplified it that will help me in models going forward.
And then it was done. I wasn’t keeping exact track of the time but I think I spent something on the order of 10-20 hours producing the model. Now it was time to print.
Printing
If you remember from my review of the AnyCubic Photon printer, the print time is directly related to the height of the object printed. Since this model was small enough that it could lay flat on my print bed, I had two choices, flat or vertical. I was going to print this with the grey, opaque resin because I wanted to get more familiar with that resin and because it makes the details a little easier to see. The opaque resin takes longer to print and cure as you have to spend a little more time on each layer when printing (16 instead of 10 seconds). So printing flat meant a 3 and a quarter hour print while a vertical print meant a 12 hour print. In the interest of testing, I went with the shorter print (I really wanted to see a print that day and not wait all night).
Once the print was done and cured, I started looking it over to see how it compared to the original miniature. The “down” side looked fine, there were some variations but overall it looked fine. Then I turned it over. The “up” side did not look nearly as good and felt almost melted to me. I realized that this was from resin pooling on the upper surfaces and not draining off and then slowly curing during the printing process. I also noticed some warping due to not having enough supports in certain places. It looked like a flat print was not going to work. So I set one up to print overnight in the vertical orientation.
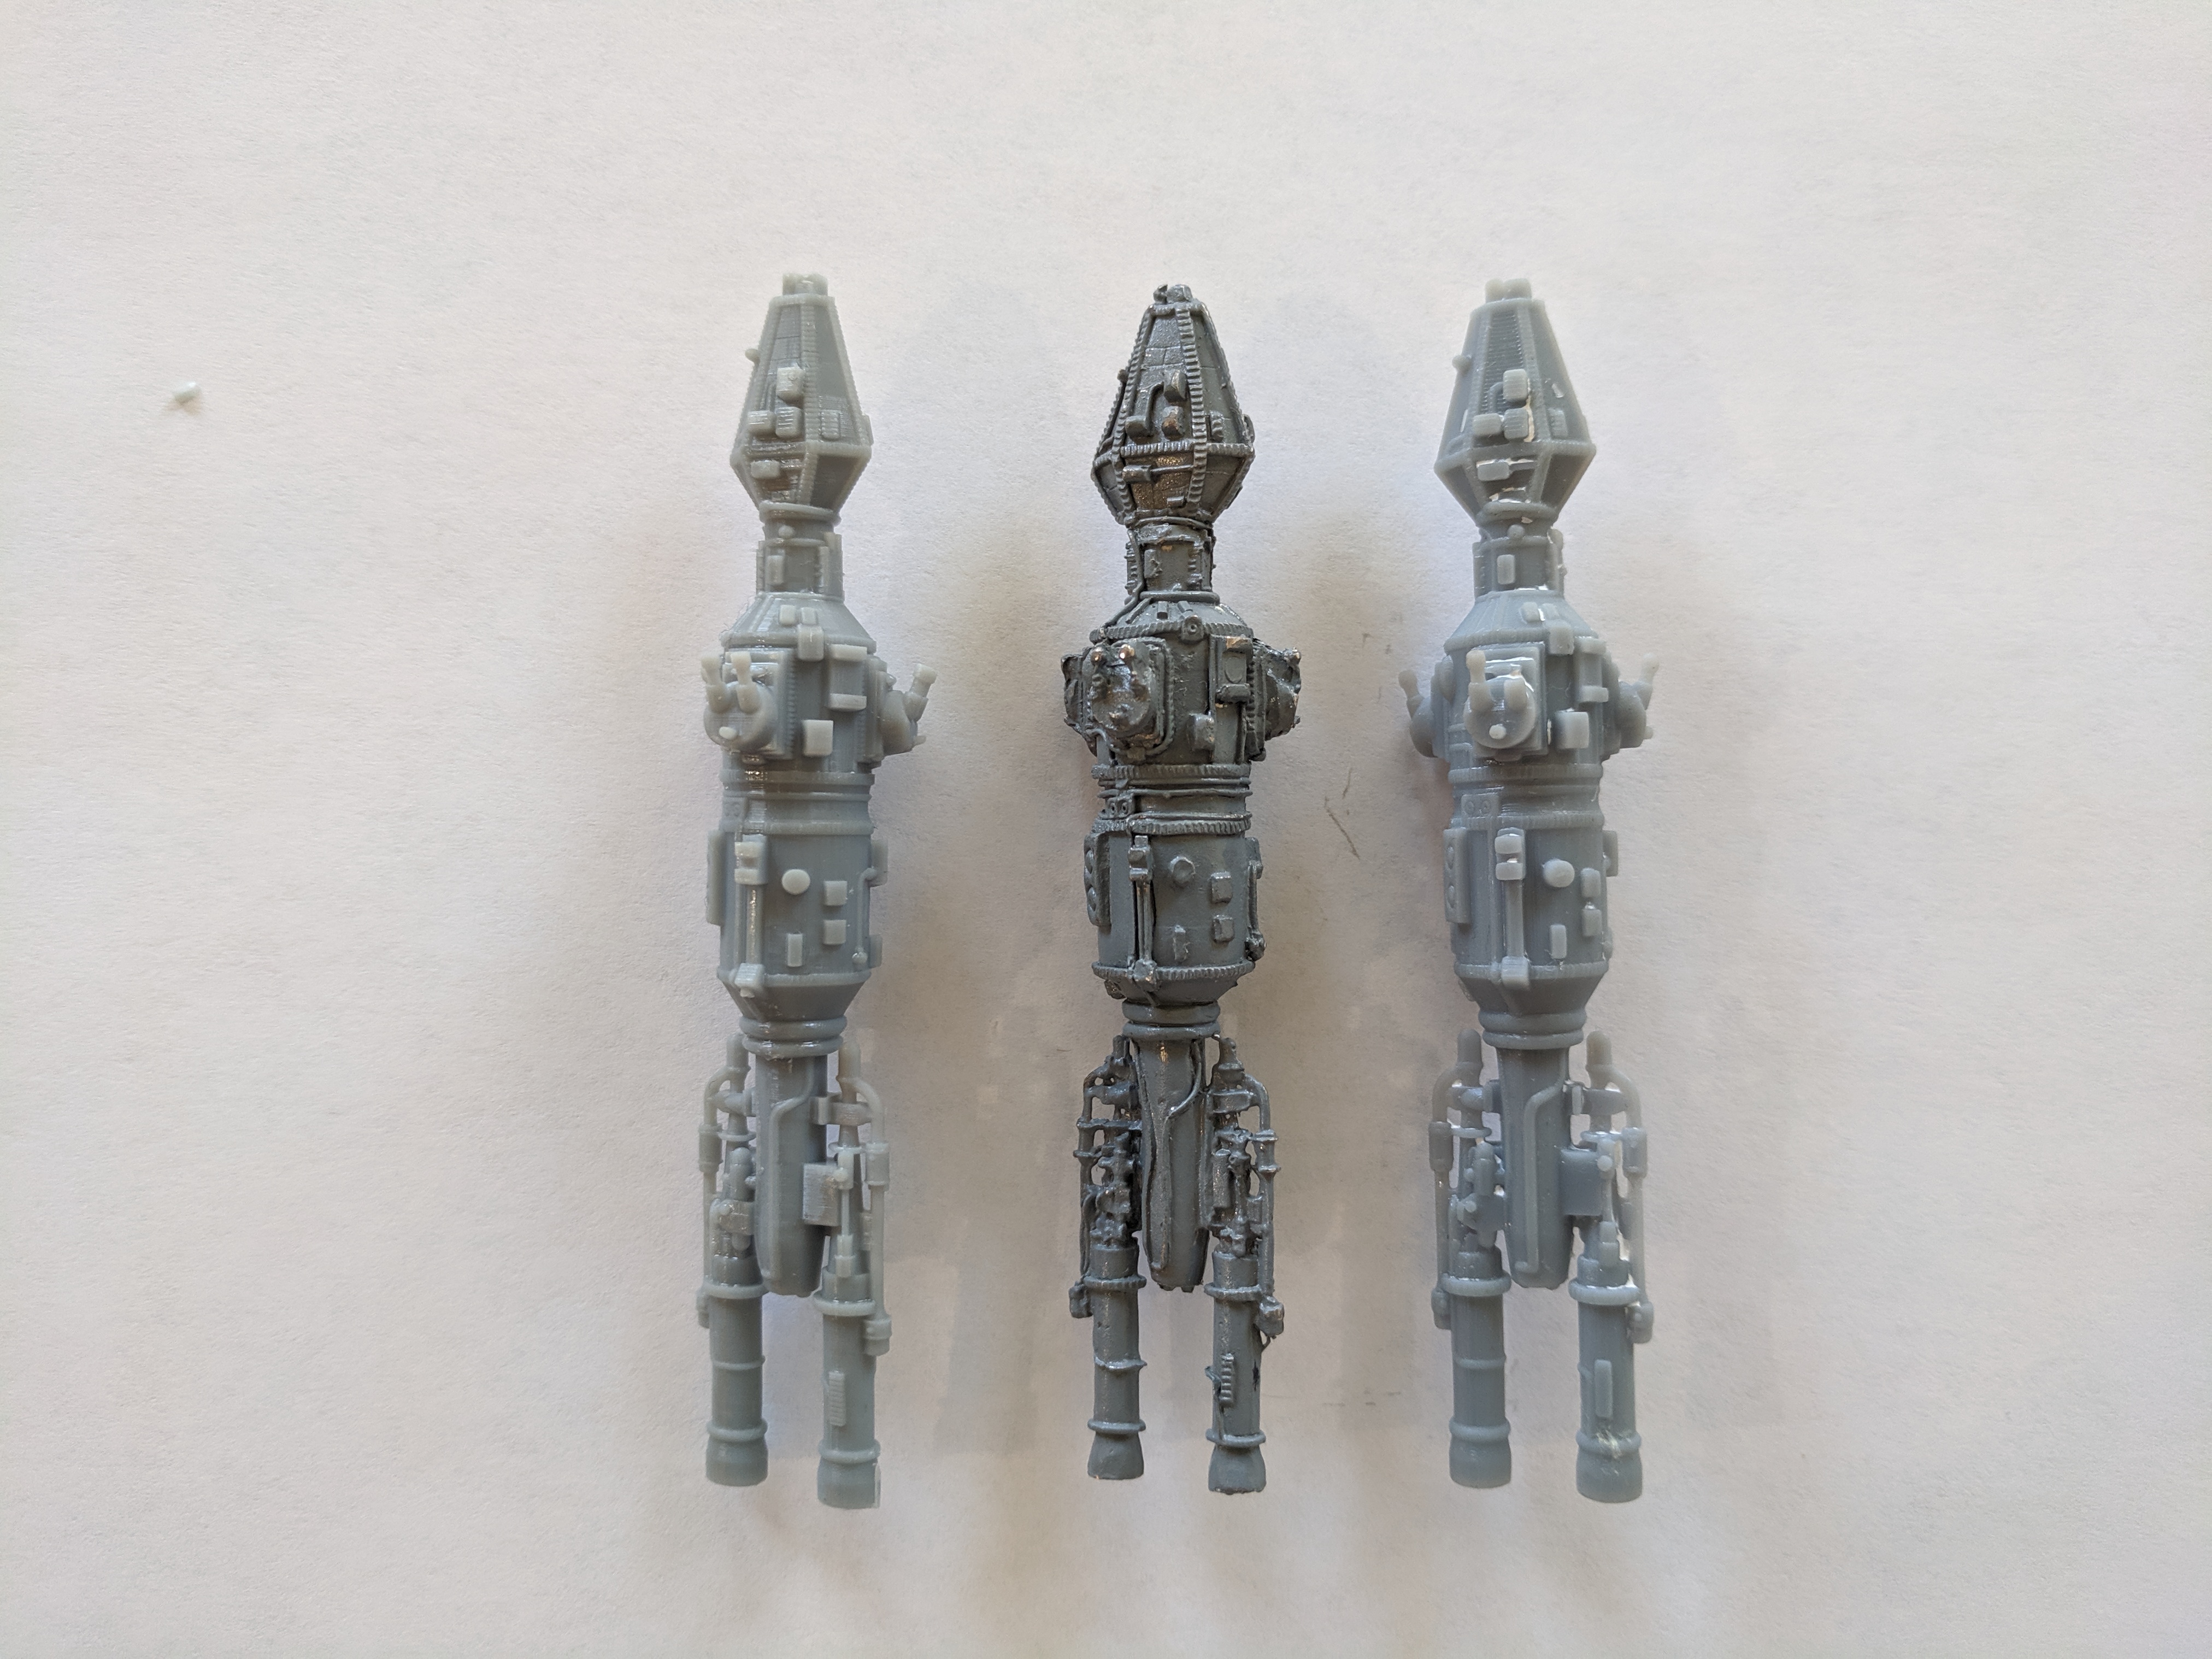
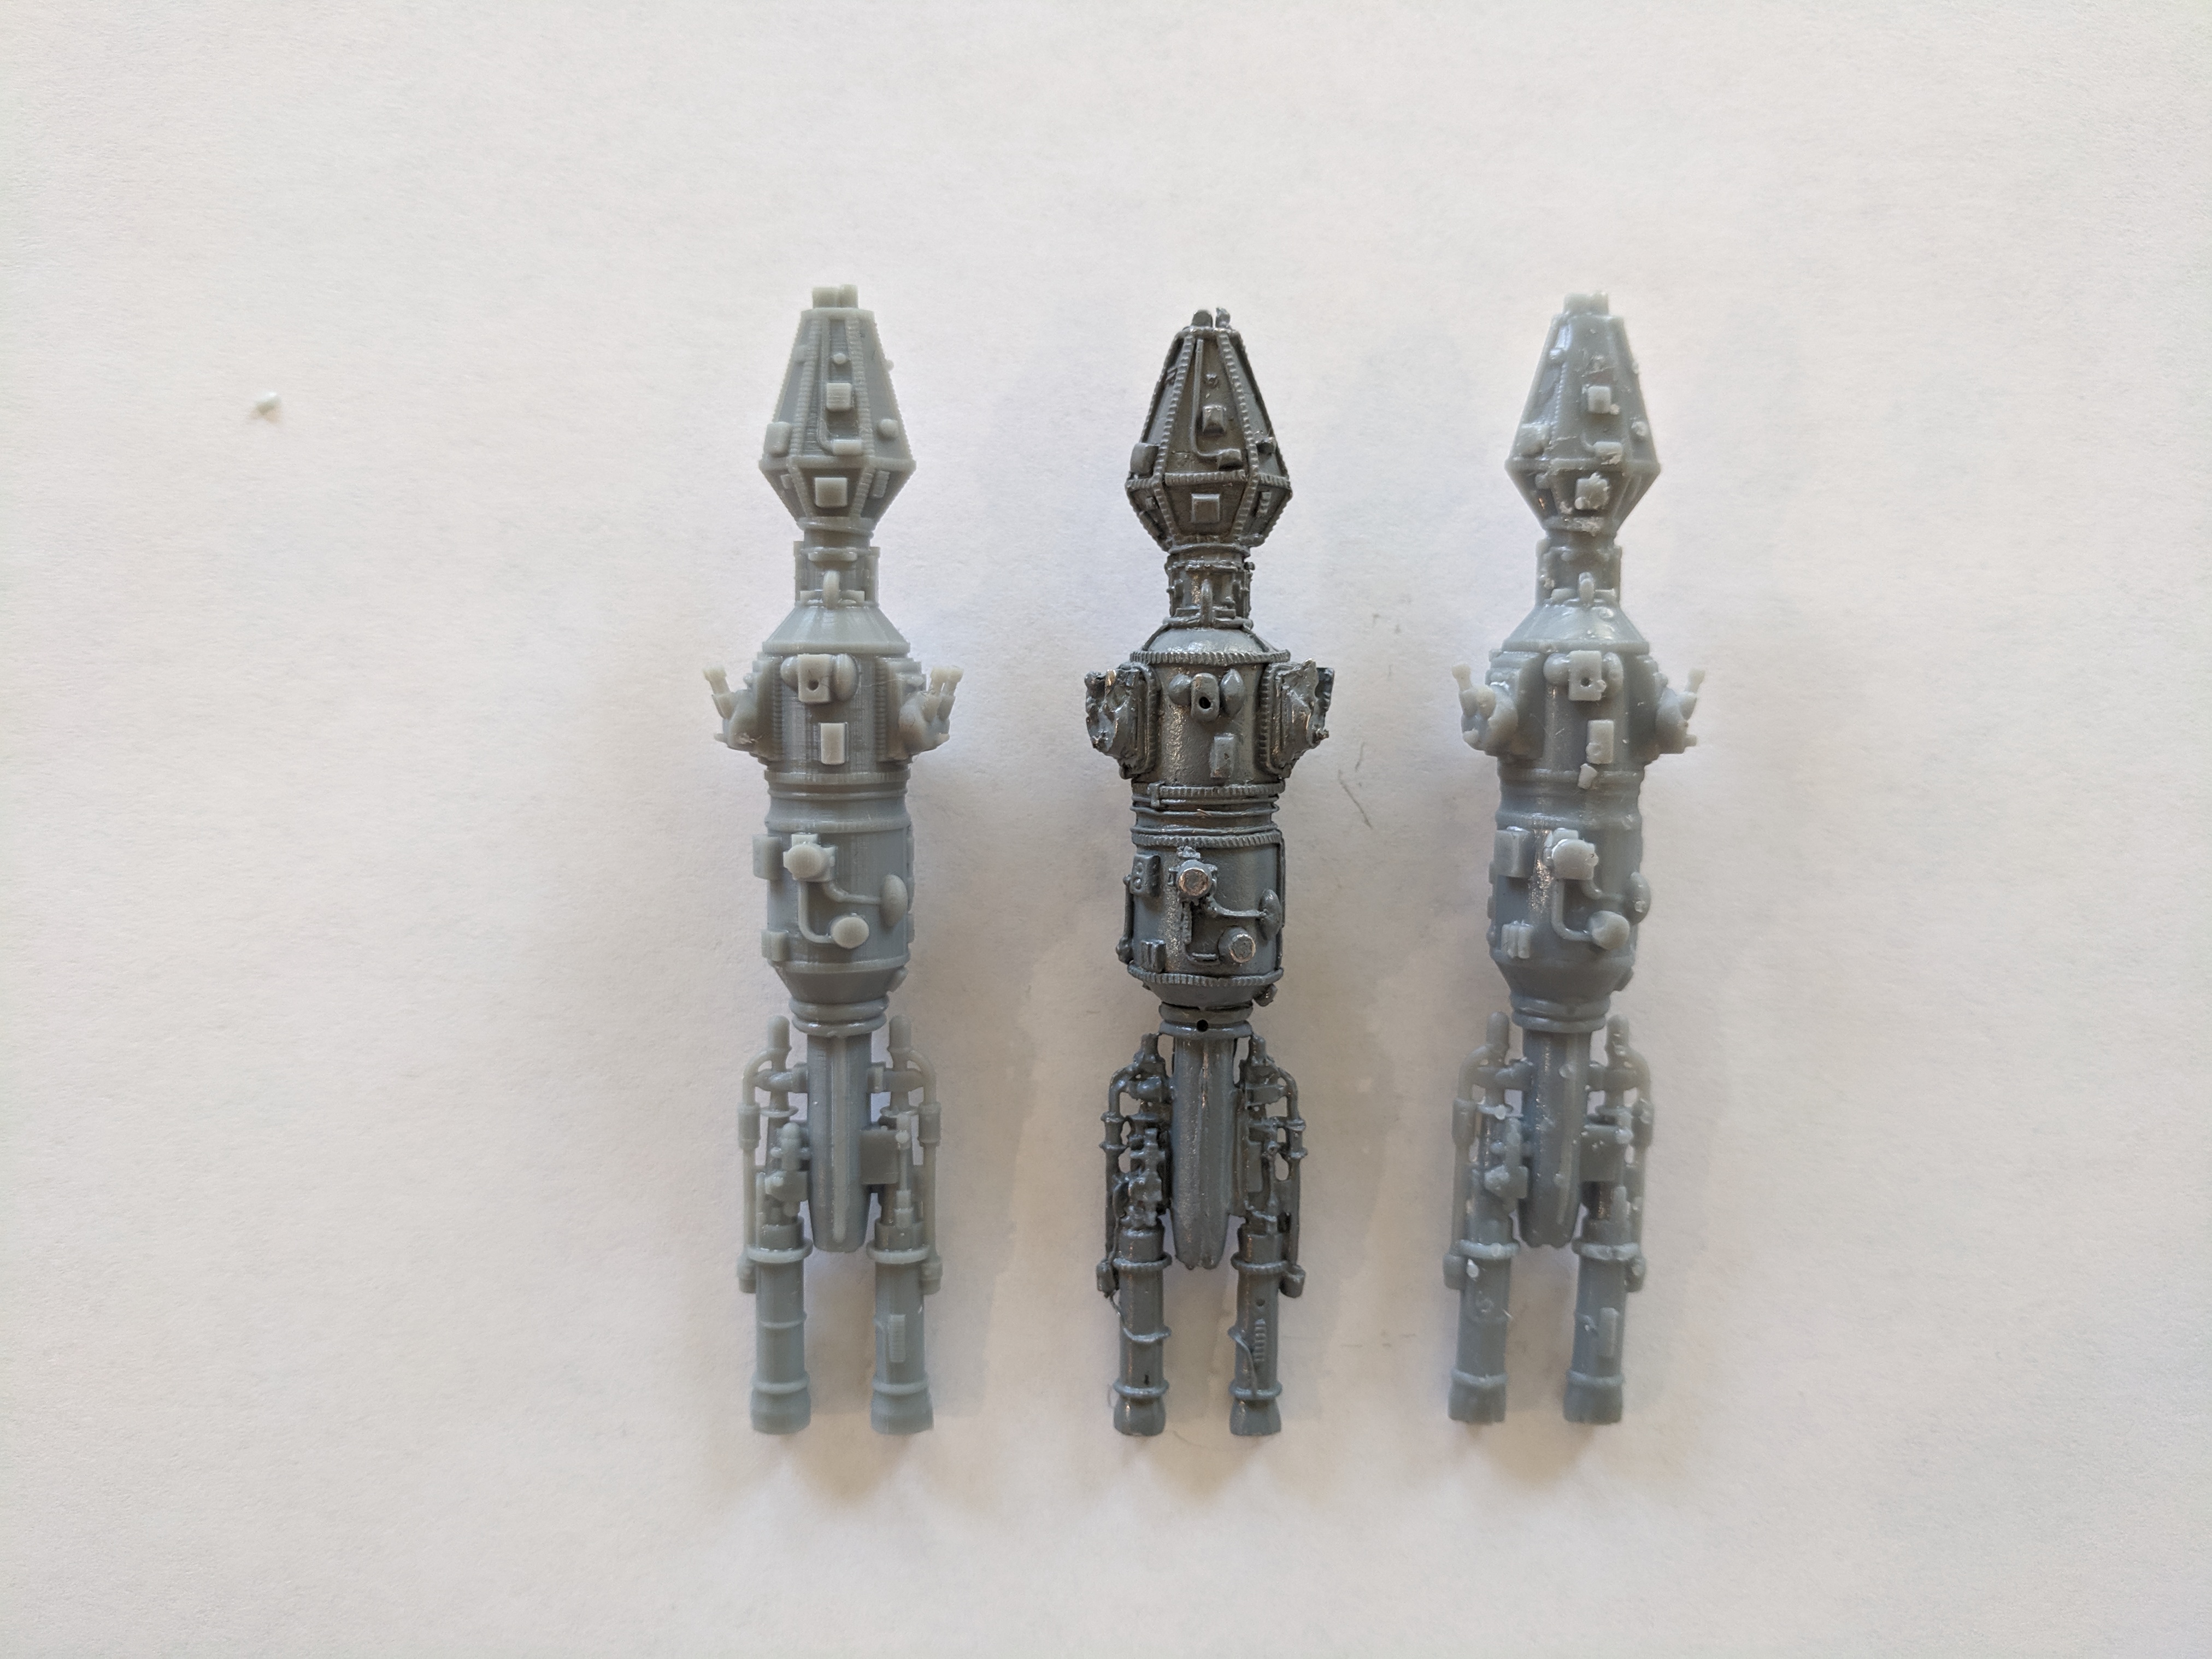
click for full resolution image
This first image shows the three minis side by side. The original metal miniature is in the middle (this is the primed one). On the left is the vertically printed mini and on the right is the horizontally printed one. This is the “down” side of the horizontally printed mini. Comparing the two printed minis, they look about the same on this side. Although I think the vertically printed one is just a little crisper.
Comparing the plastic and metal minis, I realized that despite always reducing the size of the features as I measured them off the unpainted mini, a lot of the features came out slightly larger. Also, the metal miniature still wins on the details in some places. I think I could fix that but I’m happy with the way it looks.
Turning the model over we get this view.
click for full resolution image
Here you can immediately see the issue with the printing on the horizontally printed model (on the right). The features are just not as crisp and clean. As I said before, to me it looked a bit melted. You can’t really see it in these images but the bow and ends of the engines are pinched and skinnier than the other model and the original. This is due to flexure in the printing process that could probably be fixed with more supports (I don’t think there were supports on the very tips because they were higher up and therefore didn’t technically need them). However, the issues with the remainder of the surface make this not really worth pursuing. This model will need to be printed vertically for best results.
Here’s another picture of the first side with the models in a slightly different orientation that includes a ruler for scale.
In this view, you can actually see a bit of the curvature I was talking about in the bow and engines of the model on the right.
Wondering if the opaque resin was part of the problem of the parts looking bigger or less distinct (due to the longer curing time while printing) I printed another vertically-oriented one win the translucent green resin that I did a lot of the other ships in. I don’t have a picture but I decided that there really wasn’t any difference between the two other than it was harder to see the details on the green one.
Final Thoughts
This model is good to go. I could tweak it in the future to make it look a little bit more like the original miniature but I’m happy with it the way it is so if I do tweak it, it will be some time in the future when I’ve got the rest of the line of ships complete.
I’ll be sending the model file out to my Patreon supporters later today. I’ve added this model to the price list on the Order Miniatures page for those that want to order minis for their collection. It’s priced just like the Sathar light cruiser at $2.75.
Some time in the next month (probably after we get issue 26 of the Frontier Explorer out the door), I’m going to start posting the model files up on DriveThruRPG for download as well. The models that are reproductions will be offered as pay-what-you-want while the ones that are original to me will have a small cost.
Next up is the UPF battleship. I already have the gun turrets (but not the bases, those are different) and the engines ready to go. There are a lot of repeated features on that model so it might go faster but it will definitely be November before it’s done. After that, I plan on filling in the gaps in the ship lines by designing a UPF destroyer, minelayer, and heavy cruiser, and then the assault carriers for the UPF and sathar. That will give all the ships necessary for full fleet engagements. After that I’m going to go back and tackle the pirate frigate, freighter, and privateer minis from the original sets to complete all the reproductions. There might be some new ships thrown in along the way as well.
Feel free to share your thoughts and comments below.
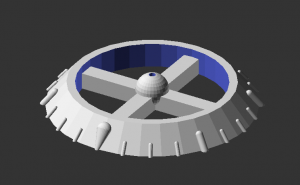
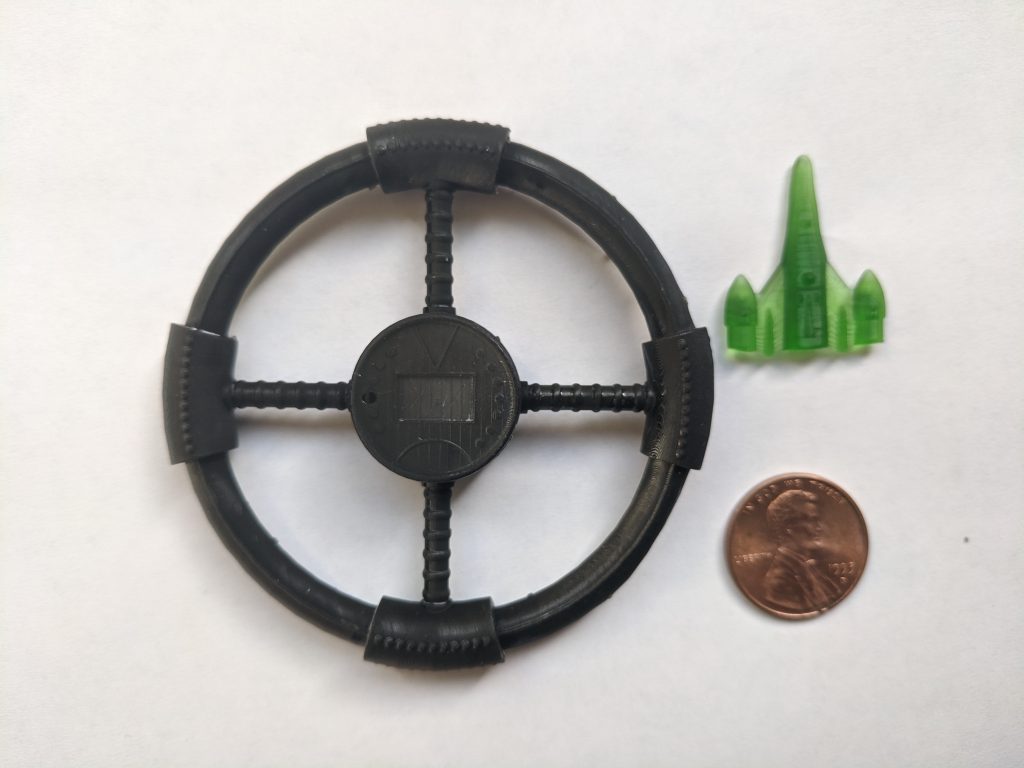
I teased this model in the last State of the Frontier post where I showed a picture of the printed miniature. In this post, I’ll talk about the creation of the Armed Station model and miniature that I created as part of my current interest in doing more 3D modelling.
Scale and Sizes
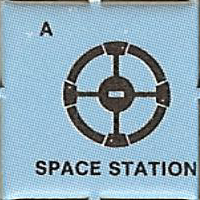
The basic outline of this model is based on the space station counter that came with the Knight Hawks boxed set, pictured to the right. For scale, I assumed this to be a HS 6 station making the diameter of the station 1200 meters, just short of a mile. In the end, the model was a bit bigger than that as I set the diameter of the center of the ring to be 1200 meters but that’s a minor quibble that can be fixed if really wanted by scaling the final model.
When I do my modeling, I typically work at 1/1000 scale in the model files so 1 meter on the actual vessel is represented as 1 mm in the model. However, for the space station, that was just a little bit too bit so instead I worked at 1/10,000th scale or 1mm = 10 meters. In the end, at that scale, the model came out at 137.4mm across, or 5.4″.
With the outer ring having a diameter of 1200 meters, that gives us some dimensions of other parts of the structure using the counter image as a silhouette.
The Main Ring
First is the cross sectional size of the ring itself. I chose to model the ring, at least for this version of the model with a circular cross section. I may do a future one with a square or rectangular cross section. Regardless, at this scale, that give the ring a height of 100 meters in the radial direction. So for the model, it has a diameter of 100 meters
That means, assuming you have 5m per deck, you could put 20 separate decks in the ring of the station, with the widest deck at the center being about 100m wide and the decks getting narrower as you move up or down from the center. The upper (and lower) two or three decks would be fairly narrow and probably used for machinery and other non-public areas.
The Spokes
On this station, the spokes connecting the hub to the ring are 60 meters across. Again, I chose to use a circular cross section so they are 60 meters in diameter.
In addition to the spokes of the station, the counter shows a thicker “sheath” around the ring where the spokes meet it. This sheath is 164 meters in diameter compared to the 100 meters of the ring. That means that there can be an additional 12 decks in this section of the station.
The Hub
Let’s start with what we can see from the picture on the counter. Measuring this out, the hub is 400 meters in diameter. That is the same size as the outer diameter on a hull size 2 station! But that’s fine. This is a big station and is supposed to be able to dock a lot of ships of all sizes.
That brings us to the first constraint. According the Star Frontiers rules, a hull size 6 station can dock any sized ship, including the HS 20 ships. Those ships are 100m in diameter. So the bay opening into the hub has to be at least that big. As drawn, in the counter, it’s only 85 meters wide so we’ll have to make it a little wider but that’s not that big of an issue. I ended up modeling it 110 meters wide. A HS 20 ship will fit, but it will be tight.
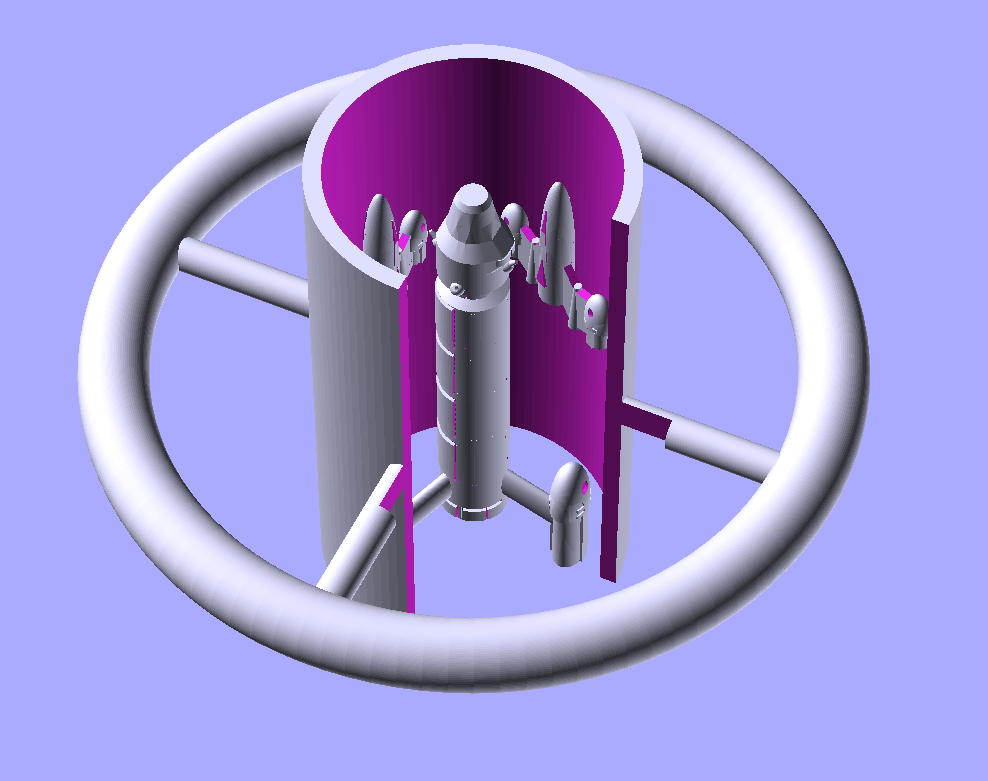
The harder part is the length of the hub. Those same HS 20 ships are 600 meters long. Or equal in length to the radius of the entire station. For our hub to be able to house those ships inside as the game implies, means that the hub has to be really long, at least 650 meters (to handle variations in width/length both the door and length should probably be larger but that’s what we’re going with here.) This results in a station that looks like this.
I tossed in some HS 18 Sathar heavy cruisers for scale. There’s also a HS 6 freigher (the CDCSS Nightwind) there to the right of the hub.
The same is true for the smaller stations. This image is one I made a long time ago of a HS 1 station which is just 200m in diameter and supposed to be able to house up the HS 6 ship. This shows a cut away of the hub with the CDCSS Nightwind inside along with a couple of assault scouts. I didn’t put bay doors on this one, as it was just for scale comparisons.
Personally, I don’t like the hub that big and in my game, the bigger ships don’t dock inside the hub. Rather they just enter a nearby parking orbit and material and people are moved across by shuttles, which can dock in the hub. So for the final version of this model, I made the hub just 200m tall instead of 650m. That’s still big enough to dock up to a HS 8 ship inside. In a future version, I might make it a little bigger, at 250-260m allowing a HS 10 ship to dock inside. But anything else starts to look a bit to big.
Finishing up the Model
Once I’d decided on the size of the hub, the basic shape of the station was done, but it was pretty boring looking. So I decided to add a bit of surface detail to the model to make it a little more visually appealing.
First I created bay doors that I could position either open or closed. In the end I decided to print the model with them closed but I created models with them both open and closed.
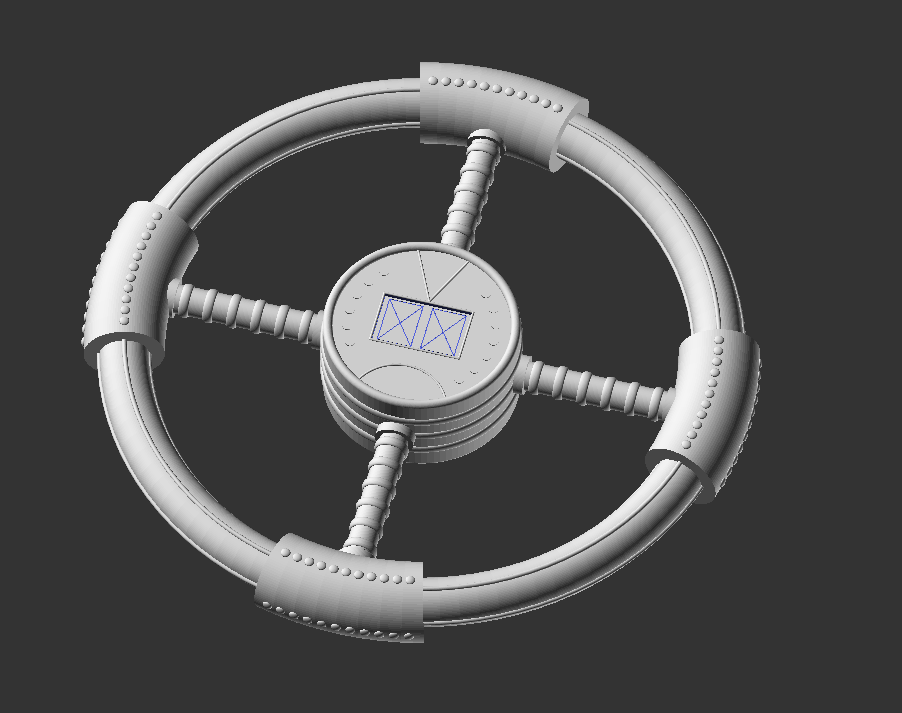
Then I added some surface detail all around the ring, spokes, and hub to give it a little character. In the end, the final model looked like this.
The asymmetry in the number of pips to the left and right of the doors was accidental. But I decided to leave them. The V-shape and half moon shape above and below the bay doors where intentional as navigational markers. The side with the ‘V’ that touches the bay entry is the “up” direction to orient ships aligning with the bay for entry. the opposite side of the hub is identical.
Printing the Model
As I said earlier, the completed model, at 1/10,000th scale is 137.4 mm. The problem is my high resolution printer has a maximum width of 120 mm. So this is just a bit too big. It’s not too tall, the limit there is 155 mm. And it’s not too thick as it can be 68 mm wide and this model is only 22mm wide (that would have been a bigger issue if I’d gone with the fat hub). I could easily print it on my big printer; in fact, I could print it at 1/5000th scale if I wanted to) but that wasn’t the plan. I wanted to print it on the SLA printer. If I rotate it just right, the software says it is possible to print the station at 1/10,000 scale in the build volume I have. And I might try that one day
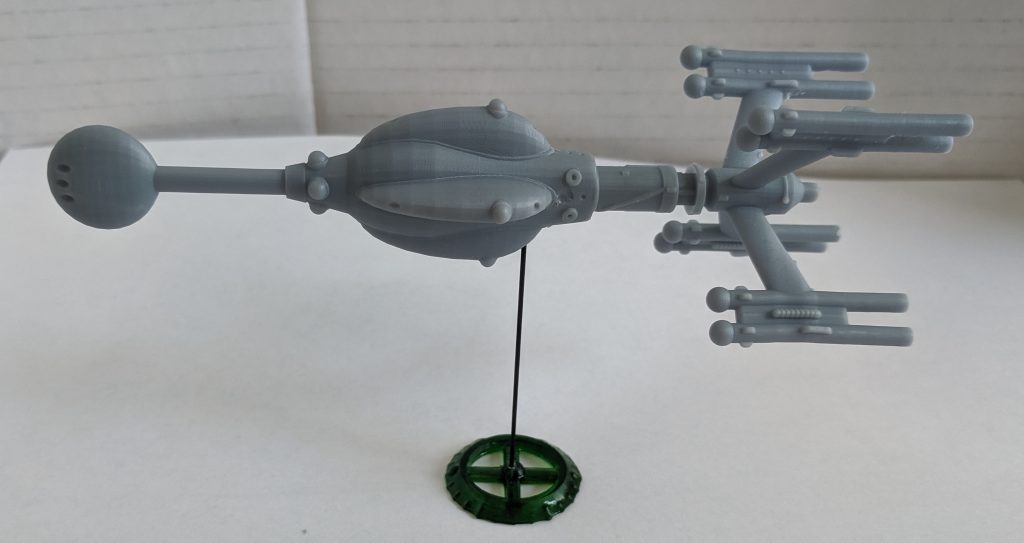
However, from the beginning I had planned to print it at 1/20,000th scale which makes the largest dimension just 68.7 mm or 2.7″. So that’s what I did. You can see the result in this image.
The station was printed with black resin, the assault scout is 1″ tall and printed in the green resin that came with the printer.
The only detail that doesn’t show up is the “X” on the bay door. They are there, but very, very faint. I might go back and thicken them up in the future so they show up better on the print.
Final Thoughts
Given the size of the station, if it is spinning such that the deck at the center of the ring has a gravity of 1.0g, then for every 60m you move toward or away from the center of the station, you gravity will change by 0.1g. This means that the upper deck, 45m above that position will have a gravity of 0.925g while the outer deck will have a gravity of 1.075g. In the part of the station where the spokes connect, assuming there are decks all the way out to the edge, you get a range from .87g to 1.13g. And the hub with a radius of 200m, has a gravity of 0.33g, roughly the equivalent of the surface of Mars.
That raises an interesting point. The docking area in the hub is supposed to be fairly low gravity. I wouldn’t consider 0.33g to be that low so the hub is probably a bit too large in diameter. But it looks cool so it’s fine for the model.
The model has already gone out to my Patreon supporters at the Surveyor ($2/month) or higher. If you join at that level you’ll get access to it as well. Anyone that joins at the Crafter level ($30/month) in the month of October will get a printed version of the model as well as 8 UPF and 8 Sathar fighters. I’m also planning on posting the UPF Light Cruiser this month (the model is almost done) so a printed mini of that model will go out to backers at that level as well. Those will all be printed and shipped out in early November.
If you don’t want to back the Patreon, but still would like to get a print of any of the miniature models I’ve created, you can jump over to the “Order Miniatures” page to see the costs for the minis and place an order.
Let me know your thoughts and comments on the Armed Station model and miniature in the comment section below.
Here’s the next installment of the timeline. This month sees the Frontier races start to explore a bit outward. Unfortunately for them, they stumble upon a heavily defended sathar starship construction center almost immediately.
I’m also trying out a new layout/design for the table let me know if you like this one or the old one better.
Date (FY)
Event
60.238
Discovery Squadron arrives at Stenmar (Kazak). This is their last stop in known space and the squadron will spend a week here making sure the ships are fully repaired and stocked for their journey.
60.239
Work begins by the Discovery Squadron astrogators
to plot the first new jump route of their trip. Their destination is the star
system OFS19, five light years away just above the jump route to the Cryxia
system.
60.240
Resupplied, the HSS History’s Hope
leaves Histran Station (Scree Fron) to return to the OFS224 system and then
begin charting the next new jump in its journey.
60.241
Sathar starship construction center in the Liberty
system completes another destroyer.
60.242
The assault scout for the K’aken-Kar
system is completed at the Fromeltar starship construction center. It begins its travel to its home system.
60.243
After six days of waiting, the storm on Mt. Spire
clears and the members of the Spire Dragons team begin their descent from the
mountain.
60.244
Having made no detections of signals
from OFS200, Strike Force Nova departs Hentz (Araks) for the Scree Fron
system.
60.245
After over thirty days in the Kizk-Kar system with
no further sign of sathar ships, the assault scouts from Kaken-Kar and
Fromeltar begin their return trips to their respective systems.
60.246
Discovery squadron begins accelerating
toward Void speed on its first jump out the Frontier and Rim region of space.
60.247
Investigations into the source of Ixiol have
definitively linked it to Malco Enterprises on Outer Reach (Dramune).
Unfortunately, the UPF charter prevents any direct action against the
operation without express consent of the planetary government which denies
the allegations.
60.248
Based on the findings regarding Ixiol production
on Outer Reach (Dramune), Inner Reach (Dramune) implements a strong
inspection policy against any ship coming from Outer Reach to search and
inspect all cargo from that planet before it can be delivered on Inner Reach.
60.249
HSS History’s Hope arrives safely in the OFS224
system. Work begins to chart a jump to
the neutron star in the OFS221 system, a jump of 7 light years.
60.250
Streel starship construction center
(Pale, Truane’s Star) reaches 90% original capacity as repairs continue.
60.251
Discovery Squadron successfully jumps to the OFS19
system, a small M1 red dwarf star.
60.252
– After a day of deceleration into the OFS19 system, the Discovery Squadron detect radio signals from the direction of one of the inner planets. They appear to be sathar in origin. Subspace radio messages are dispatched back to the Frontier and Rim.
– The squadron immediately changes vector to not be decelerating directly toward the inner system and the astrogators begin working on calculations for a return jump to Kazak.
60.253
After a day of collecting signals in the OFS19
system, at least 10 different sathar ships have been detected by Discovery
squadron. Composition is unknown.
60.254
– Strike Force Nova arrives at Histran (Screen Fron). It will spend 11 days in system exercising around both Histran and Hasokar before departing back to the Araks system
– Eight sathar ships begin accelerating out toward Discovery squadron. Two new ships have been identified but four have gone silent.
60.255
– The militia assault scouts that had been deployed to the Kaken-Kar system arrive back at their home systems. The crews are given some needed shore leave.
– Calculations complete for the return jump to Kazak, and apparently detected by the sathar vessels, Discovery Squadron begins a hard acceleration to stop and reverse direction for a jump out of the system.
60.256
Discovery Squadron completes the
stopping maneuver and begins acceleration out of the system. The sathar
vessels are nearly half-way to their position and have a sizable speed
advantage. It is questionable if the squadron can reach jump speed before the
sathar ships catch them.
60.257
With a known path, the Spire Dragons team make it
back to their camp at the base of the mountain after only fourteen days of
hiking. All that is left to complete
their expedition is to make it back to the coast.
60.258
– After two days of grueling high-g acceleration, Discovery Squadron manages to enter the Void for the jump back to Kazak just hours before the sathar vessels overtake them. Unfortunately, due to the haste of their departure, the Discovery Squadron, misjumps into a binary star system rather than Kazak.
– Prior to their jump, the Discovery Squadron identify the sathar vessels as 1 heavy cruiser, 1 assault carrier, 1 light cruiser, 2 destroyers, 1 frigate, and 2 ships of a new design approximately the size of the Streel corvettes.
60.259
The HSS History’s Hope jumps into the OFS221
system. While they arrive much further
out in the system than planned, the jump is considered a success. They will spend a week in the system
studying the neutron star before returning to OFS224.
60.260
After two days of rest from the
grueling jump and observations by the astrogators, the Discovery Squadron
determines that it is in FS50 system between Kazak and Osak, having overshot
their target. Work begins on
calculating a jump back to the Kazak system just 4 light years away.
60.261
With preliminary jump calculations done and the
crew mostly recovered from their days of high-g acceleration, Discovery
Squadron begins accelerating toward jump speed for their return to Kazak.
60.262
– While they don’t know if the UPF ships detected the starship construction center in OFS19, the sathar high command decide to shift some of the assets there to increase the defenses.
– Four destroyers from the Liberty system are dispatched to OFS19. Even with a high-speed traversal of the jump routes, this will take approximately 80 days.
– A frigate, light cruiser, assault carrier, and eight fighters are dispatched from the sathar SCC#4 (OFS111) to reinforce OFS19 as well. Much closer, it is only a 20-day trip.
60.263
The new assault scout arrives in the K’aken Kar
system. After a brief checkout, it
takes up regular patrol duties.
60.264
The third saurian Ark ship is completed
and begins its shakedown cruise.
60.265
– Strike Force Nova departs Hasokar (Screen Fron) to return to Araks. No signals from OFS200 were detected while in the system.
– Discovery Squadron successfully jumps back to the Kazak system. They immediately begin broadcasting the details of their findings in the OFS19 system to both Rim and UPF contacts.
60.266
With receipt of the information about
the sathar forces in OFS19, both Spacefleet and the Flight begin discussions
on how best to deal with the sathar presence.
While discussions are occurring, the Flight dispatches several ships
to both Cryxia and Kazak.
60.267
HSS History’s Hope begins accelerating to return to
OFS224 and chart the return leg of the jump connection the OFS221 and OFS224
systems.