A long time ago (2005 to be exact), I started working on a computer program to implement the Second Sathar War game from the Knight Hawks Campaign Book and the tactical starship combat from the Tactical Operations Manual.
I originally started the project as a way to learn how to do GUI programming and the UI definitely shows its age. It’s been basically dormant since 2011 and I’ve not done any real work on the game other than to update the library versions so it can run on modern computers. (And I’ll often show the code to my students.) However, I’ve started working on it again and have a new version to release. I hope to keep working on it slowly over time and get new versions out.
As of this version, all the core game play functionality is implemented with three exceptions: Seeker Missiles, the Repair Turn, and the ability to track ships as they move off the map. Otherwise, I think everything is in the game. I’m working on those three features now and they will be in the next release.
As currently implemented, this is a “hot-seat” game, meaning both players have to be on the same computer taking turns moving ships and firing their weapons. Network play is on the to do list, but I want the full game functionality implemented first.
There are actually two programs as part of this. There is the SSW program which is the full strategic game, and the BattleSim program which is just the Knight Hawks board game combat system. The SSW game launches the BattleSim board when combat occurs in the strategic game (or gives you the option to play out the combat somewhere else and just enter the results). The BattleSim game allows you to play the predefined scenarios in the Tactical Operations Manual or create your own (between the Sathar and the UPF, pirates/militia aren’t an option yet in the stand alone tactical game).
Download
The current version is version 0.0.18. If you are interested in testing it out and playing with it, you can download it for Windows and Linux (sorry, I don’t have a Mac to build a Mac version).
Just click on the link and unpack the contents of the file somewhere. They both place the contents into a SecondSatharWar directory. The executable files are in the bin sub-directory and you can just click on them to launch them. There are also shortcuts in the top-level directory on Windows that may or may not work (I didn’t think to check if they worked if I moved the base directory around. i.e. to a different computer. 🙂 )
I’m not 100% sure why the Linux version doesn’t compress down as small, but I suspect not many people will be grabbing that one.
The Code and Reporting Problems
If you are interested in looking at my horrible old code (the program is written in C++), you are welcome to poke around in the project’s GitHub repository. This is also where you can report bugs you discover for me to fix. Just go to the Issues tab and hit the “New Issue” button.
Release Notes
If for some reason you want to see older versions (no guarantee they will run) you can see earlier development over on my old Star Frontiers Network site in the forums. The changes since that old 0.0.17 version are as follows (and this list, as well a more developer focused details, are included in a file in the download):
Tactical combat now produces a much more informative damage summary dialog after fire resolution. The summary rolls damage up by ship, preserves weapon and defense hit identities, includes electrical fire and mine results, can show optional hit-detail lines, and now reports ADF and MR losses explicitly instead of collapsing them into vague effect text.
Damage-resolution edge cases were tightened up to match the tactical rules more closely. Hull fallback handling was expanded for cases such as advanced damage hits, repeated damage-control repeat hits, and disastrous fire outcomes, reducing incorrect or misleading damage reporting.
Stopped ships are easier to maneuver in tactical combat. The UI now supports stopped-ship facing pre-selection, free rotation before movement, preview-route rendering, and direct clicking on highlighted preview-route hexes to continue movement selection.
Tactical station setup and movement behavior were corrected. Repositioning a station during setup no longer duplicates pending placement state, and station orbital movement now preserves the intended heading and speed when movement is finalized.
Tactical screen layout and readability improved substantially. The movement and fire prompts no longer crowd or overlap action buttons, the lower panel reflows more reliably as the window changes size, ship-stat presentation is cleaner, and the tactical speed and ICM controls now size and render more consistently on wxGTK.
Tactical dialogs are more polished and predictable. The damage summary dialog has a safer close path and better default focus behavior, while tactical, strategic, and BattleSim dialogs were reworked to fit and center correctly on first show.
Startup and launch behavior is cleaner. The splash screen and initial frames are now centered consistently, and BattleSim launch dialogs and scenario flows received follow-up sizing and lifecycle fixes.
Image and icon loading is more reliable across installation layouts. Shared asset-resolution logic now handles normalized paths and fallback lookup more consistently, which reduces missing-image failures in startup, tactical, and strategic displays.
Future Plans
Currently I’m focused on finishing the tactical game system. The current prioritized task list is:
Add Seeker Missiles
Add the Repair Turn mechanics
Add map boundary handling
Add the ability to save/load a tactical game in the middle
Add the documentation into the game itself
Add the ability to toggle the display of detailed damage results (right now it shows a ship summary and the individual hits for debugging purposes). The default will be the ship level summaries with the option to turn on the detailed results if desired. This will also come with a clean up of the damage summary interface.
Last Thoughts
I’m looking to reactivate this blog and this is one of the projects you’ll be hearing about. It might be the only thing for the next couple of months but starting in July I hope to be more active.
As you may have noticed, I haven’t been posting for a while. In fact, I didn’t post at all last year. I’m planning to change that this year. I’ve been quite busy over the past year with my position as a college professor. I’ve basically rewritten two classes over the past year. That, along with other, new hobbies, has kept me away from the Frontier. However, my teaching load has leveled out and is even a bit lighter this coming semester and I’m finally feeling the desire to get back into Star Frontiers.
Projects
Over the coming months, I have several projects that I’m going to work on:
The Detailed Frontier Timeline
I plan on getting back to this on a regular basis. I don’t know if I will continue to do daily posts on X any more but may only do the monthly summary posts here on the blog as well as detailed post on the battles. In fact, that will probably be the next post after this one. Namely a battle post between SF Nova and a Sathar Battle Group at one of the sathar starship production centers.
3D Modeling
I really want to finish the Privateer models. I hope to work some more of them over the coming months. I’ve actually started one of them and so my first priority will be to finish that and and then work on the others.
Additionally, I may have a lead on a 3D scanner capable of scanning the character, creature, and robot miniatures. I’m in the process of testing it out and figuring out how best to prepare the miniatures for scanning. The bare metal reflects the laser and gives bad readings. We’ve tried a clear matte spray that worked pretty well and next I’m going to put some flat gray primer on the same miniature and see if the scan is any better. If all goes well. I’ll be able to post the STL files for people to access. And then I’ll need to finish my collection. I have most of the blister packs but I think I’m missing a few.
Frontier Fiction
Depending on how long you’ve been following the blog, you may or may not know that I’ve been working on a novel set in the Frontier, specifically on Pale during the first sathar invasion. I’m going to be working on that regularly again starting this year. I’m not sure how that will interact with the blog. I might post snippets. I might start serializing it here. I’m still working on the first draft and it’s really rough and somewhat disjointed so I don’t know how well it would work as posts in its current iteration. But I plan on posting updates on progress. It’s currently at 77,000 words (I added 538 works on the 1st) and I think I’m about a quarter of the way through the story.
Blog Archives
The other thing I want to finish up this year is to get all my posts from the now defunct Arcane Game Lore blog moved over here. I didn’t control that domain and the other host, who did, stopped renewing it and some spam site bought it up. I started moving the posts over in 2022 and plan on finishing them this year.
Posting Frequency
I hope to get back to a weekly posting frequency but I’ll probably start out with just one or two posts a month in the beginning. That is something we’ll just be playing by ear to start.
Patreon
I still have the Patreon campaign for supporting this website. It billed here in January because I forgot to pause the January billing but I’ve already paused February’s. My plan is start letting the billing happen monthly again starting in March. For those that have stuck with my over the hiatus. Thank you. If you want to help support the site, consider joining.
Keep Exploring
That’s it for now. Look for Knight Hawks battle post to be the next post in a week or so. I’ve got the order of battle all set up and now just need to play through it. Let me know if there is anything in particular you’d like me to look at in the coming months.
This was a fairly busy month with three major events. The first was the discovery of the YAS Royal Cloud by the HSS History’s Hope. This is going to send ripples through the yazirian society. The other two major events were the battles at Terledrom and Hargut. The loss of the starship construction center at Terledrom is a major blow to the UPF. Strike Force Nova is en route to hit a similar sized sathar shipyard and we’ll see what happens there next month.
Date (FY)
Events
62.069
Six more pilots graduate from the accelerated training program at Gollwin Academy. They take command of some of the fighters there and await the arrival of SG Alpha.
62.070
Both Sathar TG1 & SBF-E2 jump into the OFS020 system and begins decelerating. TG1 detects PG Probe Alpha almost immediately and takes measures to remain undetected by the UPF ships.
62.071
The HSS History’s Hope arrives in inner system of YS14 and begins the approach the ship broadcasting the mayday message. It seems to be floating in interplanetary space on highly elliptical orbit around the star.
62.072
– The UPF destroyer arrives at Kawdl-Kit (K’sta-Kar) and joins PG Vigilant.
– Arriving within visual range of the ancient yazirian vessel, the crew of the HSS History’s Hope confirms that it is indeed the YAS Royal Cloud, the only ark ship from the exodus not to arrive in the Frontier and which was carrying the imperial family of ancient Yazira.
– Inspection of the YAS Royal Cloud show that it is missing all of its engines and shows signs of blast damage on the aft part of the ship as well as serious weathering and impact damage from small objects and micro meteors.
– An assault scout is completed at the PGC shipyards (Gran Quivera, Prenglar) and joins TF Prenglar.
62.073
– TG2 jumps into the Liberty system as it is passing through.
– PG Probe Alpha successfully jumps back into the Fromeltar system without having detected the arrival of sathar SBF-E2 or TG1 entering the OFS020 system. They transmit the jump data to Spacefleet and begin decelerating and working on calculation for a return to that system and then beyond.
– After an animated discussion and deliberation, the crew of the HSS History’s Hope decides to not attempt boarding the YAS Royal Cloud. Deciding that a message about its discovery is too sensitive to broadcast, they choose to return to the Frontier to deliver it personally.
– After completing a close visual inspection of the YAS Royal Cloud, the HSS History’s Hope starts accelerating for a jump back to the YS12 system.
– A frigate is completed at the PGC shipyards (Gran Quivera, Prenglar). Together with the AS completed the day before, they are designated SG Beta and depart for the K’tsa-Kar system to join PG Vigilant
62.074
– Sathar TG1 and SBF-E2 met in the OFS020 system and all but the assault carrier from TG1 join SBF-E2. The assault carrier (TG1) departs for sathar SCC#4 (OFS111) while the other ships start accelerating for a jump into the Fromeltar system.
– An assault scout is finished at the Minotaur (Theseus) shipyards and departs for the Liberty system to join PG Liberty.
– Two fighters are completed at the Terledrom (Fromeltar) shipyards.
62.075
– TG2 is detected in the outer reaches of the Liberty system by PG Liberty. A heavy cruiser and destroyer are too much for a lone assault scout so they can only report the transit of the ships back to Spacefleet and request more support.
– PG Probe Beta arrives in the Zebulon system and begins decelerating toward Volturnus and working on jump calculations to plot a route directly to Kazak through the Xagyg Nebula.
– An assault scout is completed at the CDC shipyards (Triad, Cassidine) and begins patrol duties with FFC Squadron Eta.
62.076
– A frigate is completed at sathar SCC#4 (OFS111).
– PG Probe Gamma arrives in the Kizk-Kar system. It begins decelerating toward the planet and working on calculations for a jump to the binary star system FS56, the suspected route for sathar ships into the Kisk-Kar system.
62.077
– PG Probe Delta arrives in the K’aken-Kar system and begins decelerating toward the planet to confer with the militia assault scout crew. Work also begins on calculations for a jump to the FS33 system.
– SG Alpha arrives back at Gollwin Academy (Morgaine’s World, Prenglar) where it picks up 8 more fighters and departs for Lossend (Timeon).
62.078
– The HSS History’s Hope successfully jumps back into the YS12 system. The crew decides that they need to fully chart the route to YS14 before returning the Frontier and so begin decelerating and working on jump calculations back to that system.
– PG Liberty realizes that TG2 is not headed for the Waller Nexus system and on to Theseus but to some other destination. They relay this to Spacefleet.
62.079
SBF-E2 jumps into the Fromeltar system and begin decelerating toward Terldrom.
62.080
– SBF-E2 is detected by TF Cassidine. PG Probe Alpha aborts its jump back to OFS020 and heads to join the Task Force as it, the FFC squadron, and the Fromeltar militia prepare to meet the sathar fleet.
– Sathar fleet TG2 jumps out of the Liberty system (to OFS196).
62.081
– Two Fighters are completed at the Minotaur (Theseus) shipyards. They join the others manned by militia pilots under the direction of FFC Squadron Epsilon.
– Significantly outgunned, TF Cassidine regrets not requesting one of the minelayers in Prenglar to be transferred to Fromeltar. They hope to use the maneuverability of their smaller ships against the large number of capital ships in the sathar fleet.
62.082
– Calculations complete, PG Probe Beta begins accelerating for the jump to Kazak.
– Calculations complete, PG Probe Gamma begins accelerating for the jump to FS56.
– Calculations complete, PG Probe Delta begins accelerating for the jump to FS33.
62.083
– Sathar TG1 arrives at SCC#4.
– Second Battle of Terledrom (Fromeltar) – The sathar suffer more losses than expected but destroy the Terledrom shipyards, most of the UPF fighters in the system, and a militia assault scout.
– The fleeing sathar ships accelerate for a jump to OFS020 where they will make a high-speed run to sathar SCC#5 (OFS019).
62.084
– A frigate is completed at sathar SCC#10 (OFS174).
– TF Cassidine’s assault carrier, together with the Fromeltar militia frigate, are designated Shuttle Group Beta and depart for Dramune where the frigate will enter the shipyard for repairs and the carrier will continue on to Prenglar.
– One of the minelayers in TF Prenglar is detached and designated Shuttle Group Gamma. It departs to join TF Cassidine in Fromeltar.
62.085
After a careful review of the events of the Second Battle of Fromeltar, Spacefleet begins a program to arm and add defenses to all existing starship construction centers. Additionally, security is increased even further at all operating shipyards.
62.086
– SG Alpha arrives at Lossend where the eight fighters it is carrying are deployed as FFC Squadron Iota. SG Alpha then heads out for Theseus to pick up more fighters.
– An assault scout is completed at the PGC shipyards (Gran Quivera, Prenglar) and joins TF Prenglar.
62.087
– Calculations for the return jump to YS14 complete, the HSS History’s Hope begins accelerating for a jump back to that system.
– PG Probe Beta successfully jumps into the Kazak system. It begins decelerating and working on jump calculations for the return jump to Zebulon.
– PG Probe Gamma successfully jumps into FS56. They remain near jump speed while working on overhauls and jump calculations for the return jump to Kizk-Kar while they monitor for sathar signals in the system.
– PG Probe Delta successfully jumps into the FS33 system. With the jump back to K’aken-Kar already plotted by the militia, they remain near jump speed and begin working on jump calculations to the neutron star in OFS166 while they monitor for sathar signals in the system.
62.088
– Spacefleet changes PG Probe Beta’s orders and directs the to proceed immediately to OFS019 and monitor the system. They stark working on jump calculations for that system and maneuvering for a jump.
– A light cruiser is completed at sathar SCC#1 (OFS203) and joins SBF-A2.
– SBF-E2 jumps back into OFS020 where they remain near jump speed and begin a high-speed transit to SCC#5 (OFS019).
– Five fighters are completed at the PGC shipyards (Gran Quivera, Prenglar) and shuttled to Gollwin Academy.
62.089
– TG Beta arrives in the K’sta-Kar system from Prenglar and joins PG Vigilant.
– Sathar fleet TG2 jumps into the OFS203 system (Sathar SCC#1) and receive orders to remain near jump speed and vector to join SBF-A2 which begins acceleration for a jump to the Gruna Garu system.
– Assessment of resources and manufacturing capabilities complete, work begins on the long process of rebuilding the Terledrom (Fromeltar) starship construction center.
– Two more pilots graduate from the accelerating training program at Gollwin Academy. They continue working with the fighters at the academy while two other pilots are sent to Triad (Cassidine) to start training with FFC Squadron Eta.
62.090
The assault scout from Minotaur arrives in the Liberty system and joins PG Liberty.
62.091
PG Probe Beta jumps into the OFS019 system. They remain near jump speed as they begin working on calculations for a jump back to Kazak and monitoring for sathar signals in the system.
62.092
– The HSS History’s Hope successfully jumps back into the YS14 system completely charting the route to that system from YS12. They begin deceleration and jump calculations back to YS12 and then a return trip to Scree Fron.
– Calculations complete, PG Probe Delta successfully jumps into the OFS166 system containing the neutron star. They begin decelerating and working on calculations for a jump back to FS33 while monitoring for sathar signals.
– After only detecting signals from near one of the planets, Spacefleet orders PG Probe Beta to cautiously proceed to the inner system and examine exactly what is there. They alter their course to slowly drop into the system.
62.093
Deceleration and jump calculations complete, PG Probe Gamma begins accelerating for a jump back to the Kisk-Kar system.
62.094
– SBF-A2 (1 DD, 2 LC, 1 HC) jump into the Gruna Garu system and begin decelerating toward the planet.
– The Gruna Guru militia detects the inbound sathar ships just hours after they arrive in the system. Together with FFC Squadron Theta and the Yazira Squadron of civilian privateers, they prepare to defend against the sathar while notifying Spacefleet.
62.095
Sathar SCC#5 detects the inbound assault scouts of PG Probe Beta. The UPF ships notice a sharp decrease in transmissions from the planet but little else.
62.096
With the increased security the CNE Group infrastructure rollout has speed up and gone much more smoothly. As new areas are provided with service, customers are switching in droves away from the high prices of the Groth Energy Corporation.
62.097
– Calculations complete, and having not detected any sathar in the system, PG Probe Delta begins accelerating for a jump back to FS33.
– The two Spacefleet fighter pilots arrive at Triad (Cassidine).
62.098
– PG Probe Gamma successfully jumps back into the Kizk-Kar system and immediately begins decelerating and working on calculations for a jump back to FS56.
– Battle of Hargut (Gruna Garu) – UPF forces defeat the invading sathar but at great cost including the loss of the station around the planet.
Five fighters are completed at the CDC (Triad, Cassidine) shipyards.
62.099
– PG Probe Beta gets close enough to the planet to begin to detect details and discovers what seems to be a starship construction center as well as shuttles going between the station and planet. The SCC seems to be currently undefended.
– After several hours of observations, PG Probe Beta begins to accelerate away from the planet toward the outer system. They send a subspace radio message back to Spacefleet with their report.
– The damaged ships of the Yazira Squadron depart Hargut (Gruna Garu) for Prenglar and the shipyards there.
I can’t believe August is over already. Time has just been flying by.
Looking Back
This month turned out to be pretty good for me as far as posting here on the blog goes. We started with our usual Detailed Frontier Timeline post.
Next up was a post with a sample star system. I had talked about starting a new project and this was the first pass at that. I got very little feedback on that post. I was hoping for a bit more but that’s okay. I actually haven’t had time to finalize the details of how I’m going to present those system but it’s something to work on this coming month.
We actually had two different battles in the Detailed Frontier Timeline this month, one in Fromeltar that resulted in a major setback for the UPF and then another in Gruna Garu that will also cause some problem. The sathar didn’t come out unscathed so the UPF isn’t as bad off as they think but they don’t know that.
Next up I wrote about a campaign idea I have, searching for the Yazirian homeworld. That campaign concept is playing out in the Detailed Frontier Timeline as the journey of the HSS HIstory’s Hope. That was another post I was surprised to not get a lot of commentary on. It looks like it would probably be better as a novel then a game, I guess. But maybe if I actually started soliciting players, people would respond.
Then I had a post looking at the Yachts and Privateers from the “Fast and Deadly” Dragon article. This was actually in preparation for the battle in the Gruna Garu system in the timeline since there were privateers in that battle. As someone pointed out, there was a follow-on dragon article “Yachts & Privateers Return” that basically did the same thing as me and revised the stats for the ships. I’ll need to look at that and see how they revised them differently than me. Considering that was written by Doug Niles, who wrote the Knight Hawks rules combat rules, it definitely deserves a look.
Behind the scenes, not much else happened. I didn’t work on my websites at all, other than to create a temporary fix for an issue on the Frontier Explorer site that was cause a process to runaway and use all the CPU on the server. I did get my 3D printer set up and running here in AZ as someone wanted me to print them some ship minis but I didn’t do any modeling.
Looking Forward
Coming up we’ll have the usual Detailed Frontier Timeline post. There might be another battle this month but I haven’t progressed the timeline far enough to see how things play out. I got a bit behind with the Battle of Hargut (Gruna Garu) and the prep for that so I’m only a couple of days ahead instead of a couple of weeks like I’d like to be. That typically happens when there’s a battle.
I plan on posting at least one new star system, and maybe more. We’ll see how that goes. I’m also starting to get itchy to do some 3D modeling so maybe there will be a new model. No promises though as I’m also traveling a lot this month. I plan to keep up the archiving work on the Arcane Game Lore posts as well. But beyond that, I really don’t know what the month will bring.
Final Thoughts
I’ve been debating back and forth on the value of these “State of the Frontier” posts. I’m thinking of maybe only doing them every two or three months instead of monthly. Especially if there isn’t a lot of “behind-the-scenes” work going on. Do you find them useful? Should I keep doing them monthly? Let me know what you think.
The surprise appearance of sathar forces in the Gruna Garu system were met by the combined forces of the Hargut militia, the Frontier Fighter Corps, and the Yazira Squadron. Sustaining heavy casualities, including the complete loss of the Frontier Fighter Corps squadron, the defenders were able to destroy nearly all the invading vessels.
The final sathar ship, heavily wounded, and in an act incomprehensible to sane minds, rammed the defense station destroying itself and the station in the process. We honor those who gave their lives defending ours.
Rinna Harglot, Hargut Global News
Background
Hoping to draw some of the UPF forces from the spinward side of the Frontier where most of the fighting has occurred so far, the sathar have explored a route into the Gruna Garu system and launch a small fleet to attack that system hoping to overpower the defenders there. They are opposed by the Hargut militia, Frontier Fighter Corps Squadron Theta, and the rag-tag volunteers of the Yaziria Squadron.
Order of Battle
UPF
Militia
2 assault scouts
1 armed station
Frontier Fighter Corps (Squadron Theta)
8 fighters
For this battle, I’m using the game stats in my A Look at Yachts and Privateers post from a few days ago for the Yaziria Squadron ships. I basically picked the ships in that group at random from the ships in the article.
Yaziria Squadron
1 Belvedere Class ship
1 Astro Blaster III Class ship
1 Imp Class ship
1 Nova-AR Class ship
1 Rollo’s Revenge Class ship
1 Condor II Class ship
2 Thruster II Class ships
Sathar
1 destroyer
2 light cruisers
1 heavy cruiser
The Battle
Setup
The sathar are here to do as much damage as possible to attempt to draw forces from the other part of the Frontier. They come in relatively slow (speed 15) in attempt to get the defending forces to spread out so that they can deal with them in waves instead of all at once.
The UPF forces spread across a wide front moving at speed 20 to be prepared to engage the sathar regardless of what path they take through the system. The FFC squadron splits into two flights on the wings and the Yazira Squadron splits up as well with the militia assault scouts above them.
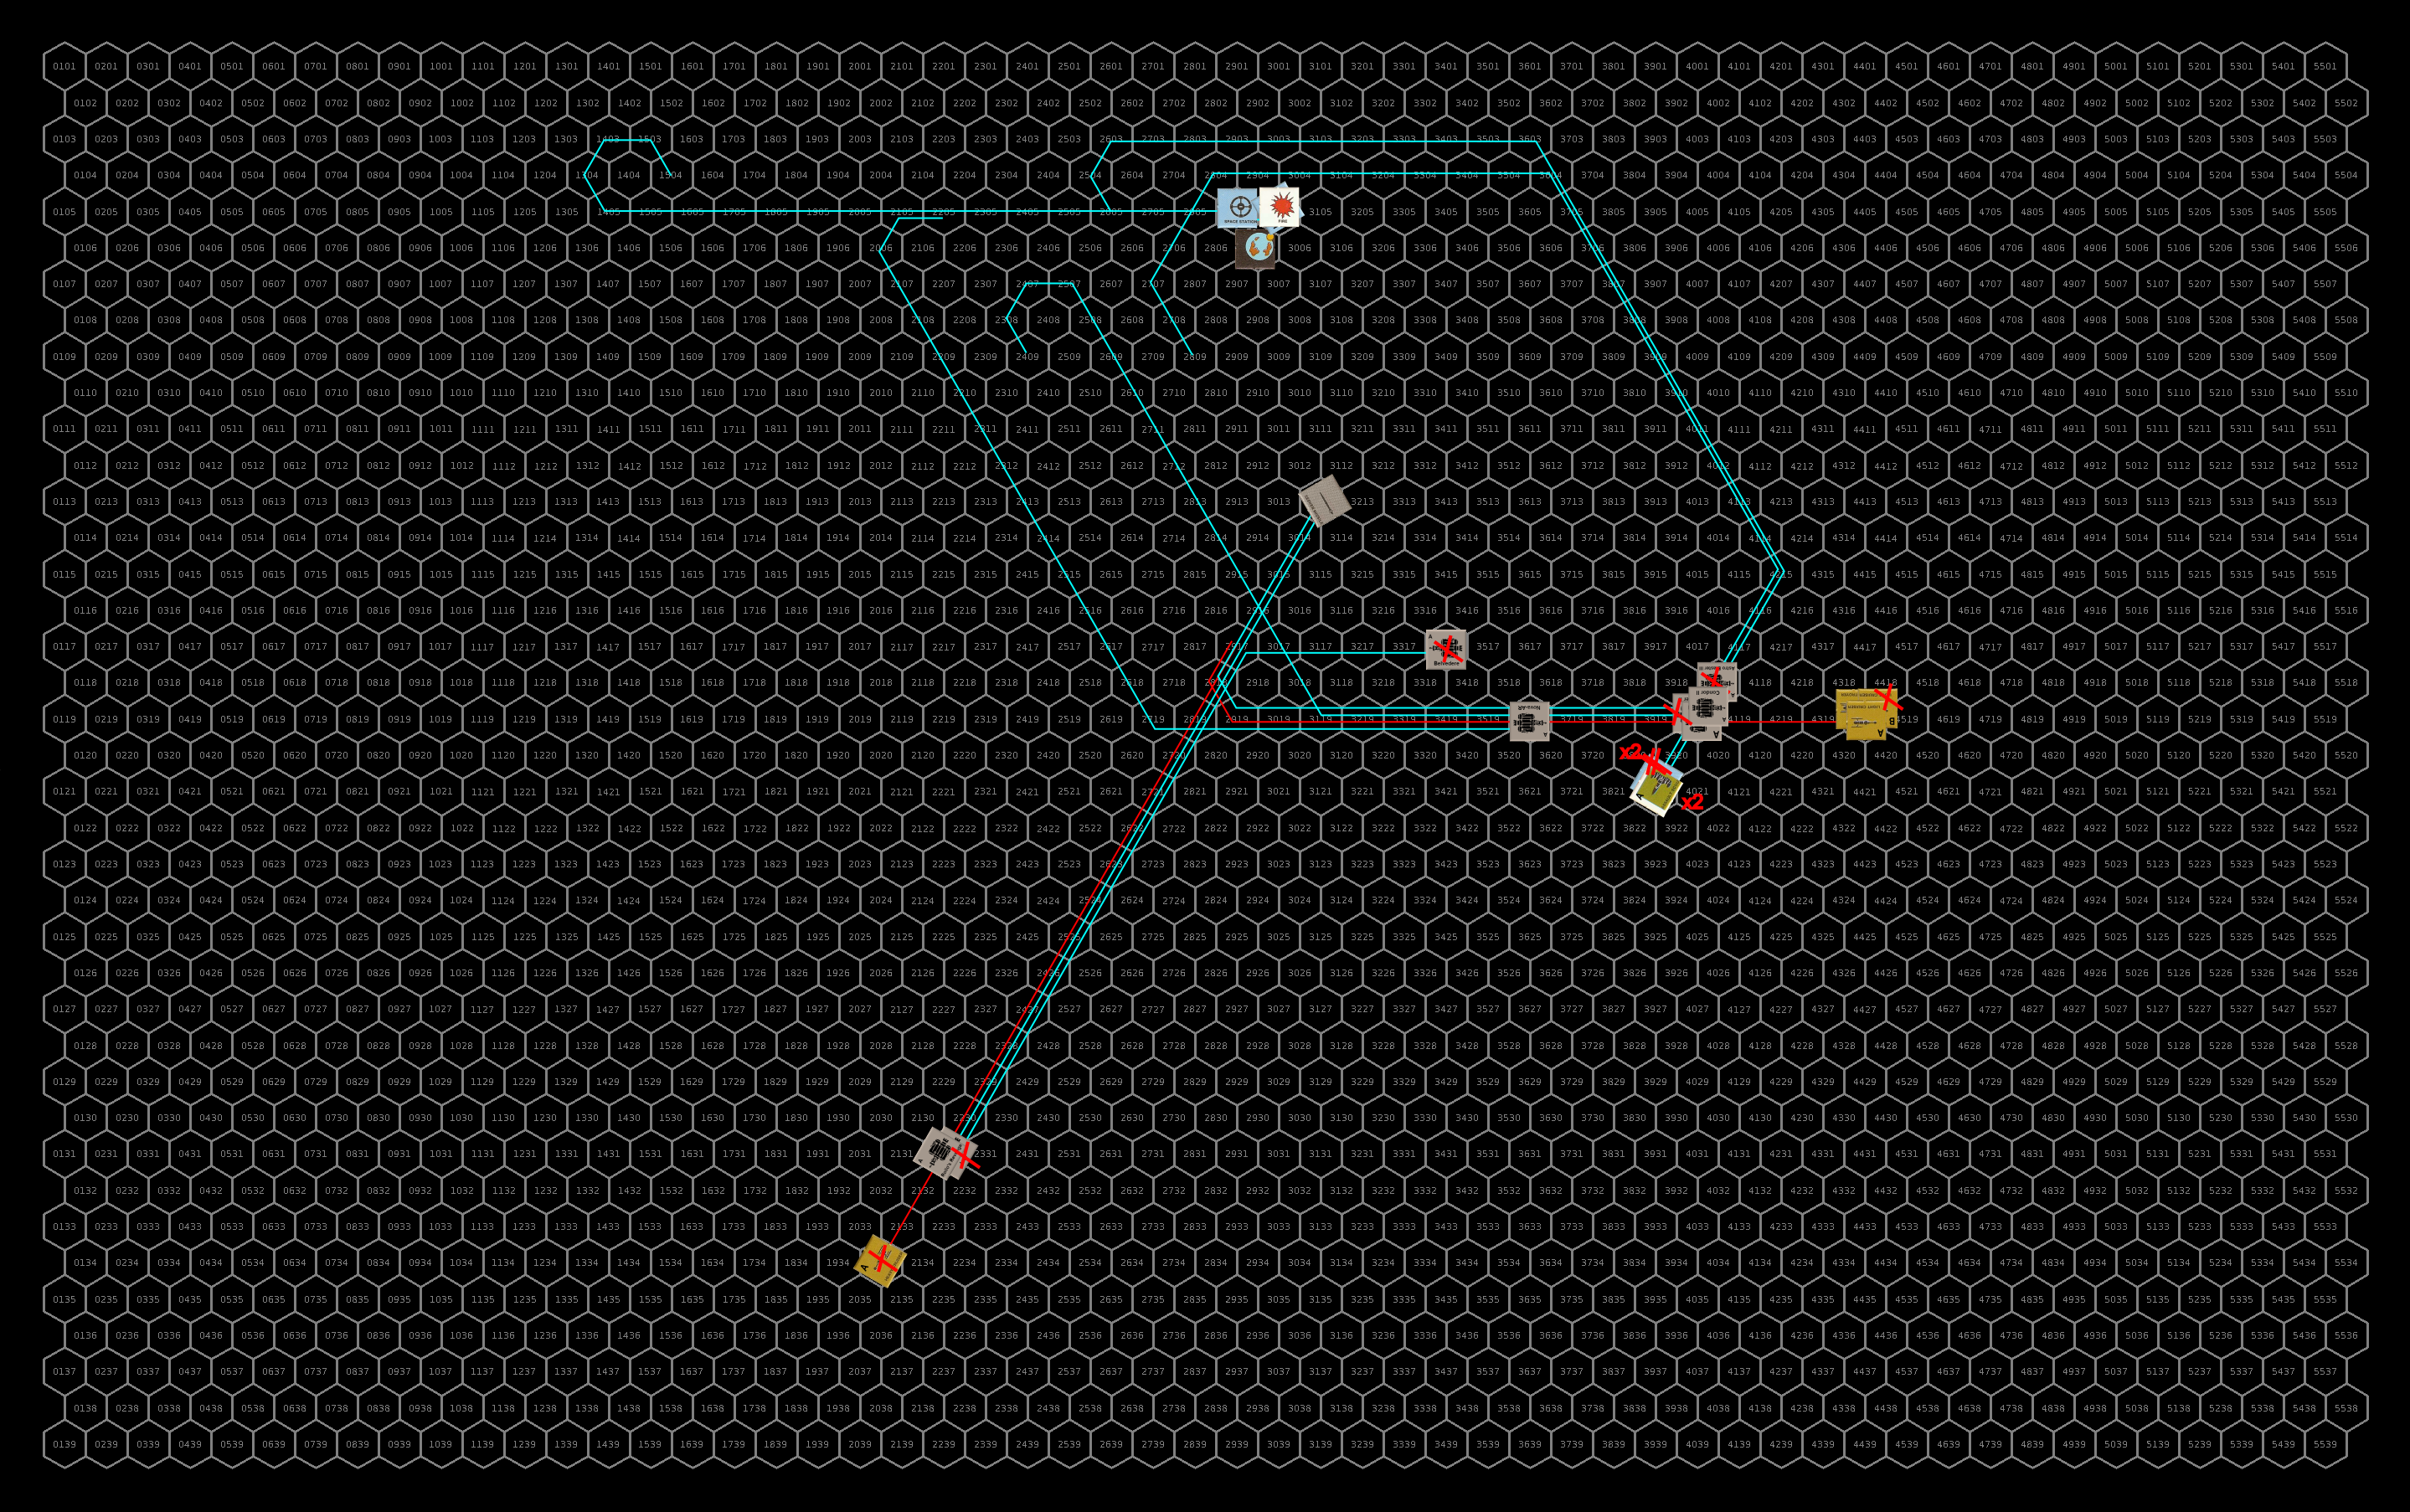
Initial starting positions for the battle. Click for full size image.
Turn 1
The sathar maintain their speed but pull into a closer defensive position. Out of range of any UPF weapons, they take some long distanced shots at the armed station with their proton and electron batteries. The second light cruiser connects with both weapons knocking out the stations laser battery and crippling its damage control system.
The UPF ships race forward applying maximum acceleration but can’t quite get in range of the sathar vessels which get another round of free shots on the station which has now come in range of their cannons as well. They are not as lucky this time and only the destroyer’s laser cannon connects with the station knocking out 9% of its hull integrity.
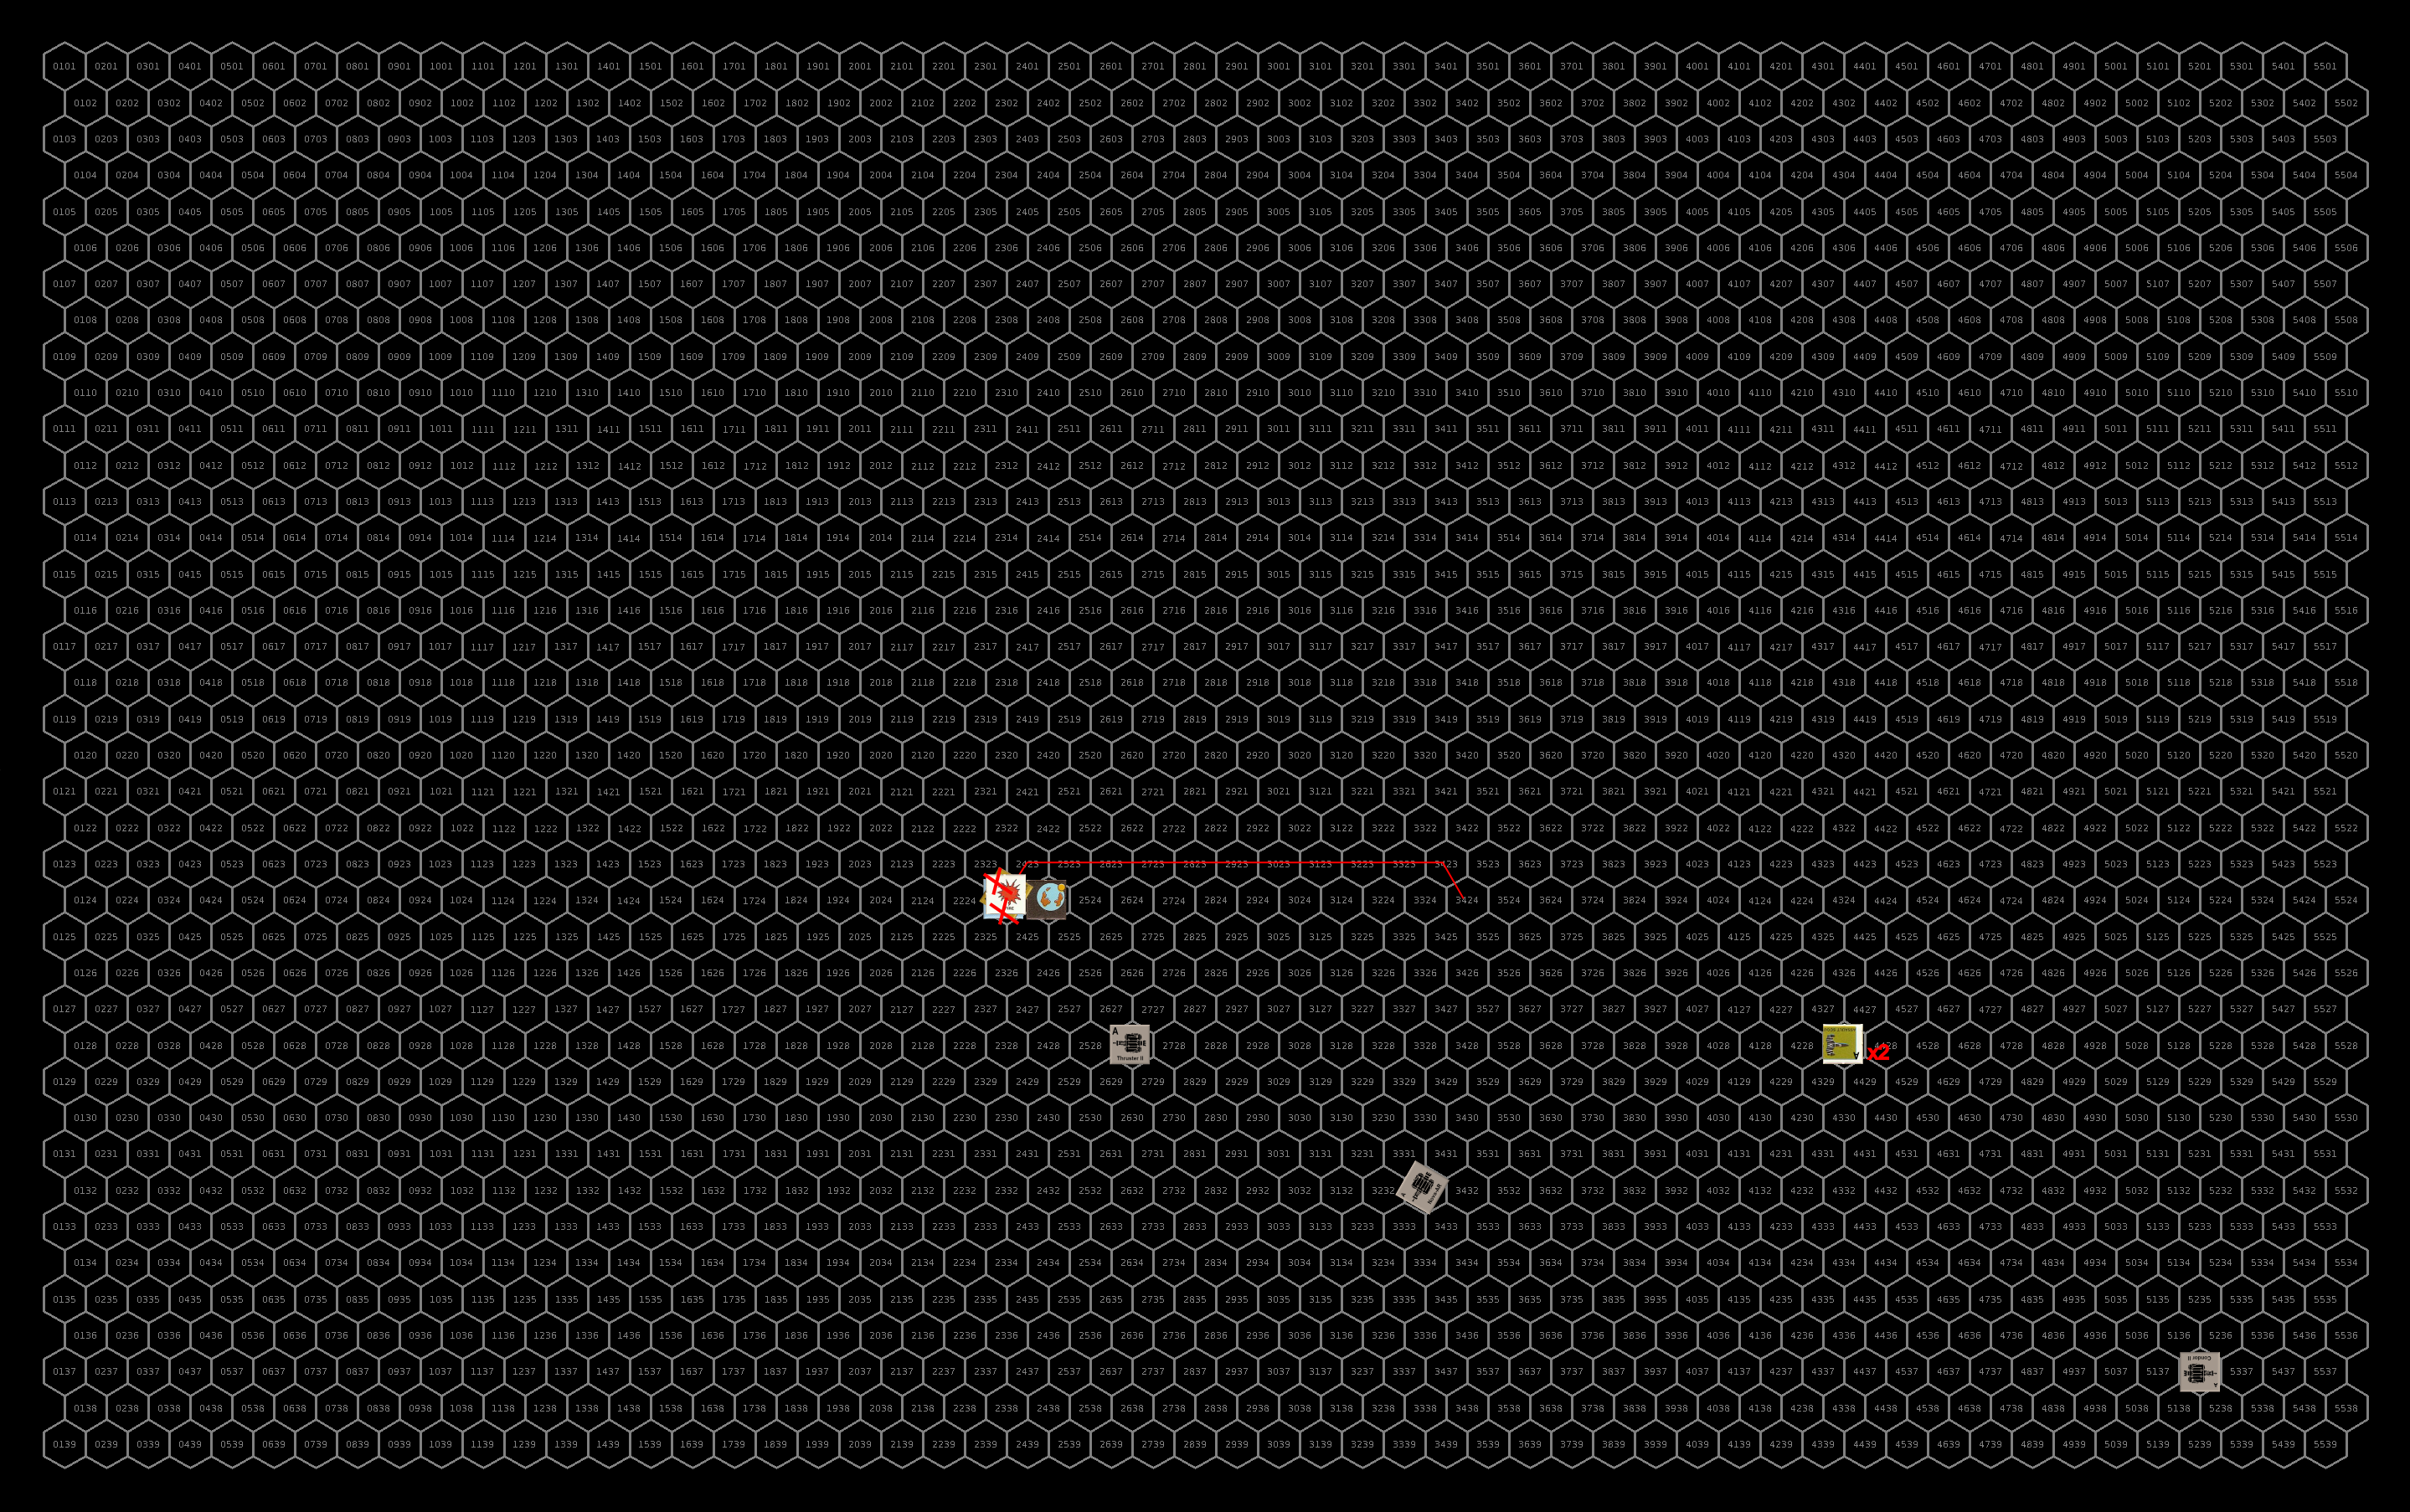
Closing the distance. Click for full image.
Turn 2
Accelerating to speed 17 and remaining as a group, the sathar turn to go after the lone flight of FFC fighters below the planet. The fire a salvo of torpedoes at the station as they pass and fire their energy weapons at the fighters with each ship targeting a single fighter and the heavy cruiser firing one of its laser batteries at the fighter targeted by the destroyer. The station fires all of its ICMs in an attempt to disrupt the torpedo attack. The heavy cruiser also drops a seeker missile along its path.
All of the torpedoes miss the station but the fighters are not so lucky. The smaller capital ships all hit with their cannons and electron batteries and the heavy cruiser hits with one of its laser batteries on its primary target. The two lead fighters are vaporized by the energy cannons hitting them. The third fighter has 25% of its hull integrity knocked out by the electron battery while the disruptor cannon damages its combat control system. The final fighter has its navigation control system jammed by the hit from the heavy cruiser’s laser battery.
The UPF move to eliminate the sathar vessels. The other flight of FFC fighters continues its maximum acceleration and loops in behind the sathar ships to unleash a volley of assault rockets. The militia assault scouts do the same. The damaged fighters remain at speed 25. The fighter with the navigation control hit spins away from the sathar vessels and never gets a shot but the other fighter maneuvers for an assault rocket shot and then flies up near the station to position itself for its next attack.
The Belvedere and Imp join up 50,000 km away from the sathar ships to remain out of range of their torpedoes and fire their laser weapons at the frigate. The Rolo’s Revenge and Condor II do the same to come up behind the sathar vessels but close to 40,000km so that they are within torpedo range. The Nova-AR and Thruster II vessels make an assault rocket pass and follow the militia assault scouts’ and fighters’ general flight plans. The Astro Blaster II, with its limited maneuverability strafes the sathar ships with its electron battery.
Defensively, the sathar ships fire their rocket batteries at the Astro Blaster II and focus their remaining weapons on the UPF fighters and Thruster II vessels. Their cannons are fired at the two wounded fighters while they fire two energy batteries each at the other 6 vessels.
The partially damaged fighter is obliterated by laser and disruptor cannon blasts from the destroyer and a light cruiser. The other light cruiser connects with its disruptor cannon starting a fire on the fighter with the navigation damage. The Astro Blaster III is hit by two of the rocket batteries knocking out 77% of its hull integrity and taking it out of the fight. In the other flight of fighters two are destroyed by electron battery fire while the other two suffer 88% and 50% hull integrity reduction from laser batteries. The second Thruster II ship is hit by an electron battery knocking out its engines.
The surviving UPF ships open fire. The seven assault rockets are all fired at the heavy cruiser while the ships focus their energy weapons on one of the light cruisers. The Rollo’s Revenge and Condor II fire torpedoes at the destroyer. The destroyer and heavy cruiser fire ICMs at the incoming torpedoes. Six of the seven assault rockets hit the heavy cruiser. On takes out the cruiser’s torpedo launcher while the other knocks out its ICM launcher. The other four hammer its hull reducing it’s hull integrity by 88%. The ICMs do their job and intercept both torpedoes headed for the destroyer. The light cruiser is raked by energy fire with the Astro Blaster III’s electron battery knocking out its ICM launcher, the Nova-AR’s laser battery short circuiting the power system, and a proton battery from the Rollo’s Revenge and a laser and proton battery from the Condor II rake the hull and reduce its hull integrity by 29%.
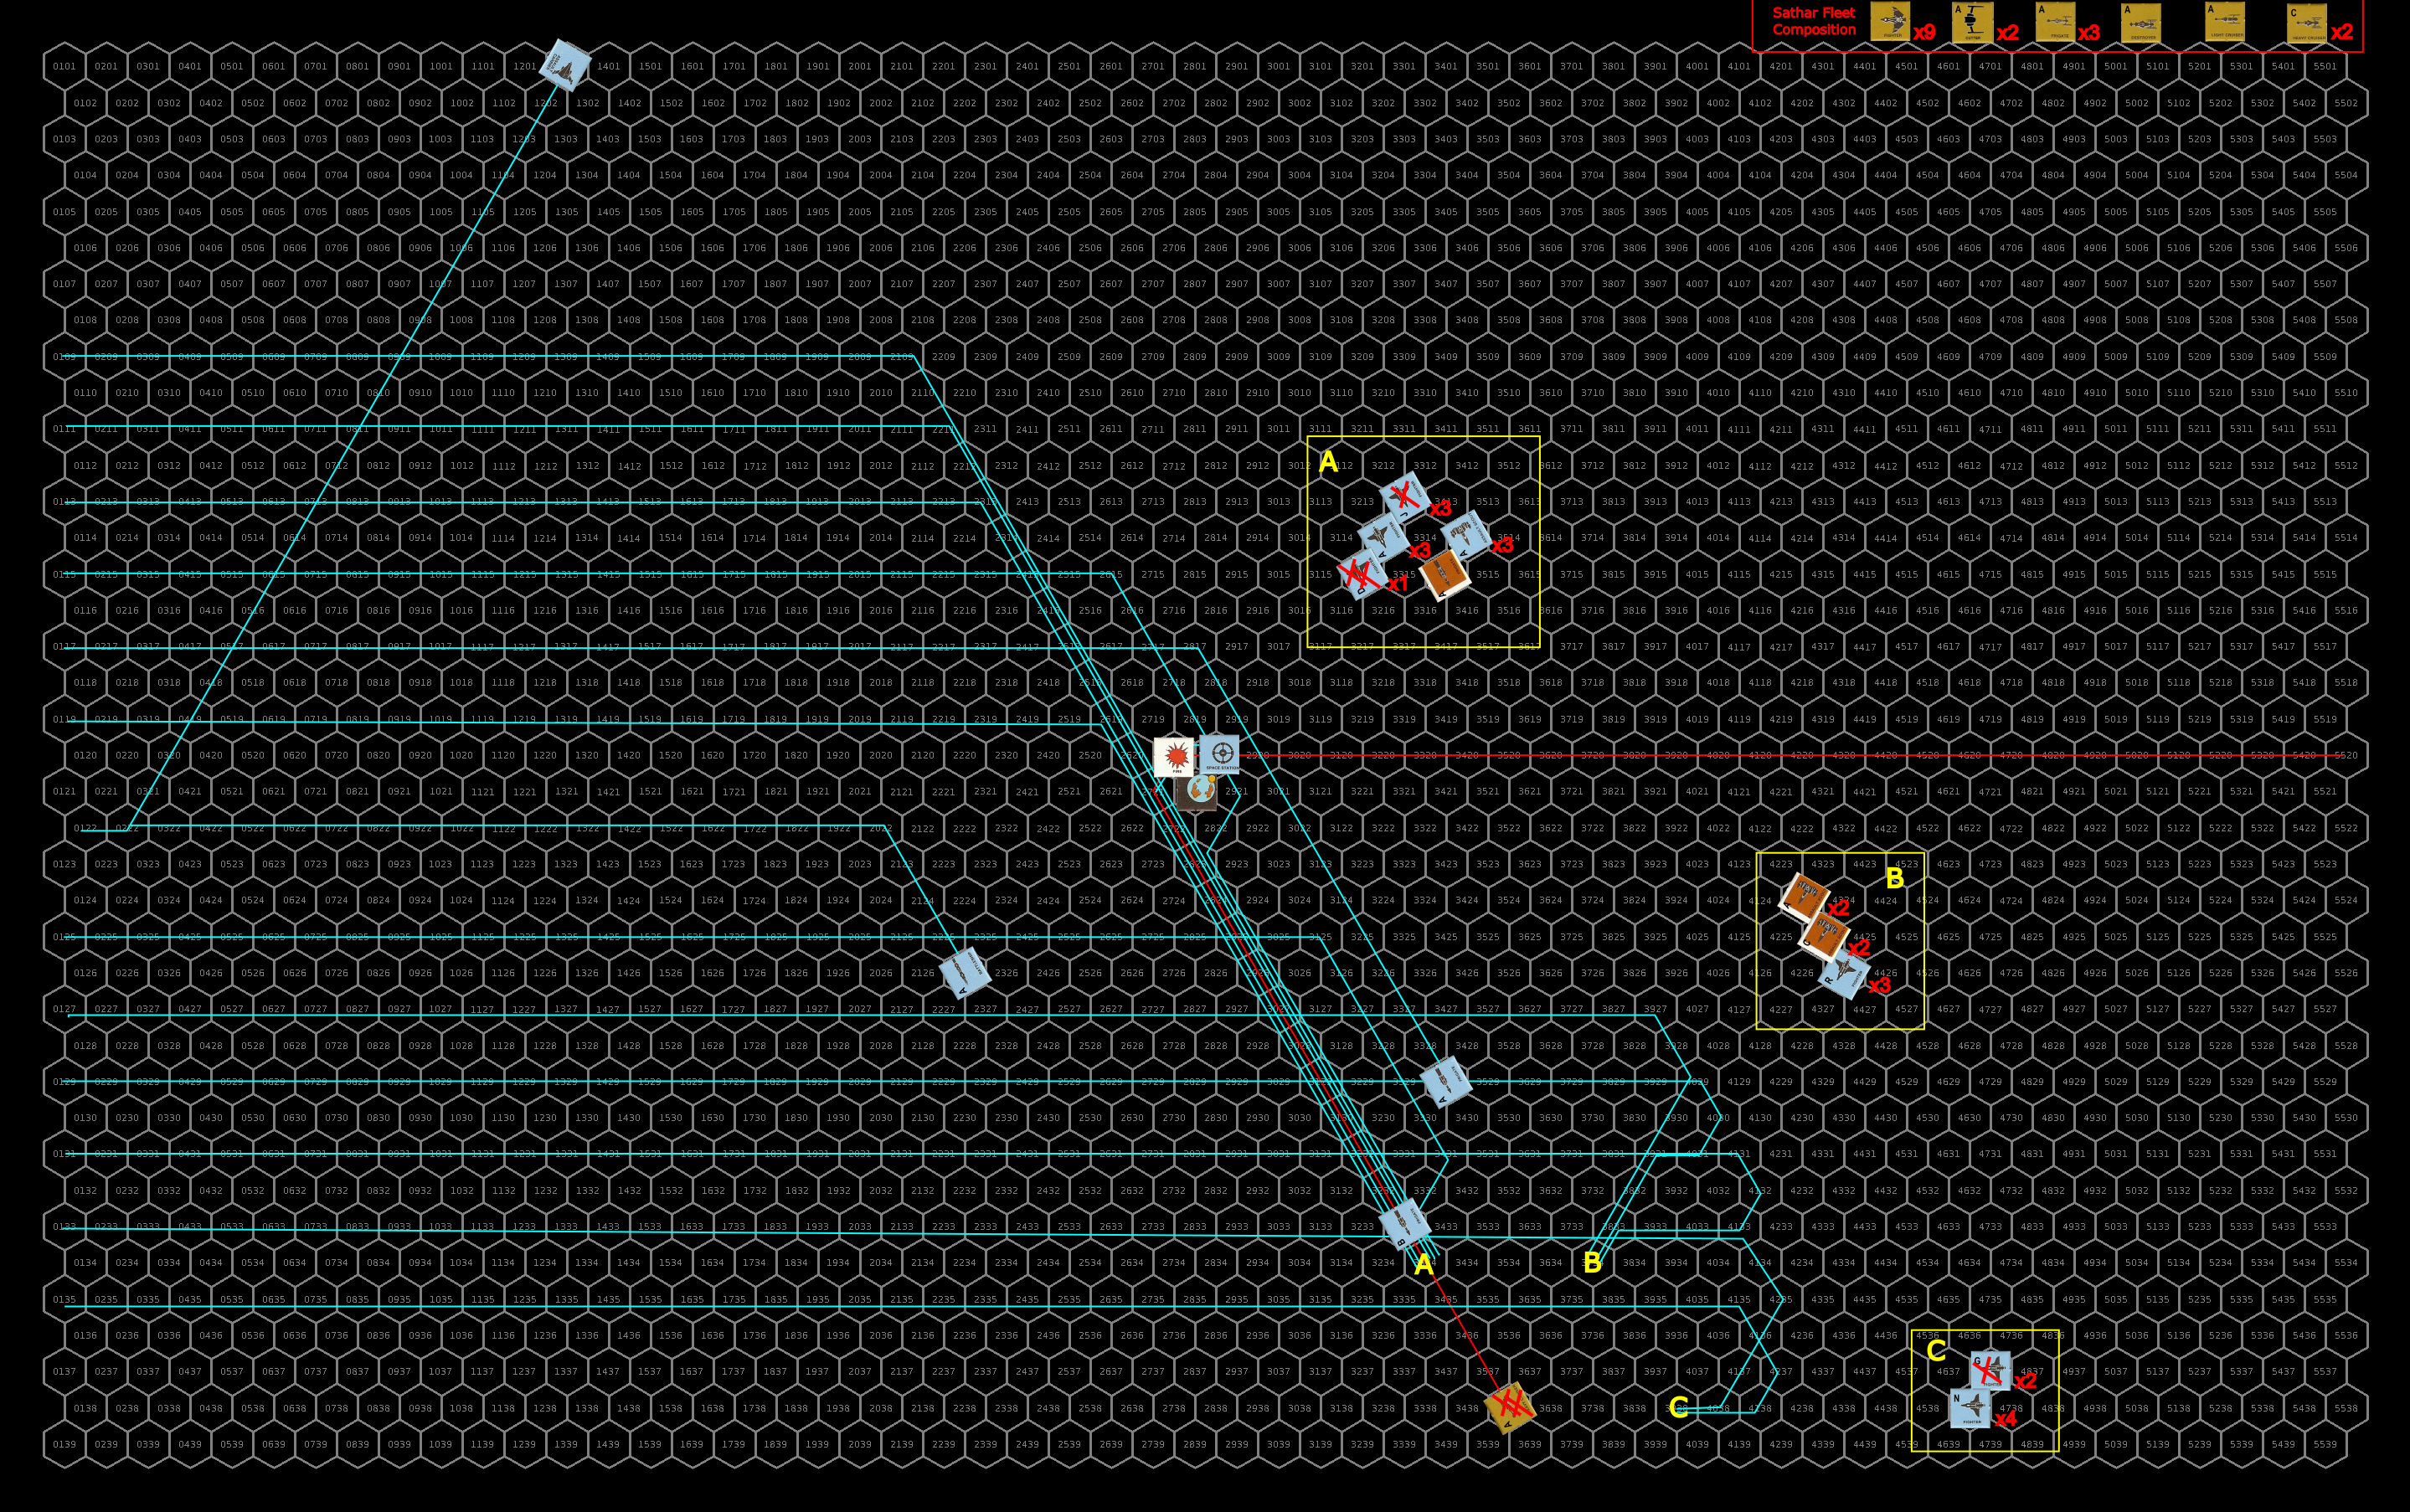
The battle after the first round of engagement. It got chaotic real fast with all the different ship capabilities. Click for full-sized image.
Turn 3
The sathar heavy cruiser, heavily damaged, just drifts away from the battle. The other sathar ships pull to port and go after the Belvedere, Imp and Astro Blaster II vessels. They also activate the seeker missile dropped last round that activates near the Rollo’s Revenge and Condor II. With the Condor II being the larger ship, it is targeted by the missile. Between the two ships they fire three ICMs at the incoming seeker missile. Unfortunately, the seeker missile evades the ICMs and slams into the Condor II but only knocks out its masking screen launcher.
Defensively, Condor II and Rolo’s Revenge fire at the Heavy Cruiser while all the other ships in range fire at the damaged light cruiser. He heavy cruiser is hit by an electron battery from the Condor II that knocks out its disruptor cannon and the Condor II and Rollo’s Revenge hit with a proton and electron battery respectively knocking it down to just 1% hull integrity (1 HP left). The Light cruiser is hit by the Belvedere’s and Imp’s laser cannons knocking out its disruptor cannon and reducing its hull integrity by 11%.
The sathar fire two torpedoes at the Rollo’s Revenge and two at the Belvedere. The heavy cruiser fires all of its energy weapons at the Rollo’s Revenge as well. The other ships fire their cannons at the Astro Blaster III as they fly by. They fire two rocket batteries at the Belvedere and on at the Imp and divide their energy battery weapons evenly between the two ships. The heavy cruiser deploys its final seeker missile along its path.
The Rollo’s Revenge and Condor II fire ICMs at the incoming torpedoes and both miss. With no ICMs, the Belvedere isn’t as lucky and one of the torpedoes hit reducing it’s hull integrity by 62%. The Rollo’s Revenge is hit by an electron battery from the heavy cruiser that knocks out its power system disabling its defenses. Both rocket batteries hit the Belvedere obliterating it. The rocket battery fired at the Imp misses. The destroyer’s laser cannon connects with the Astro Blaster III destroying it. The Imp is hit by a laser, proton, and electron battery, all of which damage its hull, but amazingly only reduce the hull integrity by 50% (only 10 HP on 3d10).
The fire on the UPF fighter damages its hull knocking out 50% of its hull integrity. That fighter pulls to the left with it’s out of control maneuvering and slows to speed 20 but its path takes it dangerously close to the planet.
The UPF fighters and militia assault scouts loop around the planet and make an assault rocket run on the undamaged sathar light cruiser while joining up and remaining at speed 30. The Imp and Rollo’s Revenge join up to go after heavy cruiser to finish it off. Due to the Rollo’s Revenge’s speed, the come within rocket battery range of the cruiser. The Condor II and Thruster II ships come up behind the sathar vessels and fire at the damaged light cruiser. The Nova-AR starts chasing down the sathar ships as well but is too far away to catch up with its limited acceleration.
Defensively, the heavy cruiser focuses its energy weapons on the Imp and fires a rocket battery at the Rollo’s Revenge. The rocket battery hits knocking out the ship’s maneuvering. A lucky hit by the cruiser’s laser battery destroys the Imp (10 HP on 1d10). The other sathar ships fire on the incoming fighters and Thruster vessels dividing their weapons among those four ships. The two fighters and damaged Thruster II ship are hit by a laser, electron, and proton battery (respectively) and each are destroyed. The other Thruster II vessel is hit by an electron battery which reduces its hull integrity by 60%.
The surviving ships open fire at their respective targets. The Rollo’s Revenge’s electron battery takes out the heavy cruiser’s proton screen just before the torpedo slams into the hull obliterating the ship. The Condor II and surviving Thruster II ship hit with every weapon except one of the Condor II’s laser battery. The Thruster II’s pod laser knocks out half of the cruiser’s maneuvering capabilities while the Condor II’s laser battery induces a navigation control failure. That is moot, however as the torpedo, assault rocket, disruptor cannon, and proton and electron batteries rip into the cruiser’s hull and destroy the ship (98 HP, too bad they didn’t shoot at the undamaged cruiser. The militia ships fire at the other light cruiser. The laser batteries miss but both assault rockets hit reducing the hull to just over 50% integrity (both AR rolled double damage but only did a total of 34 HP).
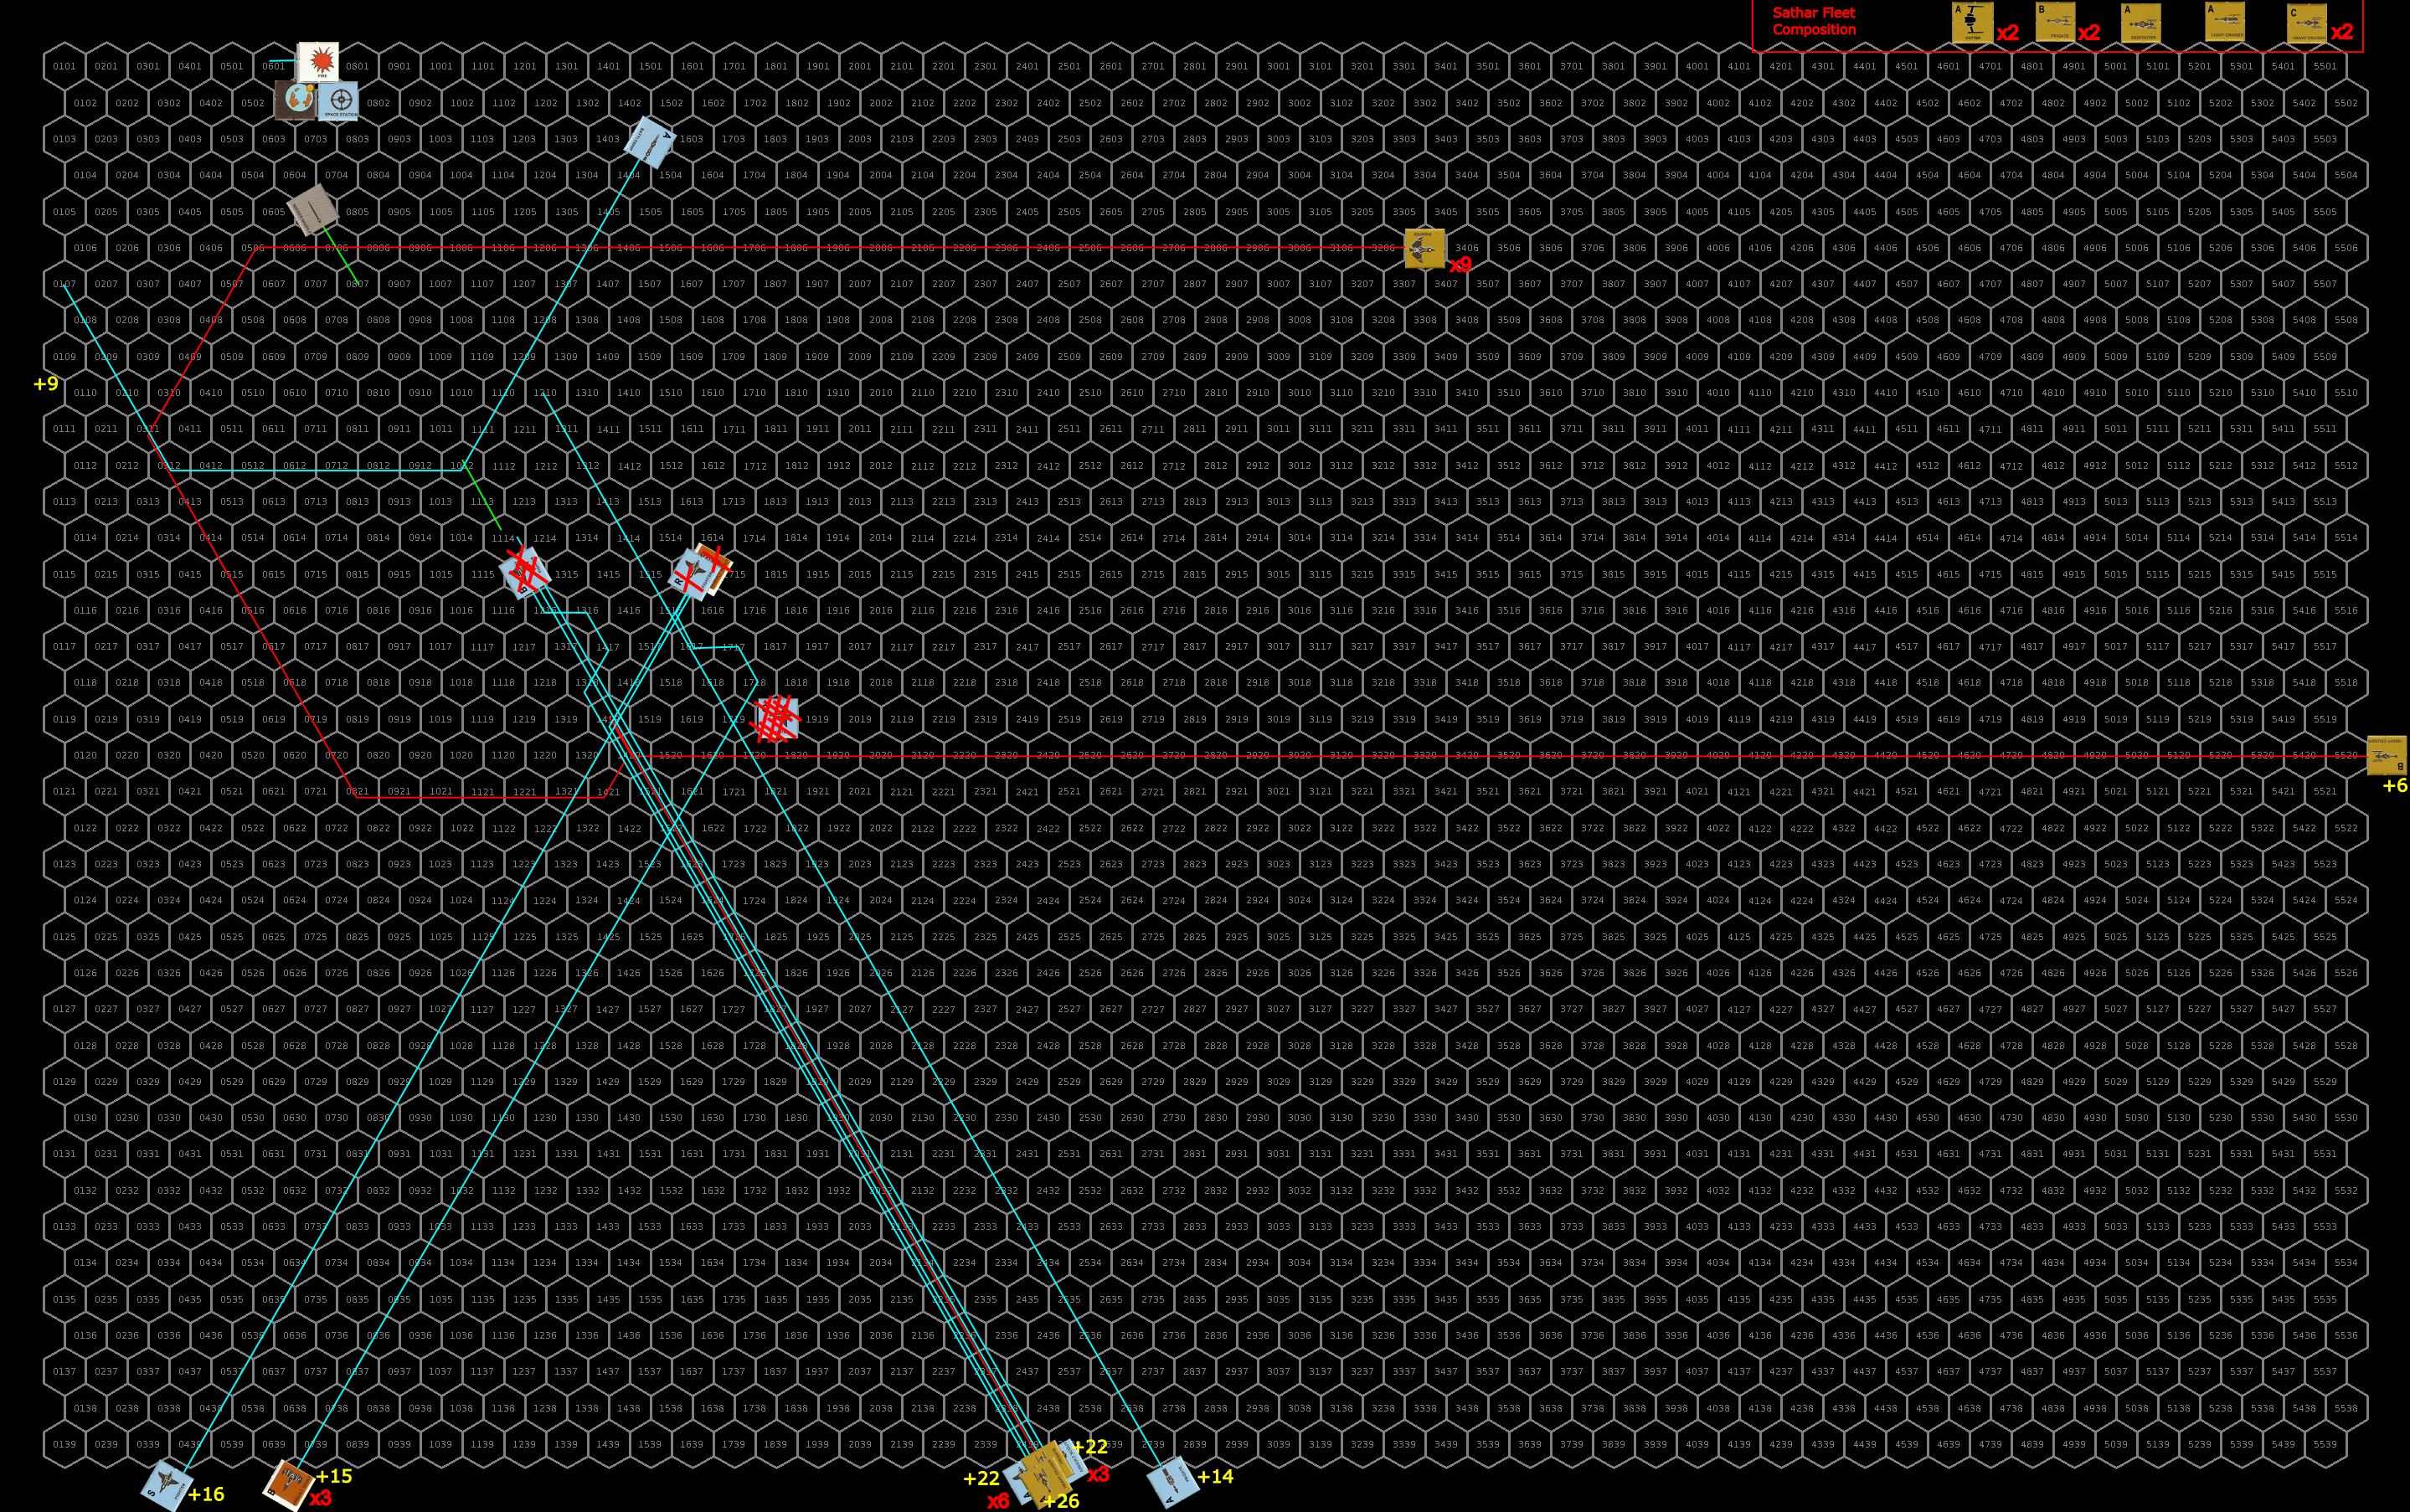
The battle after the first half hour. I shifted the map to keep all the ships on the board. Click for full-sized image.
Repair Turn 1
The damaged sathar light cruiser repairs 11% of its hull integrity.
The station repairs its laser battery. The fighter tries to repair the fighter but can’t quite get it out (rolled a 34 on a 30 DCR). The Rollo’s Revenge tries to repair its maneuvering but can’t quite get it fixed. The surviving Thruster II tries to repair its hull but the damage will require a shipyard. Finally, the Condor II repairs its masking screen launcher.
Turn 4
The sathar activate the last seeker missiles which chases down the Rollo’s Revenge. With no ICM’s left, the ship’s crew watches helplessly as the missile closes in and slams into the hull reducing the hull integrity by 62%. The two surviving ships turn to port and head back toward the planet, slowing to speed 14.
Defensively, all the ships fire at the damaged light cruiser. The Condor II hits with a laser battery reducing the hull integrity by 13% and an electron battery which starts a fire. The Thruster II’s pod laser scores a critical hit reducing the cruiser’s hull integrity by another 23%
The sathar vessels fire all their weapons at the Condor II. One electron battery hits damaging the Condor II’s combat control system while both torpedoes hit reducing the ship’s hull integrity by 78%.
The fire on the UPF fighter proves too much and compromises the hull, destroying the ship. The Rollo’s Revenge and the Condor II, both heavily damaged, just drift away from the battle as they work on repairs to their hull to prevent the ships from breaking up while maneuvering. The remaining ships loop around and go after the sathar vessels intending to take out the destroyer on this pass.
The militia assault scouts loop around and fire on the destroyer, slowing to speed 25. Like the assault scouts, the Nova-AR loops around, just counter clockwise and fires on the destroyer as well. The Thruster II follows a similar flight plan to the Nova-AR but it’s high speed takes it further away from the sathar ships after if fires its weapons.
Defensively, the destroyer fires at the Thruster II while the light cruiser fires at the lead militia assault scout. An electron battery connects with the Thruster II damaging its engines while the assault scout is hit by a laser battery knocking out the assault scout’s laser battery and an electron battery that reduces its maneuvering by 25%.
The Thruster II’s pod laser damages the destroyer’s engines but then three of the four assault rockets hit the destroyer obliterating it.
Wounded ships are starting to drift away. Had to shift the map a bit again. Click for full-sized image.
Turn 5
Cognizant of the fact that it probably won’t survive the battle with the remaining UPF vessels, the damaged sathar light cruiser turns toward the planet and station. Using the gravity of the planet to assist it’s motion the cruiser barrels straight at the station to ram it. The crew of the station watches in horror as the large sathar vessel barrels down on them. They fire their laser and rocket battery in defense but know it won’t be enough. Both of the station’s weapons miss. The cruiser fires all of its weapons at the station while it approaches. However, only the disruptor cannon actually hits knocking out the station’s empty ICM launcher. The massive ship impacts the station and the two vessels rip each other apart.
Final positions. The Rollo’s Revenge is off the bottom of the map and not shown. I shifted it again because original I was going to have the sathar ship flee and had shifted the map before I realized they would ram the station. Click for full image.
Final Repairs
The militia assault scout quickly repairs its damaged LB and then its damaged maneuvering shortly thereafter.
After about two hours, the Rollo’s Revenge has repaired all of its damage except its hull. It will have to carefully fly to Prenglar to get that repaired not what the Hentz shipyard has been destroyed.
It takes two and half hours for the Condor II to complete its repairs and like the Rollo’s Revenge, it too must carefully limp to a shipyard to completely repair its hull.
After an hour and a half, the surviving Thruster II has repaired as much as it can of the battle damage but is also unable to repair its hull and must head to a shipyard.
Aftermath
The sathar didn’t quite do as much damage as they had hoped. While they destroyed the fighter squadron and the station, they didn’t take out the militia assault scouts. However, they did succeed in showing the UPF that Gruna Garu is now vulnerable. So while they didn’t do as much damage as desired, it will have the desired effect of stretching the UPF thinner in the defense of the Frontier.
If you count the damage done to the surviving ships of the Yazira Squadron, the sathar actually did more damage than they took inflicting a total of 320 HP while losing 270. They definitely took out more ships. Although if you only count the ships destroyed, the sathar only destroyed 249 HP of ships. So it was pretty even.
Lessons Learned
The sathar were doing pretty well until turn 4. Then their defensive fire failed and the UPF ships had a stellar round. The turn before was also a bit surprising when the Condor II hit with everything and obliterated the sathar light cruiser. I was actually expecting the light cruiser to possibly survive that round but it didn’t.
Overall, the privateers and yachts did pretty well. The Condor II and Rollo’s Revenge are formidible ships. I picked the ships for the Yazira squadron fairly randomly. If those two ships hadn’t been part of the mix, it might have gone much worse for the UPF as their torpedos were quite helpful. The Yazira Squadron were “bonus” ships relative to the order of battle for the Second Sathar War game but so were the ships I gave the sathar when I added in the ships at sathar SCC#10 a while back so it evens out.
Playing out this battle was a little slower than some of the others because I was using new ships that I’d not played before in the Yazira Squadron. I have the standard ships etched into my brain from so many battles but I was continually looking up the stats for the yachts and privateers. It also made for a bit more chaotic battle as every ship had unique characteristics.
I mentioned in my State of the Frontier post that I was going to start working on transferring all my posts from the now dead Arcane Game Lore blog to this one and I’d post a summary occasionally listing the posts I’d moved over. This is the first of those summary posts.
For the most part, I just started at the beginning of the posts I made on that blog and started working forward. However, I question came up and I responded with a post I made here and realized that the post in question had links to my Arcane Game Lore blog posts. So I temporarily stopped working on the chronological progression and went through all my posts here on the Expanding Frontier to look for links to Arcane Game Lore posts and I ported them over first. That is why there are a few posts from 2015 even though the title says through December 2014.
For a couple of posts I wasn’t able to get the images, or didn’t add in the comments from the other blog. I’ve made a note of those and will go back and fix them up at some point. In once case, the image is something I need to rescan and the pictures are in Utah while I’m in Arizona. In any case, I’ll keep working on this over the coming months.
Here are links to all the archived posts I’ve uploaded to the site so far. Feel free to read some of my early writing if you’re interested. Not all of it is directly Star Frontiers related and some of it isn’t even directly sci-fi but it is all game related at some level.
I was starting to work on the Battle of Hargut (Gruna Garu) that is coming up in the Detailed Frontier Timeline in a few days and had to put together the Yazira Squadron. From the timeline I had created the following details:
Date (FY)
Events
61.299
A small group of 8 civilian privateer vessels, hailing from the yazirian worlds of the Frontier and calling themselves the Yazira Squadron, arrive in orbit around Morgaine’s World (Prenglar) and request permission to assist Starfleet in the fight against the sathar.
61.301
Worried that since the sathar have a route into Prenglar they may also have one to Gruna Garu, Spacefleet sends the Yazira Squadron back to Gruna Garu to bolster the defenses there.
61.310
Yazira Squadron arrives back in the Gruna Garu system where they join up with the local militia to coordinate the defense of that system.
So there are eight civilian privateer vessels and they were sent to Gruna Garu to bolster the defenses there. I did this even before I conceived of the sathar actually trying to chart a route to Gruna Garu. It was just a concern on Spacefleet’s job. But it turned out to be a good idea because if they weren’t there. The incoming sathar ships (1 destroyer, 2 light cruisers, and a heavy cruiser) would probably completely overwhelm the 2 militia assault scouts and Frontier Fighter Corps squadron in the system.
The question is what should the ships be. I figured I’d just pull up the old Dragon article “Fast and Deadly” (p. 78, Dragon June, 1984) that provided stats for some yachts and privateers and use those.
Then I actually looked at the ship stats in the article.
Given the starship construction rules, even allowing for a little “fudging” in the rules for upgraded military technology in some of the ships, they just didn’t make sense to me. The yachts weren’t too bad but most of the privateer vessels were just so far out there that they seemed way overpowered. So I thought I’d work through each of these ships and see if they made sense or not and if my intuition about the ships was correct.
So here we go.
Yachts
We’ll look at the yachts first as there seem to be fewer problems with these ones. I find it interesting that of all the stats for the ships that could be included, the article included the number of lifeboats on these ships.
This one actually checks out just fine with the ship design rules. The minimum hull size (MHS) for all the weapons and defenses are equal to the hull size of the ship which means that it has to loose 1 ADF or MR and it sacrifices the ADF.
It says it has an ICM launcher but not how many salvos, we’ll assume 4 (Note: after looking at the later ships, I think it meant that it had a single ICM salvo. I’d still leave it at four though). The MHS for all of the Astro-Blaster III’s weapons and defenses comes to 12 (EB=6, RH=1, ICM=5). This means that it should be losing a total of 3 ADF or MR. Since a HS 6 ships starts with ADF/MR of 3, again this one checks out. They sacrificed 2 ADF and 1 MR.
Here we run into the first problem. The MHS for the weapons and defenses add up to 5 (LB = 3, AR = 1, RH =1) and so this hull size 5 ship should lose one ADF or MR. Unless you assess a MHS penalty for each assault rocket in which case it would be 2 lost. However, the rules give the MHS requirement on the launcher not the rockets so I don’t think that should be the case. The designers here assigned a loss of both an MR and an ADF point so the ship has ADF & MR of two instead of the default 3. Personally, I think they assessed too much of a penalty.
But that’s not really the problem. The problem is that this ship cannot fire assault rockets. On Page 18 of the Knight Hawks Campaign Book (KHCB), right under the table where the minimum hull size values are listed, it says “Assault rockets cannot be used by any ship that has an MR less than 4.” The idea being that you need to be maneuverable to line these weapons up as they are not self steering. By default, a HS 5 ship, which has a base MR of 3, cannot fire assault rockets. That doesn’t mean we can’t make it work but there needs to be some changes. Let’s look at two variants on this:
For this -AR variant we kept the assault rockets. And I only assessed the single point of ADF loss bringing the ship down to ADF:2/MR:3. We gain the extra MR point by sacrificing hull points. One of the variations on ship design, found in the “Modifying Spaceships” section under “Movement” on page 22 of the KHCB says “Any ship can gain one ADF or MR point by removing 20% of its hull points.” Applying that gives us the stats above. We sacrifice 5 HP for 1 MR.
This variant is basically a slightly larger and half as fast assault scout. It has a few more HP, only 3 AR instead of 4 (although you could bump that up without penalty in my opinion) but only has 2 ADF instead of 5.
The the -L variant, we drop the assault rockets. Now the MHS total is only 4 and we definitely only need to lose one ADF or MR point which I chose to take off the ADF. I would have put two LB on the ship and taken the two points of ADF/MR penalty like the original variant, but the rules say that you have to be double the MHS for a weapon to have two of them. Since the MHS for a laser battery is 3, the ship would need to be hull size 6 to have two. I considered replacing the assault rockets with a rocket battery but the MHS for that is 5 and we would have had to take 3 points of ADF/MR penalty instead of 2. So this variant is a moderate HP laser platform, basically a bigger version of the Imp class with a few more HP.
Again we’ve run into the problem on assault rockets on a ship with an MR less than four. Additionally, while they assessed a 1-point penalty to the ADF/MR for all the weapons and defenses, that is too low. The total MHS score for the weapons and defenses is 5. Half the hull size is 1.5 and 5/1.5 = 3.333. The rules explicitly say to round that fraction up before subtracting 1 so there should be a 3 point penalty, not a one point penalty. Now if you round the fraction for the hull size up to 2 before doing the division you only get a 2 point penalty. The rules aren’t explicit on that step so you could go either way, although given the wording of the rules, I’d lean in the rounding the division of the HS up before doing the second division. I’m going to be generous and say it should only be a 2 point deduction. But we still have the problem of the MR being less than four so we need to reallocate the deduction.
This variant reallocates the full deduction to the ADF so that the MR remains at 4 and it is valid to have the assault rockets. I also bumped up the assault rocket count to two instead of one. If you think each individual assault rocket should have the MHS applied, this keeps us at a penalty of 2. If you subscribe the MHS applies only to the launcher, I wouldn’t have an issue bumping that up to 3. This ship is effectively a slow assault scout.
If you don’t like moving player only (MPO) limited weapons on your ship, the Rim-Song-L class drops the assault rockets and keeps the laser battery. Now the MHS total is 4 and we only have the 1 point deduction on ADF/MR (assuming we round up the fraction dividing the HS by 2) which I assessed to MR like the original stats. So now we have a fast maneuverable laser platform.
The original stats just listed rocket batteries, not the number of shots so I assumed four like the frigate and destroyer have. I assume that if your ship is big enough to hold the launcher, you can have 4 salvos. The original also said “masking screen” so I assumed that meant one charge although per the rules this ship could hold two.
For this ship, the default ADF and MR are 3 so they’ve assessed a 2-point penalty. Let’s see if that makes sense. The MHS total for the weapons and defenses is 14 (LB = 3, AR = 1, RB = 5, RH = 1, MS = 4). Whether we round the HS divided by two up or not, that’s a three point deduction, not two. Plus we again have the problem that you can’t put assault rockets on a ship that has an MR less than 4. And in this case, with all these weapons, there is no way to get the MR up to four. With a three point deduction and sacrificing 20% of the hull points for a +1 MR, we’d have an ADF of 0. Which doesn’t work. The assault rockets have to to.
This version keeps all the weapons except the assault rockets and bumps the masking screens to two charges. That drops the MHS total to 13 and we still have the 3 point penalty to ADF/MR. We apply the deduction knocking the ADF to 1. It’s an armed pleasure yacht so it would never normally be accelerating that much anyway.
Again, if you want a purely laser weapon system, this ship is large enough to have two laser batteries so we drop the rocket battery in favor of a second laser battery. Now the MHS total is only 11 and our ADF/MR penalty drops to two instead of three so our ADF goes back to 2 like in the original.
Privateers
Some of the yachts were fine and the others were close but still needed some adjustments to fit within the rules. I’m pretty sure the Privateers are going to need some serious adjustments. The description of the privateers say that some of them are refitted military vessels. So for these ships, I’m going to allow a few more weapons on them than on the civilian hulls that the yachts were created from. This will be represented by not dividing the hull size in half before dividing the MHS total for the ship but rather multiplying it by two instead, effectively making them capable of carrying four times as much armament. That still isn’t as strong as the military vessels in the game. We’ll see how this goes.
If you want to look at a good system that actually allows you to recreate almost all the existing military ships in the game, you should check out the Military Ship Design articles in Star Frontiersman issue 11, page 5. The variation I’m using doesn’t quite let the ships match the capability of the system in that article but is significantly better than the standard design system for arming ships. I actually think it is still a bit much but I don’t want to tweak the ships too much from the original article describing the privateer ships.
The ships here in the Privateer section are the names of the ships given for each of the miniatures in the Privateers box of ship minis produced by TSR back in the day. I’ve included pictures of each of the minis with these ships.
Okay, the MHS total for this ship is 40. If this was a civilian ship it would have a 9 point ADF/MR penalty and would not be possible. Going with the paramilitary option I described above, it only has a 1 point penalty which was applied to the MR. So we can leave this one as is.
The one is loaded with weapons and defenses. The MHS total for this ship adds up to 71, the largest we’ve seen yet. It’s also the largest ship at hull size 13. Dividing the MHS total by twice the hull size and dropping one gives us a movement penalty of 2 points. There were no penalties assigned to the original ship as it retained its full ADF and MR of 3. We’re going to have to change something.
The goal here was to get the MHS total down to 52 so we only take one point of performance penalty. That was actually pretty easy. I just dropped the electron and proton screens (a total of 22 MHS points) and that dropped us down to 49. So I tossed in another torpedo, another masking screen charge, and two more ICMs. The truth is, in all my playing of KH battles, I can’t remember a time I’ve ever activated any screen other than a masking screen so I (personally at least) don’t feel like this is any loss. I applied the one-point penalty to the MR.
Okay, this is a fun one. If you look at the image of the miniature for this ship, it is the same hull design that they use for the hull size 6 Gullwind from the Dramune Run module although this ship is listed as hull size 9.
That aside, let’s look at the design. First off, this is a missile boat. I probably wouldn’t put seeker missiles (SM) on a privateer but I didn’t design it. The MHS for the weapons and defenses on this ship add up to 33 for this ship. Dividing that by double the hull size gives us a one-point penalty which was applied to the MR for the ship. I’d probably bump the masking screen up to 2 charges and the ICMs to four salvos but we can leave this one alone.
This one is just painful. First up, the MHS total for the listed weapons and defenses is 12. Which doesn’t seem to bad but the ship is only hull size 2, smaller than an assault scout. Using our formula, it should have a 2 point penalty but none was applied. In addition, both the laser cannon and rocket battery have MHS of 5, which means that they can’t be installed on a ship this small. The canon rules bent that a bit putting a laser canon on the Streel Corvette Class, a HS 4 ship but putting it on a HS 2 ship is just too much.
We’ll fix this one by making it a heavy fighter. We will drop the rocket battery but give it another assault rocket and replace the laser cannon with a Laser Pod, a weapon introduced in the article “The Laser Pod” in Polyhedron #19. The game stats for the pod laser are:
Pod Laser: MHS: 1, Type: FF, RD, Range: 5, Damage: 1d10, Attack: 50% against RH, 10% against MS
It’s basically a mini laser cannon that can fit on a fighter.
Now the MHS for the redesigned ship is 3 and there is no penalty to ADF or MR.
This is just a civilian assault scout again but a little bigger. The MHS total for this ship’s weapons and defenses is 9 which is one over the 8 limit we have with the system we’re using for the privateers so we have a one-point performance penalty that needs to be applied. We’ll penalize the MR.
The MHS total for this ship is 15, which gives us a one point penalty which was applied to the ADF so that’s good. The problem is that we have three laser batteries on a ship that should only have one because it would need to be HS 9 to hold three but is only HS 4. If we’re willing to let that slide, this ship is fine. If not we need to do something. But dropping it down to a single laser battery just makes it a Lightspeed Lady class ship so I’m going to let it slide even though even the standard ships don’t violate this rule.
Final Thoughts
Most of these ships are a bit overpowered. And I think the privateers are really overpowered for what I feel should be available to civilian ships but they are not as overpowered as the actual military ships so I’m willing to put them into a “paramilitary” class and let them slide with only a few changes.
The one thing that the original “Fast and Deadly” article didn’t include is prices for these ships. I think it was mainly introducing them for the miniatures game so wasn’t too concerned about that. Plus I don’t think they actually looked at the ship design rules provided with the game to work out the total cost of the systems for each ship. That could be an interesting exercise for a future article or series of articles. But at the very least, I would expect the privateers to be significantly more expensive due to their upgraded weapon capability even though the extra weapons don’t add much to the cost of the ships per the costs in the rules (I feel the weapons costs are way low in the ship design rules.)
All of these ships are buildable with the alternate ship construction rules I’m working on and have posted parts of. The hull sizes might be different and the role-playing details of the ships might vary a bit but it would be easy to design each of these ships and work out their costs, crew sizes, engines, etc. And they probably wouldn’t match the miniatures very well but their Knight Hawks stats would be dead on.
Now that I’ve looked closer at these ships, it’s time to pick some of them to be the ships of the Yazira squadron and get to the Battle of Hagurt coming up in a few days.
Do you agree with the changes I made? Would you do it differently? How would you handle the privateers? Share your thoughts in the comments below.
I can’t decide if this would make a good campaign (I think it would) or if it would be better as a novel but I’ve had this idea kicking around and percolating in my brain for several years now and I thought I’d put it out there and see what everyone thinks. I kind of hinted at it in a Facebook post a month or so ago if you’re in the Star Frontiers: Alive and Well Facebook group.
Some Background
If you’ve been following the Detailed Frontier Timeline that I’ve been posting (either here or on Twitter), the HSS History’s Hope is on this campaign arc in the timeline. The timeline has a few entries:
Date (FY)
Events
59.362
Astronomers on Histran (Scree Fron system), release news of the discovery of a previously unknown brown dwarf approximately 100ly from the Frontier. Its motion indicates that it had a close encounter with a K4 star some 175 years ago. Initial news of the discovery is quickly suppressed by the Family of One.
59.373
Despite efforts of the Family of One (FoO), data on the newly discovered brown dwarf is now available. The FoO reaction to the news fuels speculation that the K4 star is Yazira, the “lost” yazirian home system.
60.082
After months of fundraising, a new organization, The Yazira Heritage Foundation, purchases and begins refitting a small vessel to use as an exploration ship. Their goal is to reach the star that rumors claim is Yazira.
60.119
Saboteurs strike against the exploration ship being refitted by the Yaziria Heritage Foundation damaging it but not destroying it, setting back their efforts. The Foundation suspects the Family of One to be behind the attack.
60.163
The Yaziria Heritage Foundation’s exploration ship, the HSS History’s Hope, completes its refit in the Hentz (Araks) starship construction center and begins its maiden voyage to Histran (Scree Fron).
This is where the campaign begins. The PCs have been hired as part of the crew of the HSS History’s Hope. They would be hired sometime shortly before the ship is completed. The ship holds a crew of 24 including the ship crew and scientists and the PCs would be part of that crew.
Campaign Outline
This is a high-level Knight Hawks campaign. The PCs will be fairly advanced. In fact, there should be at least two level 6 astrogators on the ship, one of which at least should be a PC. I envision the PCs are the command crew for the ship (pilot, engineer, astrogator, gunner, etc.) and possibly have the scientists and other crew members as secondary characters. Depending on the number of players, I could have them roll up characters for the entire crew with each player having several characters that they switch between depending on the particular events happening. The campaign is more about the exploration than level advancement although there would be some of that along the way.
The campaign would be broken into three phases:
Acquiring the ship – The PCs must travel from Histran (Scree Fron) to the Hentz (Araks) shipyard to pick up the HSS History’s Hope and transport it to Histran for supplies and picking up the rest of the crew.
Exploring the Vast Expanse – The PCs have a starmap and a destination but there are no known jump routes. They must chart a completely new course there and back. This part of the campaign will involve exploring new systems (if desired) once they jump there, possible findings of relics from the yazirian exodus, and who knows what else. This will probably take a couple of years game time to make all the jumps there and back. The PCs will have to decide how often to go back to the Frontier for maintenance and resupply, the best way to chart the routes, whether or not to report them, etc. as they go along.
The Yazira system – Once they arrive at the target system it will require a careful exploration. Is this the yazirian home system? What exactly happened if it is? Are there survivors? What became of them? Or is this a false alarm?
There are forces in the Frontier that don’t want this endeavor to succeed so the PCs can expect opposition along the way. There will be lots of character action and probably some Knight Hawks battles along the way as well.
Other Background Material
I’ve posted several articles that could be considered background for the campaign. I’d probably synthesize these into a document for the players that only contains information they would know but the relevant posts are:
I have a good idea of adventures/encounters for part one and three, but am struggling a bit to make the middle part exciting. The main issue is that the charting of new routes, ship maintenance, and void jumping are really all just die rolls that could take a few minutes of game time while covering days of game time. There may or may not be interesting things in the systems they jump into. I still trying to come up with ideas to engage the players on that aspect of the game. If they find something interesting (and there will , that’s not an issue. It the finding part that is bothering me. And maybe just rolling the dice is okay to move through a system until something happens.
I think this type of game would appeal to certain types of players and not others. Is this a campaign you’d like to play in? Or do you think it’s better suited as a novel? Or both? Let me know in the comments below.
In an unexpected and horrifying turn of events, the sathar fleet attacked the civilian orbital shipyard around Terledrom in their attack today before retreating from the system. The shipyard was completely destroyed along with all the ships under construction. Many of the crew and engineers were lost as well.
Task Force Cassidine, together with with the new Frontier Fighter Corps squadron and the militia drove off the attackers destroying five major vessels of the sathar fleet. UPF forces lost fourteen of the twenty fighters in the system and the militia lost one of its assault scouts. Luckily nearly all the crew were recovered. The militia frigate was significantly damaged as well and will be heading to Outer Reach in the Dramune system for repairs with the loss of the local shipyard.
Kat’kst’kll, Terledrom News Service
Background
Deciding on a change of tactics, the sathar launch a massive fleet at Fromeltar, larger than any of the fleets seen so far in the Frontier. Despite the increased size of the Fromeltar militia and the presence of Frontier Fighter Corps Squadron Gamma, these ships plus the depleted Task Force Cassidine are outgunned by the incoming sathar fleet. The UPF has more ships, 32 vs 21, but twenty of the UPF ships are fighters with another 7 being assault scouts. The UPF fleet only has 5 capital ships, a battleship, an assault carrier, and three frigates, compared to the 10 capital ships of the sathar fleet including four heavy cruisers.
However, unlike previous sorties into the Frontier, the primary target of this attack is not the ships of Spacefleet but rather the starship construction center in that system. This is only going to be a hit and run on the sathar’s part and they aren’t planning on a major engagement with the fleet. Three hours before the sathar ships reach the planet, the assault carrier deploys its fighters and turns to head home. It looks like the fighters are to be sacrificed.
Order of Battle
UPF
Task Force Cassidine
9 fighters
3 assault scouts
2 frigates
1 assault carrier
1 battleship
FFC Squadron Gamma
8 fighters
Terledrom Militia
3 fighters (manned for UPF)
4 assault scouts
1 frigate
armed station
Terledrom SCC
Sathar
9 fighters
2 cutters
3 frigates
1 destroyer
2 light cruisers
4 heavy cruisers
1 assault carrier (not participating in battle)
The Battle
Setup
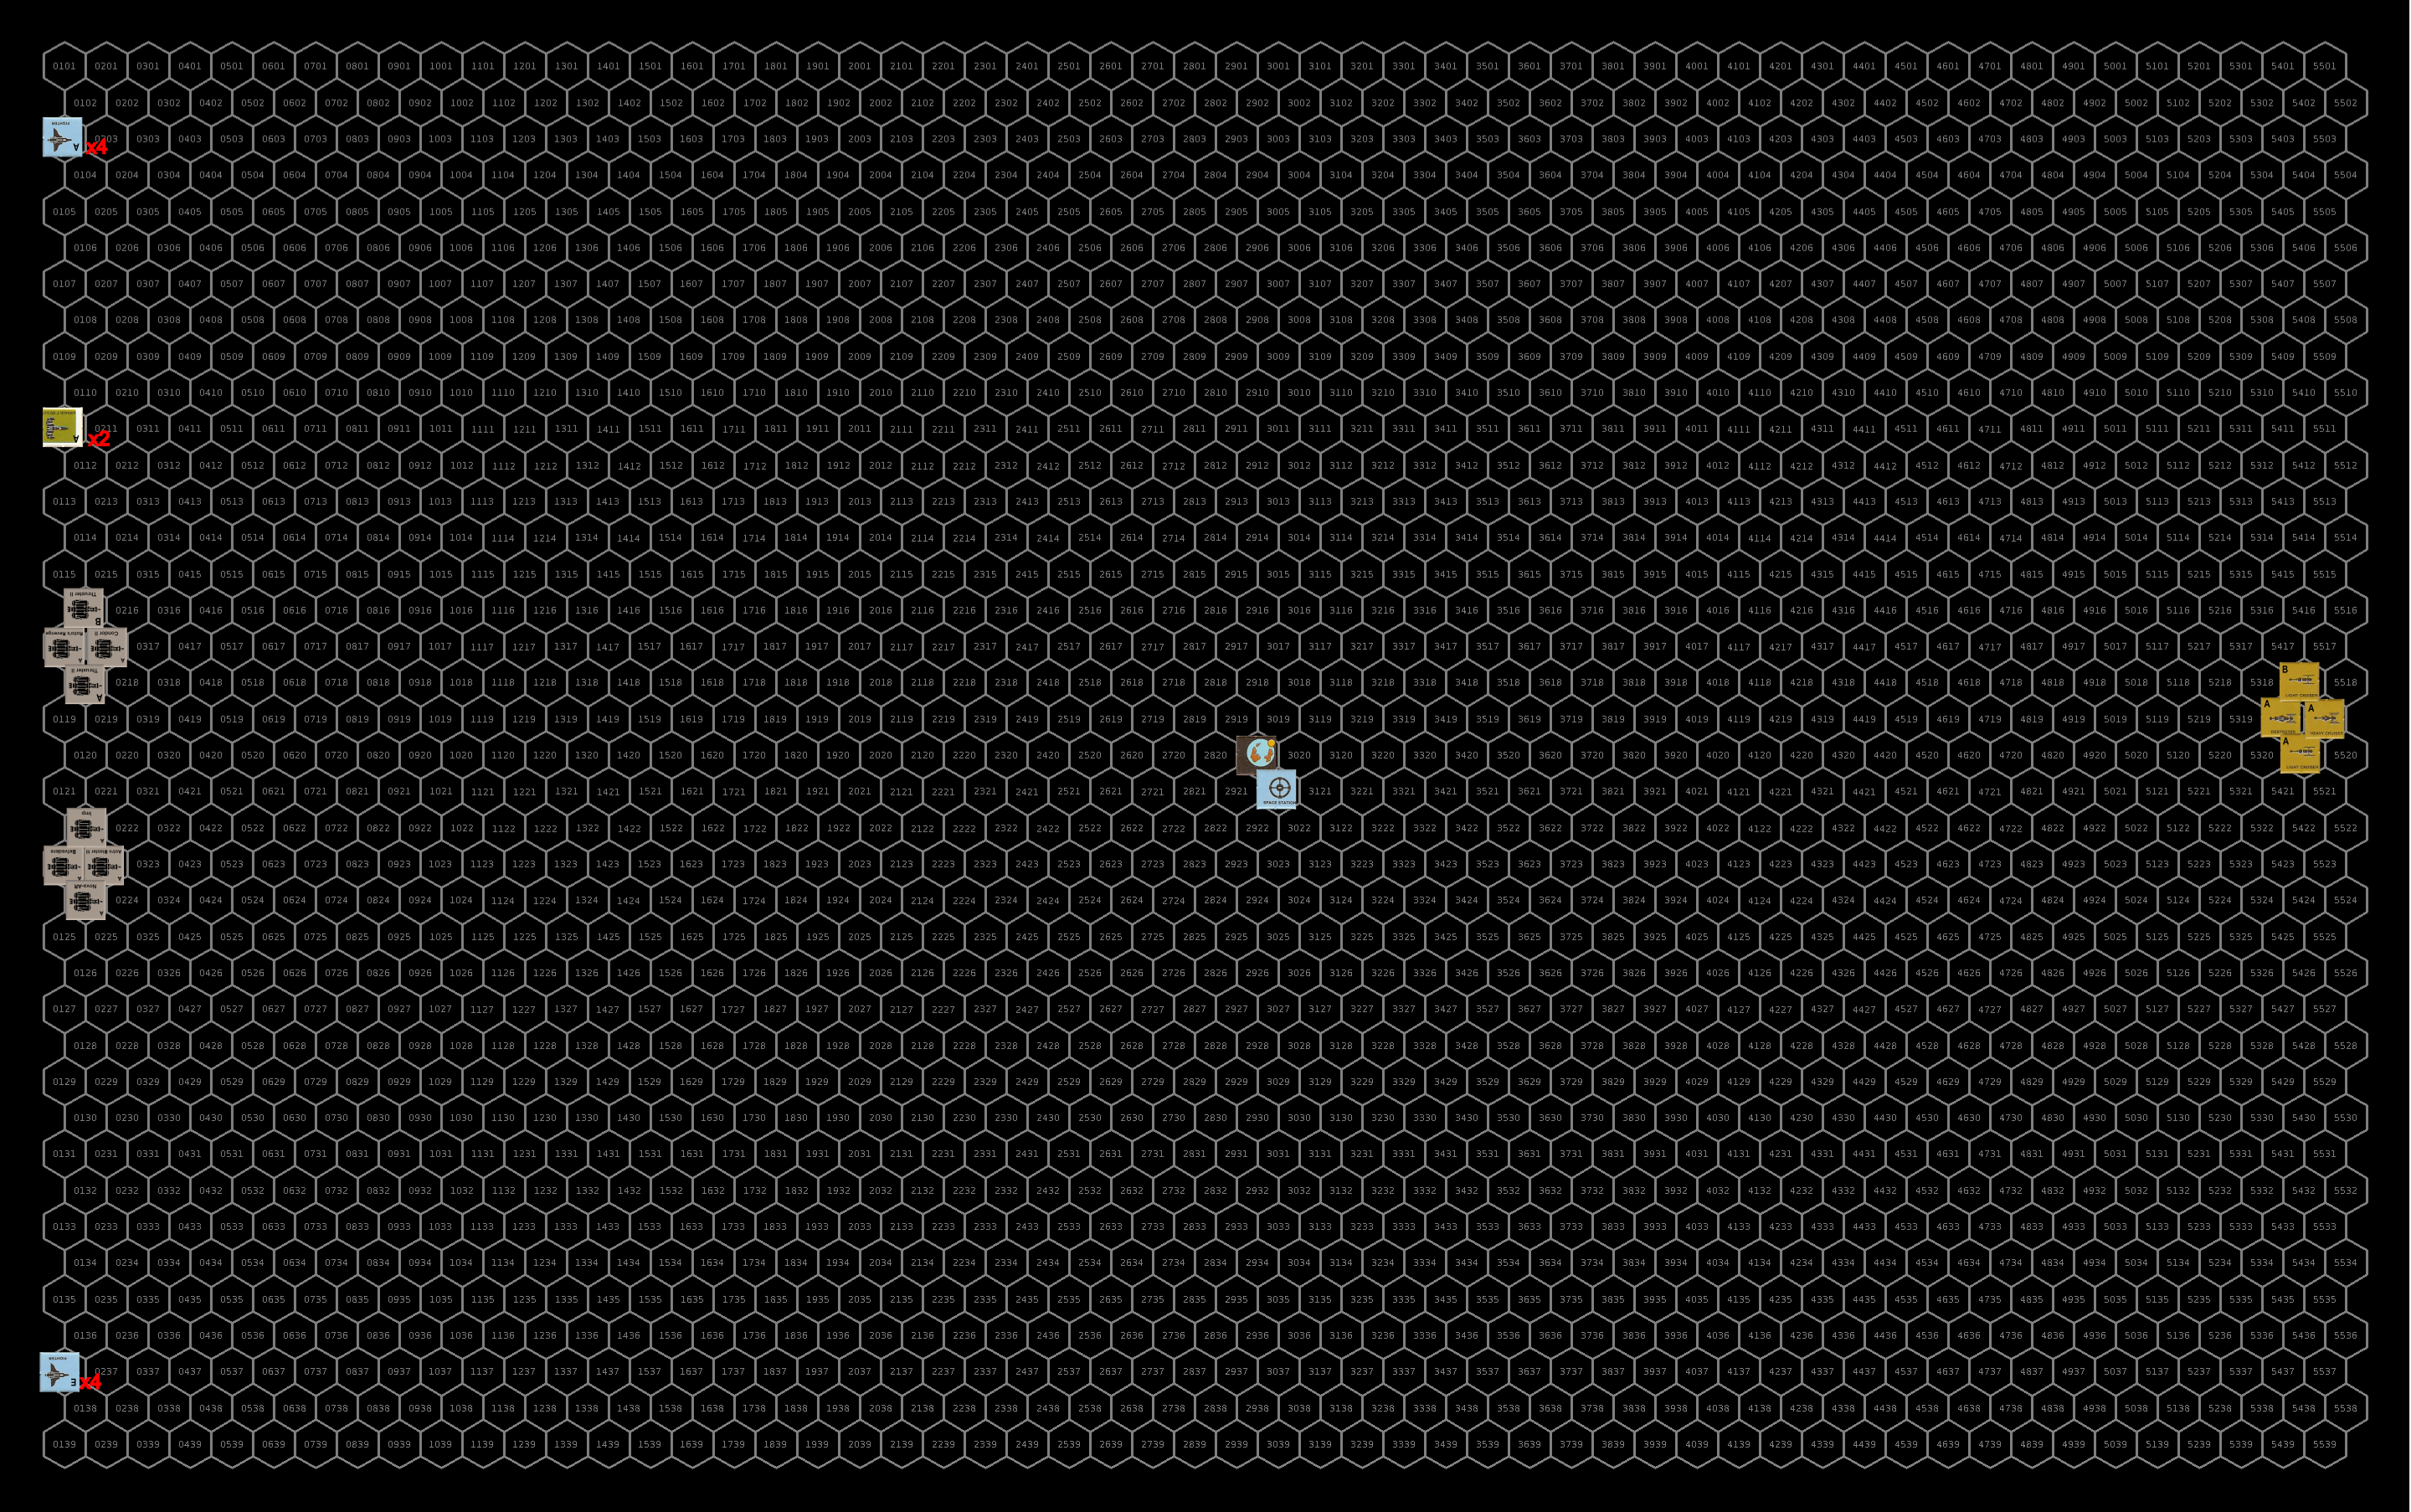
Unlike previous engagements, instead of continuing to slow as they approach the planet, two hours out, the sathar forces start accelerating instead of continuing to slow down. Additionally instead of dispersing out to engage the UPF forces, the fleet amasses into a single tight formation bearing directly on the planet. They enter the map at speed 44.
Caught by surprise by the sathar’s speedup, the UPF forces scramble to gain speed and because of this are somewhat out of position as the attack commences. The fighters and assault scouts have matched the sathar’s speed but the frigates have only achieved a speed of 35 while the battleship and assault carrier are at speed 20. The fighters form up into flights of 3 or 4 ships and the assault scout fly in pairs or trios.
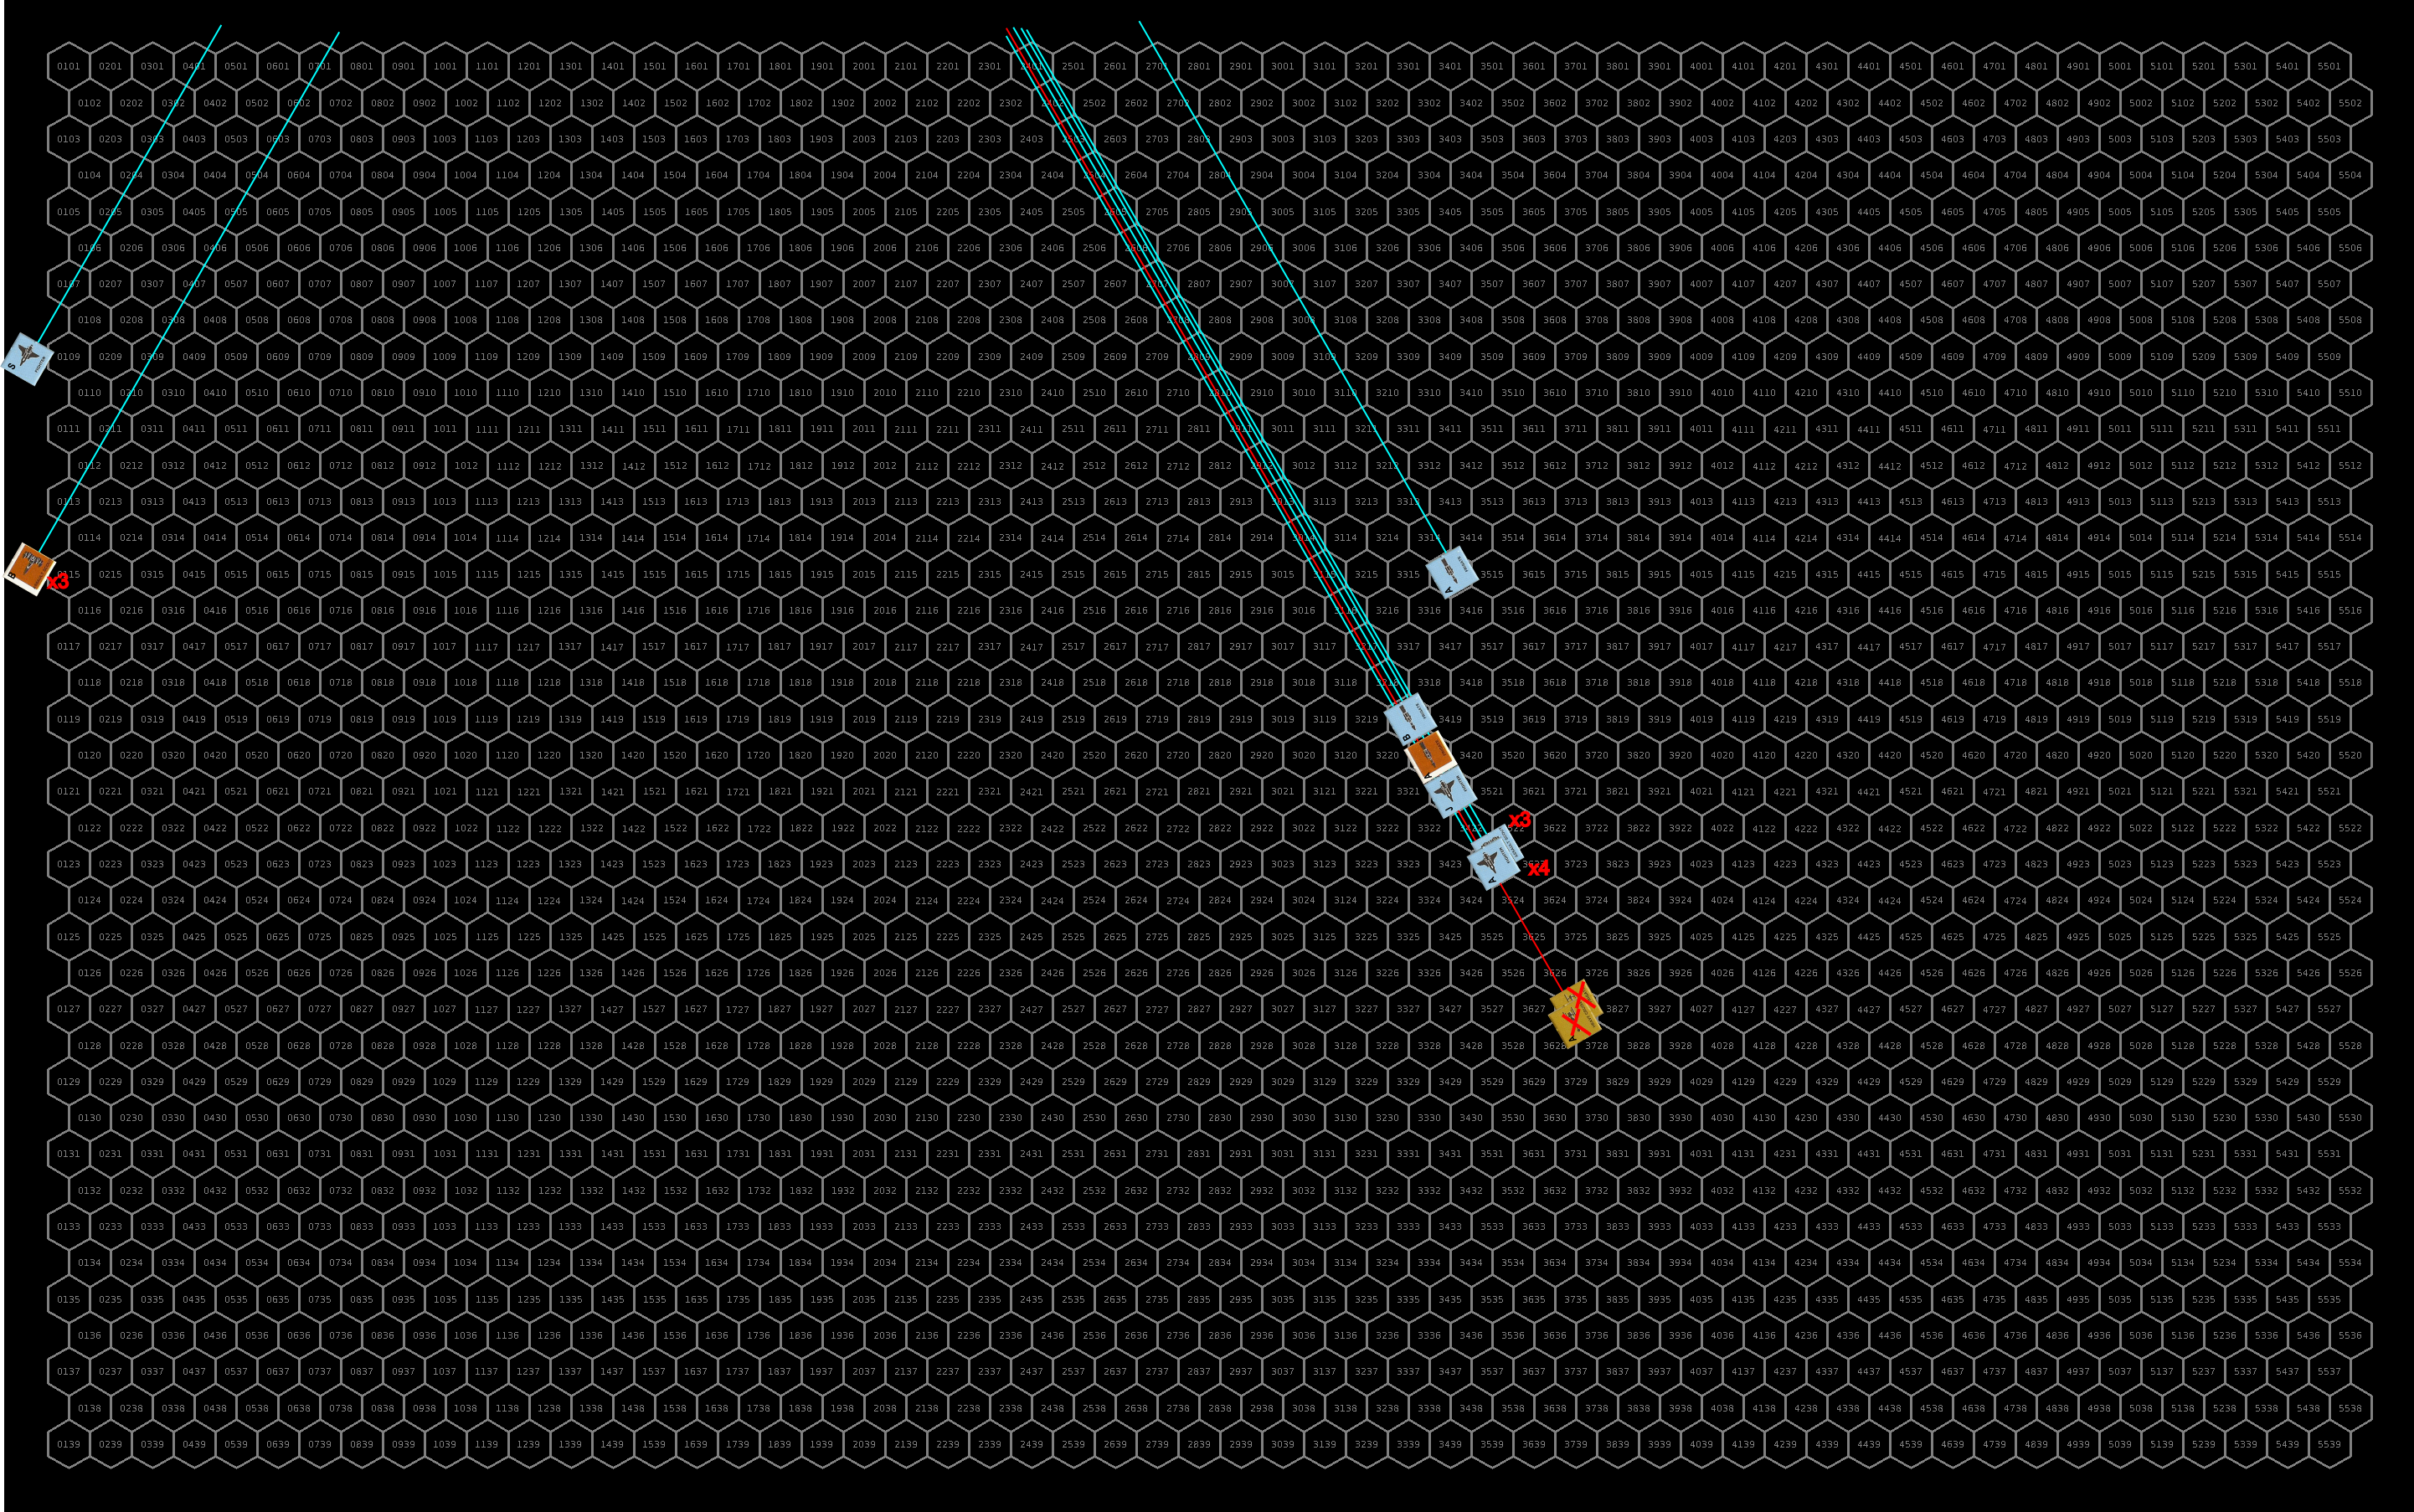
Positions at the start of the battle. The sathar are all massed into a single hex with the composition shown in the upper right box. The gray background space station is the starship construction center and the blue background one is the armed station in the system. Click for full size image.
Turn 1
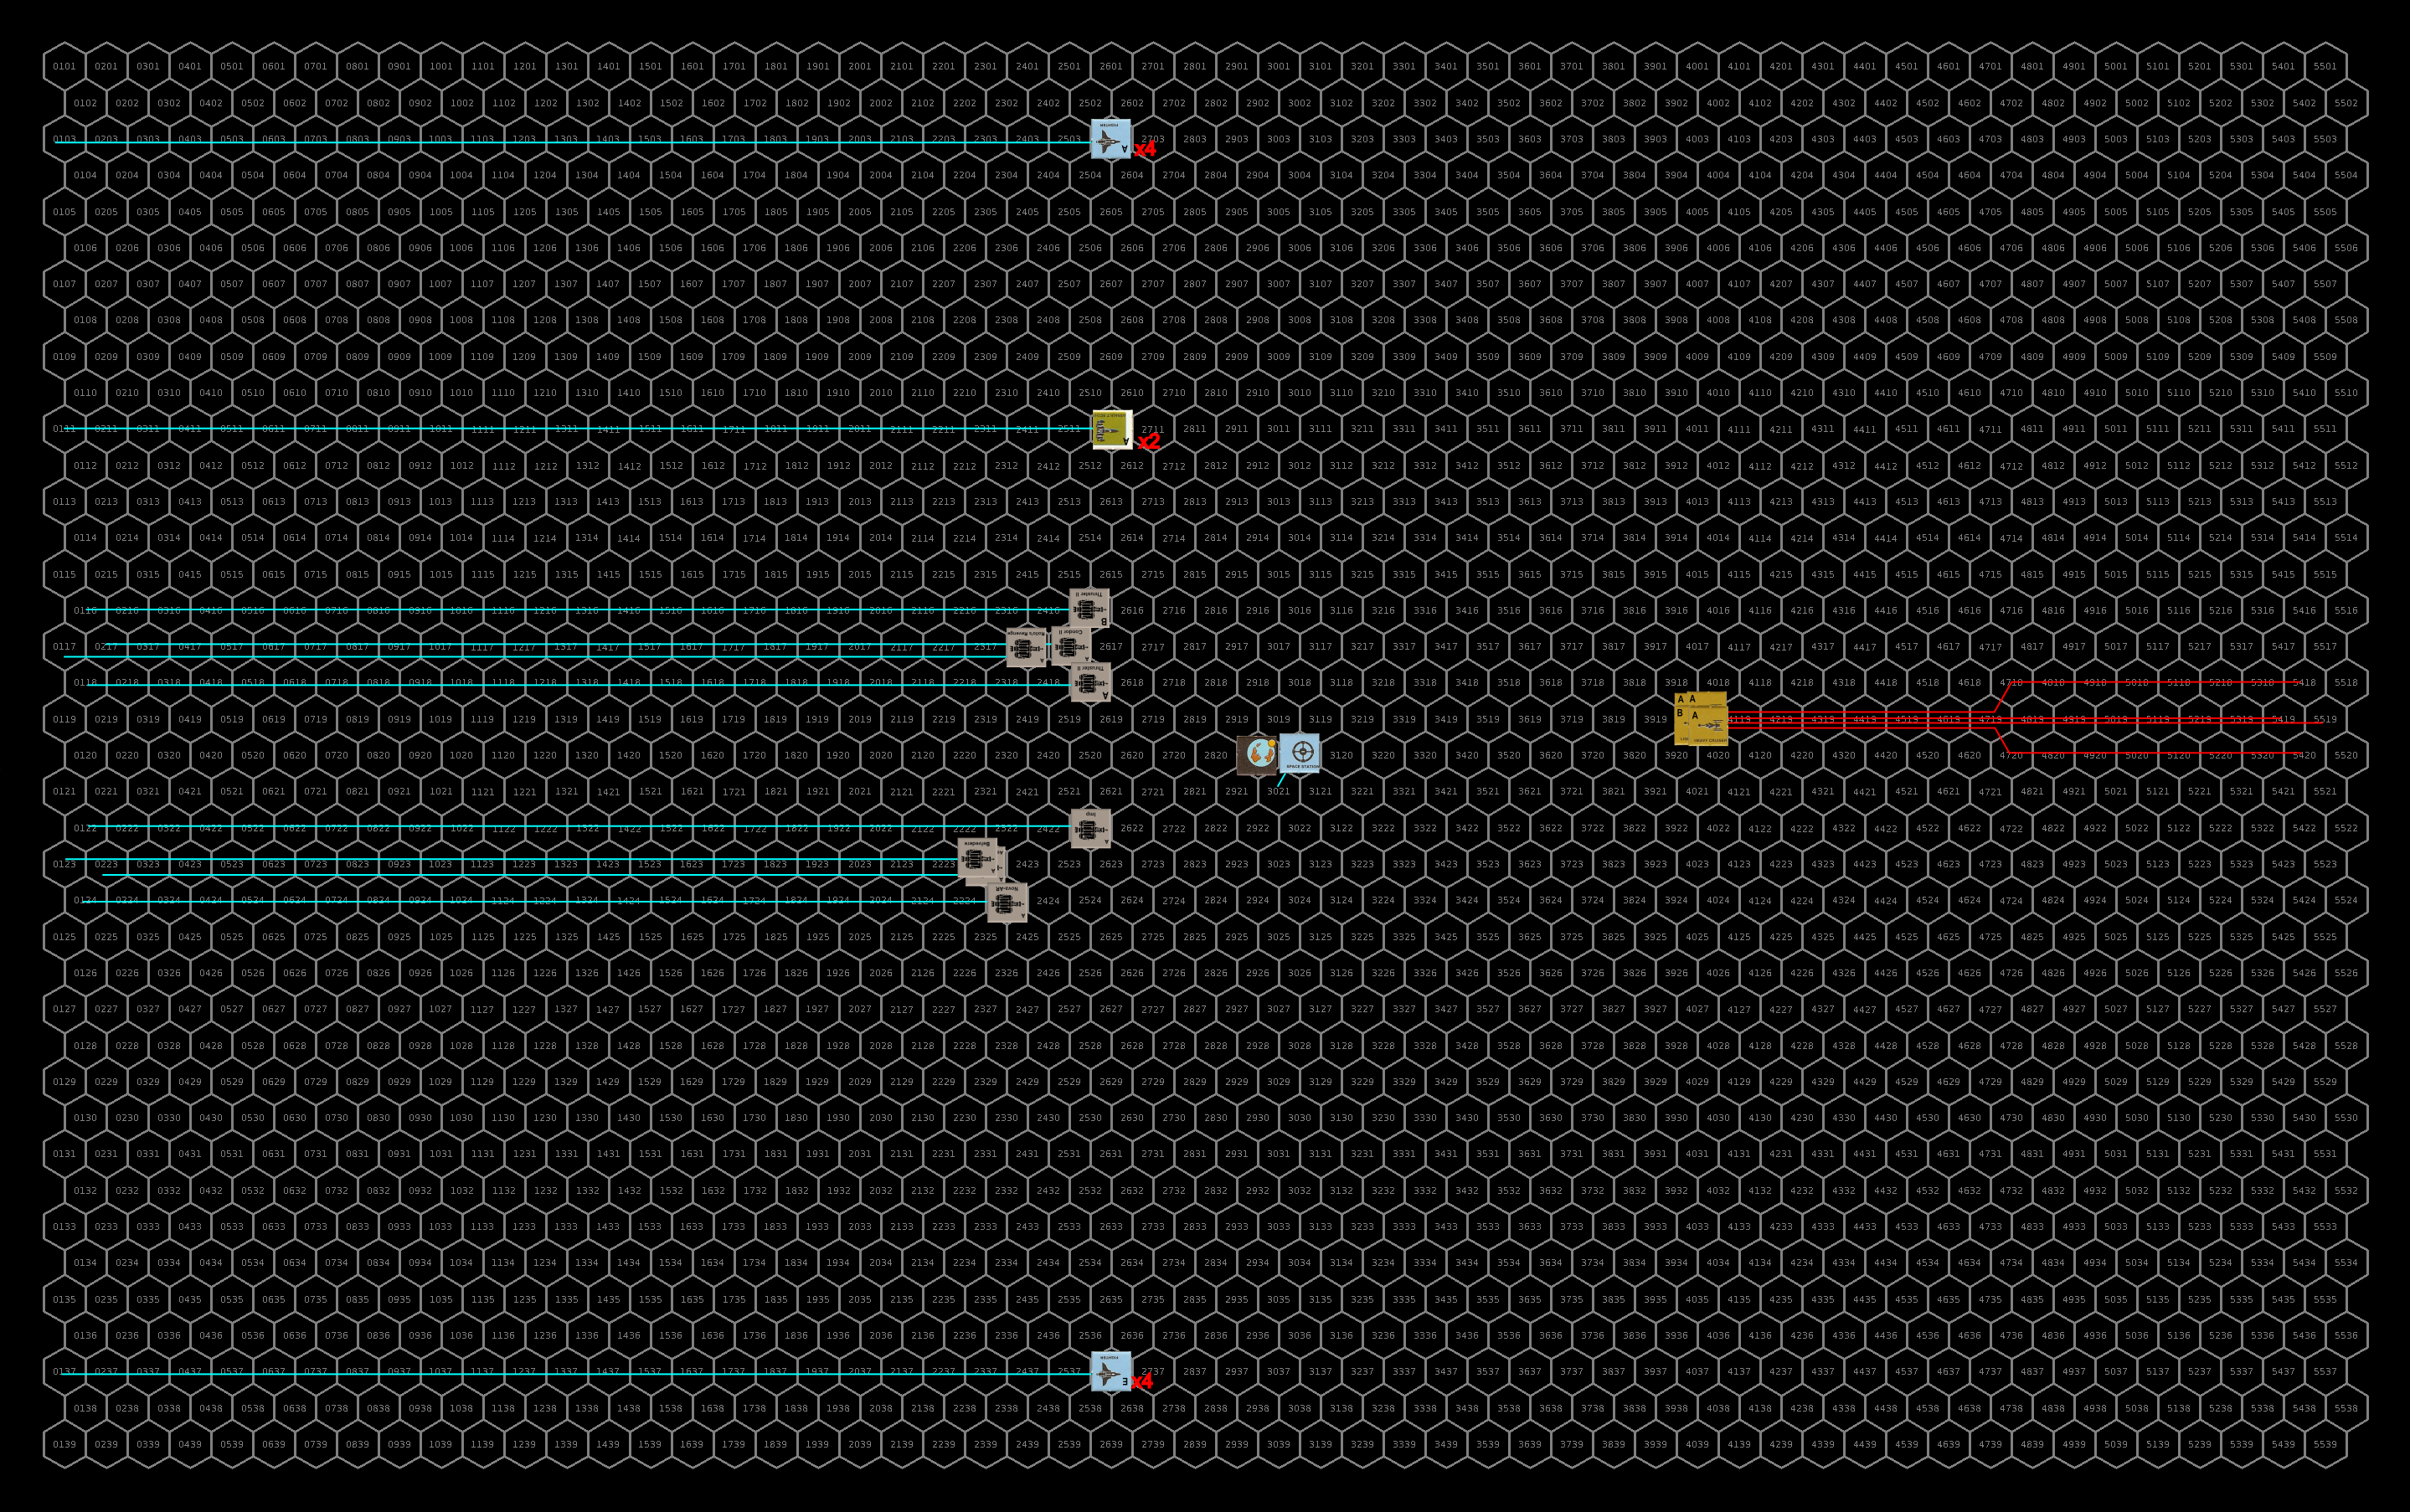
The sathar stay as a group and accelerate with an ADF of 2 to a speed of 46. The armed station, expecting to be obliterated, fires its laser battery and rocket battery at a pair of fighters, hoping to reduce the assault rockets coming at it but both miss.
Surprisingly the sathar do not attack the armed station or continue on toward the UPF ships. Rather they swing around the planet, using the gravity of the planet to get an extra turn for the heavy cruisers and as they pass by, unload all of their firepower into the starship construction center orbiting behind the armed station. Defenseless, the SCC is pummeled by the sathar attacks.
Eight of the nine assault rockets connect with various parts of the shipyard, five of which do double damage reducing the hull integrity of the station by 35%. Six of the ten fired rocket batteries hit reducing the hull integrity by another 15%. Only four of the ten torpedoes connect and amazingly are not very effective, reducing the hull integrity by only another 11%. Four of the six disruptor cannons connect knocking out the station’s DCR, and reducing its hull integrity by another 7%. All four laser cannons hit dropping the hull integrity another 10%. Seven of the ten electron and proton batteries connect, inducing an electrical fire and reducing the hull integrity by another 4%. Finally, fifteen of the eighteen laser batteries connect reducing the hull integrity by another 17% leaving the station with just 1% of its hull integrity remaining. Finally, the heavy cruisers deploy some seeker missiles along their path to activate against pursing ships.
Enraged by the nearly complete destruction of the shipyard, its crews, and the ships inside, the UPF forces swarm after the fleeing sathar vessels. The only exception is the assault carrier which flies to get as far away from the sathar as possible. The battleship is moving too slow to get into range, and the two UPF frigates can’t get to optimal range but are at least able to bring some of their weapons to bear. The fire on the SCC knocks out half of its remaining hull integrity (3 of 600 HP left).
Recognizing the danger of all the fighters, the sathar concentrate their defensive fire on that threat. The defensive fire destroys four fighters and nearly destroys two more. It damages the engines on two fighters, and completely knocks out the engines on another. It knocks out the maneuvering system on one fighter and the assault rocket launcher on yet another. Finally, one of the fighters is hit damaging its combat control system.
The UPF ships return fire with a vengeance. The fighters concentrate on two of the heavy cruisers while the assault scouts focus one of the light cruisers. The frigates focus on one of their counterparts. The more distant frigates miss but the one close in with the fighters connects with its laser cannon and a torpedo. The don’t do as much damages as they could but still manage to take out 67% of the sathar frigate’s hull integrity (the LC only did 3 HP and the T, while rolling double damage, only did 24 HP).
The assault scouts miss with their laser batteries but connect with six of the seven assault rockets on the light cruiser knocking out its ICM launcher and damaging its maneuvering jets before the others slam into it and destroy it completely. The first heavy cruiser is hit by six of the eight assault rockets launched at it. The rockets take out just over half of its hull integrity, knock out its maneuvering, damage its engines, knock out its disruptor cannon, and cause a power short circuit knocking out all of its screens and ICMs. The second doesn’t fare as well. It is also hit by six assault rockets. The first three knock out about 56% of its hull integrity, the next two damage its engines and knock out its maneuvering. But the final assault rocket slams into the cruiser’s torpedo magazine causing a massive explosion that destroys the ship.
Courses and positions after the first round. The UPF ships show in the yellow boxes are positioned at the corresponding letter on the map. Their facing is as given in the boxes. Click for larger image.
Turn 2
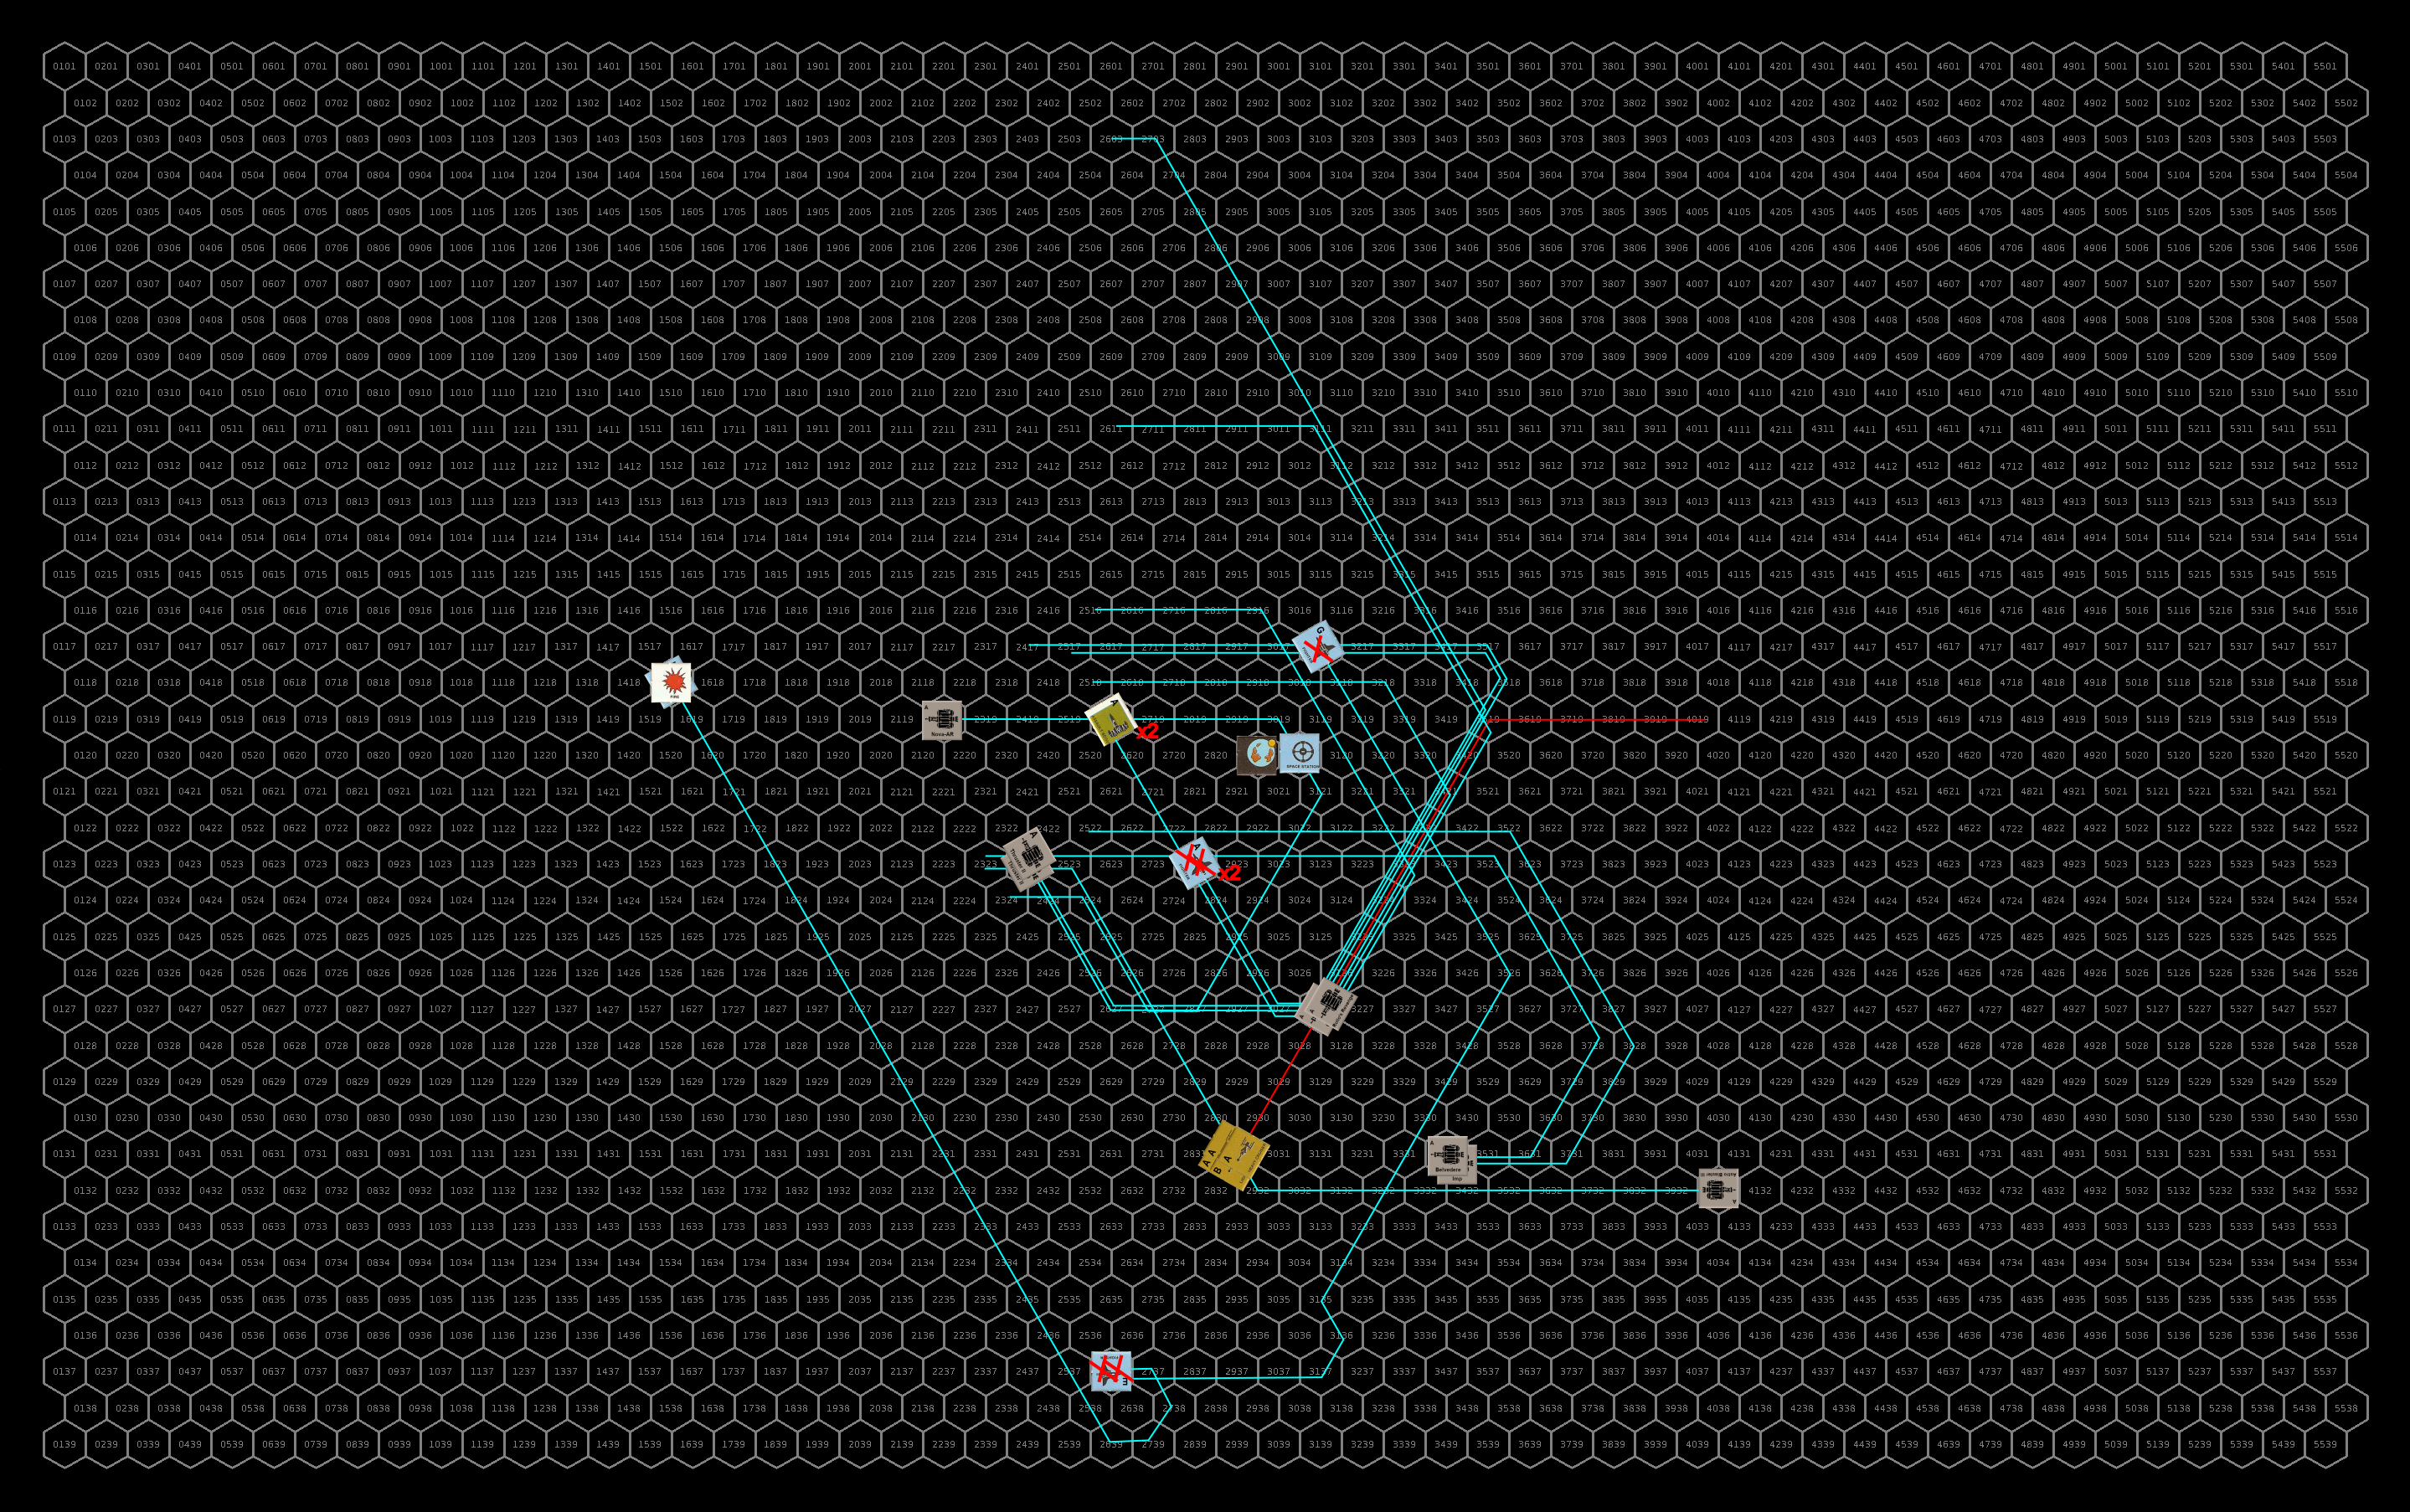
The sathar continue to effect their retreat from the system. The wounded heavy cruiser with no MR, accompanied by the wounded frigate accelerate by 1 (the HC’s max) and continue straight and the frigate doesn’t break up from the slight acceleration. The other capital ships make a turn to port, accelerate by two and begin to leave the inner system. The fighters loop back to make a pass at the battleship.
At the same time the sathar activate three of the seeker missiles that they had deployed last turn. The first one starts to accelerate toward the armed station. The second activates among all the fighters and assault scouts and targets the militia frigate in that group. The third goes after the UPF frigate just behind the larger group of ships chasing the sathar fleet. Both frigates fire off all of their ICMs in an attempt to intercept the incoming missile. The missile going after the UPF frigate manages to evade the seeker missile but the militia frigate isn’t so lucky. The missile slams home but mercifully doesn’t destroy the ship. It’s hull integrity is only reduced by 40% (only 16 points on 5d10).
Defensively, the armed station, UPF frigate A, and the battleship fire at the fighters while the other ships focus on the damaged heavy cruiser. The frigate connects with the lead fighter knocking out its AR launcher. The station misses but the battleship hit with 2 laser batteries destroying one fighter and knocking out the AR launcher on a second, and its disruptor cannon vaporizes a second fighter. The other frigates and assault scouts, firing on the damaged heavy cruiser, only manage to land two laser battery hits (from the militia frigate and assault scout) knocking out the cruisers PB and only scratching its hull (1 HP).
Offensively, the sathar fighters fire their assault rockets at the battleship, but the destruction of and damage to their wingworms distract them and only one of the five rockets connect damaging the battleship’s engines.
The fleeing sathar ships focus the energy battery weapons on the fighters behind them, while they focus their cannons and rocket batteries on the fighters in the lower group (C) along their flight path. They fire torpedoes at the frigate and assault scouts behind them as well. The assault scouts immediately start dodging in an attempt to evade the incoming torpedoes but the frigate, having expended its ICMs unsuccessfully on the seeker missile can only watch as the torpedo homes in.
While the torpedoes are only moderately successful, damaging the LC on the militia frigate and destroying one of the militia assault scouts, the energy weapons and rocket batteries are much more effective, completely destroying the fighters along the sathar flight path and destroying four fighters in the trailing groups. In addition, two more fighters are damaged (12% and 88% hull integrity left).
With the battleship too slow to catch the fleeing ships, and some of the assault scouts thrown off track trying to avoid the incoming torpedoes, the UPF cannot safely pursue the larger group of sathar vessels and go after the damaged ships to finish them off. Three of the assault scouts are able to pursue even with their evasive maneuvers and are joined by the four functional fighters. One fighter has its maneuvering damaged and just starts to decelerate. The sixth fighter cannot accelerate and tries to stay with the main group but falls behind and doesn’t come into weapon range. The frigates also pursue the damaged sathar ships but they are still at a speed disadvantage and fall a bit further behind. The battleship starts slowing down and staying near the station while the three militia assault scouts slow down as they are headed off in the wrong direction for pursuit but should be able to start to catch up soon. The assault carrier, now safe, begins slowing down and returning to the planet.
The starship construction center succumbs the fire and is completely destroyed. Defensively, the sathar heavy cruiser and frigate fire on the incoming fighters but all the shots go wide.
The UPF ships fire five assault rockets at the heavy cruiser and two at the frigate. They focus all their energy weapons at the frigate (3 LB from the Assault scouts and 2 LC & LB from the frigates). Four of the five assault rockets hit the heavy cruiser. All of them rip into the hull completely destroying the ship. Of the energy weapons fired at the frigate, only one of the assault scouts score a hit reducing the frigate’s hull integrity by 10%. One of the assault rockets knocks out the frigate’s LC while the other detonates in the core of the ship with a titanic explosion that consumes the entire ship (42 HP).
Upper half of the map. The yellow numbers indicate how many hexes off the map the ship is along the direction they were traveling. Click for larger image.Lower map. The top row of this map is the same as the bottom row of the upper map. Click for the full-size image.
Turn 3
The remaining sathar ships continue to flee the system but activate their remaining seeker missile that they left by the planet. Both the newly activated one and the one activated the previous turn fly at the armed station. Firing ICMs to try to avoid an impact, one of the missiles is intercepted but the other one hits the station reducing its hull integrity by 30% but not destroying it. With the sathar ships now quite far away and retreating, the UPF calls off the pursuit and begins looking for survivors from the starship construction center.
Repairs
The only damage on the surviving sathar ships are damaged assault rocket launchers on two of the fighters which are quickly repaired once they rejoin the assault carrier.
Damage to the UPF ships is only a little more extensive. The battleship quickly repairs its damaged engines and the militia frigate is able to get its laser cannon back online immediately as well. Over the next hour an a half it is able to get its hull back up to 75% integrity but then hits a snag that can only be repaired in a shipyard.
The fighter with the lightly damaged engines also gets that under control immediately can begin decelerating with the rest of the fighter group. It takes nearly an hour for the fighter with the completely knocked out engines to get some engine power back and many hours for it to slow down enough to dock with the carrier where it is completely repaired. After an hour and half of work, the fighter with the damaged maneuvering jets restores some control and begins to head back to the carrier where it arrives a few hours later and is completely repaired. The fighters with damages hull carefully make their way back to the carrier where they are fully repaired.
Unfortunately, the damage to the station from the seeker missile are such that it would take tools and equipment from the shipyard to repair. Those repairs will take some time to effect now that the shipyard has been destroyed.
Aftermath
The sathar lost more ships than they had planned on, losing 34.5% of their hull points that they came into the battle with, 2 fighters, a frigate, a light cruiser and 2 heavy cruisers (286 HP of ships). That said, they accomplished their primary goal of destroying the starship construction center.
The UPF “only” lost 14 fighters (72% of the ships) and a militia assault scout (for a total of 135 HP) but the loss of the shipyard is going to be significant. Additionally, it lost the ships that were in the shipyard including an assault scout that would have been completed the next day, two fighters, and a frigate and destroyer under construction. There were also three civilian ships in the shipyard, a HS 11 ship undergoing maintenance, and HS 10 and HS 11 ships that were under construction and scheduled to be completed in 38 and 76 days respectively.
The remaining six fighters are all assigned to Frontier Fighter Corps Squadron Delta. The assault carrier is detached from TF Cassidine and with the militia frigate heads toward Dramune. The frigate will enter the shipyard there while the carrier will head to Prenglar to pick up more fighters to round out FCC Squadron Delta and replenish its compliment with TF Cassidine. Also, one of the minelayers at Prenglar will be heading to Fromeltar.
The shipyard situation is more serious. Work will begin to build a new shipyard but it will be years before it is back at capacity. Additionally, with the loss of the shipyard here at Terledrom and the one at Hentz (Araks), the UPF is going to start arming the shipyards, adding defenses, and increasing security.
Given that the UPF know the route to one of the active sathar shipyards in OFS019, the remnant of this battle group is headed there for defense while the sathar continue to rebuild their forces.
Lessons Learned
When I first conceived this scenario, I thought the sathar would come in hot, swing by the planet, take out the shipyard and then fly out of the system. And that went just about perfectly as far as destruction of the shipyard went. They did 594 HP of out the 600 HP the shipyard had and left it with a fire that took out the last 6 HP. And that was despite rolling poorly for the damage from the torpedoes.
However, as I was setting things up, I realized that with the limited ADF of the sathar since they were staying together as a group, the small fast UPF ships would be able to boost to the same speed and intercept the sathar. So I set it up that way and the sathar took more damage than they expected. The downside was that the UPF was just barely able to intercept the sathar on the first round which meant that they had to stay close and be subject to offensive fire from the sathar instead of making a run and turning out to be farther away. They could have done that a little bit (2-4 hexes) but I didn’t have them do so as they are new pilots and I chalked it up to inexperience.
I was surprised at how close to exact the damage done to the shipyard was. Since the shipyard as designed didn’t have weapons or defenses, the only non-hull hits possible were the fire and DCR. Equipping the shipyards with weapons and defenses will help to increase their survivability since the damage will be spread around. But not by much.
The sathar could have possibly wiped out the remaining UPF forces completely if they had stayed in the system but that would have been a long drawn out battle as it would have taken them a long time to slow back down. The shipyard was their target so they took it out and left.
I mentioned in my July State of the Frontier post that I was working on putting together a way to generate star systems. This is a sample of the data you can expect to see for each system. This particular system isn’t tied to any specific system on the map but is more for demonstration purposes. This is also not the final formatting or colors, but rather the default colors from the programs. Once I figure out exactly what I want, I’ll update the code to make the output match. So let’s look at what we have.
System Data
First up is the system data. This is generated using a program called StarGen. It’s a bit old and doesn’t work exactly for the smallest or largest stars but it is good start for most of the more interesting systems that might have habitable planets. I also don’t think it takes into account much of the new exoplanet data but we’re making system for a science fiction game so that’s okay. I’ll probably tweak things as I go along.
This generates a lot of data for each planet including thinks like average, min, and max temperatures, orbital characteristics, rotational characteristics, atmospheric composition (if present) and more.
-243.6° C Earth temperature -438.5° F Earth temperature
Normal temperature range
Night
Day
-234.6° C -390.3° F
–
-224.5° C -372.1° F
Min
Max
-249.8° C -417.7° F
–
-209.6° C -345.2° F
Equatorial radius
5165.8 Km
0.81 Earth radii
Density
2.25 grams/cc
0.41 Earth densities
Eccentricity of orbit
0.030
Escape Velocity
5.8 Km/sec
Molecular weight retained
0.0 and above
H, H2, He, N, O, CH4, NH3, H2O…
Axial tilt
39°
Planetary albedo
0.15
Exospheric Temperature
0.95° K
-1272.05° C Earth temperature
Length of year
104035.23 Earth days
93990.83 Local days 284.83 Earth years
Length of day
26.56 hours
Boiling point of water
-53.4° Celcius -64.1° Fahrenheit
Hydrosphere percentage
0.0
Cloud cover percentage
0.0
Ice cover percentage
0.1
There is an alternate output for the system view at the top. Instead of the images, it can make a simple system diagram that looks like this:
This shows the relative positions of the planets on a log scale as well as the range of their orbits (the gray bars) based on the generated eccentricities. The blue bar is the habitable zone for the system and the numbers above the gray bars are the masses of the planets in Earth masses. I’m leaning toward using this one. What do you think?
Planetary Maps
For each system, I want to do planetary maps for at least the habitable planets and possibly some of the ones classified as Venusian, Martian, Water, or Ice by StarGen. I haven’t found a program that will make good maps of the airless worlds (putting craters everywhere).
I also haven’t found a program that I’m completely happy with as far as generating the maps go. I have two that each do a bit of what I like.
Worldbuilder
The first is a program called Worldbuilder. It creates the world using plate tectonics it figure out mountain ranges, subduction zones, and the like and then has an atmospheric circuation model to figure out rainfall and temperatures and such. I like all that. It also can do a lot of different map projections, including on a globe and allow you to zoom in on any part of the map. Strangely, it only does a hex grid across the map and not lattitude and longitude lines.
It has a lot of knobs you can turn to adjust things like the water percentage, heat level, number of techtonic plates, and so on. And it does ice caps quite nicely.
One of the major downsides is that it is not supported anymore and the last development on it was in 2015. And while I have the code, it is in Lua, a languate I know nothing about so its a bit hard to read and edit. Another issue is that there is no key that I have been able to find to explain the colorings on the various maps (temperature, elevation, biomes). I’m sure its in the code but I’m still trying to figure it out.
Here are some maps for a sample world from that system. You might recognize the map style from other maps I’ve posted on the blog for locations and adventures on Pale. I used this program to generate the planetary map I used for that.
Globe view with the biomes selected
Biomes map
Elevation map
Tempurature map
And just for fun the tectonic plates.
I really like the way this program generates the worlds, I just wish there was a little more documentation on what the program knobs do, and a key to the maps. In looking at the code, the biomes seem to be fairly generic: ice, water, rock, sand, etc.
Planet Map Generator
The other program is just called Planet, although the web page calls it Planet Map Generator. This one doesn’t have as many things you can adjust in the planet generation and just make maps based on an algorithm that generates the elevations on the map. The maps can look very fractally or smoother depending on the coloring scheme you use. It is a fractal generation method so you can zoom in as much as you want and it has some projections that I like that Worldbuilder including an icosohedral projection that is great for gaming.
You can tweak the water level and colors used but not much else. Addtionally, the developer also just added biome generation based on a simple air flow and rain model for given terrains. And the biome list has 11 different biomes, so that is nice.
Here are a few maps from that program. These are all elevation maps.
The default color scheme. I don’t like how jagged the elevation contours look with this scheme.
This is an alternate color scheme that I like a lot better as it makes things look smoother.
Same map as above but with biomes substituted for the elevation data. The oceans are a little intense on this one so it might be better to try a different color scheme for this.
Here’s the globe.
This is the Mollweide projection that I like as it shows the entire world but doesn’t distort the regions near the poles. Worldbuilder doesn’t have this projection (or any others like it).
Finally the icosahedral projection. This one is great becuase it is effectively equal area everywhere with minor distorations and works great for gaming by overlaying a hex grid on it.
I really like the look of these maps. The one thing it doesn’t do is show ice caps or really do any weather patterns.
Which to choose?
I want to be consistent so I probably need to choose one of the map programs over the other. While i love the look of the maps coming from the Planet Map Generator, it isn’t quite as versatile for creating different types of worlds with different characteristics and I’m leaning more toward the Worldbuilder program for that reason.
There is an interesting option. The Planetary Map builder does have the option to import a low resolution (24×12) map of symbols as a seed for it’s map generation. So if I take that sample elevation map from Worldbuilder and convert it into the format Planetary Map Builder needs for input, I get a map that looks like this (with the original map below it).
Some of the details are lost and the terrain is a bit different, the Planetary Map Builder tends to put the moutains in the middle of the contients while the Worldbuilder does it on tectonic boundaries.
I could also create the biome map in Planetary Map Builder.
So while I can make the nicer looking maps from the Worldbuilder seed maps, I don’t think I like the way that changes the terrain. So I’m leaning toward the Worldbuilder maps as I like the terrain features better. I just need to figure out how to color them like the Planetary Map Builder maps and get better biome information.
What I probably need to do is learn Lua and translate the Worldbuilder code into C/C++ and then merge it with the relevant code from Planetary Map Builder. But that’s a bit of work. We’ll see if I can find time. Until then, I think I’ll use the Worldbuilder maps as is. The nice thing is that it is reproduceable and if I do make code upgrades later, I can rerun the programs to produce the same worlds with upgraded maps.
Final Thoughts
I still haven’t decided how to format these or where to host them but that’s a small matter. I can always start as blog posts like this one and then move them somewhere later.
What do you think about the different maps and style? Which do you prefer? Share your thoughts in the comments below.
And if you like the things I’m working on and want to encource me to spend more time on it, consider supporting me on Patreon.