The surprise appearance of sathar forces in the Gruna Garu system were met by the combined forces of the Hargut militia, the Frontier Fighter Corps, and the Yazira Squadron. Sustaining heavy casualities, including the complete loss of the Frontier Fighter Corps squadron, the defenders were able to destroy nearly all the invading vessels.
The final sathar ship, heavily wounded, and in an act incomprehensible to sane minds, rammed the defense station destroying itself and the station in the process. We honor those who gave their lives defending ours.
Rinna Harglot, Hargut Global News
Background
Hoping to draw some of the UPF forces from the spinward side of the Frontier where most of the fighting has occurred so far, the sathar have explored a route into the Gruna Garu system and launch a small fleet to attack that system hoping to overpower the defenders there. They are opposed by the Hargut militia, Frontier Fighter Corps Squadron Theta, and the rag-tag volunteers of the Yaziria Squadron.
Order of Battle
UPF
Militia
2 assault scouts
1 armed station
Frontier Fighter Corps (Squadron Theta)
8 fighters
For this battle, I’m using the game stats in my A Look at Yachts and Privateers post from a few days ago for the Yaziria Squadron ships. I basically picked the ships in that group at random from the ships in the article.
Yaziria Squadron
1 Belvedere Class ship
1 Astro Blaster III Class ship
1 Imp Class ship
1 Nova-AR Class ship
1 Rollo’s Revenge Class ship
1 Condor II Class ship
2 Thruster II Class ships
Sathar
1 destroyer
2 light cruisers
1 heavy cruiser
The Battle
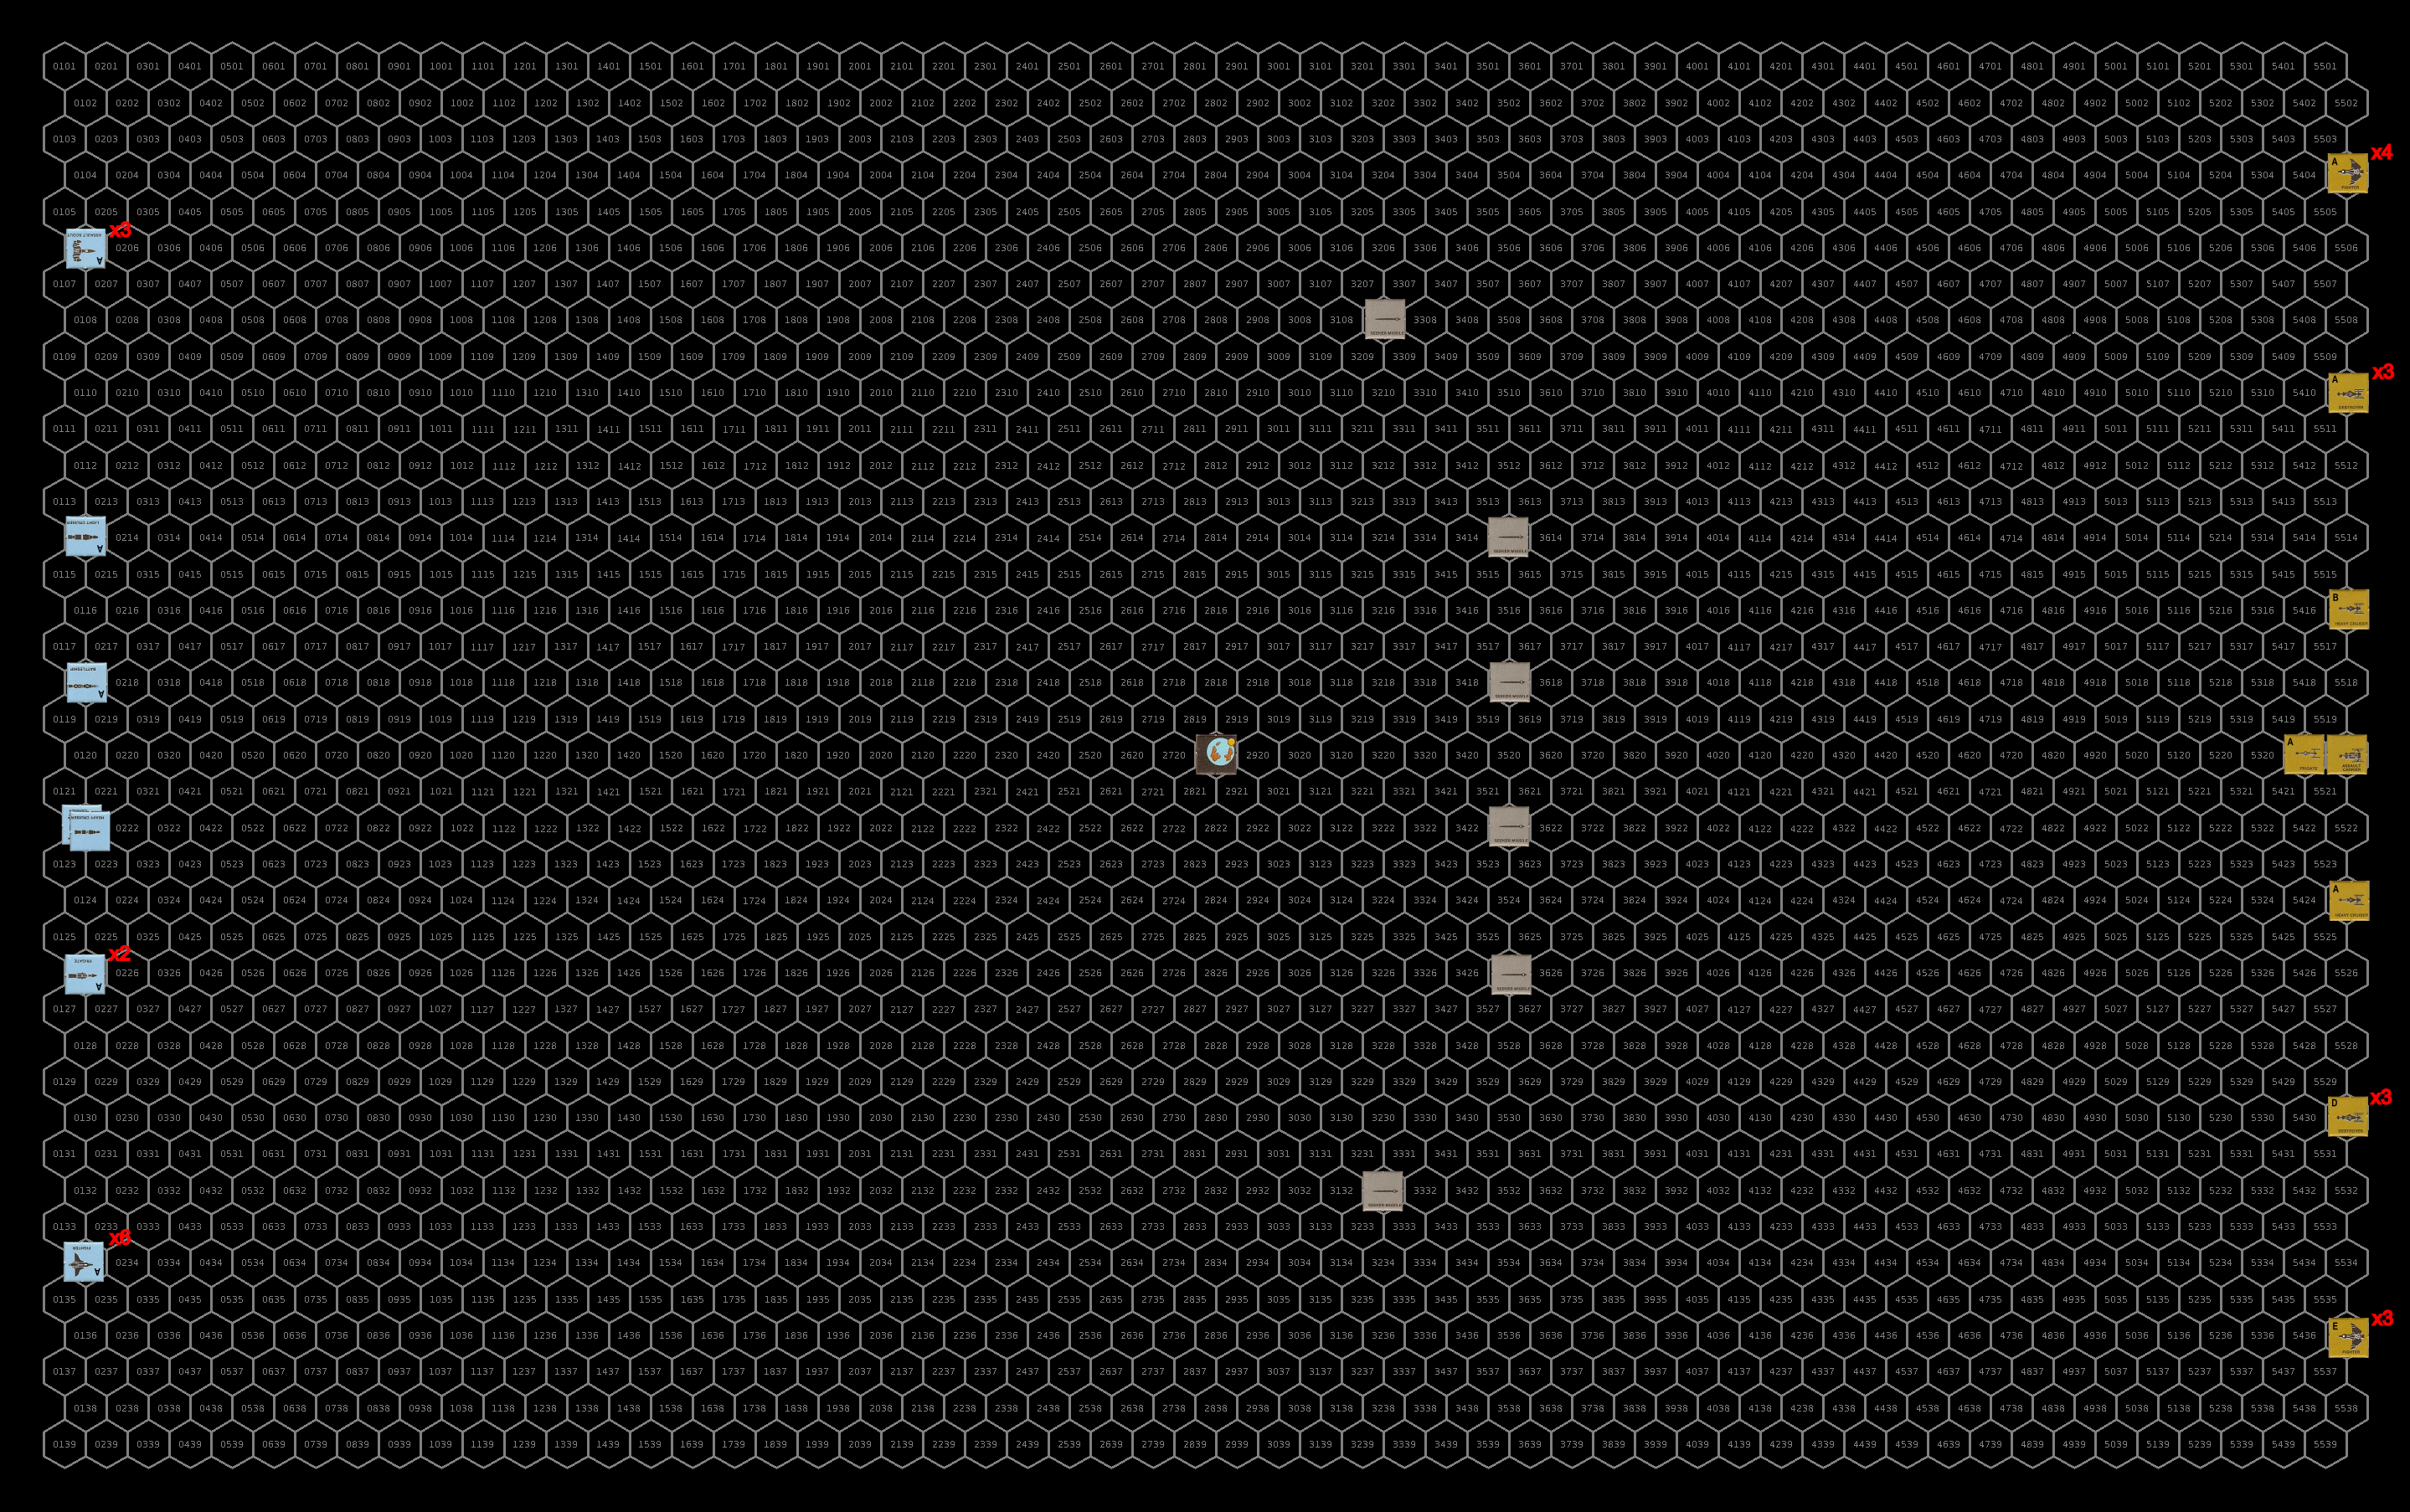
Setup
The sathar are here to do as much damage as possible to attempt to draw forces from the other part of the Frontier. They come in relatively slow (speed 15) in attempt to get the defending forces to spread out so that they can deal with them in waves instead of all at once.
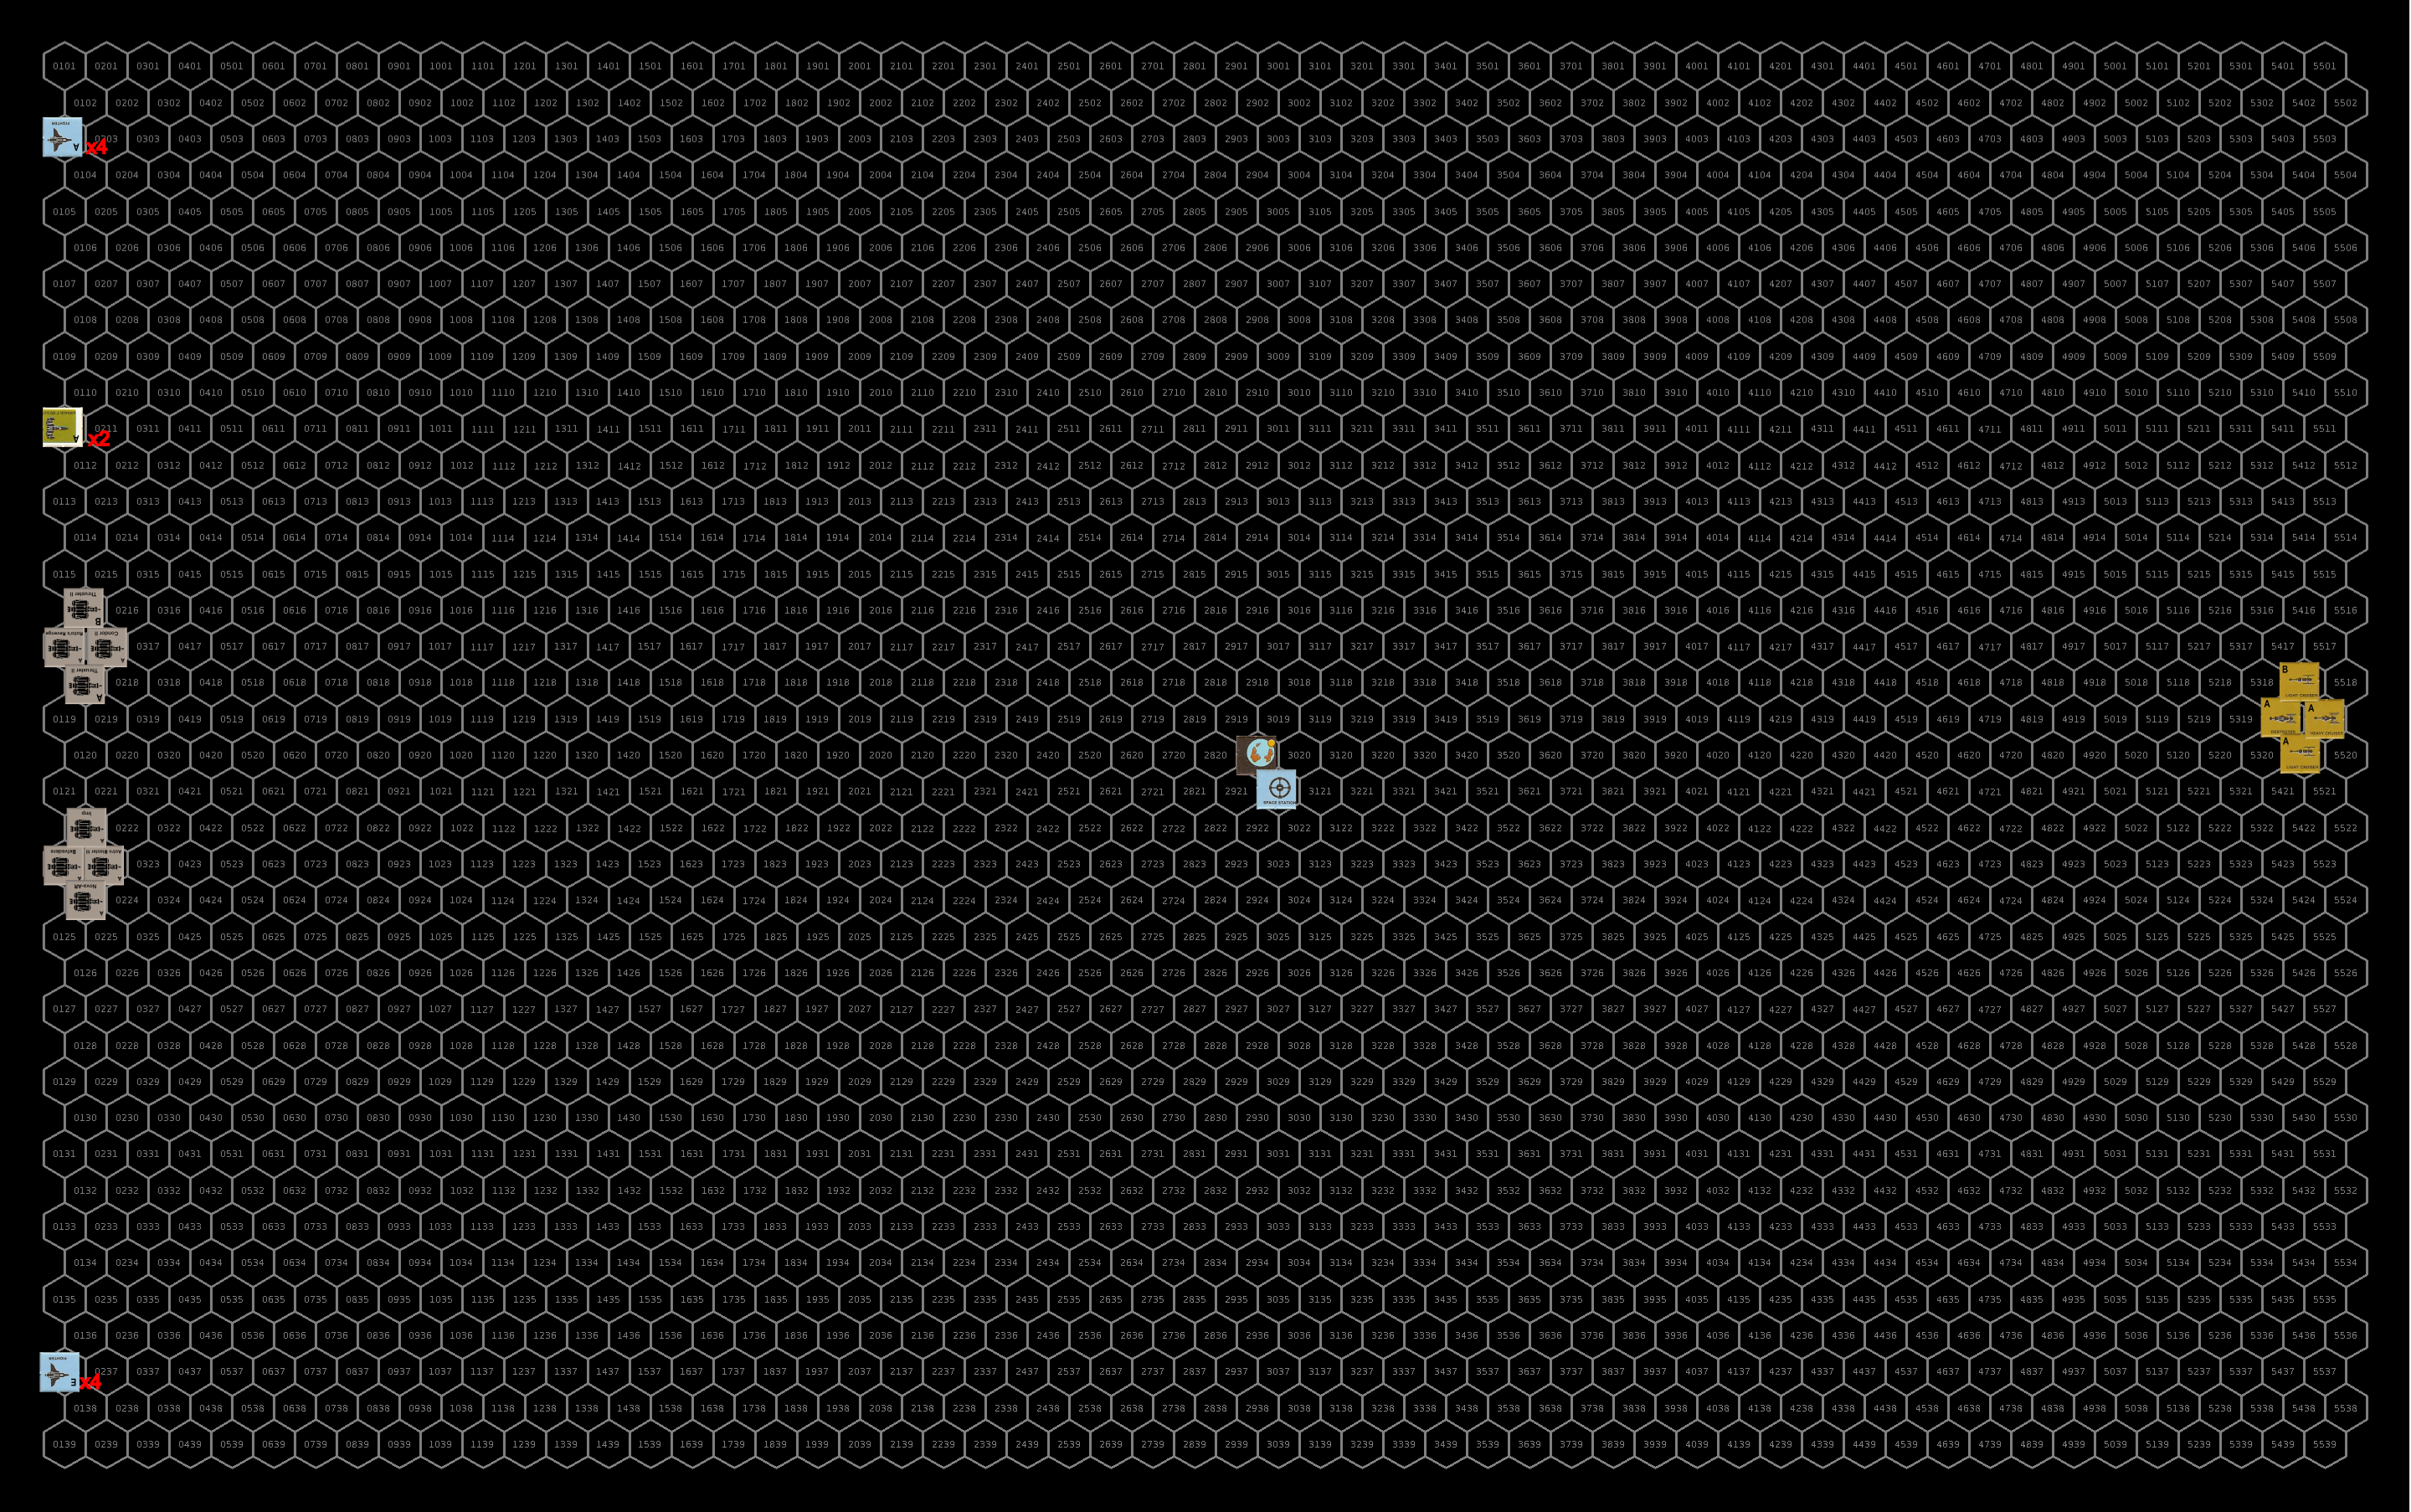
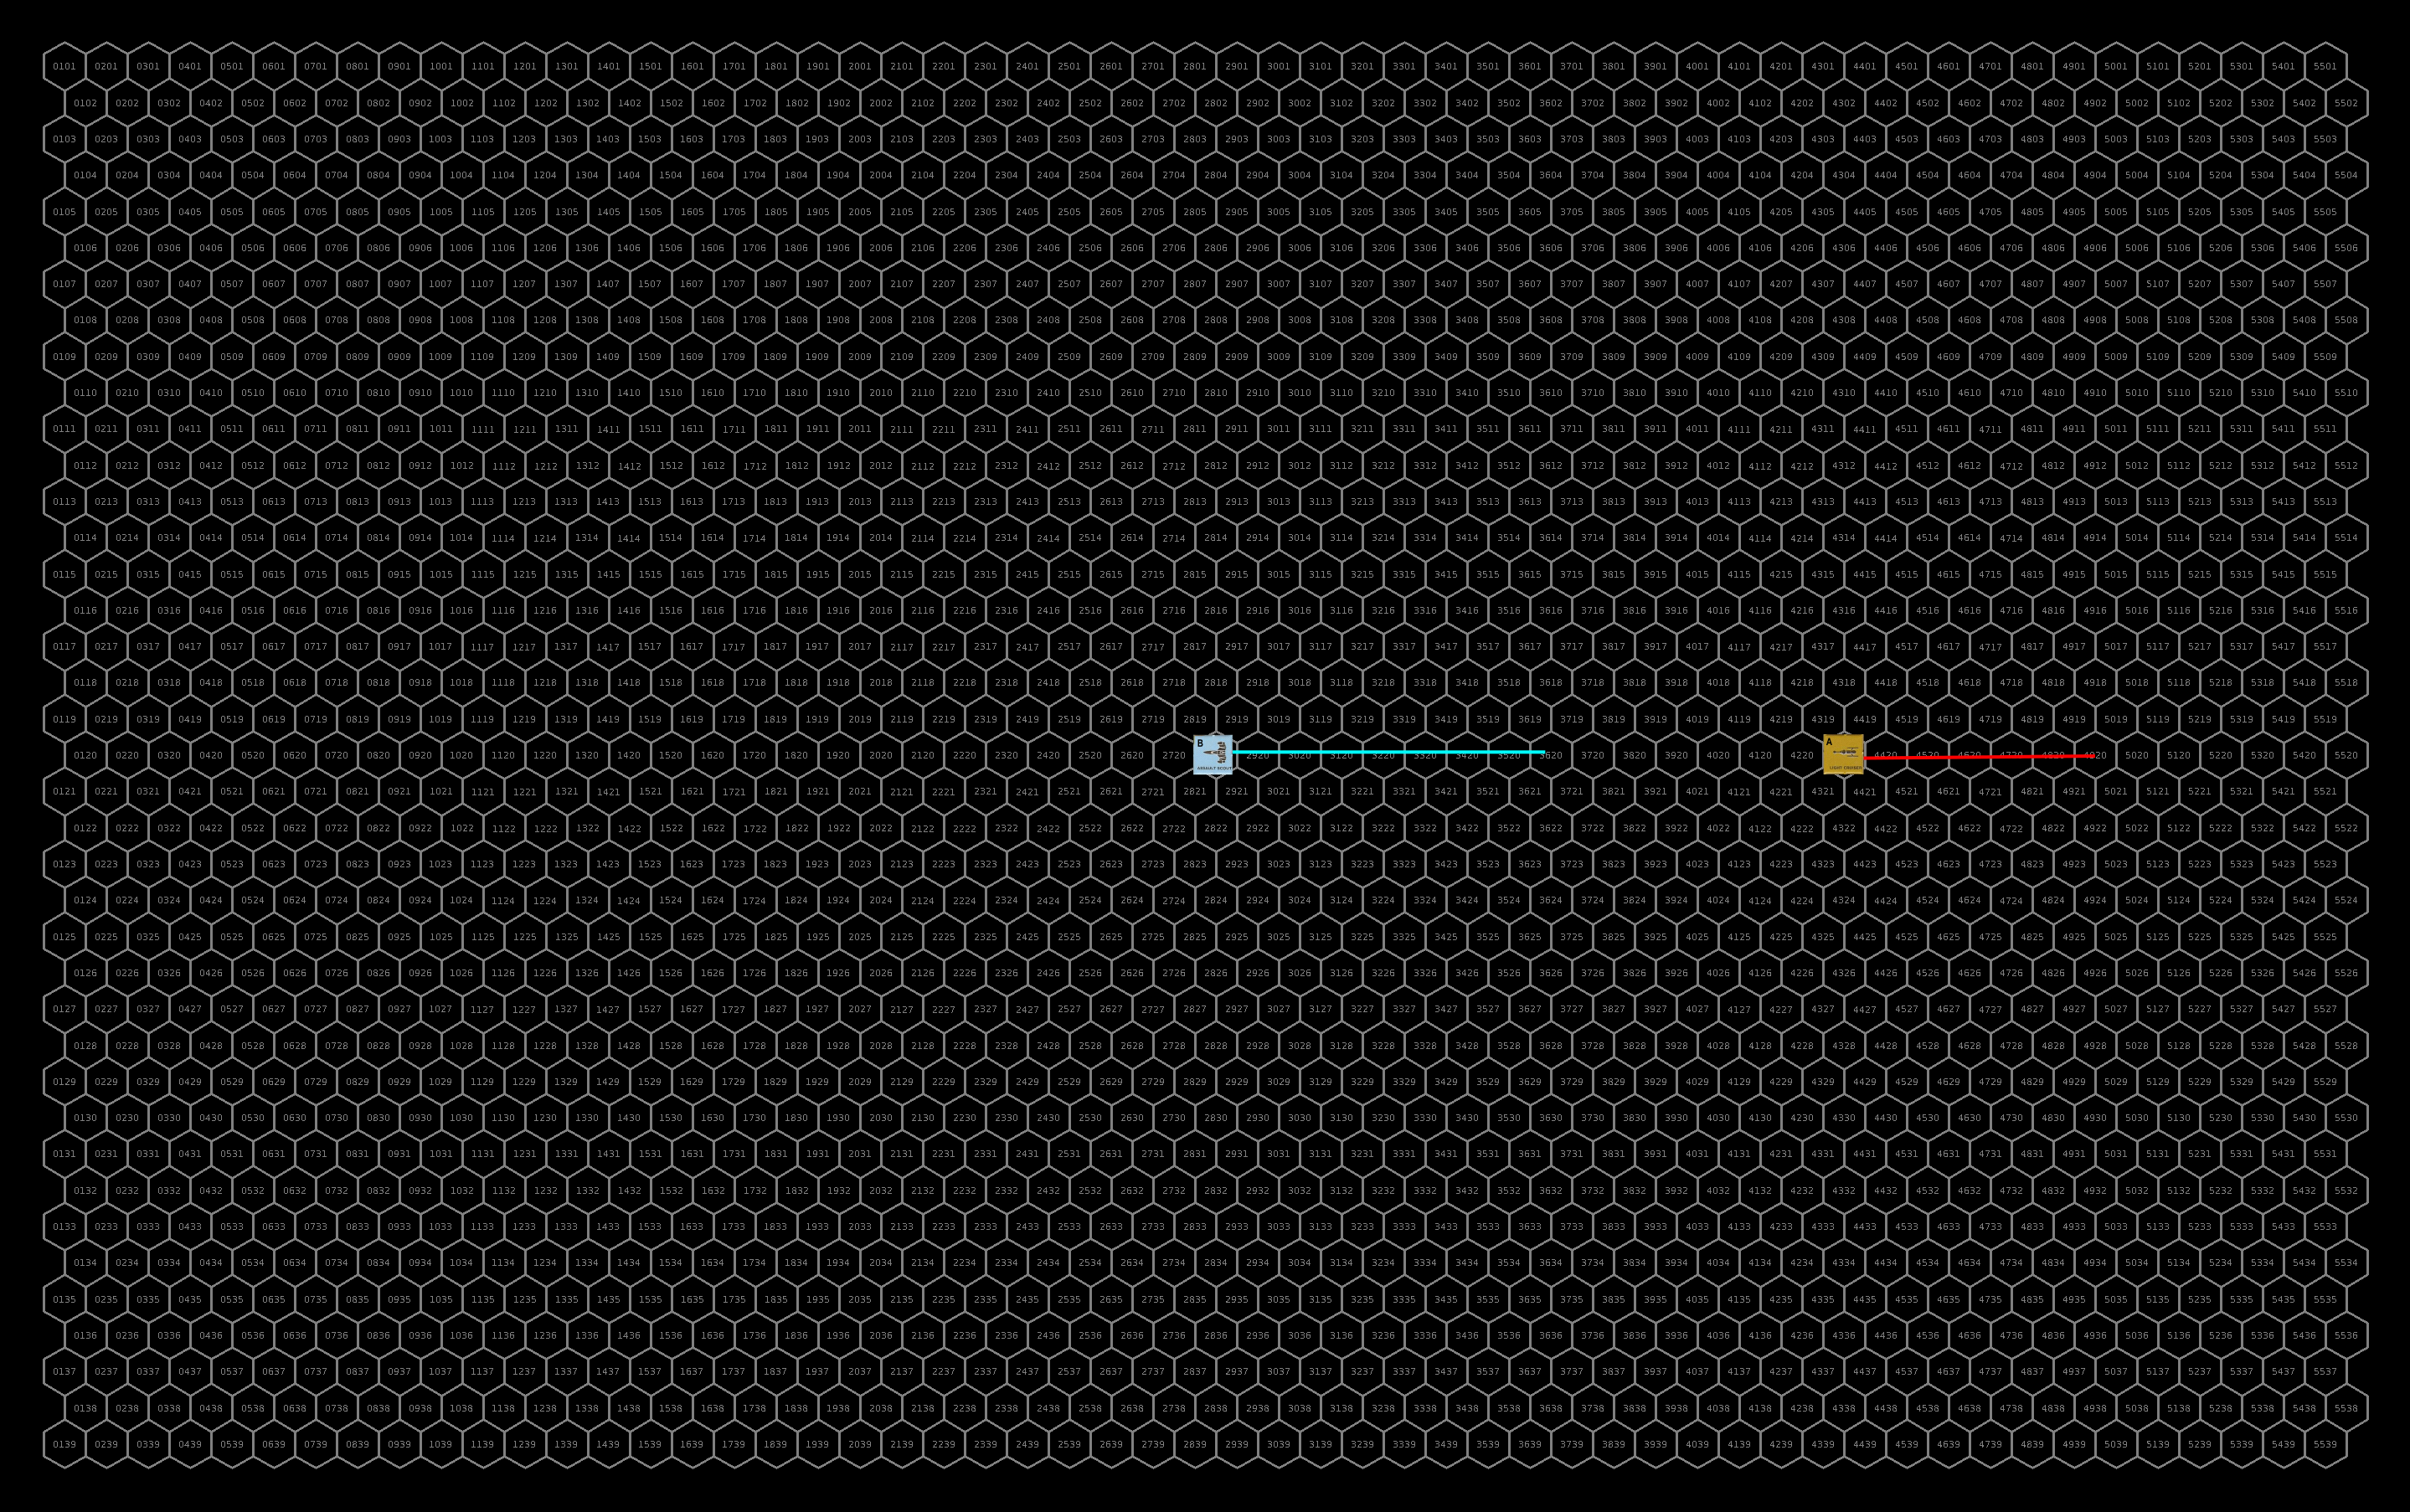
The UPF forces spread across a wide front moving at speed 20 to be prepared to engage the sathar regardless of what path they take through the system. The FFC squadron splits into two flights on the wings and the Yazira Squadron splits up as well with the militia assault scouts above them.
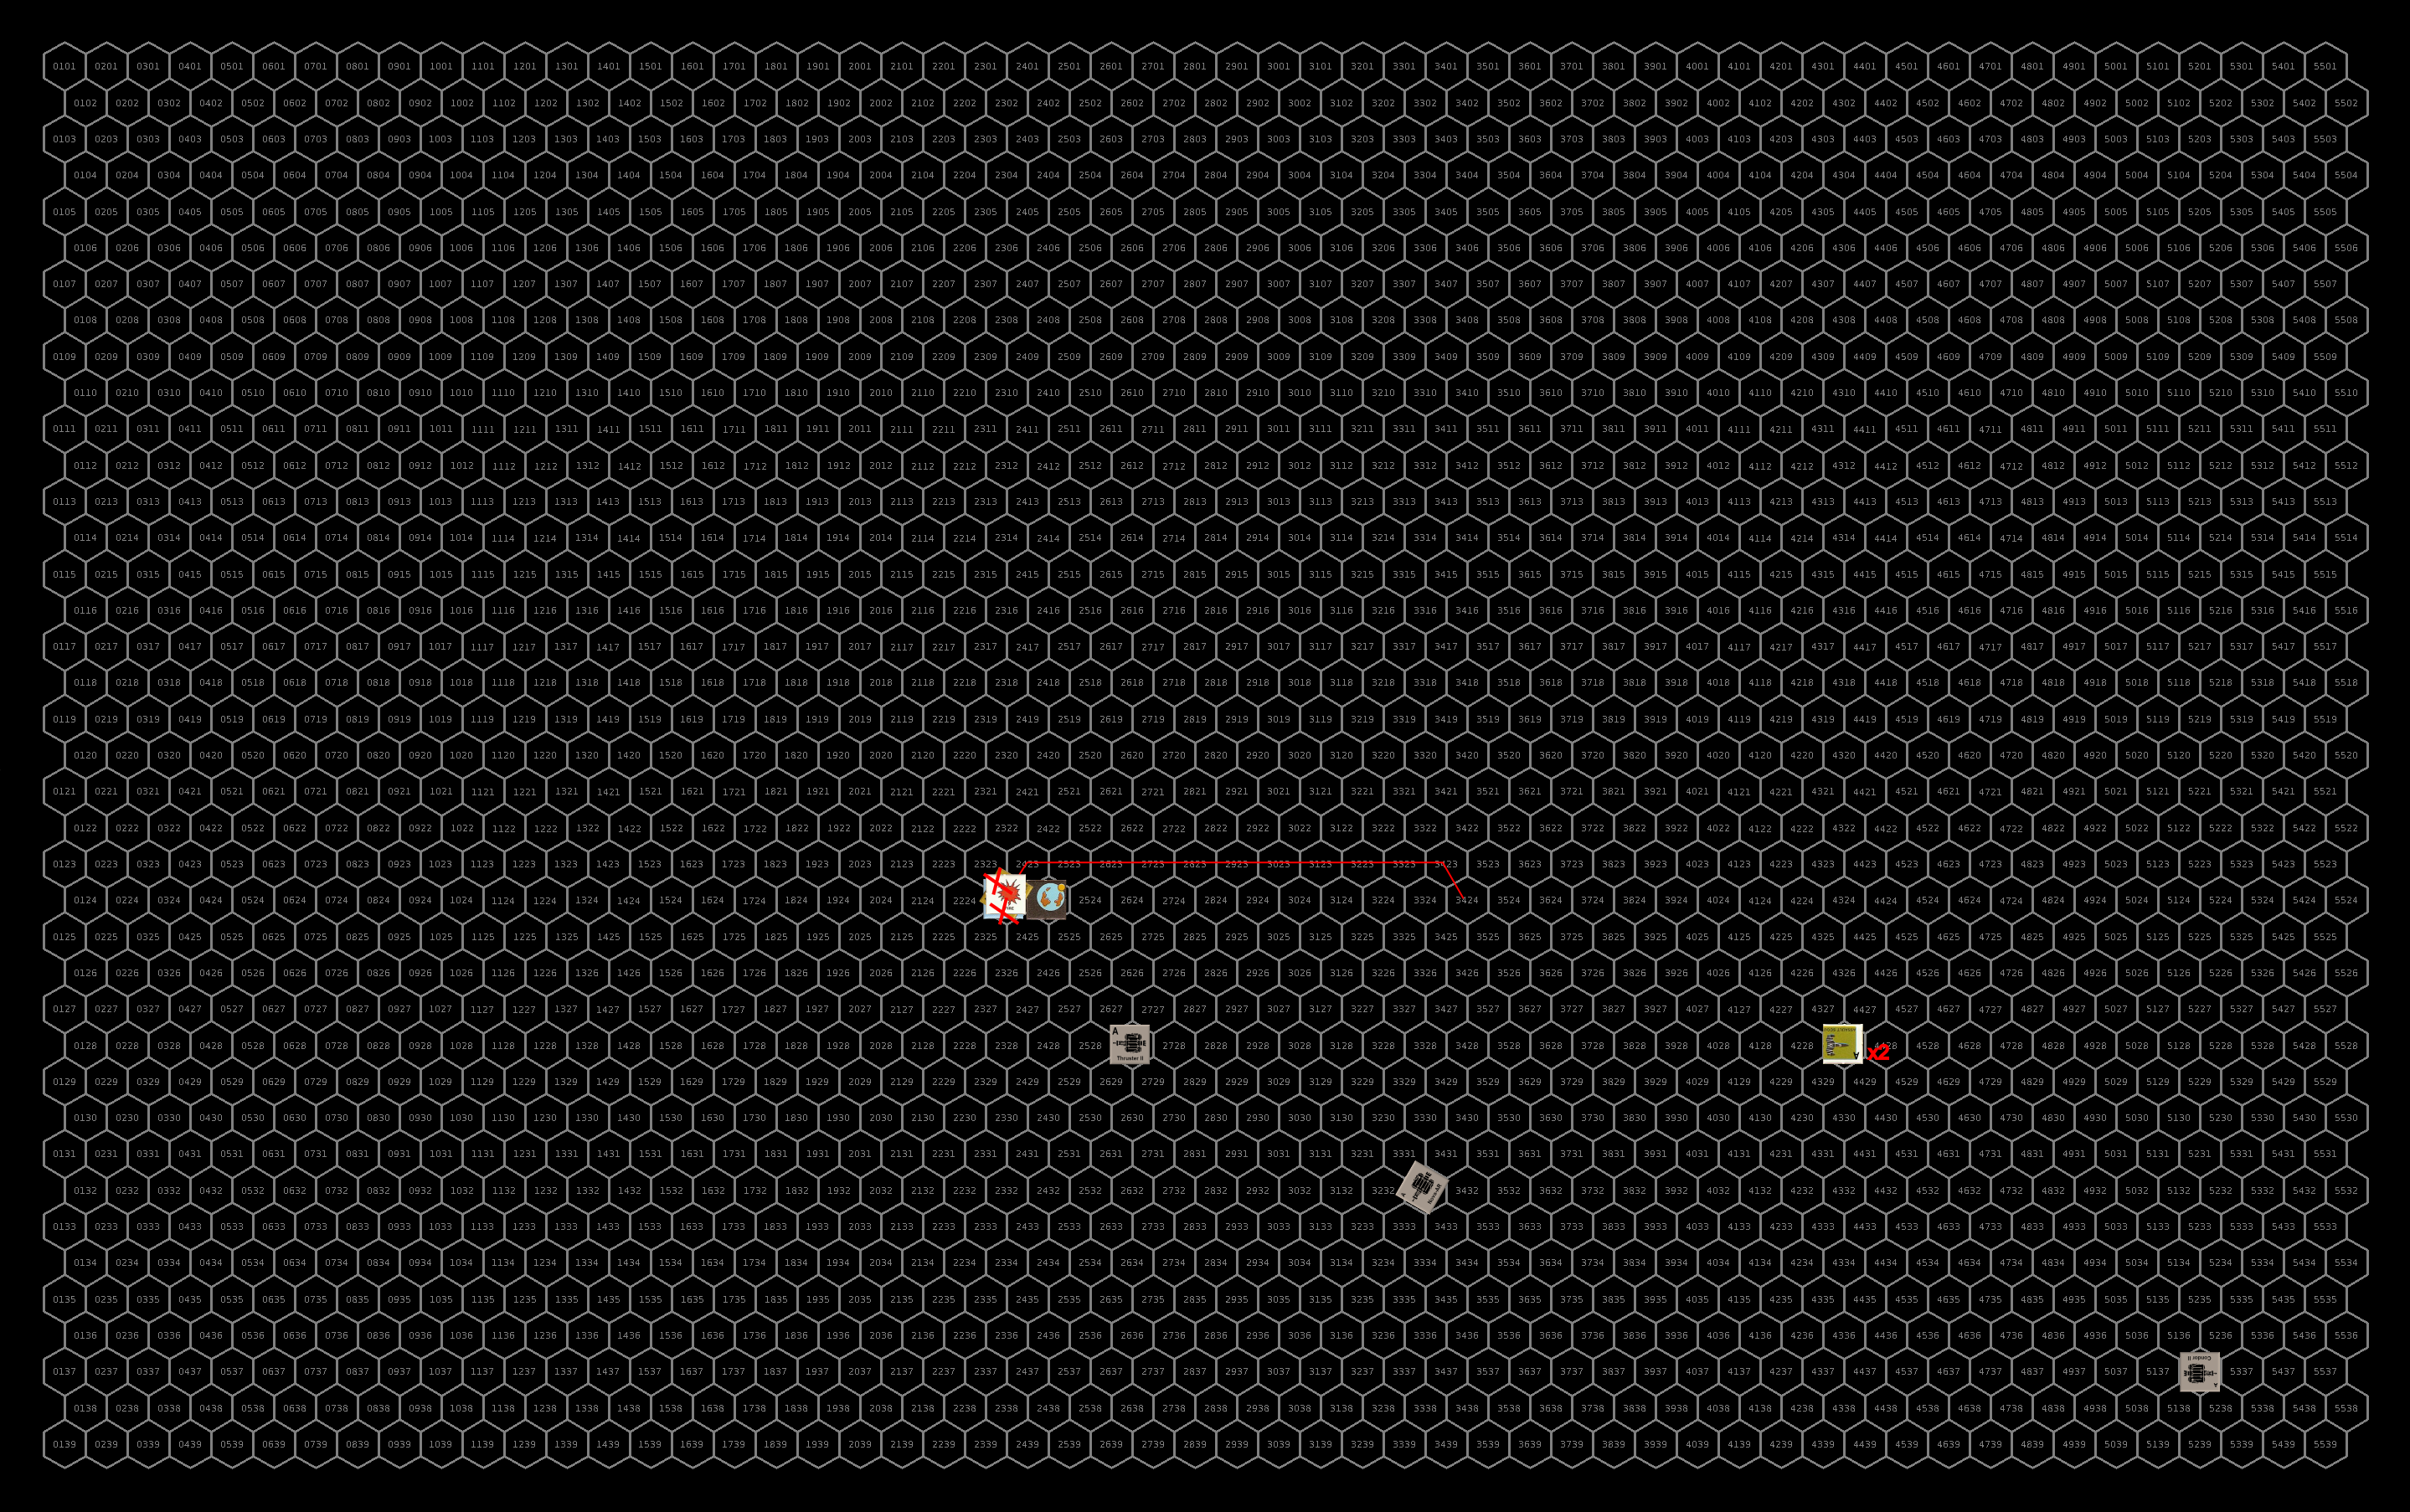
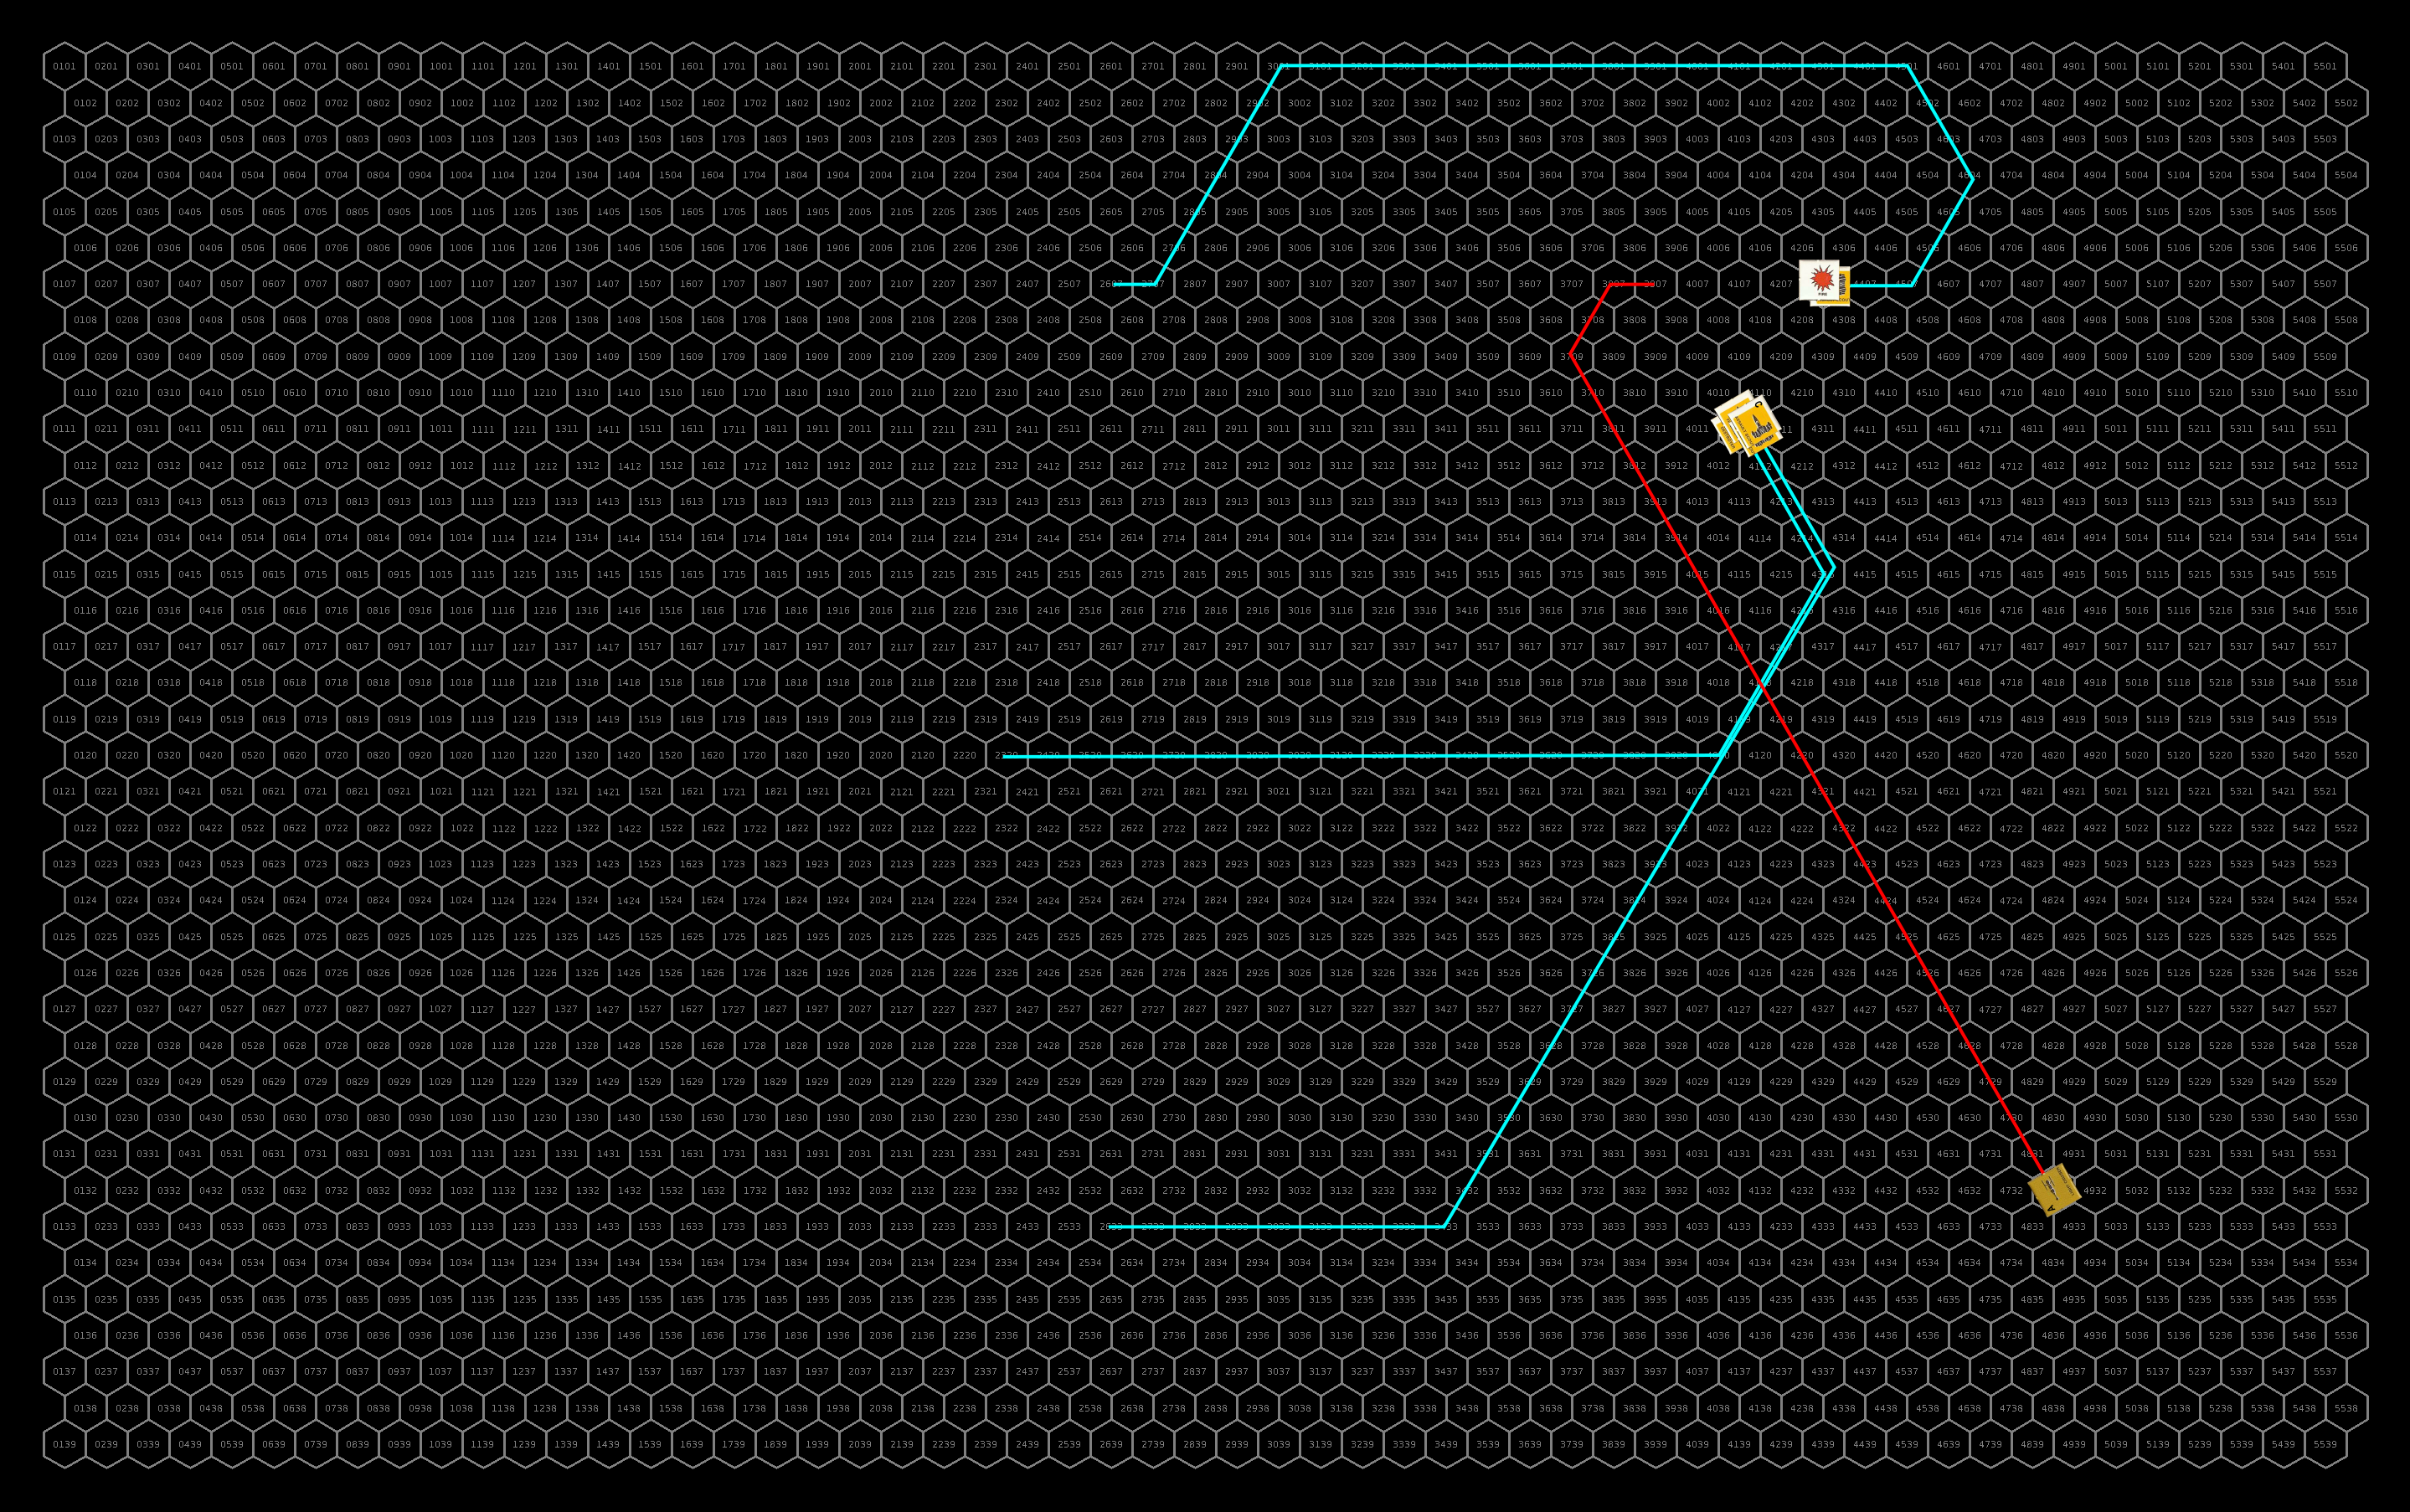
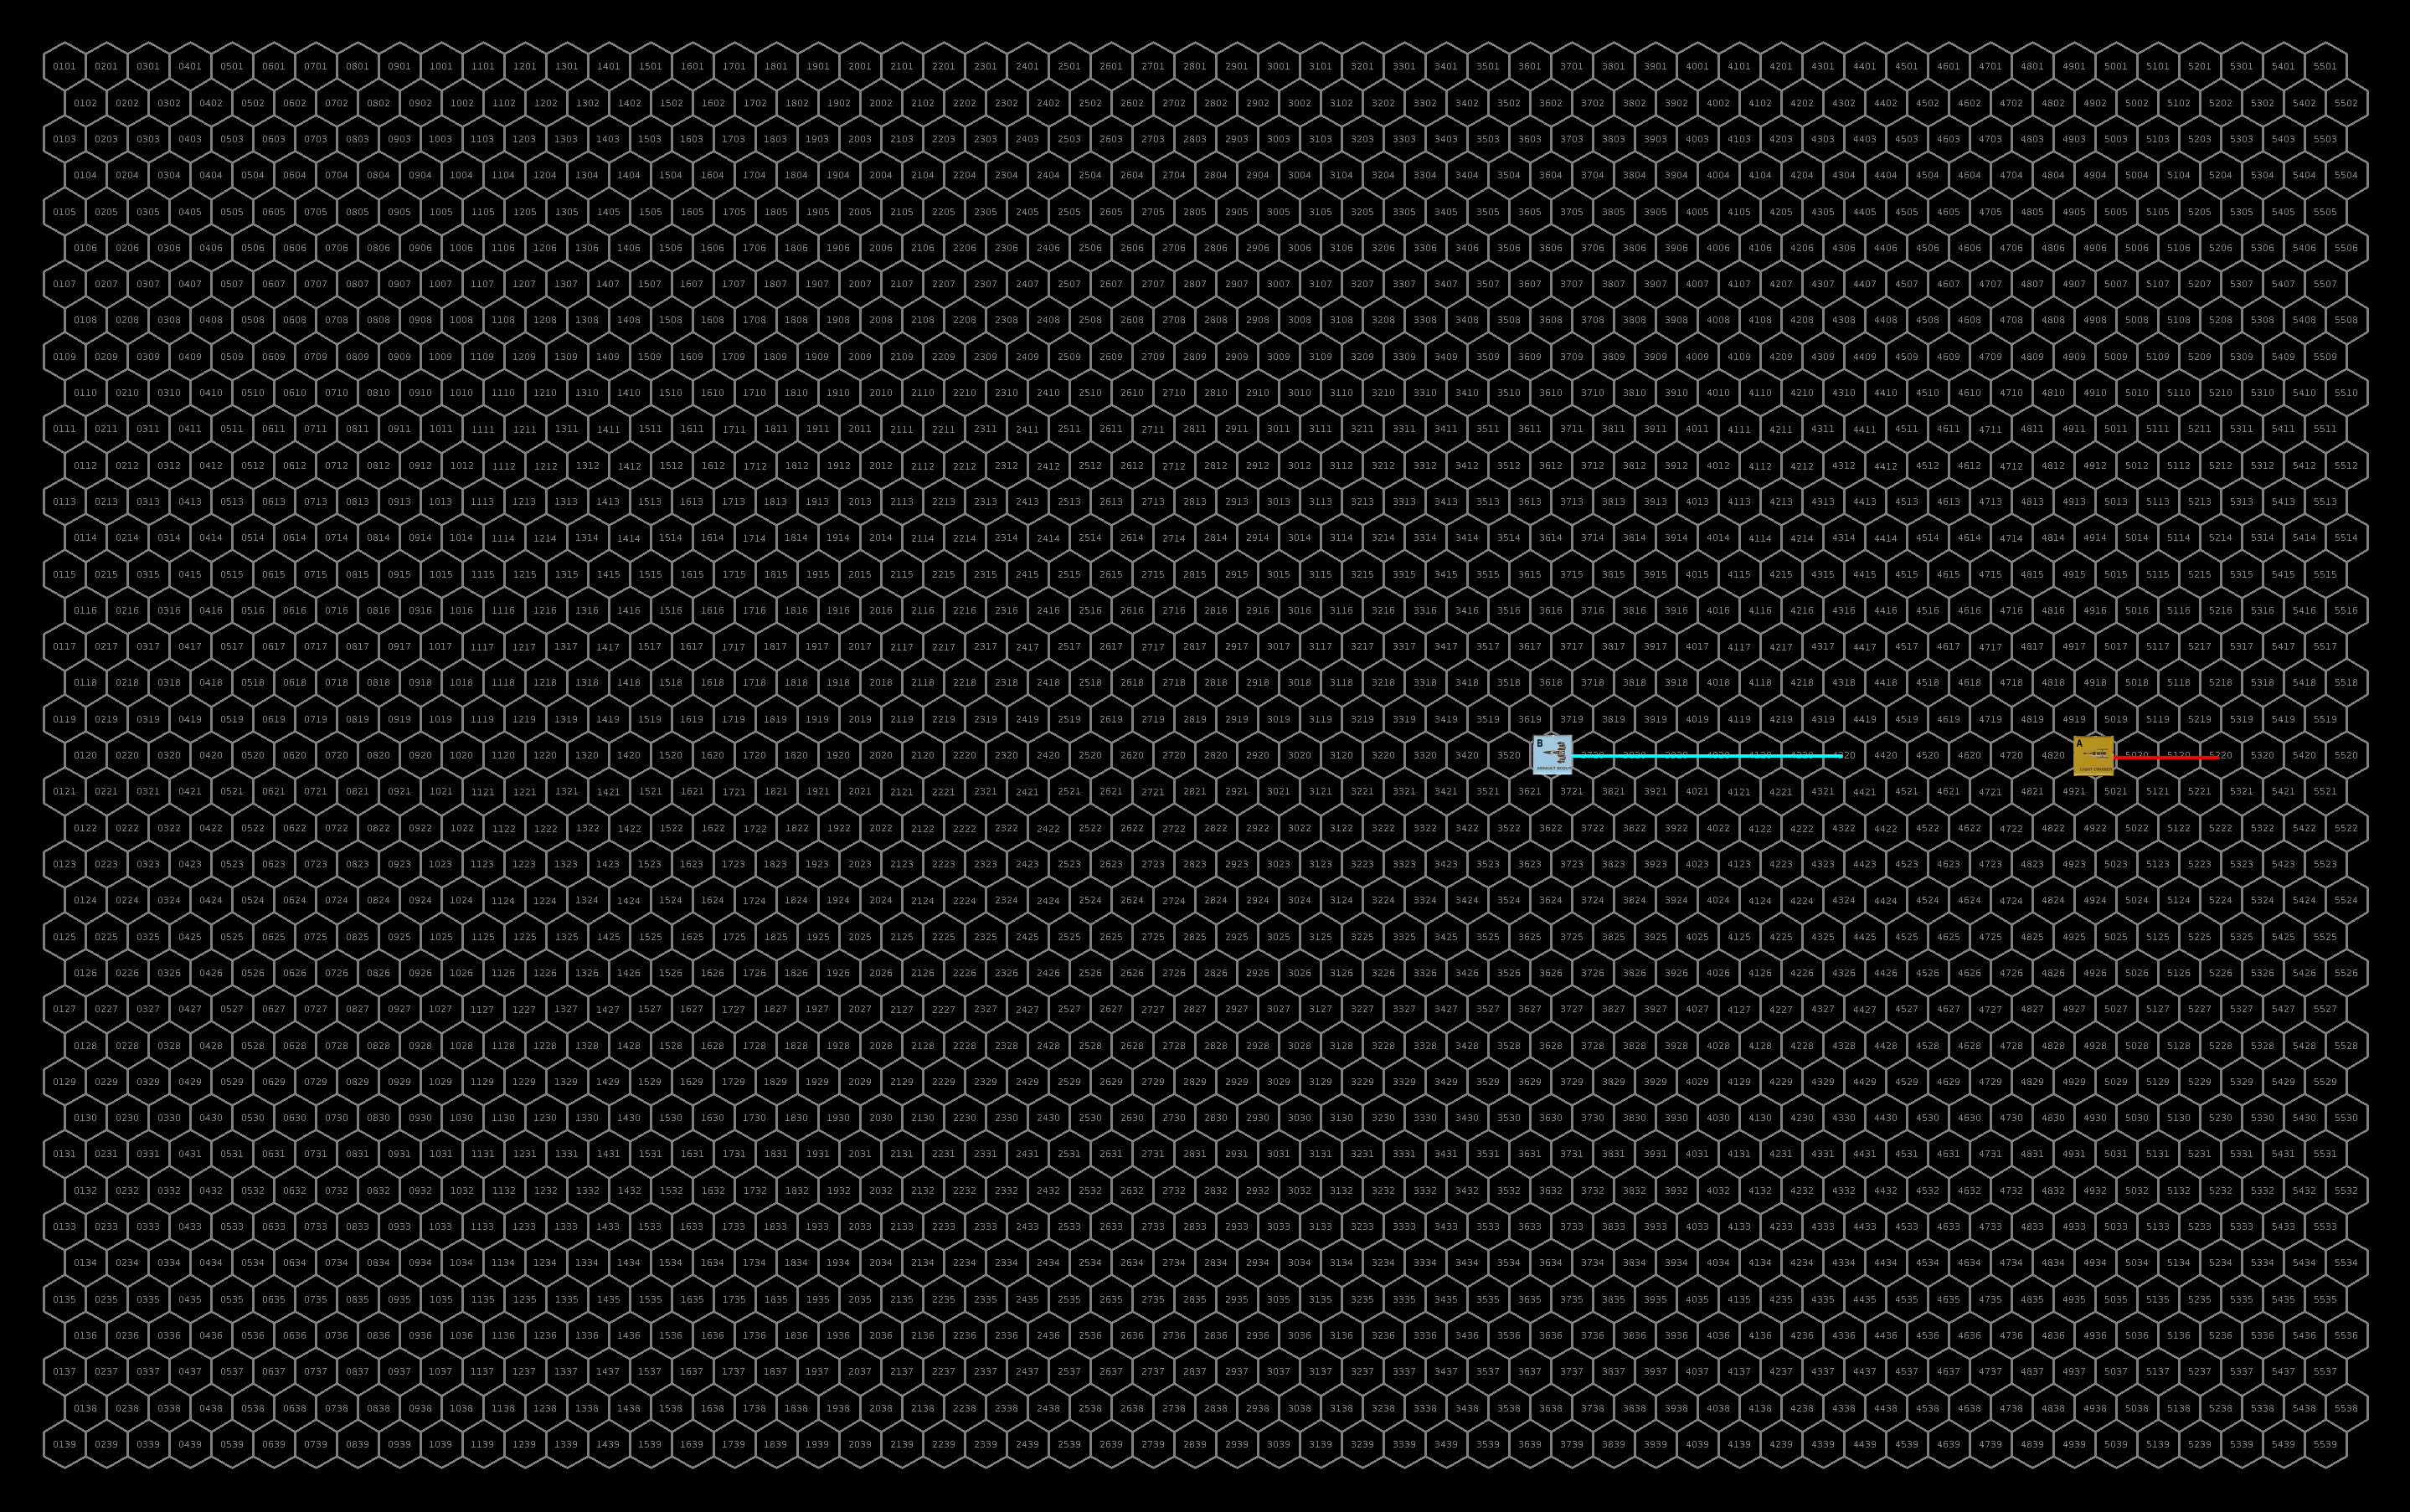
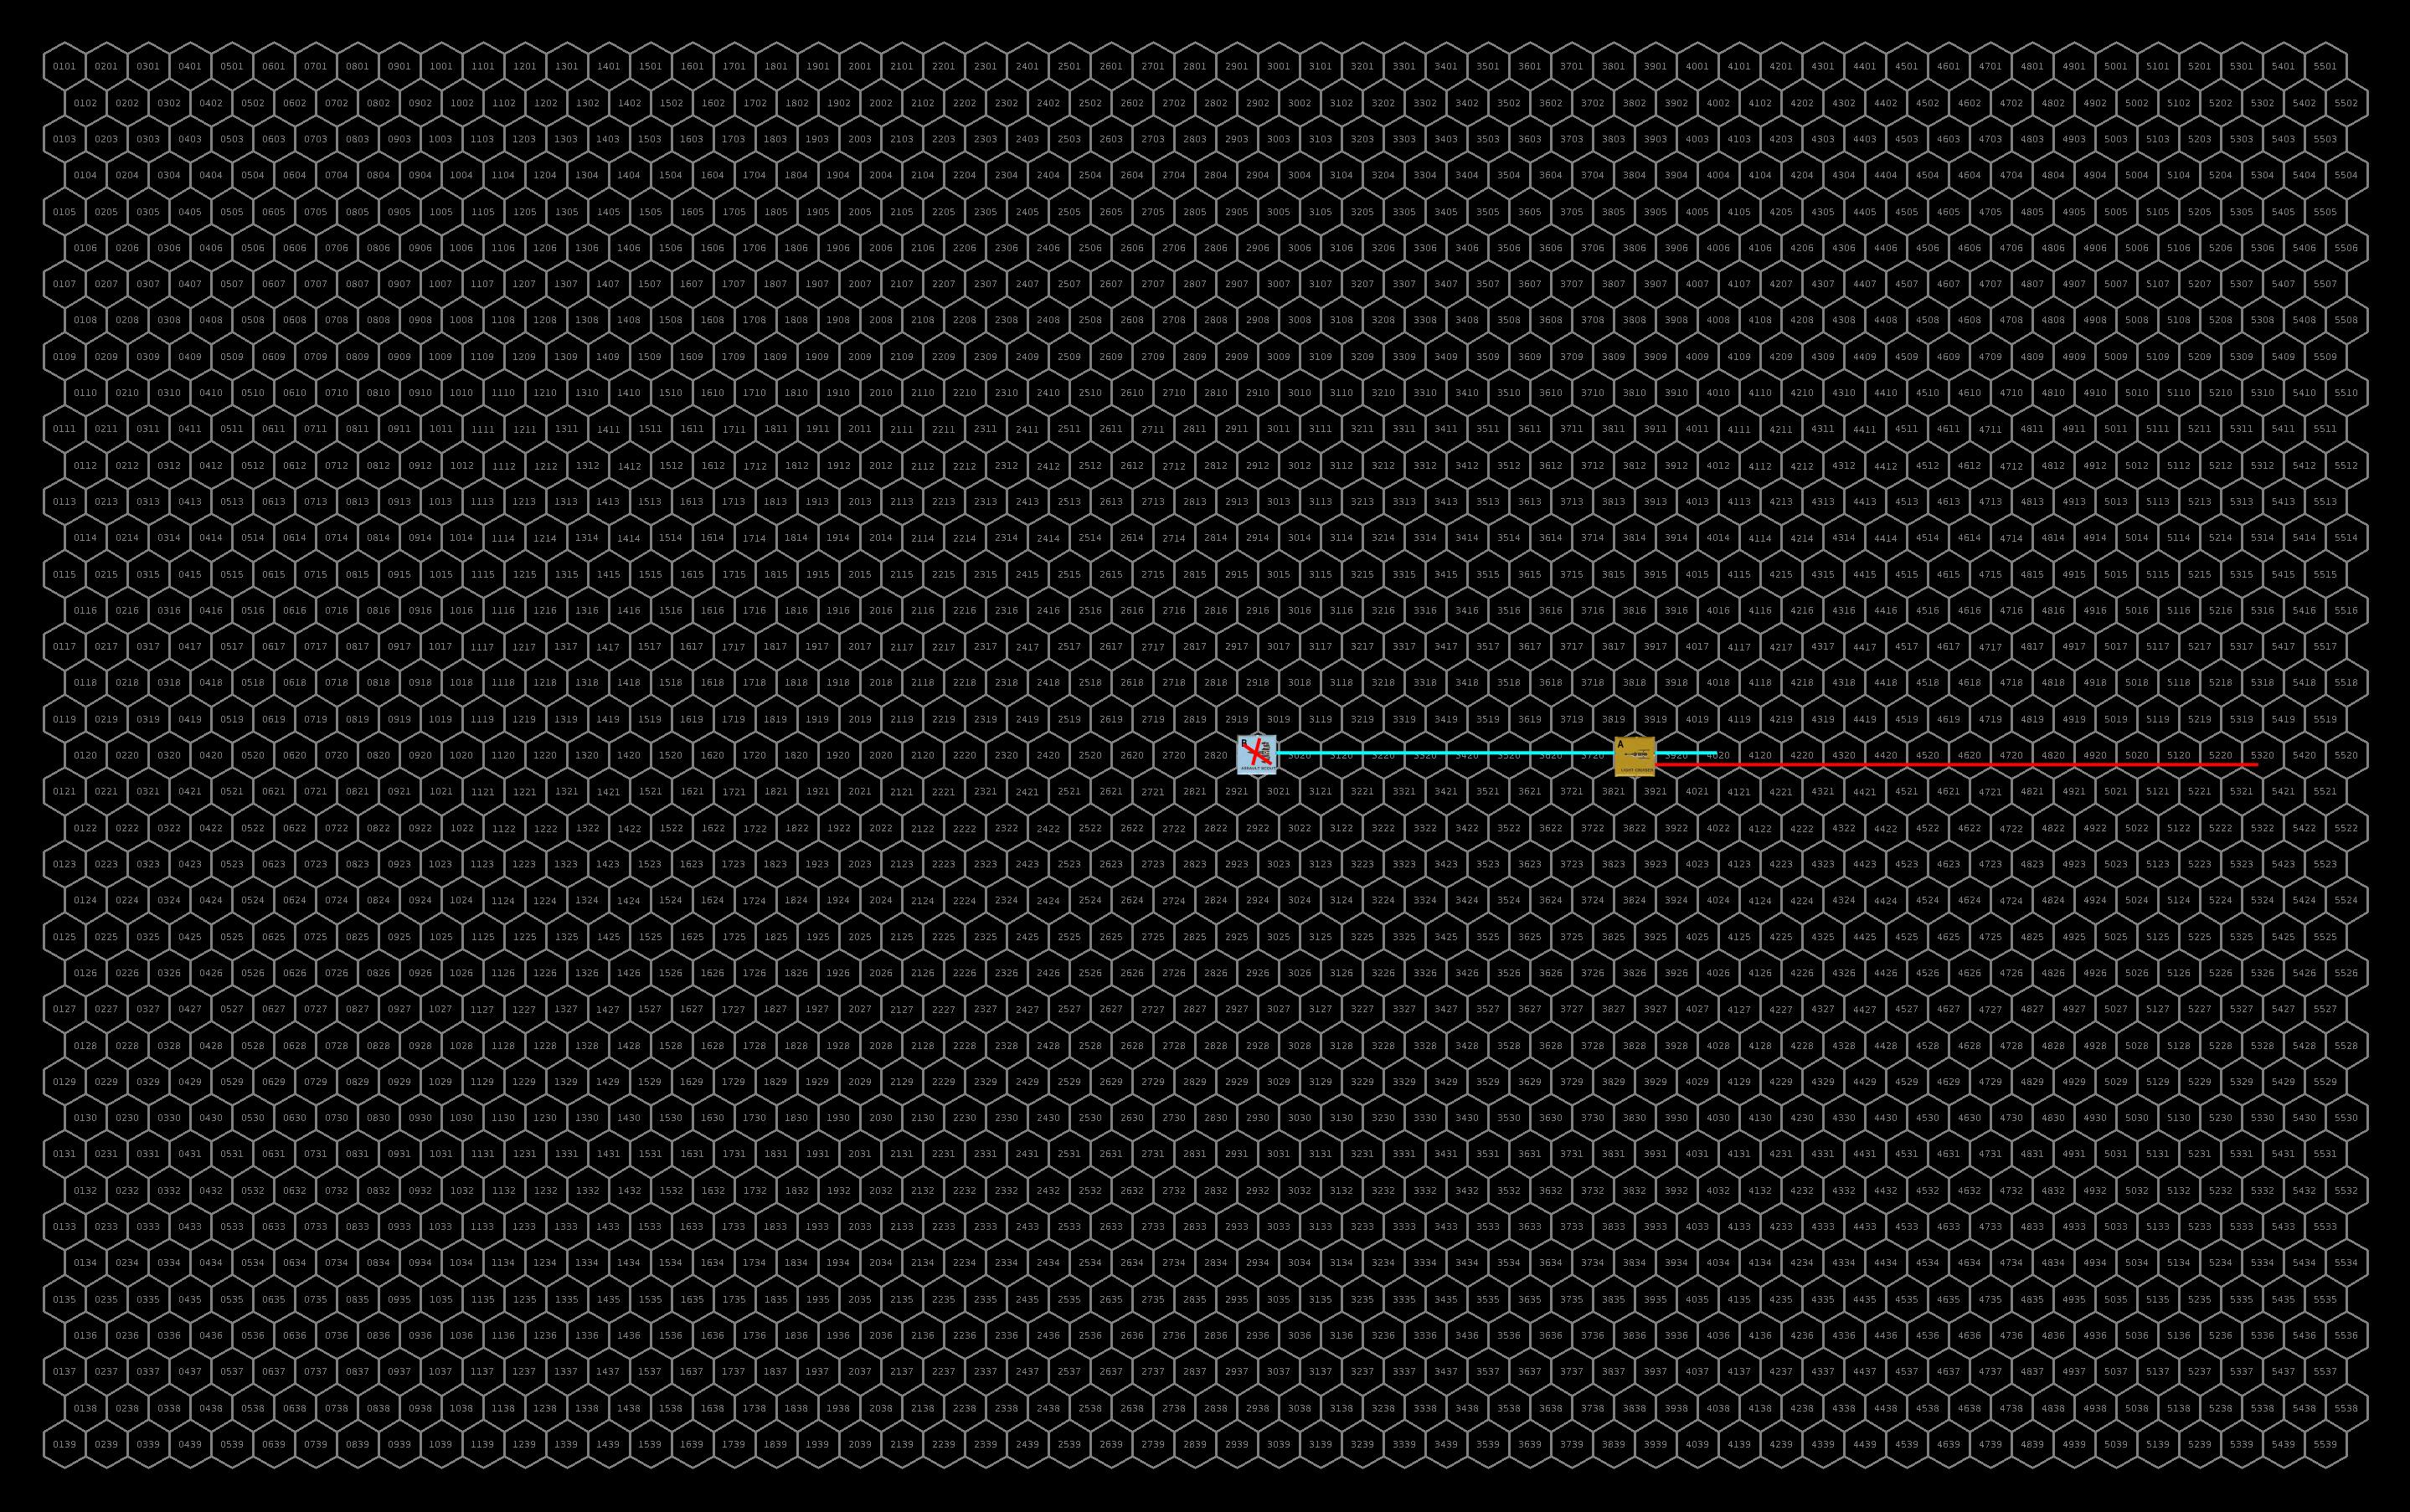
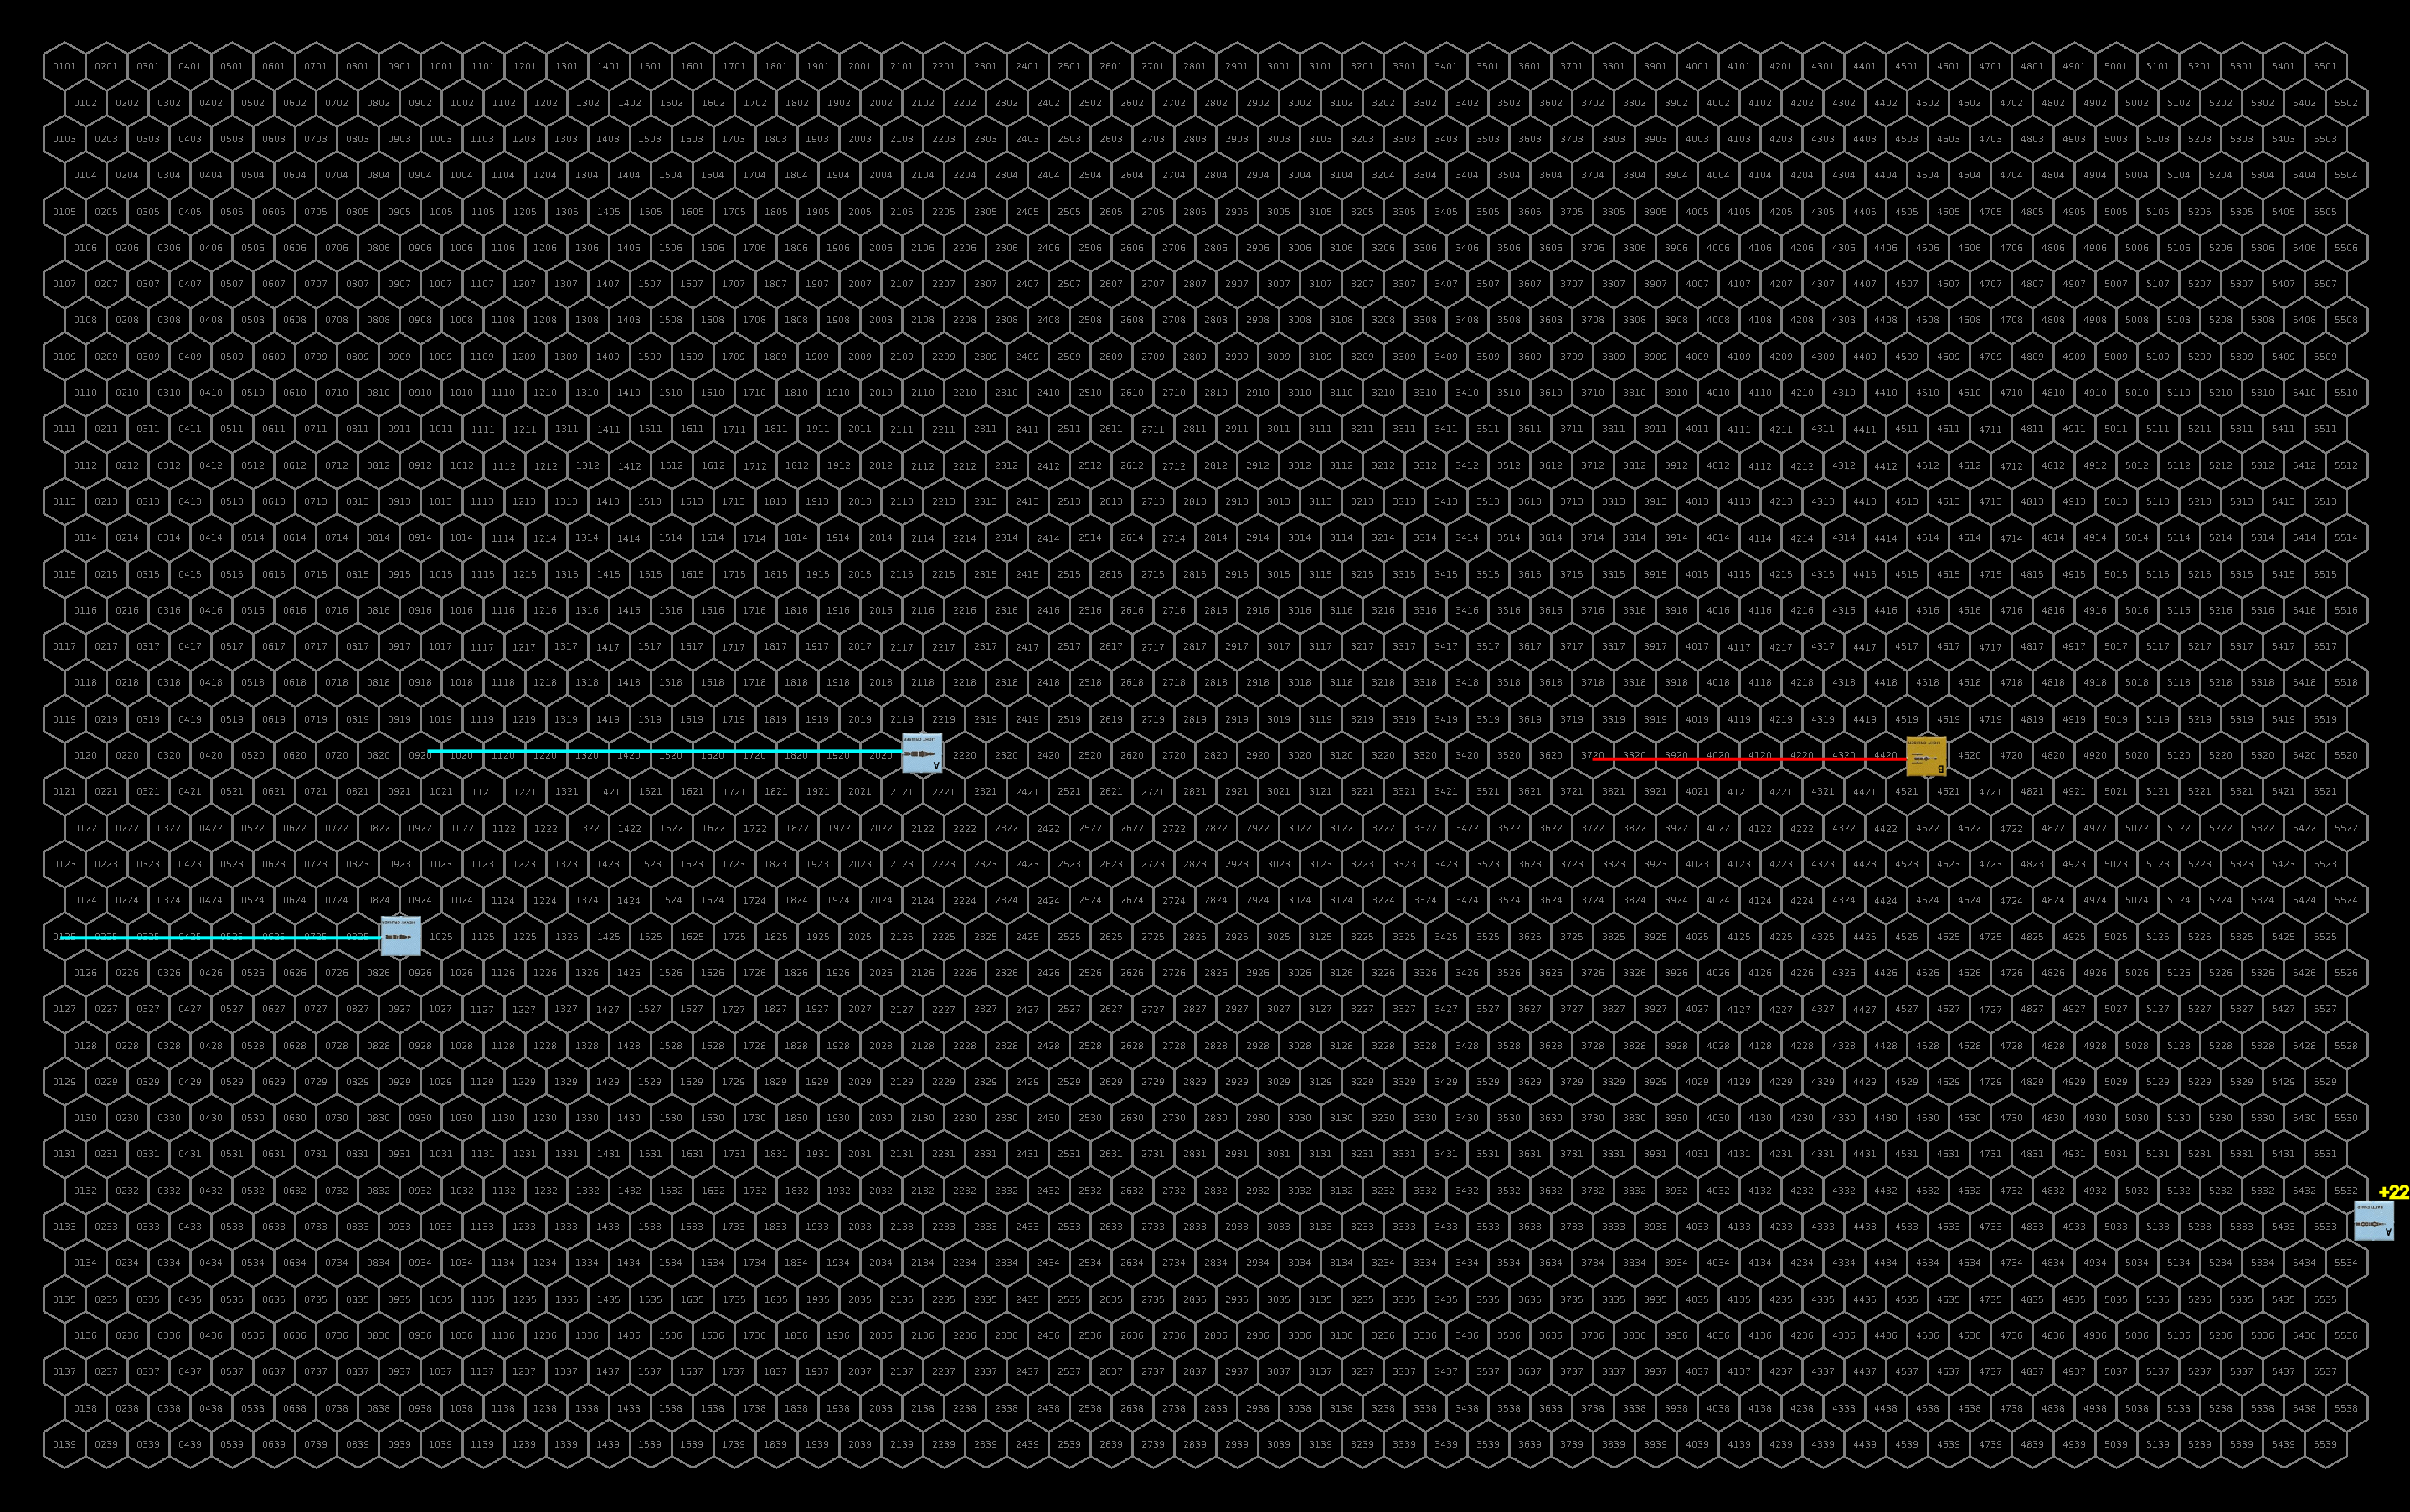
Initial starting positions for the battle. Click for full size image.
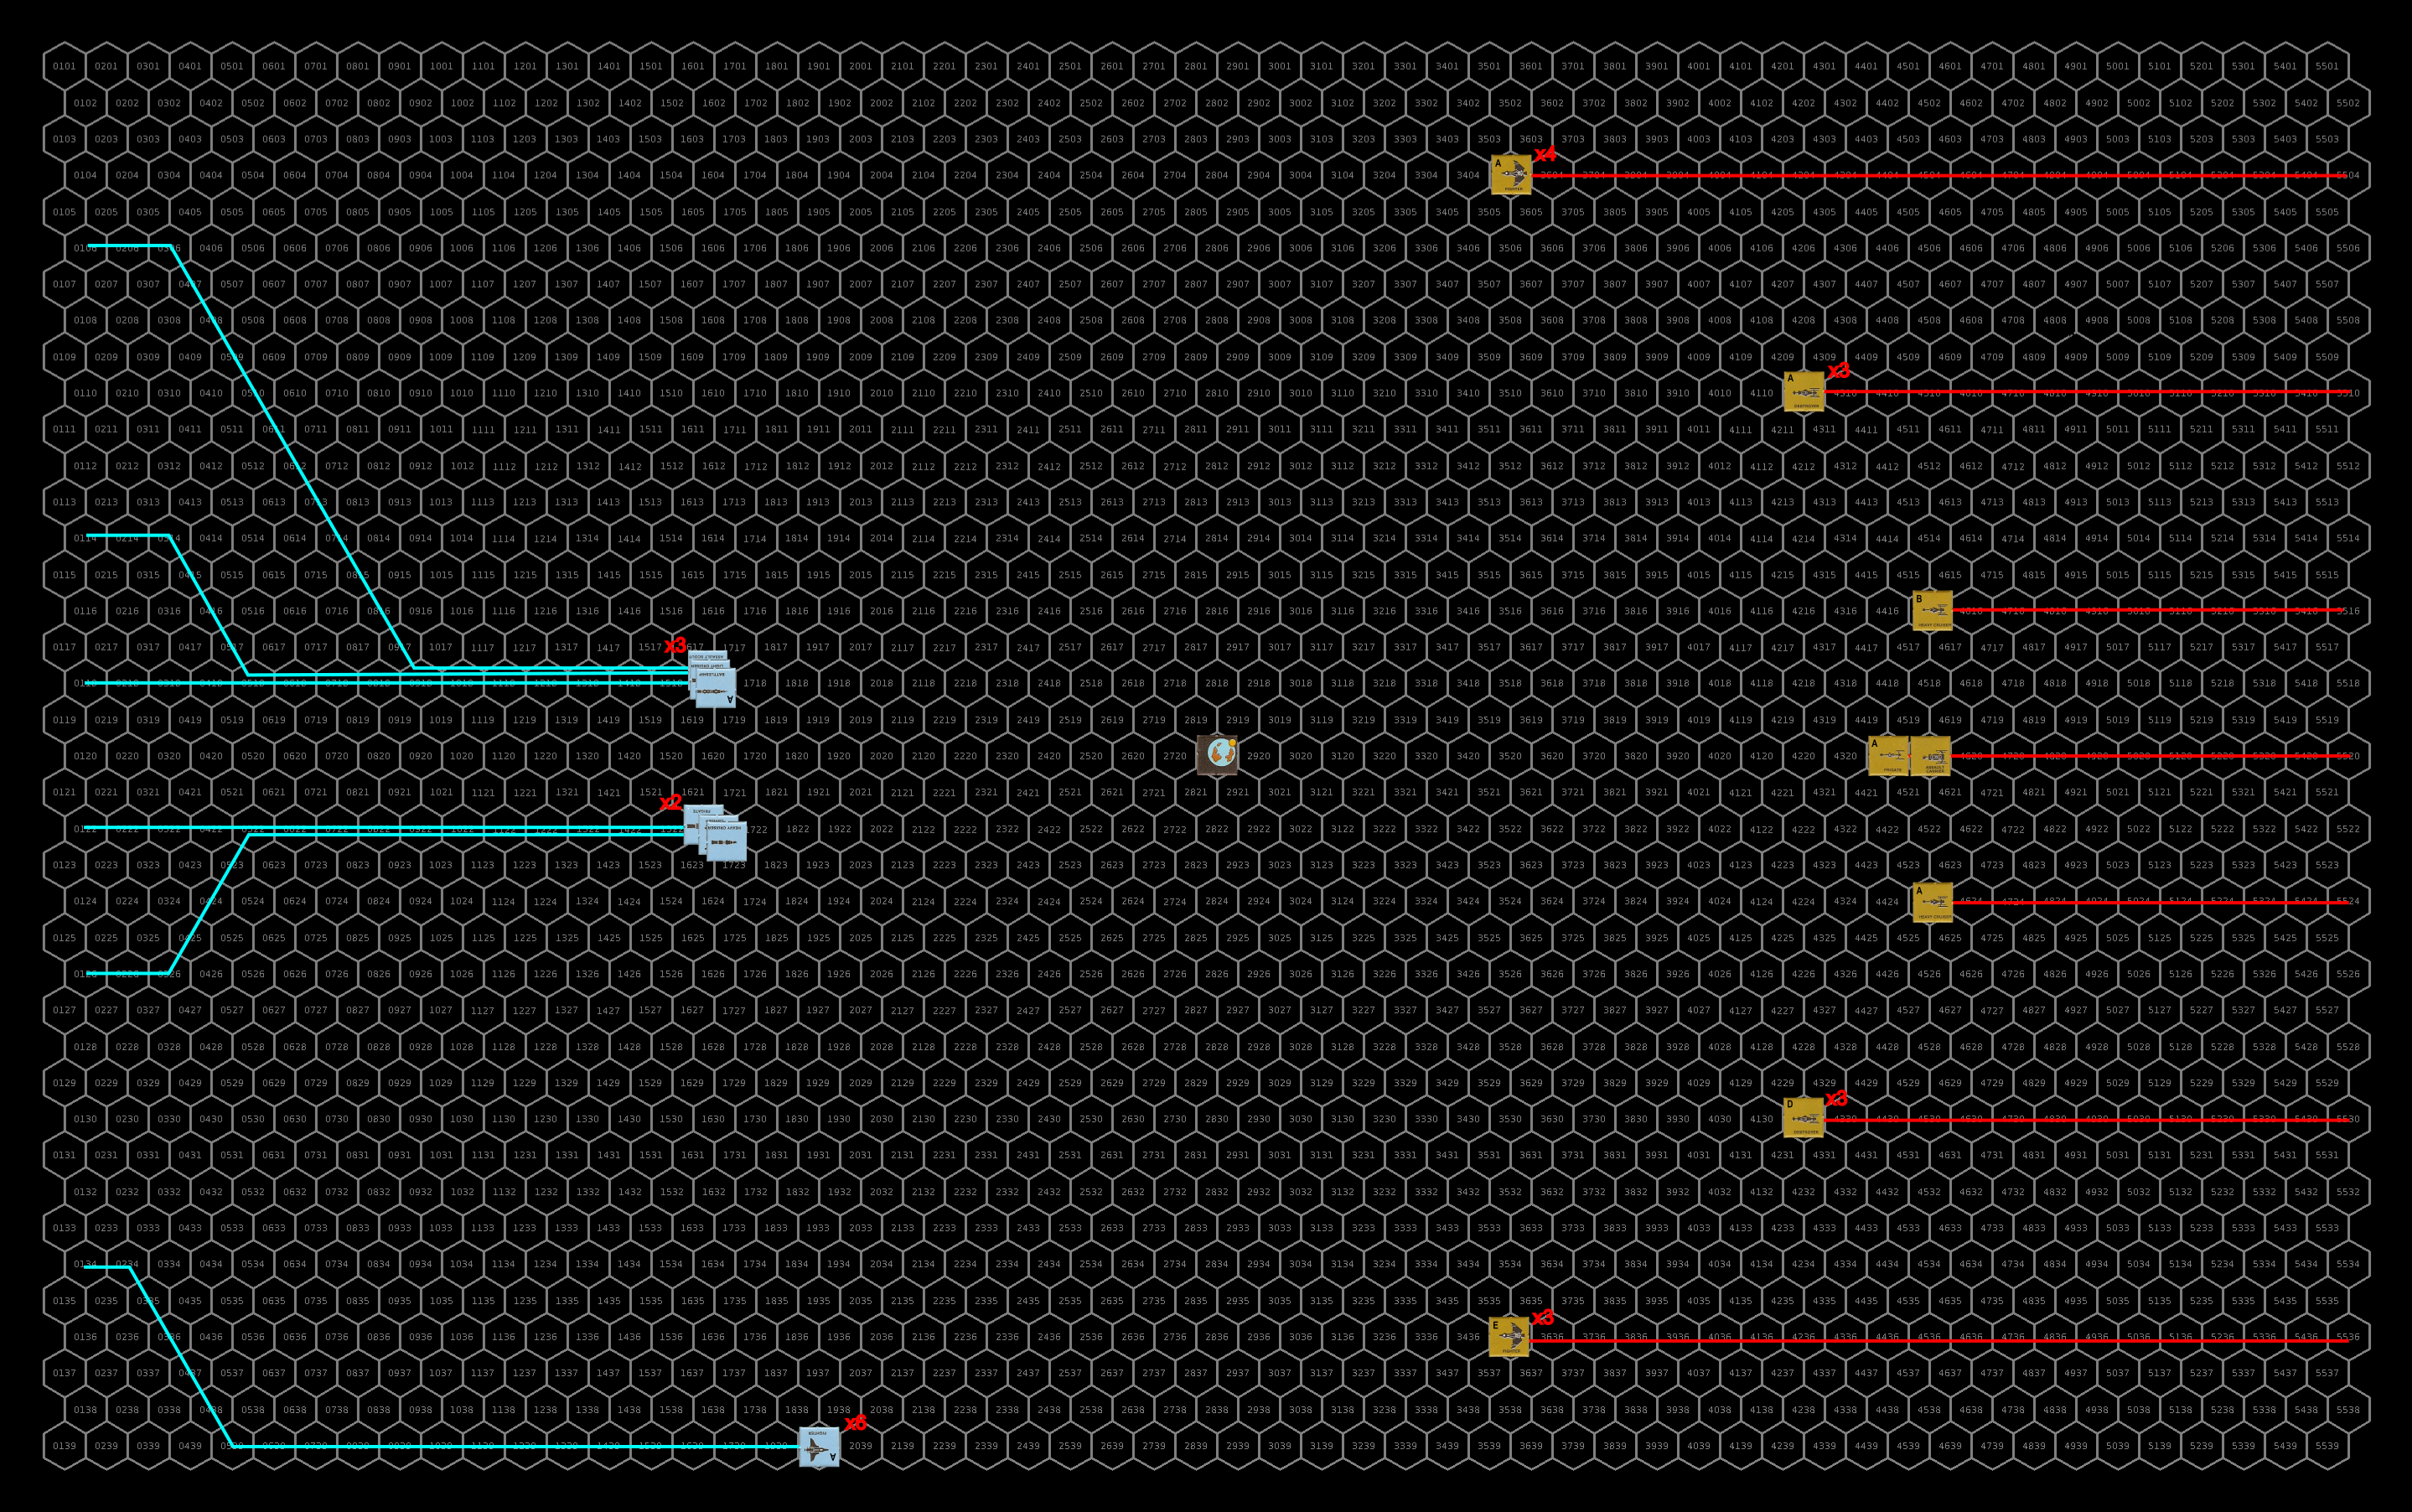
Turn 1
The sathar maintain their speed but pull into a closer defensive position. Out of range of any UPF weapons, they take some long distanced shots at the armed station with their proton and electron batteries. The second light cruiser connects with both weapons knocking out the stations laser battery and crippling its damage control system.
The UPF ships race forward applying maximum acceleration but can’t quite get in range of the sathar vessels which get another round of free shots on the station which has now come in range of their cannons as well. They are not as lucky this time and only the destroyer’s laser cannon connects with the station knocking out 9% of its hull integrity.
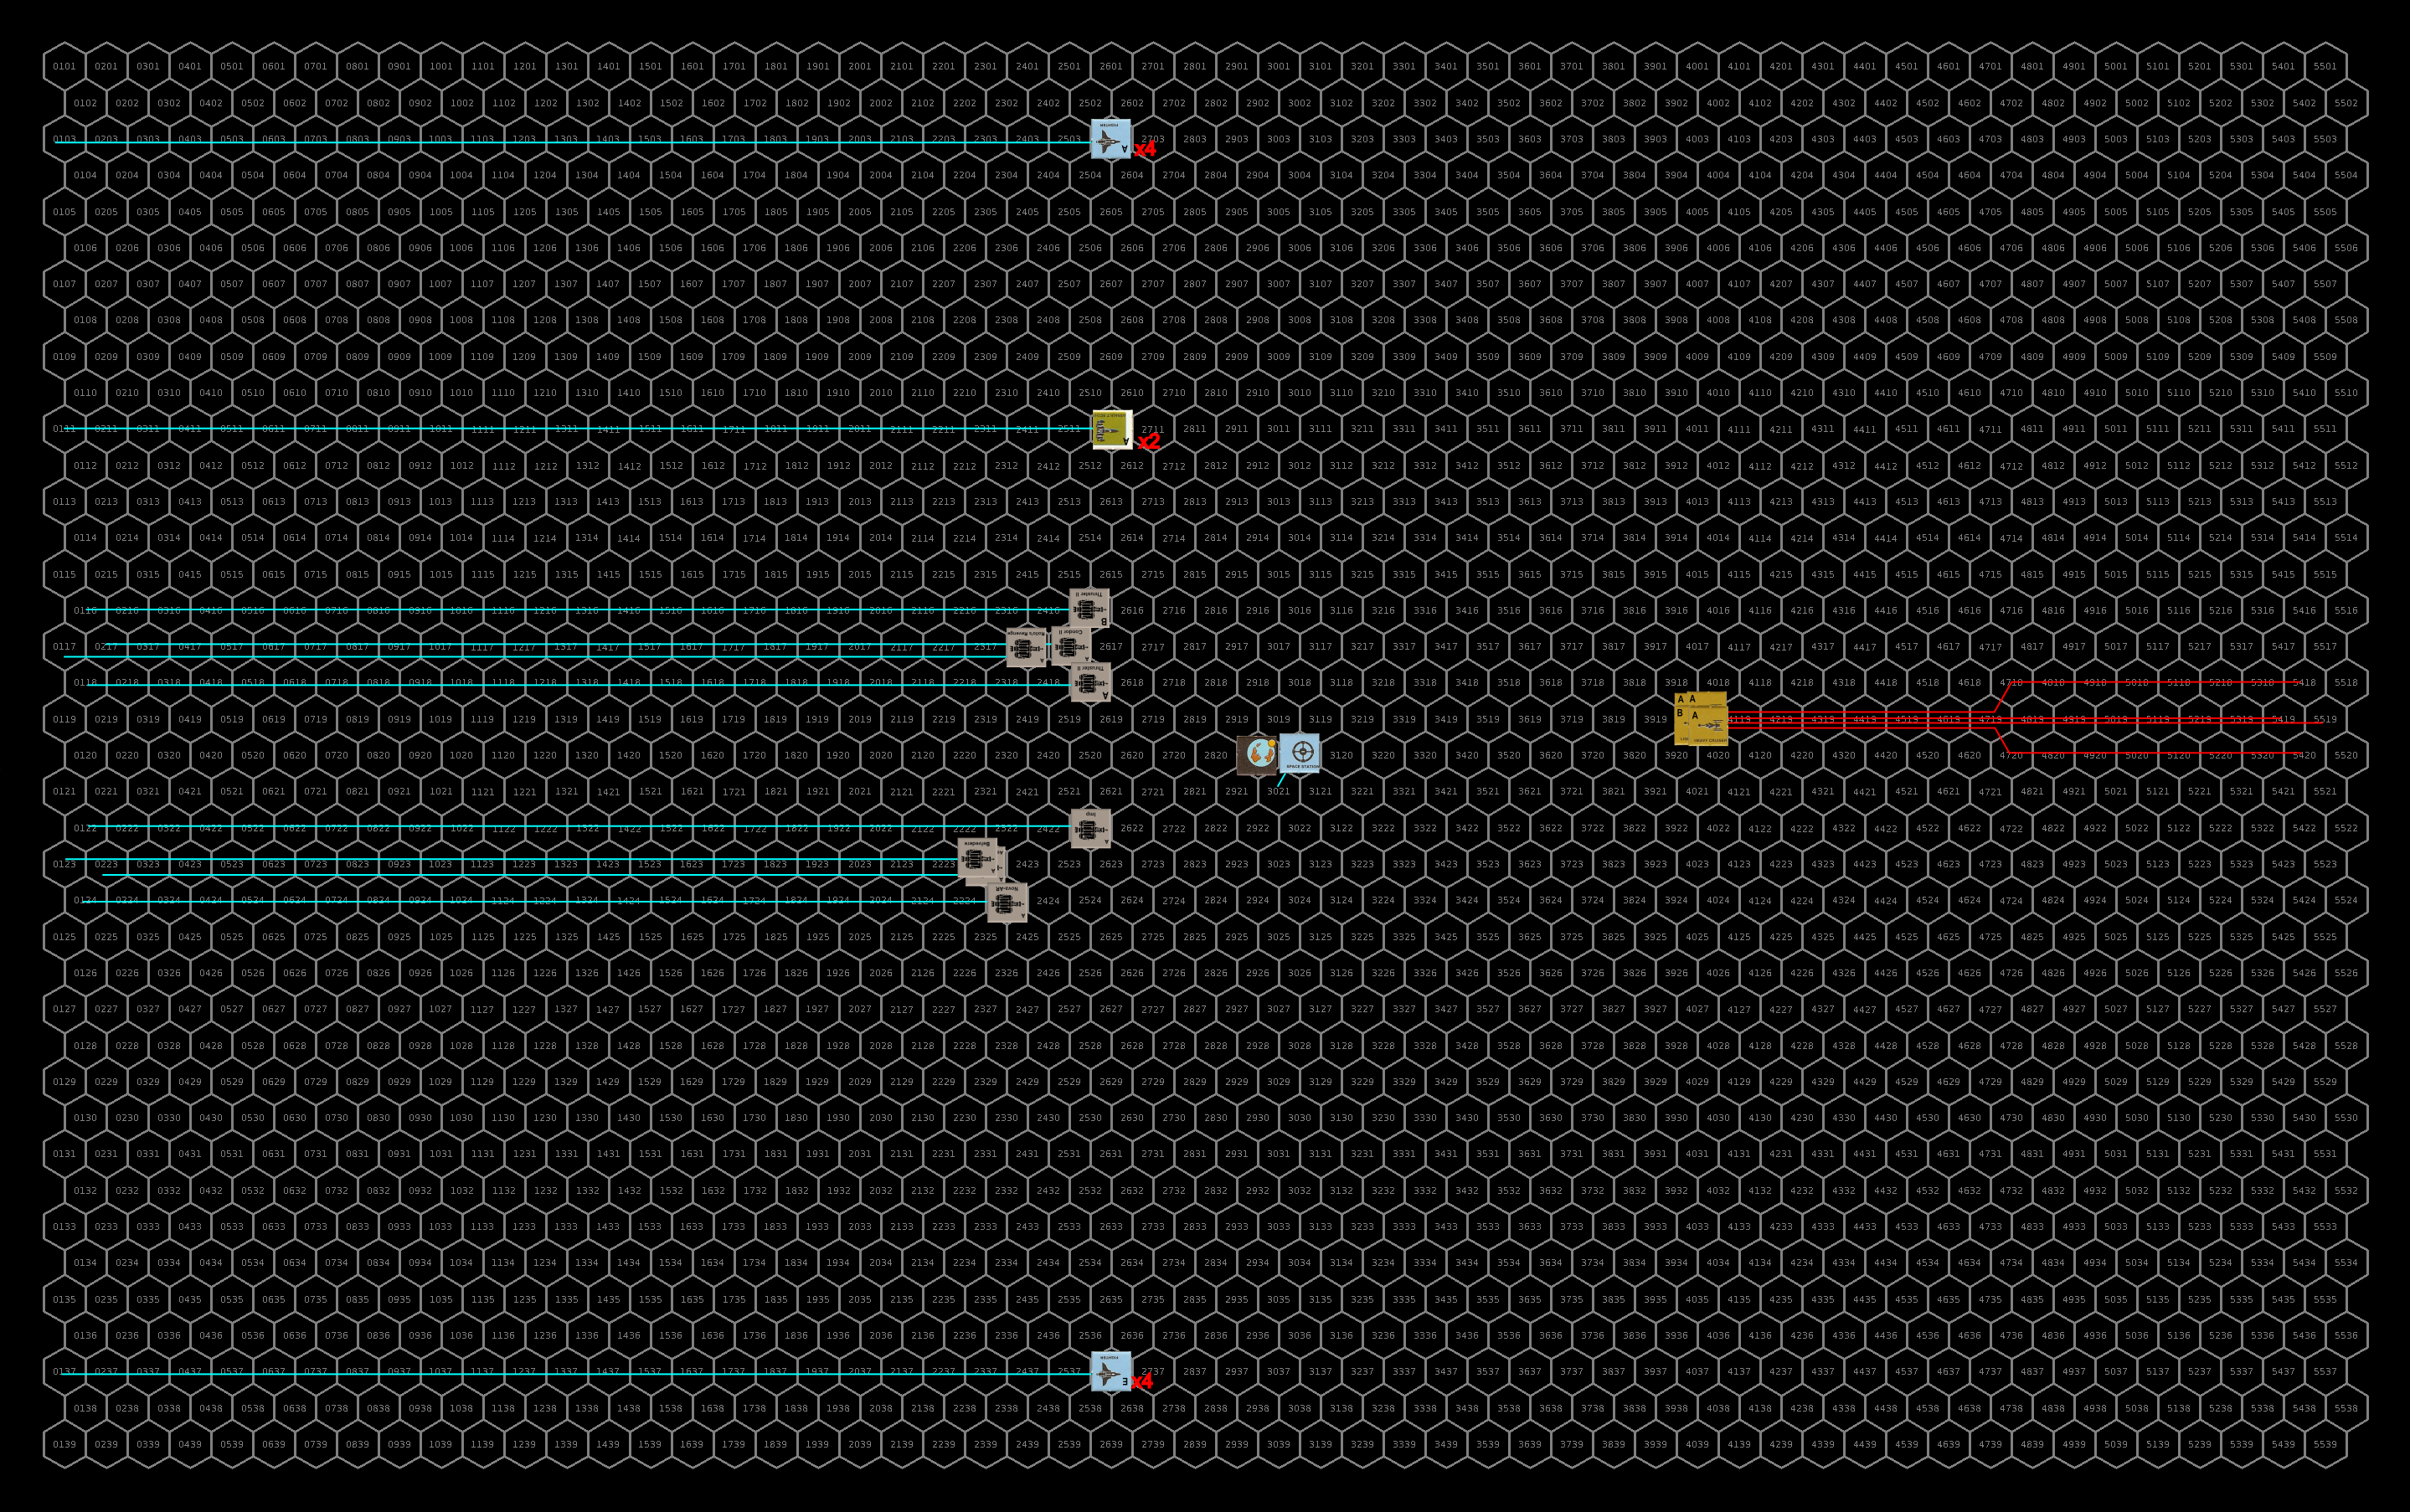
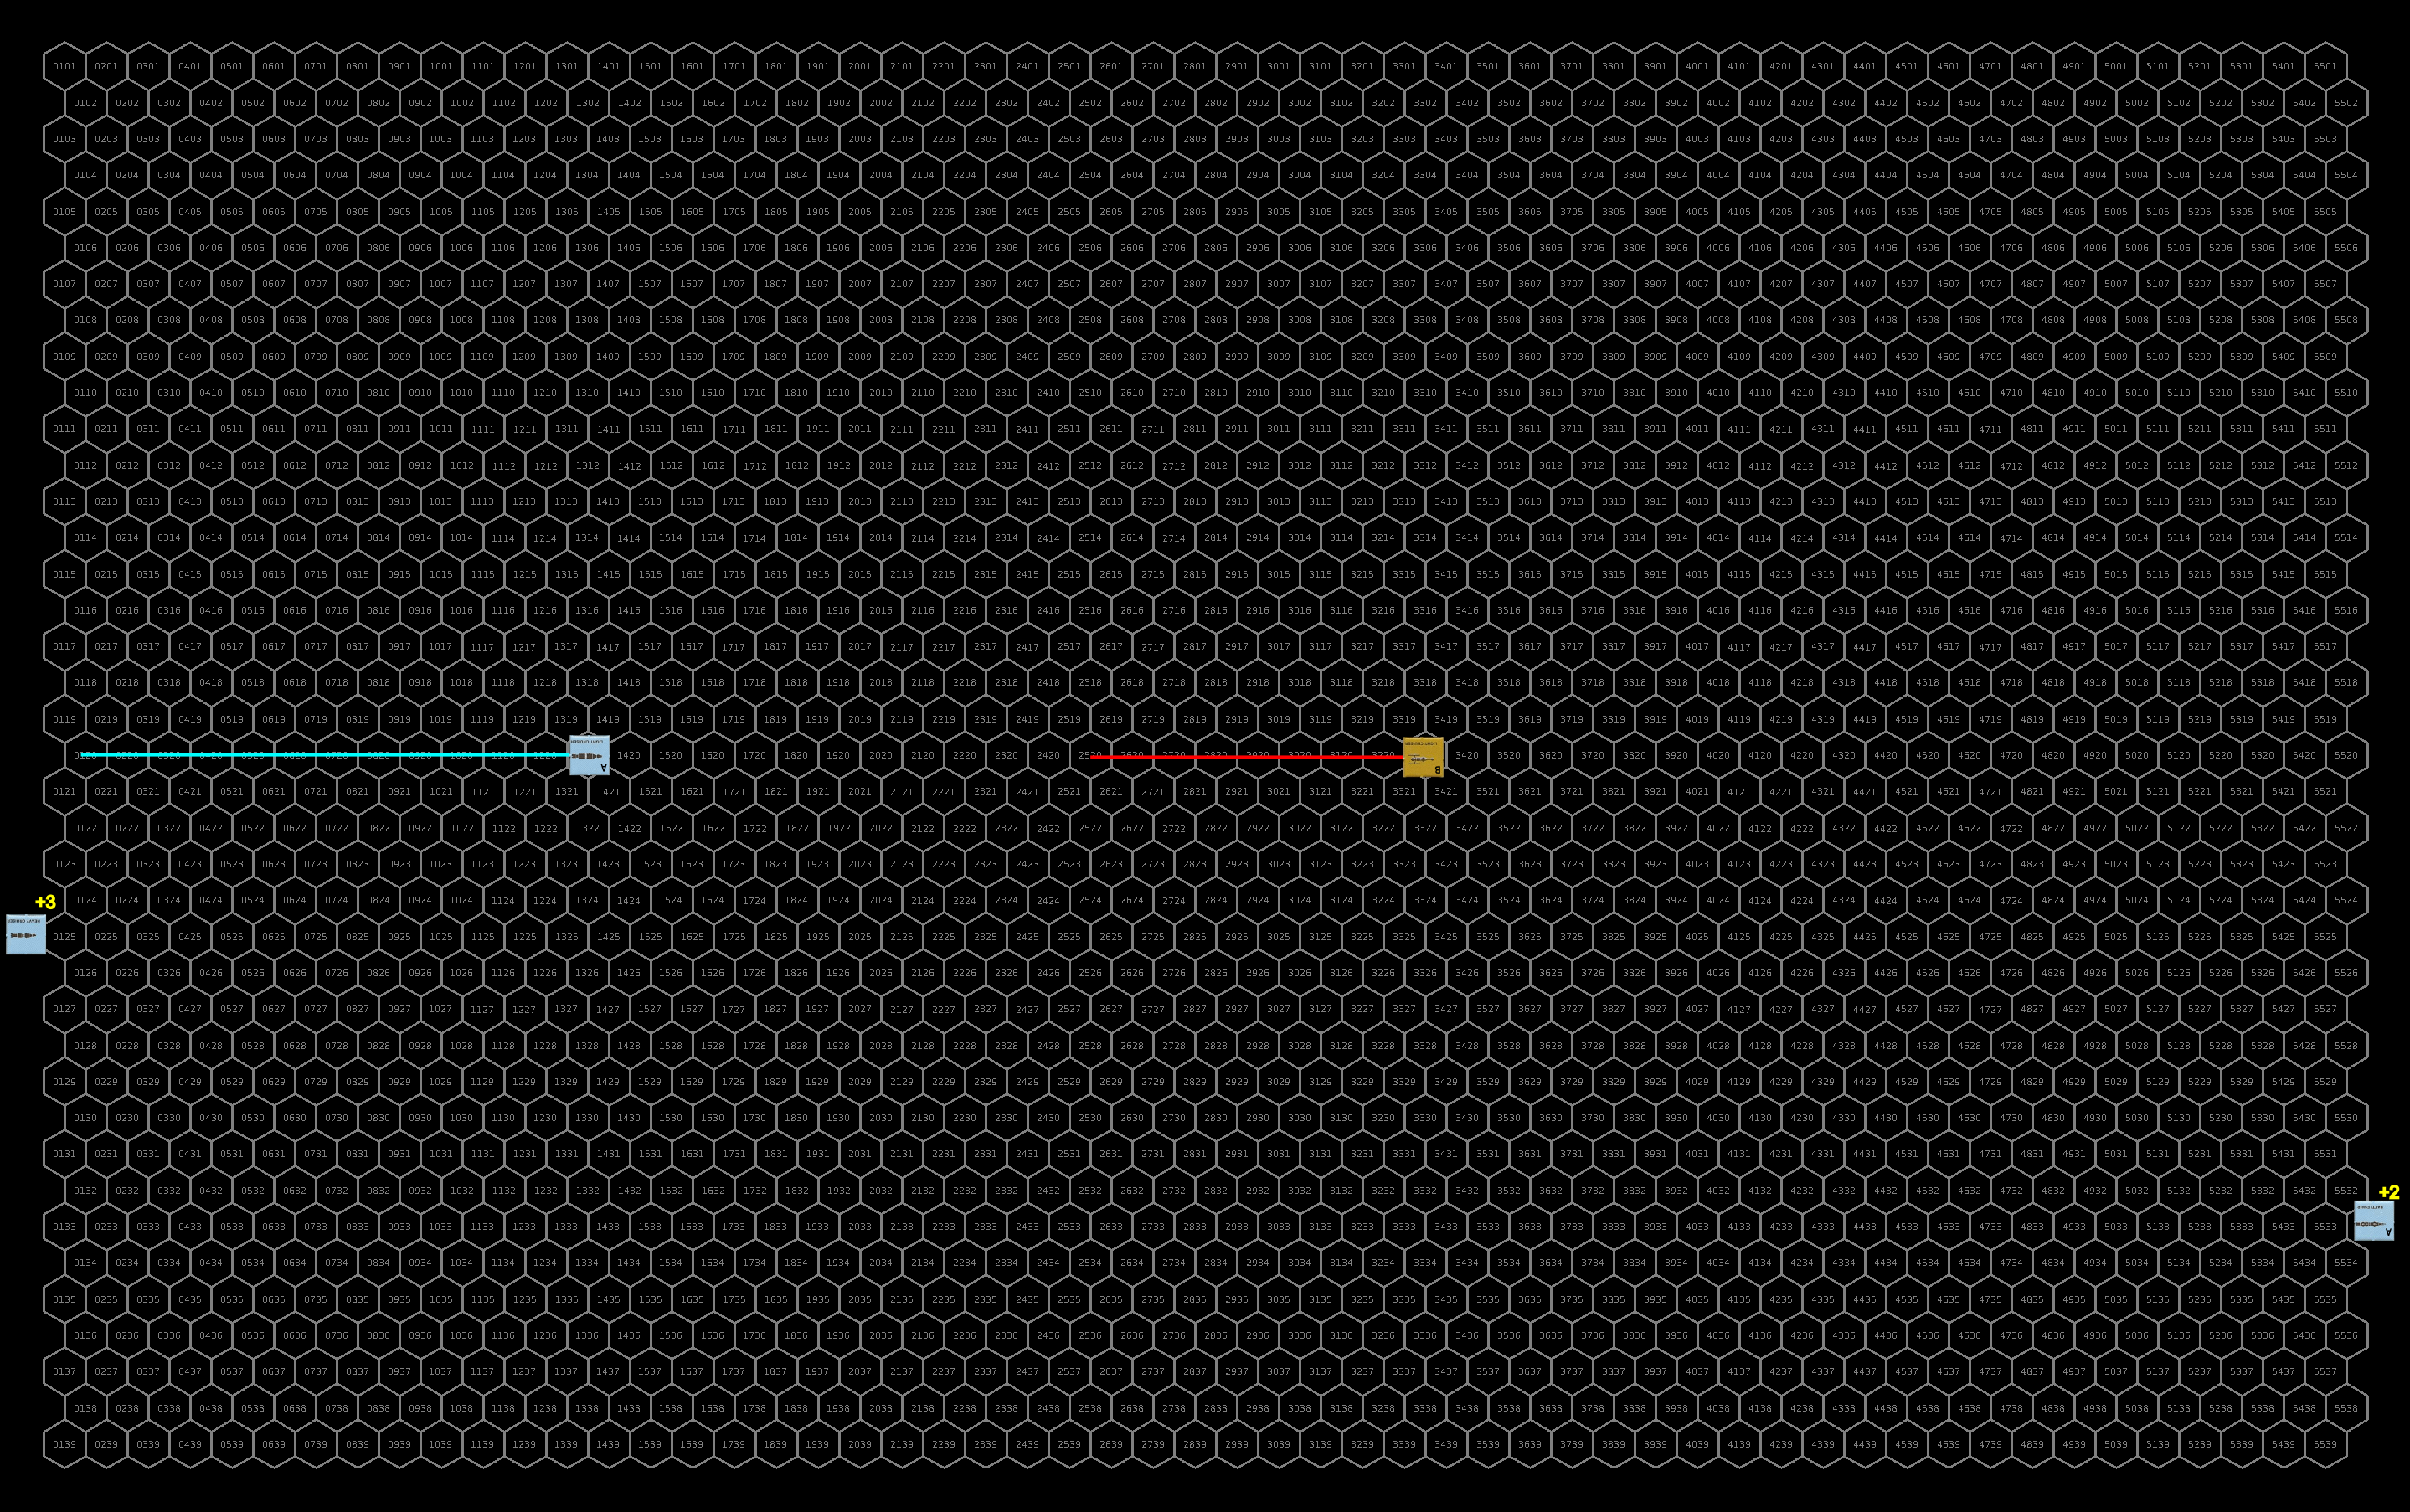
Closing the distance. Click for full image.
Turn 2
Accelerating to speed 17 and remaining as a group, the sathar turn to go after the lone flight of FFC fighters below the planet. The fire a salvo of torpedoes at the station as they pass and fire their energy weapons at the fighters with each ship targeting a single fighter and the heavy cruiser firing one of its laser batteries at the fighter targeted by the destroyer. The station fires all of its ICMs in an attempt to disrupt the torpedo attack. The heavy cruiser also drops a seeker missile along its path.
All of the torpedoes miss the station but the fighters are not so lucky. The smaller capital ships all hit with their cannons and electron batteries and the heavy cruiser hits with one of its laser batteries on its primary target. The two lead fighters are vaporized by the energy cannons hitting them. The third fighter has 25% of its hull integrity knocked out by the electron battery while the disruptor cannon damages its combat control system. The final fighter has its navigation control system jammed by the hit from the heavy cruiser’s laser battery.
The UPF move to eliminate the sathar vessels. The other flight of FFC fighters continues its maximum acceleration and loops in behind the sathar ships to unleash a volley of assault rockets. The militia assault scouts do the same. The damaged fighters remain at speed 25. The fighter with the navigation control hit spins away from the sathar vessels and never gets a shot but the other fighter maneuvers for an assault rocket shot and then flies up near the station to position itself for its next attack.
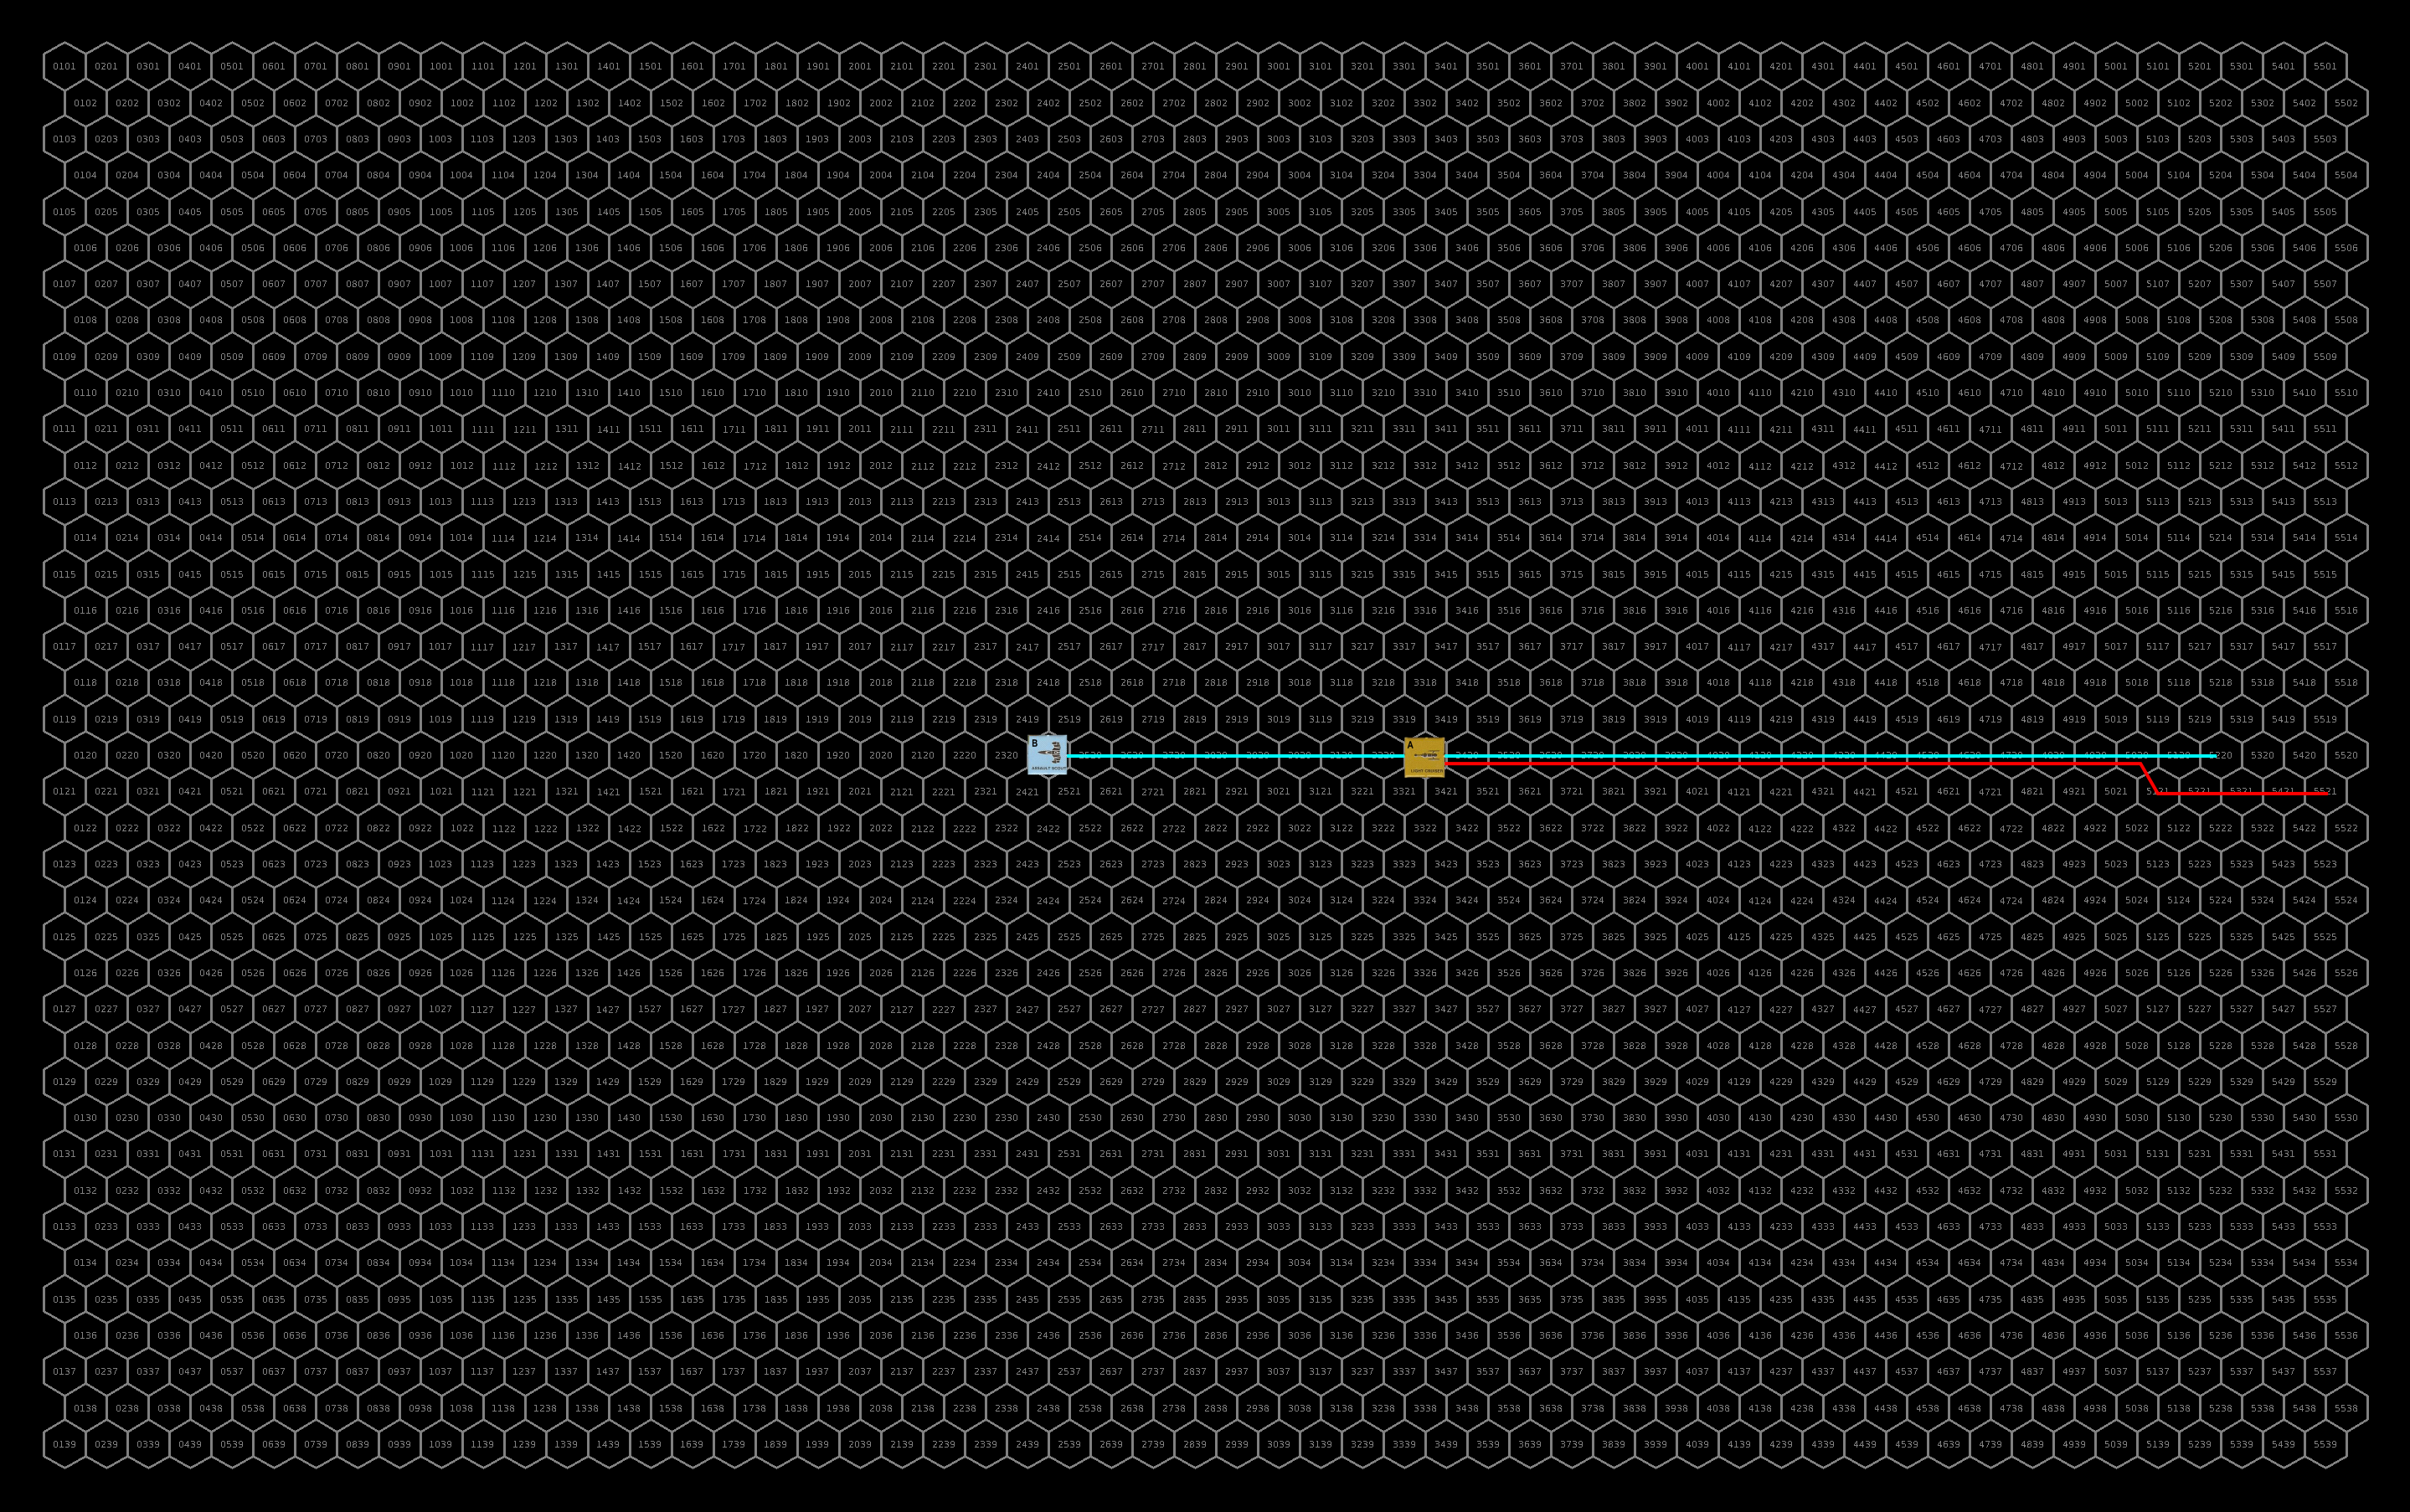
The Belvedere and Imp join up 50,000 km away from the sathar ships to remain out of range of their torpedoes and fire their laser weapons at the frigate. The Rolo’s Revenge and Condor II do the same to come up behind the sathar vessels but close to 40,000km so that they are within torpedo range. The Nova-AR and Thruster II vessels make an assault rocket pass and follow the militia assault scouts’ and fighters’ general flight plans. The Astro Blaster II, with its limited maneuverability strafes the sathar ships with its electron battery.
Defensively, the sathar ships fire their rocket batteries at the Astro Blaster II and focus their remaining weapons on the UPF fighters and Thruster II vessels. Their cannons are fired at the two wounded fighters while they fire two energy batteries each at the other 6 vessels.
The partially damaged fighter is obliterated by laser and disruptor cannon blasts from the destroyer and a light cruiser. The other light cruiser connects with its disruptor cannon starting a fire on the fighter with the navigation damage. The Astro Blaster III is hit by two of the rocket batteries knocking out 77% of its hull integrity and taking it out of the fight. In the other flight of fighters two are destroyed by electron battery fire while the other two suffer 88% and 50% hull integrity reduction from laser batteries. The second Thruster II ship is hit by an electron battery knocking out its engines.
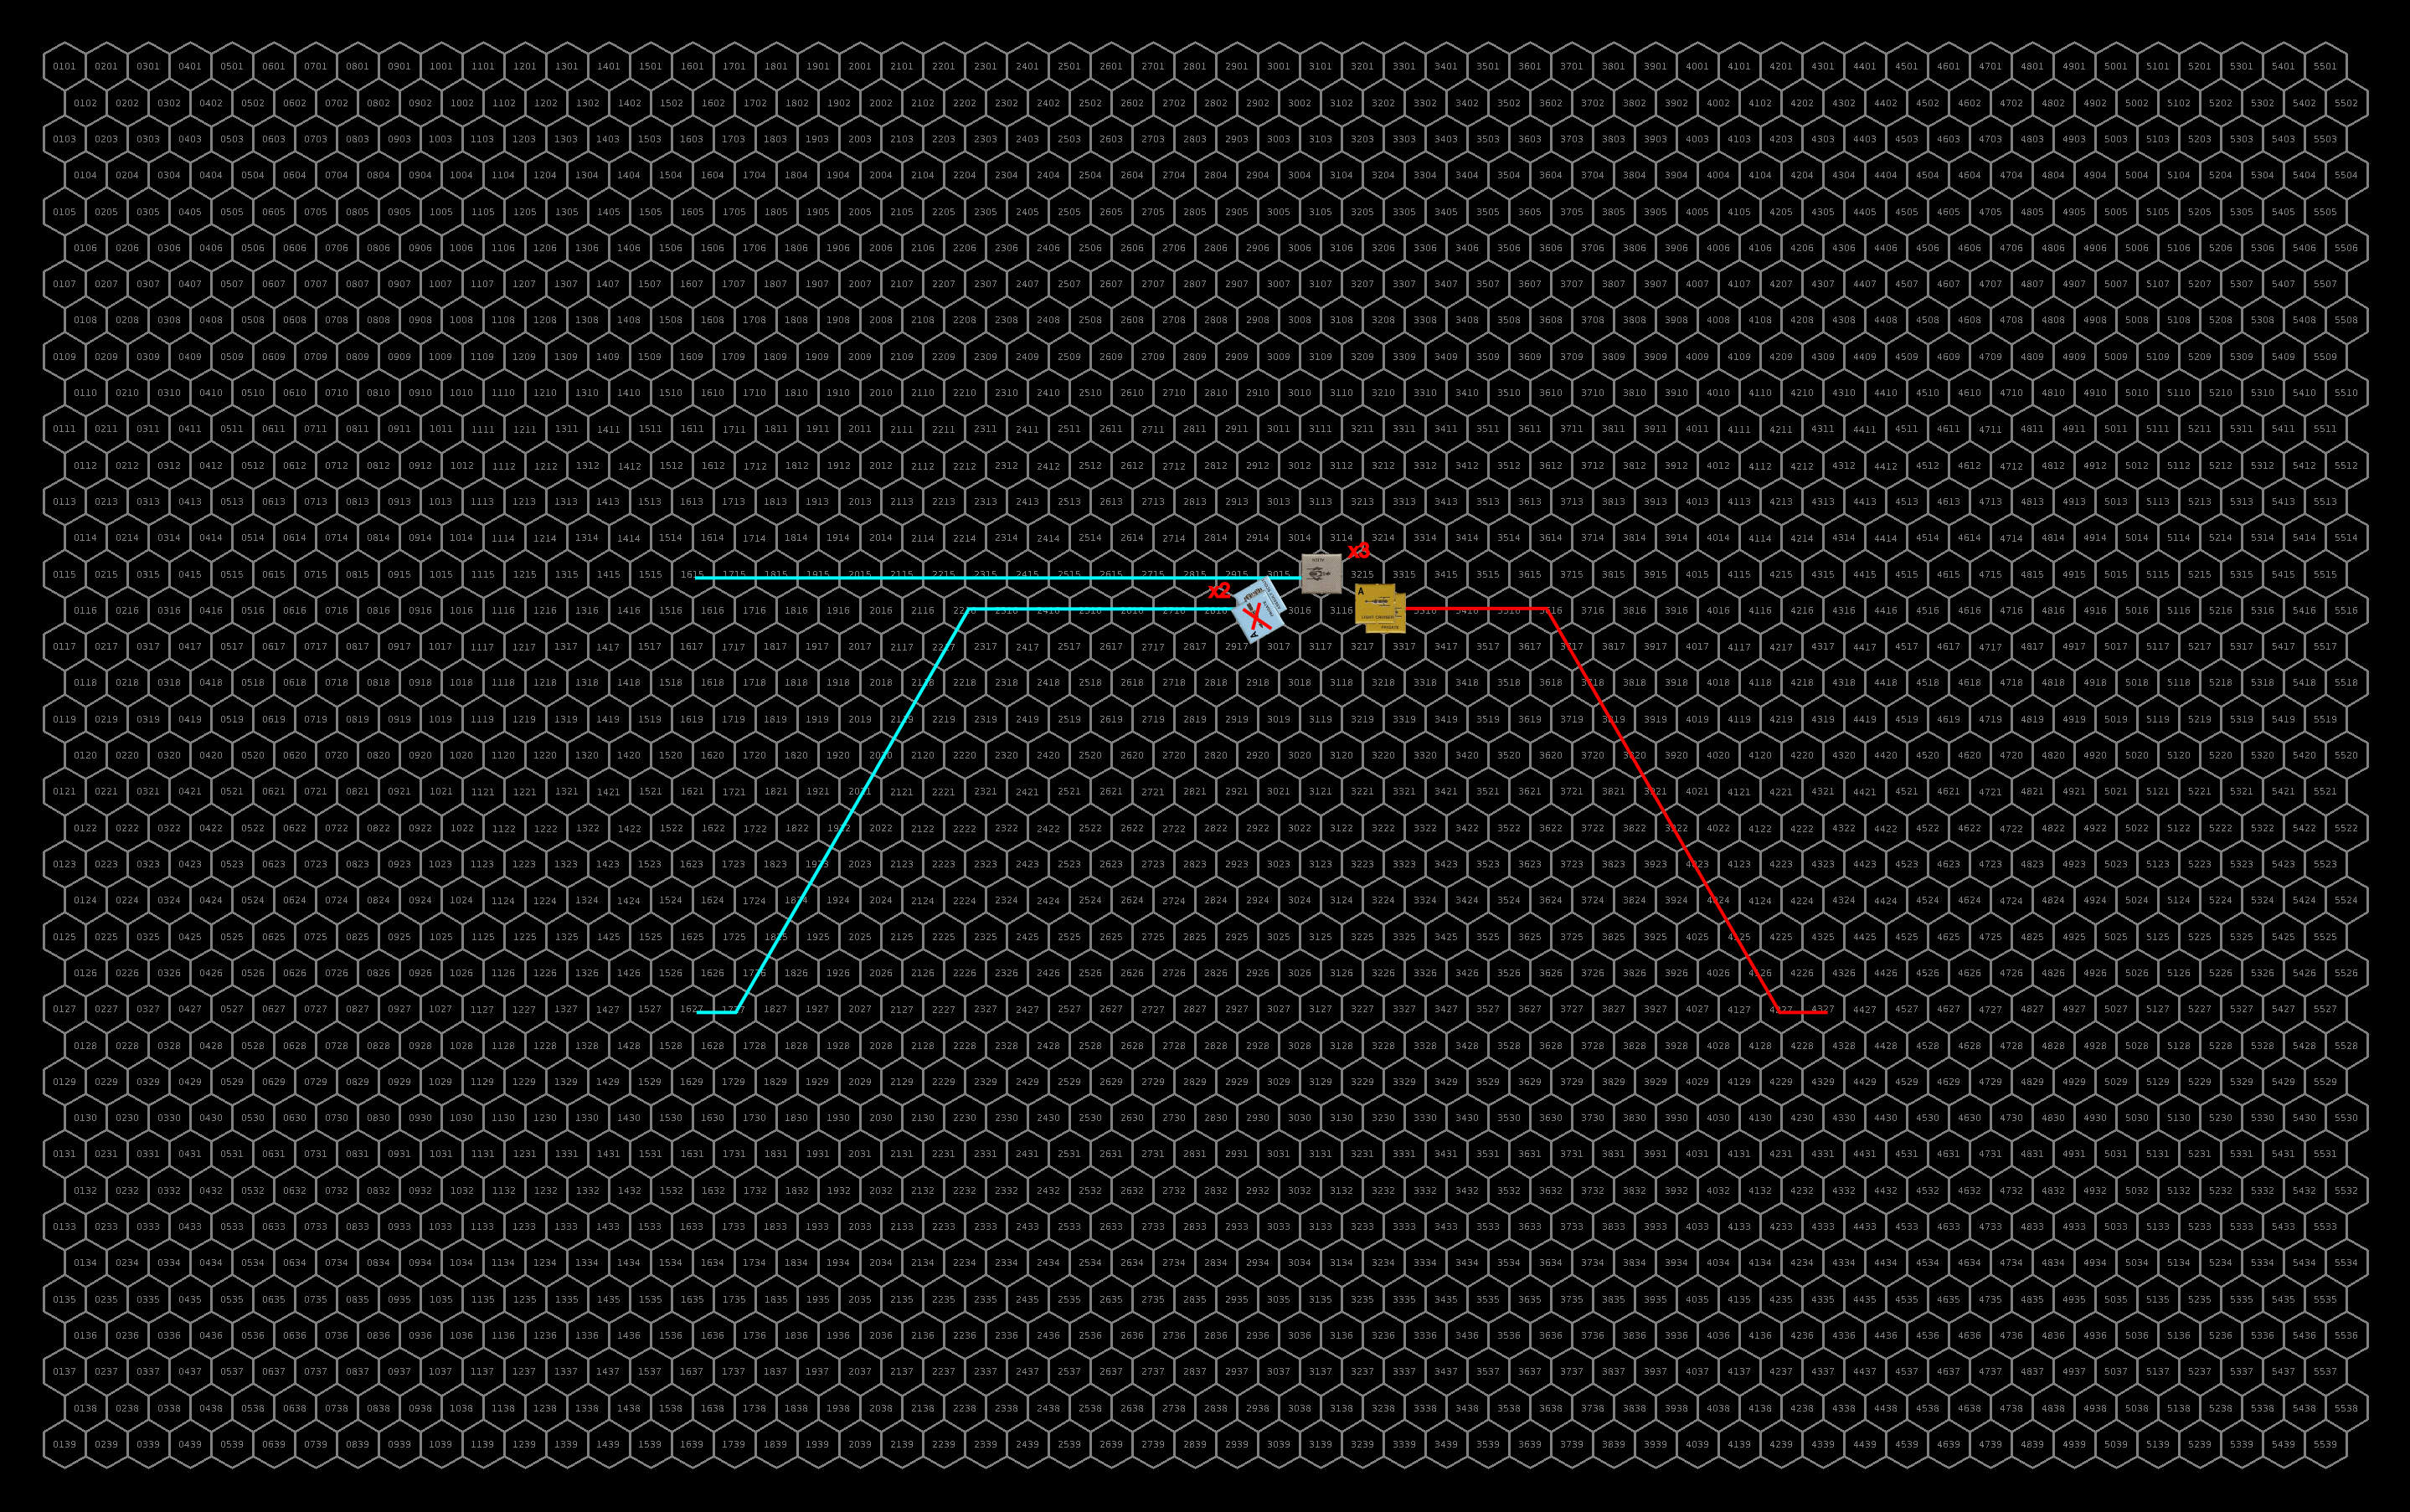
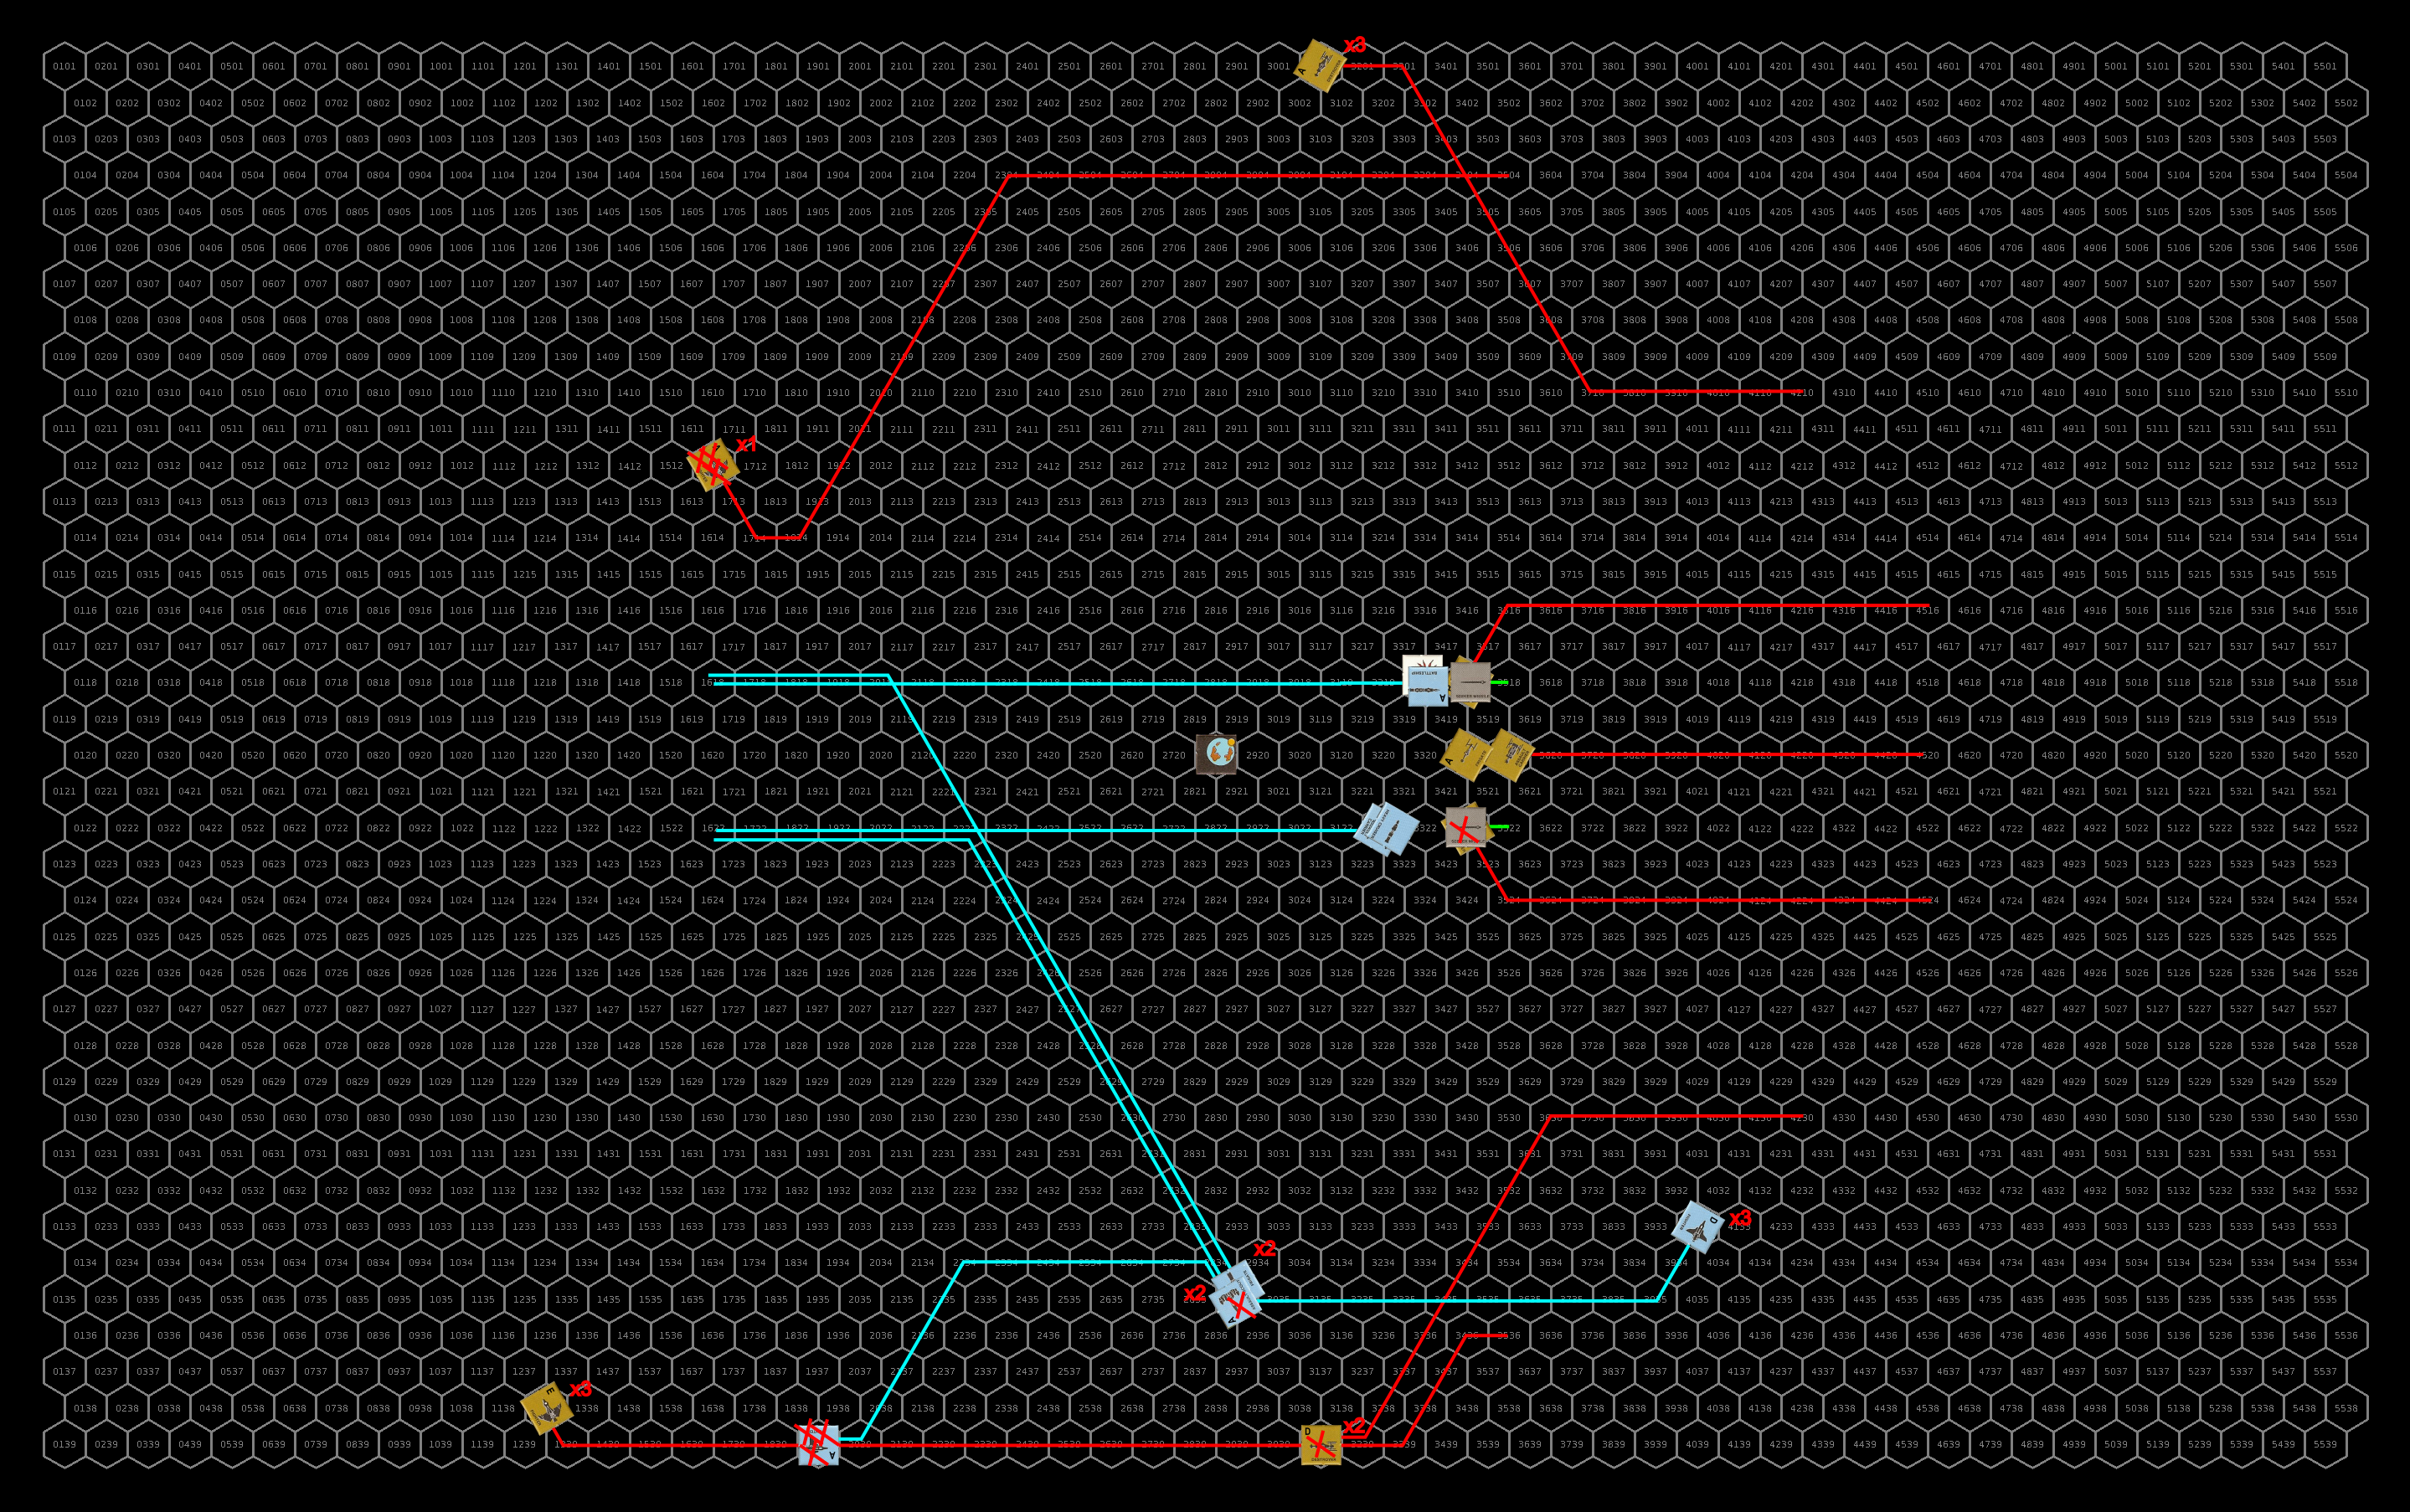
The surviving UPF ships open fire. The seven assault rockets are all fired at the heavy cruiser while the ships focus their energy weapons on one of the light cruisers. The Rollo’s Revenge and Condor II fire torpedoes at the destroyer. The destroyer and heavy cruiser fire ICMs at the incoming torpedoes. Six of the seven assault rockets hit the heavy cruiser. On takes out the cruiser’s torpedo launcher while the other knocks out its ICM launcher. The other four hammer its hull reducing it’s hull integrity by 88%. The ICMs do their job and intercept both torpedoes headed for the destroyer. The light cruiser is raked by energy fire with the Astro Blaster III’s electron battery knocking out its ICM launcher, the Nova-AR’s laser battery short circuiting the power system, and a proton battery from the Rollo’s Revenge and a laser and proton battery from the Condor II rake the hull and reduce its hull integrity by 29%.
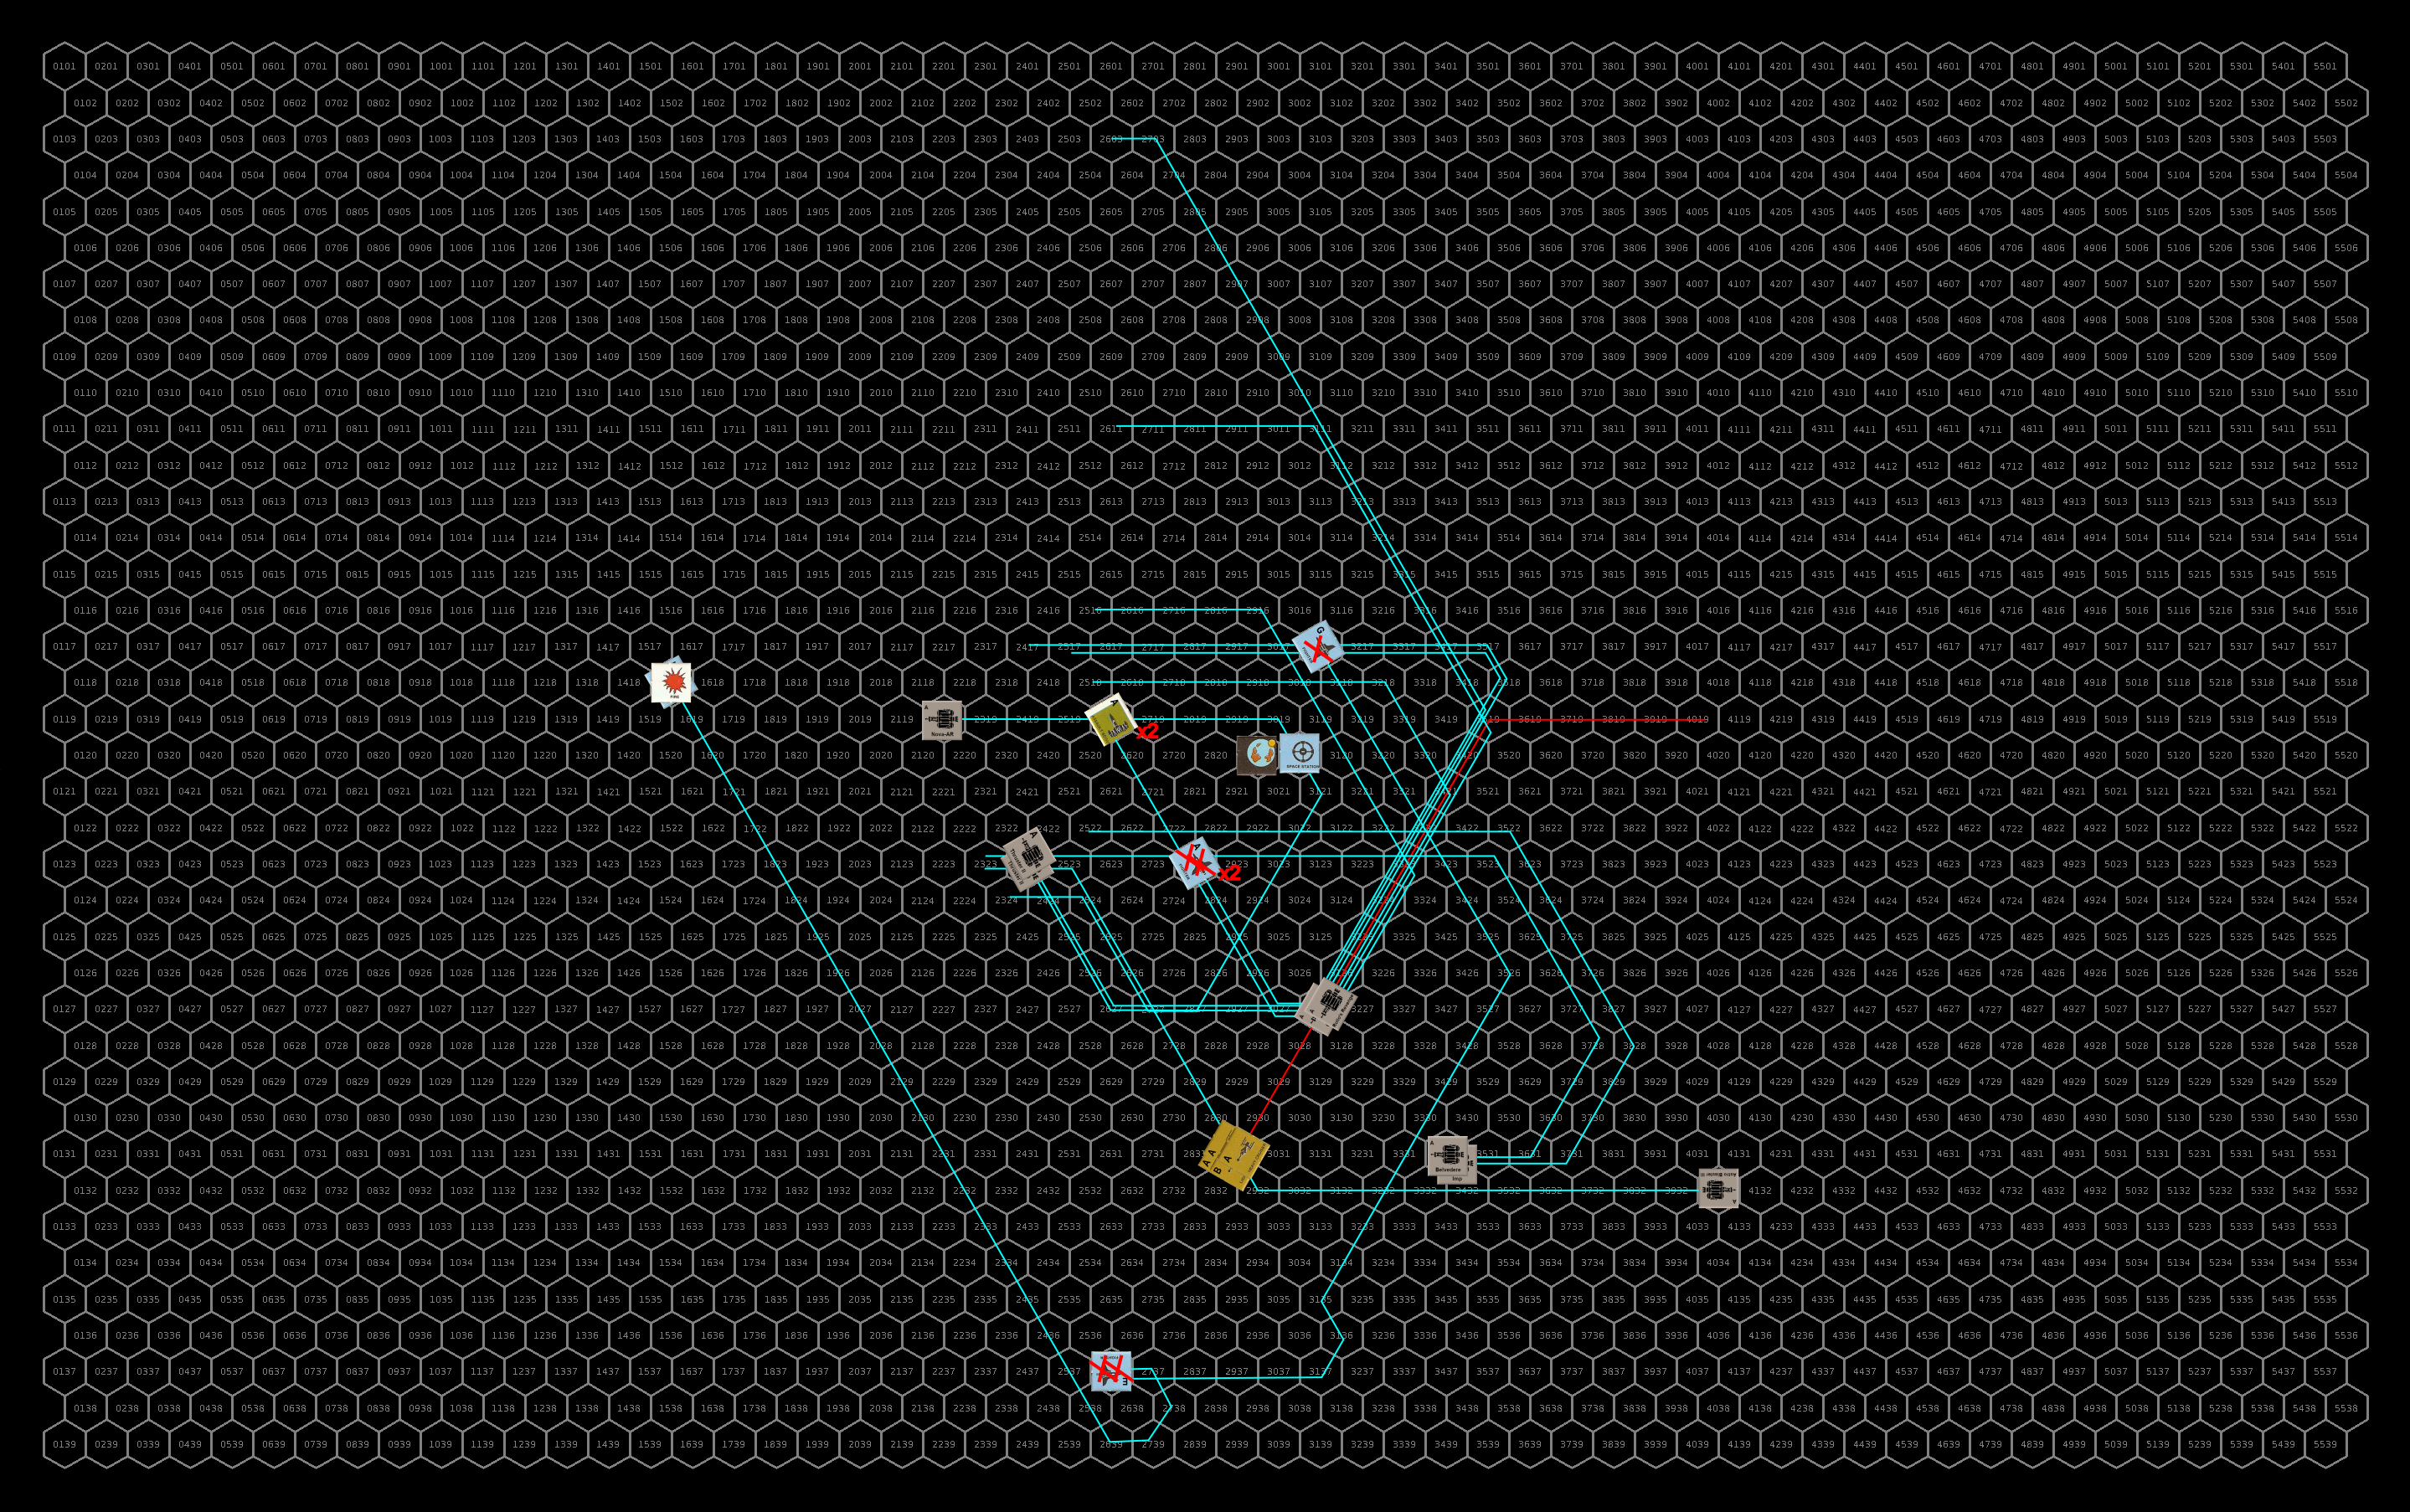
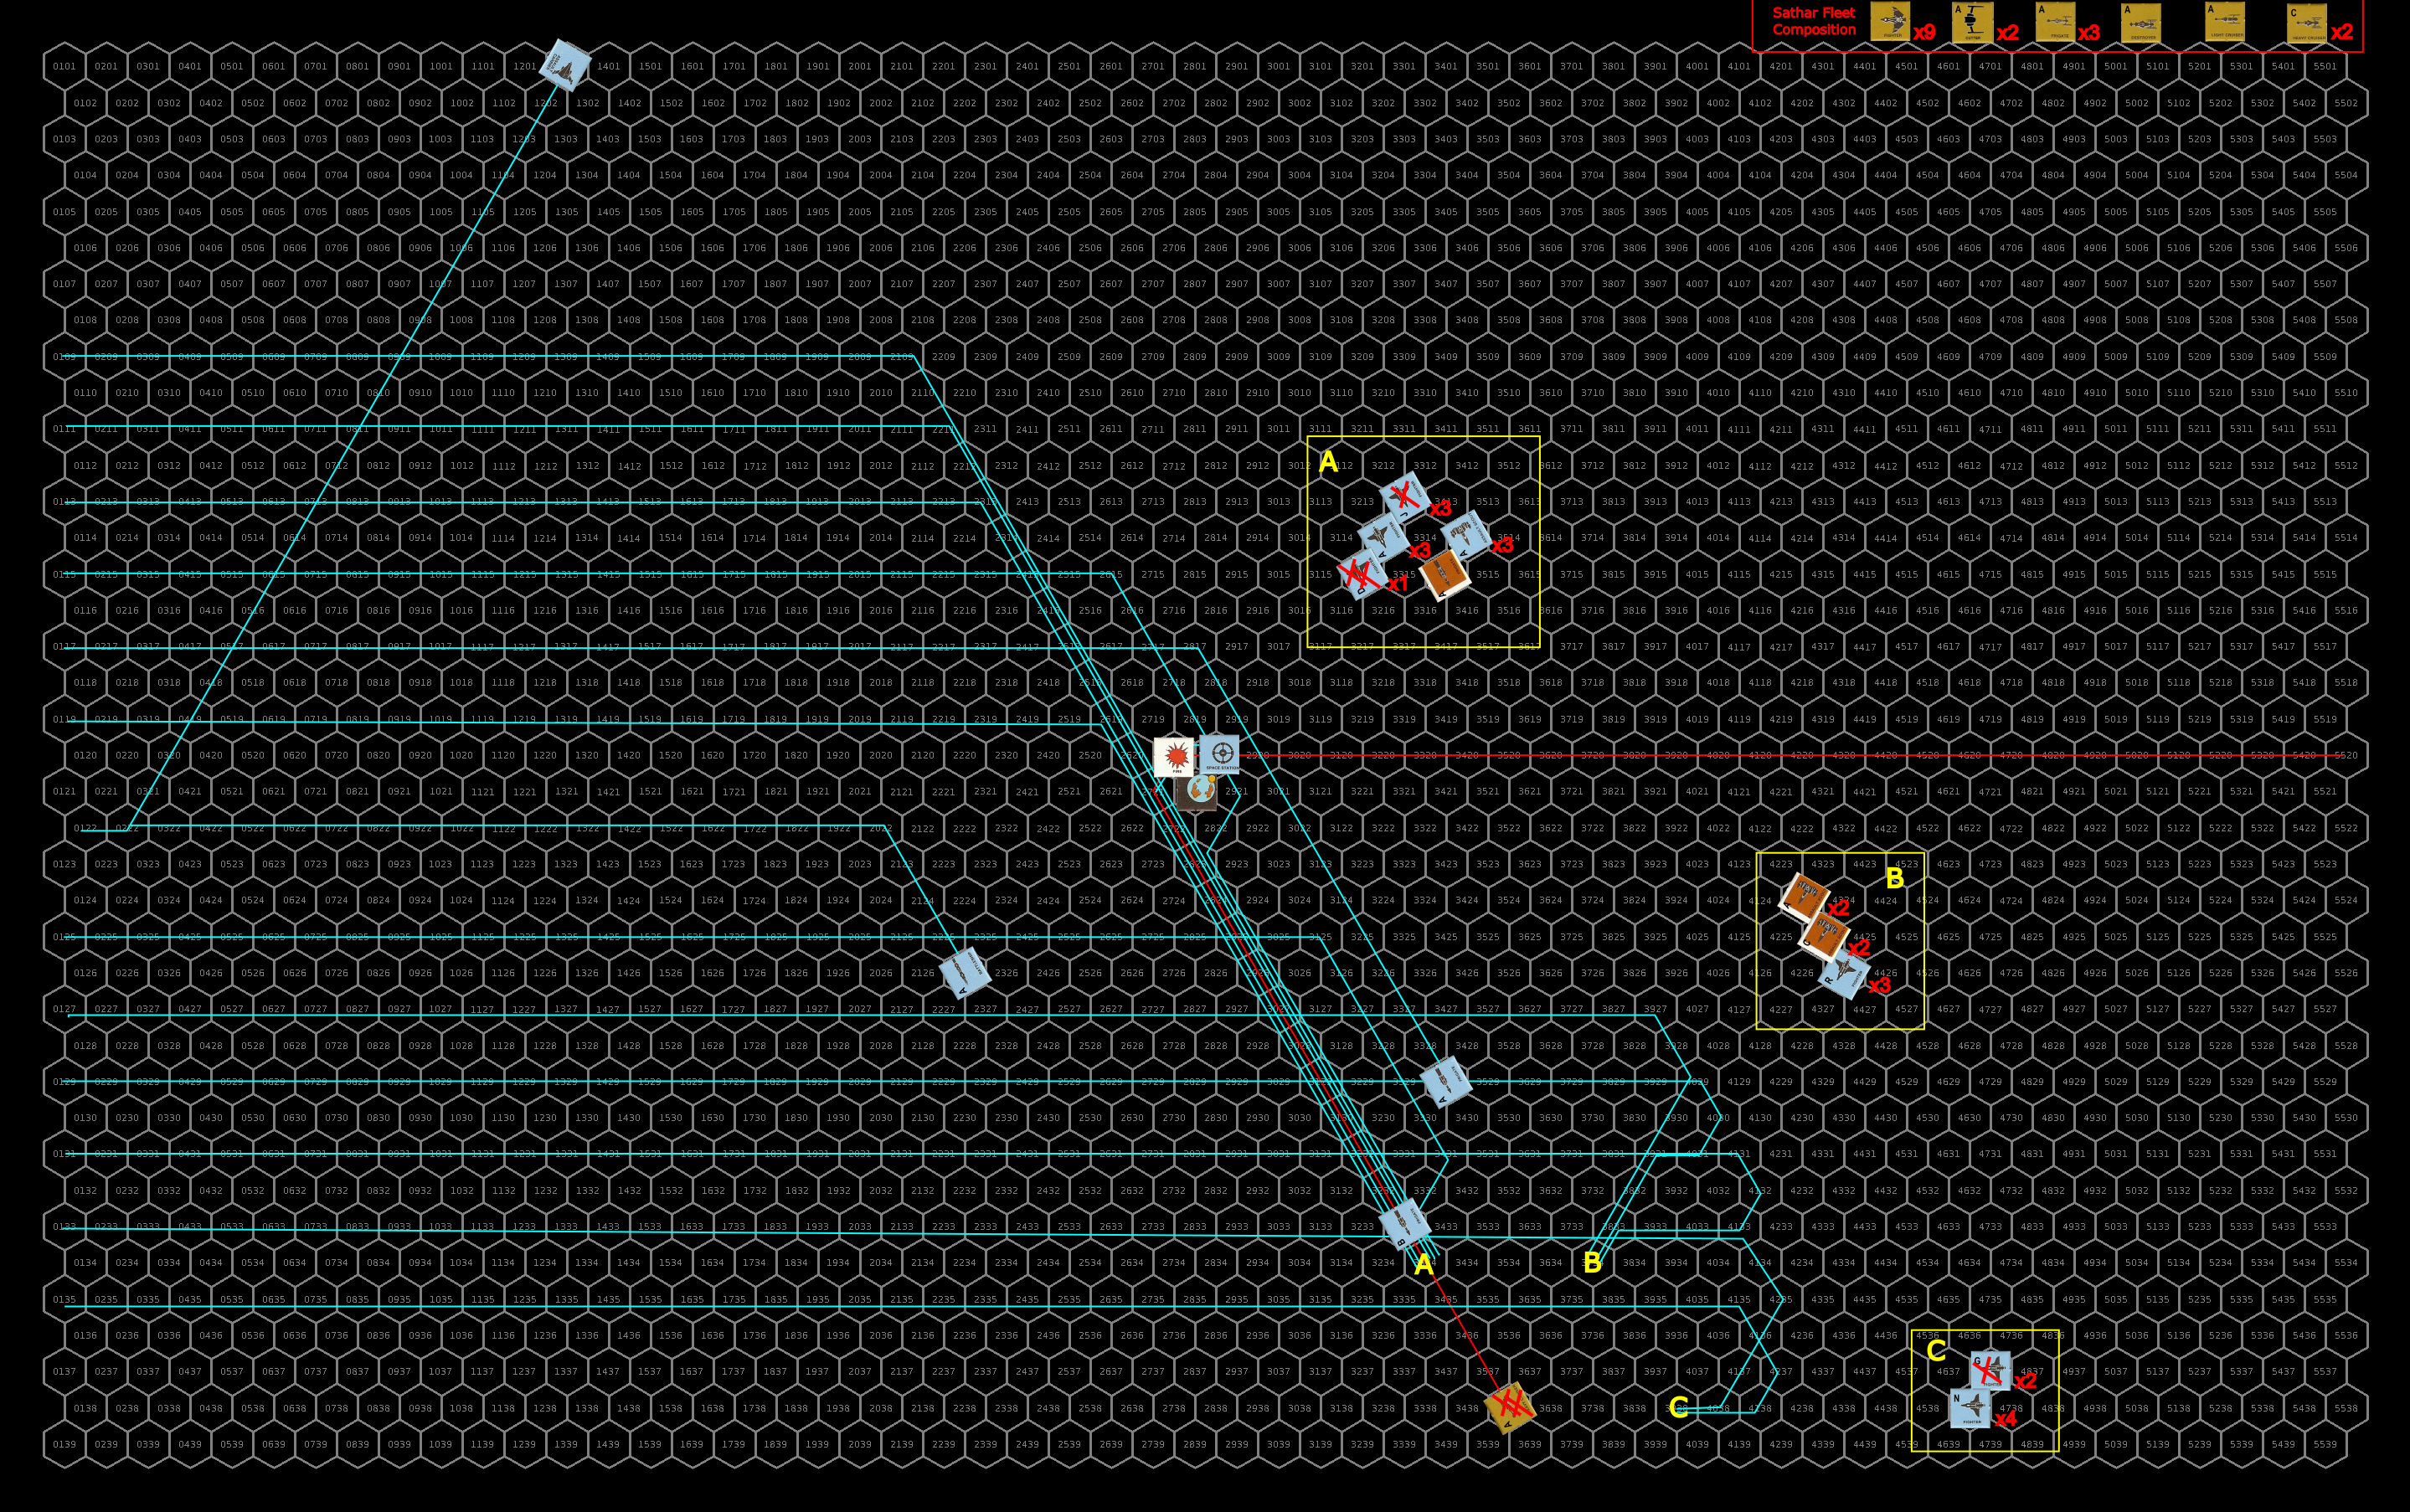
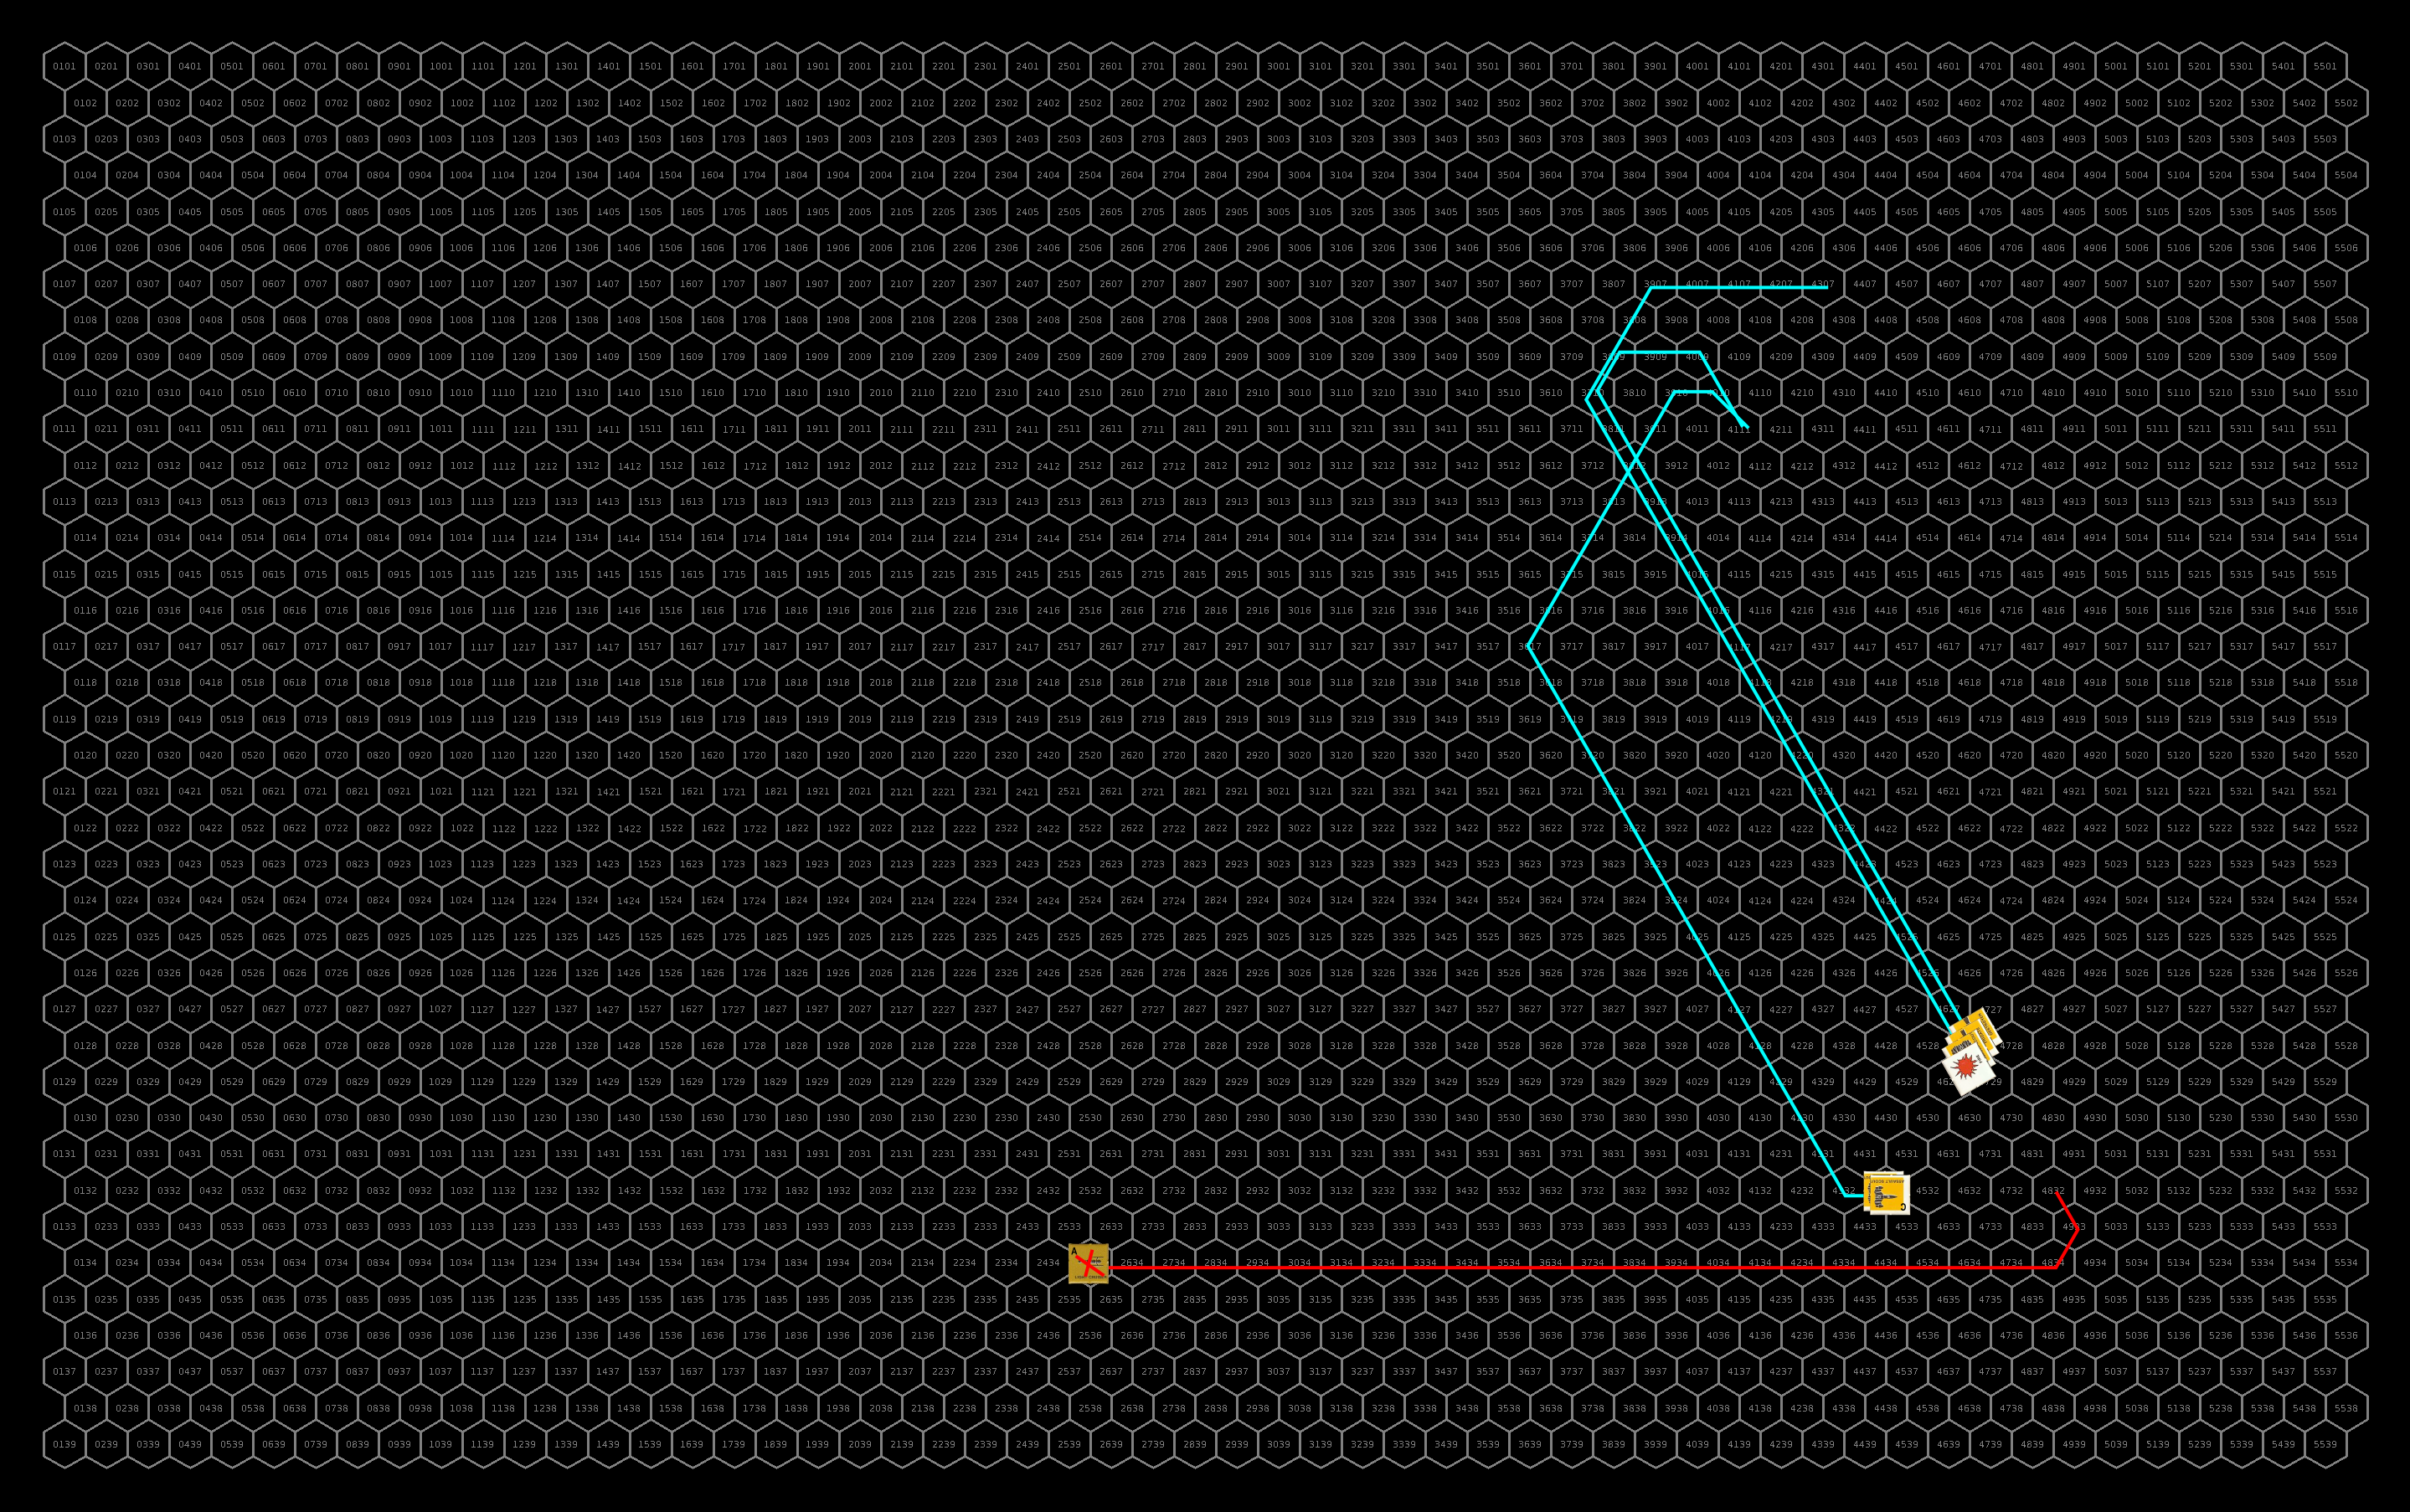
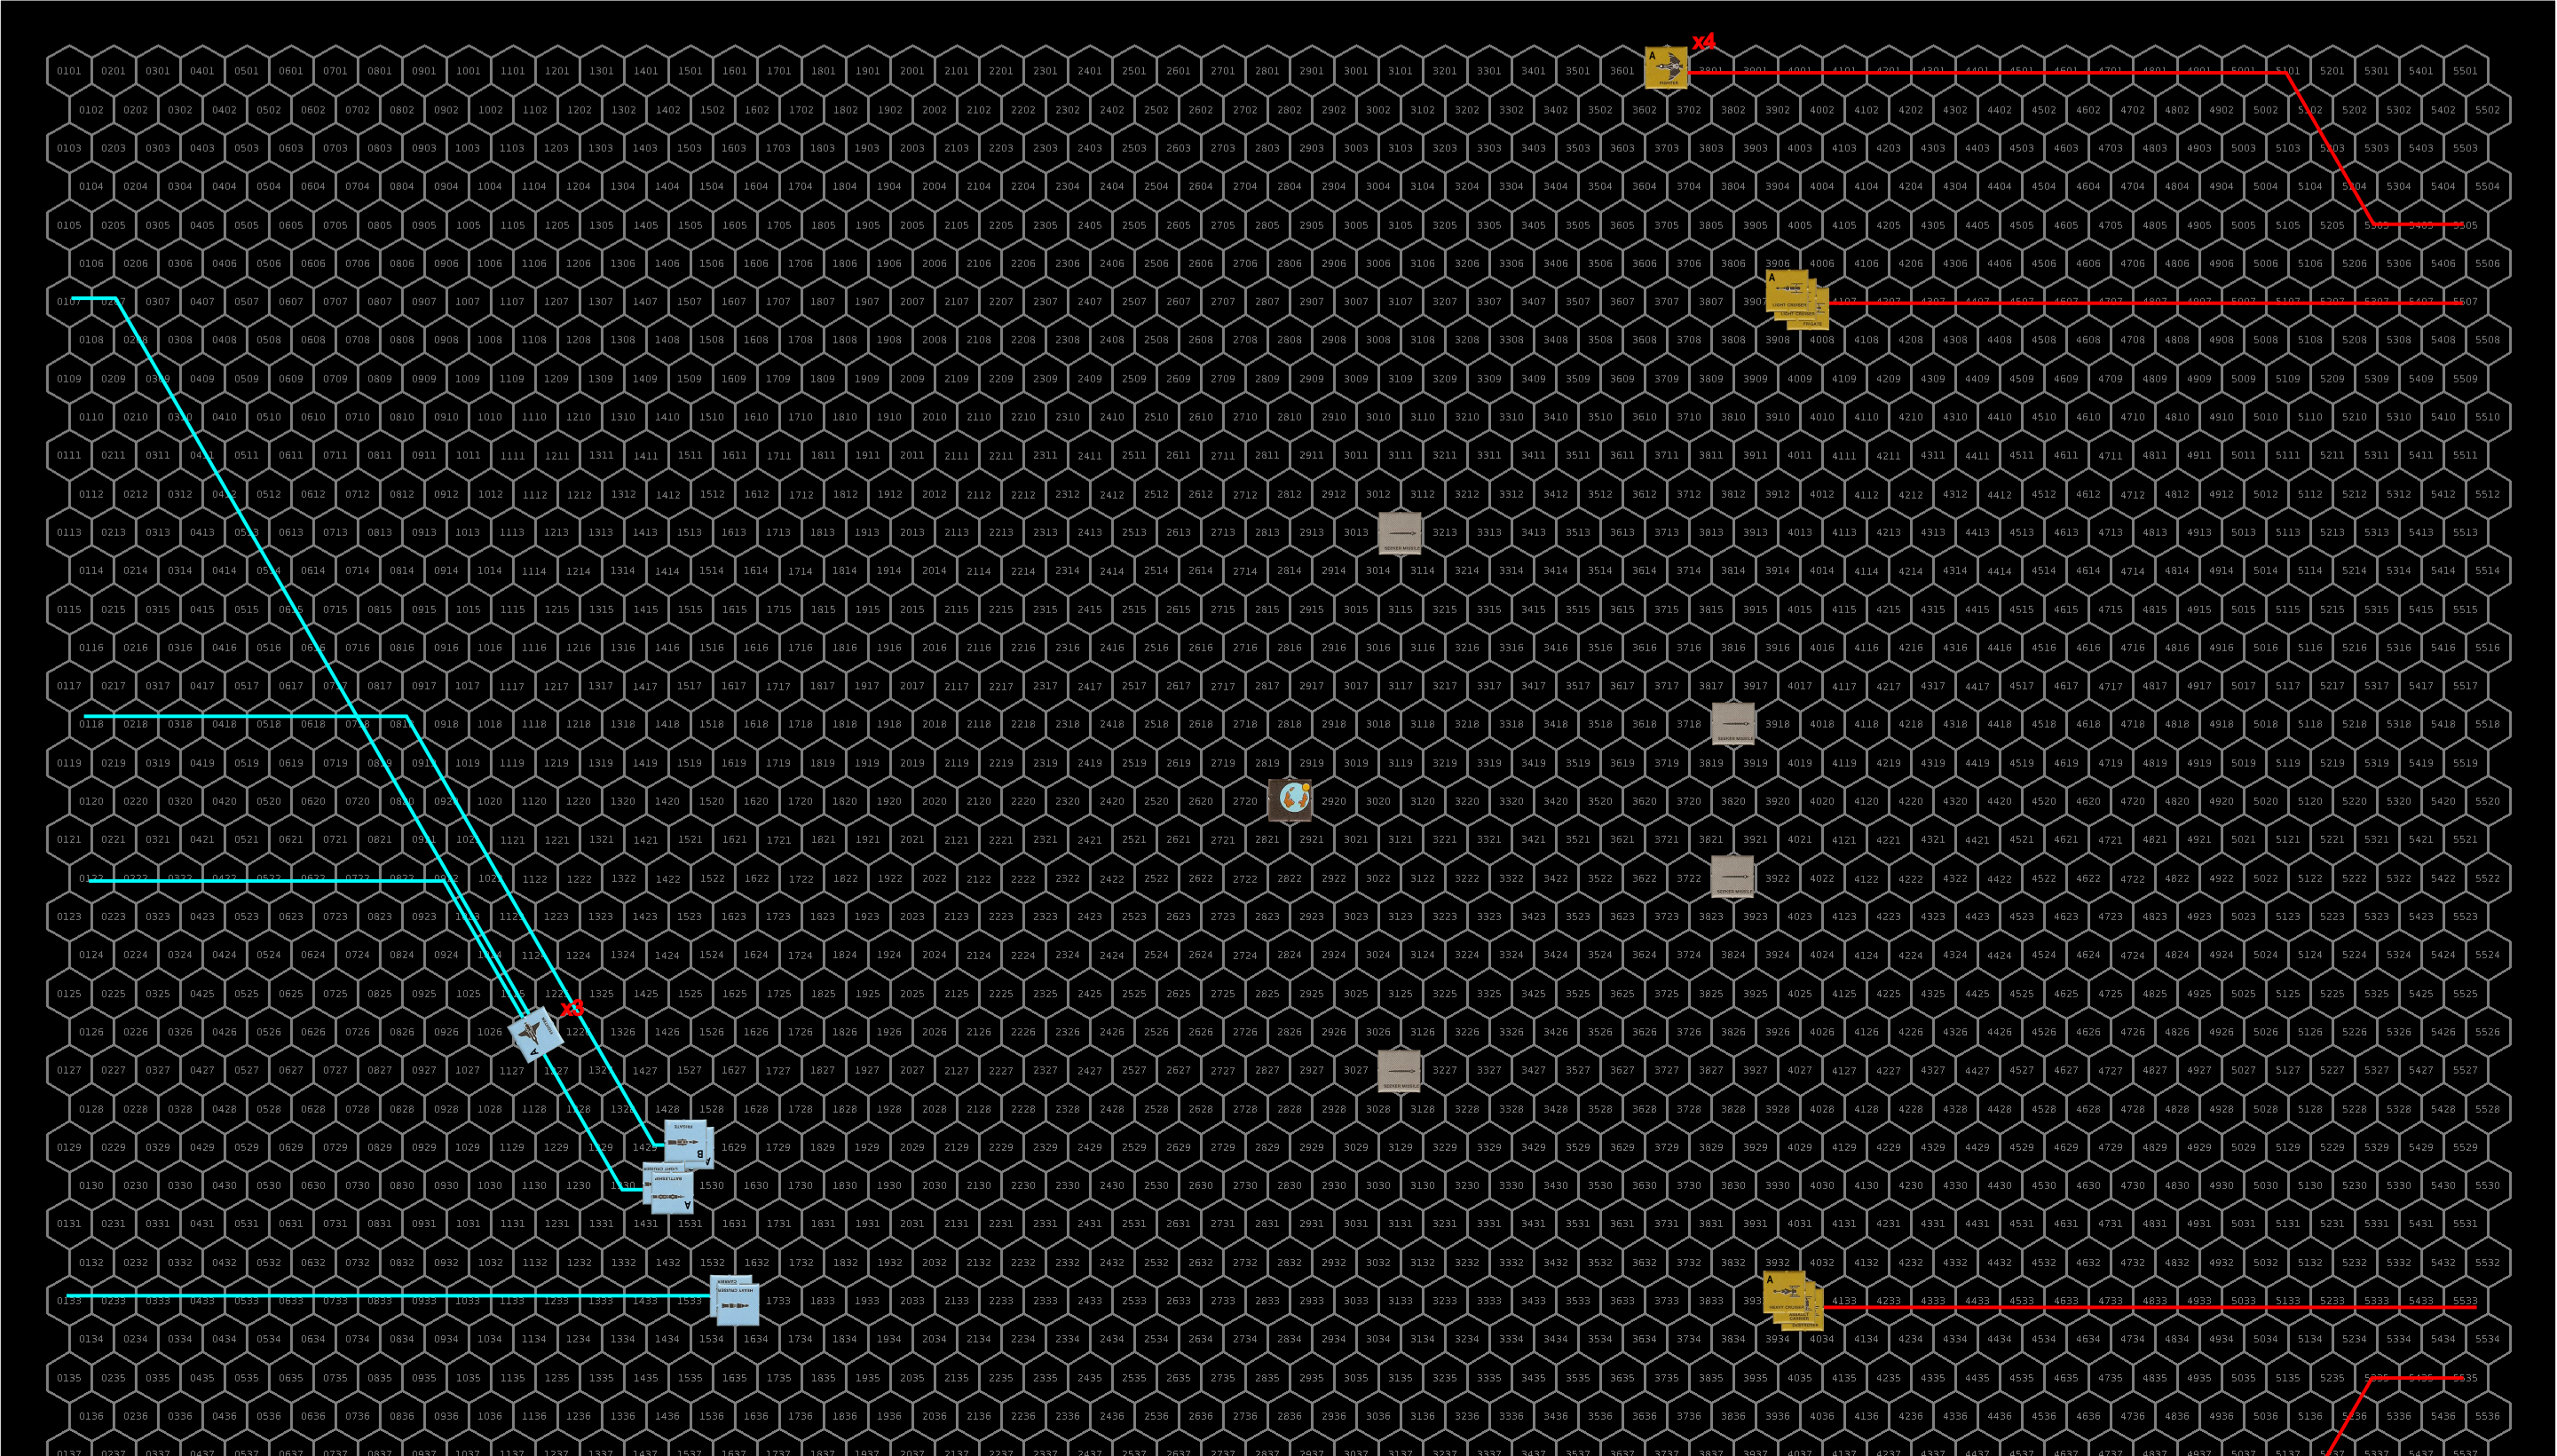
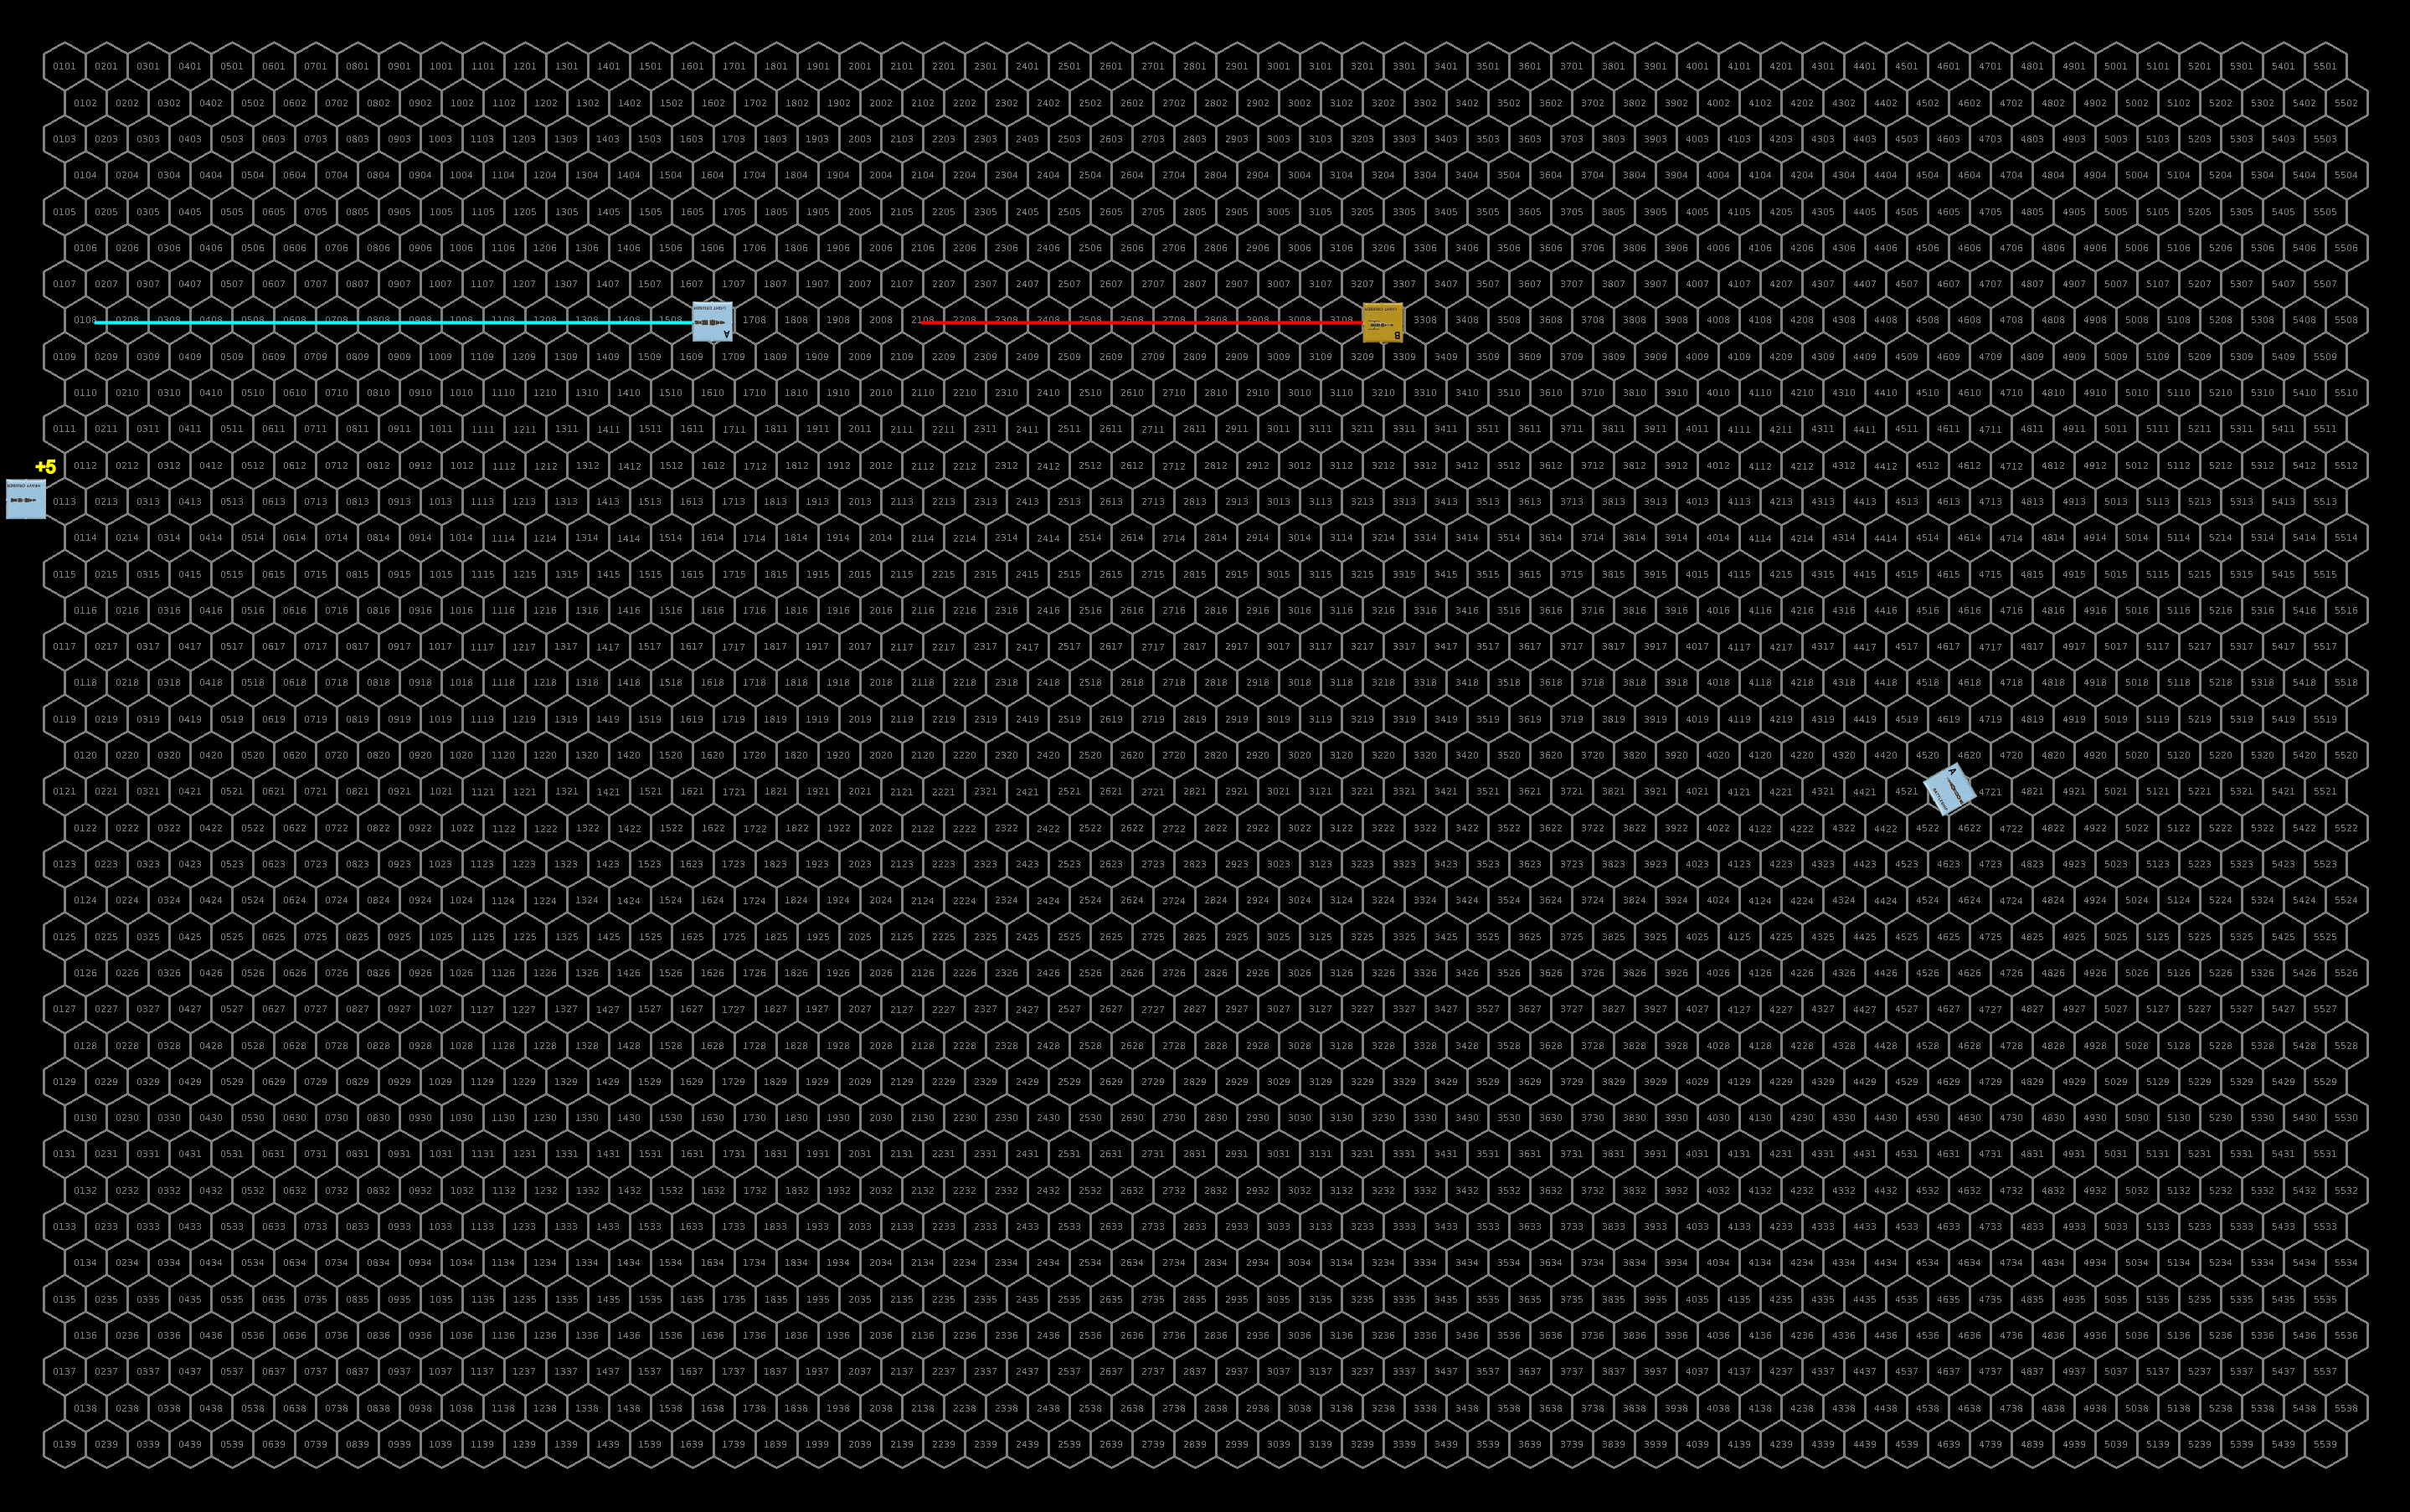
The battle after the first round of engagement. It got chaotic real fast with all the different ship capabilities. Click for full-sized image.
Turn 3
The sathar heavy cruiser, heavily damaged, just drifts away from the battle. The other sathar ships pull to port and go after the Belvedere, Imp and Astro Blaster II vessels. They also activate the seeker missile dropped last round that activates near the Rollo’s Revenge and Condor II. With the Condor II being the larger ship, it is targeted by the missile. Between the two ships they fire three ICMs at the incoming seeker missile. Unfortunately, the seeker missile evades the ICMs and slams into the Condor II but only knocks out its masking screen launcher.
Defensively, Condor II and Rolo’s Revenge fire at the Heavy Cruiser while all the other ships in range fire at the damaged light cruiser. He heavy cruiser is hit by an electron battery from the Condor II that knocks out its disruptor cannon and the Condor II and Rollo’s Revenge hit with a proton and electron battery respectively knocking it down to just 1% hull integrity (1 HP left). The Light cruiser is hit by the Belvedere’s and Imp’s laser cannons knocking out its disruptor cannon and reducing its hull integrity by 11%.
The sathar fire two torpedoes at the Rollo’s Revenge and two at the Belvedere. The heavy cruiser fires all of its energy weapons at the Rollo’s Revenge as well. The other ships fire their cannons at the Astro Blaster III as they fly by. They fire two rocket batteries at the Belvedere and on at the Imp and divide their energy battery weapons evenly between the two ships. The heavy cruiser deploys its final seeker missile along its path.
The Rollo’s Revenge and Condor II fire ICMs at the incoming torpedoes and both miss. With no ICMs, the Belvedere isn’t as lucky and one of the torpedoes hit reducing it’s hull integrity by 62%. The Rollo’s Revenge is hit by an electron battery from the heavy cruiser that knocks out its power system disabling its defenses. Both rocket batteries hit the Belvedere obliterating it. The rocket battery fired at the Imp misses. The destroyer’s laser cannon connects with the Astro Blaster III destroying it. The Imp is hit by a laser, proton, and electron battery, all of which damage its hull, but amazingly only reduce the hull integrity by 50% (only 10 HP on 3d10).
The fire on the UPF fighter damages its hull knocking out 50% of its hull integrity. That fighter pulls to the left with it’s out of control maneuvering and slows to speed 20 but its path takes it dangerously close to the planet.
The UPF fighters and militia assault scouts loop around the planet and make an assault rocket run on the undamaged sathar light cruiser while joining up and remaining at speed 30. The Imp and Rollo’s Revenge join up to go after heavy cruiser to finish it off. Due to the Rollo’s Revenge’s speed, the come within rocket battery range of the cruiser. The Condor II and Thruster II ships come up behind the sathar vessels and fire at the damaged light cruiser. The Nova-AR starts chasing down the sathar ships as well but is too far away to catch up with its limited acceleration.
Defensively, the heavy cruiser focuses its energy weapons on the Imp and fires a rocket battery at the Rollo’s Revenge. The rocket battery hits knocking out the ship’s maneuvering. A lucky hit by the cruiser’s laser battery destroys the Imp (10 HP on 1d10). The other sathar ships fire on the incoming fighters and Thruster vessels dividing their weapons among those four ships. The two fighters and damaged Thruster II ship are hit by a laser, electron, and proton battery (respectively) and each are destroyed. The other Thruster II vessel is hit by an electron battery which reduces its hull integrity by 60%.
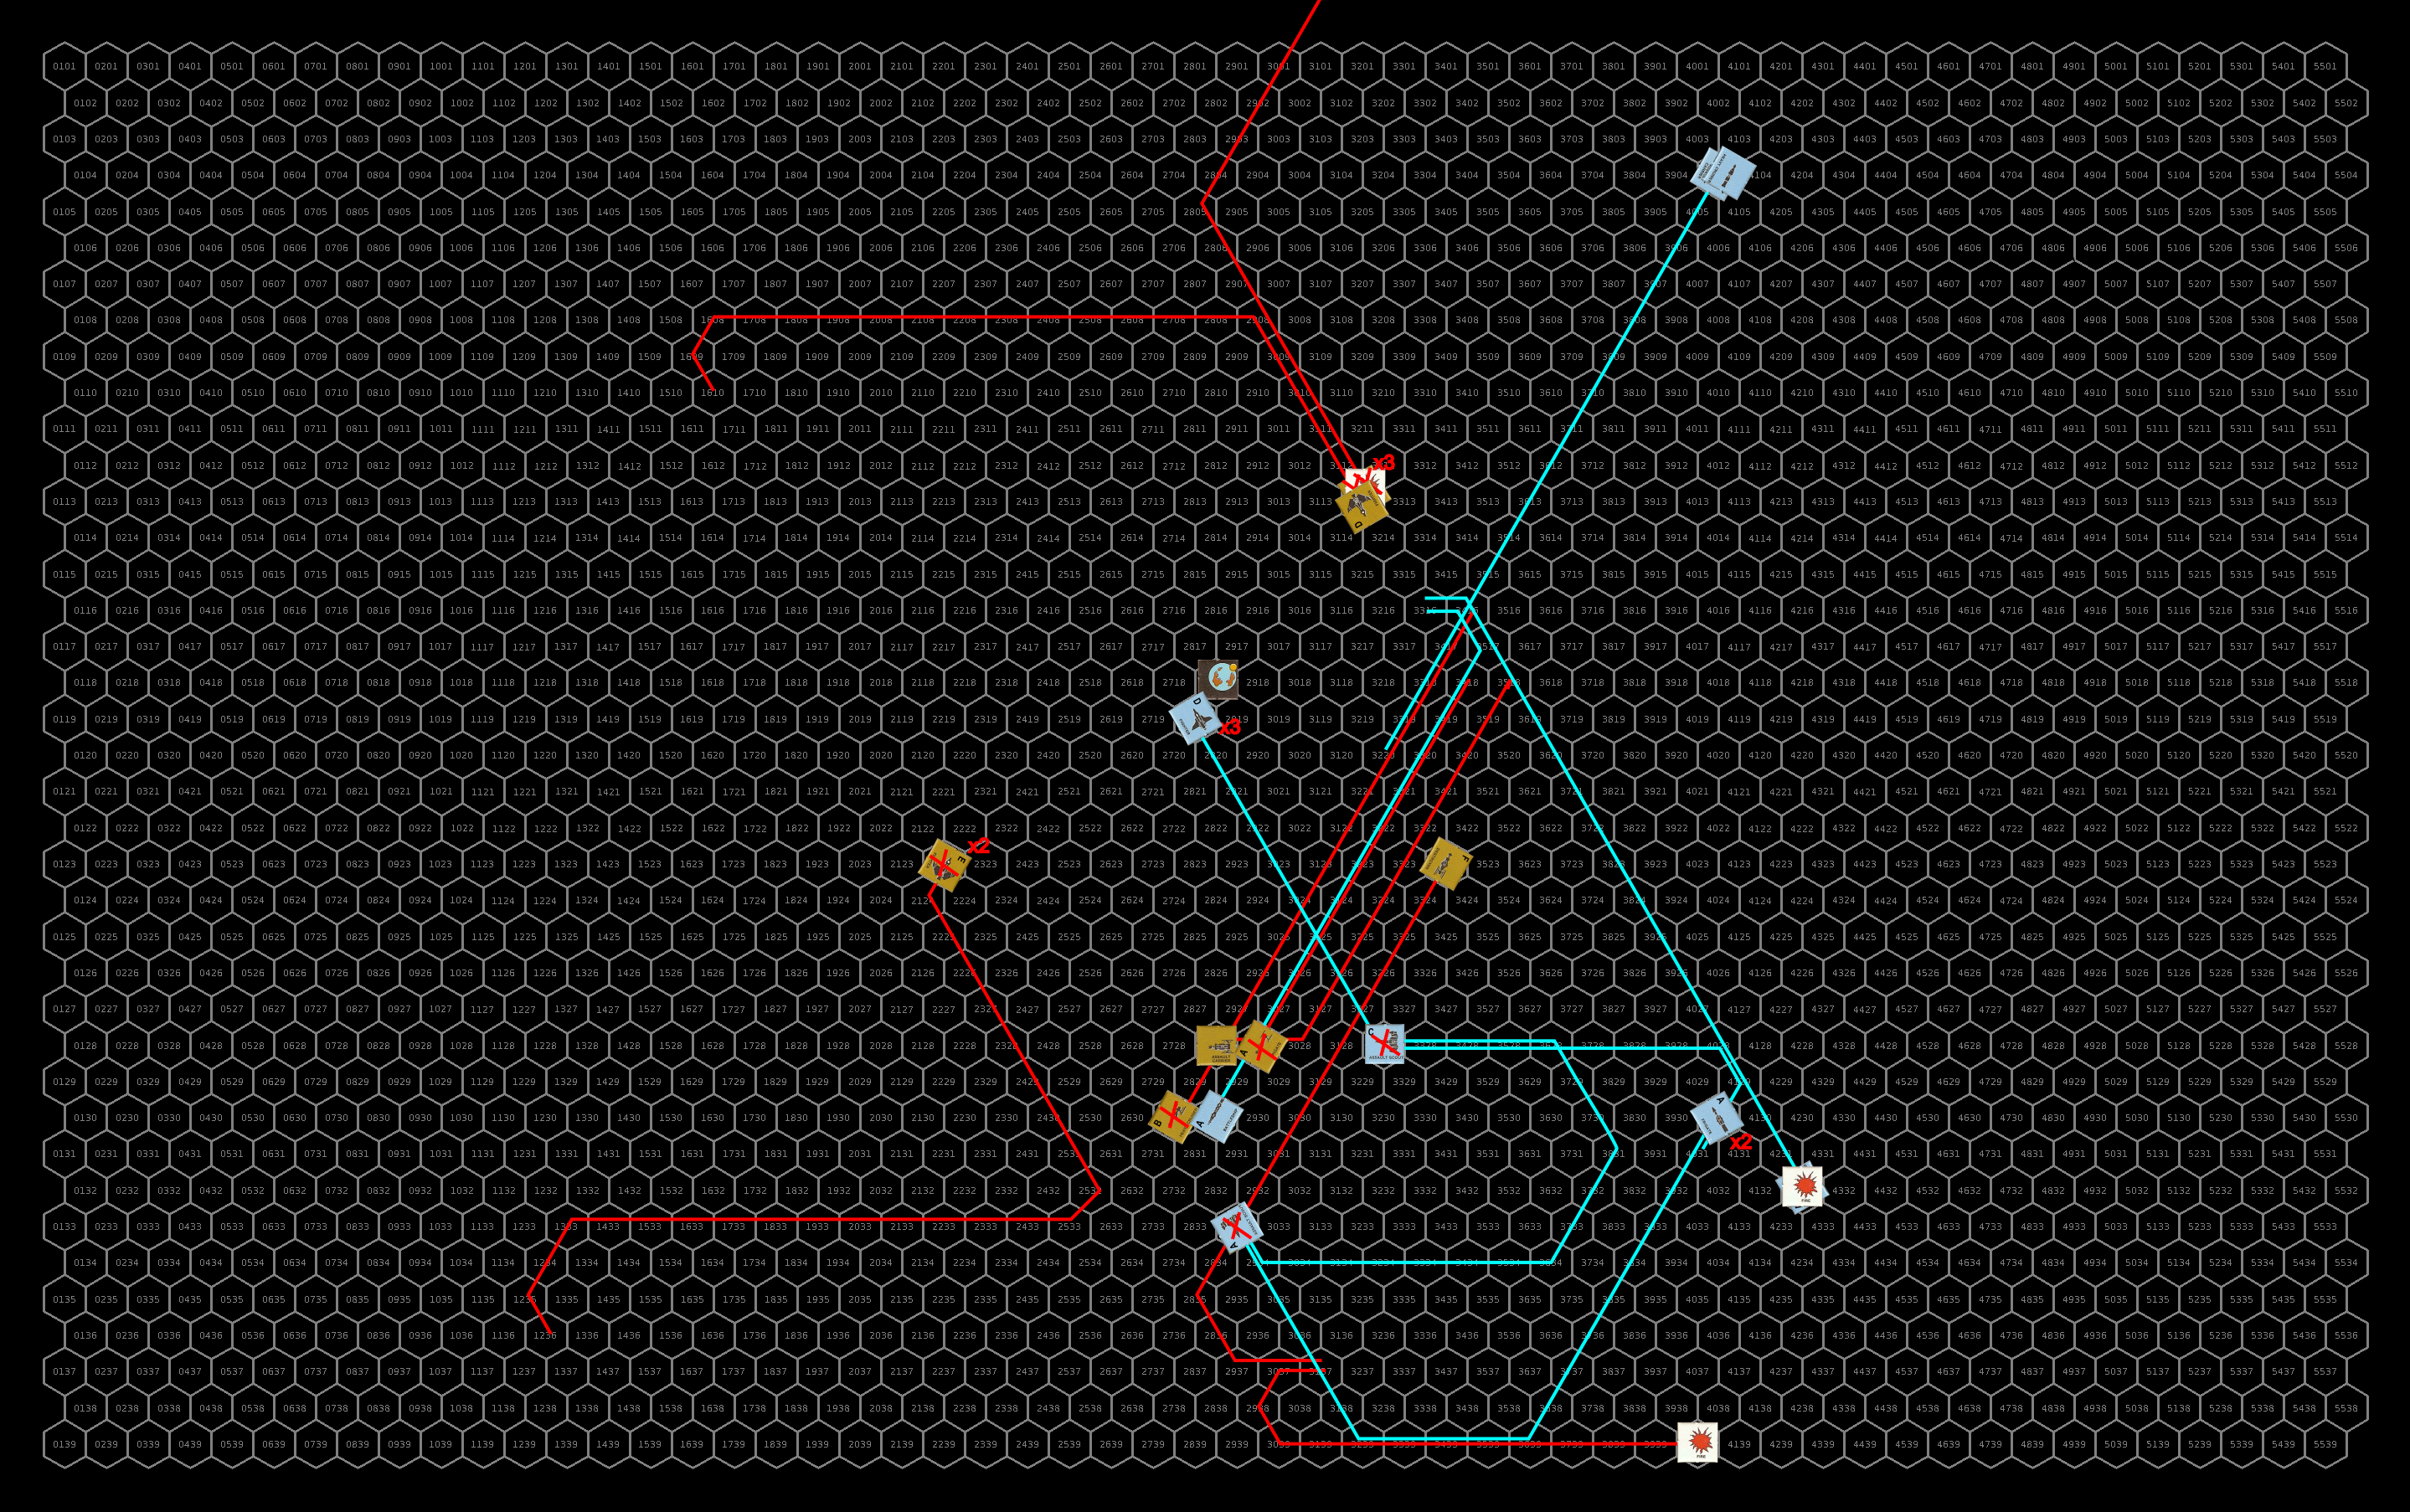
The surviving ships open fire at their respective targets. The Rollo’s Revenge’s electron battery takes out the heavy cruiser’s proton screen just before the torpedo slams into the hull obliterating the ship. The Condor II and surviving Thruster II ship hit with every weapon except one of the Condor II’s laser battery. The Thruster II’s pod laser knocks out half of the cruiser’s maneuvering capabilities while the Condor II’s laser battery induces a navigation control failure. That is moot, however as the torpedo, assault rocket, disruptor cannon, and proton and electron batteries rip into the cruiser’s hull and destroy the ship (98 HP, too bad they didn’t shoot at the undamaged cruiser. The militia ships fire at the other light cruiser. The laser batteries miss but both assault rockets hit reducing the hull to just over 50% integrity (both AR rolled double damage but only did a total of 34 HP).
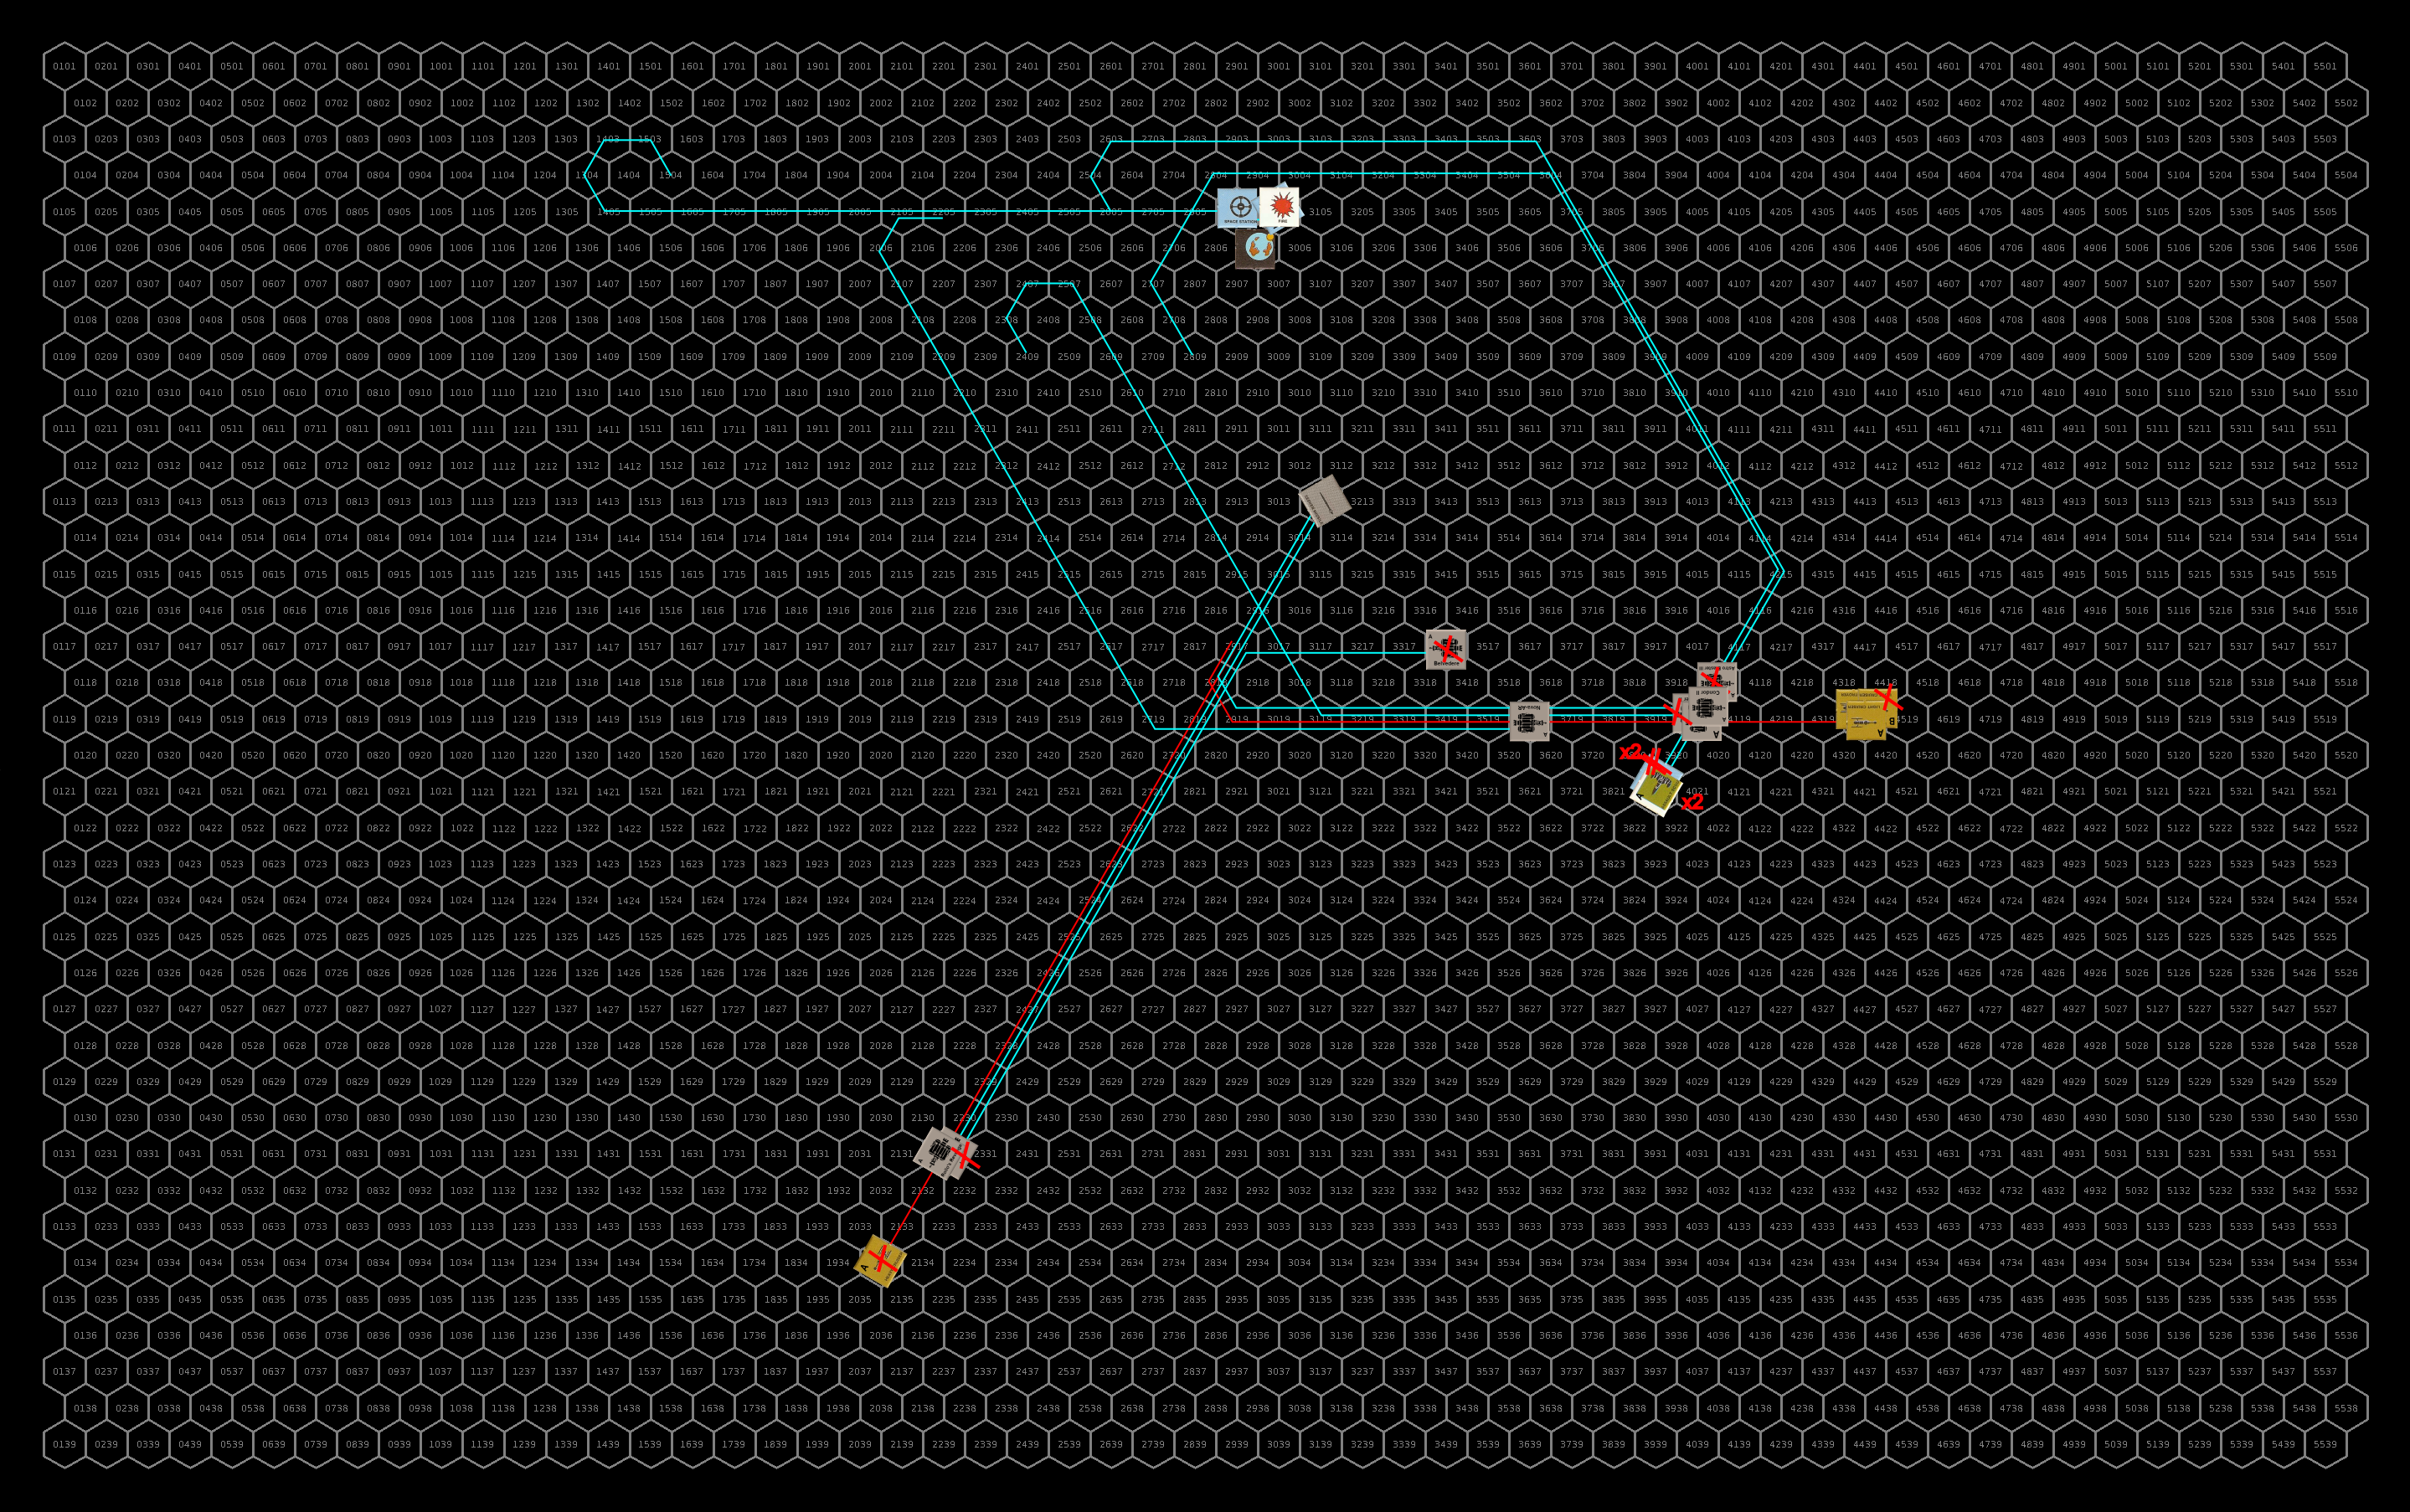
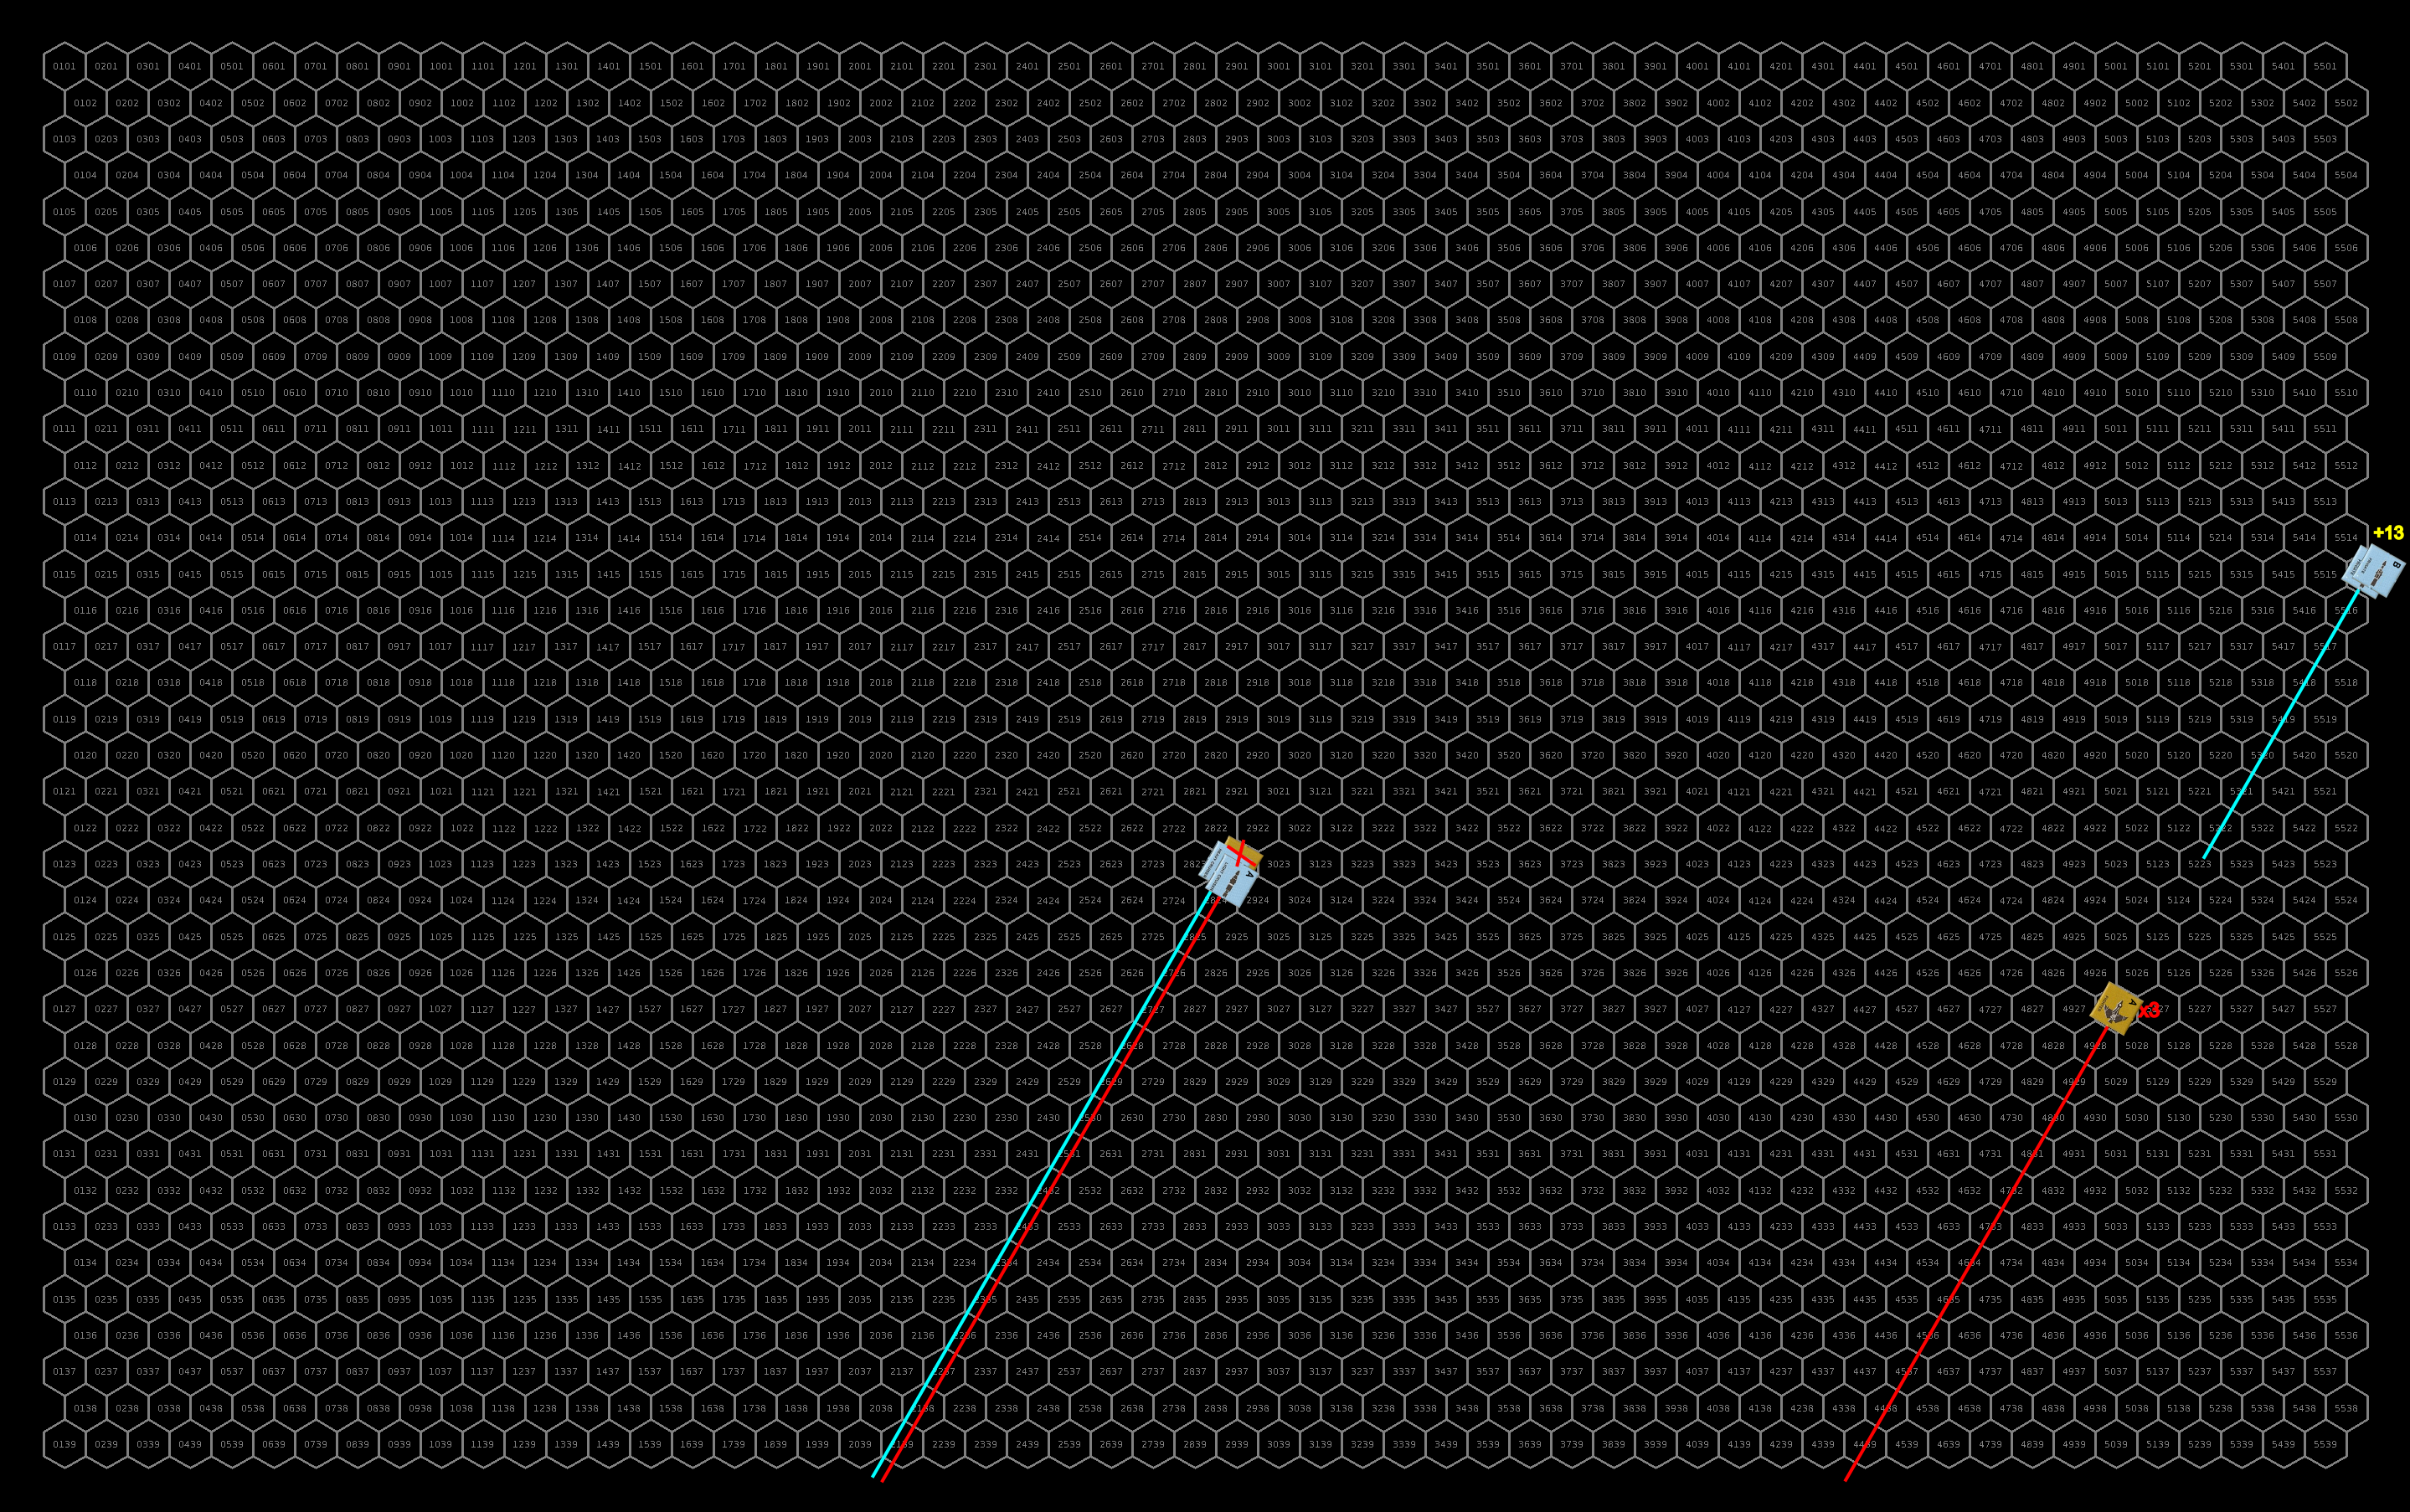
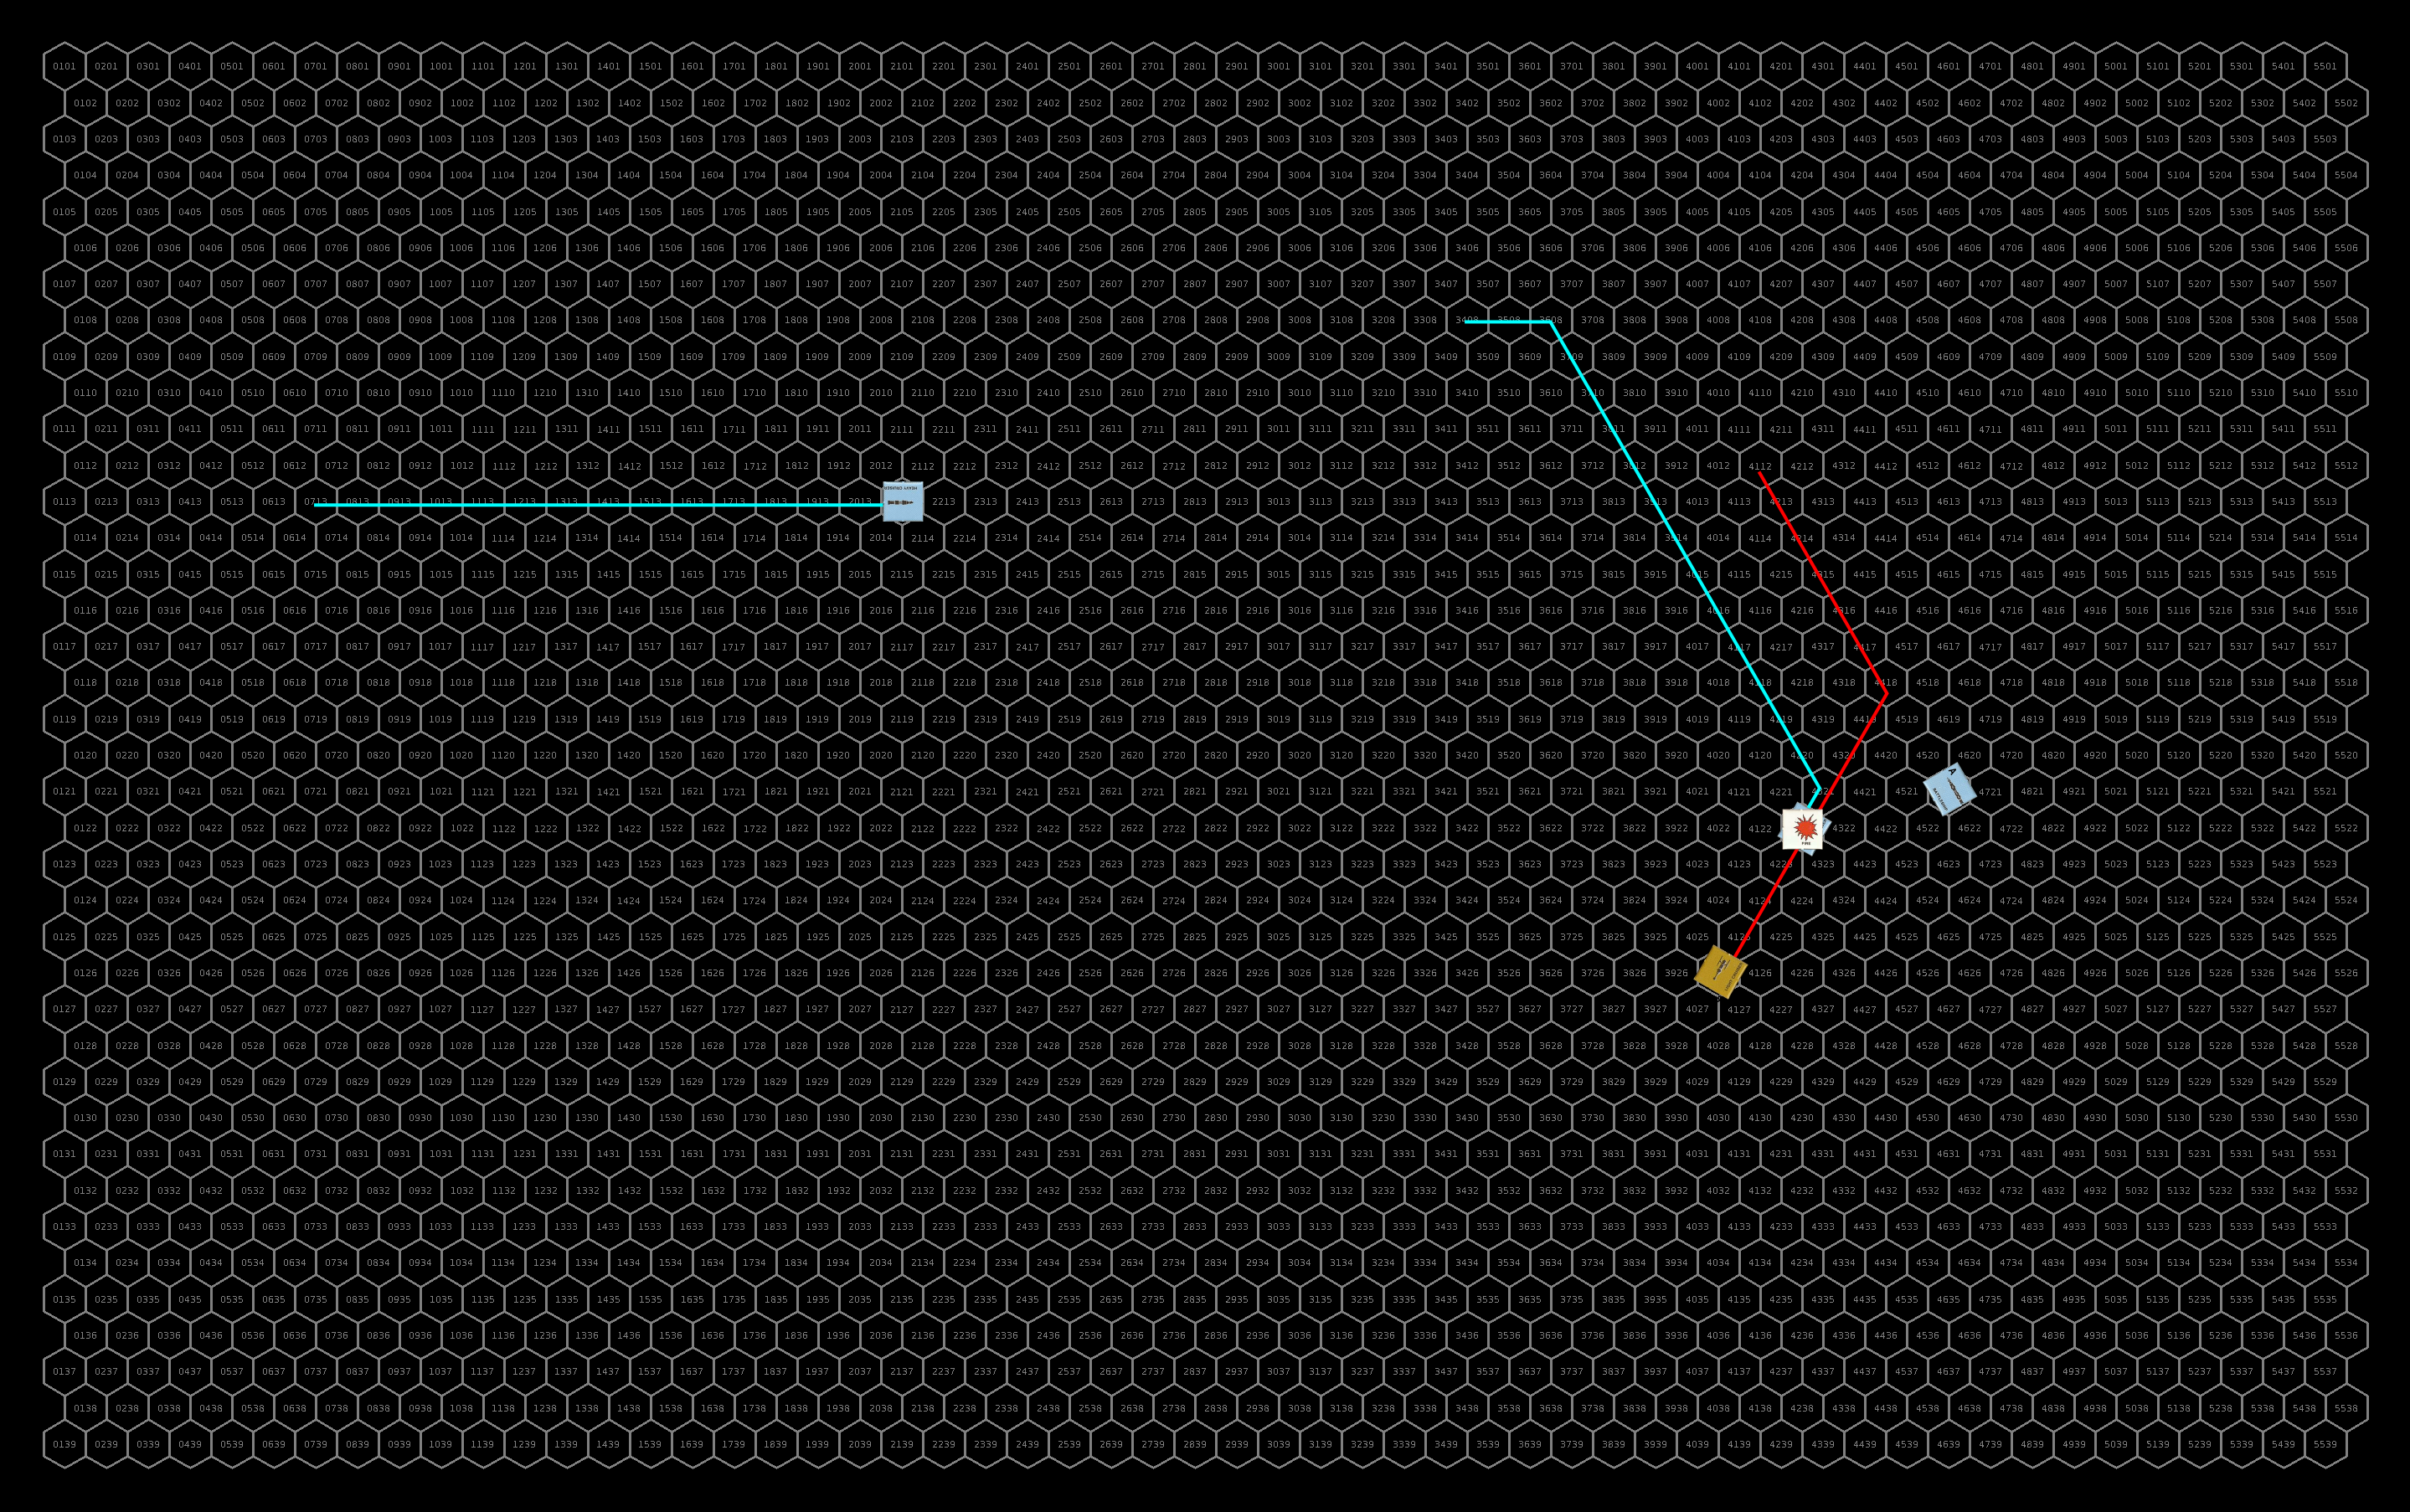
The battle after the first half hour. I shifted the map to keep all the ships on the board. Click for full-sized image.
Repair Turn 1
The damaged sathar light cruiser repairs 11% of its hull integrity.
The station repairs its laser battery. The fighter tries to repair the fighter but can’t quite get it out (rolled a 34 on a 30 DCR). The Rollo’s Revenge tries to repair its maneuvering but can’t quite get it fixed. The surviving Thruster II tries to repair its hull but the damage will require a shipyard. Finally, the Condor II repairs its masking screen launcher.
Turn 4
The sathar activate the last seeker missiles which chases down the Rollo’s Revenge. With no ICM’s left, the ship’s crew watches helplessly as the missile closes in and slams into the hull reducing the hull integrity by 62%. The two surviving ships turn to port and head back toward the planet, slowing to speed 14.
Defensively, all the ships fire at the damaged light cruiser. The Condor II hits with a laser battery reducing the hull integrity by 13% and an electron battery which starts a fire. The Thruster II’s pod laser scores a critical hit reducing the cruiser’s hull integrity by another 23%
The sathar vessels fire all their weapons at the Condor II. One electron battery hits damaging the Condor II’s combat control system while both torpedoes hit reducing the ship’s hull integrity by 78%.
The fire on the UPF fighter proves too much and compromises the hull, destroying the ship. The Rollo’s Revenge and the Condor II, both heavily damaged, just drift away from the battle as they work on repairs to their hull to prevent the ships from breaking up while maneuvering. The remaining ships loop around and go after the sathar vessels intending to take out the destroyer on this pass.
The militia assault scouts loop around and fire on the destroyer, slowing to speed 25. Like the assault scouts, the Nova-AR loops around, just counter clockwise and fires on the destroyer as well. The Thruster II follows a similar flight plan to the Nova-AR but it’s high speed takes it further away from the sathar ships after if fires its weapons.
Defensively, the destroyer fires at the Thruster II while the light cruiser fires at the lead militia assault scout. An electron battery connects with the Thruster II damaging its engines while the assault scout is hit by a laser battery knocking out the assault scout’s laser battery and an electron battery that reduces its maneuvering by 25%.
The Thruster II’s pod laser damages the destroyer’s engines but then three of the four assault rockets hit the destroyer obliterating it.
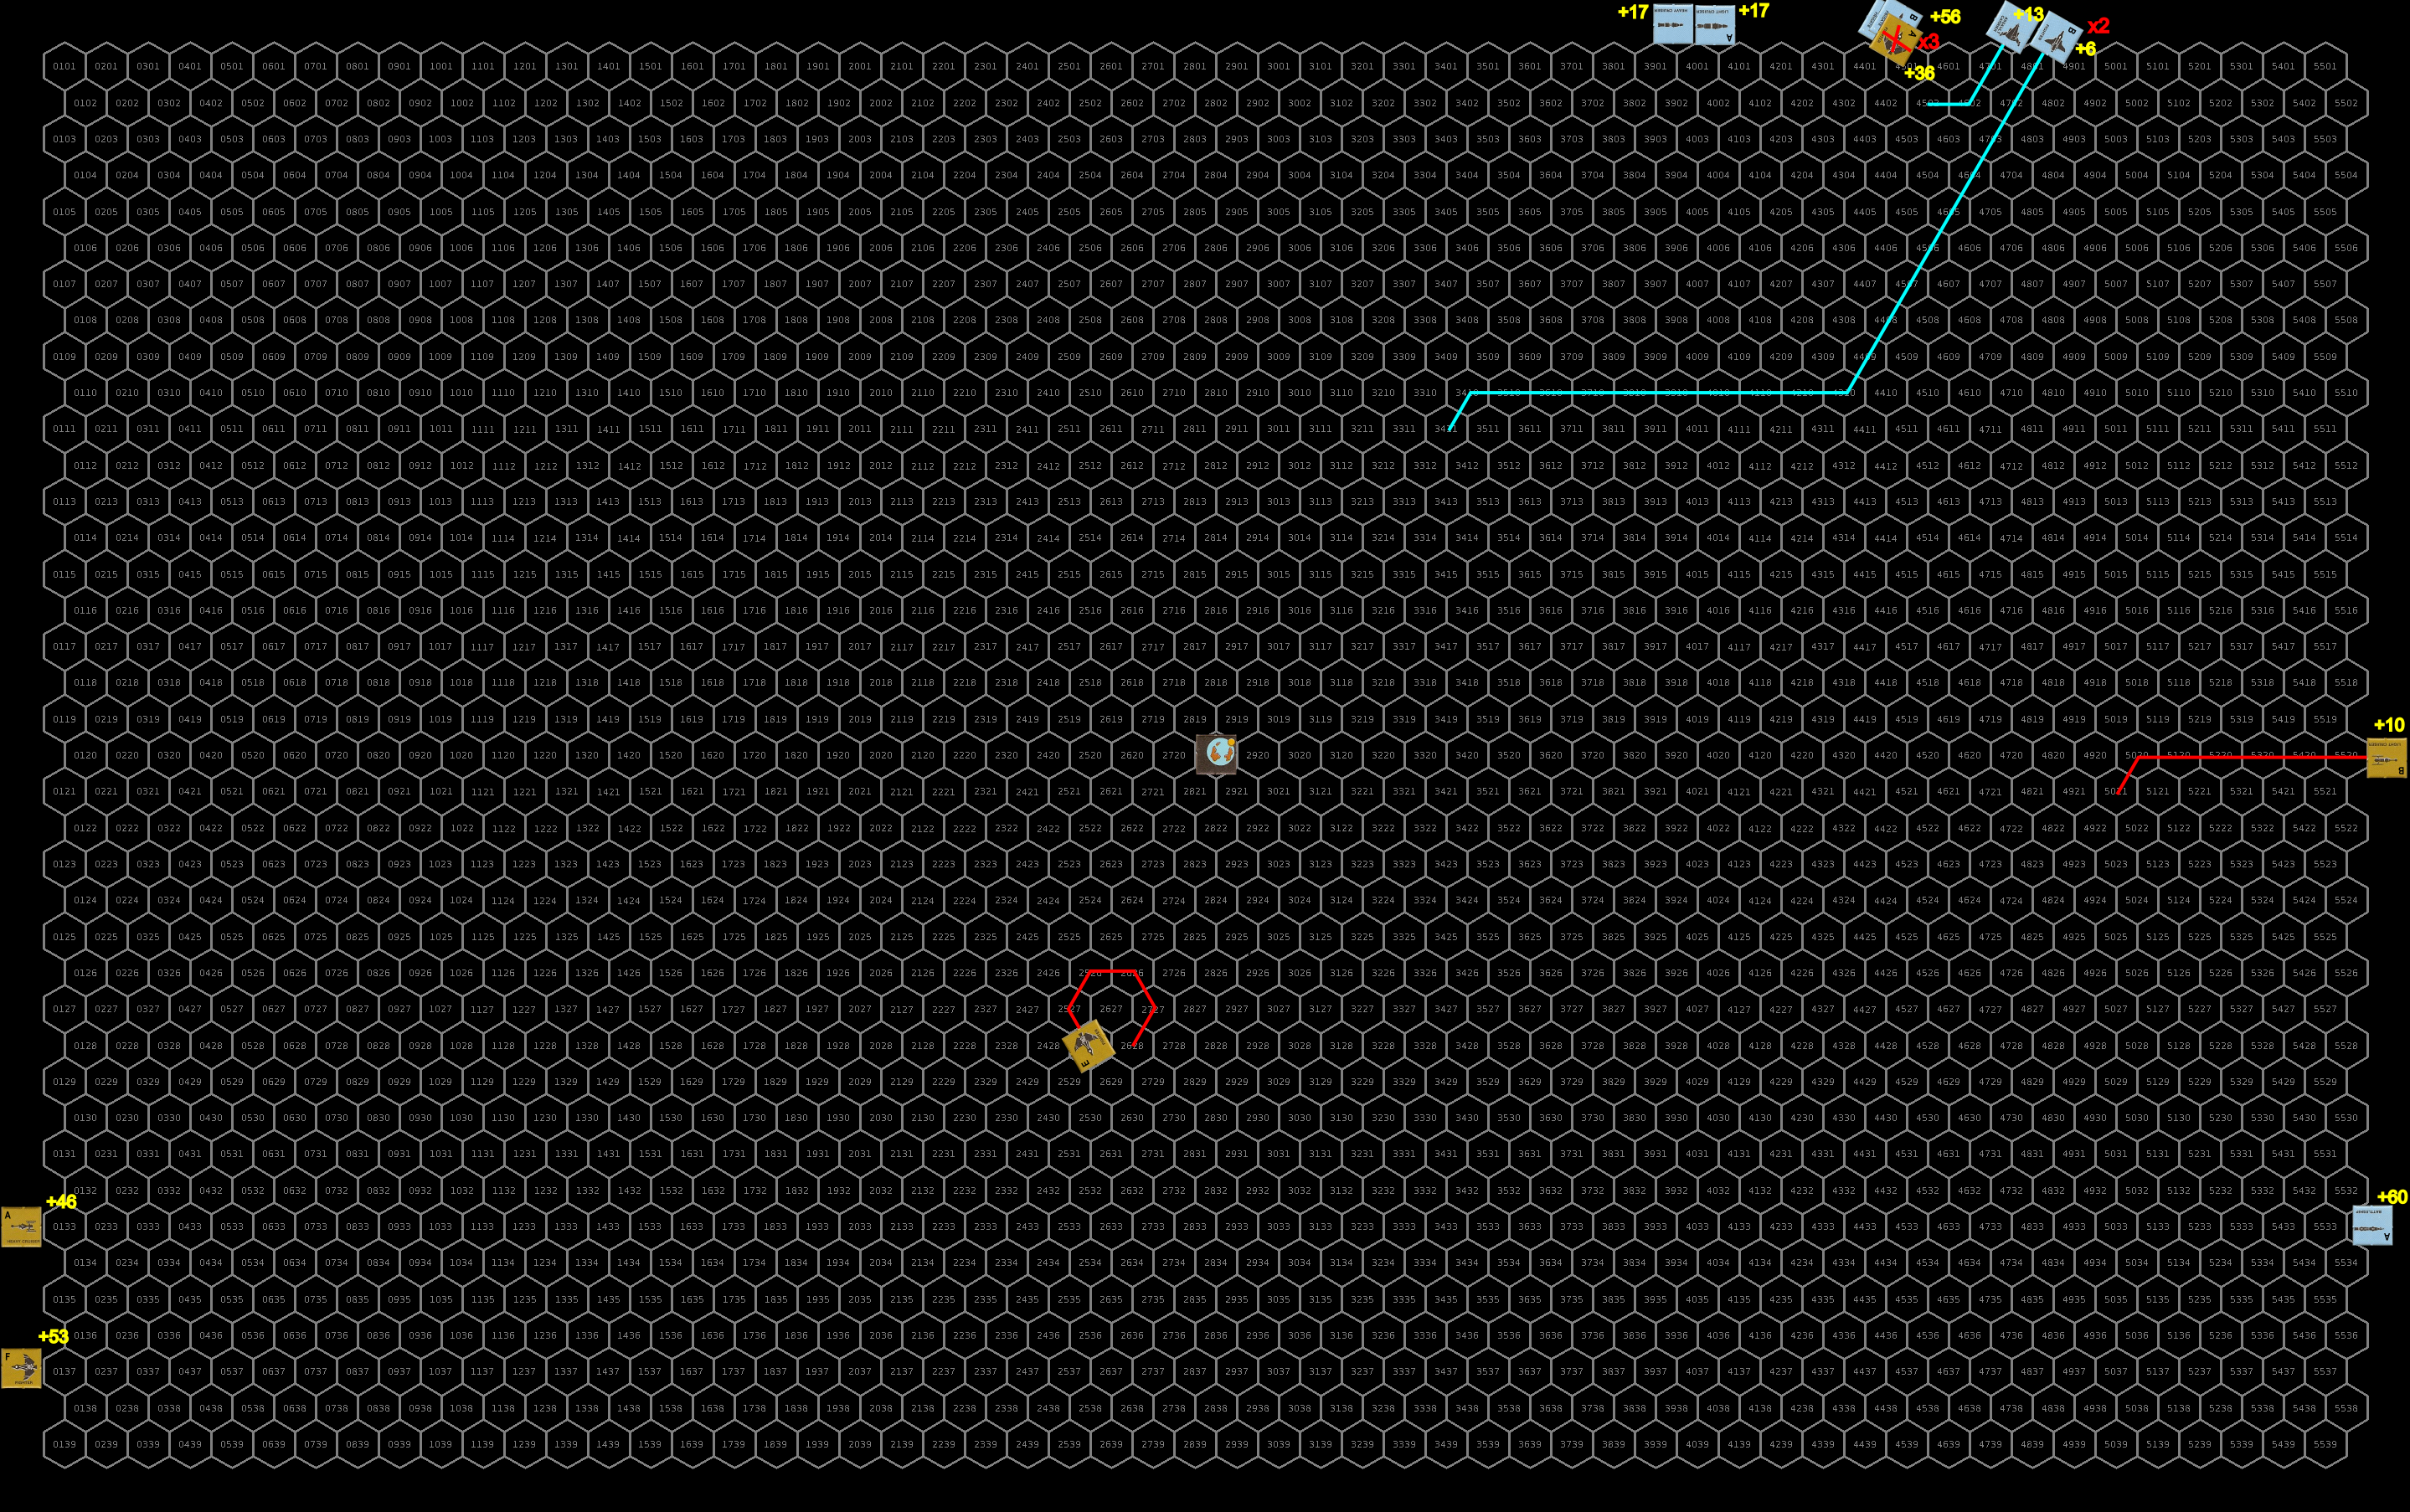
Wounded ships are starting to drift away. Had to shift the map a bit again. Click for full-sized image.
Turn 5
Cognizant of the fact that it probably won’t survive the battle with the remaining UPF vessels, the damaged sathar light cruiser turns toward the planet and station. Using the gravity of the planet to assist it’s motion the cruiser barrels straight at the station to ram it. The crew of the station watches in horror as the large sathar vessel barrels down on them. They fire their laser and rocket battery in defense but know it won’t be enough. Both of the station’s weapons miss. The cruiser fires all of its weapons at the station while it approaches. However, only the disruptor cannon actually hits knocking out the station’s empty ICM launcher. The massive ship impacts the station and the two vessels rip each other apart.
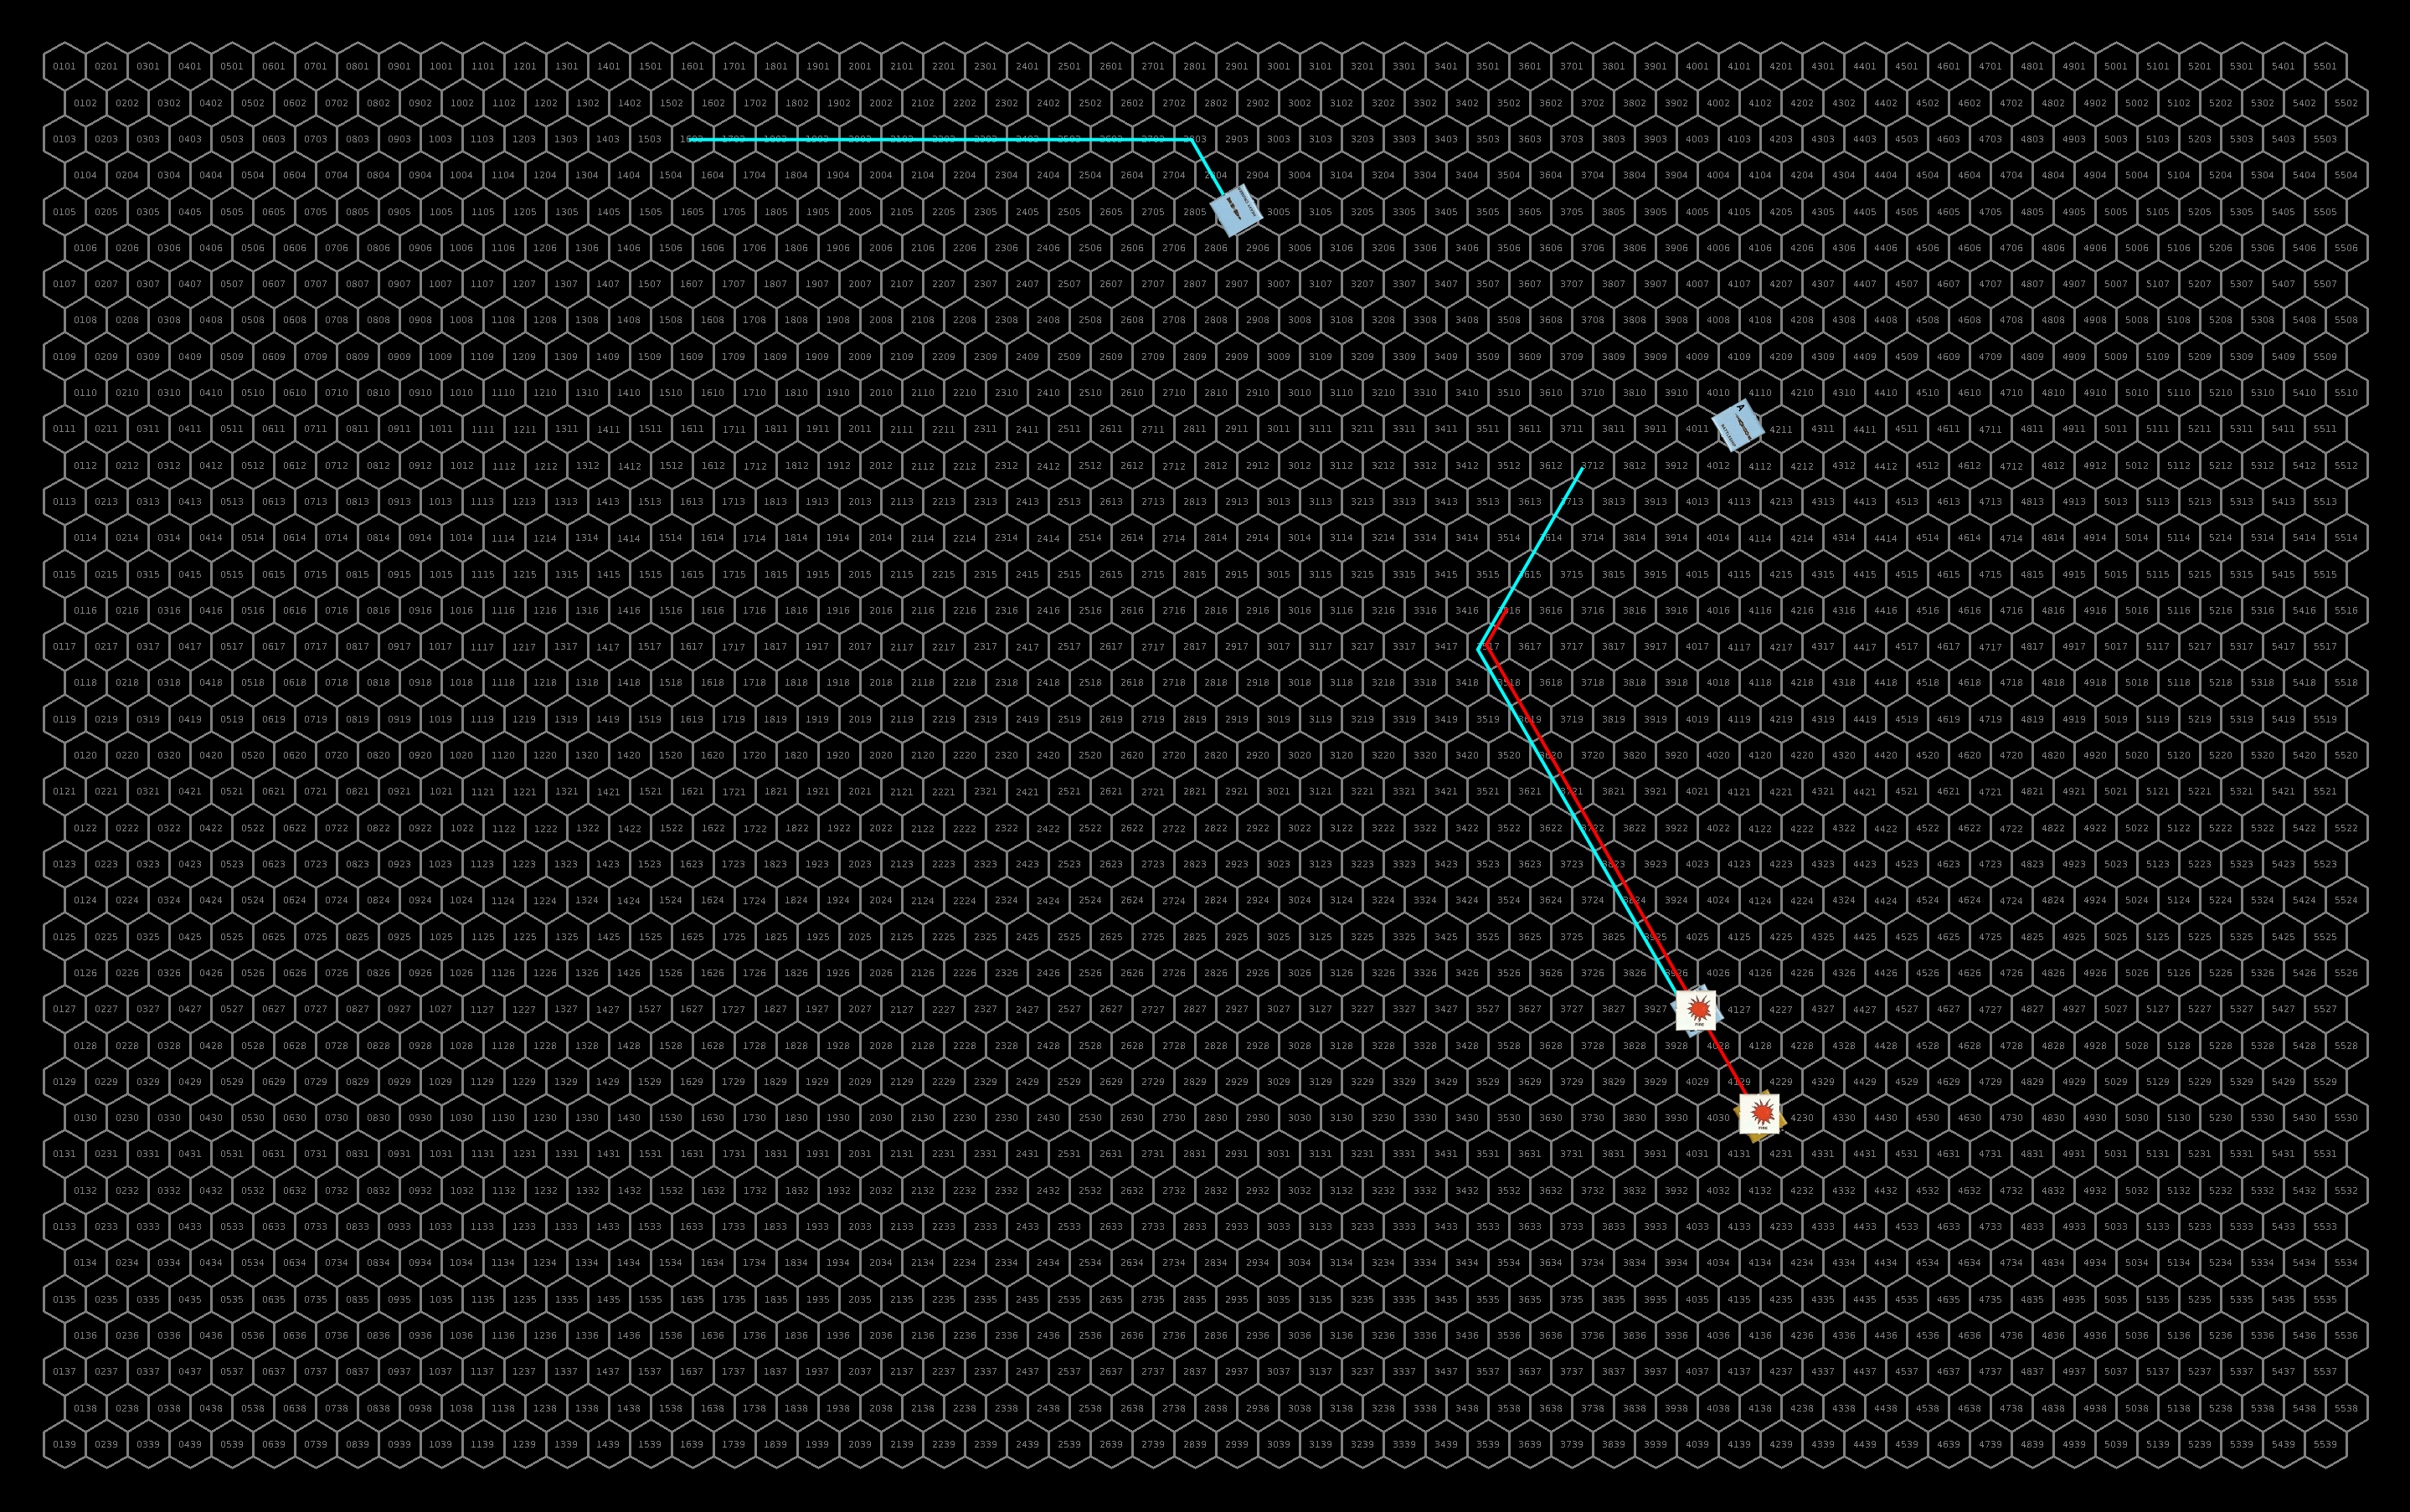
Final positions. The Rollo’s Revenge is off the bottom of the map and not shown. I shifted it again because original I was going to have the sathar ship flee and had shifted the map before I realized they would ram the station. Click for full image.
Final Repairs
The militia assault scout quickly repairs its damaged LB and then its damaged maneuvering shortly thereafter.
After about two hours, the Rollo’s Revenge has repaired all of its damage except its hull. It will have to carefully fly to Prenglar to get that repaired not what the Hentz shipyard has been destroyed.
It takes two and half hours for the Condor II to complete its repairs and like the Rollo’s Revenge, it too must carefully limp to a shipyard to completely repair its hull.
After an hour and a half, the surviving Thruster II has repaired as much as it can of the battle damage but is also unable to repair its hull and must head to a shipyard.
Aftermath
The sathar didn’t quite do as much damage as they had hoped. While they destroyed the fighter squadron and the station, they didn’t take out the militia assault scouts. However, they did succeed in showing the UPF that Gruna Garu is now vulnerable. So while they didn’t do as much damage as desired, it will have the desired effect of stretching the UPF thinner in the defense of the Frontier.
If you count the damage done to the surviving ships of the Yazira Squadron, the sathar actually did more damage than they took inflicting a total of 320 HP while losing 270. They definitely took out more ships. Although if you only count the ships destroyed, the sathar only destroyed 249 HP of ships. So it was pretty even.
Lessons Learned
The sathar were doing pretty well until turn 4. Then their defensive fire failed and the UPF ships had a stellar round. The turn before was also a bit surprising when the Condor II hit with everything and obliterated the sathar light cruiser. I was actually expecting the light cruiser to possibly survive that round but it didn’t.
Overall, the privateers and yachts did pretty well. The Condor II and Rollo’s Revenge are formidible ships. I picked the ships for the Yazira squadron fairly randomly. If those two ships hadn’t been part of the mix, it might have gone much worse for the UPF as their torpedos were quite helpful. The Yazira Squadron were “bonus” ships relative to the order of battle for the Second Sathar War game but so were the ships I gave the sathar when I added in the ships at sathar SCC#10 a while back so it evens out.
Playing out this battle was a little slower than some of the others because I was using new ships that I’d not played before in the Yazira Squadron. I have the standard ships etched into my brain from so many battles but I was continually looking up the stats for the yachts and privateers. It also made for a bit more chaotic battle as every ship had unique characteristics.
I can’t decide if this would make a good campaign (I think it would) or if it would be better as a novel but I’ve had this idea kicking around and percolating in my brain for several years now and I thought I’d put it out there and see what everyone thinks. I kind of hinted at it in a Facebook post a month or so ago if you’re in the Star Frontiers: Alive and Well Facebook group.
Some Background
If you’ve been following the Detailed Frontier Timeline that I’ve been posting (either here or on Twitter), the HSS History’s Hope is on this campaign arc in the timeline. The timeline has a few entries:
Date (FY)
Events
59.362
Astronomers on Histran (Scree Fron system), release news of the discovery of a previously unknown brown dwarf approximately 100ly from the Frontier. Its motion indicates that it had a close encounter with a K4 star some 175 years ago. Initial news of the discovery is quickly suppressed by the Family of One.
59.373
Despite efforts of the Family of One (FoO), data on the newly discovered brown dwarf is now available. The FoO reaction to the news fuels speculation that the K4 star is Yazira, the “lost” yazirian home system.
60.082
After months of fundraising, a new organization, The Yazira Heritage Foundation, purchases and begins refitting a small vessel to use as an exploration ship. Their goal is to reach the star that rumors claim is Yazira.
60.119
Saboteurs strike against the exploration ship being refitted by the Yaziria Heritage Foundation damaging it but not destroying it, setting back their efforts. The Foundation suspects the Family of One to be behind the attack.
60.163
The Yaziria Heritage Foundation’s exploration ship, the HSS History’s Hope, completes its refit in the Hentz (Araks) starship construction center and begins its maiden voyage to Histran (Scree Fron).
This is where the campaign begins. The PCs have been hired as part of the crew of the HSS History’s Hope. They would be hired sometime shortly before the ship is completed. The ship holds a crew of 24 including the ship crew and scientists and the PCs would be part of that crew.
Campaign Outline
This is a high-level Knight Hawks campaign. The PCs will be fairly advanced. In fact, there should be at least two level 6 astrogators on the ship, one of which at least should be a PC. I envision the PCs are the command crew for the ship (pilot, engineer, astrogator, gunner, etc.) and possibly have the scientists and other crew members as secondary characters. Depending on the number of players, I could have them roll up characters for the entire crew with each player having several characters that they switch between depending on the particular events happening. The campaign is more about the exploration than level advancement although there would be some of that along the way.
The campaign would be broken into three phases:
Acquiring the ship – The PCs must travel from Histran (Scree Fron) to the Hentz (Araks) shipyard to pick up the HSS History’s Hope and transport it to Histran for supplies and picking up the rest of the crew.
Exploring the Vast Expanse – The PCs have a starmap and a destination but there are no known jump routes. They must chart a completely new course there and back. This part of the campaign will involve exploring new systems (if desired) once they jump there, possible findings of relics from the yazirian exodus, and who knows what else. This will probably take a couple of years game time to make all the jumps there and back. The PCs will have to decide how often to go back to the Frontier for maintenance and resupply, the best way to chart the routes, whether or not to report them, etc. as they go along.
The Yazira system – Once they arrive at the target system it will require a careful exploration. Is this the yazirian home system? What exactly happened if it is? Are there survivors? What became of them? Or is this a false alarm?
There are forces in the Frontier that don’t want this endeavor to succeed so the PCs can expect opposition along the way. There will be lots of character action and probably some Knight Hawks battles along the way as well.
Other Background Material
I’ve posted several articles that could be considered background for the campaign. I’d probably synthesize these into a document for the players that only contains information they would know but the relevant posts are:
I have a good idea of adventures/encounters for part one and three, but am struggling a bit to make the middle part exciting. The main issue is that the charting of new routes, ship maintenance, and void jumping are really all just die rolls that could take a few minutes of game time while covering days of game time. There may or may not be interesting things in the systems they jump into. I still trying to come up with ideas to engage the players on that aspect of the game. If they find something interesting (and there will , that’s not an issue. It the finding part that is bothering me. And maybe just rolling the dice is okay to move through a system until something happens.
I think this type of game would appeal to certain types of players and not others. Is this a campaign you’d like to play in? Or do you think it’s better suited as a novel? Or both? Let me know in the comments below.
In an unexpected and horrifying turn of events, the sathar fleet attacked the civilian orbital shipyard around Terledrom in their attack today before retreating from the system. The shipyard was completely destroyed along with all the ships under construction. Many of the crew and engineers were lost as well.
Task Force Cassidine, together with with the new Frontier Fighter Corps squadron and the militia drove off the attackers destroying five major vessels of the sathar fleet. UPF forces lost fourteen of the twenty fighters in the system and the militia lost one of its assault scouts. Luckily nearly all the crew were recovered. The militia frigate was significantly damaged as well and will be heading to Outer Reach in the Dramune system for repairs with the loss of the local shipyard.
Kat’kst’kll, Terledrom News Service
Background
Deciding on a change of tactics, the sathar launch a massive fleet at Fromeltar, larger than any of the fleets seen so far in the Frontier. Despite the increased size of the Fromeltar militia and the presence of Frontier Fighter Corps Squadron Gamma, these ships plus the depleted Task Force Cassidine are outgunned by the incoming sathar fleet. The UPF has more ships, 32 vs 21, but twenty of the UPF ships are fighters with another 7 being assault scouts. The UPF fleet only has 5 capital ships, a battleship, an assault carrier, and three frigates, compared to the 10 capital ships of the sathar fleet including four heavy cruisers.
However, unlike previous sorties into the Frontier, the primary target of this attack is not the ships of Spacefleet but rather the starship construction center in that system. This is only going to be a hit and run on the sathar’s part and they aren’t planning on a major engagement with the fleet. Three hours before the sathar ships reach the planet, the assault carrier deploys its fighters and turns to head home. It looks like the fighters are to be sacrificed.
Order of Battle
UPF
Task Force Cassidine
9 fighters
3 assault scouts
2 frigates
1 assault carrier
1 battleship
FFC Squadron Gamma
8 fighters
Terledrom Militia
3 fighters (manned for UPF)
4 assault scouts
1 frigate
armed station
Terledrom SCC
Sathar
9 fighters
2 cutters
3 frigates
1 destroyer
2 light cruisers
4 heavy cruisers
1 assault carrier (not participating in battle)
The Battle
Setup
Unlike previous engagements, instead of continuing to slow as they approach the planet, two hours out, the sathar forces start accelerating instead of continuing to slow down. Additionally instead of dispersing out to engage the UPF forces, the fleet amasses into a single tight formation bearing directly on the planet. They enter the map at speed 44.
Caught by surprise by the sathar’s speedup, the UPF forces scramble to gain speed and because of this are somewhat out of position as the attack commences. The fighters and assault scouts have matched the sathar’s speed but the frigates have only achieved a speed of 35 while the battleship and assault carrier are at speed 20. The fighters form up into flights of 3 or 4 ships and the assault scout fly in pairs or trios.
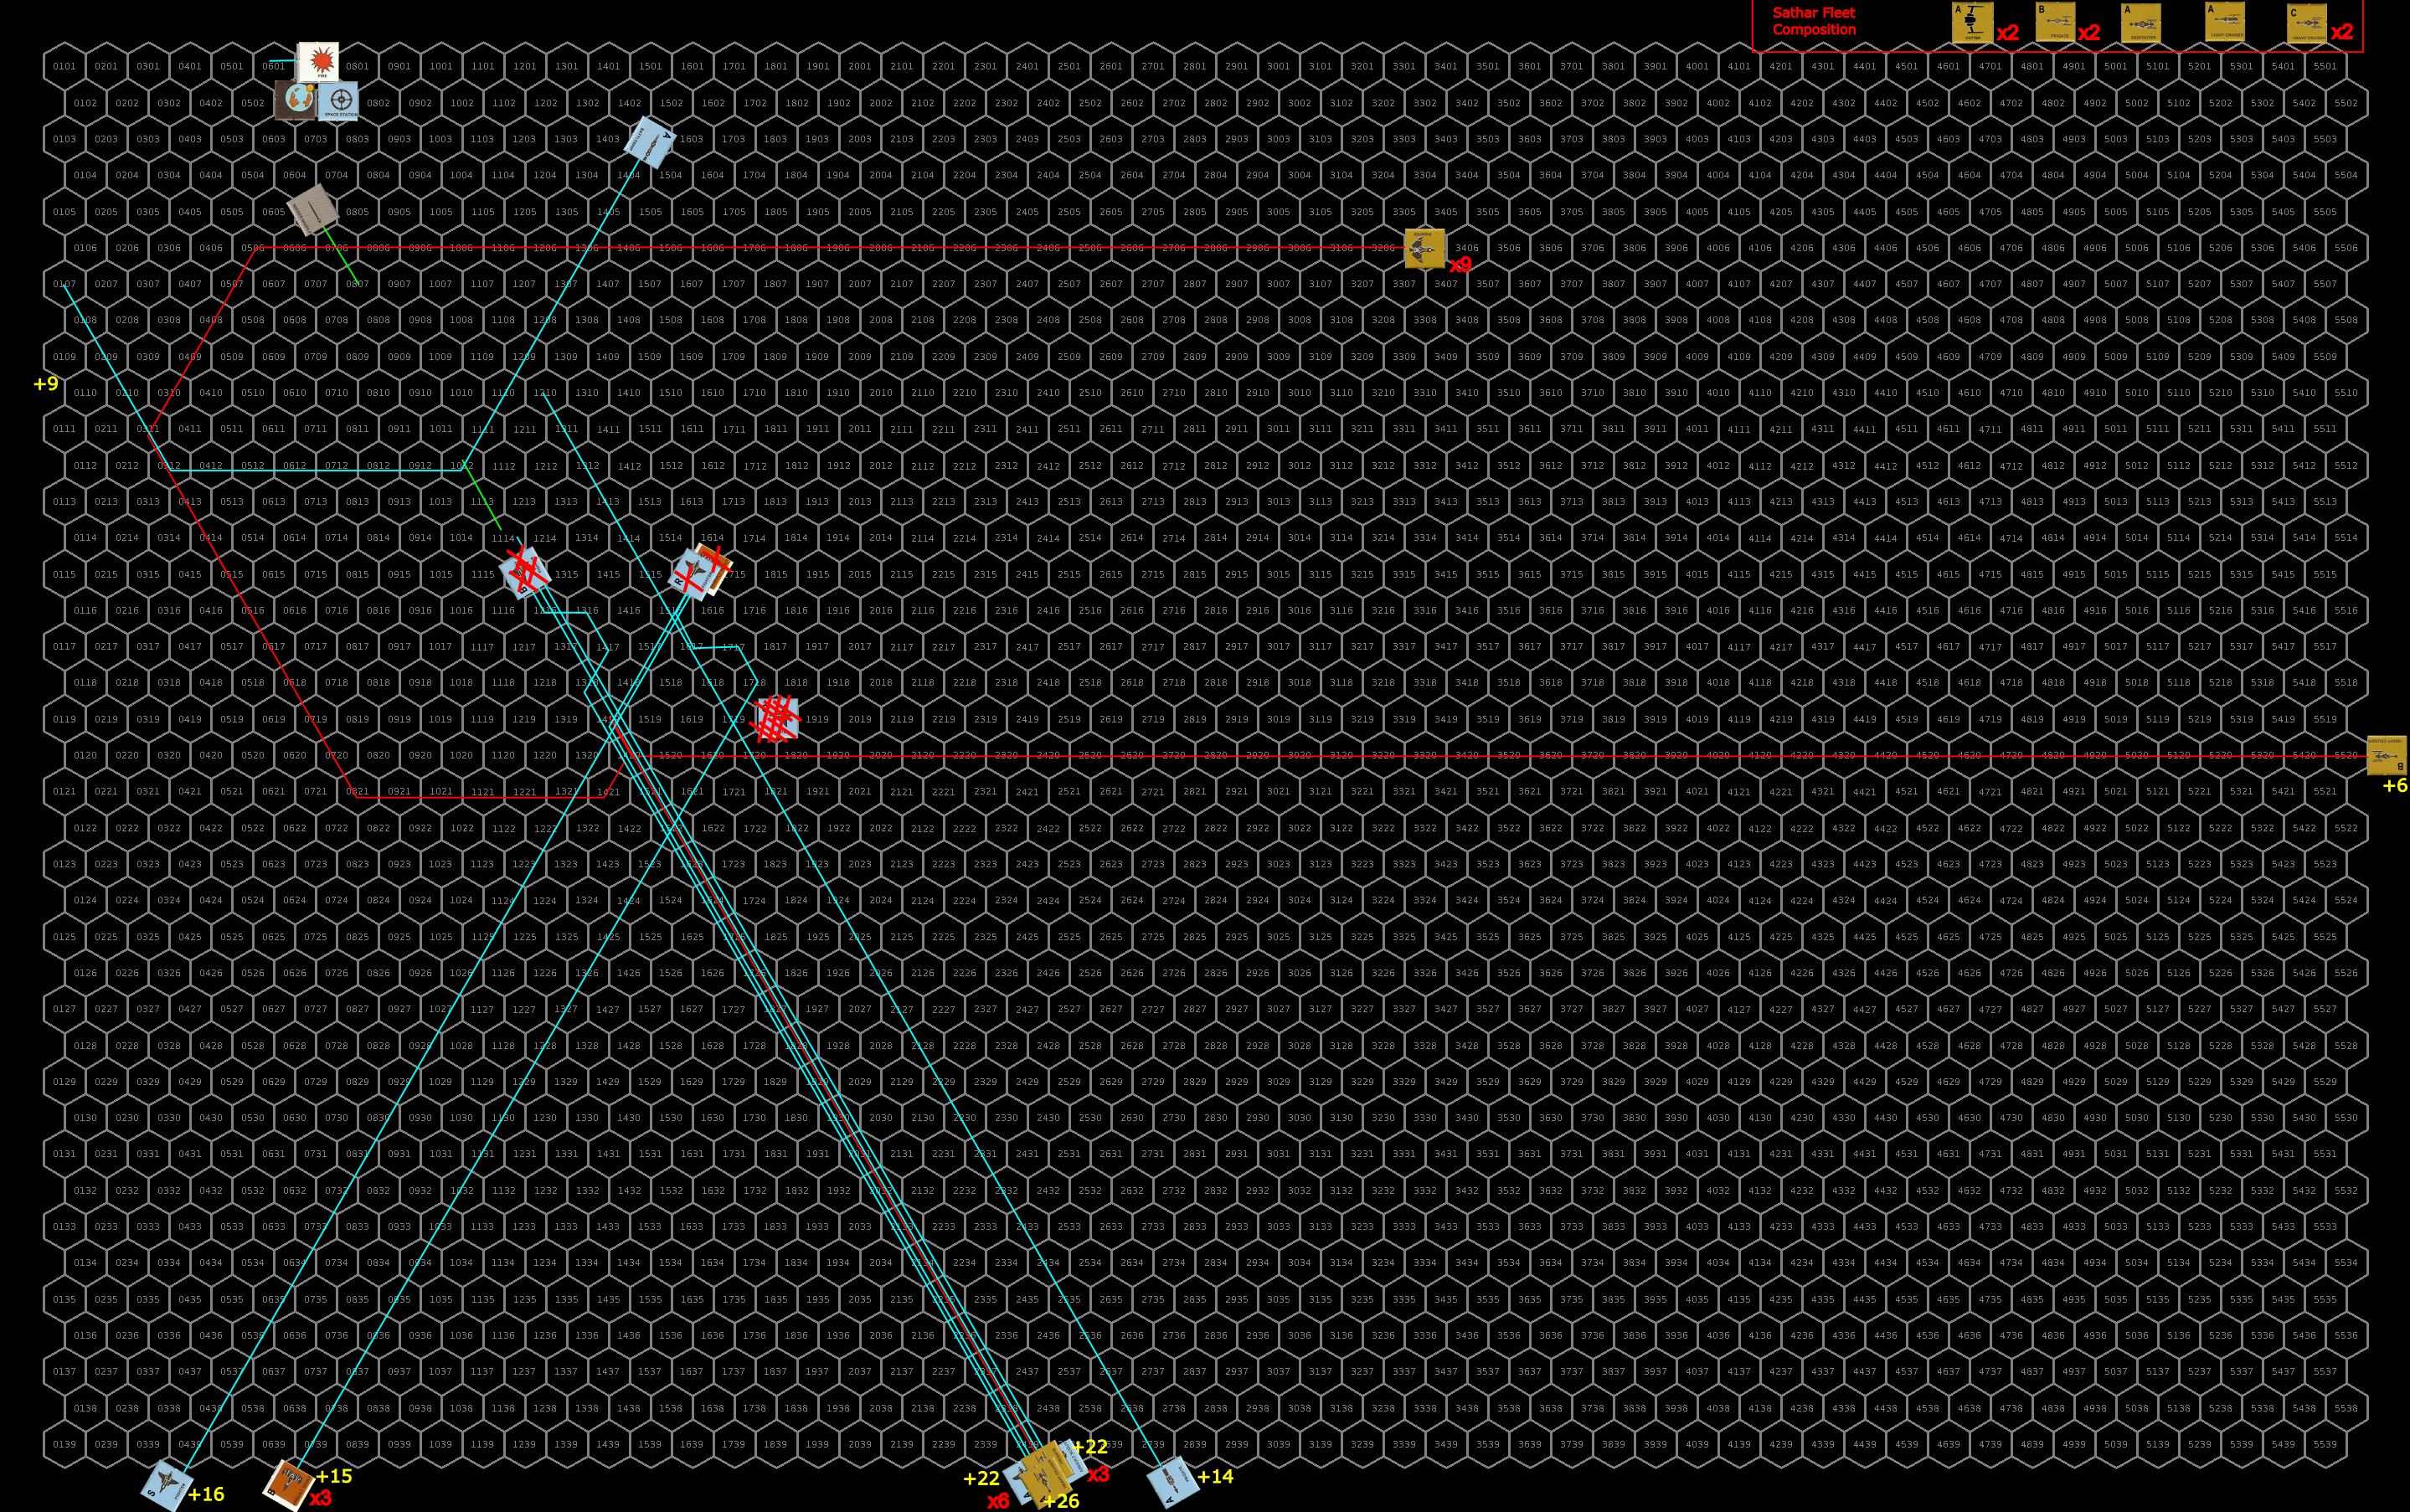
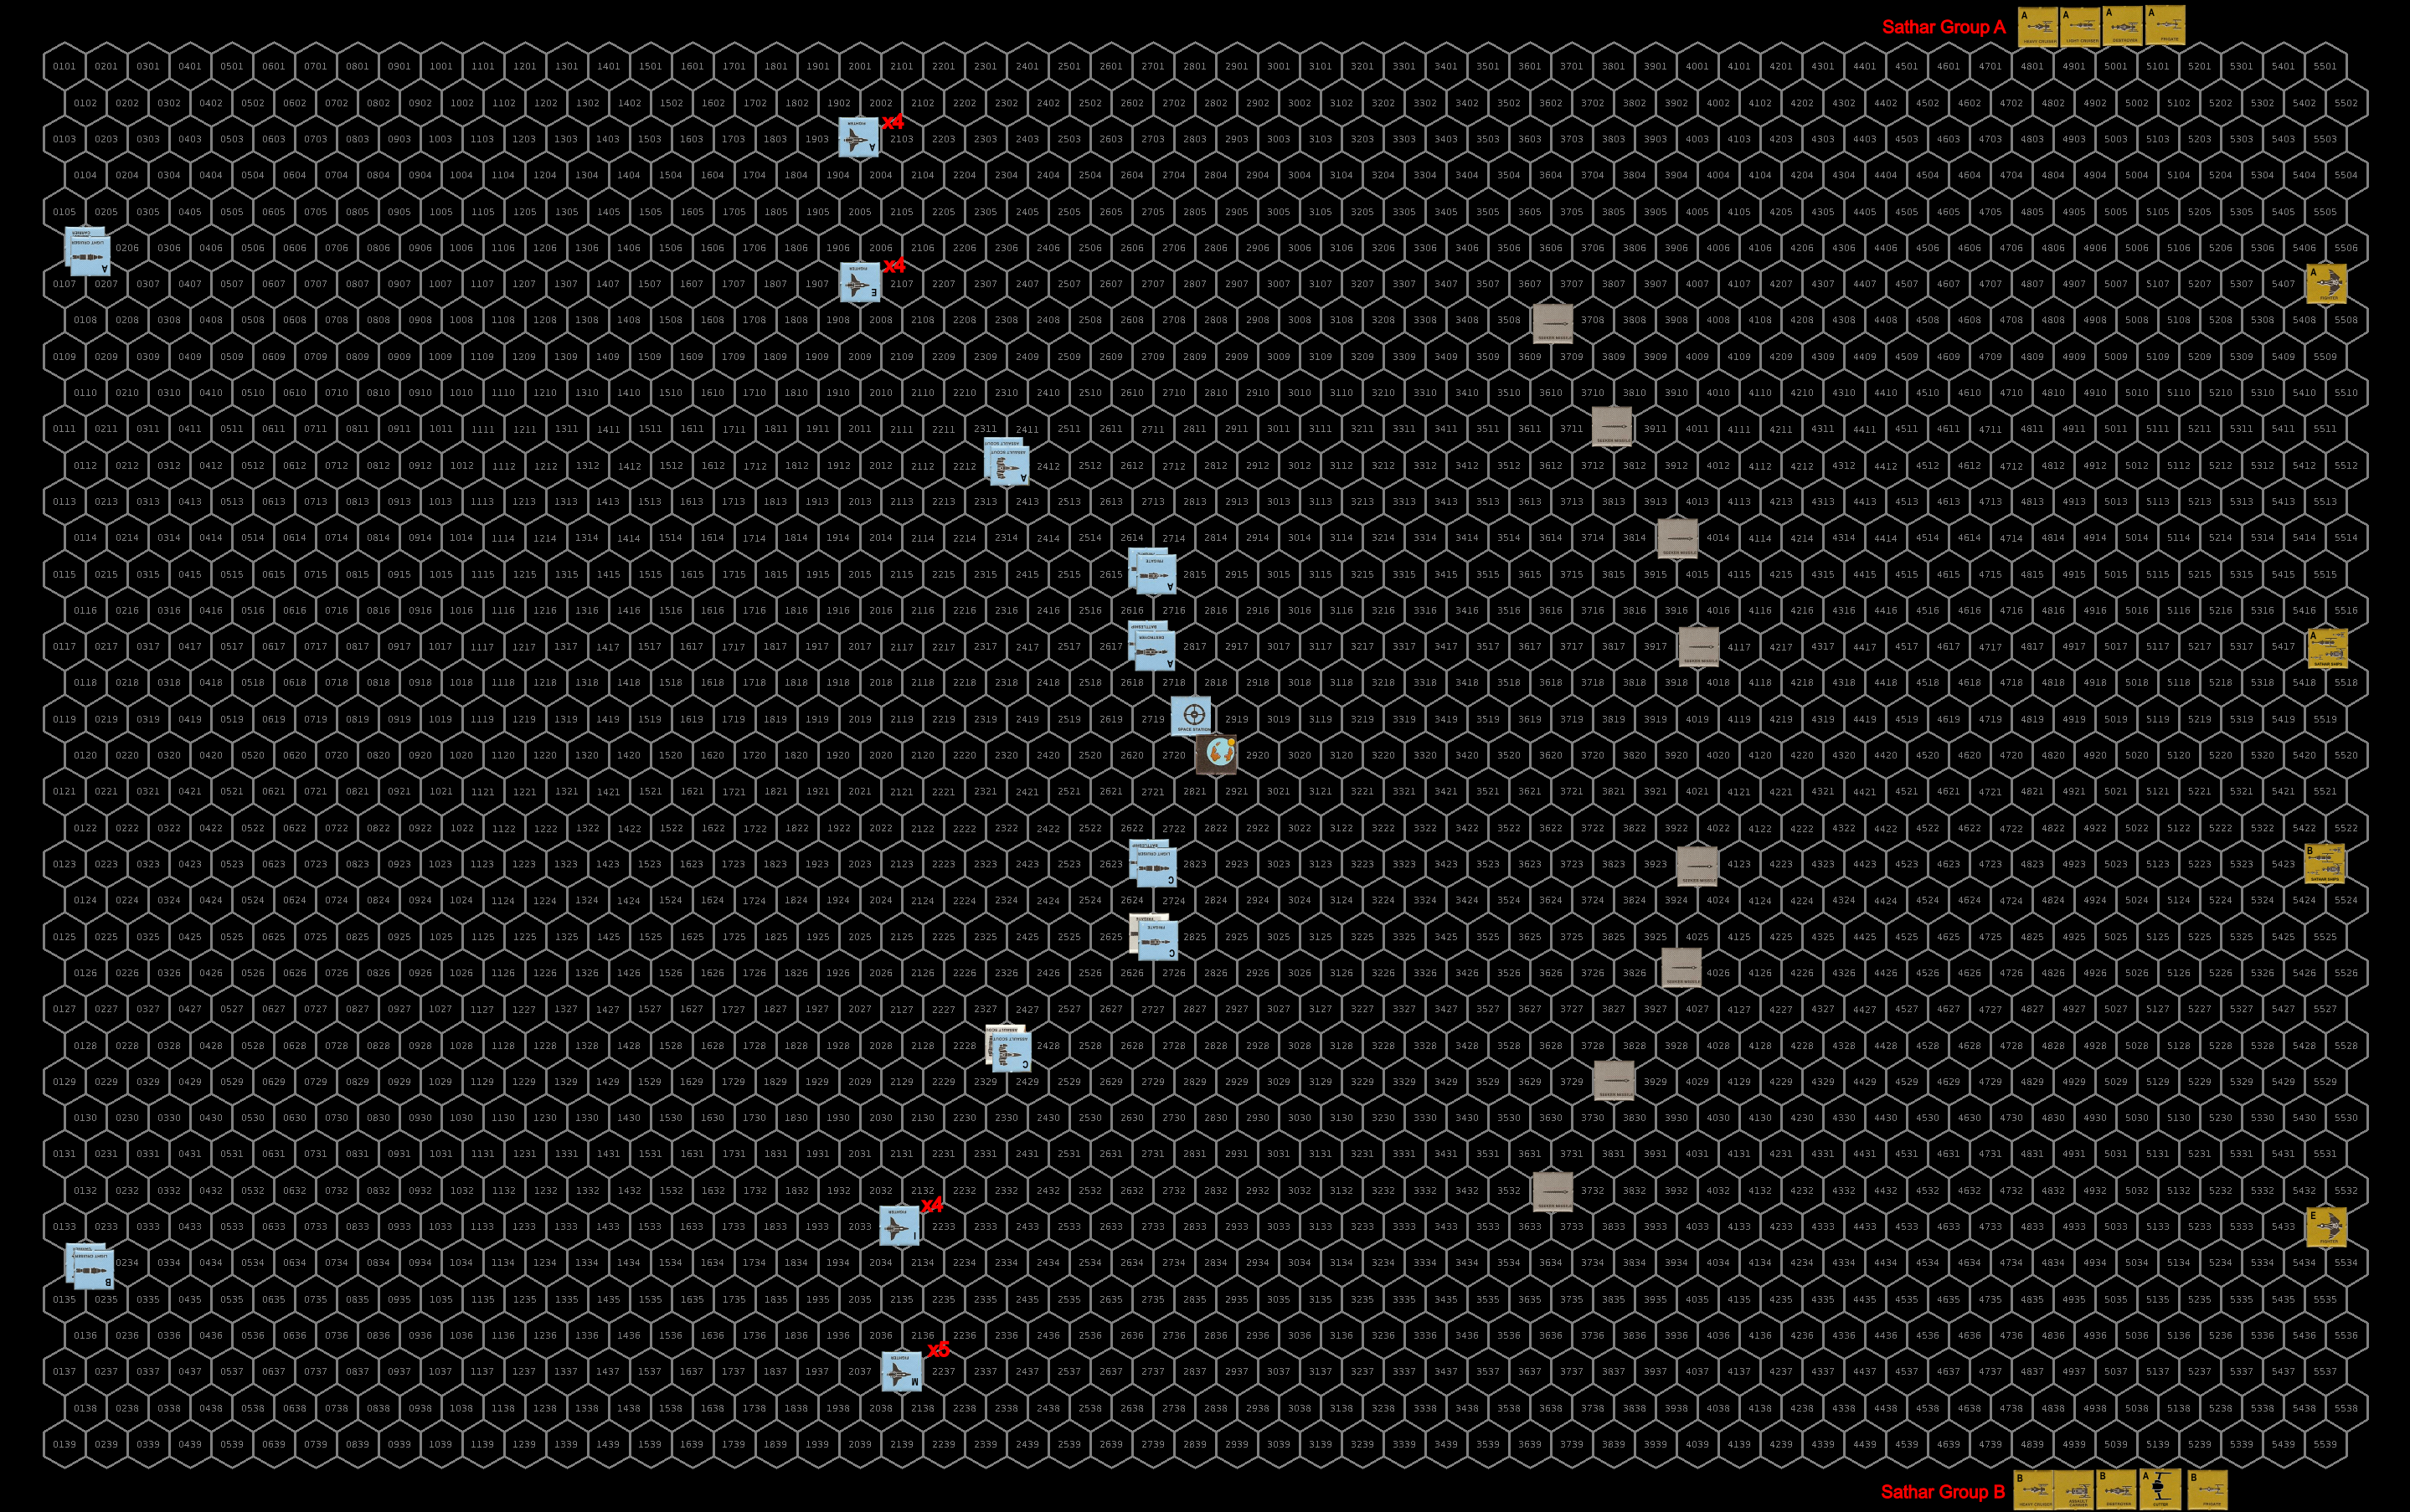
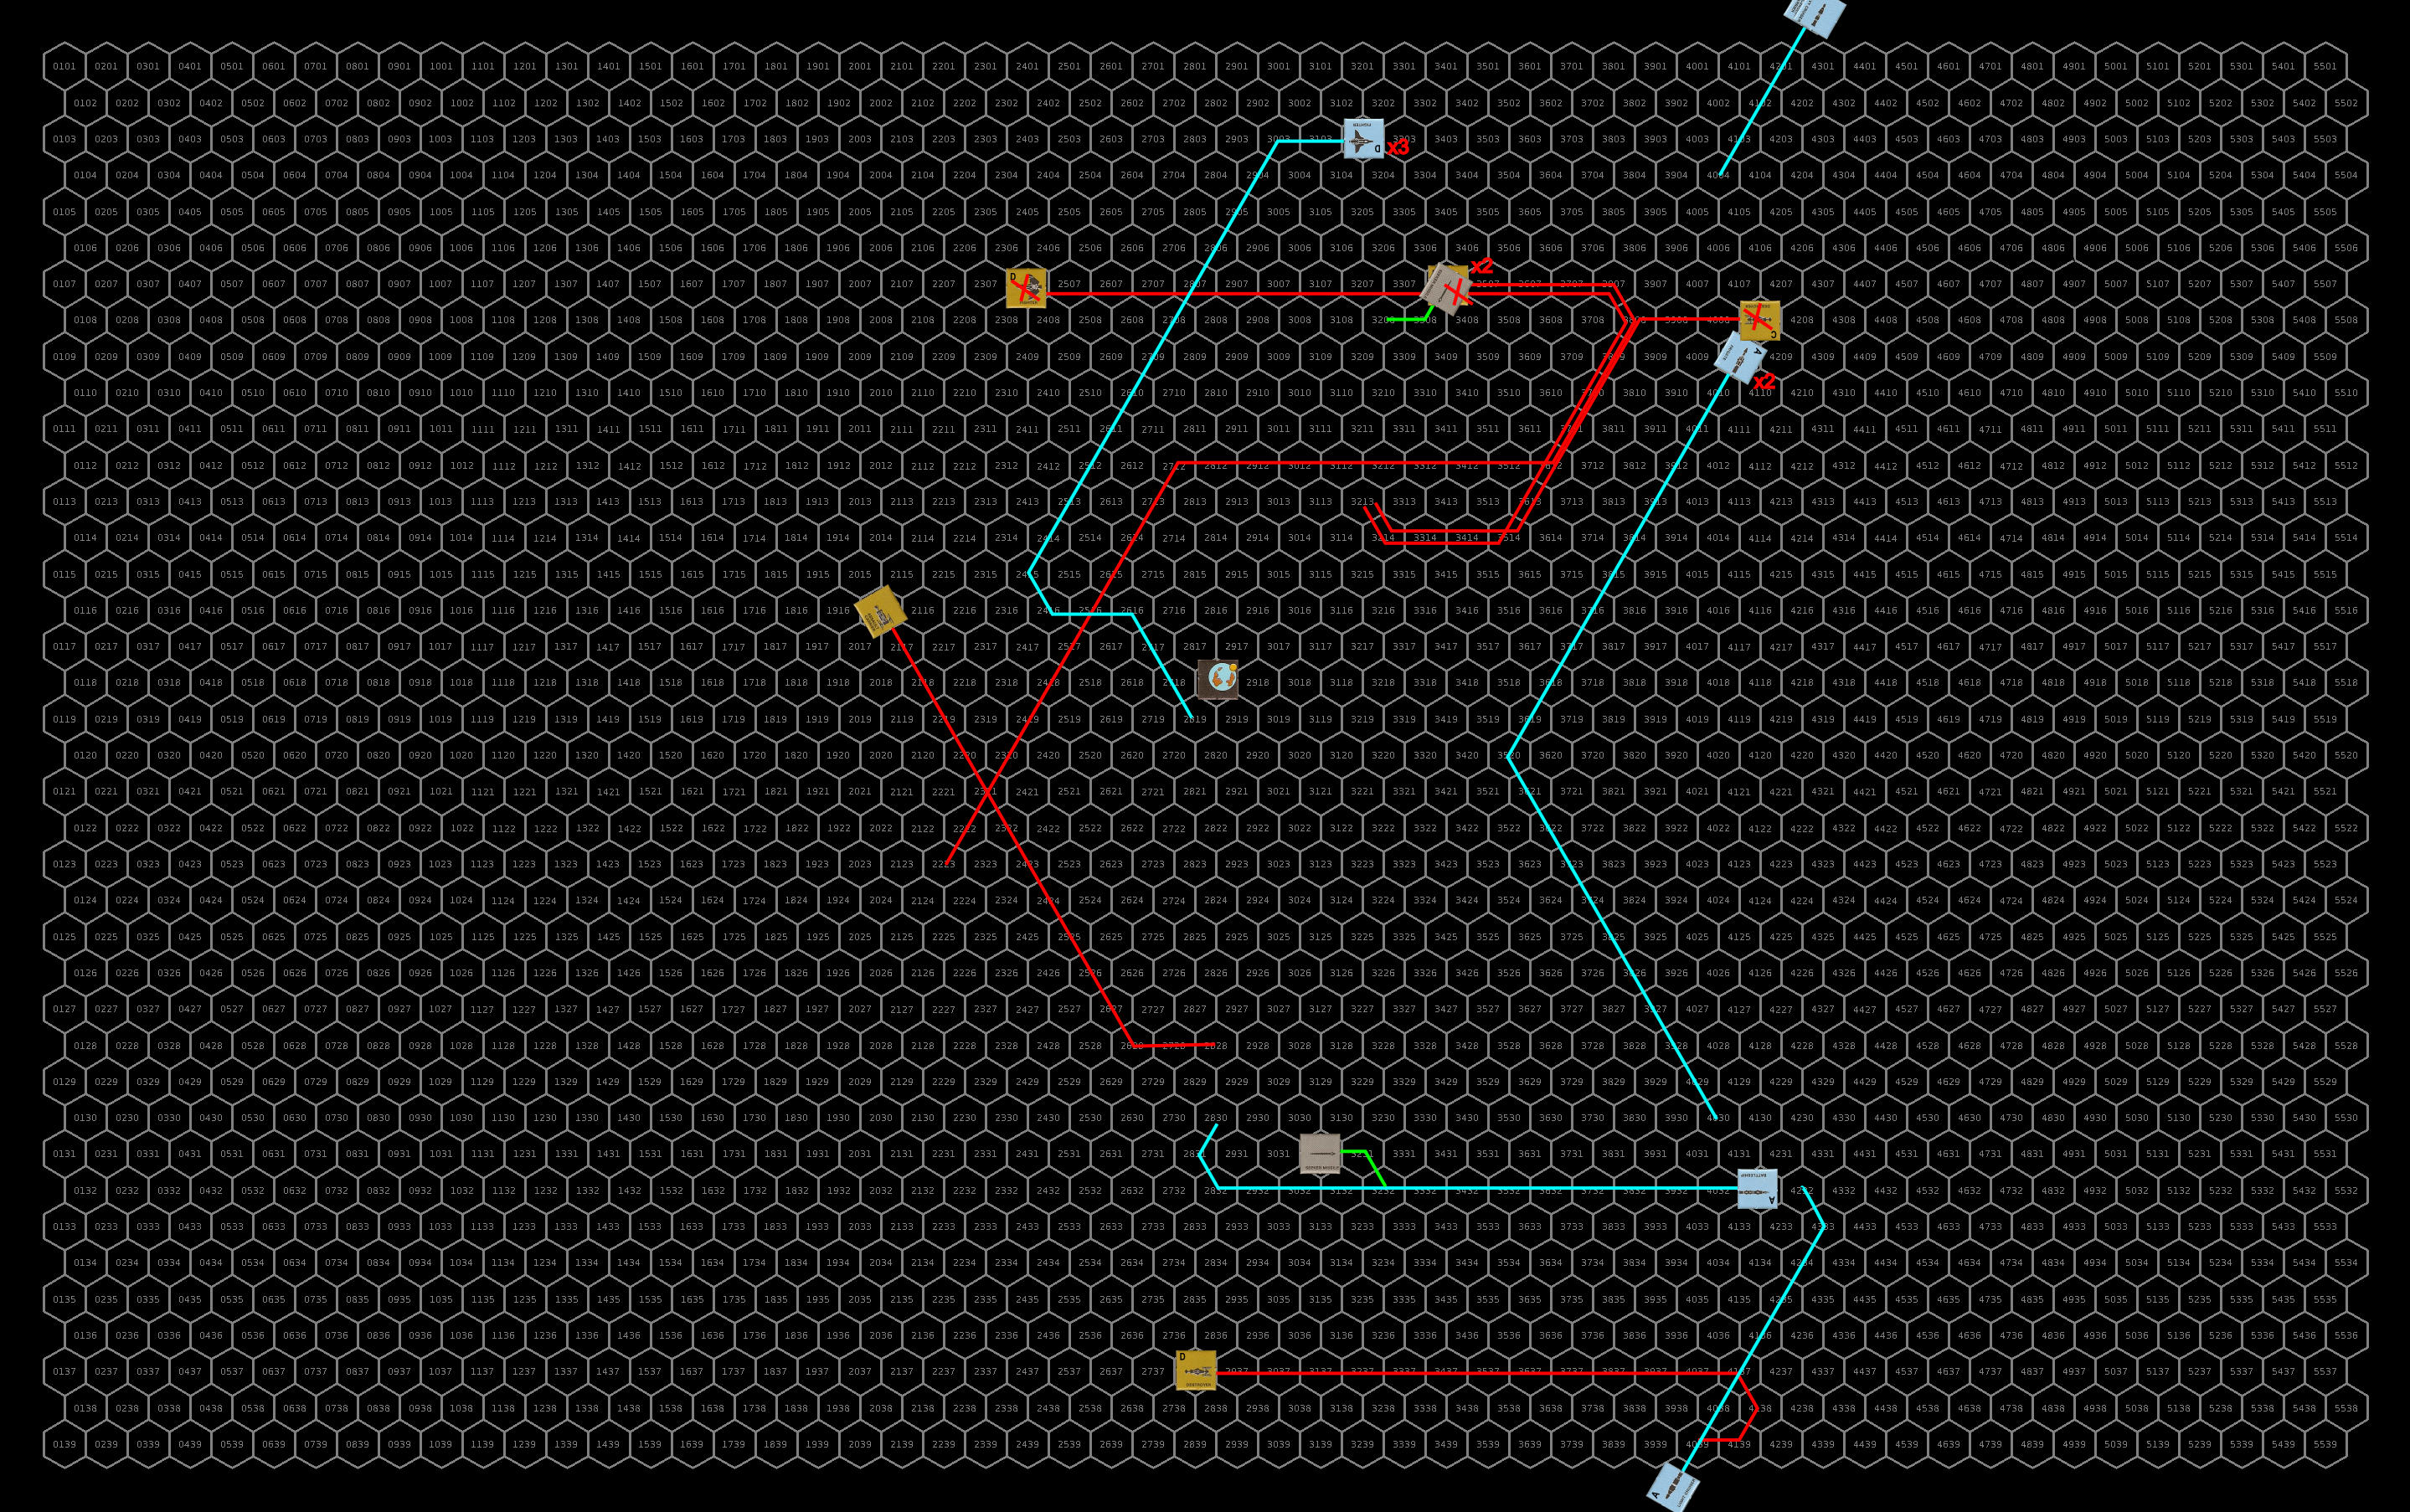
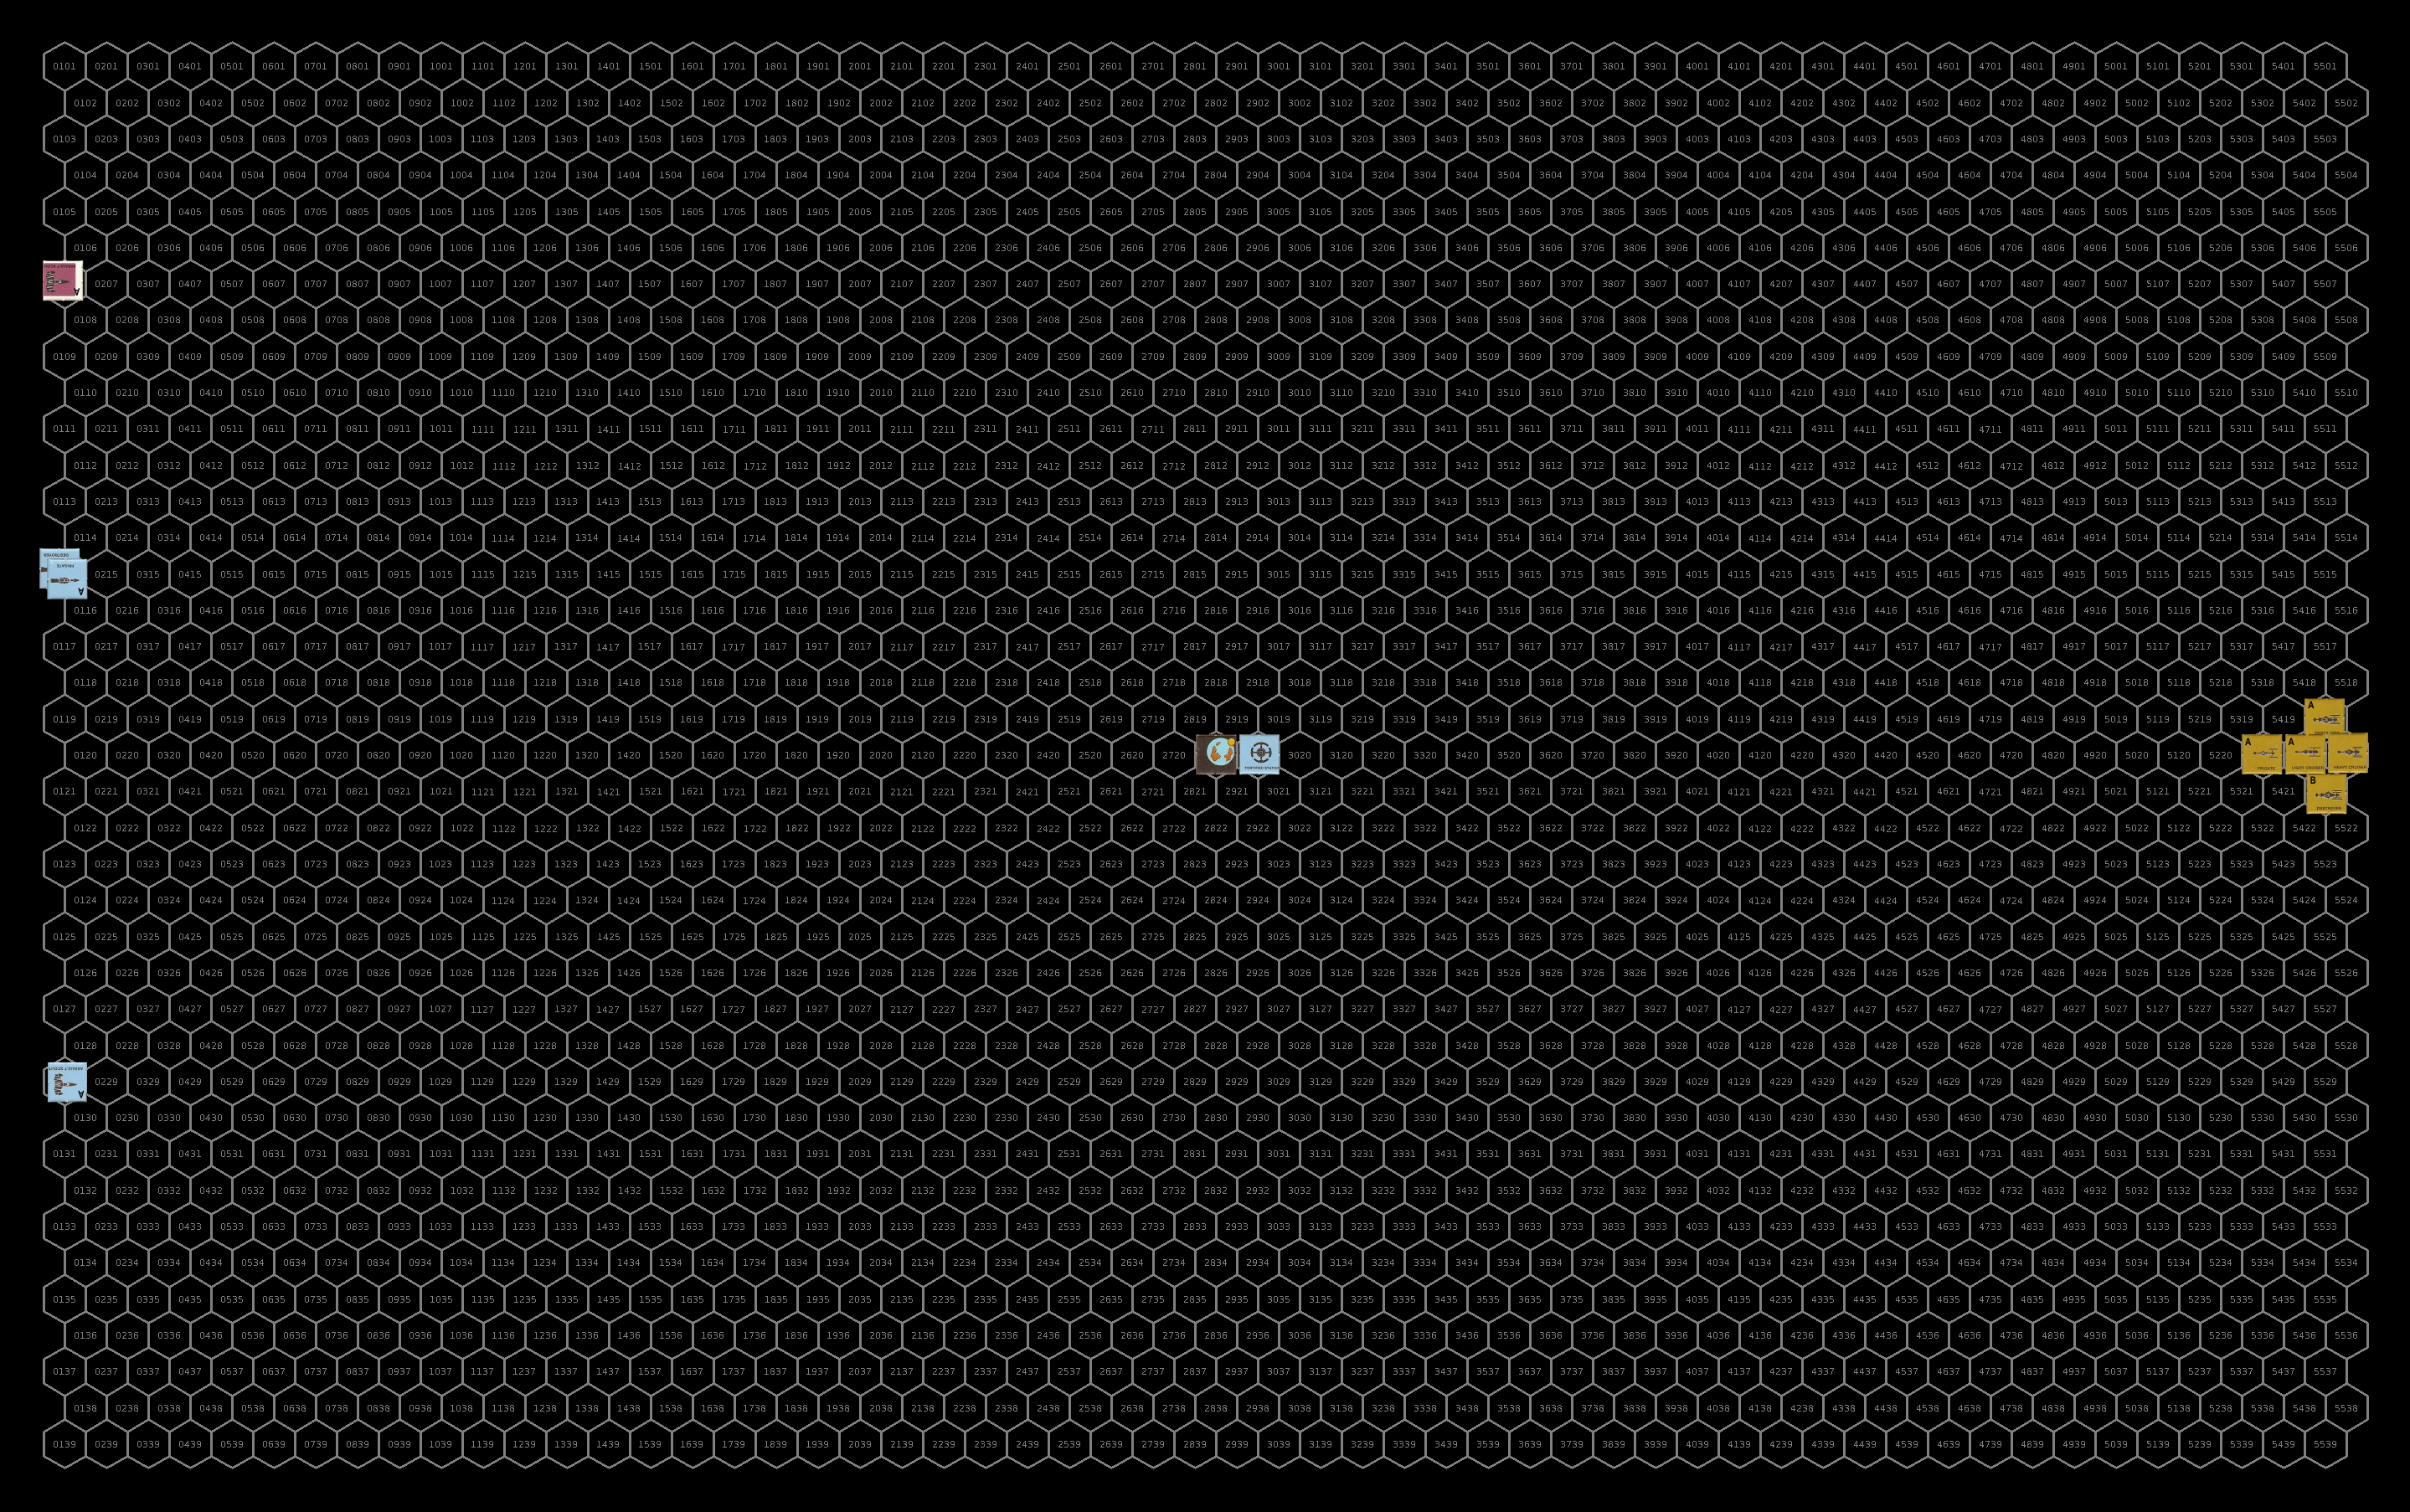
Positions at the start of the battle. The sathar are all massed into a single hex with the composition shown in the upper right box. The gray background space station is the starship construction center and the blue background one is the armed station in the system. Click for full size image.
Turn 1
The sathar stay as a group and accelerate with an ADF of 2 to a speed of 46. The armed station, expecting to be obliterated, fires its laser battery and rocket battery at a pair of fighters, hoping to reduce the assault rockets coming at it but both miss.
Surprisingly the sathar do not attack the armed station or continue on toward the UPF ships. Rather they swing around the planet, using the gravity of the planet to get an extra turn for the heavy cruisers and as they pass by, unload all of their firepower into the starship construction center orbiting behind the armed station. Defenseless, the SCC is pummeled by the sathar attacks.
Eight of the nine assault rockets connect with various parts of the shipyard, five of which do double damage reducing the hull integrity of the station by 35%. Six of the ten fired rocket batteries hit reducing the hull integrity by another 15%. Only four of the ten torpedoes connect and amazingly are not very effective, reducing the hull integrity by only another 11%. Four of the six disruptor cannons connect knocking out the station’s DCR, and reducing its hull integrity by another 7%. All four laser cannons hit dropping the hull integrity another 10%. Seven of the ten electron and proton batteries connect, inducing an electrical fire and reducing the hull integrity by another 4%. Finally, fifteen of the eighteen laser batteries connect reducing the hull integrity by another 17% leaving the station with just 1% of its hull integrity remaining. Finally, the heavy cruisers deploy some seeker missiles along their path to activate against pursing ships.
Enraged by the nearly complete destruction of the shipyard, its crews, and the ships inside, the UPF forces swarm after the fleeing sathar vessels. The only exception is the assault carrier which flies to get as far away from the sathar as possible. The battleship is moving too slow to get into range, and the two UPF frigates can’t get to optimal range but are at least able to bring some of their weapons to bear. The fire on the SCC knocks out half of its remaining hull integrity (3 of 600 HP left).
Recognizing the danger of all the fighters, the sathar concentrate their defensive fire on that threat. The defensive fire destroys four fighters and nearly destroys two more. It damages the engines on two fighters, and completely knocks out the engines on another. It knocks out the maneuvering system on one fighter and the assault rocket launcher on yet another. Finally, one of the fighters is hit damaging its combat control system.
The UPF ships return fire with a vengeance. The fighters concentrate on two of the heavy cruisers while the assault scouts focus one of the light cruisers. The frigates focus on one of their counterparts. The more distant frigates miss but the one close in with the fighters connects with its laser cannon and a torpedo. The don’t do as much damages as they could but still manage to take out 67% of the sathar frigate’s hull integrity (the LC only did 3 HP and the T, while rolling double damage, only did 24 HP).
The assault scouts miss with their laser batteries but connect with six of the seven assault rockets on the light cruiser knocking out its ICM launcher and damaging its maneuvering jets before the others slam into it and destroy it completely. The first heavy cruiser is hit by six of the eight assault rockets launched at it. The rockets take out just over half of its hull integrity, knock out its maneuvering, damage its engines, knock out its disruptor cannon, and cause a power short circuit knocking out all of its screens and ICMs. The second doesn’t fare as well. It is also hit by six assault rockets. The first three knock out about 56% of its hull integrity, the next two damage its engines and knock out its maneuvering. But the final assault rocket slams into the cruiser’s torpedo magazine causing a massive explosion that destroys the ship.
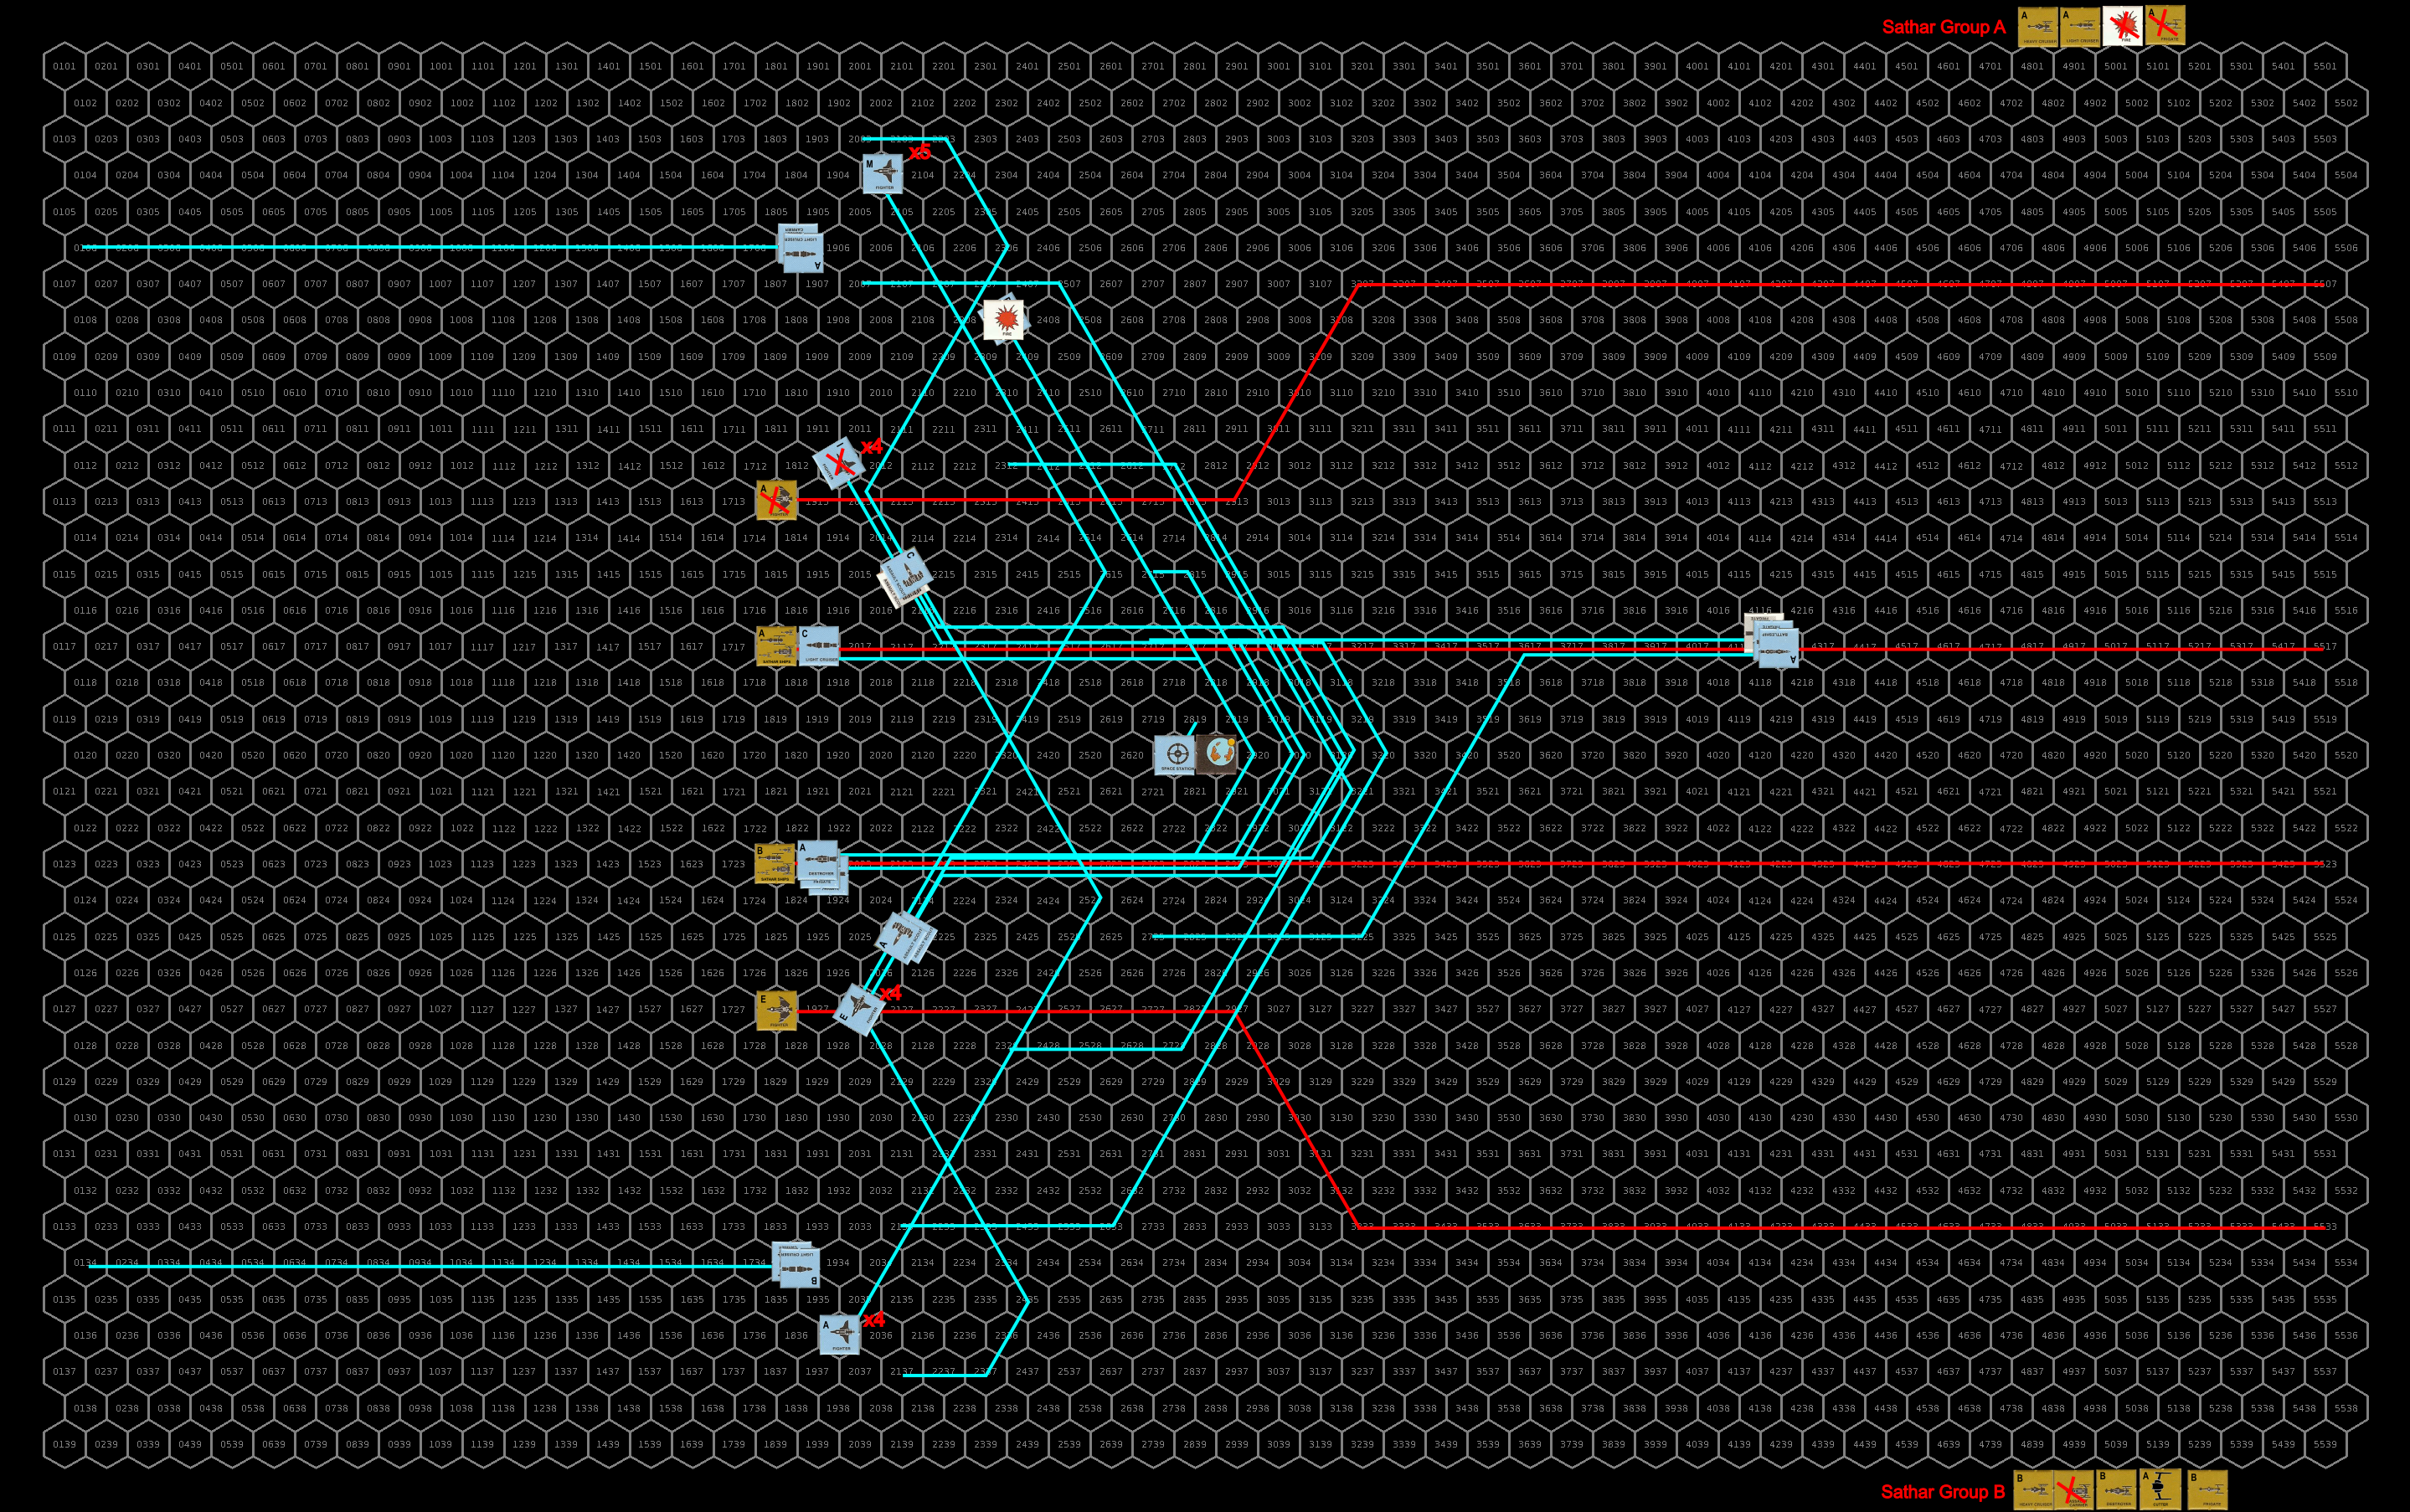
Courses and positions after the first round. The UPF ships show in the yellow boxes are positioned at the corresponding letter on the map. Their facing is as given in the boxes. Click for larger image.
Turn 2
The sathar continue to effect their retreat from the system. The wounded heavy cruiser with no MR, accompanied by the wounded frigate accelerate by 1 (the HC’s max) and continue straight and the frigate doesn’t break up from the slight acceleration. The other capital ships make a turn to port, accelerate by two and begin to leave the inner system. The fighters loop back to make a pass at the battleship.
At the same time the sathar activate three of the seeker missiles that they had deployed last turn. The first one starts to accelerate toward the armed station. The second activates among all the fighters and assault scouts and targets the militia frigate in that group. The third goes after the UPF frigate just behind the larger group of ships chasing the sathar fleet. Both frigates fire off all of their ICMs in an attempt to intercept the incoming missile. The missile going after the UPF frigate manages to evade the seeker missile but the militia frigate isn’t so lucky. The missile slams home but mercifully doesn’t destroy the ship. It’s hull integrity is only reduced by 40% (only 16 points on 5d10).
Defensively, the armed station, UPF frigate A, and the battleship fire at the fighters while the other ships focus on the damaged heavy cruiser. The frigate connects with the lead fighter knocking out its AR launcher. The station misses but the battleship hit with 2 laser batteries destroying one fighter and knocking out the AR launcher on a second, and its disruptor cannon vaporizes a second fighter. The other frigates and assault scouts, firing on the damaged heavy cruiser, only manage to land two laser battery hits (from the militia frigate and assault scout) knocking out the cruisers PB and only scratching its hull (1 HP).
Offensively, the sathar fighters fire their assault rockets at the battleship, but the destruction of and damage to their wingworms distract them and only one of the five rockets connect damaging the battleship’s engines.
The fleeing sathar ships focus the energy battery weapons on the fighters behind them, while they focus their cannons and rocket batteries on the fighters in the lower group (C) along their flight path. They fire torpedoes at the frigate and assault scouts behind them as well. The assault scouts immediately start dodging in an attempt to evade the incoming torpedoes but the frigate, having expended its ICMs unsuccessfully on the seeker missile can only watch as the torpedo homes in.
While the torpedoes are only moderately successful, damaging the LC on the militia frigate and destroying one of the militia assault scouts, the energy weapons and rocket batteries are much more effective, completely destroying the fighters along the sathar flight path and destroying four fighters in the trailing groups. In addition, two more fighters are damaged (12% and 88% hull integrity left).
With the battleship too slow to catch the fleeing ships, and some of the assault scouts thrown off track trying to avoid the incoming torpedoes, the UPF cannot safely pursue the larger group of sathar vessels and go after the damaged ships to finish them off. Three of the assault scouts are able to pursue even with their evasive maneuvers and are joined by the four functional fighters. One fighter has its maneuvering damaged and just starts to decelerate. The sixth fighter cannot accelerate and tries to stay with the main group but falls behind and doesn’t come into weapon range. The frigates also pursue the damaged sathar ships but they are still at a speed disadvantage and fall a bit further behind. The battleship starts slowing down and staying near the station while the three militia assault scouts slow down as they are headed off in the wrong direction for pursuit but should be able to start to catch up soon. The assault carrier, now safe, begins slowing down and returning to the planet.
The starship construction center succumbs the fire and is completely destroyed. Defensively, the sathar heavy cruiser and frigate fire on the incoming fighters but all the shots go wide.
The UPF ships fire five assault rockets at the heavy cruiser and two at the frigate. They focus all their energy weapons at the frigate (3 LB from the Assault scouts and 2 LC & LB from the frigates). Four of the five assault rockets hit the heavy cruiser. All of them rip into the hull completely destroying the ship. Of the energy weapons fired at the frigate, only one of the assault scouts score a hit reducing the frigate’s hull integrity by 10%. One of the assault rockets knocks out the frigate’s LC while the other detonates in the core of the ship with a titanic explosion that consumes the entire ship (42 HP).
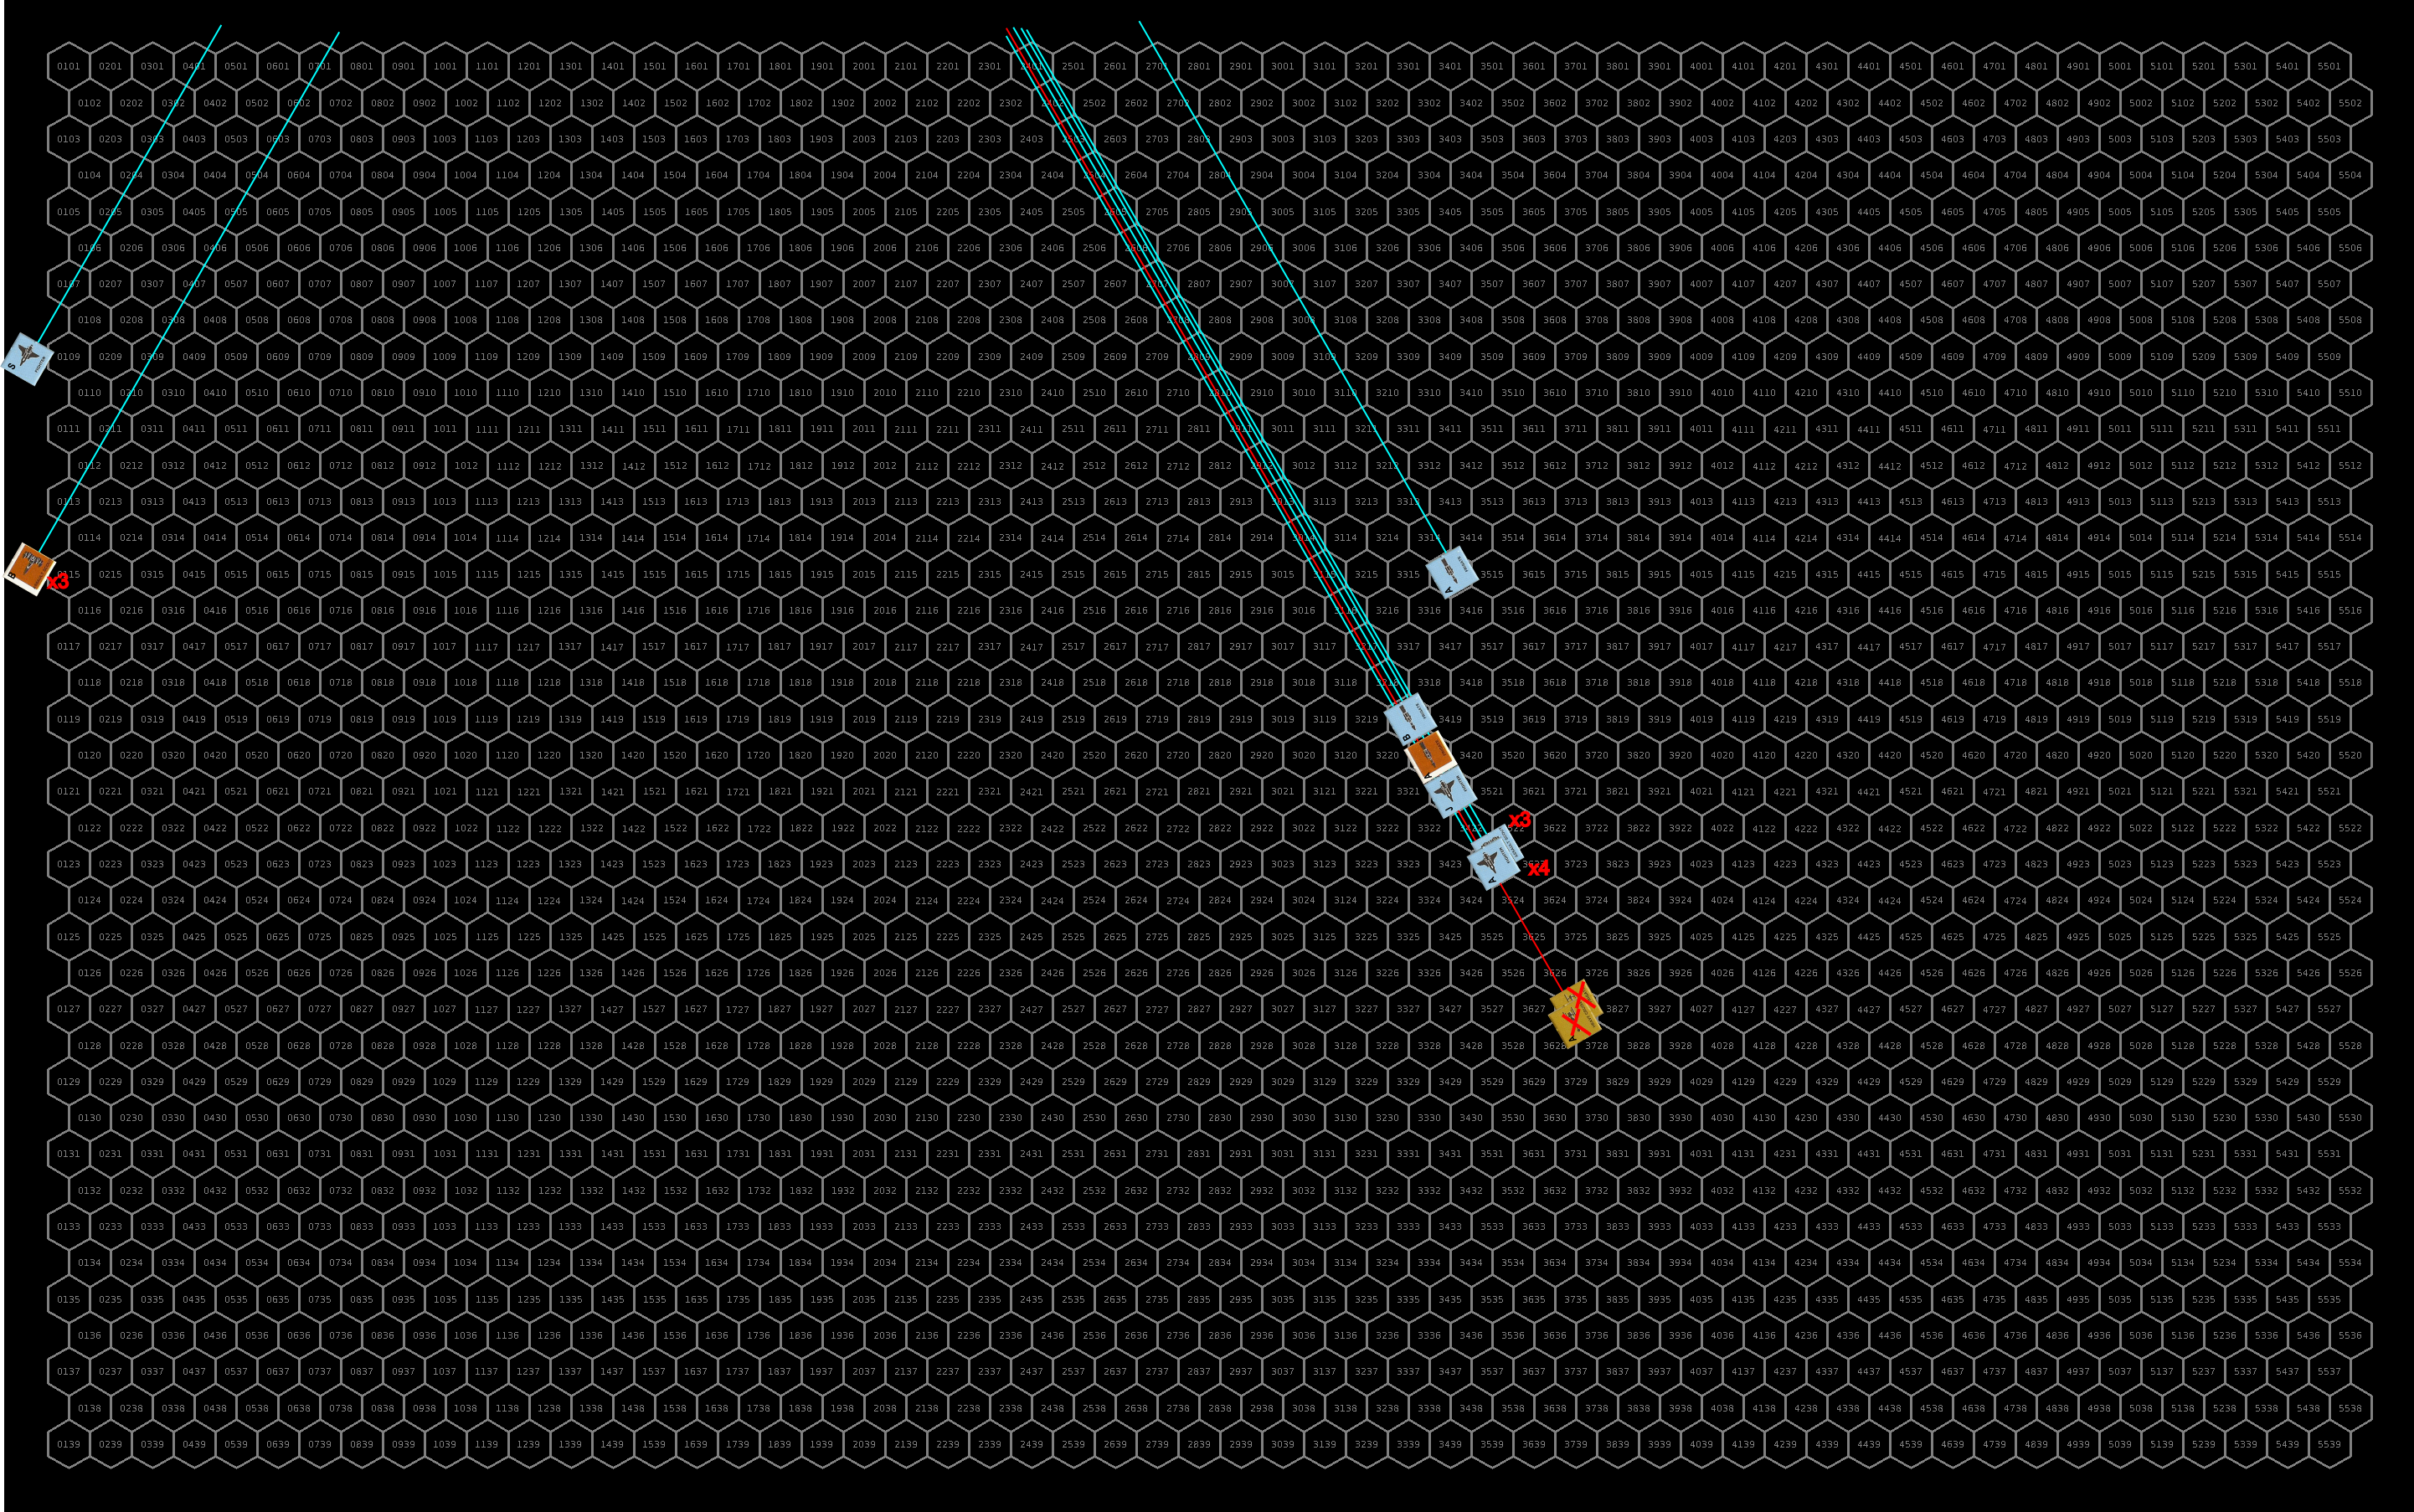
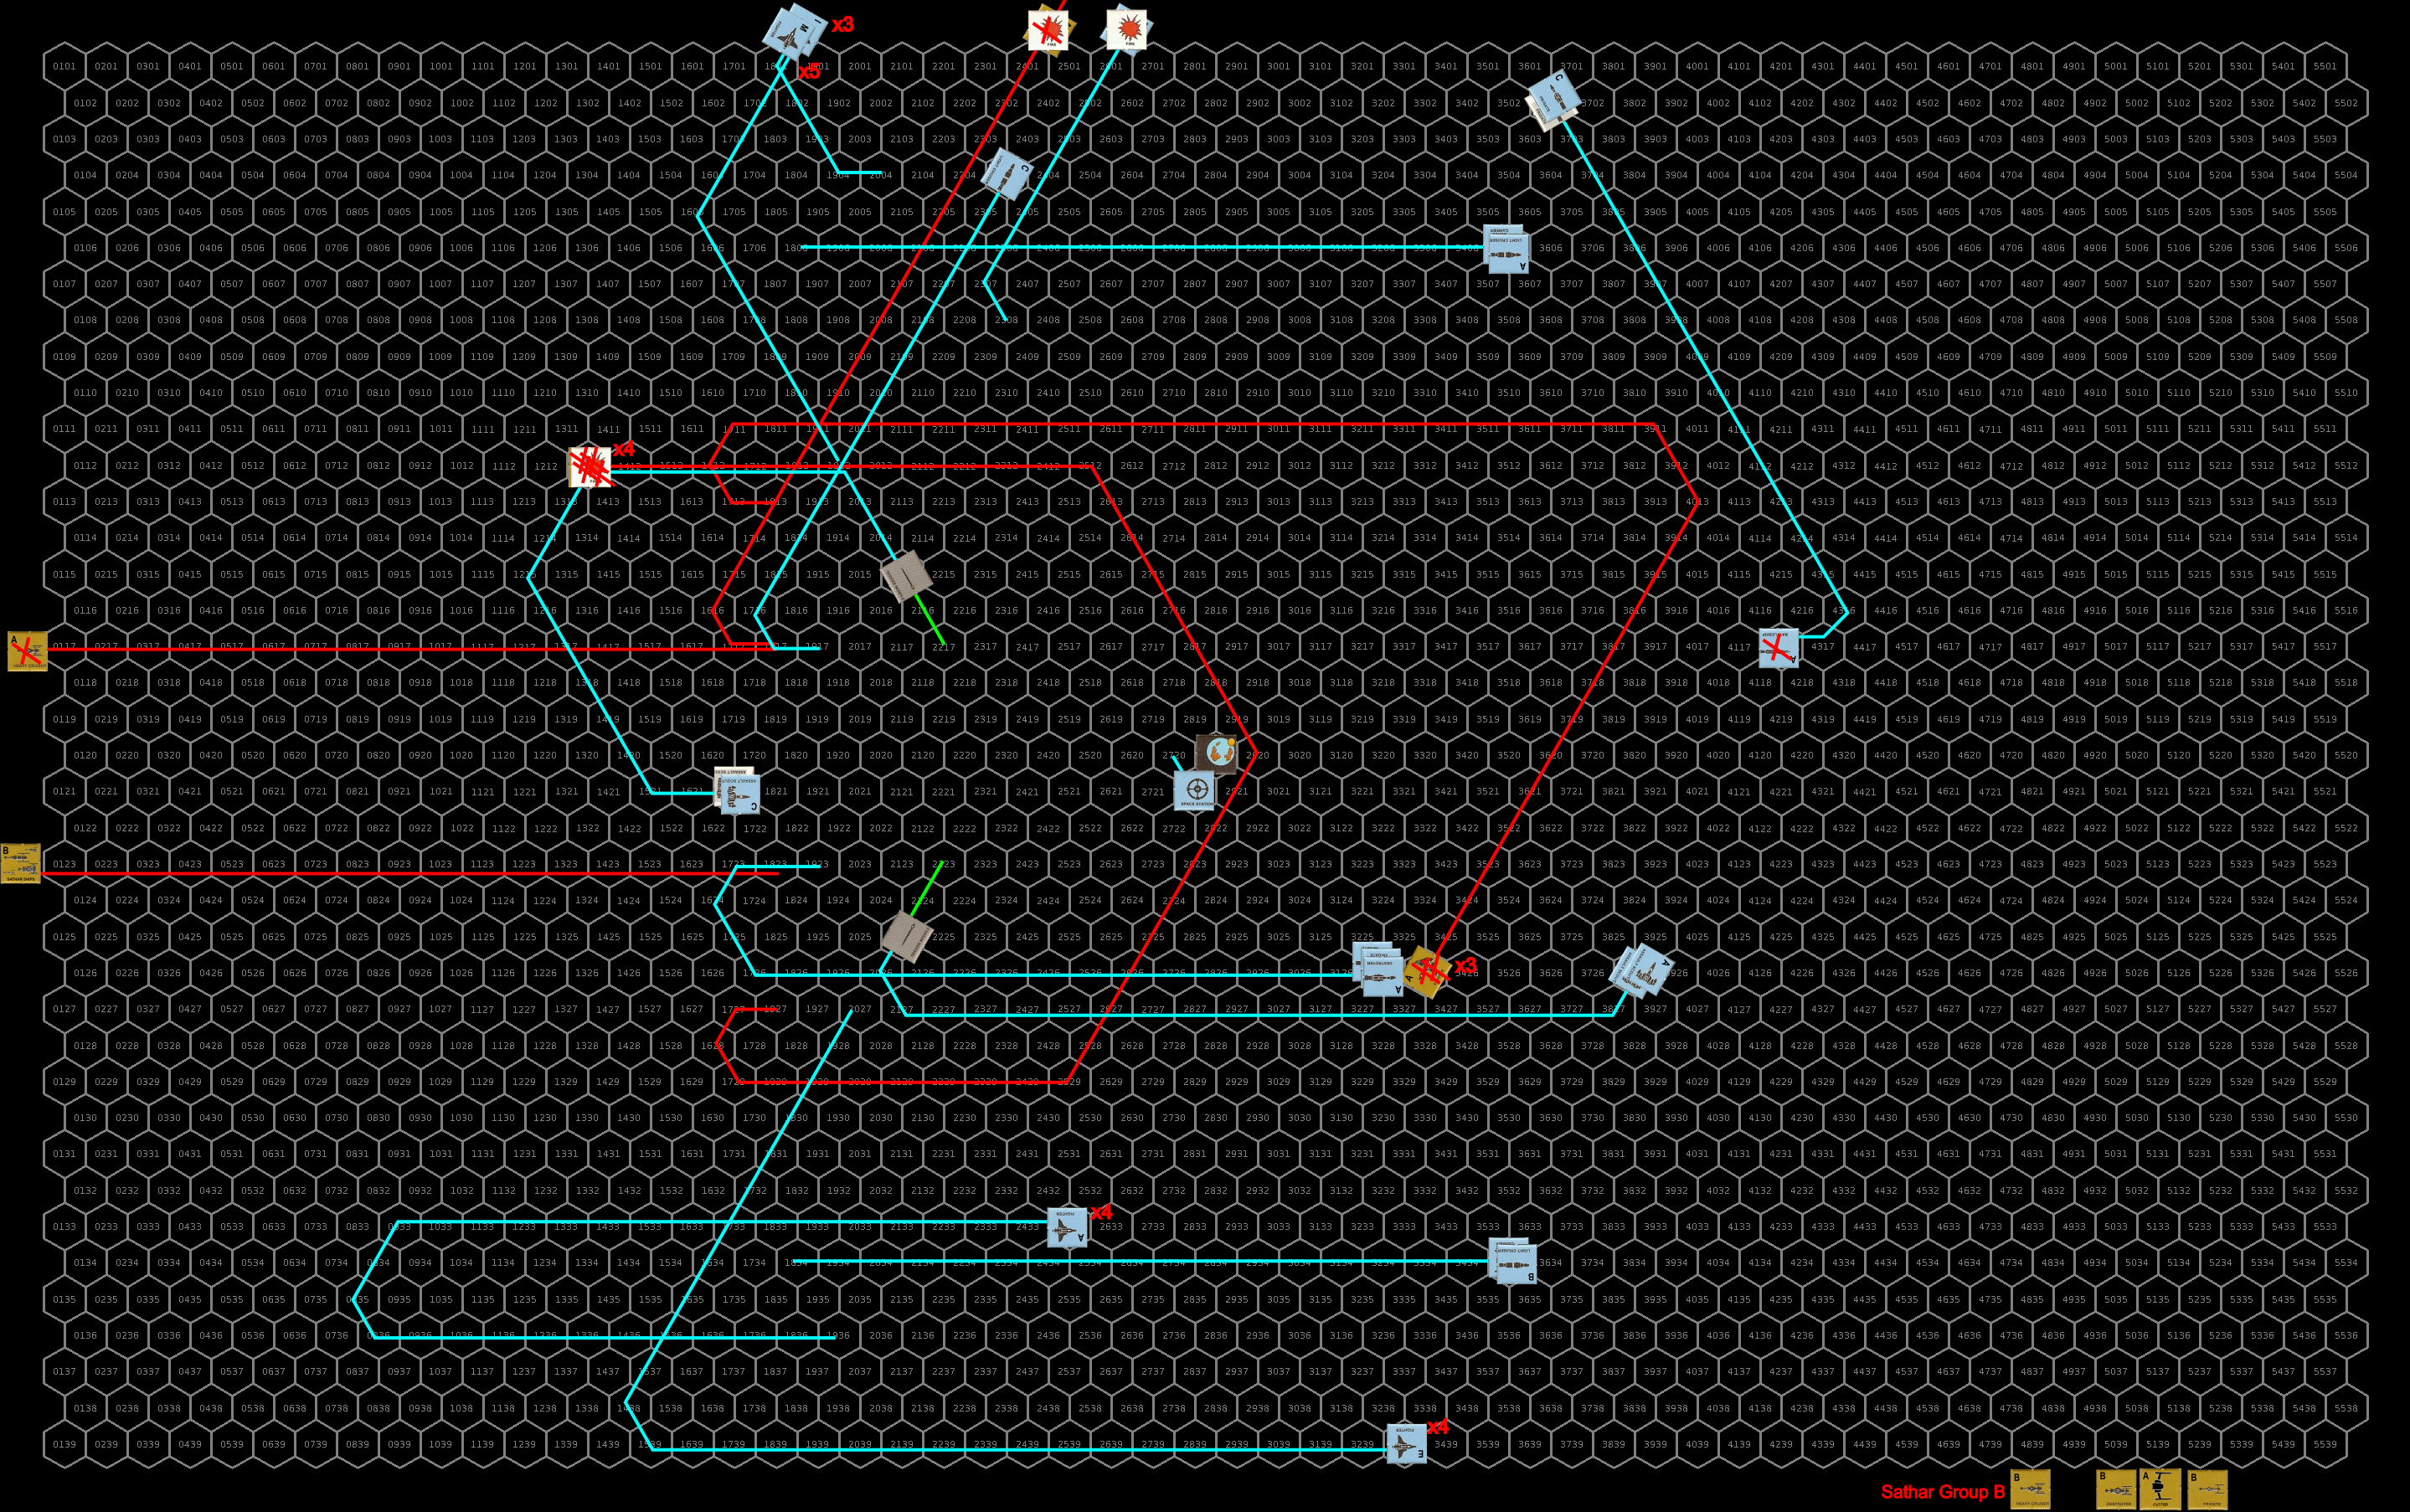
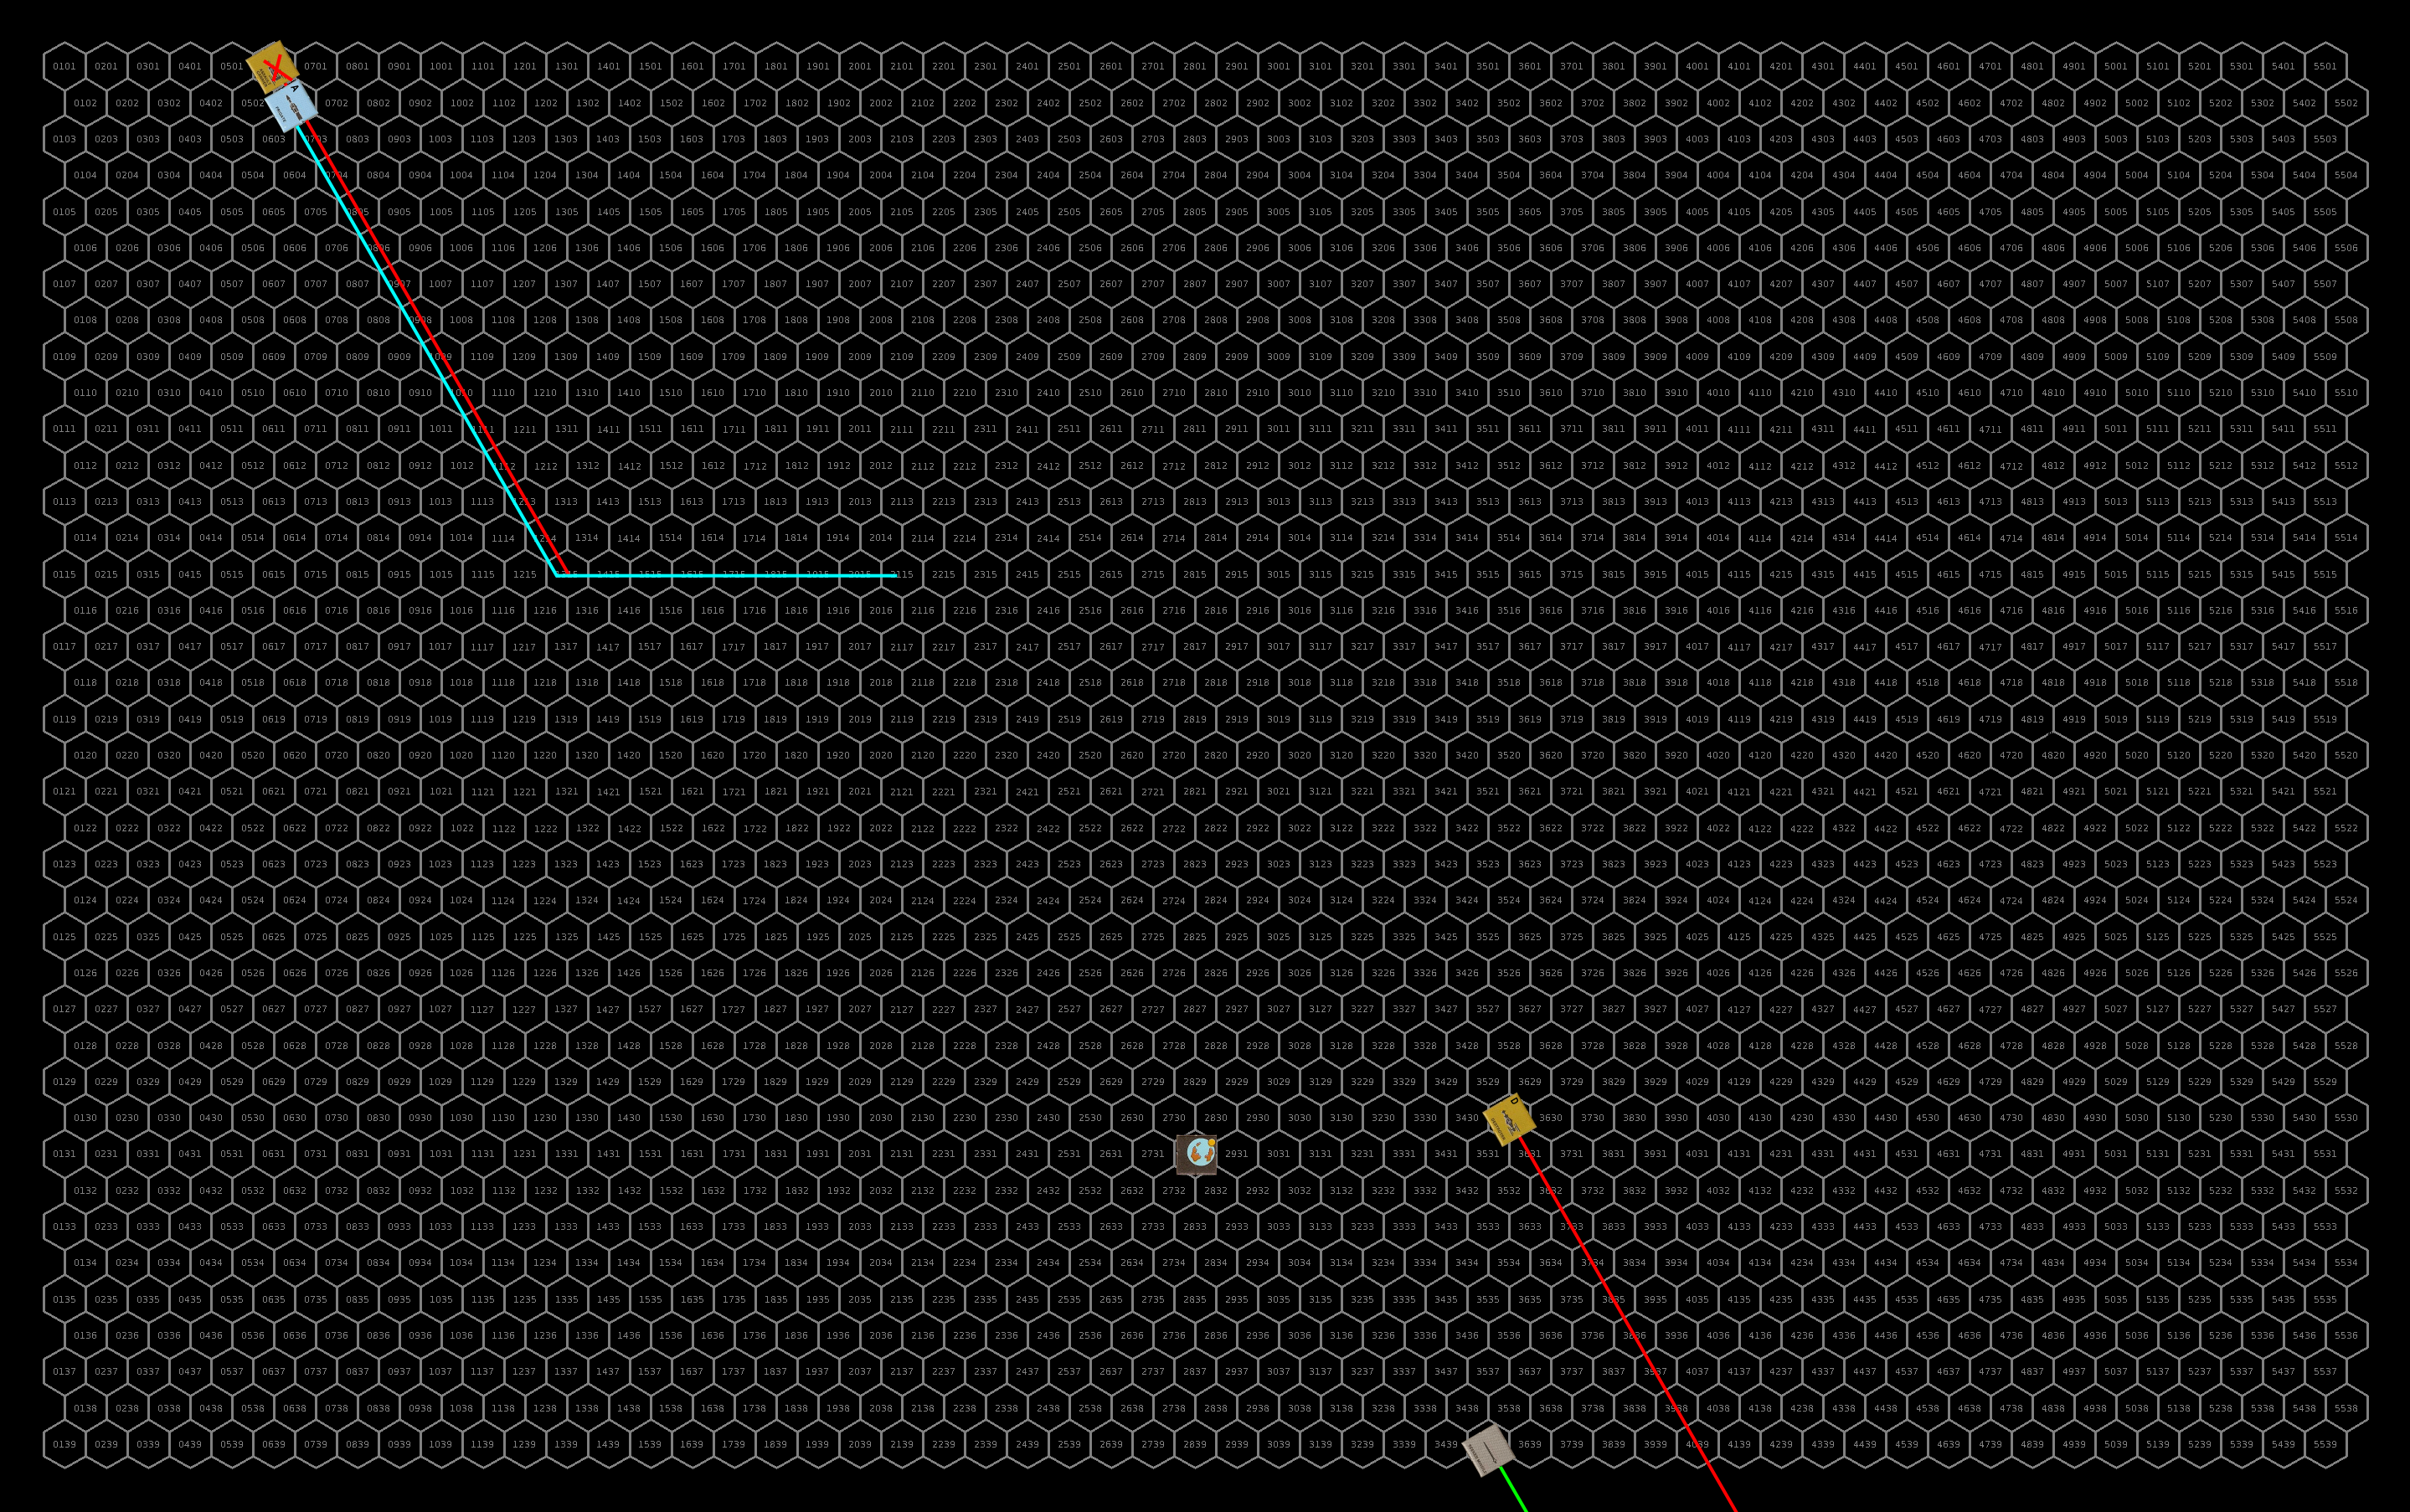
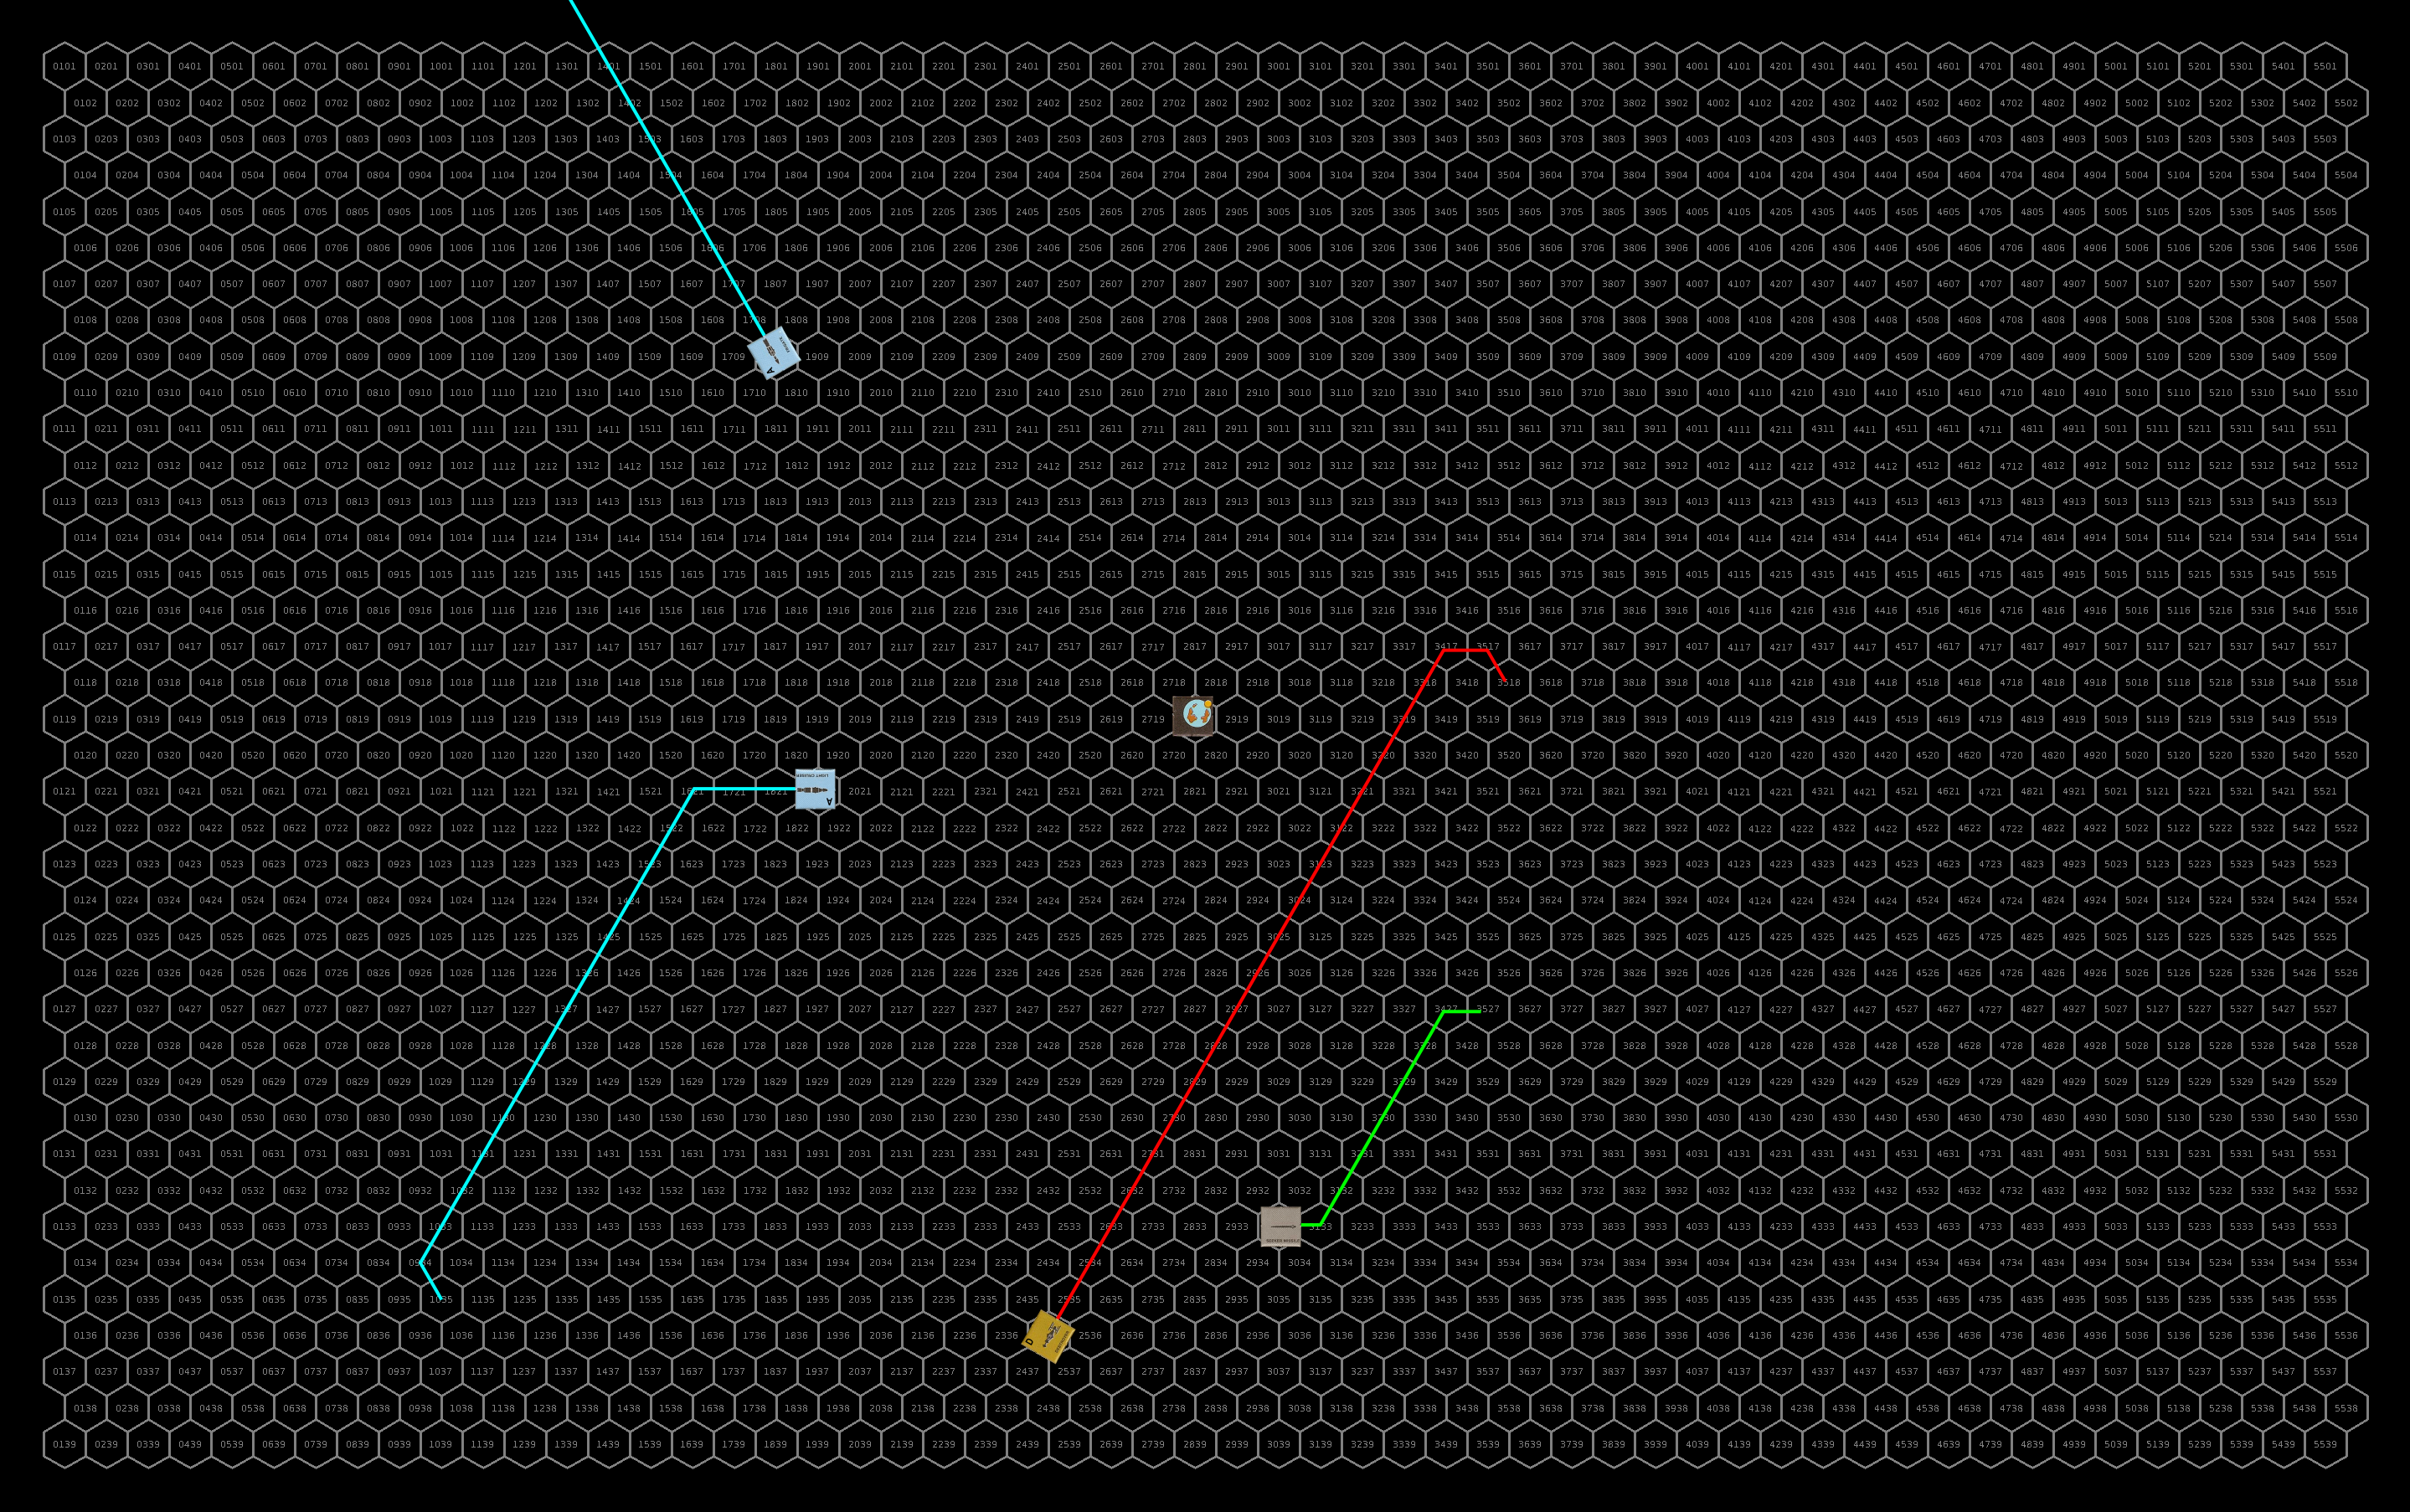
Upper half of the map. The yellow numbers indicate how many hexes off the map the ship is along the direction they were traveling. Click for larger image.Lower map. The top row of this map is the same as the bottom row of the upper map. Click for the full-size image.
Turn 3
The remaining sathar ships continue to flee the system but activate their remaining seeker missile that they left by the planet. Both the newly activated one and the one activated the previous turn fly at the armed station. Firing ICMs to try to avoid an impact, one of the missiles is intercepted but the other one hits the station reducing its hull integrity by 30% but not destroying it. With the sathar ships now quite far away and retreating, the UPF calls off the pursuit and begins looking for survivors from the starship construction center.
Repairs
The only damage on the surviving sathar ships are damaged assault rocket launchers on two of the fighters which are quickly repaired once they rejoin the assault carrier.
Damage to the UPF ships is only a little more extensive. The battleship quickly repairs its damaged engines and the militia frigate is able to get its laser cannon back online immediately as well. Over the next hour an a half it is able to get its hull back up to 75% integrity but then hits a snag that can only be repaired in a shipyard.
The fighter with the lightly damaged engines also gets that under control immediately can begin decelerating with the rest of the fighter group. It takes nearly an hour for the fighter with the completely knocked out engines to get some engine power back and many hours for it to slow down enough to dock with the carrier where it is completely repaired. After an hour and half of work, the fighter with the damaged maneuvering jets restores some control and begins to head back to the carrier where it arrives a few hours later and is completely repaired. The fighters with damages hull carefully make their way back to the carrier where they are fully repaired.
Unfortunately, the damage to the station from the seeker missile are such that it would take tools and equipment from the shipyard to repair. Those repairs will take some time to effect now that the shipyard has been destroyed.
Aftermath
The sathar lost more ships than they had planned on, losing 34.5% of their hull points that they came into the battle with, 2 fighters, a frigate, a light cruiser and 2 heavy cruisers (286 HP of ships). That said, they accomplished their primary goal of destroying the starship construction center.
The UPF “only” lost 14 fighters (72% of the ships) and a militia assault scout (for a total of 135 HP) but the loss of the shipyard is going to be significant. Additionally, it lost the ships that were in the shipyard including an assault scout that would have been completed the next day, two fighters, and a frigate and destroyer under construction. There were also three civilian ships in the shipyard, a HS 11 ship undergoing maintenance, and HS 10 and HS 11 ships that were under construction and scheduled to be completed in 38 and 76 days respectively.
The remaining six fighters are all assigned to Frontier Fighter Corps Squadron Delta. The assault carrier is detached from TF Cassidine and with the militia frigate heads toward Dramune. The frigate will enter the shipyard there while the carrier will head to Prenglar to pick up more fighters to round out FCC Squadron Delta and replenish its compliment with TF Cassidine. Also, one of the minelayers at Prenglar will be heading to Fromeltar.
The shipyard situation is more serious. Work will begin to build a new shipyard but it will be years before it is back at capacity. Additionally, with the loss of the shipyard here at Terledrom and the one at Hentz (Araks), the UPF is going to start arming the shipyards, adding defenses, and increasing security.
Given that the UPF know the route to one of the active sathar shipyards in OFS019, the remnant of this battle group is headed there for defense while the sathar continue to rebuild their forces.
Lessons Learned
When I first conceived this scenario, I thought the sathar would come in hot, swing by the planet, take out the shipyard and then fly out of the system. And that went just about perfectly as far as destruction of the shipyard went. They did 594 HP of out the 600 HP the shipyard had and left it with a fire that took out the last 6 HP. And that was despite rolling poorly for the damage from the torpedoes.
However, as I was setting things up, I realized that with the limited ADF of the sathar since they were staying together as a group, the small fast UPF ships would be able to boost to the same speed and intercept the sathar. So I set it up that way and the sathar took more damage than they expected. The downside was that the UPF was just barely able to intercept the sathar on the first round which meant that they had to stay close and be subject to offensive fire from the sathar instead of making a run and turning out to be farther away. They could have done that a little bit (2-4 hexes) but I didn’t have them do so as they are new pilots and I chalked it up to inexperience.
I was surprised at how close to exact the damage done to the shipyard was. Since the shipyard as designed didn’t have weapons or defenses, the only non-hull hits possible were the fire and DCR. Equipping the shipyards with weapons and defenses will help to increase their survivability since the damage will be spread around. But not by much.
The sathar could have possibly wiped out the remaining UPF forces completely if they had stayed in the system but that would have been a long drawn out battle as it would have taken them a long time to slow back down. The shipyard was their target so they took it out and left.
A sathar light cruiser, detected three days ago by a pair of patrolling militia assault scouts, was engaged today by the full force of the Minotaur militia after a long, high-g boost to intercept the alien vessel. A thirty minute battle ended with the complete destruction of the sathar ship while only one of the militia assault scouts sustained some minor hull damage.
An anonymous source has confirmed that Spacefleet has assets in systems beyond Theseus that alerted the militia to the possibility of the sathar vessel arriving in system. Our thanks go out to those brave souls risking their lives to watch the sathar movements.
Victoria Sorensen, StarPlay News
Background
After the failed attempt by the frigate to chart the course into the Theseus system, the sathar dispatch a light cruiser (the remains of SBF-J2) to attempt to complete the route. Detected after three days of deceleration by two patrolling militia assault scouts, the light cruiser attempts to evade and jump out of the system before it can be attacked.
Unsure of their ability to take on the light cruiser by themselves, the two militia assault scouts report in and begin to trail the light cruiser while the rest of the militia ships begin a high-g boost in an attempt to intercept the light cruiser before it can jump out of the system. After three days of grueling pursuit, the militia ships overtake the light cruiser and engage.
Order of Battle
Minotaur Militia
4 Assault Scouts
1 Frigate
1 Destroyer
Sathar
1 light cruiser
The Battle
Setup
The militia are the attackers in this fight and will move first. The militia deploy in three groups: the destroyer and frigate together in the middle to take the light cruiser on directly while the assault scouts deploy into two pairs on the wings to make strafing attacks with their assault rockets. They start a speed 20.
Out gunned, the light cruiser plans to focus on the smaller faster ships in an attempt to disable the militia ships enough to escape. The light cruiser also starts at speed 20.
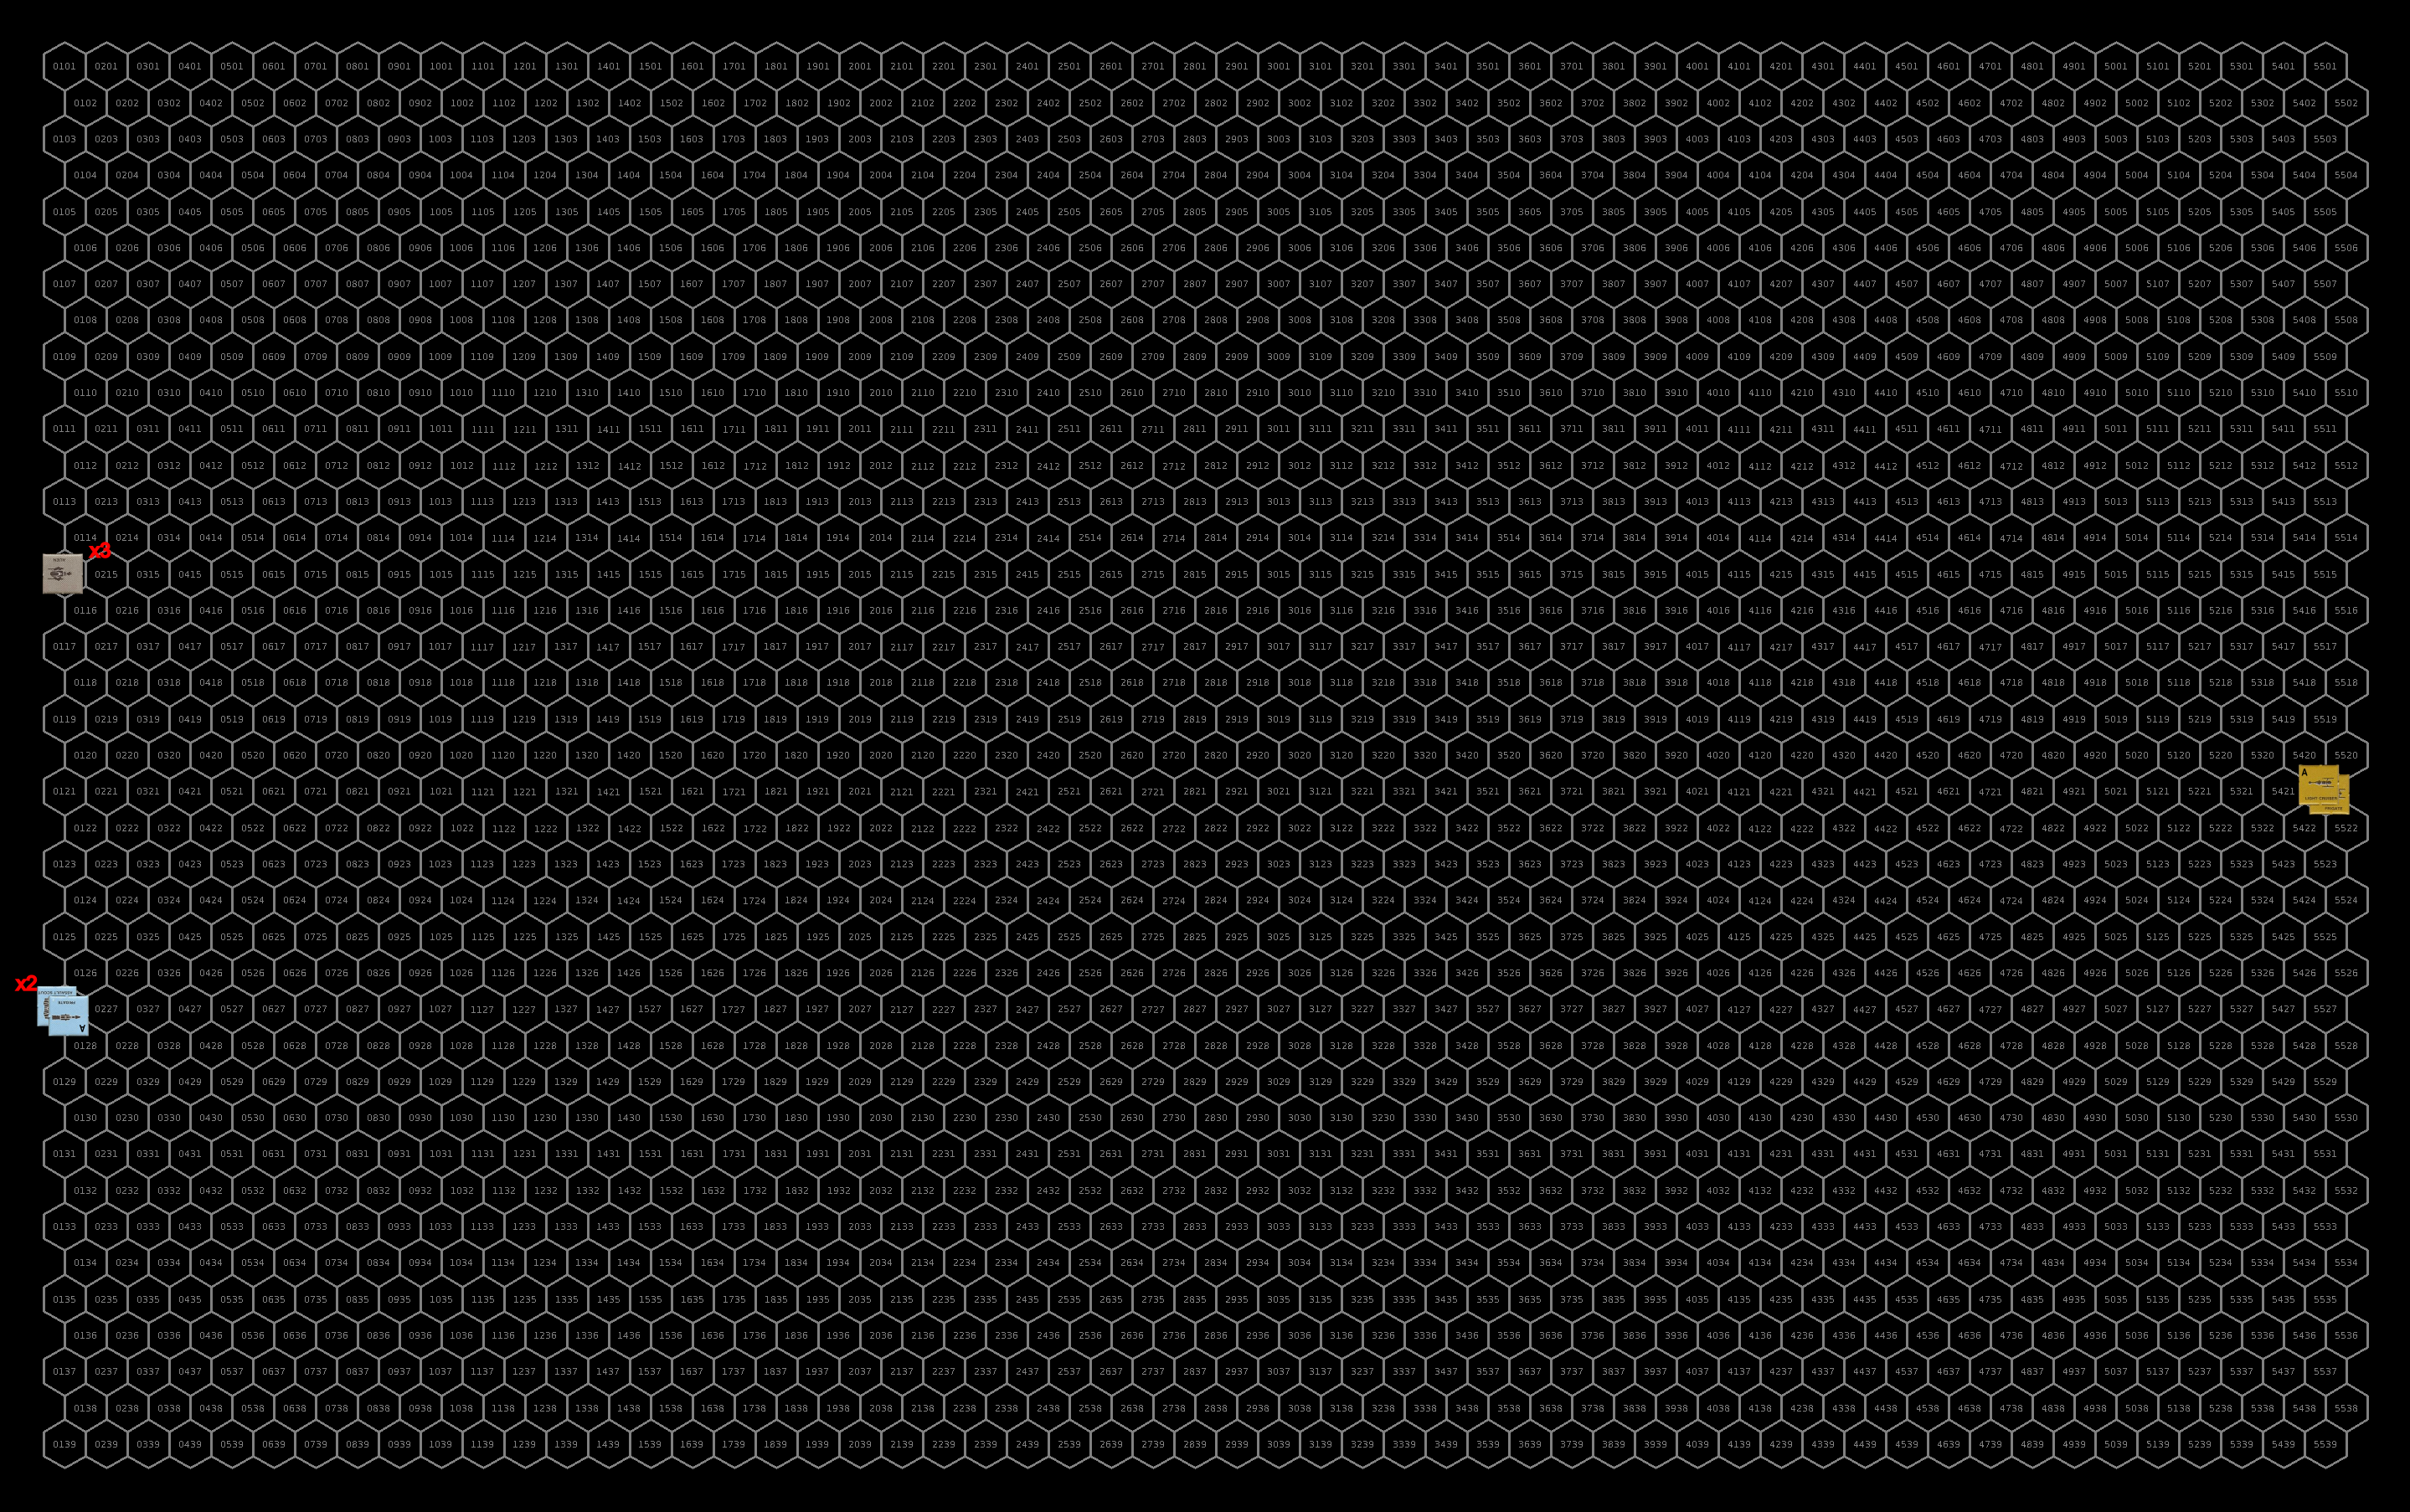
Initial setup for this battle. Click for full sized image.
Turn 1
The assault scouts accelerate to speed 25 while the destroyer accelerates to 23 and the frigate only accelerates to 22 allowing the destroyer to catch up to it. The sathar light cruiser accelerates to speed 23 and veers to starboard to go after the upper flight of assault scouts. All ships are out of range this round.
The ships start to close. Click for full size image
Turn 2
The militia ships continue to accelerate and close on the light cruiser from multiple directions with the assault scouts accelerating to a speed of 30 and the capital ships accelerating to a speed of 26. The light cruiser fires all of its beam weapons at the lead assault scout in the upper group. It only hits with the electron battery but induces a fire on the small ship.
The militia ships fire everything they have except their rocket batteries as they are out of range. The light cruiser fires two ICMs at each of the incoming torpedoes both of which are intercepted by the ICMs. The gunners on the destroyer are having a bad day with none of their weapons connecting. The frigate scores hits with both its laser cannon and battery knocking out the cruiser’s proton battery and slightly damaging its hull (6%). The four assault scouts only connect with one of their laser batteries damaging the cruiser’s hull (10%) but three of the assault rockets slam home knocking out 20% of the cruisers hull integrity, it’s electron battery, and a third of it’s engine capability.
Unable to bring its disruptor cannon to bear, the sathar light cruiser pulls a turn to port, accelerates to a speed of 25, and fires broadside at the militia ships. It fires a torpedo at the frigate, a rocket battery at one assault scout, and its laser battery at the other assault scout. Defensively, the militia ships fire their energy weapons again with the destroyer and frigate also firing rocket batteries at the cruiser.
Both militia rocket batteries connect damaging the hull (22%) and its combat controls systems. The frigate hits with its laser cannon knocking out the cruiser’s disruptor cannon while the destroyer with its two batteries, damaging the hull (10%) and knocking out the electron screen. The assault scouts connect with two of their laser batteries taking out the torpedo launcher and scratching the hull (1 HP). The cruiser misses with all of its weapons.
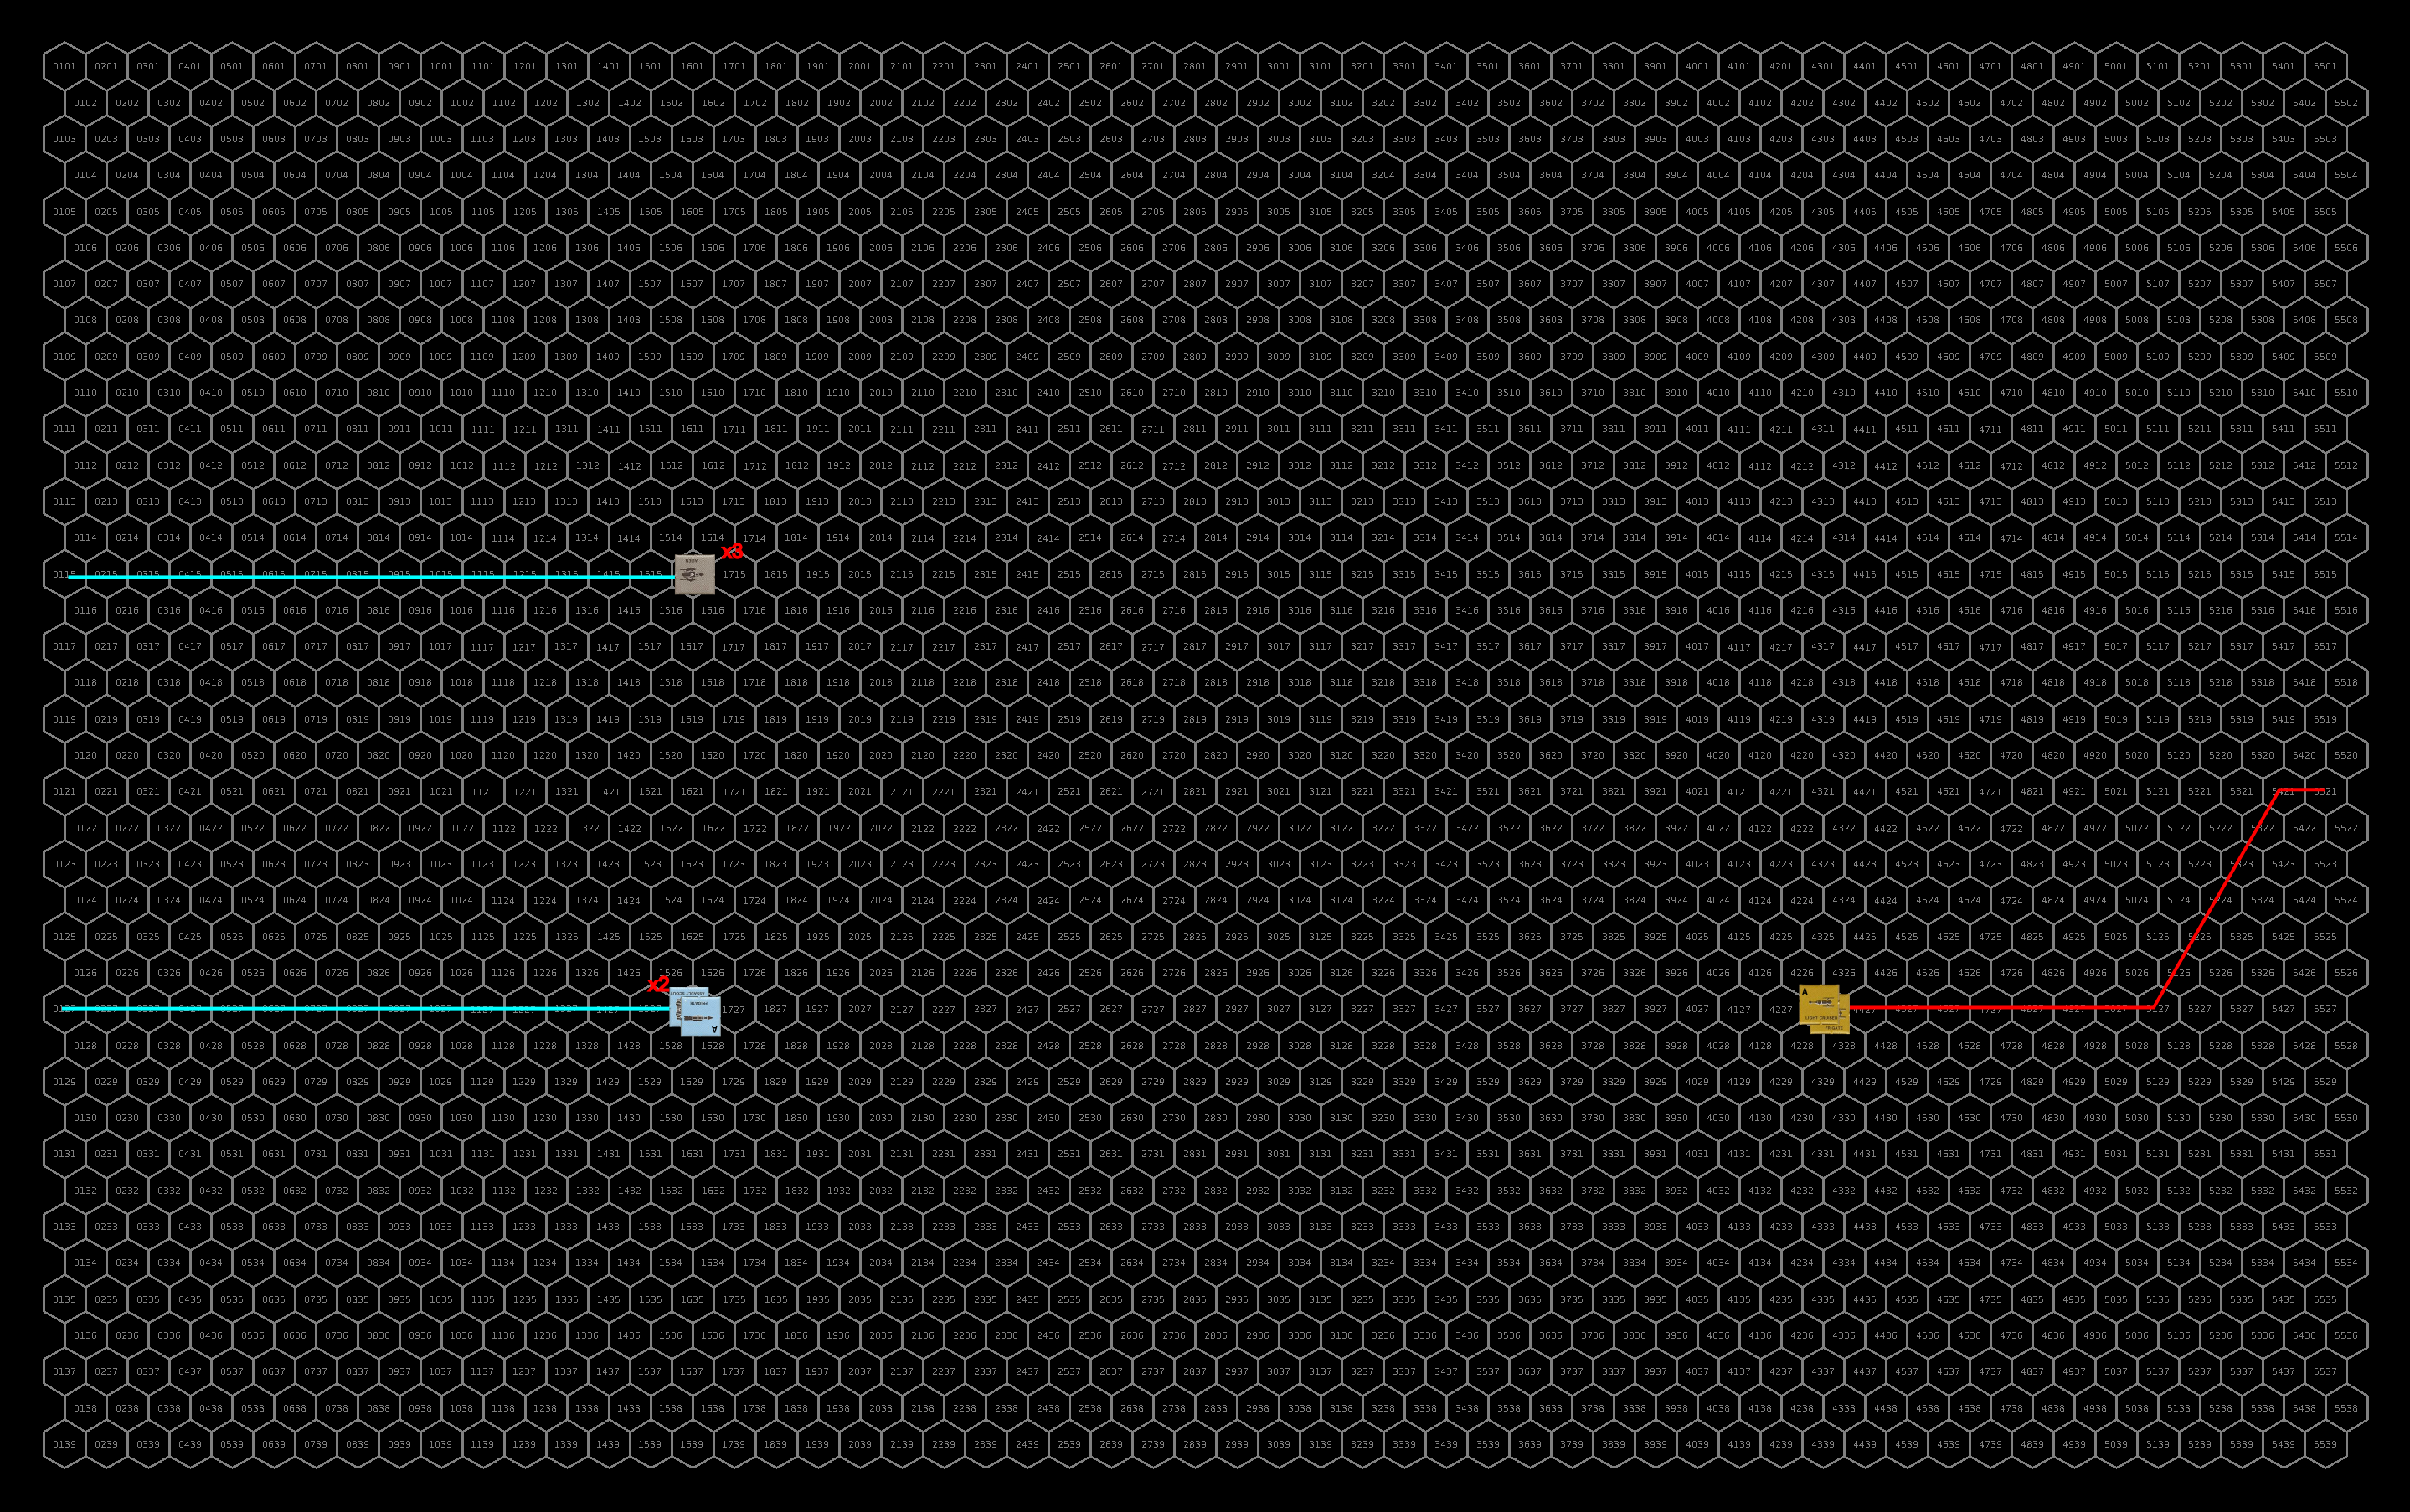
First shots exchanged. Click for full sized image.
Turn 3
The militia ships continue to pursue the carrier with the capital ships slowing to speed 23 and the assault scouts slowing to speed 25. They continue to stay outside of rocket battery range which limits the heavily damaged cruiser to just its laser battery. The fire on the assault scout knocks out its laser battery. The cruiser fires at the scout with the fire hitting it but only slightly damaging the hull (1 HP).
Once again the militia ships fire all their energy weapons and the scouts fire their assault rockets. Given the damaged state of the cruiser, the capital ships elect not to fire torpedoes. With no torpedoes incoming, the cruiser elects to fire an ICM at each of the assault rockets but it doesn’t make any difference as three of the AR impact the cruiser while one goes off course. The militia ships also hit with one laser cannon and two laser batteries. The assault rockets take out the cruisers stasis screen and ICM launcher while the laser cannon takes out the laser batteries take out 13% of the cruises hull (leaving it with only 4% hull integrity and damage its navigation control system.
The navigation control damage causes the cruiser to pull to starboard. Amazingly, the heavily damaged cruiser holds together through the turn but is then obliterated by the laser fire from the militia ships before it has a chance to get a shot off.
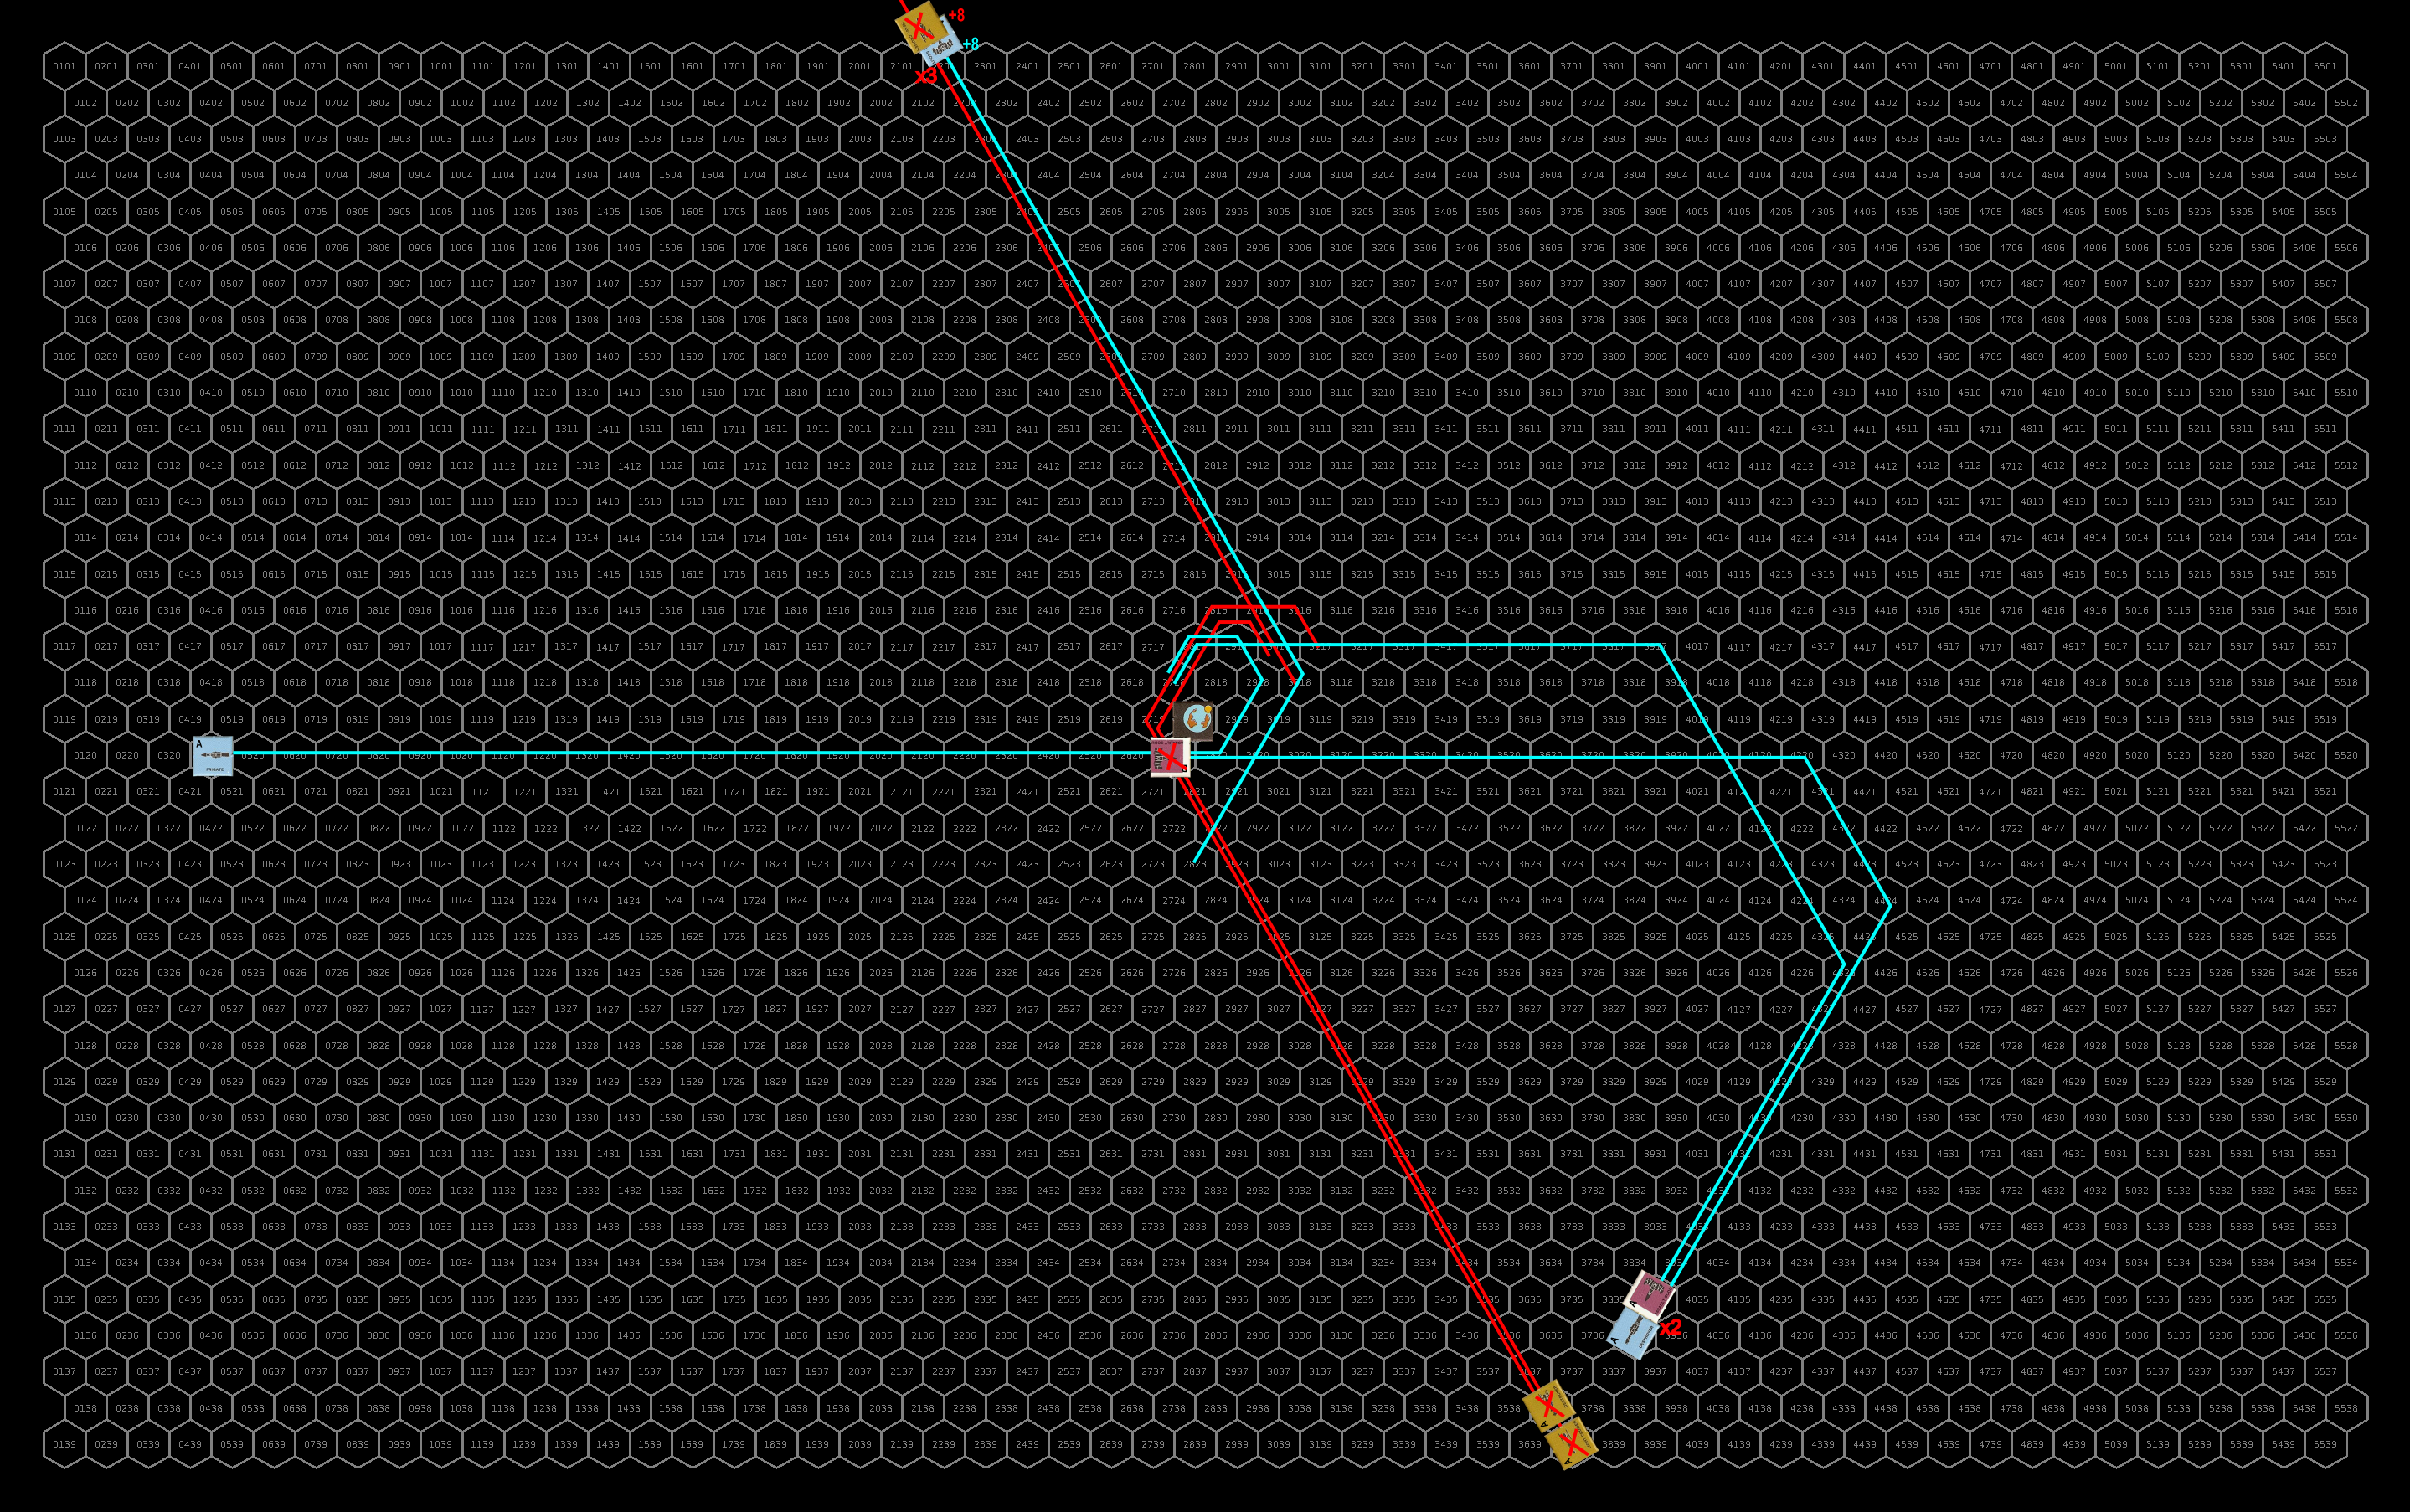
Final positions when the sathar light cruiser is destroyed. Click for full size image.
Final repairs
The scout manages to get the fire out immediately but its hull damage will require a day in the shipyard to repair.
Lessons Learned
The sathar cruiser really didn’t have a chance in this one against the full militia roster. Its only real hope was to get lucky and damage the engines on several of the ships to allow it to even the odds a bit and get away but that didn’t happen. Unfortunately, it was detected in the system while it was still decelerating to jump back out which greatly increased the chance that the militia, with their faster ships, could catch it. Had it been detected outbound, it would have either gotten away or, if the militia decided to press their luck, only had to engage to the two assault scouts.
Engaged sathar forces outbound from Snowball. Lucky hit by sathar torpedo detonated magazine on UPFS Singing River (frigate) during initial engagement. Mhemne forces, together with assault scouts (UPFS Dirk and Heron) destroyed sathar frigate but UPFS Dirk lost maneuvering and pursued by sathar light cruiser. Damage to engines resulted in light cruiser overtaking and destroying UPFS Dirk. UPFS Heron remains on station in system.
*** FLASH FLASH FLASH ***
Spacefleet Signal Traffic
Background
With the loss of the single frigate comprising Exploration Group 1, the sathar decide to go with a stronger reconnaissance force and dispatch SBF-J2 (a light cruiser and frigate) to explore the route to Theseus.
Detected departing Snowball by PG Liberty, Spacefleet authorizes them to attack the sathar vessels on their way out of the system. The Mhemne offer some of their ships to help. Although limited in technology compared to the UPF and sathar vessels, the Mhemne ships will be able to make at least a single pass at the sathar vessels.
Three days out from the planet, the UPF and Mhemne forces intercept the sathar vessels.
Order of Battle
The Mhemne ships only posses limited chemical drives compared to the atomic drives of the sathar and UPF vessels and required significant help to boost up to the required speed. For the purposes of this battle they all have 25 HP, 2 ADF, 2 MR, and a laser battery. In addition, they can only use a total of 8 MR and/or ADF before their fuel supply is exhausted.
UPF
2 Assault Scouts
1 Frigate
3 Mhemne vessels
Sathar
1 Frigate
1 Light Cruiser
The Battle
Setup
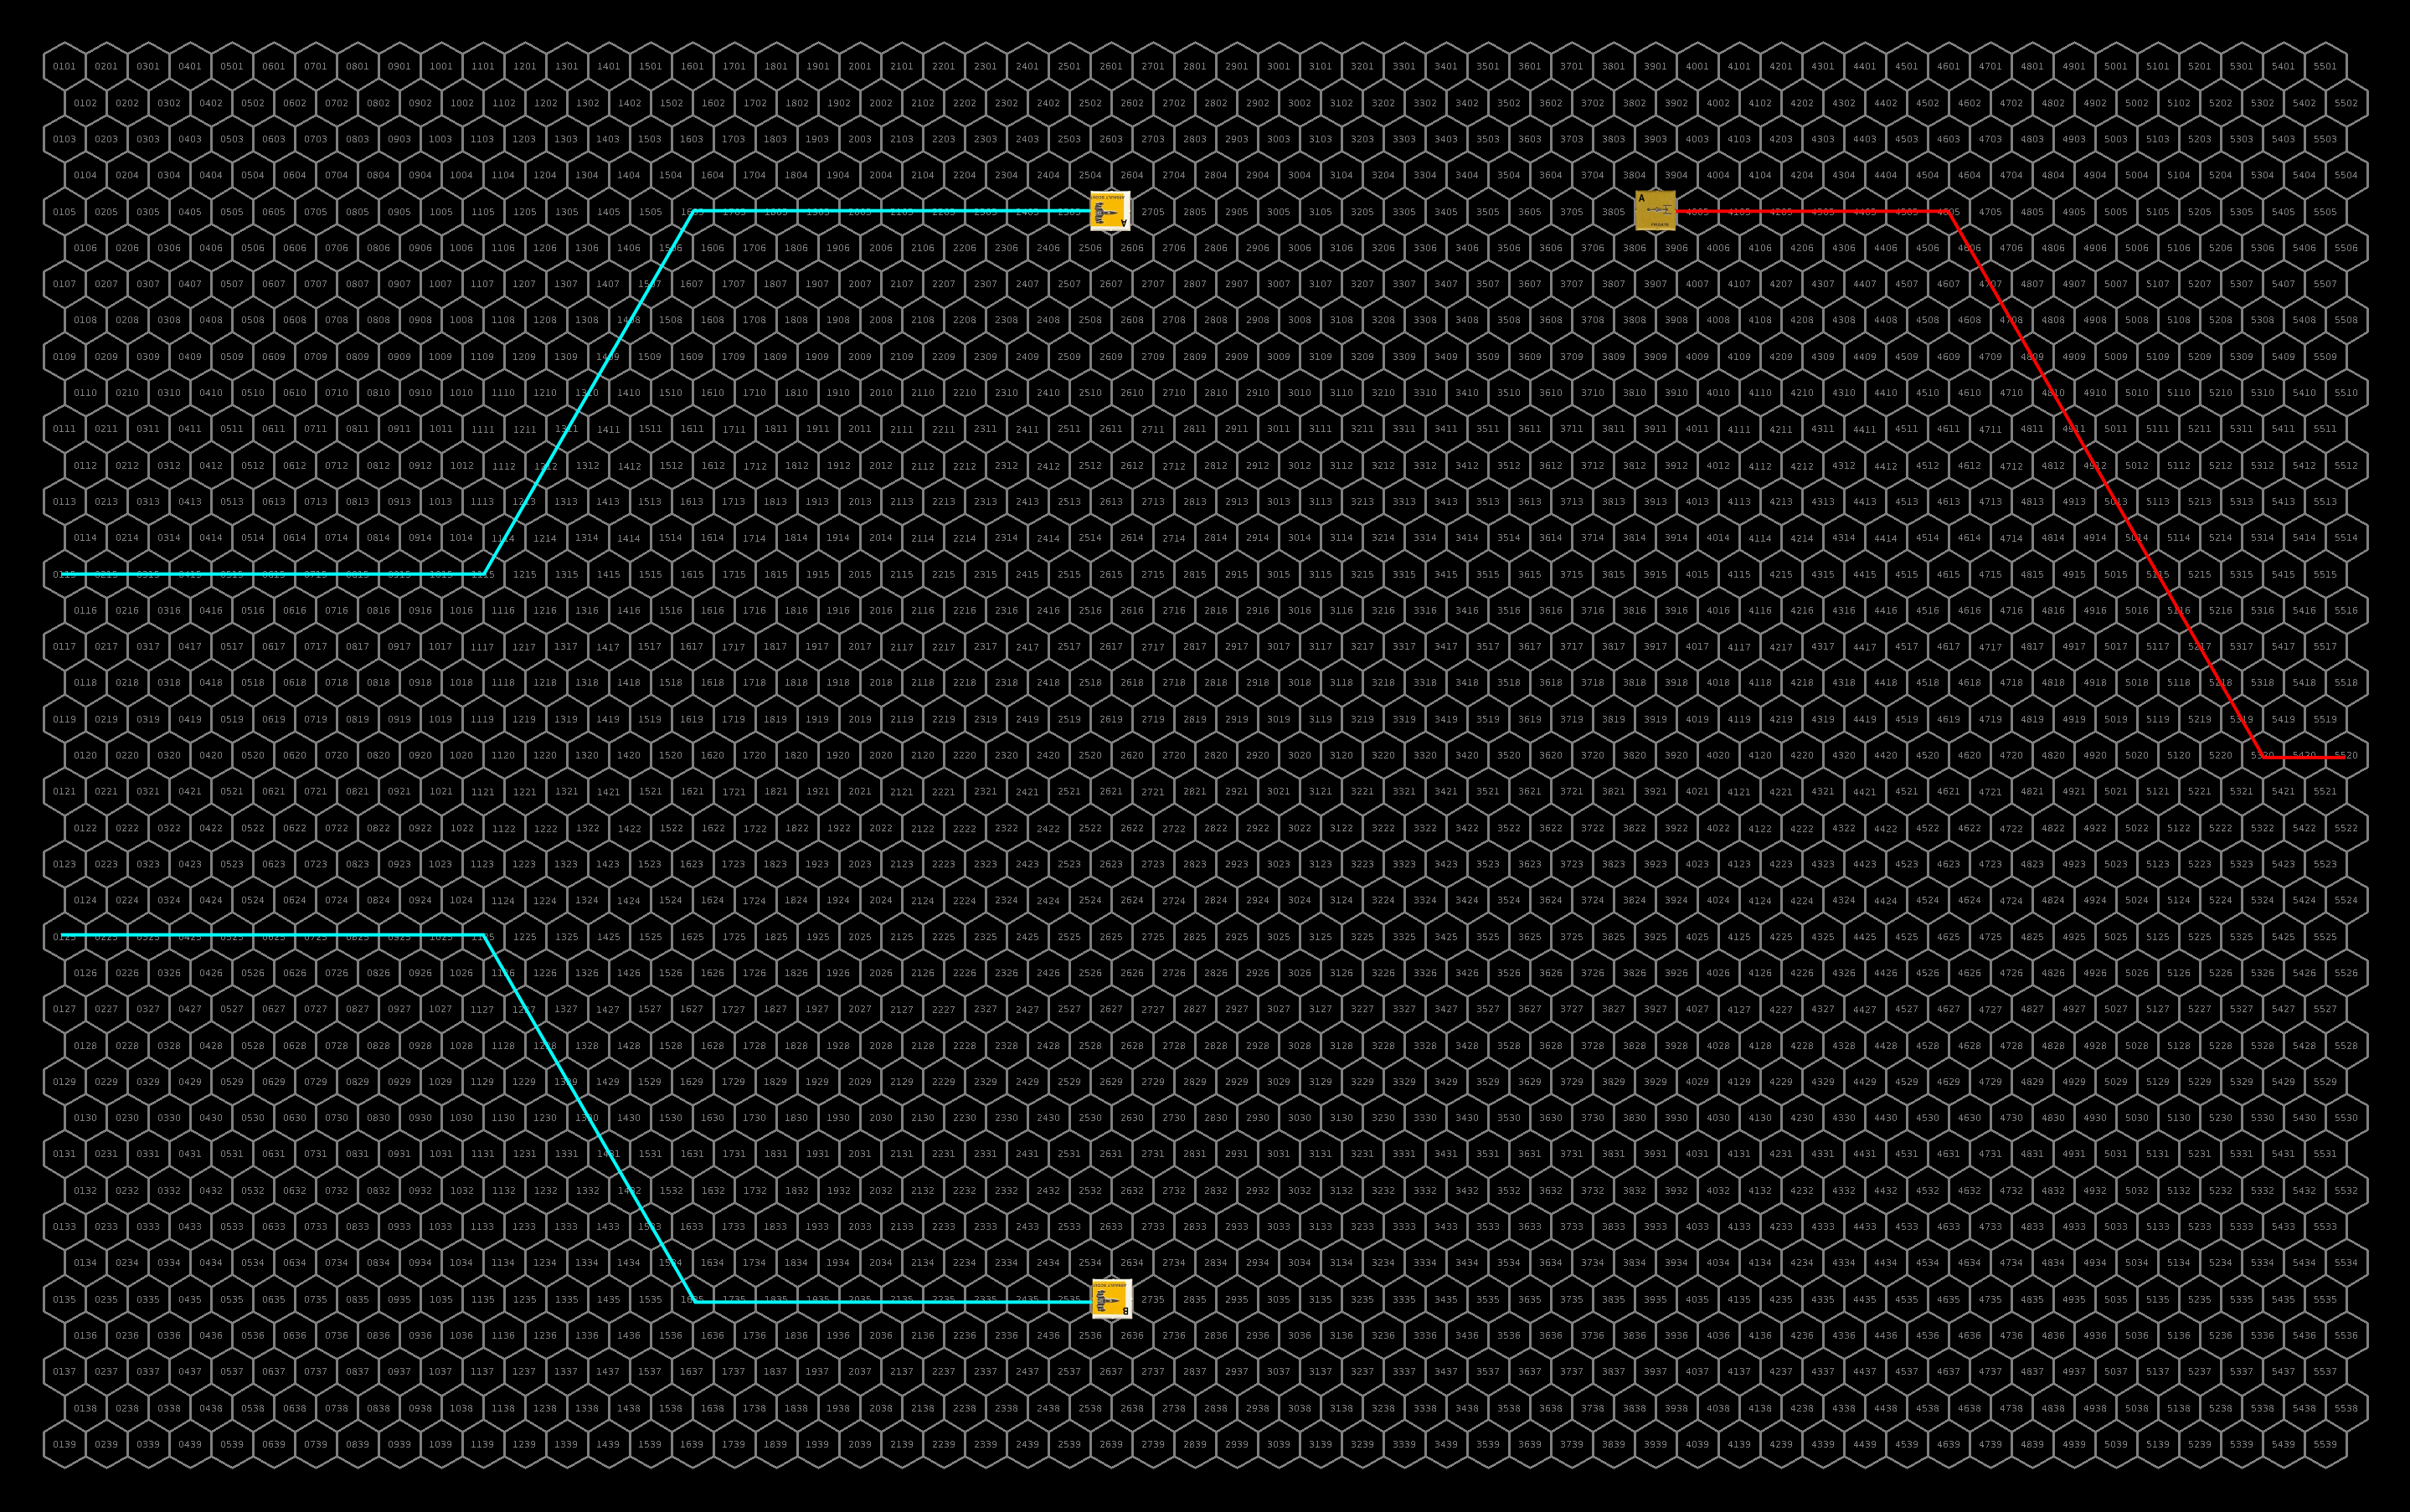
The UPF are the attackers in this scenario. The sathar ships are flying in formation moving at speed 15 entering from the right of the battle area.
The three UPF ships are in a formation with the three Mhemne ships flying together nearby. They are also moving at speed 15. The plan is for the Mhemne to make a single pass at the sathar vessels firing at the frigate and then continue on while the UPF continue to engage and hopefully destroy the sathar.
Initial positions. Click for full size image.
Turn 1
The UPF and Mhemne forces drift forward maintaining their speed of 15. Perceiving the UPF forces to be the bigger threat, the sathar maneuver to take the UPF ships on head-on while also maintaining their speed of 15. No shots fires as the combatants are all out of range.
Initial maneuvering. Click for full size image.
Turn 2
Seeing that the sathar are tracking them, and hoping to draw them into the firing range of the Mhemne, the UPF forces pull up parallel the Mhemne course and accelerate to speed 19. They turn to face the oncoming sathar vessels in the hope that that will cause the sathar ships to fly up near the Mhemne vessels.
The UPF plan works (maybe too well) and the sathar accelerate to speed 16 and maneuver so that they don’t come into the forward firing arc of the frigate’s laser cannon and move into rocket battery range. However, that brings them within 20,000 km of the Mhemne ships.
Defensively, the UPF and Mhemne all focus their fire on the sathar frigate. Two of the Mhemne ships hit lightly damaging the frigates hull (5%) and knocking out its laser cannon. The UPF forces all miss.
Offensively, the sathar ships fire their energy weapons at the assault scouts and rocket weapons at the frigate. They miss the lead assault scout but the light cruiser its the second assault scout with its disruptor cannon damaging its navigation control system. They do much better against the frigate hitting it with a rocket battery and a torpedo that slips through the ICM screen destroying the UPF vessel.
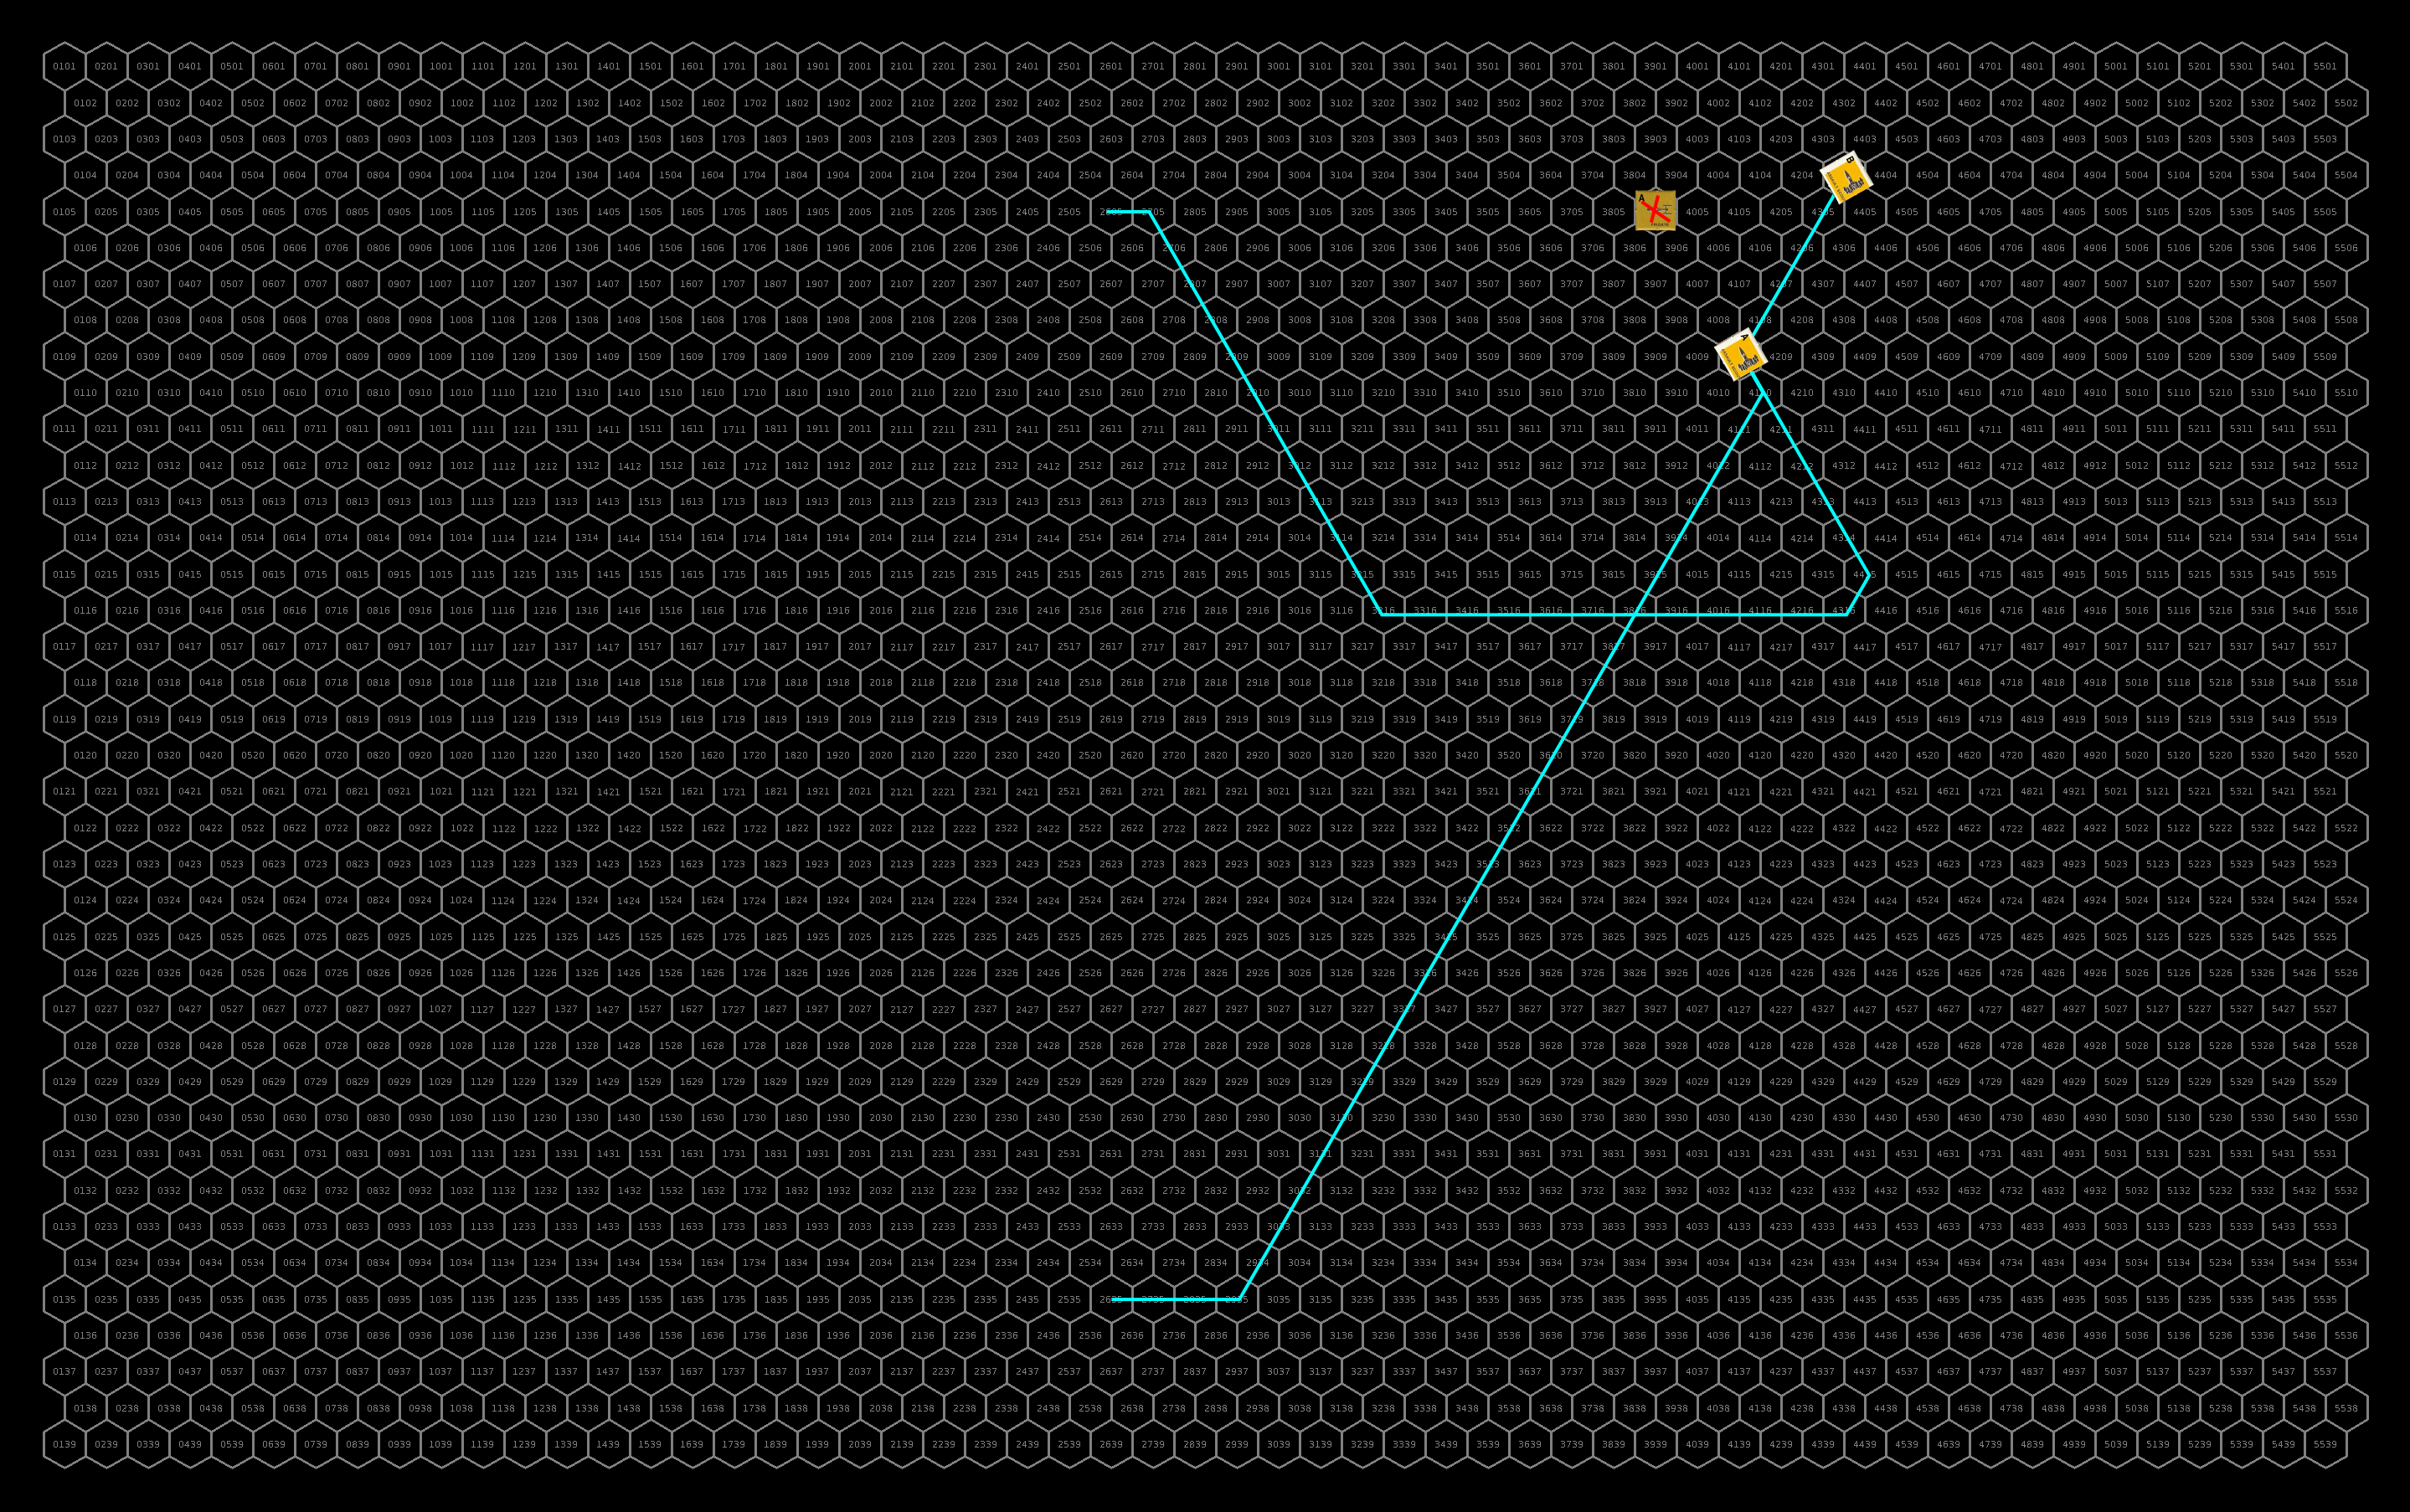
Positions after initial engagement. Click for full size image.
Turn 3
With the UPF frigate destroyed right off the bat, the UPF forces are now seriously out gunned. The assault scout, its navigation controls system damaged, turns to port and accelerates to maximum to try to get away. It doesn’t have a perfect shot but fires its assault rocket at the sathar frigate. The other assault scout loops around and fires on the frigate from behind before heading off away from the sathar vessels at maximum acceleration. The Mhemne ships continue to drift away reserving their limited maneuvering in case they need it later.
Ignoring the Mhemne ships, the sathar vessels fire all their energy weapons at the two assault scouts. The lead assault scout is hit by a laser and electron battery as well as the light cruiser’s disruptor cannon seriously damaging its hull (60%) and crippling its damage control systems. The second assault scout is hit by a proton battery damaging its hull (47%).
The Mhemne ships fire at the frigate as they pass hitting with 2 laser batteries damaging the sathar vessels hull (33%). The assault scouts both fire everything at the frigate as well hitting with 1 laser battery and 2 assault rockets knocking out the frigates maneuvering (with the laser battery) before destroying it with the assault rockets.
The sathar light cruiser accelerates to chase after the assault scout directly ahead, ignoring the other ships. The assault scout fires its laser battery in defense but misses. The light cruiser fires its energy weapons at the assault scout hitting with its electron and proton batteries damaging the assault scout’s engines and knocking out its maneuvering capability.
Repair Turn 1
Neither of the assault scouts are able to effect any repairs. No other ships are currently damaged.
Positions after the first half hour. Click for full size image.
Turn 4
The UPF assault scout and Mhemne ships continue to drift away from the sathar ship. The assault scout being chased, lacking any maneuvering maxes out its acceleration as it tries to escape the pursing light cruiser.
The light cruiser hits the assault scout with its proton battery knocking out half of the assault scout’s acceleration capability. The assault scout misses the light cruiser. The light cruiser continues to accelerate as it chases the assault scout and maneuvers to come directly astern of the smaller ship. It drops a bit behind this turn but with the assault scout’s engines mostly disabled, it will close on it soon enough. It gets some extreme range shots with its energy weapons but misses.
It’s a tail chase now. The other ships are far enough away that they get away safely and we are just tracking the sathar vessel and its target. Click for full image.
Turn 5
Using what acceleration it has, the assault scout continues to speed up as it tries to get away. The LC hits it with its disruptor cannon igniting a fire. It returns fire with its laser battery but misses. The assault scout’s initial speed advantage temporarily takes it out of range of the light cruiser’s weapons.
To avoid having to draw long trails, and since relative velocity is all that really matters, I’ve adjusted the displayed speeds down. Click for full-size image.
Turn 6
The gap between the ships widen but the light cruiser’s greater acceleration will start closing it once again soon.
Repair Turn 2
Again the assault scouts fail to repair any systems.
Positions of the two ships still engaged after an hour. Click for full size image.
Turn 7
The light cruiser matches the assault scouts’ speed and will begin to overtake it on the next turn. (I forgot to save an image but it was just more of the same.)
Turn 8
The light cruiser starts to close the gap and is just out of range of its electron and proton battery weapons.
The gap between the ships start to close. Click for full size image.
Turn 9
The light cruiser closes to within 90,000 km. The assault scout fires on the cruiser with its laser battery but misses. The light cruiser fires with its energy weapons and hits with its proton battery destroying the small UPF ship.
And the fight is over after an hour and a half. Click for full size image.
Final Repairs
It takes another 8 hours but the damaged UPF assault scout manages to repair its damage control system (7 hours) and its hull (another hour).
Lessons Learned
That didn’t go at all like the UPF planned. They did manage to destroy the sathar frigate but expected their frigate to survive a bit longer. Poor shooting by the UPF and great shooting by the sathar on the first round definitely tipped things in favor of the sathar.
The Mhemne acquitted themselves well hitting with 4 of their 6 shots. Had the frigate survived the first round they might have tried to loop back around for a second pass but the quick destruction of the frigate put survival ahead of damaging the sathar.
The second assault scout almost got away but the long range hit by the light cruiser’s distruptor cannon that knocked out its engines, combined with its failed repair rolls, spelled eventual doom for that ship as it was seriously outgunned by the light cruiser.
The sathar finally won a battle but unfortunately for them it was just a minor one on the periphery of the battle.
After nearly two and half hours of fighting, Task Force Cassidine defeated the invading sathar forces destroying all but a heavy cruiser and fighter which are currently departing the system. The ships of the task force are almost all heavily damaged but only a single fighter was lost in the battle, the pilot of which ejected safely and has been recovered.
Rak’tal-ka, StarPlay News
Okay, I thought the Second Battle of Kwadl-Kit was a long one, this one went even longer. Sorry about the delay in getting it out but it took a while to play out. Task Force Cassidine just seems to like these long, spread-out battles. The map is going to really shift around this time as this fight involves a long chase and at one point it’s happening on two different maps as the battle spreads out. I hope you enjoy the narration. I also think this might now be the longest blog post yet.
Background
Fresh from the battle with the other sathar force in the K’tsa-Kar system, Task Force Cassidine is ready to face this new sathar threat. While the presence of the militia assault scout that recently disappeared trying to probe the source of the sathar fleets would have been helpful, it would not have made a lot of difference in the fight.
After the recently losses in the K’tsa-Kar and Truane’s Star systems, SBF-J1, crewed by veterans of the campaign against the saurians, look to turn the tide and chalk up a victory for the sathar forces. The fleets are fairly evenly matched with the UPF forces leaning more toward the larger ships with the loss of their assault scouts and half of their fighters in the previous engagement.
Order of Battle
This is probably the most evenly matched battle, in terms of hull points and capabilities, of any fight yet in the war. Looking at hull points, the UPF are coming into this with a total of 435 HP of ship compared to the sathar’s 441. Three of the UPF ships are slightly damaged: one fighter only has 5 of 8 HP, a frigate is at 29 of 40, and the battleship has a damaged stasis screen. Those were all battle damage that couldn’t be repaired in space after their recent battle in the K’sta-Kar system. It will be interesting to see how this one plays out.
Spacefleet (Task Force Cassidine)
3 Fighters
2 Frigates
1 Light Cruiser
1 Assault Carrier
1 Heavy Cruiser
1 Battleship
Sathar
7 Fighters
1 Frigate
1 Destroyer
2 Light Cruisers
1 Assault Carrier
1 Heavy Cruiser
The Battle
Setup
The UPF elect to battle near the planet although with no station left to defend, they start far back from the planet at a moderate speed of 15 for all ships, including the fighters. The two frigates form a battle group and the light cruiser and the battleship team up. Those two groups form the center of the battle line. The heavy cruiser escorts the assault carrier toward the bottom of the battle area while the three fighters form a flight near the top. They deploy four of the six seeker missiles available on the side of the planet the sathar will be approaching from. The heavy cruiser and battleship each retain one seeker missile in their magazines for deployment during the fight.
Like the UPF, the sathar come in at only a moderate speed to try to gauge the other side’s tactics and responses before committing. They too are only moving at speed 15 but are split up to go wide around the planet. The sathar heavy cruiser and assault carrier, escorted by a destroyer come in opposite their UPF counterparts with a flight of three fighters just off their wing. The light cruisers, escorted by a frigate, come in opposite the UPF fighters, with a flight of four fighters off their wing.
Initial positions of the ships. The seeker missiles are not shown. Click for full sized image.
Turn 1
The sathar capital ships maintain their speed and advance on the UPF forces. The fighters accelerate to speed 20 and fly farther out on the wings of the formation.
The UPF ships converge toward the lower group of sathar capital ships. The heavy cruiser and assault carrier continue to advance at speed 15. The light cruiser and battleship accelerate to speed 17, the frigates to speed 19, the fighters to speed 20.
No shots are fired this round as the two forces remain out of range.
Positions after the first turn of maneuvering. Also the seeker missiles are shown on this one for reference. Unfortunately, the file was partially corrupted and the bottom of the map was cut off but the three sathar fighters just mirrored the maneuver of the fighters at the top of the map. Click for full size image.
Turn 2
The sathar all begin accelerating toward the UPF. The group centered around the heavy cruiser accelerates to speed 17 and flies straight at their UPF counterpart while their wing of fighters accelerates to 25 and makes a pass at the same group. All the sathar ships fire at the UPF assault carrier. The upper battle group accelerates to speed 18 and turns down toward the UPF forces while the upper flight of fighters accelerates to speed 25 and sets up for an attack run next turn as they are too far away to engage this round.
Defensive, the UPF ships all focus on the flight of three lower fighters with the UPF heavy cruiser taking a long-range shot with its disruptor cannon at the sathar destroyer. They don’t do too well and of the 17 shots fired at the three fighters, only one connects with each ship, knocking the hull integrity down by half on one, inducing a navigation control hit on a second, and knocking out the maneuvering on the third. The disruptor cannon shot at the destroyer also misses.
Offensively, the sathar fare a bit better. Two of the assault rockets hit the assault carrier knocking out half its engine capability and reducing its hull integrity by 17%. The sathar destroyer hits with its laser cannon further reducing the hull integrity of the UPF assault carrier by another 19%. The heavy cruiser’s distruptor cannon knocks out the assault carrier’s masking screen launcher.
The larger UPF capital ships maintain their speeds and converge on the sathar battle group. The heavy cruiser and assault carrier fly right over the group turning up toward the planet at the end of their move. The battleship and light cruiser maneuver down to take point blank shots at the sathar as well. The frigates accelerate to speed 20 and come just in range of their rocket batteries while the fighters accelerate to speed 25 and make an assault rocket pass from below.
Defensively, the sathar ships continue to fire at the assault carrier with their energy weapons while they fire their three rocket batteries at the lead frigate. The frigate is hit by two of the rocket batteries reducing its hull integrity by 28% and knocking out a third of its maneuvering capability.
The assault carrier is hammered by the sathar’s weapons being hit by 2 electron, 2 laser, and one proton battery as wall as a laser and disruptor cannon. All told the damage knocks out all of the UPF assault carrier’s weapons, starts a fire, damages its combat control system, induces a navigation control failure, and reduces its hull integrity by another 13%.
Offensively the UPF focus on the sathar assault carrier and heavy cruiser with the frigates and fighters firing at the assault carrier and the other ships firing on the heavy cruiser.
Only one of the fighters hit the assault carrier but it scores a critical hull hit dropping the carrier’s hull integrity by 40%. The frigates combine to hit with a laser battery, laser cannon and rocket battery knocking out the carriers engines and further reducing its hull integrity by 7%.
The sathar heavy cruiser fares even worse being hit by a barrage of weapons from the UPF battleship, light cruiser and heavy cruiser. All told it is hit by all 3 distruptor cannons, 2 rocket batteries, 3 laser batteries, two proton batteries, and an electron battery. The damage knocks out the sathar heavy cruiser’s engines and maneuvering, ICM launcher, laser battery, proton screen and stasis screen, cuts it damage control ability in half, and starts a fire. Surprisingly, the weapons did little hull damage only reducing the ship’s hull integrity by 25%.
Positions and course after the first shots were fired. Click for full size image.
Turn 3
The sathar fighter and heavy cruiser, both with no MR, fly straight ahead (to the left). The fighter slows down to speed 20 while the heavy cruiser, with no ADF either, just stays at speed 17. The fighter with the navigation control hit slows to speed 20 and spins to port flying up toward the planet while the remaining fighter from the lower group accelerates to speed 20 and goes after the pair of UPF frigates. The other fighters also speed up to 30 hexes/turn and go after the frigates as well, both fighter groups looping around the planet.
The sathar assault carrier, with its navigation control hit, pull to starboard and with no ADF, flies up away from the main battle. The sathar destroyer loops around to go after the UPF frigates as well and the light cruisers and frigate decelerate back to 15 and light up for a shot at the UPF battleship. The fire on the UPF assault carrier damages its hull (5%).
Defensively, the UPF frigates fire their laser batteries at the fighters and rocket batteries at the destroyer while the other UPF ships concentrate all their fire on the lead sathar light cruiser.
The UPF frigates miss the fighters completely but hit the destroyer with two rocket batteries seriously damaging it and deducing its hull integrity by 72%. The other ships hit the sathar light cruiser with 2 laser, 2 rocket, 1 electron, and 1 proton battery knocking out its ICM launcher, engines, and stasis screen, starting a fire and reducing its hull integrity by 16%.
Offensively, the sathar fighters hit the lead UPF frigate with and assault rocket reducing its hull integrity by 43% and the second one with an assault rocket as well reducing its already damaged hull (from the previous battle) by 38%. The destroyer also hits the second UPF frigate with its electron battery and laser cannon knocking out the frigates engines.
The sathar frigate and light cruisers hammer the UPF battleship hitting it with 2 disruptor cannons, 2 proton batteries, 1 electron battery, and 2 torpedoes that slip through the battleship’s ICM screen. The weapons short circuit the battleship’s defensive system, reduce its maneuvering ability by half, knock out its proton battery and reduce its hull integrity by 66%.
The two UPF frigates, now heavily damaged, drift on their current course firing at the destroyer as they leave. The assault carrier also drifts but its navigation control hit causes it to pull to port. Despite its weakened hull, it holds together. The battleship also drifts away from the fight firing all its weapons at the damaged light cruiser.
The UPF heavy cruiser turns parallel to the course of the assault carrier but lines up for a direct shot with its disruptor cannon at the sathar destroyer. It fires its rocket battery and torpedo at the undamaged light cruiser and uses its energy batteries to fire on the sathar fighters. The light cruiser follows a similar path and firing at the same targets. The fighters loop up around the planet and come up behind the sathar frigate firing their assault rockets at it.
The fire on the sathar light cruiser and sathar heavy cruiser damages both ships’ hulls reducing their integrity by 13% and 11% respectively.
Defensively, the sathar ships continue to fire at the battleship, hoping to destroy it before it can fly out of range. The sathar assault carrier makes a long range attack at its UPF counterpart with its proton battery but misses. The sathar destroyer fires at the lead UPF frigate hitting with its electron and rocket batteries knocking out the frigate’s masking screen launcher and damaging its combat control system.
The battleship manages to get off lightly and is only hit by 2 distruptor cannons and a laser battery cutting its damage control capability in half and reducing its hull integrity by another 14%.
Offensively, the UPF battleships hits the lead sathar destroyer with its laser and 2 electron batteries and slips a torpedo through the cruiser’s ICM screen destroying it and scoring the first kill of the battle. The UPF heavy cruiser manages to get its torpedo through the other light cruiser’s ICM screen cutting the sathar ship’s maneuvering in half but otherwise missing.
The UPF fighters hit the sathar frigate with all three assault rockets destroying it completely. The sathar destroyer is hit by disruptor canons from the UPF light and heavy cruiser, as well as a laser battery and two rocket batteries from the frigates. The frigates also manage to get a torpedo through the destroyer’s ICM screen. The combined damage from the UPF weapons obliterates the sathar ship. The sathar fighters get away with only minor damage: one loses 60% of its engine capability, one has its damage control capabilities cut in half, and the third loses 38% of its hull integrity.
Repair Turn
As the ships work on repairs, the lead UPF frigate finds that it’s hull is too damaged to repair in space and must find a way to a shipyard with only 30% of its hull intact. The other frigate manages to repair a bit of its hull restoring 10% of its integrity. The UPF assault carrier puts out the on-board fire while the battleship repairs 3% of its hull.
The two sathar fighters with hull damage find that they need a shipyard to repair their hull as well with their hull integrity sitting at 62% and 50% respectively. The sathar assault carrier restores 11% of its hull integrity while the heavy cruiser gets its fire under control.
Courses and positions after a half hour of combat and repairs. Things are starting to scatter as ships are damaged and lose maneuvering capability and control or are too damaged to risk maneuvering. Ships moving off the map will have a yellow number by them showing how many hexes off the map they are. Click for full size image.
Turn 4
The flight of four sathar fighters all go after the UPF assault carrier hoping to finish it off. They loop around to make a direct assault and then fly off to chase after the UPF frigates. The lone fighter, after firing its last assault rocket at the heavy cruiser loops around and starts heading for its carrier to dock and rearm. The fighter with the navigation control damage loops to port and fires one of its assault rockets at a UPF fighter as it passes by. The remaining fighter, with no maneuvering, along with the sathar heavy cruiser in the same condition, continue to drift away from the fight. The sathar assault carrier, with its navigation control damage, pulls to starboard and passes distantly in front of the UPF cruisers and assault carrier. The remaining sathar light cruiser turns to go after the battleship hoping to finish it off.
Defensively, the UPF cruisers fire at the sathar fighters hoping to take them out before they can fire their assault rockets. The battleship fires at the light cruiser pursuing it and the frigates get a couple of distant shots at the sathar fighters.
The sathar light cruiser is hit by one of the battleship’s laser batteries and both electron batteries which score a critical hull hit (integrity reduced by 26%), knock out its ICM launcher, and damage its navigation control systems. Four of the five sathar fighters are hit by the UPF ships knocking the hull integrity down to half on one, destroying a second and damaging the assault rocket launcher on the other two (including the lone fighter going after the heavy cruiser).
Offensively, the two fighters with working assault rocket launchers firing at the assault carrier both miss while the sathar fighter with the navigation hit firing at the UPF fighter hits with its assault rocket destroying the UPF fighter, the first (and as it will turn out, only) UPF ship destroyed in the fight. The battleship is hit by the sathar light cruiser’s electron battery, proton battery, and distruptor cannon knocking out its proton screen, damaging its combat control system, and reducing its hull integrity by another 12% (only 11% remaining).
The two UPF frigates continue to drift and fire long distance shots at the fighters. The battleship drifts away from the light cruiser firing at it as it goes. The two UPF fighters loop around and take a run at the sathar light cruiser firing their last assault rockets. The UPF assault carrier pulls to starboard and runs parallel to its sathar counterpart while the UPF light and heavy cruisers maneuver directly onto the sathar assault carrier’s tail and take point blank shots with all their weapons.
Defensively, the sathar light cruiser fires at the battleship and the sathar assault carrier fires at the UPF light cruiser. The UPF light cruiser is hit by a rocket battery reducing its hull integrity by 17% while the battleship is hit by an electron battery knocking out its ICM launcher.
Offensively, the sathar light cruiser is hit by one of the battleship’s laser batteries knocking out its proton battery and by both assault rockets from the fighters which damage its combat control system and knock its hull integrity down by 20%. The lead UPF frigate manages to score a long range laser battery shot on the lead sathar fighter knocking out its assault rocket launcher. The UPF cruisers hit the sathar assault carrier with a distruptor cannon and a laser, electron, and rocket battery knocking out the carriers maneuvering, laser battery, and masking screen launcher and damaging its combat control system.
Maneuvering and positions after forty minutes of battle. The UPF are stating to score kills and the ships are really starting to scatter. Click for full size image.
Turn 5
The group of three sathar fighters sets off after the two UPF frigates, the lone fighter, with its assault rocket launcher disabled, and realizing that the assault carrier is probably not going to survive the battle, attempts to ram the UPF light cruiser. The sathar light cruiser pulls to port and slows down, firing at the two UPF fighters. The other ships just continue to drift away with the assault carrier firing at the UPF light cruiser as it drifts.
Defensively, the UPF frigates fire at the remaining fighter with a working assault rocket launcher but miss. The UPF light cruiser fires at the oncoming fighter and destroys it before it can ram the larger ship. The UPF heavy cruiser hits the sathar assault carrier with its laser and rocket battery and reduces its hull integrity by another 36%.
Offensive, the sathar fighter misses the UPF frigate with its assault rocket while the sathar light cruiser hits one of the UPF fighters damaging its combat control system. The sathar assault carrier hits the UPF light cruiser with its proton and rocket battery short circuiting the cruiser’s defensive systems and reducing its hull integrity by 20%.
The UPF assault carrier’s loss of navigation control pulls it to starboard and the fighters, out of assault rockets, start heading back to the carrier to rearm. The heavy and light cruiser stay on the tail of the sathar assault carrier while the frigates and battleship continue to drift.
Defensively, the sathar assault carrier continues to fire on the UPF light cruiser hitting with its rocket battery for another 16% hull reduction on the cruiser. All other ships are out of range.
Offensively the UPF frigates fire at the pursuing fighters but miss. The UPF cruiser open fire on the sathar assault carrier and hit with 3 laser batteries, 2 proton batteries, an electron battery, a disruptor cannon, and two torpedoes completely destroying the sathar carrier.
This is the ships off the top of the main map (UPF cruisers and frigates, sathar assault carrier and fighters). The bottom row of hexes on this map exactly correspond to the top row of hexes on the main map (below). Click for full size image.Main battle map after turn 5. Things continue to spread out. Click for full size image.
Turn 6
With their carrier destroyed and being either out of weapons or their weapon system disabled, the three sathar fighters attempt to ram the UPF frigates. The sathar light cruiser pulls to starboard and accelerates back to speed 16, the lone fighter near the planet pulls to port with its navigation damage and the other two ships continue to drift away.
Defensively, the frigates fire everything they can at the incoming fighters hitting two with their laser batteries, the lead fighter for 75% of its hull and the second for a navigation hit but not enough to destroy them before they ram. Two fighters slam into the lead frigate and despite its damaged hull fail to destroy it only taking out 20% of the remaining 30% hull integrity. The third fighter hits the second frigate for a measly 5% of its hull integrity.
The UPF frigates and battleship continue to drift, the assault carrier pulls to port and the fighters continue to close on the carrier to rearm. The heavy and light cruiser start accelerating and turn to head after the sathar light cruiser. No shots are fired as everyone is out of range.
Repair Turn 2
The lead UPF frigate repairs the damage caused by the two ramming sathar fighters but can repair its hull no further. The other frigate repairs 12% of its hull integrity while the light cruiser repairs 3% of its. The assault carrier gets its navigation control system fixed as well as repairing 8% of its hull. The battleship repairs 5% of its hull and brings is damage control system fully back on-line.
The sathar light cruiser repairs its navigation control system while the heavy cruiser discovers that a shipyard will be required to bring its damage control system back fully on-line.
The upper map after an hour of fighting. The second blue line by the assault carrier should have fighters at the end of it but I forgot to move the tokens. Click for full size image.The main battle map after an hour. The poor sathar fighter can’t get is navigation system under control and is stuck near the planet. Click for full size image.
Turn 7
With its navigation control system repaired, the sathar light cruiser sets off at max acceleration to attempt to intercept the UPF battleship and finish it off. The damaged fighter comes to a stop near the planet as the pilot continues to work on its navigation control issues.
The UPF cruisers continue in pursuit of the sathar light cruiser while the assault carrier, its hull and navigation control fixed, starts to turn around and head back toward the planet. The two surviving fighters pull alongside the carrier and start docking procedures.
We’ve now shifted the map to track the sathar light cruiser pursing the battleship and the UPF cruisers pursing it. The other ships are effectively out of the battle. The planet is some 200,000 km off the left side of this map. Click for full size image.
Turn 8
The chase continues. The sathar light cruiser continues to close on the battleship but the UPF light cruiser, which had a slight speed advantage on the sathar light cruiser, continues to close on it as well as it starts to outdistance the older heavy cruiser that has a lower acceleration. The two UPF fighters dock with the assault carrier.
The gaps between the ships are narrowing. Click for full size image.
Turn 9
Since relative speed are all that matter, I’ve adjusted the speeds shown on the maps down so that the battleship is stopped and the other three ships have been scaled accordingly.
The chase continues as the light cruisers close on their targets. The UPF heavy cruiser is as close as it is going to get to the sathar ship unless the sathar vessel’s engines are damaged as the greater acceleration of the sathar light cruiser has allowed it to match speeds with the heavy cruiser. The UPF fighters are rearmed.
Repair Turn 3
The lead UPF frigate repairs some of its maneuvering while the other frigate repairs 10% of its hull. The UPF light cruiser also repairs 10% of its hull while the assault carrier brings its laser and proton battery back on-line. The battleship, expecting to have to defend against torpedoes from the the sathar light cruiser, gets its ICM launcher working again and repairs another 5% of its hull.
The lone sathar fighter repairs some of its maneuvering capability and starts to maneuver to meet up with the heavy cruiser. The sathar light cruiser repairs 13% of its hull while the heavy cruiser restores half of its engine capability and begins accelerating to out of the system.
The ships have almost come in range of the battleship. Speeds have been adjusted so that they are relative to the battleship being at rest. Click for full size image.
Turn 10
The sathar light cruiser continues to close on the battleship and the UPF light cruiser continues to close on the sathar light cruiser. The two UPF fighters, rearmed, launch from the assault carrier and go after the lone sathar fighter near the planet.
The heavy cruiser is now starting to fall behind. Click for full size image.
Turn 11
The UPF light cruiser continues to close the gap but it is looking like the sathar ship will get to the battleship before the UPF light cruiser can intercept it. The battleship, at relative rest to the other ships, rotates to face the direction it expects the sathar vessel to come from in order to bring its disruptor cannon to bear.
It’s taken nearly an hour, but the sathar light cruiser is nearly in range of the battleship with the UPF light cruiser in hot pursuit and gaining. Click for full size image.
Turn 12
Realizing it cannot quite get into torpedo range this round, the sathar light cruiser remains at its current speed staying at extreme range for the battleship’s defenses although this will also allow the UPF light cruiser a chance to close as well.
Defensively the battleships fires all of its energy weapons at the sathar vessel but they all go wide although one of the electron batteries would have hit except for the battleship’s damaged combat control system. The sathar light cruiser returns fire but also misses.
The UPF light cruiser and heavy cruiser close in on the sathar vessel but the heavy cruiser is still well out of range. The sathar ship fires once again at the battleship this time hitting with its distruptor cannon shorting out the battleships defenses and ICMs. The battleship and light cruiser return fire. The battleship connects with a LB damaging the sathar light cruiser’s hull (11%). The UPF light cruiser is still too far away and its shots go wide.
The UPF fighters hit the sathar fighter with one of their assault rockets knocking out it’s assault rocket launcher.
Repair Turn 4
The lead UPF frigate repairs its combat control system and is now as functional as it can be without getting to a shipyard to repair its heavily damaged hull. The other frigate restores more of its engine capability. The UPF light cruiser repairs 13% of its hull while the assault carrier also gets a minor hull repair restoring 1%. The battleship focuses all of its repairs on its hull, hoping to survive the oncoming attack and restores 13% of its hull integrity.
The sathar fighter under attack by the UPF fighters finally fixes its navigation control system while the other fighter restores some of its maneuverability. The UPF light cruiser fixes its combat control system and brings its proton battery back on-line in preparation for attacking the UPF Battleship.
Shots are fired as the ships once more come in range. Click for full size image.
Turn 13
The sathar light cruiser makes a pass on the battleship firing everything it can at the larger vessel and using its maximum acceleration. The lone sathar fighter, its navigation control issues solved, begins accelerating away from the planet, hoping to surviving the next two rounds of assault rocket fire from the two UPF fighters.
Defensively, the battleship and light cruiser try to take out the sathar light cruiser before it can inflict any more damage on the battleship. The UPF light cruiser, at nearly maximum range misses, while the battleship connects with 2 laser batteries, a proton battery, and its disruptor cannon slightly damaging the cruiser’s hull (8%), knocking out its laser battery and engines, and inducing a malfunction in its navigation control system.
The sathar light cruiser returns fire with all of its function weapons but in the excitement of the moment, the gunner all miss and the battleship escapes unscathed.
The UPF light cruiser closes to torpedo range on the sathar vessel and opens fire with everything it can. The heavy cruiser continues to close and the battleship fires a long range salvo at the now retreating sathar light cruiser. The fighters again fire at the lone sathar fighter, this time hitting it with one of their assault rockets and destroying it.
Defensively the sathar light cruiser now focuses on its pursuer and fires at the UPF light cruiser hitting with both its electron and proton battery inducing a fire and damaging the light cruiser’s damage control system.
Returning fire at the sathar light cruiser, the battleship misses and the UPF light cruiser hits with its laser, electron, and proton batteries damaging the ship’s hull (14%), knocking out its rocket battery, and damaging its combat control system.
The sathar light cruiser gets its shot and fails. It probably should have stayed closer to the battleship to get one more try. Click for full size image.
Turn 14
The sathar light cruiser pulls to port and holds together. The fire on the UPF light cruiser knocks out its laser battery.
Defensively, the battleship and light cruiser fire on the sathar ship. The battleship hits with an electron and proton battery starting a fire and knocking out its stasis screen. The light cruiser hits with its proton battery and disruptor cannon knocking out the sathar ship’s disruptor cannon and electron screen.
The sathar light cruiser fires at the UPF light cruiser but misses.
The UPF light cruiser continues to tail the sathar vessel closing to rocket battery range while the heavy cruiser starts catching up with the other ships. The fire on the sathar light cruiser damages its hull (6%)
The sathar light cruiser fires on the approaching UPF light cruiser hitting with its electron and proton battery damaging its hull (4%) and knockign out a third of its engine capability.
The UPF light cruiser hits the sathar ship with its electron and rocket batteries destroying it and ending the battle.
Final moves of the fight. Click for full size image.
Turn 15
The fire on UPF light cruiser damages its navigation control system.
Repair Turn 5
The UPF light cruiser gets its fire under control, the assault carrier repairs its rocket battery but discovers that any more repair of its engines will require a shipyard, and the battleship repairs another 11% of its hull.
The sathar heavy cruiser fully repairs its engines.
Final repairs
Battle repairs of the UPF ships continue over the next four and a half hours as the ships return to orbit around Ken’zah-Kit. In the end, the second UPF frigate can only get its hull up to 65% integrity, and the battleship can only get its hull up to 58%.
The lone sathar fighter meets up with the heavy cruiser and is attached to the hull of the larger vessel where it will remain until they get back to a shipyard. It’s maneuvering is fully repaired as the ships accelerate out of the ship. The heavy cruiser gets all of its systems repaired over the next four hours expect its hull which it is only able to restore to 81% outside a shipyard.
Lessons Learned
The sathar just can’t seem to catch a break and finish off the UPF ships. I though the light cruiser was going to finish off the battleship but rolled over 80 for every single attack so it missed completely. The battleship only had about 26 HP at that point. (On a whim I rerolled all the attacks and the second time it hit with a PB and RB, the latter did double damage and destroyed the battleship. But alas, that wasn’t the actual roll.) The same with the ramming of the frigates. I thought for sure the UPF frigate hit by two fighters was going to be destroyed, it only had 12 HP left but then I just rolled 8 on 2d10 for the hull damaged sustained. And it wouldn’t have done any good for the third one to hit it as I only rolled a measly 2 HP damage for that ship as well. There were several other times where I expected the sathar to get better hits but the dice were just against them. The UPF had bad spells as well but it didn’t seem to be at those critical, ship-finishing moments.
I considered having the light cruiser ram the battleship but the odds were in the favor of the battleship avoiding the ramming attempt and if it failed, the sathar ship would have been at point blank range for both the battleship and the oncoming UPF light cruiser so it didn’t try. Although it probably should have stayed a bit closer to the battleship as it ended its movement. But I really didn’t expect it to completely miss. This does have me thinking a bit about the ramming rules, however, so there may be a blog post about that when I have time to think on it some more.
The UPF are pretty beat up with the two cruisers and a fighter as the only ships not needing to go to a shipyard for repairs, but they only lost a single fighter. The sathar on the other hand lost everything expect a fighter and a heavy cruiser. Task Force Cassidine has now destroyed two major sathar fleets while only losing 3 assault scouts and 4 fighters.
There is one more battle coming up (in the Liberty system) and then things are going to quite down a bit as the sathar just don’t have very many ships surviving at the moment. They are done to just 9 fighters, 1 cutter, 2 frigates, 1 destroyer 2 light cruisers, 2 heavy cruisers, and two assault carriers but they are spread out all over the Frontier and the starship construction centers (and two are in the battle coming up in the Liberty system and may not survive). Its going to take some time to get them all together and build a few more ships.
In a short, high-speed battle around New Pale today, the invading sathar forces were destroyed or driven off by the militia and the augmented Strike Force Nova.
The victory was not with out cost, however, as both UPF battleships were destroyed in the fighting, along with one of the UPF fighters. While the sathar losses were much higher, we mourn the loss of the crews of those ships
Goolar Nadd, New Pale News
Background
With the arrival of Task Force Relief (battleship, assault carrier, and 10 fighters) and its merger with Strike Force Nova, the UPF and Truane’s Star militia outgun the invading sathar fleet nearly two to one. Despite these odds, the sathar continue on to engage the UPF forces although they aim for New Pale instead of Pale to avoid the UPF Fortress at that world.
Order of Battle
Pale Militia
Armed Station
1 Assault Scout
1 Frigate
Strike Force Nova
17 Fighters
3 Assault Scouts
3 Frigates
1 Destroyer
3 Light Cruisers
2 Assault Carriers
2 Battleships
Sathar
8 Fighters
1 Cutter
2 Frigates
2 Destroyers
1 Light Cruiser
1 Assault Carrier
2 Heavy Cruisers
The Battle
Setup
Expecting the sathar to make a run at the station as they have in other systems (and in the battle here over a month ago), the UPF position the battleships on either side of the planet, one supported by a destroyer and the other a light cruiser. Out from the battleships is a pair of frigates on each side with a pair of assault scouts out and slightly back from the frigates. There are two wings of fighters beyond and a bit back from each pair of assault scouts. The assault carriers, each escorted by a light cruiser, are far back from the planet. The capital ships and assault scouts are all moving at speed 15, the assault scouts are at speed 20, and the fighters are at speed 30. The eight seeker missiles from the two battleships are arrayed in an arc around the planet.
The sathar, recognizing that they are not going to win this fight, are planning a high speed pass hoping to take out the UPF battleships and assault carriers and then escaping the system. They line up in two groups directly opposite the battleships. The upper group is comprised of a heavy and light cruiser, a destroyer, and a frigate while the lower group is composed of a heavy cruiser, the assault carrier and cutter, and a destroyer and frigate. The fighters are divided into two flights of four, one on each wing. All of the sathar vessels come in much faster than the UPF expected and are moving at speed 35.
Positions of ships and seeker missiles at the beginning of the battle. The two main groups of sathar ships are represented by a single marker with the actual ships displayed at the top and bottom of the map. Click for full size image.
Turn 1
The sathar capital ships accelerate to speed 37 and fly straight at and past the UPF battleships. The fighters accelerate to speed 40 turning in to fire at the battleships as well.
Defensively the assault scouts and frigates fire their laser batteries at the fighters and the frigates fire their rocket batteries at their sathar counterparts in each group. The battleship and destroyer in the upper group, along with the station, fire at the sathar destroyer, while the battleship and light cruiser in the lower group fire at the assault carrier.
The defensive fire at the sathar fighters is fairly ineffective, slightly damaging the engines on three fighters and knocking the hull integrity down to 38% on two others. However, none are destroyed and all are able to fire their assault rockets at the battleships.
The sathar frigate in the upper group is hit by a rocket battery knocking out 30% of its hull while the sathar frigate in the lower group is hit by two rocket batteries knocking out its laser battery and slightly damaging its maneuvering.
The destroyer in the upper group is pummeled by the UPF destroyer and battleship being hit with 2 laser batteries, 3 electron batteries, a proton battery, a rocket battery and the cannons from both ships. In the end, it has it defenses knocked off-line, its electron battery and engines knocked out, a hit to its combat controls system, its hull integrity reduced by 68%, and a fire breaks out on-board.
The assault carrier in the lower group doesn’t fare much better. It is hit by 2 laser batteries, an electron battery, 2 proton batteries, a disruptor cannon and a rocket battery. It loses its laser battery and 65% of its hull integrity.
The sathar unload all of their weapons at the battleship they fly over with the battleships firing 3 ICMs at each incoming torpedo.
The Admiral Clinton (upper battleship) is hammered. All 4 assault rockets from the fighters hit knocking out its engines and maneuvering capability and reducing its hull integrity by 22%. The sathar frigate hits it with its laser cannon knocking out the battleship’s disruptor cannon. The sathar destroyer hits with its laser cannon, rocket battery, and a torpedo that slipped through the ICM screen knocking out the battleship’s torpedo and ICM launchers and knocking the hull integrity down another 16%. The sathar light cruiser lands a series of hull hits with its disruptor cannon and electron and rocket batteries reducing the battleships hull by another 28%. Finally, the sathar heavy cruiser hits with its laser, electron, and proton batteries as well as its disruptor cannon knocking out the battleship’s proton screen, damaging its combat control system and reduces its hull integrity by another 28%. In the end, the Admiral Clinton has only 6% of its hull integrity left.
The sathar is the lower group were not as effective firing on the new UPF battleship, the Admiral R’kazk’tar. Only one of the four assault rockets connect knocking out the battleship’s disruptor cannon while the cutter misses completely. The sathar frigate hits with everything but its torpedo knocking out the battleship’s torpedo and ICM launcher and knocking half of its engines off-line. The sathar destroyer hits will everything expect its torpedo inducing an on-board fire and knocking out 35% of the battleship’s hull integrity. The sathar assault carrier scores a minor (<2%) hull hit with its laser battery while the sathar heavy cruiser only hits with it’s laser battery and disruptor cannon cutting the battleship’s maneuvering in half and knocking the hull integrity down another 13%.
Each sathar heavy cruiser deploys a single seeker missile, about 40,000 km behind their final positions where they expect the UPF to end the movement to fire their torpedoes at maximum range.
The maneuvering on this turn was so complicated, that I almost did a sathar movement map and a UPF movement one but in the end I left them on the same map. It’s a bit confusing but so was the maneuvering.
The seriously wounded battleship drifts away from the fight and two frigates join it as escorts. The other battleship, its MR reduced by half, turns and uses the gravity of New Pale to gain an extra turn. The other ships also loop around the planet, accelerating as much as possible to come around and bring all their weapons to bear on the various sathar vessels. The fighters split their fire between the heavy cruiser and frigate in the upper group, and the heavy cruiser and assault carrier in the lower group, assisted by the assault scouts firing on the heavy cruisers as well. The other ships focus their fire on the smaller more maneuverable ships. The assault carriers and their escorts accelerate and cross the sathar battle line hoping to get out of the maneuvering arc of the larger ships. They fire what weapons they can at the sathar fighters. The fire on the sathar destroyer knocks out its laser cannon.
Defensively, the upper flight of sathar ships focus their particle battery weapons at the damaged battleship, hoping to finish it off but they all miss. They use their laser batteries defensively against the fighters destroying one, nearly destroying another, lightly damaging the engines on a third. They fire their rocket batteries at the light cruiser but they all miss.
In the lower group of sathar ships, all the beam weapons are focused on the fighters but only one hits damaging the fighter’s combat control system while the rocket batteries are fired at the UPF destroyer but they all miss as well.
The upper UPF assault carrier connected with its laser and proton battery destroying one fighter and knocking out the assault rocket launcher on the other. The lower assault carrier hits with it’s proton battery and almost takes out a figher but it manages to hold togheter. The carrier’s light cruiser escort hits the same fighter with its laser battery, damaging the fighter’s engines, and a different fighter with it’s proton battery damaging its maneuverability.
The sathar heavy cruiser in the upper group is hit by 5 assault rockets and a laser battery from the fighters and assault scouts which damage its combat control system, short circuits its defenses, and reduces its hull integrity by 98% nearly destroying it.
The sathar heavy cruiser in the lower group gets away fairly unscathed as it is only hit by 3 assault rockets from the fighters and assault scouts knocking out its ICM launcher and maneuvering and reducing its hull integrity by 16%.
The sathar frigate in the upper group is hit by 2 assault rockets from the fighters as well as an electron batter, disruptor cannon, and torpedo from the light cruiser which knock out its defenses before the torpedo destroyers the ship.
The final fighter flight hits the upper sathar assault carrier with four assault rockets destroying it. while the sathar destroyer is destroyed by its UPF counterpart which hit with its laser and rocket batteries as well as torpedo that got through the ICM screen.
The sathar frigate in the lower group is hit by its UPF counterpart with a laser battery that damages its maneuvering and a torpedo that slips through the ICM screen but only manages to take out the frigate’s laser battery.
Maneuvering and final positions after the first ten minutes of battle. Click for full size image.
Turn 2
With the assault carrier destroyed, the sathar fighters are stranded and so continue the attack on the battleships. The flight that lost a fighter loops around to go after the heavily wounded battleship (Admiral Clinton) while the other group goes after the less damaged one. The heavily damaged heavy cruiser just drifts away from the battle while the light cruiser from the upper group turns to make a pass at the less damaged battleship (Admiral R’kazk’tar) as it accelerates away from the battle. The lower group, minus the destroyed assault carrier, just accelerate straight away from the battle at the heavy cruiser’s max acceleration (it has 0 MR), staying in formation. They fire on the UPF destroyer as they fly away. The fire on the Admiral R’kazk’tar induces a navigation control hit.
The sathar also activate the two seeker missiles they deployed the previous round. Unfortunately for the sathar, the UPF did not react as expected and the only ships nearby are the assault scouts. Each seeker missile goes after one of the assault scouts but they both miss.
Defensively, the battleships fire at the incoming fighters as do the assault scouts and the frigates escorting the heavily damaged battleship. They are assisted by the station and the lower assault carrier and it’s escort. Together the UPF ships manage to destroy two of the three fighters headed for the Admiral Clinton and two of the four headed for the Admiral R’kazk’tar, inducing a fire on a third.
The upper light cruiser and assault carrier fire at the light cruiser as it passes. It is hit by 2 laser, an electron, and 2 rocket batteries damaging its combat control system and engines, knocking out its ICM launcher and reducing its hull integrity by 23%.
The lone light cruiser fires at the drifting heavy cruiser connecting with a rocket battery and its disruptor cannon destroying the heavily damaged sathar vessel.
Finally, the group of frigates and destroyer focus their fire on the fleeing heavy cruiser from the lower group connecting with 3 laser batteries, a rocket battery and a laser cannon damaging the heavy cruiser’s combat control system and reducing its hull integrity by 46%.
Offensively, the surviving figher manages to hit the Admiral Clinton with its assault rocket destroying the battleship. The Admiral R’kazk’tar is hit by an assault rocket from the two fighers and a torpededo from the light cruiser reducing its hull integrity by another 36%.
The fire from the remaining ships are focused on the UPF destroyer. It is hit by 4 laser batteries and an electron battery which knock out its masking screen launcher, short circuit its defensive systems, and reduces its hull integrity by 46%.
The surviving battleship, with its navigation control damage and seriously damaged hull, pulls to starboard but manages to hold together. Given the speed differentials, and despite the greater acceleration of the smaller UPF ships, Spacefleet decides to not purse the main surviving group of sathar vessels but the upper two flight of fighters do go after the lone light cruiser. The assault scouts and the frigate and destroyer group go after the surviving sathar fighters. The fire on the sathar fighter induces a navigation control hit. The fire on the light cruiser cause 9 HP of damage.
Defensively, the sathar light cruiser fires at the incoming fighters but only manages to hit one with a proton battery lightly damaging its hull.
Offensively, the UPF fighters hit the light cruiser with all eight assault rockets destroying it while the frigates and destroyer destroy two of the three surviving fighters with the remaining fighter having its combat control system damaged, its assault rocket launcher knocked out, its hull integrity reduced by 38% and a fire started onboard.
Final positions after the second round of combat, the destroyed sathar light cruiser, damaged UPF battleship and UPF fighters are off the top of the map while the fleeing sathar ships are off the left side. Click for full size image.
Turn 3
The fire on the battleship burns through the hull reducing its hull integrity by another 10%. Its navigation control damage causes the large ship to pull to port and the strain on its severely damaged hull causes it to break apart destroying the vessel after only 10 days of active duty. The remaining sathar fighter is obliterated by the combined fire of the destroyer and frigates.
Repair Turn 1
The lightly damaged fighters manage to repair their systems almost immediately and the destroyer manages to repair some of its hull. The sathar heavy cruiser manages to repair some of its hull as well.
Final Repairs
After another hour and a half the damaged UPF destroyer manages to fix as much as it can in space. All of its systems are fixed but the hull is stuck at 66% integrity and it will need to get into the starship construction center at Pale to complete repairs.
After another hour the sathar heavy cruiser has repaired enough of its hull that the surviving ships resume their acceleration out of the system. Another 2.5 hours later, it has repaired as much as it can outside of a shipyard. All of the internals systems are back online but it’s hull is stuck at 75% integrity until it gets back to SSC#5 for final repairs.
Lessons Learned
I knew the sathar were going to lose this one but I expected them to do a little better than they did. They managed to take out the two battleships, part of their primary objective, but didn’t do as much collateral damage as I was expecting/hoping they would. Part of that was the dice were just not cooperative, especially on the defensive fire round of the UPF move in turn one. I rolled a bunch of 80’s on the sathar’s to hit rolls and nothing really connected. Although the same thing happened to the UPF at another point so I guess it evens out.
The sathar misjudged the positions on the first round and were unable to make pass at the assault carriers like they wanted. They managed to get some ships out of the battle but not as many as I was hoping they would. The UPF really cleaned up.
The loss of the battleships will be significant, those won’t be replaced anytime soon. It will be interesting to see how that affects the fights going forward.
What are your thoughts on the battle? Share in the comments below.
Earlier today, in the space around Kawdl-Kit, Task Force Cassidine engaged the invading sathar forces. After nearly an hour and a half of fighting, the last of sathar forces were destroyed.
While almost all of the Spacefleet vessels sustained serious damage, battle losses were light with the Task Force only losing three fighters and three assault scouts.
Hours after the battle, repair work for the heavily damaged assault carrier and battleship are still ongoing.
Vah’zen’rk – Kawdl-Kit Global Reporting
This one was a doozie. This was the longest lasting battle as far as number of turns of play go. Although that’s partially because the combination of speeds, damage, and lack of maneuverability caused everything to get spread out. You’ll notice the maps shift around a bit, especially toward the end as I shifted the view to keep the main part of the battle in view. I might have to shift to a larger map grid. As always this fight held a few surprises, not the least of which was the final outcome.
Background
Reinforced with some additional ships from SCC#10, veterans of campaign against the saurians, SBF-B2 reenters the K’tsa-Kar system with the intent to wipe out Task Force Cassidine. The UPF forces, while somewhat outgunned, are determined to hold the line here.
Order of Battle
Task Force Cassidine
6 Fighters
3 Assault Scouts
2 Frigates
1 Light Cruiser
1 Assault Carrier
1 Heavy Cruiser
1 Battleship
Sathar
7 Fighters
1 Frigate
6 Destroyers
1 Assault Carrier
2 Heavy Cruisers
The Battle
Setup
Task Force Cassidine elects to hold the battle around the planet, hoping to use the planet’s gravity well to their advantage even though there is no longer a station there. With no station to defend, the UPF form up in a broad line far back from the planet and the oncoming sathar forces to give them time to study the sathar deployment before committing. The capital ships are moving at speed 15 while the fighters and assault scouts are moving at speed 25. The six seeker missiles (from the battleship and heavy cruiser) are deployed in an arc on the side of the planet the sathar are approaching from.
The sathar, also cautious for this major battle, come in relatively slow, with their capital ships moving at speed 10 and fighters at speed 20. The assault carrier, escorted by the frigate, take the center position with a heavy cruiser on either side which is in turned flanked by a trio of destroyers and a flight of fighters.
Deployment at start of battle with seeker missiles shown for reference (they will only show up later when activated). Click for full size image.
Turn 1
While the sathar destroyers all accelerate to speed 13, the rest just drift forward at their current speed.
Closing ranks to defend against the expected oncoming flights of fighters, the light cruiser and assault scouts join the battleship while the frigates join up with the heavy cruiser and assault carrier. The fighters slow to speed 20 to remain out of range of all of the approaching sathar ships except possiblly the lower flight of fighters.
No shots are fired as everyone is still out of range.
Both sides approach the planet. Click for full size image.
Turn 2
Yhe upper flight of sathar fighters accelerate to speed 25 and make a pass at the upper group of ships, firing on assault rocket each at the assault scouts and light cruiser. The lower flight make a pass at the UPF fighters and fire an assault rocket at three fighters in that group. The sathar destroyers accelerate to speed 16 and fly out to the flanks with the upper group turning to head back into the fight while the lower group keeps their forward firing weapons aimed at the UPF fighters. The heavy cruisers accelerate to speed 12 and turn to cross in front of the planet while the frigate and assault carrier remain at speed 10 but turn to pass below the planet.
Defensively, all of the UPF ships fire at the upper group of incoming fighters, while the more distant ships don’t connect, it adds to the crossfire and shots from the closer ship manage to destroy three of the four fighters while almost destroying the fourth (it has 1 HP left).
The surviving fighter fires at the light cruiser and knocks out its engines, it will be stuck at speed 17 until it can get those repaired. The lower flight of sathar fighters all hit with their assault rockets destroying three of the UPF fighters (half the flight).
The UPF activate two of the previously placed seeker missiles. Upon activation, each of them detects the nearby heavy cruiser and accelerate, driving home into the ships. Both cruisers fire 3 ICMs to attempt to intercept the missiles but they fail. The upper cruiser has its ICM launcher knocked out while the lower suffers a devastating hull hit (76 HP – double damage) nearly destroying it.
Ignoring for a moment the fighters and the upper group of destroyers, the UPF ships focus on the other capital ships. The remaining fighters, the assault scouts, and the frigates and make a pass at the lower group of destroyers. The heavy cruiser and assault carrier go after the severely damaged heavy cruiser and the sathar frigate, while the battleship and light cruiser go after the other heavy cruiser.
Defensively, the frigate, upper heavy cruiser, and assault carrier focus their fire on the UPF light cruiser damaging its maneuvering, taking out its laser and proton battery, slightly damaging its hull, and starting an on-board fire. The heavily damaged heavy cruiser fires at the UPF assault carrier knocking out its engines (stuck at speed 16) and severely damaging its hull (a little over 1/3 of hull integrity lost). The lower flight of destroyers focus their fire on two of the assault scouts. One is lightly grazed suffering a 20% hull integrity reduction while the other is destroyed.
Under combined fire from the UPF light cruiser and battleship, the upper sathar heavy cruiser has its maneuvering and proton battery knocked out, and suffers a 43% hull integrity loss from multiple hits. While the UPF assault carrier misses, the UPF heavy cruiser finishes off the heavily damaged sathar heavy cruiser with it’s pair of laser batteries. The shots by those ships at the frigate are much better. The frigate manages to intercept the heavy cruiser’s torpedo with its ICMs, but the sathar vessel is hit with the cruiser’s disruptor cannon and rocket batteries from both vessels damaging its damage controls system and reducing its hull integrity to only 8%.
The lower flight of sathar destroyers doesn’t fair much better. The lead destroyer is hit by an assault rocket and laser battery inducing a navigation control hit and suffering 28% hull integrity reduction. The second is hit by an assault rocket from one of the fighters which scores a critical hit and the laser cannon from one of the frigates and is destroyed by the damage inflicted. The last destroyer is hit by two laser batteries and an assault rocket knocking out 54% of its hull integrity.
First shots fired. Click for full size image.
Turn 3
The surviving heavy cruiser, having no MR, accelerates to speed 14 to come in range of the assault scouts and frigates. The seriously damaged frigate just drifts forward at speed 10 and the assault carrier follows it but accelerates to speed 12 and turns to cross its path near the end of its move All three ships fire at the UPF assault carrier. The upper flight of destroyers swoop down and are joined by the surviving fighter from the upper flight. They unleash everything they have at the UPF battleship. The lower flight of fighters loop around and fire on the UPF frigates (2 AR at one and 1 at another) while one of the destroyers loops around to fire at the lead assault scout with everything but it’s torpedo which it fires at the second frigate. The destroyer with the navigation control hit loops away from the fight but fires at the remaining assault scout as it passes by. The fire on the UPF light cruiser damages its combat control system.
Defensively, the frigates and assault scouts fire their laser batteries at the oncoming fighters destroying one and lightly damaging another. The frigates fire their other weapons at the damaged destroyer making the attack on them knocking out another 30% hull integrity and short circuiting out its screens and ICMs.
The UPF heavy cruiser and assault carrier fire their laser batteries at the sathar frigate (short circuiting its screens and ICMs and inducing a navigation control failure) and all their other weapons at the passing heavy cruiser. The battleship and light cruiser fire their disruptor cannons at the heavy cruiser, which combinded with the fire from the heavy cruiser and assault carrier, destroy that ship. They fire 2 laser batteries at the incoming fighter but miss and concentrate the rest of their weapons on the lead destroyer damaging its damage control system, inducing a fire, and nearly destroying it with a critical hit (only 8% hull integrity left).
The lone sathar fighter fire a salvo at the battleship. While most of the shots miss, the ones that hit are significant. The fighter’s assault rocket knocks out the battleship’s ICMs, the lead destroyer’s torpedo scores a critical hit knocking out 25% of the battleship’s hull, and the second destroyer scores a critical hit with its rocket battery taking out another 22% of the hull.
The UPF assault carrier is hit by both the sathar frigate and assault carrier knocking out its proton and laser batteries and multiple hull hits knocking another 40% off of it’s hull integrity. Shots at the surviving assault scouts destroy the lead assault scout while completely missing the other one. The lead UPF frigate is hit by an assault rocket damaging its engines while the other is hit by an assault rocket and torpedo knocking out nearly half its hull and acceleration ability.
The UPF light cruiser, with its engines nearly completely off line, turns to starboard and drifts down toward the lone sathar destroyer at the bottom of the map. The battleship turns hard to starboard and flies down over the wounded sathar frigate and flying past the assault carrier. The surviving UPF fighters and assault scouts loop around and make a run at the sathar assault carrier. The two frigates go after the lone sathar destroyer at the bottom of the map and loop back toward the main fight. The UPF assault carrier, severely damaged and with its engines disabled, drifts away from the fight escorted by the UPF heavy cruiser. The fire on the sathar destroyer rampages through the ship knocking out its engines and damaging its combat controls system
Defensively, the upper flight of sathar destroyers once again concentrate all their fire on the battleship, hoping to do better defensively than they did offensively. Their hope is in vain however as only one hit does hull damage (reducing it by another 10%) but they also induce a navigation control malfunction, knock out its stasis screen, and damage its combat control systems.
The lone sathar destroyer in the middle of the fight fires at the UPF assault carrier short circuiting its defensive systems and reducing its damage control capabilities.
The lone destroyer at the bottom of the map with the navigation control malfunction focuses its fire on the more damaged frigate knocking out it’s laser cannon.
The sathar frigate and assault carrier fire their energy battery weapons at the incoming UPF fighters (one is hit for a 38% hull integrity reduction) and the frigate fires its rocket battery at the assault scout (critical hit destroying the scout) and laser cannon at the battleship as it flies by (that’s the shot that induced the navigation control hit mentioned above).
The UPF fighters fire at the sathar assault carrier but only connect with one assault rocket knocking out the carrier’s maneuvering. The frigates work to finish off the damaged destroyer with the navigation hit but only manage to hit with a single laser battery inducing an onboard fire.
The light cruiser fires at the second destroyer in the upper group as it flies away hitting with its laser, proton, and electron batteries damaging it’s hull and weapons before the light cruier’s torpedo slips past the ICMs launched by the destroyer and scores a critical hit, destroying the sathar ship.
The battleship fires it’s disruptor cannon and a laser battery at the frigate hitting the laser battery and destroying it, two laser batteries at the damaged destroyer in the upper group, one of which connects destroying that ship, and the rest of its weapons at the third destroyer connecting with the electron battery and torpedo and knocking out 70% of the sathar vessel’s hull integrity.
Finally, the assault carrier and heavy cruiser fire at the damaged destroyer in the middle of the map destroying it with multiple hits.
While the UPF ships are fairly damaged, they are definitely in control of the fight at this point.
Positions after the first half hour of battle. This is the first of the map shifts (moved up slightly this time for that destroyer at the bottom to stay on the map). Click for full size image.
Repair Turn
On the UPF side, the damaged fighter fails its repair attempt on its hull which will have to be repaired at a shipyard, luckily it is still over 50% hull integrity and doesn’t have to worry about breaking up. The second UPF frigate and the battleship both manage to repair some of their hull while the battleship also effects repairs to its combat control system. The light cruiser gets its fire under control while the assault carrier repairs its damage control systems.
On the sathar side, the two damaged fighters repair their hull while the surviving destroyer from the upper group fails its hull repair, leaving it permanently damaged below 50% hull integrity. The other surviving destroyer gets its fire under control while the assault carrier repairs its maneuvering and combat control systems.
Turn 4
Recognizing that they can’t win, the sathar attempt to at least finish off the already damaged ships. To that end, the upper destroyer and 3 fighters go after the assault carrier. Though severely damaged, the destroyer manages to hold together (rolled 37 with a 30% breakup chance). The assault carrier turns away from the battleship and accelerates as much as possible. The other sathar destroyer, although it put its fire out, still has a problem with its navigation control system and pulls a turn to port. It also accelerates.
Defensive fire:
The UPF assault carrier and heavy cruiser fire defensively at the sathar fighters, using their ICMs to defend against the incoming torpedo, managing to destroy two of the three fighters. The battleship fires everything it can at the assault carrier causing significant system damage (all maneuvering, navigation control damage, half engine capabilities, and knocking out its ICM launcher) and some minor hull damage (20%). The UPF light cruiser and frigates fire long distance shots at the other destroyer but the shots all go wide.
The sathar fighter fires its final assault rocket at the UPF assault carrier knocking out that ship’s masking screen system. The sathar destroyer hits the assault carrier with its laser battery and a rocket battery but only causes minor hull damage (15% hull integrity reduction). The sathar assault carrier hits the UPF battleship with both of its energy weapons inducing a loss of navigation control and some minor (~6%) hull damage. However, that is enough to put the battleship below 50% hull integrity and with the navigation control damage, it could break up
At this point, I really thought we were going to loose the battleship. Especially when it takes even more damage as part of sathar defensive fire phase of this round. But that same destroyer saved the battleship as well. This is where the damage to all the ships combined with their high speed, really started to spread things out. Any of the ship staying in the fight (mainly the UPF light and heavy cruisers) I tracked on separate maps so they could loop around and come back in if the fight lasted that long.
The battleship, with its navigation control damage pulls a turn to port. Luckily its damaged hull holds together (rolled 24 on 14). The frigates, unable to reach the assault carrier, go after the destroyer at the top of the map. The light cruiser, with its limited maneuverability turns to try to come back around to the battle area. The UPF fighters make a final run at the sathar assault carrier before turning to return to their assault carrier. They also activate two more seeker missiles, one accelerates and slams into the remaining sathar fighter destroying it. The second starts to go after the battleship but as the battleship flies away, turns its sights on the sathar destroyer.
Defensively the sathar assault carrier misses its shots at the UPF fighters while the sathar destroyer hits the battleship for another 5% hull integrity loss and knocks out all of its maneuvering. The sathar destroyer connects with the damaged UPF frigate knocking out some of its engines and nearly destroying it.
Two of the three assault rockets from the UPF fighters connect with the sathar assault carrier, one of which scores a critical hit and between the two of them reduce the carriers hull integrity by another 64%. The UPF frigates, assault carrier and heavy cruiser all fire at the remaining sathar destroyer at the top of the map connecting with multiple weapons and destroying it. The battle ship hits the destroyer at the bottom of the map with a laser and electron battery reducing its hull integrity by another 24%.
Start of the cleanup phase for the UPF. Click for full size image.
Turn 5
The two remaining sathar ships are heavily damaged. The assault carrier just drifts away while the destroyer, with its navigation control system damaged pulls a hard turn to starboard and accelerates to speed 19. It doesn’t break up from the strain.
Defensively, the battleship is the only ship in range and it opens fire on the destroyer hitting with all of its battery weapons damaging its combat control system and short circuiting its defensive systems, knocking out its torpedo launcher, reducing its maneuverability, and slightly damaging its hull (6%).
Offensively, the destroyer fires back at the battleship and hits with both its rocket battery and a torpedo (the battleship’s ICM launcher is damaged) which both damage the battleships hull and nearly destroy it. It has only 6% hull integrity left.
If the destroyer hadn’t knocked out the battleship’s MR, it would definitely have broken up from the strain of the turn this round.
The seeker missile reverses course and heads after the battleship and sathar destroyer, the undamaged UPF frigate turns and accelerates to speed 24 to chase after the sathar assault carrier. The UPF heavy cruiser (off the top of the map) with no foreseeable danger to the damaged UPF assault carrier, turns and starts to pursue the sathar assault carrier as well. The light cruiser (off the bottom of the map) continues to slowly turn back to the combat area and the damaged battleship, frigate, and assault carrier just drift on their current course. Finally, the fighters start to close with the assault carrier to board and rearm.
Defensively the assault carrier fires at the oncoming frigate but misses. The destroyer takes its final shots at the battleship hitting with its laser battery. Unfortunately for the sathar, it only damages the battleship’s engines instead of damaging its hull.
Offensively, the battleship fires its final salvo, including a torpedo at the destroyer but only hitting with an electron battery damaging its engines and a proton battery knocking it out its rocket battery launcher . The UPF frigate fires at the sathar assault carrier but doesn’t hit at the extreme range.
Chasing down the stragglers. Click for full sized image.
Turn 6
The sathar assault carrier continues to drift while the destroyer’s navigation damage causes it to pull to port and fly up toward the planet, its reduced maneuverablity reducing its chance of breaking up and spreading out its movement. Defensively the frigate fires once again at the assault carrier, this time dialing in the range and hitting with both the laser battery (damaging the combat control system) and the laser cannon (16% hull integrity), nearly destroying the ship. The assault carrier returns fire but misses.
The UPF frigate chases down the assault carrier and surviving the defensive fire (laser battery hit for 18% hull integrity), hits the carrier with its laser cannon for 20% hull integrity and a rocket battery knocking out is proton battery and destroying it. The seeker missile continues to pursue the destroyer.
Main battlemap after an hour of combat. Most of the surviving combatants are off the map which has shifted down to keep the sathar assault carrier in view. Click for full size image.
Repair Turn 2
The two UPF frigates, assault carrier, and battleship all repair some of their hull while the assault carrier also repairs the short circuit in its defensive systems and the light cruiser restores complete maneuverability.
The sathar destroyer manages to repair 18% of its hull
Turn 7
The destroyer’s navigation control damage causes it to turn to port toward the light cruiser and it accelerates to continue to stay away from the seeker missile. The light cruiser, its maneuvering repaired continues a wide turn to avoid the seeker as well, otherwise, it could have closed on the sathar ship. The frigate turns after destroying the assault carrier, accelerating to chase after the destroyer. No shots are fired.
The map has shifted up again and the UPF light cruiser is back in view. It would have been visible last turn except for the map shift. Click for full size image.
Turn 8
Continuing to accelerate, the sathar destroyer’s navigation damage turns it to starboard and it passes within 40,000 km of the light cruiser. Defensive fire from the more distant frigate misses, but the light cruiser connects with its electron battery knocking out the destroyer’s masking screen. The destroyer returns fire and hits with its electron battery knocking out the cruiser’s ICM launcher.
The seeker missile continues to chase the ships but can’t catch them at their high speed. The light cruiser turns to run parallel to the sathar destroyer’s path. The frigate loops around and comes up directly behind the destroyer and the heavy cruiser completes it large turn and comes in directly at the destroyer.
Defensively, the destroyer fires at the frigate as it closes but misses with everything.
The light cruiser can only fire it’s EB and misses. The frigate fires its energy weapons (everything else is expended) and scores critical hits with both knocking out 52% of the sathar destroyer’s hull integrity (it only has 6% left). The heavy cruiser opens up with all of its energy weapons but misses as well.
Final positions of the ships still in view at the end of the end of the fight. The UPF heavy cruiser, has managed to turn around back to the battle area. Click for full sized image.
Turn 9
Now severely damaged after the hits from the frigate, and with the navigation control damage causing it to pull to starboard, the strain on the sathar destroyer’s hull is too much and the ship breaks apart as the crew tries to save it.
Task Force Cassidine has won the day, and while most of the capital ships are damaged (the heavy cruiser is the only one unscathed), they have only lost 3 fighters and three assault scouts. The crews get to work immediately upon field repairs.
Final Repairs
The frigate still in the fight completes its repairs in another half hour and just needs a reload to be fully operational. An hour an a half later the light cruiser finishes its repairs. An hour after that the other frigate completes as much repair as it can, its hull is only at 73% integrity but the rest of the work is going to need to be done at a shipyard. Another hour and a half (4.5 hours after the battle ended) the assault carrier completes all of its repairs. Finally, 6 hours after the battle is over the battleship completes the repairs of all its systems except for its stasis screen which is going to require a work in a shipyard.
Lessons Learned
I was really surprised the UPF did as well as they did. I really thought the sathar were going to win this one or at least leave Task Force Cassidine gutted. From a purely hull point perspective, the sathar had the advantage 631 to 518. Some lucky damage rolls, like the seeker missile doing 76 HP to the heavy cruiser on round two, and bad rolls on the sathar’s side, definitely helped tip the scales in their favor.
The other problem was that the sathar just couldn’t manage to finish off the UPF ships. The UPF battleship, one of the frigates, and the assault carrier were all nearly destroyed. They all were down to single digit hull points during the fight. The sathar just couldn’t manage to get the killing blow in. Those low hull points were late in the battle (expect for the assault carrier) so eliminating the ships would not have made much difference in this fight but eliminating them would have definitely helped the sathar’s war effort later on. As it is, Task Force Cassidine is almost completely intact. They will have to replace some fighters and assault scouts, but that’s relatively easy compared to having to replace a battleship and assault carrier.
What did you think of this fight? What should either side have done differently? Share your thoughts in the comments below.
A lone sathar frigate, detected three days ago shortly after it entered the system was engaged today by two militia assault scouts. While one of the assault scouts was heavily damaged in the encounter, the militia ships eliminated the enemy vessel in a single assault run.
Speculation rages as to the origin of the sathar vessel. There are unconfirmed reports that Spacefleet has established routes outward from Theseus toward the Great Void. Could it be that the sathar are coming in along those routes?
Victoria Sorensen, StarPlay News
Background
A lone sathar frigate jumped into the Theseus system as part of an effort by the sathar to chart a route to the Frontier from the Liberty system. Due to an alert that the ship was headed in that general direction from the forces of PG Liberty, the Minotaur militia was on alert and patrolling the system. The frigate was detected by two of the militia assault scouts and they vectored to intercept. Unable to jump out of the system before being caught, the frigate turns to fight the oncoming militia ships. This battle occurs in deep space.
Order of Battle
Minotaur Militia
2 Assault Scouts
Sathar
1 Frigate
The Battle
Setup
The opposing forces enter from opposite sides of the map. The militia are moving at speed 30 while the sathar frigate is moving at speed 20. The militia are the attackers in this scenario and will move first. The sathar are not necessarily trying to destroy the militia ships but rather escape the battle.
Initial positions of this fight. Click for full size image.
Turn 1
The two forces close with each other but no shots are fired. The militia ships swing wide to flank the sathar and maintain their speed. The sathar frigate changes course to go after the upper assault scout and uses its maximum acceleration but remains just out of laser canon range.
Initial closing movement. Click for full size image.
Turn2
The closer assault scout turns to avoid flying into range of the frigates laser cannon and loops around, remaining at speed 30 and ends in a position to fire its assault rocket at the frigate. The farther assault scout accelerates to speed 34 and makes a pass at the frigate firing its assault rocket from the same position where the other assault scout ends its movement but flits out of torpedo range to end its move.
The frigate focuses its fire at the closer assault scout while firing all of its ICMs at the incoming assault rocket from that ship. The laser battery hits for 8 HP of damage. The ICMs are ineffective and both assault rockets slam into the sathar frigate. The laser battery from the second assault scout also hits the sathar vessel. The combined damage from both ships obliterates the sathar frigate and that quickly the fight is over.
Final positions when sathar frigate is destroyed. Click for full size image.
Repairs
Unable to repair the hull damage, the wounded assault scout heads carefully back to Minotuar where it will enter the starship construction center for repairs.
Lessons Learned
The sathar should have matched the militia ships’ speed. Or at least started at speed 25. If it had, it could have brought at least its laser canon and laser battery to bear on the lone assault scout on turn 1 and possible even its rocket weapons (if it had started at speed 30). That would have significantly changed the outcome of the fight as it would have had another salvo at the militia and could have possibly eliminated one of the ships right away.
Once again this went faster than I expected. The damage rolls for the attacks were 18 and 20 HP for the assault rockets and 10 HP for the laser battery. While I rolled well for the damage effects (all of the hits did hull damage which I wasn’t suspecting), I actually rolled really low on damage for the assault rockets as both of those were double damage rolls! They should have done more on the order of 30 HP each. But it was still enough.
The sathar have part of the route to the Frontier from Liberty mapped, but because of the misjump the frigate made, the route in not complete.
Arriving from the recent engagement in the K’tsa-Kar system, the local militia ships, together with elements from Spacefleet arrive back at Ken’zah-Kit just as the sathar arrived at the planet. Arriving just too late to prevent the destruction of the fortified defense station in orbit, the militia and Spacefleet vessels made quick work of the sathar invaders, destroying all five ships in just twenty minutes of fighting.
While several ships will need time in a starship construction center to complete repairs, the only loss, beyond the station, was one of the militia assault scouts which was lost with all hands.
With Task Force Cassidine in-system and only three days out, it feels like Ken’zah-Kit is secure for now.
Rak’tal-ka, StarPlay News
Background
The UPF forces had wanted to engage the sathar in deep space, but having jumped in on the opposite side of the system, they were only able to intercept the attacking forces as they approached the planet. The frigate UPFS Flying Cloud, which has been on a continuous high speed transit from the Liberty system before the fighting started, finally joins up with the rest of PG Meteor just a day before the sathar are engaged. Task Force Cassidine is also in the K’aken Kar system. However, they just jumped in a day ago and are too far away to participate in this fight.
With Task Force Cassidine coming in behind them and the militia and PG Meteor ahead of them, the sathar have to fight and intend to take on the smaller group first, hoping to defeat them and then join up with SBF-B2 that is currently en route from the K’tsa-Kar system before taking on the UPF task force.
While the UPF have more ships, the sathar have a slight hull advantage in this fight. It was supposed to be a tough fight for the UPF forces.
Order of Battle
K’aken-Kar Militia
2 assault scouts
1 fortified station
UPF – PG Meteor
3 assault scouts
1 frigate
2 destroyers
Sathar
1 frigate
2 destroyers
1 light cruiser
1 heavy cruiser
The Battle
Setup
The station is on the side of the planet facing the invading sathar forces and orbiting counterclockwise. With both fleets racing to intercept and coming directly from jumps into the system from opposite directions, they are starting on opposite sides of the map. The K’aken-Kar militia and PG Virgo are coming in fast on the left side of the map moving at speed 30. The K’aken-Kar militia assault scouts are high above the planet with the UPF assault scouts are below the planet. The frigate and destroyer are flying in formation in the middle and come in just above the planet.
The sathar, moving fast at speed 25, appear in their standard diamond formation headed straight at the station and planet. They intend to make a fast run at the station before engaging the smaller ships.
Initial positions for the battle. Click for full size image.
Turn 1
The sathar maintain their speed making a full frontal assault on the station, veering off just 20,000 km away to avoid colliding with the planet and turn toward the UPF capital ships and the militia.
Defensively, the stations fires all of its weapons at the closest sathar destroyer hitting with its laser batteries knocking out the destroyer’s masking screen launcher and causing an electrical fire. It also fires all of its ICMs at the salvo of incoming torpedoes.
Offensively, the sathar fire every weapon they have at the station. The UPF and militia forces can only watch helplessly as 17 of the 26 weapons fired, including 3 torpedoes that made it through the ICM screen, connect with the station and obliterate it.
Angered by the destruction of the station, the Frontier forces swoop in to exact their revenge. The UPF assault scouts use their maximum acceleration and swing up from below the planet to fire at the lower destroyer. The militia assault scouts line up for an assault rocket run at the sathar frigate and then veer off behind the planet, accelerating to speed 34. The frigate and destroyers slow to speed 29 to just come within rocket battery range and fire on the sathar heavy cruiser; they turn away from the planet at the last moment to prepare to fire at the sathar ships as they fly by.
Defensively, the sathar frigate and light cruiser fire their energy weapons at the militia assault scouts, each targeting a single ship, and their rocket batteries at the UPF frigate. The other three ships target the lead UPF destroyer. The sathar frigate misses completely but the light cruiser connects with its laser battery and electron battery damaging the assault scout’s engines and causing a loss of navigation control. It also hits the frigate with the rocket battery knocking out its laser cannon. The other sathar ships don’t do much better with the far destroyer and heavy cruiser missing completely while the closer destroyer only hits with its electron battery shorting out the UPF ship’s defensive systems.
While the gunners on the sathar vessels were not very effective, the same cannot be said for the gunners on the Frontier ships. The militia ships hit with one laser battery and both assault rockets destroying the sathar frigate. Similarly, the UPF assault scouts hit the lower destroyer with a laser battery and two assault rockets destroying that vessel. The UPF capital ships fare nearly as well. While the torpedoes didn’t make it through the screen of ICMs fired by the heavy cruiser, the large ship was still hit by a rocket battery from the frigate and each destroyer hit with their laser cannon, laser battery, and a rocket battery. Combined, the damage from the weapons disabled the cruiser’s distruptor cannon, damaged its engines, knocked out its maneuvering, and seriously damaged it, leaving it’s hull integrity at a mere 26 percent.
Courses and positions after the first round of combat. Click for full size image.
Turn 2
Seriously damaged, the sathar heavy cruiser just drifts away from the battle firing at the UPF frigate as it passes. The light cruiser and surviving destroyer loop around the planet (speed 25 and 26), buzzing the UPF capital ships and firing their torpedoes at the lead destroyer. They then train all of their energy weapons on the militia assault scouts and fire their rocket batteries at the UPF assault scouts.
Defensively, the UPF frigate fires at the heavy cruiser and connects with its laser cannon, cutting the large ship’s remaining hull integrity by over half but not quite destroying it. The UPF destroyers fire at the remaining sathar destroyer only missing with a rocket and laser battery. The weapons that do hit knock out the destroyer’s electron battery before ripping its hull to shreds. The assault scouts all fire at the light cruiser and two of the UPF assault scouts hit knocking out the light cruiser’s laser batter and causing significant hull damage with maximum damage laser battery hit (20 HP).
Of the weapons brought to bear, only the heavy cruiser’s electron battery misses the UPF frigate with the torpedo slipping through the ICM screen. The frigate has its damage and navigation control systems comprised and its hull severely damaged, knocking its hull integrity down to just 32 percent. The torpedo from the light cruiser misses the UPF destroyer, but it hits the trailing militia assault scout with it’s proton battery and distruptor cannon destroying it. It also hits one of the UPF assault scouts with the rocket battery knocking its hull integrity down to less than half.
The 3 UPF Assault scouts chase after the Heavy cruiser while the destroyers and surviving militia assault scout go after the light cruiser. The UPF Flying Cloud (frigate) with a damaged navigation control system, pulls a hard turn to starboard, looping around the planet. It manages to hold its damaged hull together and not break up from the strain of the maneuver.
The heavy cruiser fires at the incoming assault scouts but only hits one with a laser battery knocking its hull integrity to just 33 percent. The light cruiser fires at the militia assault scout hitting with an electron battery knocking out half of the small ship’s hull integrity. It fires its rocket battery at the lead UPF destroyer but misses.
The UPF assault scouts hit the heavy cruiser with 2 of their assault rockets finally destroying the larger vessel. The other ships combine their fire on the light cruiser hitting with 2 laser canons, a laser and rocket battery, and an assault rocket and torpedo. The torpedo took out the cruiser’s proton screen but the other weapons all ripped into its hull destroying it.
Final moves and positions. The heavy cruiser and assault scouts are an additional 8 hexes off the map with the assault scouts veering of at a range of 4 hexes after making their assault rocket attack. Click for full size image.
Repairs
The UPF frigate manages to hold together after another hard turn to port and then gets its navigation control issues fixed despite its reduced damage control capabilities. Over the next 3 hours it repairs the rest of its systems but can only get its hull to 75% without spending time in a shipyard. The militia assault scout repairs some of it’s hull but only gets it back to 66% before running into issues that will require a shipyard. The UPF assault scout hit by the heavy cruiser repairs most of its hull but has a little (13%) that needs attention in a shipyard. The other assault scout and the damaged destroyer get all their systems back online in under an hour.
Lessons Learned
This one didn’t go anything like I expected. With the ships staring out on the opposite sides of the map, I knew the sathar would get a free round on the station. I expected them to take out the station (it was a primary target) but maybe not as spectacularly as they did (170 of 140 HP with three weapons, including 2 torpedoes, doing double damage).
From there everything went pear shaped for the sathar. Their tactics were actually pretty sound but their gunners couldn’t hit to save their lives (literally). The sathar light cruiser gunners did just fine, constantly hitting their targets but the other ships, beyond hitting the station, were not so accurate. This really didn’t help the sathars’ cause as they were unable to eliminate the assault scouts and suffered a few more assault rocket hits than they would have liked.
That, combined with the absolutely amazing firing from the UPF, both just in accuracy in hitting and also some well-placed double-damage rolls on the first round (two AR for 34 HP each on the frigate and destroyer, a LB hit for 14 HP on the destroyer, and a RB hit for 34 HP on the heavy cruiser), destroyed two of the sathar ships and seriously wounded a third right off the bat shifting the balance of power to the UPF. Had those ships survived that first round, the UPF would have probably still won but the casualty list would have been much higher. The rapid destruction of the ships on round one allowed the UPF to focus their fire on round 2 and keep the engagement short.
The incoming SBF-B2, being a just slightly larger version of the fleet destroyed here (an extra destroyer plus an assault carrier with 7 fighters) doesn’t have a chance against the combined forces of Task Force Cassidine (which is roughly the same strength, substituting a frigate, 3 assault scouts and a battleship for the three sathar destroyers), PG Meteor, and the surviving militia assault scout. The sathar are going to have to reasses their strategy.