The Expanding Frontier

Creating Sci-fi RPG Resources

  • Home
  • Order Eclipse Glasses
  • Order a Map
  • Order Miniatures
  • Supporters
  • About
  • Bio
Monthly Archives: December 2020

State of the Frontier – Dec 2020

You may have noticed that I didn’t have a post last week. I think that was the first weekly post I’ve missed since I started the blog. The truth is, I just didn’t have anything ready to write about, nor the time to generate anything. Hopefully you were too busy with the holidays (like I was) to really notice or miss it.

I don’t do yearly retrospectives in these updates so looking back will only be December. However, given some of the things that happened this month, looking forward will take a bit longer view than just January. Read on.

Looking Back

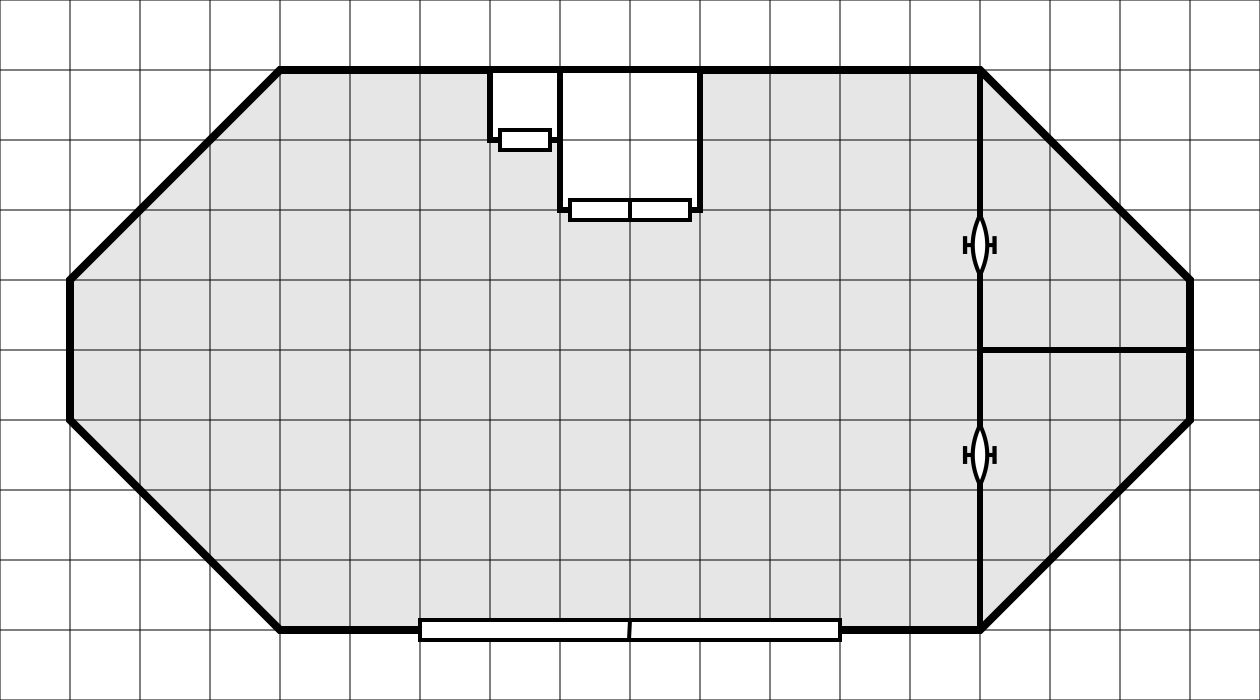
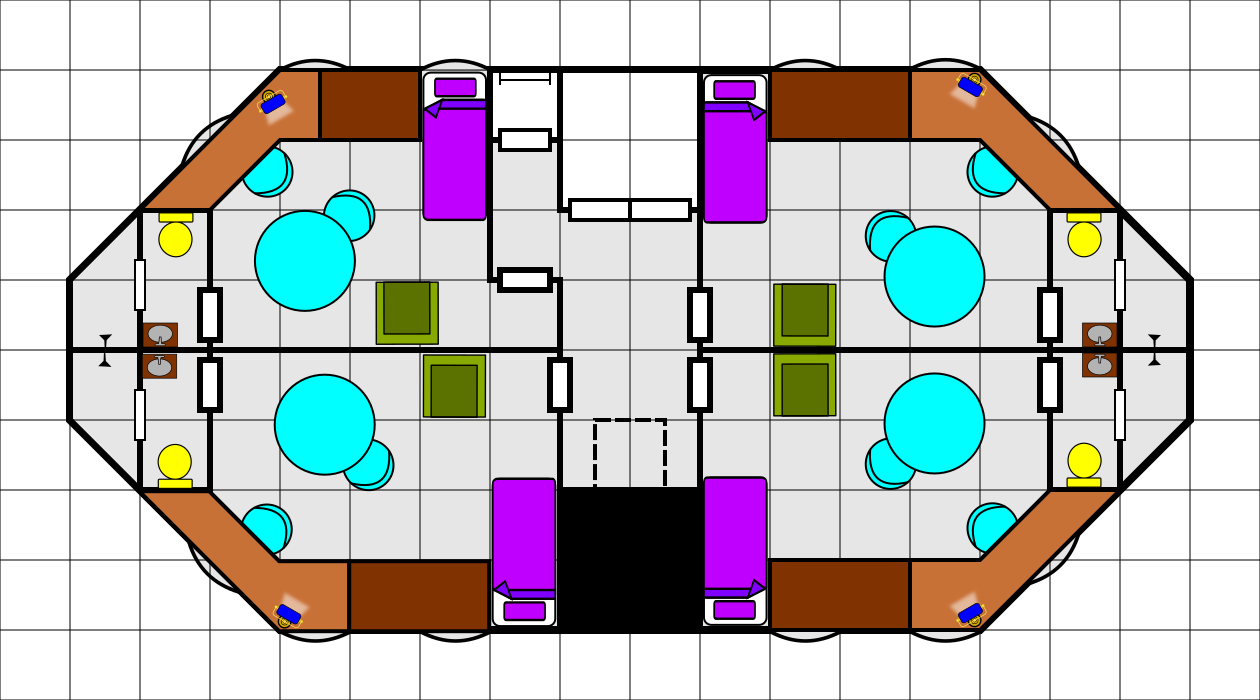
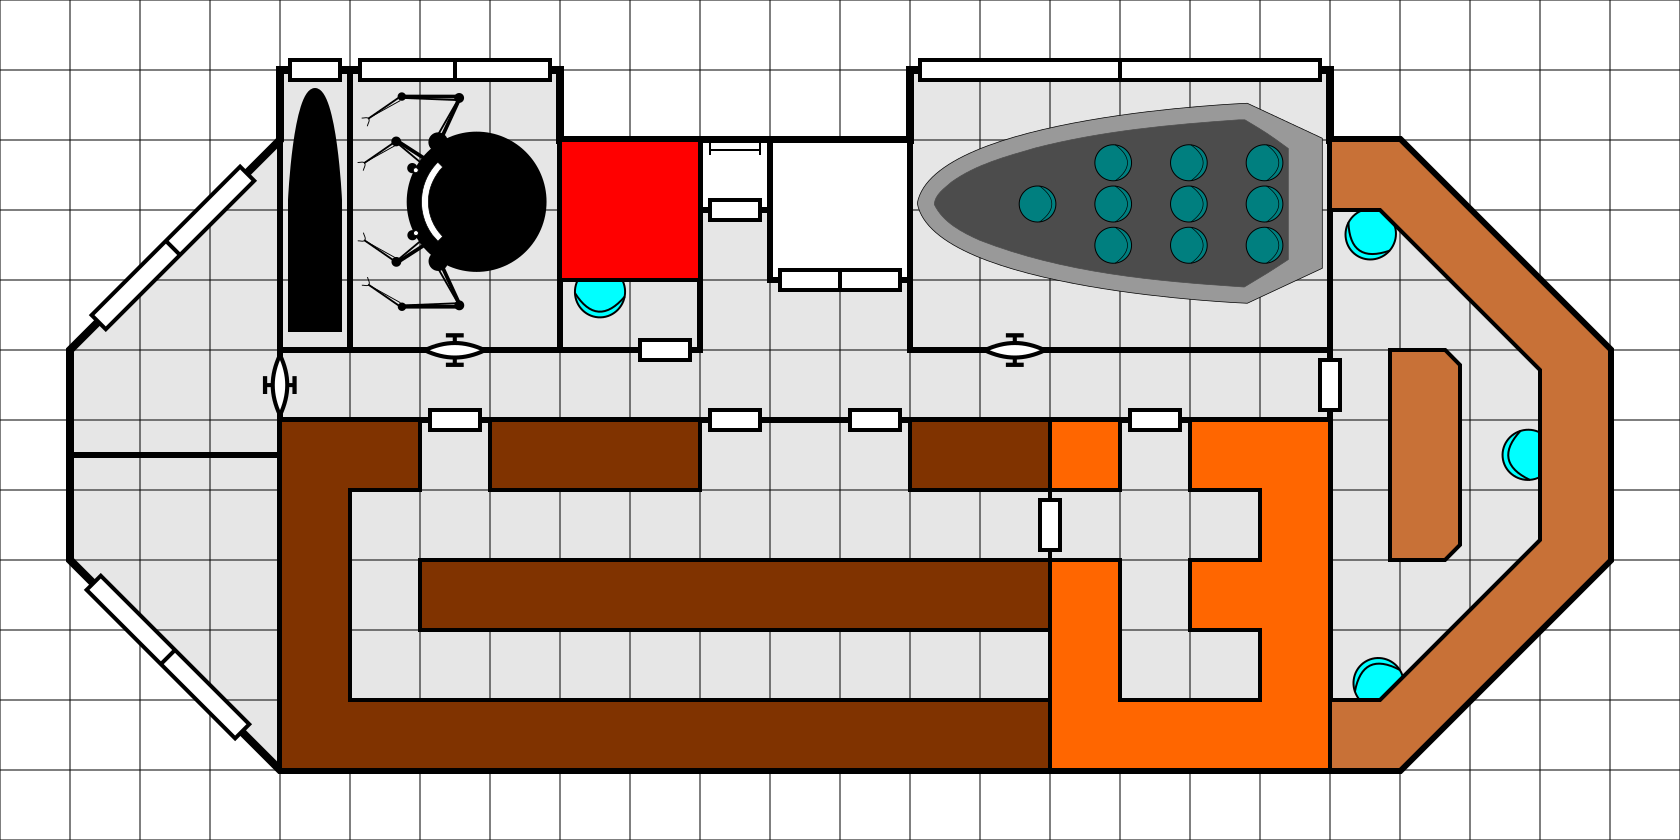
As I already mentioned, I missed last week’s post. That said, I still managed to get four posts up (this one makes five) this month. It’s just that one of them was the off-schedule battle report post of the Battle of Ken’zah-Kit. We started the month with the usual Detailed Frontier Timeline post which I followed up with some musings on the Second Sathar War triggered by all the work I’ve been doing on that in the the timeline. I then posted the first part of a series with videos showing how I make my ship deck plans as I work on the deck plans for the HSS History’s Hope.

And that was it on the blog front. The reason for that is that there has been a lot going on behind the scenes.

First and foremost, I changed jobs mid-month. Now instead of being an Adjunct (part-time) Professor at the local university teaching an occasional computer science class and working full time as a software developer at NASA, I’m now an Assistant (full-time, tenure-track) Professor at the university and only part-time at NASA. Making that transition (I’m no longer working from home), plus the holidays, has severely cut into my free time this month and I haven’t had as much time as I’d like to work on game related topics. I’m still getting my schedule sorted out and figuring out when I have time to schedule my various activities.

What time I did have was put primarily into the next issue (#31) of the Frontier Explorer. I’ve edited most of the articles and will finish those up this week and get the preliminary layout done so we can figure out what art is still needed. Once again, I had more things scheduled for the issue than will fit so we’re already well on our way to having all the content for issue 32.

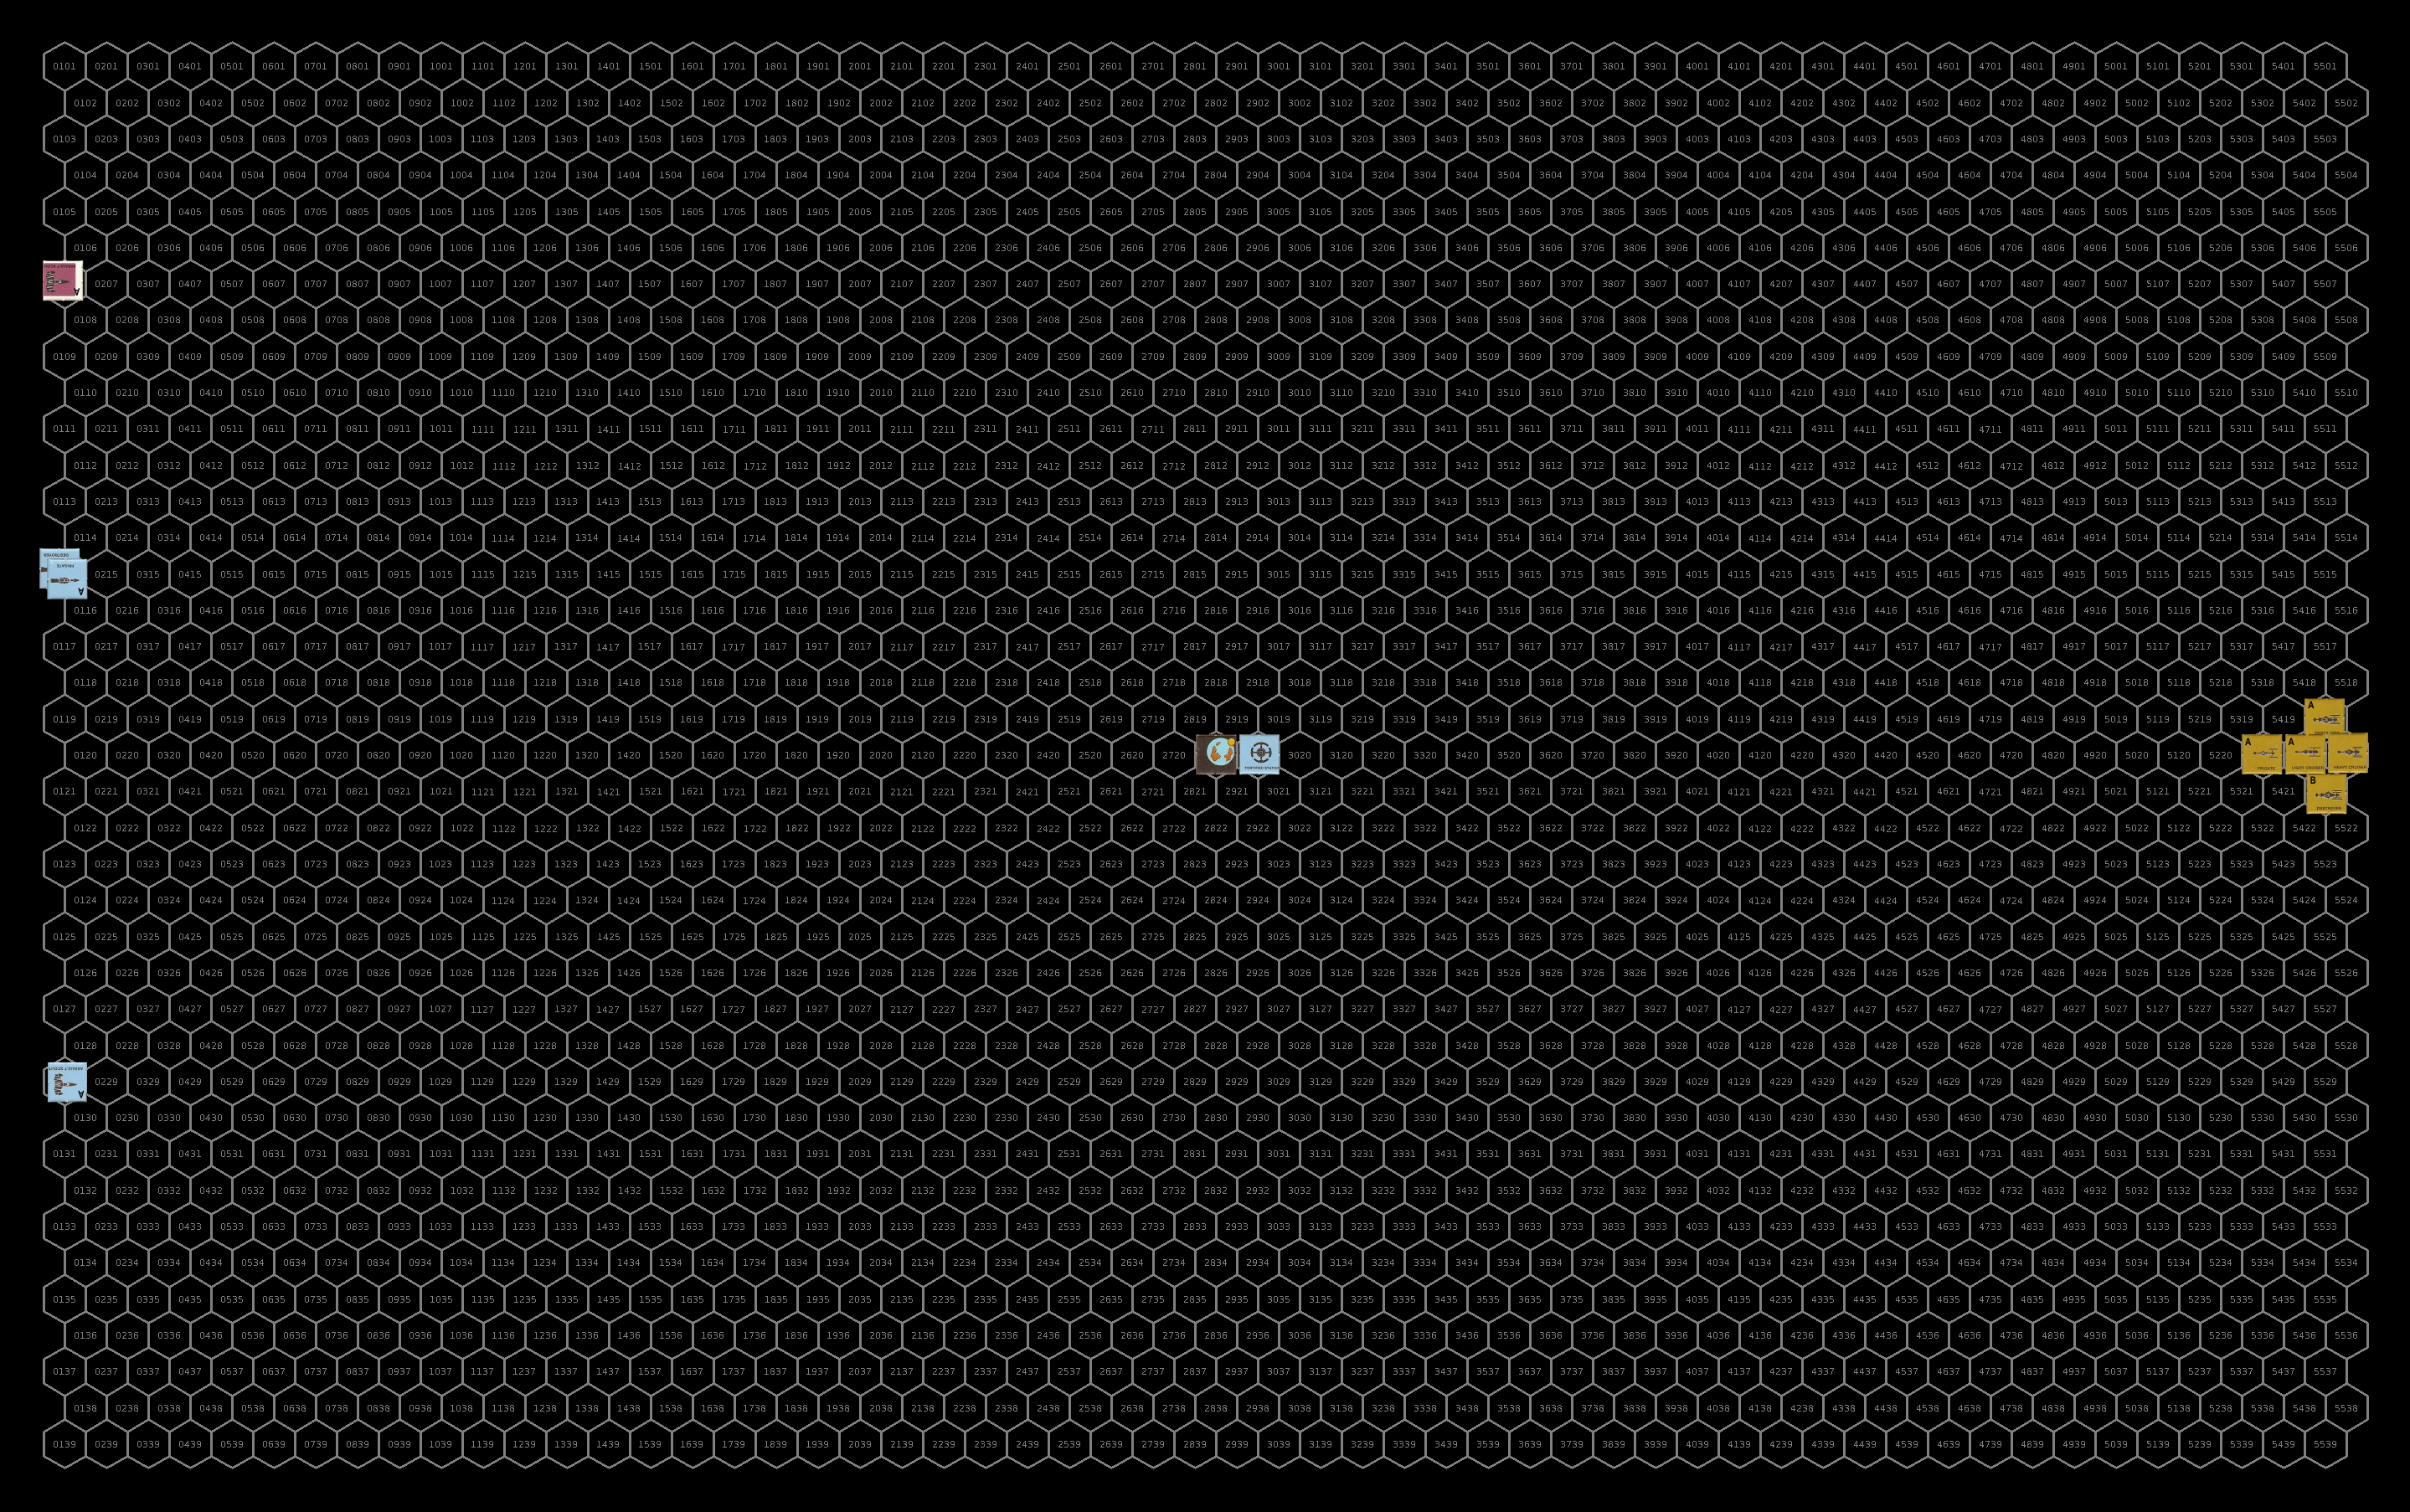
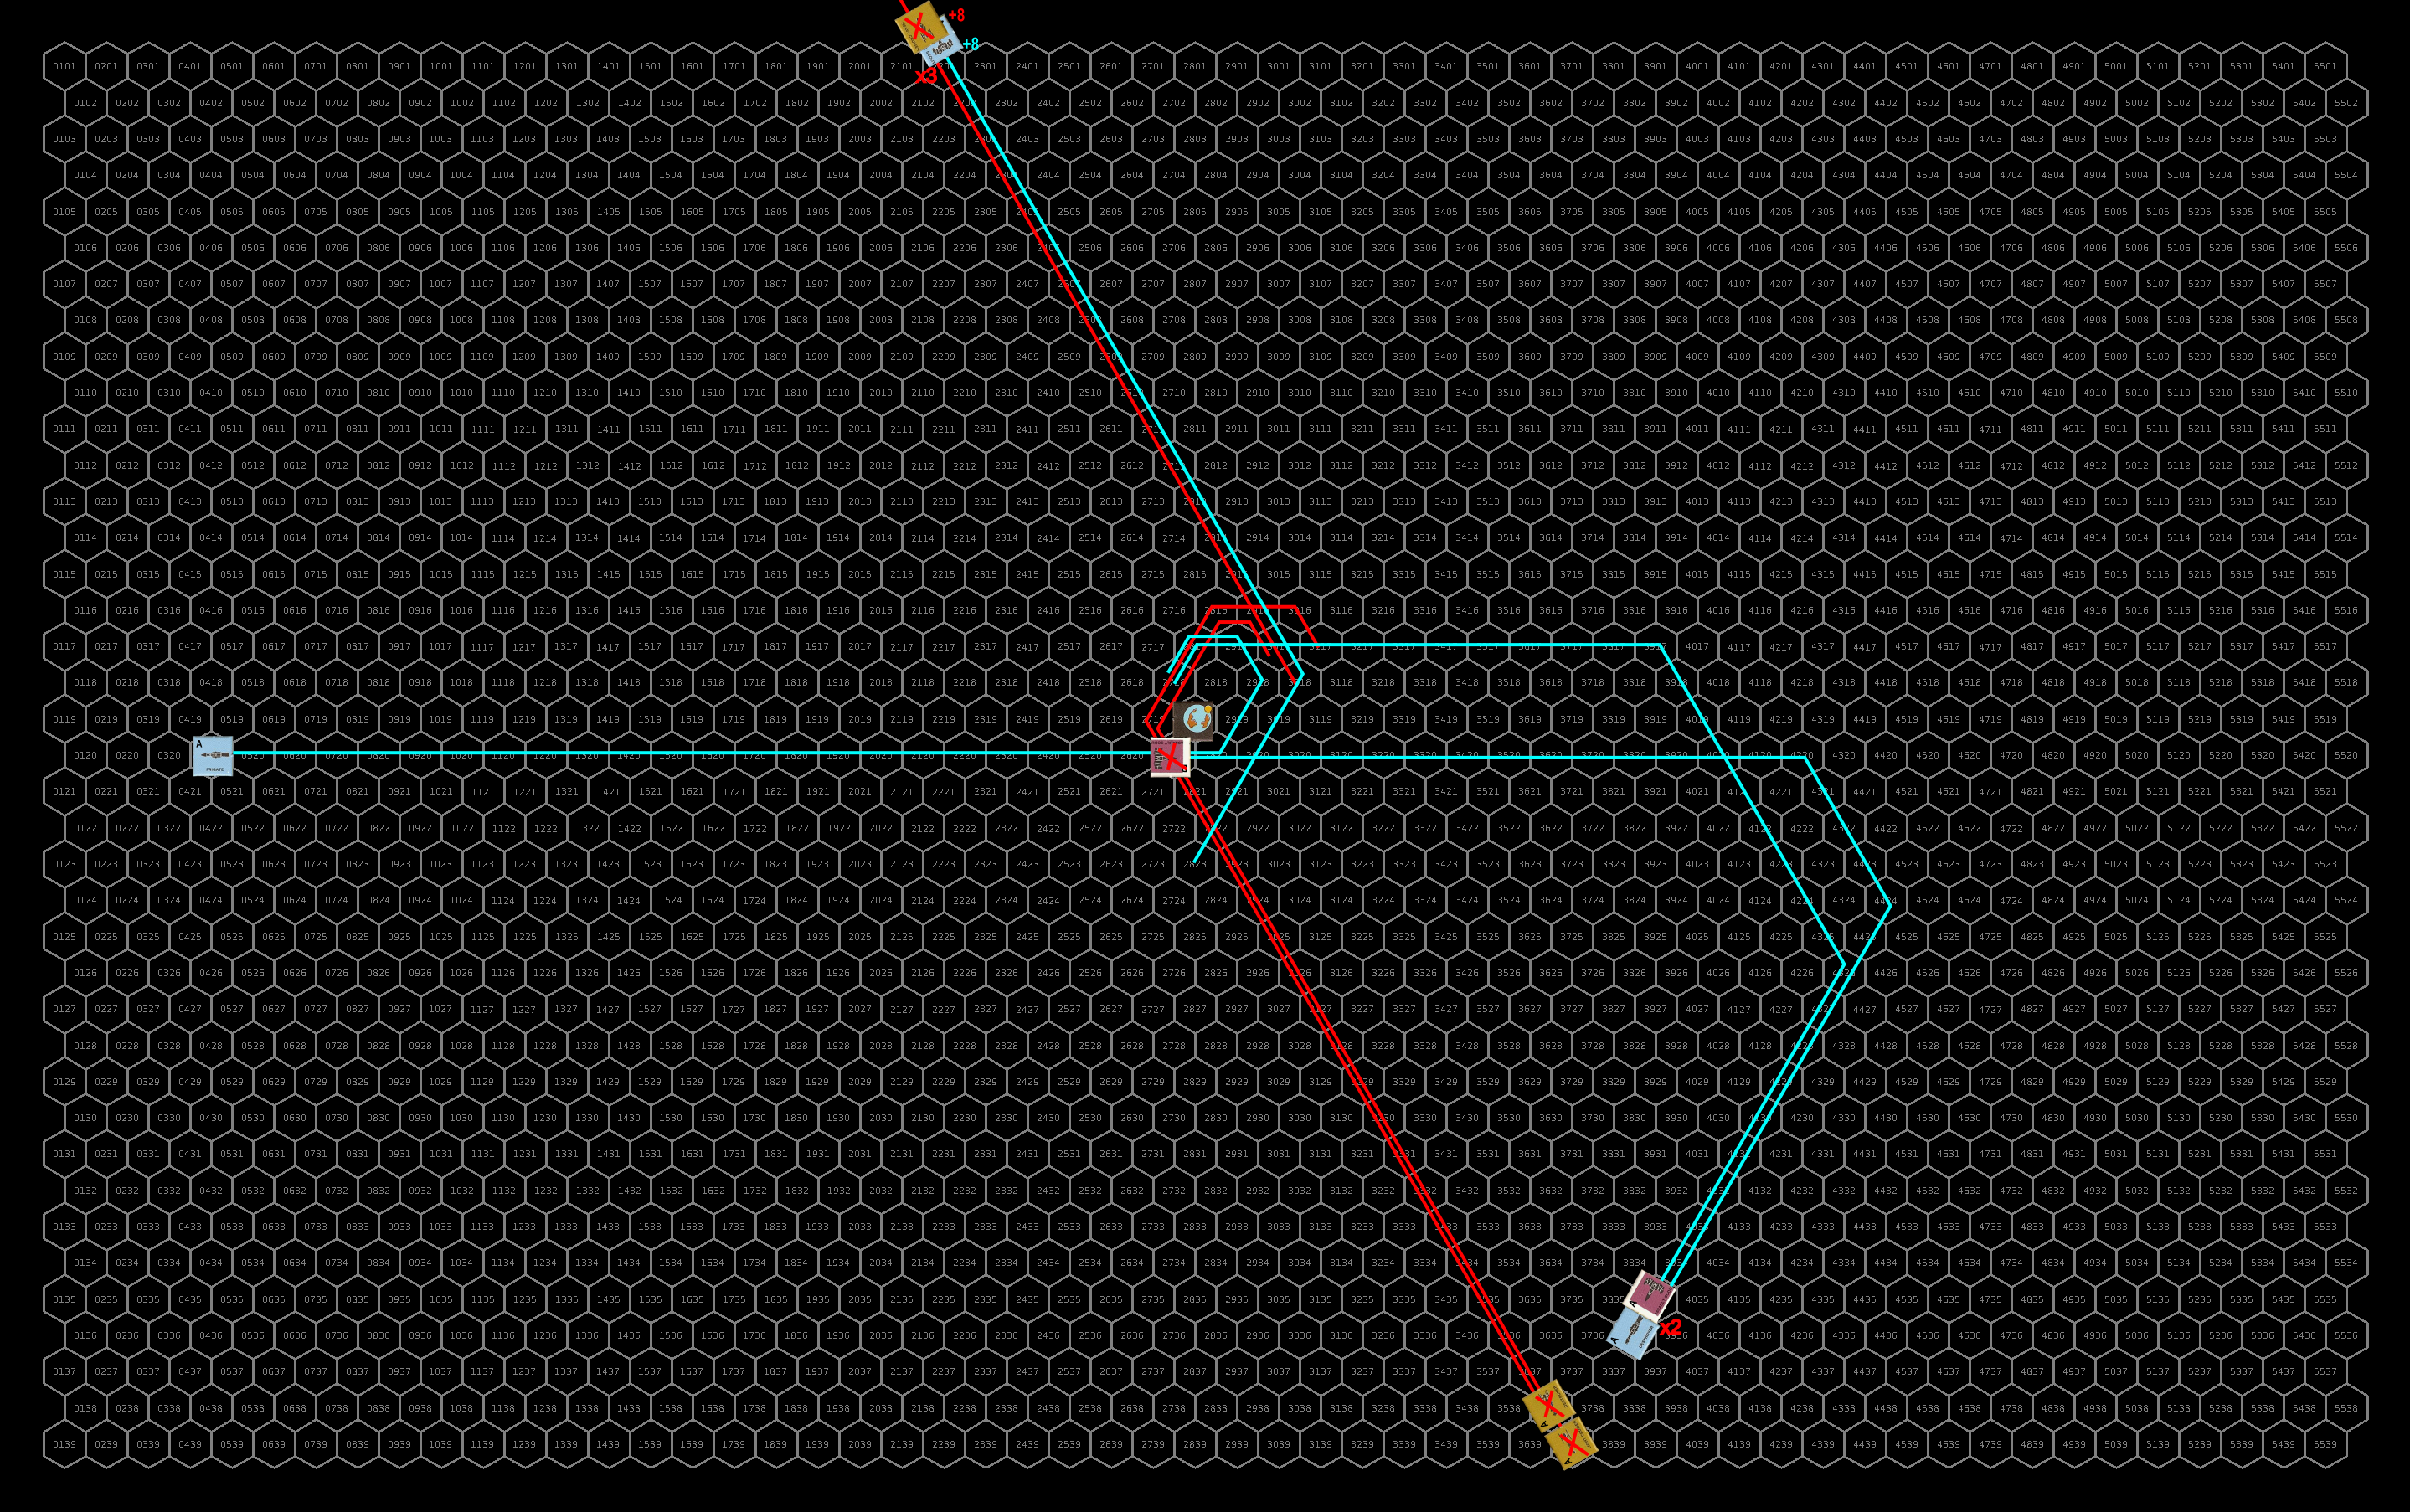
Another chunk of time was spent on the timeline. With the aftermath of the battles last month and this, there was a bunch of logistical things I had to track and work through for the timeline and that ate up a bunch of time.

The other thing that happened is that I started looking at the Star Frontiersman magazine again. Ever since Bill Logan passed the magazine off to me, I’ve had two things I’ve wanted to do. The first is bring it back to life, probably on an annual or semi-annual basis filling the pages with adventures, kind of like TSR’s old Dungeon magazine. Looking over the magazine submission queue, there are several adventures in there and it may be time to kick that project off.

The second is that I’d like to make print versions of the Star Frontiersman issues available for those that want them. The first 17 issues used to be available in black and white from Lulu but with the trademark kerfluffle a a couple of years ago, WotC had Lulu take them down. I want to make the full color versions (like the PDFs) available. The problem is that for most of those back issues, I only have the PDF files, not the original documents, and the format needed to make the print version is not just the PDF that currently exists. I started to go into an explanation of the issues involved but realized I should save that for a separate post and do it proper justice. The short version is that I managed to get proper print files for issues 1-6 ready and sent off. I’ve received the print proof or issue 1, which I did first, and am happy with it. I’m just waiting on the other five. This project sucked up the remaining free time I had this month (including some time I probably should have spent on the Frontier Explorer).

Looking Forward

On the blog, there will definitely be another Detailed Frontier Timeline post next week, and toward the end of the month, three more battle reports (which I still need to play out the battles for). I also hope to finish the History’s Hope deck plans and post those and the associated videos. Beyond that, I don’t know what other posts, if any are coming. It’s really going to depend on what I end up working on.

The other thing that is definitely coming out this month is the next issue of the Frontier Explorer and the print-on-demand editions of the first six issues of the Star Frontiersman. I haven’t missed an issue of the Frontier Explorer since we started in 2012 and don’t plan on starting now. That will always get my #1 priority slot. And the Star Frontiersman issues are just waiting on the print queue and shipping. Once they arrive and I can look them over, I’ll make them available.

Over the past month or two, I’ve been thinking a lot about what projects I want to work on going forward and what that will mean for this blog.

For the past half year or so, I’ve felt really pressured to try and get an article out each week even when it hasn’t been something I really wanted to work on for focus my time on. When I started the blog, I also launched my associated Patreon campaign. I originally promised one post a month but later decided to try to get a weekly post out as a way to generate interest and Patreon supporters even though a weekly post was way down on the goals list. But I felt that a more frequent and regular posting schedule would be helpful in growing my readership and patronage. And I was was able to keep it up for over 2.5 years. However, I think going forward, I’m going to dial back my posting a little bit.

I’ll continue to have the Detailed Frontier Timeline posts on the first Tuesday of each month, and I’ll continue to do these State of the Frontier posts on the last Tuesday of each month. In between that though, I think I’ll be posting on a more sporadic basis as I finish projects and/or have progress to report. I also might start doing more small announcement type posts when I learn about other things going on or have something to mention. But that begs the question of what will I be working on beyond the Detailed Frontier Timeline.

First, I want to finish up the deck plans of the HSS History’s Hope and produce a Technical Manual for the ship. That should be good for at least two posts. One, which I hope to have ready by the end of the month, on the rest of the decks, and a second giving more details about the ship in general, maybe with more detailed room descriptions. Then there will be an announcement post when the final Technical Manual is available.

Second, I want to get back to my 3D modelling. Both finishing up the recreations of the miniatures from the Privateers boxed set that TSR created, and making new ships of my own design. I’m going to start with the Privateers. If I can manage to get one done each month, that will get me through to June. When I get to my own designs, they may or may not come with deck plans. I’d like to Technical Manuals for each one but may shift to a lighter “spec sheet” version that doesn’t go into quite as much detail as my Technical Manuals but still provides game data on the ships.

Third, and related to the modeling effort. I have a new starship construction system nearly complete (it has been for a long while) that I want to finish and make available. I’ve posted excerpts from this in the past and really need to just finish it and get it out there. My plan is to base all the miniature designs of my own creation on ships created with this system.

Fourth, I want to finish the Death at Rosegard and Ghost Ship Osiris adventures that I started when I began this blog. I’ll probably start with Death at Rosegard as that one is mostly done, I just need to stitch it all together. Then I can tackle Ghost Ship Osiris. The latter was put on hold as Bill wasn’t really doing anything with FrontierSpace. However, with Trevor Holman’s FrontierSpace adventures coming out (that I edit for him), and Bill starting to get things going again with FrontierSpace, it’s time to finish that one up as well.

Finally, I want to get back to writing. I’m 75,000+ words into a first draft (probably about a quarter done) of a Star Frontiers novel and have an outline for the sequel to my book Discovery. I’d like to start spending more time on those as well. I’m not sure how much of the writing will show up in the blog until I get toward later drafts and have excerpts I can post, but it’s something that I will be spending time on.

Final Thoughts

Things are going to look a little different going forward, but hopefully there will still be plenty of content for you to enjoy. What types of material would you be interested in seeing that I haven’t mentioned already? Or what aspects of the mentioned projects would you be interested in seeing me write about here? I’m always open to suggestions.

I want to end this post with a big thank you to all those who have supported me on Patreon over the years. You have really helped to keep this blog going. If you are already a supporter, thank you again. If you’re not a supporter, consider helping out.

December 29, 2020 Tom 1 Comment

HSS History’s Hope Deck Plans – part 1

This is going to be a two-parter, mainly because I haven’t finished all the deck plans. The reason is that instead of just drawing the deck plans, I decided to record myself doing so and make a set of how-to videos about how I make the deck plans, similar to what I did for drawing the Rosegard maps (part 2, part 3, part 4) a couple of years ago. But because of that, I haven’t had a chance to record all the videos with everything going on. This post will provide links to the maps and videos I have finished, and the next one (hopefully sometime next month, I hope to record the rest over the Christmas break) with provide the rest of the decks.

All of the maps are drawn at 140 DPI or 70 pixels per grid square which is exactly the size needed for Roll20 and most virtual table tops.

Getting Started/Cargo Deck

The first video shows the set up of my drawing environment and then we draw the first/lowest deck on the ship, the cargo deck, which is also the simplest. Here’s the video:

Here’s the final map for the Cargo Deck.

Cargo Deck map. Click for full-size image.

This map is fairly simple, there is the elevator and ladder well, the main cargo bay, and two smaller sealed cargo bays on the right side. These smaller rooms have secure doors that can be locked. There is the main cargo bay doors at the bottom of the map. These open downward to form a loading ramp to get into the cargo bay if landed on a planet’s surface.

Crew Deck

There are two videos for this deck. The first one fixes some minor issues with the cargo deck and then gets to work on the crew deck. The second one adds in the portholes for the deck.

This is actually the deck plan for five different decks on the ship as they are all the same except the Officer’s Deck which has a ceiling access to the bridge deck. Here is the final map for these level.

Officer Deck. The only difference between this and the other decks is that the dashed square (which represents the access to the bridge) is absent on the other decks. Click for full-sized image.

Once again the deck is fairly simple, consisting of four nearly identical cabins, with one being slightly smaller due to needing to access the ladder well.

Each cabin has a bed, desk, table, several chairs, wardrobe and private bath.

Science and Exploration Deck

This is the final deck for this installment. This is the deck that houses all the exploration equipment (atmoprobes, remote probes, landing drones), the ships laboratory, a small lifeboat and workpod, and the hydroponics and life support system.

And here’s the deck plan.

Science and life support deck. Click for full-sized version.

You may notice that this deck looks a bit different than the end shot in the video. As I mentioned in the video, I forgot about the life support machinery when I was drawing it. I’ve gone back and fixed that mistake.

The missile silhouette is the atmoprobes, the are two of them, one on top of the other, The two bays on the left with nothing drawn in them are the landing drone (top) and remote probe (bottom) bays. The area on the right is the laboratory and the large area at the bottom is the hydroponics bay (left) and life support machinery (right).

This deck changed the most from my original sketches due to the creation of the 3D model. You may notice that the three bays at the top “stick out” from the the basic shape of the ship. As I was making the model and working on the hull, I found that there was more space available given the angular shape I gave the hull. So I was able to extend these bays out instead of having them take up space from the hydroponics and life support area and still be within the sloped edges of the hull. You can see the cutouts for these bays doors on the model.

Final Thoughts

There are only three maps here but they actually represent 7 of the 12 decks in the ship so on some level, I’m over half done. This is a short post, although if you watch the videos, you’ve got a bit more than an hour and a half of viewing ahead of you.

I had hoped to finish all of the deck plans but I’ve been crazy busy this month (among other things I start my new position as a computer science professor today) and just haven’t had the time to dedicate to this project as I’d like. So I decided to do this post for today and finish up the other ones in a future post.

December 15, 2020 Tom 4 Comments

Thoughts on the Second Sathar War

Obviously, as I’ve been playing through the battles and coordinating the movements of the UPF and sathar forces for the Detailed Frontier Timeline, the events and conditions surrounding the Second Sathar War have been on my mind. A lot.

While the rules in the Knight Hawks Campaign Books are really geared around a balanced war game, I’ve been porting the scenario over more to the RPG side and looking at it from that perspective. In this post, I thought I’d collect some of the ideas I’ve had along the way. The topics are not necessarily connected or in any particular order but all relate to the how the Second Sathar War would impact or play out in the Frontier. So let’s get started

The Rim

I already mentioned this in one of the battle reports, but I’m not really considering the Rim in my narrative beyond the two battles I’ve already reported. I’ve never sat down and worked out the starship construction capabilities of the Rim, the order of battle for the Flight (the Rim’s version of Spacefleet), or any of those logistical considerations.

When I set this scenario up, literally decades ago, I didn’t have a copy of Zebulon’s Guide so the Rim was never in my considerations. Since I’m really just playing out that setup from so many years ago, and I never did the background work necessary for the Rim, they just weren’t part of the plan. I’m really just assuming that their fortunes go the same as in the Frontier.

Civilian and Megacorp Ships

I think handling these other Frontier ships is the biggest issue that moving this from a war game over to the RPG side of things needs to consider and I’m not sure how I’m going to address it completely yet.

In looking at starship construction based on the listed starship construction centers in the Frontier, I’ve estimated that without any changes to the SCCs, there are probably about 2300 ships flying around the Frontier, which is probably low. But let’s use that number to start.

There are 23 worlds in the Frontier (including Volturnus), so if you just divide those ships out, that’s about 100 ships per world. That probably shifts around a bit, for example, Laco, in Dixon’s Star, is an outpost world with very low population, so it probably doesn’t have as many ships. Neither would Volturnus. And the more heavily populated worlds probably have a little more. Morgaine’s World in Prenglar is also an outpost but since that’s the home of Spacefleet, I give them just as many ships as at least a medium population planet and say that those are all the Spacefleet ships.

Plus there are the ships that the megacorps own. We know that Streel and Pan Galactic have military ships, it stands to reason that WarTech and CDC do as well and I even gave some to Trans Travel in my timeline. So some fraction of those 2300 ships are going to be military vessels owned by the megacorps. All of which could do some damage to sathar ships invading a system.

Finally, and what I really want to focus on, is that given that piracy is a concern for ships in the setting, even the “non-military” ships are going to be armed to some extent or another, even if it is just a laser battery or three on any ship HS 6 or larger.

Let’s assume for a minute that every ship in the Frontier has at least a laser battery. Now some won’t have any weapons but others will have more than one so it probably all averages out. What happens if 50 of these ships decide to not sit idly by while Spacefleet dukes it out out with the sathar but join the fight?

First, lets just look at the “average” hull damage done by a laser battery. On the damage table, there is a 10% change of double hull damage, a 35% chance of regular hull damage and a 55% chance of damaging some other system. The laser battery does 1d10 damage for an average of 5.5 hull points of normal damage and 11 points when double damage is called for. Multiplying that out by the percentage that they occur means that on average, ignoring the damage from system hits, a hit by a laser battery does 3 HP of damage (11 points 10% of the time, 5.5 points 35% of the time and 0 points 55% of the time).

At an average of 3 HP of damage per hit, 14 hits kill a frigate, 17 kill a destroyer, 24 kill a light cruiser, 25 kill an assault carrier, and 27 kill a heavy cruiser. Do you see where this is going?

The next question is how often do these laser batteries hit? The base “average” chance to hit with a laser battery is 50%. But since laser batteries suffer from range diffusion, it’s only that high if the ships are within 10,000 km (1 hex on the game map) of each other. Getting that close means that the sathar can use their rocket batteries and torpedoes against you if they want and since these are civilian ships, we’ll assume they try really hard to stay out of the range of those weapons. So they shoot from 50,000 km (5 hexes) away and have a chance to hit of only 25%. Which means that the average laser battery shot, factoring in the miss rate, does a little over 0.75 HP of damage any given round.

That doesn’t seem like a lot, but remember that is an average taking into account of all the probabilities and that is per ship. So let’s look at those 50 ships. If you take 50 ships, each doing ~0.75 HP each time they fire, you have a combined damage output of 37-38 HP. And since the laser battery can fire both offensively and defensively, that doubles to about 75 HP each round of combat. That’s enough damage to take out any single ship expect a heavy cruiser.

And the truth is, that there is a good chance that the HP damage output is actually larger. We have 100 shots (50 ships, 2x each) at 25% to hit. So 25 of those shots hit the target. 11.25 (45%) of those do hull damage while the other 13.75 (55%) do system damage. But if the system damage results calls for a hit on a system already destroyed, you get hull damage instead. Some of those system hits are going to shift over to the hull side and increase the damage. (I really should write a program to analyze this and get the actual numbers.)

The bottom line is that in any give turn, that swarm of civilian ships could take out any one large sathar ship, two frigates, or a swarm of fighters.

From the sathar side, there is really nothing you can do about this. You are looking at 25-50 targets (depending on how you distribute the laser batteries), each with 30 or more HP, and taking out 2 or 3 each round is not going to make much difference in their damage output. They will overwhelm you with sheer numbers. Death by a thousand cuts.

This is something that the war game doesn’t have to deal with but which will definitely come into play in an RPG-level look at the conflict. Maybe the civilian and mega-corps ships won’t get involved. But if their worlds are threatened, I don’t really see them not stepping up, at least a good number of them. And what if Spacefleet calls for a 3rd Common Muster? (There has to be something in the UPF charter about that.) Then they will be involved. The sathar are going to need more ships.

Starship Construction Centers

In the war game, ship construction and replacement is very abstracted. Every 20 days, the UPF get 2 fighters and/or assault scouts for each fortified station on the map and a capital ship for every fortress. The sathar just have a base 35% chance to replace every ship lost in the previous 20 days.

A big part of this project for me was to see how using the starship construction rules, combined with the distribution of UPF starship construction centers, and giving the sathar some SCCs as well, would play out in the logistics of what ships were available for combat. I knew this would drag things out as you couldn’t replace ships that quickly but wanted to see what would actually happen. We’ll find out as this plays out.

But, as the first battles have been fought, and the UPF is looking to replace ships, I started really looking at the distribution of the SCCs in the Frontier. Until now I had just taken them for granted and not though much about it. And for the most part, the type of construction center and its location make sense for the SCCs described in the book. Analyzing that (and maybe reorganizing them) may be another post in the future. But three of the SCCs stood out as a little odd. Let’s look at those from least troublesome to most (in my opinion).

Clarion (White Light)

This is a Type III SCC which means it can have up to 20 hull sizes (HS) of ships under construction but they cannot be military vessels and cannot have atomic drives.

To me, this feels a little bit odd. White Light is the nexus for jumps to four different systems so it’s a major hub system (and the only access to Theseus). Maybe because it is the setting for the Warirors of White Light adventures but it seems to me that there should be a more major construction center here.

However, with the Type II center just a system away in Theseus, and the fact that the main output of the planet is resources, not industrial products, maybe having a small shipyard is okay even if the planet does have a high population and is a major crossroads.

Outer Reach (Dramune)

Like at Clarion, the Outer Reach shipyard is a Type III SCC. There are a couple of things that stand out for me here.

One is the lack of an SCC at Inner Reach. Given the animosity between the two worlds, which is part of the canon background material before you even factor in the events of the Dramune Run module, and the fact that animosity has erupted into fighting in the past, if Outer Reach has a SCC, I would expect Inner Reach to have one as well. I don’t see them being willing to wait for ships to come in from Fromeltar or Cassidine, they would want to be able to build them themselves.

The other issue I have is the SCC class. As a Type III SCC, this shipyard is not supposed to have the capability to produce military vessels or ones that use atomic drives. But since this world is the home of a major crime syndicate, and supplies and supports pirates, I see this shipyard as where many of those pirate vessels, which are assault scouts, corvettes, and frigates, are created. Thus the shipyard can obviously handle military class vessels and atomic drives and should really be a Type II.

Because of this, for the Second Sathar War, I’m classifying this shipyard as a Type II-s (the s is for small). It can still only handle 20 HS of ships total like a Type III SCC, but like a Type II, can build ships with atomic drives and military ships up to HS 6 (i.e. destroyers).

Pale (Truane’s Star)

This is the one that baffles me the most. The rules say that this is another Type III shipyard. Pale is classified as a medium population, which tends to indicate a smaller shipyard, but its main economies are industry and resources, which would lend itself to ship building and therefore a larger SCC. Having a Type III SCC here just doesn’t make sense to me for a couple of reasons.

First, everyone knows that the sathar have a jump route into the Frontier that goes through Truane’s Star. This was the locus of the First Sathar War that resulted in the founding of the UPF. Spacefleet has a fortress here, it would stand to reason that there should be a good shipyard to build up ships here as well.

Second, and more important to me, this is the world where Streel is headquartered. We know they make ships, the corvette is designed by them, and they have a number of ships to fight against the ships of the Pan Galactic Corporation in the corporate wars. Assuming the shipyard at Gran Quivera (Prenglar) is owned by PGC where they have their headquarters, and the one at Triad (Cassidine) is owned by the Cassidine Development Corporation where they have theirs, if the #1 and #3 megacorps have Type I SCCs, then the #2 megacorp should have at least a Type II shipyard, If not a Type I. It’s a matter of corporate pride and sustainability. I mean, if they don’t have their own shipyard, PGC and CDC could just deny building them ships and they’d have to travel even farther afield to Hentz or Fromeltar to get ships build. It just doesn’t make sense.

I’m leaving it as a Type III SCC for the Second Sathar War in the timeline, but if I ever revisit the SCC distribution in the Frontier, I think Pale will be getting a bigger one.

Other Thoughts

It seems I had one more item that I wanted to talk about but it is slipping my mind at the moment and I didn’t write it down when the idea occurred to me to write this post a week or so ago. If it does come back to me, I’ll have a topic for a future post.

Overall, the sathar did not fare too well in their initial foray into the Frontier. In fact, if this was just the war game, they may very well have lost the game as I believe every retreat condition that the sathar players could have chosen have been met. Although if I was using those retreat conditions, I probably would have set things up a little differently and made a few different choices. However, I’m not using those conditions directly and the sathar have another wave of ships coming later this month. After that, however, it might be a while as they rebuild their forces.

This post has given me the idea for a few other posts that may show up in the future. The first looking at the distribution of starship construction centers in the Frontier (and probably the Rim) and another looking at the average damage output by the different ship types. The third one would be a look at exactly what is in the UPF Charter. We’ll see when or if those actually materialize.

Have you ever tried to incorporate, in detail, the Second Sathar War into your campaign? What assumptions did you make and what ideas did you incorporate? What other ideas should I consider? Let me know in the comments below.

December 8, 2020 Tom 3 Comments

Battle of Ken’zah-Kit (K’aken-Kar) – FY61.296

Arriving from the recent engagement in the K’tsa-Kar system, the local militia ships, together with elements from Spacefleet arrive back at Ken’zah-Kit just as the sathar arrived at the planet. Arriving just too late to prevent the destruction of the fortified defense station in orbit, the militia and Spacefleet vessels made quick work of the sathar invaders, destroying all five ships in just twenty minutes of fighting.

While several ships will need time in a starship construction center to complete repairs, the only loss, beyond the station, was one of the militia assault scouts which was lost with all hands.

With Task Force Cassidine in-system and only three days out, it feels like Ken’zah-Kit is secure for now.

Rak’tal-ka, StarPlay News

Background

The UPF forces had wanted to engage the sathar in deep space, but having jumped in on the opposite side of the system, they were only able to intercept the attacking forces as they approached the planet. The frigate UPFS Flying Cloud, which has been on a continuous high speed transit from the Liberty system before the fighting started, finally joins up with the rest of PG Meteor just a day before the sathar are engaged. Task Force Cassidine is also in the K’aken Kar system. However, they just jumped in a day ago and are too far away to participate in this fight.

With Task Force Cassidine coming in behind them and the militia and PG Meteor ahead of them, the sathar have to fight and intend to take on the smaller group first, hoping to defeat them and then join up with SBF-B2 that is currently en route from the K’tsa-Kar system before taking on the UPF task force.

While the UPF have more ships, the sathar have a slight hull advantage in this fight.  It was supposed to be a tough fight for the UPF forces.

Order of Battle

K’aken-Kar Militia

  • 2 assault scouts
  • 1 fortified station

UPF – PG Meteor

  • 3 assault scouts
  • 1 frigate
  • 2 destroyers

Sathar

  • 1 frigate
  • 2 destroyers
  • 1 light cruiser
  • 1 heavy cruiser

The Battle

Setup

The station is on the side of the planet facing the invading sathar forces and orbiting counterclockwise.  With both fleets racing to intercept and coming directly from jumps into the system from opposite directions, they are starting on opposite sides of the map. The K’aken-Kar militia and PG Virgo are coming in fast on the left side of the map moving at speed 30.  The K’aken-Kar militia assault scouts are high above the planet with the UPF assault scouts are below the planet. The frigate and destroyer are flying in formation in the middle and come in just above the planet.

The sathar, moving fast at speed 25, appear in their standard diamond formation headed straight at the station and planet.  They intend to make a fast run at the station before engaging the smaller ships.

Initial positions for the battle. Click for full size image.

Turn 1

The sathar maintain their speed making a full frontal assault on the station, veering off just 20,000 km away to avoid colliding with the planet and turn toward the UPF capital ships and the militia.

Defensively, the stations fires all of its weapons at the closest sathar destroyer hitting with its laser batteries knocking out the destroyer’s masking screen launcher and causing an electrical fire. It also fires all of its ICMs at the salvo of incoming torpedoes.

Offensively, the sathar fire every weapon they have at the station. The UPF and militia forces can only watch helplessly as 17 of the 26 weapons fired, including 3 torpedoes that made it through the ICM screen, connect with the station and obliterate it.

Angered by the destruction of the station, the Frontier forces swoop in to exact their revenge. The UPF assault scouts use their maximum acceleration and swing up from below the planet to fire at the lower destroyer. The militia assault scouts line up for an assault rocket run at the sathar frigate and then veer off behind the planet, accelerating to speed 34. The frigate and destroyers slow to speed 29 to just come within rocket battery range and fire on the sathar heavy cruiser; they turn away from the planet at the last moment to prepare to fire at the sathar ships as they fly by.

Defensively, the sathar frigate and light cruiser fire their energy weapons at the militia assault scouts, each targeting a single ship, and their rocket batteries at the UPF frigate. The other three ships target the lead UPF destroyer. The sathar frigate misses completely but the light cruiser connects with its laser battery and electron battery damaging the assault scout’s engines and causing a loss of navigation control. It also hits the frigate with the rocket battery knocking out its laser cannon. The other sathar ships don’t do much better with the far destroyer and heavy cruiser missing completely while the closer destroyer only hits with its electron battery shorting out the UPF ship’s defensive systems.

While the gunners on the sathar vessels were not very effective, the same cannot be said for the gunners on the Frontier ships. The militia ships hit with one laser battery and both assault rockets destroying the sathar frigate. Similarly, the UPF assault scouts hit the lower destroyer with a laser battery and two assault rockets destroying that vessel. The UPF capital ships fare nearly as well. While the torpedoes didn’t make it through the screen of ICMs fired by the heavy cruiser, the large ship was still hit by a rocket battery from the frigate and each destroyer hit with their laser cannon, laser battery, and a rocket battery. Combined, the damage from the weapons disabled the cruiser’s distruptor cannon, damaged its engines, knocked out its maneuvering, and seriously damaged it, leaving it’s hull integrity at a mere 26 percent.

Courses and positions after the first round of combat. Click for full size image.

Turn 2

Seriously damaged, the sathar heavy cruiser just drifts away from the battle firing at the UPF frigate as it passes.  The light cruiser and surviving destroyer loop around the planet (speed 25 and 26), buzzing the UPF capital ships and firing their torpedoes at the lead destroyer. They then train all of their energy weapons on the militia assault scouts and fire their rocket batteries at the UPF assault scouts.

Defensively, the UPF frigate fires at the heavy cruiser and connects with its laser cannon, cutting the large ship’s remaining hull integrity by over half but not quite destroying it. The UPF destroyers fire at the remaining sathar destroyer only missing with a rocket and laser battery. The weapons that do hit knock out the destroyer’s electron battery before ripping its hull to shreds. The assault scouts all fire at the light cruiser and two of the UPF assault scouts hit knocking out the light cruiser’s laser batter and causing significant hull damage with maximum damage laser battery hit (20 HP).

Of the weapons brought to bear, only the heavy cruiser’s electron battery misses the UPF frigate with the torpedo slipping through the ICM screen. The frigate has its damage and navigation control systems comprised and its hull severely damaged, knocking its hull integrity down to just 32 percent. The torpedo from the light cruiser misses the UPF destroyer, but it hits the trailing militia assault scout with it’s proton battery and distruptor cannon destroying it. It also hits one of the UPF assault scouts with the rocket battery knocking its hull integrity down to less than half.

The 3 UPF Assault scouts chase after the Heavy cruiser while the destroyers and surviving militia assault scout go after the light cruiser.  The UPF Flying Cloud (frigate) with a damaged navigation control system, pulls a hard turn to starboard, looping around the planet.  It manages to hold its damaged hull together and not break up from the strain of the maneuver.

The heavy cruiser fires at the incoming assault scouts but only hits one with a laser battery knocking its hull integrity to just 33 percent. The light cruiser fires at the militia assault scout hitting with an electron battery knocking out half of the small ship’s hull integrity. It fires its rocket battery at the lead UPF destroyer but misses.

The UPF assault scouts hit the heavy cruiser with 2 of their assault rockets finally destroying the larger vessel. The other ships combine their fire on the light cruiser hitting with 2 laser canons, a laser and rocket battery, and an assault rocket and torpedo. The torpedo took out the cruiser’s proton screen but the other weapons all ripped into its hull destroying it.

Final moves and positions. The heavy cruiser and assault scouts are an additional 8 hexes off the map with the assault scouts veering of at a range of 4 hexes after making their assault rocket attack. Click for full size image.

Repairs

The UPF frigate manages to hold together after another hard turn to port and then gets its navigation control issues fixed despite its reduced damage control capabilities. Over the next 3 hours it repairs the rest of its systems but can only get its hull to 75% without spending time in a shipyard. The militia assault scout repairs some of it’s hull but only gets it back to 66% before running into issues that will require a shipyard. The UPF assault scout hit by the heavy cruiser repairs most of its hull but has a little (13%) that needs attention in a shipyard. The other assault scout and the damaged destroyer get all their systems back online in under an hour.

Lessons Learned

This one didn’t go anything like I expected. With the ships staring out on the opposite sides of the map, I knew the sathar would get a free round on the station. I expected them to take out the station (it was a primary target) but maybe not as spectacularly as they did (170 of 140 HP with three weapons, including 2 torpedoes, doing double damage).

From there everything went pear shaped for the sathar. Their tactics were actually pretty sound but their gunners couldn’t hit to save their lives (literally). The sathar light cruiser gunners did just fine, constantly hitting their targets but the other ships, beyond hitting the station, were not so accurate. This really didn’t help the sathars’ cause as they were unable to eliminate the assault scouts and suffered a few more assault rocket hits than they would have liked.

That, combined with the absolutely amazing firing from the UPF, both just in accuracy in hitting and also some well-placed double-damage rolls on the first round (two AR for 34 HP each on the frigate and destroyer, a LB hit for 14 HP on the destroyer, and a RB hit for 34 HP on the heavy cruiser), destroyed two of the sathar ships and seriously wounded a third right off the bat shifting the balance of power to the UPF. Had those ships survived that first round, the UPF would have probably still won but the casualty list would have been much higher. The rapid destruction of the ships on round one allowed the UPF to focus their fire on round 2 and keep the engagement short.

The incoming SBF-B2, being a just slightly larger version of the fleet destroyed here (an extra destroyer plus an assault carrier with 7 fighters) doesn’t have a chance against the combined forces of Task Force Cassidine (which is roughly the same strength, substituting a frigate, 3 assault scouts and a battleship for the three sathar destroyers), PG Meteor, and the surviving militia assault scout. The sathar are going to have to reasses their strategy.

December 2, 2020 Tom 1 Comment

Detailed Frontier Timeline – FY61.265 to FY61.294

This months sees the opening battles of the Second Sathar War. Maneuvers and engagement from this conflict overshadow nearly everything else happening in the Frontier as everyone watches the events unfold.

It is this conflict that I originally started this timeline to track so it will be heavily focused on the events of the battles and how the sides react for the next little while. Also things get really busy so there are a lot of entries every day this month. I think there are only 2 or 3 days that don’t have at least two entries and toward the end when the invasion starts, it’s rare to have a day with less than 5 or 6 entries. Links to battle reports on all the ship engagements are linked in the timeline.

On day 61.280, the arrivial of Strike Force Nova in the Prenglar system on the same day as the sathar fleet was pure coincidence. I had planned out the maneuvers of SF Nova separately from the sathar movements without consulting between the two. I was completely surprised when they ended up jumping in on the same day.

Settle in. This one is a bit of a read.

Date (FY)Events
61.265– After eight days of exercises with the crews of Fortress Kdikit, SF Nova departs Kdikit (Madderly’s Star) for a jump to Triad (Cassidine).

– PG Virgo arrives in the Zebulon system and begins work for the jump back to Pale (Truane’s Star).
61.266– Sathar Fleet SBF-C1 (1 HC, 1 LC, 2 DD, & 1 FF) departs SCC#3 (OFS138) and begin accelerating for a jump to the OFS137 system.

– PG Liberty arrives at Snowball (Liberty) and joins up with PG Lancet.  The assault scout in PG Lancet is transferred to PG Liberty, with the UPFS Flying Cloud (frigate), UPFS Eleanor Moraes, and UPF Backdoor (sathar scout ship) remaining attached to PG Lancet.
61.267– The SF Meteor destroyers arrive at Lossend (Timeon).

– The CMS Osprey arrives back at Clarion.  The ship is immediately put into the starship construction center for maintenance, repairs, and refits while the crew is given some much needed leave.
61.268– Sathar Fleet SBF-B1 (1 HC, 1 LC, 2 DD, & 1 FF) departs the rendezvous point in OFS167 and begins accelerating for a jump to the OFS166 system.

– The HSS History’s Hope and escorts jump into the OFS222 system.  They begin work on engine overhauls and jump calculations for the YS01 system.
61.269– The SF Meteor destroyers depart Lossend (Timeon) and begin accelerating for a jump to the White Light system.

– After three days debriefing the commander of PG Liberty and introducing him to the Mhemne contacts, Captain Reider and PG Lancet depart Snowball (Liberty) for a jump back to the Waller Nexus system and a high speed transit to Minotaur (Theseus).
61.270– Sathar Fleet SBF-A1 (2 HC, 2AC, 1 LC, 4 DD, 2 FF & 14 fighters) departs SCC#1 (OFS203) and begin accelerating for a jump to the FS12 system.

– PG Virgo arrives in the Truane’s Star system and begins decelerating toward Fortress Pale (Pale, Truane’s Star).
61.271-= Sathar Fleets SBF-E1 (1 HC, 1 LC, 2 DD, & 1 FF) and SBF-F1 depart SCC#5 (OFS019) and begin accelerating for a jump to the Kazak system in the Rim.

– Sathar fleet SBF-C1 arrives in the OFS137 system.  It maintains its high speed and begins calculations for a jump to OFS136.
61.272– Sathar Fleet SBF-D1 (1 HC, 1 LC, 2 DD, & 1 FF) departs SCC#4 (OFS111) and begins accelerating for a jump to the OFS020 system.

– The HSS History’s Hope and escorts jump into the YS01 system.  They detect transmissions from several other ships in the system.  Hoping to avoid a confrontation, they begin work on engine overhauls and jump calculations for the YS02 system.
61.273Sathar fleet SBF-B1 arrives in the OFS166 system.  It maintains its high speed and begins calculations for a jump to FS33.
61.274– Sathar fleet SBF-C1 arrives in the OFS136 system.  It maintains its high speed and begins calculations for a jump to FS56.

– Strike Force Nova arrives at Triad (Cassidine).  They will spend just 2 days in the system exercising with Task Force Cassidine before heading back to Morgaine’s World (Prenglar).

– PG Lancet arrives in the Waller Nexus system.  They immediately begin work on overhauling the ships’ engines and plotting a jump to Padda.
61.275– Sathar fleet SBF-A1 arrives in the FS12 system.  It maintains its high speed and begins calculations for a jump to Prenglar.

– Another small fleet of sathar ships, consisting of 2 LC, 3 DD, & 1 FF, designated SBF-F2 arrive at SCC#5 (OFS019) from deeper in sathar controlled space.

– PG Virgo arrives at Fortress Pale (Pale, Truane’s Star).  The crews are given a week of leave while the ships go into the starship construction center for repairs and maintenance.
61.276– Sathar fleets SBF-E1 and SBF-F1 arrive in the Kazak system.  SBF-F1 begins decelerating toward the inner system to engage the Rim forces there.  SBF-E1 maintains its high speed and begins calculations for a jump to Zebulon.

– Sathar fleet SBF-B1 arrives in the FS33 system.  It maintains its high speed and begins calculations for a jump to K’tsa-Kar.

– SF Nova leaves Triad (Cassidine) for a jump to Morgaine’s World (Prenglar)
61.277– Sathar fleet SBF-D1 arrives in the OFS020 system.  It maintains its high speed and begins calculations for a jump to Fromeltar.

– Sathar fleet SBF-C1 arrives in the FS56 system.  It maintains its high speed and begins calculations for a jump to Kisk-Kar.

– The sathar fleet (SBF-F1) decelerating toward Stenmar (Kazak) are detected by Rim forces in the system (10 F, 3 AS, 2 FF, 2 DD, 1 LC), alerts go out to systems in the Rim and the Frontier.

– Just hours before the engine overhauls are complete and the HSS History’s Hope is ready to jump once again, the ship and her escorts are attacked by three unidentified vessels. 

– A running battle ensues as the escorts attempt to screen the HSS History’s Hope long enough to make the jump. In the ensuing fight, one of the escort vessels is destroyed along with two of the attacking ships. The last attacker manages to get a hit in on the History’s Hopes engines but it is not enough to stop the ship and it slips into the Void.

– After the HSS History’s Hope jumps out of the YS01 system, the remaining escorts ships finish off the final attacker.  After the fight, the escorts repair what damage they can and begin heading back to Scree Fron for repairs.
61.278– Now in the YS02 system, the crew of the HSS History’s Hope works on repairing the battle damage to their ship and preparing for the next leg of their journey, a jump to the YS03 system.

– The 2 destroyers arrive at Fortress Redoubt (Clarion, White Light).  They join with the other ships of PG Meteor which now consists of the two destroyers and 3 assault scouts.

– With the alert from the Kazak system, PG Virgo’s maintenance is fast tracked and the crews are recalled from leave after only 3 days.
61.279PG Lancet makes the jump to the Padda system.  Work begins immediately on the engines and calculations for the jump to Minotaur (Theseus).
61.280– Sathar battle fleets appear in five different Frontier system within hours of one another and most begin decelerating towards the inhabited worlds in those systems.  SBF-A1 arrives in the Prenglar system, SBF-B1 arrives in K’tsa-Kar, SBF-C1 arrives in Kizk-Kar, SBF-D1 arrives in Fromeltar, and SBF-E1 arrives in Zebulon.

– Unlike the other sathar fleets, SBF-E1 doesn’t slow down in Zebulon but prepares for a jump to the Truane’s Star system.

– Due to the alert sent out by forces in the Kazak system, these fleets are detected within hours of their arrival in system.  Alerts are broadcast all across the Frontier.

– Task Force Cassidine, leaving its minelayer in the Cassidine system, departs on a high-speed risk jump to Dramune.

– PG Meteor is dispatched on a high risk run to reinforce the armed station at K’tsa-Kar as there is no militia in that system.  The Clarion Royal Marines (1 FF, 4 AS) join PG Meteor.

– The two ZKKDA assault scouts, currently in K’aken-Kar also depart on a high risk run to the K’tsa-Kar system per the defense agreement.

– Both of the planetary militias of Dramune independently agree to make a high speed risk jump to the Fromeltar system to assist with the defense of that system, hoping to stop the sathar before they can get  any further into the Frontier.

– Strike Force Nova arrives in the Prenglar system within hours of the sathar fleet appearing.  They begin decelerating to engage the sathar fleet simultaneously with Task Force Prenglar.

– Sathar Fleet SBF-B2 (1 HC, 1 AC, 3 DD, 1 FF, 7 F) departs the rendezvous point in OFS167 and begins accelerating for a jump to the OFS166 system.
61.281– Battle of Stenmar (Kazak) between Rim forces (1 LC, 2 DD, 2FF, 3 AS, 10 F & 1 fortified station) and SBF-F1.  The sathar forces are completely destroyed and the Rim only lose 1 LC, 2 DD, and 1 AS with the station severely damaged. Word of the victory is broadcast across the Rim and Frontier.

– PG Lancet jumps back into the Theseus system and is dissolved. The UPFS Eleanor Moraes and UPFS Backdoor break off from the group and start decelerating toward Minotaur.  The UPFS Flying Cloud remains at velocity and starts working on the jump to White Light.

– The last of the ships of PG Virgo emerge from their maintenance in the Streel shipyards (Pale, Truane’s Star).  The crews go on high alert as they monitor the sathar progress across the Frontier.  While cheered by the news of the Flight’s victory in Kazak, they mourn the loss of friends made while stationed in that system.
61.282– The sathar forces from the Sauria system arrive back at their base, SCC#10 (OFS228) where they stand down to effect repairs from the recent campaign.

– Sathar fleet SBF-E1 jumps into the Truane’s Star system and begins decelerating toward Pale.  The Truane’s Star militia, along with PG Virgo, prepare to meet them.

– Task Force Cassidine successfully jumps into the Dramune system, they maintain the high speed and start working on a risk jump to Fromeltar.

– The Dramune militias successfully jump into the Fromeltar system and begin decelerating toward Terledrom, the apparent destination of the sathar forces in that system.

– PG Meteor and the White Light militia successfully jump into the K’tsa-Kar system and begin decelerating toward the planet and sathar forces approaching it.

– The ZKKDA assault scouts also successfully arrive in the K’tsa-Kar system and race to join the fight.
61.283– Sathar Fleets SBF-E2 (1 HC, 1 AC, 1 LC, 1 DD, 1 FF, & 8 fighters) and SBF-F2 depart SCC#5 (OFS019) and begin accelerating for a jump to the Kazak system in the Rim.  After the initial loss in the Kazak system, the sathar commit their 4 new cutters to SBF-F2 to boost the strength of that fleet.

– Deciding that PG Liberty can provide advanced warning if sathar start to come from that direction, the Theseus militia, together with the remaining saurian forces in Theseus, begin accelerating for a jump to the White Light system.
61.284– The HSS History’s Hope jumps to the YS03 system and begins preparations for a jump to YS05.

– Sathar fleet SBF-B2 arrives in the OFS166 system.  It maintains its high speed and begins calculations for a jump to FS33.

– TF Cassidine makes the jump to the Fromeltar system and begin a hard deceleration.  They won’t arrive in time for the initial battle but can engage any sathar forces remaining in the system if the militias cannot successfully hold the line.
61.285– Battle of Zik-Kit (Kisk-Kar) – Overwhelmed by the forces of SBF-C1 the two militia assault scouts and the armed station are destroyed with only minimal damage to the sathar vessels.

– Battle of Terledrom (Fromeltar) – The combined militias of Dramune and Fromeltar quickly overwhelm the sathar forces in an intense 20-minute battle. The only loss is the Inner Reach destroyer with the 2 Outer Reach destroyers sustaining heavy damage.

– Battle of Kawdl-Kit (K’sta-Kar) With some amazing gunnery by the UPF and militia forces, the sathar fleet is reduced to scrap in just 20 minutes.  However, before they are destroyed, they manage to obliterate the armed station orbiting Kawdl-Kit.  No UPF or militia forces were lost although the CMS Osprey sustained some hull damage that will require a shipyard to repair.

– Battle of Gran Quivera (Prenglar) – Approaching cautiously due to the expected minefield, the sathar’s slow speed limits their maneuverability and they are overwhelmed by the combined forces of TF Prenglar and SF Nova in less than an hour. The UPF only lose 2 F, 5 AS, 1 DD, and 2 LC in the battle. Several other ships will require shipyard repairs.
61.286– The UPFS Flying Cloud jumps into the White Light system.  It maintains its high speed while performing engine overhauls and jump calculations to get to K’sta-Kar and join up with PG Meteor.

– The CMS Osprey leaves Kawdl-Kit and begins accelerating for a jump back to the shipyards orbiting Clarion. The White Light SCC has space for up to a HS 4 ship so space is held for the Osprey.

– A HS 8 freighter completes its annual maintenance at the Terledrom SCC giving a total of 12 HS of space in the SCC.  The two Outer Reach frigates are immediately admitted for repairs.

– Orbiting high above Zik-Kit the sathar ships spend the day rearming but make no move toward the planet. All UPF and militia ships that were in battles the previous day also spend the day rearming and checking that all systems are ready to go.

– With the militias in control of the Fromeltar system, Task Force Cassidine immediately starts calculations and acceleration for a jump to the K’izk-Kar system.
61.287– Sathar fleet SBF-B2 arrives in the FS33 system.  It maintains its high speed and begins calculations for a jump to K’tsa-Kar.

– Battle of New Pale (Truane’s Star) – Sathar target the smaller UPF vessels to great effect destroying 5 fighters, 6 AS, and 1 LC while only losing a DD & LC.  While their remaining ships are damaged, so are the remaining UPF vessels which are unable to purse as the sathar break off the fight.

– After finishing what battle repairs they can, the remnants of SBF-E1 start accelerating for a jump to the Zebulon system.

– SBF-C1 leaves orbit around Zit-Kit (Kizk-Kar) and begin accelerating for a jump to the Kaken-Kar system.

– Spacefleet now has several damaged ships in need of immediate repair and a need to replace ships lost in battles with the sathar. However, there is no space in most SCCs across the Frontier and especially in Prenglar.

– Given the state of the Frontier’s starship construction centers, and expecting things to get worse, Spacefleet addresses the Council of Worlds and requests that the Wartime Construction Control clause of the UPF charter be invoked.  A relic of the original charter, it has never been invoked in the history of the UPF.

– Receiving word of the departure of SBF-C1, PG Meteor and the K’aken-Kar militia, now rearmed, begin accelerating for a jump to the K’aken-Kar system to meet the on-coming sathar forces.
61.288– Sathar fleets SBF-E2 and SBF-F2 arrive in the Kazak system.  SBF-F2 begins decelerating toward the inner system to engage the Rim forces there.  SBF-E2 maintains its high speed and begins calculations for a jump to Zebulon.

– Shortly after their arrival in the Kazak system, the sathar fleets are detected and an alert is sent out.  The Rim forces brace for another battle.

– Space clears in the Outer Reach (Dramune) SCC and construction starts on a new Destroyer for the Inner Reach militia.

– Space clears in the CDC shipyards orbiting Triad (Cassidine), Spacefleet convinces the shipyard managers to start construction of 5 fighters and another assault scout, preempting the regular construction schedule.

– One of the Outer Reach frigates completes its repairs in the Terledrom (Fromeltar) shipyard freeing up 5 HS of space. 
61.289– Receiving the alert from Kazak, Spacefleet realize they only have 10-11 days to reinforce Truane’s Star.  Replenishing SF Nova’s order of battle with ships from TF Prenglar, but having to leave the damaged assault carrier and its fighters behind, it begins a high risk jump to Dixon’s Star and then on to Truane’s Star.

– Betting that Cassidine is safe, the third UPF Minelayer is ordered to Fromeltar.  It begins accelerating for a jump to Dramune as the first leg of its trip.

– Realizing that there is still enough room in the Outer Reach (Dramune) SSC, Spacefleet gets construction started on a new assault scout before anything else can be moved in.

– The second Outer Reach frigate completes its repairs in the Terledrom (Fromeltar) shipyard freeing up 5 more HS of space.  As HS 10 mining ship is moved in to the shipyard for its annual maintenance.
61.290– Two-day end of year celebration on Hum begins. With the events currently happening in the Rim and Frontier, the celebrations are more subdued than normal.

– The HSS History’s Hope arrives in YS05 and begin preparations for the jump to YS06.

– Overhauls complete, the UPFS Flying Cloud jumps into the K’sta-Kar system.  It remains at high speed working on calculations for a jump to K’aken-Kar with the rest of PG Meteor.  It will be just a day behind them.

– More space opens up in the CDC shipyards (14 HS worth). However, having just bumped six ships ahead in the queue for Spacefleet, they resist efforts to start more military construction giving the space to a large freighter that has been waiting over a month for its annual maintenance.

– Space opens up in the Minotaur (Theseus) shipyards (6 HS worth).  The Theseus government starts construction of a new destroyer for the militia although they suspect the hull will be assigned to Spacefleet.

– Space opens up (4 HS worth for a total of 6 free) in the Terledrom (Fromeltar) SCC.  The Terledrom government alerts Spacefleet of the availability and starts construction on 2 assault scouts, one for Spacefleet and one for the militia.

– Space (8 HS) opens up in the PGC shipyard at Gran Quivera (Prenglar) as a freighter completes maintenance. After the recent battle, shipyard owners are more than happy to hold the space for Spacefleet. The damaged assault scout and frigate are moved in immediately and begin repairs.

– TF Cassidine jumps into the Kizk-Kar system.  They don’t slow down but immediately begin working on engine overhauls and calculating a jump to  K’aken-Kar.
61.291– Sathar fleet SBF-E2 arrives in the Zebulon system.  They don’t slow down but begin immediate calculations for a jump to the Truane’s Star system.

– Sathar fleet SBF-B2 arrives in the K’tsa-Kar system and starts decelerating toward the White Light Militia ships there. PG Meteor and the K’aken-Kar militia are less than 10 hours from jumping out of the system when the sathar are detected.

– Realizing that the K’aken-Kar militia will suffer the same fate as the K’izk-Kar militia if they return to face the sathar alone, PG Meteor continues with them for the jump to K’aken-Kar.

– SF Nova jumps into the Dixon’s Star system.  Working feverishly on overhauls to the assault scouts’ engines, they begin calculating the jump to Truane’s Star.

– The UPF assault scout and frigate complete their hull repairs after a single day in the PGC shipyard (Gran Quivera, Prenglar) and return to active duty.

– Another 6 HS of space open up in the PGC shipyards (Gran Quivera, Prenglar) for a total of 16 HS of space available.  The damaged assault carrier is moved into the shipyard to have its engines repaired.

– Realizing that they cannot withstand the incoming sathar force, the White Light militia starts plotting a jump back to their home system. They delay departure, however, acting as bait and hoping to draw SBF-B2 deeper into the system so they don’t jump immediately after PF Virgo or straight to White Light.
61.292– SBF-C1 jumps into the K’aken-Kar system and begins decelerating toward the planet.

– PG Meteor and the K’aken-Kar militia jump into the K’aken-Kar system and begin decelerating to meet the sathar.

– The Theseus militia, along with the second saurian Ark Ship arrive in orbit around Clarion (White Light).  The saurians join their sister ships in orbit while the Theseus militia confers with the Clarion Royal Marines and Fortress Redoubt to establish defensive plans.

– SBF-E1 jumps into the Zebulon system and establish contact with SBF-E2 relaying full details of their encounter.  They start working on a jump to Kazak System and then back to SCC#5 (OFS019) for repairs.

– The UPF assault carrier’s engines complete their repairs.  With 16 HS of space available at the PGC shipyards, Spacefleet begins construction on a fighter, an assault scout, and a light cruiser.
61.293– Second Battle of Stenmar (Kazak) – seriously outgunned, the Rim forces are nearly all destroyed with only a single fighter surviving.  They manage to take out a sathar light cruiser and cutter before being overwhelmed.

– The UPFS Flying Cloud jumps into the K’aken-Kar system. It remains at high speed to catch up with the rest of PG Meteor and will execute a hard deceleration to match speed with the group when it does.

– Having succeeded in drawing SBF-B2 into the K’sta-Kar system, the White Light militia, reluctant to abandon Kawdl-Kit, begins acceleration for their jump home.

– Seeing the White Light militia start to leave the system, SBF-B2 changes course and start accelerating for a jump to K’aken-Kar to join SBF-C1.

– The UPF minelayer jumps into the Dramune system.  It doesn’t slow down but begins calculations for its jump to Fromeltar.

– Space (5HS) opens up in the Hentz (Araks) shipyards. It is not immediately filled as there is a larger ship waiting on maintenance.
61.294– SBF-E2 jumps into the Truane’s Star system and begin decelerating toward New Pale.

– SF Nova arrives in the Truane’s Star system just hours after the sathar.  Unfortunately, they arrived much farther out in the system than anticipated.  They begin a fast run and hard deceleration toward New Pale in order to arrive before the sathar forces.

– Seeing more and more sathar ships arriving in the Frontier, the Council of Worlds stops blocking the activation the Wartime Construction Control (WCC) clause in the UPF Charter. Spacefleet is granted complete control of all starship construction centers in the Frontier.

– With the activation of the WCC clause, Spacefleet, with the assistance of Star Law, move to take control of the shipyards. They temporarily suspend any new maintenance work while they sort out the schedule and priorities.

– More space opens in several SCCs across the Frontier: 2 HS at Hentz (Araks) for a total of 7 HS, 18 HS at Rupert’s Hole (Cassidine) emptying that facility, 6 HS at Terledrom (Fromeltar) 12 HS at Gran Quivera (Prenglar), and 5 HS at Minotaur (Theseus)

– Working to replenish their immediate losses, Spacefleet takes control of the destroyer construction at Minotaur, and start construction of 2 assault scouts at Hentz, a light cruiser at Gran Quivera, and a fighter and assault scout at Terledrom.

– Lacking facilities to construct military vessels, the Rupert’s Hole SCC is designated for ship maintenance and two ships are moved in immediately.  The other Type III SSCs at Pale & Clarion are given the same designation.

– Spacefleet also authorizes the start of construction for two assault scouts to replenish some of the ships lost by the Truane’s Star militia with the understanding that they may be deputized by Spacefleet during the conflict. Construction starts in Terledrom and Minotaur

Here’s the full timeline to download:

DetailedFrontierTimeline-1Download

December 1, 2020 Tom 1 Comment
Become a Patron!

Recent Posts

  • State of the Frontier – January 2024
  • Detailed Frontier Timeline – FY62.069 to FY62.99
  • State of the Frontier – August 2022
  • Battle of Hargut (Gruna Garu) – FY62.098
  • Archived Arcane Game Lore Posts – May 2013 to Dec 2014
  • A Look at Yachts and Privateers
  • Homeworld Bound – A Campaign Concept
  • Second Battle of Fromeltar (Terledrom) – FY62.083
  • Sample Star System Data
  • Detailed Frontier Timeline – FY62.038 to FY62.068

Categories

  • 3D Models
  • Adventures
  • Background
  • Creatures/Races
  • Deck Plans
  • Equipment
  • Game Design
  • General
  • Locations
  • Maps
  • NPCs
  • Optional Rules
  • Patreon-only
  • Project Overviews
  • Reviews
  • Setting Material
  • Starships
  • System Brief
  • Vehicles
  • Writing

Recent Comments

  • Tom on State of the Frontier – January 2024
  • Tom on State of the Frontier – January 2024
  • Tom on Star Map Generator – GUI Edition
  • David on Star Map Generator – GUI Edition
  • DM_Shroud on Star Map Generator – GUI Edition
  • Tom on Fighter Miniatures
  • Rlaybeast on Fighter Miniatures
  • Loguar on Detailed Frontier Timeline – FY62.069 to FY62.99
  • Loguar on Detailed Frontier Timeline – FY62.069 to FY62.99
  • Tom on Detailed Frontier Timeline – FY62.069 to FY62.99

Archives

  • January 2024 (1)
  • September 2022 (1)
  • August 2022 (9)
  • July 2022 (3)
  • June 2022 (3)
  • May 2022 (3)
  • June 2021 (1)
  • April 2021 (1)
  • February 2021 (4)
  • January 2021 (6)
  • December 2020 (5)
  • November 2020 (11)
  • October 2020 (4)
  • September 2020 (5)
  • August 2020 (4)
  • July 2020 (6)
  • June 2020 (5)
  • May 2020 (8)
  • April 2020 (5)
  • March 2020 (5)
  • February 2020 (5)
  • January 2020 (5)
  • December 2019 (7)
  • November 2019 (4)
  • October 2019 (6)
  • September 2019 (5)
  • August 2019 (6)
  • July 2019 (7)
  • June 2019 (5)
  • May 2019 (6)
  • April 2019 (7)
  • March 2019 (4)
  • February 2019 (5)
  • January 2019 (7)
  • December 2018 (5)
  • November 2018 (10)
  • October 2018 (4)
  • September 2018 (4)
  • August 2018 (5)
  • July 2018 (4)
  • June 2018 (4)
  • May 2018 (12)
  • December 2015 (1)
  • November 2015 (2)
  • December 2014 (4)
  • November 2014 (3)
  • June 2014 (1)
  • January 2014 (1)
  • July 2013 (1)
  • June 2013 (2)
  • May 2013 (3)

Meta

  • Log in
  • Entries feed
  • Comments feed
  • WordPress.org

Recent Posts

  • State of the Frontier – January 2024
  • Detailed Frontier Timeline – FY62.069 to FY62.99
  • State of the Frontier – August 2022
  • Battle of Hargut (Gruna Garu) – FY62.098
  • Archived Arcane Game Lore Posts – May 2013 to Dec 2014

Recent Comments

  • Tom on State of the Frontier – January 2024
  • Tom on State of the Frontier – January 2024
  • Tom on Star Map Generator – GUI Edition
  • David on Star Map Generator – GUI Edition
  • DM_Shroud on Star Map Generator – GUI Edition

Archives

  • January 2024 (1)
  • September 2022 (1)
  • August 2022 (9)
  • July 2022 (3)
  • June 2022 (3)
  • May 2022 (3)
  • June 2021 (1)
  • April 2021 (1)
  • February 2021 (4)
  • January 2021 (6)
  • December 2020 (5)
  • November 2020 (11)
  • October 2020 (4)
  • September 2020 (5)
  • August 2020 (4)
  • July 2020 (6)
  • June 2020 (5)
  • May 2020 (8)
  • April 2020 (5)
  • March 2020 (5)
  • February 2020 (5)
  • January 2020 (5)
  • December 2019 (7)
  • November 2019 (4)
  • October 2019 (6)
  • September 2019 (5)
  • August 2019 (6)
  • July 2019 (7)
  • June 2019 (5)
  • May 2019 (6)
  • April 2019 (7)
  • March 2019 (4)
  • February 2019 (5)
  • January 2019 (7)
  • December 2018 (5)
  • November 2018 (10)
  • October 2018 (4)
  • September 2018 (4)
  • August 2018 (5)
  • July 2018 (4)
  • June 2018 (4)
  • May 2018 (12)
  • December 2015 (1)
  • November 2015 (2)
  • December 2014 (4)
  • November 2014 (3)
  • June 2014 (1)
  • January 2014 (1)
  • July 2013 (1)
  • June 2013 (2)
  • May 2013 (3)

Categories

  • 3D Models
  • Adventures
  • Background
  • Creatures/Races
  • Deck Plans
  • Equipment
  • Game Design
  • General
  • Locations
  • Maps
  • NPCs
  • Optional Rules
  • Patreon-only
  • Project Overviews
  • Reviews
  • Setting Material
  • Starships
  • System Brief
  • Vehicles
  • Writing

Meta

  • Log in
  • Entries feed
  • Comments feed
  • WordPress.org
Powered by WordPress | theme Layout Builder