The Expanding Frontier

Creating Sci-fi RPG Resources

  • Home
  • Order a Map
  • Order Miniatures
  • Supporters
  • About
  • Bio
Monthly Archives: July 2022

HSS History’s Hope Deck Plans – part 2

So 19 months ago (Dec 2020), I posted the part 1 of this pair of posts with the first decks of the HSS History’s Hope. In that post I was also making videos of how I create the deck plans. This post is just the completed deck plans for the rest of the ship, no videos. I didn’t do the videos for two reasons. Primarily, I just didn’t have the time to sit down and do the recordings. I worked on these 10 minutes here, 15 minutes there, until they were done. The second was that there really wasn’t anything new as far as map creation goes while making the maps for these decks so any videos would have been more of the same. That said, here are the remaining decks of the ship.

The Deck Plans

All of these decks are drawn at 1 square = 1 meter and the full resolution files are at 140 dpi so each square is 1/2″ in size (the size of the chits from the original game) and line up nicely with the grid sizes (70 pixels) of at least Roll20 and possibly other virtual tabletops.

Engineering Deck

First up is the engineering deck.

Engineering deck. Click for full sized image.

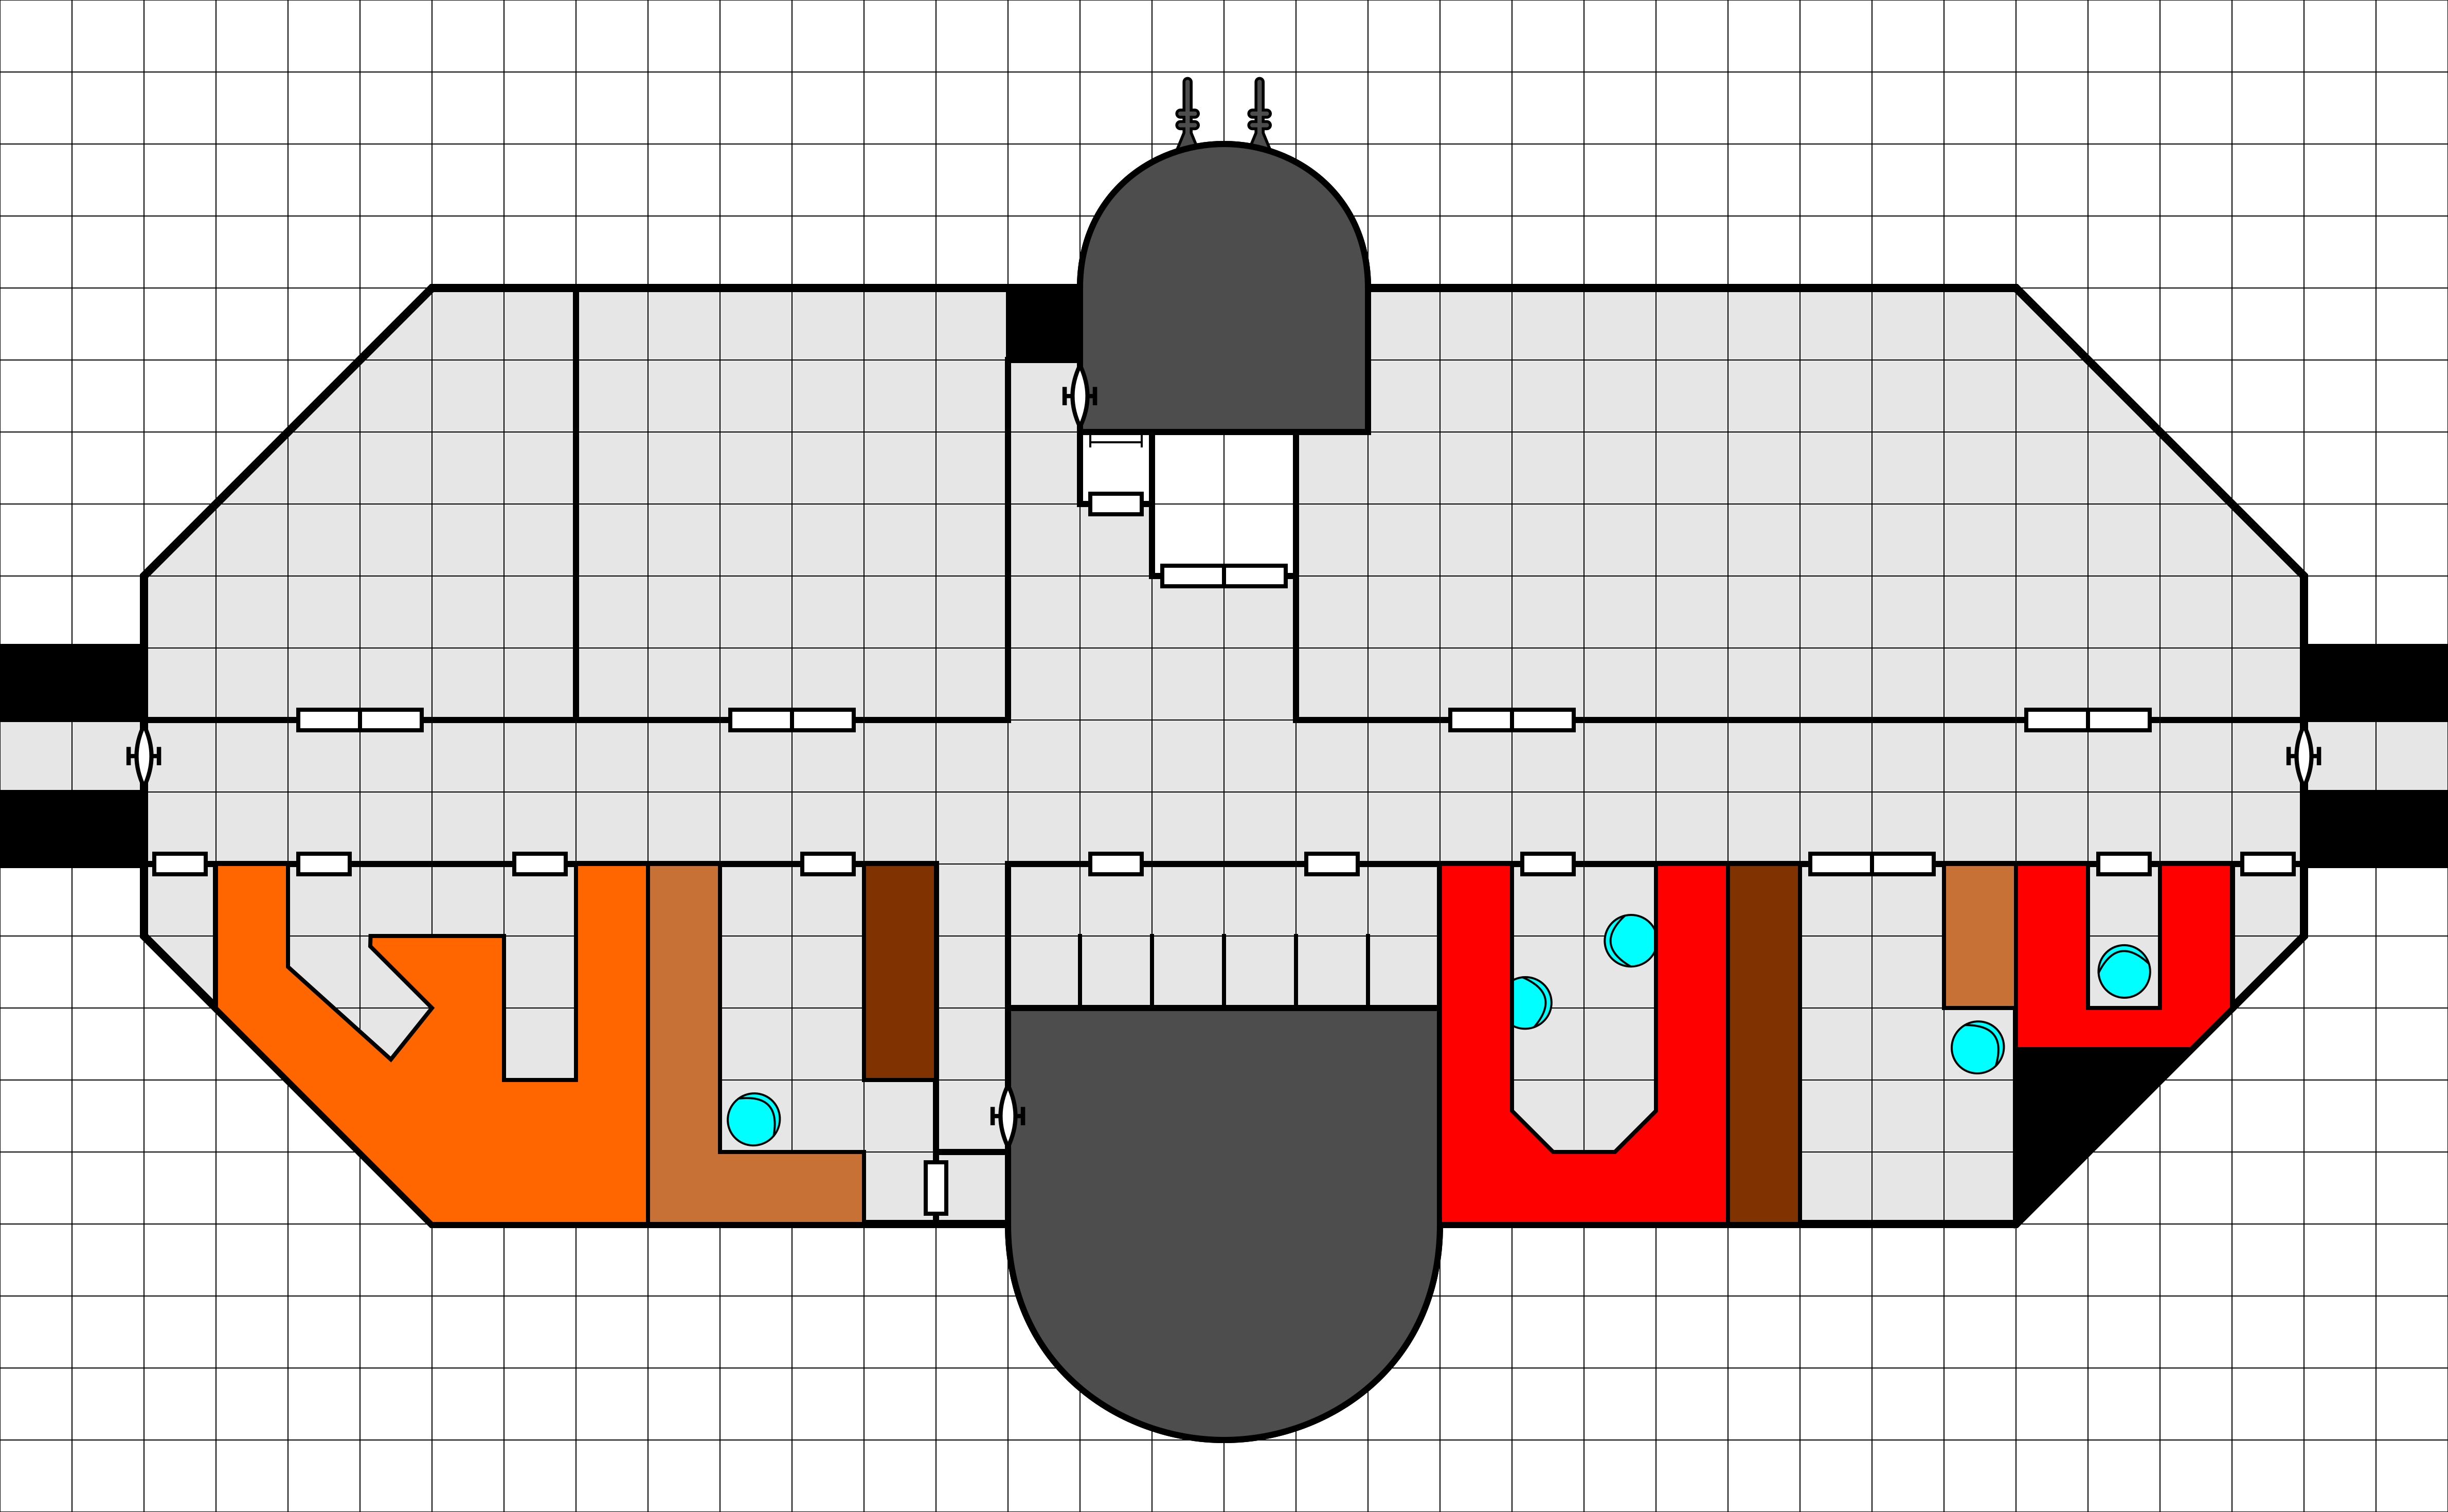
There’s actually a lot more there than just the engineering areas but we’ll start with those. Across the bottom of the map (left to right) we have the primary life support machinery that handles air and water filtration and circulation, a robotics shop, robot storage and the astrogation telescope dome, engineering and life support control, a machine shop, and the communication and scanner systems controls. The two little rooms on each end are storage.

The large rooms across the top are all life support food storage. The one on the left closest to the elevator is actually a freezer. At the top is the laser battery turret and on either end of the deck are the access passages to the engines.

Common Deck

Common deck. Not sure how I ended up with an extra row of squares across the top outside the ship. Click for full image.

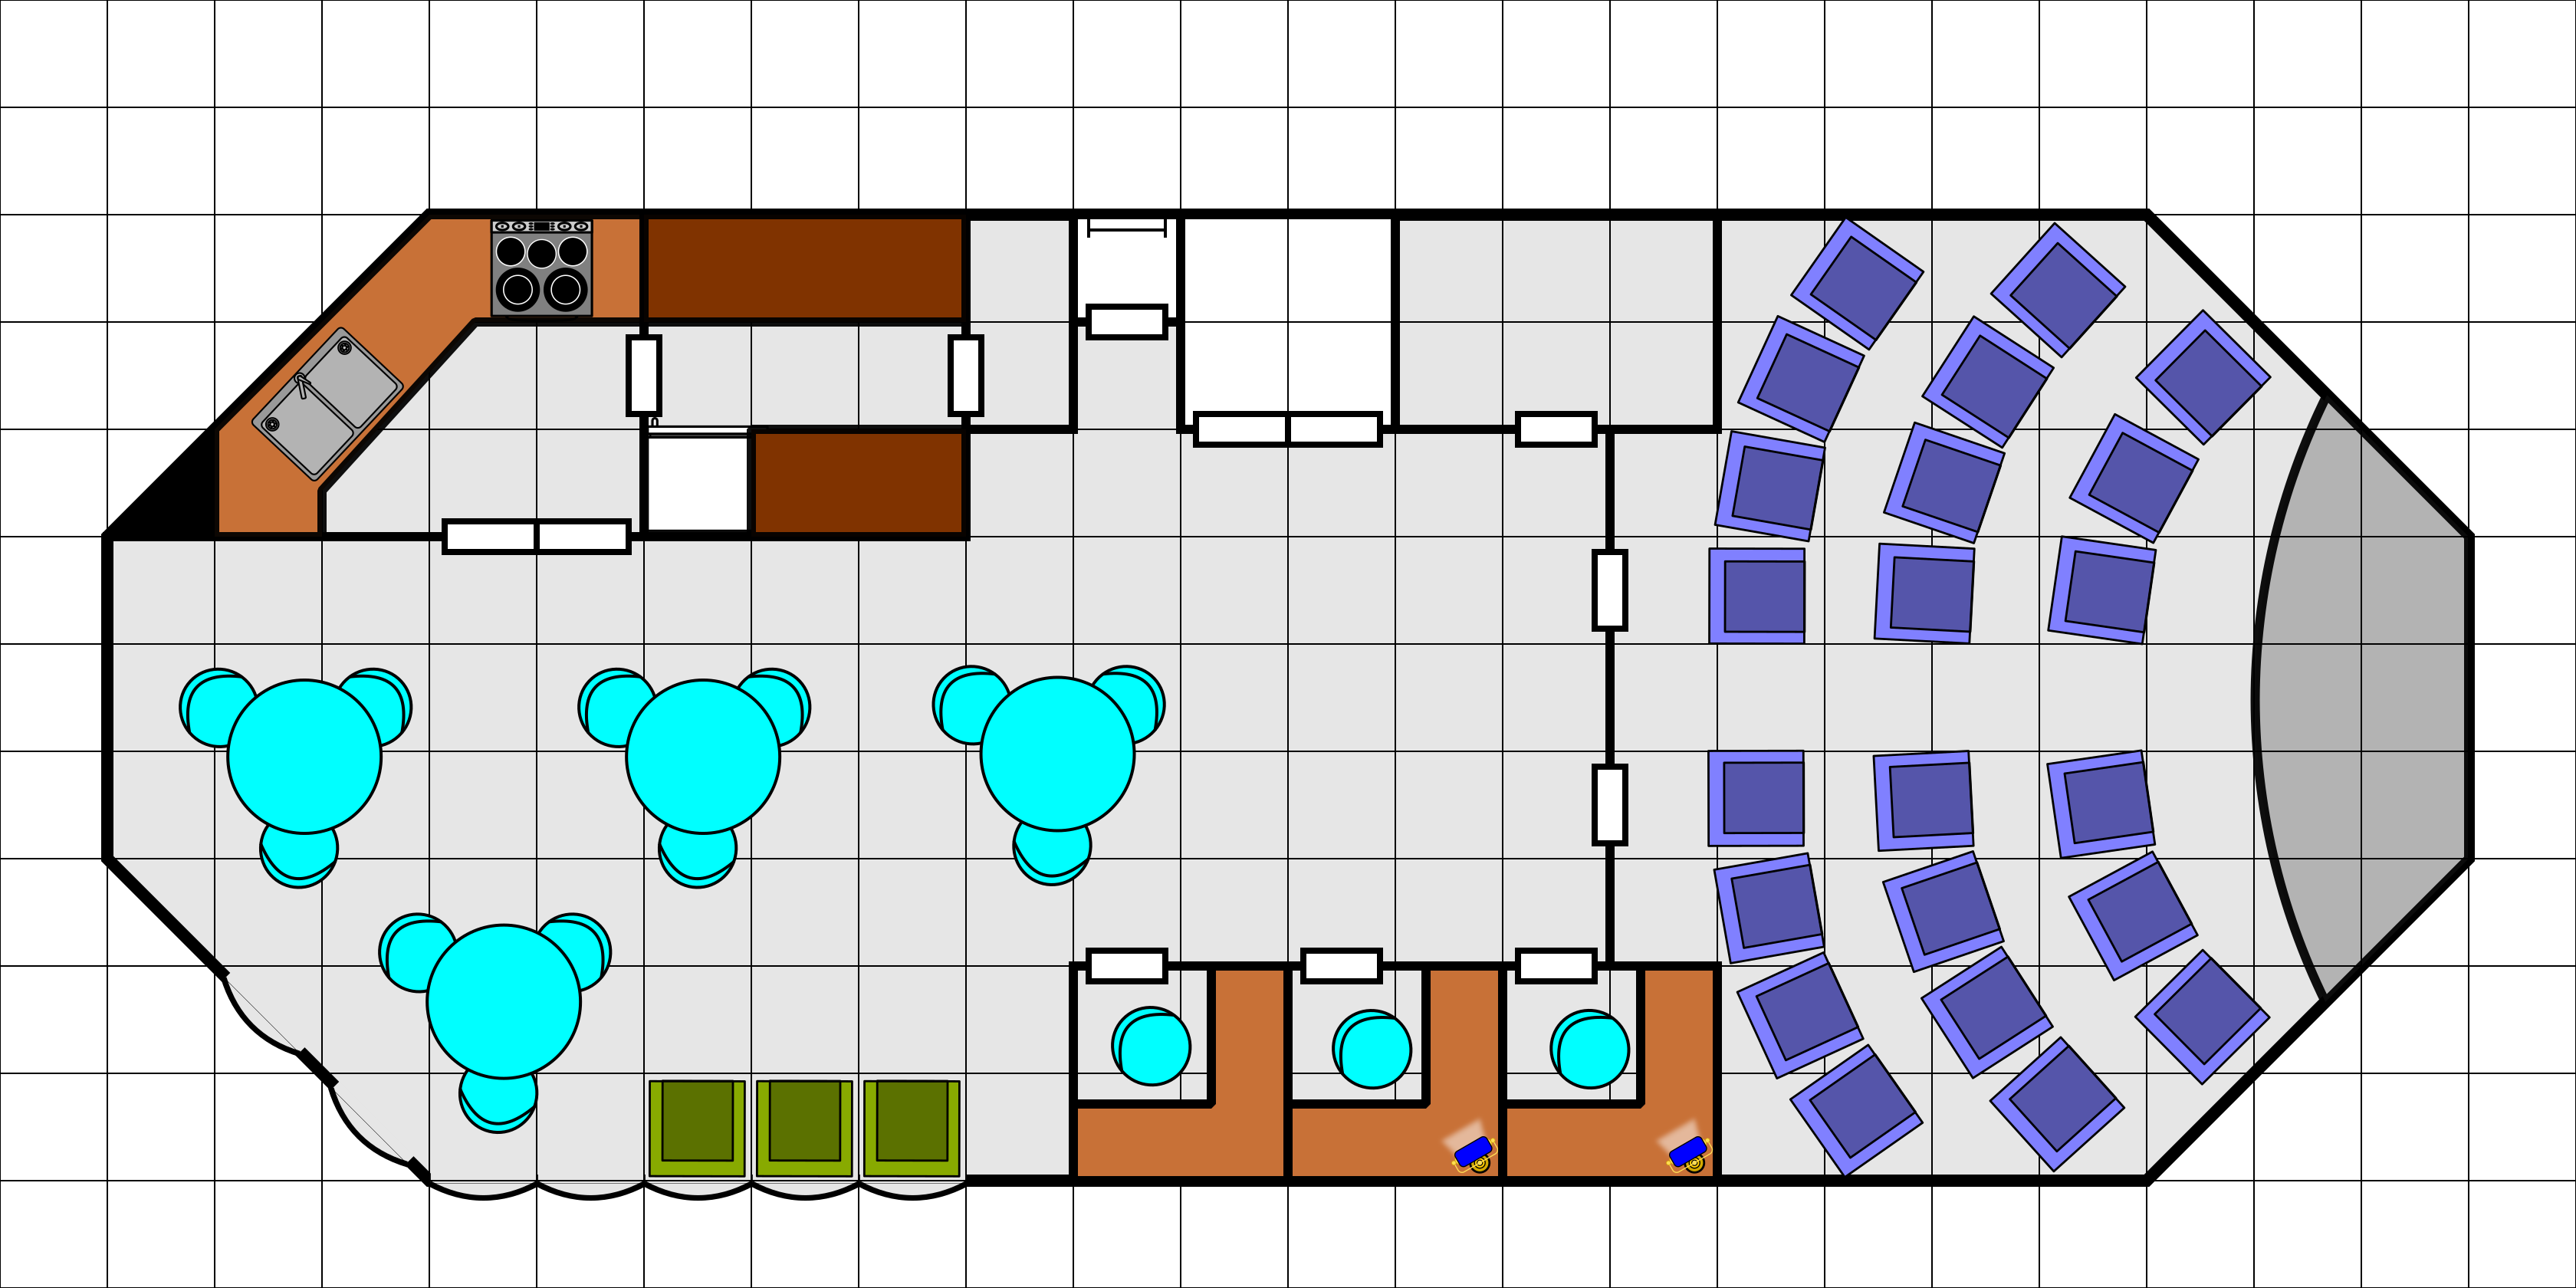
This deck is the common area for the ship. It contains a theater (right side) for both entertainment and meetings/briefings. Along the bottom are some small offices where crew can study and/or work. This is also the dining hall with the galley and attached pantry.

Airlock & Medical Deck

Airlock & medbay deck. Actually I do know how there was an extra row at the top of this deck and the previous one. I started with the file for the Science Deck (from part 1) that has bays that stick out a bit so the map had to be bigger. Click for full image.

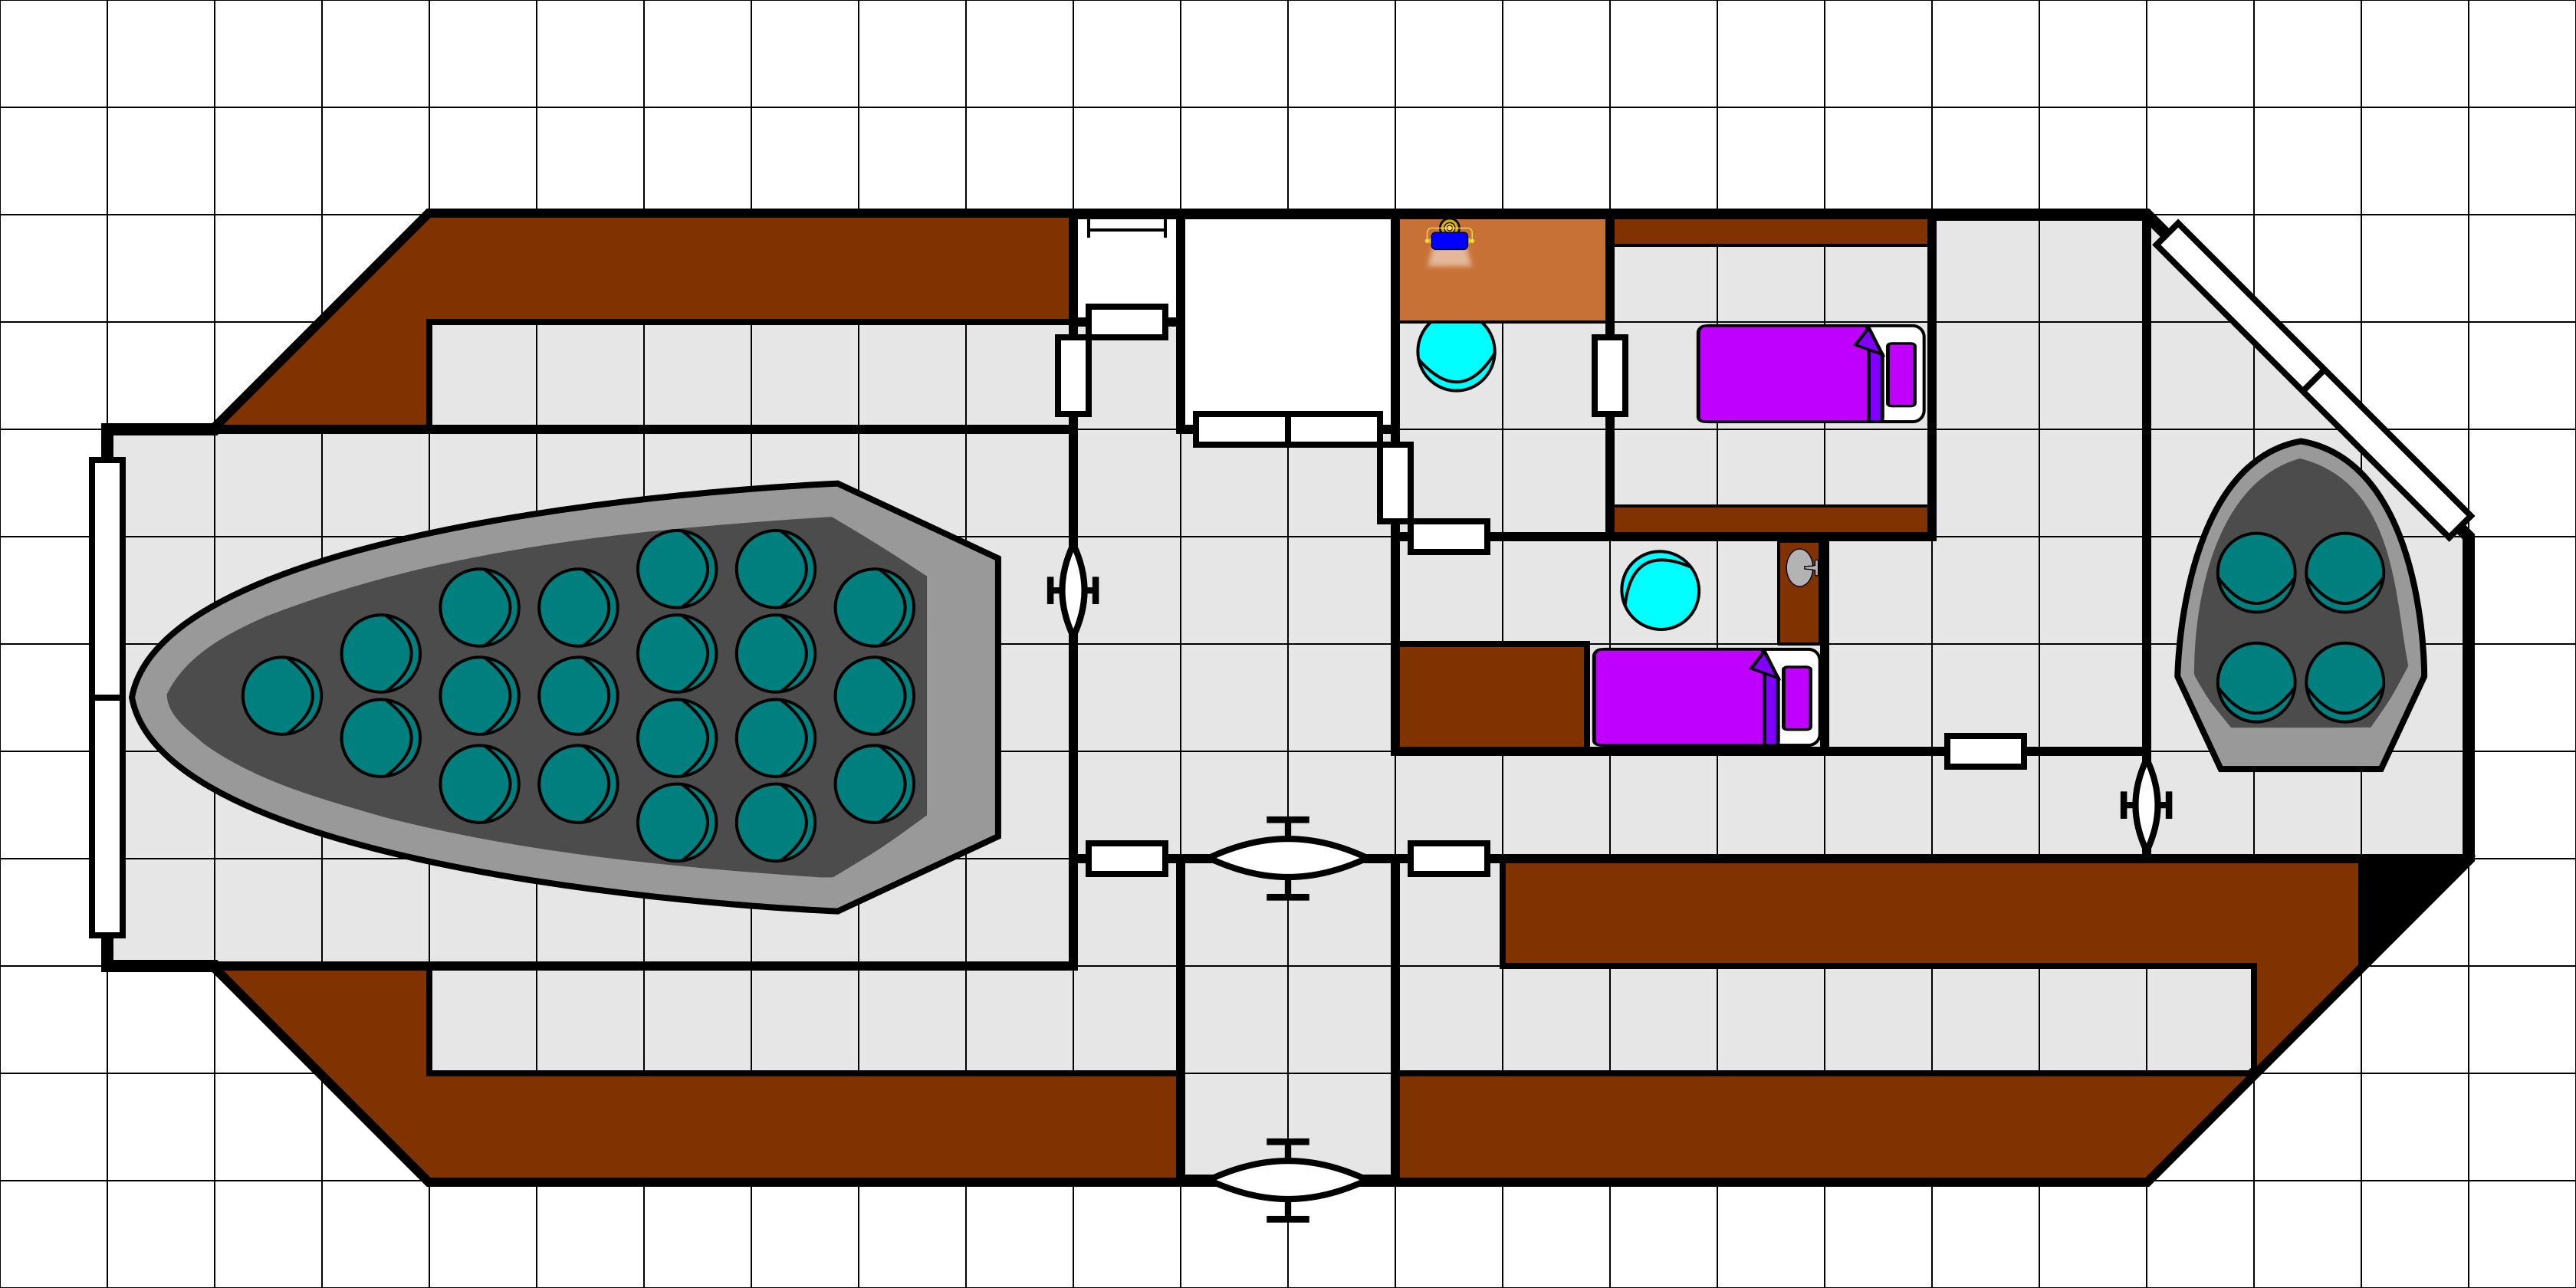
This deck has the ship’s airlock, along with storage for space suits for all the ship’s crew. Also on this deck is the ship’s medical bay with a small office, sickroom, and operating room. Finally, the deck houses the ship’s lifeboat (left) and a small launch (right).

Recreation Deck

Recreation deck. Click for full sized image.

The central feature of this deck is the gym area. That blue area is a mat, not a pool. Off of the gym is a sauna (left) and steam room (right). This deck also house the remaining four staterooms for the crew not housed on the crew decks from the previous posts.

Bridge

The bridge. Click for full size image.

The final deck is the bridge. It houses the main computer and stations for the pilot, astrogagor, gunner, and engineer. Access is by a ladder through a hatch in the floor from the officer’s deck.
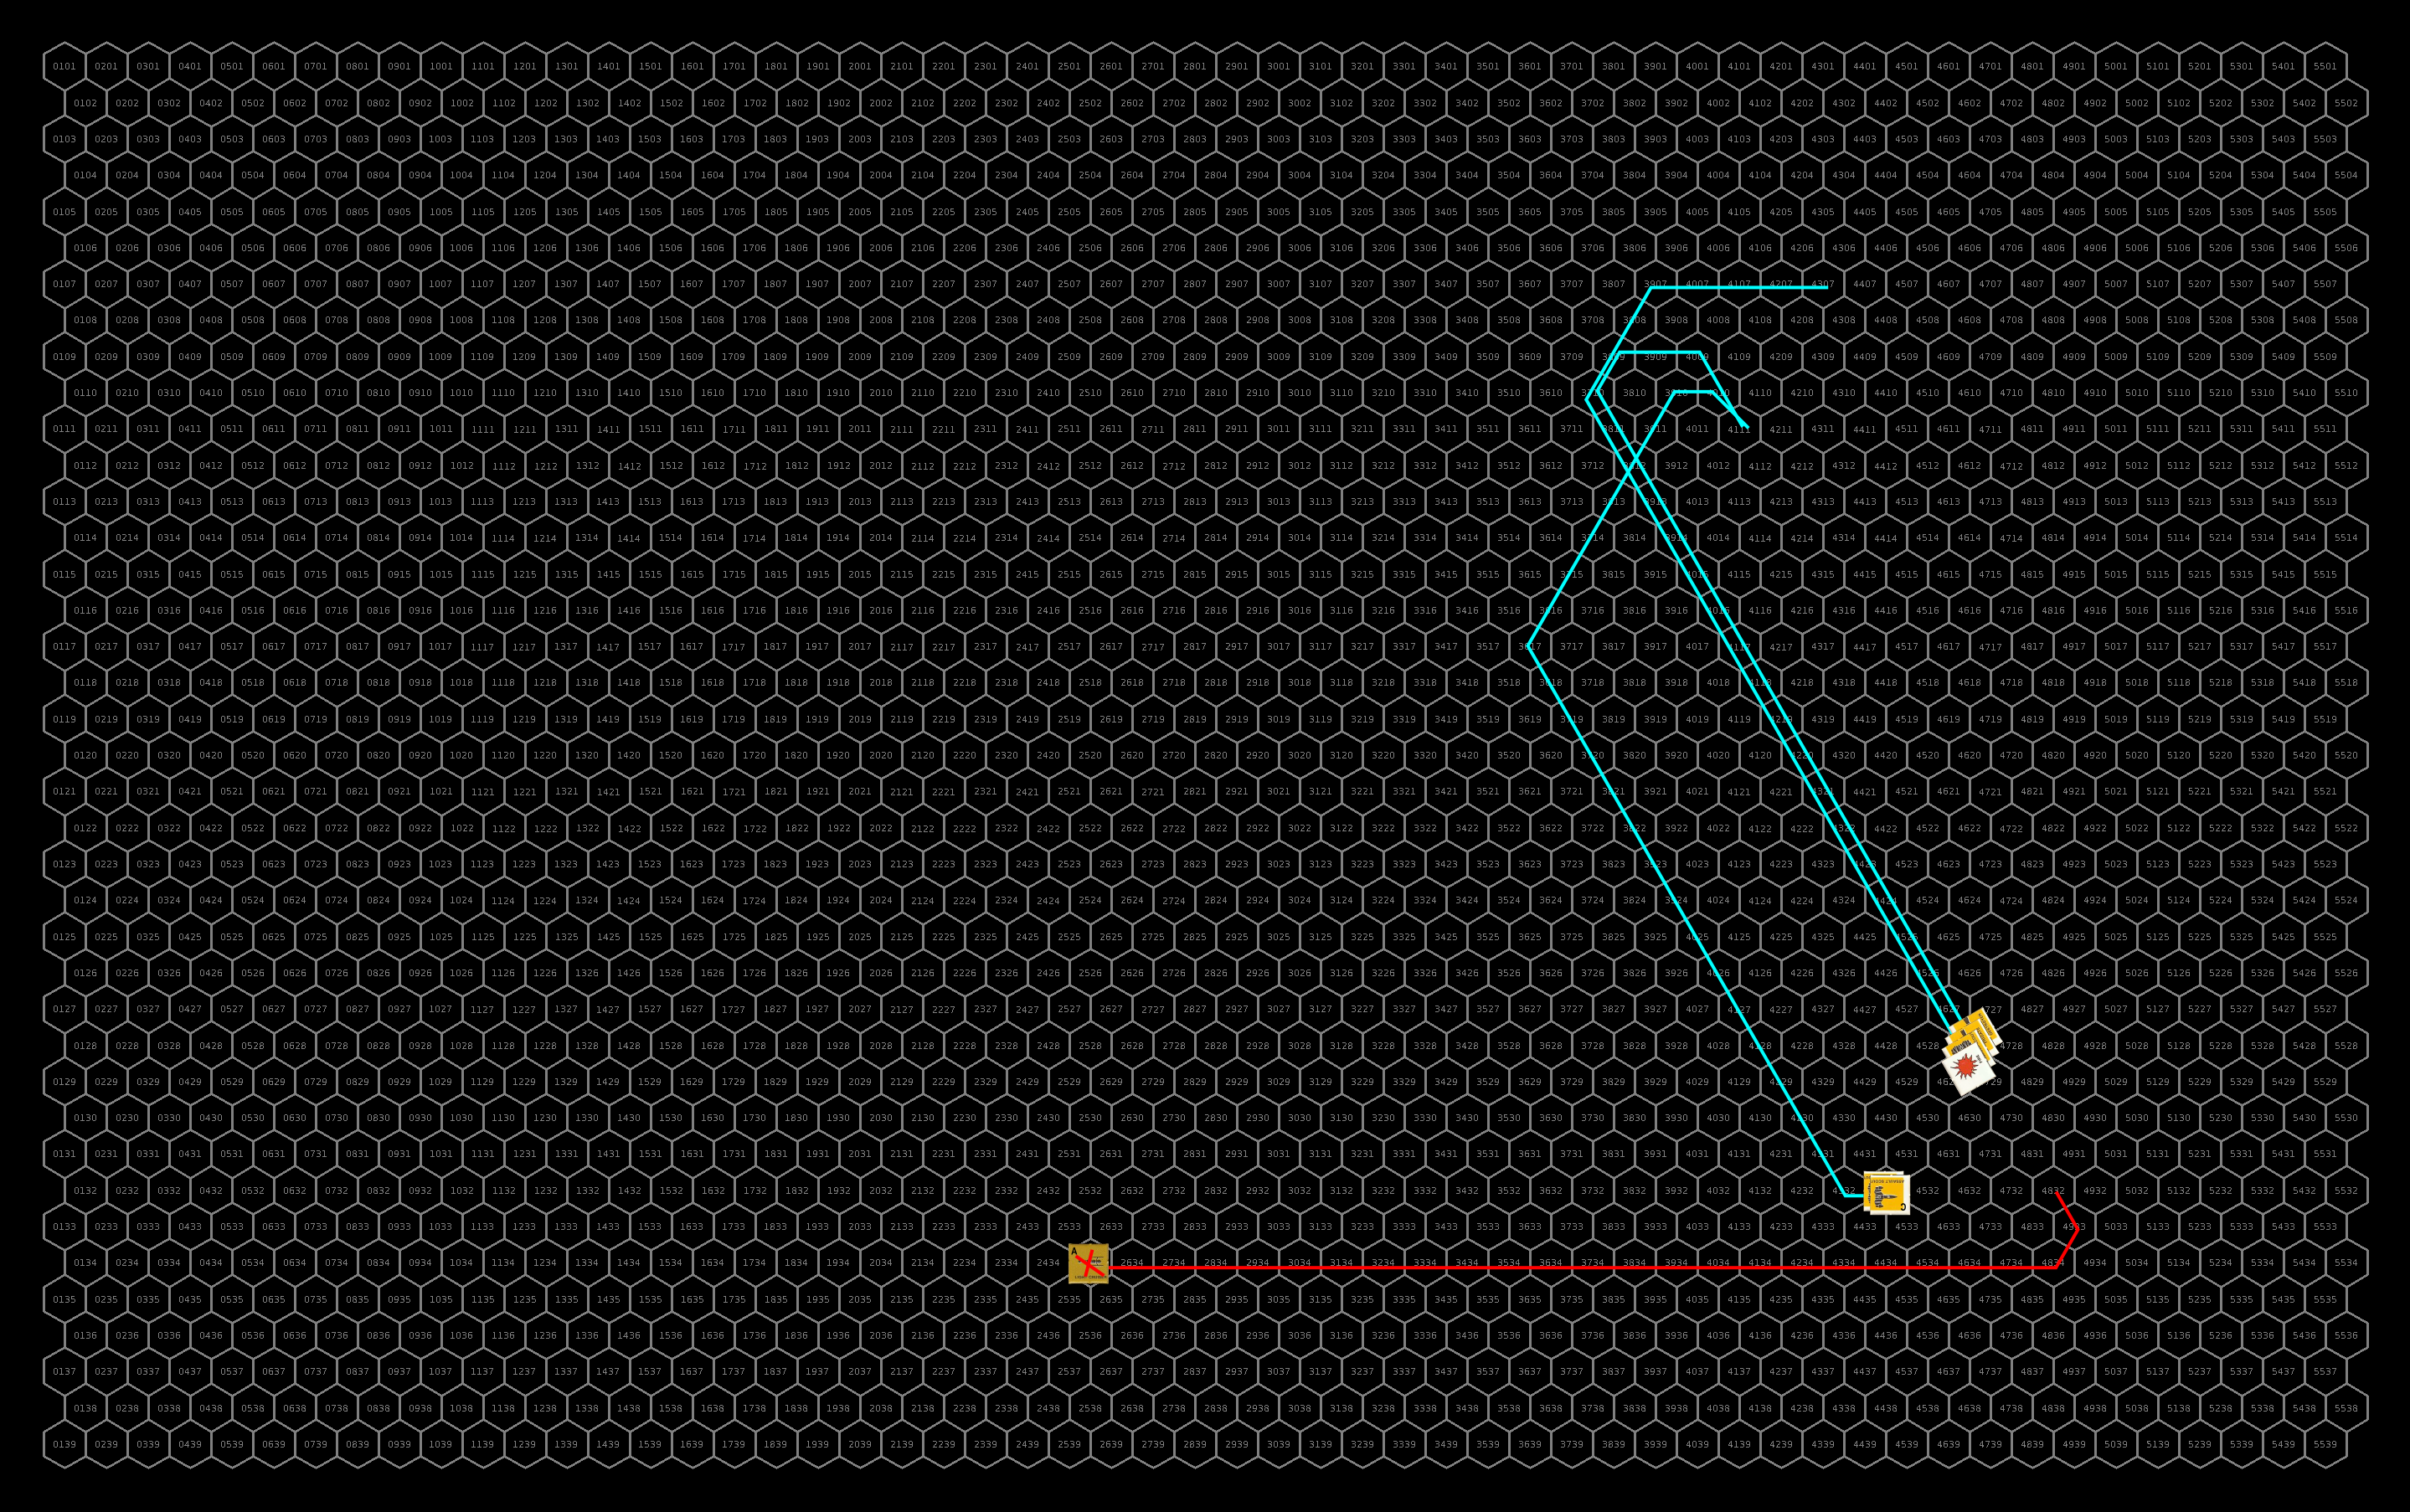
HSS History’s Hope cutaway to show deck placement. Click for a larger image.

Deck Order

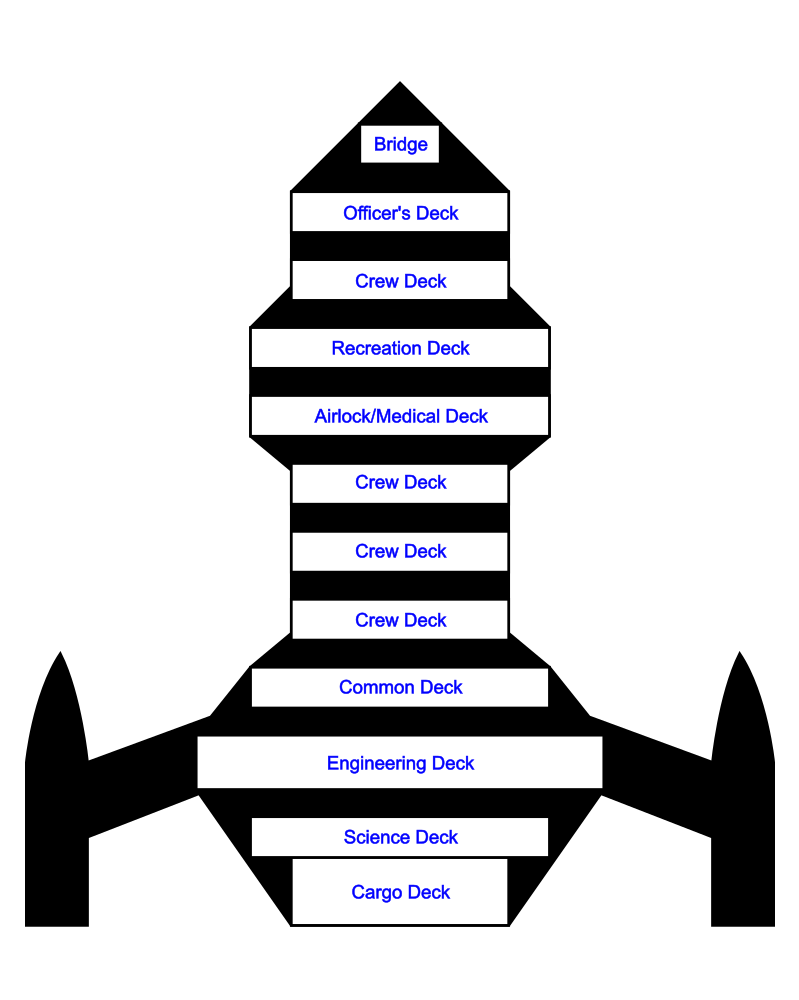
The decks are arranged as follows on the ship from bottom to top as shown in the image to the right. Most of the decks are 3m tall with 2m between decks although the cargo deck is nearly 5m tall and the engineering deck is 4m tall.

  1. Cargo Deck
  2. Science Deck
  3. Engineering Deck
  4. Common Deck
  5. Crew Deck
  6. Crew Deck
  7. Crew Deck
  8. Airlock/Medical Deck
  9. Recreation Deck
  10. Crew Deck
  11. Officer’s Deck
  12. Bridge

What’s Next?

It took me long enough to finish these deck plans but they are finally done. The next thing I have planned for this ship is to create a full technical manual for it. So the next step is for me to add annotations to each deck and write up the detailed descriptions for each room. There might be some tweaks as I start looking at it for the details but they will be small. These decks, plus the descriptions from earlier posts should be enough for anyone to use the ship in a game if they desire.

Some time soon I’ll be posting an updated map of the travels of the ship as recorded in the Detailed Frontier Timeline I’m creating. They are actually over halfway to their destination but I haven’t published a copy of that map recently.

Let me know your thoughts below.

July 12, 2022 Tom 1 Comment

Detailed Frontier Timeline – FY62.08 to FY62.37

This month both sides of the conflict are probing for new routes into enemy space with the Sathar looking for routes to Theseus and Gruna Garu and the UPF probing outward from Fromeltar. The lost militia scout begins to find its way home and the HSS History’s Hope continues its journey.

Both sides continue to build up their forces and the Sathar start a major reshuffling of their ships in preparation for a major change in tactics. The sathar continue with sabotage efforts around the Frontier. This month also sees the events of SF4: Mission to Alcazzar play out.

Date (FY)Events
62.008– The militia assault scout coming from Theseus arrives back at Pale station. The crew is debriefed, and the ship immediately begins duties.

– SG Alpha arrives at Gollwin Academy to pick up a shipment of fighters to be delivered to K’sta-Kar.

– Five fighters are completed at the Triad (Cassidine) SCC and work begins on five more.
62.009After loading 8 fighters at Gollwin Academy, SG Alpha departs for K’sta-Kar.
62.010– PG Liberty does not detect the return of SBF-J2 until they are nearly back to Snowball being tipped off my some of their Mhemne contacts.  They radio the news of the fleet’s return back to Spacefleet.

– Construction is competed at the Minotaur (Theseus) shipyard of a HS: 7 civilian freighter.  This is the first civilian ship competed since the beginning of the conflict.  It was started before the conflict began.
62.011– Arriving back at Snowball (Liberty) SBF-J2 spends a day replenishing supplies before heading back out of the system to complete charting the route to Theseus.

– Eight Academy pilots arrive at Theseus and take control of the waiting fighters.  They form FFC Squadron Epsilon.
62.012Jump calculations for the next leg complete, the HSS History’s Hope begins accelerating toward Void speed. 
62.013An assault scout is completed in the PGC (Gran Quivera, Prenglar) shipyards and joins TF Prenglar.  Work begins on another assault scout.
62.014– Two UPF assault scouts are completed at the CDC (Triad, Cassidine) shipyards.  They are designated Patrol Group Probe Alpha and depart for the Fromeltar system to explore outward an attempt to find the sathar route into that system. Work begins on two more assault scouts.

– Two fighters are completed at the Minotaur (Theseus) station. One rounds out FFC Squadron Epsilon bringing it up to full strength and the other is manned by the militia supporting the FFC.  Work begins on two more fighters.

– The CDC team arrives on Alcazzar. Within minutes of their landing, their transport, the Nightrunner, is attacked and forced to flee the system, stranding them on the planet. (SF4)
62.015– After securing the CDC compound on Alcazzar, the strike team realizes that their only option for off-world communication will be at the Streel compound about 120 km away.  As they prepare to depart, they are attacked by an aircar with Streel markings. (SF4)

– A UPF light cruiser, part of Task Force Meteor, is completed at the CDC shipyards (Triad, Cassidine).  It departs immediately to join up with TF Cassidine in the Fromeltar system. Work is started on another light cruiser.

– After a day of travel over rugged terrain, and several encounters with the mega-fauna of Alcazzar, the CDC set up camp for the night. (SF4)
62.016– As the CDC team sets out to continue its journey to the Streel compound, they are attacked by a large armed force of Streel vehicles.  After an intense battle, the Streel forces are destroyed but the CDC team is down to a single vehicle. (SF4)

– The HSS History’s Hope successfully make the jump into the system they are now designating YS12.  They begin deceleration and start calculations for the return jump to YS11.

– Entering the forest east of the Streel compound, the CDC explorer is bombarded by fruit pits from unseen assailants for a few seconds before the bombardment ends with chittering echoing through the forest. (SF4)

– A few hours after the fruit pit bombardment, the CDC team’s path is blocked by six individuals that they recognize as members of the planet’s sentient species.  Recognizing the opportunity for allies against Streel, the team attempts to communicated with the natives. (SF4)
62.017– Having established friendly relations with the natives of Alcazzar, the CDC team works with the natives to plan an attack on the Streel compound where over a hundred of the natives are being held and used as slave labor. (SF4)

– After nearly 70 days, the astrogator on the K’aken-Kar militia assault scout finally determines the ship’s location and discovers that they are well outside the Frontier.  They begin plotting a jump to OFS167 to start the trek home.
62.018An unauthorized aircar attempts to approach Spacefleet headquarters on Morgaine’s World. Refusing to divert, it is engaged and shot down but detonates upon impact causing considerable damage and several civilian casualties. The driver is incinerated in the blast.
62.019With jump calculations about halfway done, the crew of the K’aken-Kar militia assault scout begin accelerating toward jump speed for the jump to OFS167, 5 light years away.
62.020– After 3 days of planning and resting, the CDC team, together with the Alcazzar natives, launch an attack on the Streel mining compound. (SF4)

– The attacking CDC team manages to fuse the reactor of the Streel compound and get a message to the Nightrunner to pick them up back at the CDC compound in ten days. (SF4)

– Nine more pilots graduate from the accelerated training program.  Eight depart for Triad (Cassidine) while the remaining pilot joins Task Force Prenglar.
62.021– Deceleration into YS12 complete, the HSS History’s Hope begins accelerating for it’s jump back to YS11 while jump calculation continue.

– Four fighters are completed at the Hentz (Araks) shipyards.  They are temporarily crewed by militia pilots under the supervision of PG  Tranquility. Work begins on four more.

– Two fighters are completed at the Minotaur (Theseus) shipyards and work begins on two more.
62.022A cutter is completed at sathar SCC#5 (OFS19)
62.023An attempt is made to sabotage the starship construction center at Rupert’s Hole (Cassidine) but is thwarted by security personnel.  The saboteur, a human, kills himself before he can be captured.
62.024– SBF-J2 arrives in the Padda system and begins working on jump calculations to chart a route to the Theseus system.

– The K’aken-Kar militia assault scout successfully jumps into the OFS167 system. As the engineers start working on their engine overhauls, the astrogator gets to work plotting a jump to the neutron star in OFS166.

– A frigate is completed at sathar SCC#10 (OFS174)
62.025SG Alpha arrives at K’sta-Kar delivering 8 fighters which become Frontier Fighter Corps Squadron Zeta.  The crew is given 2 days of R&R before heading out for the Araks system.  The assault scout joins PG Vigilant.
62.026The HSS History’s Hope successfully jumps back to YS11 and begins deceleration and starts calculations for the jump back to YS12.
62.027– PG Probe Alpha arrives at Terledrom (Fromeltar) and confers with leader from TF Cassidine and the local militia about the sathar incursion into the system.  They decide to attempt to chart the route through the nebula to the double star system OFS020 a 6 light year jump.

– With their jump calculations nearly complete, the K’aken-Kar militia assault scout begins acceleration for the jump to OFS166.
62.028– Jump calculations complete, sathar SBF-J2 begins accelerating for the jump into the Theseus system.

– A destroyer is completed at sathar SCC#1 (OFS203).

– Deciding to try a different tactic, the sathar begin a major fleet reshuffling. The ships (1 F, 1 FF, 1 HC, & 1 AC) at SCC#10 (OFS228), designated TG1 depart for SCC#3 (OFS138).

– Five fighters are completed at the PGC shipyards (Gran Quivera, Prenglar) and are transferred to Gollwin Academy while work begins on five more.
62.029The 8 FFC pilots arrive at Cassidine and take command of the fighters stored there forming FFC Squadron Eta.
62.030– The Nightrunner arrives back at Alcazzar and retrieves the CDC team.  They slip out of the system avoiding Streel forces and return to Triad (Cassidine). (SF4)

– With assistance from the TF Cassidine astrogators, PG Probe Alpha completes jump calculations and begins accelerating for a jump to the OFS020 system.
62.031SBF-A2 (1 LC) departs SSC#1 (OFS203) to attempt to chart a route to Gruna Garu.
62.032The K’aken-Kar militia assault scouts misjumps once again and ends up in another unknown star system (FS33).  They begin working on finding their location.
62.033SBF-J2 successfully jumps into the Theseus system. It begins deceleration to turn around and jump back to the Padda system.
62.034Eight more pilots graduate from the accelerated fighter training program at Gollwin Academy.  They are to join SG Alpha as it passes through the system in 10 days to take control of the new fighters at Hentz (Araks).
62.035– The HSS History’s Hope jumps back into the YS12 system and begins calculations for the next jump, a small star system 8 light years away.  They remain near jump speed as the next system is in nearly a direct line to their current line of travel.

– PG Probe Alpha successfully jumps into the OFS020 system.  They remain near jump speed and monitor the system for sathar presence while work begins on engine overhauls and calculations for the return jump to Fromeltar.

– A heavy cruiser is completed at sathar SCC#3 (OFS138).
62.036– SBF-J2 is detected by a patrol of two assault scouts of the Theseus militia and detects them in return.  It immediately begins altering its flight path to attempt to avoid an engagement.

– Loath to engage the light cruiser of SBF-J2 by themselves, the two Theseus assault scouts radio for backup and begin to trail the sathar ship.  The rest of the militia immediately boosts to attempt to intercept the sathar.

– SBF-A2 successfully jumps into the Gruna Garu system. It begins deceleration out of the system plane to attempt to avoid detection while it plots the return jump.
62.037After 2 days of no sathar detection, PG Probe Alpha begins deceleration in preparation for the return jump to Fromeltar.

The full timeline file can be downloaded here:

DetailedFrontierTimelineDownload
July 5, 2022 Tom Leave a comment

Second Battle of Theseus – FY62.039

A sathar light cruiser, detected three days ago by a pair of patrolling militia assault scouts, was engaged today by the full force of the Minotaur militia after a long, high-g boost to intercept the alien vessel. A thirty minute battle ended with the complete destruction of the sathar ship while only one of the militia assault scouts sustained some minor hull damage.

An anonymous source has confirmed that Spacefleet has assets in systems beyond Theseus that alerted the militia to the possibility of the sathar vessel arriving in system. Our thanks go out to those brave souls risking their lives to watch the sathar movements.

Victoria Sorensen, StarPlay News

Background

After the failed attempt by the frigate to chart the course into the Theseus system, the sathar dispatch a light cruiser (the remains of SBF-J2) to attempt to complete the route.  Detected after three days of deceleration by two patrolling militia assault scouts, the light cruiser attempts to evade and jump out of the system before it can be attacked.

Unsure of their ability to take on the light cruiser by themselves, the two militia assault scouts report in and begin to trail the light cruiser while the rest of the militia ships begin a high-g boost in an attempt to intercept the light cruiser before it can jump out of the system.  After three days of grueling pursuit, the militia ships overtake the light cruiser and engage.

Order of Battle

Minotaur Militia

  • 4 Assault Scouts
  • 1 Frigate
  • 1 Destroyer

Sathar

  • 1 light cruiser

The Battle

Setup

The militia are the attackers in this fight and will move first.  The militia deploy in three groups: the destroyer and frigate together in the middle to take the light cruiser on directly while the assault scouts deploy into two pairs on the wings to make strafing attacks with their assault rockets.  They start a speed 20.

Out gunned, the light cruiser plans to focus on the smaller faster ships in an attempt to disable the militia ships enough to escape.  The light cruiser also starts at speed 20.

Initial setup for this battle. Click for full sized image.

Turn 1

The assault scouts accelerate to speed 25 while the destroyer accelerates to 23 and the frigate only accelerates to 22 allowing the destroyer to catch up to it.  The sathar light cruiser accelerates to speed 23 and veers to starboard to go after the upper flight of assault scouts.  All ships are out of range this round.

The ships start to close. Click for full size image

Turn 2

The militia ships continue to accelerate and close on the light cruiser from multiple directions with the assault scouts accelerating to a speed of 30 and the capital ships accelerating to a speed of 26.  The light cruiser fires all of its beam weapons at the lead assault scout in the upper group.  It only hits with the electron battery but induces a fire on the small ship.

The militia ships fire everything they have except their rocket batteries as they are out of range.  The light cruiser fires two ICMs at each of the incoming torpedoes both of which are intercepted by the ICMs.  The gunners on the destroyer are having a bad day with none of their weapons connecting.  The frigate scores hits with both its laser cannon and battery knocking out the cruiser’s proton battery and slightly damaging its hull (6%).  The four assault scouts only connect with one of their laser batteries damaging the cruiser’s hull (10%) but three of the assault rockets slam home knocking out 20% of the cruisers hull integrity, it’s electron battery, and a third of it’s engine capability.

Unable to bring its disruptor cannon to bear, the sathar light cruiser pulls a turn to port, accelerates to a speed of 25, and fires broadside at the militia ships.  It fires a torpedo at the frigate, a rocket battery at one assault scout, and its laser battery at the other assault scout.  Defensively, the militia ships fire their energy weapons again with the destroyer and frigate also firing rocket batteries at the cruiser. 

Both militia rocket batteries connect damaging the hull (22%) and its combat controls systems.  The frigate hits with its laser cannon knocking out the cruiser’s disruptor cannon while the destroyer with its two batteries, damaging the hull (10%) and knocking out the electron screen. The assault scouts connect with two of their laser batteries taking out the torpedo launcher and scratching the hull (1 HP).  The cruiser misses with all of its weapons.

First shots exchanged. Click for full sized image.

Turn 3

The militia ships continue to pursue the carrier with the capital ships slowing to speed 23 and the assault scouts slowing to speed 25.  They continue to stay outside of rocket battery range which limits the heavily damaged cruiser to just its laser battery.  The fire on the assault scout knocks out its laser battery.  The cruiser fires at the scout with the fire hitting it but only slightly damaging the hull (1 HP). 

Once again the militia ships fire all their energy weapons and the scouts fire their assault rockets.  Given the damaged state of the cruiser, the capital ships elect not to fire torpedoes.  With no torpedoes incoming, the cruiser elects to fire an ICM at each of the assault rockets but it doesn’t make any difference as three of the AR impact the cruiser while one goes off course.  The militia ships also hit with one laser cannon and two laser batteries.  The assault rockets take out the cruisers stasis screen and ICM launcher while the laser cannon takes out the laser batteries take out 13% of the cruises hull (leaving it with only 4% hull integrity and damage its navigation control system.

The navigation control damage causes the cruiser to pull to starboard.  Amazingly, the heavily damaged cruiser holds together through the turn but is then obliterated by the laser fire from the militia ships before it has a chance to get a shot off.

Final positions when the sathar light cruiser is destroyed. Click for full size image.

Final repairs

The scout manages to get the fire out immediately but its hull damage will require a day in the shipyard to repair.

Lessons Learned

The sathar cruiser really didn’t have a chance in this one against the full militia roster.  Its only real hope was to get lucky and damage the engines on several of the ships to allow it to even the odds a bit and get away but that didn’t happen.  Unfortunately, it was detected in the system while it was still decelerating to jump back out which greatly increased the chance that the militia, with their faster ships, could catch it. Had it been detected outbound, it would have either gotten away or, if the militia decided to press their luck, only had to engage to the two assault scouts.

July 2, 2022 Tom 1 Comment
Become a Patron!

Recent Posts

  • Detailed Frontier Timeline – FY62.069 to FY62.99
  • State of the Frontier – August 2022
  • Battle of Hargut (Gruna Garu) – FY62.098
  • Archived Arcane Game Lore Posts – May 2013 to Dec 2014
  • A Look at Yachts and Privateers
  • Homeworld Bound – A Campaign Concept
  • Second Battle of Fromeltar (Terledrom) – FY62.083
  • Sample Star System Data
  • Detailed Frontier Timeline – FY62.038 to FY62.068
  • State of the Frontier – July 2022

Categories

  • 3D Models
  • Adventures
  • Background
  • Creatures/Races
  • Deck Plans
  • Equipment
  • Game Design
  • General
  • Locations
  • Maps
  • NPCs
  • Optional Rules
  • Patreon-only
  • Project Overviews
  • Reviews
  • Setting Material
  • Starships
  • System Brief
  • Vehicles
  • Writing

Recent Comments

  • Loguar on Detailed Frontier Timeline – FY62.069 to FY62.99
  • Loguar on Detailed Frontier Timeline – FY62.069 to FY62.99
  • Tom on Detailed Frontier Timeline – FY62.069 to FY62.99
  • Rook on Maps and Counters
  • Loguar on Detailed Frontier Timeline – FY62.069 to FY62.99
  • Tom on Detailed Frontier Timeline – FY62.069 to FY62.99
  • Tom on Second Battle of Fromeltar (Terledrom) – FY62.083
  • Loguar on Detailed Frontier Timeline – FY62.069 to FY62.99
  • Loguar on Second Battle of Fromeltar (Terledrom) – FY62.083
  • Aemon Aylward on Sample Star System Data

Archives

  • September 2022 (1)
  • August 2022 (9)
  • July 2022 (3)
  • June 2022 (3)
  • May 2022 (3)
  • June 2021 (1)
  • April 2021 (1)
  • February 2021 (4)
  • January 2021 (6)
  • December 2020 (5)
  • November 2020 (11)
  • October 2020 (4)
  • September 2020 (5)
  • August 2020 (4)
  • July 2020 (6)
  • June 2020 (5)
  • May 2020 (8)
  • April 2020 (5)
  • March 2020 (5)
  • February 2020 (5)
  • January 2020 (5)
  • December 2019 (7)
  • November 2019 (4)
  • October 2019 (6)
  • September 2019 (5)
  • August 2019 (6)
  • July 2019 (7)
  • June 2019 (5)
  • May 2019 (6)
  • April 2019 (7)
  • March 2019 (4)
  • February 2019 (5)
  • January 2019 (7)
  • December 2018 (5)
  • November 2018 (10)
  • October 2018 (4)
  • September 2018 (4)
  • August 2018 (5)
  • July 2018 (4)
  • June 2018 (4)
  • May 2018 (12)
  • December 2015 (1)
  • November 2015 (2)
  • December 2014 (4)
  • November 2014 (3)
  • June 2014 (1)
  • January 2014 (1)
  • July 2013 (1)
  • June 2013 (2)
  • May 2013 (3)

Meta

  • Log in
  • Entries feed
  • Comments feed
  • WordPress.org
Powered by WordPress | theme Layout Builder