This was a fairly busy month with three major events. The first was the discovery of the YAS Royal Cloud by the HSS History’s Hope. This is going to send ripples through the yazirian society. The other two major events were the battles at Terledrom and Hargut. The loss of the starship construction center at Terledrom is a major blow to the UPF. Strike Force Nova is en route to hit a similar sized sathar shipyard and we’ll see what happens there next month.
Date (FY)
Events
62.069
Six more pilots graduate from the accelerated training program at Gollwin Academy. They take command of some of the fighters there and await the arrival of SG Alpha.
62.070
Both Sathar TG1 & SBF-E2 jump into the OFS020 system and begins decelerating. TG1 detects PG Probe Alpha almost immediately and takes measures to remain undetected by the UPF ships.
62.071
The HSS History’s Hope arrives in inner system of YS14 and begins the approach the ship broadcasting the mayday message. It seems to be floating in interplanetary space on highly elliptical orbit around the star.
62.072
– The UPF destroyer arrives at Kawdl-Kit (K’sta-Kar) and joins PG Vigilant.
– Arriving within visual range of the ancient yazirian vessel, the crew of the HSS History’s Hope confirms that it is indeed the YAS Royal Cloud, the only ark ship from the exodus not to arrive in the Frontier and which was carrying the imperial family of ancient Yazira.
– Inspection of the YAS Royal Cloud show that it is missing all of its engines and shows signs of blast damage on the aft part of the ship as well as serious weathering and impact damage from small objects and micro meteors.
– An assault scout is completed at the PGC shipyards (Gran Quivera, Prenglar) and joins TF Prenglar.
62.073
– TG2 jumps into the Liberty system as it is passing through.
– PG Probe Alpha successfully jumps back into the Fromeltar system without having detected the arrival of sathar SBF-E2 or TG1 entering the OFS020 system. They transmit the jump data to Spacefleet and begin decelerating and working on calculation for a return to that system and then beyond.
– After an animated discussion and deliberation, the crew of the HSS History’s Hope decides to not attempt boarding the YAS Royal Cloud. Deciding that a message about its discovery is too sensitive to broadcast, they choose to return to the Frontier to deliver it personally.
– After completing a close visual inspection of the YAS Royal Cloud, the HSS History’s Hope starts accelerating for a jump back to the YS12 system.
– A frigate is completed at the PGC shipyards (Gran Quivera, Prenglar). Together with the AS completed the day before, they are designated SG Beta and depart for the K’tsa-Kar system to join PG Vigilant
62.074
– Sathar TG1 and SBF-E2 met in the OFS020 system and all but the assault carrier from TG1 join SBF-E2. The assault carrier (TG1) departs for sathar SCC#4 (OFS111) while the other ships start accelerating for a jump into the Fromeltar system.
– An assault scout is finished at the Minotaur (Theseus) shipyards and departs for the Liberty system to join PG Liberty.
– Two fighters are completed at the Terledrom (Fromeltar) shipyards.
62.075
– TG2 is detected in the outer reaches of the Liberty system by PG Liberty. A heavy cruiser and destroyer are too much for a lone assault scout so they can only report the transit of the ships back to Spacefleet and request more support.
– PG Probe Beta arrives in the Zebulon system and begins decelerating toward Volturnus and working on jump calculations to plot a route directly to Kazak through the Xagyg Nebula.
– An assault scout is completed at the CDC shipyards (Triad, Cassidine) and begins patrol duties with FFC Squadron Eta.
62.076
– A frigate is completed at sathar SCC#4 (OFS111).
– PG Probe Gamma arrives in the Kizk-Kar system. It begins decelerating toward the planet and working on calculations for a jump to the binary star system FS56, the suspected route for sathar ships into the Kisk-Kar system.
62.077
– PG Probe Delta arrives in the K’aken-Kar system and begins decelerating toward the planet to confer with the militia assault scout crew. Work also begins on calculations for a jump to the FS33 system.
– SG Alpha arrives back at Gollwin Academy (Morgaine’s World, Prenglar) where it picks up 8 more fighters and departs for Lossend (Timeon).
62.078
– The HSS History’s Hope successfully jumps back into the YS12 system. The crew decides that they need to fully chart the route to YS14 before returning the Frontier and so begin decelerating and working on jump calculations back to that system.
– PG Liberty realizes that TG2 is not headed for the Waller Nexus system and on to Theseus but to some other destination. They relay this to Spacefleet.
62.079
SBF-E2 jumps into the Fromeltar system and begin decelerating toward Terldrom.
62.080
– SBF-E2 is detected by TF Cassidine. PG Probe Alpha aborts its jump back to OFS020 and heads to join the Task Force as it, the FFC squadron, and the Fromeltar militia prepare to meet the sathar fleet.
– Sathar fleet TG2 jumps out of the Liberty system (to OFS196).
62.081
– Two Fighters are completed at the Minotaur (Theseus) shipyards. They join the others manned by militia pilots under the direction of FFC Squadron Epsilon.
– Significantly outgunned, TF Cassidine regrets not requesting one of the minelayers in Prenglar to be transferred to Fromeltar. They hope to use the maneuverability of their smaller ships against the large number of capital ships in the sathar fleet.
62.082
– Calculations complete, PG Probe Beta begins accelerating for the jump to Kazak.
– Calculations complete, PG Probe Gamma begins accelerating for the jump to FS56.
– Calculations complete, PG Probe Delta begins accelerating for the jump to FS33.
62.083
– Sathar TG1 arrives at SCC#4.
– Second Battle of Terledrom (Fromeltar) – The sathar suffer more losses than expected but destroy the Terledrom shipyards, most of the UPF fighters in the system, and a militia assault scout.
– The fleeing sathar ships accelerate for a jump to OFS020 where they will make a high-speed run to sathar SCC#5 (OFS019).
62.084
– A frigate is completed at sathar SCC#10 (OFS174).
– TF Cassidine’s assault carrier, together with the Fromeltar militia frigate, are designated Shuttle Group Beta and depart for Dramune where the frigate will enter the shipyard for repairs and the carrier will continue on to Prenglar.
– One of the minelayers in TF Prenglar is detached and designated Shuttle Group Gamma. It departs to join TF Cassidine in Fromeltar.
62.085
After a careful review of the events of the Second Battle of Fromeltar, Spacefleet begins a program to arm and add defenses to all existing starship construction centers. Additionally, security is increased even further at all operating shipyards.
62.086
– SG Alpha arrives at Lossend where the eight fighters it is carrying are deployed as FFC Squadron Iota. SG Alpha then heads out for Theseus to pick up more fighters.
– An assault scout is completed at the PGC shipyards (Gran Quivera, Prenglar) and joins TF Prenglar.
62.087
– Calculations for the return jump to YS14 complete, the HSS History’s Hope begins accelerating for a jump back to that system.
– PG Probe Beta successfully jumps into the Kazak system. It begins decelerating and working on jump calculations for the return jump to Zebulon.
– PG Probe Gamma successfully jumps into FS56. They remain near jump speed while working on overhauls and jump calculations for the return jump to Kizk-Kar while they monitor for sathar signals in the system.
– PG Probe Delta successfully jumps into the FS33 system. With the jump back to K’aken-Kar already plotted by the militia, they remain near jump speed and begin working on jump calculations to the neutron star in OFS166 while they monitor for sathar signals in the system.
62.088
– Spacefleet changes PG Probe Beta’s orders and directs the to proceed immediately to OFS019 and monitor the system. They stark working on jump calculations for that system and maneuvering for a jump.
– A light cruiser is completed at sathar SCC#1 (OFS203) and joins SBF-A2.
– SBF-E2 jumps back into OFS020 where they remain near jump speed and begin a high-speed transit to SCC#5 (OFS019).
– Five fighters are completed at the PGC shipyards (Gran Quivera, Prenglar) and shuttled to Gollwin Academy.
62.089
– TG Beta arrives in the K’sta-Kar system from Prenglar and joins PG Vigilant.
– Sathar fleet TG2 jumps into the OFS203 system (Sathar SCC#1) and receive orders to remain near jump speed and vector to join SBF-A2 which begins acceleration for a jump to the Gruna Garu system.
– Assessment of resources and manufacturing capabilities complete, work begins on the long process of rebuilding the Terledrom (Fromeltar) starship construction center.
– Two more pilots graduate from the accelerating training program at Gollwin Academy. They continue working with the fighters at the academy while two other pilots are sent to Triad (Cassidine) to start training with FFC Squadron Eta.
62.090
The assault scout from Minotaur arrives in the Liberty system and joins PG Liberty.
62.091
PG Probe Beta jumps into the OFS019 system. They remain near jump speed as they begin working on calculations for a jump back to Kazak and monitoring for sathar signals in the system.
62.092
– The HSS History’s Hope successfully jumps back into the YS14 system completely charting the route to that system from YS12. They begin deceleration and jump calculations back to YS12 and then a return trip to Scree Fron.
– Calculations complete, PG Probe Delta successfully jumps into the OFS166 system containing the neutron star. They begin decelerating and working on calculations for a jump back to FS33 while monitoring for sathar signals.
– After only detecting signals from near one of the planets, Spacefleet orders PG Probe Beta to cautiously proceed to the inner system and examine exactly what is there. They alter their course to slowly drop into the system.
62.093
Deceleration and jump calculations complete, PG Probe Gamma begins accelerating for a jump back to the Kisk-Kar system.
62.094
– SBF-A2 (1 DD, 2 LC, 1 HC) jump into the Gruna Garu system and begin decelerating toward the planet.
– The Gruna Guru militia detects the inbound sathar ships just hours after they arrive in the system. Together with FFC Squadron Theta and the Yazira Squadron of civilian privateers, they prepare to defend against the sathar while notifying Spacefleet.
62.095
Sathar SCC#5 detects the inbound assault scouts of PG Probe Beta. The UPF ships notice a sharp decrease in transmissions from the planet but little else.
62.096
With the increased security the CNE Group infrastructure rollout has speed up and gone much more smoothly. As new areas are provided with service, customers are switching in droves away from the high prices of the Groth Energy Corporation.
62.097
– Calculations complete, and having not detected any sathar in the system, PG Probe Delta begins accelerating for a jump back to FS33.
– The two Spacefleet fighter pilots arrive at Triad (Cassidine).
62.098
– PG Probe Gamma successfully jumps back into the Kizk-Kar system and immediately begins decelerating and working on calculations for a jump back to FS56.
– Battle of Hargut (Gruna Garu) – UPF forces defeat the invading sathar but at great cost including the loss of the station around the planet.
Five fighters are completed at the CDC (Triad, Cassidine) shipyards.
62.099
– PG Probe Beta gets close enough to the planet to begin to detect details and discovers what seems to be a starship construction center as well as shuttles going between the station and planet. The SCC seems to be currently undefended.
– After several hours of observations, PG Probe Beta begins to accelerate away from the planet toward the outer system. They send a subspace radio message back to Spacefleet with their report.
– The damaged ships of the Yazira Squadron depart Hargut (Gruna Garu) for Prenglar and the shipyards there.
In an unexpected and horrifying turn of events, the sathar fleet attacked the civilian orbital shipyard around Terledrom in their attack today before retreating from the system. The shipyard was completely destroyed along with all the ships under construction. Many of the crew and engineers were lost as well.
Task Force Cassidine, together with with the new Frontier Fighter Corps squadron and the militia drove off the attackers destroying five major vessels of the sathar fleet. UPF forces lost fourteen of the twenty fighters in the system and the militia lost one of its assault scouts. Luckily nearly all the crew were recovered. The militia frigate was significantly damaged as well and will be heading to Outer Reach in the Dramune system for repairs with the loss of the local shipyard.
Kat’kst’kll, Terledrom News Service
Background
Deciding on a change of tactics, the sathar launch a massive fleet at Fromeltar, larger than any of the fleets seen so far in the Frontier. Despite the increased size of the Fromeltar militia and the presence of Frontier Fighter Corps Squadron Gamma, these ships plus the depleted Task Force Cassidine are outgunned by the incoming sathar fleet. The UPF has more ships, 32 vs 21, but twenty of the UPF ships are fighters with another 7 being assault scouts. The UPF fleet only has 5 capital ships, a battleship, an assault carrier, and three frigates, compared to the 10 capital ships of the sathar fleet including four heavy cruisers.
However, unlike previous sorties into the Frontier, the primary target of this attack is not the ships of Spacefleet but rather the starship construction center in that system. This is only going to be a hit and run on the sathar’s part and they aren’t planning on a major engagement with the fleet. Three hours before the sathar ships reach the planet, the assault carrier deploys its fighters and turns to head home. It looks like the fighters are to be sacrificed.
Order of Battle
UPF
Task Force Cassidine
9 fighters
3 assault scouts
2 frigates
1 assault carrier
1 battleship
FFC Squadron Gamma
8 fighters
Terledrom Militia
3 fighters (manned for UPF)
4 assault scouts
1 frigate
armed station
Terledrom SCC
Sathar
9 fighters
2 cutters
3 frigates
1 destroyer
2 light cruisers
4 heavy cruisers
1 assault carrier (not participating in battle)
The Battle
Setup
Unlike previous engagements, instead of continuing to slow as they approach the planet, two hours out, the sathar forces start accelerating instead of continuing to slow down. Additionally instead of dispersing out to engage the UPF forces, the fleet amasses into a single tight formation bearing directly on the planet. They enter the map at speed 44.
Caught by surprise by the sathar’s speedup, the UPF forces scramble to gain speed and because of this are somewhat out of position as the attack commences. The fighters and assault scouts have matched the sathar’s speed but the frigates have only achieved a speed of 35 while the battleship and assault carrier are at speed 20. The fighters form up into flights of 3 or 4 ships and the assault scout fly in pairs or trios.
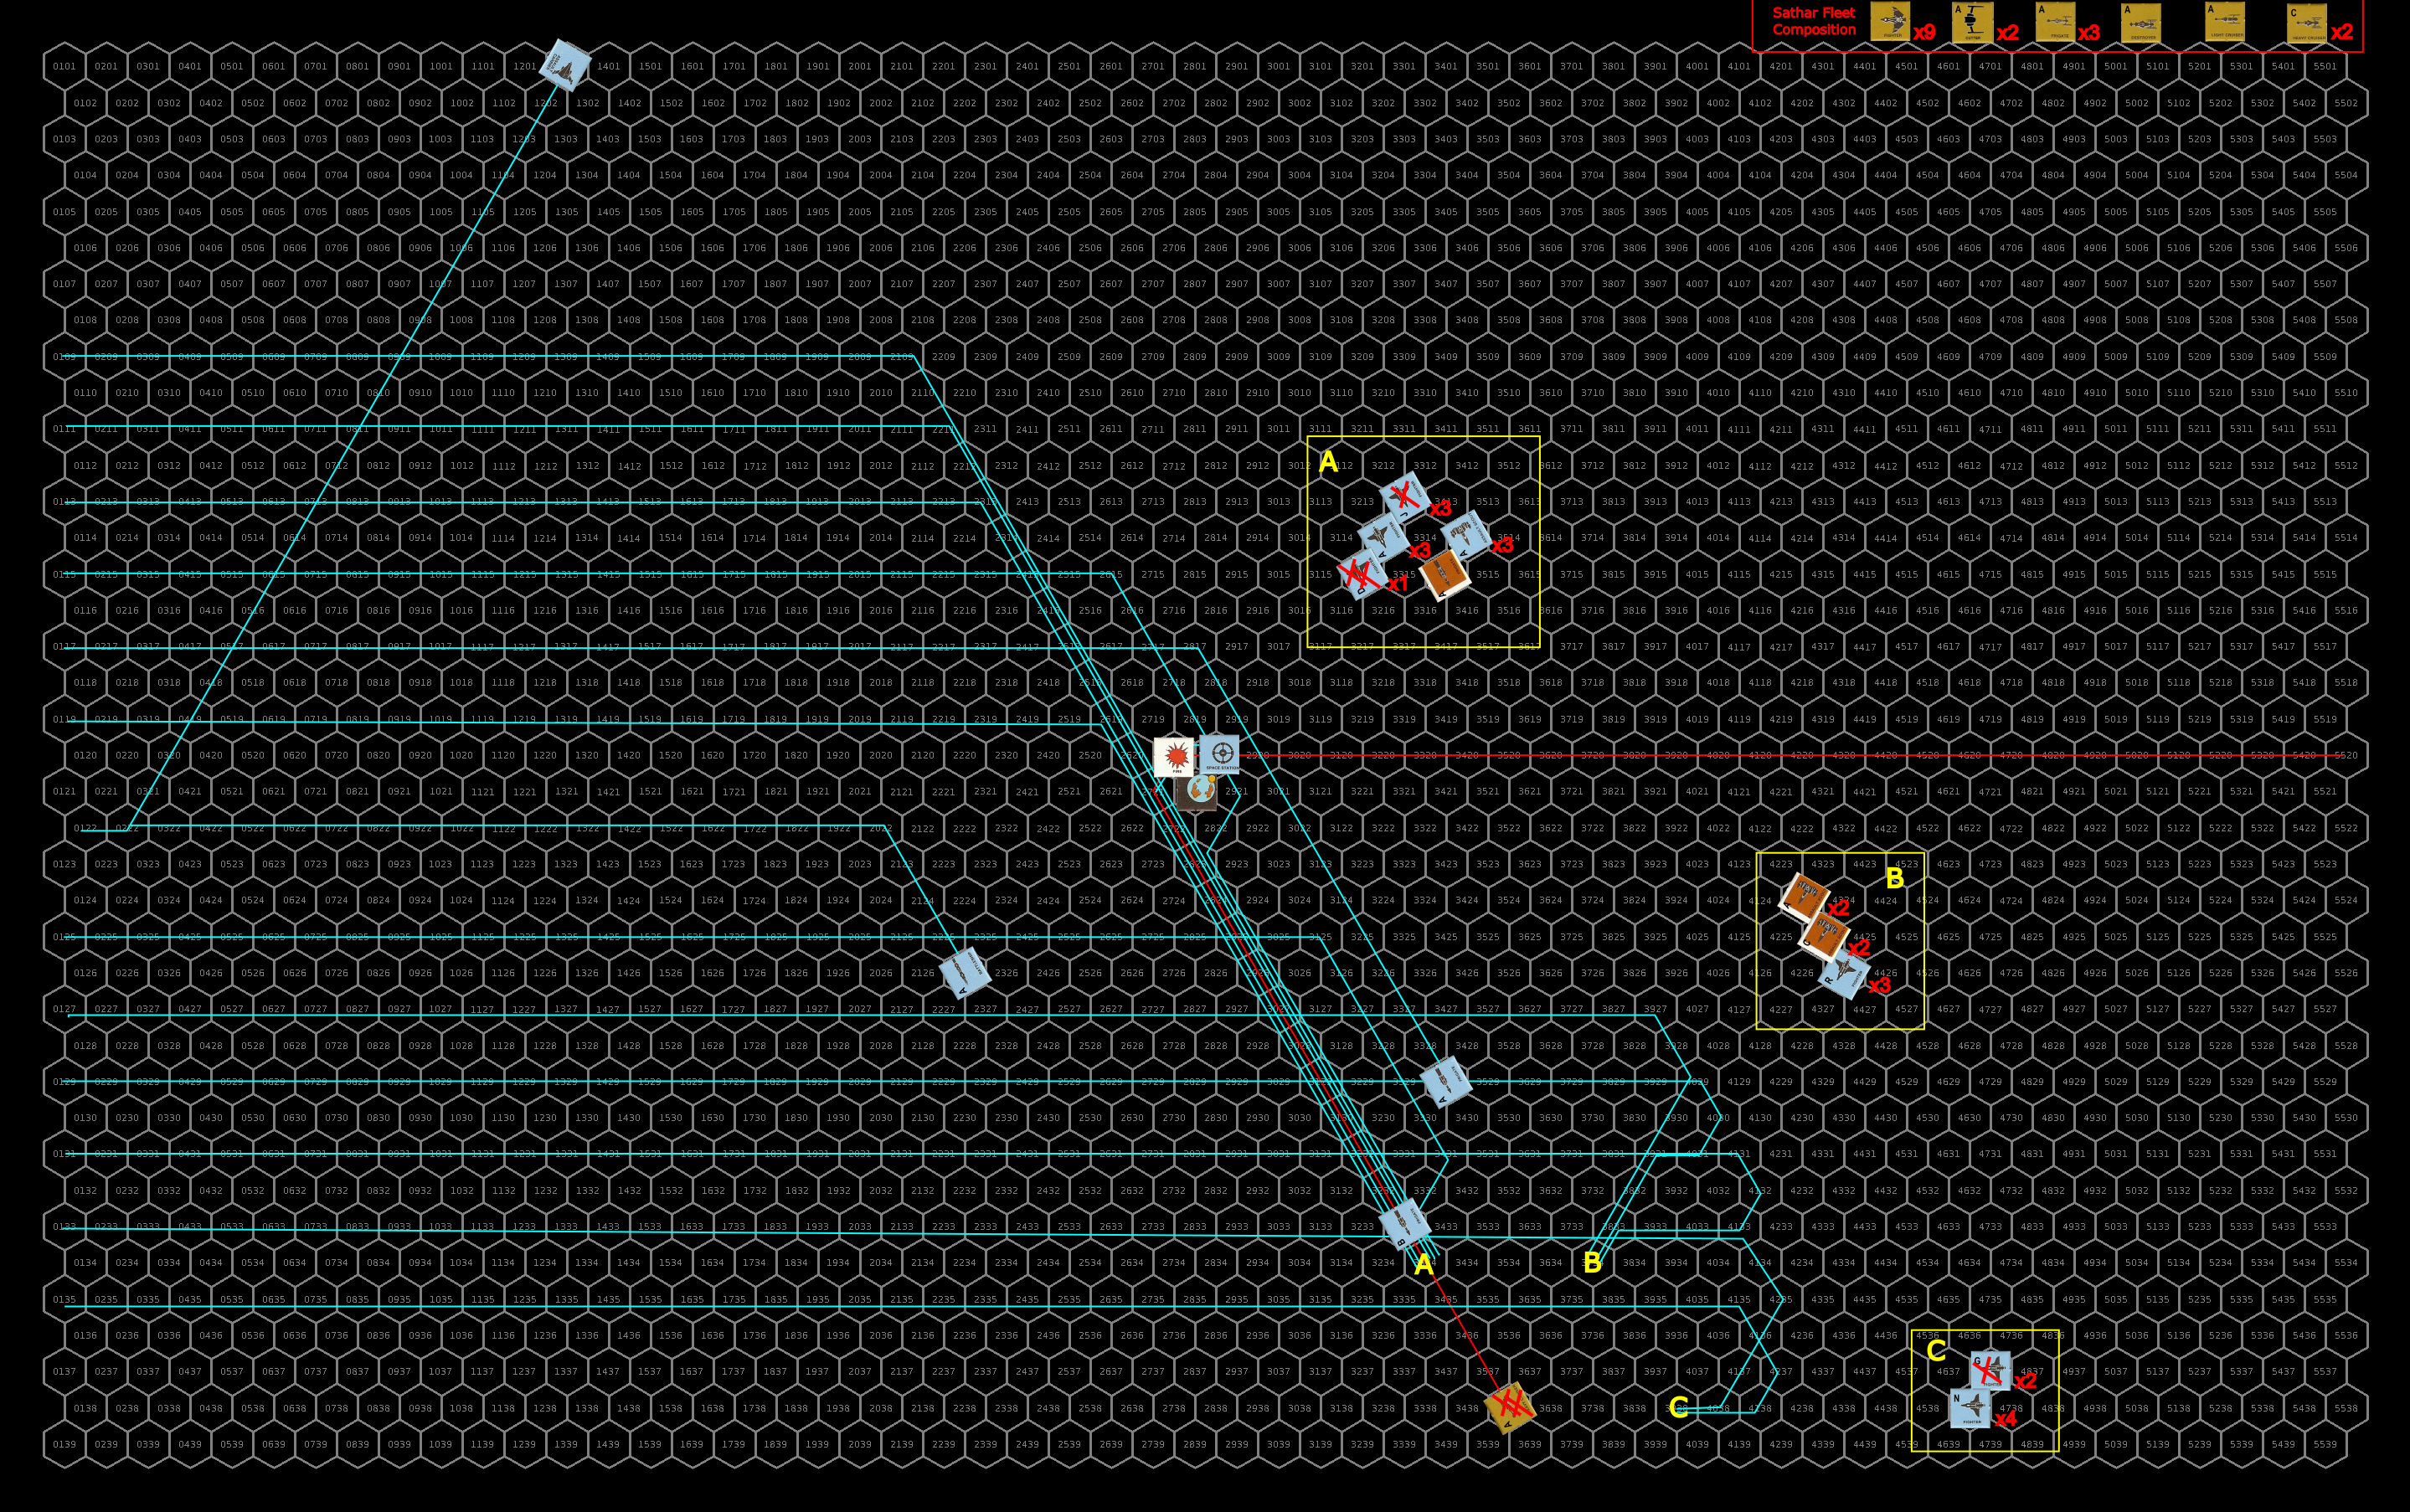
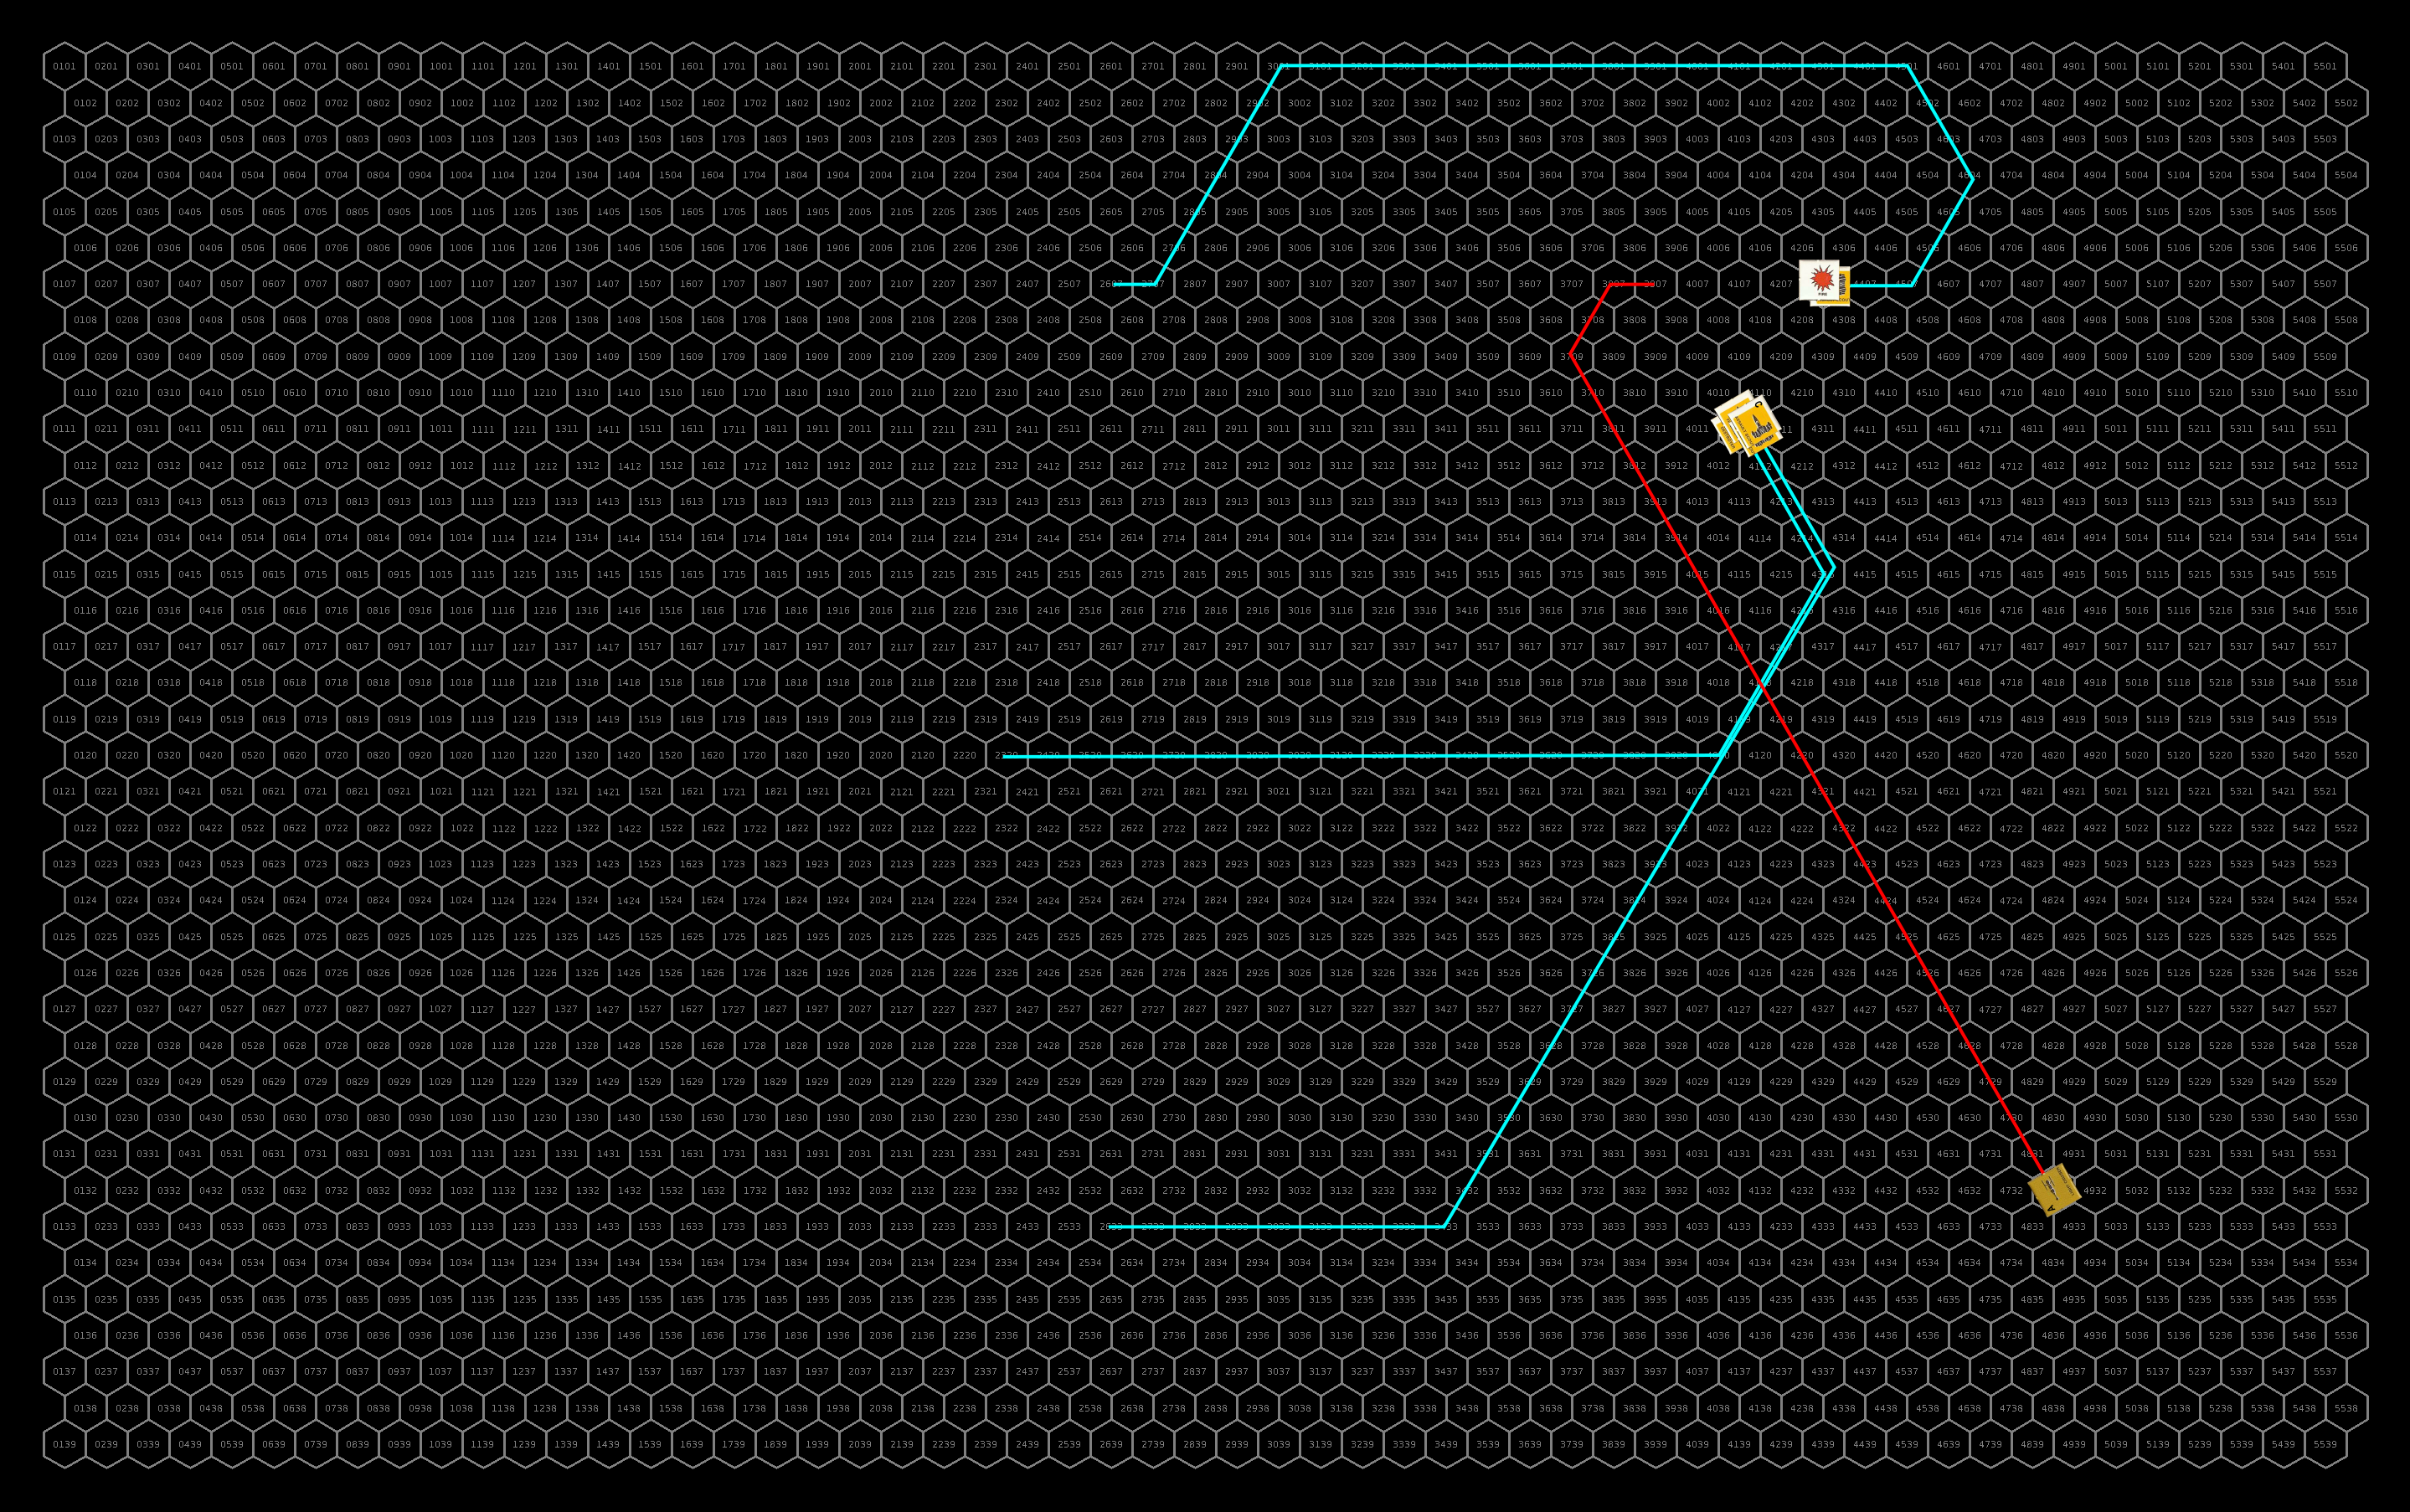
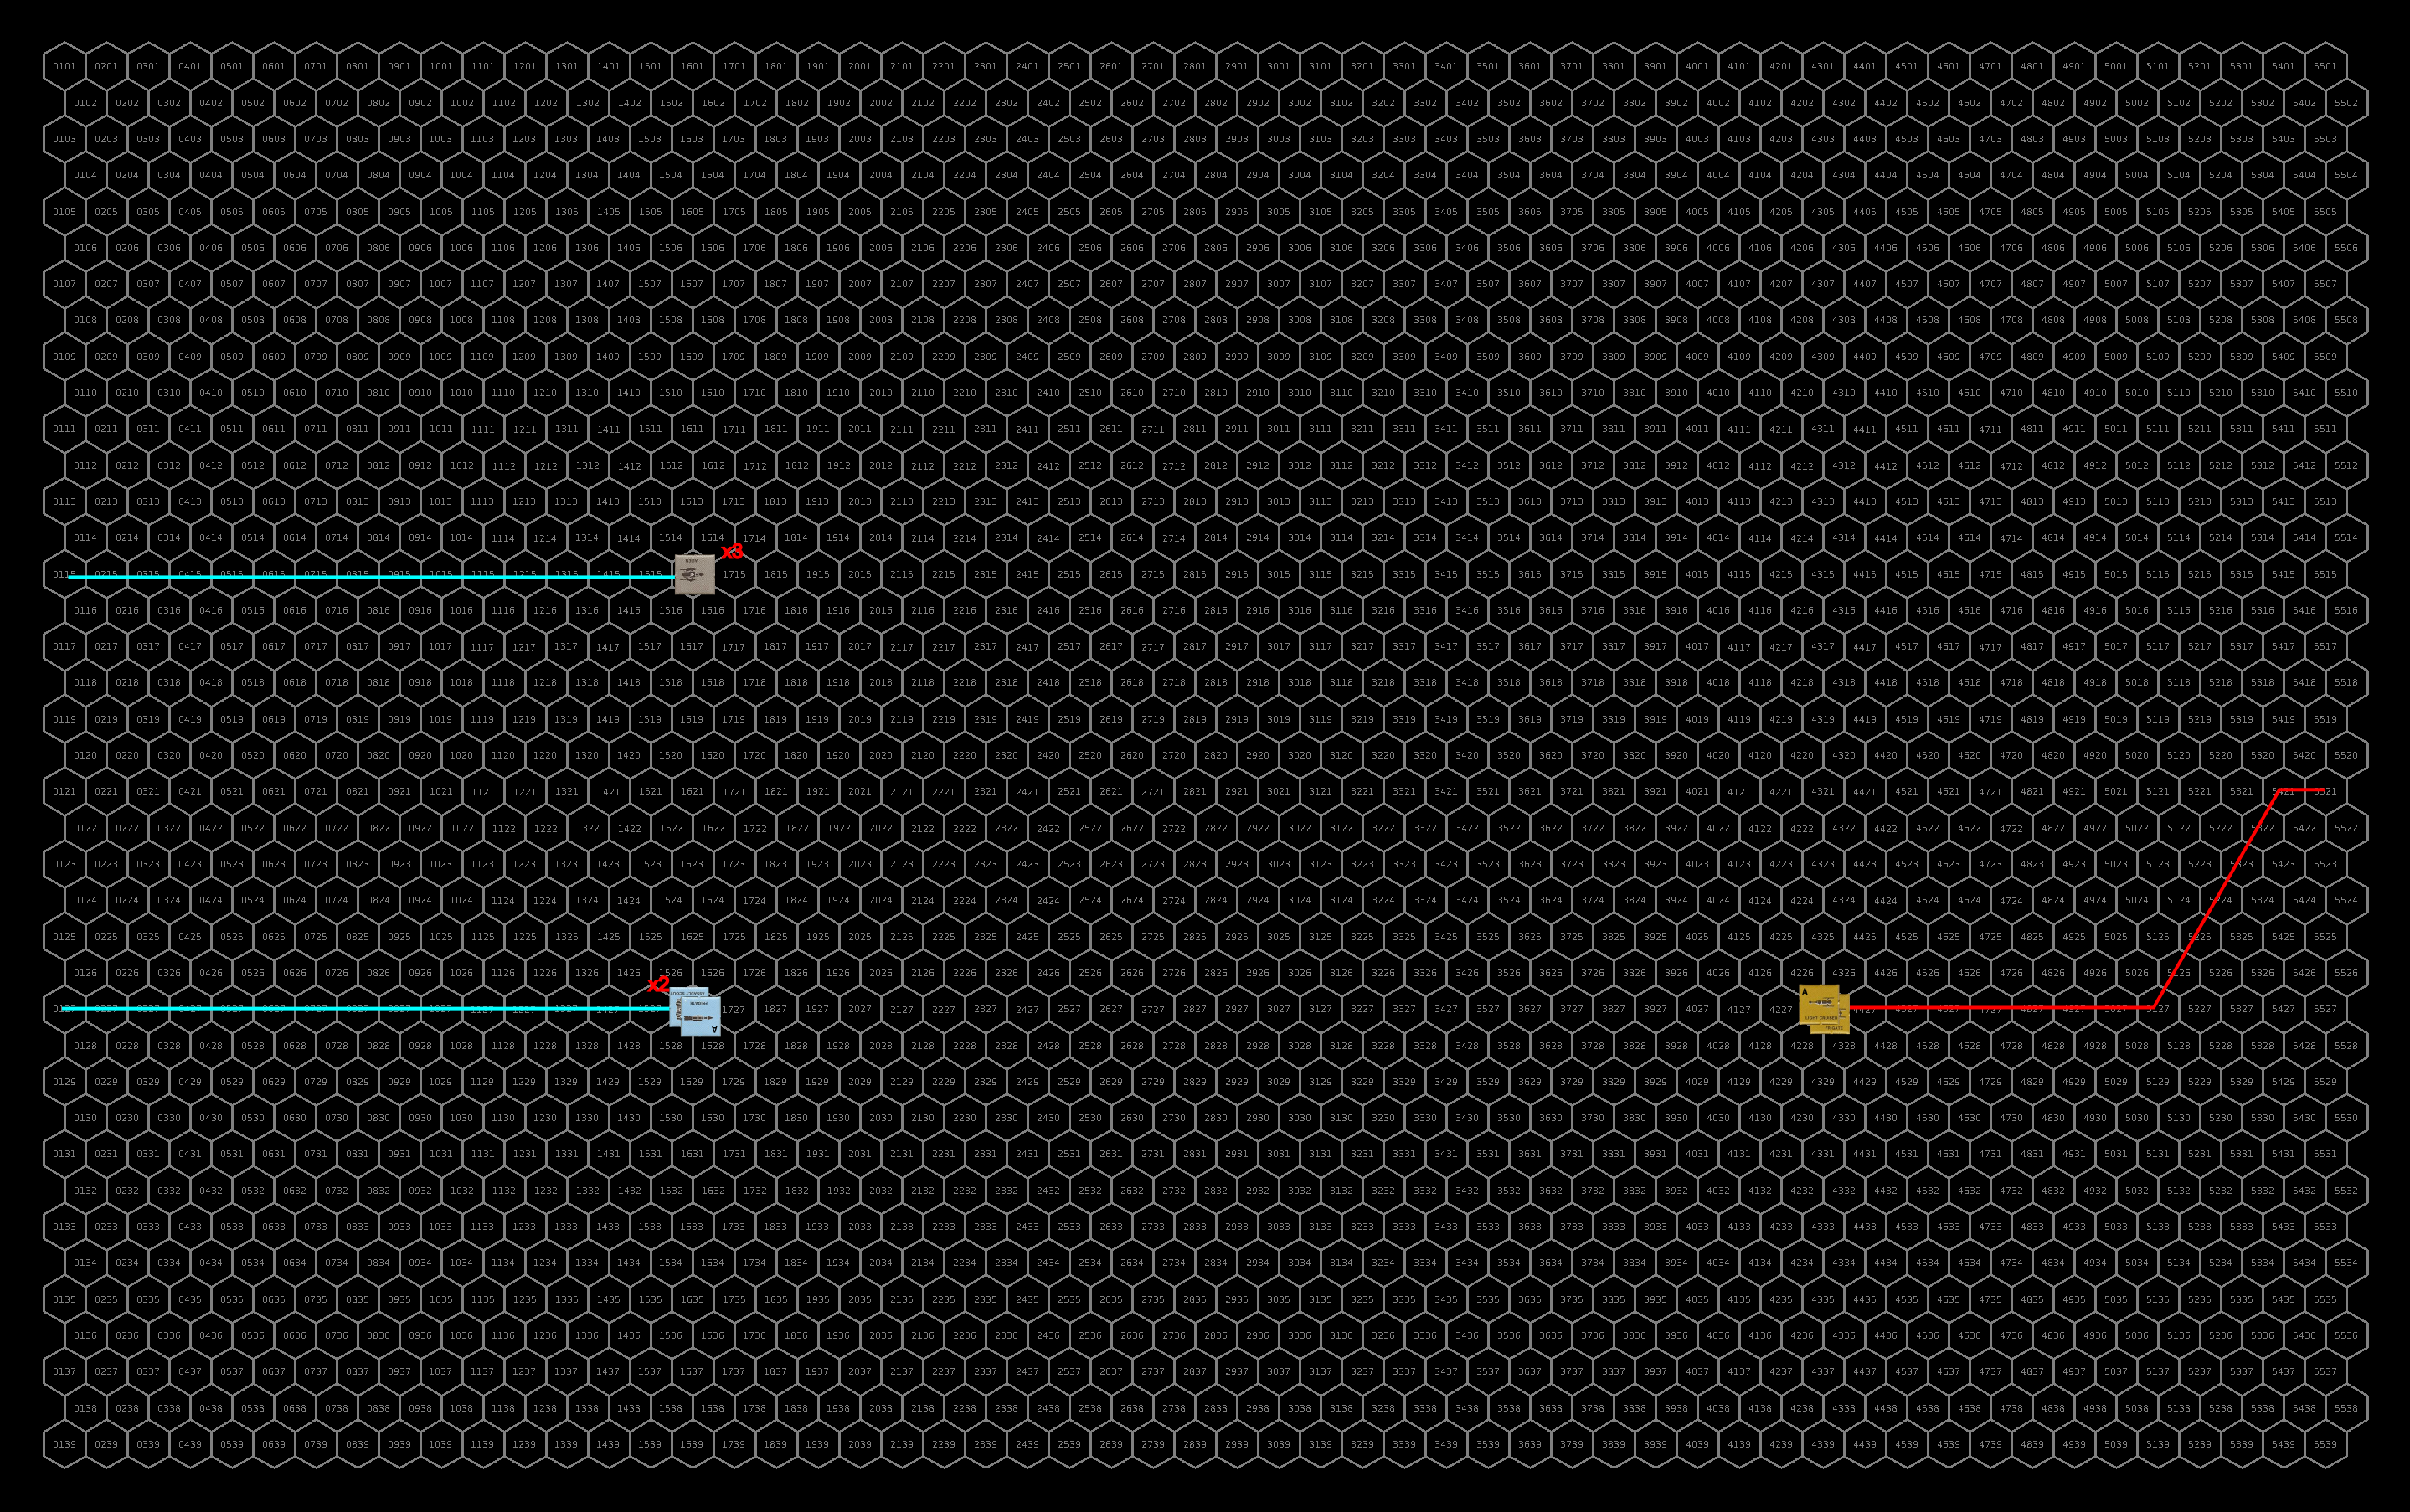
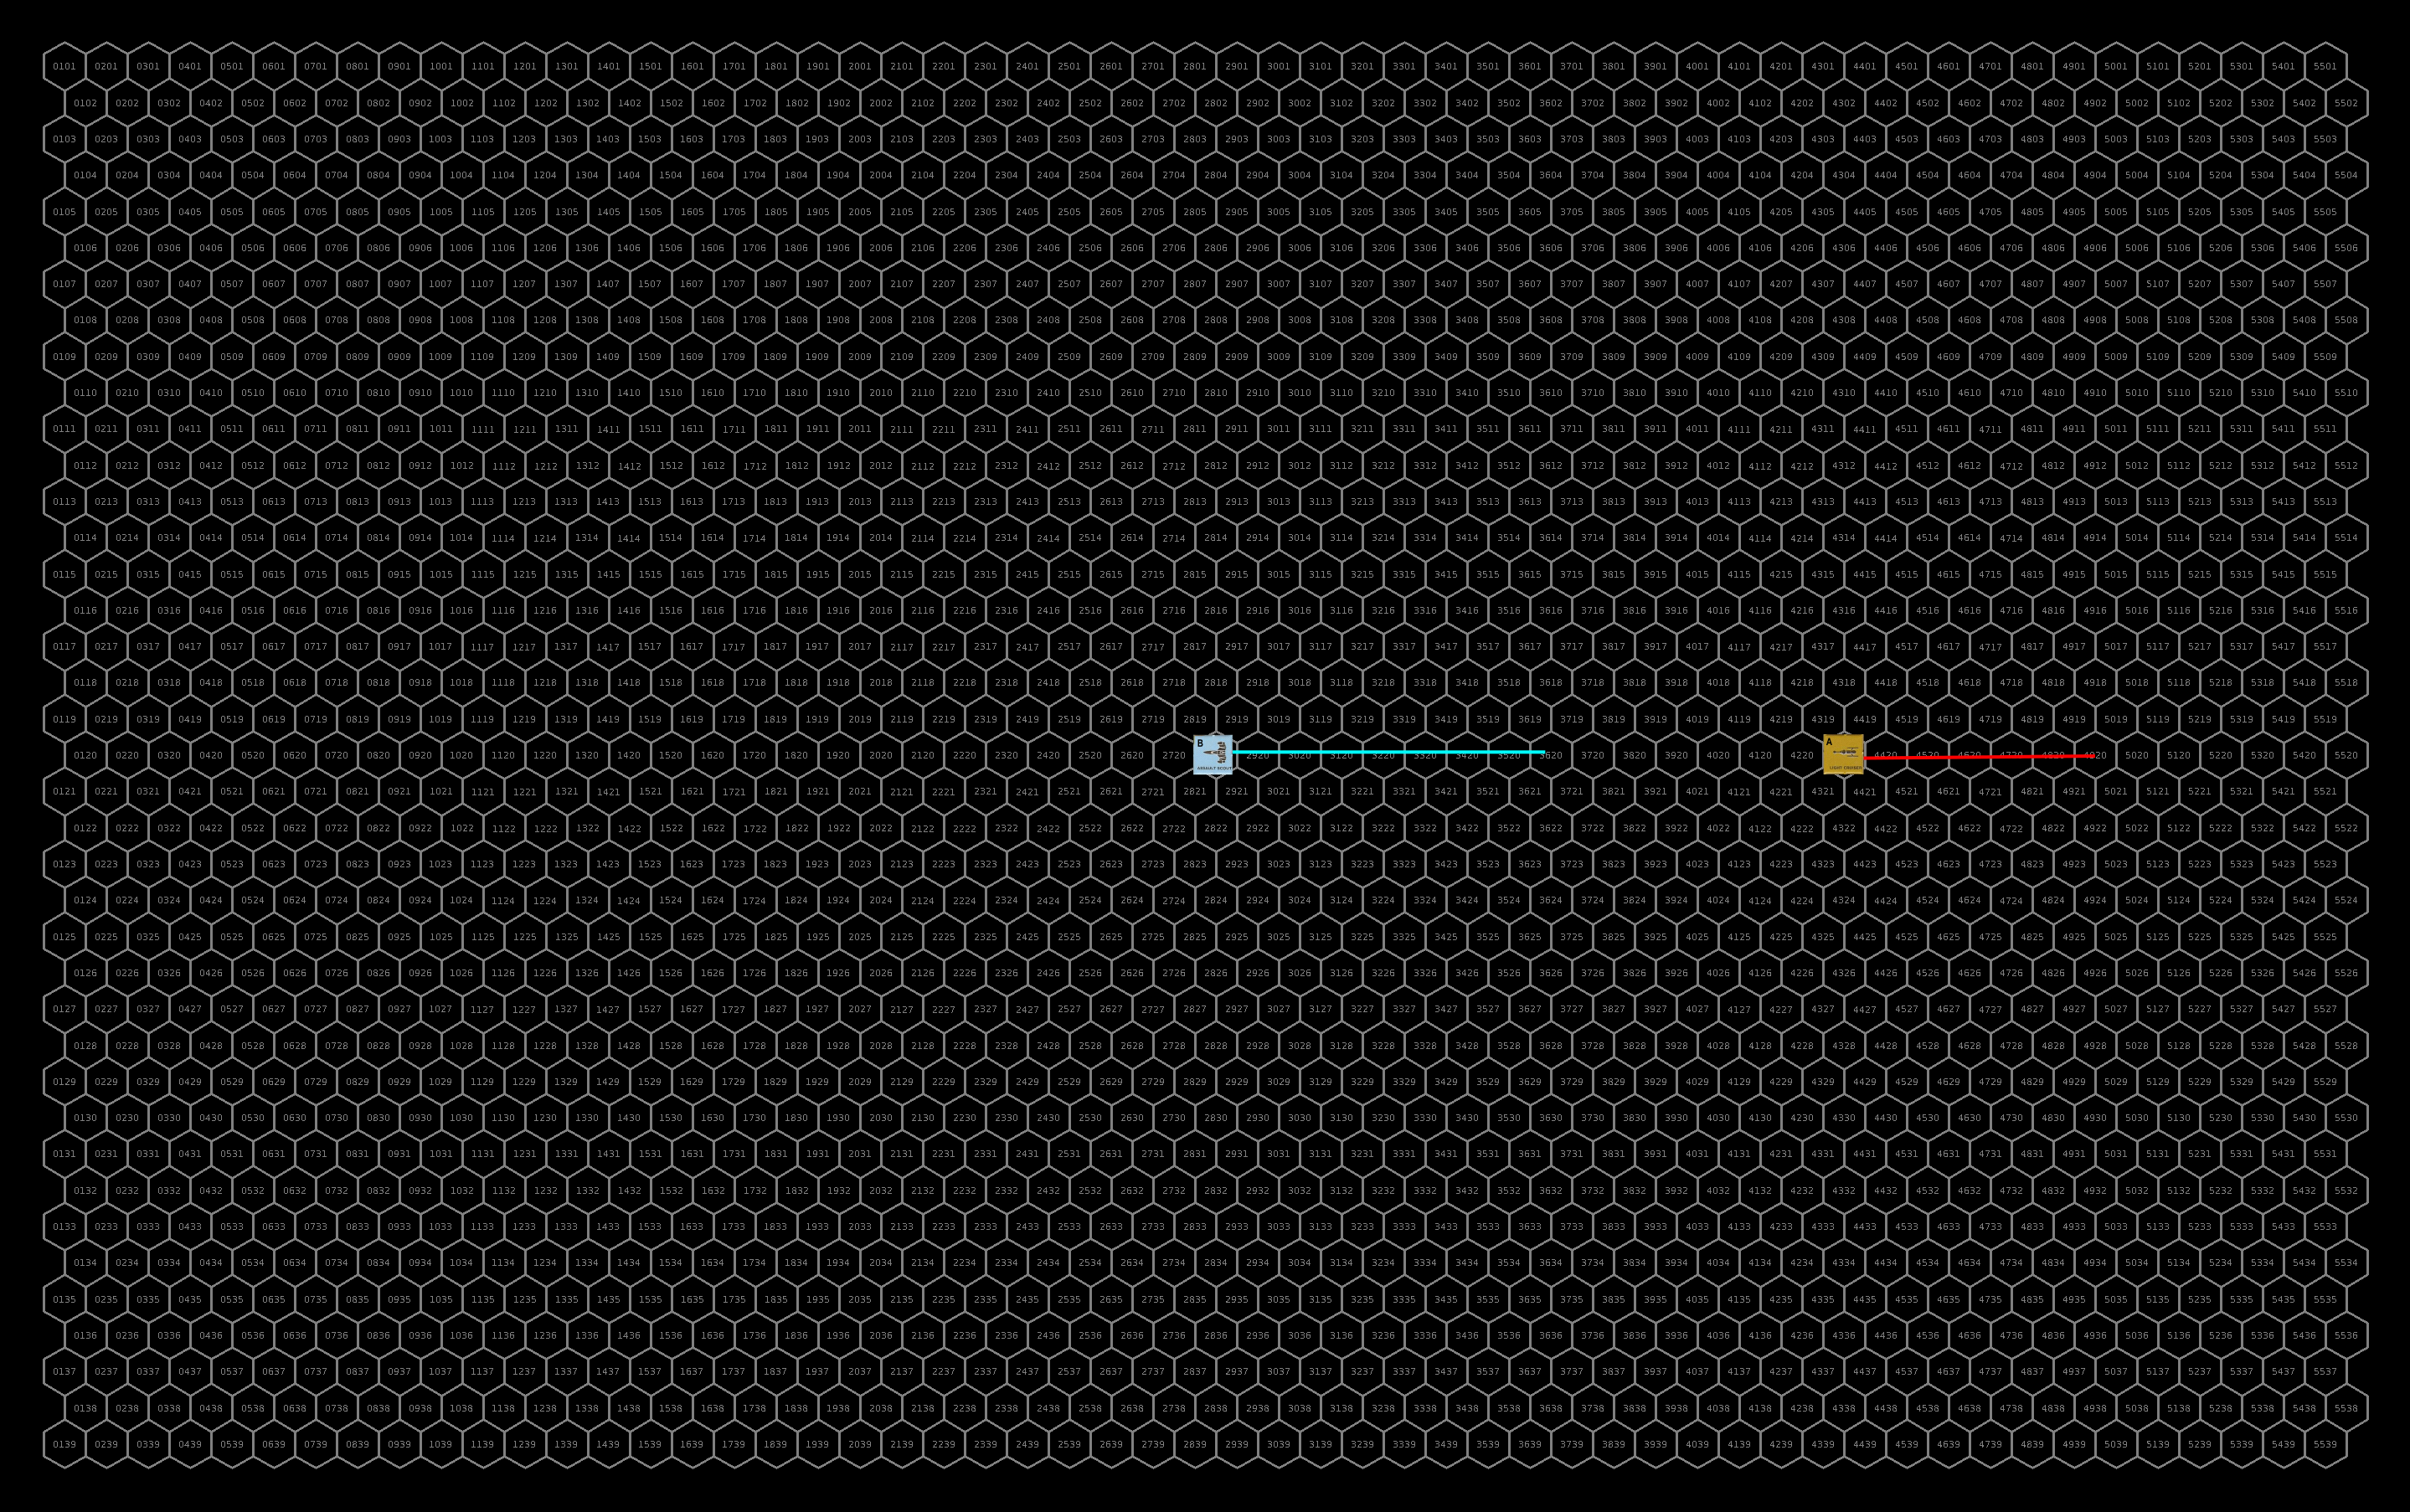
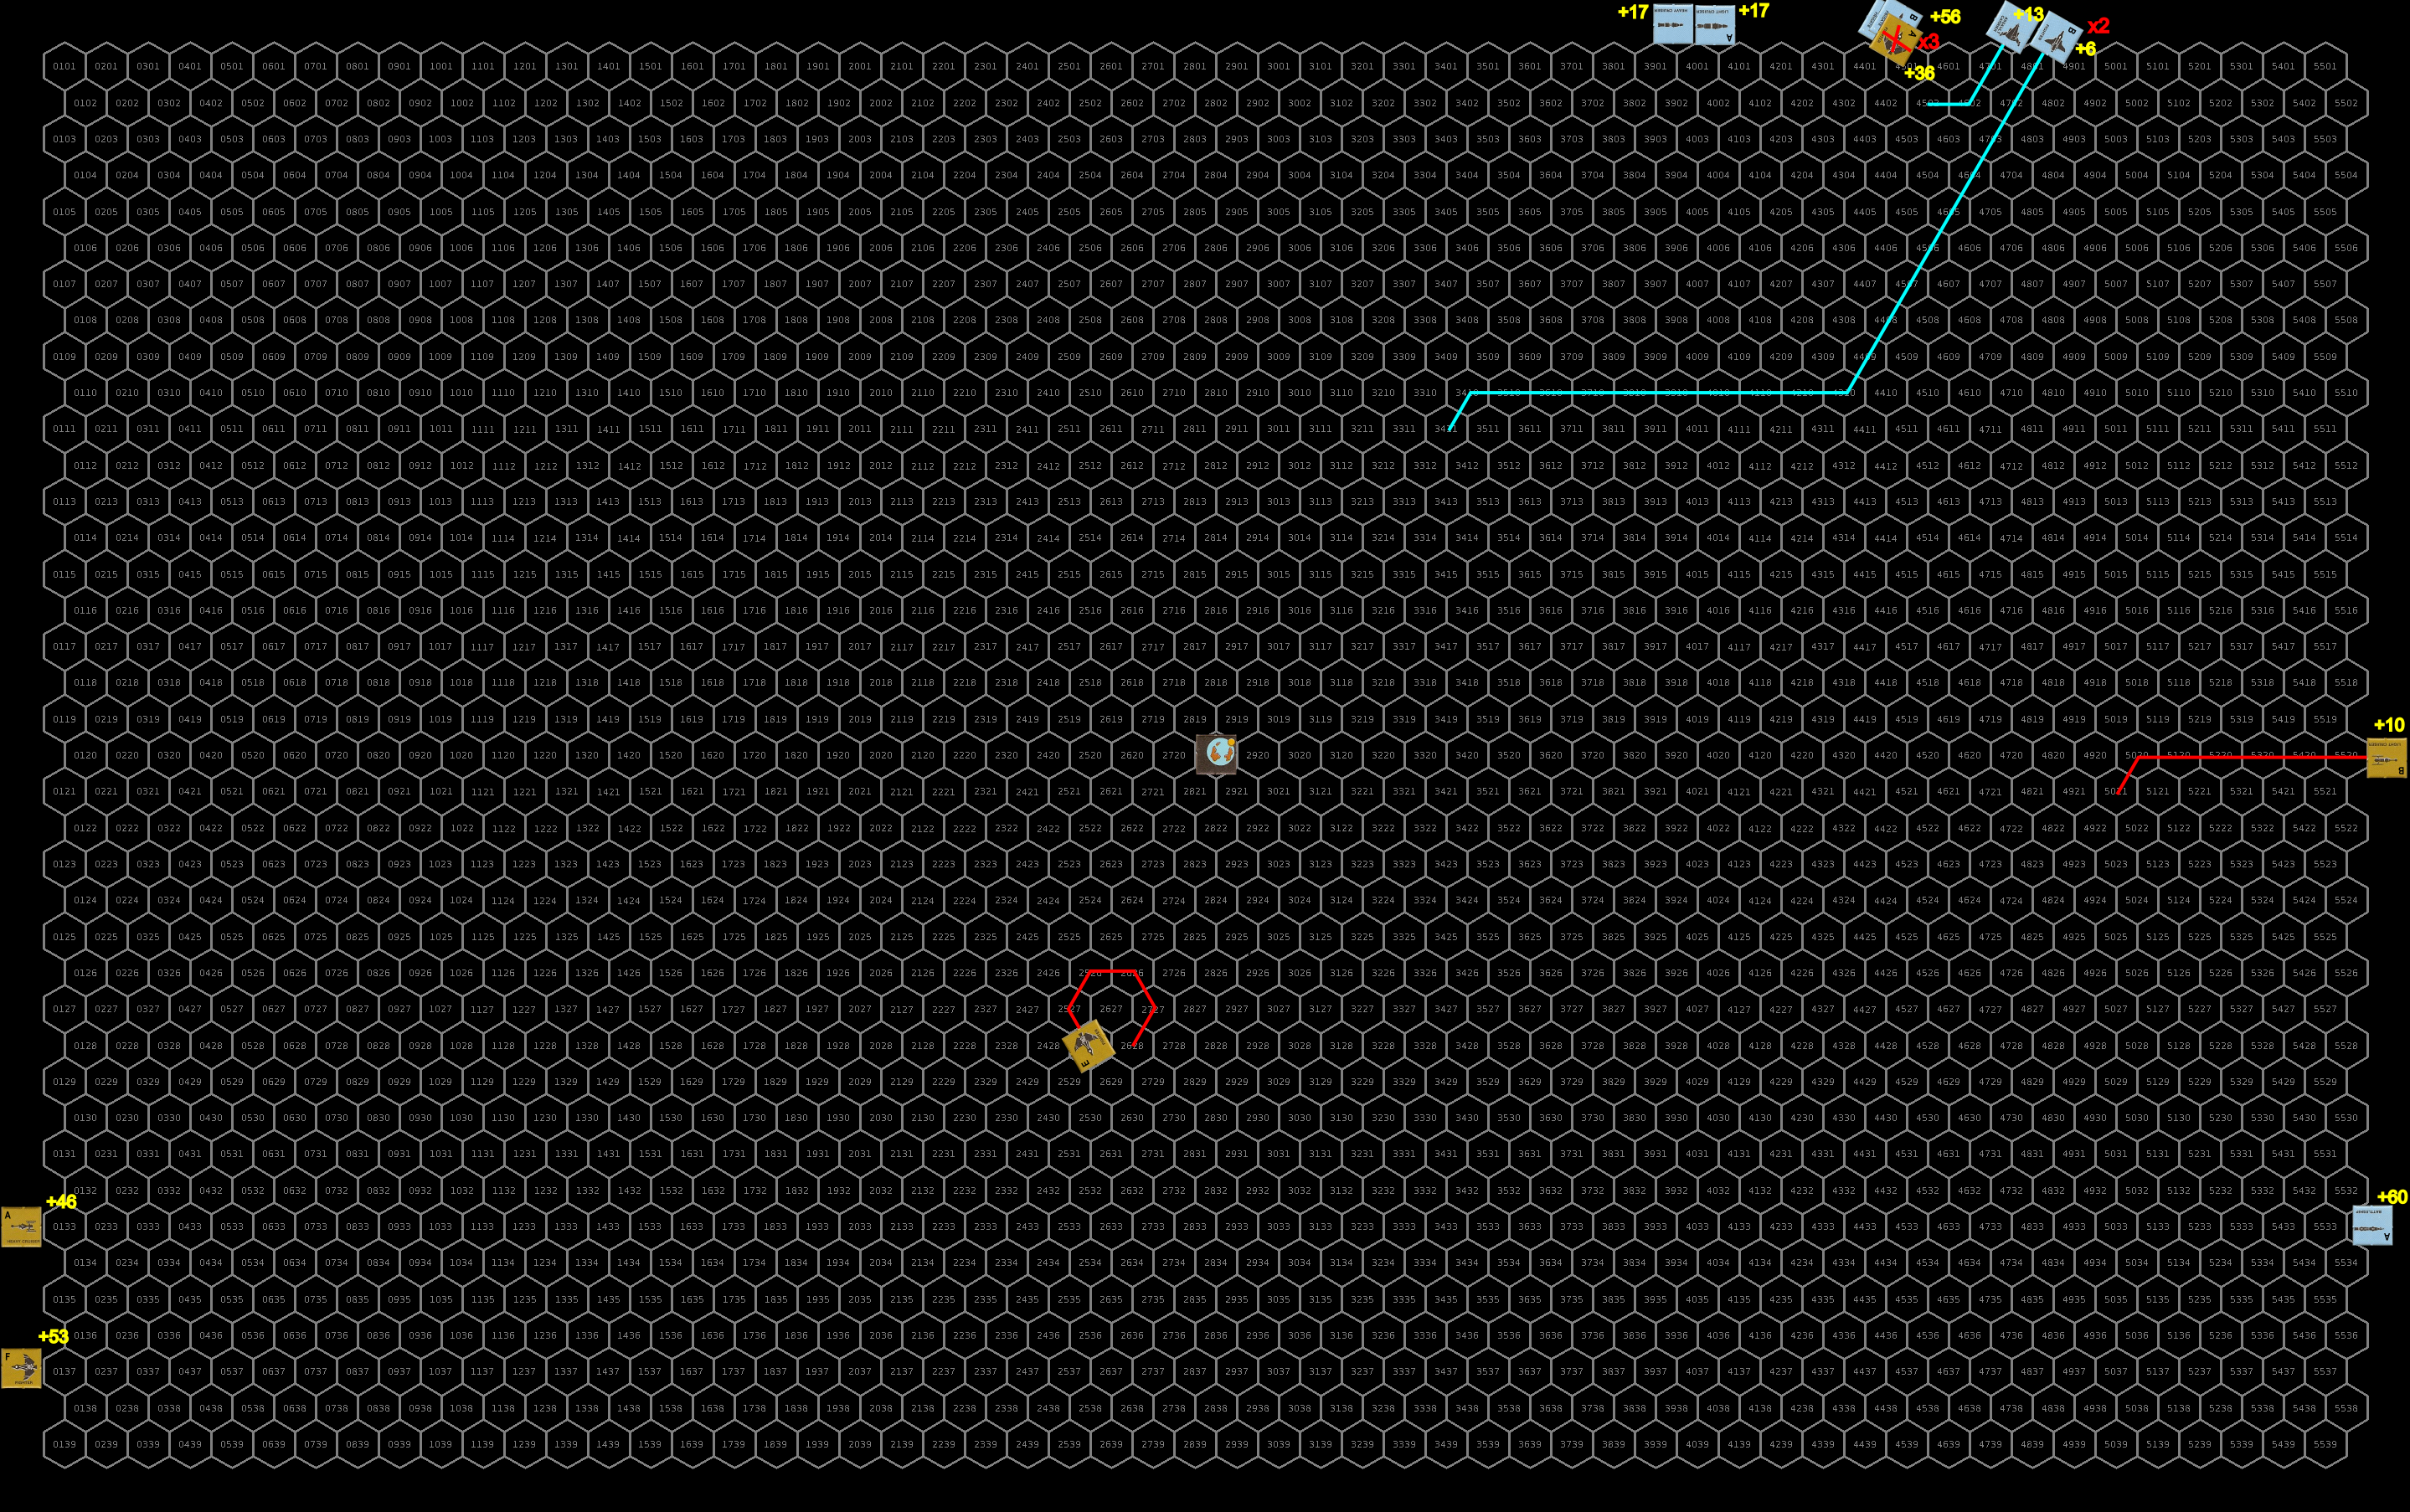
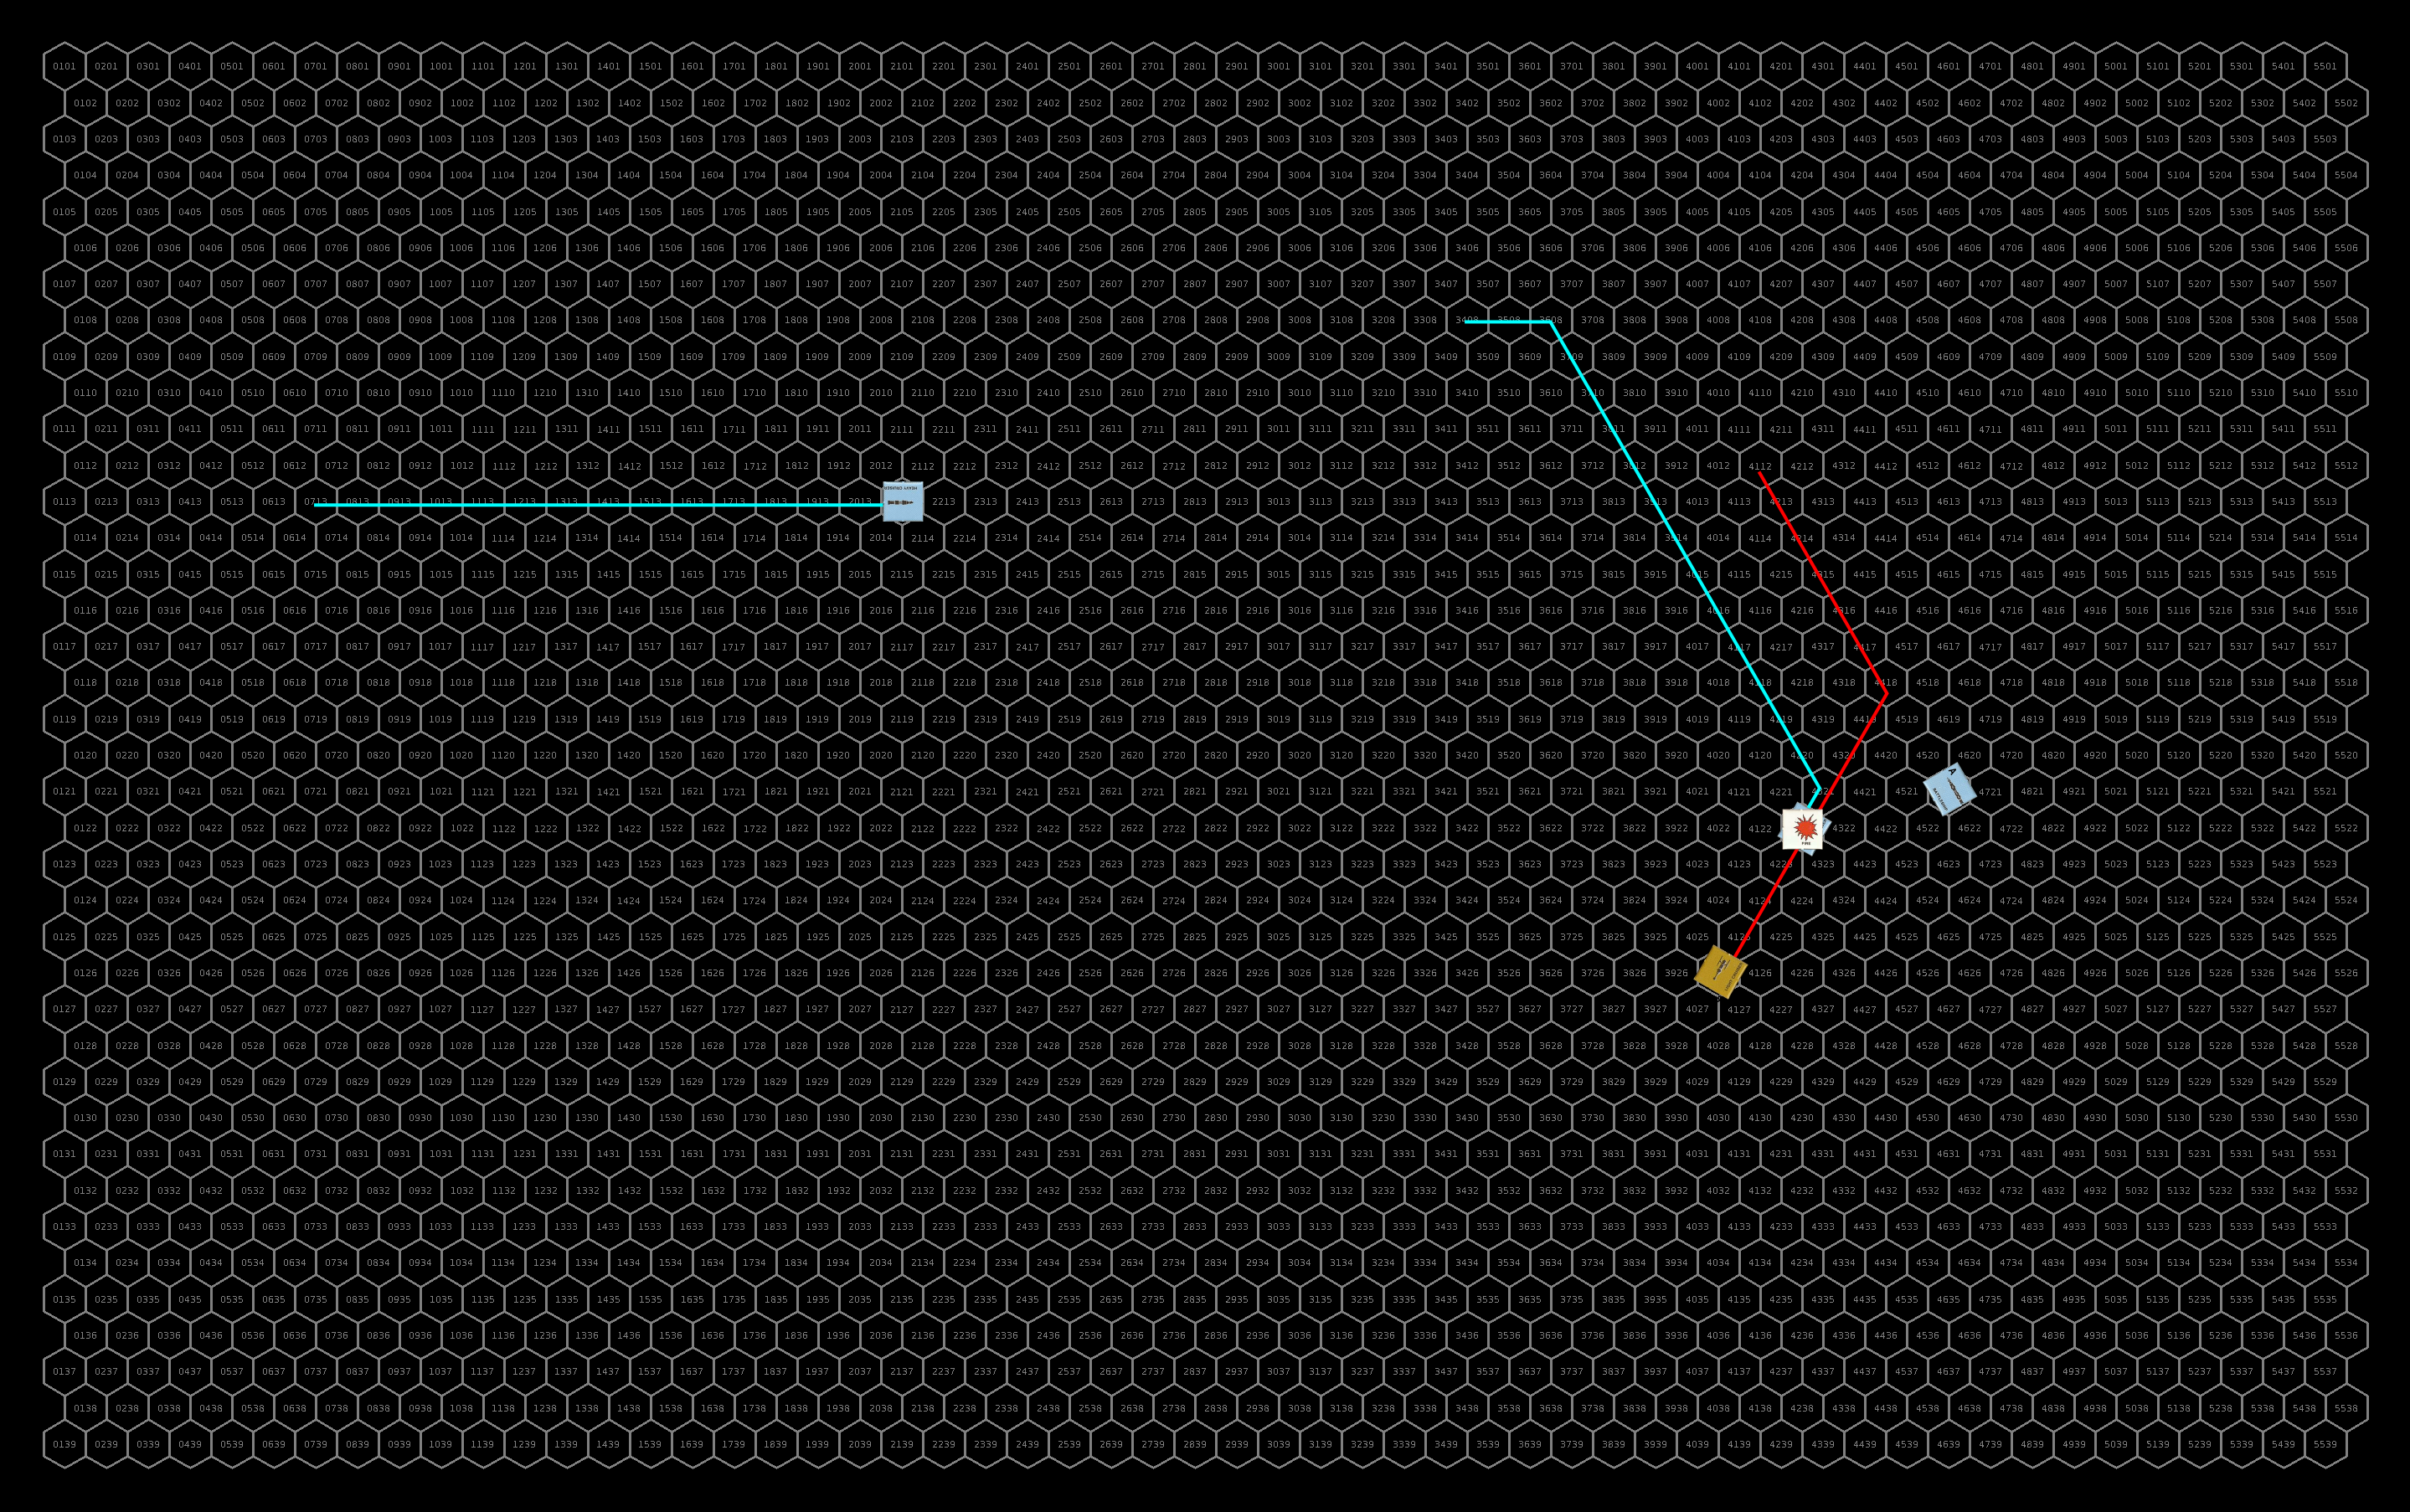
Positions at the start of the battle. The sathar are all massed into a single hex with the composition shown in the upper right box. The gray background space station is the starship construction center and the blue background one is the armed station in the system. Click for full size image.
Turn 1
The sathar stay as a group and accelerate with an ADF of 2 to a speed of 46. The armed station, expecting to be obliterated, fires its laser battery and rocket battery at a pair of fighters, hoping to reduce the assault rockets coming at it but both miss.
Surprisingly the sathar do not attack the armed station or continue on toward the UPF ships. Rather they swing around the planet, using the gravity of the planet to get an extra turn for the heavy cruisers and as they pass by, unload all of their firepower into the starship construction center orbiting behind the armed station. Defenseless, the SCC is pummeled by the sathar attacks.
Eight of the nine assault rockets connect with various parts of the shipyard, five of which do double damage reducing the hull integrity of the station by 35%. Six of the ten fired rocket batteries hit reducing the hull integrity by another 15%. Only four of the ten torpedoes connect and amazingly are not very effective, reducing the hull integrity by only another 11%. Four of the six disruptor cannons connect knocking out the station’s DCR, and reducing its hull integrity by another 7%. All four laser cannons hit dropping the hull integrity another 10%. Seven of the ten electron and proton batteries connect, inducing an electrical fire and reducing the hull integrity by another 4%. Finally, fifteen of the eighteen laser batteries connect reducing the hull integrity by another 17% leaving the station with just 1% of its hull integrity remaining. Finally, the heavy cruisers deploy some seeker missiles along their path to activate against pursing ships.
Enraged by the nearly complete destruction of the shipyard, its crews, and the ships inside, the UPF forces swarm after the fleeing sathar vessels. The only exception is the assault carrier which flies to get as far away from the sathar as possible. The battleship is moving too slow to get into range, and the two UPF frigates can’t get to optimal range but are at least able to bring some of their weapons to bear. The fire on the SCC knocks out half of its remaining hull integrity (3 of 600 HP left).
Recognizing the danger of all the fighters, the sathar concentrate their defensive fire on that threat. The defensive fire destroys four fighters and nearly destroys two more. It damages the engines on two fighters, and completely knocks out the engines on another. It knocks out the maneuvering system on one fighter and the assault rocket launcher on yet another. Finally, one of the fighters is hit damaging its combat control system.
The UPF ships return fire with a vengeance. The fighters concentrate on two of the heavy cruisers while the assault scouts focus one of the light cruisers. The frigates focus on one of their counterparts. The more distant frigates miss but the one close in with the fighters connects with its laser cannon and a torpedo. The don’t do as much damages as they could but still manage to take out 67% of the sathar frigate’s hull integrity (the LC only did 3 HP and the T, while rolling double damage, only did 24 HP).
The assault scouts miss with their laser batteries but connect with six of the seven assault rockets on the light cruiser knocking out its ICM launcher and damaging its maneuvering jets before the others slam into it and destroy it completely. The first heavy cruiser is hit by six of the eight assault rockets launched at it. The rockets take out just over half of its hull integrity, knock out its maneuvering, damage its engines, knock out its disruptor cannon, and cause a power short circuit knocking out all of its screens and ICMs. The second doesn’t fare as well. It is also hit by six assault rockets. The first three knock out about 56% of its hull integrity, the next two damage its engines and knock out its maneuvering. But the final assault rocket slams into the cruiser’s torpedo magazine causing a massive explosion that destroys the ship.
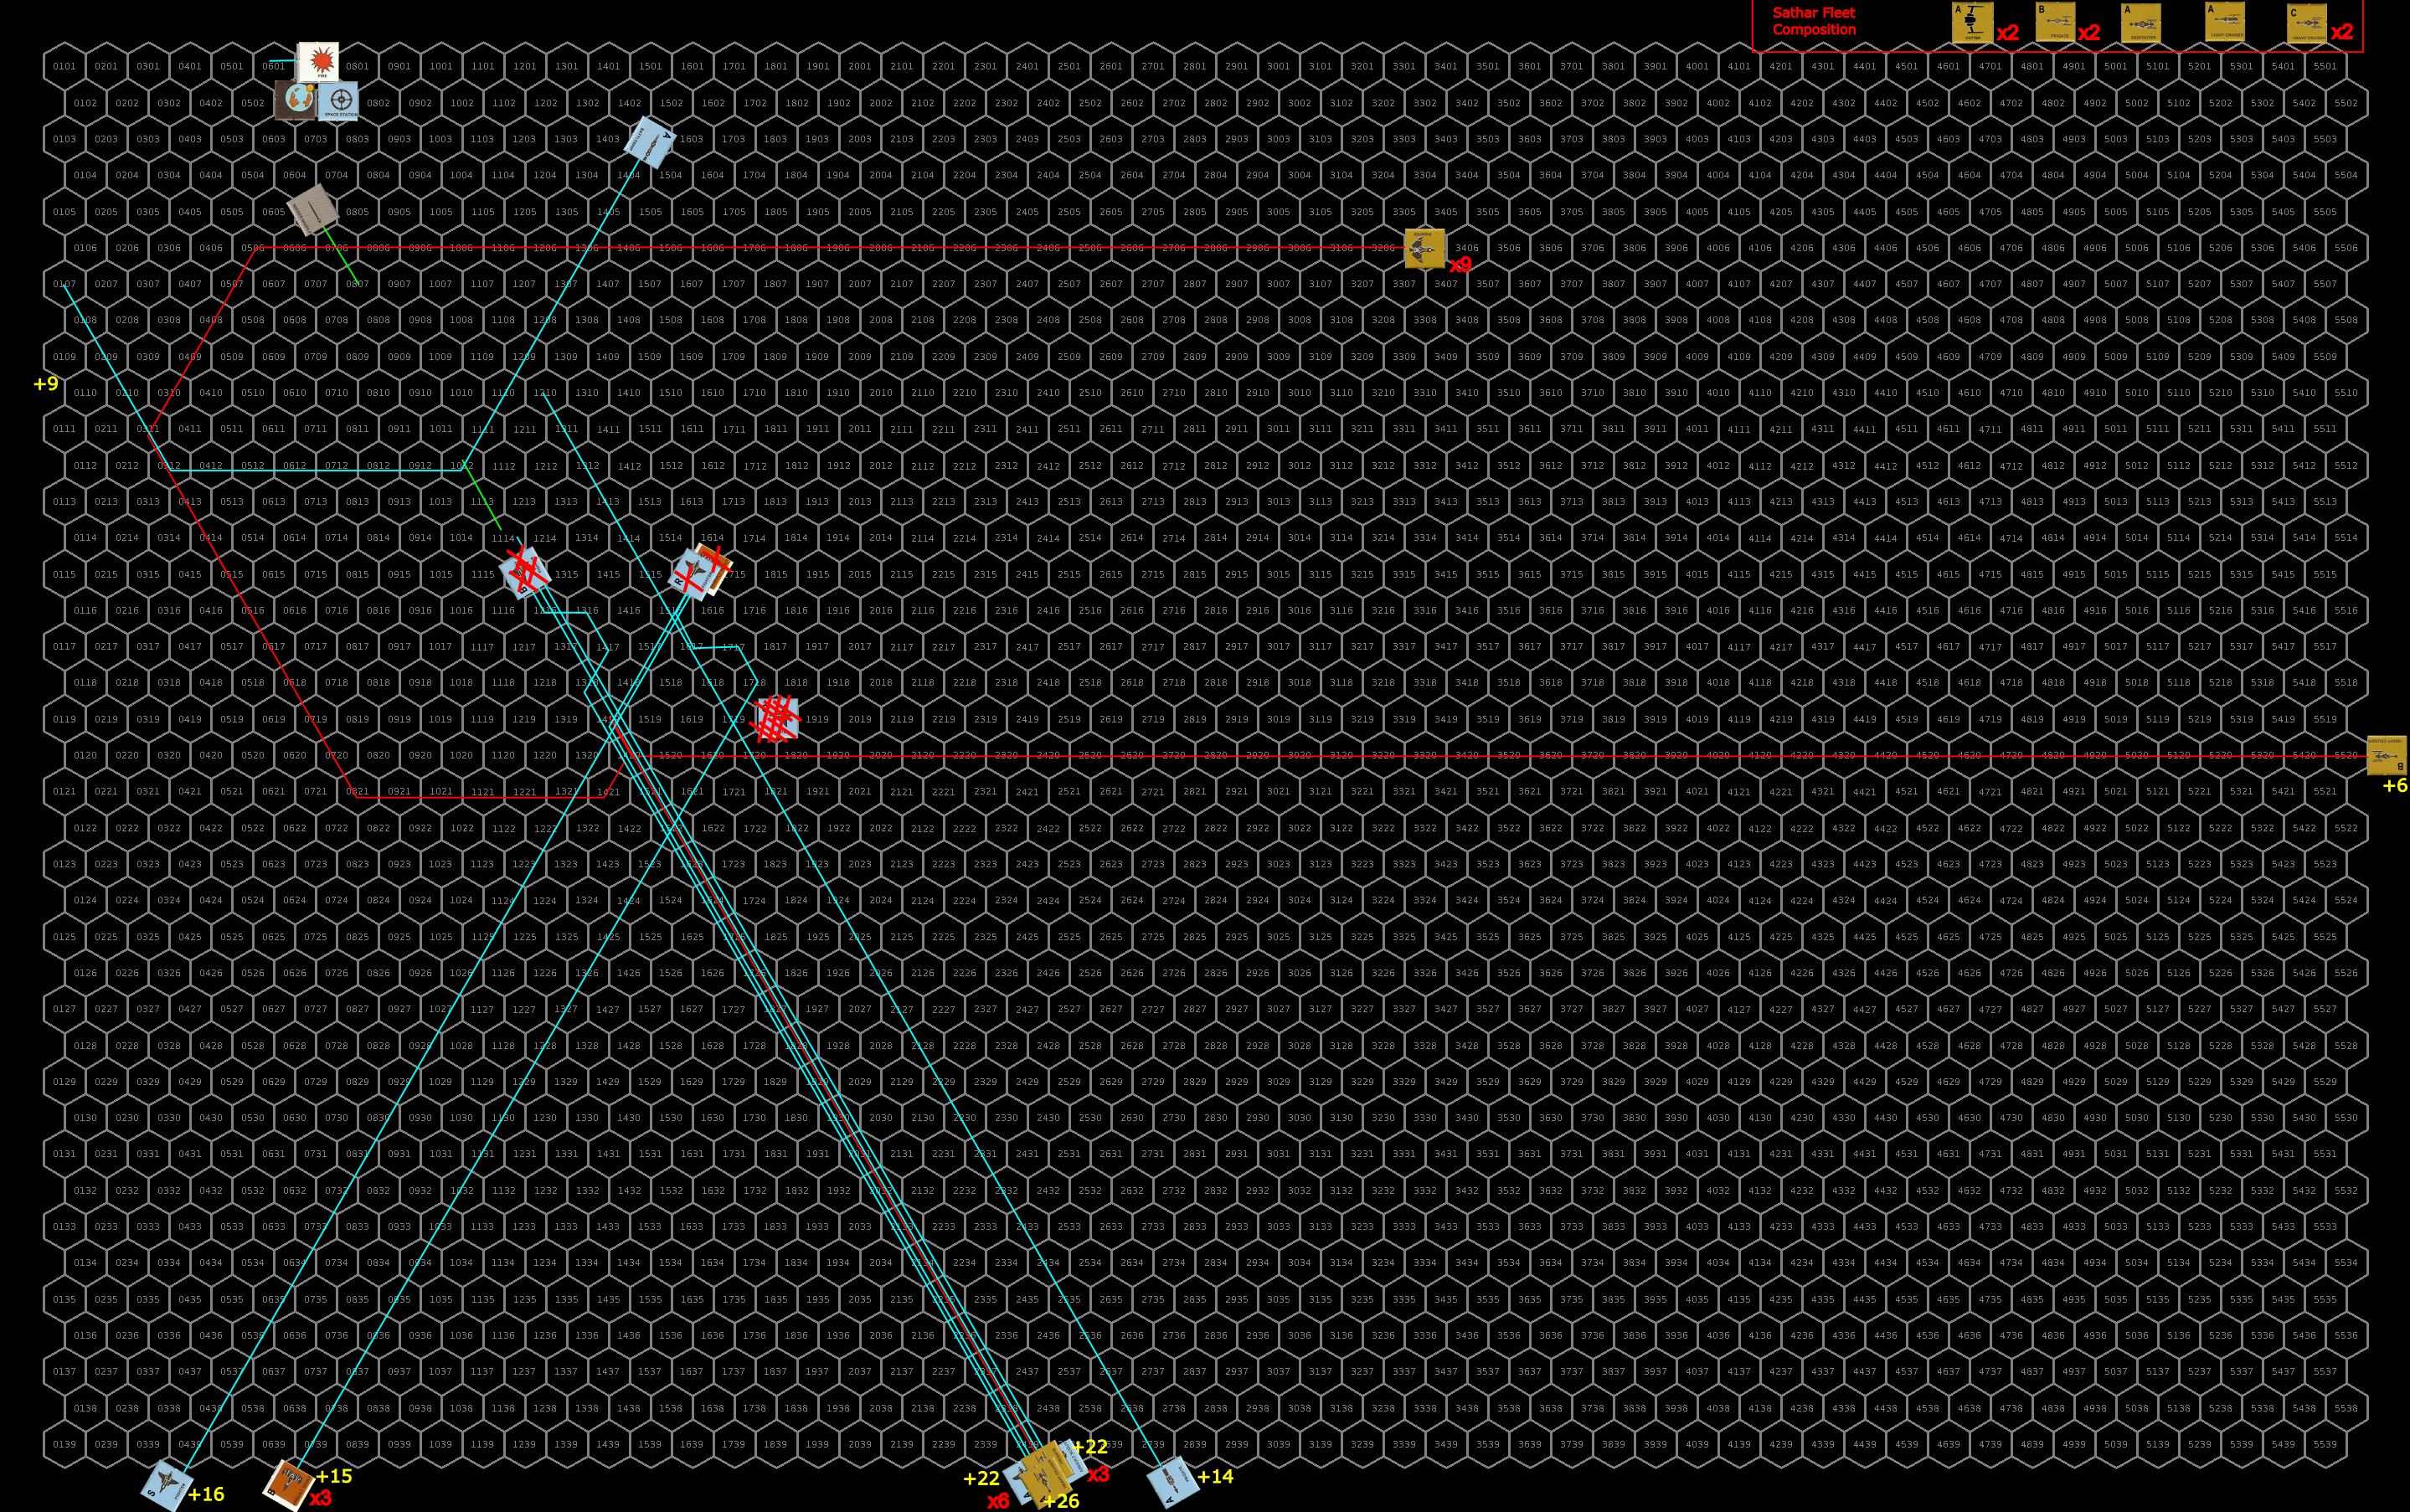
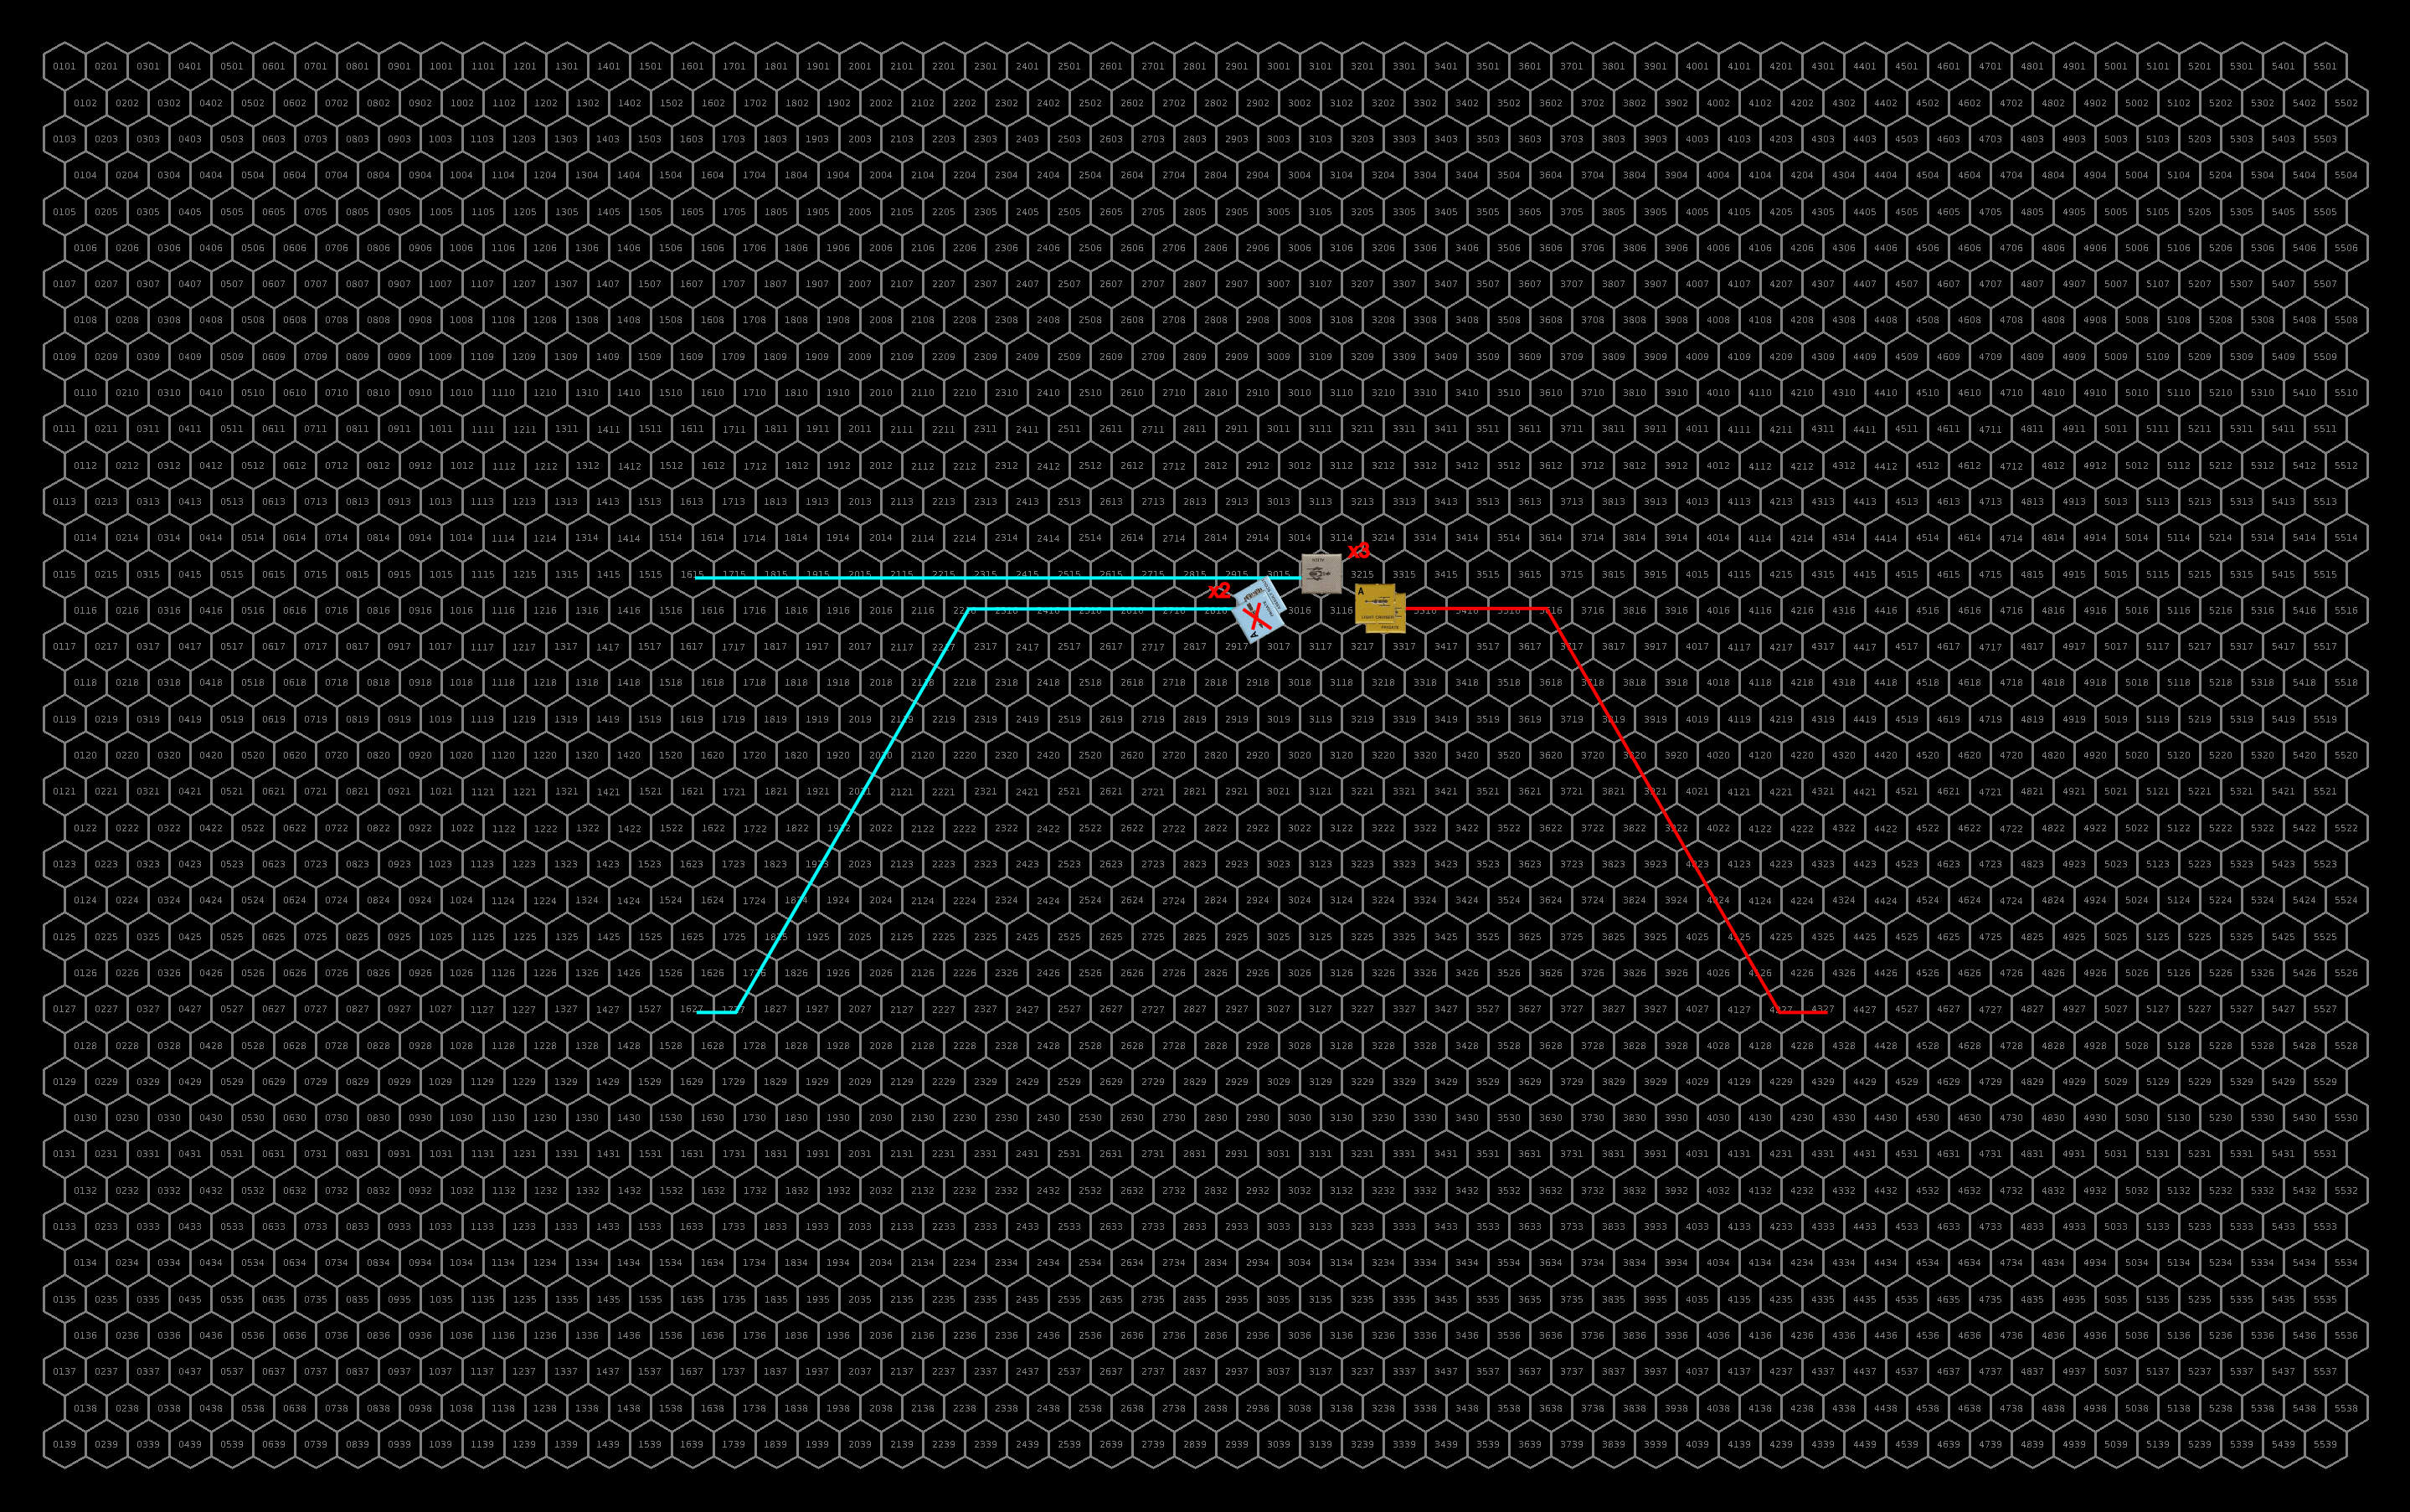
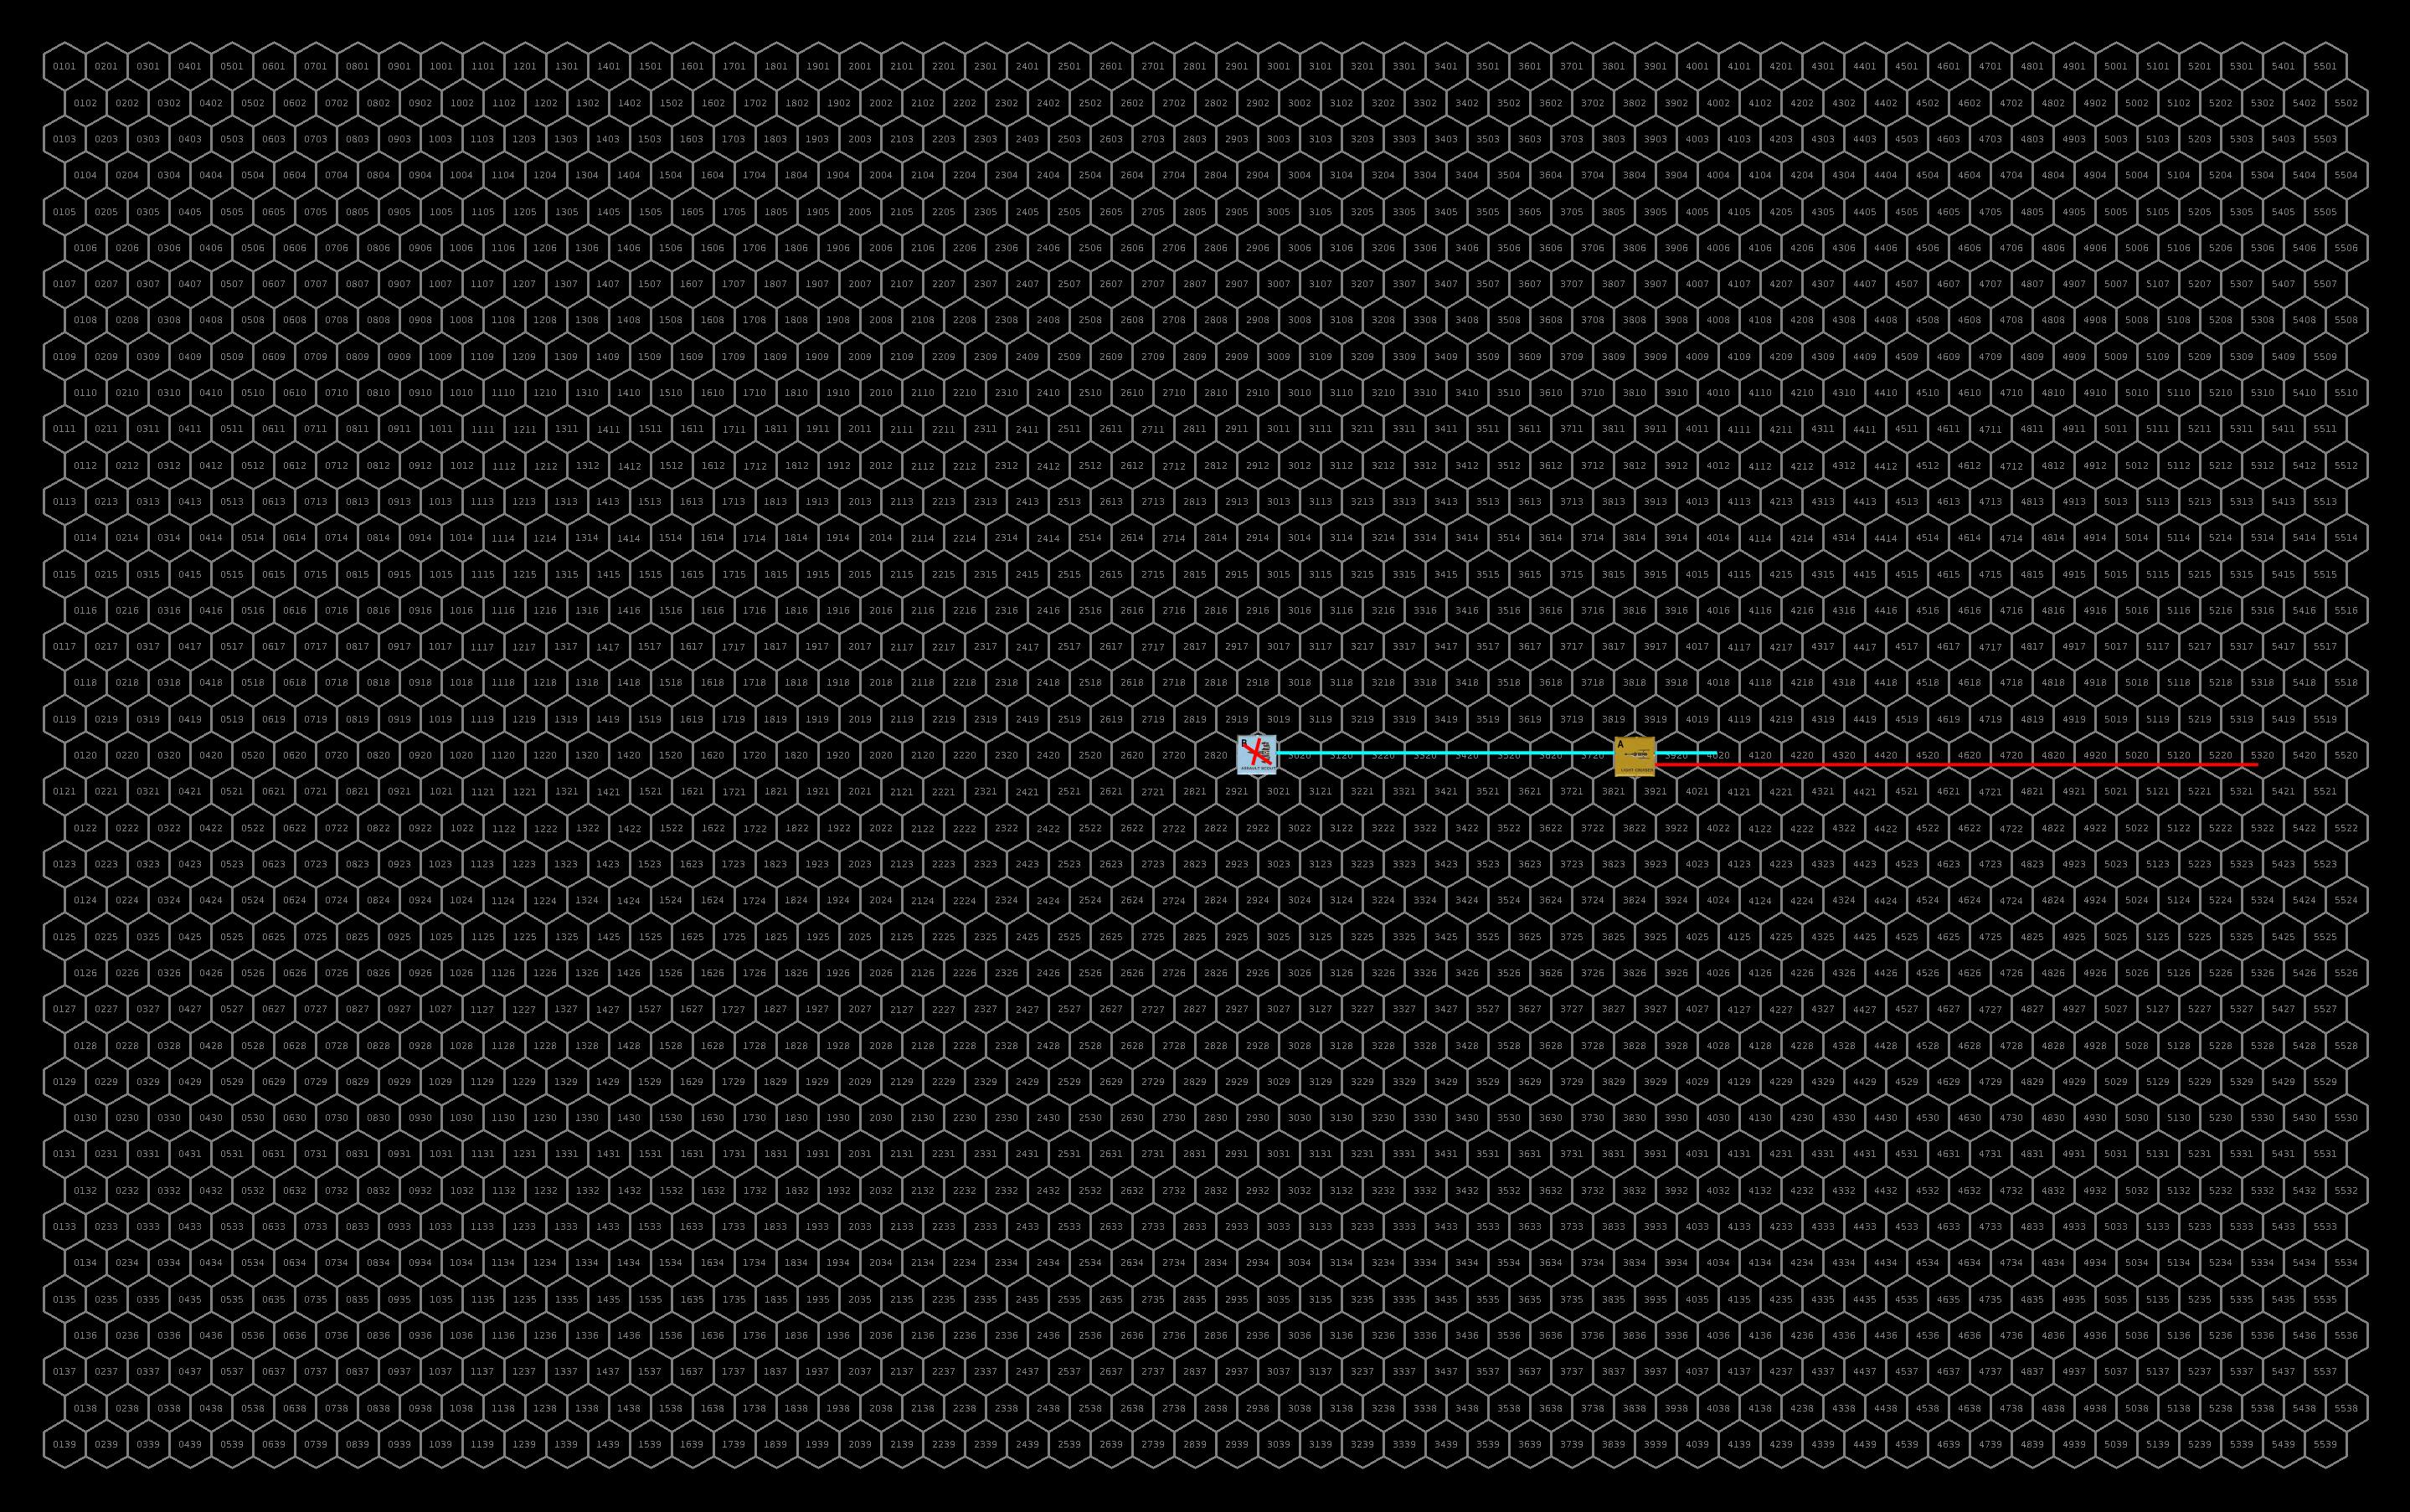
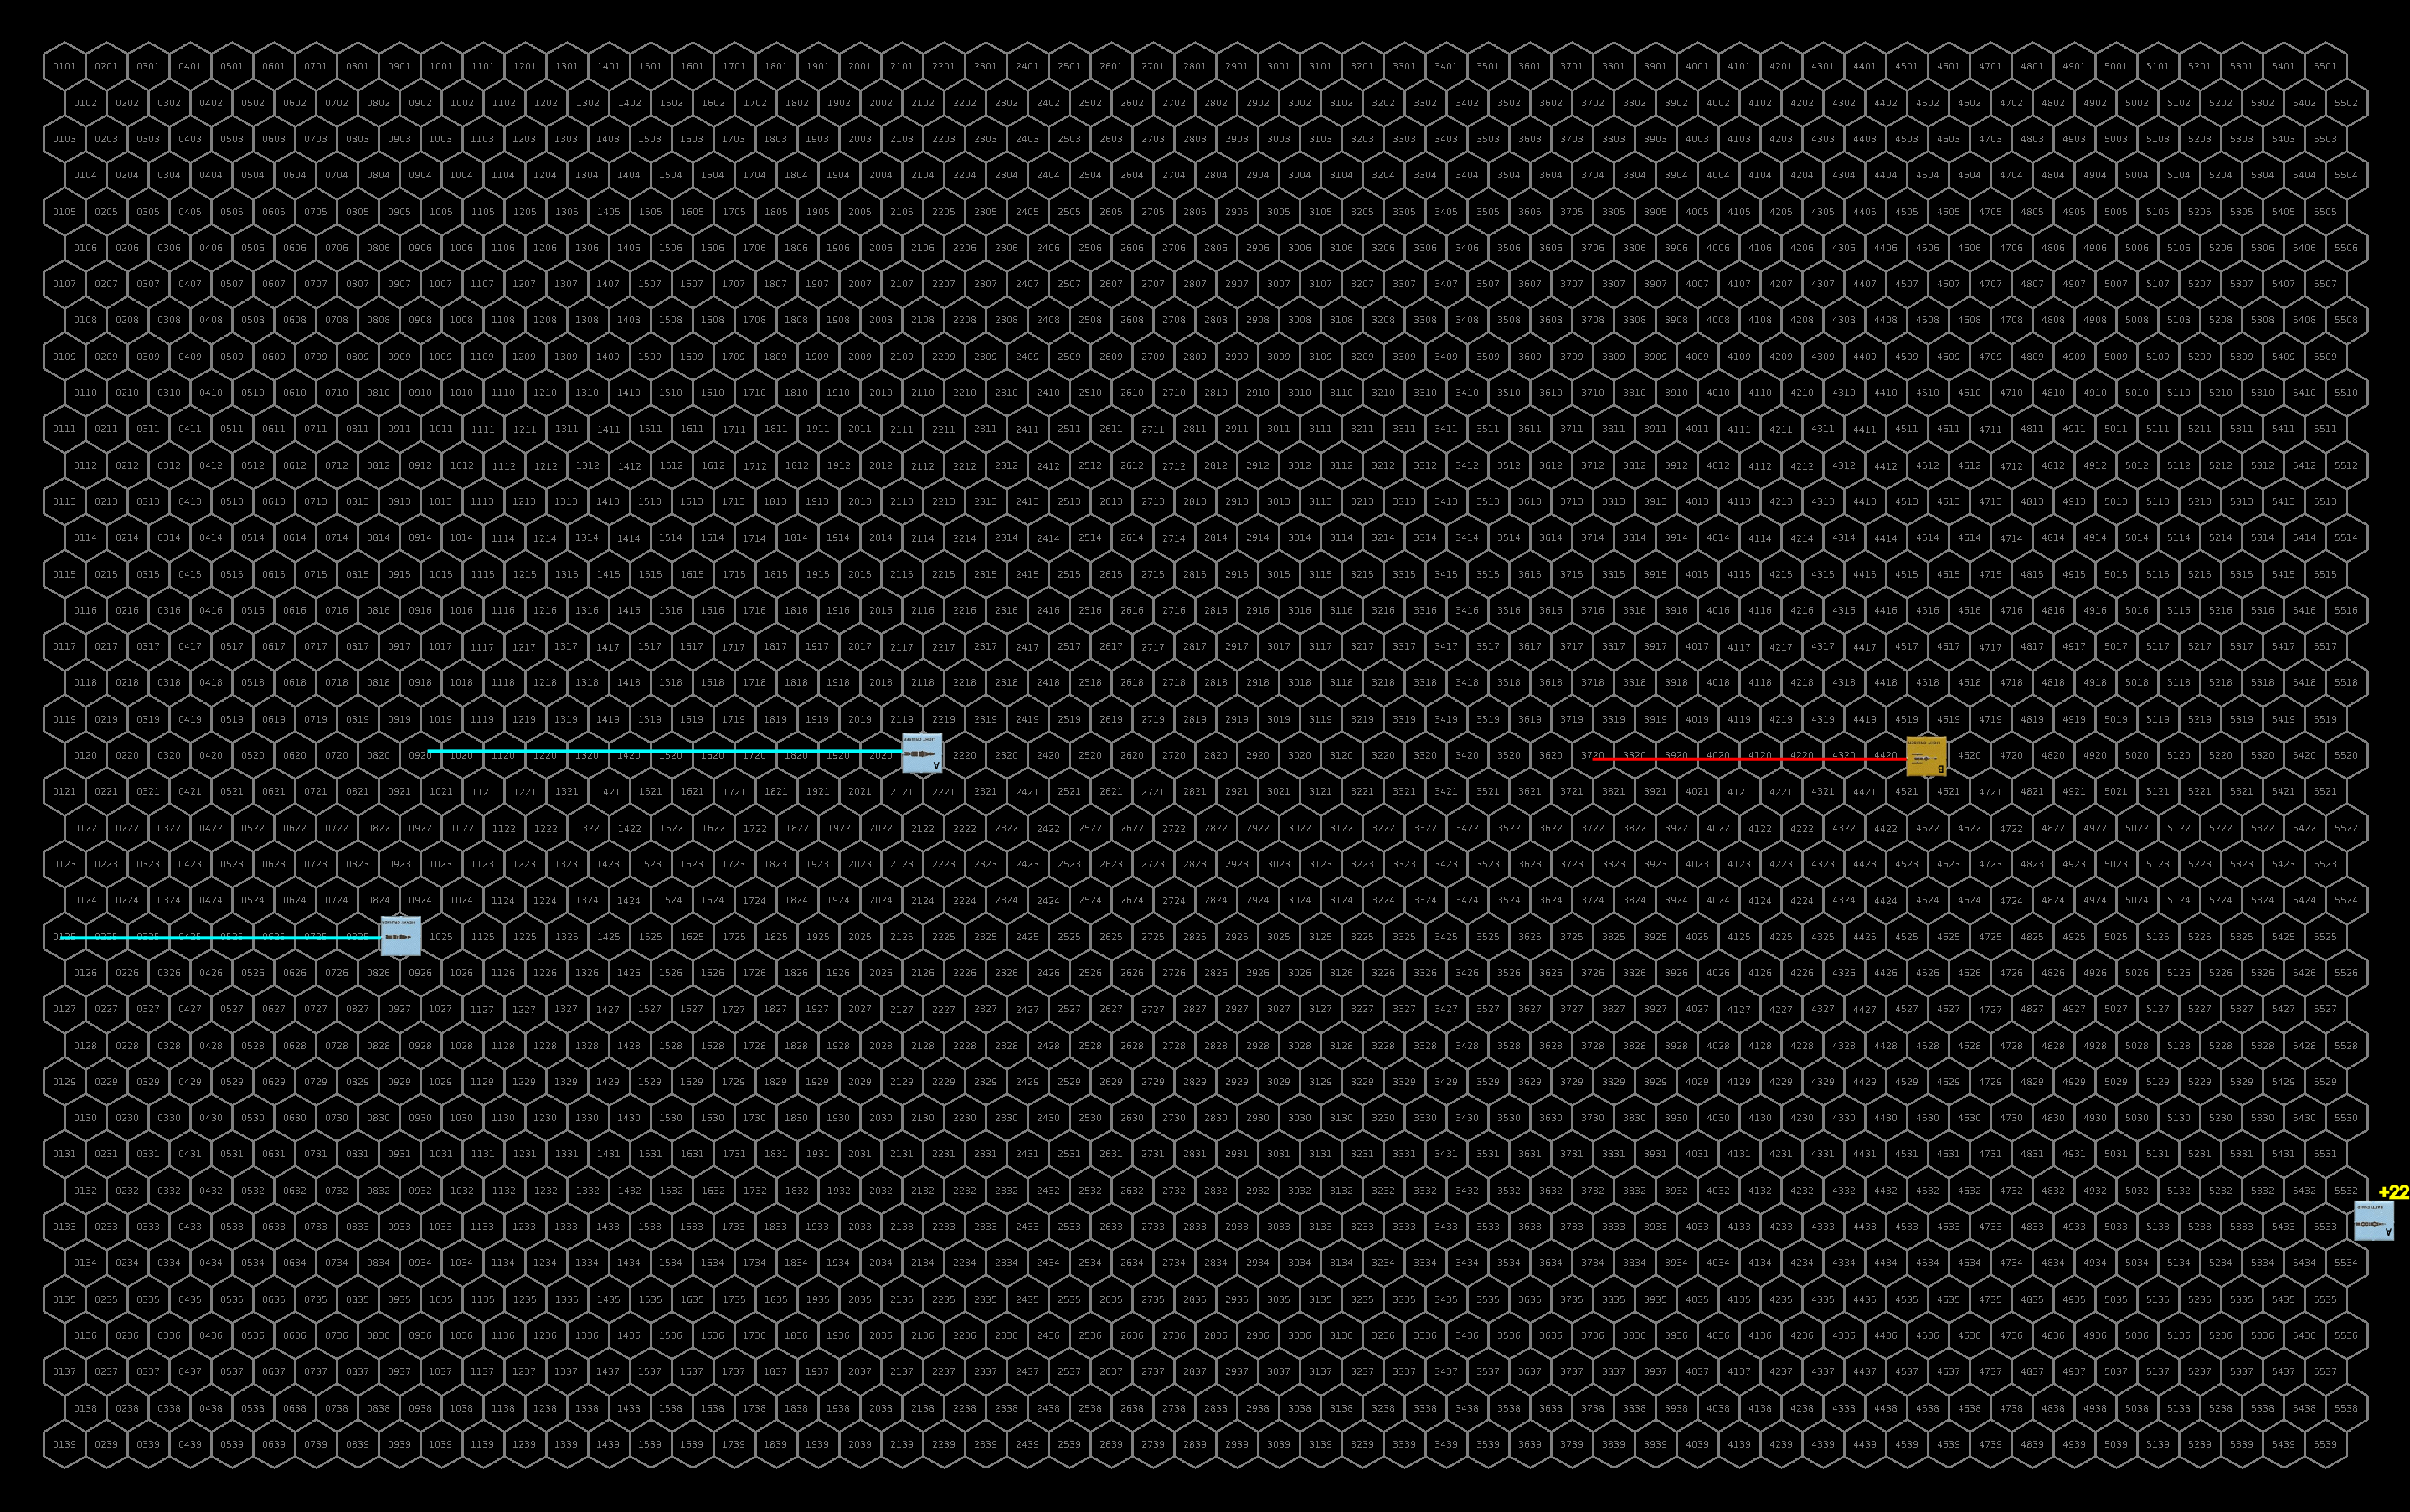
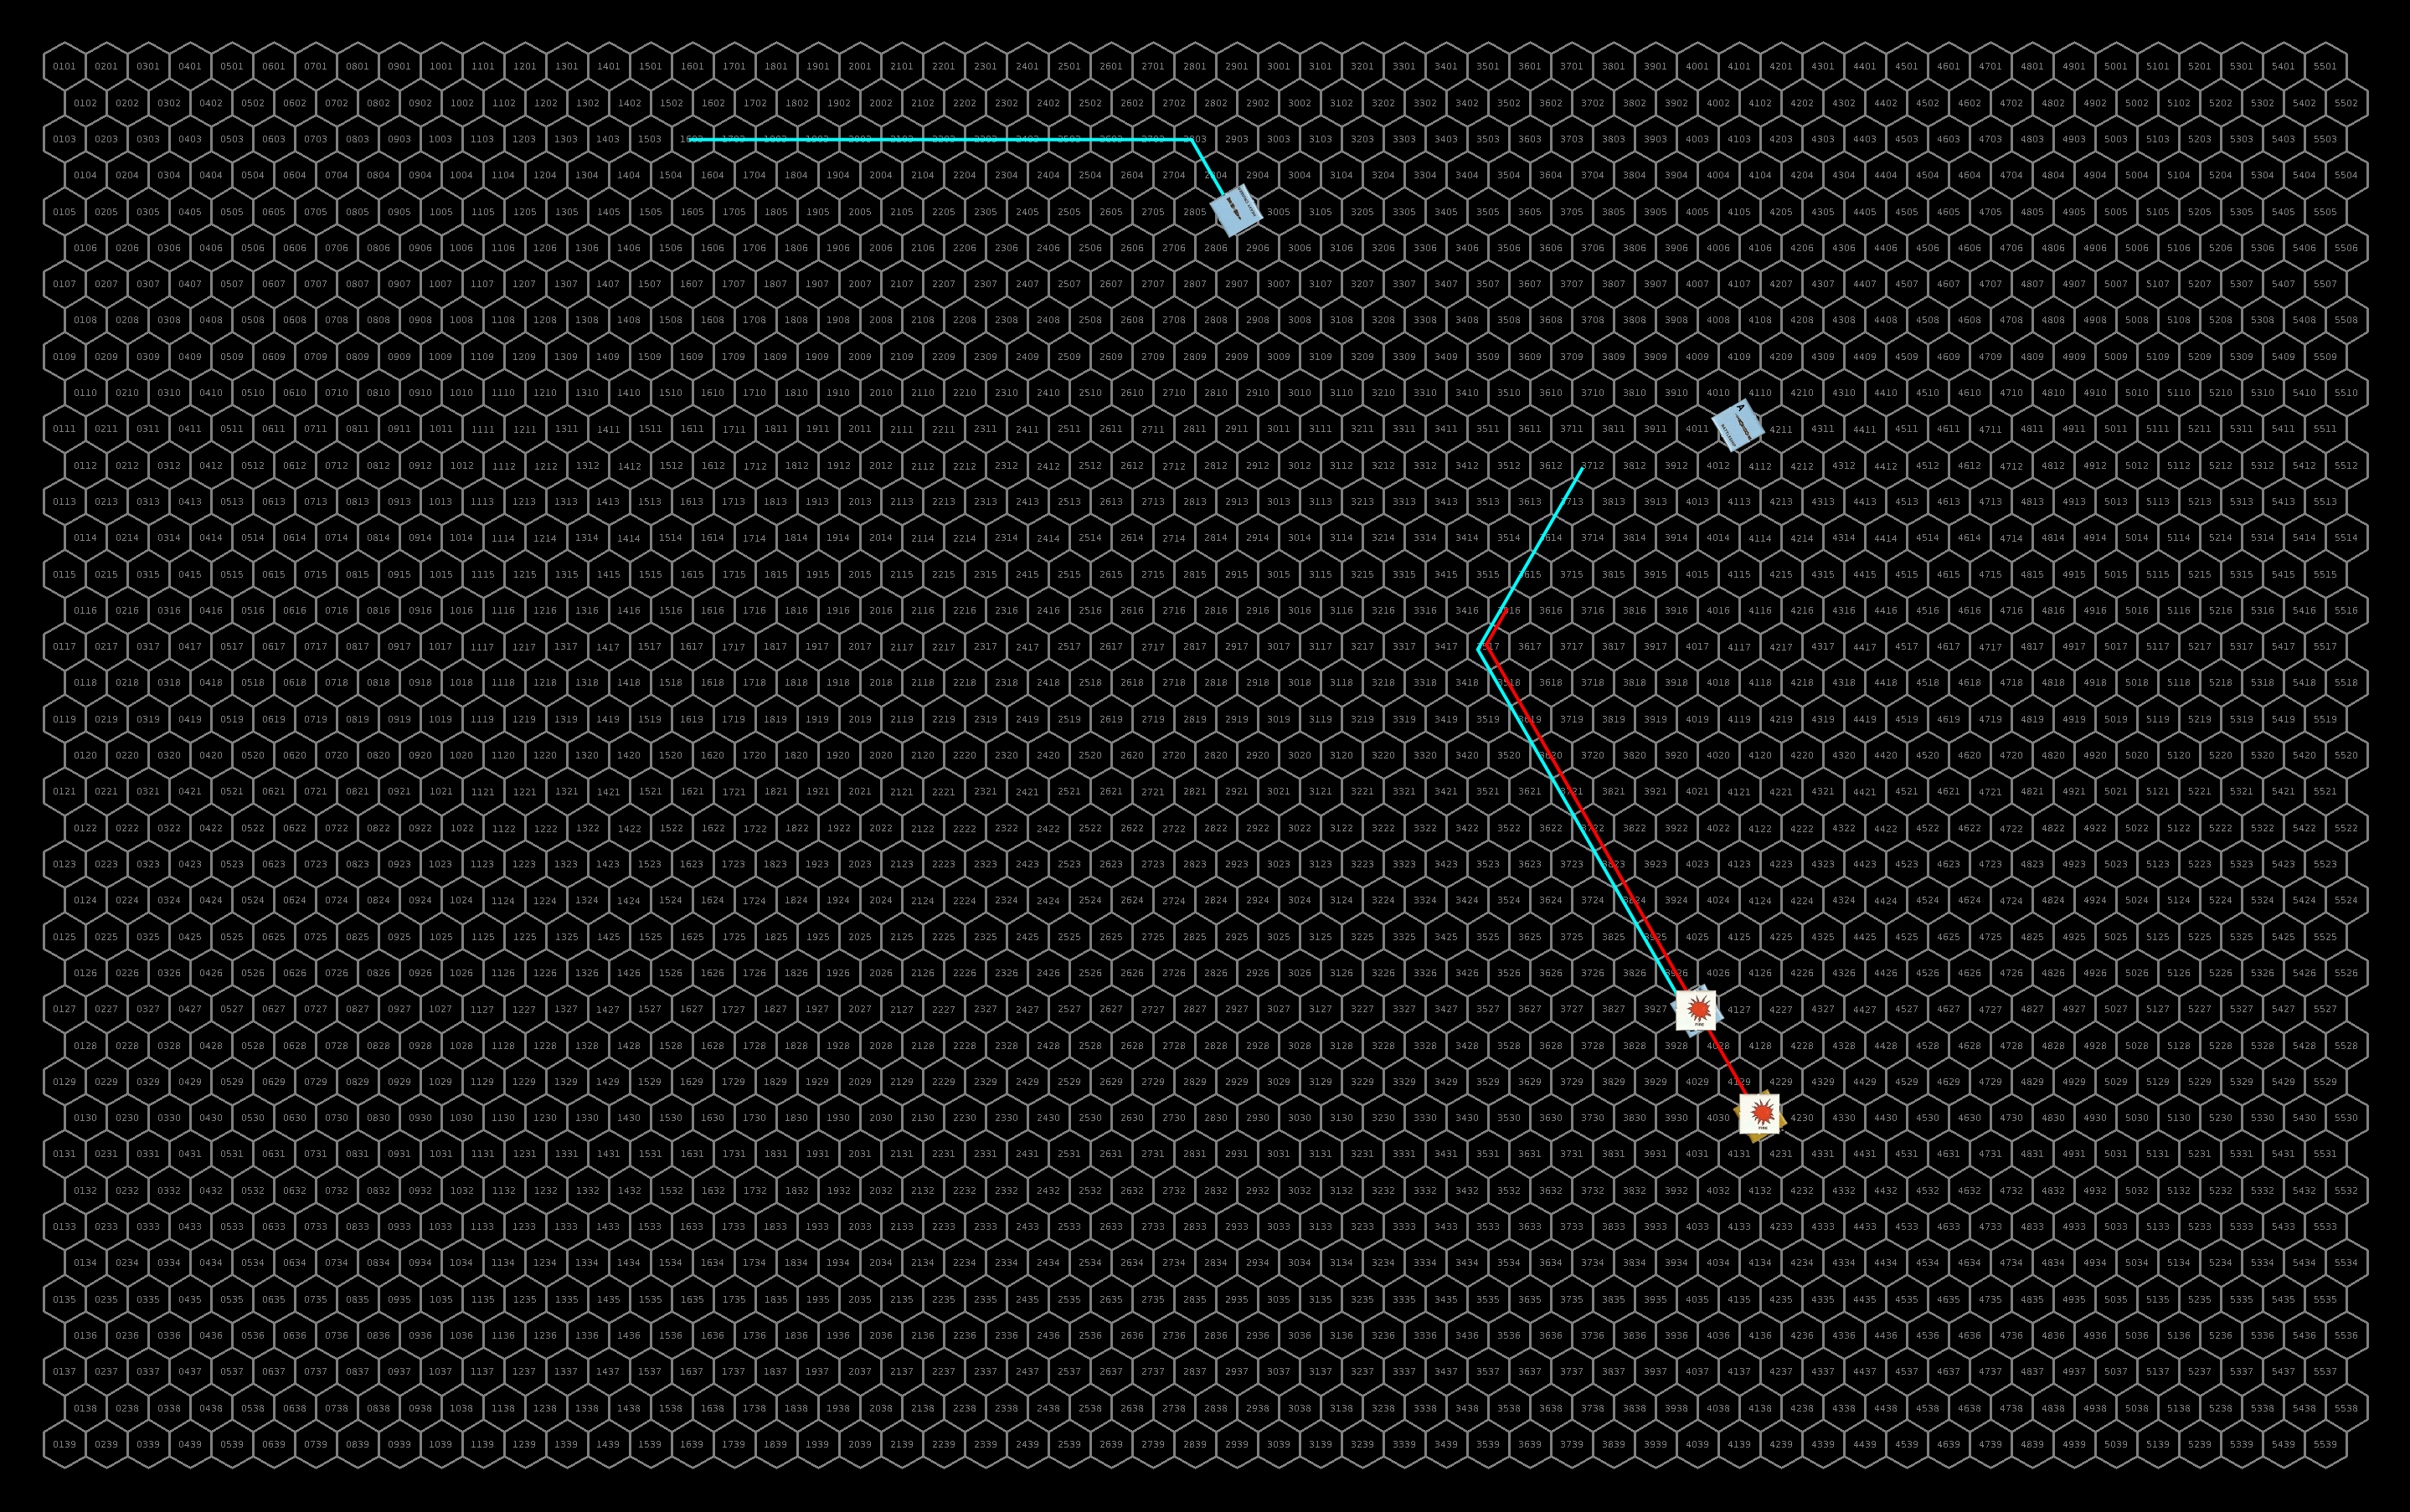
Courses and positions after the first round. The UPF ships show in the yellow boxes are positioned at the corresponding letter on the map. Their facing is as given in the boxes. Click for larger image.
Turn 2
The sathar continue to effect their retreat from the system. The wounded heavy cruiser with no MR, accompanied by the wounded frigate accelerate by 1 (the HC’s max) and continue straight and the frigate doesn’t break up from the slight acceleration. The other capital ships make a turn to port, accelerate by two and begin to leave the inner system. The fighters loop back to make a pass at the battleship.
At the same time the sathar activate three of the seeker missiles that they had deployed last turn. The first one starts to accelerate toward the armed station. The second activates among all the fighters and assault scouts and targets the militia frigate in that group. The third goes after the UPF frigate just behind the larger group of ships chasing the sathar fleet. Both frigates fire off all of their ICMs in an attempt to intercept the incoming missile. The missile going after the UPF frigate manages to evade the seeker missile but the militia frigate isn’t so lucky. The missile slams home but mercifully doesn’t destroy the ship. It’s hull integrity is only reduced by 40% (only 16 points on 5d10).
Defensively, the armed station, UPF frigate A, and the battleship fire at the fighters while the other ships focus on the damaged heavy cruiser. The frigate connects with the lead fighter knocking out its AR launcher. The station misses but the battleship hit with 2 laser batteries destroying one fighter and knocking out the AR launcher on a second, and its disruptor cannon vaporizes a second fighter. The other frigates and assault scouts, firing on the damaged heavy cruiser, only manage to land two laser battery hits (from the militia frigate and assault scout) knocking out the cruisers PB and only scratching its hull (1 HP).
Offensively, the sathar fighters fire their assault rockets at the battleship, but the destruction of and damage to their wingworms distract them and only one of the five rockets connect damaging the battleship’s engines.
The fleeing sathar ships focus the energy battery weapons on the fighters behind them, while they focus their cannons and rocket batteries on the fighters in the lower group (C) along their flight path. They fire torpedoes at the frigate and assault scouts behind them as well. The assault scouts immediately start dodging in an attempt to evade the incoming torpedoes but the frigate, having expended its ICMs unsuccessfully on the seeker missile can only watch as the torpedo homes in.
While the torpedoes are only moderately successful, damaging the LC on the militia frigate and destroying one of the militia assault scouts, the energy weapons and rocket batteries are much more effective, completely destroying the fighters along the sathar flight path and destroying four fighters in the trailing groups. In addition, two more fighters are damaged (12% and 88% hull integrity left).
With the battleship too slow to catch the fleeing ships, and some of the assault scouts thrown off track trying to avoid the incoming torpedoes, the UPF cannot safely pursue the larger group of sathar vessels and go after the damaged ships to finish them off. Three of the assault scouts are able to pursue even with their evasive maneuvers and are joined by the four functional fighters. One fighter has its maneuvering damaged and just starts to decelerate. The sixth fighter cannot accelerate and tries to stay with the main group but falls behind and doesn’t come into weapon range. The frigates also pursue the damaged sathar ships but they are still at a speed disadvantage and fall a bit further behind. The battleship starts slowing down and staying near the station while the three militia assault scouts slow down as they are headed off in the wrong direction for pursuit but should be able to start to catch up soon. The assault carrier, now safe, begins slowing down and returning to the planet.
The starship construction center succumbs the fire and is completely destroyed. Defensively, the sathar heavy cruiser and frigate fire on the incoming fighters but all the shots go wide.
The UPF ships fire five assault rockets at the heavy cruiser and two at the frigate. They focus all their energy weapons at the frigate (3 LB from the Assault scouts and 2 LC & LB from the frigates). Four of the five assault rockets hit the heavy cruiser. All of them rip into the hull completely destroying the ship. Of the energy weapons fired at the frigate, only one of the assault scouts score a hit reducing the frigate’s hull integrity by 10%. One of the assault rockets knocks out the frigate’s LC while the other detonates in the core of the ship with a titanic explosion that consumes the entire ship (42 HP).
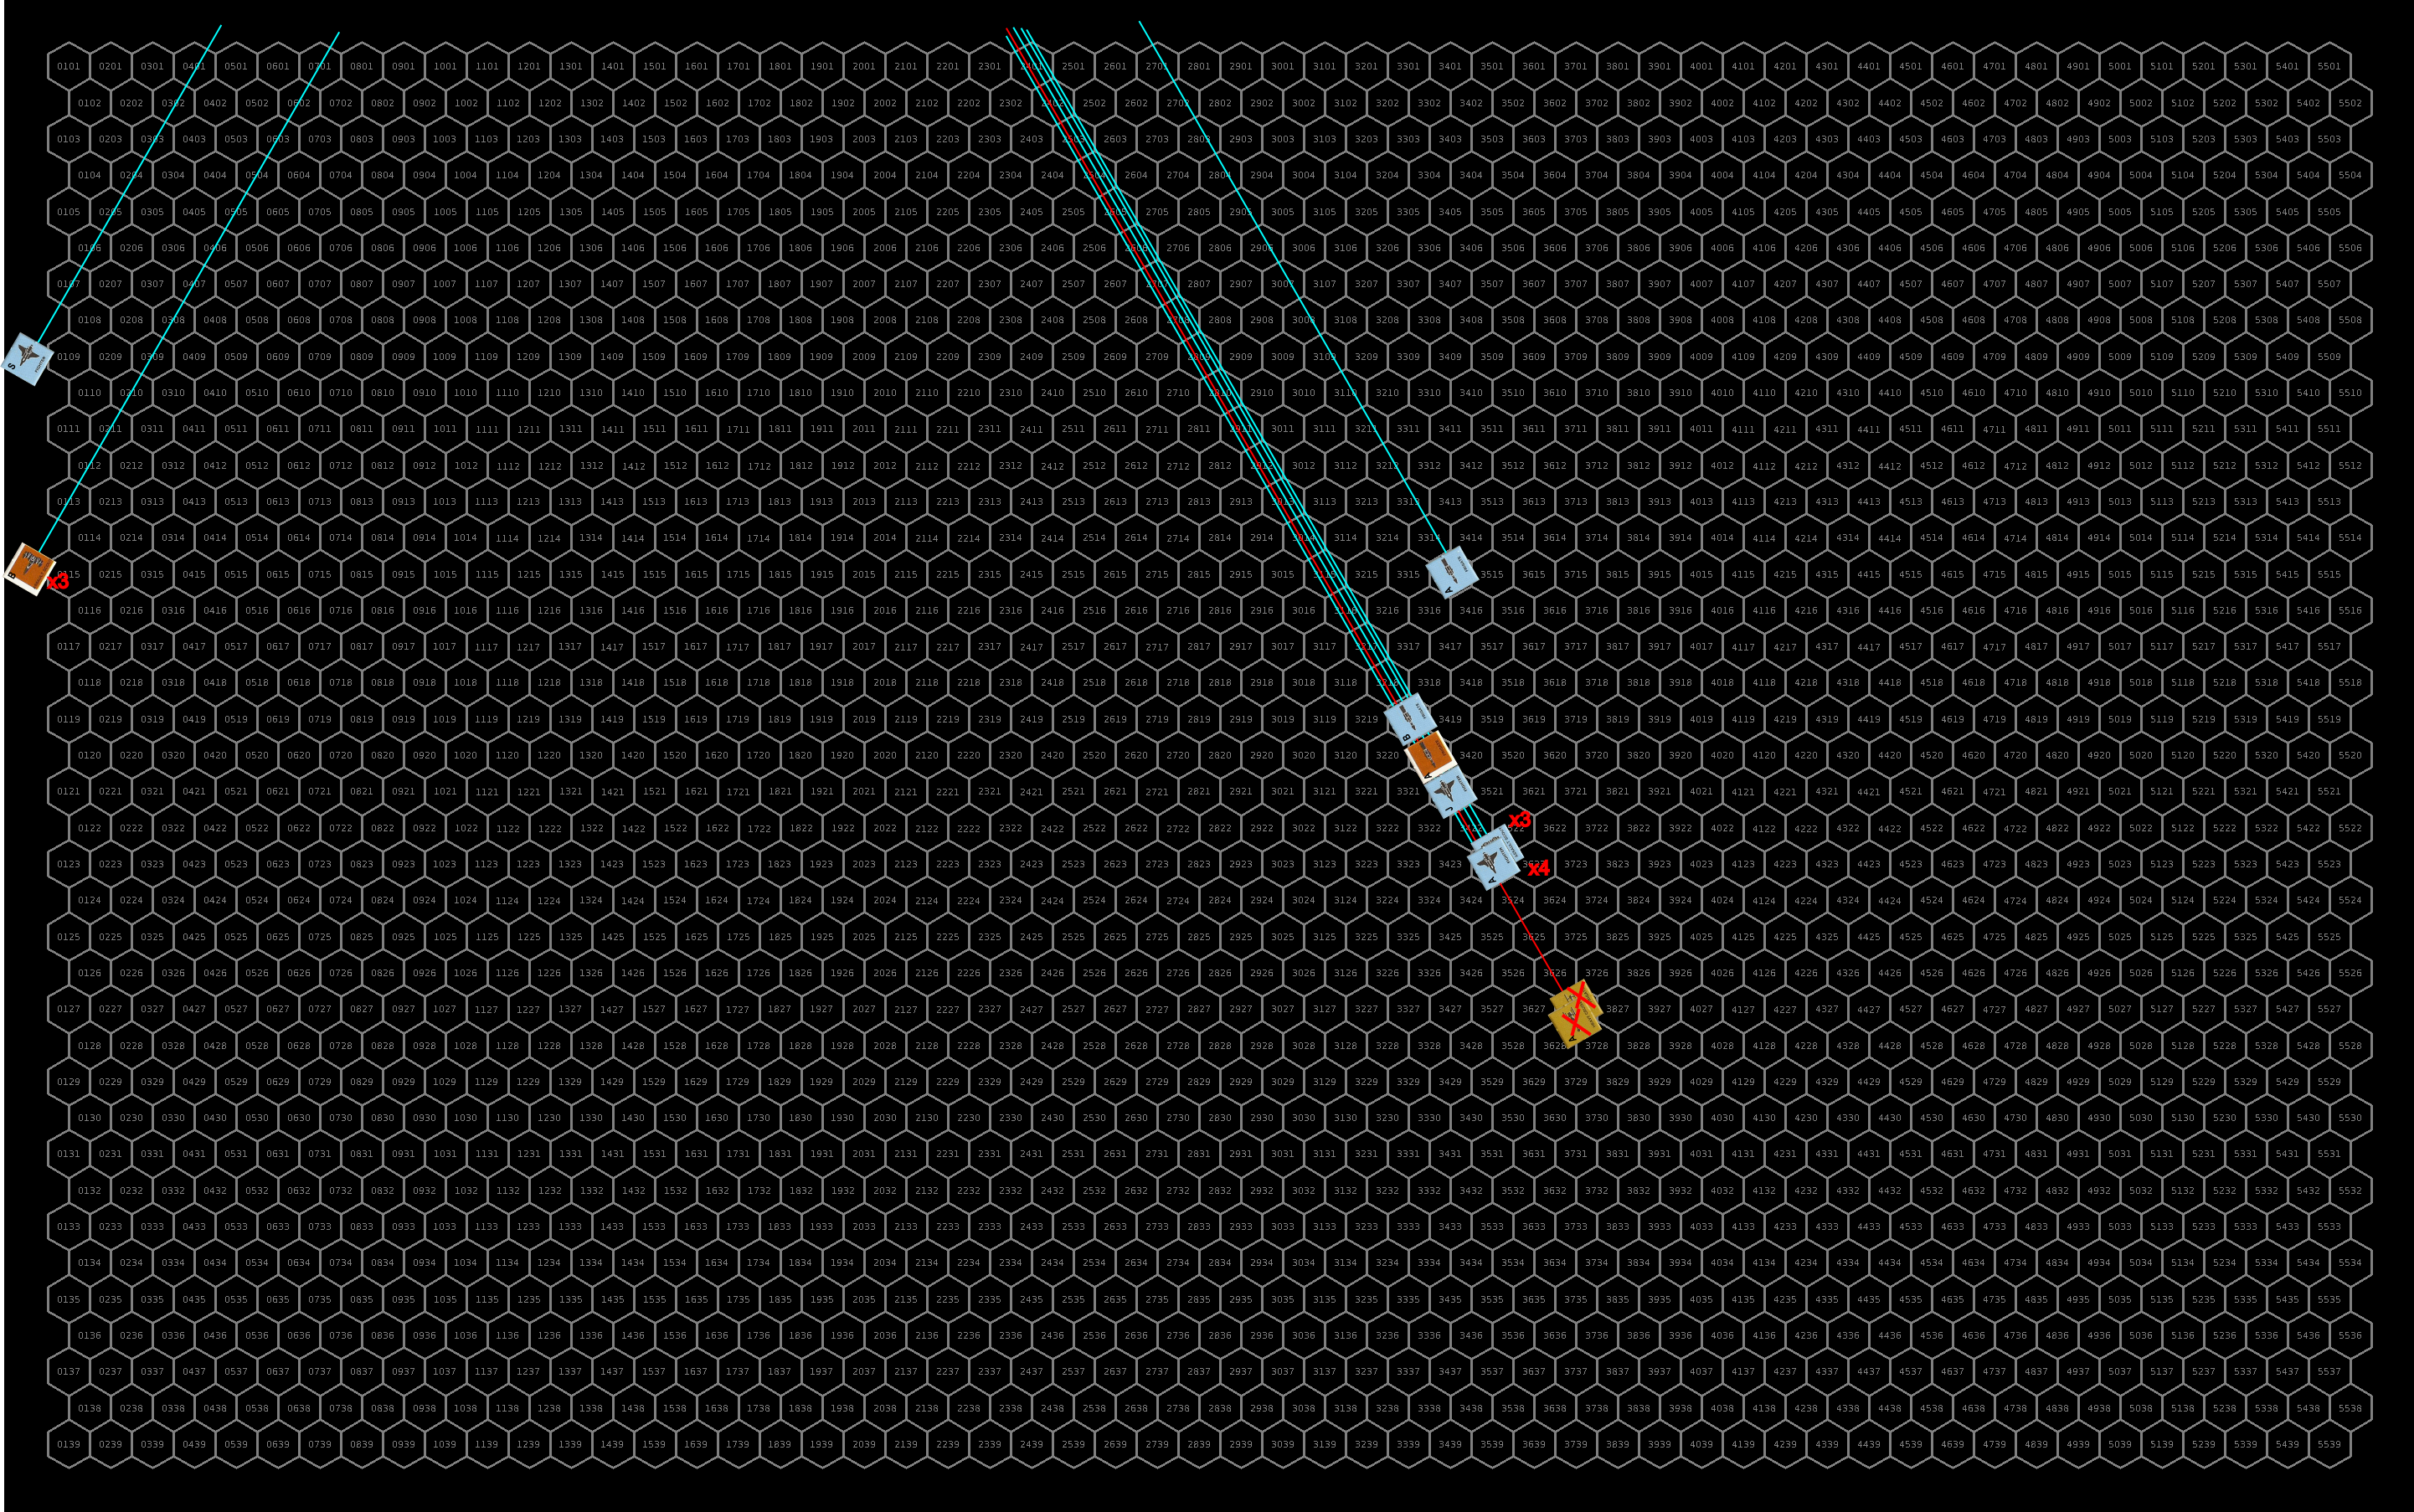
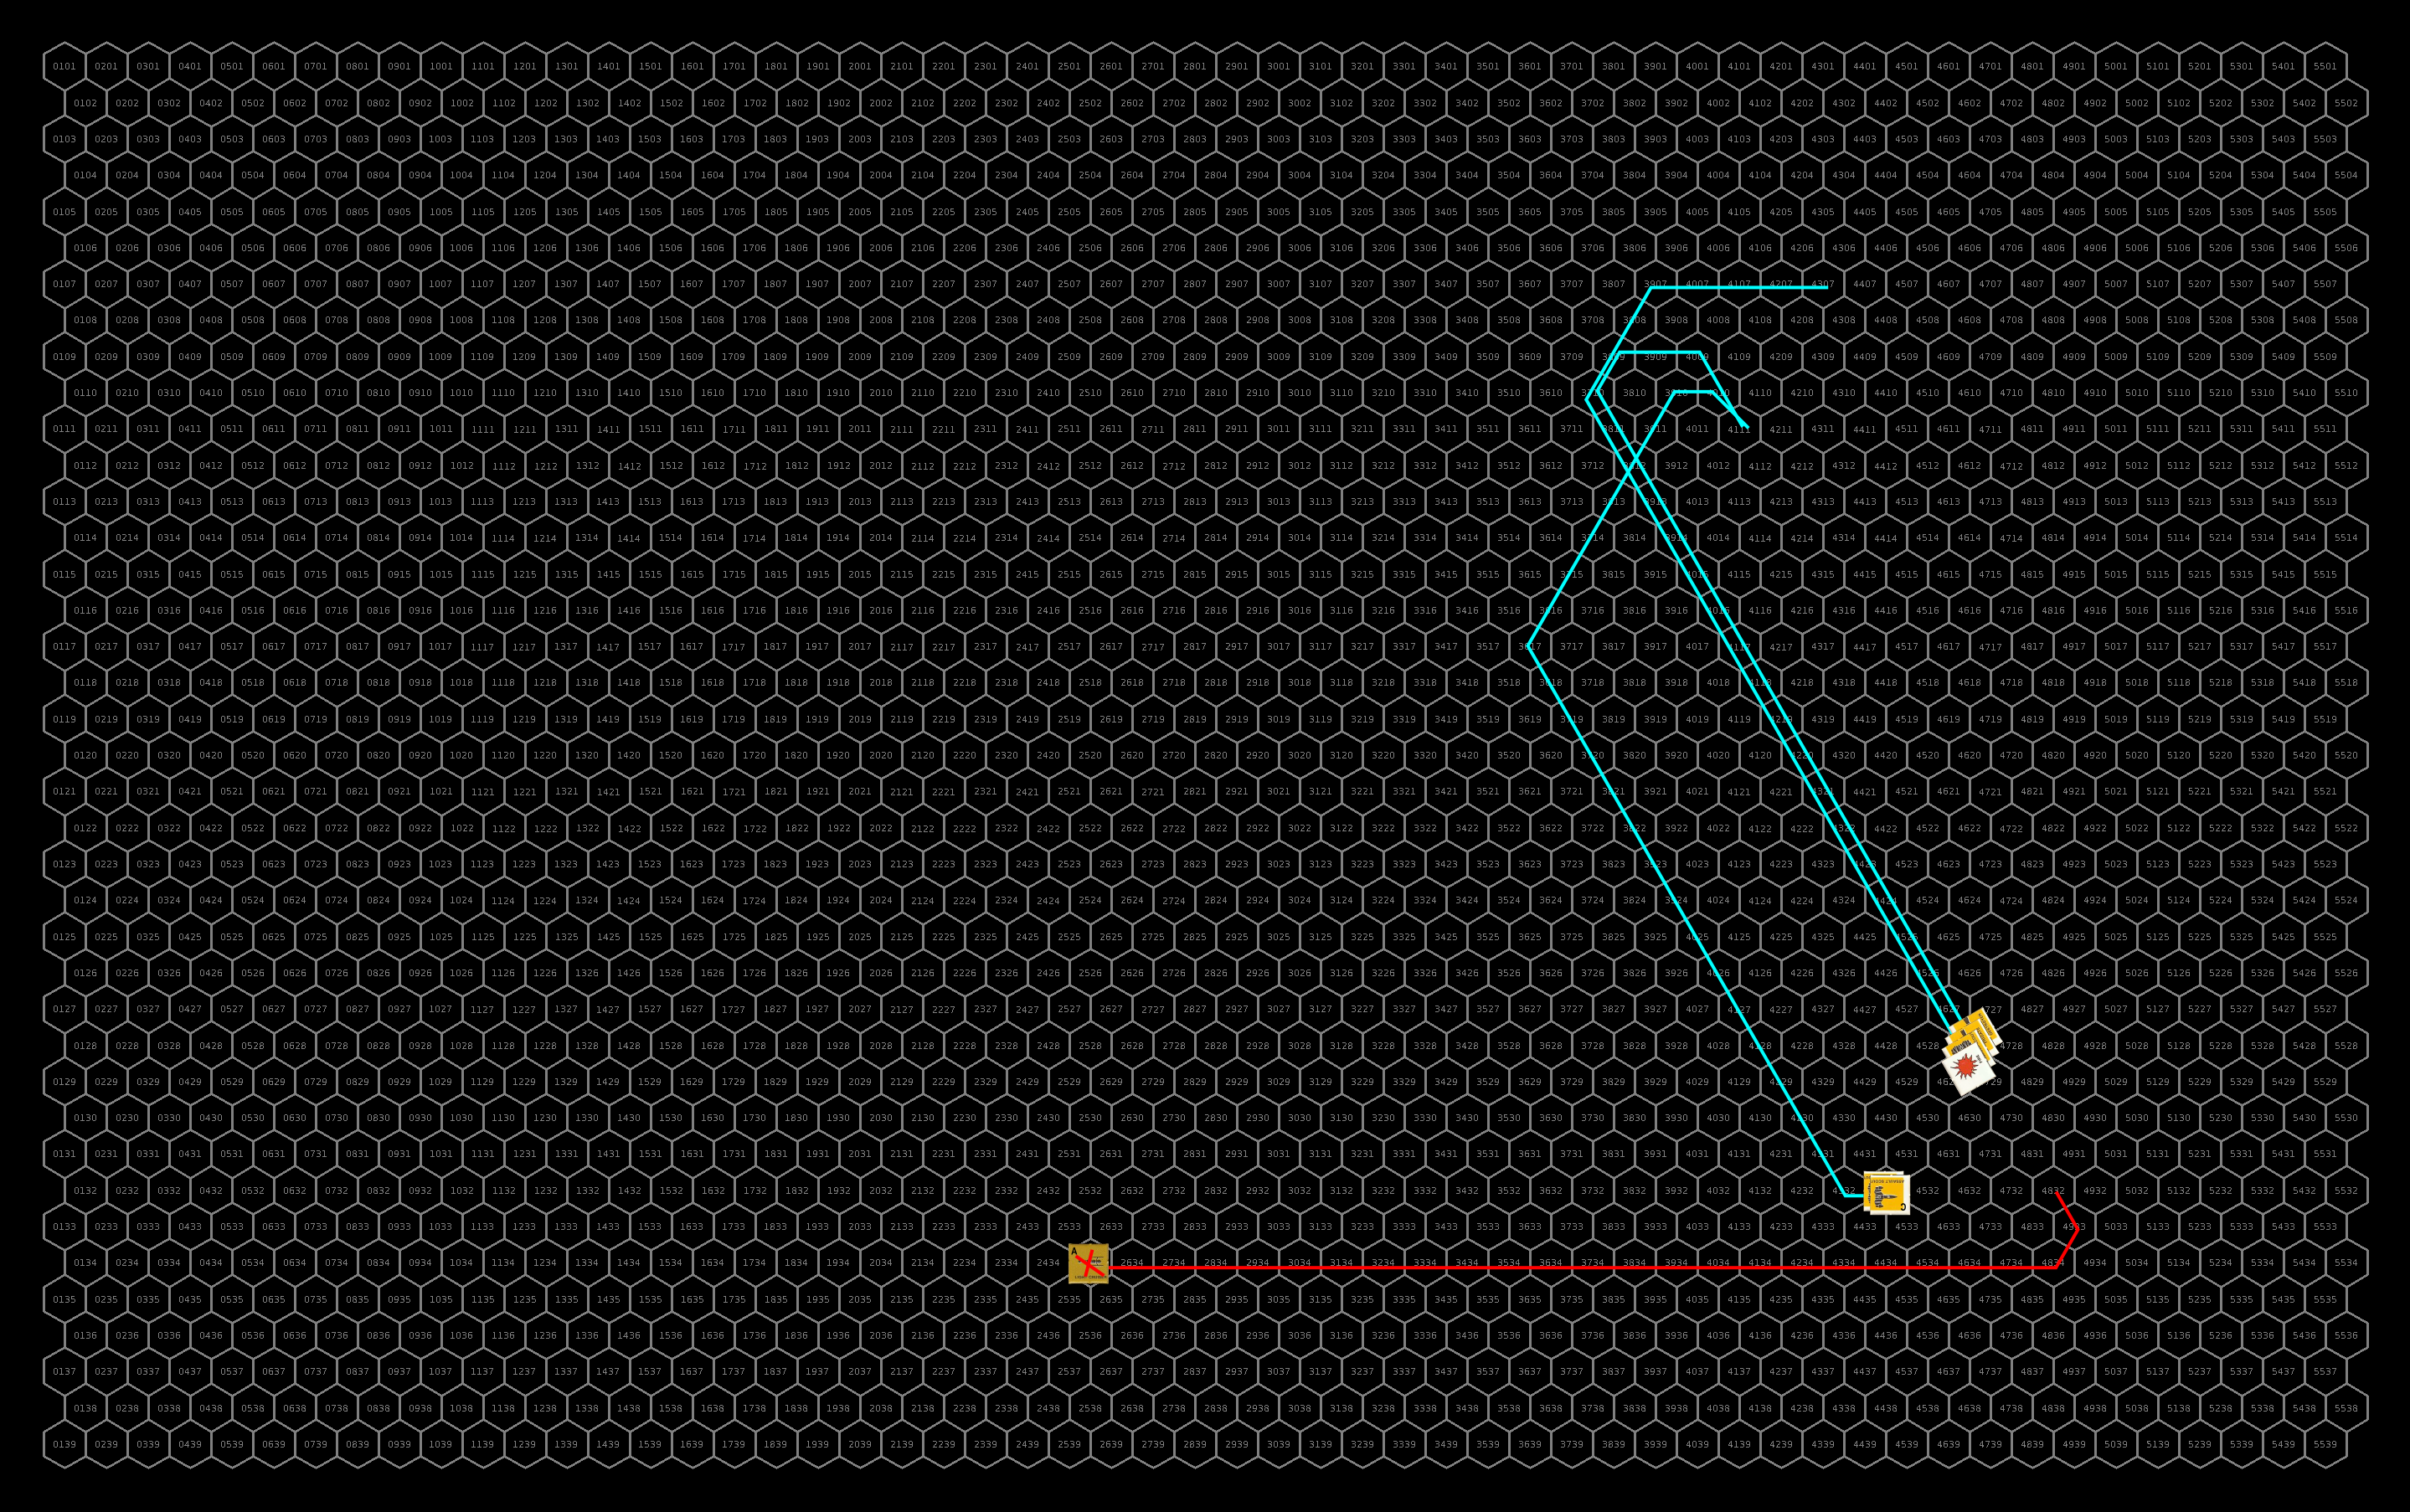
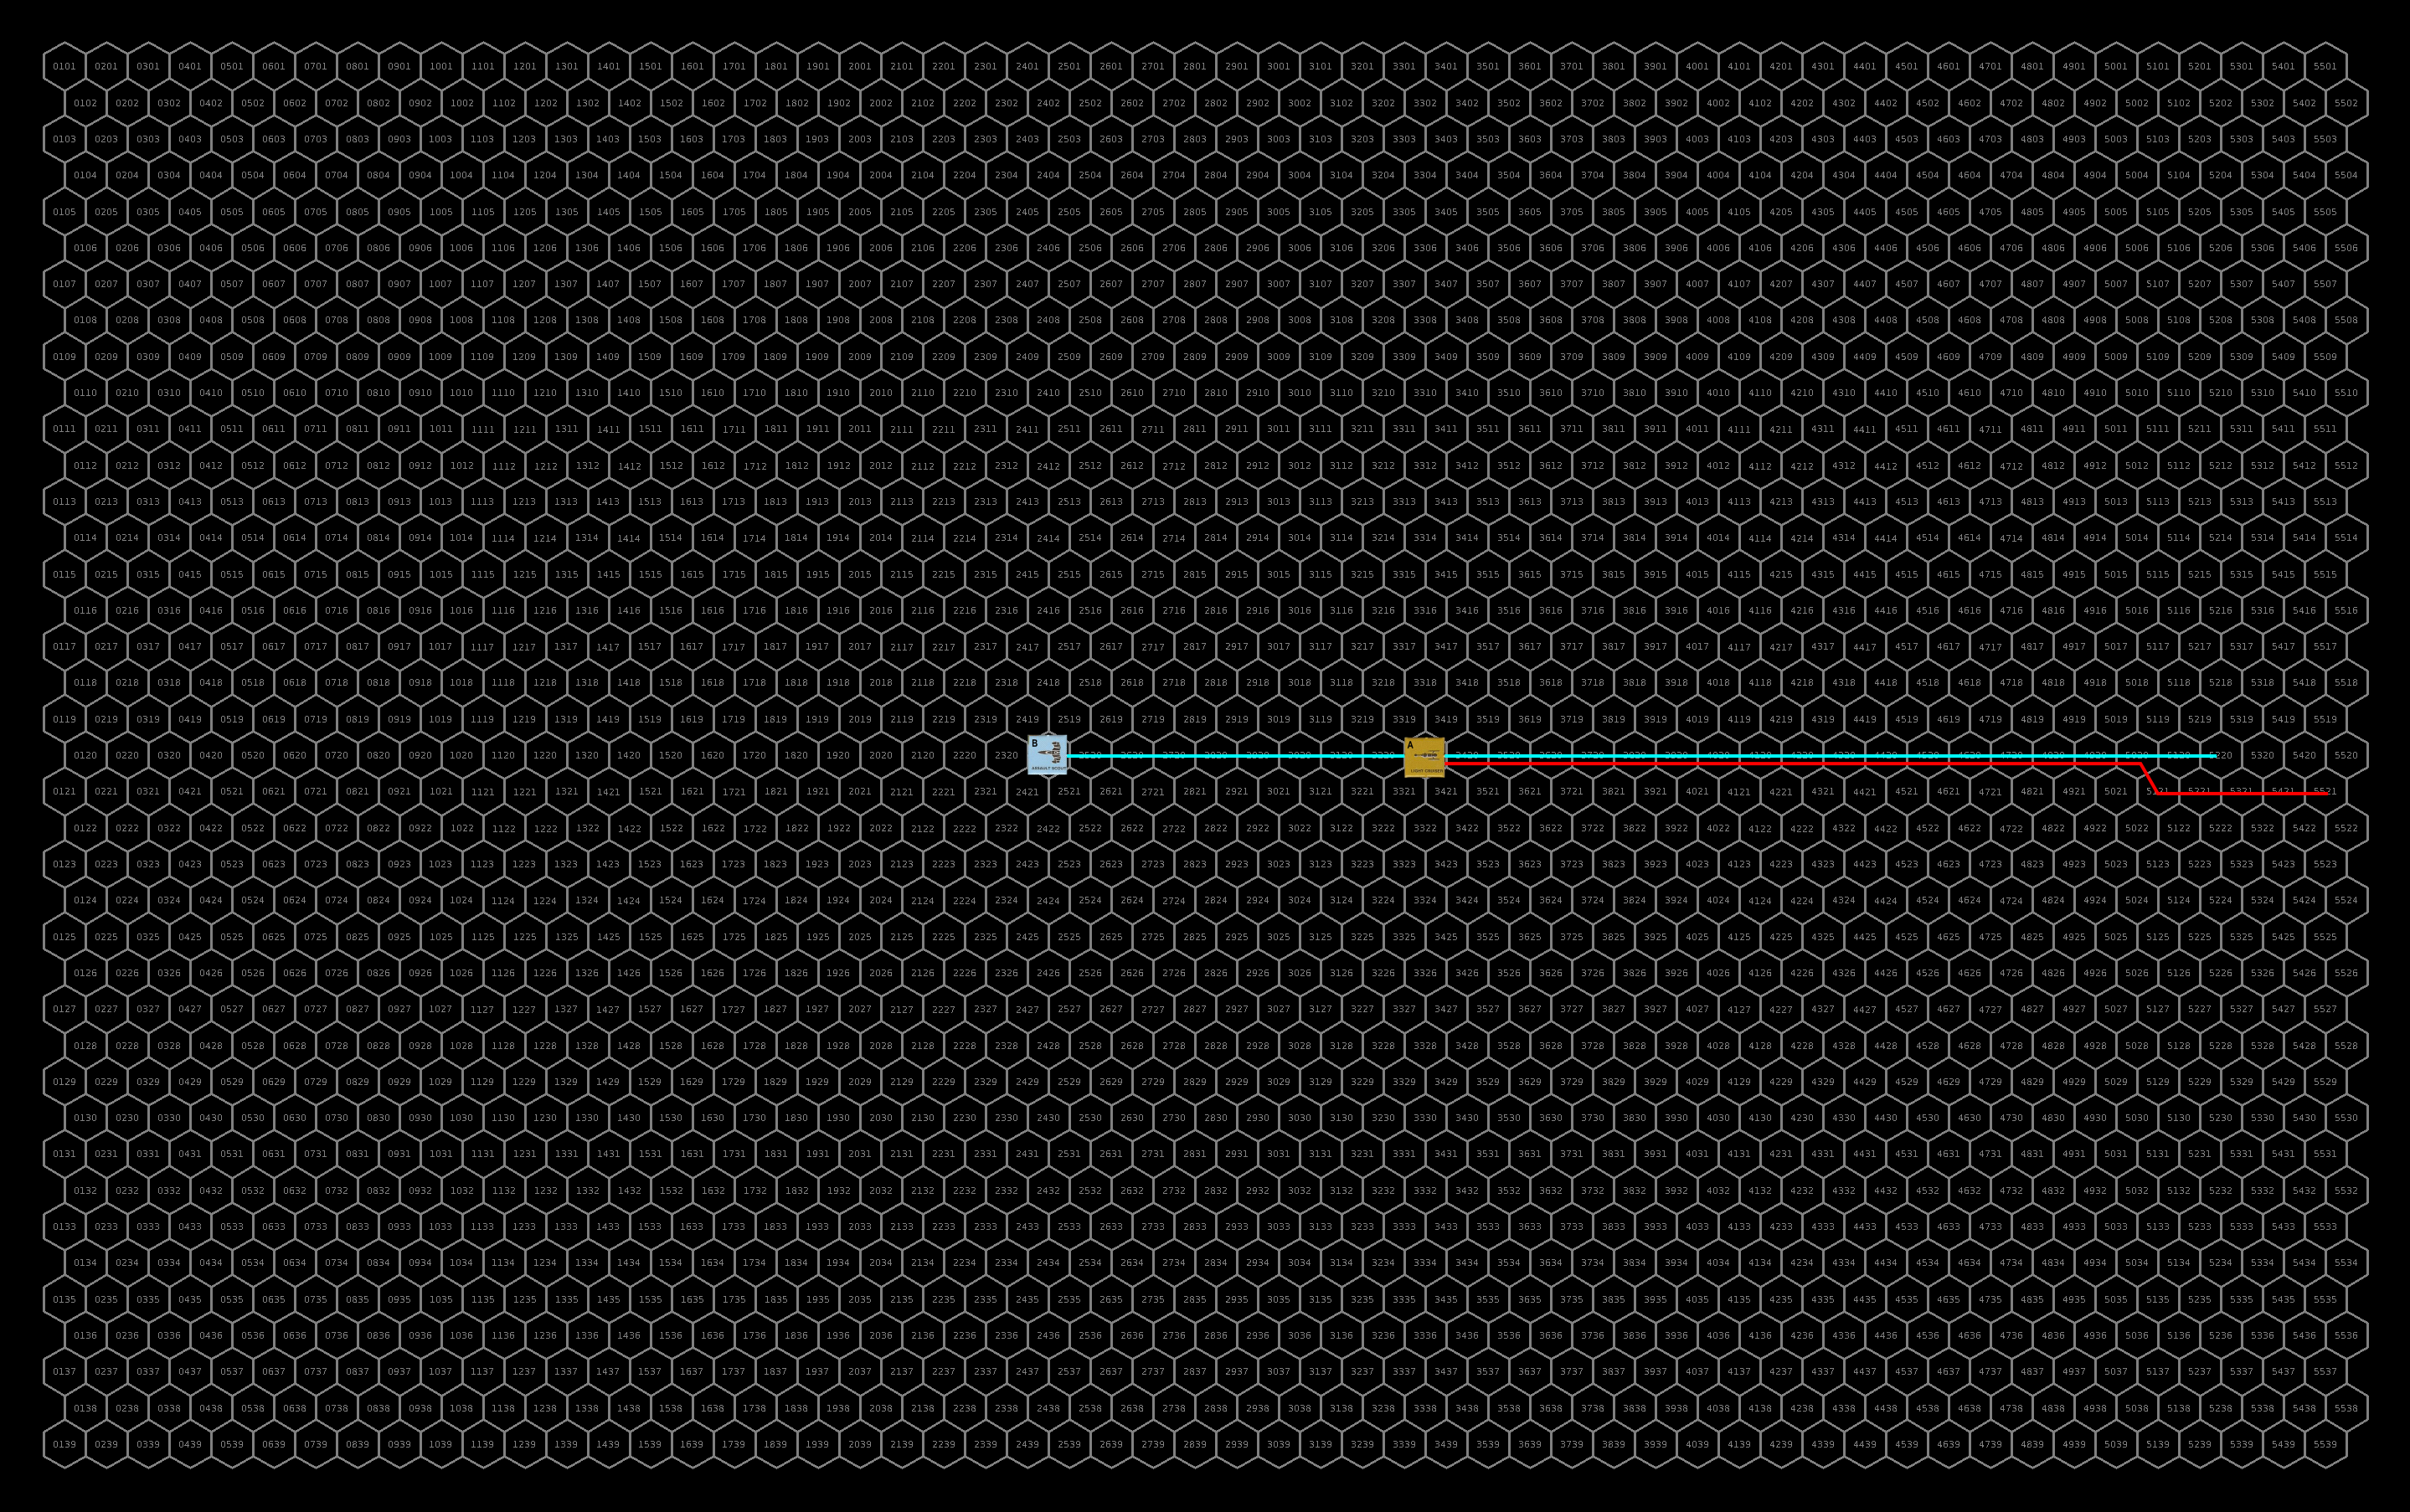
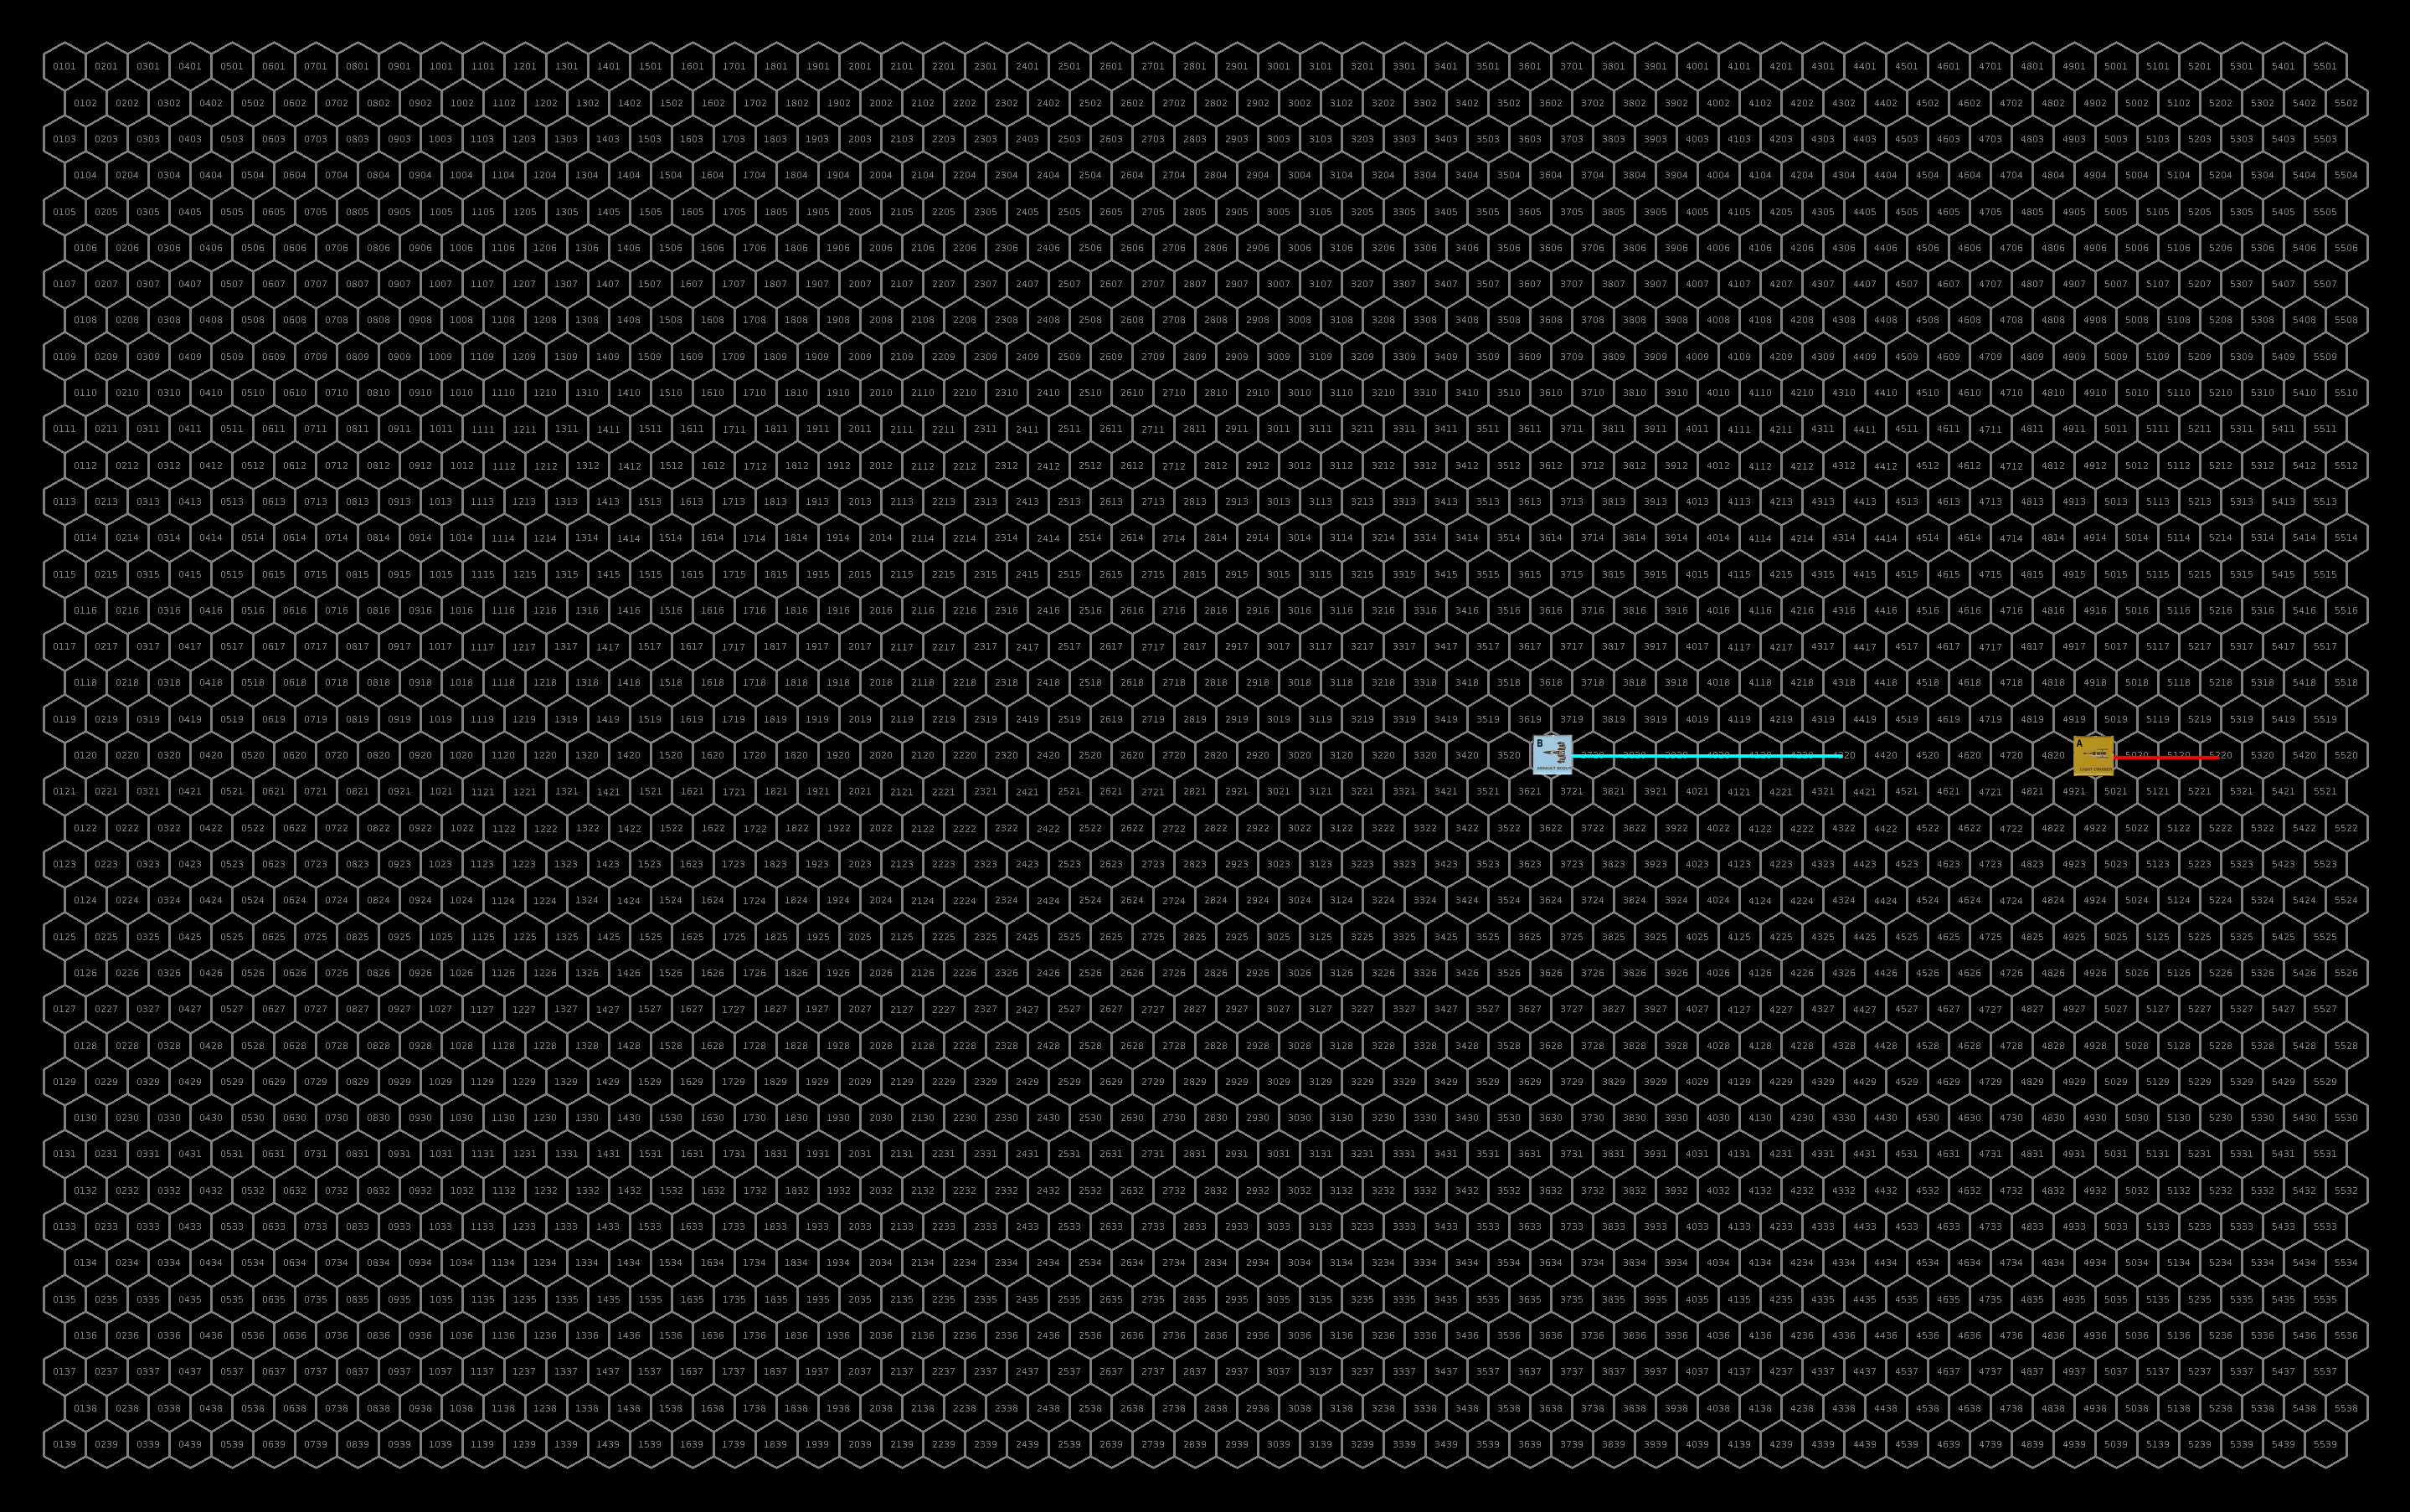
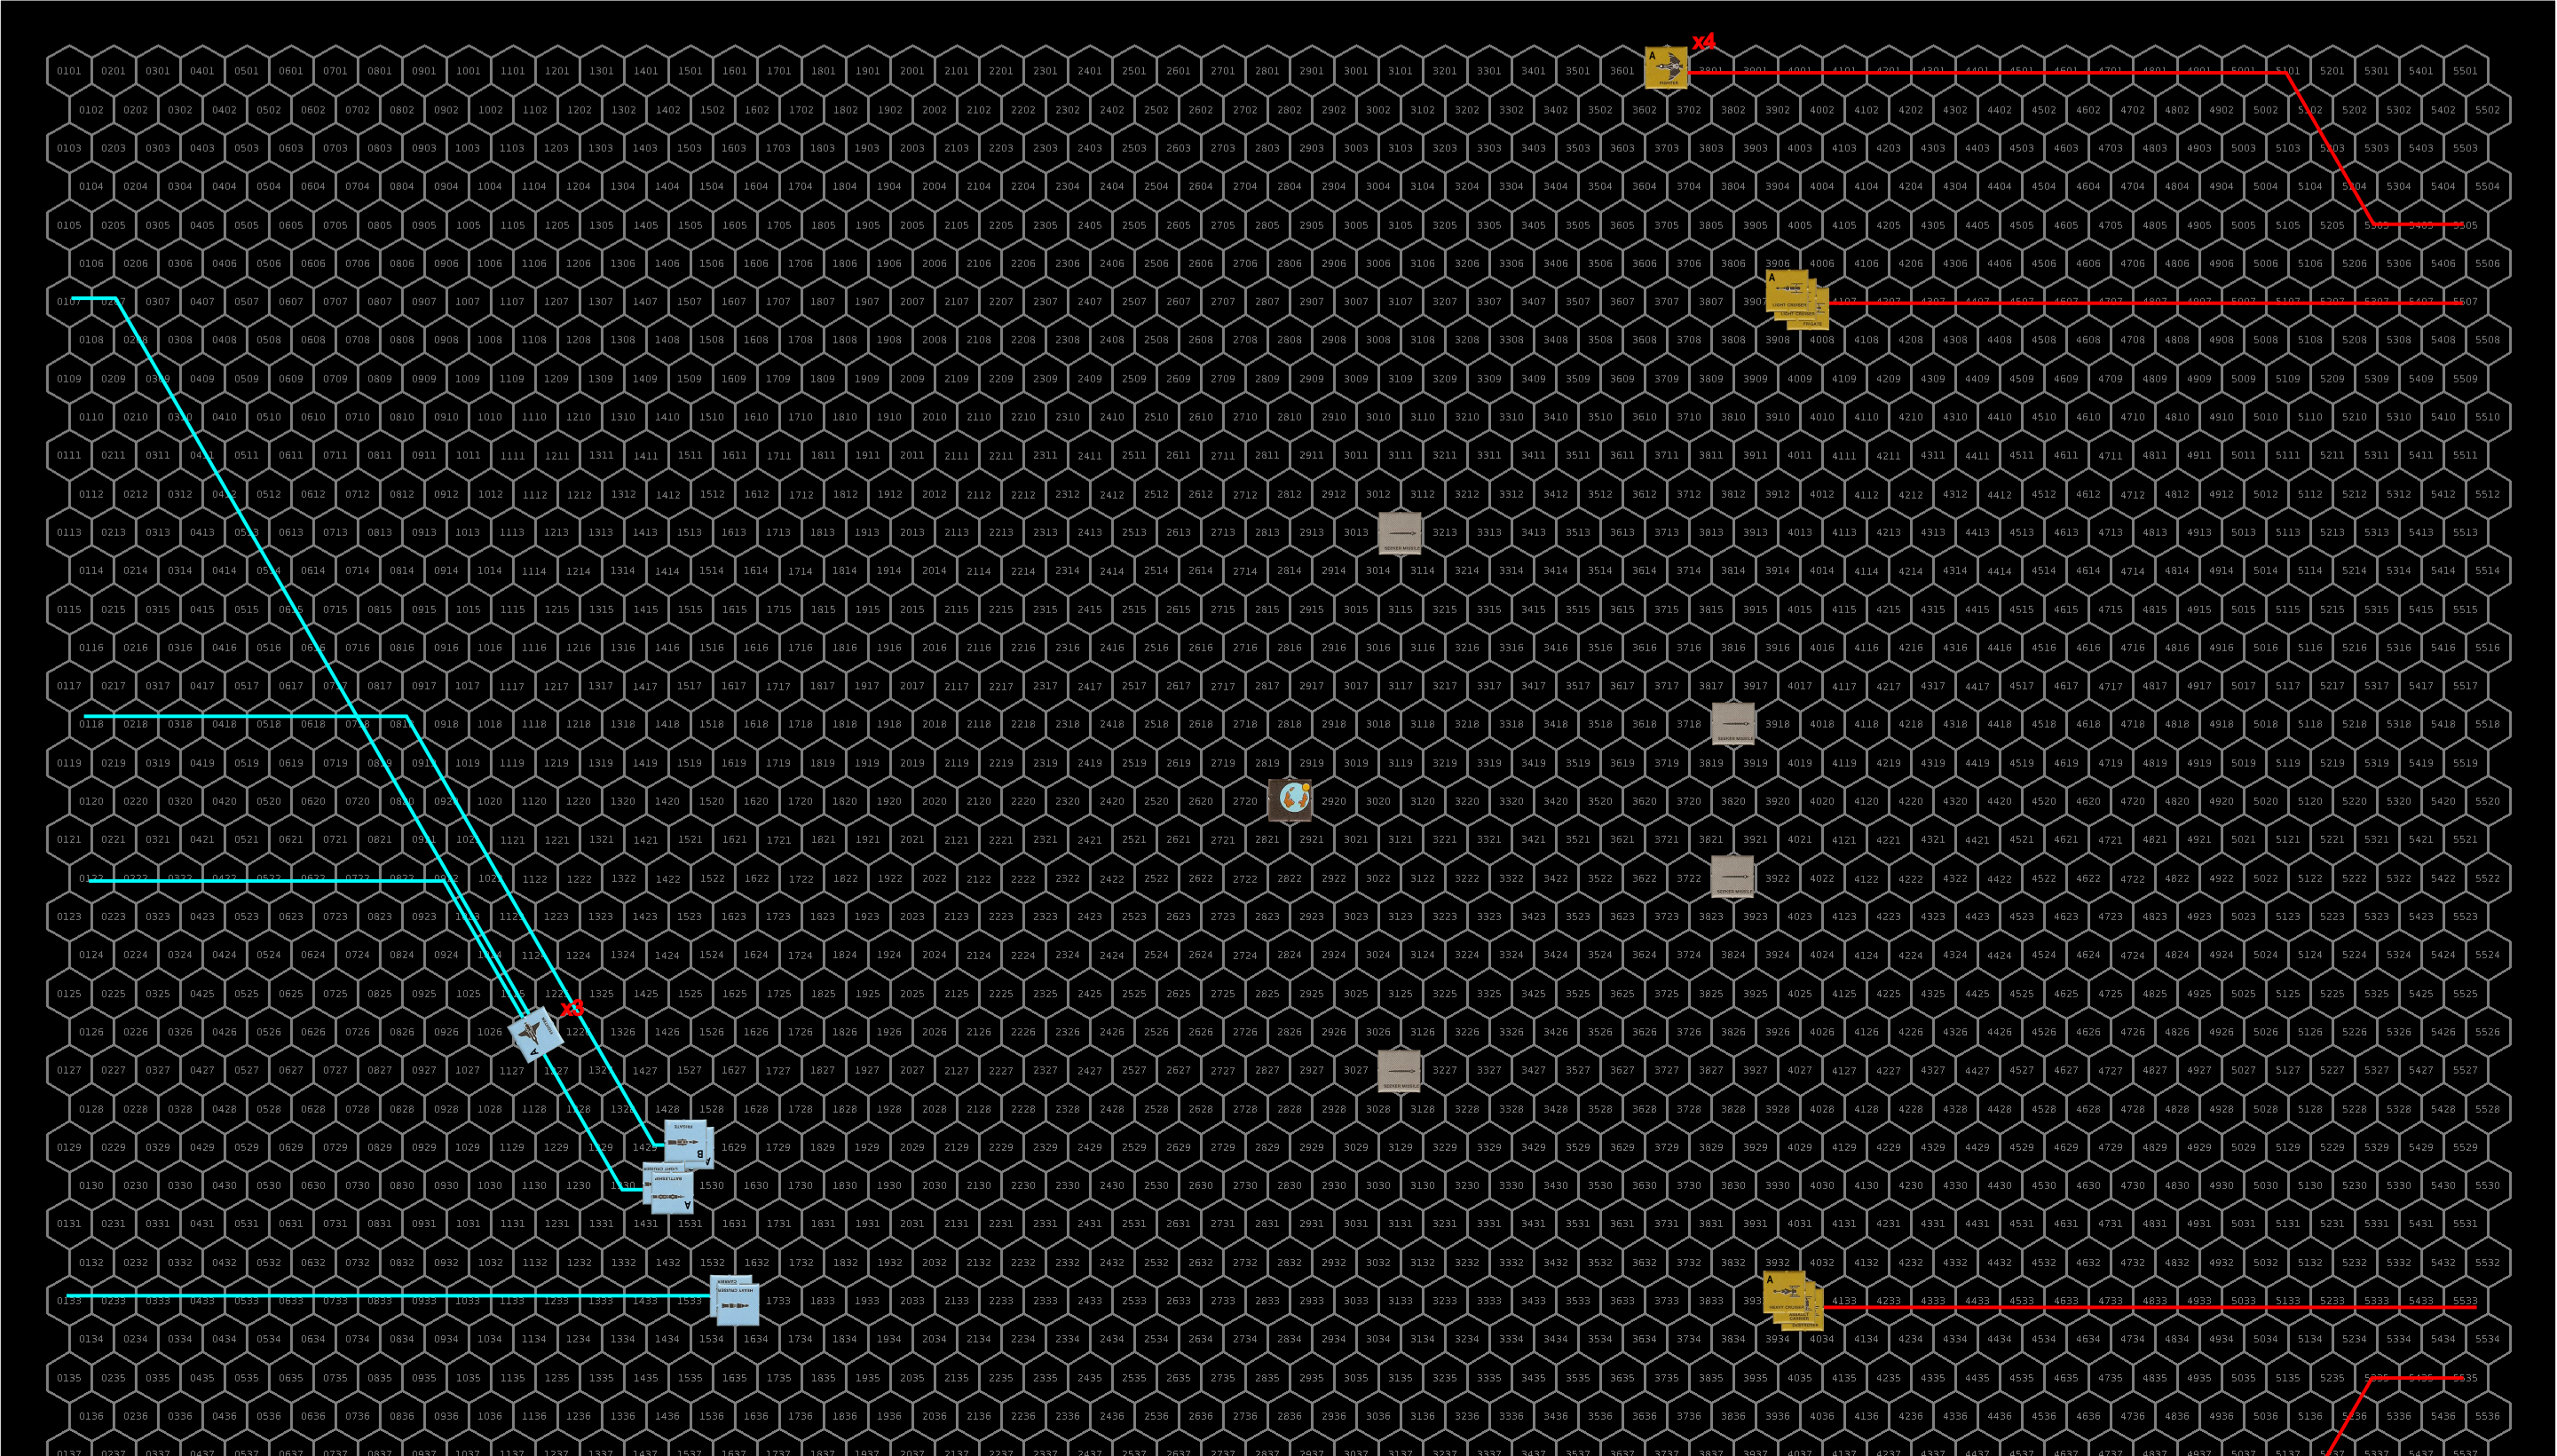
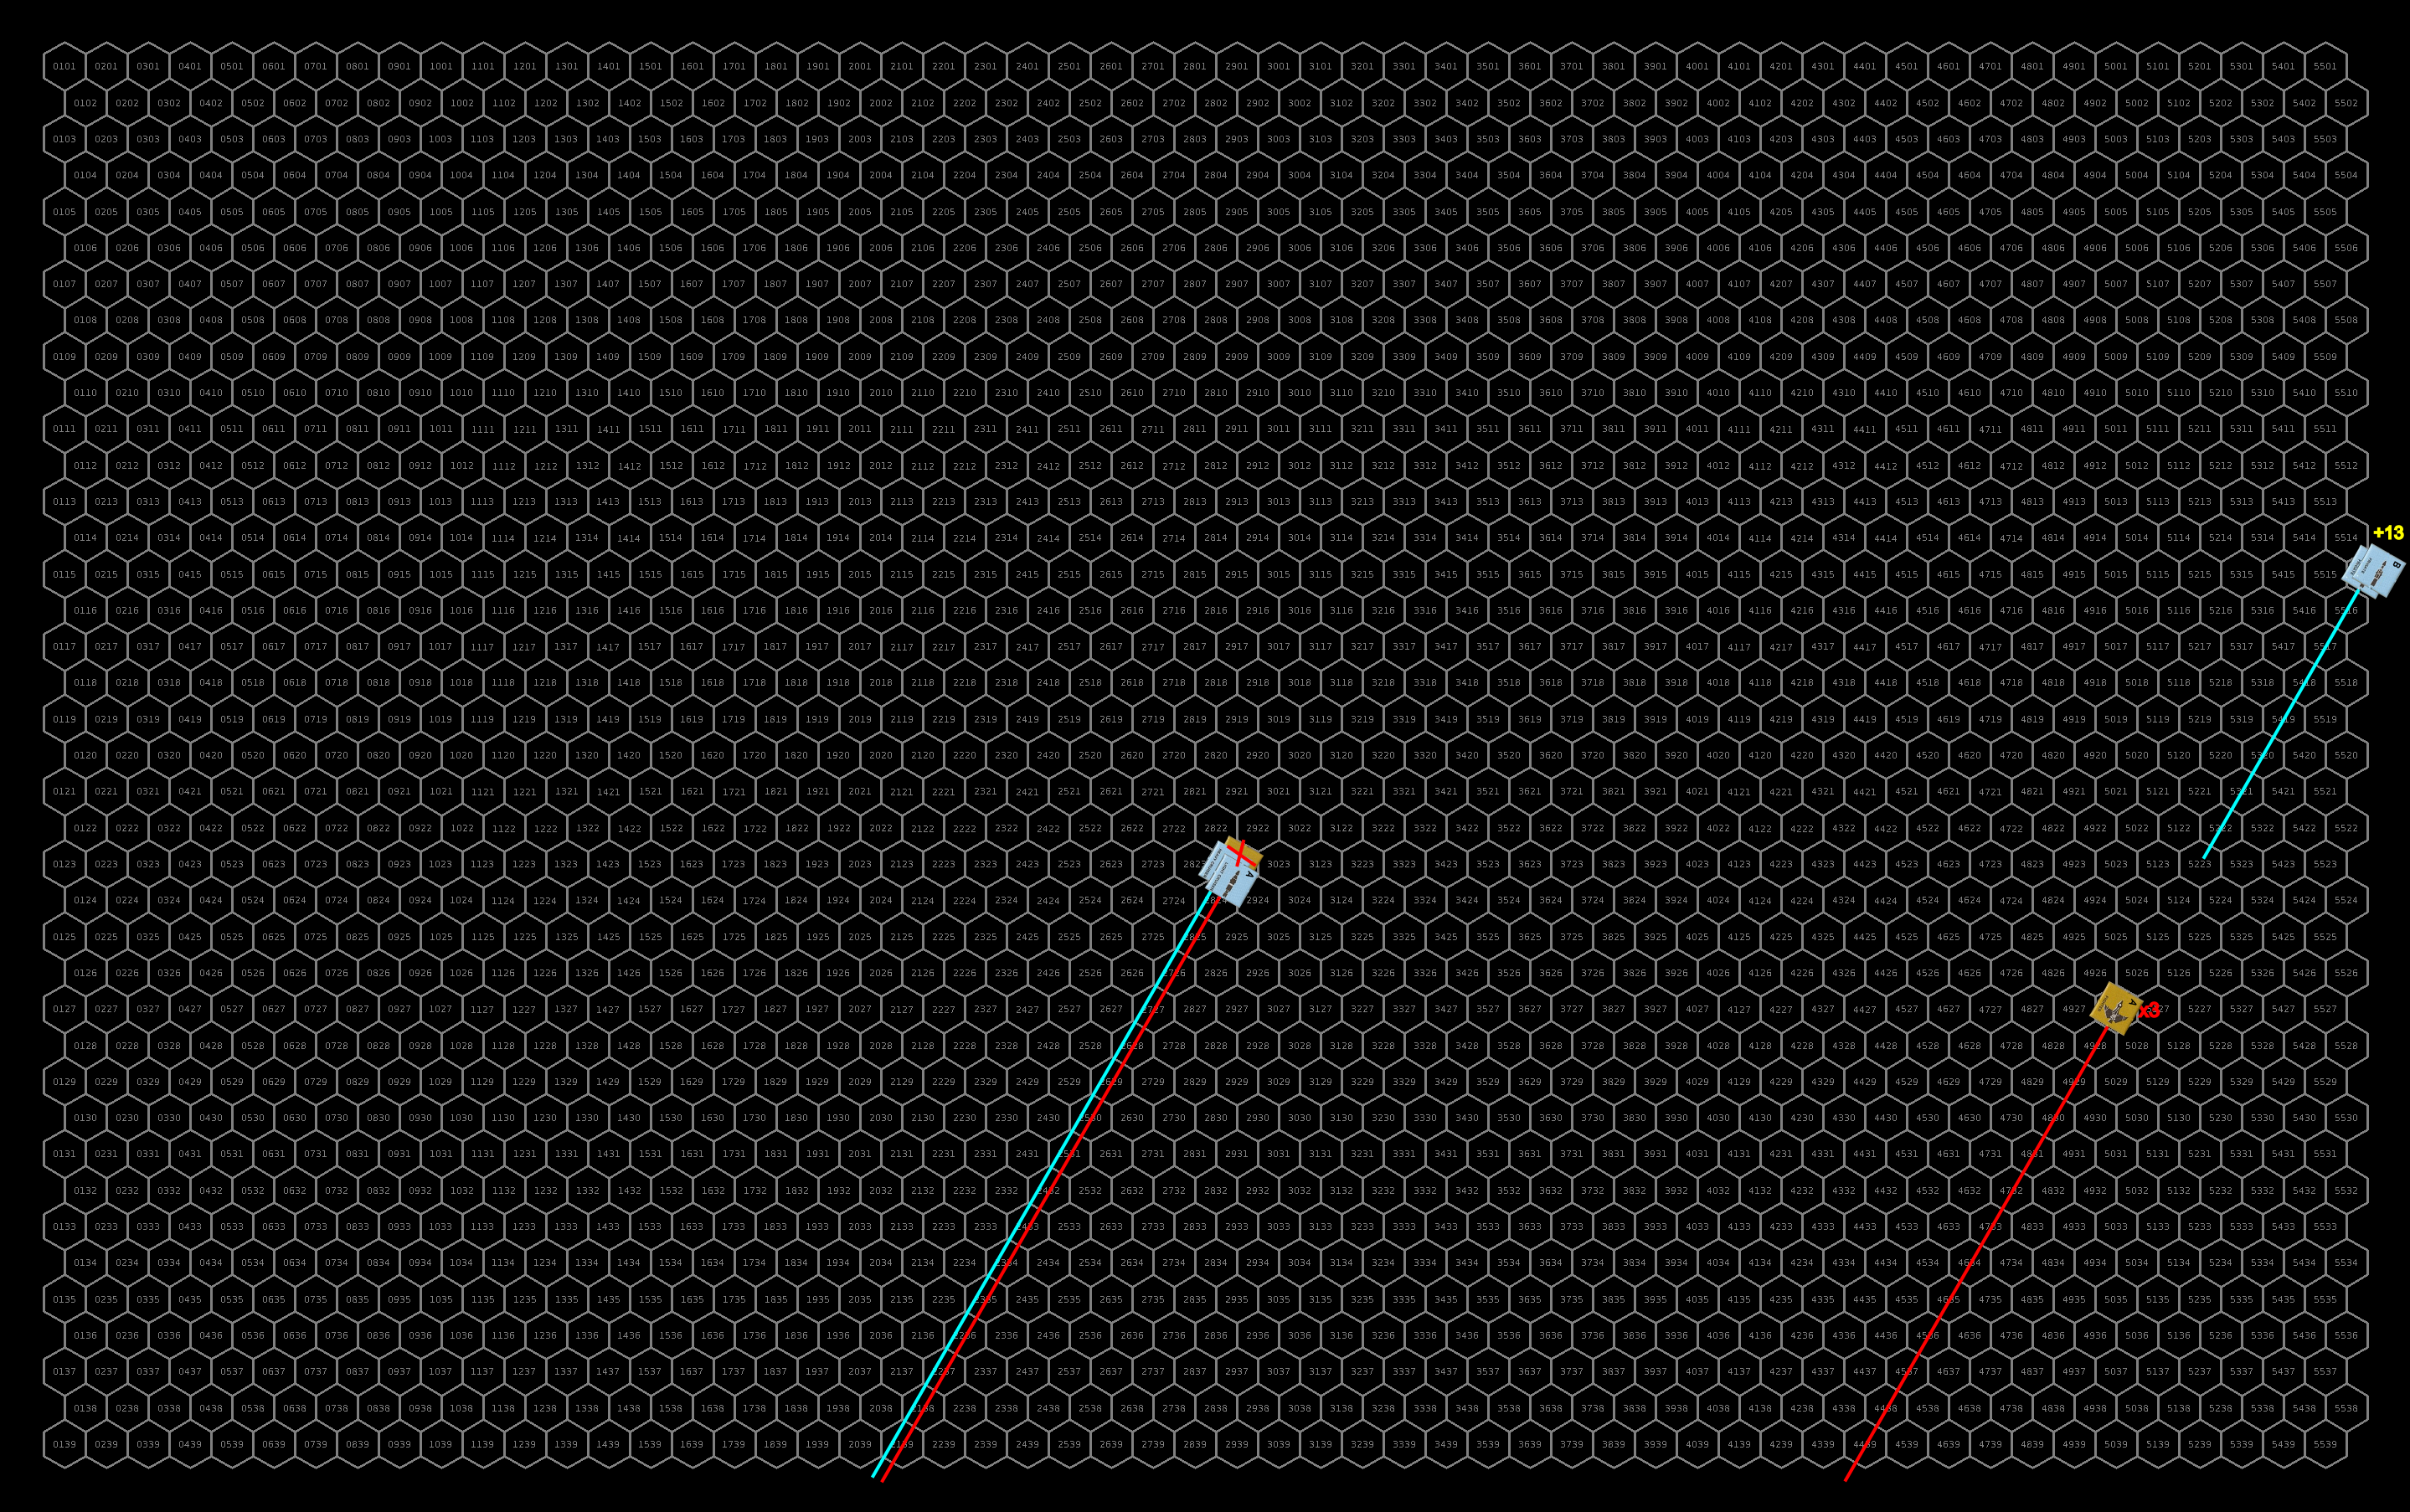
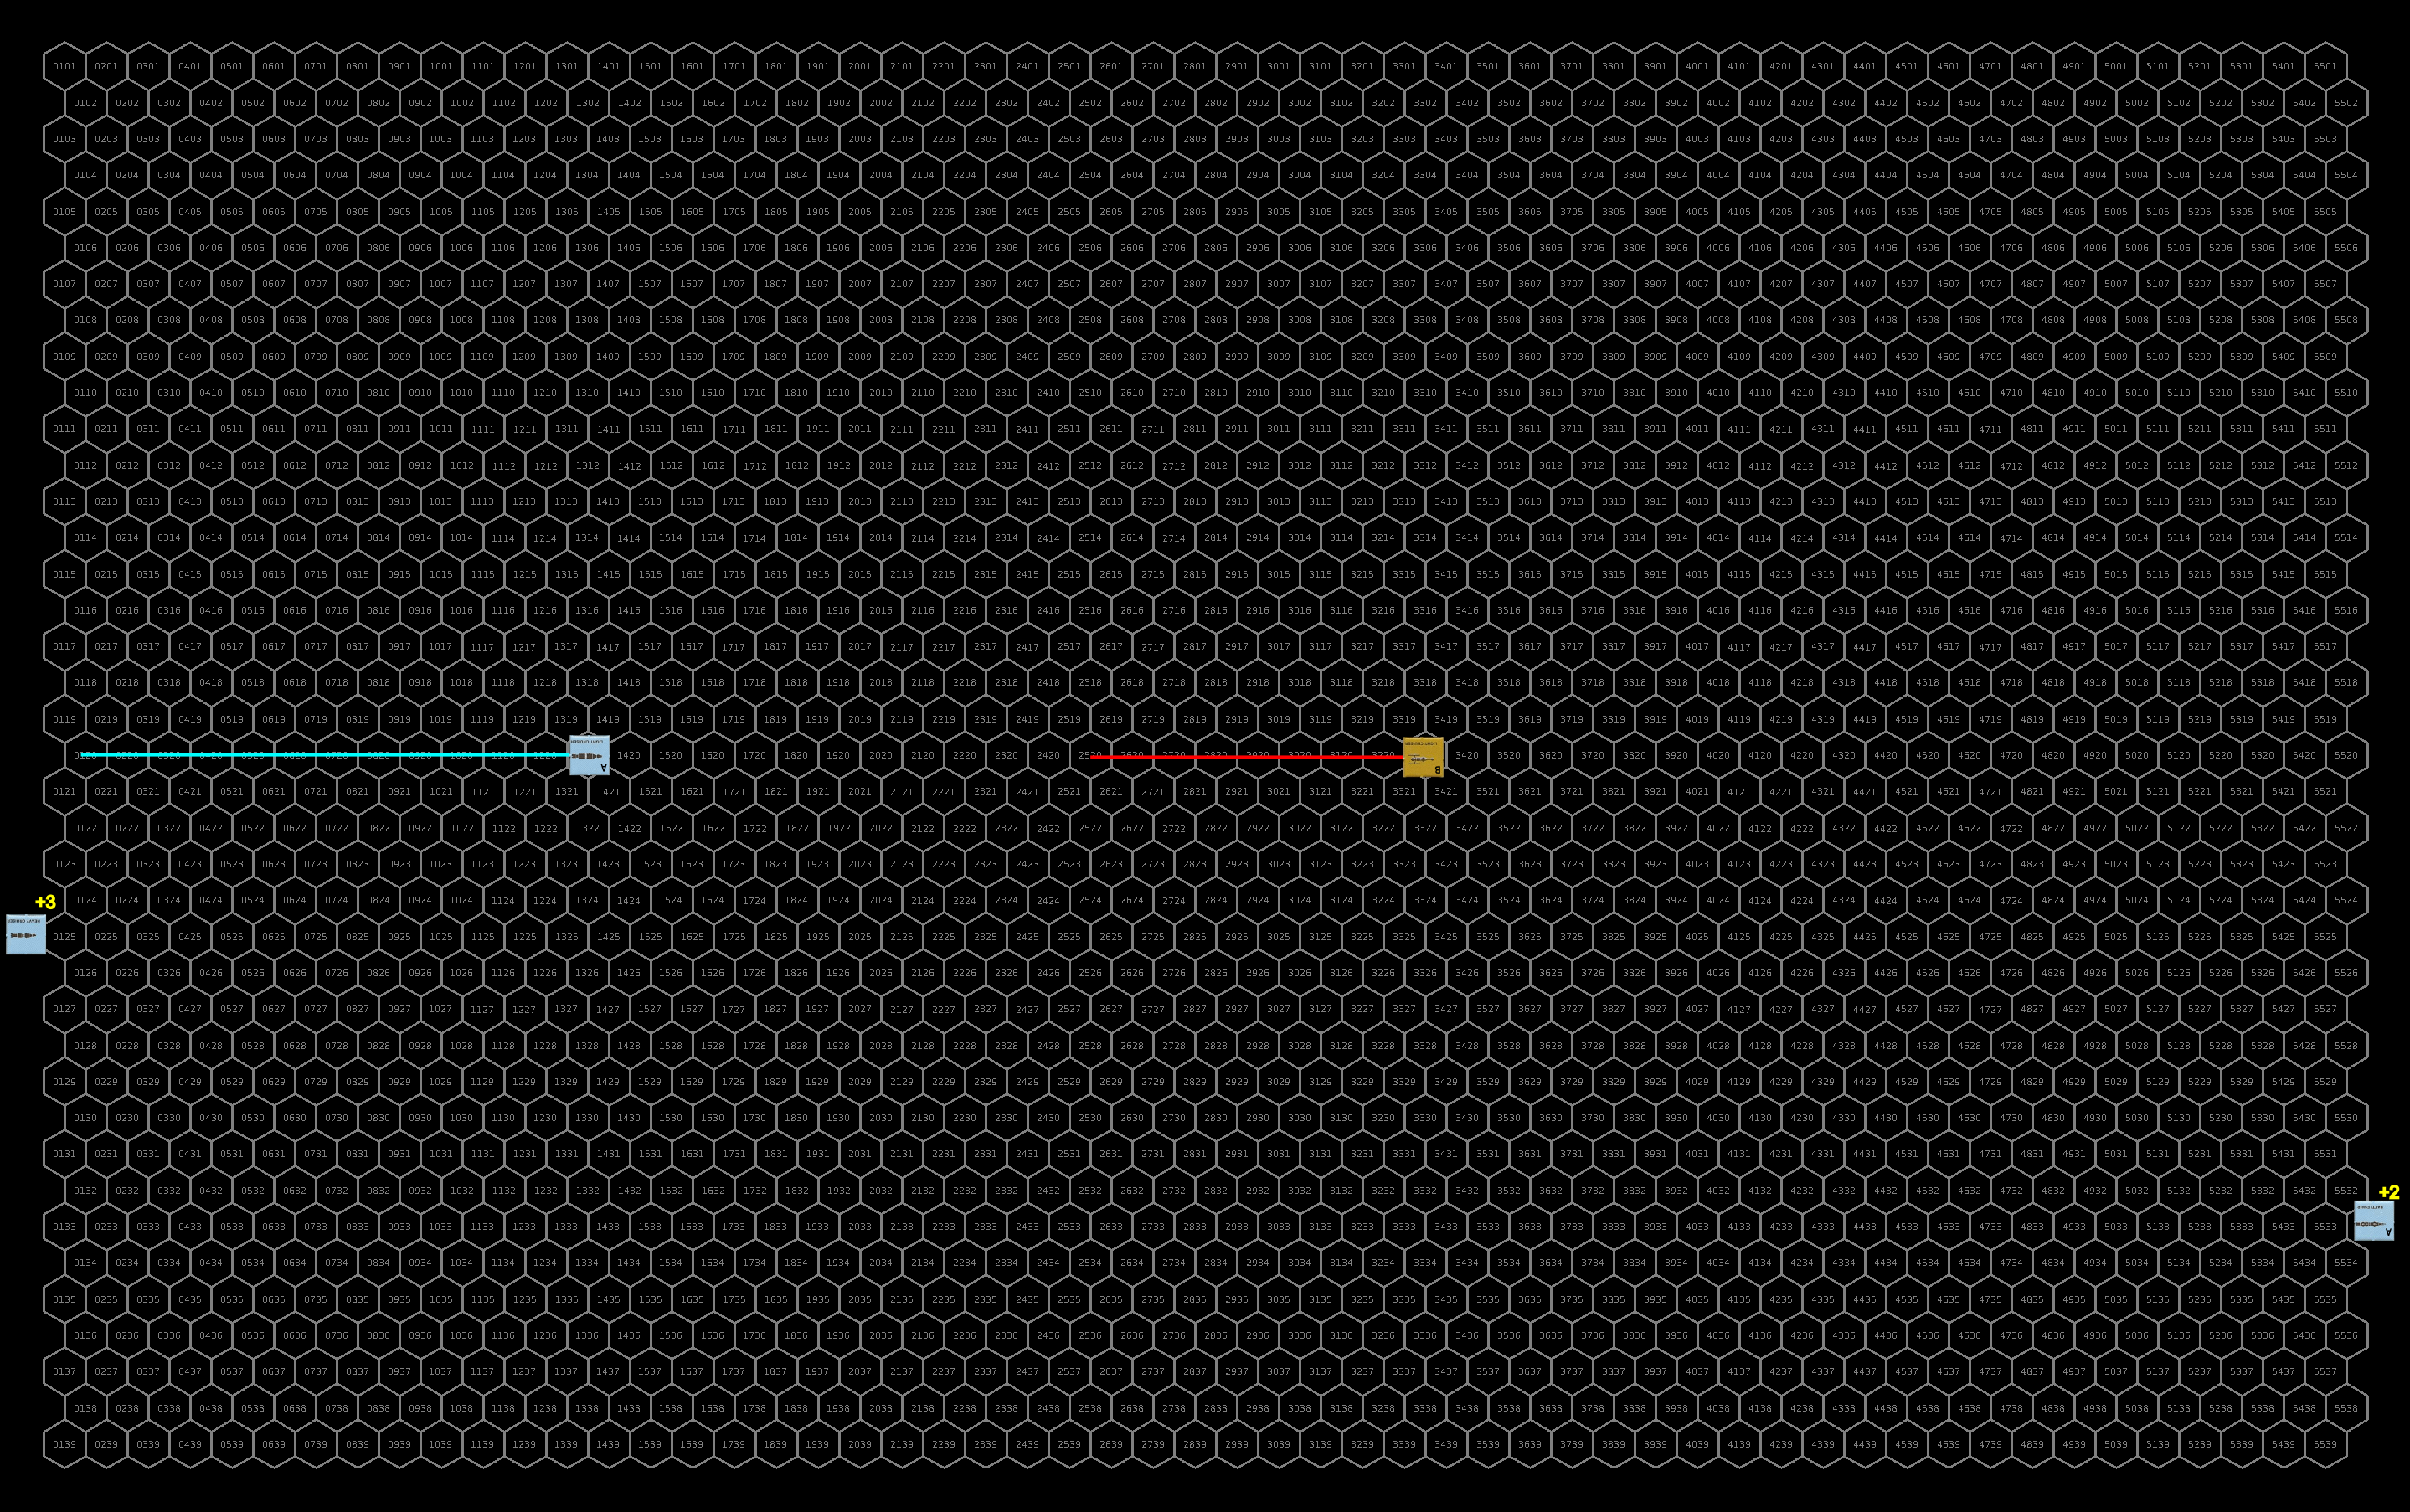
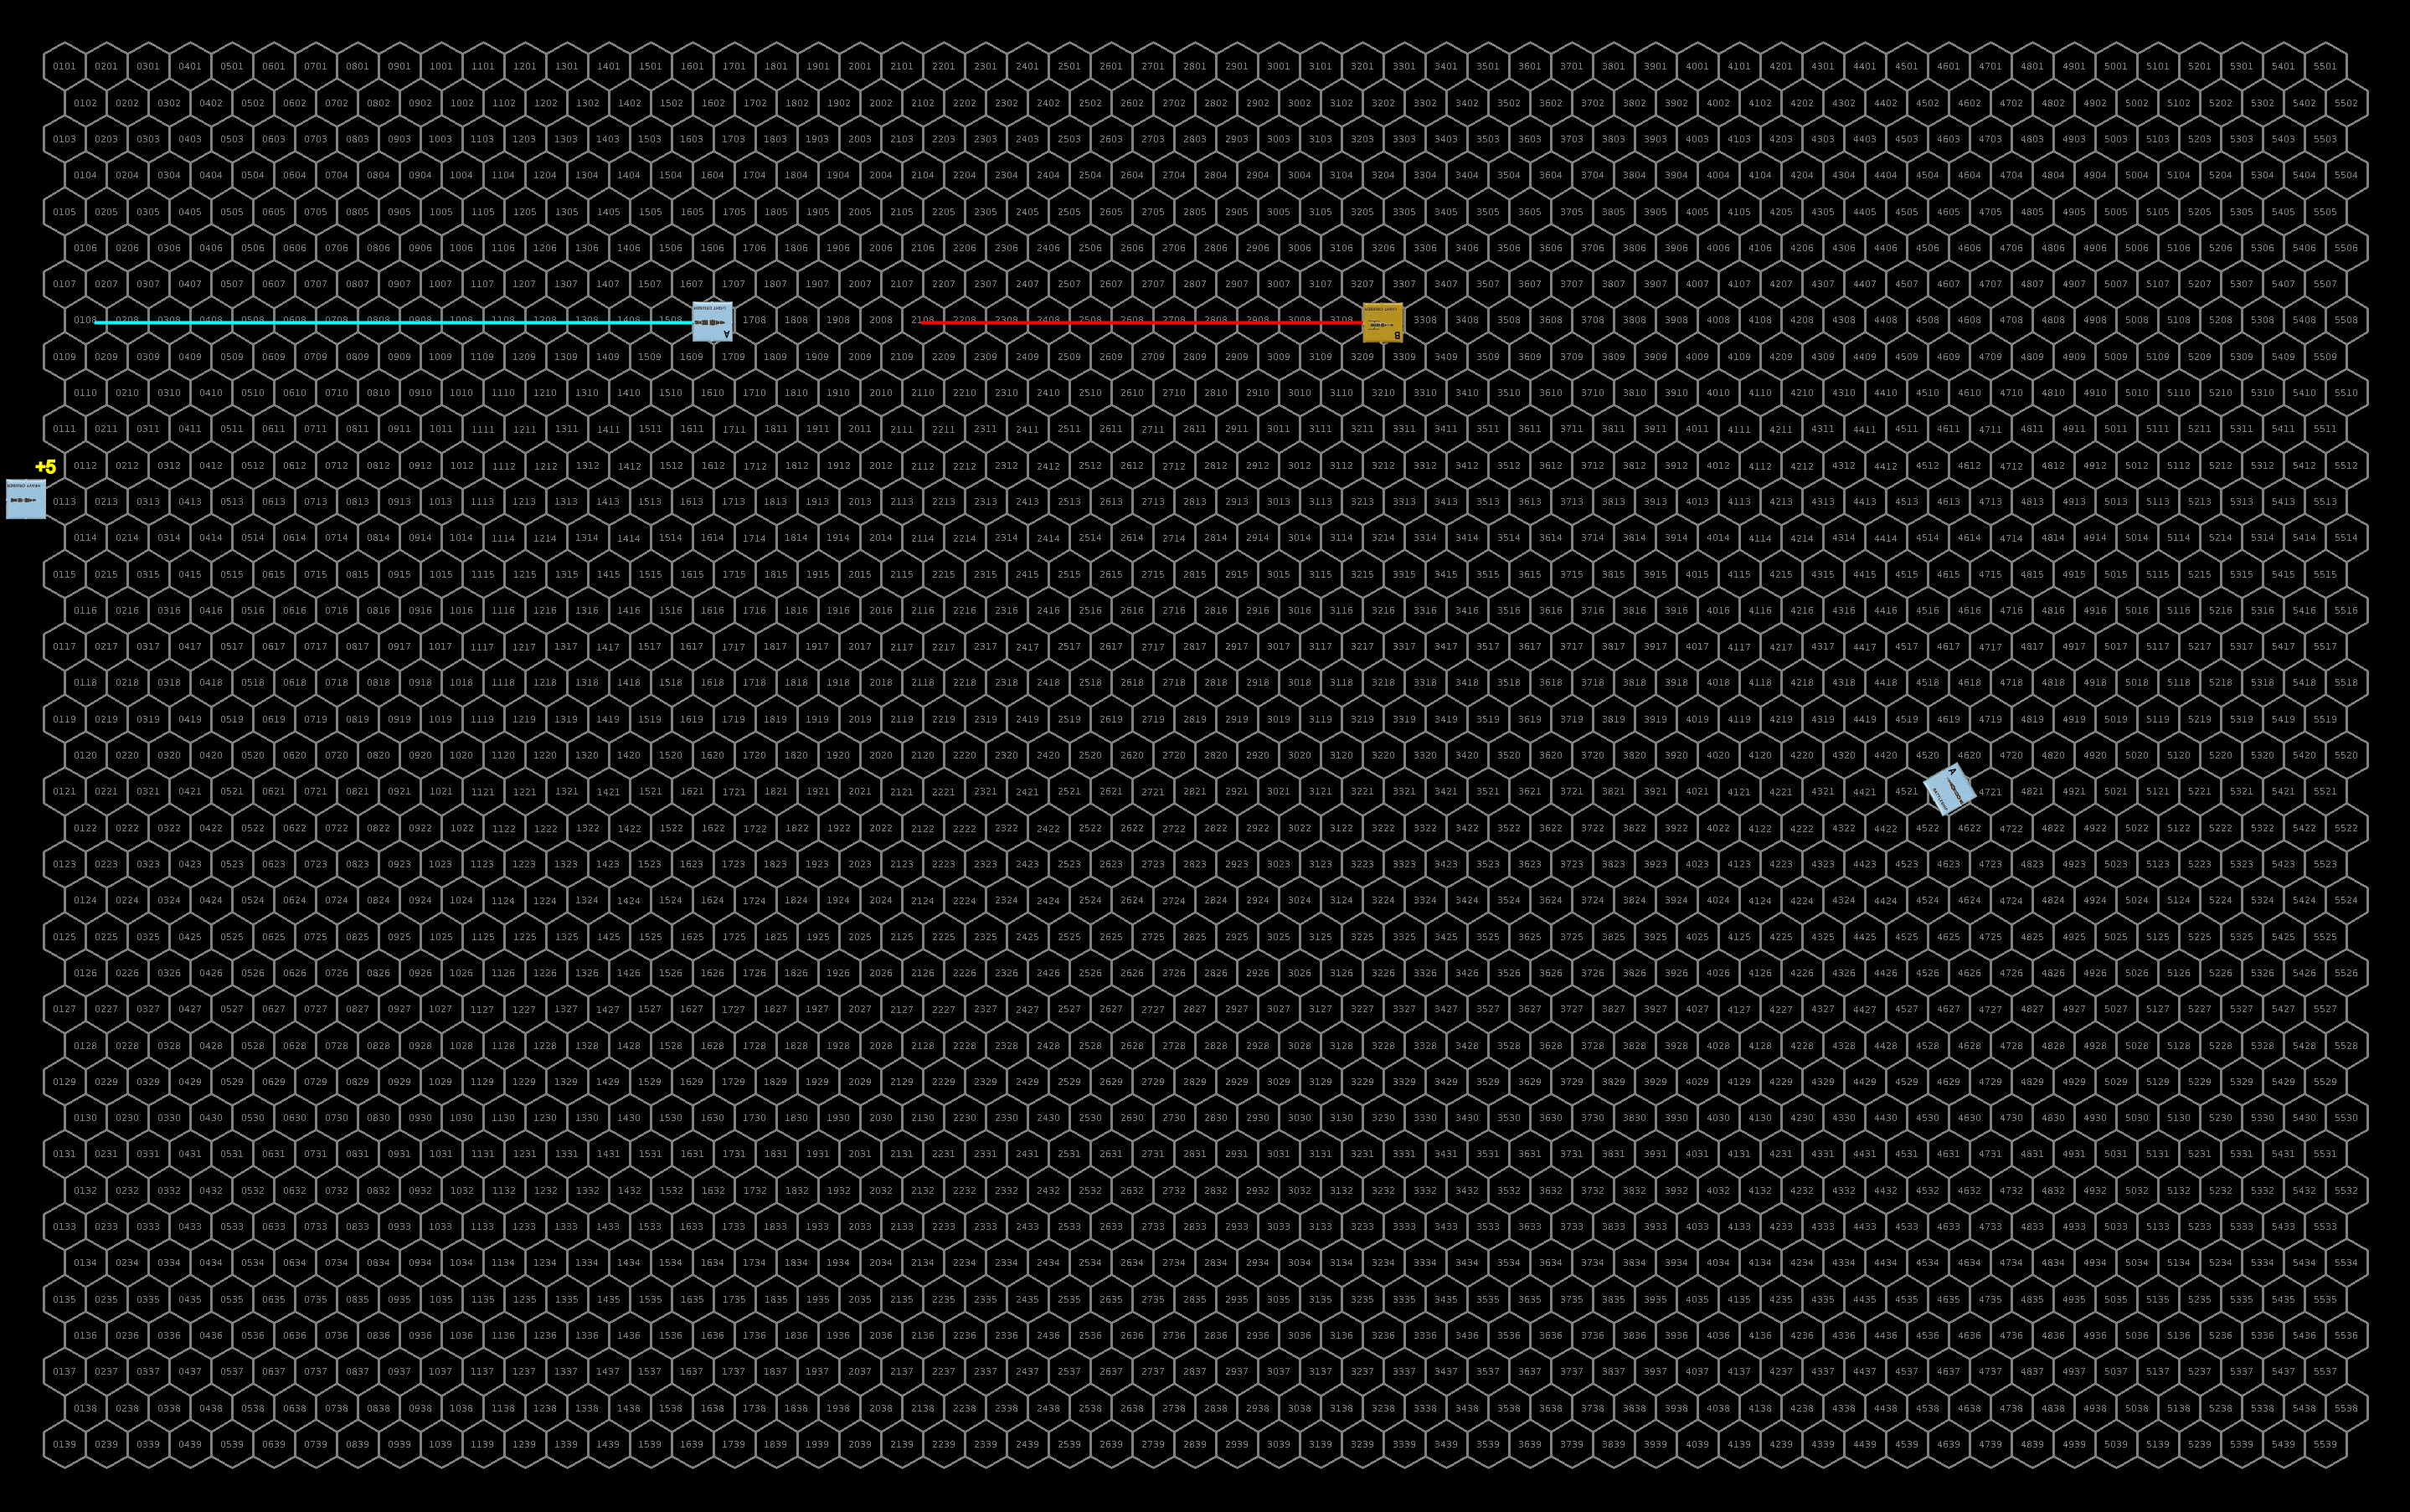
Upper half of the map. The yellow numbers indicate how many hexes off the map the ship is along the direction they were traveling. Click for larger image.Lower map. The top row of this map is the same as the bottom row of the upper map. Click for the full-size image.
Turn 3
The remaining sathar ships continue to flee the system but activate their remaining seeker missile that they left by the planet. Both the newly activated one and the one activated the previous turn fly at the armed station. Firing ICMs to try to avoid an impact, one of the missiles is intercepted but the other one hits the station reducing its hull integrity by 30% but not destroying it. With the sathar ships now quite far away and retreating, the UPF calls off the pursuit and begins looking for survivors from the starship construction center.
Repairs
The only damage on the surviving sathar ships are damaged assault rocket launchers on two of the fighters which are quickly repaired once they rejoin the assault carrier.
Damage to the UPF ships is only a little more extensive. The battleship quickly repairs its damaged engines and the militia frigate is able to get its laser cannon back online immediately as well. Over the next hour an a half it is able to get its hull back up to 75% integrity but then hits a snag that can only be repaired in a shipyard.
The fighter with the lightly damaged engines also gets that under control immediately can begin decelerating with the rest of the fighter group. It takes nearly an hour for the fighter with the completely knocked out engines to get some engine power back and many hours for it to slow down enough to dock with the carrier where it is completely repaired. After an hour and half of work, the fighter with the damaged maneuvering jets restores some control and begins to head back to the carrier where it arrives a few hours later and is completely repaired. The fighters with damages hull carefully make their way back to the carrier where they are fully repaired.
Unfortunately, the damage to the station from the seeker missile are such that it would take tools and equipment from the shipyard to repair. Those repairs will take some time to effect now that the shipyard has been destroyed.
Aftermath
The sathar lost more ships than they had planned on, losing 34.5% of their hull points that they came into the battle with, 2 fighters, a frigate, a light cruiser and 2 heavy cruisers (286 HP of ships). That said, they accomplished their primary goal of destroying the starship construction center.
The UPF “only” lost 14 fighters (72% of the ships) and a militia assault scout (for a total of 135 HP) but the loss of the shipyard is going to be significant. Additionally, it lost the ships that were in the shipyard including an assault scout that would have been completed the next day, two fighters, and a frigate and destroyer under construction. There were also three civilian ships in the shipyard, a HS 11 ship undergoing maintenance, and HS 10 and HS 11 ships that were under construction and scheduled to be completed in 38 and 76 days respectively.
The remaining six fighters are all assigned to Frontier Fighter Corps Squadron Delta. The assault carrier is detached from TF Cassidine and with the militia frigate heads toward Dramune. The frigate will enter the shipyard there while the carrier will head to Prenglar to pick up more fighters to round out FCC Squadron Delta and replenish its compliment with TF Cassidine. Also, one of the minelayers at Prenglar will be heading to Fromeltar.
The shipyard situation is more serious. Work will begin to build a new shipyard but it will be years before it is back at capacity. Additionally, with the loss of the shipyard here at Terledrom and the one at Hentz (Araks), the UPF is going to start arming the shipyards, adding defenses, and increasing security.
Given that the UPF know the route to one of the active sathar shipyards in OFS019, the remnant of this battle group is headed there for defense while the sathar continue to rebuild their forces.
Lessons Learned
When I first conceived this scenario, I thought the sathar would come in hot, swing by the planet, take out the shipyard and then fly out of the system. And that went just about perfectly as far as destruction of the shipyard went. They did 594 HP of out the 600 HP the shipyard had and left it with a fire that took out the last 6 HP. And that was despite rolling poorly for the damage from the torpedoes.
However, as I was setting things up, I realized that with the limited ADF of the sathar since they were staying together as a group, the small fast UPF ships would be able to boost to the same speed and intercept the sathar. So I set it up that way and the sathar took more damage than they expected. The downside was that the UPF was just barely able to intercept the sathar on the first round which meant that they had to stay close and be subject to offensive fire from the sathar instead of making a run and turning out to be farther away. They could have done that a little bit (2-4 hexes) but I didn’t have them do so as they are new pilots and I chalked it up to inexperience.
I was surprised at how close to exact the damage done to the shipyard was. Since the shipyard as designed didn’t have weapons or defenses, the only non-hull hits possible were the fire and DCR. Equipping the shipyards with weapons and defenses will help to increase their survivability since the damage will be spread around. But not by much.
The sathar could have possibly wiped out the remaining UPF forces completely if they had stayed in the system but that would have been a long drawn out battle as it would have taken them a long time to slow back down. The shipyard was their target so they took it out and left.
I mentioned in my July State of the Frontier post that I was working on putting together a way to generate star systems. This is a sample of the data you can expect to see for each system. This particular system isn’t tied to any specific system on the map but is more for demonstration purposes. This is also not the final formatting or colors, but rather the default colors from the programs. Once I figure out exactly what I want, I’ll update the code to make the output match. So let’s look at what we have.
System Data
First up is the system data. This is generated using a program called StarGen. It’s a bit old and doesn’t work exactly for the smallest or largest stars but it is good start for most of the more interesting systems that might have habitable planets. I also don’t think it takes into account much of the new exoplanet data but we’re making system for a science fiction game so that’s okay. I’ll probably tweak things as I go along.
This generates a lot of data for each planet including thinks like average, min, and max temperatures, orbital characteristics, rotational characteristics, atmospheric composition (if present) and more.
-243.6° C Earth temperature -438.5° F Earth temperature
Normal temperature range
Night
Day
-234.6° C -390.3° F
–
-224.5° C -372.1° F
Min
Max
-249.8° C -417.7° F
–
-209.6° C -345.2° F
Equatorial radius
5165.8 Km
0.81 Earth radii
Density
2.25 grams/cc
0.41 Earth densities
Eccentricity of orbit
0.030
Escape Velocity
5.8 Km/sec
Molecular weight retained
0.0 and above
H, H2, He, N, O, CH4, NH3, H2O…
Axial tilt
39°
Planetary albedo
0.15
Exospheric Temperature
0.95° K
-1272.05° C Earth temperature
Length of year
104035.23 Earth days
93990.83 Local days 284.83 Earth years
Length of day
26.56 hours
Boiling point of water
-53.4° Celcius -64.1° Fahrenheit
Hydrosphere percentage
0.0
Cloud cover percentage
0.0
Ice cover percentage
0.1
There is an alternate output for the system view at the top. Instead of the images, it can make a simple system diagram that looks like this:
This shows the relative positions of the planets on a log scale as well as the range of their orbits (the gray bars) based on the generated eccentricities. The blue bar is the habitable zone for the system and the numbers above the gray bars are the masses of the planets in Earth masses. I’m leaning toward using this one. What do you think?
Planetary Maps
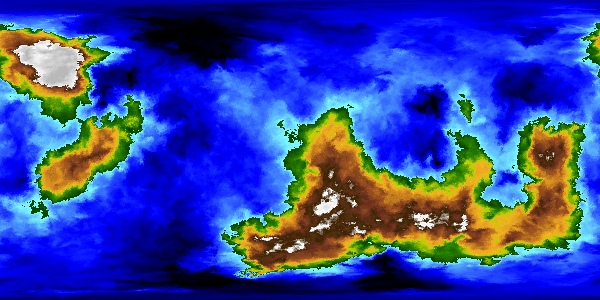
For each system, I want to do planetary maps for at least the habitable planets and possibly some of the ones classified as Venusian, Martian, Water, or Ice by StarGen. I haven’t found a program that will make good maps of the airless worlds (putting craters everywhere).
I also haven’t found a program that I’m completely happy with as far as generating the maps go. I have two that each do a bit of what I like.
Worldbuilder
The first is a program called Worldbuilder. It creates the world using plate tectonics it figure out mountain ranges, subduction zones, and the like and then has an atmospheric circuation model to figure out rainfall and temperatures and such. I like all that. It also can do a lot of different map projections, including on a globe and allow you to zoom in on any part of the map. Strangely, it only does a hex grid across the map and not lattitude and longitude lines.
It has a lot of knobs you can turn to adjust things like the water percentage, heat level, number of techtonic plates, and so on. And it does ice caps quite nicely.
One of the major downsides is that it is not supported anymore and the last development on it was in 2015. And while I have the code, it is in Lua, a languate I know nothing about so its a bit hard to read and edit. Another issue is that there is no key that I have been able to find to explain the colorings on the various maps (temperature, elevation, biomes). I’m sure its in the code but I’m still trying to figure it out.
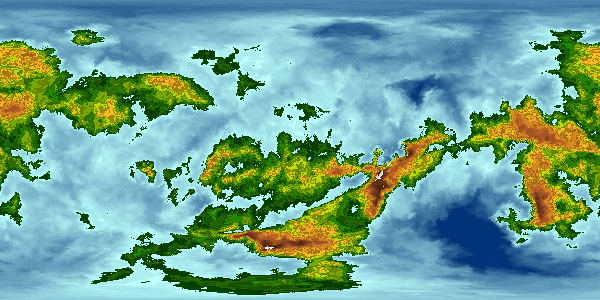
Here are some maps for a sample world from that system. You might recognize the map style from other maps I’ve posted on the blog for locations and adventures on Pale. I used this program to generate the planetary map I used for that.
Globe view with the biomes selected
Biomes map
Elevation map
Tempurature map
And just for fun the tectonic plates.
I really like the way this program generates the worlds, I just wish there was a little more documentation on what the program knobs do, and a key to the maps. In looking at the code, the biomes seem to be fairly generic: ice, water, rock, sand, etc.
Planet Map Generator
The other program is just called Planet, although the web page calls it Planet Map Generator. This one doesn’t have as many things you can adjust in the planet generation and just make maps based on an algorithm that generates the elevations on the map. The maps can look very fractally or smoother depending on the coloring scheme you use. It is a fractal generation method so you can zoom in as much as you want and it has some projections that I like that Worldbuilder including an icosohedral projection that is great for gaming.
You can tweak the water level and colors used but not much else. Addtionally, the developer also just added biome generation based on a simple air flow and rain model for given terrains. And the biome list has 11 different biomes, so that is nice.
Here are a few maps from that program. These are all elevation maps.
The default color scheme. I don’t like how jagged the elevation contours look with this scheme.
This is an alternate color scheme that I like a lot better as it makes things look smoother.
Same map as above but with biomes substituted for the elevation data. The oceans are a little intense on this one so it might be better to try a different color scheme for this.
Here’s the globe.
This is the Mollweide projection that I like as it shows the entire world but doesn’t distort the regions near the poles. Worldbuilder doesn’t have this projection (or any others like it).
Finally the icosahedral projection. This one is great becuase it is effectively equal area everywhere with minor distorations and works great for gaming by overlaying a hex grid on it.
I really like the look of these maps. The one thing it doesn’t do is show ice caps or really do any weather patterns.
Which to choose?
I want to be consistent so I probably need to choose one of the map programs over the other. While i love the look of the maps coming from the Planet Map Generator, it isn’t quite as versatile for creating different types of worlds with different characteristics and I’m leaning more toward the Worldbuilder program for that reason.
There is an interesting option. The Planetary Map builder does have the option to import a low resolution (24×12) map of symbols as a seed for it’s map generation. So if I take that sample elevation map from Worldbuilder and convert it into the format Planetary Map Builder needs for input, I get a map that looks like this (with the original map below it).
Some of the details are lost and the terrain is a bit different, the Planetary Map Builder tends to put the moutains in the middle of the contients while the Worldbuilder does it on tectonic boundaries.
I could also create the biome map in Planetary Map Builder.
So while I can make the nicer looking maps from the Worldbuilder seed maps, I don’t think I like the way that changes the terrain. So I’m leaning toward the Worldbuilder maps as I like the terrain features better. I just need to figure out how to color them like the Planetary Map Builder maps and get better biome information.
What I probably need to do is learn Lua and translate the Worldbuilder code into C/C++ and then merge it with the relevant code from Planetary Map Builder. But that’s a bit of work. We’ll see if I can find time. Until then, I think I’ll use the Worldbuilder maps as is. The nice thing is that it is reproduceable and if I do make code upgrades later, I can rerun the programs to produce the same worlds with upgraded maps.
Final Thoughts
I still haven’t decided how to format these or where to host them but that’s a small matter. I can always start as blog posts like this one and then move them somewhere later.
What do you think about the different maps and style? Which do you prefer? Share your thoughts in the comments below.
And if you like the things I’m working on and want to encource me to spend more time on it, consider supporting me on Patreon.
This was a busy month in the Frontier. The sathar probe into the Theseus system is intercepted and destroyed by the militia. The lost K’aken-Kar assault scout finally finds its way home and Spacefleet starts to get serious about locating the sathar routes into the Frontier and their starship construction centers. The UPF suffers a major blow to its production capabilities as saboteurs nearly completely destroy the Hentz (Araks) starship construction center. Finally, the HSS History’s Hope misjumps into an unplanned system and makes what might be a major yazirian cultural discovery.
Date (FY)
Events
62.038
Five fighters are completed at the CDC shipyards (Triad, Cassidine) and work begins on five more. Three of the fighters are immediately assigned to fill out FFC Squadron Eta while the other two are placed in storage.
62.039
The Second Battle of Theseus. The Theseus militia intercepts SFB-J2 and destroys, only suffering minimal damage.
62.040
– Jump calculations complete, the HSS History’s Hope begins the final accelerations and alignment for their next jump.
– Deceleration complete, SBF-A2 begins accelerating for the return jump to OFS203.
62.041
– Deceleration complete and with still no sign of sathar presence in the OFS020 system, PG Probe Alpha begins acceleration for a return jump to the Fromeltar system.
– The militia ships arrive back at Minotaur (Theseus) after the battle with the sathar and the damaged assault scout is immediately moved into the shipyard for repairs, bumping out a HS 5 ship undergoing maintenance.
– SG Alpha jumps into the Prenglar system. A ship carrying the new fighter pilot graduates boosts to meet up with carrier as work begins on calculations for the jump to Athor.
– A heavy cruiser is completed at SCC#5 (OFS19) and joins SBF-E2. The battle group, consisting of 2 C, 1 FF, 1 DD, 1 LC, & 2 HC depart for SCC#4 (OFS111).
– Three assault scouts are completed at the PGC shipyards (Gran Quivera, Prenglar) and join TF Prenglar. The shipyard space is released by Spacefleet back for pubic ship maintenance work.
62.042
The HSS History’s Hope successfully jumps into the new system which they are designation YS13. They begin deceleration an jump calculations for the return trip to YS12.
62.043
SBF-A2 is detected in the outer reaches of the Gruna Garu system but is too far away to be identified and just recorded as an unidentified vessel. Due to the on-going conflict, it is reported immediately to Spacefleet.
62.044
Two fighters completed at the Minotaur (Theseus) shipyards and join those manned by the militia under the direction of FFC Squadron Epsilon.
62.045
– After 13 days, the astrogator on the K’aken-Kar assault scout establishes that they are in FS33, the original destination for their first misjump. They begin work on calculations to jump back to their home system.
– SBF-A2 slips into the void but misjumps, overshooting its target and ending up in OFS198.
– Given the reports from the Gruna Garu system of unidentified vessels in the outer system, Spacefleet orders SG Alpha to deliver the fighters waiting at Hentz (Araks) to the Gruna Garu system.
62.046
– PG Probe Alpha slips into the Void but misjumps and doesn’t end up in the Fromeltar system. However, their comm systems light up almost immediately and they realize they have overshot their target and ended up in the Dramune system. They immediately begin decelerating and plotting a return jump to Fromeltar.
– SBF-A2 determines its location and begins plotting a jump back to OFS203.A light cruiser is completed at sathar SCC#4 (OFS111)
62.047
Starfleet puts out a Frontier-wide announcement looking for high level astrogators to participate in a high-paying, adventurous, but possibly dangerous classified project.
62.048
With CNE Group’s infrastructure rollout on Groth (Fromeltar) plagued by constant sabotage, the consortium brings in a large MercCo contingent as additional security and several investigative teams.
62.049
Despite the vagueness of the advertisement, Starfleet’s call for high level astrogators garners dozens of applicants in just two days. Screening of applicants begins immediately.
62.050
Three more pilots complete the accelerated training at Gollwin Academy. They are temporarily assigned to fighters at the Academy and start training with TF Prenglar while awaiting permanent assignment.
62.051
– The HSS History’s Hope misjumps and instead of ending up in YS12 are in an unknown system which they designate YS14. They begin immediately working on finding their position.
– The K’aken-Kar militia assault scout begins accelerating for the jump back to its home system.
– Four fighters are completed at the Hentz (Araks) shipyard and FFC Squadron Beta takes control of them and the other four fighters currently manned by the militia in preparation for the arrive of SG Alpha in a few days.
– Two fighters are completed at the Minotaur (Theseus) shipyards and join the partial squadron manned by the militia under the command of FFC Squadron Epsilon.
– SG Alpha jumps into the Araks system and begins deceleration towards Hentz to pick up the fighter stored there.
62.052
Sathar agents succeed in sabotaging the Hentz (Araks) starship construction center almost completely destroying it. Pieces of the SCC rain down on the planet. All ships in the center, including 4 civilian vessels, 2 assault scouts, & 4 fighters are destroyed. It will be years before the facility is back to full capacity.
62.053
In wake of the near total loss of the Hentz (Araks) SCC, Star Law launches an investigation into the Family of One’s management of the facility and their security measures. Security is tightened at all other SCCs.
62.054
– Sathar fleet TG1 jumps into the OFS138 system containing sathar SCC#3. It is joined by the frigate and heavy cruiser there and continues on toward OFS020.
– A destroyer is completed at sathar SCC#10 (OFS174).
– A HS:5 ship completes maintenance at the Minotaur (Theseus) SCC and the militia uses the space to begin construction of another frigate.
62.055
– After a full assessment of the damage to the Hentz (Araks) SCC, it is determined that existing center is effectively a total loss (98% damaged) and the decision is made to build a completely new structure. The limited capacity of the surviving center is dedicated to that work.
– SG Alpha arrives at the Hentz station and the eight pilots take control of their fighters and begin loading them onto the assault carrier for transport to Gruna Garu.
62.056
– The K’aken-Kar militia assault scout successfully jumps back into the K’aken-Kar system and begins decelerating toward home. All data from its travel are immediately transmitted to Spacefleet.
– With the fighters loaded, SG Alpha departs for Gruna Garu.
– The crew of the HSS History’s Hope detects a faint, intermittent radio signal emanating from somewhere in the YS14 system. While the astrogators continue to work on locating their position, other crew work on finding the source of the signal and understanding it.
62.057
– SBF-E2 arrives at SCC#4 (OFS111). The AC, LC, and 8 fighters are attached to the battle fleet and preparations are made for them to join TG1 in OFS020.
– An assault scout is completed at the PGC shipyards (Gran Quivera, Prenglar) and joins TF Prenglar.
62.058
– A heavy cruiser is completed at sathar SCC#10 (OFS174). Together with the destroyer completed four days earlier, they are designated TG2, and immediately departs for SCC#1 (OFS203).
– Three assault scouts are completed at the CDC shipyards (Triad, Cassidine). Designated Shuttle Group Beta, they depart immediately for Prenglar.
– Five fighters are completed at the PGC shipyards (Gran Quivera, Prenglar) and are transferred to Gollwin Academy.
62.059
PG Probe Alpha arrives back at Terledrom (Fromeltar). Two high level astrogators from TF Cassidine are transferred to the ships of PG Probe Alpha and it sets out once again to OFS020 to try to chart the jump back.
62.060
– SBF-A2 successfully arrives back at sathar SCC#1 (OFS203).
– The astrogators on the HSS History’s Hope identify their location as a system 9 light years from YS12 and begin plotting a jump back to the YS12 system.
– A Spacefleet destroyer is completed at the Minotaur (Theseus) shipyards. It departs to joint PG Vigilant in the K’sta-Kar system.
62.061
– With the screening of the initial astrogator candidates complete, Spacefleet organizes three new patrol groups, Probe Beta, Gamma, & Delta, each consisting of two assault scouts (drawn from TF Prenglar) with a level six astrogator on board.
– After a final briefing, the newly formed patrol groups are dispatched to try to discover the jump routes the sathar are using to enter the Frontier.
62.062
With more resources available now that their position has been determined, the crew of the HSS History’s Hope localizes the source of the mysterious signal to a planet in the inter system. It appears to be a FM radio signal and work begins on decoding it.
62.063
Security for CNE Group on Groth capture saboteurs attempting to disrupt their infrastructure rollout. As suspected the saboteurs were hired by the Groth Energy Corporation.
62.064
PG Probe Alpha jumps into the OFS020 system and immediately begins deceleration and jump calculations for the return to Fromeltar.
62.065
– Jump calculations complete, the HSS History’s Hope begins acceleration for the jump back to YS12.
– SBF-E2 departs sathar SCC#4 (OFS111) for a jump into the OFS020 system to join up with TG1.
– SG Alpha arrives at Hargut (Gruna Garu) delivering the fighters from Hentz which are formed into FFC Squadron Theta. The assault carrier departs to return to Prenglar.
62.066
– The crew of the HSS History’s Hope finally have a breakthrough on the signals from the inner system of YS14. To their surprise, it is a garbled mayday message in a very old Yazirian dialect.
– The old yazirian mayday identifies the ship as the Yazirian Ark Ship (YAS) Royal Cloud. The HSS History’s Hope immediately aborts the jump back to YS12 and starts heading to the inner system.
62.067
– Now 500 days since hatching, the Eorna young are still growing and thriving. The problems seem to have been all with the rogue Eorna and a new batch of eggs are prepared for hatching and plans begin to accelerate the population growth program.
– An assault scout is complete at the Outer Reach (Dramune) shipyard and departs for Morgaine’s World (Prenglar) to join TF Prenglar.
– All attempts at communication with the YAS Royal Cloud by the crew of the HSS History’s Hope receive no response.
62.068
– SG Beta arrives at Gollwin Academy and joins up with TF Prenglar, replacing several of the assault scouts that departed as part of the new patrol groups.
– The replacement destroyer for the Inner Reach (Dramune) militia is completed at the Outer Reach shipyards and departs across the system to Inner Reach. Outer Reach begins construction of a destroyer for themselves.
– Five more fighters and an assault scout are completed at the CDC (Cassidine, Triad) shipyards. The fighters are temporarily attached to FCC Squadron Eta while the assault scouts depart to join PG Vigilant.
This month both sides of the conflict are probing for new routes into enemy space with the Sathar looking for routes to Theseus and Gruna Garu and the UPF probing outward from Fromeltar. The lost militia scout begins to find its way home and the HSS History’s Hope continues its journey.
Both sides continue to build up their forces and the Sathar start a major reshuffling of their ships in preparation for a major change in tactics. The sathar continue with sabotage efforts around the Frontier. This month also sees the events of SF4: Mission to Alcazzar play out.
Date (FY)
Events
62.008
– The militia assault scout coming from Theseus arrives back at Pale station. The crew is debriefed, and the ship immediately begins duties.
– SG Alpha arrives at Gollwin Academy to pick up a shipment of fighters to be delivered to K’sta-Kar.
– Five fighters are completed at the Triad (Cassidine) SCC and work begins on five more.
62.009
After loading 8 fighters at Gollwin Academy, SG Alpha departs for K’sta-Kar.
62.010
– PG Liberty does not detect the return of SBF-J2 until they are nearly back to Snowball being tipped off my some of their Mhemne contacts. They radio the news of the fleet’s return back to Spacefleet.
– Construction is competed at the Minotaur (Theseus) shipyard of a HS: 7 civilian freighter. This is the first civilian ship competed since the beginning of the conflict. It was started before the conflict began.
62.011
– Arriving back at Snowball (Liberty) SBF-J2 spends a day replenishing supplies before heading back out of the system to complete charting the route to Theseus.
– Eight Academy pilots arrive at Theseus and take control of the waiting fighters. They form FFC Squadron Epsilon.
62.012
Jump calculations for the next leg complete, the HSS History’s Hope begins accelerating toward Void speed.
62.013
An assault scout is completed in the PGC (Gran Quivera, Prenglar) shipyards and joins TF Prenglar. Work begins on another assault scout.
62.014
– Two UPF assault scouts are completed at the CDC (Triad, Cassidine) shipyards. They are designated Patrol Group Probe Alpha and depart for the Fromeltar system to explore outward an attempt to find the sathar route into that system. Work begins on two more assault scouts.
– Two fighters are completed at the Minotaur (Theseus) station. One rounds out FFC Squadron Epsilon bringing it up to full strength and the other is manned by the militia supporting the FFC. Work begins on two more fighters.
– The CDC team arrives on Alcazzar. Within minutes of their landing, their transport, the Nightrunner, is attacked and forced to flee the system, stranding them on the planet. (SF4)
62.015
– After securing the CDC compound on Alcazzar, the strike team realizes that their only option for off-world communication will be at the Streel compound about 120 km away. As they prepare to depart, they are attacked by an aircar with Streel markings. (SF4)
– A UPF light cruiser, part of Task Force Meteor, is completed at the CDC shipyards (Triad, Cassidine). It departs immediately to join up with TF Cassidine in the Fromeltar system. Work is started on another light cruiser.
– After a day of travel over rugged terrain, and several encounters with the mega-fauna of Alcazzar, the CDC set up camp for the night. (SF4)
62.016
– As the CDC team sets out to continue its journey to the Streel compound, they are attacked by a large armed force of Streel vehicles. After an intense battle, the Streel forces are destroyed but the CDC team is down to a single vehicle. (SF4)
– The HSS History’s Hope successfully make the jump into the system they are now designating YS12. They begin deceleration and start calculations for the return jump to YS11.
– Entering the forest east of the Streel compound, the CDC explorer is bombarded by fruit pits from unseen assailants for a few seconds before the bombardment ends with chittering echoing through the forest. (SF4)
– A few hours after the fruit pit bombardment, the CDC team’s path is blocked by six individuals that they recognize as members of the planet’s sentient species. Recognizing the opportunity for allies against Streel, the team attempts to communicated with the natives. (SF4)
62.017
– Having established friendly relations with the natives of Alcazzar, the CDC team works with the natives to plan an attack on the Streel compound where over a hundred of the natives are being held and used as slave labor. (SF4)
– After nearly 70 days, the astrogator on the K’aken-Kar militia assault scout finally determines the ship’s location and discovers that they are well outside the Frontier. They begin plotting a jump to OFS167 to start the trek home.
62.018
An unauthorized aircar attempts to approach Spacefleet headquarters on Morgaine’s World. Refusing to divert, it is engaged and shot down but detonates upon impact causing considerable damage and several civilian casualties. The driver is incinerated in the blast.
62.019
With jump calculations about halfway done, the crew of the K’aken-Kar militia assault scout begin accelerating toward jump speed for the jump to OFS167, 5 light years away.
62.020
– After 3 days of planning and resting, the CDC team, together with the Alcazzar natives, launch an attack on the Streel mining compound. (SF4)
– The attacking CDC team manages to fuse the reactor of the Streel compound and get a message to the Nightrunner to pick them up back at the CDC compound in ten days. (SF4)
– Nine more pilots graduate from the accelerated training program. Eight depart for Triad (Cassidine) while the remaining pilot joins Task Force Prenglar.
62.021
– Deceleration into YS12 complete, the HSS History’s Hope begins accelerating for it’s jump back to YS11 while jump calculation continue.
– Four fighters are completed at the Hentz (Araks) shipyards. They are temporarily crewed by militia pilots under the supervision of PG Tranquility. Work begins on four more.
– Two fighters are completed at the Minotaur (Theseus) shipyards and work begins on two more.
62.022
A cutter is completed at sathar SCC#5 (OFS19)
62.023
An attempt is made to sabotage the starship construction center at Rupert’s Hole (Cassidine) but is thwarted by security personnel. The saboteur, a human, kills himself before he can be captured.
62.024
– SBF-J2 arrives in the Padda system and begins working on jump calculations to chart a route to the Theseus system.
– The K’aken-Kar militia assault scout successfully jumps into the OFS167 system. As the engineers start working on their engine overhauls, the astrogator gets to work plotting a jump to the neutron star in OFS166.
– A frigate is completed at sathar SCC#10 (OFS174)
62.025
SG Alpha arrives at K’sta-Kar delivering 8 fighters which become Frontier Fighter Corps Squadron Zeta. The crew is given 2 days of R&R before heading out for the Araks system. The assault scout joins PG Vigilant.
62.026
The HSS History’s Hope successfully jumps back to YS11 and begins deceleration and starts calculations for the jump back to YS12.
62.027
– PG Probe Alpha arrives at Terledrom (Fromeltar) and confers with leader from TF Cassidine and the local militia about the sathar incursion into the system. They decide to attempt to chart the route through the nebula to the double star system OFS020 a 6 light year jump.
– With their jump calculations nearly complete, the K’aken-Kar militia assault scout begins acceleration for the jump to OFS166.
62.028
– Jump calculations complete, sathar SBF-J2 begins accelerating for the jump into the Theseus system.
– A destroyer is completed at sathar SCC#1 (OFS203).
– Deciding to try a different tactic, the sathar begin a major fleet reshuffling. The ships (1 F, 1 FF, 1 HC, & 1 AC) at SCC#10 (OFS228), designated TG1 depart for SCC#3 (OFS138).
– Five fighters are completed at the PGC shipyards (Gran Quivera, Prenglar) and are transferred to Gollwin Academy while work begins on five more.
62.029
The 8 FFC pilots arrive at Cassidine and take command of the fighters stored there forming FFC Squadron Eta.
62.030
– The Nightrunner arrives back at Alcazzar and retrieves the CDC team. They slip out of the system avoiding Streel forces and return to Triad (Cassidine). (SF4)
– With assistance from the TF Cassidine astrogators, PG Probe Alpha completes jump calculations and begins accelerating for a jump to the OFS020 system.
62.031
SBF-A2 (1 LC) departs SSC#1 (OFS203) to attempt to chart a route to Gruna Garu.
62.032
The K’aken-Kar militia assault scouts misjumps once again and ends up in another unknown star system (FS33). They begin working on finding their location.
62.033
SBF-J2 successfully jumps into the Theseus system. It begins deceleration to turn around and jump back to the Padda system.
62.034
Eight more pilots graduate from the accelerated fighter training program at Gollwin Academy. They are to join SG Alpha as it passes through the system in 10 days to take control of the new fighters at Hentz (Araks).
62.035
– The HSS History’s Hope jumps back into the YS12 system and begins calculations for the next jump, a small star system 8 light years away. They remain near jump speed as the next system is in nearly a direct line to their current line of travel.
– PG Probe Alpha successfully jumps into the OFS020 system. They remain near jump speed and monitor the system for sathar presence while work begins on engine overhauls and calculations for the return jump to Fromeltar.
– A heavy cruiser is completed at sathar SCC#3 (OFS138).
62.036
– SBF-J2 is detected by a patrol of two assault scouts of the Theseus militia and detects them in return. It immediately begins altering its flight path to attempt to avoid an engagement.
– Loath to engage the light cruiser of SBF-J2 by themselves, the two Theseus assault scouts radio for backup and begin to trail the sathar ship. The rest of the militia immediately boosts to attempt to intercept the sathar.
– SBF-A2 successfully jumps into the Gruna Garu system. It begins deceleration out of the system plane to attempt to avoid detection while it plots the return jump.
62.037
After 2 days of no sathar detection, PG Probe Alpha begins deceleration in preparation for the return jump to Fromeltar.
A sathar light cruiser, detected three days ago by a pair of patrolling militia assault scouts, was engaged today by the full force of the Minotaur militia after a long, high-g boost to intercept the alien vessel. A thirty minute battle ended with the complete destruction of the sathar ship while only one of the militia assault scouts sustained some minor hull damage.
An anonymous source has confirmed that Spacefleet has assets in systems beyond Theseus that alerted the militia to the possibility of the sathar vessel arriving in system. Our thanks go out to those brave souls risking their lives to watch the sathar movements.
Victoria Sorensen, StarPlay News
Background
After the failed attempt by the frigate to chart the course into the Theseus system, the sathar dispatch a light cruiser (the remains of SBF-J2) to attempt to complete the route. Detected after three days of deceleration by two patrolling militia assault scouts, the light cruiser attempts to evade and jump out of the system before it can be attacked.
Unsure of their ability to take on the light cruiser by themselves, the two militia assault scouts report in and begin to trail the light cruiser while the rest of the militia ships begin a high-g boost in an attempt to intercept the light cruiser before it can jump out of the system. After three days of grueling pursuit, the militia ships overtake the light cruiser and engage.
Order of Battle
Minotaur Militia
4 Assault Scouts
1 Frigate
1 Destroyer
Sathar
1 light cruiser
The Battle
Setup
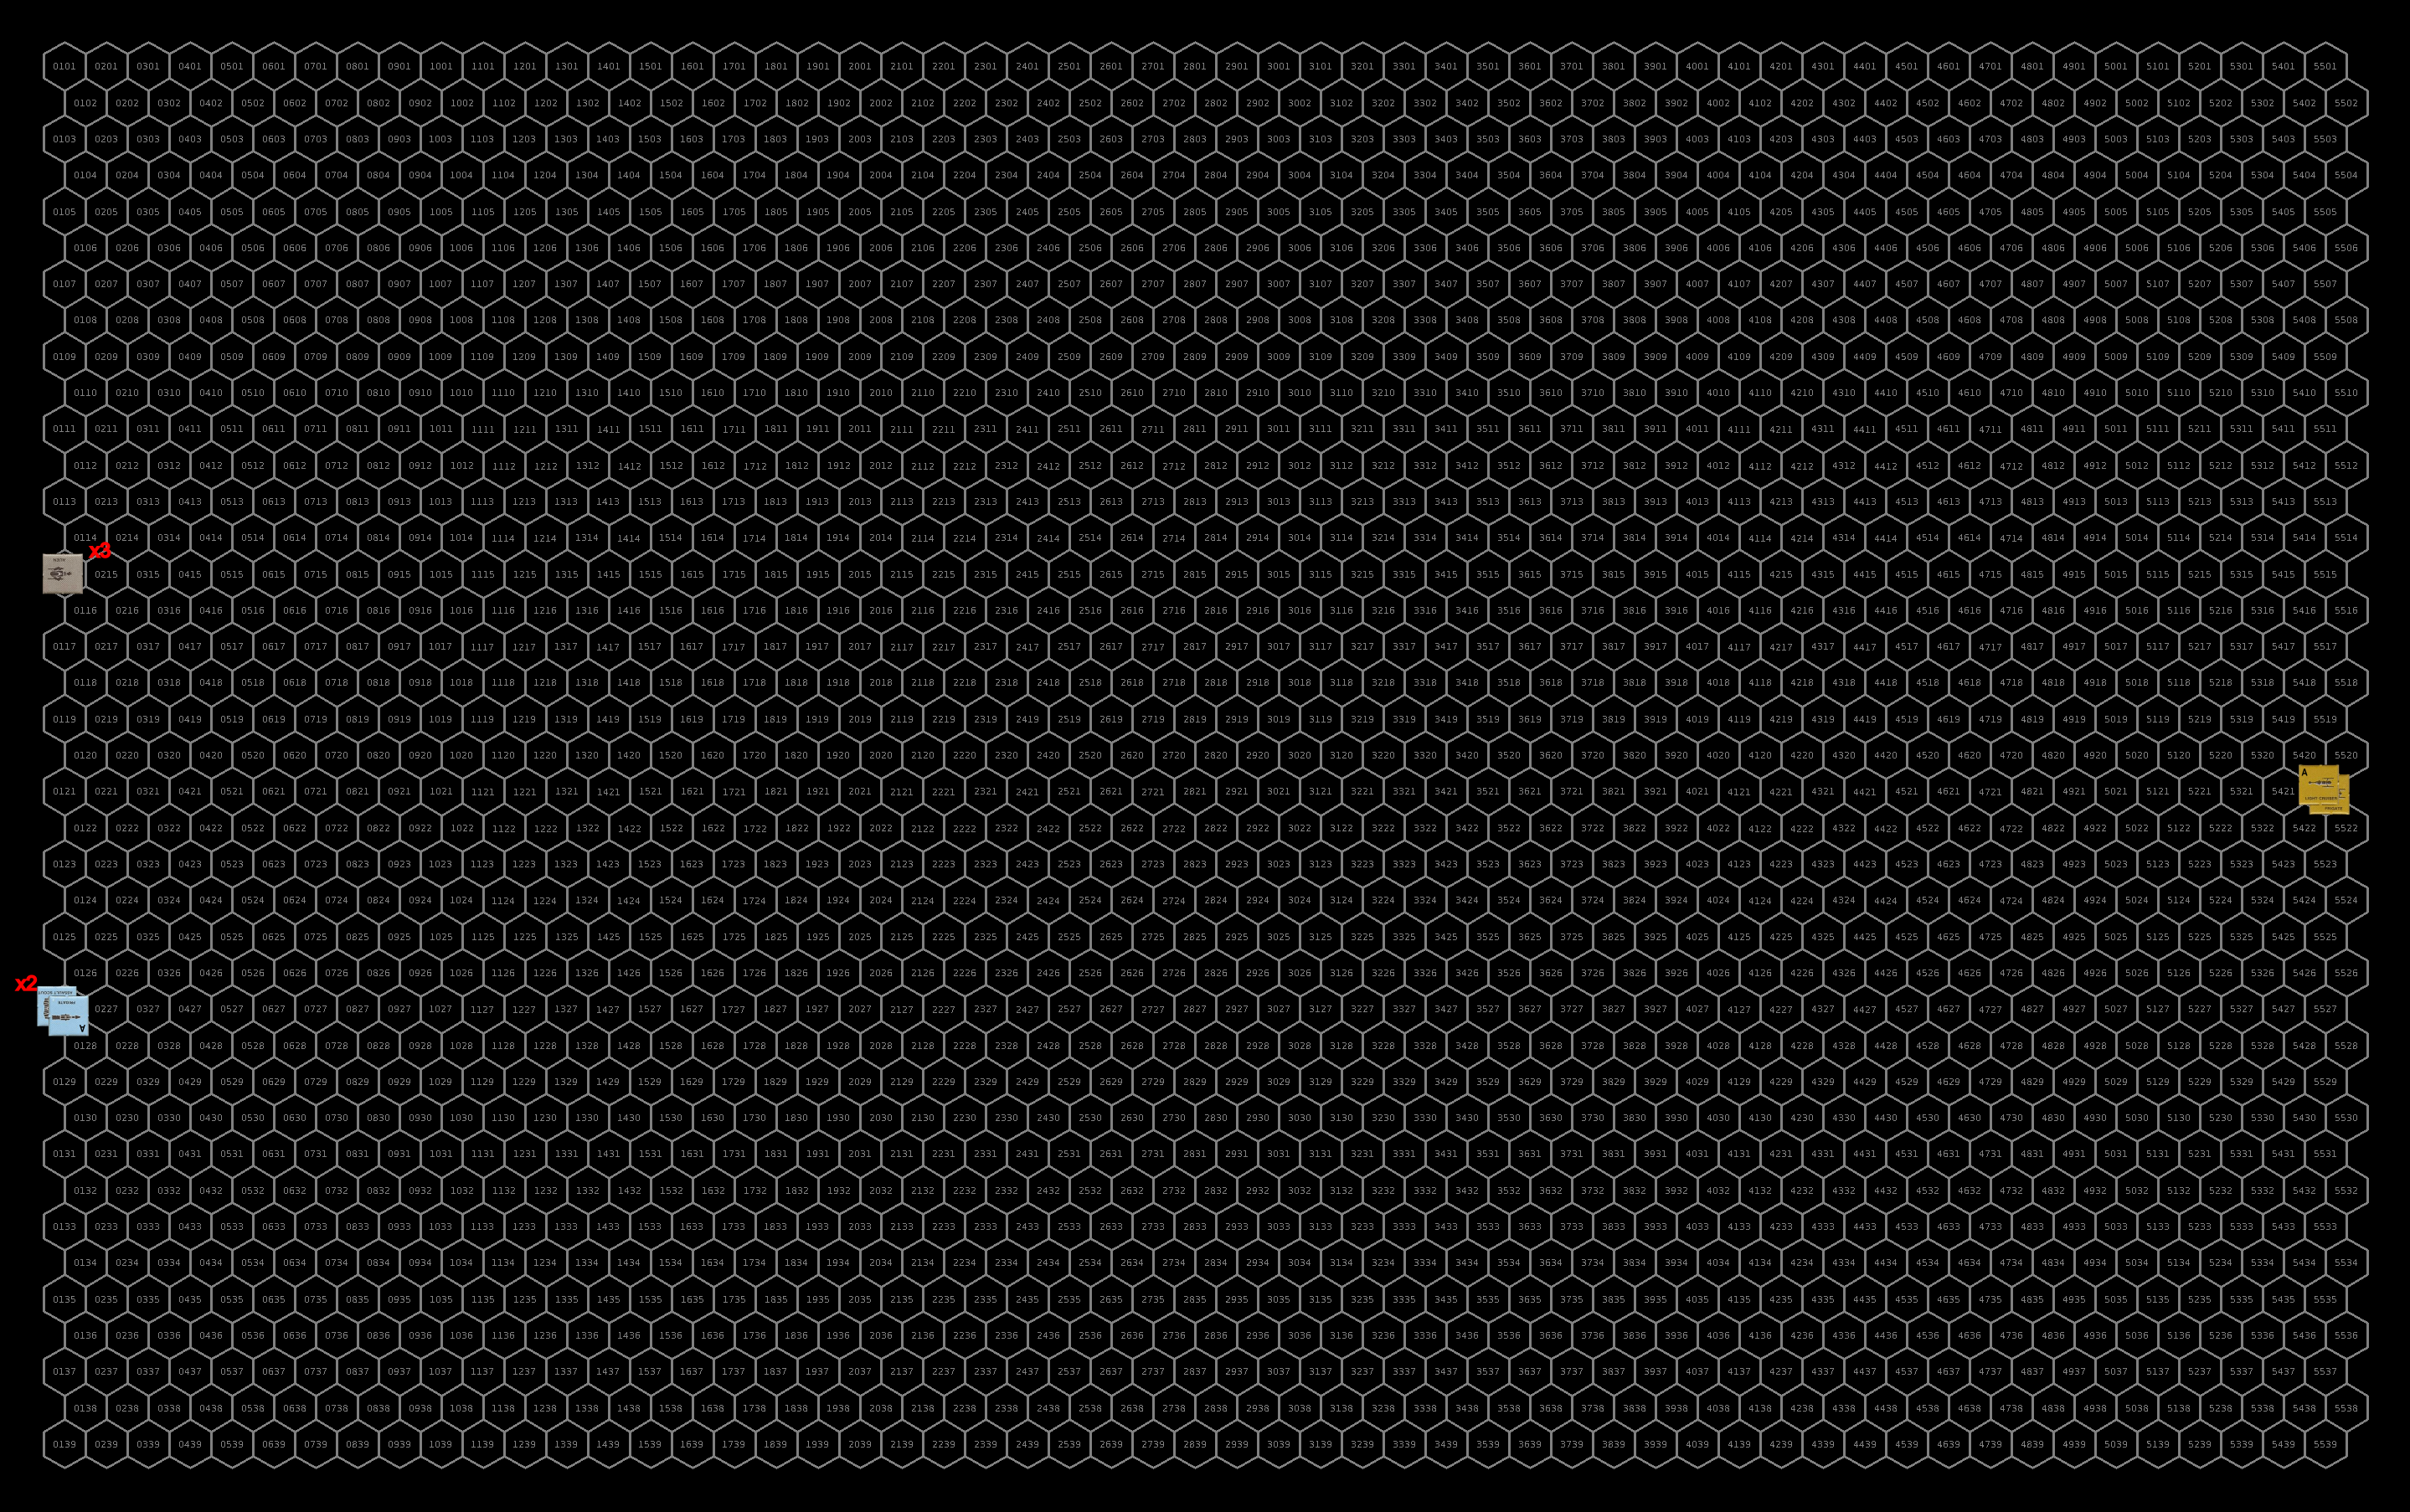
The militia are the attackers in this fight and will move first. The militia deploy in three groups: the destroyer and frigate together in the middle to take the light cruiser on directly while the assault scouts deploy into two pairs on the wings to make strafing attacks with their assault rockets. They start a speed 20.
Out gunned, the light cruiser plans to focus on the smaller faster ships in an attempt to disable the militia ships enough to escape. The light cruiser also starts at speed 20.
Initial setup for this battle. Click for full sized image.
Turn 1
The assault scouts accelerate to speed 25 while the destroyer accelerates to 23 and the frigate only accelerates to 22 allowing the destroyer to catch up to it. The sathar light cruiser accelerates to speed 23 and veers to starboard to go after the upper flight of assault scouts. All ships are out of range this round.
The ships start to close. Click for full size image
Turn 2
The militia ships continue to accelerate and close on the light cruiser from multiple directions with the assault scouts accelerating to a speed of 30 and the capital ships accelerating to a speed of 26. The light cruiser fires all of its beam weapons at the lead assault scout in the upper group. It only hits with the electron battery but induces a fire on the small ship.
The militia ships fire everything they have except their rocket batteries as they are out of range. The light cruiser fires two ICMs at each of the incoming torpedoes both of which are intercepted by the ICMs. The gunners on the destroyer are having a bad day with none of their weapons connecting. The frigate scores hits with both its laser cannon and battery knocking out the cruiser’s proton battery and slightly damaging its hull (6%). The four assault scouts only connect with one of their laser batteries damaging the cruiser’s hull (10%) but three of the assault rockets slam home knocking out 20% of the cruisers hull integrity, it’s electron battery, and a third of it’s engine capability.
Unable to bring its disruptor cannon to bear, the sathar light cruiser pulls a turn to port, accelerates to a speed of 25, and fires broadside at the militia ships. It fires a torpedo at the frigate, a rocket battery at one assault scout, and its laser battery at the other assault scout. Defensively, the militia ships fire their energy weapons again with the destroyer and frigate also firing rocket batteries at the cruiser.
Both militia rocket batteries connect damaging the hull (22%) and its combat controls systems. The frigate hits with its laser cannon knocking out the cruiser’s disruptor cannon while the destroyer with its two batteries, damaging the hull (10%) and knocking out the electron screen. The assault scouts connect with two of their laser batteries taking out the torpedo launcher and scratching the hull (1 HP). The cruiser misses with all of its weapons.
First shots exchanged. Click for full sized image.
Turn 3
The militia ships continue to pursue the carrier with the capital ships slowing to speed 23 and the assault scouts slowing to speed 25. They continue to stay outside of rocket battery range which limits the heavily damaged cruiser to just its laser battery. The fire on the assault scout knocks out its laser battery. The cruiser fires at the scout with the fire hitting it but only slightly damaging the hull (1 HP).
Once again the militia ships fire all their energy weapons and the scouts fire their assault rockets. Given the damaged state of the cruiser, the capital ships elect not to fire torpedoes. With no torpedoes incoming, the cruiser elects to fire an ICM at each of the assault rockets but it doesn’t make any difference as three of the AR impact the cruiser while one goes off course. The militia ships also hit with one laser cannon and two laser batteries. The assault rockets take out the cruisers stasis screen and ICM launcher while the laser cannon takes out the laser batteries take out 13% of the cruises hull (leaving it with only 4% hull integrity and damage its navigation control system.
The navigation control damage causes the cruiser to pull to starboard. Amazingly, the heavily damaged cruiser holds together through the turn but is then obliterated by the laser fire from the militia ships before it has a chance to get a shot off.
Final positions when the sathar light cruiser is destroyed. Click for full size image.
Final repairs
The scout manages to get the fire out immediately but its hull damage will require a day in the shipyard to repair.
Lessons Learned
The sathar cruiser really didn’t have a chance in this one against the full militia roster. Its only real hope was to get lucky and damage the engines on several of the ships to allow it to even the odds a bit and get away but that didn’t happen. Unfortunately, it was detected in the system while it was still decelerating to jump back out which greatly increased the chance that the militia, with their faster ships, could catch it. Had it been detected outbound, it would have either gotten away or, if the militia decided to press their luck, only had to engage to the two assault scouts.
This post takes us into Frontier Year 62. Things are relatively quiet with no major incursions by the sathar although they begin to step up sabotage attempts. The UPF continues to build up the Frontier Fighter Corps while replacing the ships lost in battle. The sathar are also working on replacing battle losses and commit additional resources to the war effort. They also continue to probe for new routes into the Frontier.
The HSS History’s Hope suffers a serious malfunction but recovers and continues on it’s way. This installment also sees the beginning of the events in the final module not already included, SF4: Mission to Alcazzar.
Date (FY)
Events
61.382
– SBF-J1 arrives back at SSC#10 (OFS228). The heavy cruiser under construction is moved out of the shipyard to make room for the damaged cruiser from the battle fleet.
– Work is completed on a UPF assault scout at the PGC shipyards (Gran Quivera, Prenglar) and it joins TF Prenglar at Morgaine’s World. Construction begins on another UPF assault scout.
61.383
SBF-J2 successfully jumps into the Waller Nexus system. It remains near void speed as the astrogators begin calculating the 7 light year jump to the Padda system.
61.384
– The HSS History’s Hope successfully jumps into the YS11 system. However, just minutes after the jump is completed and confirmed, a short circuit causes a fire to break out onboard. The fire is put out but not before it severely damages the hull reducing it to only 25% integrity.
– With its serious hull damage, the HSS History’s Hope begins to drift while the crew attempts repairs. After an hour an a half, the hull is patched and the ship resumes deceleration while the crew cleans up the ship. They begin calculations for the return jump to YS08.
– SG Alpha jumps into the Dramune system. It remains near jump speed and begin calculations for a jump to Fromeltar.
– Two UPF assault scouts are completed at the Hentz (Araks) shipyards. Their crews, having arrived with the FFC pilots take command of the ships immediately. They are given orders to remain in the Araks system for now and together with the FFC fighters are designated PG Tranquility. Work begins on two more assault scouts.
– A UPF fighter and assault scout, as well as the replacement assault scout for the Pale militia is completed at the Terledrom (Fromeltar) shipyards. The UPF battleship is moved into the shipyard for repairs and work begins on two more fighters.
– The second Pale assault scout is completed in the Minotaur (Theseus) shipyards and work begins on another assault scout for Spacefleet. The Pale assault scouts both depart immediately on high-speed transits to their home system.
61.385
The third assault scout for the Pale militia is completed at the CDC shipyards (Triad, Cassidine). With the new classified route linking Cassidine and Truane’s star the ship will be home after a single jump instead of the usual three. Spacefleet begins work on another assault scout
61.386
– After four days of work the damaged heavy cruiser emerges from sathar SCC#10 (OFS228) fully repaired and work resumes on the partially completed heavy cruiser that was moved out to make room.
– The assault scout from Dramune arrives and joins TF Cassidine.
61.387
Two assault scouts, replacements for the Zik-kit (Kizk-Kar) militia, emerge from the CDC shipyards (Triad, Cassidine) and begin a high-speed transit to their home system where they will join up with SF Meteor. Spacefleet begins work on a new destroyer.
61.388
SG Alpha jumps into the Fromeltar system and begins decelerating toward Terledrom to deliver the ships to Task Force Cassidine.
61.389
– Deceleration and jump calculations, along with as much damage clean-up as possible complete, the HSS History’s Hope begins accelerating for the return jump to YS08.
– Another group of 8 pilots graduate in the accelerated program at Gollwin Academy. They immediately depart for the Theseus system to take command of the fighters waiting there.
61.390
Calculations complete, SBF-J2 slips into the Void and successfully jumps to the Padda system. With the next jump being Theseus, they begin decelerating and work on calculations for a return jump to the Waller Nexus system.
61.391
– Four more fighters are completed at the Hentz (Araks) shipyards and their pilots take command of them, filling out FFC Squadron Beta.
– Two more fighters are competed at the Minotaur (Theseus) shipyards. They are crewed by militia pilots until the pilots en route from Gollwin Academy arrive.
61.392
– SG Alpha arrives at Terledrom (Fromeltar). Three of the fighters are transferred to TF Cassidine, while the other 8 are formed into FFC Squadron Gamma.
– A light cruiser is completed at Sathar SCC#5 (OFS19).
61.393
– After 40 days of operation, the CDC compound on Alcazzar (Rhianna), which had been producing at levels even higher than the previous season, suddenly goes silent. (SF4)
– SF Alpha departs for Prenglar to pick up more fighters.
61.394
– The HSS History’s Hope successfully jumps back to the YS08 system, completely mapping that route. Despite the recent fire, the crew decides to press on toward their target and begin decelerating and working on calculations for the jump back to YS11.
– The Pale militia assault scout arriving from Cassidine docks at Pale station. The crew is debriefed and the ship begins duties immediately.
– The UPF Battleship of TF Cassidine emerges from the Terledrom (Fromeltar) shipyards fully repaired. Work begins on 2 destroyers, a frigate and an assault scout.
61.395
Deceleration and calculations complete, SBF-J2 beings to accelerate for the jump back to the Waller Nexus system.
61.396
A UPF assault scout is completed at the Gran Quivera (Prenglar) shipyard and joins TF Prenglar. Work begins on another assault scout.
61.397
After months of negotiations, many energy suppliers on Terledrom (Fromeltar) and Inner Reach (Dramune) agree to join the Consolidated Nebula Energy Group. CNE begins major infrastructure rollouts on Groth (Terledrom).
61.398
Five fighters are completed in the PGC shipyards (Gran Quivera, Prenglar) and transferred to Gollwin Academy. Work begins on five more.
61.399
Successfully jumping in the Waller Nexus system, the sathar have fully plotted the jump route between Waller Nexus and Padda. SBF-J2 remains near jump speed and works on the jump back to the Liberty system.
61.400
Seven more pilots graduate in the accelerated cadet class at Gollwin Academy. They take command of fighters at the Academy, and together with the surviving fighter assigned to TF Prenglar form FFC Squadron Delta base out Morgaine’s World (Prenglar).
62.001
A strike team is assembled by CDC on Triad (Cassidine) and briefed on the Alcazzar project. They depart immediately for the Rhianna system to investigate. (SF4)
62.002
An attempt to sabotage the Inner Reach militia destroyer under construction at the Outer Reach (Dramune) shipyards is thwarted due to a last-minute tip off to the shipyard management. Star Law is called in to investigate.
62.003
– HSS History’s Hope successfully jumps back in YS11. They begin decelerating and begin work on jump calculations for the next leg of their journey, a 9 light year jump.
– The militia assault scout coming from Fromeltar arrives back at Pale station. The crew is debriefed the ship immediately resumes duties.
62.004
The sabotage attempt on the Inner Reach destroyer is quickly traced to agents tied to criminal organizations based on Outer Reach. However, the exact organization responsible is still unknown.
62.005
A frigate is completed at Sathar SCC#3 (OFS138)
62.006
– SBF-J2 successfully jumps back in the Liberty system completely charting the route between Liberty and Waller Nexus. They begin decelerating back toward Snowball.
– The Zik-Kit militia assault scouts arrive at their home station. After a day of debriefing, they begin patrol duties with SF Meteor.
– Sathar commit a portion of the production capacity of Sathar SCC#6 (OFS117) to the war effort and start ramping up production of frigates and destroyers at that center.
62.007
An inside source provides a tip to Star Law indicating that Malthar Enterprises, thought to be mostly destroyed after the events known as the “Dramune Run,” are connected with the recent sabotage attempt of the Inner Reach destroyer.
This post is only a bit over a year late. These are the events that I posted to twitter back in February of 2021 just before I stopped blogging. I’m finally getting them online. I also plan on resuming the daily Twitter posts of the events. starting on day FY61.382. If you want to get the daily updates, follow the @StarFrontiers account on twitter or the #SFTimeline hashtag. If you want to review everything that has happened, or are new to this series of posts, you can grab the PDF file linked at the bottom of the post that contains every entry in the timeline since I started it. Its up to 81 pages so there’s a bit of reading there.
Also, depending on how things go generating the timeline, I might start posting events using the GST calendar of the Frontier. Which means you’ll get 36 Frontier days worth of events every 30 Earth days as the GST calendar only has 20 hours per day instead of our 24. We’ll see if that actually pans out.
The events in this post include the two battles I posted the detail of early last year which are linked in their appropriate entries. With the conclusion of the Battle of Liberty, the war cools down for a while. The sathar are currently out of ships at the moment although they have dozens under construction. Both sides are now maneuvering to reposition and rebuild forces. Otherwise, not much happening in this post outside of the war events.
Date (FY)
Events
61.357
– Ten more pilots complete their fast-tracked certifications for the Frontier Fighter Corps. They immediately depart for Hentz (Araks).
– SBF-J2 (Liberty system) begin calculations for a jump to the Waller Nexus system.Spacefleet holds the space in anticipation of more ships finishing and beginning construction on a new battleship.
61.358
– Second Battle of Ken’zah-Kit (K’aken-Kar) – After nearly 2.5 hours of fighting TF Cassidine defeats SBF-J1 losing only a single fighter while the sathar only have a fighter and heavy cruiser surviving. Most of the UPF ships have damage requiring a shipyard to repair.
– The surviving sathar heavy cruiser and fighter from SBF-J1 accelerate for a jump to the K’sta-Kar system.
– The damaged UPF destroyer completes repairs in the Streel shipyards (Pale, Truane’s Star) and the ship that was moved out to make room resumes construction (it will be done in 23 days).
– SBF-E2 jumps into the Zebulon system. It remains at high speed and begins calculations for jump to Kazak.
– A HS:8 ship completes maintenance in the PGC shipyards (Gran Quivera, Prenglar). Spacefleet moves a couple of small ships in for maintenance to coordinate their completion with more ships finishing and beginning construction on a new battleship.
61.359
– Calculations for the jump back to YS07 complete, the HSS History’s Hope begins accelerating for the jump while the astrogators get a day of rest before double checking the figures on the way out.
– Sathar TG-1 jumps into the OFS136 system where SCC#3 is located as they continue on their journey to SCC#4 (OFS111)
– The battleship Admiral Dooltan and accompanying minelayer arrive at Zit-kit (Kisk-Kar) and join up with PG Meteor. With the addition of the battleship and minelayer, the fleet is now designated Task Force Meteor.
– After spending a day rearming, Task Force Cassidine splits up with the undamaged heavy and light cruiser, now designated Patrol Group Vigilant, departing in pursuit of the sathar heavy cruiser which is headed toward K’tsa-Kar.
– The main force of TF Cassidine, all needing time in a shipyard to fully repair, begin accelerating for a jump to the Kizk-Kar system and then on to Fromeltar. The Terledrom (Fromeltar) shipyard is notified that they will arrive on FY61.375 and begins making preparations to receive them.
– The Clarion (White Light) militia, at the request of Spacefleet, depart for a jump to K’sta-Kar to join up with PG Vigilant and patrol that system. The saurians send 3 of their 6 Battle Rays to assist.
61.360
– Calculations complete, SBF-J2 (LC & FF) begin accelerating from the Liberty system for a jump to the Waller Nexus system. PG Liberty detects the departure almost immediately and subspace radio the intel back to Spacefleet.
– Stationing 8 of the fighters at Fortress Pale as the first official squadron of the Frontier Fighter Corps, the second assault carrier currently with Strike Force Nova is designated as Shuttle Group Alpha and departs back to Triad (Cassidine) to start moving more fighters around the Frontier.
61.361
– PG Liberty are authorized to engage the outbound SBF-J2 if conditions are favorable. Several Mhemne Belter ships offer to assist although their outdated engines mean that they will only be able to make a single pass at the sathar vessels. The ships all boost for intercept.
– Four fighters are completed at the Hentz (Araks) shipyard. They are put into storage awaiting the arrival of the Spacefleet pilots. Construction beings on four more fighters.
– Two fighters are completed at the Minotaur (Theseus) shipyards for the Frontier Fighter Corps but are currently manned by the militia. Construction begins on two more fighters.
61.362
– SBF-E2 jumps into the Kazak system and begins calculations for a jump to OFS019 and SCC#5.
– Battle of Liberty – PG Liberty, augmented by Mhemne ships, engage the sathar in the outer system. The fight does not go well for the UPF who lose their frigate and an assault scout although they do manage to destroy the sathar frigate.
– After fighting the UPF in the Liberty system, the surviving sathar light cruiser of SBF-J2 continues on its course to jump to the Waller Nexus system.
61.363
– CDC staff arrive back on Alcazzar (Rhianna) in anticipation of the new mining season. (SF4)
– SBF-J1 jumps into the K’sta-Kar system. They remain at speed and begin calculations for a jump to FS33.
61.364
– The HSS History’s Hope successfully jumps back into the YS07 jump completely charting that route. They begin decelerating to turn around and jump back to YS08 to continue their journey forward.
– PG Vigilant and the Clarion militia both jump into the K’sta-Kar system from opposite directions. Keeping an eye on the retreating SBF-J1, they start deceleration toward Kwadl-Kit.
– TF Cassidine jumps into the Kizk-Kar system and begin calculations for the jump to Fromeltar. They transmit details of their recent battles to TF Meteor to share their experiences.
61.365
– SBF-E2 jumps back into the OFS019 system and begins decelerating toward SCC#5.
– SBF-J2 enters the Void and like the frigate before it, misjumps, this time ending up in the OFS196 system.
– Enough space has cleared in the CDC shipyard (Triad, Cassidine) to allow Spacefleet to begin construction on another battleship to replace one of the two lost in the Second Battle of New Pale.
61.366
– SBF-J1 jumps into the FS33 system and begins calculations for a jump to OFS166.
– Eight more fighters are completed at the PGC shipyards (Gran Quivera, Prenglar) and shuttled to Gollwin Academy. Spacefleet delays the start of construction of more fighters as production of the ships is outpacing training of pilots and they want to use the space for construction of another battleship.
61.367
– As OFS196 is a system in the sathar charts, being on the route to OFS203 and SCC#1, SBF-J2 determines it position after just two days. It decides to take the known route back to Liberty and try again.
– Enough space opens up in the PGC shipyards (Gran Quivera, Prenglar) for Spacefleet to begin construction on the second battleship to replace the second one lost in the Second Battle of New Pale.
61.368
– The HSS History’s Hope arrives in the inner system of YS07 where they will rest for a day before they begin accelerating for the jump back to YS08.
– Task Force Cassidine jumps into the Fromeltar system and begins a slow deceleration toward Terledrom and the shipyard there. They radio ahead that they are a few days early.
– Spacefleet resumes fighter construction in the PGC shipyards (Gran Quivera, Prenglar) but only producing five at a time instead of eight. The other 3 HS worth of space is dedicated to constructing an assault scout. Additionally, 3 more assault scouts are started in the CDC shipyards (Triad, Cassidine).
61.369
– PG Vigilant and the Clarion militia, together with the saurian battle rays, arrive in orbit around Kwadl-Kit (K’sta-Kar). They set up a patrol schedule to watch for new sathar threats.
– SBF-J1 jumps into the OFS166 system and begins calculations for a jump to OFS167.
– SG Alpha arrives back at the CDC shipyards (Triad, Cassidine). The fighters in storage are transferred to the carrier while they await the arrival of their pilots, scheduled to graduate from Gollwin Academy tomorrow.
61.370
– SBF-E2 arrives back at SSC#5 (OFS019). The heavy cruiser under construction is moved out of the shipyard to make room for the damaged one to receive the necessary repairs.
– Nine more pilots graduate in the accelerated cadet class at Gollwin Academy. They immediately depart to take command of the fighters currently sitting in storage at Triad (Cassidine).
61.371
SBF-J1 jumps into the OFS167 system and begins calculations for a jump to OFS169.
61.372
An attempt to explode a bomb at the Council of Worlds building while the council is in session is foiled by Star Law agents and local law enforcement. Unfortunately, none of the perpetrators survived. An investigation is launched immediately to track down the origin of the plot.
61.373
TF Cassidine arrives in orbit around Terledrom. There is currently 6 HS of open space in the shipyard and the heavily damaged frigate and fighter are moved in for repairs.
61.374
– The HSS History’s Hope jumps back to the YS08 system. They begin decelerating and working on the jump calculations for the next system, a binary system 5 ly away.
– SBF-J1 jumps into the OFS169 system and begins calculations for a jump to the OFS170 system.
– The K’aken-Kar militia assault scout, also in OFS169, happens to detect the heavy cruiser just hours after it jumps into the system. Realizing they are in sathar controlled space, the ship goes into as stealthy a mode as possible to avoid detection as they monitor the sathar vessel.
– SBF-J2 jumps back into the Liberty system.
– The TF Cassidine fighter in the Terledrom (Fromeltar) shipyard competes its repairs. The space is held in reserve for the larger ships needing repairs.
61.375
– Princess Leotia’s 35th birthday. Major celebrations are held all over Clarion (White Light) in commemoration of her coming of age. While her father had planned to step down and hand the government over to her during the ceremonies, this has been delayed due to the ongoing sathar conflict.
– SBF-J1 jumps into the OFS170 system and begins calculations for the final leg of their jump back to SSC#10 in the OFS228 system.
– PG Liberty detects the returning light cruiser and radios its presence back to Spacefleet.
– The damaged sathar heavy cruiser at SCC#5 (OFS019) completes repairs and construction is resumed on the new heavy cruiser.
61.376
Three UPF fighters are completed at the Terledrom (Fromeltar) shipyards. They are transferred to Task Force Cassidine. The shipyard space is held in reserve to fit the larger ships needing repair.
61.377
– SBF-J1 jumps back into the OFS228 system and begins decelerating toward SSC#10
– An assault scout is completed in the Outer Reach (Dramune) shipyards. It sets off immediately for the Fromeltar system to join TF Cassidine. Construction begins on a new assault scout.
61.378
– SBF-J2 arrives back in orbit around Snowball. After rearming, it sets off once again to try to jump to the Waller Nexus system.
– Calculations complete, the HSS History’s Hope begins accelerating to the next system on their route, which they designate as YS11.
– A UPF assault scout is completed at the CDC shipyards (Triad, Cassidine). This is the first of the replacement ships larger that a fighter to come out of the shipyards since the conflict began. 5 fighters are also completed and work begins on another AS and 5 fighters. The completed ships join SG Alpha.
– The first damaged frigate from TF Cassidine emerges from the shipyard at Terledrom (Fromeltar) fully repaired. The other frigate enters and work begins on it.
61.379
– The Frontier Fighter Corps pilots arrive at Hentz (Araks) to take command of their fighters there. There is some initial tension between the UPF and militia forces as the latter do not want to turn over control of the ships.
– The Spacefleet pilots arrive at Triad (Cassidine). They are immediately transferred to the carrier in SG Alpha where their ships are awaiting them. SG Alpha departs immediately for a jump to Dramune and then on to Fromeltar where the fighters are to be delivered.
– The Yazira Dome completes its second year of operation. With the on-going sathar conflict, travel has been curtailed and off-world yazirian visitors diminished but the Dome is still wildly popular with on-planet visitors.
– Detecting SBF-J2 outbound once again, PG Liberty sends a subspace message informing Spacefleet and continues to monitor the sathar ship.
– Calculations complete and checked, the HSS History’s Hope begins accelerating for the jump to the next system on their route, designated YS11.
61.380
– Sathar TG-1 arrives at SCC#4 (OFS111), joining the other ships there.
– After several back-and-forth communications, including a threat by Spacefleet to dispatch TF Prenglar to the Araks system to eliminate or take control of the militia, the Hentz militia turns over control of the Frontier Fighter Corps fighters to the UPF crews.
– The second damaged frigate from TF Cassidine completes repairs at the Terledrom (Fromeltar) shipyards. A new UPF assault scout, along with an assault scout for the local militia are also completed. This frees up enough space that TF Cassidine’s assault carrier can move in for repairs.
61.381
TF Cassidine’s assault carrier completes repairs at the Terledrom (Fromeltar) shipyards. There is not enough free space to move the battleship in, but that space will free up in three days. With 30% of the shipyard empty, the work crews can each get a full day off to rest over the next few days.
Engaged sathar forces outbound from Snowball. Lucky hit by sathar torpedo detonated magazine on UPFS Singing River (frigate) during initial engagement. Mhemne forces, together with assault scouts (UPFS Dirk and Heron) destroyed sathar frigate but UPFS Dirk lost maneuvering and pursued by sathar light cruiser. Damage to engines resulted in light cruiser overtaking and destroying UPFS Dirk. UPFS Heron remains on station in system.
*** FLASH FLASH FLASH ***
Spacefleet Signal Traffic
Background
With the loss of the single frigate comprising Exploration Group 1, the sathar decide to go with a stronger reconnaissance force and dispatch SBF-J2 (a light cruiser and frigate) to explore the route to Theseus.
Detected departing Snowball by PG Liberty, Spacefleet authorizes them to attack the sathar vessels on their way out of the system. The Mhemne offer some of their ships to help. Although limited in technology compared to the UPF and sathar vessels, the Mhemne ships will be able to make at least a single pass at the sathar vessels.
Three days out from the planet, the UPF and Mhemne forces intercept the sathar vessels.
Order of Battle
The Mhemne ships only posses limited chemical drives compared to the atomic drives of the sathar and UPF vessels and required significant help to boost up to the required speed. For the purposes of this battle they all have 25 HP, 2 ADF, 2 MR, and a laser battery. In addition, they can only use a total of 8 MR and/or ADF before their fuel supply is exhausted.
UPF
2 Assault Scouts
1 Frigate
3 Mhemne vessels
Sathar
1 Frigate
1 Light Cruiser
The Battle
Setup
The UPF are the attackers in this scenario. The sathar ships are flying in formation moving at speed 15 entering from the right of the battle area.
The three UPF ships are in a formation with the three Mhemne ships flying together nearby. They are also moving at speed 15. The plan is for the Mhemne to make a single pass at the sathar vessels firing at the frigate and then continue on while the UPF continue to engage and hopefully destroy the sathar.
Initial positions. Click for full size image.
Turn 1
The UPF and Mhemne forces drift forward maintaining their speed of 15. Perceiving the UPF forces to be the bigger threat, the sathar maneuver to take the UPF ships on head-on while also maintaining their speed of 15. No shots fires as the combatants are all out of range.
Initial maneuvering. Click for full size image.
Turn 2
Seeing that the sathar are tracking them, and hoping to draw them into the firing range of the Mhemne, the UPF forces pull up parallel the Mhemne course and accelerate to speed 19. They turn to face the oncoming sathar vessels in the hope that that will cause the sathar ships to fly up near the Mhemne vessels.
The UPF plan works (maybe too well) and the sathar accelerate to speed 16 and maneuver so that they don’t come into the forward firing arc of the frigate’s laser cannon and move into rocket battery range. However, that brings them within 20,000 km of the Mhemne ships.
Defensively, the UPF and Mhemne all focus their fire on the sathar frigate. Two of the Mhemne ships hit lightly damaging the frigates hull (5%) and knocking out its laser cannon. The UPF forces all miss.
Offensively, the sathar ships fire their energy weapons at the assault scouts and rocket weapons at the frigate. They miss the lead assault scout but the light cruiser its the second assault scout with its disruptor cannon damaging its navigation control system. They do much better against the frigate hitting it with a rocket battery and a torpedo that slips through the ICM screen destroying the UPF vessel.
Positions after initial engagement. Click for full size image.
Turn 3
With the UPF frigate destroyed right off the bat, the UPF forces are now seriously out gunned. The assault scout, its navigation controls system damaged, turns to port and accelerates to maximum to try to get away. It doesn’t have a perfect shot but fires its assault rocket at the sathar frigate. The other assault scout loops around and fires on the frigate from behind before heading off away from the sathar vessels at maximum acceleration. The Mhemne ships continue to drift away reserving their limited maneuvering in case they need it later.
Ignoring the Mhemne ships, the sathar vessels fire all their energy weapons at the two assault scouts. The lead assault scout is hit by a laser and electron battery as well as the light cruiser’s disruptor cannon seriously damaging its hull (60%) and crippling its damage control systems. The second assault scout is hit by a proton battery damaging its hull (47%).
The Mhemne ships fire at the frigate as they pass hitting with 2 laser batteries damaging the sathar vessels hull (33%). The assault scouts both fire everything at the frigate as well hitting with 1 laser battery and 2 assault rockets knocking out the frigates maneuvering (with the laser battery) before destroying it with the assault rockets.
The sathar light cruiser accelerates to chase after the assault scout directly ahead, ignoring the other ships. The assault scout fires its laser battery in defense but misses. The light cruiser fires its energy weapons at the assault scout hitting with its electron and proton batteries damaging the assault scout’s engines and knocking out its maneuvering capability.
Repair Turn 1
Neither of the assault scouts are able to effect any repairs. No other ships are currently damaged.
Positions after the first half hour. Click for full size image.
Turn 4
The UPF assault scout and Mhemne ships continue to drift away from the sathar ship. The assault scout being chased, lacking any maneuvering maxes out its acceleration as it tries to escape the pursing light cruiser.
The light cruiser hits the assault scout with its proton battery knocking out half of the assault scout’s acceleration capability. The assault scout misses the light cruiser. The light cruiser continues to accelerate as it chases the assault scout and maneuvers to come directly astern of the smaller ship. It drops a bit behind this turn but with the assault scout’s engines mostly disabled, it will close on it soon enough. It gets some extreme range shots with its energy weapons but misses.
It’s a tail chase now. The other ships are far enough away that they get away safely and we are just tracking the sathar vessel and its target. Click for full image.
Turn 5
Using what acceleration it has, the assault scout continues to speed up as it tries to get away. The LC hits it with its disruptor cannon igniting a fire. It returns fire with its laser battery but misses. The assault scout’s initial speed advantage temporarily takes it out of range of the light cruiser’s weapons.
To avoid having to draw long trails, and since relative velocity is all that really matters, I’ve adjusted the displayed speeds down. Click for full-size image.
Turn 6
The gap between the ships widen but the light cruiser’s greater acceleration will start closing it once again soon.
Repair Turn 2
Again the assault scouts fail to repair any systems.
Positions of the two ships still engaged after an hour. Click for full size image.
Turn 7
The light cruiser matches the assault scouts’ speed and will begin to overtake it on the next turn. (I forgot to save an image but it was just more of the same.)
Turn 8
The light cruiser starts to close the gap and is just out of range of its electron and proton battery weapons.
The gap between the ships start to close. Click for full size image.
Turn 9
The light cruiser closes to within 90,000 km. The assault scout fires on the cruiser with its laser battery but misses. The light cruiser fires with its energy weapons and hits with its proton battery destroying the small UPF ship.
And the fight is over after an hour and a half. Click for full size image.
Final Repairs
It takes another 8 hours but the damaged UPF assault scout manages to repair its damage control system (7 hours) and its hull (another hour).
Lessons Learned
That didn’t go at all like the UPF planned. They did manage to destroy the sathar frigate but expected their frigate to survive a bit longer. Poor shooting by the UPF and great shooting by the sathar on the first round definitely tipped things in favor of the sathar.
The Mhemne acquitted themselves well hitting with 4 of their 6 shots. Had the frigate survived the first round they might have tried to loop back around for a second pass but the quick destruction of the frigate put survival ahead of damaging the sathar.
The second assault scout almost got away but the long range hit by the light cruiser’s distruptor cannon that knocked out its engines, combined with its failed repair rolls, spelled eventual doom for that ship as it was seriously outgunned by the light cruiser.
The sathar finally won a battle but unfortunately for them it was just a minor one on the periphery of the battle.
After nearly two and half hours of fighting, Task Force Cassidine defeated the invading sathar forces destroying all but a heavy cruiser and fighter which are currently departing the system. The ships of the task force are almost all heavily damaged but only a single fighter was lost in the battle, the pilot of which ejected safely and has been recovered.
Rak’tal-ka, StarPlay News
Okay, I thought the Second Battle of Kwadl-Kit was a long one, this one went even longer. Sorry about the delay in getting it out but it took a while to play out. Task Force Cassidine just seems to like these long, spread-out battles. The map is going to really shift around this time as this fight involves a long chase and at one point it’s happening on two different maps as the battle spreads out. I hope you enjoy the narration. I also think this might now be the longest blog post yet.
Background
Fresh from the battle with the other sathar force in the K’tsa-Kar system, Task Force Cassidine is ready to face this new sathar threat. While the presence of the militia assault scout that recently disappeared trying to probe the source of the sathar fleets would have been helpful, it would not have made a lot of difference in the fight.
After the recently losses in the K’tsa-Kar and Truane’s Star systems, SBF-J1, crewed by veterans of the campaign against the saurians, look to turn the tide and chalk up a victory for the sathar forces. The fleets are fairly evenly matched with the UPF forces leaning more toward the larger ships with the loss of their assault scouts and half of their fighters in the previous engagement.
Order of Battle
This is probably the most evenly matched battle, in terms of hull points and capabilities, of any fight yet in the war. Looking at hull points, the UPF are coming into this with a total of 435 HP of ship compared to the sathar’s 441. Three of the UPF ships are slightly damaged: one fighter only has 5 of 8 HP, a frigate is at 29 of 40, and the battleship has a damaged stasis screen. Those were all battle damage that couldn’t be repaired in space after their recent battle in the K’sta-Kar system. It will be interesting to see how this one plays out.
Spacefleet (Task Force Cassidine)
3 Fighters
2 Frigates
1 Light Cruiser
1 Assault Carrier
1 Heavy Cruiser
1 Battleship
Sathar
7 Fighters
1 Frigate
1 Destroyer
2 Light Cruisers
1 Assault Carrier
1 Heavy Cruiser
The Battle
Setup
The UPF elect to battle near the planet although with no station left to defend, they start far back from the planet at a moderate speed of 15 for all ships, including the fighters. The two frigates form a battle group and the light cruiser and the battleship team up. Those two groups form the center of the battle line. The heavy cruiser escorts the assault carrier toward the bottom of the battle area while the three fighters form a flight near the top. They deploy four of the six seeker missiles available on the side of the planet the sathar will be approaching from. The heavy cruiser and battleship each retain one seeker missile in their magazines for deployment during the fight.
Like the UPF, the sathar come in at only a moderate speed to try to gauge the other side’s tactics and responses before committing. They too are only moving at speed 15 but are split up to go wide around the planet. The sathar heavy cruiser and assault carrier, escorted by a destroyer come in opposite their UPF counterparts with a flight of three fighters just off their wing. The light cruisers, escorted by a frigate, come in opposite the UPF fighters, with a flight of four fighters off their wing.
Initial positions of the ships. The seeker missiles are not shown. Click for full sized image.
Turn 1
The sathar capital ships maintain their speed and advance on the UPF forces. The fighters accelerate to speed 20 and fly farther out on the wings of the formation.
The UPF ships converge toward the lower group of sathar capital ships. The heavy cruiser and assault carrier continue to advance at speed 15. The light cruiser and battleship accelerate to speed 17, the frigates to speed 19, the fighters to speed 20.
No shots are fired this round as the two forces remain out of range.
Positions after the first turn of maneuvering. Also the seeker missiles are shown on this one for reference. Unfortunately, the file was partially corrupted and the bottom of the map was cut off but the three sathar fighters just mirrored the maneuver of the fighters at the top of the map. Click for full size image.
Turn 2
The sathar all begin accelerating toward the UPF. The group centered around the heavy cruiser accelerates to speed 17 and flies straight at their UPF counterpart while their wing of fighters accelerates to 25 and makes a pass at the same group. All the sathar ships fire at the UPF assault carrier. The upper battle group accelerates to speed 18 and turns down toward the UPF forces while the upper flight of fighters accelerates to speed 25 and sets up for an attack run next turn as they are too far away to engage this round.
Defensive, the UPF ships all focus on the flight of three lower fighters with the UPF heavy cruiser taking a long-range shot with its disruptor cannon at the sathar destroyer. They don’t do too well and of the 17 shots fired at the three fighters, only one connects with each ship, knocking the hull integrity down by half on one, inducing a navigation control hit on a second, and knocking out the maneuvering on the third. The disruptor cannon shot at the destroyer also misses.
Offensively, the sathar fare a bit better. Two of the assault rockets hit the assault carrier knocking out half its engine capability and reducing its hull integrity by 17%. The sathar destroyer hits with its laser cannon further reducing the hull integrity of the UPF assault carrier by another 19%. The heavy cruiser’s distruptor cannon knocks out the assault carrier’s masking screen launcher.
The larger UPF capital ships maintain their speeds and converge on the sathar battle group. The heavy cruiser and assault carrier fly right over the group turning up toward the planet at the end of their move. The battleship and light cruiser maneuver down to take point blank shots at the sathar as well. The frigates accelerate to speed 20 and come just in range of their rocket batteries while the fighters accelerate to speed 25 and make an assault rocket pass from below.
Defensively, the sathar ships continue to fire at the assault carrier with their energy weapons while they fire their three rocket batteries at the lead frigate. The frigate is hit by two of the rocket batteries reducing its hull integrity by 28% and knocking out a third of its maneuvering capability.
The assault carrier is hammered by the sathar’s weapons being hit by 2 electron, 2 laser, and one proton battery as wall as a laser and disruptor cannon. All told the damage knocks out all of the UPF assault carrier’s weapons, starts a fire, damages its combat control system, induces a navigation control failure, and reduces its hull integrity by another 13%.
Offensively the UPF focus on the sathar assault carrier and heavy cruiser with the frigates and fighters firing at the assault carrier and the other ships firing on the heavy cruiser.
Only one of the fighters hit the assault carrier but it scores a critical hull hit dropping the carrier’s hull integrity by 40%. The frigates combine to hit with a laser battery, laser cannon and rocket battery knocking out the carriers engines and further reducing its hull integrity by 7%.
The sathar heavy cruiser fares even worse being hit by a barrage of weapons from the UPF battleship, light cruiser and heavy cruiser. All told it is hit by all 3 distruptor cannons, 2 rocket batteries, 3 laser batteries, two proton batteries, and an electron battery. The damage knocks out the sathar heavy cruiser’s engines and maneuvering, ICM launcher, laser battery, proton screen and stasis screen, cuts it damage control ability in half, and starts a fire. Surprisingly, the weapons did little hull damage only reducing the ship’s hull integrity by 25%.
Positions and course after the first shots were fired. Click for full size image.
Turn 3
The sathar fighter and heavy cruiser, both with no MR, fly straight ahead (to the left). The fighter slows down to speed 20 while the heavy cruiser, with no ADF either, just stays at speed 17. The fighter with the navigation control hit slows to speed 20 and spins to port flying up toward the planet while the remaining fighter from the lower group accelerates to speed 20 and goes after the pair of UPF frigates. The other fighters also speed up to 30 hexes/turn and go after the frigates as well, both fighter groups looping around the planet.
The sathar assault carrier, with its navigation control hit, pull to starboard and with no ADF, flies up away from the main battle. The sathar destroyer loops around to go after the UPF frigates as well and the light cruisers and frigate decelerate back to 15 and light up for a shot at the UPF battleship. The fire on the UPF assault carrier damages its hull (5%).
Defensively, the UPF frigates fire their laser batteries at the fighters and rocket batteries at the destroyer while the other UPF ships concentrate all their fire on the lead sathar light cruiser.
The UPF frigates miss the fighters completely but hit the destroyer with two rocket batteries seriously damaging it and deducing its hull integrity by 72%. The other ships hit the sathar light cruiser with 2 laser, 2 rocket, 1 electron, and 1 proton battery knocking out its ICM launcher, engines, and stasis screen, starting a fire and reducing its hull integrity by 16%.
Offensively, the sathar fighters hit the lead UPF frigate with and assault rocket reducing its hull integrity by 43% and the second one with an assault rocket as well reducing its already damaged hull (from the previous battle) by 38%. The destroyer also hits the second UPF frigate with its electron battery and laser cannon knocking out the frigates engines.
The sathar frigate and light cruisers hammer the UPF battleship hitting it with 2 disruptor cannons, 2 proton batteries, 1 electron battery, and 2 torpedoes that slip through the battleship’s ICM screen. The weapons short circuit the battleship’s defensive system, reduce its maneuvering ability by half, knock out its proton battery and reduce its hull integrity by 66%.
The two UPF frigates, now heavily damaged, drift on their current course firing at the destroyer as they leave. The assault carrier also drifts but its navigation control hit causes it to pull to port. Despite its weakened hull, it holds together. The battleship also drifts away from the fight firing all its weapons at the damaged light cruiser.
The UPF heavy cruiser turns parallel to the course of the assault carrier but lines up for a direct shot with its disruptor cannon at the sathar destroyer. It fires its rocket battery and torpedo at the undamaged light cruiser and uses its energy batteries to fire on the sathar fighters. The light cruiser follows a similar path and firing at the same targets. The fighters loop up around the planet and come up behind the sathar frigate firing their assault rockets at it.
The fire on the sathar light cruiser and sathar heavy cruiser damages both ships’ hulls reducing their integrity by 13% and 11% respectively.
Defensively, the sathar ships continue to fire at the battleship, hoping to destroy it before it can fly out of range. The sathar assault carrier makes a long range attack at its UPF counterpart with its proton battery but misses. The sathar destroyer fires at the lead UPF frigate hitting with its electron and rocket batteries knocking out the frigate’s masking screen launcher and damaging its combat control system.
The battleship manages to get off lightly and is only hit by 2 distruptor cannons and a laser battery cutting its damage control capability in half and reducing its hull integrity by another 14%.
Offensively, the UPF battleships hits the lead sathar destroyer with its laser and 2 electron batteries and slips a torpedo through the cruiser’s ICM screen destroying it and scoring the first kill of the battle. The UPF heavy cruiser manages to get its torpedo through the other light cruiser’s ICM screen cutting the sathar ship’s maneuvering in half but otherwise missing.
The UPF fighters hit the sathar frigate with all three assault rockets destroying it completely. The sathar destroyer is hit by disruptor canons from the UPF light and heavy cruiser, as well as a laser battery and two rocket batteries from the frigates. The frigates also manage to get a torpedo through the destroyer’s ICM screen. The combined damage from the UPF weapons obliterates the sathar ship. The sathar fighters get away with only minor damage: one loses 60% of its engine capability, one has its damage control capabilities cut in half, and the third loses 38% of its hull integrity.
Repair Turn
As the ships work on repairs, the lead UPF frigate finds that it’s hull is too damaged to repair in space and must find a way to a shipyard with only 30% of its hull intact. The other frigate manages to repair a bit of its hull restoring 10% of its integrity. The UPF assault carrier puts out the on-board fire while the battleship repairs 3% of its hull.
The two sathar fighters with hull damage find that they need a shipyard to repair their hull as well with their hull integrity sitting at 62% and 50% respectively. The sathar assault carrier restores 11% of its hull integrity while the heavy cruiser gets its fire under control.
Courses and positions after a half hour of combat and repairs. Things are starting to scatter as ships are damaged and lose maneuvering capability and control or are too damaged to risk maneuvering. Ships moving off the map will have a yellow number by them showing how many hexes off the map they are. Click for full size image.
Turn 4
The flight of four sathar fighters all go after the UPF assault carrier hoping to finish it off. They loop around to make a direct assault and then fly off to chase after the UPF frigates. The lone fighter, after firing its last assault rocket at the heavy cruiser loops around and starts heading for its carrier to dock and rearm. The fighter with the navigation control damage loops to port and fires one of its assault rockets at a UPF fighter as it passes by. The remaining fighter, with no maneuvering, along with the sathar heavy cruiser in the same condition, continue to drift away from the fight. The sathar assault carrier, with its navigation control damage, pulls to starboard and passes distantly in front of the UPF cruisers and assault carrier. The remaining sathar light cruiser turns to go after the battleship hoping to finish it off.
Defensively, the UPF cruisers fire at the sathar fighters hoping to take them out before they can fire their assault rockets. The battleship fires at the light cruiser pursuing it and the frigates get a couple of distant shots at the sathar fighters.
The sathar light cruiser is hit by one of the battleship’s laser batteries and both electron batteries which score a critical hull hit (integrity reduced by 26%), knock out its ICM launcher, and damage its navigation control systems. Four of the five sathar fighters are hit by the UPF ships knocking the hull integrity down to half on one, destroying a second and damaging the assault rocket launcher on the other two (including the lone fighter going after the heavy cruiser).
Offensively, the two fighters with working assault rocket launchers firing at the assault carrier both miss while the sathar fighter with the navigation hit firing at the UPF fighter hits with its assault rocket destroying the UPF fighter, the first (and as it will turn out, only) UPF ship destroyed in the fight. The battleship is hit by the sathar light cruiser’s electron battery, proton battery, and distruptor cannon knocking out its proton screen, damaging its combat control system, and reducing its hull integrity by another 12% (only 11% remaining).
The two UPF frigates continue to drift and fire long distance shots at the fighters. The battleship drifts away from the light cruiser firing at it as it goes. The two UPF fighters loop around and take a run at the sathar light cruiser firing their last assault rockets. The UPF assault carrier pulls to starboard and runs parallel to its sathar counterpart while the UPF light and heavy cruisers maneuver directly onto the sathar assault carrier’s tail and take point blank shots with all their weapons.
Defensively, the sathar light cruiser fires at the battleship and the sathar assault carrier fires at the UPF light cruiser. The UPF light cruiser is hit by a rocket battery reducing its hull integrity by 17% while the battleship is hit by an electron battery knocking out its ICM launcher.
Offensively, the sathar light cruiser is hit by one of the battleship’s laser batteries knocking out its proton battery and by both assault rockets from the fighters which damage its combat control system and knock its hull integrity down by 20%. The lead UPF frigate manages to score a long range laser battery shot on the lead sathar fighter knocking out its assault rocket launcher. The UPF cruisers hit the sathar assault carrier with a distruptor cannon and a laser, electron, and rocket battery knocking out the carriers maneuvering, laser battery, and masking screen launcher and damaging its combat control system.
Maneuvering and positions after forty minutes of battle. The UPF are stating to score kills and the ships are really starting to scatter. Click for full size image.
Turn 5
The group of three sathar fighters sets off after the two UPF frigates, the lone fighter, with its assault rocket launcher disabled, and realizing that the assault carrier is probably not going to survive the battle, attempts to ram the UPF light cruiser. The sathar light cruiser pulls to port and slows down, firing at the two UPF fighters. The other ships just continue to drift away with the assault carrier firing at the UPF light cruiser as it drifts.
Defensively, the UPF frigates fire at the remaining fighter with a working assault rocket launcher but miss. The UPF light cruiser fires at the oncoming fighter and destroys it before it can ram the larger ship. The UPF heavy cruiser hits the sathar assault carrier with its laser and rocket battery and reduces its hull integrity by another 36%.
Offensive, the sathar fighter misses the UPF frigate with its assault rocket while the sathar light cruiser hits one of the UPF fighters damaging its combat control system. The sathar assault carrier hits the UPF light cruiser with its proton and rocket battery short circuiting the cruiser’s defensive systems and reducing its hull integrity by 20%.
The UPF assault carrier’s loss of navigation control pulls it to starboard and the fighters, out of assault rockets, start heading back to the carrier to rearm. The heavy and light cruiser stay on the tail of the sathar assault carrier while the frigates and battleship continue to drift.
Defensively, the sathar assault carrier continues to fire on the UPF light cruiser hitting with its rocket battery for another 16% hull reduction on the cruiser. All other ships are out of range.
Offensively the UPF frigates fire at the pursuing fighters but miss. The UPF cruiser open fire on the sathar assault carrier and hit with 3 laser batteries, 2 proton batteries, an electron battery, a disruptor cannon, and two torpedoes completely destroying the sathar carrier.
This is the ships off the top of the main map (UPF cruisers and frigates, sathar assault carrier and fighters). The bottom row of hexes on this map exactly correspond to the top row of hexes on the main map (below). Click for full size image.Main battle map after turn 5. Things continue to spread out. Click for full size image.
Turn 6
With their carrier destroyed and being either out of weapons or their weapon system disabled, the three sathar fighters attempt to ram the UPF frigates. The sathar light cruiser pulls to starboard and accelerates back to speed 16, the lone fighter near the planet pulls to port with its navigation damage and the other two ships continue to drift away.
Defensively, the frigates fire everything they can at the incoming fighters hitting two with their laser batteries, the lead fighter for 75% of its hull and the second for a navigation hit but not enough to destroy them before they ram. Two fighters slam into the lead frigate and despite its damaged hull fail to destroy it only taking out 20% of the remaining 30% hull integrity. The third fighter hits the second frigate for a measly 5% of its hull integrity.
The UPF frigates and battleship continue to drift, the assault carrier pulls to port and the fighters continue to close on the carrier to rearm. The heavy and light cruiser start accelerating and turn to head after the sathar light cruiser. No shots are fired as everyone is out of range.
Repair Turn 2
The lead UPF frigate repairs the damage caused by the two ramming sathar fighters but can repair its hull no further. The other frigate repairs 12% of its hull integrity while the light cruiser repairs 3% of its. The assault carrier gets its navigation control system fixed as well as repairing 8% of its hull. The battleship repairs 5% of its hull and brings is damage control system fully back on-line.
The sathar light cruiser repairs its navigation control system while the heavy cruiser discovers that a shipyard will be required to bring its damage control system back fully on-line.
The upper map after an hour of fighting. The second blue line by the assault carrier should have fighters at the end of it but I forgot to move the tokens. Click for full size image.The main battle map after an hour. The poor sathar fighter can’t get is navigation system under control and is stuck near the planet. Click for full size image.
Turn 7
With its navigation control system repaired, the sathar light cruiser sets off at max acceleration to attempt to intercept the UPF battleship and finish it off. The damaged fighter comes to a stop near the planet as the pilot continues to work on its navigation control issues.
The UPF cruisers continue in pursuit of the sathar light cruiser while the assault carrier, its hull and navigation control fixed, starts to turn around and head back toward the planet. The two surviving fighters pull alongside the carrier and start docking procedures.
We’ve now shifted the map to track the sathar light cruiser pursing the battleship and the UPF cruisers pursing it. The other ships are effectively out of the battle. The planet is some 200,000 km off the left side of this map. Click for full size image.
Turn 8
The chase continues. The sathar light cruiser continues to close on the battleship but the UPF light cruiser, which had a slight speed advantage on the sathar light cruiser, continues to close on it as well as it starts to outdistance the older heavy cruiser that has a lower acceleration. The two UPF fighters dock with the assault carrier.
The gaps between the ships are narrowing. Click for full size image.
Turn 9
Since relative speed are all that matter, I’ve adjusted the speeds shown on the maps down so that the battleship is stopped and the other three ships have been scaled accordingly.
The chase continues as the light cruisers close on their targets. The UPF heavy cruiser is as close as it is going to get to the sathar ship unless the sathar vessel’s engines are damaged as the greater acceleration of the sathar light cruiser has allowed it to match speeds with the heavy cruiser. The UPF fighters are rearmed.
Repair Turn 3
The lead UPF frigate repairs some of its maneuvering while the other frigate repairs 10% of its hull. The UPF light cruiser also repairs 10% of its hull while the assault carrier brings its laser and proton battery back on-line. The battleship, expecting to have to defend against torpedoes from the the sathar light cruiser, gets its ICM launcher working again and repairs another 5% of its hull.
The lone sathar fighter repairs some of its maneuvering capability and starts to maneuver to meet up with the heavy cruiser. The sathar light cruiser repairs 13% of its hull while the heavy cruiser restores half of its engine capability and begins accelerating to out of the system.
The ships have almost come in range of the battleship. Speeds have been adjusted so that they are relative to the battleship being at rest. Click for full size image.
Turn 10
The sathar light cruiser continues to close on the battleship and the UPF light cruiser continues to close on the sathar light cruiser. The two UPF fighters, rearmed, launch from the assault carrier and go after the lone sathar fighter near the planet.
The heavy cruiser is now starting to fall behind. Click for full size image.
Turn 11
The UPF light cruiser continues to close the gap but it is looking like the sathar ship will get to the battleship before the UPF light cruiser can intercept it. The battleship, at relative rest to the other ships, rotates to face the direction it expects the sathar vessel to come from in order to bring its disruptor cannon to bear.
It’s taken nearly an hour, but the sathar light cruiser is nearly in range of the battleship with the UPF light cruiser in hot pursuit and gaining. Click for full size image.
Turn 12
Realizing it cannot quite get into torpedo range this round, the sathar light cruiser remains at its current speed staying at extreme range for the battleship’s defenses although this will also allow the UPF light cruiser a chance to close as well.
Defensively the battleships fires all of its energy weapons at the sathar vessel but they all go wide although one of the electron batteries would have hit except for the battleship’s damaged combat control system. The sathar light cruiser returns fire but also misses.
The UPF light cruiser and heavy cruiser close in on the sathar vessel but the heavy cruiser is still well out of range. The sathar ship fires once again at the battleship this time hitting with its distruptor cannon shorting out the battleships defenses and ICMs. The battleship and light cruiser return fire. The battleship connects with a LB damaging the sathar light cruiser’s hull (11%). The UPF light cruiser is still too far away and its shots go wide.
The UPF fighters hit the sathar fighter with one of their assault rockets knocking out it’s assault rocket launcher.
Repair Turn 4
The lead UPF frigate repairs its combat control system and is now as functional as it can be without getting to a shipyard to repair its heavily damaged hull. The other frigate restores more of its engine capability. The UPF light cruiser repairs 13% of its hull while the assault carrier also gets a minor hull repair restoring 1%. The battleship focuses all of its repairs on its hull, hoping to survive the oncoming attack and restores 13% of its hull integrity.
The sathar fighter under attack by the UPF fighters finally fixes its navigation control system while the other fighter restores some of its maneuverability. The UPF light cruiser fixes its combat control system and brings its proton battery back on-line in preparation for attacking the UPF Battleship.
Shots are fired as the ships once more come in range. Click for full size image.
Turn 13
The sathar light cruiser makes a pass on the battleship firing everything it can at the larger vessel and using its maximum acceleration. The lone sathar fighter, its navigation control issues solved, begins accelerating away from the planet, hoping to surviving the next two rounds of assault rocket fire from the two UPF fighters.
Defensively, the battleship and light cruiser try to take out the sathar light cruiser before it can inflict any more damage on the battleship. The UPF light cruiser, at nearly maximum range misses, while the battleship connects with 2 laser batteries, a proton battery, and its disruptor cannon slightly damaging the cruiser’s hull (8%), knocking out its laser battery and engines, and inducing a malfunction in its navigation control system.
The sathar light cruiser returns fire with all of its function weapons but in the excitement of the moment, the gunner all miss and the battleship escapes unscathed.
The UPF light cruiser closes to torpedo range on the sathar vessel and opens fire with everything it can. The heavy cruiser continues to close and the battleship fires a long range salvo at the now retreating sathar light cruiser. The fighters again fire at the lone sathar fighter, this time hitting it with one of their assault rockets and destroying it.
Defensively the sathar light cruiser now focuses on its pursuer and fires at the UPF light cruiser hitting with both its electron and proton battery inducing a fire and damaging the light cruiser’s damage control system.
Returning fire at the sathar light cruiser, the battleship misses and the UPF light cruiser hits with its laser, electron, and proton batteries damaging the ship’s hull (14%), knocking out its rocket battery, and damaging its combat control system.
The sathar light cruiser gets its shot and fails. It probably should have stayed closer to the battleship to get one more try. Click for full size image.
Turn 14
The sathar light cruiser pulls to port and holds together. The fire on the UPF light cruiser knocks out its laser battery.
Defensively, the battleship and light cruiser fire on the sathar ship. The battleship hits with an electron and proton battery starting a fire and knocking out its stasis screen. The light cruiser hits with its proton battery and disruptor cannon knocking out the sathar ship’s disruptor cannon and electron screen.
The sathar light cruiser fires at the UPF light cruiser but misses.
The UPF light cruiser continues to tail the sathar vessel closing to rocket battery range while the heavy cruiser starts catching up with the other ships. The fire on the sathar light cruiser damages its hull (6%)
The sathar light cruiser fires on the approaching UPF light cruiser hitting with its electron and proton battery damaging its hull (4%) and knockign out a third of its engine capability.
The UPF light cruiser hits the sathar ship with its electron and rocket batteries destroying it and ending the battle.
Final moves of the fight. Click for full size image.
Turn 15
The fire on UPF light cruiser damages its navigation control system.
Repair Turn 5
The UPF light cruiser gets its fire under control, the assault carrier repairs its rocket battery but discovers that any more repair of its engines will require a shipyard, and the battleship repairs another 11% of its hull.
The sathar heavy cruiser fully repairs its engines.
Final repairs
Battle repairs of the UPF ships continue over the next four and a half hours as the ships return to orbit around Ken’zah-Kit. In the end, the second UPF frigate can only get its hull up to 65% integrity, and the battleship can only get its hull up to 58%.
The lone sathar fighter meets up with the heavy cruiser and is attached to the hull of the larger vessel where it will remain until they get back to a shipyard. It’s maneuvering is fully repaired as the ships accelerate out of the ship. The heavy cruiser gets all of its systems repaired over the next four hours expect its hull which it is only able to restore to 81% outside a shipyard.
Lessons Learned
The sathar just can’t seem to catch a break and finish off the UPF ships. I though the light cruiser was going to finish off the battleship but rolled over 80 for every single attack so it missed completely. The battleship only had about 26 HP at that point. (On a whim I rerolled all the attacks and the second time it hit with a PB and RB, the latter did double damage and destroyed the battleship. But alas, that wasn’t the actual roll.) The same with the ramming of the frigates. I thought for sure the UPF frigate hit by two fighters was going to be destroyed, it only had 12 HP left but then I just rolled 8 on 2d10 for the hull damaged sustained. And it wouldn’t have done any good for the third one to hit it as I only rolled a measly 2 HP damage for that ship as well. There were several other times where I expected the sathar to get better hits but the dice were just against them. The UPF had bad spells as well but it didn’t seem to be at those critical, ship-finishing moments.
I considered having the light cruiser ram the battleship but the odds were in the favor of the battleship avoiding the ramming attempt and if it failed, the sathar ship would have been at point blank range for both the battleship and the oncoming UPF light cruiser so it didn’t try. Although it probably should have stayed a bit closer to the battleship as it ended its movement. But I really didn’t expect it to completely miss. This does have me thinking a bit about the ramming rules, however, so there may be a blog post about that when I have time to think on it some more.
The UPF are pretty beat up with the two cruisers and a fighter as the only ships not needing to go to a shipyard for repairs, but they only lost a single fighter. The sathar on the other hand lost everything expect a fighter and a heavy cruiser. Task Force Cassidine has now destroyed two major sathar fleets while only losing 3 assault scouts and 4 fighters.
There is one more battle coming up (in the Liberty system) and then things are going to quite down a bit as the sathar just don’t have very many ships surviving at the moment. They are done to just 9 fighters, 1 cutter, 2 frigates, 1 destroyer 2 light cruisers, 2 heavy cruisers, and two assault carriers but they are spread out all over the Frontier and the starship construction centers (and two are in the battle coming up in the Liberty system and may not survive). Its going to take some time to get them all together and build a few more ships.