 Unlock with Patreon
Outline of the Ghost Ship Osiris Module Project
This is a project I’m working on with Bill Logan, the creator of the FrontierSpaceTM role-playing game. This will be a module for that game designed for somewhat advanced characters. Bill created the general outline of the adventure, the star system, and the PC’s ship, but I’ve been working on a lot of the rest of the details. I suspect that as we get further along Bill will be adding in additional details and material as well.
As I was writing up this outline, and the one for the Sathar Assault Carrier, I realized that while the spoiler alert icon was an interesting idea, almost everything I’m creating is for the GM side of the screen and so it is all spoilery. I’ve decided to just drop that icon and not worry about it going forward, both on this project and the others. On to the outline.
Ghost Ship Osiris
Project Tag: Osiris
Level
A FrontierSpaceTM adventure for 4-6 characters of rank 1-2.
Tagline from the Title Page
A team of corporate troubleshooters is sent to Outpost Osiris to solve a dangerous threat. What they find may change the political, technological, and scientific landscape of the frontier forever.
Premise
The Nebula Vista corporation operates the Osiris mining base in the inner asteroid belt. The miners uncovered something dangerous a few days ago and have requested help. The PCs are being sent in to investigate and assist the mining team.
Basic Story
Outpost Osiris is a Nebula Vista Corporation mining and research base on a mineral-rich asteroid in the Duergan’s Star System. They mined deep into the rock, following unusual readings from their mining scanners. They located what they believe to be the ruins of an ancient alien starship, somehow embedded deep in the asteroid’s core. While probing its exterior, they somehow awakened it from its slumber. Its proximity defense system attacked them, and they were forced to retreat to the warehouse complex on the asteroid’s surface. They tended their wounds and sent a request to NVC for a team of troubleshooters to assist.
Unknown to the miners, their discovery attracted the attention of a crew of independent scavengers who believe such a find would bring forth untold riches. The crew, commanded by Captain Thrawl, intercepted the mining outpost’s call for aid and has contacted a group of hit men on Hawthorne (the closest known NVC administration facility) to stop any departing troubleshooter team, or at least slow them down. Thrawl and his crew landed and took over operations at the facility, hoping to get as much salvaged alien tech as they could before the NVC team arrives. Thrawl explored the alien starship and found a very valuable piece of alien tech: a “phase screen” generator, but lost several men in the process of trying to decouple it from the reactor core.
Hiring hitmen is a bold move for Thrawl and his kind. They’re not normally this violent unless they believe they have vast wealth at their fingertips. The scavengers aren’t looking for a fight. They will dump their prisoners and escape with a cargo bay full of looted alien tech at the first sign of an NVC ship approaching, reluctantly abandoning the phase screen generator.
The activities of the scavengers have activated alien security robots which are not moving through the mining complex. The PCs will need to neutralize the robot threat, pursue Thrawl, investigate the alien ship to remove the phase screen, and fight off an attack by Thrawl and a rag-tag scavenger fleet bent on capturing the phase screen.
Materials Needed
- System map showing the location of the planets and asteroid belts
- Star system description (partially done by Bill)
- Deck plans of PC ship (already done by Bill)
- Deck plans for Thrawl ship
- Stats for the various robots
- Map of Outpost Osiris
- Deck plans for alien ship
- Details on the aliens
- Bio for Thrawl and other significant NPCs
- Stats for all NPCs, both scavengers and miners
- Table of rumors for the PCs to know/learn (partially done)
- Final adventure write-up
Last Words
That’s the basic outline for this project. This one is slightly different as it is a collaborative project between me and Bill. As such, I’ll only be posting what I work on here on the blog. To get all the details you’ll have to wait for the final product.
Now that the three projects are laid out, it’s time to start working on the details. If you have any questions, comments, or suggestions, let me know in the comment section below.
Outline for the Sathar Assault Carrier Project
 As I was thinking about this project, I realized that if you are a player in a campaign and your GM uses any of my sathar material (probably a Star Frontiers campaign), this entire project is one giant spoiler. Although if you’ve already read through my Sathar Destroyer Technical Manual, then there will only be a few new things in this project beyond the decks themselves. Those are the bits I’m going to call out with the spoiler icon in all future posts on this subject as I’m going to assume that anyone here has read the technical manual. If you haven’t read the Sathar Destroyer Technical Manual, then the following warning applies to the entire series. You’ve been warned.

Now that that’s out of the way, let’s get started.
Sathar Assault Carrier
Project Tag: SatharAC
Overview
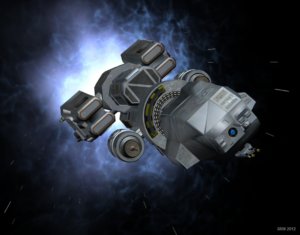
This is a project in the vein of my Sathar Destroyer and UPF Assault Scout technical manuals. It will cover in detail, including maps for every deck, the interior of the Sathar Assault Carrier. The design of the assault carrier will be based on the game stats and (roughly) the silhouette from the game rules but with my twist on how the sathar design and use their ships.
In addition to the physical design of the ship I include information about how the ship typically operates and information about the larger divisions of the sathar military (beyond that detailed in the destroyer technical manual).
Finally, I’ll include, either as part of this document or as a pair of separate documents, deck plans for the shuttles and fighters used by the assault carrier. I provided basic information on the shuttles in the Sathar Destroyer Technical Manual but no deck plans. I aim to correct that.
I’ll also be creating a 3D model of this ship.
Materials Needed
- Ship design overview
- Description of Sathar military structure
- Fighter deck plan and write-up
- Shuttle deck plan and write-up
- Ship crew roster
- Description and stats for any robots on the ship
- Plans for each unique ship deck and description
- Ship silhouette/cross-section showing deck arrangement
- 3D model of ships (one each of the following for the assault carrier, fighters, and shuttles)
- basic STL file for printing
- Blender file with materials and coloration for 3D graphics
- Complete technical manual write-up describing each deck and the ship’s operation
Last Words
That’s the basic outline for this project. The assault carrier is a big ship. Based on the game rules, it’s about 380-475 meters long. I’m suspecting it will be closer to the smaller end but still, that’s going to be a lot of decks to create. However, many of them will be identical but used multiple times throughout the ship. It may actually end up having fewer unique decks than the destroyer did but we’ll see how this all falls out in the end.
If you have any thoughts or comments on this particular project, let me know in the comments below.
Outline of the Death at Rosegard Adventure Project
 This is the first of what will be the “Outline” series of posts. I’ll typically do one of these for the start of each project and possibly smaller ones for major sub-projects pieces. We’ll have to see how it goes. In these posts my plan is to lay out the basic structure of the project, identifying what will be included, what needs to be created and so forth. I’ll tag each of these outlines, along with the post related to that project with a tag to make them easily identifiable. For this particular project, the tag is “Rosegard” as is called out below.
The first three outlines, for my initial projects, will probably be a bit more fleshed out than later ones since I’ve been thinking about them a bit, or in the case of this one, already mostly finished it. Or it may be that things go on, these will get more detailed as I’ll be better about thinking of things in advance. We’ll have to see. Also, these first ones won’t be open to much debate as they are projects that are fairly well along. For future projects however, I will be taking input and idea from commenters and Patreon supporters to provide direction on what is created.
This particular project, Death at Rosegard, is an adventure I ran for my on-line Star Frontiers game and I have all the major pieces in some form, I just need to clean them up and present them. So hopefully it will go pretty quickly. That’s not true of the other initial projects and any future projects I create.
Let’s get started.
Death at Rosegard
Project tag: Rosegard
Level
An adventure for 4-6 beginning characters. This was literally written for a group of 6 brand new characters as their first adventure.
Premise
The PCs work for a mega-corp (Streel in this case) which has an arrangement with the small village of Rosegard to operate a mine near the town. One of the mining staff has been murdered and the PCs are sent to investigate.
Spoiler Sidebar
These outline posts are going to be, by definition, spoilery. It can’t be helped. But then again, I think the main audience for this material is going to be game masters more than players. However, if you want to be a player in these adventures and have your GM run them, I’ll try to flag out things to skip so you don’t ruin the surprise. To do so I’ll flag spoilery sections with this blue and gold warning mark:
If it appears near a heading, skip to the next section. If it appears next to a paragraph or bullet item, you only have to skip that small bit. Finally, when I do a post about one of these spoiler topics, I’ll put the warning icon right at the top and that means you may want to skip the entire article. I may not always be successful in tagging everything but I’ll try. You’ve been warned.
In this particular article, I think the only thing you need to skip is the Basic Story section coming up and a couple of bullet items in the “materials needed” section.
Basic Story 
One of the mine staff is a sleeper agent for the sathar and has been recently activated. He has been slowly over the past several months been “liberating” supplies from the mining facility and providing them to his sathar handler. He has been aided recently by someone from the town providing supplies as well. His actions were discovered and caught off guard, he killed the discoverer. He then disposed of the body in a way to attempt to make it look like it was done by the native fauna but that failed.
The PC’s are sent to attempt to find the murder and in the process should uncover the sathar connection, discover another sathar agent unconnected to the town, and a small sathar base in the mountains. In addition, they will get to interact with the village, meet the inhabitants and possibly form some connections to the village. There is also the person in the village that is aiding the sathar agent at the mine to discover
Materials Needed for the Adventure
- World map showing the location of Rosegard in relation to other points of interest
- Area map of the countryside around the village and the mine
- Village map (rough draft appears above)
- Mining compound map
- Stats and bios of the mining staff
- Stats and bios of the villagers
 Map and bio for location with the external agent and how he’s connected to the story
- Map and stats for the sathar base
- Various bits of background and history for the planet and area
- A “Where to go from here” section with further story ideas
Last Words
And there we go, a basic outline for the adventure and a list of what is needed. Normally that “materials needed” section would be the final bit of the outline but seeing as this is the first one, I thought I’d talk about it and how it will be used. At a most basic level, that list is the roadmap for upcoming blog posts. Those are the bits and pieces I’ll need to develop (and share) as I build the adventure.
The list will probably be incomplete and often a bit vague in the beginning as I’ll think of other things that need to be added along the way. It’s not my intention to come back and edit it as we go but I might do a post at the end to compare what was made to what I originally envisioned, in part to just see how it fell out and partially as a learning tool for myself to get better at planning and estimating what is involved.
In this particular case, most of what is on that list already exists, either as notes, sketches, rough drafts as I have already run the adventure. We’ll be working on turning those notes and drafts into final forms over the coming weeks.
What do you think about the outline format? Are there things you’d like to see included? Things that need more detail? Should I not worry about the spoiler alerts? Let me know in the comments below.
Contacting Me
I would love to hear from you! If you have suggestions, comments, or questions about any of the stuff I post or am working on feel free to reach out to me. If you do want to reach out, there are quite a number of ways to get a hold of me.
The most obvious is to comment on the post here on the site you want to discuss. I’ll respond here as well and we can have a public discussion on the topic that anyone that comes after can read and learn from. This works best for discussions specific to the post in question.
If you want or need a non-public discussion, feel free to e-mail me at tom[at]expandingfrontier.com. I check my e-mail regularly so you should get a fairly timely response although it definitely won’t be immediate. If you are a Patreon supporter at the Senior Advisor level or higher, you will also have a private e-mail channel to contact me at. Those e-mails will typically get a faster response, or at least a higher priority in responding to them.
If you are a Patreon supporter you can always contact through Patreon or on the Discord server as well.
Beyond that, I’m active on social media in a variety of places and you can find me in those venues by clicking on the social media icons in the sidebar. Twitter (I’m @dagorym) is probably best as I typically have my Twitter feed up on a side screen during the day but my phone will ping me when I get direct messages at any of the other locations as well.
So don’t be afraid to contact me. I want to interact with those reading the blog and supporting me on Patreon.
That said, I’ll probably be off-line from now until Tuesday (May 8, 2018) as my wife and I are headed out of town for our 24th anniversary and for at least part of the time will be places where there is no internet or cell service. I’m going to try to get a post queued up to post tomorrow but beyond that I’ll be back next week.
Some Example Content
After I posted my announcements about this site on my various social media platforms, someone asked about content samples. The plan to post some examples was already in the works as part of launching this site so here we go.
Let’s start with this one, the image I’m using as my cover image on the Patreon campaign.

This showcases a few of the bits that went into making the Assault Scout Technical Manual (link downloads the PDF) that I released back in Nov 2017. The deck plans on the right fade from my initial sketches through different iterations to the final labeled deck plan. Then comes the cross section created to show the relative positions of the decks in the ship. Next comes a page from the technical manual where that cross section image is featured. The yellow ship is the full 3D model of the ship based on the deck plans and the final image is the 6″ printed version of that model (1/333 scale) fading from unpainted to painted (with a different color scheme that the digital image).
I had posted most of the images used in this collage on-line in the process of creating them. Here’s a few links to some of the posts with full versions of the images:
- The unpainted model – The image at this link is actually the 4″ one unpainted but there are pictures of all of the various sizes I printed including the 12.6″ (10mm scale) version of the model
- A Star Frontiers logo I made (that I’m trying to get permission to make a patch out of) that used the painted digital 3D model used to make that cross section image.
- The painted physical 3D model – This is actually the 7.6″ (6mm scale) version and is sitting here on my desk next to me as I write this.
- The cross section image – unlabeled in this case.
- The unlabeled deck plans
In addition to the Assault Scout Technical Manual, I also created a Sathar Destroyer Technical Manual (link is to the PDF) back in 2014 to describe that ship.
Here are a couple of other large maps I made, recreating the big poster maps that came with the original Star Frontiers boxed sets. Unfortunately I can’t to link to the full files since I was asked by WotC not to and they own the IP


Here’s a “family portrait” of many of the 3D ship models I’ve created (this one predates the assault scout model). All of these models were designed to be used as tabletop minis. Several are based on the old Star Frontiers metal miniatures and are replicas of them.
Finally, I’m going to link to you my collection of Two Sheet Locations on DriveThruRPG. These are small four page write-up (the first 4 are free) that provide a map, location description, and NPC for use in your games. The are mini versions of the types of things that I’m hoping to produce with this project. The only reason that project stalled was that I reentered grad school for my Masters of Library Science degree and just didn’t have the time to keep producing them.
I hope that gives you a feel for some of the things I’ve created in the past and what to expect in the future. In addition, you should check out my posts (published under my dagorym handle) on the Arcane Game Lore blog (which is now offline and the posts are archived here on this blog) to see some the “behind the scenes” materials I’ve posted in the past.
Initial Projects
To get this project started, I plan on working on three initial projects. This will help me get into the swing of things and figure out my workflow for this site and Patreon. The three initial projects are detailed below.
Sathar Assault Carrier Technical Manual
I created a detailed set of deck plans and write up for a Sathar Destroyer several years ago. Part of the reason was to create a miniature for the ship. Since there is no miniature for the Assault Carrier, I thought that might be a fun project to tackle. The project will include:
- a full set of deck plans for the ship
- a write-up on the ship and its operation
- a 3D model of the ship that can be printed for use as a miniature
- a fully textured 3D model for use in digital images
Death at Rosegard
This is a complete adventure that I recently finished running for my home group. While it is based on Star Frontiers, the adventure could be used in almost any system. This project will include:
- several location maps (town, mine facilities, and other locations)
- numerous NPC bios
- full adventure write-up
- new creatures
Ghost Ship Osiris
This is a module for the FrontierSpace RPG by Bill Logan that I am working on with him. This will be a DWD Studios product when completed so I need to talk with Bill a bit about what I can share but given his license on the property, probably most of the things I create can be shared here. This project will include:
- Several ship deck plans
- Several robots
- NPCs
- Locations (with maps)
- A full adventure module
- possible 3D models of the ships
Those are the project I’m looking at starting off with. You can also expect to see tweaks to the web site as the content expands and I look more at the presentation Is there one you’d like to see prioritized over the others? Any thoughts on other types of materials you’d like to see produced? Let me know in the comments.
Welcome to the Expanding Frontier
Welcome to the Expanding Frontier. This blog and site is dedicated to creating gaming resources focused on science fiction role-playing games. I’ll be posting maps, locations, ships, vehicles, characters, and more that you can use in your games. I’ll also be talking about the tools and processes I use to to create the materials.
I’ll primarily be focusing on creating adventures and all the bits and pieces that go along with that. There will occasionally be other stand-alone or one-off projects as well.
A lot of the work I do is supported by may Patreon campaign. Some of the posts that appear on the blog will be only available to Patreon supporters but most will be publicly available. If you want to help support the work I do, just hit the “Become a Patron” button on the right and sign up.
This is very much a work in progress so don’t be surprised to see changes and updates to the site and the things I work on as time goes on. If you have suggestions or requests, feel free to comment below.
Designing Out Loud – Void Jumping
This post originally appeared on the now-defunct Arcane Game Lore blog.
This post is running a little behind as I’ve been swamped with end of semester projects. One down, two to go. Next week’s post might get impacted as well.
My last two articles (one, two), part of the November RPG blog carnival, talked about the unexpected in Void Jump travel. In this article I want to discuss some more details about Void travel in my game and the mechanics that will be used. Or at least what I am considering for a first pass.
Some Constraints
Gravity Wells
In my universe, Void travel cannot start or stop anywhere. If you are too close to a large mass, the gravitational field of that object prevents void jumping. This was somewhat inspired by Larry Niven’s hyperspace. I liked the idea of having to worry about the large masses that you are traveling by. Unlike Niven’s hyperspace, getting too close doesn’t cause anything bad to happen, it just bounces you back into real space or prevents you from initiating a Void jump at all. Of course if the object is close, directly ahead, and you’re moving fast, things could get scary.
This has a couple of implications for FTL travel. First, you have to get away from everything. I have an exact forumulation for it but for a solar sized star, you need to get about 4 AU away from the star before you can jump. Starting at a planet about 1 AU away, it takes abut 84 hours of acceleration at 1g to get out that far. This means that at a minimum, if everything is aligned properly and everything works, a single insterstellar jump will take about seven days (assuming a 24 hour day).
Next, it means you only have to be accurate in your direction vector enough to hit that sphere around your target star where Void travel doesn’t work. As long as you’re lined up well enough, you’ll drop out of the Void when you hit that gravity well. This places an upper limit on how accurate you need to be. Now, the question is, can you get out of the Void on your own or do you have to hit one of these gravity wells to come out of the Void? I’m leaning toward the following combination. You can get out on your own, but it’s much harder than being pulled out naturally by hitting a gravity well. In this scenario, you want to try to hit the target gravity well when you can.
This also means that locations close to the mass source (star or large planet) are “shielded” by the “no jump zone”. Any arriving ship or fleet has to arrive outside that zone so there will be advanced warning before they get to their destination (at least if anyone is looking).
Everything is Moving
Another constraint is that nothing is ever in the same place twice. Planets orbit their stars which are orbiting the galactic center and moving relative to each other. This means that no two jumps are ever exactly the same. A jump from one planet to another, repeated just a few weeks later, means that both the start point and the destination as moved. It won’t be by much, but if you remember from my last article, even a little bit of error can result in a huge wrong location.
So every jump needs its direction vector recalculated before you can start. The good news is that this actually isn’t a very hard calculation. Or rather it is a hard calculation but a good computer can do it relatively quickly. There is a lot of data that goes into it but for game purposes, I’ve decided that the calculation can be done in under an hour. All you need is your start time, your start location, and a good astronomical database that has the information about your departure and destination system. However …
Getting Lined Up is Hard
Figuring out where you need to go is easy, determining if you are actually going there is another story. The problem is the same as the one above, everything is moving. There is not really an absolute reference frame. The problem is that you don’t just need to know your position relative to the star your leaving but relative to all the stars in the sector. And it’s not really the position that matters but rather your velocity vector. How are you moving relative to all of these objects? And how do you determine this direction down to arcsecond (or sub arcsecond) accuracy?
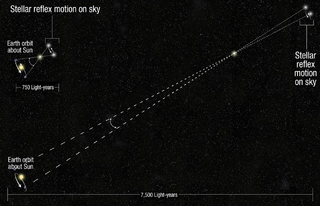
This can be overcome by the fact that you are moving quite a bit to get out of the gravity well. As you move along your path, nearby stars will appear to move relative to more distant ones. This is called parallax. By measuring how much each of the stars move, and which direction they move, you can determine your vector in space relative to your departure and destination star.
There are some things to remember when trying to measure parallax. First, you have to move quite a ways to measure any shift at all in stars; they are really far away. Second, when you first start out, you’re not moving very fast so you don’t move very much between measurements. This means that the more accurate of a measurement you need, the longer it is going to take as you need to have larger and larger baselines to measure small parallax angles. You get these longer baselines by waiting longer and by accelerating so you’re moving faster and covering these distances faster.
What is the Jump Process?
Given all of this, what does a typical Void jump look like in game.
First, the astrogator computes the jump vector. For this he needs to know the time of departure. Plus or minus a few hours doesn’t make much difference. This takes about an hour of time on the ship’s computer or could be requested from a central astrogation computer on the system’s data network if it exists.
Next the ship points in the general direction of the target system and begins accelerating. Images are taken of the stars being measured for parallax. As the ship continues to accelerate and covers more distance, new pictures are taken and the parallax measurements are made. From this the course can be adjusted to make it more accurate. This is repeated until the course is accurate enough.
Once the ship is lined up and the minimum jump distance is reached, the ship can engage whatever technology enables the jump and shifts to the Void, makes the trip, and emerges in the destination system.
At this point more standard navigation techniques can be used to decelerate and travel to the destination system.
How to Trigger a Jump
You may have noticed that I kind of glossed over actually making the jump. That is going to depend on the setting. Star Frontiers does it by hitting 1% the speed of light (of course that begs the question, 1% of c relative to what?).
For my world/game, the ability to enter the Void is controlled by a “Jump Field Generator”. When you want to enter the Void, you turn this device on and it envelops the ship in a field that allows the ship to shift into the Void and make the jump. Turning it off takes you out of the Void.
How Long Does it Take?
This really depends on the setting. How fast can the ships accelerate? What is the minimum jump distance? How long does it take to line up the ship?
If you want to use this idea, you’ll have to answer that for your own setting. I’ll give you my answers.
How fast can ships accelerate?
For my setting, there is no artificial gravity. Thus to get simulated gravity on a ship it has to accelerate. But you also can’t accelerate too quickly or everyone gets squished. By default, ships tend to travel by accelerating and decelerating at one standard gravity which in my setting is defined as 10 m/s/s for simplicity. This means that accelerations are relatively low and it takes time to get from place to place.
What is the minimum jump distance?
For my setting, I’ve decided that the local gravitational acceleration (from everything smaller than the galaxy itself) has to be less than some specific value which I don’t remember off the top of my head as I’m writing this. For a star like the sun, this distance works out to something like 4.05 AU. At one standard gravity of acceleration, it takes about 84 hours to go from a planet at 1 AU out to the jump distance. This sets a minimum time for a jump.
How long does it take to line up the ship?
I’ve thought a bit about this but I’m going to invoke a bit of handwavium here toward the end for the fine details. There are several factors that go into it.
The first question is how accurate of a parallax angle can you measure. Modern systems dedicated to this can measure parallaxes of 10 micro arcseconds with lots of data on a 2 AU baseline (diameter of the Earth’s orbit) over five years. So it is reasonable that the ships should be able to achieve 10 mili-arcsecond accuracy (1000x worse) on the same baseline. After all, they should have at least equivalent sized telescopes and detectors. They just lack the time frame. So we should be able to measure o.o1 arcsecond parallaxes on a 2AU baseline or 0.1 arcsec parallaxes on a 0.2AU baseline.
The next question is how big of a target are we trying to hit. Assuming you have to hit the “no jump zone” around a solar sized star, that target is a direct function of the distance. For a star 5 light years away, that 4 AU radius target corresponds to a direction accuracy of 2.6 arc seconds. So if we can measure 0.1 arcseconds in 0.2 AU of travel, let’s assume that we should be able to get our course vector accurate to 2.6 arcseconds in about 0.4 AU (0.2 AU to get the first vector, adjust, and 0.2 AU to verify).
So how long does it take to travel 0.4 AU assuming 1g acceleration and starting at rest? 30.43 hours
Now a 10 ly jump requires an accuracy of 1.3 arcseconds. The question is, how long should this take to dial in the desired accuracy? I’m fond of inverse square laws so I’d say that double the accuracy requires 4 times the distance. That means you have to travel 1.6 AU to get enough measurements and course corrections to achieve the desired accuracy. Traveling 1.6 AU from rest requires about 60 hours.
Here’s where I will apply the handwavium quite liberally. I could easily pick some numbers and justify the accuracy needed to achieve a jump and compute the travel time exactly needed to achieve that accuracy for a given distance. And I could even provide the forumulas. But it would be kind of messy. However, I want something quick and simple. I could present the data in a table to look up. And I might do that as a later optional rule for those that want more realistic values.
But what I really want is something quick and simple that is easy to remember. And I want a 10 light year jump to take longer to line up than it takes to get out to the minimum jump distance. I also want it to become unpractical to make really, really long jumps. So let’s set the time required to line up the ship to the distance to be traveled, in light years squared in hours or 10 hours whichever is longer. Or for those that like formulas:
Time = (d in ly)^2 hours
So a jump of one to three light years would take 10 hours to line up. A five light year jump would take 25 hours, and a 10 light year jump would take 100 hours.
Putting it all together
That was a very long winded explanation for what in the end is actually a simple result.
If you want to make a Void Jump for distance of 9 light years or less, it takes 80 hours (notice I rounded it down to 80 hours from the 84 I was quoting above) to get out to the minimum jump distance at which point you are lined up and can make the jump.
If your want to make a Void Jump for a distance of greater than 9 light years, it takes the number of light years squared in hours to get the ship lined up accurately enough. At which point you can safely make the jump.
Variations
Obviously that “simple” solution is based on starting at rest at a planet 1AU from the star and needing to get out to 4 AU before you can jump. There are lots of variations on this scenario that you can imagine that will vary the time. Possibilities include:
- You’re starting further out in the system, maybe already beyond the minimum jump distance.
- Instead of heading straight outward from the star, your destination is actually on the opposite side of the star and so instead of having to travel 3 AU to get to the minimum jump distance you have to travel up to 5 AU (if starting at 1 AU) or maybe even 8 AU if you’re on the other edge and have to go all the way across
- A combination of both of the above. You’re outside the gravity well but the jump vector crosses it so you have to move to get a different line to your destination
- You get attacked or encounter something and have to maneuver while getting lined up. Now you’re all messed up and you have to start over.
- What if you accelerate at a higher (or lower) rate?
- What if you don’t spend enough time lining up?
Are there any other variations that come to mind? Are there any concepts that I should have explained better? Is there something I overlooked? Let me know in the comments below?
Your Final Destination – Exiting a Void Jump – November Blog Carnival – part 2
This post originally appeared on the now-defunct Arcane Game Lore blog.

My last post on Void Sickness along with reading Mike Bourke’s second portal article (I’m still a week behind but I’m catching up!), got me thinking about another aspect of Void travel that I like to use but which I don’t see talked that much about: where you come out on the other end. And since I’m approaching it as something you can’t completely control, the exact location is somewhat unpredictable and can have unexpected results. So this will be another entry into the November RPG Blog Carnival. Enjoy.
Never the Same Place Twice
Last time I played with the Disruption parameter. This time I want to talk about Repeatability. When I was defining void travel in the previous post, I stated that the repeatability was “vague” which was defined as “A new Portal from the same origin may be directable to some point near where the old one was” in the original portal article that sparked my first post. In his second article, he added, “but the exact same destination is unreachable” to the end of that when he summarized the detailed definitions. In that second post I liked the definition he gave for “unpredictable” which was “A new Portal from the same origin will connect with another point completely at random, uncontrollably, within the destination plane of existence, perhaps restricted to a significant region.”
My idea of void travel falls somewhere between those two. It’s not that reaching the exact same location is impossible, it’s just very unlikely. You’ll always end up close (on a cosmic scale) unless you make a major mistake but probably not in the same location. And in truth the chances of actually starting in the same place are slim to none as well depending on your definitions of location and the scale of what constitutes the “same origin” (Are you measuring in meters, kilometers, or AU?). Given the two summarized definitions I’m actually leaning a little more toward unpredictable but both work. The point is, the place you come out is always going to be different. Let’s look at that and what it may mean for your game.
Non-repeatability
So why is it not possible to come out in the same spot? From my perspective this comes down to two factors that related to how I treat void travel. In my interpretation of how void travel works, whatever vector you have in the real universe when you enter the void is the vector you maintain in the void. You can’t change your direction and you move in a “straight” line. Which means you need to be lined up exactly right or you’re going to go way off course.
Stay on Target
Just how exactly do you need to be lined up? Let’s look at a couple of examples. Take a piece of paper. Draw a small dot on it no larger than half a millimeter. Now hold that up at arm’s length. See how big that dot is? Depending on the size of your dot and the length of your arm, that dot covers an angle of about 2-3 arc minutes. If your direction vector were off by that much, how far off would you be at your destination?
I’m going to be generous and assume you drew a small dot and have a long arm and go with the 2 arc minute number. Assuming you make a small void jump, say 4.3 light years, the distance to the nearest solar type star, Alpha Centauri, you’d be off target by only 5.5 billion kilometers. Space is big, that’s not too bad, right? Well, that’s about 36.7 Astronomical Units (the distance between the Earth and the Sun). Which means if you were shooting for Earth, you’d be out by Pluto. Depending on how fast your ship is, that may take a while to compensate for.
But an error of 2 arc minutes is pretty big. We can do better than that. Let’s say we can get our error down to the size of an arc second (1 degree = 60 arc minutes = 3600 arc seconds). That’s equivalent to putting your dot about 24 feet (7.2m) away. If we do that and make the same jump to Alpha Centauri, we’d still be off by about 46 million kilometers or 0.3 AU, roughly the distance between the Earth and Venus at closest approach. (By the way, an error of 1 arc second means your ship moved laterally 4.8 mm after traveling 1 kilometer). And if you make a jump twice as far, the error will be twice as large as it is really just the direction error (in radians) multiplied by the distance traveled. Double the distance, double the offset.
Just based on that, you can see that you’re probably not going to come out at the same place at your destination no matter how hard you try. Getting your vector to that accuracy is going to take some effort. But there is another effect, the time spent in the void.
How Good is Your Clock?
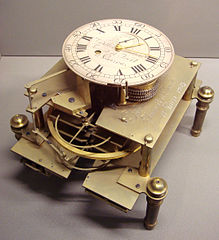
The other aspect of determining your position is how long you spend in the void and how far you travel in a given amount of time. If there are errors in your time keeping, this will translate into errors in the distance traveled.
Let’s use the example I gave in my earlier post: void travel occurs at the rate of one light year per second. Now, a light year is 9.4607×10¹² km. That means that an error of a millisecond equal a distance of 9.4607×10⁹ km (63 AU, roughly twice the distance to Neptune). A microsecond error reduced that by a factor of 1000 and an error of only a nanosecond reduces that by another factor of 1000 or down to an error of only 9460.7 km, less than the diameter of the Earth.
Modern computers can get to about a 10 nanosecond resolution which means an accuracy of about 95,000 km roughly 1/4 the distance to the moon. Depending on the technology you allow in your setting (and what you allow to work in the void), the accuracy could be better or worse than this. But even with a microsecond error, the distance you’ll be off is only 0.063 AU.
So while there is an effect, and you probably won’t end up in the same spot, it is much less than the effect you can expect from an error in the velocity vector. Depending on the story you’re trying to tell, that may or may not be negligible.
Impact on Your Game
We’ve seen what the scale of the effect is, what impact does that have on your game? While the details will depend on you exact setting, here are three ideas off the top of my head.
Travel times
Given the natural variation in arrival locations, you are typically going to be off target which means the actual travel time to the destination is going to vary. It will no longer be “three days” but “three to four days”. You can’t really plan on exact time tables.
To put some numbers to that, assume you were off by the 0.3AU distance from earlier. Assuming your ship is traveling at 1% the speed of light (3,000 km/s, just under 11 million km per hour), it will take you about 4.25 hours to cover that extra distance. If you’re off by more or going slower, it will take even longer (and that’s ignoring a bunch of real world physics about changing direction and such which will only add to the time).
This means that you have to plan for and account for the extra time and it may add tension to a situation. We only have 100 hours to reach the destination and stop the “big event”. The jump and associated travel time takes 80+2d10 hours to just get to the location where the big event will happen. Do the characters arrive with hours to spare or are they landing with only minutes until they have to spring into action? What impacts will this have on their preparations? Will it limit what they can do or bring to bear in the situation?
Space Piracy
Again ignoring real world physics of matching velocities in space, the result of non-repeatability of void jumps means you’re probably not going to have space pirates lurking in the outer system for ships to appear and then pounce on them. Even if you had hundreds of ships entering a system every day, the odds of one appearing near where a pirate vessel was lurking is really, really small. The pirate ship could sit out there for years and never have an encounter. This means that piracy, if it occurs, will happen near the population centers, at remote, fixed outposts, or on the outbound leg of a journey before the void jump when the routes are much more predictable.
Arriving in Formation
Remember this scene from Return of the Jedi? (0:43-1:04 is the relevant part if you don’t want to watch the whole thing).
That just isn’t going to happen with void jumping. Even assuming that you can get the velocity vector the same for all the ships, which might be hard but could be possible (although not with everyone dodging in and out among each other like the fighters in the beginning of that clip) the timing variations between the ship computers will scatter everyone across tens of thousands of kilometers of space. You will need time to regroup. Which means you probably want to appear further out in the system to allow yourself that time which in turns means longer travel to your destination and a greater chance for discovery.
Or if you do allow for piracy to occur in the outer reaches of the system, merchants and their escorts may be separated on arrival. The convoy scattered across space. Can the escorts get back to their charges before the pirates attack or do they only arrive in time to extract revenge for damage done?
Void Travel is Unpredictable
From the above thoughts, it’s fairly obvious that this method of FTL travel has the potential to add some randomness and unpredictability into your game. Whether to add tension or just flavor, there is no real reason that void travel should be routine. Are there other ideas for impacts that come to mind because of the unpredictability? Let us know in the comments below.
Comments
Mike Bourke – November 24, 2015 at 11:28 am
There’s an obvious solution: the very short void jump. You arrive and find yourself 30 AU away from where you want to be? Jump for long enough to travel 29 AU. This distance is short enough that the final error will be relatively small.
Now, I happen to think that this tactic, while eminently sensible, is not as desirable as the additional flavor that the randomness gives. That leads me to suggesting that in order to make a jump, a ship has to utilize a minimum amount of power or more, which in turn means that there is a minimum jump distance.
This wouldn’t completely eliminate the viability of the tactic; it would mean that the most practical approach is to aim for a point half your anticipated error away from whatever the minimum jump distance is. For convenience, let’s say that your maximum error is 10AU per light year, and you are jumping 20 light-years, and that the minimum jump is 150 AU:
10 AU x 20 light years is 200 AU maximum error. Half that is 100 AU, so that’s the mean error that you will experience. But that leaves you too close to make the minimum jump, so you move that destination point out by the minimum, and aim to arrive 250 AU away. That means that your range of arrival points is 250±100 AU – so even if you get as close to your ultimate destination as possible, you are still a minimum jump away, and might be as much as 350AU.
The thing is that picking just any point that far away is not good enough; you would need some standard navigational reference points from which to get your precise distance for the second jump. Observations would take time, and without standard references, you might have to wait for weeks, months, or years for the objects you are measuring (presumably outer planets) to have moved enough to permit navigation.
And standard reference points for a jump means that your arrival point is a much smaller volume of space – making piracy possible after all. Not easy, but not entirely out of the question, either.
Mike Bourke – November 24, 2015 at 6:58 pm
Alternately, maybe a ship develops some sort of energy “charge” that simply delays making another jump for a period of time. That would prevent the “stop short and recalibrate” dodge – if there’s a deadline involved.
Tom – November 24, 2015 at 9:26 pm
Yes, both of those are possible implications as well. I like the minimum power required idea. I didn’t include it here but I also utilize limit on gravity wells. Kind of like Larry Niven’s hyperspace. You can’t get too close to a large mass and still have your void jump system work. This actually counter acts some of the implications depending on how you implement it. I think that will be another void jumping article at some point.