The Expanding Frontier

Creating Sci-fi RPG Resources

  • Home
  • Order a Map
  • Order Miniatures
  • Supporters
  • About
  • Bio

Tag Archives: GODCo

Skills For Hire – Lab Crawl

So last week I wrote up the location of the GODCo bio-lab. This week we’re going to look at what my players found when they got there. First I’ll provide my game notes with the details of what had changed, and then so a short write-up of the players’ actions. “Lab Crawl” is the title I gave this scenario in my notes.

Background

GODCo has been operating the lab on Pale for about 20 years now.  The lab is a location the GODCo scientists are studying the Pale flora and fauna and looking for ways to adapt various yazirian plant species to the environment as well as improving flora and fauna used by Frontiersmen to be more adaptable to the Pale climates.

A few days ago the quarterly supply delivery to the “secret” base left but the drivers and vehicles (two ground trucks) never returned.  Yesterday an aircar flew out to the site and was shot at by the site’s defenses (heavy laser).  The PCs are being sent in (on the ground) to investigate. Their objectives are:

  • Figure out what happened
  • Rescue any personnel trapped and still alive in the lab
  • Secure the site if possible.

What Happened

In my game, there are still sathar on Pale from the First Sathar War (referred to as the Great Sathar War on Pale as the second one is just now brewing). While a few of the sathar on the planet are holdovers from the war, many more have actually slipped to the surface over the intervening years. They have been working to subvert the society and develop new bio-weapons (e.g. lesser quickdeath, sathar poison squirrel). It is to do some work on the poison squirrel that they have capture the lab.

A few weeks ago, a team of sathar attacked and captured the base. They needed access to the equipment and facilities to complete some work that they had been doing in more makeshift labs elsewhere on the planet. The staff that survived the attack are being held as prisoners and used as test subjects (and food) for the creatures they brought with them.

Changes From Last Post

In my previous post, I described the lab during “normal” operations. Here is what changed when the PCs arrived

Staff

There are only 1d5+5 of the original 44 staff members still alive, all scientists. They are locked individually in the living quarters and isolated from one another. They are all malnourished and weak. They will not be able to assist the PCs in any fighting.

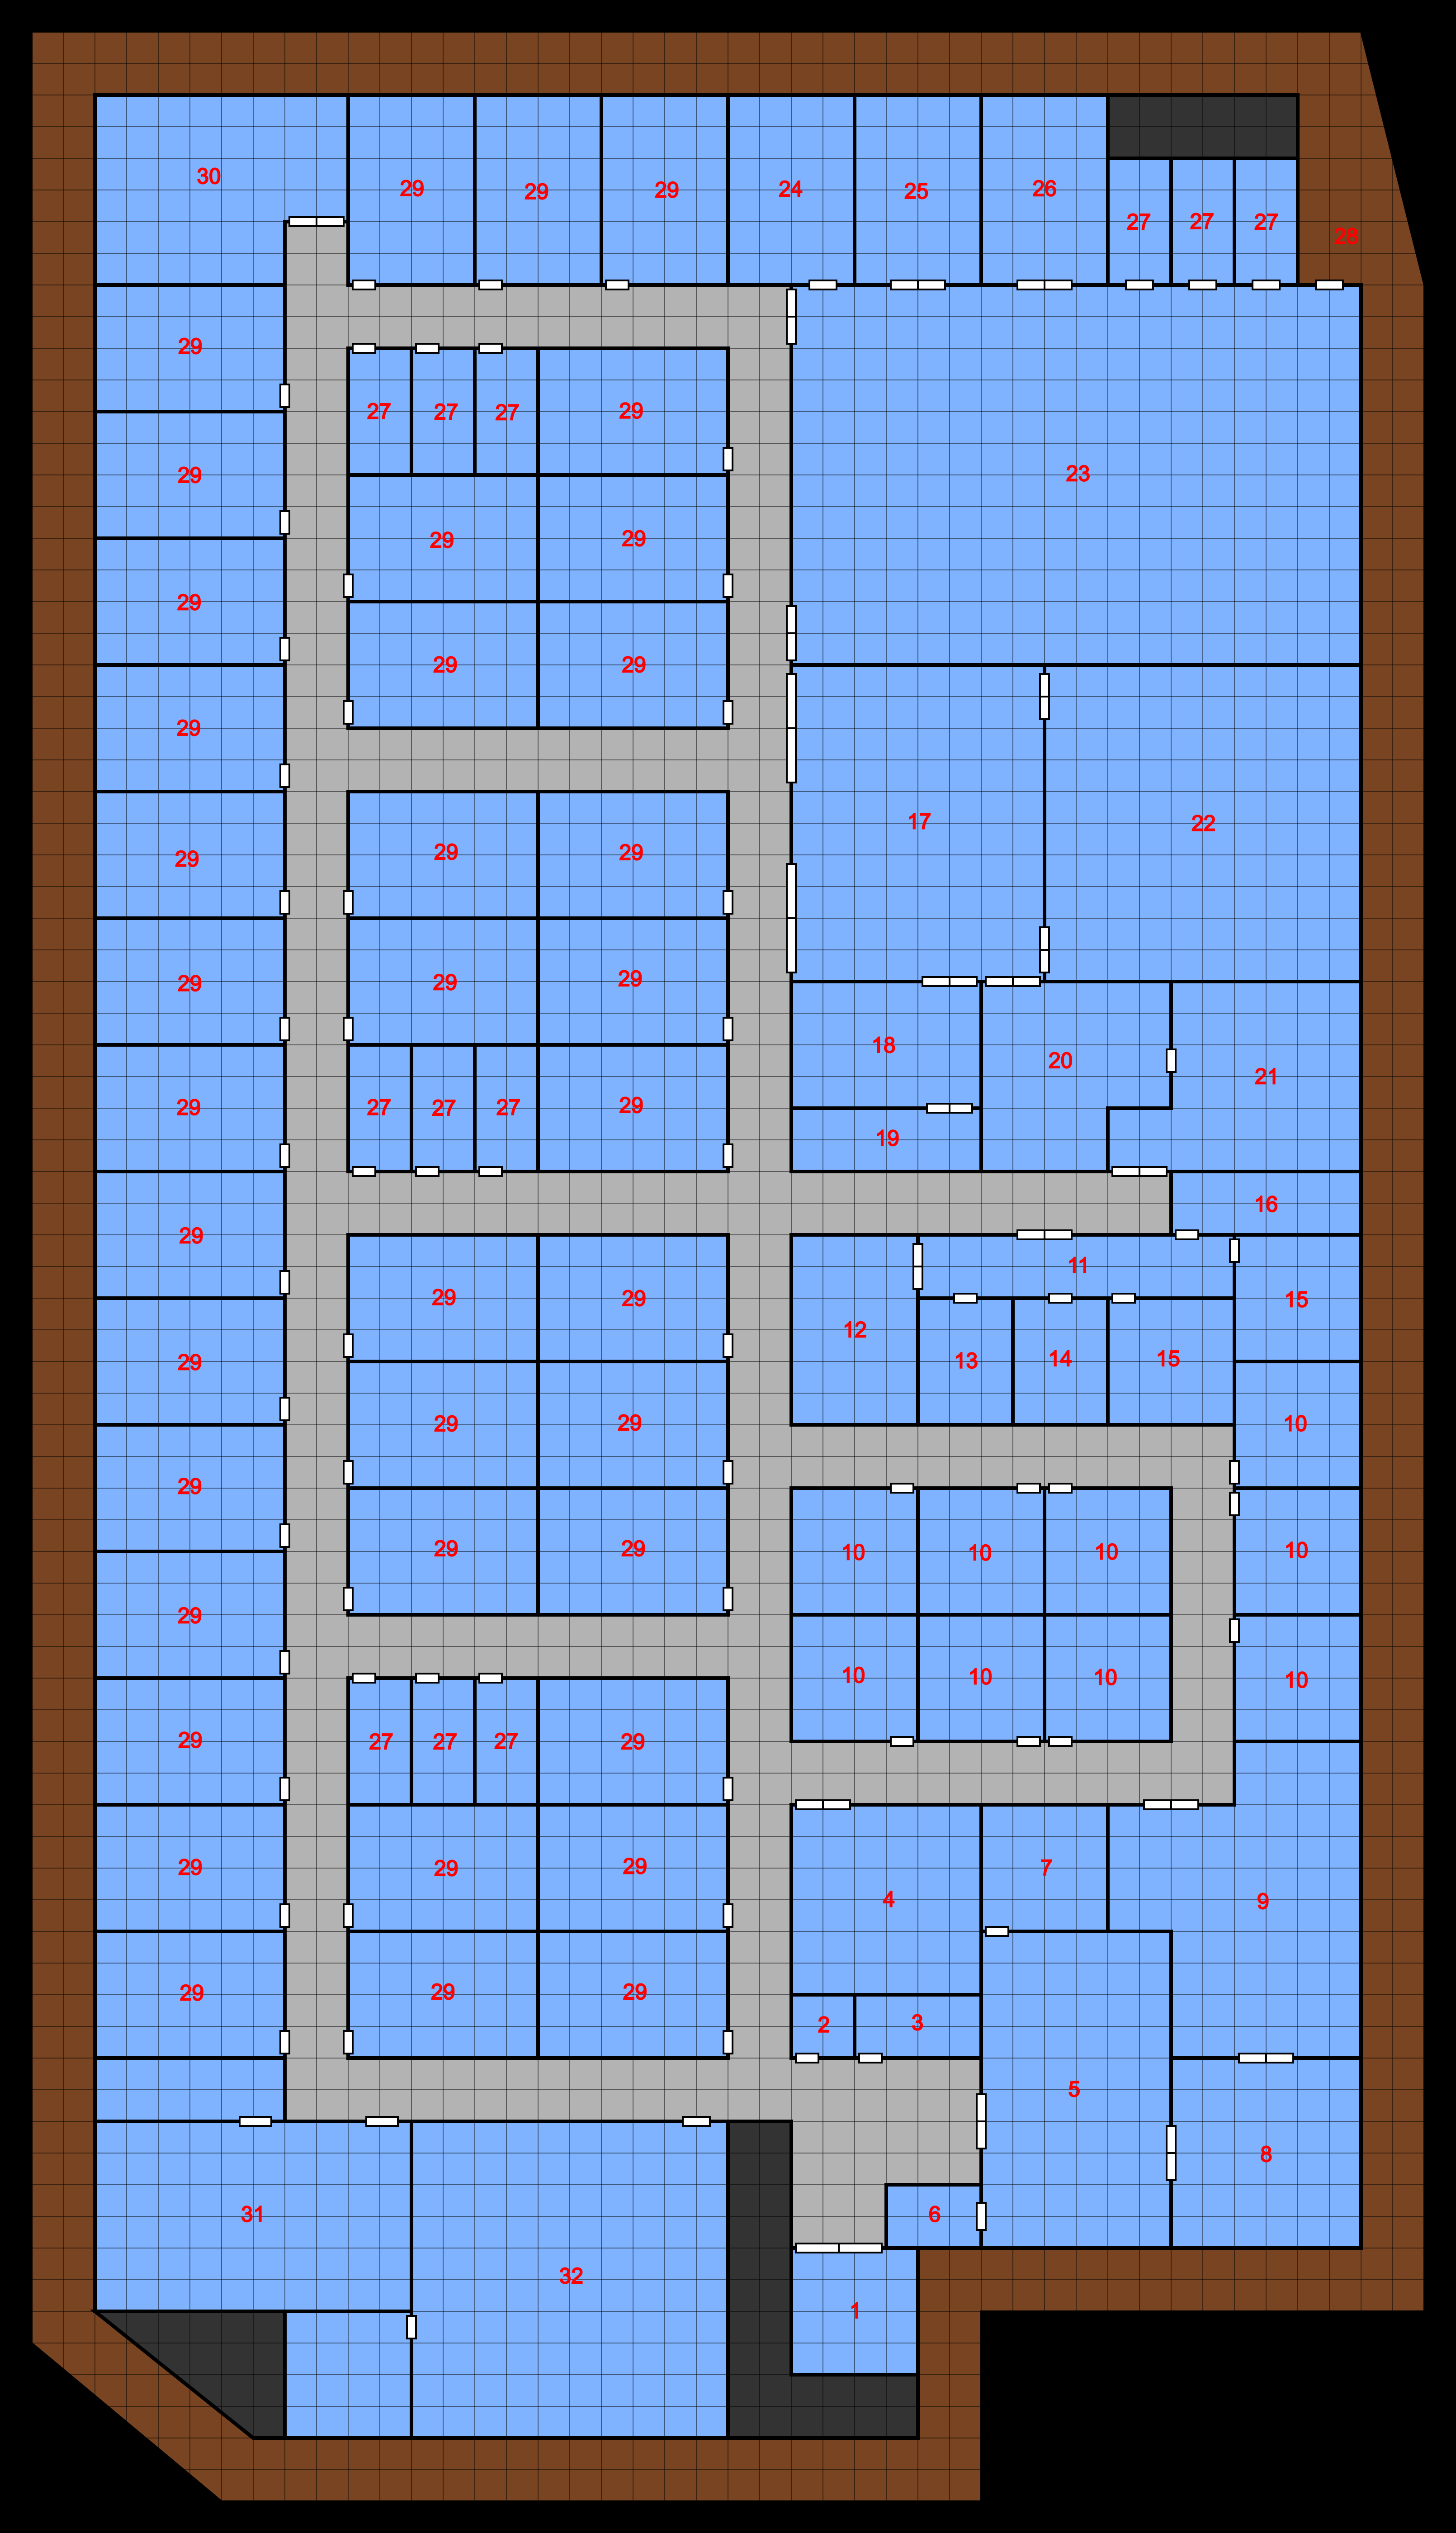
I put them in the rooms farthest from the elevator/stairs but you could put them anywhere. The sathar have changed the computer security system so that none of the staff ID cards work to open the living quarters doors.

Vehicles

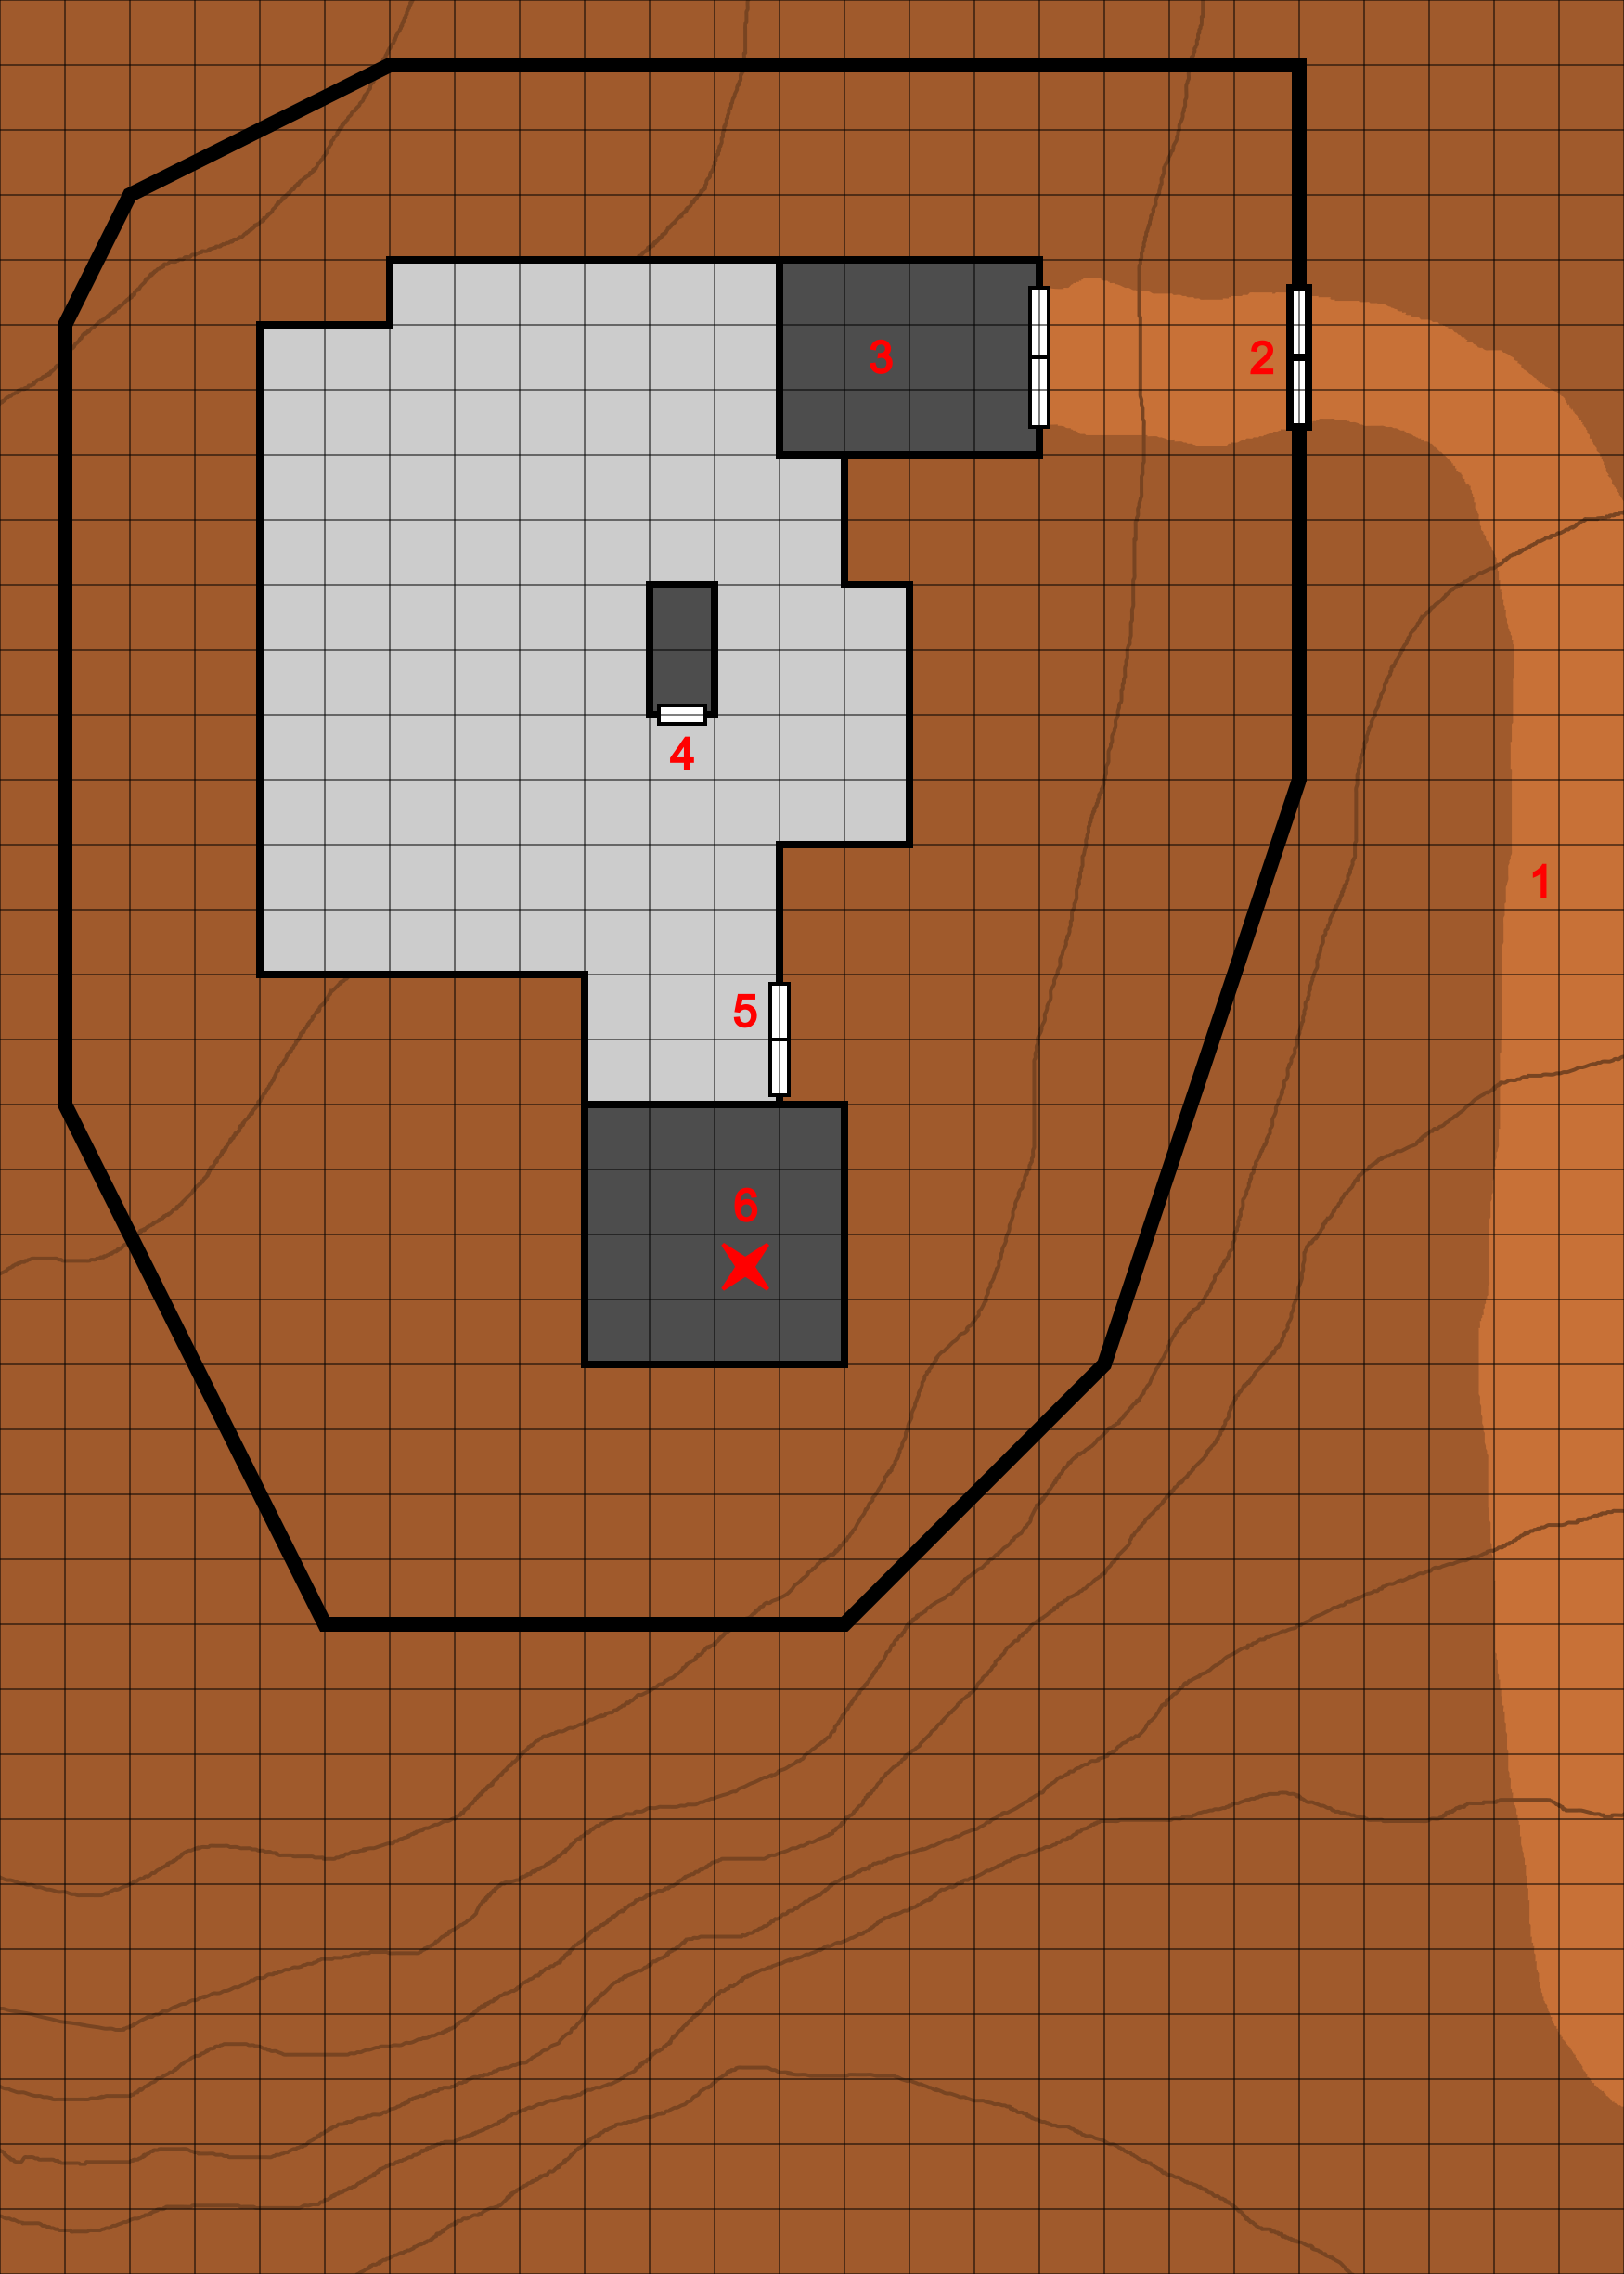
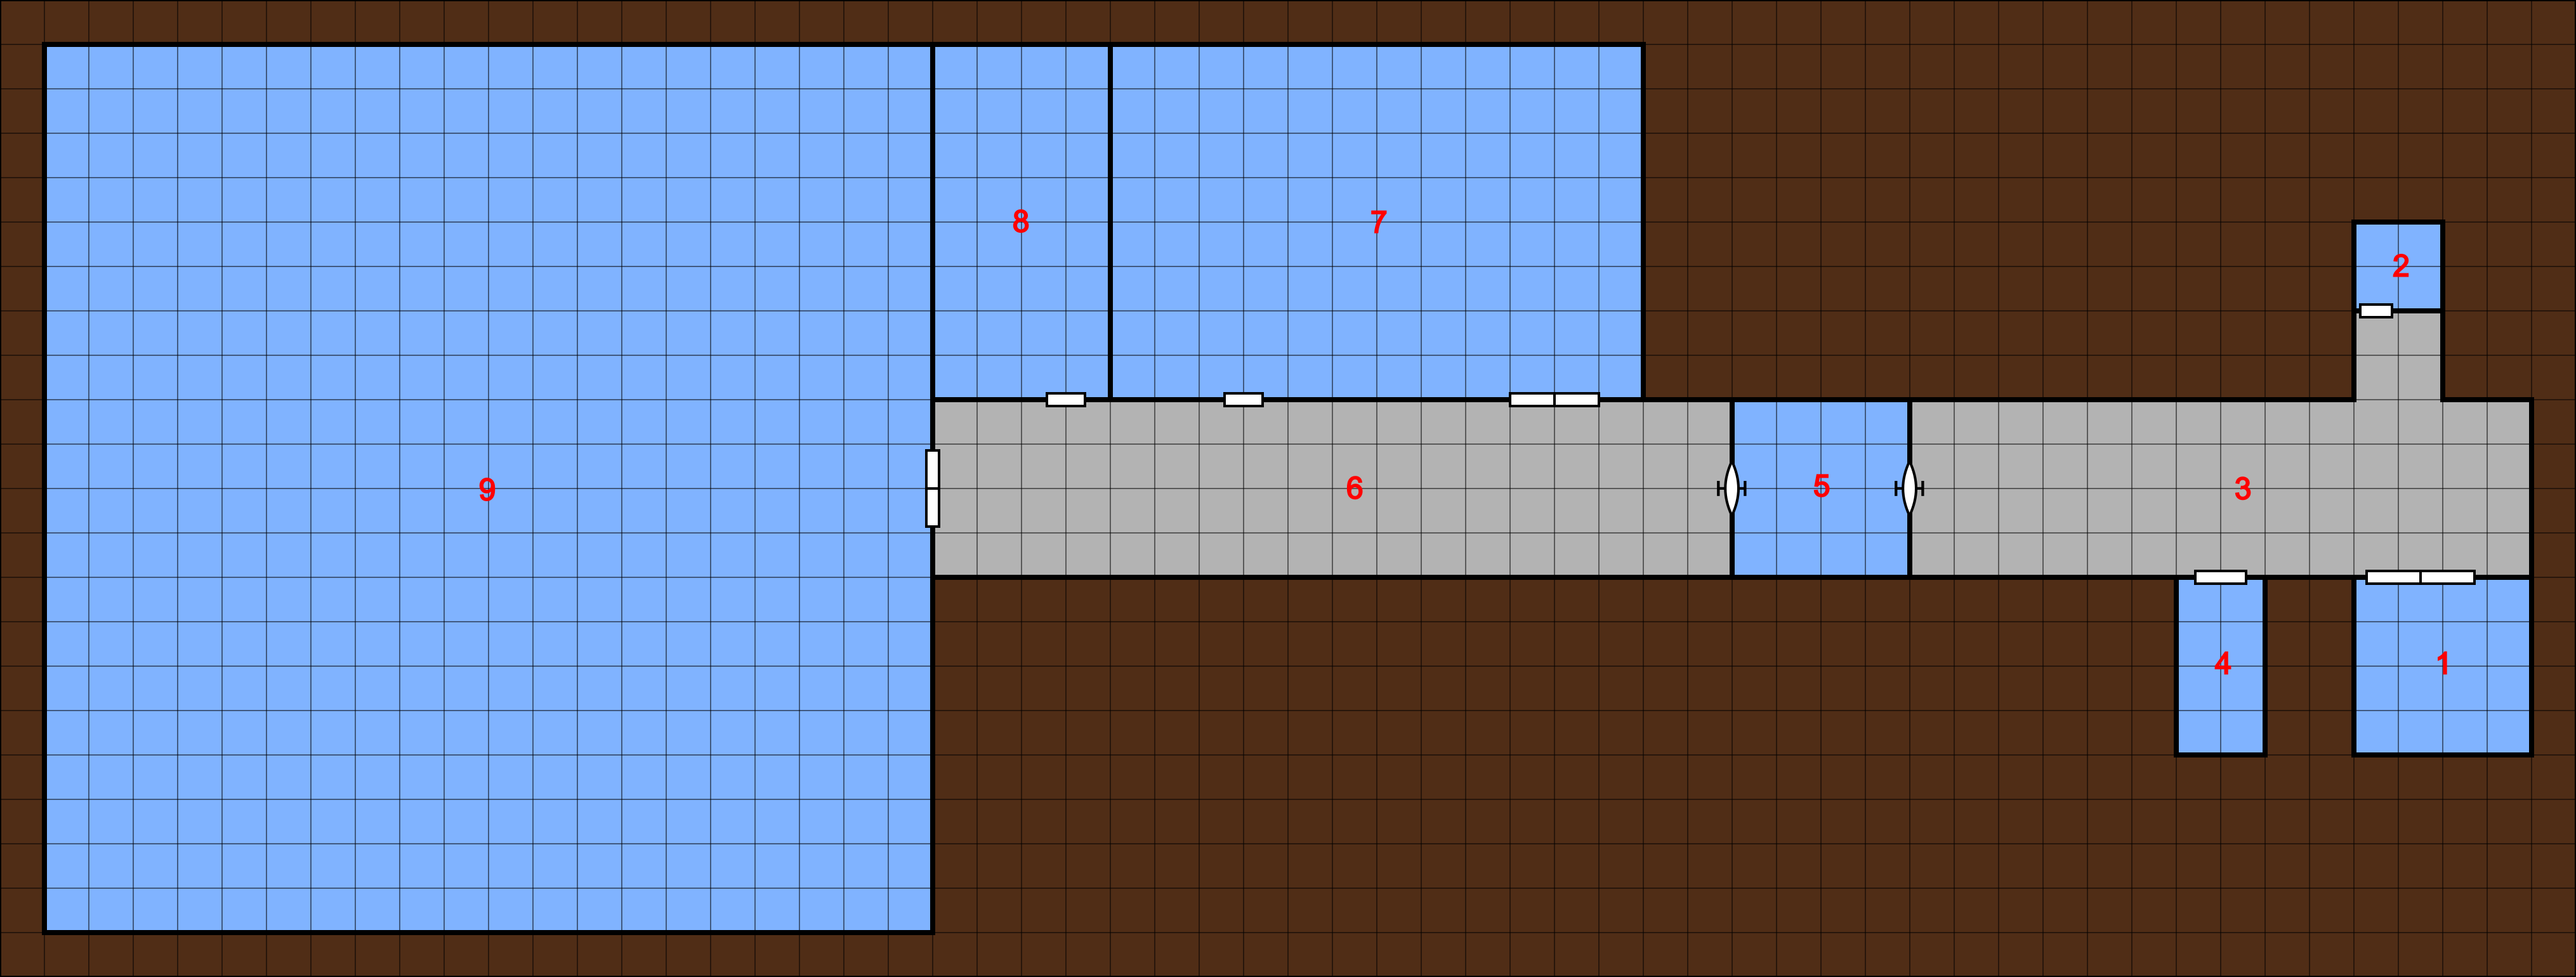
There is a ground transport in the garage (area 3, ground level). It is only partially unloaded.

Robots

All of the security robots were destroyed in the original attack. The sathar have reprogrammed all the maintenance and service robots to have attack/destroy programs and will attack any non-sathar beings on sight. These robots are all level 3 and have only their mechanical hands as weapons. The security locks have all been removed by the sathar as they modified them. They have the following stats:

STA: 100 ATT: 60 IM: 6 DMG: 2d10 Move: 30 m/turn

The remaining robots are located in the following areas:

  • 2 service robots – Ground Level in hallway (area 5)
  • 4 maintenance robots – Level 1 area 30. There is a random 10% change per minute that one will emerge and go about some maintenance task. If attacked, it can summon the others.
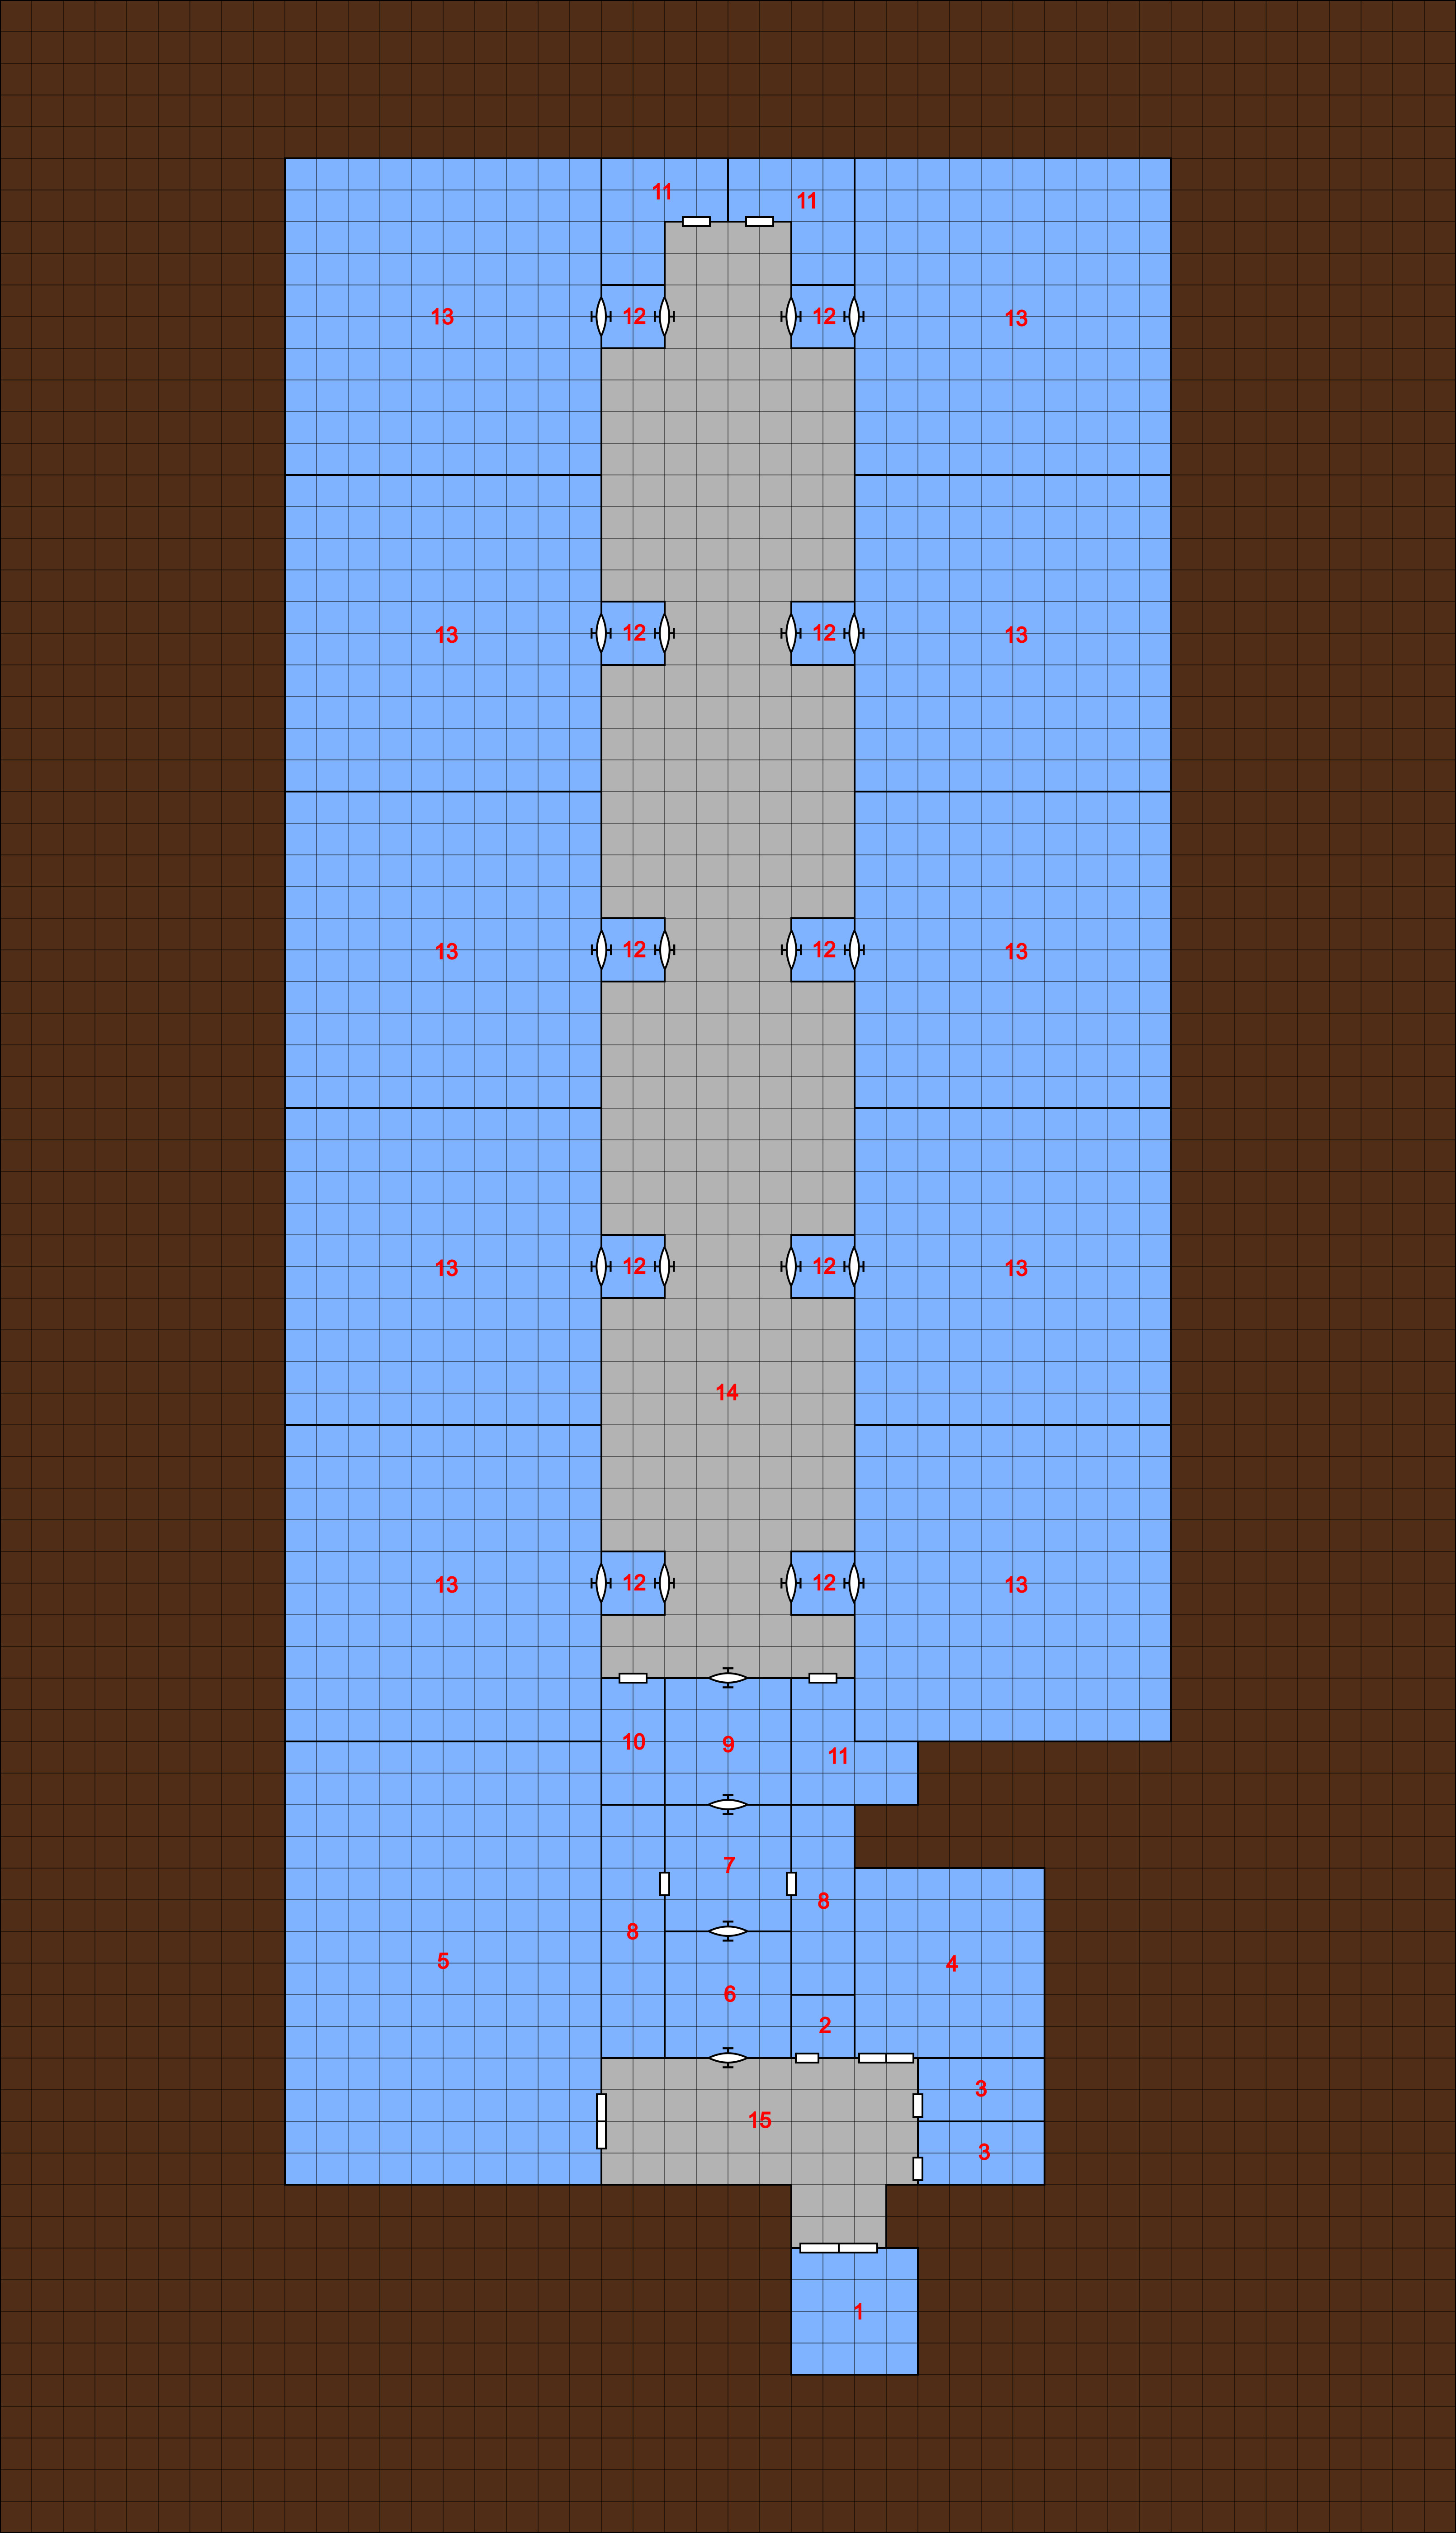
  • 4 maintenance robots – Level 2 area 11 (at the far end of the lab area). There is a random 10% change per minute that one will emerge and go about some maintenance task. If attacked, it can summon the others. They can also be called by the sathar on this level.

Sathar

There are 10 sathar at the facility.

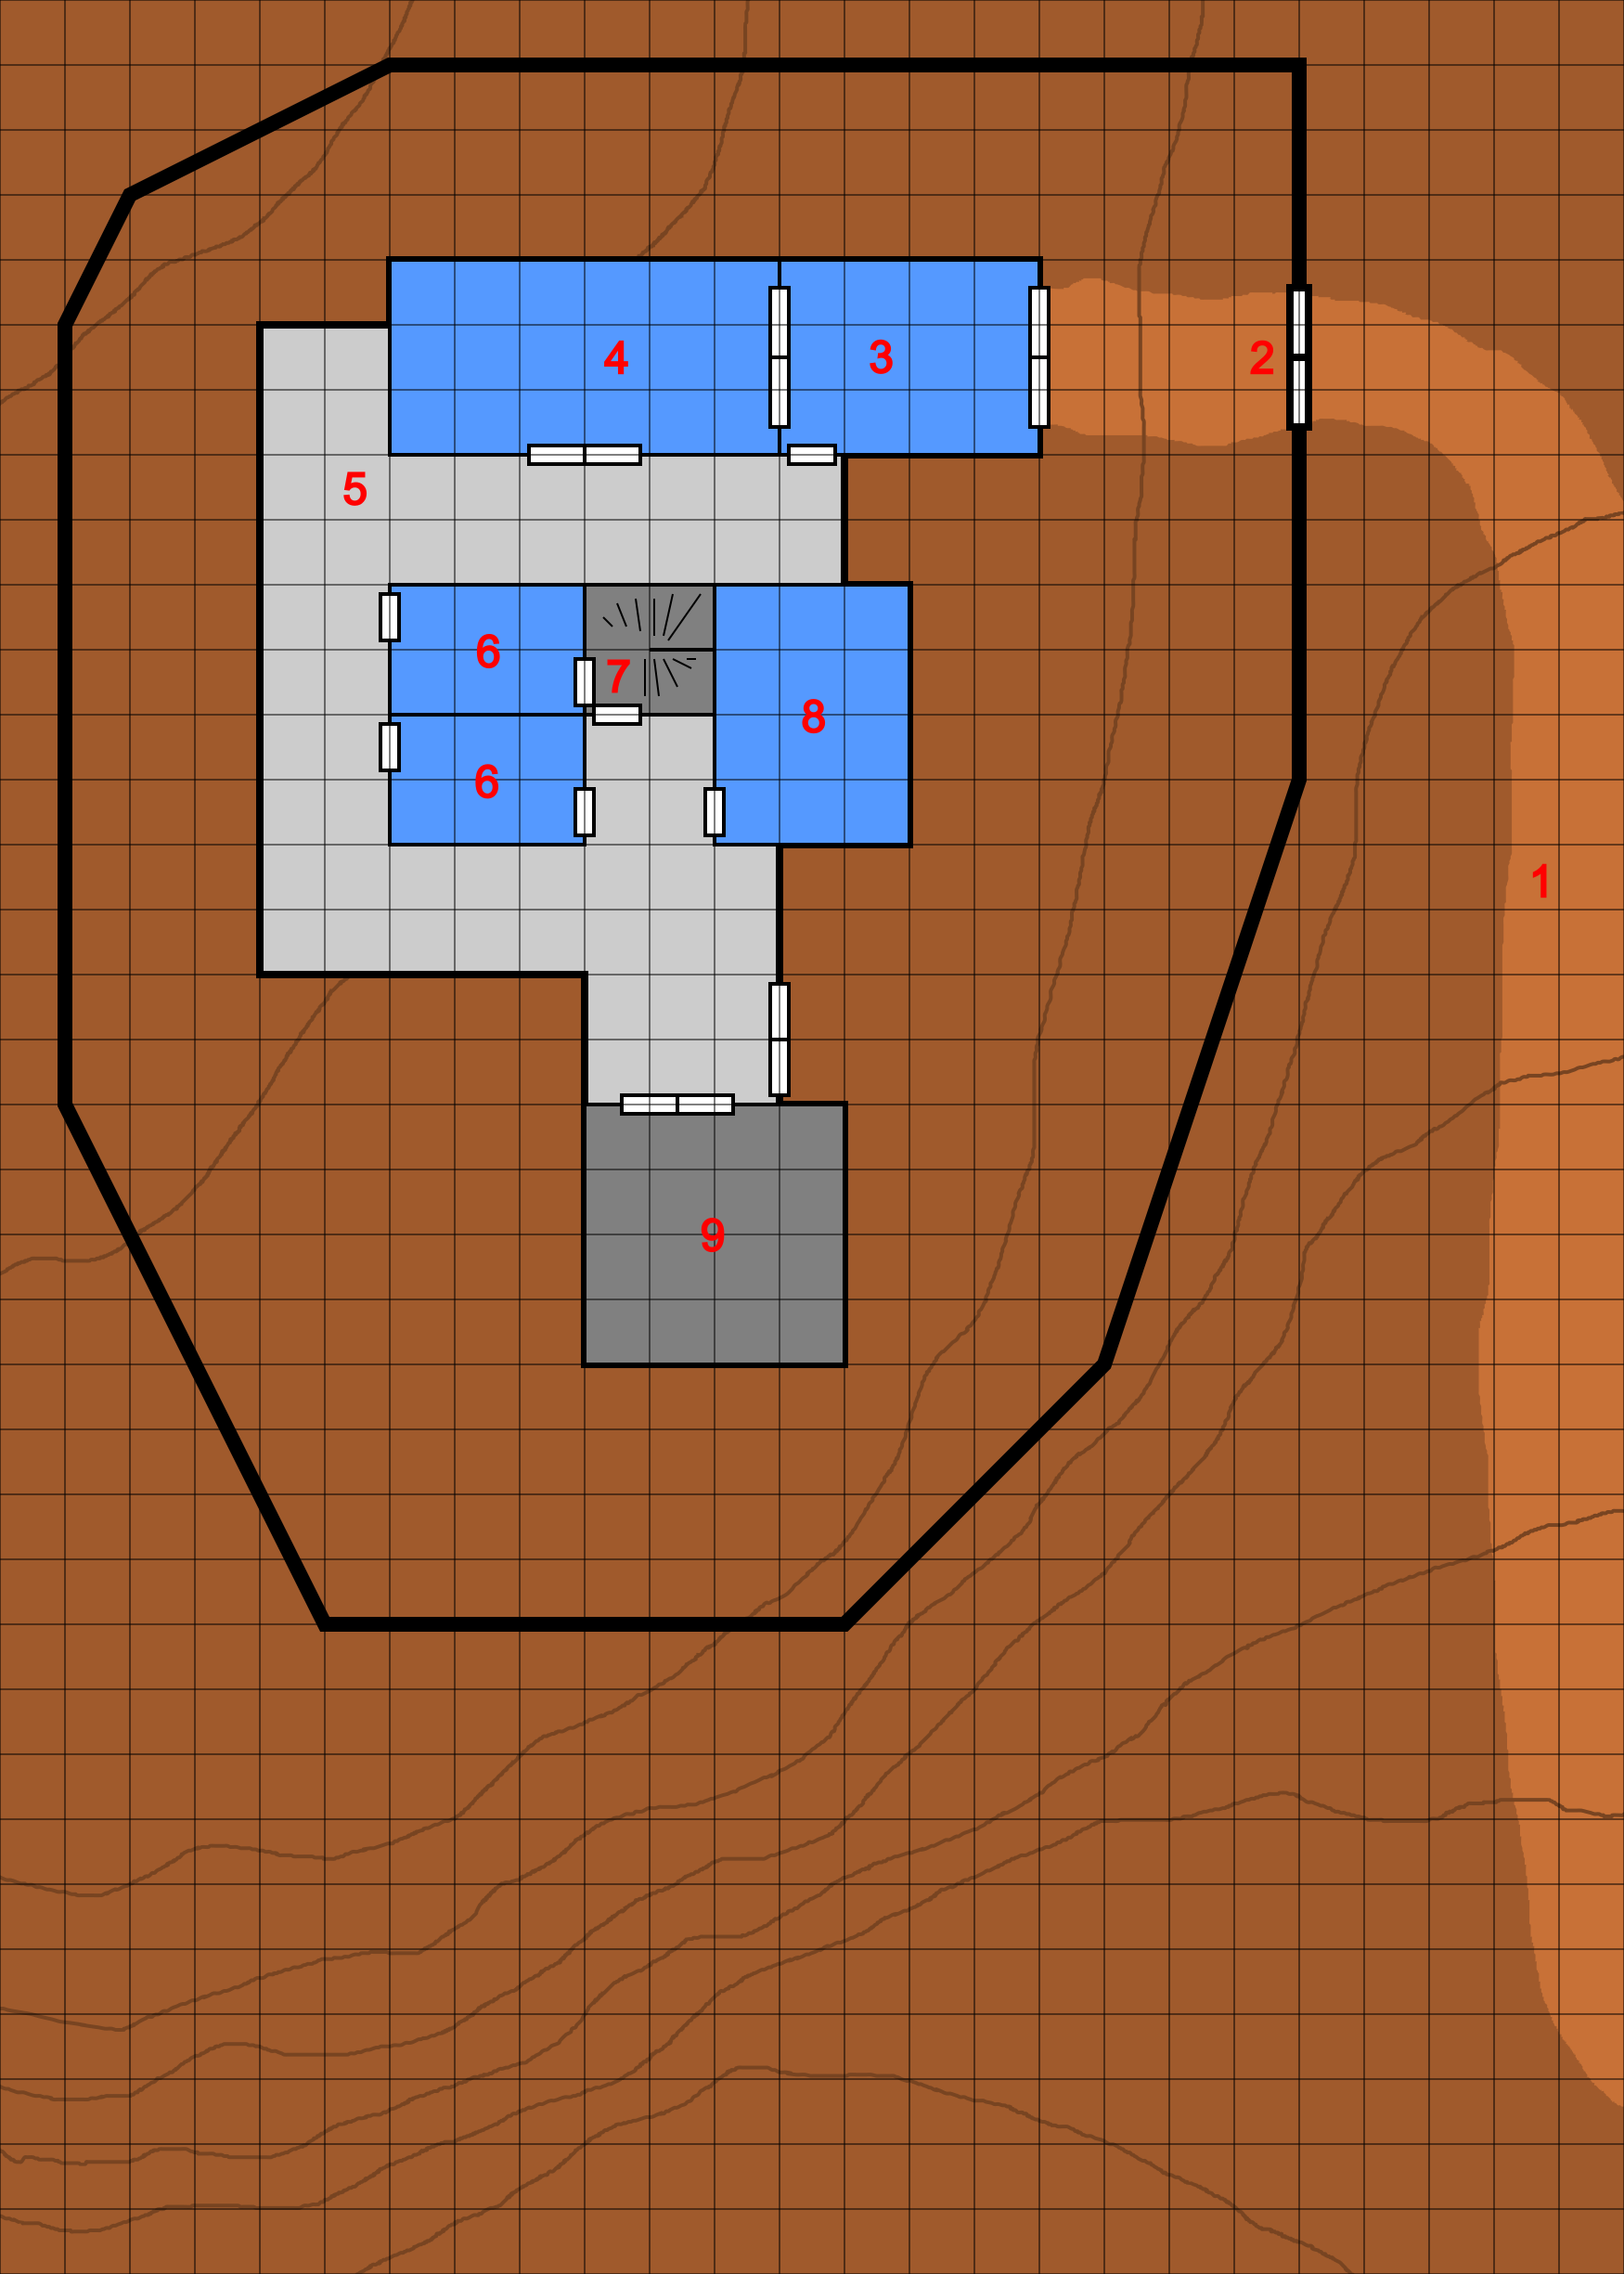
Two are security officers and will be in the security office on that level (area 8). If the robots start fighting they will emerge and attack the intruders. These sathar have laser pistols with 3 power clips and a level 3 skill. Their stats are:

STA: 45 ATT: 50 IM: 5 DMG: 2d10 PS: 3 Move: 30 m/turn

The other eight are in the lab areas on level 2. Divide as desired among 3 labs. These are all scientists and will only have improvised melee weapons when attacked but do have a level 1 melee skill. Stats for these sathar are:

STA: 40 ATT: 30 IM: 4 DMG: 1d10 PS: 2 Move: 30 m/turn

In addition to the sathar on level 2, there are a number of sathar attack monsters with them in some of the labs. There are 2 cybernuks in one of the bio-labs, although only one has the cyber implant, and a caged juvenile quick death in another (use the Lesser Quickdeath stats).  A third lab has a cage containing 10 tailless squirrels.  If freed, any of these creatures will attack the PCs.  If they can, the sathar scientists will release the creatures into the lab hall (area 14) to attack the PCs as part of their defense.

Place the sathar and creatures in the labs as desired. In my game, I had them all in labs on the right side of the map. The first lab had 3 sathar, the second had 2 sathar and the nuks, the third had 3 sathar and the squirrels, and the fourth lab had the quick-death.

Other Notes

The computer is level 4 with a level 3 computer security program.  Lab doors have level 5 locks, bedrooms have level 1 locks.

Something got out and the power generator level is overgrown with a blue fungus/moss that is mildly toxic to the touch (S1/T20) toxin. This is currently growing on all the walls on level 3, part of the stairwell between level 2 and 3, and in the elevator shaft near level 3.  It has not yet traveled to Level 1 or 2.  Due to the fungus, the power occasionally will short out and brownouts occur occasionally around the lab.  There is a 5% chance any minute that the power will temporarily go out or lights will dim in any given room.

Loose Ends

Some things I left open ended and which didn’t really come up when playing that you can flesh out as desired for your game:

  1. Where’s the other ground truck? There were two in the convoy but only one is here. I honestly forgot about there being two when I was running it but it never came up directly. This is an opportunity to expand the scope of this encounter if you want your PCs to possibly pursue the sathar across the planet.
  2. The fungus/moss on the generator level – Was this something the sathar brought with them? Was it something GODCo was working on?

Running the Adventure

This adventure played out over two game sessions.

The PCs had no idea there were sathar involved when they were hired. The job was simply to go to the lab, investigate what happened, rescuing any survivors, and secure the facility. GODCo offered a generous bonus of 500 cr. per staff member recovered alive.

After about six hours of travel, mostly in an explorer, the PCs arrived at the facility to find the gate closed. As they got close to the site, however, they noticed that no radio communications were working. The site appeared deserted. The humma decided to jump the fence and got shot at by the heavy laser for his trouble. Luckily, it missed him. He was able to open the main gate and the explorer entered the compound.

They gained access to the garage and discovered the partially emptied ground transport. Exiting into the hall, they were attacked by the robot stationed there. They took some damage but were able to quickly deactivate the robot. (Since the sathar removed the security lock, I only required a DEX roll – the robot was attacking them after all – to switch it off. Their roboticist has a high DEX but still missed a few of the rolls throughout the adventure.)

As they rounded the barracks (not knowing what they were) they encountered the other robot and after starting to engage that, the two sathar emerged and started firing at them. A well tossed tangler grenade captured both sathar (although one was killed by laser fire the same round). Realizing it was caught and the robot deactivated, the captured sathar committed suicide.

Clearing the rest of the level, they opted to take the stairs down and not alert anyone else by using the elevator. As they emerged into the hall on level 1 they experienced their first brownout of the power. They entered the security office and found a number of CCTV cameras looking at different parts of the lab including the hallways on level 1 and one into each lab on level 2. They saw the 8 sathar and the attack creature but didn’t know where in the complex those images were coming from.

Examing the hallways, they ran into two maintenance robots coming out of area 30 on the fall left hall way. A fight ensued with those robots and the other two that were called out of room 30 after the fight was engaged. They managed to deactivate two of the robots while the other two were destroyed.

The fighting was occurring at the end of the hall by area 30 and the prisoners in the rooms there heard them and tried to get their attention. They proceeded to open (via tech or brute force, depending on the player) each of the doors and discovered that 9 of the scientists were still alive, although is fairly poor shape.

From the scientists they got the information about the attack and current situation as they understood it. They also learned that the brownouts only started occurring after the sathar arrived. Speculation began on what the sathar were doing that needed that much power.

With the scientists found, they shepherded them up to the surface, planning on driving them out in the ground transport. At this point a discussion ensued on what was next. Fighting sathar is a job for Star Law and really above their pay grade and several PCs were all for bugging out with the scientists, reporting what they found, collecting their rewards and walking away. However, one of the PCs is a member of the Anti-Satharian League (ASL) and floated the idea that they might be able to get some reward from that group for the sathar if they took them out themselves.

In the end, they decided that the Anti-Satharian League PC would drive the scientists out and call in for medical pickup once he got out of the radio jamming. He would report the sathar presence and request instructions from Galactic Task Force (GTF). He’d also contact the ASL and see what he could negotiate. That discussion ended the first session.

Session 2 started with finalizing the plan. While the ASL PC headed out with the scientists, the other PCs set about exploring the rest of level 1. They realized part of the way through that they should have asked the scientists for a tour. Meanwhile, the PC with the scientists, after about 40 minutes of driving, got out of the jamming range. Calling in GTF immediately dispatched some flying transports to pick up the scientists and told him to stand by on the sathar situation. While he waited, he called ASL and got the same response. After a few minutes, GTF told him that if the team chose to go in after the sathar, they would be deputized by Star Law for the operation (Star Law couldn’t get anyone there for many hours and didn’t want the sathar to get away) and offered a bonus of 1500 cr. each. Just after that conversation, he was called by his ASL contact and offered a 250 cr. reward for each sathar killed plus and additional 500 cr for any sathar data collected from the computer systems.

With the offers in hand, he headed back to the compound once the medical team arrived to escort the scientists. Having been gone a couple of hours, the rest of the team was getting a bit antsy and debated exploring the generator level but decided to be patient and wait. They also reprogrammed the two maintenance robots to obey them and attack sathar while they were waiting. When the offers were presented, they decided to take on the sathar and collect the reward from both sources.

Not wanting to walk down 50 m of stairs, and figuring they had the drop on the sathar, they opted to take the elevator. They quickly examined the areas outside the decontamination airlocks on that level. Hoping to reduce the odds, they hacked into the life support and ventilation systems for the labs (all 10 individually) and dropped a doze grenade into each system to try to knock out the sathar. They had to do all 10 because they didn’t know which system went to which lab or even which labs the sathar were in. Luckily they had 11 doze grenades between the 5 PCs.

Doze grenades dropped and hoping they worked, they went through the cleaning rooms into the lab area. Upon entering and seeing into the labs, they found that the sathar in the lab with the cybernuks had been knocked out but the other were still up and about.

They rushed the robots over to the first lab and had them block the door preventing the sathar from exiting while the PCs headed down the the third lab where the three sathar were working with the tailless squirrels. As they were approaching, the sathar let the squirrels out and there were suddenly several critters attacking most of the PCs.

On the second round of the fight, the four robots emerged from the robot storage area and started to advance on the PCs as well. An on the next round they realized the flaw with having the robots block the sathar in the first lab as one of the sathar deactivated one of the two robots.

With enemy both in front of them and behind, they started to fall back and regroup trying to deactivate robots, kill sathar, and fight the squirrel critters. A well placed frag grenade managed to kill most of the squirrels as they fell back but not before a couple of the PCs were bitten and poisoned.

Just as they were starting to get the situation under control, one of the sathar in the nuk lab woke up (I had rolled for the time each were going to be out and rolled low for that one). After spending a round trying to rouse its comrade (with no success), it then headed to the doors to let the nuks out into the fight.

The sathar and squirrels turned out to be the easy targets with the nuks and robots providing the most challenge. They managed to take out the sathar that had freed the nuks before it could let the quickdeath out or things might have been really bad for the team. As it was, two of the team members, wounded and cornered, retreated into the lab that the squirrels had come out of pursued by one of the robots. They trapped one of the nuks in the entrance to another lab, and then finished off or deactivated the remaining robots and creatures.

When the fighting was over, they had deactivated two more robots, killed seven sathar, 10 squirrels and one nuk. The last sathar never woke up and they hit it with a StayDose to keep it sedated. They left the trapped quickdeath and nuk for StarLaw and GODCo to deal with. They decided to report that there were only 7 sathar (they had miscounted) and secret the live sathar away to turn over to the Anti-Satharian League for a 2000 cr. reward.

It was touch and go there in the middle of the battle with a couple of PCs getting down to single digit STA, but they pulled through in the end. Each PC ended up with 6 XP and 3600 cr. They also ended up with 7 damaged service and maintenance robots that they took with them as well.

Final Thoughts

It was a good adventure. It just took longer to finish than I had hoped due to scheduling conflicts (on my part) and not being able to get it all done in a single session (or I would have posted this sooner).

I actually completely forgot about the quickdeath in the heat of the battle which is why the sathar didn’t immediately make a bee-line for that lab to try to get it out. But that was probably just as well. Had the quickdeath came into the fray it might have been too much. As it is, the fight went well. They PCs were a little worried there for a bit, but managed to pull it out in the end. I actually thought the squirrel were going to do a bit more damage but the frag grenade really did a number on them, only three of the 10 survived the initial blast.

The activating and deactivating of the robots was a bit of humor (at least for me) during the big fight. There was a bit of a go around of the sathar turning their robots off, them trying to turn the sathar robots off and also trying to turn their back on, and fighting the robots that weren’t deactivated. And the moment when I said that the sathar turned their first robot off definitely seemed to catch them off guard and ratchet up the tension.

This will be the the last Skills for Hire post for a while. As I talked about in my “What I need is … more focus” post back in August, I have a lot of things going on and that was the main cause of the scheduling conflicts. As such, I’ve decided to put the game on hiatus for now. My players are going to take up the GM mantle and run games for each other in the meantime but I won’t be doing anything for a while.

Did you like the adventure? What might you have done differently? What changes or additions would you make? How could you use this in your game? Let me know your thoughts in the comments.

October 27, 2020 Tom Leave a comment

GODCo Bio-Lab

In the mountains, about five hours west of Navin’s Mill on Pale, the Greater Overall Development Corporation (GODCo) has a a semi-secret bio-lab. Everyone knows it there, or at least that it exists, if not its exact location, what is not known is exactly what type of research is done there.

And the truth isn’t all that exciting. As the Frontier’s preeminent terraforming company, GODCo has research labs all over the Frontier looking at adapting species, both flora and fauna, to the environments of the worlds inhabited by the Frontier races. And adapting the local flora and fauna for use by the Frontier races as well. This particular lab on Pale was looking at ways to better adapt some of the yaririan food crops to better live and thrive in Pale’s cooler climate with its yellower sun.

The secrecy around the bio-lab is institutional, not necessarily due to the work being done there. GODCo is always very secretive about its work as a way to avoid competition. Especially here on the Streel Corporation’s homeworld.

Location

Click for full-sized image

The lab is located in the mountains west of Navin’s Mill on Pale. Access is by paved roads and then a rough ground track (for the last 100 km). The total travel time from Navin’s Mill is about about five hours. While it’s possible to land an aircar at the facility, this form of access is rarely used.

The lab is built underground in the side of a mountain. Only a small structure is visible on the surface. This was done partially to take advantage of a geothermal power source discovered there, partially to make it easier to regulate the temperature in the labs, and partially to help maintain the secrecy of the lab by not having everything out in the open. The lab has been in operation for over 20 years.

Lab Staff

As part of GODCo’s veil of secrecy, all of the staff currently working at the lab live on-site. The non-science staff rotate in and out regularly while the scientists typically stay longer for the duration of there experimental work. The lab’s staff consists of:

  • Lab admin and assistant admin
  • 20 scientists
  • 8 security personnel
  • 2 power technicians
  • 2 roboticists
  • 2 computer technicians
  • 4 general technicians
  • 4 hospitality staff (cooks, recreation, etc)

In addition to the 44 staff members, there are 8 security, 12 maintenance, and 4 service robots at the facility.

Floor Plans

The lab itself consists of four levels. Except for the ground level, which is the only visible level on the surface, all of the levels are built into caverns that have been carved out of the mountain. The following sections give details on each level.

The various room descriptions are intentionally left fairly generic. Feel free to embellish or modify them to suit your game and campaign. Unless otherwise specified, all doors in the complex have level 1 locks that open to the staff ID badges.

Each of these maps are produce at 140 DPI, two squares to the inch with a scale of 1 meter per square. They should be able to be imported directly into your virtual table top of choice is you so desire.

Ground level

The only part of the complex visible on the surface, this level consists of the outer fence, a garage and storage facility, a security office, barracks for some of the security personnel, and an elevator and stairwell descending to the below-ground levels.

The contour lines on the following maps represent 1 meter elevation gains.

Exterior View

Exterior view. Click for full image. There is an unlabeled version as well.

This is the exterior view of the facility. The labeled items are:

  1. Access Road – This two meter wide access road is a gravel and pressed dirt road winding up the mountain.
  2. Wall and Gate – The wall surrounding the compound is 3 meters tall. The gate stands a little taller at 4 meters and can be opened (inward) to allow vehicular access.
  3. Garage – This garage is big enough to hold a ground truck for unloading when supplies are delivered (typically monthly). The roof here is 5 meters tall instead of the 4 meters of the rest of the building (the light gray area).
  4. Roof Access – This is a taller portion of the roof (total height 6 meters) that provides access to the roof from the stairwell below.
  5. Doors – Other than the garage, this is the only access into the building.
  6. Elevator Roof and Heavy Laser Mount – This is the roof of the elevator shaft. It extends an additional 4 meters above the lower roof and has a ladder to allow access. On top of this part of the building is a heavy laser that is connected to the complex’s power supply and computer.

Interior View

Interior view. Click for full sized version. There is also an unlabeled version.

This is the inside of the ground level of the complex. The labeled rooms and areas are described below:

  1. Access Road – as described above
  2. Wall and Gate – as described above
  3. Garage – Large enough for a ground transport, there are some tools and a parabattery recharging station here.
  4. Storage – This room is used as storage to unload arrive ground transport and hold supplies for which there isn’t room in the main underground facility. There will be a variety of lab and medical supplies, as well as food and housekeeping supplies in this room at any given time
  5. Hallway – This is the main hall of this level.
  6. Barracks – These are double bunk room for the four security personnel currently working on this level.
  7. Stairwell – This is long helical stairwell that descends to the lower levels of the complex. The stairs also extend up to the roof access (#4 in the exterior view). There are small landings every 10 meters of decent going down. Primarily used only in emergencies.
  8. Security Office – This is the security office for this level with a computer terminal as well as video feeds from external and internal cameras. This room has a level 2 lock.
  9. Elevator – This large elevator is the main mode of travel between the various levels of the complex. It is capable of holding up to 16 beings at once or carrying large freight or pieces of equipment. It travels 10 meters every 6 seconds.

Level 1 – Housing and Recreation

This level is located 20 meters below the surface. It extends deep into the mountain and houses all the housing, recreation, and office space of the facility along with things like the computer, tech shop, medical bays, and life support system.

Level 1. Click for full sized version. There is also a version without labels
  1. Elevator – This large elevator connects the various levels. It travels 10 meters every 6 seconds.
  2. Stairs – This is the stairwell that connects the levels of the complex.
  3. Security Office – This is the main security office for the entire complex. It has video feeds from security cameras on all levels of the complex as well as a computer terminal. This room has a level 2 lock.
  4. Administrator’s Office – This office is plushly decorated and has a small conference table and chairs in addition to the working desk. The desk contains reports of the work from the various labs as well as other administrative reports. This office has a level 3 lock.
  5. Tech/Robotics Shop – This is workshop for working on the complex’s computers, robots, and other mechanical items. It is well stocked and has high quality equipment. Any tech skill to work on machines, robots, or computers gains a +10% bonus when performed here.
  6. Storage – This room contains supplies and equipment for use in the repair shop.
  7. Main Computer – This room houses the main computer for the complex. There is an admin terminal here in the room. The room has a level 4 lock.
  8. Life Support Systems – This room houses the machinery that runs the life support system for this level and level 3. It contains water and air filtration and circulation systems.
  9. Garden – This room is filled with solar spectrum lamps and contains both hydroponic gardens growing food for the complex as well as just a relaxation garden with grass, flowers, and small shrubs.
  10. Offices – These rooms are offices for some of the higher ranked scientists. Each is decorated (and cluttered) according to the whims of the owner.
  11. Medical Bay Entrance – This small hallway provides access to the various rooms in the medical bay
  12. Operating Room – This room is a full surgical room. Any surgery skills performed here get a +10% bonus.
  13. Medical Office – This is the main office of the complex’s medical officer when they are not working down in the lab level.
  14. Exam Room – Typical doctor’s office exam room
  15. Sick Rooms – These two rooms are used to isolate sick members of the staff while they recover or away transport back to Navin’s Mill or Point True.
  16. Medical Storage – This room contains all the supplies needed by the medic for the exam room, sick rooms, and operating rooms. It contains the equivalent of 10 medkits plus any other supplies needed.
  17. Dining/Common Room – This room contains tables and chairs as well as a few couches and recliners There is a bay door/counter area between here and area 18 that can be opened for serving food in addition to the regular doors connecting the two areas.
  18. Kitchen – This is where all the food preparation is done
  19. Pantry – This is where most of the food for the complex is store. Part the room is a walk in freezer.
  20. Library – This room houses a collection of books as well as a computer terminal with access to the complex’s information storage program.
  21. Conference room – This room contains several tables and chairs. It also has a video screen for calls outside the facility as needed.
  22. Theater – This room is a large theater/lecture hall where the staff can watch movies or listen to presentations. Used for staff meetings and relaxation, the entire off-duty staff can fit in this room at once.
  23. Gym – This room contains a variety of mats and equipment for recreation.
  24. Sauna – This is a large sauna for use by the staff. Controls are in the wall by the door.
  25. Steam Room – Popular with the dralasite staff, this steam room allows for the addition of scents and other substances to be added to the steam system. Controls are by the door.
  26. Weight Room – This room contains a number of weights, weight machines and other exercise equipment for use by the staff.
  27. Restrooms/showers – Located throughout the facility, each of these rooms contains showers and lavatory facilities usable by the Frontier races.
  28. Cave/Running Track – Outside of the actual building, the residents have access to a running track that runs the perimeter of the cavern that the complex in built into. the floor has been smoothed and a track laid down but the walls and ceiling are still rough-hewn stone, although obviously cut and not natural. There is lighting along the entire length of the track.
  29. Living Quarters – These rooms are the living quarters for all of the staff. Each contains a bed, sofa, table and chairs. While the layout of each room is basically the same, each is decorated according to the taste of the tenant.
  30. Robot Storage – This is where the robots that work on this level and the ground level in the facility are kept when they are not working. It contains small bays for each robot that contain the recharging stations.
  31. Assistant Administrator Apartment – This is a luxury apartment for the assistant admin. It has it’s own private bathroom. This room has a level 2 lock.
  32. Administrator’s Apartment – This very luxurious apartment belongs to the administrator of the facility. It has it’s own private bath as part of the suite. This room has a level 3 lock.

Level 2 – Labs

This level houses the labs where the actual work of the facility is done. It is located an additional 50 meters below level 1. There are a total of ten labs on the level. The entire lab area is accessed through a series of decontamination chambers and then each lab is accessed through a separate airlock.

Level 2. Click for full sized version. There is also a version without labels.
  1. Elevator – This is the location of the elevator on this level.
  2. Stairs – This is the location of the stairwell on this level.
  3. Restrooms – These are the restrooms for this level.
  4. Conference Room – A large conference room for this level so that those working don’t need to go up the upper level for meetings or as a second room if the first one is in use.
  5. Life Support Systems – This room houses the life support systems and air filtration systems for this level. There are 11 systems here. Ten are independent systems that handle the cleaning and filtering of the air for each of the 10 labs. The other system handles all the other rooms.
  6. Cleaning room – This room contains large fans and scrubbers to remove most loose dirt and other contaminants from those entering the lab area. The floor is covered with sticky tiles that pull dirt off the bottom of shoes as you walk through the room. The inner door will not open until a full cleaning cycle has been completed.
  7. Changing Room – This room is where those going into the lab change into their lab suits and other gear.
  8. Clean Room Suit Storage – These rooms contain the clean room suits, lab coats, and other gear to be worn in the labs.
  9. Decontamination Room – This room does a final cleaning of any one or anything entering the lab area to remove any final contaminates. The inner door will not open until a full cleaning cycle has occured.
  10. Storage – This room contains lab supplies and other equipment that has passed through the decontamination process for use in the various labs.
  11. Robot Storage – These rooms are the storage area and charging stations for the robots that work on this level.
  12. Lab Entrance – These rooms are mini airlocks that provide the final security lock to prevent material from traveling into or out of the labs. These rooms have transparent walls so that you can see those inside. These doors have level 5 locks and can only be opened by those scientists working in the specific lab.
  13. Labs – Each lab is set up to work on an individual experiment. The walls facing the hall (area 14) are glass so that you can see into each lab area.
  14. Lab Hall – This hallway is inside the clean area and allows access to each of the labs and to the robot storage areas.
  15. Outer Hall – This hallway is outside the clean area and allows access to the elevator, stairs, life support systems, and conference room.

Level 3 – Power Generation

This level only houses the power generator. It is an additional 150 meters below the lab level. It’s quite a hike if you have to use the stairs.

Level 3. Click for full sized version. There is also a version without labels.
  1. Elevator – The location of the elevator on this level
  2. Stairs – The stair access on this level
  3. Outer Hall – Hallway connecting elevator and stairs with the robot storage area (#4) and the airlock into the generator area (#5).
  4. Robot Storage – This is the storage and charging area for robots working on this level.
  5. Airlock – Separates the power system from the access area to prevent anything crossing the boundary into the main facility. The locks on this door are level 4 and only open to the power techs.
  6. Inner Hall – Hallway connecting the airlock to the power generator
  7. Parabattery Bank – This room is full of racks of Type IV parabatteries. This is the backup power system for the facility that kicks in when there is not enough power being generated by the main generator or it is off-line for service. These parabatteries are charged when the generator is running.
  8. Control Room – A manual control room that allows for monitoring of the power generator in room 9 and the use of power throughout the facility.
  9. Power Generator. This is a Type III generator that is hooked in to a geothermal vent discovered in mountain. This rooms houses all the machinery, pumps, and transformers needed to power the facility.

Using The Lab In Game

That’s the basic write-up for the facility. I’ve left it fairly adaptable so that you can have whatever research you want going on. In my game, I had them working on yazirian food crops and a small yazirian pet, but you can have it be as innocent or sinister as you want GODCo to be in your campaign. And of course, you don’t have to leave this facility on Pale, you could move (or clone) it anywhere you need this type of facility on your game.

Next week I’ll do the write-up of how I actually used this lab for my Skills For Hire game. This is the “normal” operation. It was anything but normal when the players arrived.

How do you like the lab? What did I forget to include or what would make it a better location? Let me know in the comments below.

October 13, 2020 Tom 1 Comment
Become a Patron!

Recent Posts

  • Detailed Frontier Timeline – FY62.069 to FY62.99
  • State of the Frontier – August 2022
  • Battle of Hargut (Gruna Garu) – FY62.098
  • Archived Arcane Game Lore Posts – May 2013 to Dec 2014
  • A Look at Yachts and Privateers
  • Homeworld Bound – A Campaign Concept
  • Second Battle of Fromeltar (Terledrom) – FY62.083
  • Sample Star System Data
  • Detailed Frontier Timeline – FY62.038 to FY62.068
  • State of the Frontier – July 2022

Categories

  • 3D Models
  • Adventures
  • Background
  • Creatures/Races
  • Deck Plans
  • Equipment
  • Game Design
  • General
  • Locations
  • Maps
  • NPCs
  • Optional Rules
  • Patreon-only
  • Project Overviews
  • Reviews
  • Setting Material
  • Starships
  • System Brief
  • Vehicles
  • Writing

Recent Comments

  • Loguar on Detailed Frontier Timeline – FY62.069 to FY62.99
  • Loguar on Detailed Frontier Timeline – FY62.069 to FY62.99
  • Tom on Detailed Frontier Timeline – FY62.069 to FY62.99
  • Rook on Maps and Counters
  • Loguar on Detailed Frontier Timeline – FY62.069 to FY62.99
  • Tom on Detailed Frontier Timeline – FY62.069 to FY62.99
  • Tom on Second Battle of Fromeltar (Terledrom) – FY62.083
  • Loguar on Detailed Frontier Timeline – FY62.069 to FY62.99
  • Loguar on Second Battle of Fromeltar (Terledrom) – FY62.083
  • Aemon Aylward on Sample Star System Data

Archives

  • September 2022 (1)
  • August 2022 (9)
  • July 2022 (3)
  • June 2022 (3)
  • May 2022 (3)
  • June 2021 (1)
  • April 2021 (1)
  • February 2021 (4)
  • January 2021 (6)
  • December 2020 (5)
  • November 2020 (11)
  • October 2020 (4)
  • September 2020 (5)
  • August 2020 (4)
  • July 2020 (6)
  • June 2020 (5)
  • May 2020 (8)
  • April 2020 (5)
  • March 2020 (5)
  • February 2020 (5)
  • January 2020 (5)
  • December 2019 (7)
  • November 2019 (4)
  • October 2019 (6)
  • September 2019 (5)
  • August 2019 (6)
  • July 2019 (7)
  • June 2019 (5)
  • May 2019 (6)
  • April 2019 (7)
  • March 2019 (4)
  • February 2019 (5)
  • January 2019 (7)
  • December 2018 (5)
  • November 2018 (10)
  • October 2018 (4)
  • September 2018 (4)
  • August 2018 (5)
  • July 2018 (4)
  • June 2018 (4)
  • May 2018 (12)
  • December 2015 (1)
  • November 2015 (2)
  • December 2014 (4)
  • November 2014 (3)
  • June 2014 (1)
  • January 2014 (1)
  • July 2013 (1)
  • June 2013 (2)
  • May 2013 (3)

Meta

  • Log in
  • Entries feed
  • Comments feed
  • WordPress.org
Powered by WordPress | theme Layout Builder