Earlier today, in the space around Kawdl-Kit, Task Force Cassidine engaged the invading sathar forces. After nearly an hour and a half of fighting, the last of sathar forces were destroyed.
While almost all of the Spacefleet vessels sustained serious damage, battle losses were light with the Task Force only losing three fighters and three assault scouts.
Hours after the battle, repair work for the heavily damaged assault carrier and battleship are still ongoing.
Vah’zen’rk – Kawdl-Kit Global Reporting
Background
Reinforced with some additional ships from SCC#10, veterans of campaign against the saurians, SBF-B2 reenters the K’tsa-Kar system with the intent to wipe out Task Force Cassidine. The UPF forces, while somewhat outgunned, are determined to hold the line here.
Order of Battle
Task Force Cassidine
- 6 Fighters
- 3 Assault Scouts
- 2 Frigates
- 1 Light Cruiser
- 1 Assault Carrier
- 1 Heavy Cruiser
- 1 Battleship
Sathar
- 7 Fighters
- 1 Frigate
- 6 Destroyers
- 1 Assault Carrier
- 2 Heavy Cruisers
The Battle
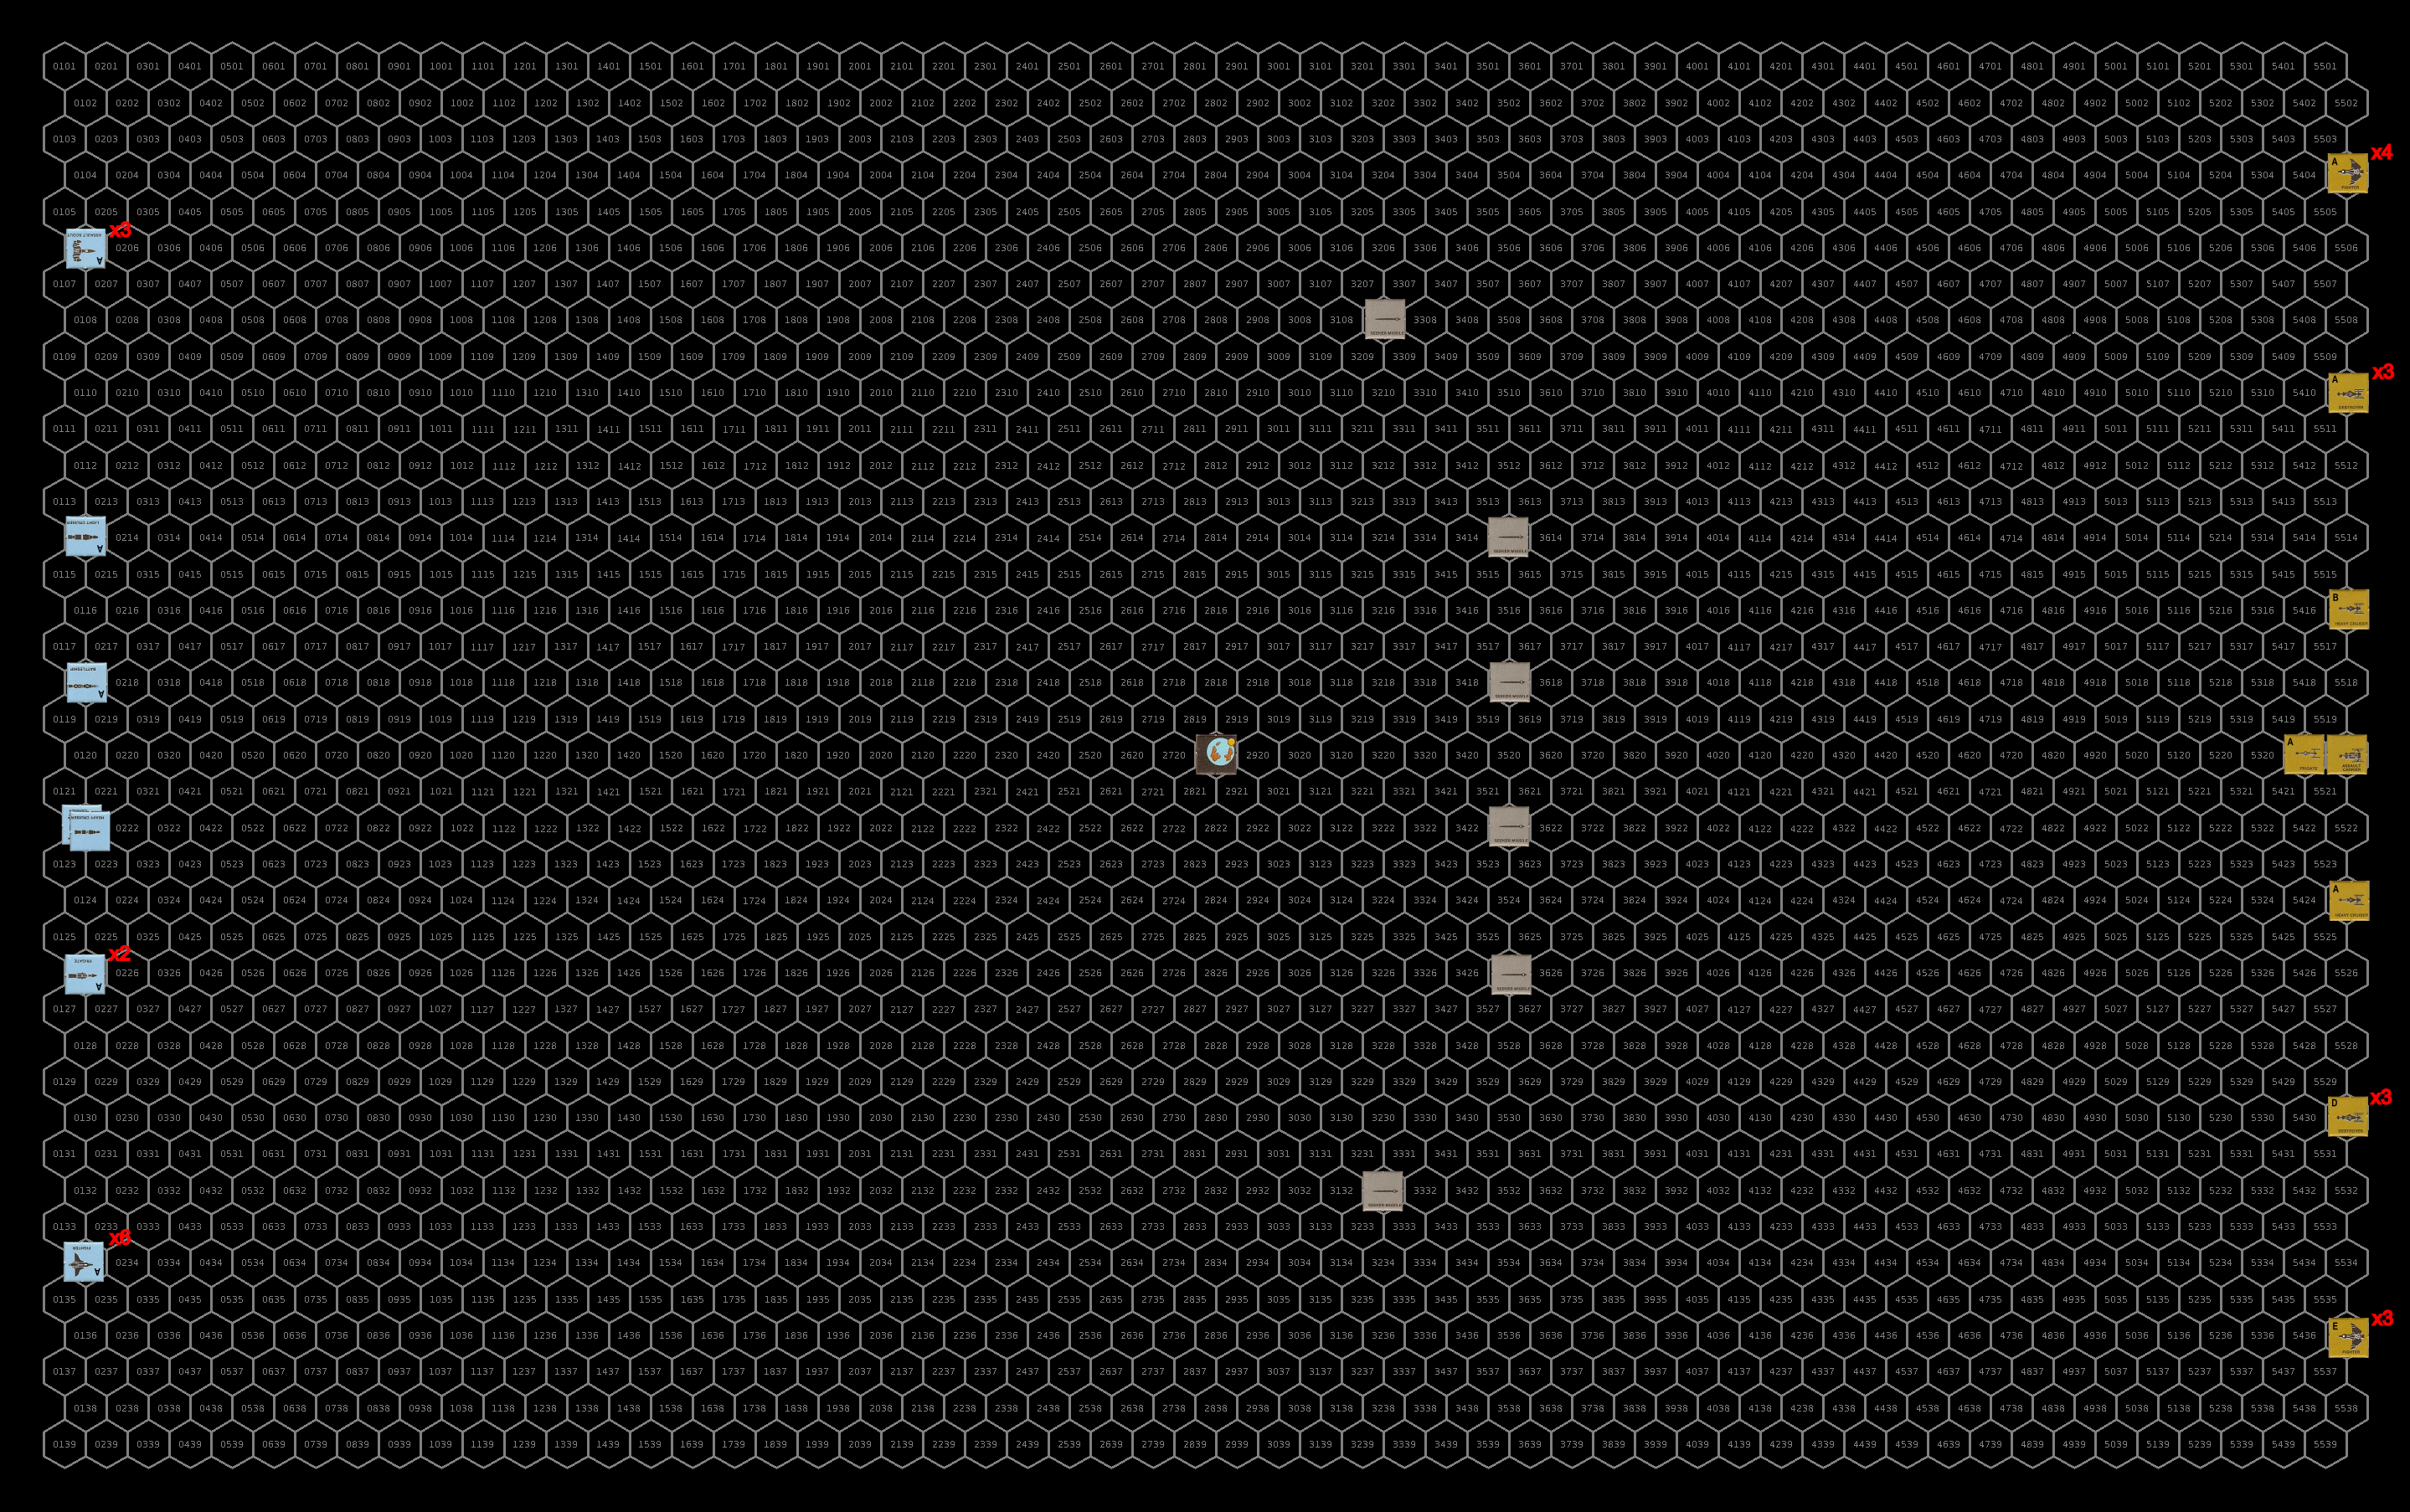
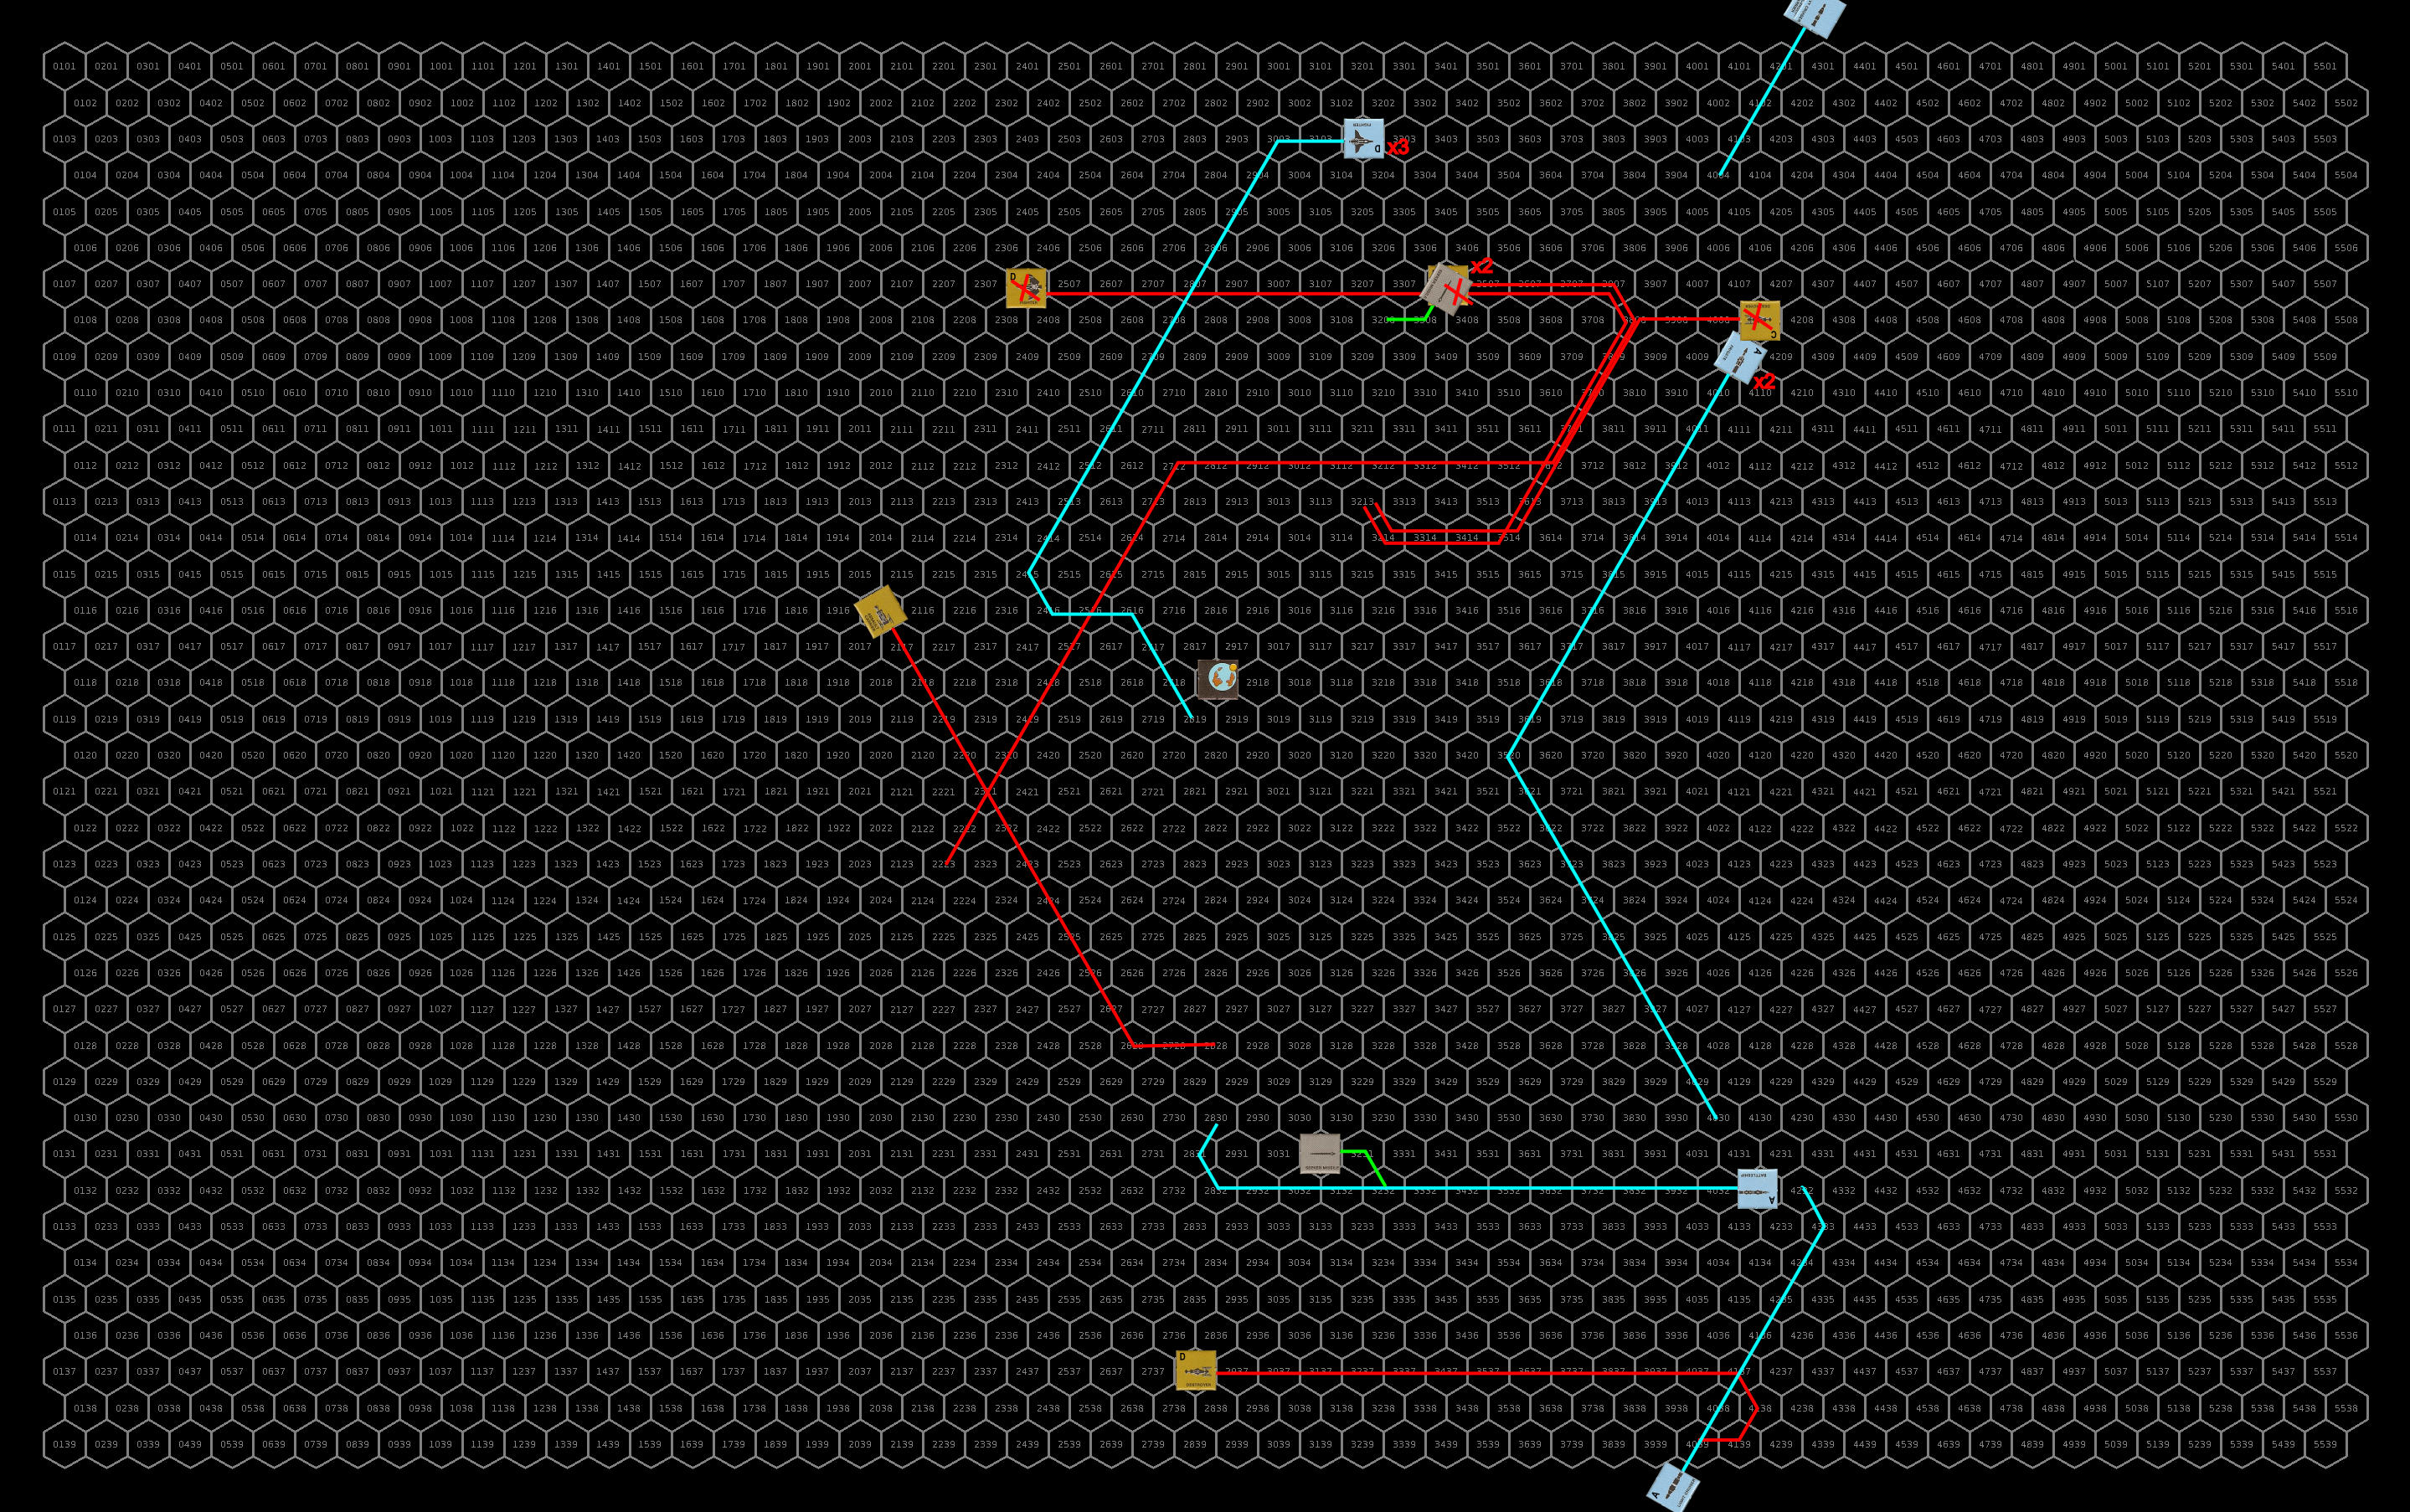
Setup
Task Force Cassidine elects to hold the battle around the planet, hoping to use the planet’s gravity well to their advantage even though there is no longer a station there. With no station to defend, the UPF form up in a broad line far back from the planet and the oncoming sathar forces to give them time to study the sathar deployment before committing. The capital ships are moving at speed 15 while the fighters and assault scouts are moving at speed 25. The six seeker missiles (from the battleship and heavy cruiser) are deployed in an arc on the side of the planet the sathar are approaching from.
The sathar, also cautious for this major battle, come in relatively slow, with their capital ships moving at speed 10 and fighters at speed 20. The assault carrier, escorted by the frigate, take the center position with a heavy cruiser on either side which is in turned flanked by a trio of destroyers and a flight of fighters.
Turn 1
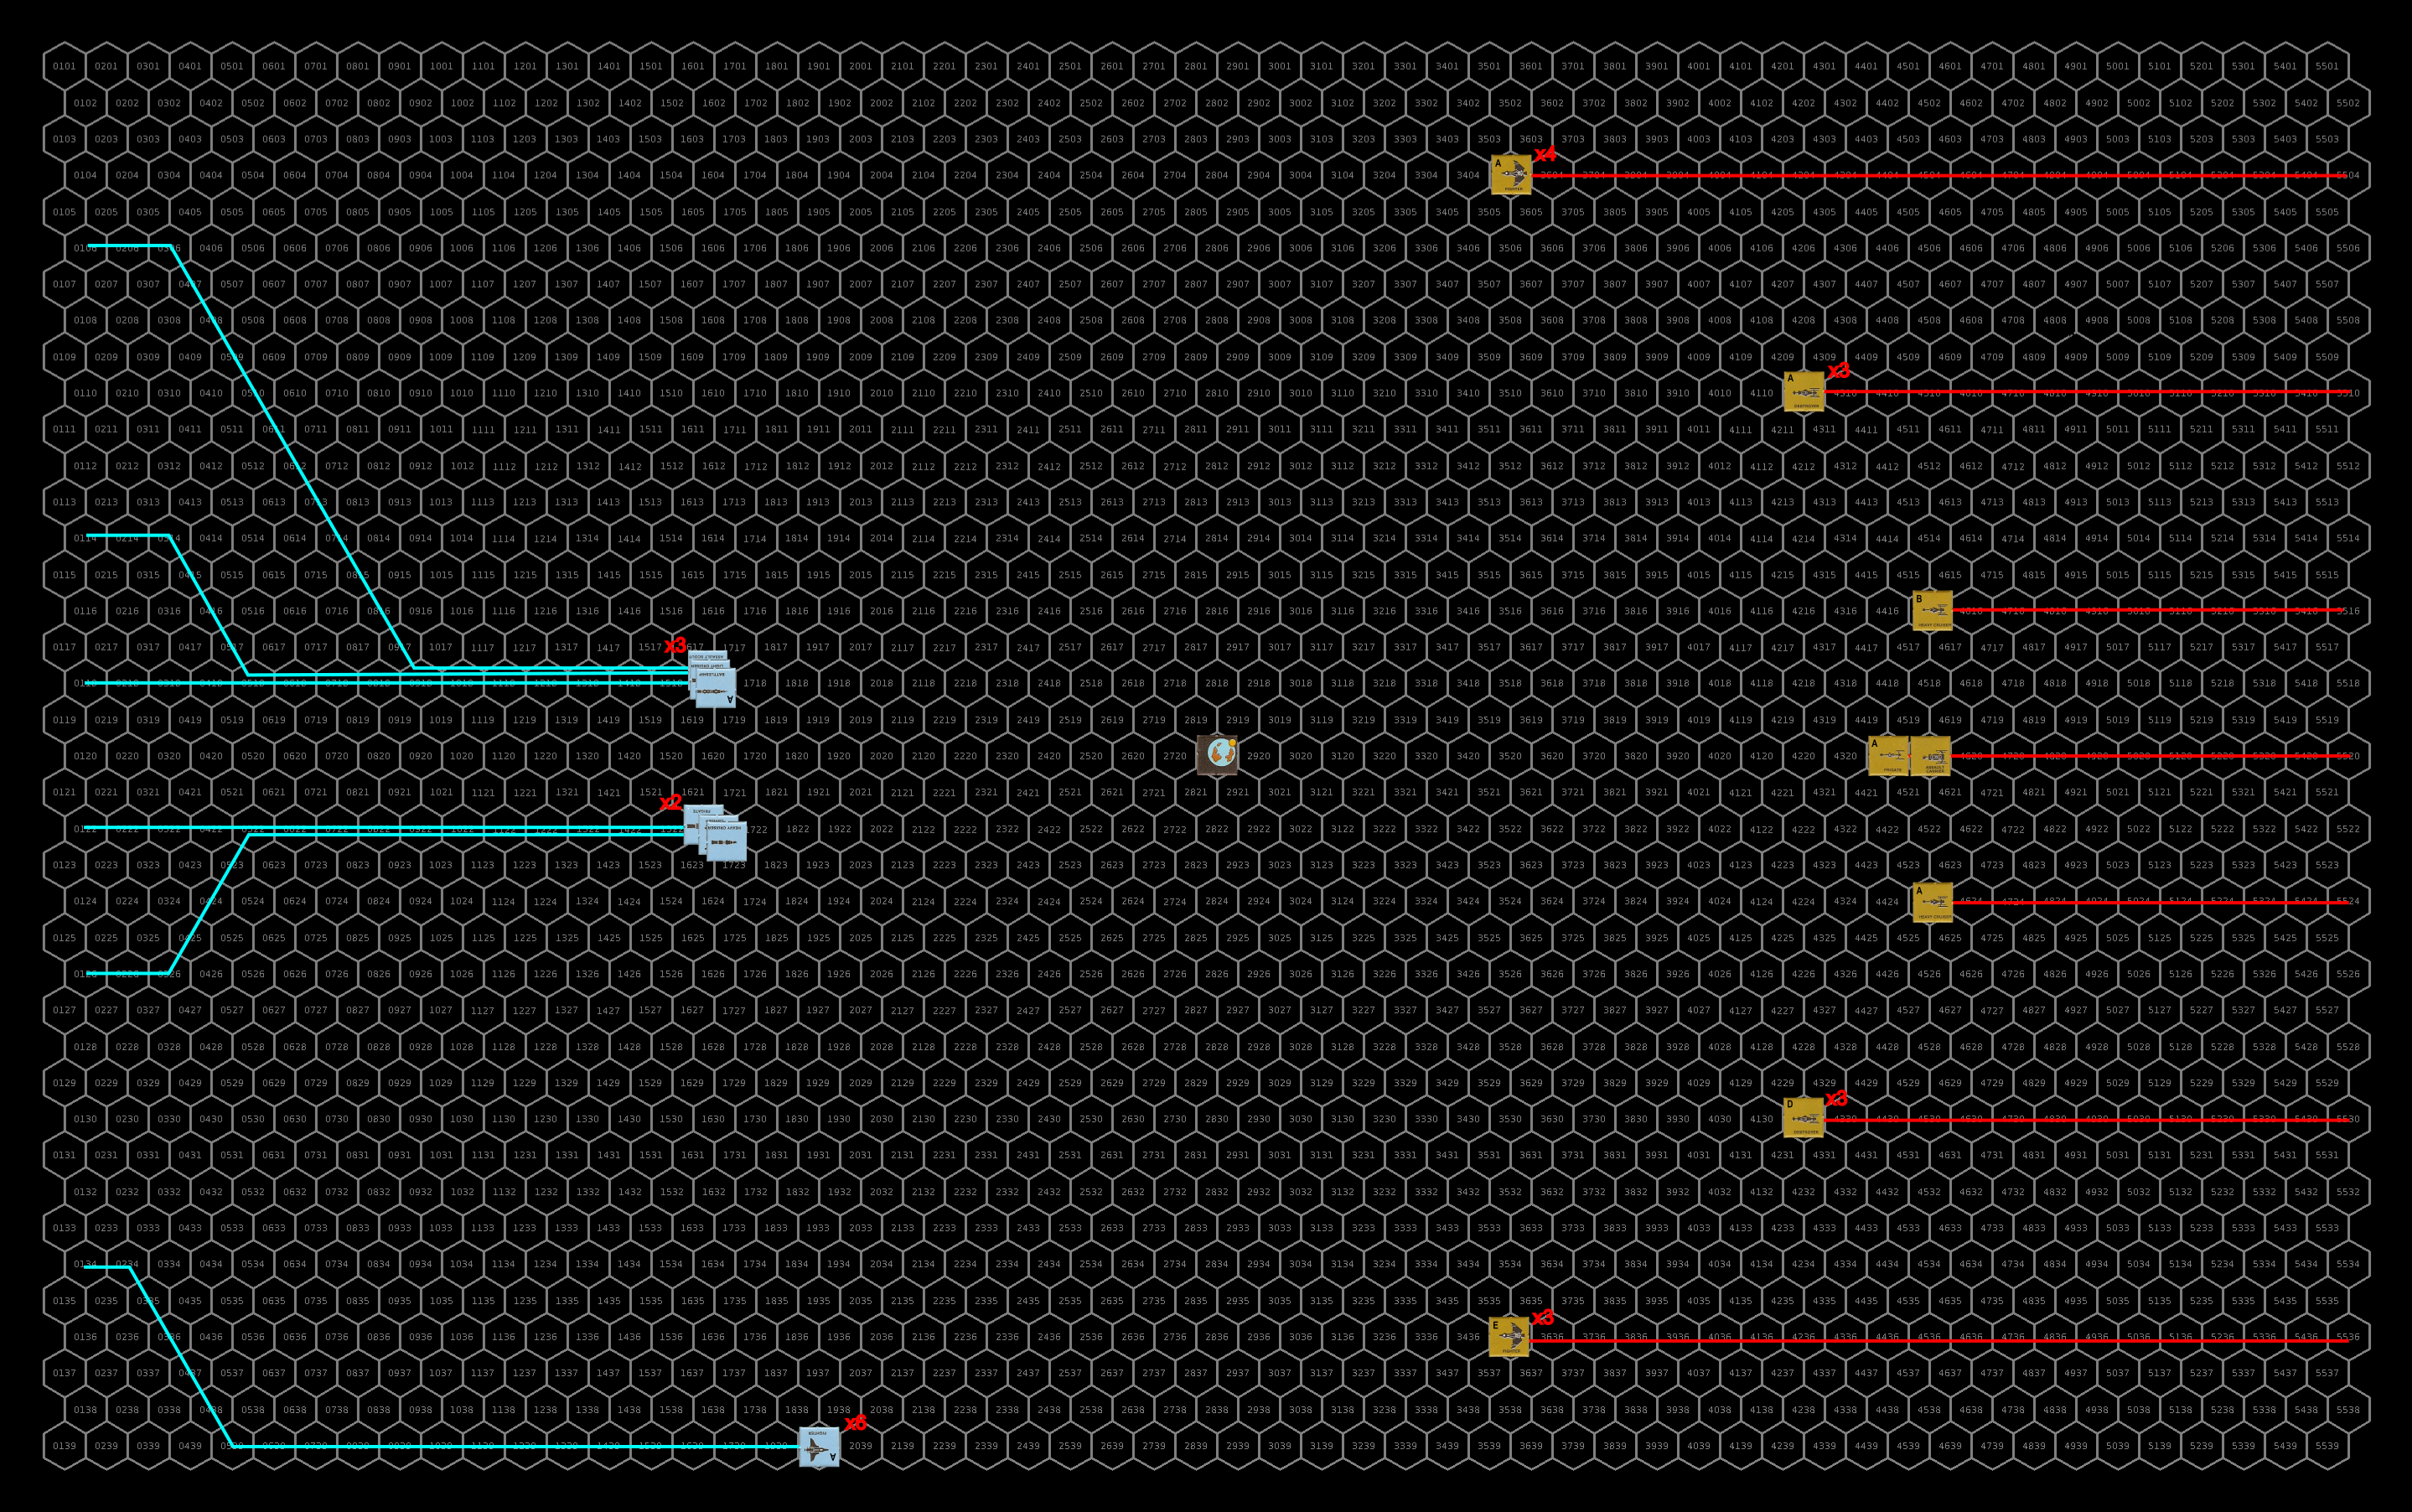
While the sathar destroyers all accelerate to speed 13, the rest just drift forward at their current speed.
Closing ranks to defend against the expected oncoming flights of fighters, the light cruiser and assault scouts join the battleship while the frigates join up with the heavy cruiser and assault carrier. The fighters slow to speed 20 to remain out of range of all of the approaching sathar ships except possiblly the lower flight of fighters.
No shots are fired as everyone is still out of range.
Turn 2
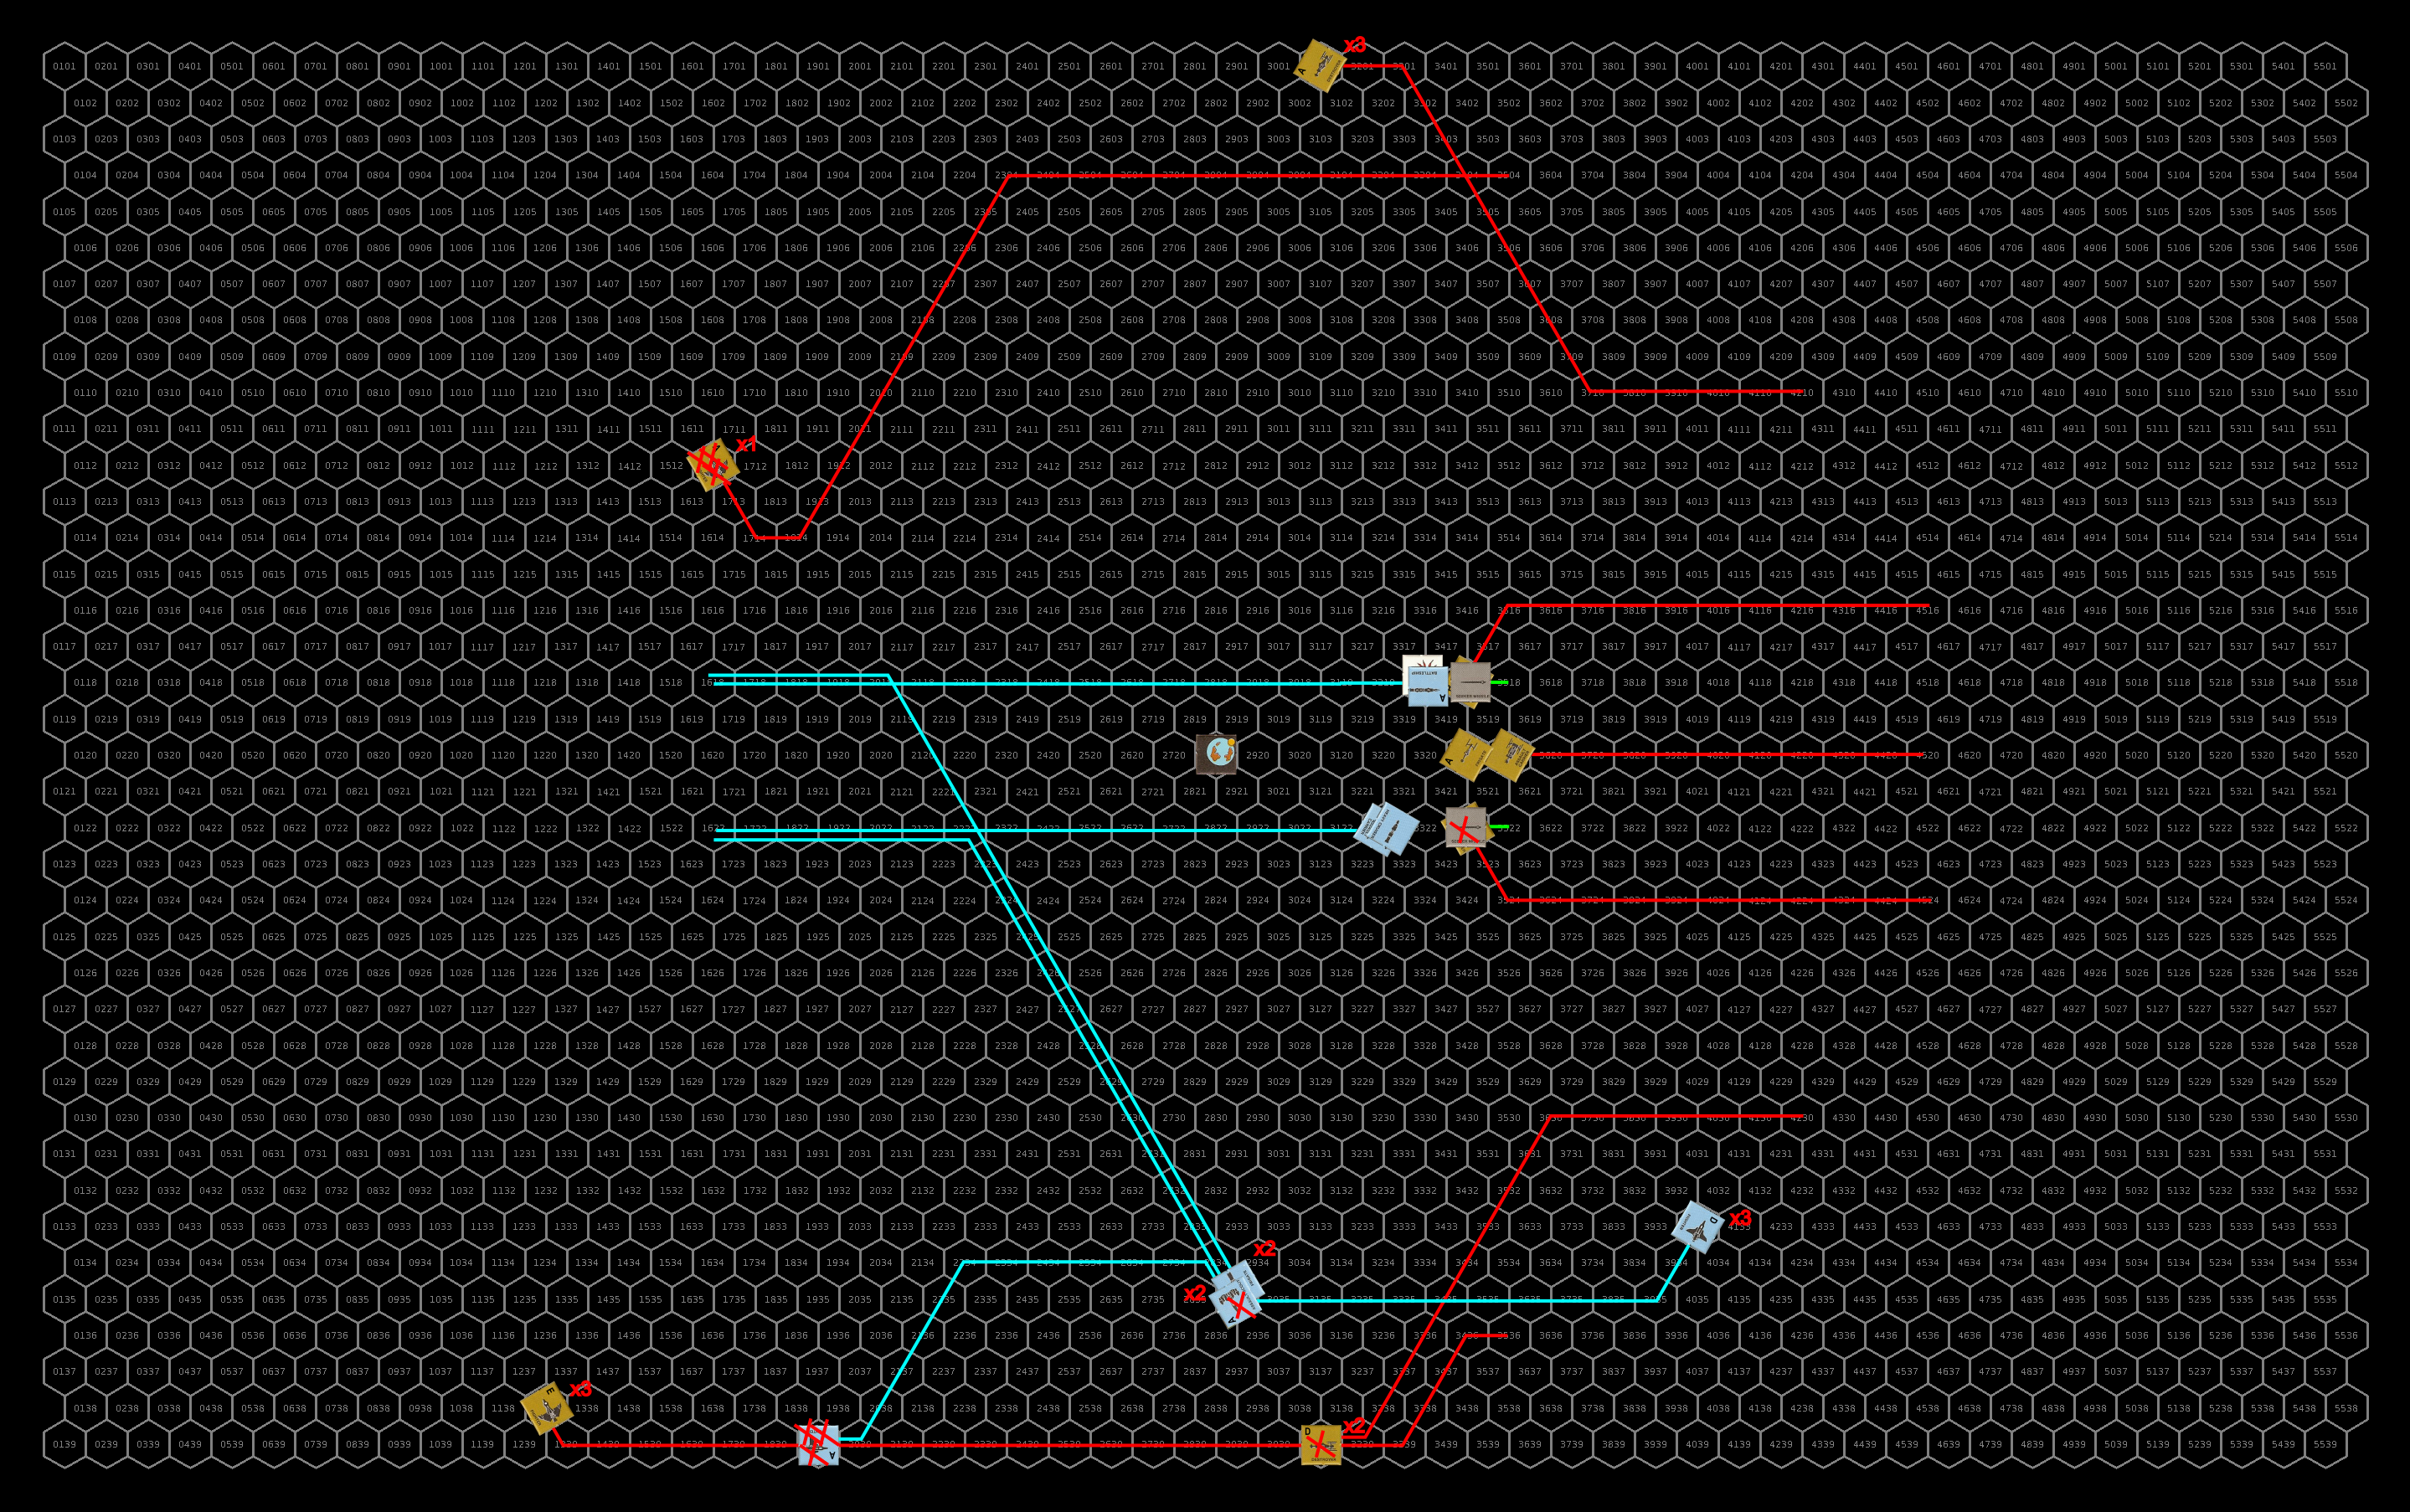
Yhe upper flight of sathar fighters accelerate to speed 25 and make a pass at the upper group of ships, firing on assault rocket each at the assault scouts and light cruiser. The lower flight make a pass at the UPF fighters and fire an assault rocket at three fighters in that group. The sathar destroyers accelerate to speed 16 and fly out to the flanks with the upper group turning to head back into the fight while the lower group keeps their forward firing weapons aimed at the UPF fighters. The heavy cruisers accelerate to speed 12 and turn to cross in front of the planet while the frigate and assault carrier remain at speed 10 but turn to pass below the planet.
Defensively, all of the UPF ships fire at the upper group of incoming fighters, while the more distant ships don’t connect, it adds to the crossfire and shots from the closer ship manage to destroy three of the four fighters while almost destroying the fourth (it has 1 HP left).
The surviving fighter fires at the light cruiser and knocks out its engines, it will be stuck at speed 17 until it can get those repaired. The lower flight of sathar fighters all hit with their assault rockets destroying three of the UPF fighters (half the flight).
The UPF activate two of the previously placed seeker missiles. Upon activation, each of them detects the nearby heavy cruiser and accelerate, driving home into the ships. Both cruisers fire 3 ICMs to attempt to intercept the missiles but they fail. The upper cruiser has its ICM launcher knocked out while the lower suffers a devastating hull hit (76 HP – double damage) nearly destroying it.
Ignoring for a moment the fighters and the upper group of destroyers, the UPF ships focus on the other capital ships. The remaining fighters, the assault scouts, and the frigates and make a pass at the lower group of destroyers. The heavy cruiser and assault carrier go after the severely damaged heavy cruiser and the sathar frigate, while the battleship and light cruiser go after the other heavy cruiser.
Defensively, the frigate, upper heavy cruiser, and assault carrier focus their fire on the UPF light cruiser damaging its maneuvering, taking out its laser and proton battery, slightly damaging its hull, and starting an on-board fire. The heavily damaged heavy cruiser fires at the UPF assault carrier knocking out its engines (stuck at speed 16) and severely damaging its hull (a little over 1/3 of hull integrity lost). The lower flight of destroyers focus their fire on two of the assault scouts. One is lightly grazed suffering a 20% hull integrity reduction while the other is destroyed.
Under combined fire from the UPF light cruiser and battleship, the upper sathar heavy cruiser has its maneuvering and proton battery knocked out, and suffers a 43% hull integrity loss from multiple hits. While the UPF assault carrier misses, the UPF heavy cruiser finishes off the heavily damaged sathar heavy cruiser with it’s pair of laser batteries. The shots by those ships at the frigate are much better. The frigate manages to intercept the heavy cruiser’s torpedo with its ICMs, but the sathar vessel is hit with the cruiser’s disruptor cannon and rocket batteries from both vessels damaging its damage controls system and reducing its hull integrity to only 8%.
The lower flight of sathar destroyers doesn’t fair much better. The lead destroyer is hit by an assault rocket and laser battery inducing a navigation control hit and suffering 28% hull integrity reduction. The second is hit by an assault rocket from one of the fighters which scores a critical hit and the laser cannon from one of the frigates and is destroyed by the damage inflicted. The last destroyer is hit by two laser batteries and an assault rocket knocking out 54% of its hull integrity.
Turn 3
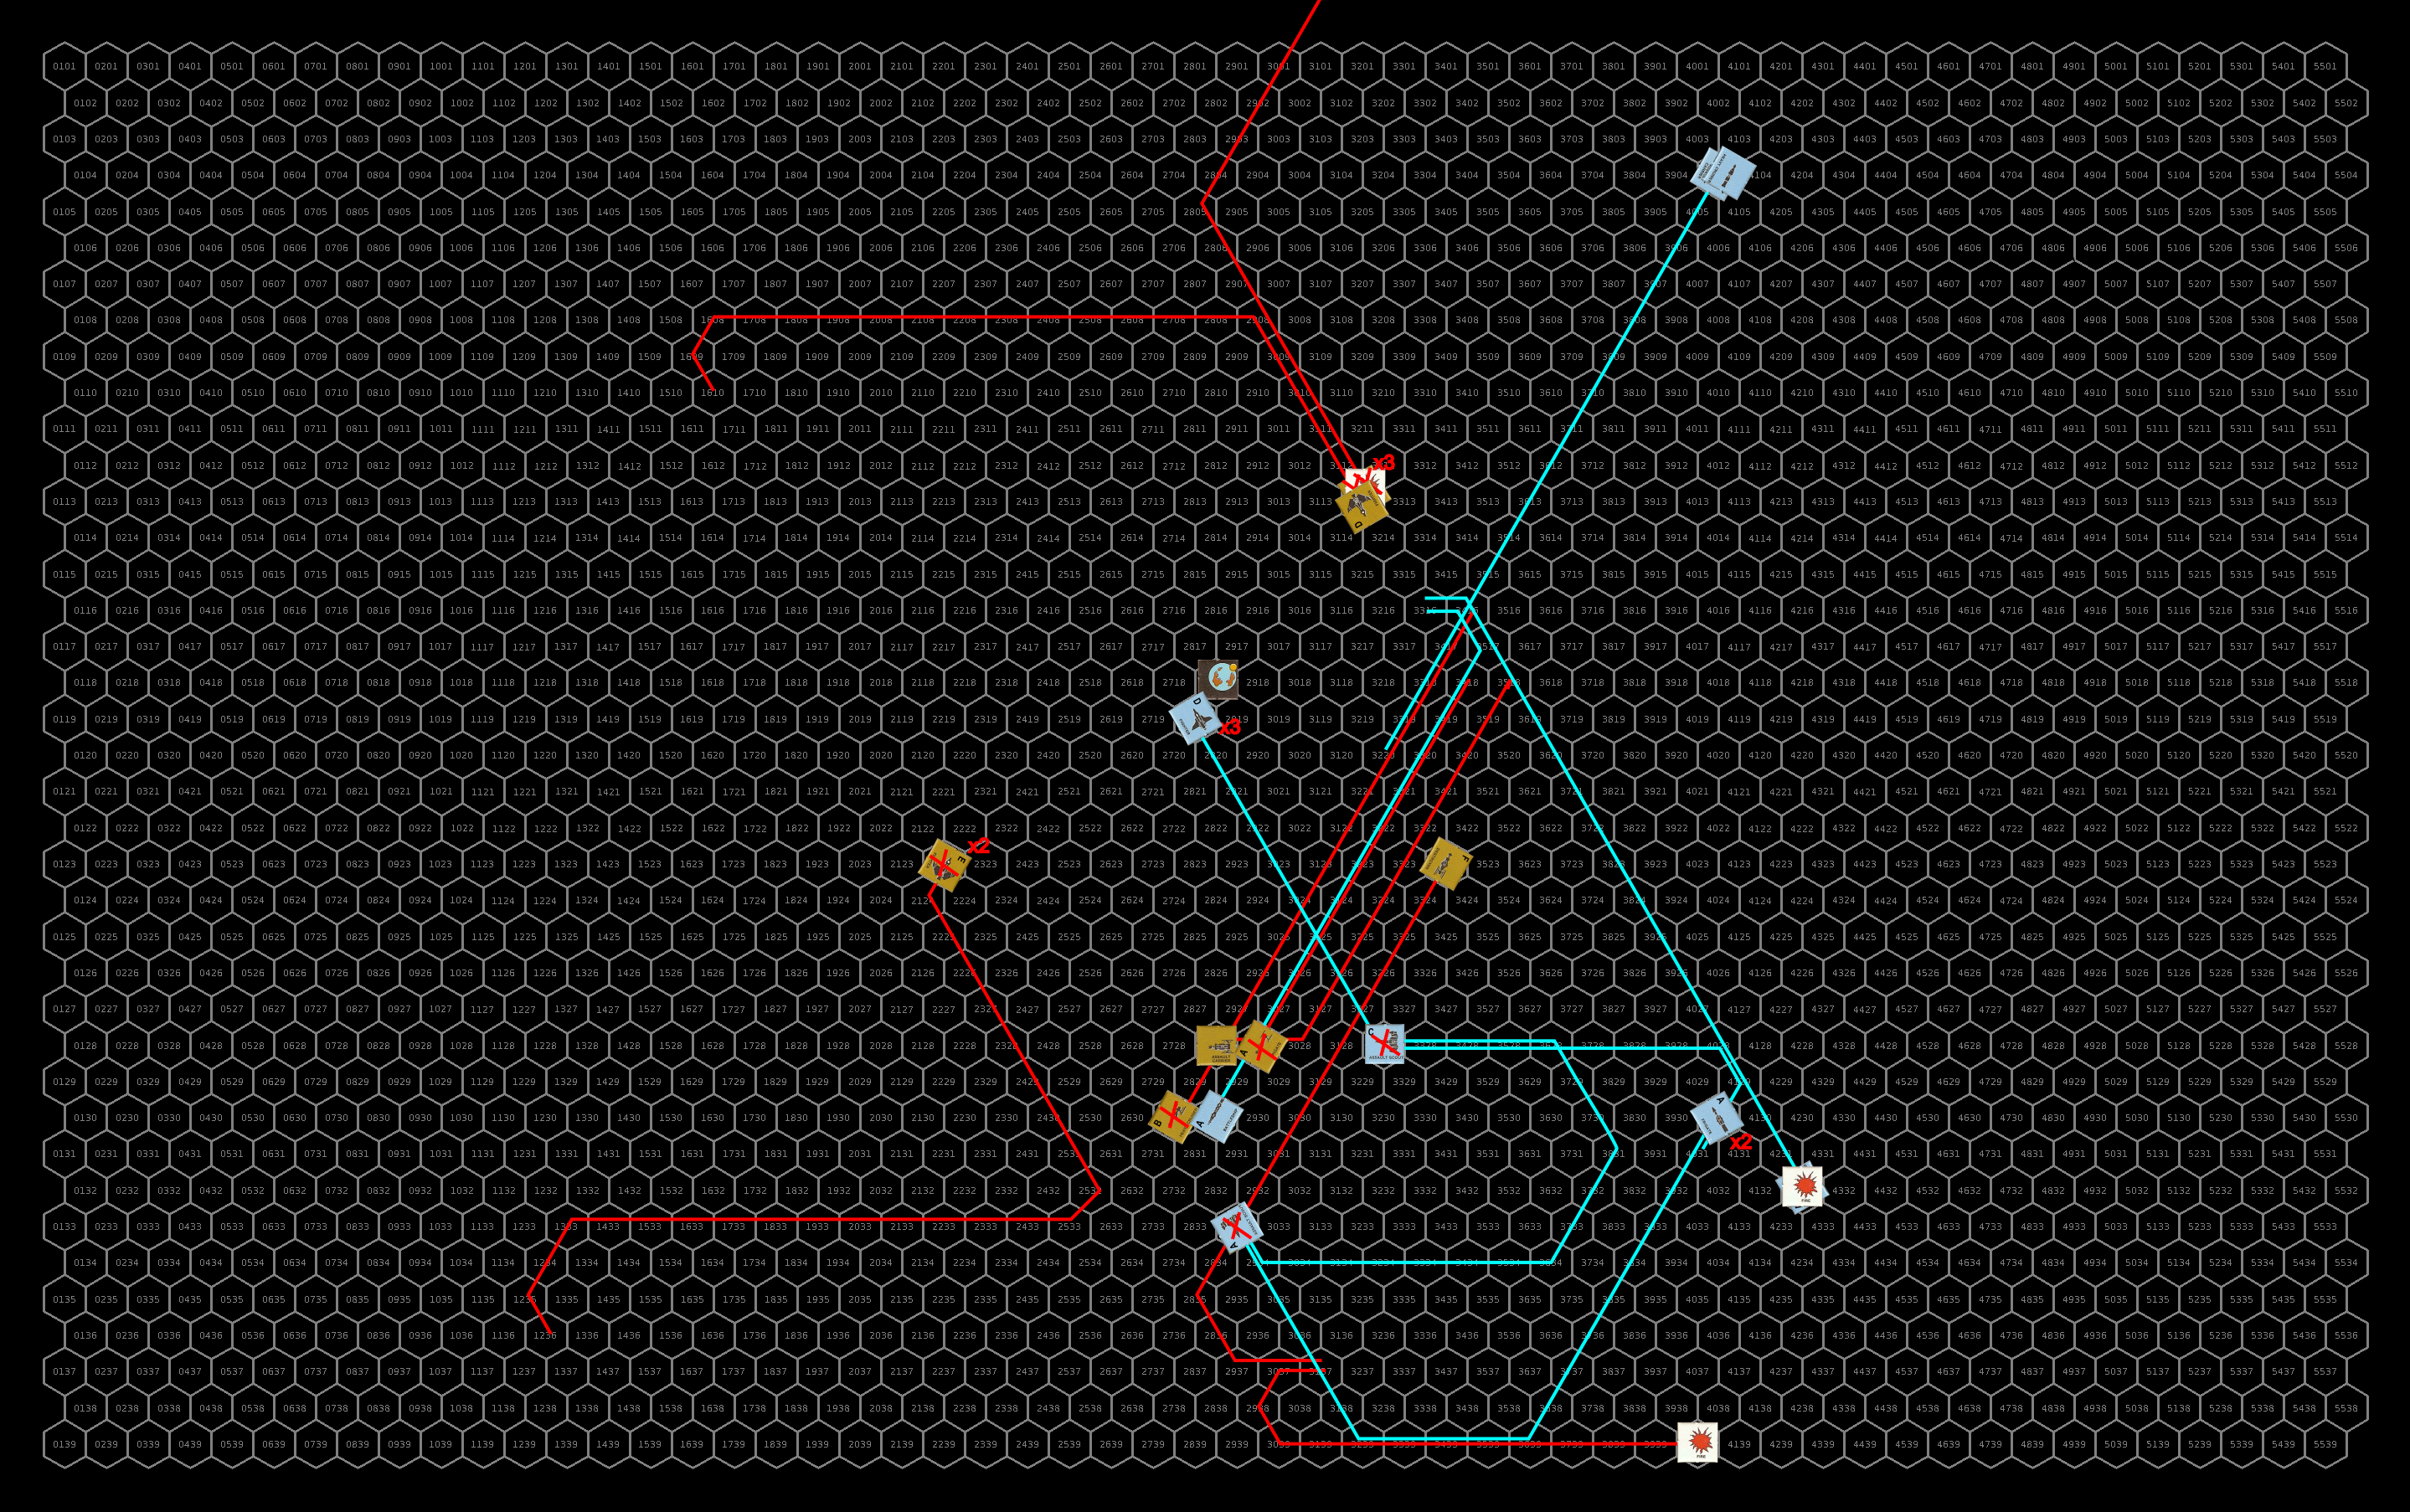
The surviving heavy cruiser, having no MR, accelerates to speed 14 to come in range of the assault scouts and frigates. The seriously damaged frigate just drifts forward at speed 10 and the assault carrier follows it but accelerates to speed 12 and turns to cross its path near the end of its move All three ships fire at the UPF assault carrier. The upper flight of destroyers swoop down and are joined by the surviving fighter from the upper flight. They unleash everything they have at the UPF battleship. The lower flight of fighters loop around and fire on the UPF frigates (2 AR at one and 1 at another) while one of the destroyers loops around to fire at the lead assault scout with everything but it’s torpedo which it fires at the second frigate. The destroyer with the navigation control hit loops away from the fight but fires at the remaining assault scout as it passes by. The fire on the UPF light cruiser damages its combat control system.
Defensively, the frigates and assault scouts fire their laser batteries at the oncoming fighters destroying one and lightly damaging another. The frigates fire their other weapons at the damaged destroyer making the attack on them knocking out another 30% hull integrity and short circuiting out its screens and ICMs.
The UPF heavy cruiser and assault carrier fire their laser batteries at the sathar frigate (short circuiting its screens and ICMs and inducing a navigation control failure) and all their other weapons at the passing heavy cruiser. The battleship and light cruiser fire their disruptor cannons at the heavy cruiser, which combinded with the fire from the heavy cruiser and assault carrier, destroy that ship. They fire 2 laser batteries at the incoming fighter but miss and concentrate the rest of their weapons on the lead destroyer damaging its damage control system, inducing a fire, and nearly destroying it with a critical hit (only 8% hull integrity left).
The lone sathar fighter fire a salvo at the battleship. While most of the shots miss, the ones that hit are significant. The fighter’s assault rocket knocks out the battleship’s ICMs, the lead destroyer’s torpedo scores a critical hit knocking out 25% of the battleship’s hull, and the second destroyer scores a critical hit with its rocket battery taking out another 22% of the hull.
The UPF assault carrier is hit by both the sathar frigate and assault carrier knocking out its proton and laser batteries and multiple hull hits knocking another 40% off of it’s hull integrity. Shots at the surviving assault scouts destroy the lead assault scout while completely missing the other one. The lead UPF frigate is hit by an assault rocket damaging its engines while the other is hit by an assault rocket and torpedo knocking out nearly half its hull and acceleration ability.
The UPF light cruiser, with its engines nearly completely off line, turns to starboard and drifts down toward the lone sathar destroyer at the bottom of the map. The battleship turns hard to starboard and flies down over the wounded sathar frigate and flying past the assault carrier. The surviving UPF fighters and assault scouts loop around and make a run at the sathar assault carrier. The two frigates go after the lone sathar destroyer at the bottom of the map and loop back toward the main fight. The UPF assault carrier, severely damaged and with its engines disabled, drifts away from the fight escorted by the UPF heavy cruiser. The fire on the sathar destroyer rampages through the ship knocking out its engines and damaging its combat controls system
Defensively, the upper flight of sathar destroyers once again concentrate all their fire on the battleship, hoping to do better defensively than they did offensively. Their hope is in vain however as only one hit does hull damage (reducing it by another 10%) but they also induce a navigation control malfunction, knock out its stasis screen, and damage its combat control systems.
The lone sathar destroyer in the middle of the fight fires at the UPF assault carrier short circuiting its defensive systems and reducing its damage control capabilities.
The lone destroyer at the bottom of the map with the navigation control malfunction focuses its fire on the more damaged frigate knocking out it’s laser cannon.
The sathar frigate and assault carrier fire their energy battery weapons at the incoming UPF fighters (one is hit for a 38% hull integrity reduction) and the frigate fires its rocket battery at the assault scout (critical hit destroying the scout) and laser cannon at the battleship as it flies by (that’s the shot that induced the navigation control hit mentioned above).
The UPF fighters fire at the sathar assault carrier but only connect with one assault rocket knocking out the carrier’s maneuvering. The frigates work to finish off the damaged destroyer with the navigation hit but only manage to hit with a single laser battery inducing an onboard fire.
The light cruiser fires at the second destroyer in the upper group as it flies away hitting with its laser, proton, and electron batteries damaging it’s hull and weapons before the light cruier’s torpedo slips past the ICMs launched by the destroyer and scores a critical hit, destroying the sathar ship.
The battleship fires it’s disruptor cannon and a laser battery at the frigate hitting the laser battery and destroying it, two laser batteries at the damaged destroyer in the upper group, one of which connects destroying that ship, and the rest of its weapons at the third destroyer connecting with the electron battery and torpedo and knocking out 70% of the sathar vessel’s hull integrity.
Finally, the assault carrier and heavy cruiser fire at the damaged destroyer in the middle of the map destroying it with multiple hits.
While the UPF ships are fairly damaged, they are definitely in control of the fight at this point.
Repair Turn
On the UPF side, the damaged fighter fails its repair attempt on its hull which will have to be repaired at a shipyard, luckily it is still over 50% hull integrity and doesn’t have to worry about breaking up. The second UPF frigate and the battleship both manage to repair some of their hull while the battleship also effects repairs to its combat control system. The light cruiser gets its fire under control while the assault carrier repairs its damage control systems.
On the sathar side, the two damaged fighters repair their hull while the surviving destroyer from the upper group fails its hull repair, leaving it permanently damaged below 50% hull integrity. The other surviving destroyer gets its fire under control while the assault carrier repairs its maneuvering and combat control systems.
Turn 4
Recognizing that they can’t win, the sathar attempt to at least finish off the already damaged ships. To that end, the upper destroyer and 3 fighters go after the assault carrier. Though severely damaged, the destroyer manages to hold together (rolled 37 with a 30% breakup chance). The assault carrier turns away from the battleship and accelerates as much as possible. The other sathar destroyer, although it put its fire out, still has a problem with its navigation control system and pulls a turn to port. It also accelerates.
Defensive fire:
The UPF assault carrier and heavy cruiser fire defensively at the sathar fighters, using their ICMs to defend against the incoming torpedo, managing to destroy two of the three fighters. The battleship fires everything it can at the assault carrier causing significant system damage (all maneuvering, navigation control damage, half engine capabilities, and knocking out its ICM launcher) and some minor hull damage (20%). The UPF light cruiser and frigates fire long distance shots at the other destroyer but the shots all go wide.
The sathar fighter fires its final assault rocket at the UPF assault carrier knocking out that ship’s masking screen system. The sathar destroyer hits the assault carrier with its laser battery and a rocket battery but only causes minor hull damage (15% hull integrity reduction). The sathar assault carrier hits the UPF battleship with both of its energy weapons inducing a loss of navigation control and some minor (~6%) hull damage. However, that is enough to put the battleship below 50% hull integrity and with the navigation control damage, it could break up
The battleship, with its navigation control damage pulls a turn to port. Luckily its damaged hull holds together (rolled 24 on 14). The frigates, unable to reach the assault carrier, go after the destroyer at the top of the map. The light cruiser, with its limited maneuverability turns to try to come back around to the battle area. The UPF fighters make a final run at the sathar assault carrier before turning to return to their assault carrier. They also activate two more seeker missiles, one accelerates and slams into the remaining sathar fighter destroying it. The second starts to go after the battleship but as the battleship flies away, turns its sights on the sathar destroyer.
Defensively the sathar assault carrier misses its shots at the UPF fighters while the sathar destroyer hits the battleship for another 5% hull integrity loss and knocks out all of its maneuvering. The sathar destroyer connects with the damaged UPF frigate knocking out some of its engines and nearly destroying it.
Two of the three assault rockets from the UPF fighters connect with the sathar assault carrier, one of which scores a critical hit and between the two of them reduce the carriers hull integrity by another 64%. The UPF frigates, assault carrier and heavy cruiser all fire at the remaining sathar destroyer at the top of the map connecting with multiple weapons and destroying it. The battle ship hits the destroyer at the bottom of the map with a laser and electron battery reducing its hull integrity by another 24%.
Turn 5
The two remaining sathar ships are heavily damaged. The assault carrier just drifts away while the destroyer, with its navigation control system damaged pulls a hard turn to starboard and accelerates to speed 19. It doesn’t break up from the strain.
Defensively, the battleship is the only ship in range and it opens fire on the destroyer hitting with all of its battery weapons damaging its combat control system and short circuiting its defensive systems, knocking out its torpedo launcher, reducing its maneuverability, and slightly damaging its hull (6%).
Offensively, the destroyer fires back at the battleship and hits with both its rocket battery and a torpedo (the battleship’s ICM launcher is damaged) which both damage the battleships hull and nearly destroy it. It has only 6% hull integrity left.
The seeker missile reverses course and heads after the battleship and sathar destroyer, the undamaged UPF frigate turns and accelerates to speed 24 to chase after the sathar assault carrier. The UPF heavy cruiser (off the top of the map) with no foreseeable danger to the damaged UPF assault carrier, turns and starts to pursue the sathar assault carrier as well. The light cruiser (off the bottom of the map) continues to slowly turn back to the combat area and the damaged battleship, frigate, and assault carrier just drift on their current course. Finally, the fighters start to close with the assault carrier to board and rearm.
Defensively the assault carrier fires at the oncoming frigate but misses. The destroyer takes its final shots at the battleship hitting with its laser battery. Unfortunately for the sathar, it only damages the battleship’s engines instead of damaging its hull.
Offensively, the battleship fires its final salvo, including a torpedo at the destroyer but only hitting with an electron battery damaging its engines and a proton battery knocking it out its rocket battery launcher . The UPF frigate fires at the sathar assault carrier but doesn’t hit at the extreme range.

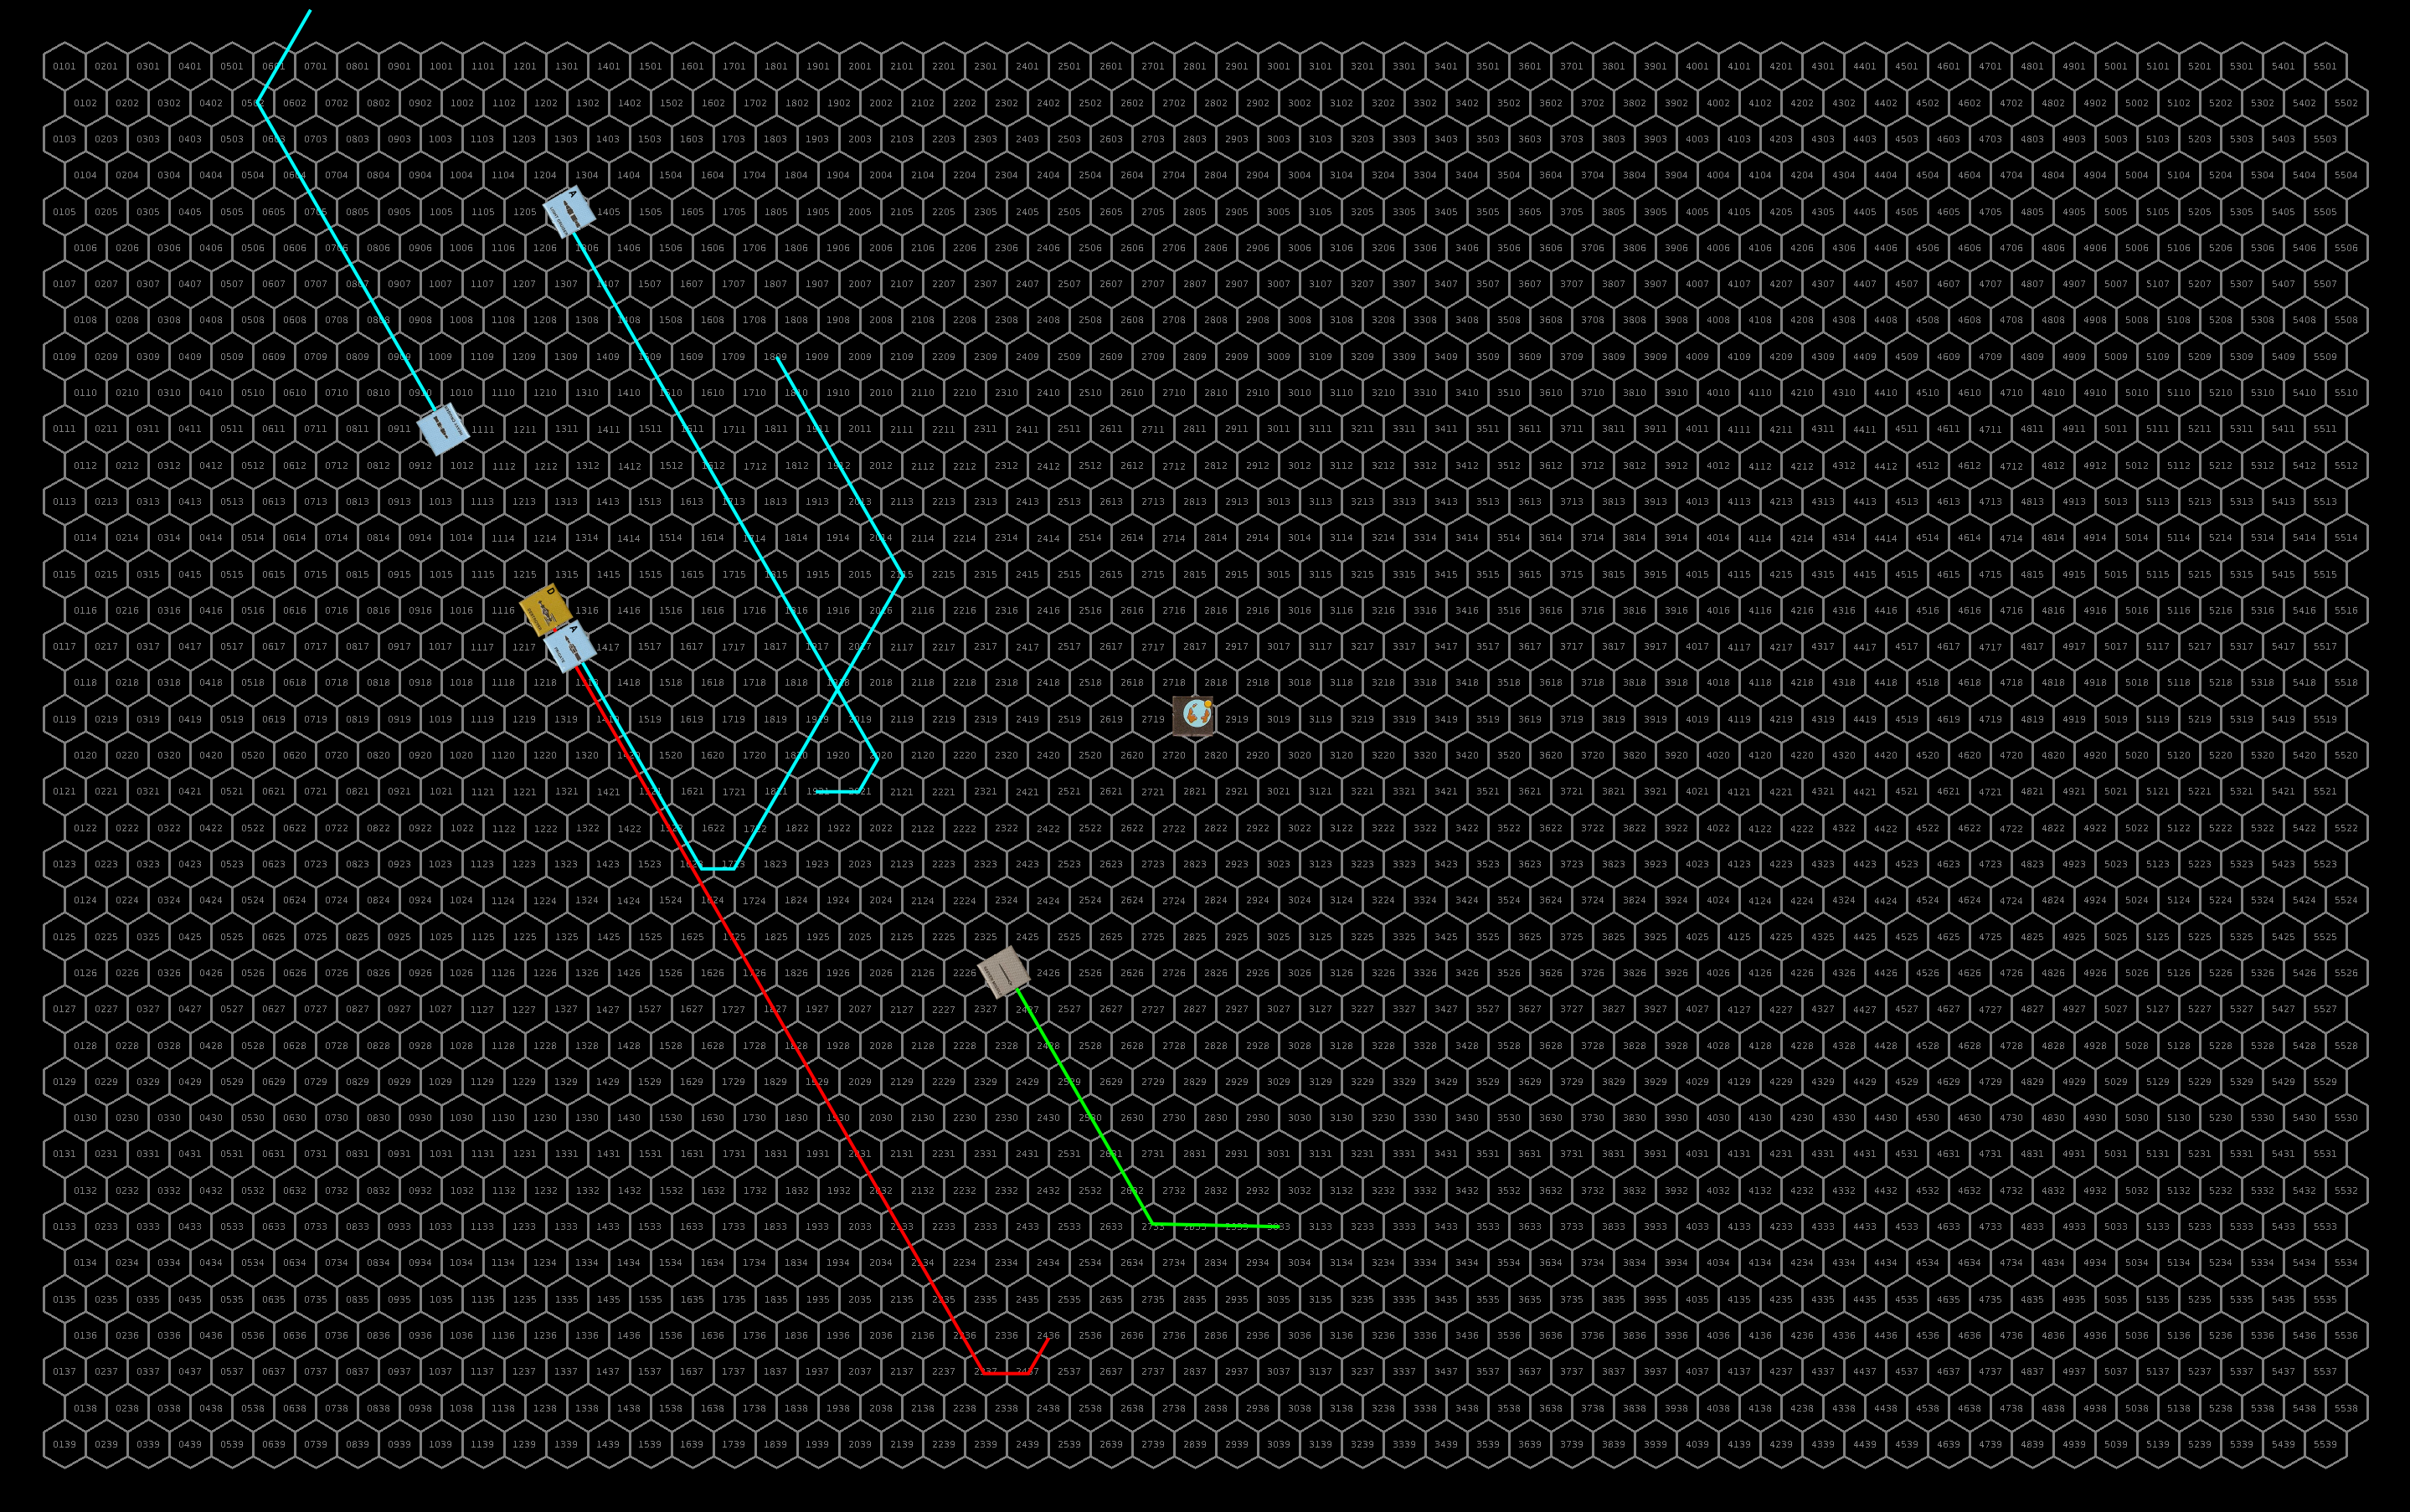
Turn 6
The sathar assault carrier continues to drift while the destroyer’s navigation damage causes it to pull to port and fly up toward the planet, its reduced maneuverablity reducing its chance of breaking up and spreading out its movement. Defensively the frigate fires once again at the assault carrier, this time dialing in the range and hitting with both the laser battery (damaging the combat control system) and the laser cannon (16% hull integrity), nearly destroying the ship. The assault carrier returns fire but misses.
The UPF frigate chases down the assault carrier and surviving the defensive fire (laser battery hit for 18% hull integrity), hits the carrier with its laser cannon for 20% hull integrity and a rocket battery knocking out is proton battery and destroying it. The seeker missile continues to pursue the destroyer.
Repair Turn 2
The two UPF frigates, assault carrier, and battleship all repair some of their hull while the assault carrier also repairs the short circuit in its defensive systems and the light cruiser restores complete maneuverability.
The sathar destroyer manages to repair 18% of its hull
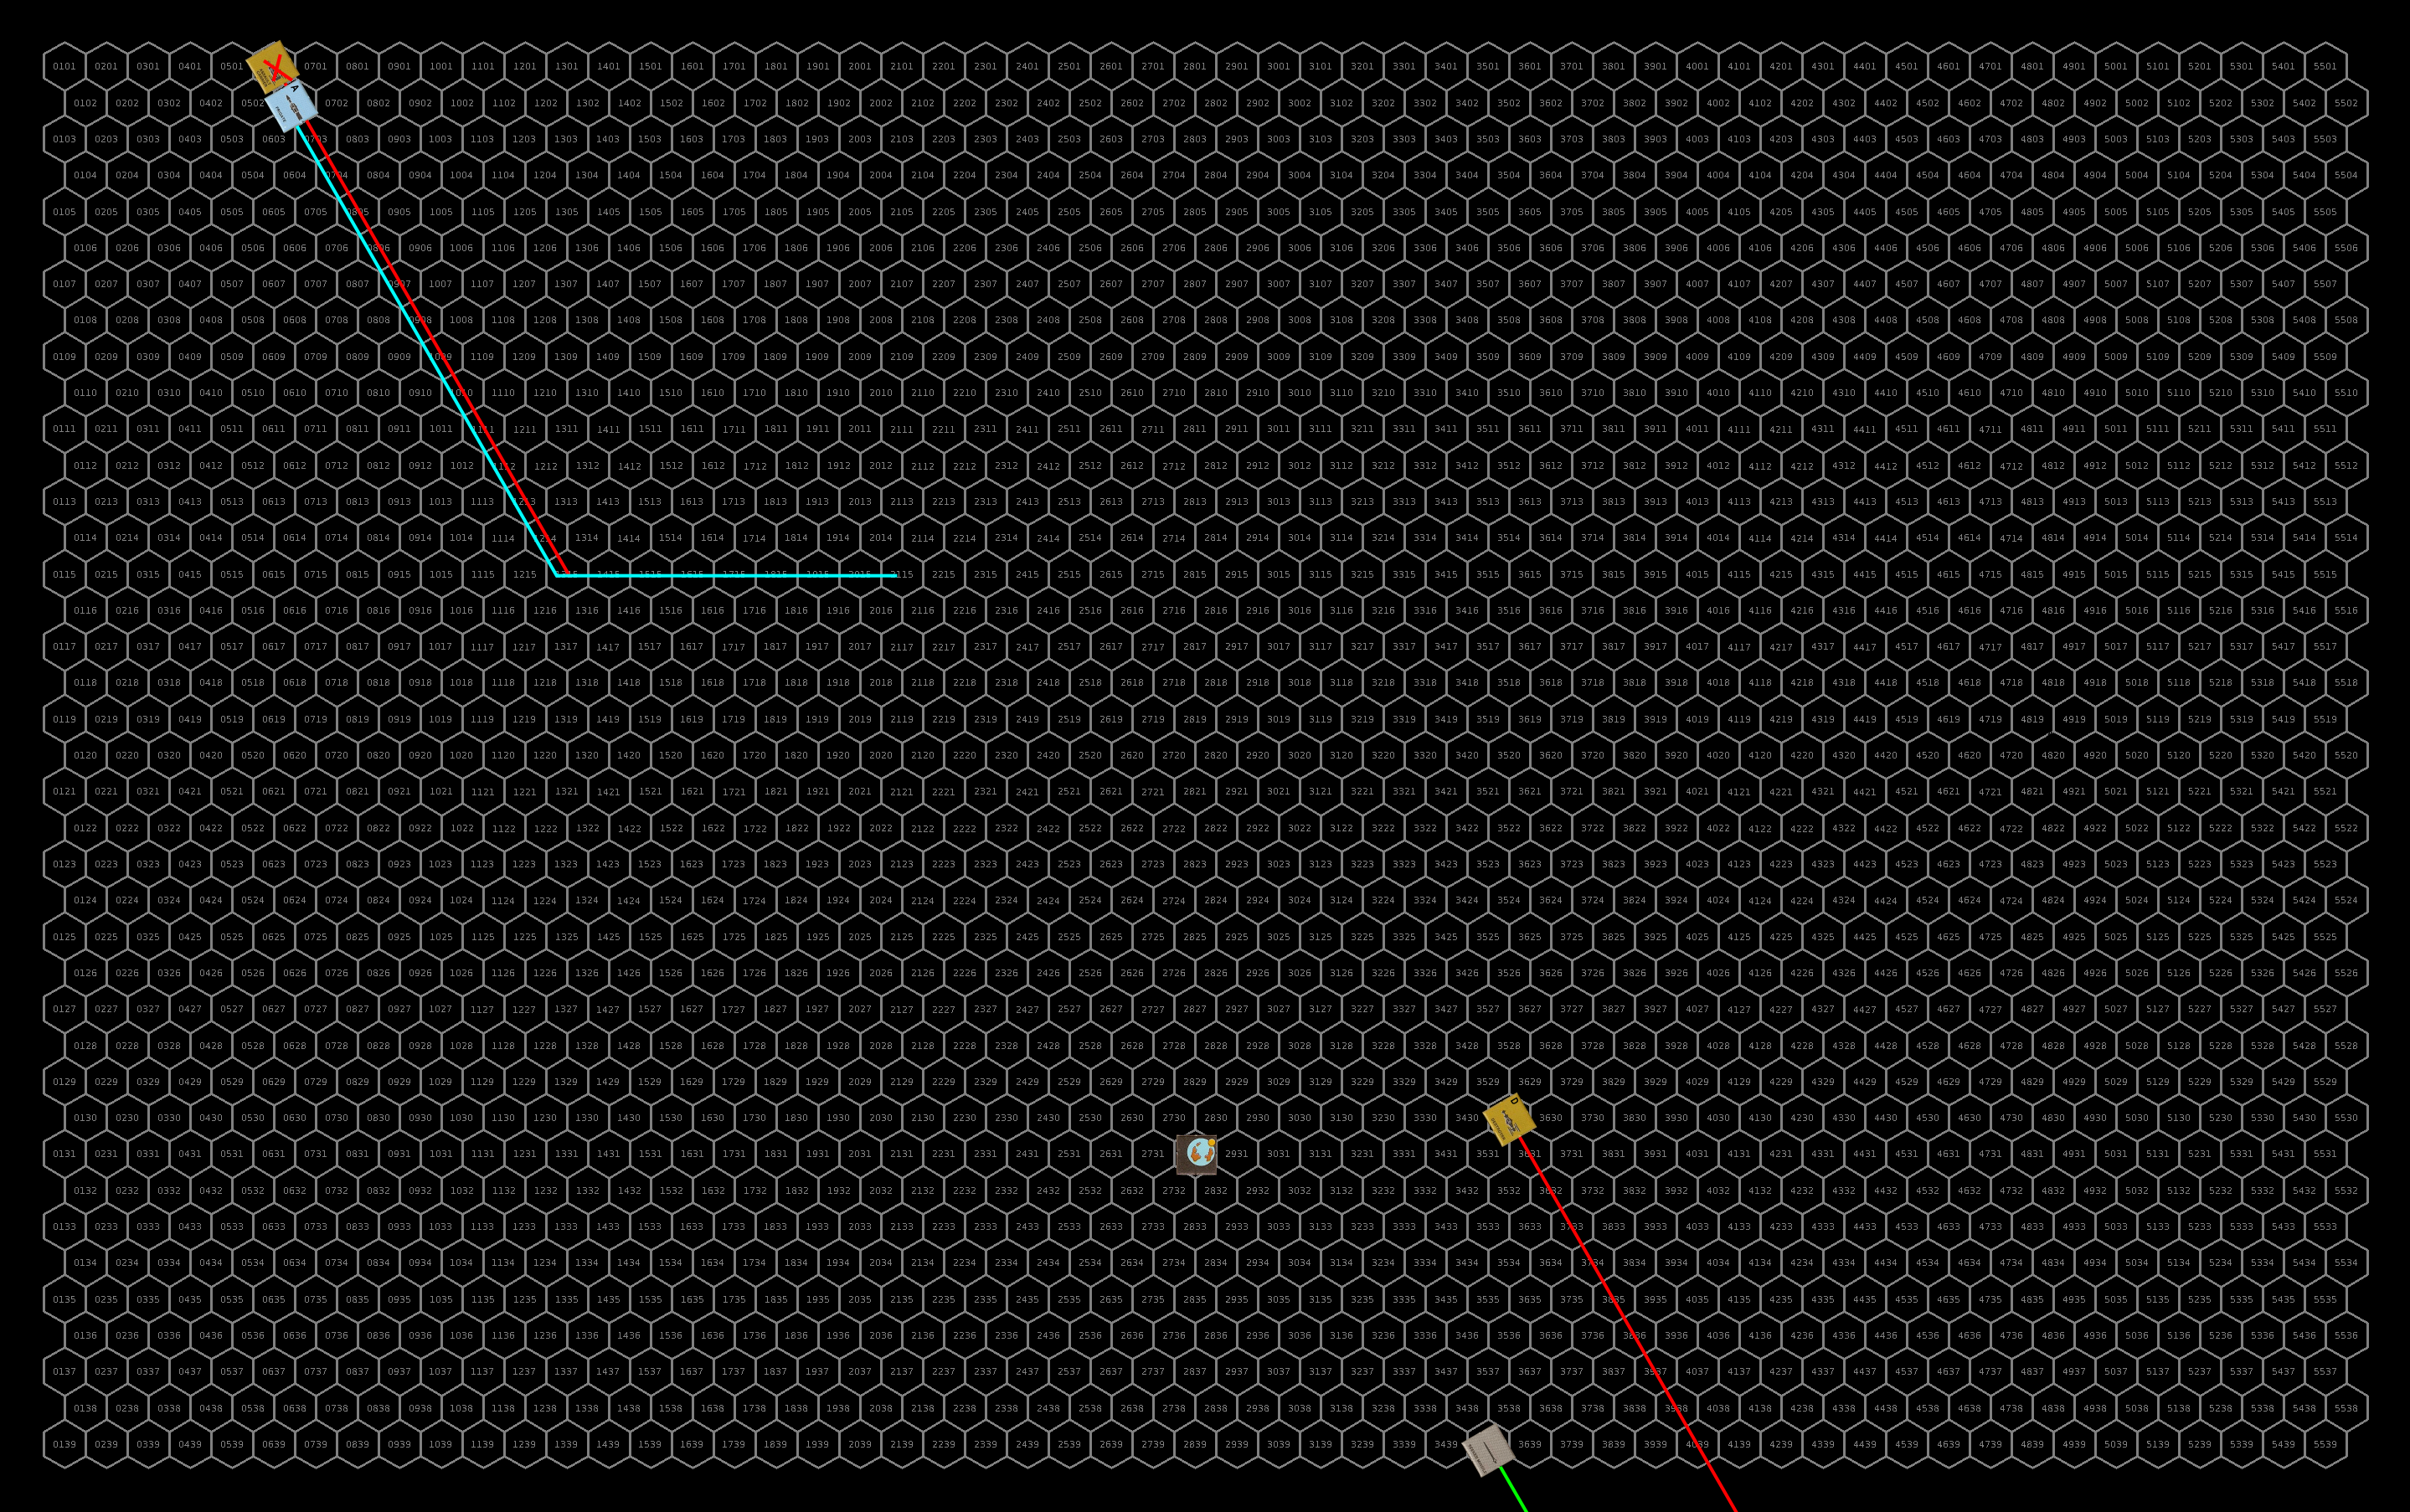
Turn 7
The destroyer’s navigation control damage causes it to turn to port toward the light cruiser and it accelerates to continue to stay away from the seeker missile. The light cruiser, its maneuvering repaired continues a wide turn to avoid the seeker as well, otherwise, it could have closed on the sathar ship. The frigate turns after destroying the assault carrier, accelerating to chase after the destroyer. No shots are fired.
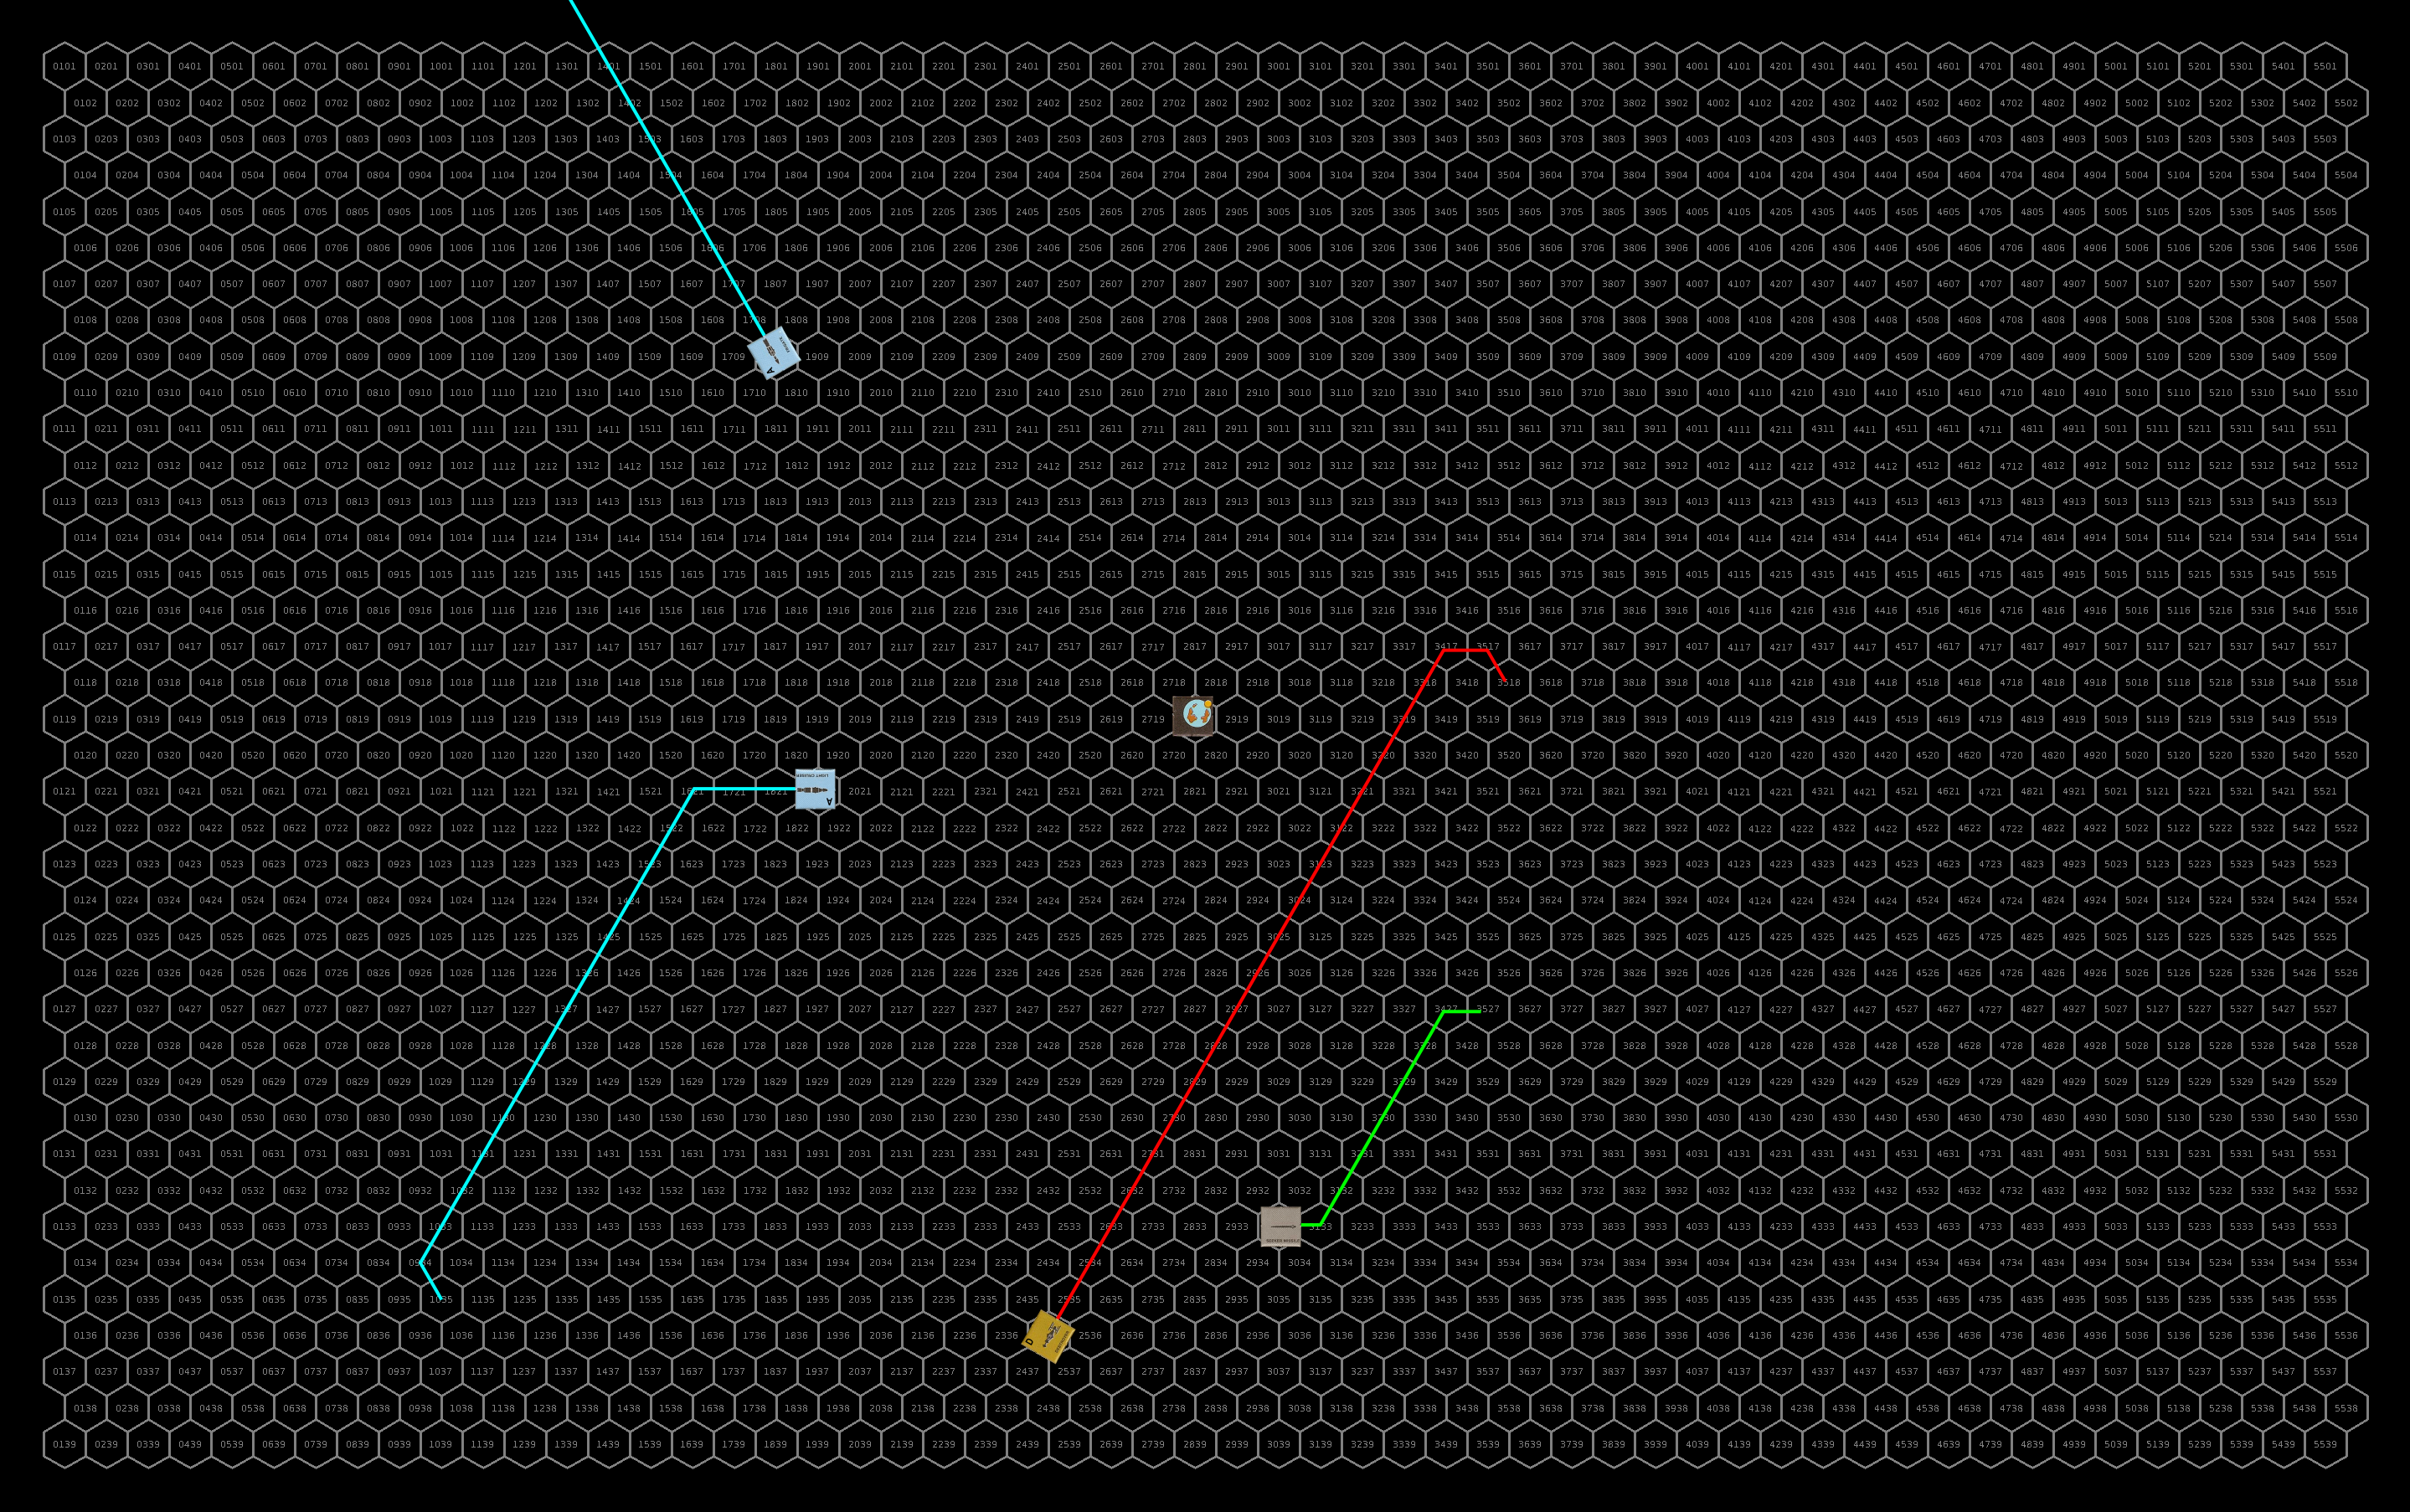
Turn 8
Continuing to accelerate, the sathar destroyer’s navigation damage turns it to starboard and it passes within 40,000 km of the light cruiser. Defensive fire from the more distant frigate misses, but the light cruiser connects with its electron battery knocking out the destroyer’s masking screen. The destroyer returns fire and hits with its electron battery knocking out the cruiser’s ICM launcher.
The seeker missile continues to chase the ships but can’t catch them at their high speed. The light cruiser turns to run parallel to the sathar destroyer’s path. The frigate loops around and comes up directly behind the destroyer and the heavy cruiser completes it large turn and comes in directly at the destroyer.
Defensively, the destroyer fires at the frigate as it closes but misses with everything.
The light cruiser can only fire it’s EB and misses. The frigate fires its energy weapons (everything else is expended) and scores critical hits with both knocking out 52% of the sathar destroyer’s hull integrity (it only has 6% left). The heavy cruiser opens up with all of its energy weapons but misses as well.
Turn 9
Now severely damaged after the hits from the frigate, and with the navigation control damage causing it to pull to starboard, the strain on the sathar destroyer’s hull is too much and the ship breaks apart as the crew tries to save it.
Task Force Cassidine has won the day, and while most of the capital ships are damaged (the heavy cruiser is the only one unscathed), they have only lost 3 fighters and three assault scouts. The crews get to work immediately upon field repairs.
Final Repairs
The frigate still in the fight completes its repairs in another half hour and just needs a reload to be fully operational. An hour an a half later the light cruiser finishes its repairs. An hour after that the other frigate completes as much repair as it can, its hull is only at 73% integrity but the rest of the work is going to need to be done at a shipyard. Another hour and a half (4.5 hours after the battle ended) the assault carrier completes all of its repairs. Finally, 6 hours after the battle is over the battleship completes the repairs of all its systems except for its stasis screen which is going to require a work in a shipyard.
Lessons Learned
I was really surprised the UPF did as well as they did. I really thought the sathar were going to win this one or at least leave Task Force Cassidine gutted. From a purely hull point perspective, the sathar had the advantage 631 to 518. Some lucky damage rolls, like the seeker missile doing 76 HP to the heavy cruiser on round two, and bad rolls on the sathar’s side, definitely helped tip the scales in their favor.
The other problem was that the sathar just couldn’t manage to finish off the UPF ships. The UPF battleship, one of the frigates, and the assault carrier were all nearly destroyed. They all were down to single digit hull points during the fight. The sathar just couldn’t manage to get the killing blow in. Those low hull points were late in the battle (expect for the assault carrier) so eliminating the ships would not have made much difference in this fight but eliminating them would have definitely helped the sathar’s war effort later on. As it is, Task Force Cassidine is almost completely intact. They will have to replace some fighters and assault scouts, but that’s relatively easy compared to having to replace a battleship and assault carrier.
What did you think of this fight? What should either side have done differently? Share your thoughts in the comments below.