This is going to be a two-parter, mainly because I haven’t finished all the deck plans. The reason is that instead of just drawing the deck plans, I decided to record myself doing so and make a set of how-to videos about how I make the deck plans, similar to what I did for drawing the Rosegard maps (part 2, part 3, part 4) a couple of years ago. But because of that, I haven’t had a chance to record all the videos with everything going on. This post will provide links to the maps and videos I have finished, and the next one (hopefully sometime next month, I hope to record the rest over the Christmas break) with provide the rest of the decks.
All of the maps are drawn at 140 DPI or 70 pixels per grid square which is exactly the size needed for Roll20 and most virtual table tops.
Getting Started/Cargo Deck
The first video shows the set up of my drawing environment and then we draw the first/lowest deck on the ship, the cargo deck, which is also the simplest. Here’s the video:
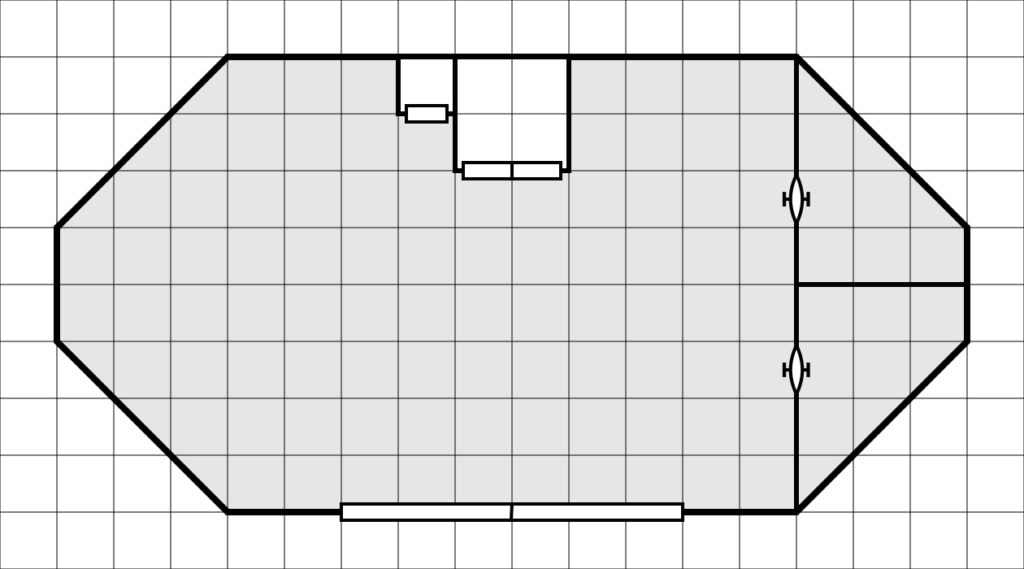
Here’s the final map for the Cargo Deck.

This map is fairly simple, there is the elevator and ladder well, the main cargo bay, and two smaller sealed cargo bays on the right side. These smaller rooms have secure doors that can be locked. There is the main cargo bay doors at the bottom of the map. These open downward to form a loading ramp to get into the cargo bay if landed on a planet’s surface.
Crew Deck
There are two videos for this deck. The first one fixes some minor issues with the cargo deck and then gets to work on the crew deck. The second one adds in the portholes for the deck.
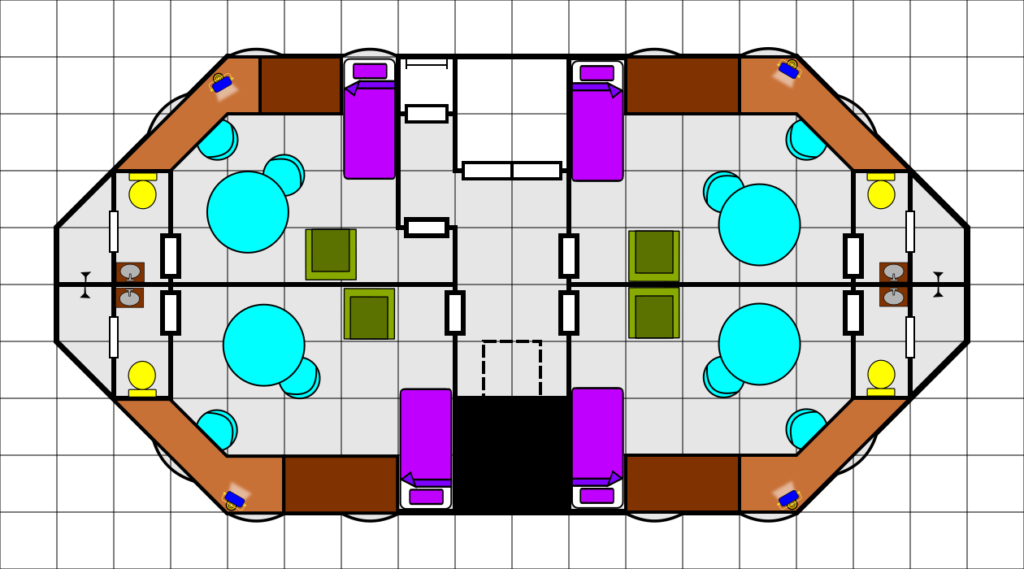
This is actually the deck plan for five different decks on the ship as they are all the same except the Officer’s Deck which has a ceiling access to the bridge deck. Here is the final map for these level.

Once again the deck is fairly simple, consisting of four nearly identical cabins, with one being slightly smaller due to needing to access the ladder well.
Each cabin has a bed, desk, table, several chairs, wardrobe and private bath.
Science and Exploration Deck
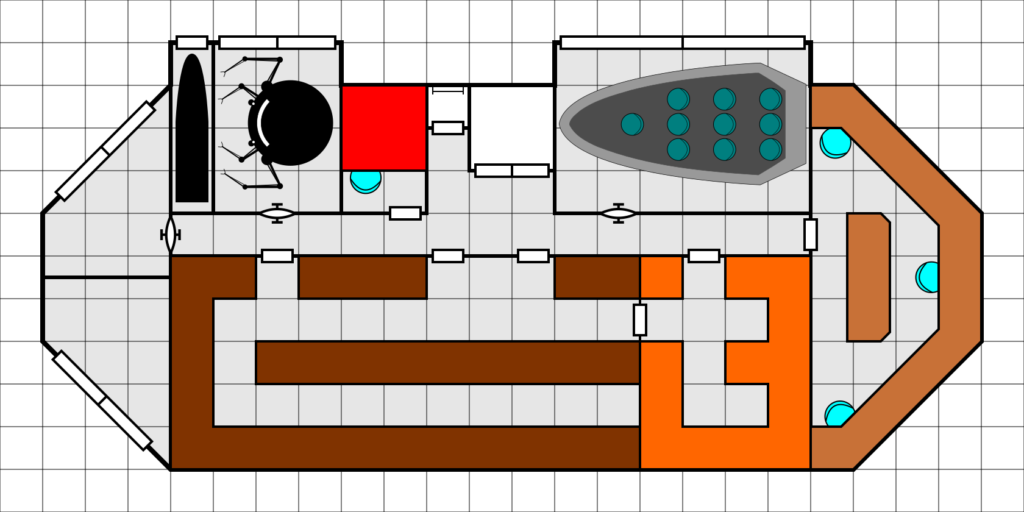
This is the final deck for this installment. This is the deck that houses all the exploration equipment (atmoprobes, remote probes, landing drones), the ships laboratory, a small lifeboat and workpod, and the hydroponics and life support system.
And here’s the deck plan.

You may notice that this deck looks a bit different than the end shot in the video. As I mentioned in the video, I forgot about the life support machinery when I was drawing it. I’ve gone back and fixed that mistake.
The missile silhouette is the atmoprobes, the are two of them, one on top of the other, The two bays on the left with nothing drawn in them are the landing drone (top) and remote probe (bottom) bays. The area on the right is the laboratory and the large area at the bottom is the hydroponics bay (left) and life support machinery (right).
This deck changed the most from my original sketches due to the creation of the 3D model. You may notice that the three bays at the top “stick out” from the the basic shape of the ship. As I was making the model and working on the hull, I found that there was more space available given the angular shape I gave the hull. So I was able to extend these bays out instead of having them take up space from the hydroponics and life support area and still be within the sloped edges of the hull. You can see the cutouts for these bays doors on the model.
Final Thoughts
There are only three maps here but they actually represent 7 of the 12 decks in the ship so on some level, I’m over half done. This is a short post, although if you watch the videos, you’ve got a bit more than an hour and a half of viewing ahead of you.
I had hoped to finish all of the deck plans but I’ve been crazy busy this month (among other things I start my new position as a computer science professor today) and just haven’t had the time to dedicate to this project as I’d like. So I decided to do this post for today and finish up the other ones in a future post.
Thanks for sharing your process; I never know where to start when I try something like this – so I end up just downloading some plans and trying to make them fit!