After nearly two and half hours of fighting, Task Force Cassidine defeated the invading sathar forces destroying all but a heavy cruiser and fighter which are currently departing the system. The ships of the task force are almost all heavily damaged but only a single fighter was lost in the battle, the pilot of which ejected safely and has been recovered.
Rak’tal-ka, StarPlay News
Background
Fresh from the battle with the other sathar force in the K’tsa-Kar system, Task Force Cassidine is ready to face this new sathar threat. While the presence of the militia assault scout that recently disappeared trying to probe the source of the sathar fleets would have been helpful, it would not have made a lot of difference in the fight.
After the recently losses in the K’tsa-Kar and Truane’s Star systems, SBF-J1, crewed by veterans of the campaign against the saurians, look to turn the tide and chalk up a victory for the sathar forces. The fleets are fairly evenly matched with the UPF forces leaning more toward the larger ships with the loss of their assault scouts and half of their fighters in the previous engagement.
Order of Battle
Spacefleet (Task Force Cassidine)
- 3 Fighters
- 2 Frigates
- 1 Light Cruiser
- 1 Assault Carrier
- 1 Heavy Cruiser
- 1 Battleship
Sathar
- 7 Fighters
- 1 Frigate
- 1 Destroyer
- 2 Light Cruisers
- 1 Assault Carrier
- 1 Heavy Cruiser
The Battle
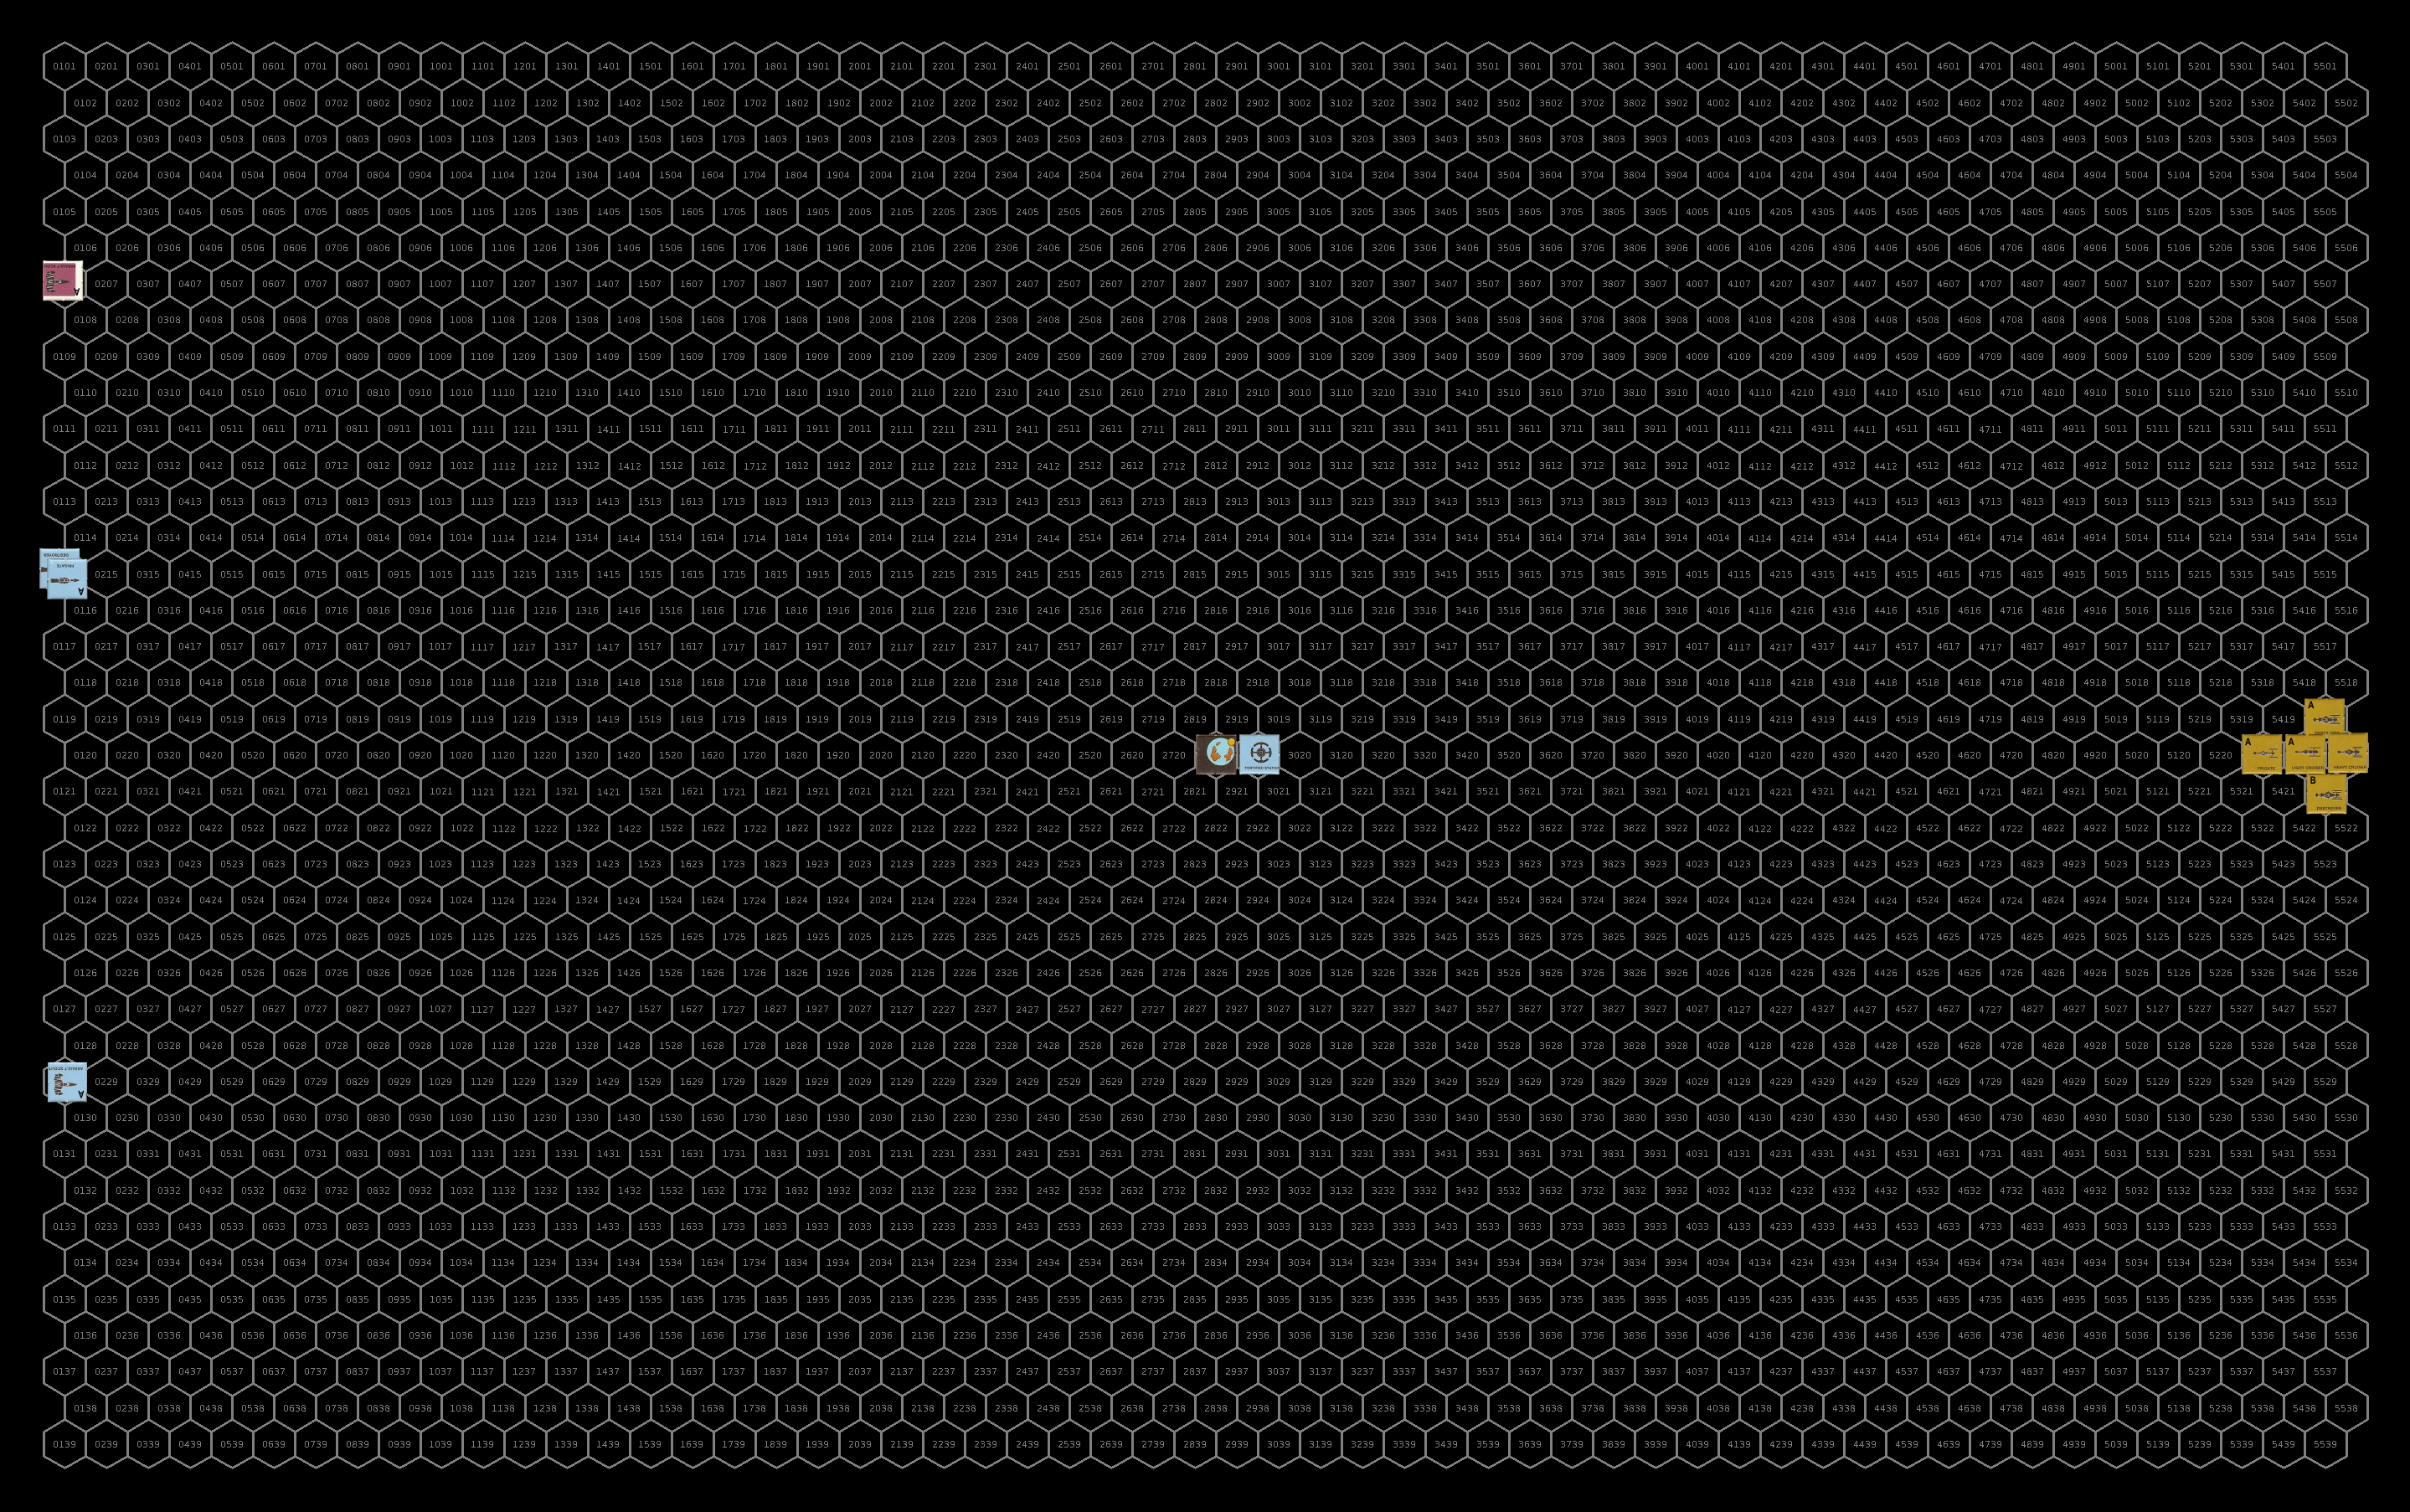
Setup
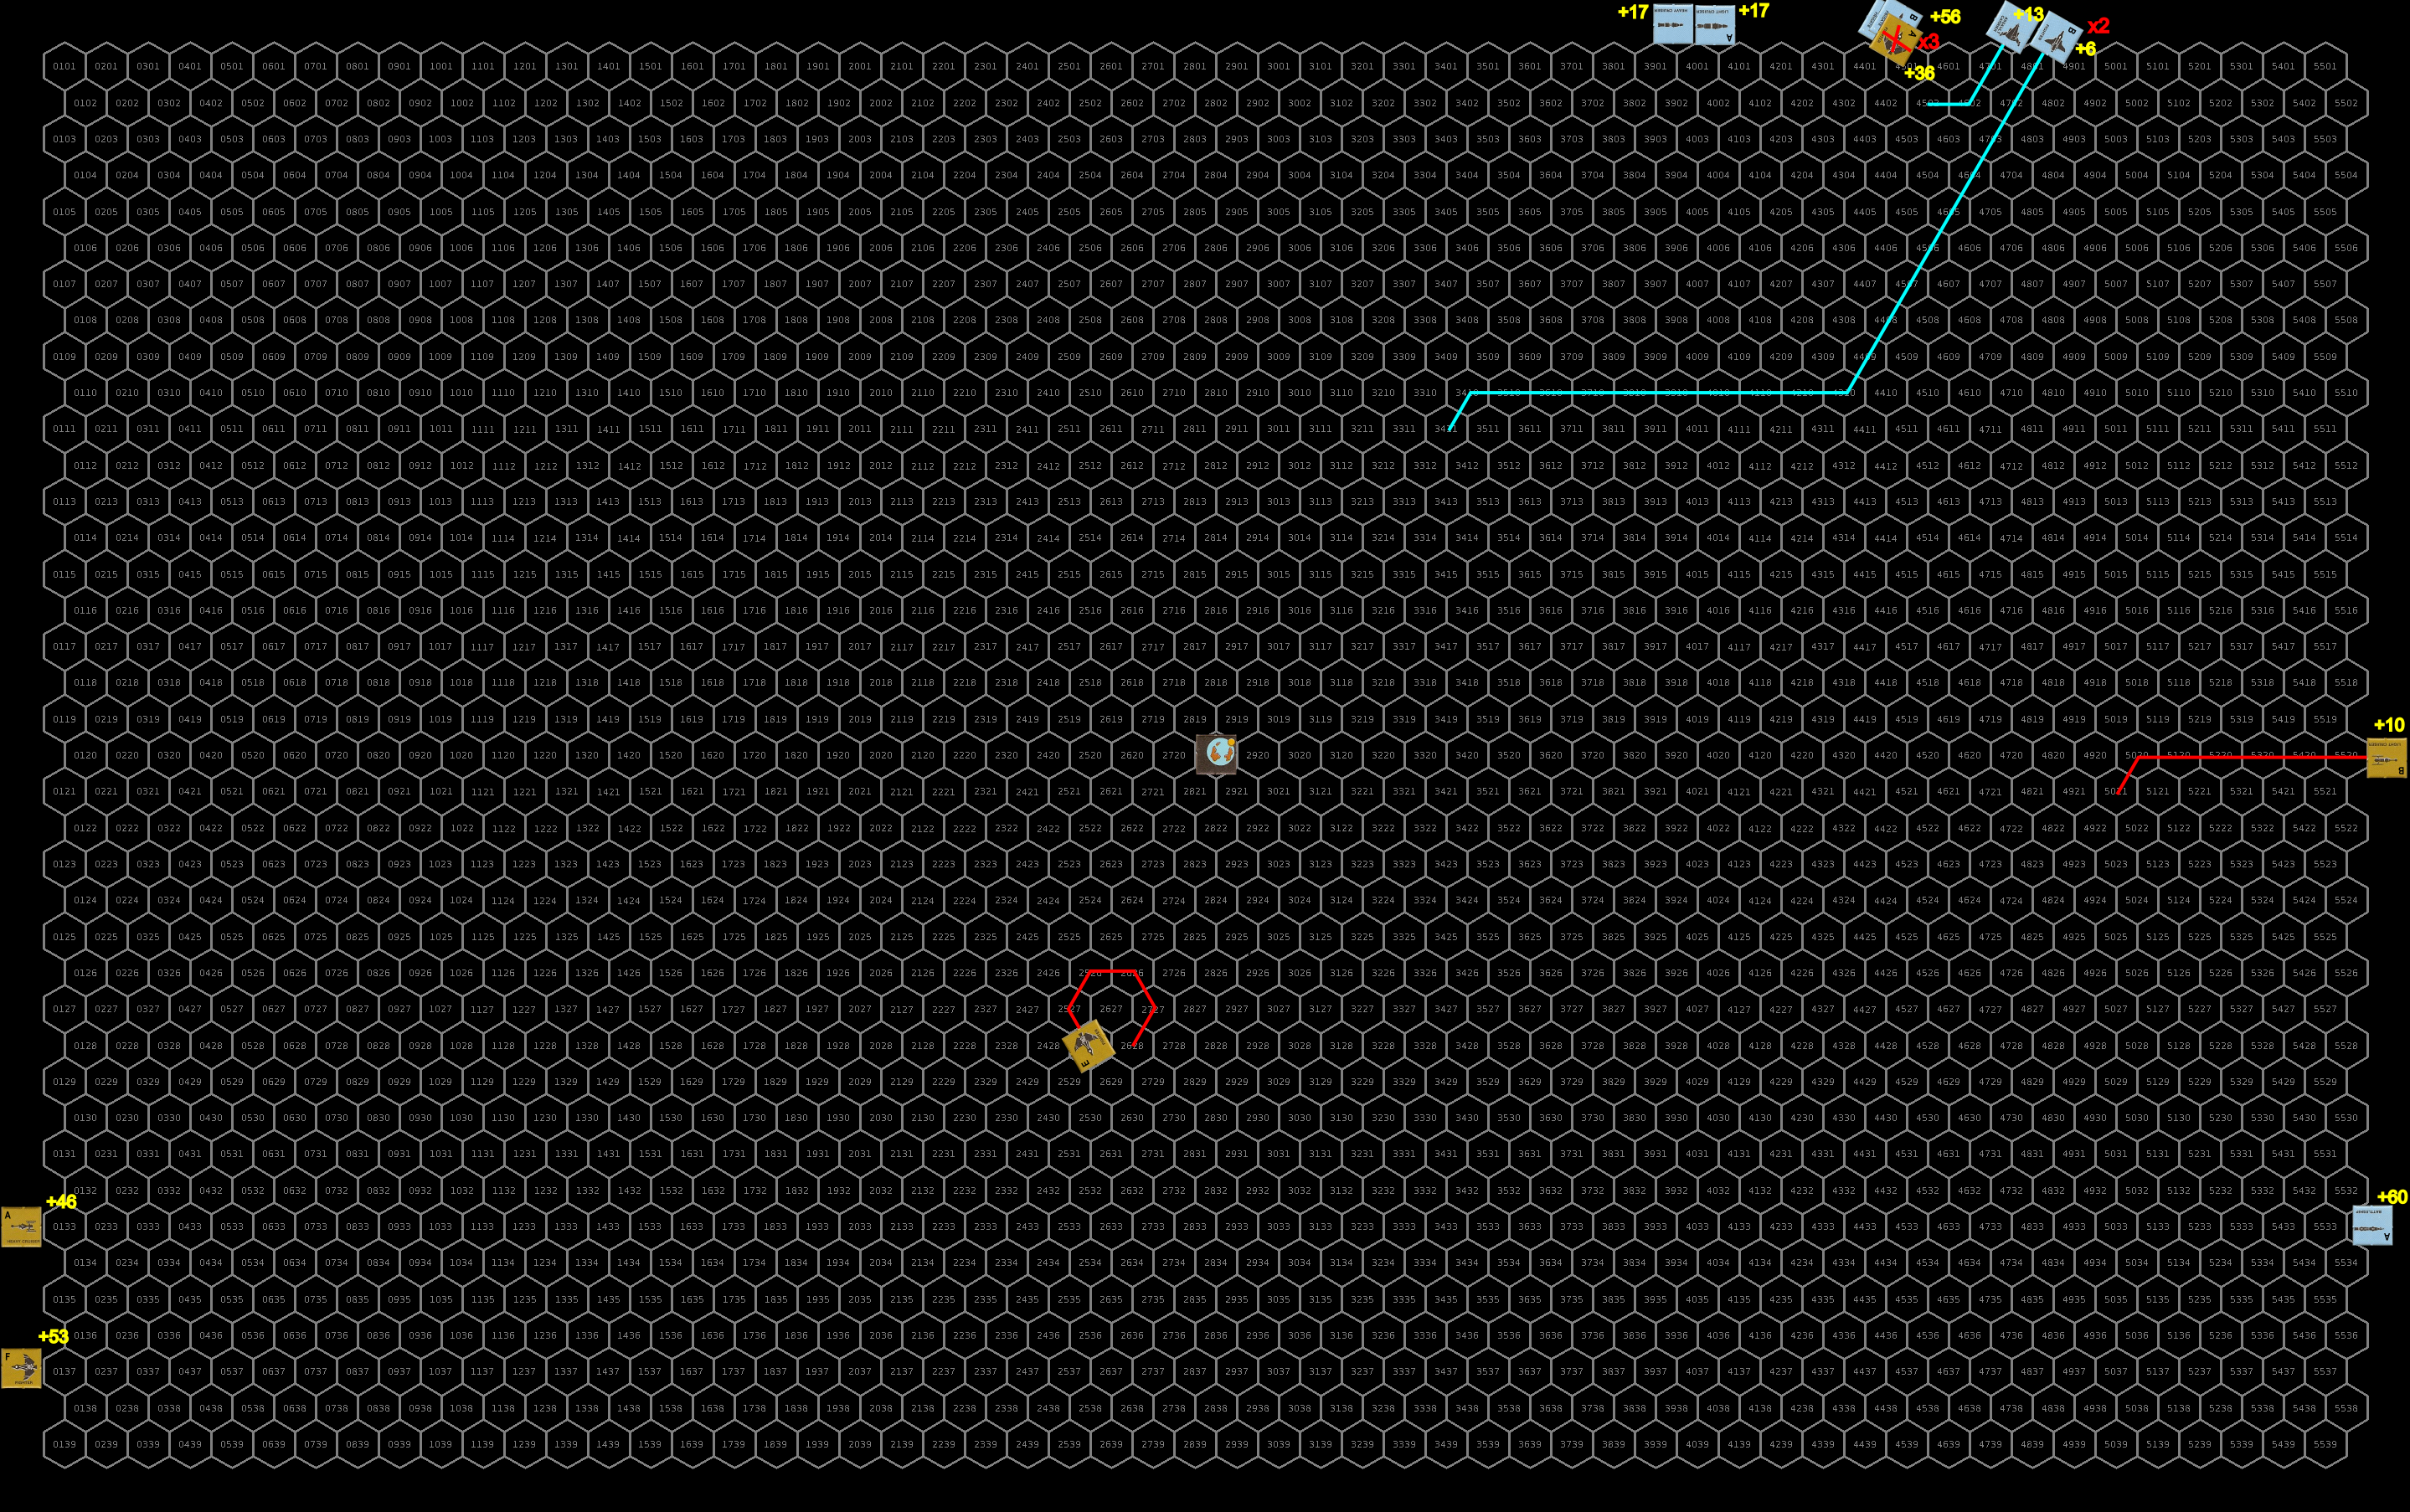
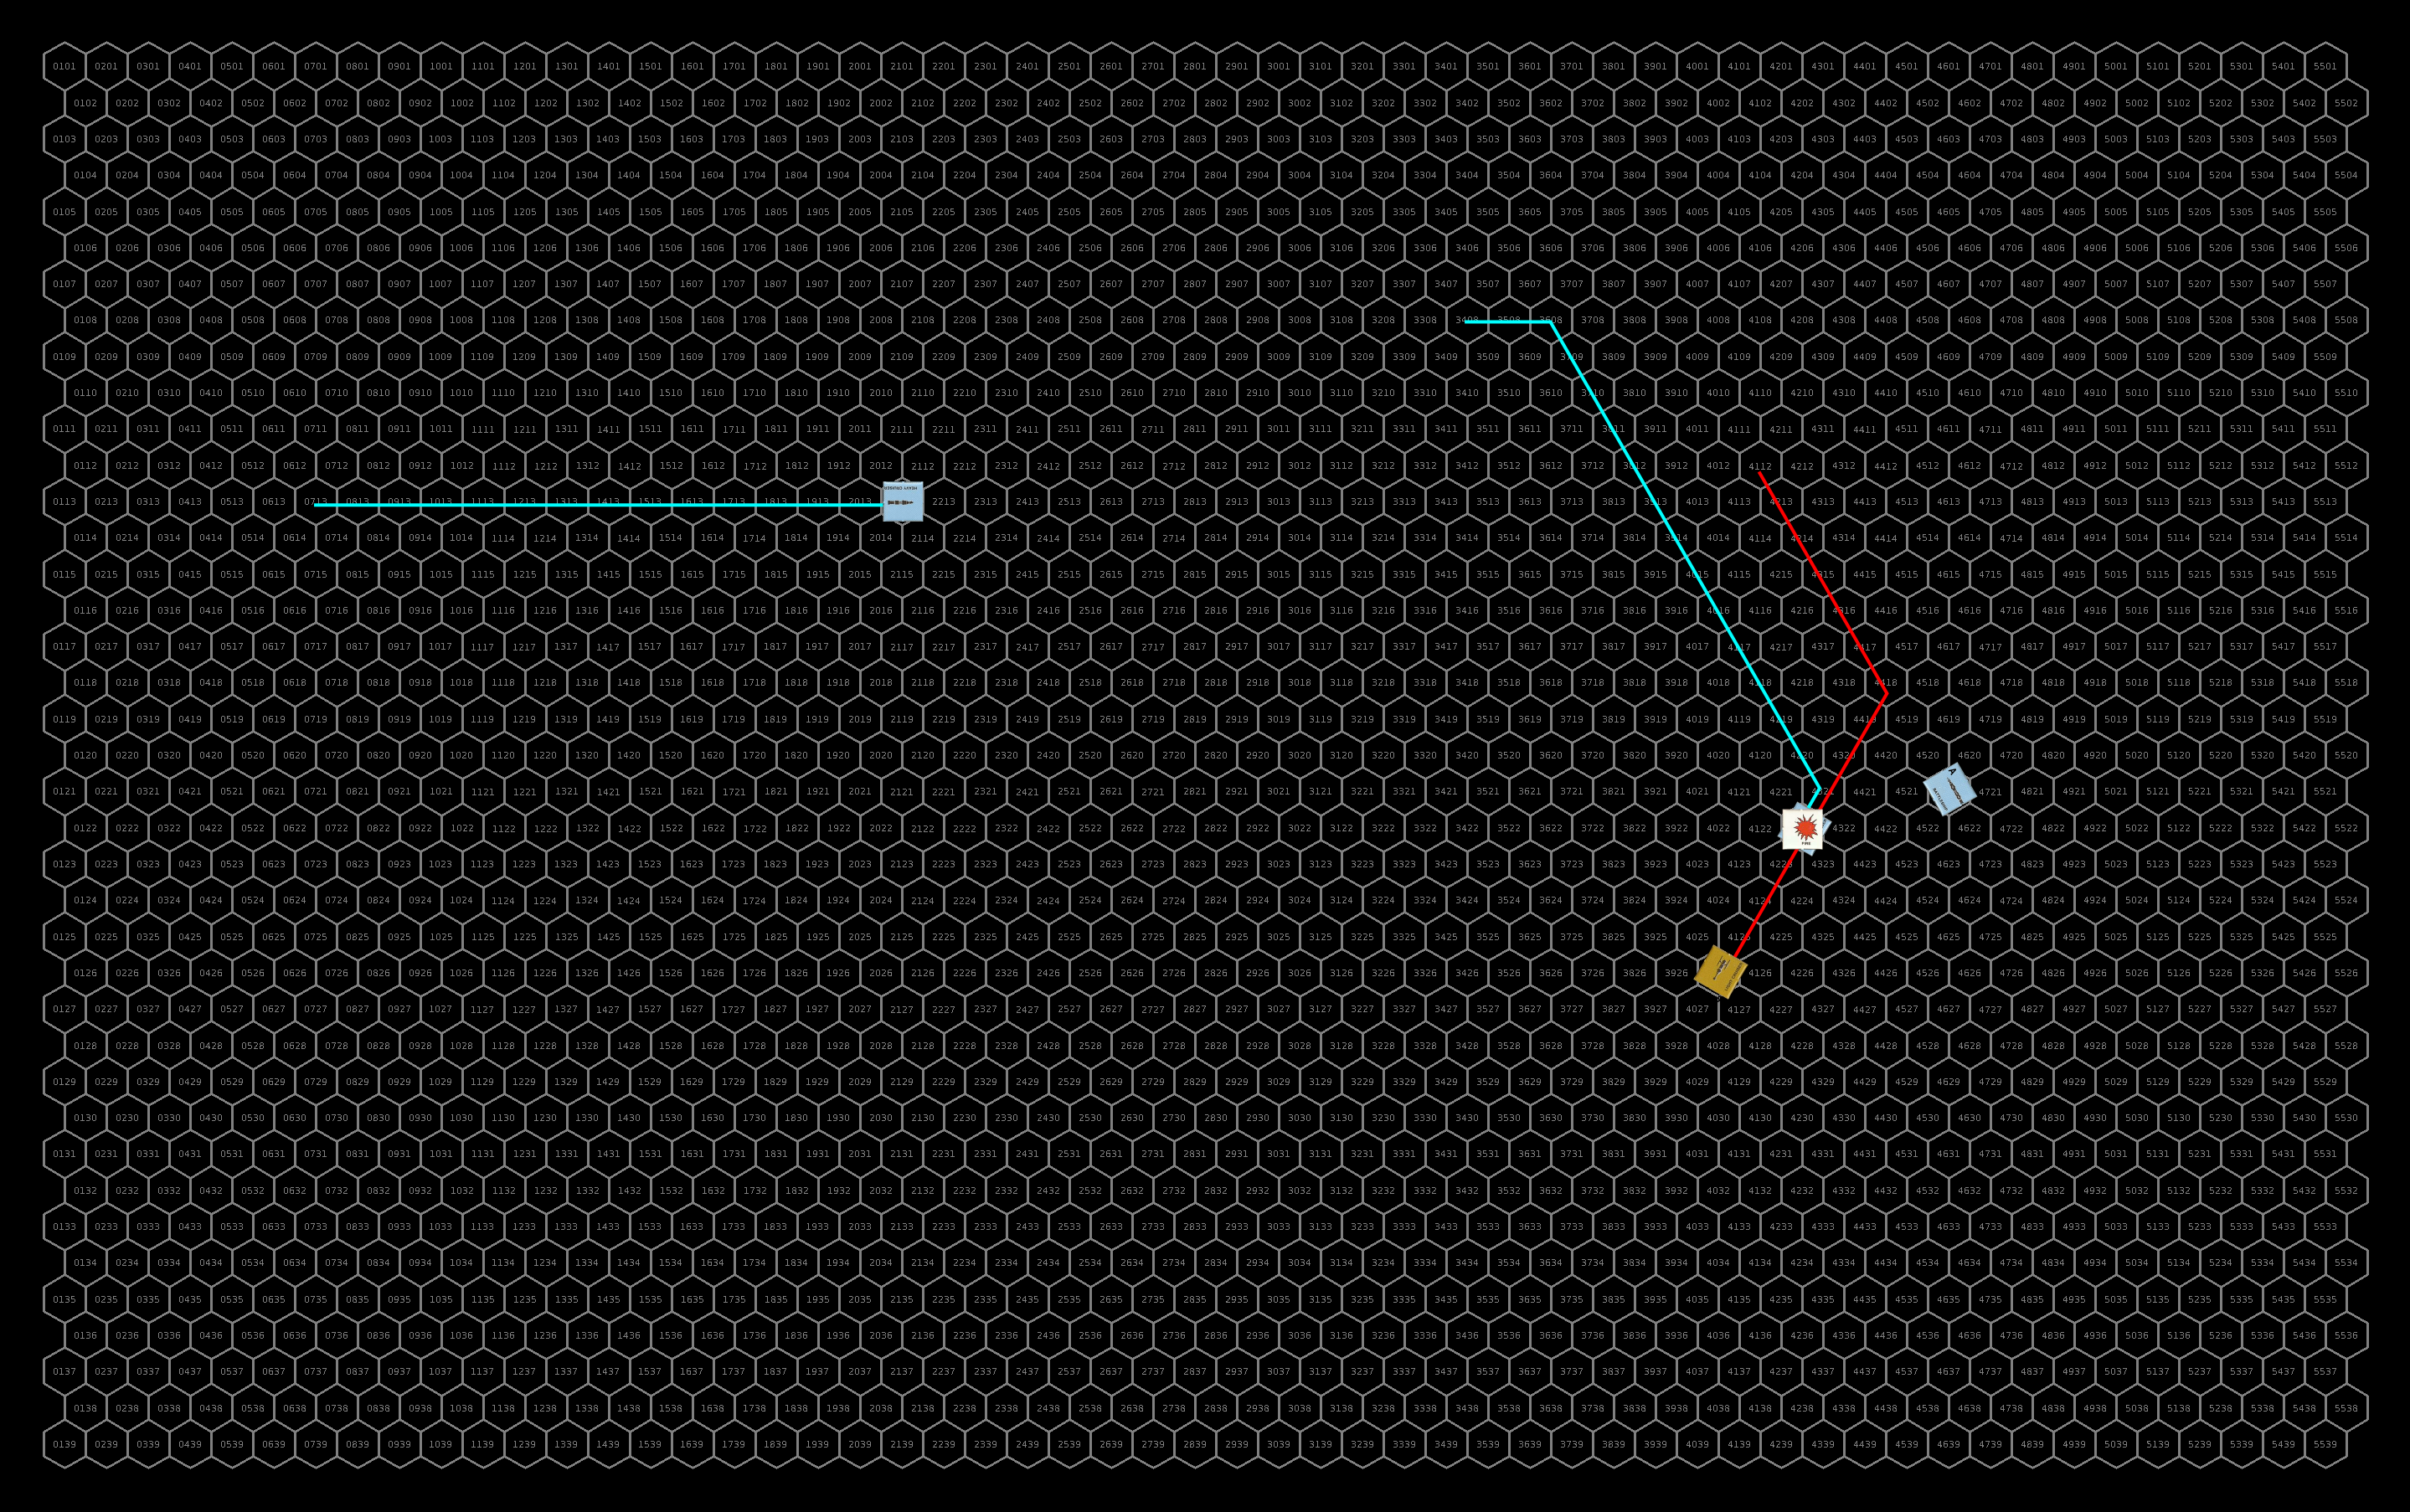
The UPF elect to battle near the planet although with no station left to defend, they start far back from the planet at a moderate speed of 15 for all ships, including the fighters. The two frigates form a battle group and the light cruiser and the battleship team up. Those two groups form the center of the battle line. The heavy cruiser escorts the assault carrier toward the bottom of the battle area while the three fighters form a flight near the top. They deploy four of the six seeker missiles available on the side of the planet the sathar will be approaching from. The heavy cruiser and battleship each retain one seeker missile in their magazines for deployment during the fight.
Like the UPF, the sathar come in at only a moderate speed to try to gauge the other side’s tactics and responses before committing. They too are only moving at speed 15 but are split up to go wide around the planet. The sathar heavy cruiser and assault carrier, escorted by a destroyer come in opposite their UPF counterparts with a flight of three fighters just off their wing. The light cruisers, escorted by a frigate, come in opposite the UPF fighters, with a flight of four fighters off their wing.

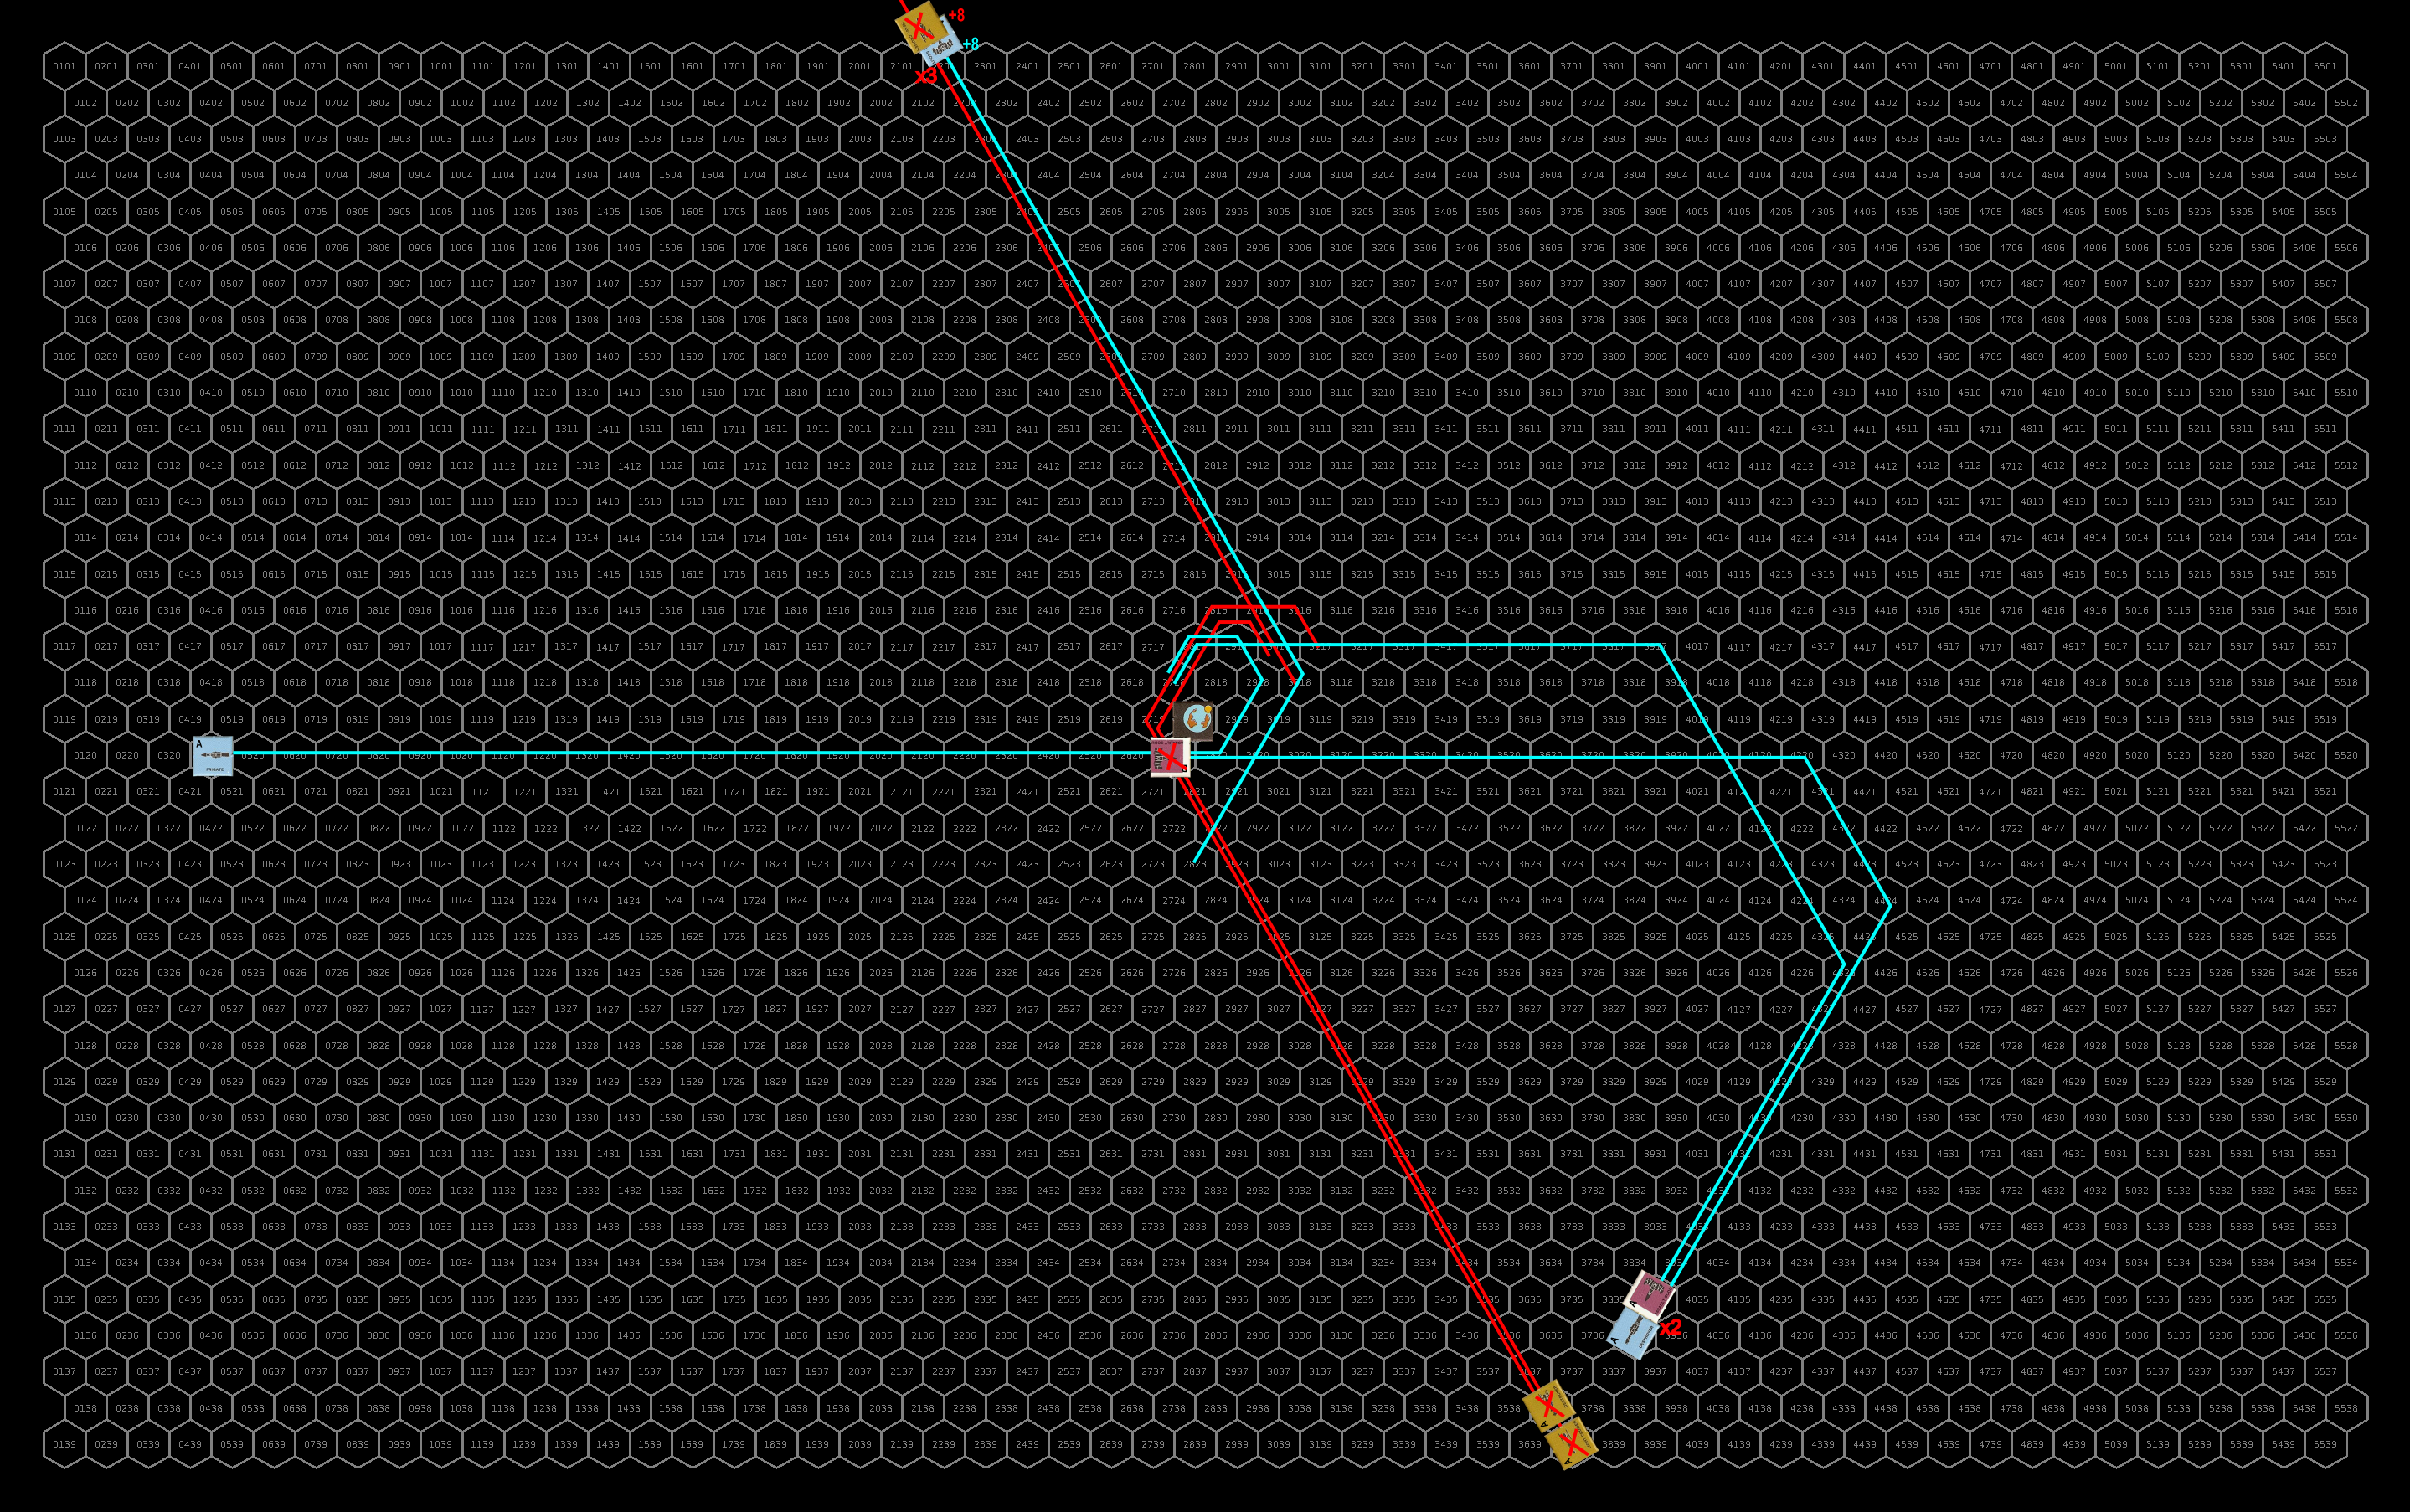
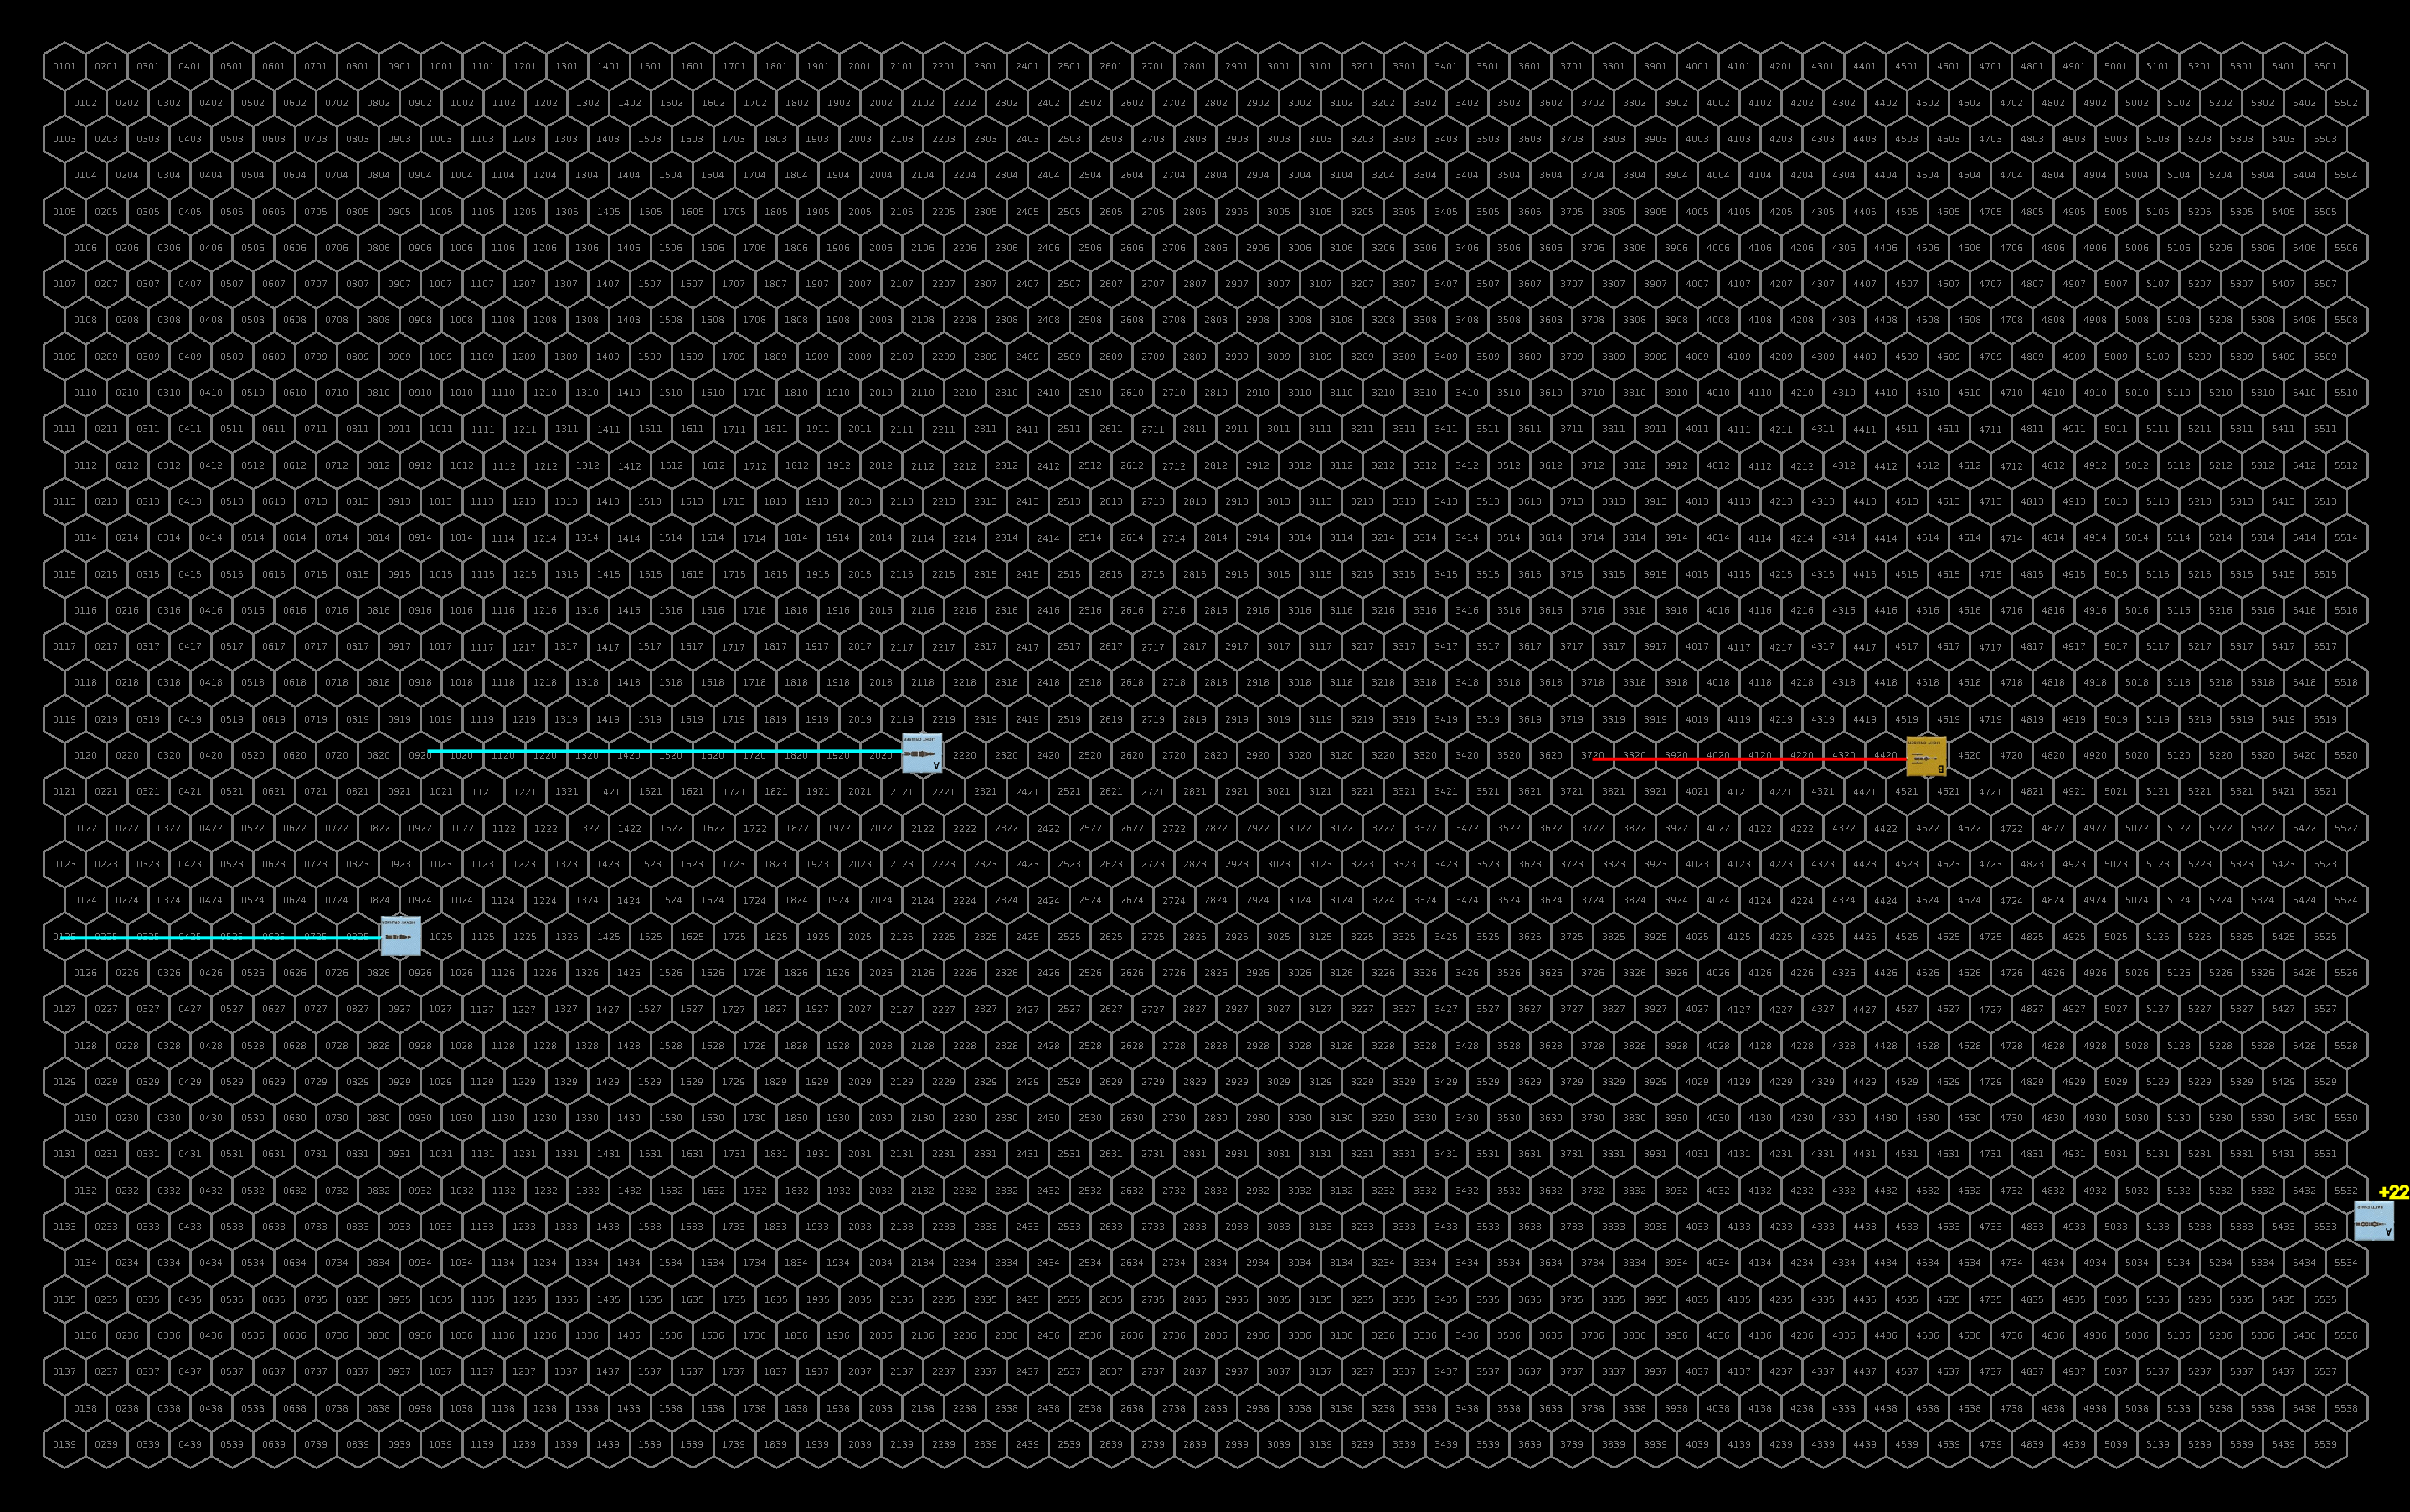
Turn 1
The sathar capital ships maintain their speed and advance on the UPF forces. The fighters accelerate to speed 20 and fly farther out on the wings of the formation.
The UPF ships converge toward the lower group of sathar capital ships. The heavy cruiser and assault carrier continue to advance at speed 15. The light cruiser and battleship accelerate to speed 17, the frigates to speed 19, the fighters to speed 20.
No shots are fired this round as the two forces remain out of range.
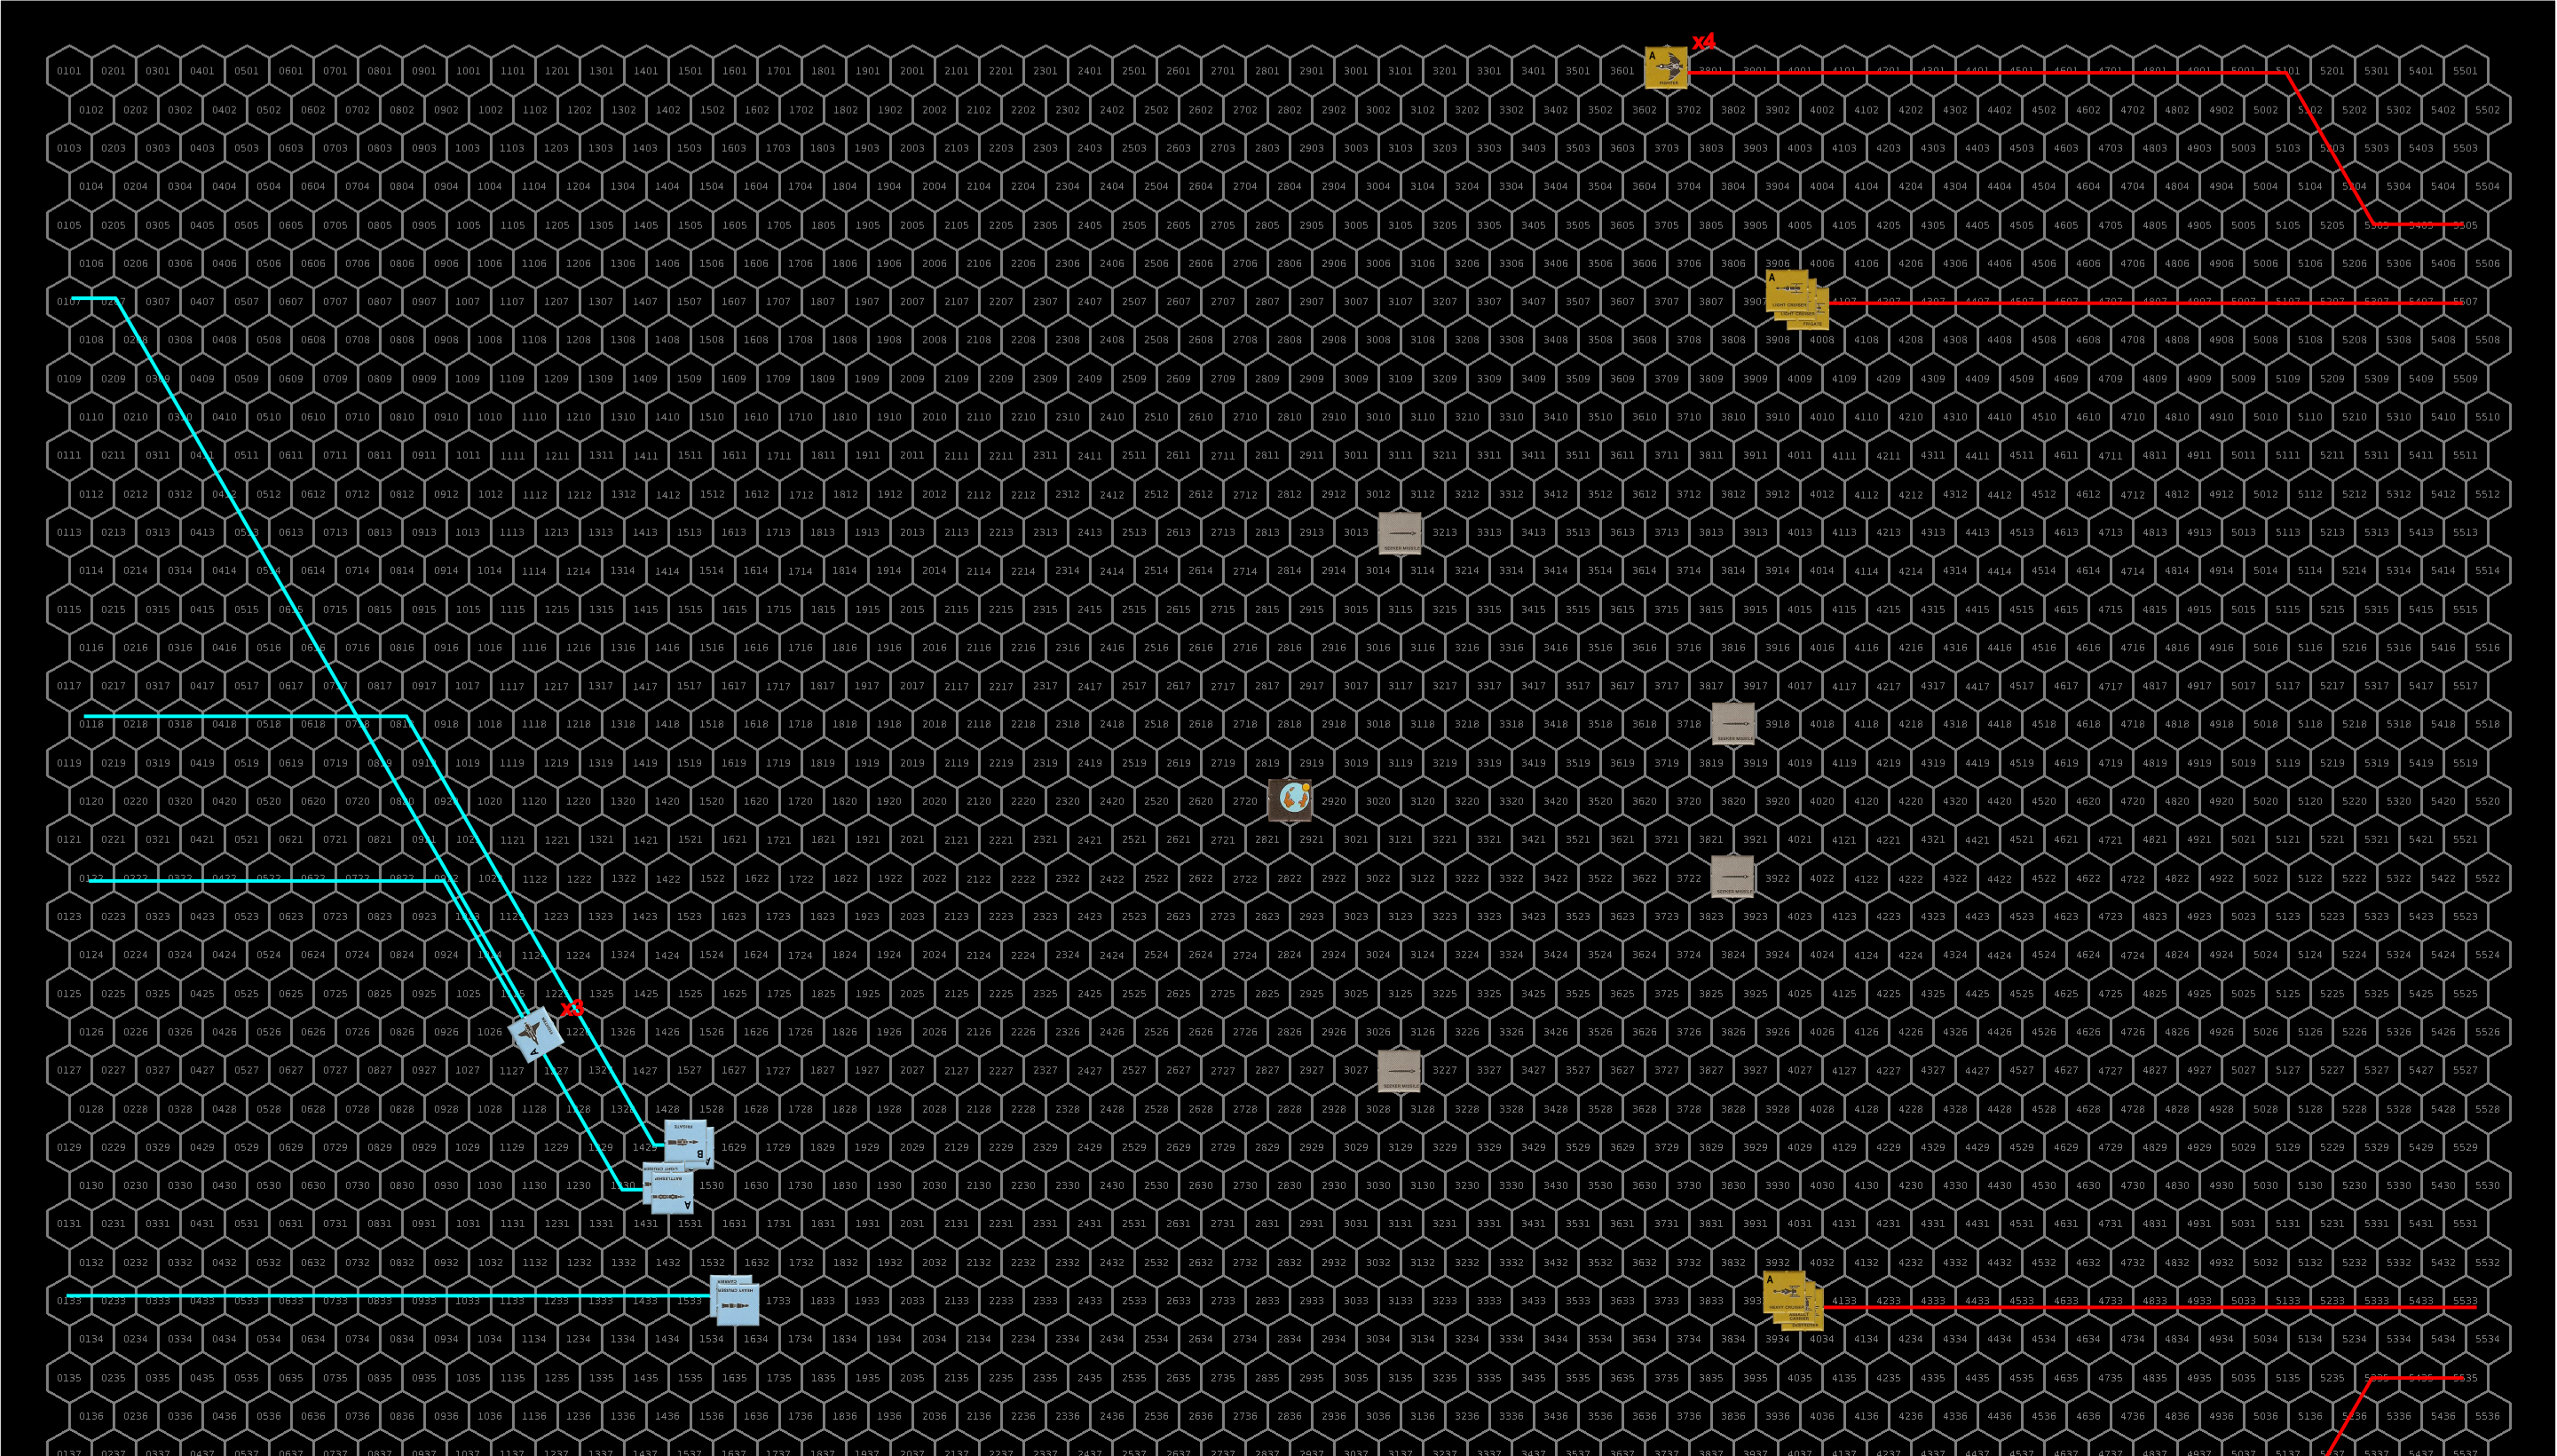
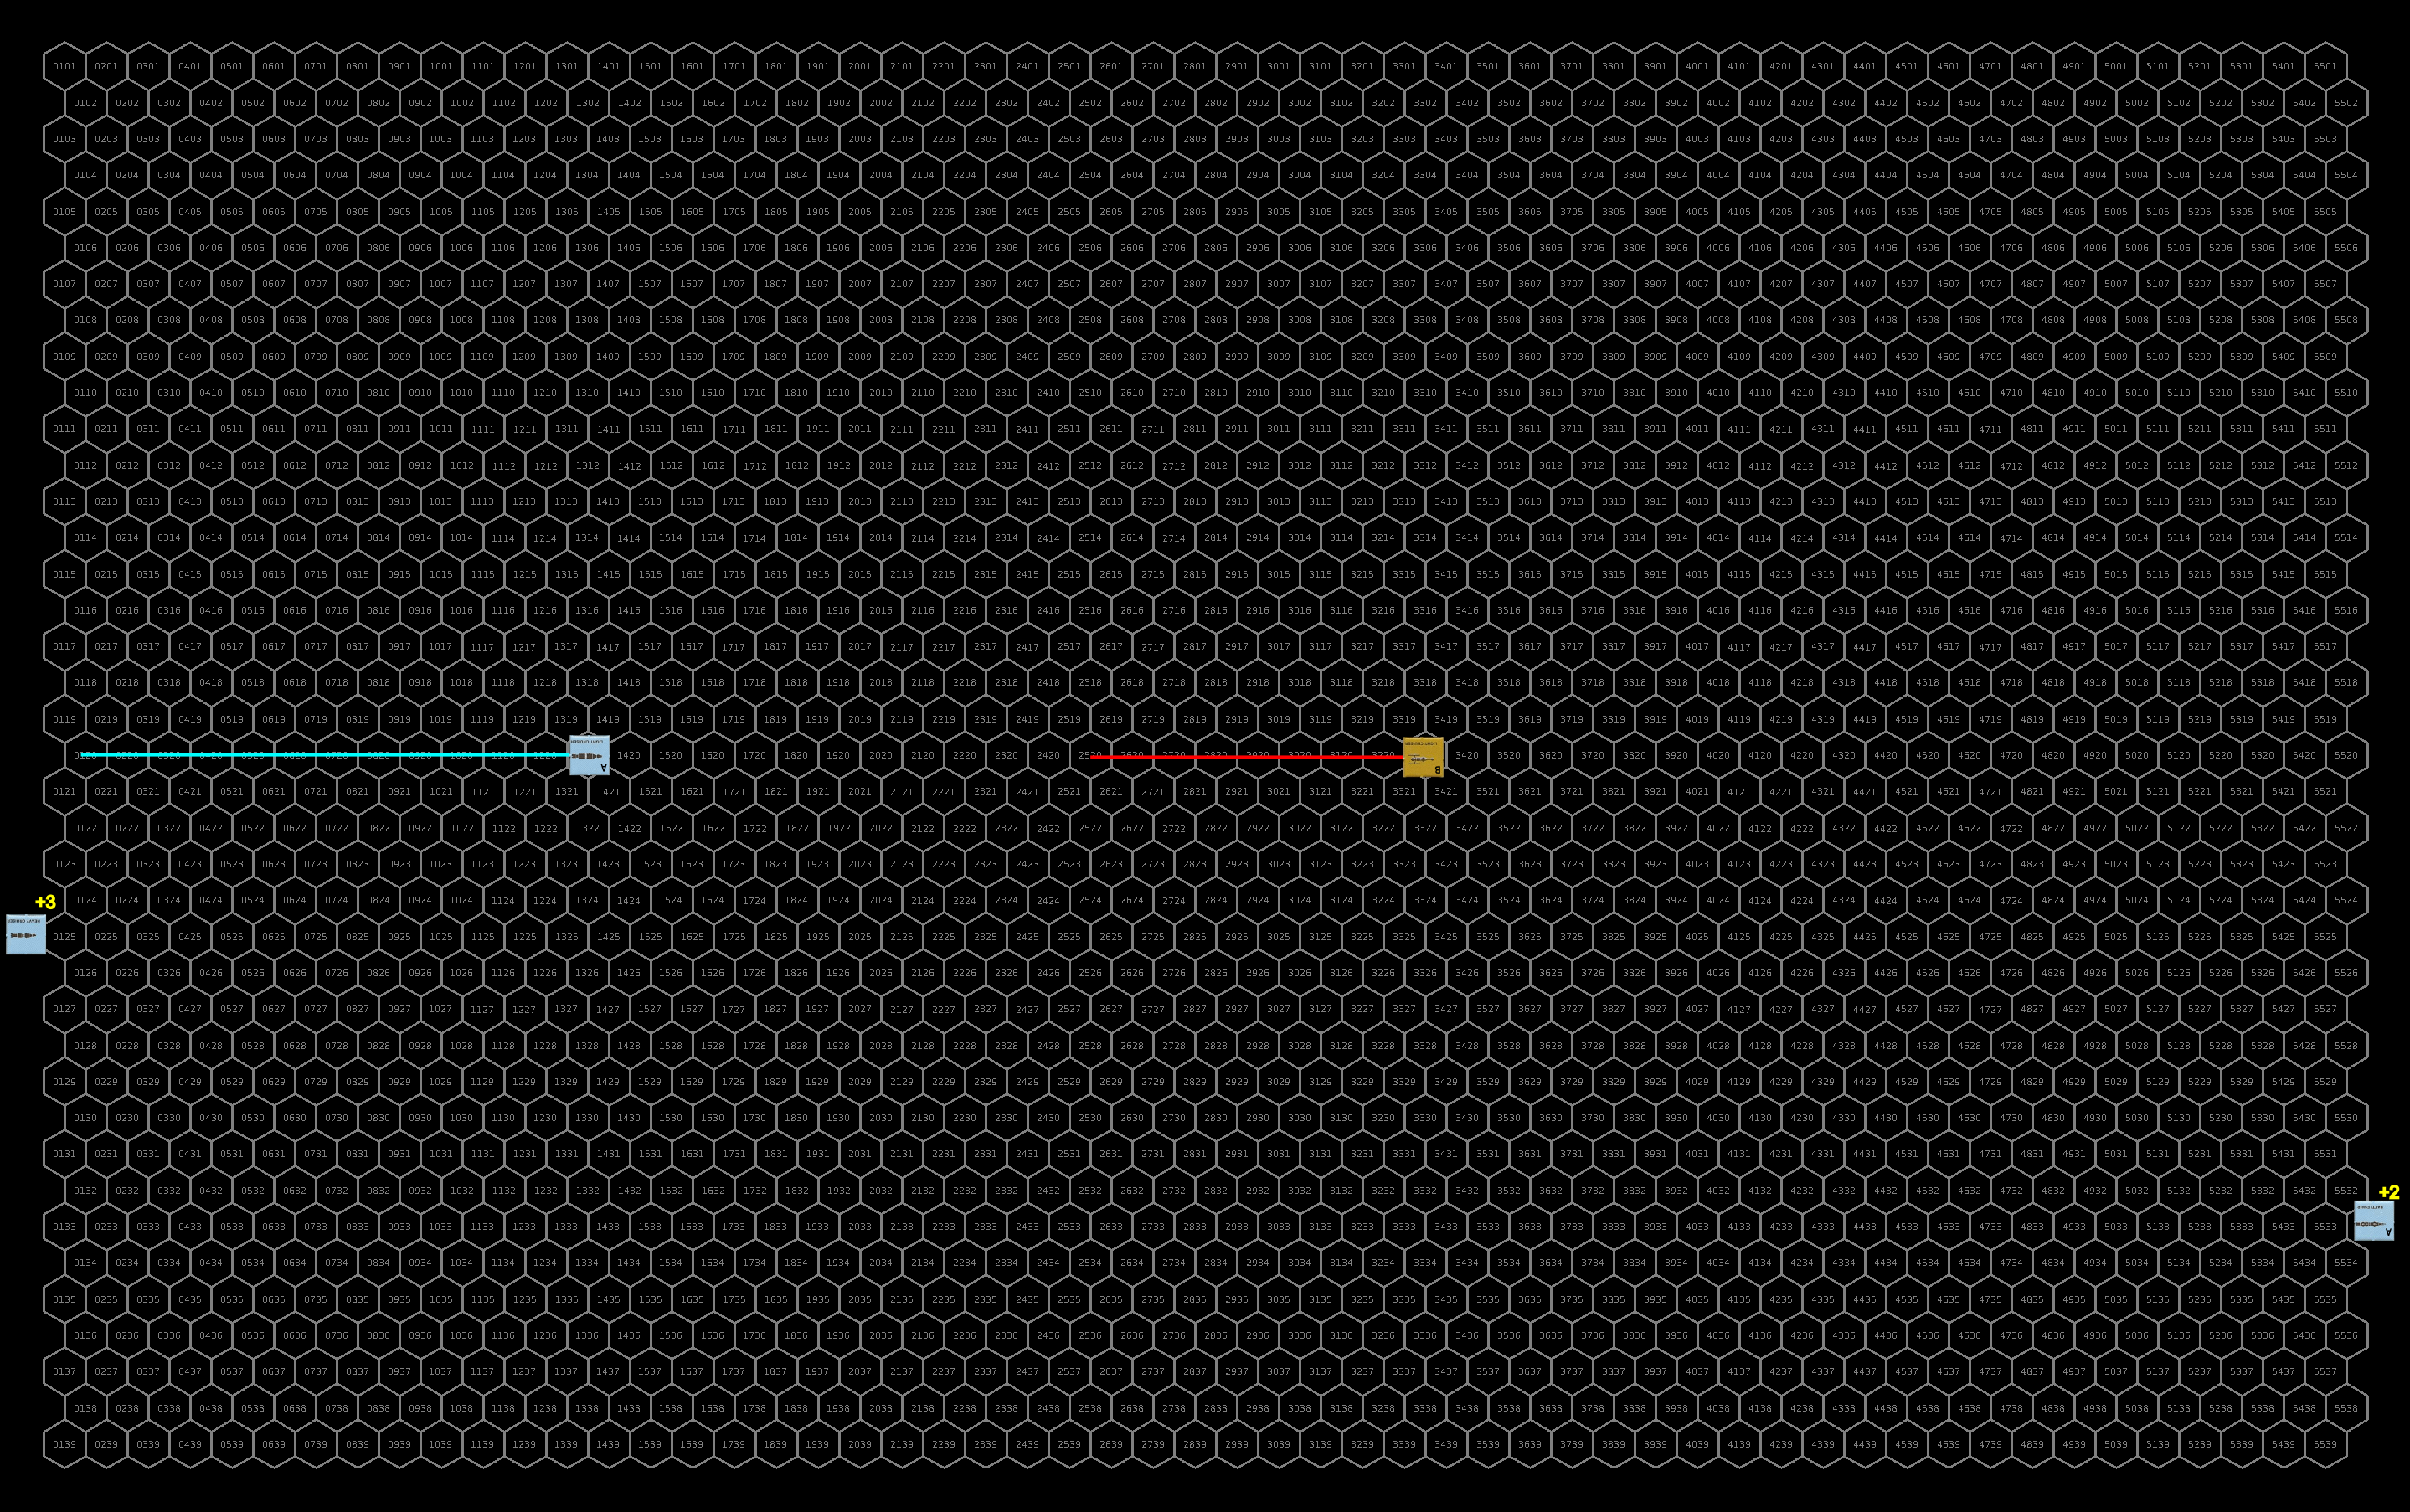
Turn 2
The sathar all begin accelerating toward the UPF. The group centered around the heavy cruiser accelerates to speed 17 and flies straight at their UPF counterpart while their wing of fighters accelerates to 25 and makes a pass at the same group. All the sathar ships fire at the UPF assault carrier. The upper battle group accelerates to speed 18 and turns down toward the UPF forces while the upper flight of fighters accelerates to speed 25 and sets up for an attack run next turn as they are too far away to engage this round.
Defensive, the UPF ships all focus on the flight of three lower fighters with the UPF heavy cruiser taking a long-range shot with its disruptor cannon at the sathar destroyer. They don’t do too well and of the 17 shots fired at the three fighters, only one connects with each ship, knocking the hull integrity down by half on one, inducing a navigation control hit on a second, and knocking out the maneuvering on the third. The disruptor cannon shot at the destroyer also misses.
Offensively, the sathar fare a bit better. Two of the assault rockets hit the assault carrier knocking out half its engine capability and reducing its hull integrity by 17%. The sathar destroyer hits with its laser cannon further reducing the hull integrity of the UPF assault carrier by another 19%. The heavy cruiser’s distruptor cannon knocks out the assault carrier’s masking screen launcher.
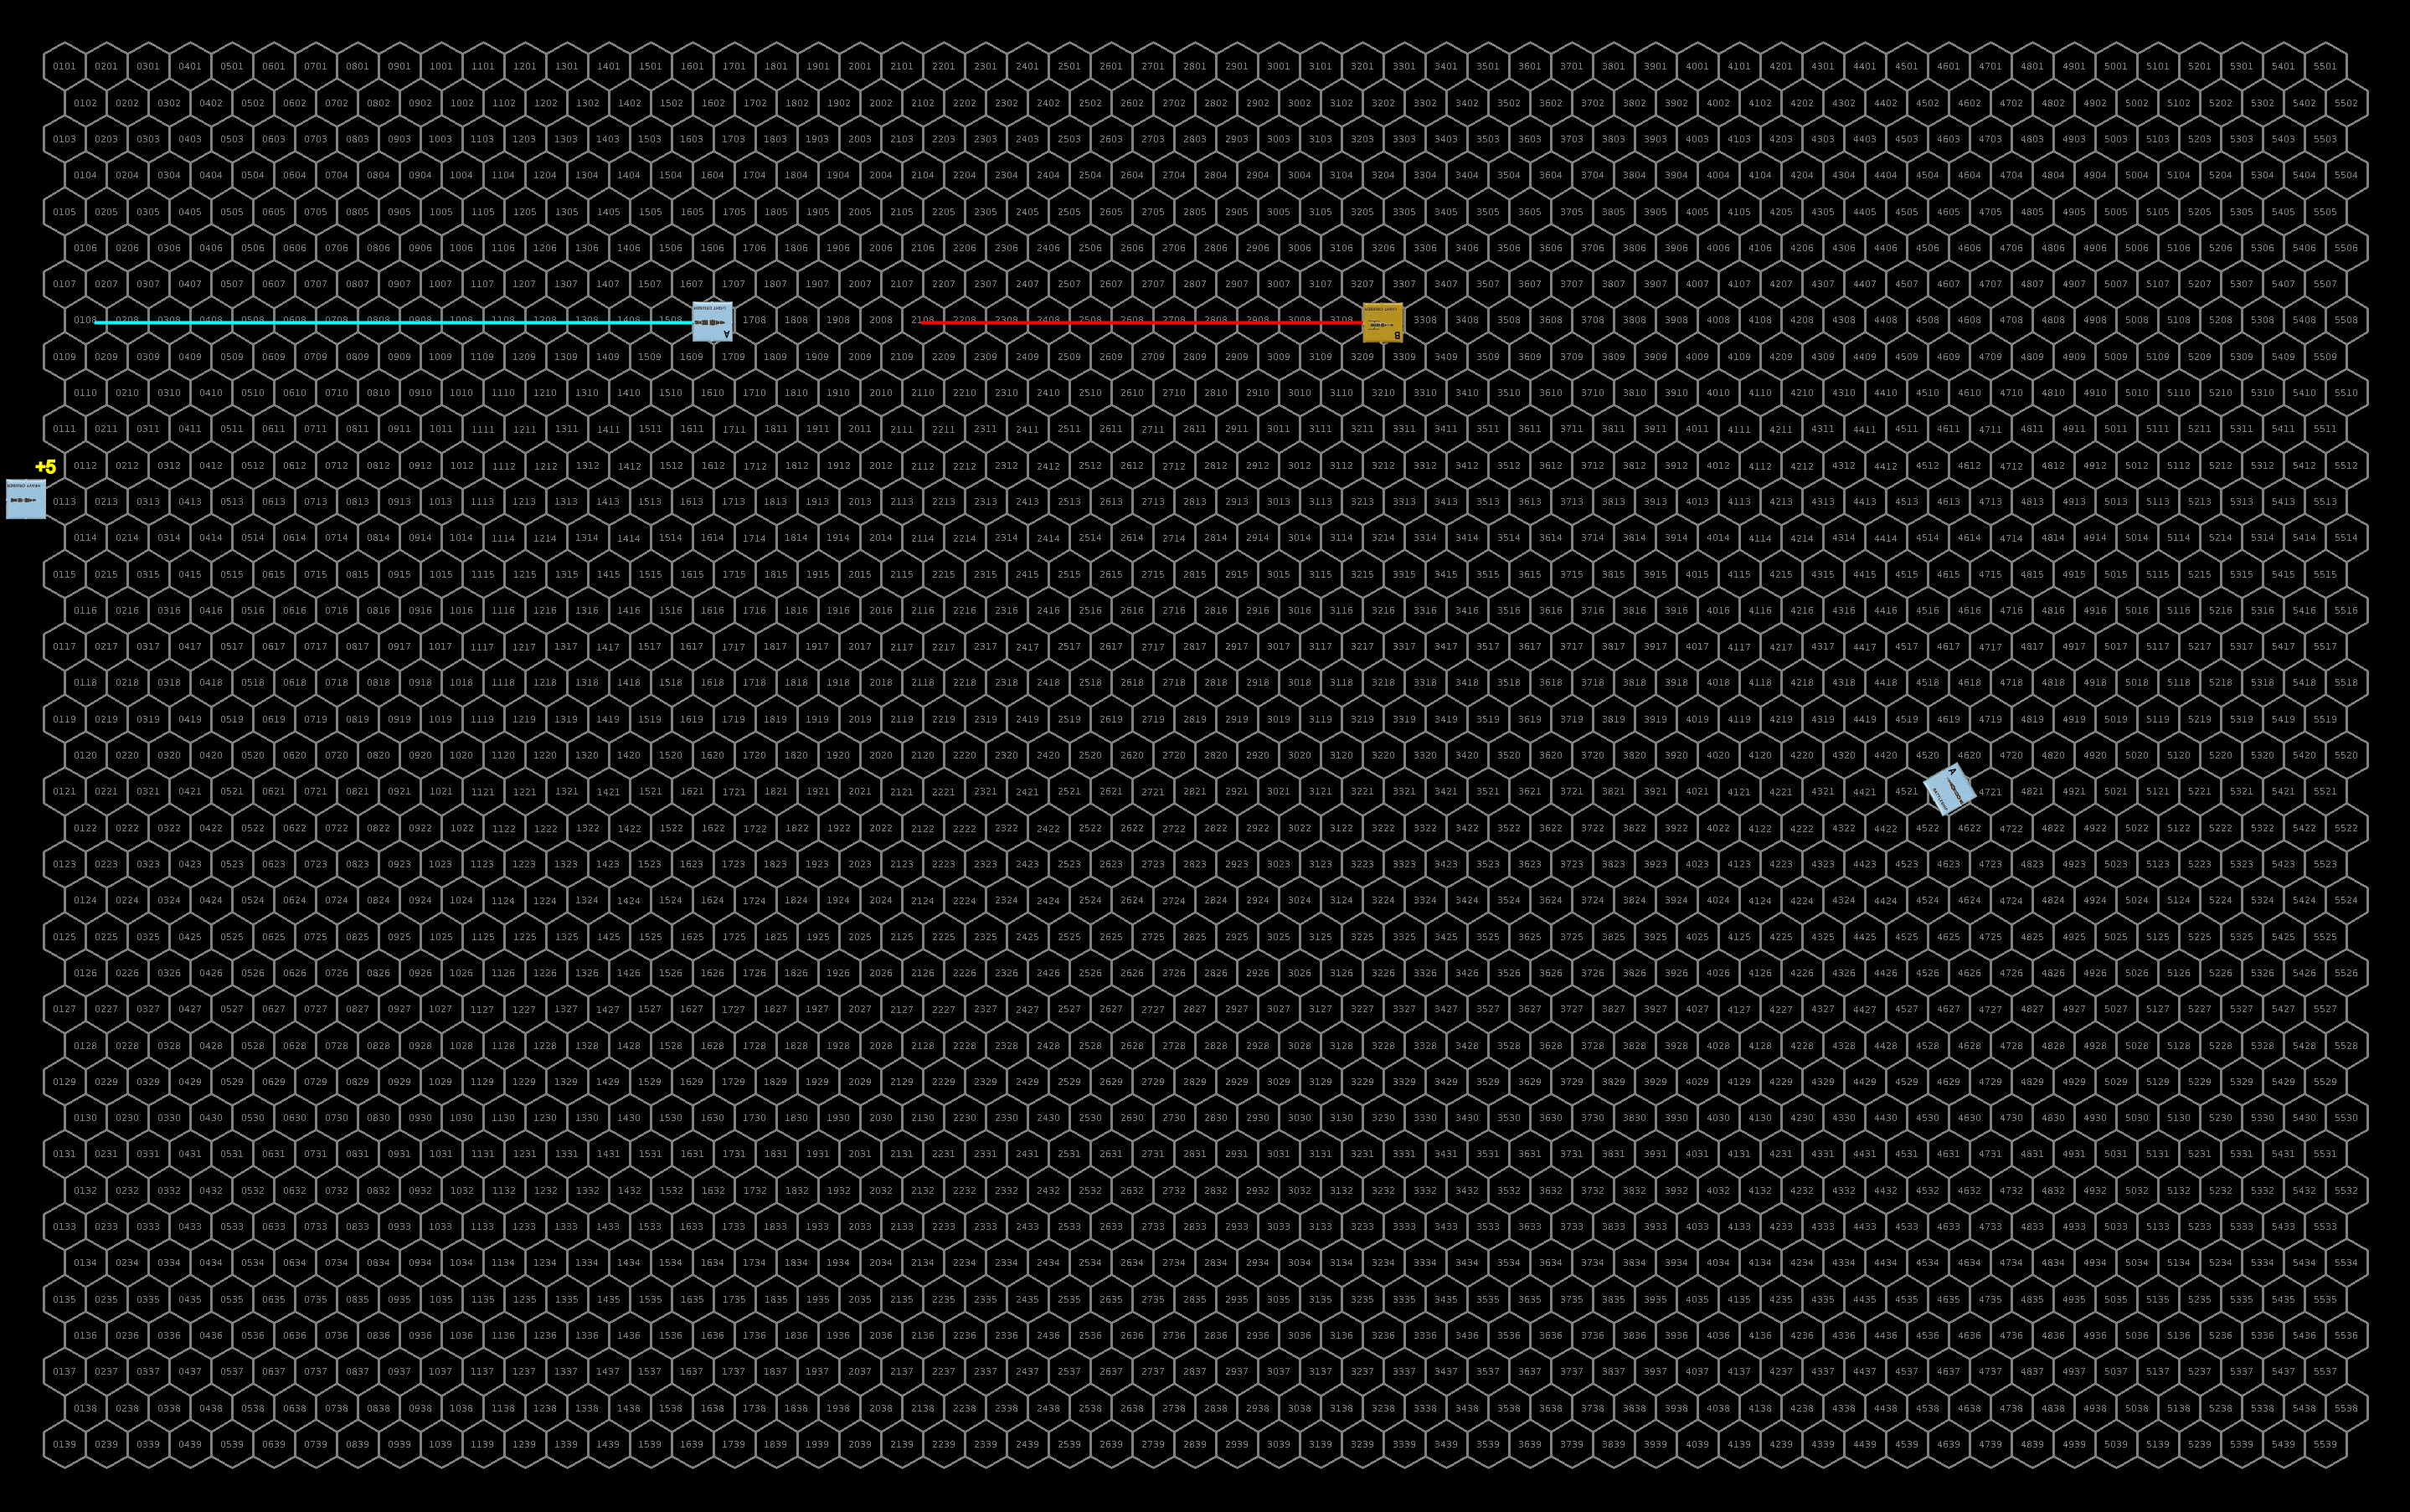
The larger UPF capital ships maintain their speeds and converge on the sathar battle group. The heavy cruiser and assault carrier fly right over the group turning up toward the planet at the end of their move. The battleship and light cruiser maneuver down to take point blank shots at the sathar as well. The frigates accelerate to speed 20 and come just in range of their rocket batteries while the fighters accelerate to speed 25 and make an assault rocket pass from below.
Defensively, the sathar ships continue to fire at the assault carrier with their energy weapons while they fire their three rocket batteries at the lead frigate. The frigate is hit by two of the rocket batteries reducing its hull integrity by 28% and knocking out a third of its maneuvering capability.
The assault carrier is hammered by the sathar’s weapons being hit by 2 electron, 2 laser, and one proton battery as wall as a laser and disruptor cannon. All told the damage knocks out all of the UPF assault carrier’s weapons, starts a fire, damages its combat control system, induces a navigation control failure, and reduces its hull integrity by another 13%.
Offensively the UPF focus on the sathar assault carrier and heavy cruiser with the frigates and fighters firing at the assault carrier and the other ships firing on the heavy cruiser.
Only one of the fighters hit the assault carrier but it scores a critical hull hit dropping the carrier’s hull integrity by 40%. The frigates combine to hit with a laser battery, laser cannon and rocket battery knocking out the carriers engines and further reducing its hull integrity by 7%.
The sathar heavy cruiser fares even worse being hit by a barrage of weapons from the UPF battleship, light cruiser and heavy cruiser. All told it is hit by all 3 distruptor cannons, 2 rocket batteries, 3 laser batteries, two proton batteries, and an electron battery. The damage knocks out the sathar heavy cruiser’s engines and maneuvering, ICM launcher, laser battery, proton screen and stasis screen, cuts it damage control ability in half, and starts a fire. Surprisingly, the weapons did little hull damage only reducing the ship’s hull integrity by 25%.

Turn 3
The sathar fighter and heavy cruiser, both with no MR, fly straight ahead (to the left). The fighter slows down to speed 20 while the heavy cruiser, with no ADF either, just stays at speed 17. The fighter with the navigation control hit slows to speed 20 and spins to port flying up toward the planet while the remaining fighter from the lower group accelerates to speed 20 and goes after the pair of UPF frigates. The other fighters also speed up to 30 hexes/turn and go after the frigates as well, both fighter groups looping around the planet.
The sathar assault carrier, with its navigation control hit, pull to starboard and with no ADF, flies up away from the main battle. The sathar destroyer loops around to go after the UPF frigates as well and the light cruisers and frigate decelerate back to 15 and light up for a shot at the UPF battleship. The fire on the UPF assault carrier damages its hull (5%).
Defensively, the UPF frigates fire their laser batteries at the fighters and rocket batteries at the destroyer while the other UPF ships concentrate all their fire on the lead sathar light cruiser.
The UPF frigates miss the fighters completely but hit the destroyer with two rocket batteries seriously damaging it and deducing its hull integrity by 72%. The other ships hit the sathar light cruiser with 2 laser, 2 rocket, 1 electron, and 1 proton battery knocking out its ICM launcher, engines, and stasis screen, starting a fire and reducing its hull integrity by 16%.
Offensively, the sathar fighters hit the lead UPF frigate with and assault rocket reducing its hull integrity by 43% and the second one with an assault rocket as well reducing its already damaged hull (from the previous battle) by 38%. The destroyer also hits the second UPF frigate with its electron battery and laser cannon knocking out the frigates engines.
The sathar frigate and light cruisers hammer the UPF battleship hitting it with 2 disruptor cannons, 2 proton batteries, 1 electron battery, and 2 torpedoes that slip through the battleship’s ICM screen. The weapons short circuit the battleship’s defensive system, reduce its maneuvering ability by half, knock out its proton battery and reduce its hull integrity by 66%.
The two UPF frigates, now heavily damaged, drift on their current course firing at the destroyer as they leave. The assault carrier also drifts but its navigation control hit causes it to pull to port. Despite its weakened hull, it holds together. The battleship also drifts away from the fight firing all its weapons at the damaged light cruiser.
The UPF heavy cruiser turns parallel to the course of the assault carrier but lines up for a direct shot with its disruptor cannon at the sathar destroyer. It fires its rocket battery and torpedo at the undamaged light cruiser and uses its energy batteries to fire on the sathar fighters. The light cruiser follows a similar path and firing at the same targets. The fighters loop up around the planet and come up behind the sathar frigate firing their assault rockets at it.
The fire on the sathar light cruiser and sathar heavy cruiser damages both ships’ hulls reducing their integrity by 13% and 11% respectively.
Defensively, the sathar ships continue to fire at the battleship, hoping to destroy it before it can fly out of range. The sathar assault carrier makes a long range attack at its UPF counterpart with its proton battery but misses. The sathar destroyer fires at the lead UPF frigate hitting with its electron and rocket batteries knocking out the frigate’s masking screen launcher and damaging its combat control system.
The battleship manages to get off lightly and is only hit by 2 distruptor cannons and a laser battery cutting its damage control capability in half and reducing its hull integrity by another 14%.
Offensively, the UPF battleships hits the lead sathar destroyer with its laser and 2 electron batteries and slips a torpedo through the cruiser’s ICM screen destroying it and scoring the first kill of the battle. The UPF heavy cruiser manages to get its torpedo through the other light cruiser’s ICM screen cutting the sathar ship’s maneuvering in half but otherwise missing.
The UPF fighters hit the sathar frigate with all three assault rockets destroying it completely. The sathar destroyer is hit by disruptor canons from the UPF light and heavy cruiser, as well as a laser battery and two rocket batteries from the frigates. The frigates also manage to get a torpedo through the destroyer’s ICM screen. The combined damage from the UPF weapons obliterates the sathar ship. The sathar fighters get away with only minor damage: one loses 60% of its engine capability, one has its damage control capabilities cut in half, and the third loses 38% of its hull integrity.
Repair Turn
As the ships work on repairs, the lead UPF frigate finds that it’s hull is too damaged to repair in space and must find a way to a shipyard with only 30% of its hull intact. The other frigate manages to repair a bit of its hull restoring 10% of its integrity. The UPF assault carrier puts out the on-board fire while the battleship repairs 3% of its hull.
The two sathar fighters with hull damage find that they need a shipyard to repair their hull as well with their hull integrity sitting at 62% and 50% respectively. The sathar assault carrier restores 11% of its hull integrity while the heavy cruiser gets its fire under control.

Turn 4
The flight of four sathar fighters all go after the UPF assault carrier hoping to finish it off. They loop around to make a direct assault and then fly off to chase after the UPF frigates. The lone fighter, after firing its last assault rocket at the heavy cruiser loops around and starts heading for its carrier to dock and rearm. The fighter with the navigation control damage loops to port and fires one of its assault rockets at a UPF fighter as it passes by. The remaining fighter, with no maneuvering, along with the sathar heavy cruiser in the same condition, continue to drift away from the fight. The sathar assault carrier, with its navigation control damage, pulls to starboard and passes distantly in front of the UPF cruisers and assault carrier. The remaining sathar light cruiser turns to go after the battleship hoping to finish it off.
Defensively, the UPF cruisers fire at the sathar fighters hoping to take them out before they can fire their assault rockets. The battleship fires at the light cruiser pursuing it and the frigates get a couple of distant shots at the sathar fighters.
The sathar light cruiser is hit by one of the battleship’s laser batteries and both electron batteries which score a critical hull hit (integrity reduced by 26%), knock out its ICM launcher, and damage its navigation control systems. Four of the five sathar fighters are hit by the UPF ships knocking the hull integrity down to half on one, destroying a second and damaging the assault rocket launcher on the other two (including the lone fighter going after the heavy cruiser).
Offensively, the two fighters with working assault rocket launchers firing at the assault carrier both miss while the sathar fighter with the navigation hit firing at the UPF fighter hits with its assault rocket destroying the UPF fighter, the first (and as it will turn out, only) UPF ship destroyed in the fight. The battleship is hit by the sathar light cruiser’s electron battery, proton battery, and distruptor cannon knocking out its proton screen, damaging its combat control system, and reducing its hull integrity by another 12% (only 11% remaining).
The two UPF frigates continue to drift and fire long distance shots at the fighters. The battleship drifts away from the light cruiser firing at it as it goes. The two UPF fighters loop around and take a run at the sathar light cruiser firing their last assault rockets. The UPF assault carrier pulls to starboard and runs parallel to its sathar counterpart while the UPF light and heavy cruisers maneuver directly onto the sathar assault carrier’s tail and take point blank shots with all their weapons.
Defensively, the sathar light cruiser fires at the battleship and the sathar assault carrier fires at the UPF light cruiser. The UPF light cruiser is hit by a rocket battery reducing its hull integrity by 17% while the battleship is hit by an electron battery knocking out its ICM launcher.
Offensively, the sathar light cruiser is hit by one of the battleship’s laser batteries knocking out its proton battery and by both assault rockets from the fighters which damage its combat control system and knock its hull integrity down by 20%. The lead UPF frigate manages to score a long range laser battery shot on the lead sathar fighter knocking out its assault rocket launcher. The UPF cruisers hit the sathar assault carrier with a distruptor cannon and a laser, electron, and rocket battery knocking out the carriers maneuvering, laser battery, and masking screen launcher and damaging its combat control system.

Turn 5
The group of three sathar fighters sets off after the two UPF frigates, the lone fighter, with its assault rocket launcher disabled, and realizing that the assault carrier is probably not going to survive the battle, attempts to ram the UPF light cruiser. The sathar light cruiser pulls to port and slows down, firing at the two UPF fighters. The other ships just continue to drift away with the assault carrier firing at the UPF light cruiser as it drifts.
Defensively, the UPF frigates fire at the remaining fighter with a working assault rocket launcher but miss. The UPF light cruiser fires at the oncoming fighter and destroys it before it can ram the larger ship. The UPF heavy cruiser hits the sathar assault carrier with its laser and rocket battery and reduces its hull integrity by another 36%.
Offensive, the sathar fighter misses the UPF frigate with its assault rocket while the sathar light cruiser hits one of the UPF fighters damaging its combat control system. The sathar assault carrier hits the UPF light cruiser with its proton and rocket battery short circuiting the cruiser’s defensive systems and reducing its hull integrity by 20%.
The UPF assault carrier’s loss of navigation control pulls it to starboard and the fighters, out of assault rockets, start heading back to the carrier to rearm. The heavy and light cruiser stay on the tail of the sathar assault carrier while the frigates and battleship continue to drift.
Defensively, the sathar assault carrier continues to fire on the UPF light cruiser hitting with its rocket battery for another 16% hull reduction on the cruiser. All other ships are out of range.
Offensively the UPF frigates fire at the pursuing fighters but miss. The UPF cruiser open fire on the sathar assault carrier and hit with 3 laser batteries, 2 proton batteries, an electron battery, a disruptor cannon, and two torpedoes completely destroying the sathar carrier.

Turn 6
With their carrier destroyed and being either out of weapons or their weapon system disabled, the three sathar fighters attempt to ram the UPF frigates. The sathar light cruiser pulls to starboard and accelerates back to speed 16, the lone fighter near the planet pulls to port with its navigation damage and the other two ships continue to drift away.
Defensively, the frigates fire everything they can at the incoming fighters hitting two with their laser batteries, the lead fighter for 75% of its hull and the second for a navigation hit but not enough to destroy them before they ram. Two fighters slam into the lead frigate and despite its damaged hull fail to destroy it only taking out 20% of the remaining 30% hull integrity. The third fighter hits the second frigate for a measly 5% of its hull integrity.
The UPF frigates and battleship continue to drift, the assault carrier pulls to port and the fighters continue to close on the carrier to rearm. The heavy and light cruiser start accelerating and turn to head after the sathar light cruiser. No shots are fired as everyone is out of range.
Repair Turn 2
The lead UPF frigate repairs the damage caused by the two ramming sathar fighters but can repair its hull no further. The other frigate repairs 12% of its hull integrity while the light cruiser repairs 3% of its. The assault carrier gets its navigation control system fixed as well as repairing 8% of its hull. The battleship repairs 5% of its hull and brings is damage control system fully back on-line.
The sathar light cruiser repairs its navigation control system while the heavy cruiser discovers that a shipyard will be required to bring its damage control system back fully on-line.

Turn 7
With its navigation control system repaired, the sathar light cruiser sets off at max acceleration to attempt to intercept the UPF battleship and finish it off. The damaged fighter comes to a stop near the planet as the pilot continues to work on its navigation control issues.
The UPF cruisers continue in pursuit of the sathar light cruiser while the assault carrier, its hull and navigation control fixed, starts to turn around and head back toward the planet. The two surviving fighters pull alongside the carrier and start docking procedures.

Turn 8
The chase continues. The sathar light cruiser continues to close on the battleship but the UPF light cruiser, which had a slight speed advantage on the sathar light cruiser, continues to close on it as well as it starts to outdistance the older heavy cruiser that has a lower acceleration. The two UPF fighters dock with the assault carrier.

Turn 9
The chase continues as the light cruisers close on their targets. The UPF heavy cruiser is as close as it is going to get to the sathar ship unless the sathar vessel’s engines are damaged as the greater acceleration of the sathar light cruiser has allowed it to match speeds with the heavy cruiser. The UPF fighters are rearmed.
Repair Turn 3
The lead UPF frigate repairs some of its maneuvering while the other frigate repairs 10% of its hull. The UPF light cruiser also repairs 10% of its hull while the assault carrier brings its laser and proton battery back on-line. The battleship, expecting to have to defend against torpedoes from the the sathar light cruiser, gets its ICM launcher working again and repairs another 5% of its hull.
The lone sathar fighter repairs some of its maneuvering capability and starts to maneuver to meet up with the heavy cruiser. The sathar light cruiser repairs 13% of its hull while the heavy cruiser restores half of its engine capability and begins accelerating to out of the system.
Turn 10
The sathar light cruiser continues to close on the battleship and the UPF light cruiser continues to close on the sathar light cruiser. The two UPF fighters, rearmed, launch from the assault carrier and go after the lone sathar fighter near the planet.
Turn 11
The UPF light cruiser continues to close the gap but it is looking like the sathar ship will get to the battleship before the UPF light cruiser can intercept it. The battleship, at relative rest to the other ships, rotates to face the direction it expects the sathar vessel to come from in order to bring its disruptor cannon to bear.
Turn 12
Realizing it cannot quite get into torpedo range this round, the sathar light cruiser remains at its current speed staying at extreme range for the battleship’s defenses although this will also allow the UPF light cruiser a chance to close as well.
Defensively the battleships fires all of its energy weapons at the sathar vessel but they all go wide although one of the electron batteries would have hit except for the battleship’s damaged combat control system. The sathar light cruiser returns fire but also misses.
The UPF light cruiser and heavy cruiser close in on the sathar vessel but the heavy cruiser is still well out of range. The sathar ship fires once again at the battleship this time hitting with its distruptor cannon shorting out the battleships defenses and ICMs. The battleship and light cruiser return fire. The battleship connects with a LB damaging the sathar light cruiser’s hull (11%). The UPF light cruiser is still too far away and its shots go wide.
The UPF fighters hit the sathar fighter with one of their assault rockets knocking out it’s assault rocket launcher.
Repair Turn 4
The lead UPF frigate repairs its combat control system and is now as functional as it can be without getting to a shipyard to repair its heavily damaged hull. The other frigate restores more of its engine capability. The UPF light cruiser repairs 13% of its hull while the assault carrier also gets a minor hull repair restoring 1%. The battleship focuses all of its repairs on its hull, hoping to survive the oncoming attack and restores 13% of its hull integrity.
The sathar fighter under attack by the UPF fighters finally fixes its navigation control system while the other fighter restores some of its maneuverability. The UPF light cruiser fixes its combat control system and brings its proton battery back on-line in preparation for attacking the UPF Battleship.

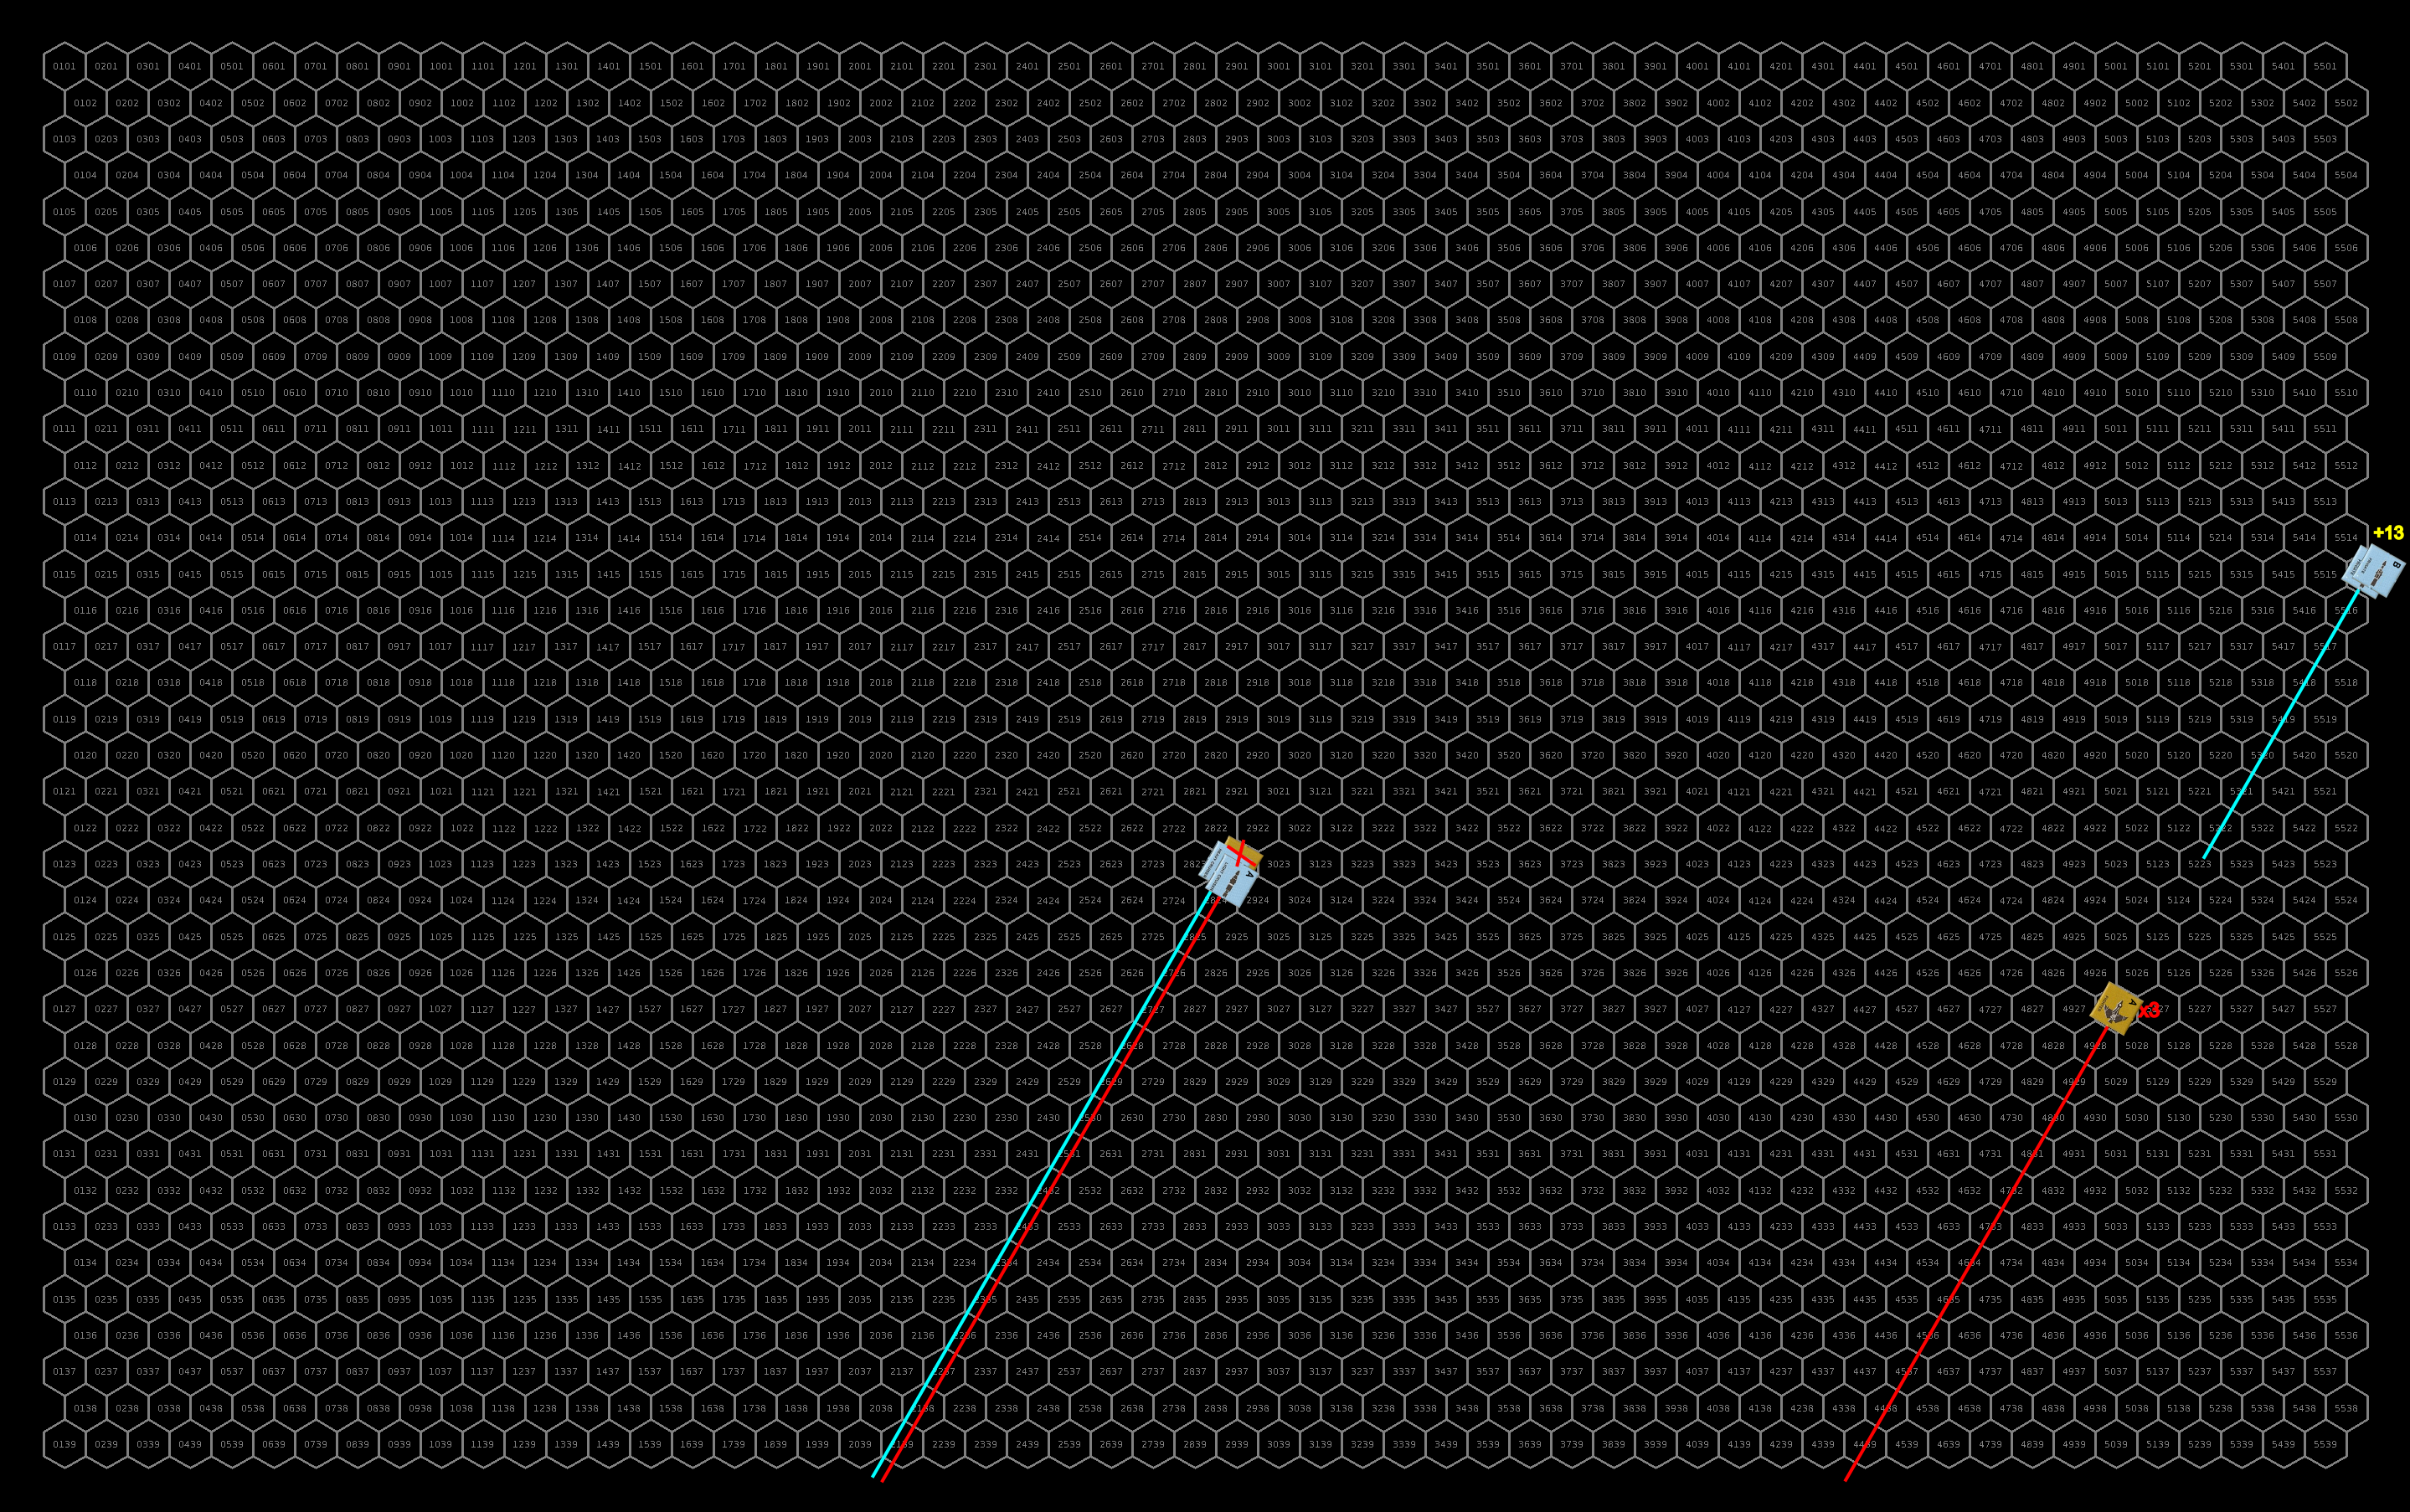
Turn 13
The sathar light cruiser makes a pass on the battleship firing everything it can at the larger vessel and using its maximum acceleration. The lone sathar fighter, its navigation control issues solved, begins accelerating away from the planet, hoping to surviving the next two rounds of assault rocket fire from the two UPF fighters.
Defensively, the battleship and light cruiser try to take out the sathar light cruiser before it can inflict any more damage on the battleship. The UPF light cruiser, at nearly maximum range misses, while the battleship connects with 2 laser batteries, a proton battery, and its disruptor cannon slightly damaging the cruiser’s hull (8%), knocking out its laser battery and engines, and inducing a malfunction in its navigation control system.
The sathar light cruiser returns fire with all of its function weapons but in the excitement of the moment, the gunner all miss and the battleship escapes unscathed.
The UPF light cruiser closes to torpedo range on the sathar vessel and opens fire with everything it can. The heavy cruiser continues to close and the battleship fires a long range salvo at the now retreating sathar light cruiser. The fighters again fire at the lone sathar fighter, this time hitting it with one of their assault rockets and destroying it.
Defensively the sathar light cruiser now focuses on its pursuer and fires at the UPF light cruiser hitting with both its electron and proton battery inducing a fire and damaging the light cruiser’s damage control system.
Returning fire at the sathar light cruiser, the battleship misses and the UPF light cruiser hits with its laser, electron, and proton batteries damaging the ship’s hull (14%), knocking out its rocket battery, and damaging its combat control system.
Turn 14
The sathar light cruiser pulls to port and holds together. The fire on the UPF light cruiser knocks out its laser battery.
Defensively, the battleship and light cruiser fire on the sathar ship. The battleship hits with an electron and proton battery starting a fire and knocking out its stasis screen. The light cruiser hits with its proton battery and disruptor cannon knocking out the sathar ship’s disruptor cannon and electron screen.
The sathar light cruiser fires at the UPF light cruiser but misses.
The UPF light cruiser continues to tail the sathar vessel closing to rocket battery range while the heavy cruiser starts catching up with the other ships. The fire on the sathar light cruiser damages its hull (6%)
The sathar light cruiser fires on the approaching UPF light cruiser hitting with its electron and proton battery damaging its hull (4%) and knockign out a third of its engine capability.
The UPF light cruiser hits the sathar ship with its electron and rocket batteries destroying it and ending the battle.
Turn 15
The fire on UPF light cruiser damages its navigation control system.
Repair Turn 5
The UPF light cruiser gets its fire under control, the assault carrier repairs its rocket battery but discovers that any more repair of its engines will require a shipyard, and the battleship repairs another 11% of its hull.
The sathar heavy cruiser fully repairs its engines.
Final repairs
Battle repairs of the UPF ships continue over the next four and a half hours as the ships return to orbit around Ken’zah-Kit. In the end, the second UPF frigate can only get its hull up to 65% integrity, and the battleship can only get its hull up to 58%.
The lone sathar fighter meets up with the heavy cruiser and is attached to the hull of the larger vessel where it will remain until they get back to a shipyard. It’s maneuvering is fully repaired as the ships accelerate out of the ship. The heavy cruiser gets all of its systems repaired over the next four hours expect its hull which it is only able to restore to 81% outside a shipyard.
Lessons Learned
The sathar just can’t seem to catch a break and finish off the UPF ships. I though the light cruiser was going to finish off the battleship but rolled over 80 for every single attack so it missed completely. The battleship only had about 26 HP at that point. (On a whim I rerolled all the attacks and the second time it hit with a PB and RB, the latter did double damage and destroyed the battleship. But alas, that wasn’t the actual roll.) The same with the ramming of the frigates. I thought for sure the UPF frigate hit by two fighters was going to be destroyed, it only had 12 HP left but then I just rolled 8 on 2d10 for the hull damaged sustained. And it wouldn’t have done any good for the third one to hit it as I only rolled a measly 2 HP damage for that ship as well. There were several other times where I expected the sathar to get better hits but the dice were just against them. The UPF had bad spells as well but it didn’t seem to be at those critical, ship-finishing moments.
I considered having the light cruiser ram the battleship but the odds were in the favor of the battleship avoiding the ramming attempt and if it failed, the sathar ship would have been at point blank range for both the battleship and the oncoming UPF light cruiser so it didn’t try. Although it probably should have stayed a bit closer to the battleship as it ended its movement. But I really didn’t expect it to completely miss. This does have me thinking a bit about the ramming rules, however, so there may be a blog post about that when I have time to think on it some more.
The UPF are pretty beat up with the two cruisers and a fighter as the only ships not needing to go to a shipyard for repairs, but they only lost a single fighter. The sathar on the other hand lost everything expect a fighter and a heavy cruiser. Task Force Cassidine has now destroyed two major sathar fleets while only losing 3 assault scouts and 4 fighters.
There is one more battle coming up (in the Liberty system) and then things are going to quite down a bit as the sathar just don’t have very many ships surviving at the moment. They are done to just 9 fighters, 1 cutter, 2 frigates, 1 destroyer 2 light cruisers, 2 heavy cruisers, and two assault carriers but they are spread out all over the Frontier and the starship construction centers (and two are in the battle coming up in the Liberty system and may not survive). Its going to take some time to get them all together and build a few more ships.