The Expanding Frontier

Creating Sci-fi RPG Resources

  • Home
  • Order a Map
  • Order Miniatures
  • Supporters
  • About
  • Bio

Tag Archives: sathar

Sathar Starship Construction Centers

I had planned to do an article on an alternate set of astrogation rules, but as I started looking at it, it was going to require more time than I had to get it done properly. So that one will come at some point in the future.

If you’re following the Star Frontiers Twitter feed, you know that yesterday started the main events of the Second Sathar War. A lot of my free time has been spent working on that and staying far enough ahead that I can get the battle posts up, track the ship movements, record and schedule repairs and new ship construction, and figure out strategy and tactics as they shift after each encounter. In fact, if I hadn’t posted it early to get some feedback, the Battle of Stenmar post I did a while back would have been today’s post as the tweet about that battle will be going up at some point today. Tracking all the ship movements and playing out the battles is keeping me busy. Who knew that managing a Frontier-wide battle for both sides would be so much work! 🙂

Given that the Second Sathar War narration is where my focus is right now, I thought I’d do a related post and talk about the Sathar starship construction centers (SCCs) in my version of the setting.

Some Background

Placing the SCCs

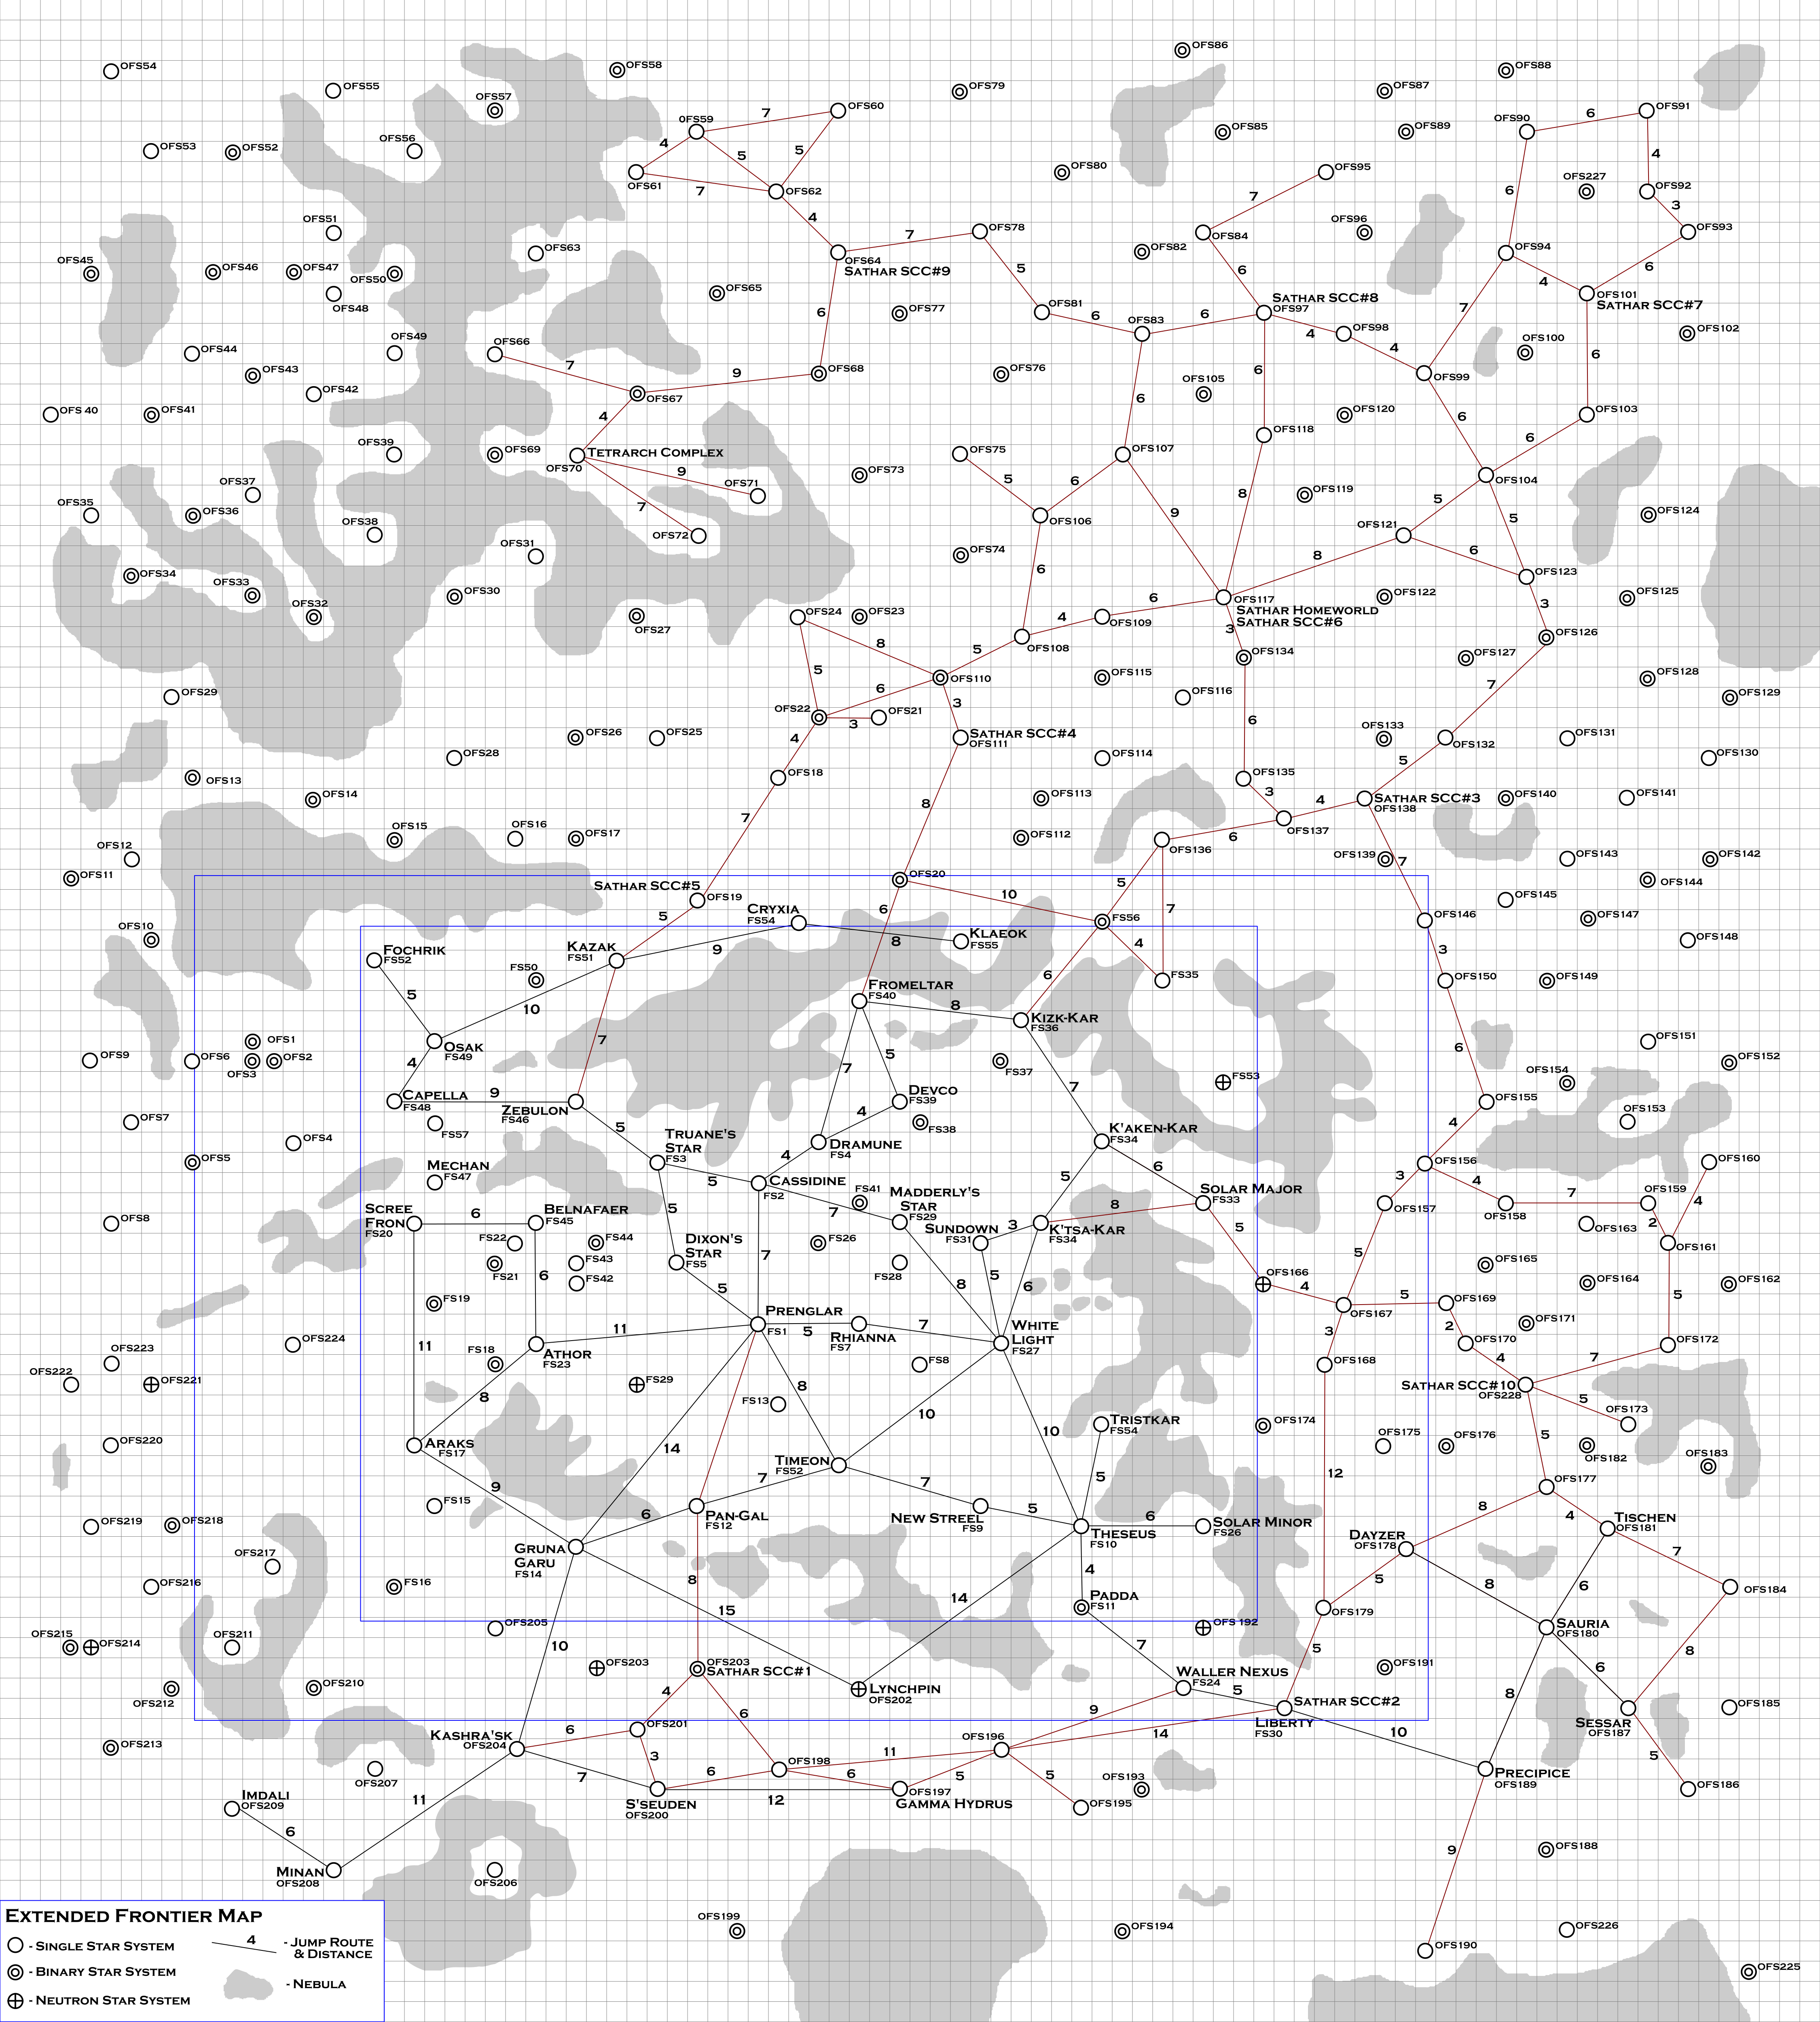
If you have looked closely at the Extended Frontier Map, you already know the locations of these SCCs – they are marked on the referee version of the map. And as I mentioned in the posts about the creation of that map, the sathar worlds and jump routes were originally laid down decades ago. I modified them slightly to account for the Zeb’s Guide data and fan material that I included in the map as the latter hadn’t been produced and I didn’t own a copy of the former when I made the original map as a teenager.

On that original map, only the first five SCCs were marked. I had originally created the map to help track the exact project I’m doing now as part of the Detailed Frontier Timeline, namely track the Second Sathar War from a ship construction and movement perspective with the RPG rules rather than the board game rules in in the Campaign Book. It was also made for a exploration campaign where the PC would go out to expand the borders of the Frontier and look for the sathar worlds but that’s a different set of posts. Because of that, I only included the five SCCs that I envisioned participating in the conflict and which is why those five, closest to the Frontier, have the first five numbers and not the ones deeper in sathar controlled space which arguably were created first. If I ever go back and rework everything, I might change the numbering.

When I was setting up the Detailed Frontier Timeline project and making the Extended Frontier Map, I realized that I needed to add in a few more SCCs in the other parts of sathar-controlled space to handle all the other ship construction needed by their empire. That got me up through the ninth SCC. I then realized they needed one to manage the fight against the Saurians and so added in the tenth one. So while they are numbered in order of creation, it was their creation in my head for the setting, not their creation dates in the timeline.

Sathar Ship Hull Sizes

Another item of note relative to the SCCs is the hull sizes I use for each of the sathar ships. These are slightly different than the values I use for the UPF ships but all fall within the range of sizes given for each class of ship on page 5 of the Knight Hawks Campaign Book. The sizes I use for the sathar ships are:

  • Fighter – HS:1
  • Cutter – HS:4
  • Frigate – HS:5
  • Destroyer – HS:6
  • Light Cruiser – HS: 14
  • Assault Carrier – HS:16
  • Heavy Cruiser – HS: 18

In the timeline the cutter is a new ship type that will see action first in the Rim and later in the Frontier. The specs for the ship can be found on page 6 of Frontier Explorer issue 2.

It’s my take that the larger sathar ships are a bit bulkier than the corresponding UPF version. So sathar light cruisers are HS:14 while the UPF ones are HS:12, the sathar assault carriers are HS:16 while the UPF ones are HS: 14, and the sathar heavy cruiser is HS:18 compared to the single UPF heavy cruiser which is HS:16. Even the sathar destroyer is actually HS:6+ being just a bit larger than the standard HS:6 volume but not enough to actually be HS:7.

The reason for this is the role I have for these larger ships. In addition to being mainline fighting ships, the larger capital ships also double as troop transports. You can see this in the Sathar Destroyer Technical Manual. Someday I’ll detail out the light and heavy cruisers similarly. In any case, this makes the sathar ships a bit bulkier and take a bit longer to produce. They aren’t being used for the troop transport role at the beginning of the war but the capability is there. While this doesn’t have any impact on the actual battles, it does impact the starship construction centers and so needed to be spelled out.

The Starship Construction Centers

In this section, we will look at each of those starship construction centers in turn to talk about their capacity, production queues, and main focus.

If you’ve been following along with the Detailed Frontier Timeline and playing close attention, you could probably reconstruct the production queues of SSCs two through five as I’ve been posting the ships that were produced there as part of the timeline. SCC#1 has just come online and only produced a single ship (a light cruiser) so it’s full queue hasn’t been revealed and SCC#10 will soon be shifting from the Saurian conflict, which has ended, to the Second Sathar War. The first ship out of that SCC (a fighter) to participate in the SSW will complete construction in early December (FY61.304).

The production queues for SSCs one to five were specifically set up to try to produce the sathar Order of Battle from page 55 of the Knight Hawks Campaign Book at the time I started up the war in the timeline. I started with an initial semi-random “seed” of ships, modified for the encounters in the Detailed Frontier Timeline (like the fight a Volturnus), and then allowed the SSCs to crank out ships. I came pretty close with only a few more fighters (most of which I destroyed in the fight in the Liberty system) and one extra destroyer. I have a small computer program that allows me to run the production queues and add (and remove) SCCs as needed to produce the ships so I don’t have to do it by hand.

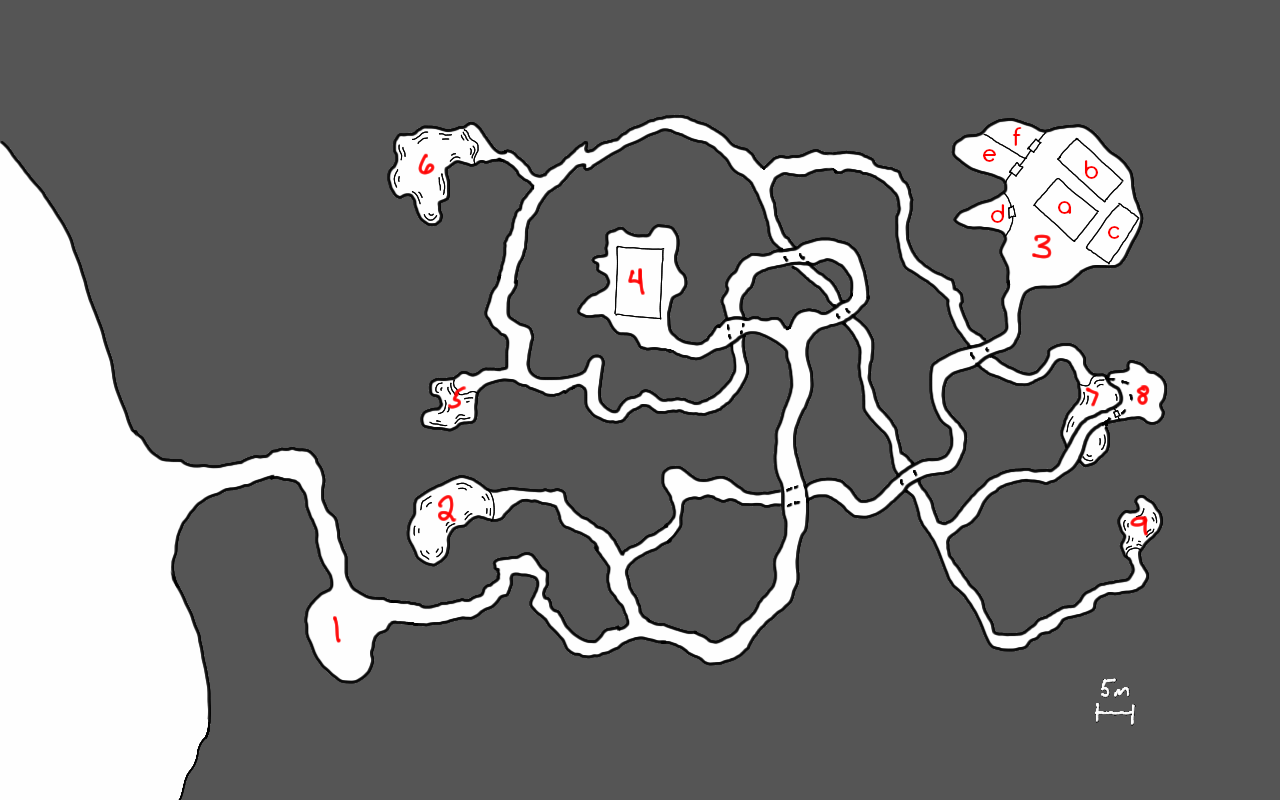
Okay, let’s look at these construction centers. Directions for the locations of the SCCs are given on the Extended Frontier map assuming the top of the map is “north.”

SCC#1

Location: OFS203 (“S” of Prenglar)

Capacity: 48 HS worth of ships

Production Queue:

  • 42 HS of capacity dedicated to the production of light cruisers (3 under construction at any one time), staggered to produce a new LC every 140 days
  • 6 HS of capacity dedicated to the production of destroyers, one every 180 days

Notes: This is the newest of the starship construction centers with its first ship being produced on FY61.208. It is at the far end on the sathar jump routes (without passing through the Frontier). It was constructed specifically to be a jump off and repair point to strike right into the heart of the Frontier at Prenglar.

The recent loss of SSC#2 and the Liberty system has actually isolated this SSC from the others. Ships produced here (or headed here) will have to pass through the Liberty system. This will give the UPF a chance to detect these ships if they try to get into the Frontier anywhere other than Prenglar.

SCC#2

Location: FS30 – now Liberty (“SE” of Theseus)

Capacity: 46 HS

Production Queue:

  • 16 HS of capacity devoted to production of assault carriers, one very 480 days
  • 24 HS of capacity devoted to production of destroyers (six under production at any one time), staggered to complete one every 45 days
  • 6 HS of capacity split between production of fighters and destroyers. Produces 6 fighters in 30 days, then a destroyer 180 days later, than back to fighters.

Notes: This SCC has been operating for a while and is responsible for the production of most of the destroyers seen in the Frontier recently and present in the fleets in the initial attacks in the Second Sathar War and produced some that were used against the saurians. It was also the driving force behind the exploration that established the sathar jump routes over to SCC#1 and in to S’esseu space.

In the notes in the SFKH4 module The War Machine (the Beyond the Frontier series), it said that this SCC was responsible for about 20% of the ships in the second sathar war. This is why I went with five SCCs when creating the original map.

This SCC was lost just recently along with a large number of fighters in the events of the SFKH4 module which wrapped up on FY61.40, only 40 days before the first sathar ships appeared in the Frontier to start the Second Sathar War. It will be interesting to see how things play out with the loss of this system, but that was always intended from the start.

SCC#3

Location: OFS138 (“NE” from Kizk-Kar)

Capacity: 59 HS

Production Queue:

  • 54 HS of capacity devoted to heavy cruiser production (three under production at any one time), staggered to produce one HC every 180 days
  • 5 HS of production dedicated to frigate production, one completed every 150 days

Notes: This is an older SCC as well and originally fueled the sathar exploration on the eastern side of the Frontier that resulted in the discovery of the saurians and the Mhemne.

Now focused on the battle with the Frontier, this SCC is responsible for the construction of the majority of heavy cruisers present in the early days of the conflict.

SCC#4

Location: OFS111 (“N” of Fromeltar)

Capacity: 49 HS

Production Queue:

  • 16 HS of capacity dedicated to assault carrier production, one every 480 days
  • 28 HS of capacity dedicated to light cruiser production (two under production at any one time), staggered to produce one every 210 days
  • 5 HS of capacity dedicated to frigate and fighter production, completing 5 fighters in 30 days, then a frigate 150 days later and then back to fighters.

Notes: This is a older SCC established after the First Sathar War to explore more into the Frontier sector and the Rim. The route to Zebulon has been known for hundreds of years but most of the other routes are fairly new.

SCC#5

Location: OFS019 (“N” of Truane’s Star/Zebulon)

Capacity: 50 HS

Production Queue:

  • 28 HS of capacity dedicated to light cruiser production (two under production at any one time), staggered to produce one every 210 days
  • 18 HS of capacity dedicated to heavy cruiser production one every 540 days
  • 4 HP of capacity dedicate to cutter production, one every 120 days

Notes: This is a newer SCC set up to provide ships for fighting in the Rim and the Frontier and built as part of the preparation for the Second Sathar War.

The cutter is a new ship that the sathar have developed partially in response to the UPF’s assault scout. It is not battle tested and at the start of the Second Sathar War, only 4 have been produced. They will see first blood in the Second Battle of Stenmar (coming on FY61.293).

SCC#6

Location: OFS117 (upper left center of Extended Frontier Map)

Capacity: 200 HS

Production Queue: Random, mostly non-military ships

Notes: This SCC is located in orbit around what in my game is the sathar homeworld. It is larger than even the largest SCC in the Frontier but is not currently involved in the SSW conflict, although that may change. This SCC primarily is responsible for producing “civilian” ships that the sathar use for non-military purposes.

It did, however, supply the ships that comprised SBF-F1 and SBF-F2 that attacked Stenmar (in the Kazak system) in the Detailed Frontier Timeline. Since those battles were outside the scope of the simulation I was working on (I’m ignoring the Rim), I had the ships for the fight in the Rim come from somewhere other than the five main SCCs.

SCC#7

Location: OFS101 (upper right of Extended Frontier Map)

Capacity: 75 HS

Production Queue: random, “civilian” ships

Notes: This is a new SCC and is currently focused on producing “civilian” ships and ships for exploration to the “NE” of the sathar homeworld. Not currently involved in SSW production.

SCC#8

Location: OFS097 (“N” of OFS117)

Capacity: 75 HS

Production Queue: random, “civilian” ships

Notes: This is another SCC that is producing civilian ships for the day-to-day operation of the sathar worlds. Not currently involved in SSW production.

SCC#9

Location: OFS064 (upper center of Extended Frontier Map)

Capacity: 75 HS

Production Queue: random, military and exploration vessels

Notes: This SCC is focused on an active campaign to explore the upper left corner of the Extended Frontier Map. It was ships from this system that many years ago discovered the Tetrach complex on OFS070 that the Discovery Squadron went looking for and which was contacted by the complex on Laco (Dixon’s Star) back at the end of FY59. It was actually this signal, plus the events of Volturnus, that kicked off the Second Sathar War.

The sathar are currently trying to find a way through the large nebula in this region as they have detected signals from another race on the other side of the nebula that they intend to conquer. It is not currently producing ships for the SSW and probably will not be used for that purpose at it is focused on a different threat.

SCC#10

Location: OFS174 (“E” of White Light)

Capacity: 60 HS

Production Queue:

  • 18 HS of capacity dedicated to heavy cruiser production, one every 540 days
  • 16 HS of capacity dedicated to assault carrier production, one every 480 days
  • 14 HS of capacity dedicated to light cruiser production, one every 420 days
  • 6 HS of capacity dedicated to destroyer production, one every 180 days
  • 5 HS of capacity dedicated to frigate production, one every 150 days
  • 1 HS of capacity dedicated to fighter production, one every 30 days

Notes: This SCC is producing some of every type of main-line sathar warship. For the past several years, it has been focused on the war with the saurians and is responsible for producing most of the ships that destroyed their worlds.

Being already focused on military production, and with the campaign against the saurians now ended (finished on FY61.282) and the loss of the SCC in the Liberty system, this SCC will shortly be added to war effort against the Frontier (officially on FY61.296).

Last Thoughts

Those are the sathar starship construction centers scattered about. All told, there are 737 HS of capacity across the 10 SCCs. It’s about 45% more capacity than in the Frontier, although more spread out. It is also more focused on military ships. The UPF has 430 HS of capacity that can produce military vessels and another 80 HS of capacity that can produce civilian ships and do maintenance.

As the battles play out, the sathar may shift the production queues to different mixes going forward (e.g. they have lost most of their destroyer production) but we’ll have to see how the upcoming battles play out. Look for the first play report later this week and running into next week as the initial battles occur around the Frontier.

How do you see the sathar starship construction being set up and handled? Have you every attempted anything like this for your game? Or have you been more sensible and just hand-waved it? Share your thoughts in the comments below.

November 17, 2020 Tom 5 Comments

Skills For Hire – Lab Crawl

So last week I wrote up the location of the GODCo bio-lab. This week we’re going to look at what my players found when they got there. First I’ll provide my game notes with the details of what had changed, and then so a short write-up of the players’ actions. “Lab Crawl” is the title I gave this scenario in my notes.

Background

GODCo has been operating the lab on Pale for about 20 years now.  The lab is a location the GODCo scientists are studying the Pale flora and fauna and looking for ways to adapt various yazirian plant species to the environment as well as improving flora and fauna used by Frontiersmen to be more adaptable to the Pale climates.

A few days ago the quarterly supply delivery to the “secret” base left but the drivers and vehicles (two ground trucks) never returned.  Yesterday an aircar flew out to the site and was shot at by the site’s defenses (heavy laser).  The PCs are being sent in (on the ground) to investigate. Their objectives are:

  • Figure out what happened
  • Rescue any personnel trapped and still alive in the lab
  • Secure the site if possible.

What Happened

In my game, there are still sathar on Pale from the First Sathar War (referred to as the Great Sathar War on Pale as the second one is just now brewing). While a few of the sathar on the planet are holdovers from the war, many more have actually slipped to the surface over the intervening years. They have been working to subvert the society and develop new bio-weapons (e.g. lesser quickdeath, sathar poison squirrel). It is to do some work on the poison squirrel that they have capture the lab.

A few weeks ago, a team of sathar attacked and captured the base. They needed access to the equipment and facilities to complete some work that they had been doing in more makeshift labs elsewhere on the planet. The staff that survived the attack are being held as prisoners and used as test subjects (and food) for the creatures they brought with them.

Changes From Last Post

In my previous post, I described the lab during “normal” operations. Here is what changed when the PCs arrived

Staff

There are only 1d5+5 of the original 44 staff members still alive, all scientists. They are locked individually in the living quarters and isolated from one another. They are all malnourished and weak. They will not be able to assist the PCs in any fighting.

I put them in the rooms farthest from the elevator/stairs but you could put them anywhere. The sathar have changed the computer security system so that none of the staff ID cards work to open the living quarters doors.

Vehicles

There is a ground transport in the garage (area 3, ground level). It is only partially unloaded.

Robots

All of the security robots were destroyed in the original attack. The sathar have reprogrammed all the maintenance and service robots to have attack/destroy programs and will attack any non-sathar beings on sight. These robots are all level 3 and have only their mechanical hands as weapons. The security locks have all been removed by the sathar as they modified them. They have the following stats:

STA: 100 ATT: 60 IM: 6 DMG: 2d10 Move: 30 m/turn

The remaining robots are located in the following areas:

  • 2 service robots – Ground Level in hallway (area 5)
  • 4 maintenance robots – Level 1 area 30. There is a random 10% change per minute that one will emerge and go about some maintenance task. If attacked, it can summon the others.
  • 4 maintenance robots – Level 2 area 11 (at the far end of the lab area). There is a random 10% change per minute that one will emerge and go about some maintenance task. If attacked, it can summon the others. They can also be called by the sathar on this level.

Sathar

There are 10 sathar at the facility.

Two are security officers and will be in the security office on that level (area 8). If the robots start fighting they will emerge and attack the intruders. These sathar have laser pistols with 3 power clips and a level 3 skill. Their stats are:

STA: 45 ATT: 50 IM: 5 DMG: 2d10 PS: 3 Move: 30 m/turn

The other eight are in the lab areas on level 2. Divide as desired among 3 labs. These are all scientists and will only have improvised melee weapons when attacked but do have a level 1 melee skill. Stats for these sathar are:

STA: 40 ATT: 30 IM: 4 DMG: 1d10 PS: 2 Move: 30 m/turn

In addition to the sathar on level 2, there are a number of sathar attack monsters with them in some of the labs. There are 2 cybernuks in one of the bio-labs, although only one has the cyber implant, and a caged juvenile quick death in another (use the Lesser Quickdeath stats).  A third lab has a cage containing 10 tailless squirrels.  If freed, any of these creatures will attack the PCs.  If they can, the sathar scientists will release the creatures into the lab hall (area 14) to attack the PCs as part of their defense.

Place the sathar and creatures in the labs as desired. In my game, I had them all in labs on the right side of the map. The first lab had 3 sathar, the second had 2 sathar and the nuks, the third had 3 sathar and the squirrels, and the fourth lab had the quick-death.

Other Notes

The computer is level 4 with a level 3 computer security program.  Lab doors have level 5 locks, bedrooms have level 1 locks.

Something got out and the power generator level is overgrown with a blue fungus/moss that is mildly toxic to the touch (S1/T20) toxin. This is currently growing on all the walls on level 3, part of the stairwell between level 2 and 3, and in the elevator shaft near level 3.  It has not yet traveled to Level 1 or 2.  Due to the fungus, the power occasionally will short out and brownouts occur occasionally around the lab.  There is a 5% chance any minute that the power will temporarily go out or lights will dim in any given room.

Loose Ends

Some things I left open ended and which didn’t really come up when playing that you can flesh out as desired for your game:

  1. Where’s the other ground truck? There were two in the convoy but only one is here. I honestly forgot about there being two when I was running it but it never came up directly. This is an opportunity to expand the scope of this encounter if you want your PCs to possibly pursue the sathar across the planet.
  2. The fungus/moss on the generator level – Was this something the sathar brought with them? Was it something GODCo was working on?

Running the Adventure

This adventure played out over two game sessions.

The PCs had no idea there were sathar involved when they were hired. The job was simply to go to the lab, investigate what happened, rescuing any survivors, and secure the facility. GODCo offered a generous bonus of 500 cr. per staff member recovered alive.

After about six hours of travel, mostly in an explorer, the PCs arrived at the facility to find the gate closed. As they got close to the site, however, they noticed that no radio communications were working. The site appeared deserted. The humma decided to jump the fence and got shot at by the heavy laser for his trouble. Luckily, it missed him. He was able to open the main gate and the explorer entered the compound.

They gained access to the garage and discovered the partially emptied ground transport. Exiting into the hall, they were attacked by the robot stationed there. They took some damage but were able to quickly deactivate the robot. (Since the sathar removed the security lock, I only required a DEX roll – the robot was attacking them after all – to switch it off. Their roboticist has a high DEX but still missed a few of the rolls throughout the adventure.)

As they rounded the barracks (not knowing what they were) they encountered the other robot and after starting to engage that, the two sathar emerged and started firing at them. A well tossed tangler grenade captured both sathar (although one was killed by laser fire the same round). Realizing it was caught and the robot deactivated, the captured sathar committed suicide.

Clearing the rest of the level, they opted to take the stairs down and not alert anyone else by using the elevator. As they emerged into the hall on level 1 they experienced their first brownout of the power. They entered the security office and found a number of CCTV cameras looking at different parts of the lab including the hallways on level 1 and one into each lab on level 2. They saw the 8 sathar and the attack creature but didn’t know where in the complex those images were coming from.

Examing the hallways, they ran into two maintenance robots coming out of area 30 on the fall left hall way. A fight ensued with those robots and the other two that were called out of room 30 after the fight was engaged. They managed to deactivate two of the robots while the other two were destroyed.

The fighting was occurring at the end of the hall by area 30 and the prisoners in the rooms there heard them and tried to get their attention. They proceeded to open (via tech or brute force, depending on the player) each of the doors and discovered that 9 of the scientists were still alive, although is fairly poor shape.

From the scientists they got the information about the attack and current situation as they understood it. They also learned that the brownouts only started occurring after the sathar arrived. Speculation began on what the sathar were doing that needed that much power.

With the scientists found, they shepherded them up to the surface, planning on driving them out in the ground transport. At this point a discussion ensued on what was next. Fighting sathar is a job for Star Law and really above their pay grade and several PCs were all for bugging out with the scientists, reporting what they found, collecting their rewards and walking away. However, one of the PCs is a member of the Anti-Satharian League (ASL) and floated the idea that they might be able to get some reward from that group for the sathar if they took them out themselves.

In the end, they decided that the Anti-Satharian League PC would drive the scientists out and call in for medical pickup once he got out of the radio jamming. He would report the sathar presence and request instructions from Galactic Task Force (GTF). He’d also contact the ASL and see what he could negotiate. That discussion ended the first session.

Session 2 started with finalizing the plan. While the ASL PC headed out with the scientists, the other PCs set about exploring the rest of level 1. They realized part of the way through that they should have asked the scientists for a tour. Meanwhile, the PC with the scientists, after about 40 minutes of driving, got out of the jamming range. Calling in GTF immediately dispatched some flying transports to pick up the scientists and told him to stand by on the sathar situation. While he waited, he called ASL and got the same response. After a few minutes, GTF told him that if the team chose to go in after the sathar, they would be deputized by Star Law for the operation (Star Law couldn’t get anyone there for many hours and didn’t want the sathar to get away) and offered a bonus of 1500 cr. each. Just after that conversation, he was called by his ASL contact and offered a 250 cr. reward for each sathar killed plus and additional 500 cr for any sathar data collected from the computer systems.

With the offers in hand, he headed back to the compound once the medical team arrived to escort the scientists. Having been gone a couple of hours, the rest of the team was getting a bit antsy and debated exploring the generator level but decided to be patient and wait. They also reprogrammed the two maintenance robots to obey them and attack sathar while they were waiting. When the offers were presented, they decided to take on the sathar and collect the reward from both sources.

Not wanting to walk down 50 m of stairs, and figuring they had the drop on the sathar, they opted to take the elevator. They quickly examined the areas outside the decontamination airlocks on that level. Hoping to reduce the odds, they hacked into the life support and ventilation systems for the labs (all 10 individually) and dropped a doze grenade into each system to try to knock out the sathar. They had to do all 10 because they didn’t know which system went to which lab or even which labs the sathar were in. Luckily they had 11 doze grenades between the 5 PCs.

Doze grenades dropped and hoping they worked, they went through the cleaning rooms into the lab area. Upon entering and seeing into the labs, they found that the sathar in the lab with the cybernuks had been knocked out but the other were still up and about.

They rushed the robots over to the first lab and had them block the door preventing the sathar from exiting while the PCs headed down the the third lab where the three sathar were working with the tailless squirrels. As they were approaching, the sathar let the squirrels out and there were suddenly several critters attacking most of the PCs.

On the second round of the fight, the four robots emerged from the robot storage area and started to advance on the PCs as well. An on the next round they realized the flaw with having the robots block the sathar in the first lab as one of the sathar deactivated one of the two robots.

With enemy both in front of them and behind, they started to fall back and regroup trying to deactivate robots, kill sathar, and fight the squirrel critters. A well placed frag grenade managed to kill most of the squirrels as they fell back but not before a couple of the PCs were bitten and poisoned.

Just as they were starting to get the situation under control, one of the sathar in the nuk lab woke up (I had rolled for the time each were going to be out and rolled low for that one). After spending a round trying to rouse its comrade (with no success), it then headed to the doors to let the nuks out into the fight.

The sathar and squirrels turned out to be the easy targets with the nuks and robots providing the most challenge. They managed to take out the sathar that had freed the nuks before it could let the quickdeath out or things might have been really bad for the team. As it was, two of the team members, wounded and cornered, retreated into the lab that the squirrels had come out of pursued by one of the robots. They trapped one of the nuks in the entrance to another lab, and then finished off or deactivated the remaining robots and creatures.

When the fighting was over, they had deactivated two more robots, killed seven sathar, 10 squirrels and one nuk. The last sathar never woke up and they hit it with a StayDose to keep it sedated. They left the trapped quickdeath and nuk for StarLaw and GODCo to deal with. They decided to report that there were only 7 sathar (they had miscounted) and secret the live sathar away to turn over to the Anti-Satharian League for a 2000 cr. reward.

It was touch and go there in the middle of the battle with a couple of PCs getting down to single digit STA, but they pulled through in the end. Each PC ended up with 6 XP and 3600 cr. They also ended up with 7 damaged service and maintenance robots that they took with them as well.

Final Thoughts

It was a good adventure. It just took longer to finish than I had hoped due to scheduling conflicts (on my part) and not being able to get it all done in a single session (or I would have posted this sooner).

I actually completely forgot about the quickdeath in the heat of the battle which is why the sathar didn’t immediately make a bee-line for that lab to try to get it out. But that was probably just as well. Had the quickdeath came into the fray it might have been too much. As it is, the fight went well. They PCs were a little worried there for a bit, but managed to pull it out in the end. I actually thought the squirrel were going to do a bit more damage but the frag grenade really did a number on them, only three of the 10 survived the initial blast.

The activating and deactivating of the robots was a bit of humor (at least for me) during the big fight. There was a bit of a go around of the sathar turning their robots off, them trying to turn the sathar robots off and also trying to turn their back on, and fighting the robots that weren’t deactivated. And the moment when I said that the sathar turned their first robot off definitely seemed to catch them off guard and ratchet up the tension.

This will be the the last Skills for Hire post for a while. As I talked about in my “What I need is … more focus” post back in August, I have a lot of things going on and that was the main cause of the scheduling conflicts. As such, I’ve decided to put the game on hiatus for now. My players are going to take up the GM mantle and run games for each other in the meantime but I won’t be doing anything for a while.

Did you like the adventure? What might you have done differently? What changes or additions would you make? How could you use this in your game? Let me know your thoughts in the comments.

October 27, 2020 Tom Leave a comment

Young Sathodragon

This is a young sathodragon, the creature that the sathar use to make cybodragons. This young specimen doesn’t have the cybernetic implants. These sathodragons stand around 1 meter at the shoulder and are 2-3 meters long.

These creatures are offspring of the cybodragons that were seeded on Pale during the sathar invasion. A female sathodragon will lay a clutch of 3-7 eggs (1d5+2) but the first one to hatch will eat the others so these creatures are typically found alone as they are fairly territorial without sathar influence.

As with all sathar bioconstructs on Pale, there is a bounty by the Pale government for the killing and/or capture of sathodragons.  The bounty for a young cybodragon offspring is 1,000 cr.

Type:Medium Omnivore
Number:1
Move: Fast (60 m/turn)
Stamina: 120
Attack:70 claws / 55 bite
Damage3d10 claws / 4d10 bite
Special Attack:None
Special Defense: None
Native World:Unknown, found on Volturnus and Pale in the Frontier. Typically found in the mountains, plains, and forested area of a world.
Iguana image by Rjcastillo. Click image for original file
May 24, 2020 Tom Leave a comment

Frontier Explorer issue 25 now available

Just a quick note to let everyone know that issue 25 of the Frontier Explorer is not available for download. You can get it at either DriveThruRPG or on the Frontier Explorer website.

This issue is a sathar themed issue with articles about all aspects of the sathar from vehicles and weapons, to biology and social structure.

Grab your copy any enjoy!

July 29, 2019 Tom Leave a comment

Extended Frontier Map – final update – Referee’s Map

Okay, I had planned to do a different post this week as part of this month’s RPG blog carnival but that will have to wait. I decided instead to just push through and finish the Expanded Frontier Map instead.

Corrections

If you downloaded the color player’s map from last week’s post, go back and do it again. As I was working on the final map, I found a bunch of mistakes that I completely missed while working on last week’s map. Most of them are minor, like names overlapping jump lines, but a few of them are pretty bad like names overlapping each other or running over jump distances. In any case, I’ve fixed those and uploaded new maps to the links in that article.

Adding the Sathar

The only difference between this map and the previous one is that I’ve added in all the jump routes known by the sathar as well as some labels on the map that give the location of the sathar homeworld, their ten starship construction centers, and the location of their Tetrarch ruins complex similar to the one on Laco (If you are following the timeline posts, this is where the signal went out to and was returned from). I haven’t defined which of these systems are actually inhabited by sathar, I’m leaving that up to the individual referee to decide.

Let’s start by showing the black and white version of the map and then I’ll talk about how I filled it in.

Extended Frontier map containing all the sathar jump routes and system labels.
Sathar jump routes are shown in red. Click for full scale version.

Jump Routes

As you can see, most of the sathar systems are up and to the right of the Frontier. This is the their main population center. The tendrils that surround the Frontier tend to be more outposts and travel lanes than population centers.

In addition to the jump routes marked in red, it is assumed that the sathar know all the UPF routes marked in black as well.

The routes don’t extend to the left side of the map as the sathar stopped their expansion in that direction after encountering the Rim. They were also stopped by that big nebula in the upper left. I have plans for some of the star systems up in that area on the far side of the nebula.

I consider the jump routes along the bottom of the map, from Saurian space, past Liberty, into S’esseu space, and then up to Prenglar to be newly explored routes. In fact, in the current version of my background material, the starship construction center just south of PanGal, labeled SCC#1, is still under construction and hasn’t even started producing ships yet in my timeline project.

When I first made this map back in the 80’s, I didn’t have Zeb’s Guide and obviously none of the fan material existed so this region of space looked a little different on my original map (I should probably scan that in and post it for reference). But the idea was that these routes were established to give the sathar the jump route right into Prenglar in the Second Sathar War game in the Knight Hawks Campaign book allowing them to strike at the heart of the Frontier. In creating this map, I modified my original concept to work through these modified regions of space. It also provides an opportunity for interdiction as the UPF could potentially cut off some of the Sathar routes.

Starship Construction Centers

The numbering on the starship construction centers may seem a little odd and requires a little bit of explanation. I originally built this map for two purposes. The first was to give me a more strategic level view to write a Second Sathar War timeline, taking into account sathar ship production as well as the UPF ship production. I wanted to see how the balance of forces would work if you stuck to the rules on ship construction. This is now being realized in my timeline project.

The other was to provide a larger Frontier region for a big exploration campaign inspired by the Beyond the Frontier series of adventures (SFKH 2-4) where the PCs would explore out from Truane’s Star upward on the map. I have had the beginnings of that campaign in a notebook for literally decades. Maybe it’s time to dust it off and use it for material here on the blog.

It’s the former purpose that resulted in the numbering of the starship construction centers. I originally had the ones labeled 1-5 dedicated to the Second Sathar War effort. They were strictly producing military vessels with which the sathar would be attacking the Frontier. And I just started at the one connected to the Prenglar jump route and numbered them counter-clockwise.

SCCs number 6-9 were added in to provide “civilian” ship construction for the sathar population and exploration away from the Frontier. They are not labeled on my original map but were added in as part of this project. The final SCC, #10, was added as part of my timeline project to provide the production capacity for the Sathar offensive against the Saurians. I’ll probably do another post about the production capabilities of all these construction centers at some point in the future.

The Sathar Homeworld

The sathar homeworld is labeld on my original map. I had always envisioned it as a slightly cooler star than the sun with their home planet close relatively close in and warm and muggy. As such, I’ve given it a K4 spectral type on the map. Someday I might actually design and write up the system.

The Final Color Map

Now that we have the background information covered and everything else in place, it was time to make the final color version of the map.

This was done in two steps. First, I made a separate data file that had all the star systems again but instead of the jump routes known to the UPF, it contained the jump routes known only to the sathar. Using this, I generated a new map.

Since the map is generated with the jump routes on different layers, the second step was to just open the new map, and copy everything off the jumps route layer, open the Player’s map, create a new layer for the sathar jumps, and paste them in. I then had to adjust the position of all the features after pasting them in but that was just a matter of looking up the position in the original image and entering that in to the final image.

Of course, it really wasn’t that simple. The last step in adding the jumps was to adjust the color. The program makes all jumps in white. I simply changed the color to red in the final map. But that does give me an idea for an enhancement in the program, namely allowing the user to specify the link color.

The next step was to add the sathar specific labels. To do this I created a second names layer that I could add in the labels for the sathar homeworld, the starship construction centers, and the Tetrarch complex. Since the sathar jumps and labels are on separate layers, I can turn them on and off as need to make a player or referee version of the map as needed.

The final step was simply clean up. I went through the entire map and moved star labels and jump route distance labels in order to have the map as clean and clear as possible and fix and small issues the program has in drawing the labels. This is where I discovered the errors in the original version of the Player’s map and fixed them. And since the sathar names and jumps were on separate levels in the image, it was easy to re-export that map.

And that was it. The map is now done. (Unless I find some more typos as I start using it.) Here it is in all it’s glory.

The sathar jump routes don’t quite show up at the resolution of this preview. Click for the full sized version (~4.5 MB). There is also a very high resolution version (~20 MB) available.

The Code

Again, if you want to play with the code and make your own maps, it is written in Python and you can grab it from my GitHub repository. I’m going to continue to work on this code. This will be to add in the remaining features it’s lacking to make it more user friendly such as command-line options, the jump route colors, and creation of nebula, but those will fall under a different article title going forward. If I get really ambitious, I might even add in a GUI to make it a windowed program instead of a command line one. We’ll see. I’m curious how much interest there would be in that project.

Final Thoughts

This has been a fun project. I’ve really enjoyed doing it. As you can probably tell by the number of posts I’ve made. And I love the look of the final map. If you see any errors, feel free to let me know and I can update the map to correct them.

I think if I was doing this again, I would make the map dimensions a little different. This map was original made by taping together six sheets of graph paper (landscape orientation). while that ended up with a nearly square work area, it wasn’t quite. The map is 90 ly wide by 100 ly tall. If I were to do it again, I’d make it either perfectly square, or conform to a more standard aspect ratio.

I’m also curious if anyone would be interested in a printed, poster sized version of the map. 24×27 inches. This is actually what prompted my thoughts on the dimensions. As a purely digital product, the aspect ratio doesn’t matter. But when you try to print it, you start to run into problems. I’ve been looking at possible printing options, and while most of them want you to use a standard aspect ratio (16×24, 24×36, 12×18, or square), I have found a few that would let me print it to exact size. Final costs would be in the $15-$25 dollar range for the 24×27 inch one. If that is something that would interest you, let me know in the comments. I might do this as a small Kickstarter for those that are interested.

And that wraps up the the Extended Frontier Map project. Let me know your thoughts, ideas, and any remaining questions you have about the project and let me know if you’d like to see more things like this in the future.

July 16, 2019 Tom 5 Comments

Maps from the Past

This post is going up a day late. Partially because I didn’t finish what I had wanted to post yesterday in time, and partially because time got away from me working on issue 24 of the Frontier Explorer (which is almost done). So I didn’t have a post ready yesterday

My original plan was to post my sketches of the Pursale ship entombed in the center of the Outpost Osiris asteroid. But in looking at those I realized a couple of things:

  1. I had used the wrong scale grid when building the original sketches. Interestingly enough when I applied the correct grid to the maps, all the corridors I had free-handed in that were off the original, wrong grid, matched up almost perfectly with the correct grid. I guess subconsciously I knew there was something wrong.
  2. I forgot a few fairly important parts of the ship, for example airlocks.

That means I need to rework the sketches before they are ready to present. That’s this week’s project.

In the mean time, I rooted around in my old folders and found some old location maps that I drew way back in the late 80’s as a teenager when I was actively playing Star Frontiers in high school. I’d probably draw them differently now, but they definitely hold a bit of nostalgia.

I’m presenting them in this post as-is. These are simply scans of the original hand-drawn maps that were created on 8.5×11 quad-ruled graph paper. (I even think I still have some of the original pads as I bought a big box of them back in the day.) I’ll be providing a little bit of commentary but not much. I actually have write-ups for some of them but I’ll hold that for a later post when I have a chance to review them and update them to remove any glaring errors I made as a teenager when I first concocted them. For all of the images, you can click on them to get the full 200dpi resolution version (each one is about 5 MB in size).

Conference Center

This one is a portion of a large area map. It is inside a clear, domed area which I think was supposed to be on an asteroid or moon but given the layout, needs some significant gravity. This location is the basis of a murder mystery adventure. I’ll definitely be updating and writing this one up at some point in the future.

Pirate Base

This location consists of three maps, and as far as I can tell, I don’t have any sort of write-up for this one. Although it is supposed to be in an asteroid. Probably inspired by the idea of the Planaron pirate base from Warrior of White Light. Do with it as you will.

Upper Level

This is the main level with the main entrance via the airlock in the lower left. I think this one has some serious scale issues. According to the scale at the bottom, one square is 10 meters. Which makes those passages large enough to drive trucks down. It probably should be 2m per square.

Lower Level

This is the officer level with private facilities, also two different escape routes, one via the airlock in the upper left to a tunnel through the asteroid and the secret exit in the upper right

Secret Escape Bay

The pirate officers have an assault scout stashed away in a hidden bunker. That ship is 21.5 squares long which gives more credence to the 1 square is 2m scale hypothesis. I vaguely remember painstakingly drawing that assault scout based on the image on the little Knight Hawks chit.

Sathar Training Base

Our last location is a set of two maps detailing a sathar training base. I’m pretty sure this one was inspired by the sathar training base in the Sundown on Starmist module. I have a write-up for this one as well that I will post in the future once I’ve had a chance to review it.

Surface Level

This is nestled in a forested area and has a number of features that stick up through the trees. I was also inspired to draw a profile view (lower right) that is looking from the bottom of the map towards the top.

Lower Level

This is the actual base and built completely underground. The defense turret is automated and has a magazine that feeds the rocket launcher and recoilless rifles mounted on the defense dome.

Other Locations

I have several other maps of other locations I developed back in the day, and even more recently. There are only one or two of the older ones that I would consider useful. Most of them were way too far fetched and fantastical for any game I’d run today but I guess made sense to my teen-aged self.

I hope you enjoyed this little walk down memory lane with me. Let me know what you think of these maps and which if any you’d like to see detailed out first. Feel free to use these maps in your own games if you want.

In the mean time, I need to get back to working on the alien ship for the Ghost Ship Osiris module. See you next week.

April 10, 2019 Tom Leave a comment

Sathar Cave System

I believe this is the last major piece of the of the Death at Rosegard adventure that I haven’t yet published so let’s get to it.

An old, abandoned mine

In my setting, the Streele Mining corporation is the forerunner of the Streel Corporation. Hilo Headrow did a lot for survivors and refugees, during and after the occupation, and quickly rose to take control of the company. As corporate interests widened from just mining, the company was renamed.

Located some 30-40 km northeast of Rosegard is an abandoned Streele Mining corporation mine. It has been abandoned since before the Great Sathar War. Sometime after the war, an enclave of sathar survivors found the mine and have set up shop. They mainly are lying very low but send out scouts into the surrounding area and are the ones that were controlling the operative at the Streel mine near Rosegard. In addition, they were in contact with Trey Mulden to do the cybernuk breeding.

Let’s start with a map

This map was drawn by hand on my old Samsung Galaxy Note Pro 12.2 tablet. I added the shading and the letters (but not the numbers) in Gimp for this post.

In addition to the labeled locations which are described below, there is a mostly destroyed and overgrown mining complex just outside the entrance. Bits and pieces of walls and foundations still exist but there really isn’t much there.

Area Descriptions

  1. Aircar landing pad – while mainly filled with debris and rusted out vehicles from over 50 years ago when this mine was shut down, there is space for an aircar to land. The sathar have an old model aircar that may or may not currently be at the base. It was used by the sathar that was contacting the agent at Rosegard. If the PC’s captured or defeated that sathar, the aircar is not present.
  2. Pool – This is a clear water pool that the sathar sometimes use for swimming but is primarily a source of drinking water.
  3. Work area
    1. Food Production (a) – This building contains a series of terrarium-like containers that have a variety of small bugs and other creatures growing in them. Additionally there are some hydroponic vats growing plants. None of these seem to be native to Pale.  There is a single sathar working here.  The sathar does not have a weapon but does have a communicator.
    2. Tech lab (b) – This building contains what appears to be a technician or robotics lab although alien in nature. What appears to be a half assembled robot sits on one worktable and other tables contain various gadgets in various states of construction. One of the items looks like a nearly complete Cybernuk headset. There are 3 sathar technicians here.  Two of them are armed (laser pistol with 2 power clips) while the other has a communicator.
    3. Food Storage (c) – This is a climate controlled building with a freezer section.  It contains a large numbers the creatures and plants from the food production building but preserved for storage. There is several months’ worth of food here.
    4. Supply storage (d)- This area contains a wide variety of physical and technical materials ranging from various electronic parts to tubing, to wires, to chemicals. Most of the materials look to be frontier in origin but some are definitely alien in appearance.
    5. Nuk pen (e)- This pen contains three cybernuks with no cybernetic attachments.  It is locked with a level 1 lock simply to keep the nuks inside.  When opened, the nuks will charge out an attack the PCs.  An INT check will alert the PCs that something alive is inside.  Wall and door have 100 structure points.
    6. Nuk Pen (f) – This pen contains a single nuk with the cyber attachment.  It is locked with a level 1 lock to keep the nuk inside.  When opened, the nuk will charge out and attack the PCs.  An INT check will alert the PCs that something alive is inside.  If this cybernuk is released first, the other three will start bashing against the wall and door trying to get out to come to its aid (controlled by cyber implant).
  4. Power plant and water processing – This is a geothermal power generator (type II). Cabling runs from here back to area 3 that has been partially hidden by debris and rubble on the floor.  Additionally there is a large water processing facility here with fillers and processing system. Pipes run from here to areas 5, 6, 7, & 9 from here along the ceiling. There are two Sathar technician here.  One of the sathar is armed (laser pistol with 2 power clips) while the other has a communicator.
  5. Small Slime Pool – This pool houses four sathar.  There are small bins by the pool that hold the personal effects of the sathar that call this pool home.  Each has a backpack with a food jar, a small communicator, and two of them have laser pistols with two power packs each.  There are currently two sathar in the pool.
    1. backpack, communicator, food jar
    2. empty
    3. empty
    4. backpack, food jar, laser pistol with 2 power clips
  6. Large Slime Pool – Similar to area five, this larger pool houses eight sathar.  There are currently four in the pool. The contents of the bins are:
    1. Empty
    2. Backpack, food jar, laser pistol with 2 power clips
    3. Empty
    4. Empty
    5. Backpack, food jar, communicator
    6. Backpack, food jar, laser pistol with 2 power clips
    7. Empty
    8. Backpack, food jar, laser pistol with 2 power clips
  7. Large Slime Pool – Similar to area five, this larger pool houses eight sathar.  There are currently four in the pool.  The contents of the bins are:
    1. Empty
    2. Empty
    3. Backpack, food jar, laser pistol with 2 power clips
    4. Empty
    5. Backpack, food jar, communicator
    6. Empty
    7. Backpack, food jar, communicator
    8. Backpack, food jar, laser pistol with 2 power clips
  8. Robot storage – This storage area holds a dozen completed combat robots.  While the parts are Frontier sourced, the design is definitely alien. Characters have a –10% modifier to attempt any skills on these robots
  9. Leader Slime Pool – This is the personal slime pool of the compound’s leader.  This is a middle caste sathar.  There is a bin here with the leader’s personal belongings which contains a backpack, a laser pistol with 4 power clips, an inertia screen with a power beltpack, two food jars, a communicator, and a small computer.

Initial status of the mine

The mine is not on alert for intrusion.  It was fairly recently set up and does not have a lot of security features installed yet as the sathar began immediate production of the combat robots and food.

One of the residents is the controller for the agent at Rosegard and possibly was captured or killed by the PC’s.  If it wasn’t, add in another sathar to area 5 (small slime pool). Another is out returning from the Trey Mulden’s compound.  The second sathar will arrive back 5d10x10 minutes after the PCs enter the compound.

When the PCs first arrive, there are two sathar returning to area 7 from area 3 after being on duty that the PC will encounter in the passageway between those two areas when they first enter it. The next duty rotation is not scheduled to occur for another 1d5 hours at which point two of the sathar in area 6 will be headed to area 4.

None of the doors, except to the nuk pens, are locked. 

Sathar Reaction to PCs Arrival

Before the sathar are alerted

When the PCs enter one of the buildings with sathar in it, immediately start combat.  Those sathar that are armed will draw their weapon the first round but cannot fire until the second round.  They will begin to attack the PCs as soon as they are able.  Sathar with communicators will attempt to alert the rest of the compound.  It takes them one turn to open their backpack, one turn to grab the communicator, and the third turn to send the message.  The alert message will go out on the sathar’s action during the third turn.  If the PCs eliminate that sathar before then, no alert goes out.  Otherwise, consider the compound to be alerted going forward.

When the PCs enter one of the pool areas containing the lower caste sathar, there is only a 5% chance that one of the sathar is not in the water.  Regardless, the sathar will notice the PCs immediately and react.  The will start exiting the pool at the rate of 1d2 sathar per round (to represent different distances from the edge of the water) starting on round 2.  Once they have left the pool, it will take them one round to reach the bins and grab their backpacks unless the PCs block their way.  On the round after reaching the bins, those sathar that are armed may begin firing; those with communicators will simply grab their communication device and begin to activate it.  They can send an alert out as their action on their next turn (3rd after exiting the water).

Sathar with communicators will engage in melee combat (two attacks per round) with their bare tentacles once the alert has been sent or immediately if the alert has already gone out.

After the sathar are alerted

Once the alert has gone out, any sathar encountered will be ready and attack immediately upon seeing the PCs. 

Any sathar in the slime pools will immediate move toward area 8 where they will begin activating the combat robots at the rate of one every other turn.  They will remain there until all the robots are activated.  At that point they will proceed up through the cavern complex looking for the invaders.  The leader will hang back sending the robots and other sathar to engage the PCs.  If the PCs arrive at area 8 before all the robots are activated, the robots that are active and those sathar that are armed will engage them while the others continue to activate the remaining robots.  As the robots are activated, they will be sent to engage immediately.

The sathar in area 4 will take cover and immediately attack the PCs if they enter the generator and processing facility.  They will get one free round of attacks on the PCs before the PCs can react.

The sathar in the food processing facility will head across the cavern to the tech lab when the alert is sounded (if they are not the one sounding the alarm) and will either engage the PCs from behind if they are in the tech lab or wait with the sathar in the tech lab until the PCs or the main body of sathar arrives.

The sathar in the tech lab will be waiting for the PCs if they arrive before the main body of sathar and robots.  There is a 10% chance that they will have been able to reassemble the laser pistol being modified on the workbench.  The sathar using it will have a 10% penalty to hit as is hasn’t been fully converted.  If the PCs take a long time to get to the tech lab after the alert is sounded, raise the probability to 20%.

Sathar tactics

As the sathar are under-armed, they will try to attack from cover or ambush if at all possible.  If they have robots with them, they will send the robots in the fore to take damage from the PCs’ weapons.  If a sathar is in danger of being captured or thinks they will die, they will attempt to close with one or more of the PCs and trigger the self-destruct in their laser pistol (if they have one).  When the self-destruct goes off, treat it as a fragmentation grenade doing a number of d10 worth of damage equal to the SEU remaining in the clip.  If the clip is empty it will still do 1d10 points of damage.  PCs get a RS check to take half damage and intertia screens and skiensuits halve the damage as well.

Stats

Sathar Leader

STR/STA:  50/50
DEX/RS:  60/50
INT/LOG:  55/55
PER/LDR:  55/70
PS: 3
IM: 5
RW: 30
MW: 30

Skills:  Beam 4, Tech 3, Enviro 2, Unarmed 3, Robotics 2, Melee 1

Equipment:  backpack, a laser pistol with 4 power clips, an inertia screen with a power beltpack, two food jars, a communicator, and a small computer

Regular Sathar

STR/STA:  40/40
DEX/RS:  45/45
INT/LOG:  45/45
PER/LDR:  45/55
PS: 2
IM: 5
RW: 23
MW: 23

Skills:  Beam 2, Robotics or Technician or Environmental 2, Melee 1, Unarmed 1

Equipment: backpack, food jar, laser pistol with 2 power clips or communicator

Combat Robots

Type: Combat
Level: 2
STA: 100
Move: 120 m/turn
Attack: 50
Damage: 2d10 hands or 5d10 laser
Programs: Attack/Defense, Security Lock
Equipment: Laser pistol, power beltpack


March 12, 2019 Tom 3 Comments

Pale Tailless Squirrel

One of the encounters the PCs have while investigating the murder at the mining facility near Rosegard is a run-in with a new Sathar bio-construct, the Sathar Poison Squirrel.  Based on a native Pale species, this bio-construct is new in the Frontier, having only been released in the last year or so.  The PCs will be one of the first to encounter it.  Here is the description and stats for both the native Pale Tailless Squirrel and the Sathar Poison Squirrel.

Pale Tailless Squirrel

The Pale Tailless Squirrel is a small rodent, native to Pale remarkably similar to squirrels of the human homeworld but lacking the signature big bushy tail.  They can be found all over Pale in any temperate, tropical, and even some arctic climates.

Pale Tailless Squirrels range in color from light tans and greys to nearly snow white depending on their environment.  They are generally skittish and shy away from members of the Frontier races although may approach if there is a chance of free food.  If cornered these creatures will fight but their small mouths and jaws, primarily designed for eating vegetation and nuts, do not do much damage (1d5 pts).

Pale Tailless Squirrel
STA: 10
RS: 70
Move: Medium (30m/turn)
Size: small
#Appearing: 1d2
Attack: 50
Damage: 1d5


Sathar Poison Squirrel

This is a sathar bio-construct based on the native Pale Tailless Squirrel.  This is a new creature in the Frontier that has just been released in the last year or so and is starting to invade the ecosystem. It was engineered in sathar biolab somewhere on Pale.  Although first seen near the village of Rosegard, the bio-lab in question is not near that village.

The Sathar version is more gregarious and will be much more likely to approach members of the Frontiers species.  It is more playful than the native version but will inevitably try to bite, typically fingers or toes.  While the bite only does 1d5 points worth of damage like the native creature, unlike the native squirrel, the bite is highly poisonous.  The Sathar Poison Squirrel’s bite contains a S4/T20 poison. A successful STA check results in half damage.  Standard Anti-Tox will treat the poison if properly administered.

Side by side comparison of the Pale Tailless Squirrel and the Sathar Poison Squirrel showing the faint strip down the back of the latter.
Pale Tailless Squirrel (left) compared to a Sathar Poison Squirrel (right). The only immediate difference is the faint pale stripe down the back of the Sathar Poison Squirrel which is not always obvious.

Physically, they are nearly identical to the native species. The most noticeable difference is that the bio-construct has a stripe of fur down its back that is slightly paler than the rest of the fur. The native species does not have this stripe. If examined closely there are other small details that set it apart from the native version such as stronger jaws, sharper teeth, slightly more hook like claws on its toes, and a stronger musculature.

Sathar Poison Squirrel
STA: 20
RS: 70
MV: Medium (30m/turn)
Size: small
#Appearing: 1d2
Attack: 60
Damage: 1d5
Special Attack: poisonous bite, S4/T20, current STA check for half damage.
June 19, 2018 Tom 1 Comment
Become a Patron!

Recent Posts

  • Detailed Frontier Timeline – FY62.069 to FY62.99
  • State of the Frontier – August 2022
  • Battle of Hargut (Gruna Garu) – FY62.098
  • Archived Arcane Game Lore Posts – May 2013 to Dec 2014
  • A Look at Yachts and Privateers
  • Homeworld Bound – A Campaign Concept
  • Second Battle of Fromeltar (Terledrom) – FY62.083
  • Sample Star System Data
  • Detailed Frontier Timeline – FY62.038 to FY62.068
  • State of the Frontier – July 2022

Categories

  • 3D Models
  • Adventures
  • Background
  • Creatures/Races
  • Deck Plans
  • Equipment
  • Game Design
  • General
  • Locations
  • Maps
  • NPCs
  • Optional Rules
  • Patreon-only
  • Project Overviews
  • Reviews
  • Setting Material
  • Starships
  • System Brief
  • Vehicles
  • Writing

Recent Comments

  • Loguar on Detailed Frontier Timeline – FY62.069 to FY62.99
  • Loguar on Detailed Frontier Timeline – FY62.069 to FY62.99
  • Tom on Detailed Frontier Timeline – FY62.069 to FY62.99
  • Rook on Maps and Counters
  • Loguar on Detailed Frontier Timeline – FY62.069 to FY62.99
  • Tom on Detailed Frontier Timeline – FY62.069 to FY62.99
  • Tom on Second Battle of Fromeltar (Terledrom) – FY62.083
  • Loguar on Detailed Frontier Timeline – FY62.069 to FY62.99
  • Loguar on Second Battle of Fromeltar (Terledrom) – FY62.083
  • Aemon Aylward on Sample Star System Data

Archives

  • September 2022 (1)
  • August 2022 (9)
  • July 2022 (3)
  • June 2022 (3)
  • May 2022 (3)
  • June 2021 (1)
  • April 2021 (1)
  • February 2021 (4)
  • January 2021 (6)
  • December 2020 (5)
  • November 2020 (11)
  • October 2020 (4)
  • September 2020 (5)
  • August 2020 (4)
  • July 2020 (6)
  • June 2020 (5)
  • May 2020 (8)
  • April 2020 (5)
  • March 2020 (5)
  • February 2020 (5)
  • January 2020 (5)
  • December 2019 (7)
  • November 2019 (4)
  • October 2019 (6)
  • September 2019 (5)
  • August 2019 (6)
  • July 2019 (7)
  • June 2019 (5)
  • May 2019 (6)
  • April 2019 (7)
  • March 2019 (4)
  • February 2019 (5)
  • January 2019 (7)
  • December 2018 (5)
  • November 2018 (10)
  • October 2018 (4)
  • September 2018 (4)
  • August 2018 (5)
  • July 2018 (4)
  • June 2018 (4)
  • May 2018 (12)
  • December 2015 (1)
  • November 2015 (2)
  • December 2014 (4)
  • November 2014 (3)
  • June 2014 (1)
  • January 2014 (1)
  • July 2013 (1)
  • June 2013 (2)
  • May 2013 (3)

Meta

  • Log in
  • Entries feed
  • Comments feed
  • WordPress.org
Powered by WordPress | theme Layout Builder