The Expanding Frontier

Creating Sci-fi RPG Resources

  • Home
  • Order Eclipse Glasses
  • Order a Map
  • Order Miniatures
  • Supporters
  • About
  • Bio
  • Home
  • Order Eclipse Glasses
  • Order a Map
  • Order Miniatures
  • Supporters
  • About
  • Bio

Tag Archives: Star Frontiers

Sathar Cave System

I believe this is the last major piece of the of the Death at Rosegard adventure that I haven’t yet published so let’s get to it.

An old, abandoned mine

In my setting, the Streele Mining corporation is the forerunner of the Streel Corporation. Hilo Headrow did a lot for survivors and refugees, during and after the occupation, and quickly rose to take control of the company. As corporate interests widened from just mining, the company was renamed.

Located some 30-40 km northeast of Rosegard is an abandoned Streele Mining corporation mine. It has been abandoned since before the Great Sathar War. Sometime after the war, an enclave of sathar survivors found the mine and have set up shop. They mainly are lying very low but send out scouts into the surrounding area and are the ones that were controlling the operative at the Streel mine near Rosegard. In addition, they were in contact with Trey Mulden to do the cybernuk breeding.

Let’s start with a map
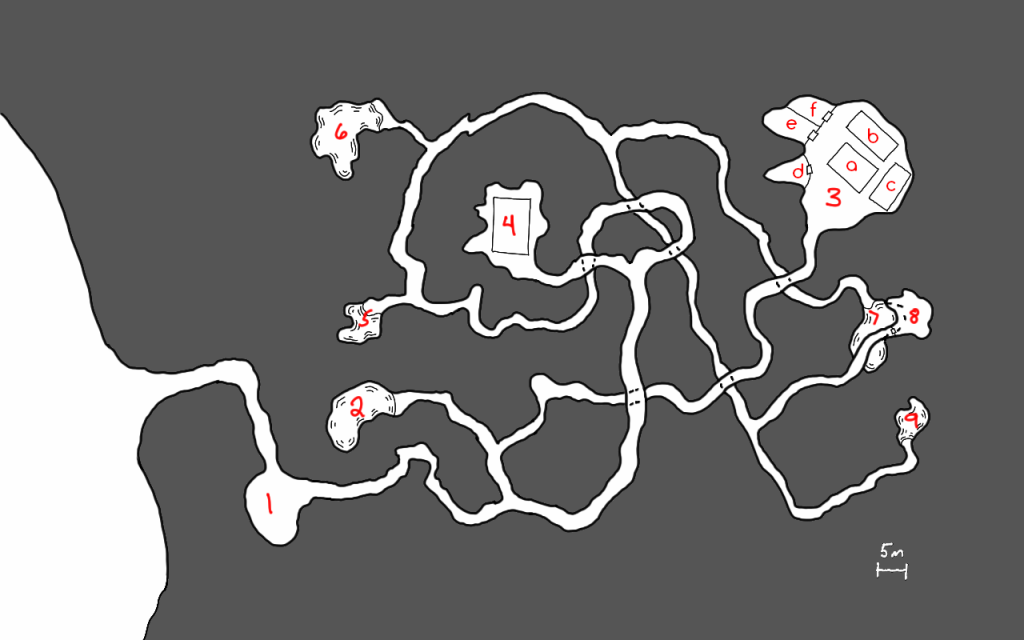
This map was drawn by hand on my old Samsung Galaxy Note Pro 12.2 tablet. I added the shading and the letters (but not the numbers) in Gimp for this post.

In addition to the labeled locations which are described below, there is a mostly destroyed and overgrown mining complex just outside the entrance. Bits and pieces of walls and foundations still exist but there really isn’t much there.

Area Descriptions

  1. Aircar landing pad – while mainly filled with debris and rusted out vehicles from over 50 years ago when this mine was shut down, there is space for an aircar to land. The sathar have an old model aircar that may or may not currently be at the base. It was used by the sathar that was contacting the agent at Rosegard. If the PC’s captured or defeated that sathar, the aircar is not present.
  2. Pool – This is a clear water pool that the sathar sometimes use for swimming but is primarily a source of drinking water.
  3. Work area
    1. Food Production (a) – This building contains a series of terrarium-like containers that have a variety of small bugs and other creatures growing in them. Additionally there are some hydroponic vats growing plants. None of these seem to be native to Pale.  There is a single sathar working here.  The sathar does not have a weapon but does have a communicator.
    2. Tech lab (b) – This building contains what appears to be a technician or robotics lab although alien in nature. What appears to be a half assembled robot sits on one worktable and other tables contain various gadgets in various states of construction. One of the items looks like a nearly complete Cybernuk headset. There are 3 sathar technicians here.  Two of them are armed (laser pistol with 2 power clips) while the other has a communicator.
    3. Food Storage (c) – This is a climate controlled building with a freezer section.  It contains a large numbers the creatures and plants from the food production building but preserved for storage. There is several months’ worth of food here.
    4. Supply storage (d)- This area contains a wide variety of physical and technical materials ranging from various electronic parts to tubing, to wires, to chemicals. Most of the materials look to be frontier in origin but some are definitely alien in appearance.
    5. Nuk pen (e)- This pen contains three cybernuks with no cybernetic attachments.  It is locked with a level 1 lock simply to keep the nuks inside.  When opened, the nuks will charge out an attack the PCs.  An INT check will alert the PCs that something alive is inside.  Wall and door have 100 structure points.
    6. Nuk Pen (f) – This pen contains a single nuk with the cyber attachment.  It is locked with a level 1 lock to keep the nuk inside.  When opened, the nuk will charge out and attack the PCs.  An INT check will alert the PCs that something alive is inside.  If this cybernuk is released first, the other three will start bashing against the wall and door trying to get out to come to its aid (controlled by cyber implant).
  4. Power plant and water processing – This is a geothermal power generator (type II). Cabling runs from here back to area 3 that has been partially hidden by debris and rubble on the floor.  Additionally there is a large water processing facility here with fillers and processing system. Pipes run from here to areas 5, 6, 7, & 9 from here along the ceiling. There are two Sathar technician here.  One of the sathar is armed (laser pistol with 2 power clips) while the other has a communicator.
  5. Small Slime Pool – This pool houses four sathar.  There are small bins by the pool that hold the personal effects of the sathar that call this pool home.  Each has a backpack with a food jar, a small communicator, and two of them have laser pistols with two power packs each.  There are currently two sathar in the pool.
    1. backpack, communicator, food jar
    2. empty
    3. empty
    4. backpack, food jar, laser pistol with 2 power clips
  6. Large Slime Pool – Similar to area five, this larger pool houses eight sathar.  There are currently four in the pool. The contents of the bins are:
    1. Empty
    2. Backpack, food jar, laser pistol with 2 power clips
    3. Empty
    4. Empty
    5. Backpack, food jar, communicator
    6. Backpack, food jar, laser pistol with 2 power clips
    7. Empty
    8. Backpack, food jar, laser pistol with 2 power clips
  7. Large Slime Pool – Similar to area five, this larger pool houses eight sathar.  There are currently four in the pool.  The contents of the bins are:
    1. Empty
    2. Empty
    3. Backpack, food jar, laser pistol with 2 power clips
    4. Empty
    5. Backpack, food jar, communicator
    6. Empty
    7. Backpack, food jar, communicator
    8. Backpack, food jar, laser pistol with 2 power clips
  8. Robot storage – This storage area holds a dozen completed combat robots.  While the parts are Frontier sourced, the design is definitely alien. Characters have a –10% modifier to attempt any skills on these robots
  9. Leader Slime Pool – This is the personal slime pool of the compound’s leader.  This is a middle caste sathar.  There is a bin here with the leader’s personal belongings which contains a backpack, a laser pistol with 4 power clips, an inertia screen with a power beltpack, two food jars, a communicator, and a small computer.

Initial status of the mine

The mine is not on alert for intrusion.  It was fairly recently set up and does not have a lot of security features installed yet as the sathar began immediate production of the combat robots and food.

One of the residents is the controller for the agent at Rosegard and possibly was captured or killed by the PC’s.  If it wasn’t, add in another sathar to area 5 (small slime pool). Another is out returning from the Trey Mulden’s compound.  The second sathar will arrive back 5d10x10 minutes after the PCs enter the compound.

When the PCs first arrive, there are two sathar returning to area 7 from area 3 after being on duty that the PC will encounter in the passageway between those two areas when they first enter it. The next duty rotation is not scheduled to occur for another 1d5 hours at which point two of the sathar in area 6 will be headed to area 4.

None of the doors, except to the nuk pens, are locked. 

Sathar Reaction to PCs Arrival

Before the sathar are alerted

When the PCs enter one of the buildings with sathar in it, immediately start combat.  Those sathar that are armed will draw their weapon the first round but cannot fire until the second round.  They will begin to attack the PCs as soon as they are able.  Sathar with communicators will attempt to alert the rest of the compound.  It takes them one turn to open their backpack, one turn to grab the communicator, and the third turn to send the message.  The alert message will go out on the sathar’s action during the third turn.  If the PCs eliminate that sathar before then, no alert goes out.  Otherwise, consider the compound to be alerted going forward.

When the PCs enter one of the pool areas containing the lower caste sathar, there is only a 5% chance that one of the sathar is not in the water.  Regardless, the sathar will notice the PCs immediately and react.  The will start exiting the pool at the rate of 1d2 sathar per round (to represent different distances from the edge of the water) starting on round 2.  Once they have left the pool, it will take them one round to reach the bins and grab their backpacks unless the PCs block their way.  On the round after reaching the bins, those sathar that are armed may begin firing; those with communicators will simply grab their communication device and begin to activate it.  They can send an alert out as their action on their next turn (3rd after exiting the water).

Sathar with communicators will engage in melee combat (two attacks per round) with their bare tentacles once the alert has been sent or immediately if the alert has already gone out.

After the sathar are alerted

Once the alert has gone out, any sathar encountered will be ready and attack immediately upon seeing the PCs. 

Any sathar in the slime pools will immediate move toward area 8 where they will begin activating the combat robots at the rate of one every other turn.  They will remain there until all the robots are activated.  At that point they will proceed up through the cavern complex looking for the invaders.  The leader will hang back sending the robots and other sathar to engage the PCs.  If the PCs arrive at area 8 before all the robots are activated, the robots that are active and those sathar that are armed will engage them while the others continue to activate the remaining robots.  As the robots are activated, they will be sent to engage immediately.

The sathar in area 4 will take cover and immediately attack the PCs if they enter the generator and processing facility.  They will get one free round of attacks on the PCs before the PCs can react.

The sathar in the food processing facility will head across the cavern to the tech lab when the alert is sounded (if they are not the one sounding the alarm) and will either engage the PCs from behind if they are in the tech lab or wait with the sathar in the tech lab until the PCs or the main body of sathar arrives.

The sathar in the tech lab will be waiting for the PCs if they arrive before the main body of sathar and robots.  There is a 10% chance that they will have been able to reassemble the laser pistol being modified on the workbench.  The sathar using it will have a 10% penalty to hit as is hasn’t been fully converted.  If the PCs take a long time to get to the tech lab after the alert is sounded, raise the probability to 20%.

Sathar tactics

As the sathar are under-armed, they will try to attack from cover or ambush if at all possible.  If they have robots with them, they will send the robots in the fore to take damage from the PCs’ weapons.  If a sathar is in danger of being captured or thinks they will die, they will attempt to close with one or more of the PCs and trigger the self-destruct in their laser pistol (if they have one).  When the self-destruct goes off, treat it as a fragmentation grenade doing a number of d10 worth of damage equal to the SEU remaining in the clip.  If the clip is empty it will still do 1d10 points of damage.  PCs get a RS check to take half damage and intertia screens and skiensuits halve the damage as well.

Stats

Sathar Leader

STR/STA:  50/50
DEX/RS:  60/50
INT/LOG:  55/55
PER/LDR:  55/70
PS: 3
IM: 5
RW: 30
MW: 30

Skills:  Beam 4, Tech 3, Enviro 2, Unarmed 3, Robotics 2, Melee 1

Equipment:  backpack, a laser pistol with 4 power clips, an inertia screen with a power beltpack, two food jars, a communicator, and a small computer

Regular Sathar

STR/STA:  40/40
DEX/RS:  45/45
INT/LOG:  45/45
PER/LDR:  45/55
PS: 2
IM: 5
RW: 23
MW: 23

Skills:  Beam 2, Robotics or Technician or Environmental 2, Melee 1, Unarmed 1

Equipment: backpack, food jar, laser pistol with 2 power clips or communicator

Combat Robots

Type: Combat
Level: 2
STA: 100
Move: 120 m/turn
Attack: 50
Damage: 2d10 hands or 5d10 laser
Programs: Attack/Defense, Security Lock
Equipment: Laser pistol, power beltpack


March 12, 2019 Tom 3 Comments

Detailed Frontier Timeline – FY60.026 to FY60.053

Here is the next installment in the detailed Frontier timeline. This month’s entries include the posts that prompted the “How to build a star system” posts earlier in the month. The sathar are beginning to ramp up their forces while the Frontier is still debating what to do about the “Sathar Situation” on Volturnus.

Date (FY)Event
60.026 Envoy delegation from the Council of Worlds is dispatched from Gran Quivera (Prenglar) to go to Volturnus (Zebulon) to meet with the races of that world.
60.027 The KSS Trader’s Gambit arrives at Kawdl-Kit (K’tsa-Kar).
60.028 Maximillian Malligigg has a piece of fused metal he found on Starmist analyzed and learns it is the result of nuclear fusion.  He begins securing funds to purchase a ship and return to Starmist in advance of an official expedition. (SF3)
60.029 Members of the Second Volturnus Expedition raid a small outpost discovered in the logs of Slave City One that was a hideout for the Star Devil.  While the Star Devil was not there, valuable information about the Star Devil’s dealings in the Frontier are uncovered.
60.030 Worried about the events in the Zebulon system, the Rim Coalition increases spending for the Flight by 50%.  Delegation dispatched to the Council of Worlds from Faire (Capella) to encourage that the Frontier take the Sathar threat seriously.
60.031 – The remnants of the sathar’s Zebulon fleet reaches sathar space arriving at the system containing sathar starship construction center #5

– Another destroyer is completed at the sathar starship construction center in the Liberty system.
60.032 Contestants, spectators, and reporters gather on Hum (Fochrik) for the annual Humma Jump Competition.  Speculation is high that the current record in the standing long jump event of 38.272 meters will be surpassed this year.
60.033 Universal Households unveils its new fashion line at its annual show on Hakosoar (Scree Fron) which is transmitted via subspace radio to all systems in the Frontier.  Products immediately go on sale across the Frontier as competitors race to match the new style.
60.034 After two days of competition, Zonuul Usu of Larg (Fochrik) wins the Humma Jump Competition with a jump of 38.275m, beating the previous species record by 3 millimeters.  Two others beat the previous record in the final round of competition but lost to Zonuul.
60.035 SF Nova arrives in Fromeltar system; it will be in system for 4 days
60.036 Initial examinations reveal that the Eorna egg cache does in fact contain viable eggs. While overjoyed that they no longer face extinction as a species, concerns about the societal impact of introducing the new Eorna are raised. (SF2)
60.037 Synthetics Corporation announces a new brand of sports drink that provides the necessary electrolytes for all Frontier and Rim races.  Included in the line is a “Hyper Humma” variation with 10x the flavor enhancers to appeal to their deadened sense of taste. It quickly becomes a point of bravado for members of the other race to attempt to consume the “Hyper Humma” variations.
60.038 Interplanetary Industries CEO Harlon Thow spotted wearing a never before seen style of toxy-rad gauge that is slimmer and more compact than previous styles.  Rumors circulate that it is a new device soon to be released by the company.
60.039 In its first 60 days of operation, the Yazira Dome has had over 1 million visitors, mostly inhabitants of Hentz (Araks). Many across the Frontier denounce the Family of One for not allowing non-yazirian visitors to the planet and the Dome.
60.040 Sathar vessels are dispatched from the Liberty system toward a staging area somewhere near the Frontier.
60.041 Sathar Clan Z vessels, previously in route to sathar starship construction center #3 are diverted by clan leaders toward Kizk-Kar.
60.042 Sathar forces, operating in Saurian(DM103) space, launch simultaneous assaults against saurian forces in the Tischen (FE004) and Dayzer (FE004) systems.
60.043 Several Streel compounds on Laco (Dixon’s Star) are captured by Galactic Task Force teams and Streel employees are forced to evacuate and return to the Streel headquarter compound in Tyrell’s Landing.
60.044 SF Nova departs Fromeltar for Kizk-Kar
60.045 The Rim delegation arrives on Pale (Truane’s Star) for a short stopover to meet with the Pale government about the sathar situation.
60.046 Another destroyer is completed in the SCC in the Liberty system.
60.047 Pale militia delegation testifies before the Council of Worlds on Gran Quivera (Prenglar) as to the events of the Battles of Zebulon and Volturnus.  Debate and deliberation on the need for increased military buildup continues.
60.048 Rim Coalition delegation departs Pale (Truane’s Star) to continue on to Gran Quivera (Prenglar) to meet with The Council of Worlds
60.049 Based on information obtained from the Star Devil lair on Volturnus (Zebulon), the Pale government raids and seizes assets from several business connected with the Star Devil pirate organization.
60.050 SF Nova arrives in Kizk-Kar.  Will be in-system for 8 days
60.051 Several PGC vessels, just arriving in the Dixon’s Star system en route to Laco are destroyed by unknown vessels.
60.052 PGC representatives appear before the Council of Worlds requesting Spacefleet aid to protect their vessels in the Dixon’s Star system from suspected Streel aggression.
60.053 Proving the rumors correct, Interplanetary Industries announces a new line of wearable monitoring devices including a new toxy-rad gauge matching the one spotted on CEO Harlon Thow several days earlier.  The new line boasts extended battery life and greater accuracy in a smaller package.

Here’s the full timeline download file:

DetailedFrontierTimelineDownload
March 4, 2019 Tom Leave a comment

How to Draw a System Map

Okay, in my last post on this topic, we generated all of the data needed to draw out a system map for the Fochrik star system. If you haven’t read the previous entry, you might want to but it’s not necessary. The next step is to take that data and turn it into the actual image. This post will cover that process. Let’s dive right in.

The Data

First a quick summary of the data for the system that we generated last time. While we won’t need all of this for the map, but it’s good to have it all summarized in one place. For generating the system map, we’re only going to need the orbital distance and the planet’s radius.

NameOrbital
Distance (AU)
Orbital
Period (hrs)
Gravity (g)Mass (Earth)Radius (km)
T10.19687.460.330.03492,064.55
T20.523,112.570.670.33734,468.50
Forge1.139,316.450.810.60125,443.75
Hum1.2311,323.30.910.81395,991.92
Larg1.6116,957.21.121.46227,215.22
J14.6683,501.43.30525.8279,714.14
J210.59286,0611.55140.1460,108.51
ID116.58560,3910.140.01892,297.74
IG118.53662,1060.9719.90228,62316
ID220.53772,1440.060.00181,054.47
IG126.011,101,0961.0218.47226,919.75

When drawing the map, we want the distances to be all on the same scale. However, we cannot use a simple linear scale in most cases as that would put all the inner planets right on top of each other if we want to see the outer planets on the same image. You can see this in the following diagram that has a linear distance scale.

Fochrik system planetary distances on a linear scale. Click for larger image.

As you can see, those inner planets are bunched up pretty close together while the outer planets have huge gaps. We want to spread out the inner planets while compressing the outer ones but still have the relative scale be correct. To do that we need to shift from a linear scale to a logarithmic one.

To get on a log scale, we are just going to take the base 10 logarithm (the ‘log’ key on your calculator) of each of the orbital distances and use that value to draw the distances. First I’ll present the numbers and then another simple drawing.

NameOrbital Distance (AU)Orbital Distance (log(AU))Scaled Distance
T1 0.19-0.721214
T2 0.52 -0.2840233
Forge 1.13 0.0531401
Hum 1.23 0.0899420
Larg 1.61 0.2087479
J1 4.66 0.6684709
J2 10.59 1.0249887
ID116.581.2196985
IG118.531.26791009
ID220.531.31241031
IG226.011.41511083

We can’t quite use the log(AU) values as the smaller numbers generate negative values (I’m not going to do a math lecture here. If you’re interested in why, you can check out this Wikipedia article). So we need to scale those numbers somehow. The scaled distance value in the table above was calculated by taking the log(AU) distances, adding 0.75 and then multiplying by 500. We’ll use these values to create the plot.

As you can see, the range of values is greatly compressed which allows things to be a bit more evenly spaced. The only issue with this scale is that zero (i.e. the position of the star) has a value of negative infinity so we’ll have to pick some arbitrary distance to separate them. However, since we’re just trying to show the relative position of the planets, that’s not too big of a problem. Here’s the simple plot we get:

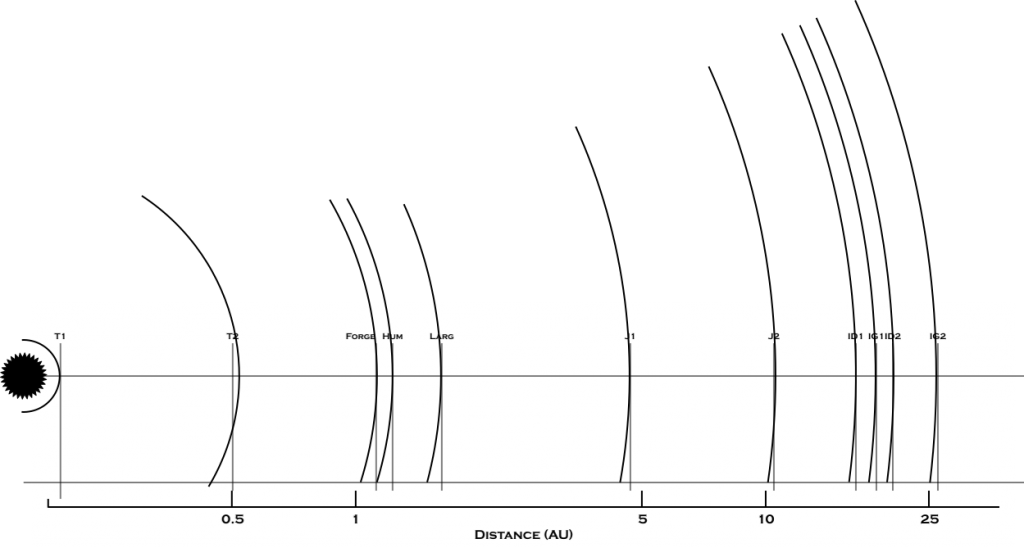
Orbital distances on a log scale. Click for larger image.

This scale compresses the outer planets a bit but helps us spread out the inner planets which are the ones we’re more interested in anyway.

Drawing the Map

With the numbers above, we have all the information we need to create the map. The last thing to decide is if we are going do make a horizontal map (oriented like the diagrams above or the map in the Clarion Calendar post) or a vertical one (like in the Duergan’s Star post). For this map, I’m going to make a horizontal map simply because all of the “along the way” image will fit better into the post than a vertical one will. However, the process applies just as well to a vertical map, you just have to rotate everything 90 degrees.

I’ll be building the map in Inkscape, my vector drawing program of choice and it will be a simple black and white drawing so it shouldn’t be too complicated.

Here’s a video I made of the map building process if you want to watch it in real time, It’s about 53 and a half minutes long and completely unedited so you can see all my mistakes and fumbling around. If you don’t want to watch the video, I’ve described all the steps below.

Laying the ground work

To start, we want to set up the basic image and some guides for us to work with. I’ve decided to make the image 1200×400 pixels in size so I create a blank document of that size to work with. I also turn on a rectangular grid to help with position items. This grid will get turned on and off as needed during the drawing process.

I’m going to use the logarithmic distance scale for my planet spacing so I then import that image into my document and position it accordingly.

Finally, I draw a guide line down the middle of the image so I know where the center line is. After this initial setup, the image looks like:

I’ve shifted the imported image just slightly so that it’s 10 pixels to the right of where it was in the original. I wanted a little more space between the star and the first planet. Since I’ll be measuring the scaled distances from the left edge of the image, this means I’ll have to add 30 pixels to the values in the table above for the final radii of the orbits.

All of the above was done on the initial default layer. I then create three more layers: one for the orbits, one for the objects (star and planets), and a third for the labels. I like to work in lots of layers as it makes it easy to turn bits and pieces on and off and add in effects if needed.

The star and the orbits

The next step is to draw in the star itself and then start adding arcs for the orbits. The symbol for Fochrik is created using the star and polygon tool in the star setting with corners set to 30 and spoke ratio set to 0.8. This is drawn on the object layer.

Next I hide the objects layer and move to the orbits layer. Here I use the circle tool to draw in the first orbit. Clicking on the point where the center guide meets the edge of the image I then drag out the circle holding down the shift and the control keys until it reaches out to the position of the guide line for the planet T1.

Holding the control key down makes the circle drawn have integer ratios between the x and y directions allowing you get a proportional circle. Holding down the shift key makes your initial click point the center of the circle instead of the upper left corner of the box enclosing the circle. Once I have the circle drawn to approximately the correct size, I use the spinner boxes for Rx and Ry (the x and y radii) to set the exact radii (44 px in this case). The fill of the circle is set to transparent, the stoke is set to black with a thickness of 2 pixels.

Inkscape allows you to draw off the edge of the image so we drew a whole circle for this first orbit. Since we will be copying and scaling this up, we don’t want our circles going way off to the left. We can turn the full circle into an arc by grabbing the small circular mark on the drawn circle (it’s at the 3 o’clock position) and moving it clockwise to break the circle. I move it down to just past the 6 o’clock position. Then I go back and grab the other small circle node at 3 o’clock and move it up to just before the 12 o’clock position. This gives us a half circle which is all we need.

Now it’s just a matter of duplicating that arc and setting the correct radii for each one. As we move out we’ll want to adjust the size of the arc so it’s not sticking up well above or below the edge of the image just to make things a little cleaner on our drawing canvas.

We can duplicate a selected object by pressing Control-D. Then we just go up and set the Rx and Ry values based on the scaled distance values in the table above (remembering to add 30 to each one). You have to remember to have the circle tool selected while you do this or you can’t set the radii.

Once that is done, we have an image that looks something like this:

Notice how the arcs are going high. They will be cut off when we export the final image. They were originally also going low as well but they have been adjusted (at a later step) and I didn’t export an image while I was drawing them.

You might also notice that the arc for the planet T2 is not lined up with it’s guide line. That is because as I was drawing it, I noticed a discrepancy between where the guide line was and where the arc was drawn based on the scaled distance values. I originally though there was an error in the scaled distance but it turns out I just drew my guide sketch wrong. It’s always good to double check your work.

Drawing the planets

We’ve got our orbits, now we need to draw the planets. This will be done on the planet layer so we switch to that layer now.

Like the orbits, we want the planets to all be on the same scale. This obviously can’t be the same scale as the orbits or we wouldn’t be able to see them since they’d just be dots on the page. To pick the initial scale, I just let the radius of the circle we’re going to draw be equal to the radius of of the planet (in km) listed in the table divided by 2000. I computed each of these values and wrote them down on a piece of scratch paper to have them handy.

Depending on how you have Inkscape set up, when you draw in the first circle, you’ll notice that you just get an arc instead of a full circle. That was my case as I have Inkscape set to remember the last setting for the tool and use that instead of resetting to the default. I find that more useful. But we need to reset the tool to draw circles. This is done by finding the Start and End boxes (up by the Rx and Ry boxes) and setting them to 0 and 360 respectively. Now we’re drawing circles again. Also you’ll want to set the fill to white instead of transparent.

I then just move to an arbitrary point on each planet’s orbit, draw a small circle and then set Rx and Ry to be the values determined for that planet. It doesn’t matter exactly where you draw them as we’ll go back and properly position them once they are all drawn.

When you start doing this, you’ll quickly notice that the scale we’ve picked is simply too small for the small terrestrial planets. In the case of a few of them, you can’t even see the disk as it is smaller than thickness of the line we drew for the orbit. To solve this we simply double the radii of these planets. However, that would make the giant and Jovian planets too big if we doubled them as well. So we’re just going to have to have different scales. The terrestrial and ice dwarf planets will be to scale with each other as will the giant and Jovian planets but the smaller planets will be twice as big as they would be if they were to scale with the larger planets.

The last step of drawing the planets is to place them at an appropriate position on their orbit circle. There are two requirements here. One is that the disk of the planet should be centered on the orbit line. The other is that for planets with close orbits, they are spread out across the image so that when we add labels there won’t be any overlap. To make this easier you should turn off the grid that we set up at the beginning so the software isn’t trying to snap your circles to positions you don’t want.

Once that is done, we have an image that looks something like this:

You’ll notice that even doubling the scale, some of those planets are pretty tiny. In fact, you might not even be able to see ice dwarf 2 unless you click on the image above to get the full sized one. But that’s okay.

Adding labels

The next step is to label everything. There are a few things we want to put in our labels. The most obvious is the name of the planet. I still haven’t come up with official names for the planets but that doesn’t matter for the purposes of demonstrating the mapping technique. The other thing we need to do is add the scale for the system map. Finally we’ll add a label for the system. I’ll be using the Copperplate Gothic Bold font for my lettering.

Let’s start with the scale. If you watched the video, you’ll know that I actually did this way back at the beginning of the process. Since it was already there in the imported image, all I had to do was trace it. Once it was drawn in and had the numbers, I put the “Distance (AU)” label on and then moved everything down as close to the bottom of the image as I wanted it.

The labels on the the scale are drawn with a height of 16px for the numbers and 20px for the label. What you choose is arbitrary and it should be picked to match the size of the drawing. You don’t want it too small but you don’t want it too large either.

However, at this point, I didn’t like the orbit lines crossing over the scale and I went back and adjusted them so that they stopped just before touching it. If you look closely in the previous image, you’ll see another guide line that sits just above the scale that all the orbit lines touch. I drew this line in and then, using the circle tool, adjusted the end of the arc of each orbit line to just touch that line, which is why they don’t extend below the image.

Turning off the layer with the guides and the scale image gives us the following at this point. I’ve also now only exported the actual drawing so everything is trimmed appropriately.

Next we label the planets. For each planet I’m going to put the name in using a 20px high font and then centered under the name, put its orbital distance in a 10px high font. Again still using Copperplate Gothic Bold. I had originally intended to just type both and then change the font size of the distance but found that I couldn’t adjust the vertical spacing like I wanted to. So instead I created two text objects, one for each line, used the alignment tools to get them lined up, and then grouped the label for each planet into a single object so I can move it around easier later.

It doesn’t really matter exactly where you put the labels to begin with as you’ll be moving them around once they are done and you have their exact sizes. Just go through and add them for each planet. Then, once they are in the drawing, move and position them so that you like the placement. This may also involve moving the position of the planet’s disk on the orbit line to get a spacing you want.

Typically for the smaller planets, I like to place label so the center of name is aligned with the center of the disk. For the large planets, I tend to set it to the lower left or right corner depending on the exact positioning. I just do this by eye. You want to avoid having the text run over the orbit lines as much as you can but in some cases it’s unavoidable. Just place the names where it looks good to you. On a vertical map, I’ll often try to center the name of the planet under the planet’s disk.

Now we have to deal with the text that is overlapping the orbit lines. This often makes the text hard to read so we need to mask out the orbit lines under the text. Your text layer should be positioned above the orbit layer. If it isn’t you’ll need to move it up in the layer stack. What we’ll do is draw some white rectangles to hide the orbit line below the text. I like to set their opacity to about 75-80% so the orbit lines slightly peek through but you can make them fully opaque if you prefer. Drawing the rectangles can either be done on a new mask layer that is placed directly under the labels layer or in the labels layer itself.

In this image I drew the rectangles directly into the labels layer. Using the rectangle tool I just drew in a small rectangle over the orbit lines in each location there was overlap between the text and the lines. You’ll want to make the rectangle extend just a bit below and above the text. Exactly how much depends on how much space you want between the lines and the text and is a matter of taste. As you draw the rectangles, they are placed above the text so you need to send them to the bottom of the z-order for the layer so they are behind the text instead.

If you draw on a new mask layer, then you don’t have to worry about moving the z-order of the boxes as they will all be between the orbit lines and the text. You also don’t have to worry about the opacity on the individual boxes but can adjust the opacity of the entire layer all at once. This is typically how I do the masks but for some reason didn’t on this particular drawing. Probably due to the fact that I was recording and it slipped my mind.

We are almost done. At this point our image looks like this:

Finishing touches

The only thing left to add is the label for the system, a border, and a white background.

We’ll put the label in the upper left. We want this to be large so we’ll use a 32px high font. We’ll also need to add a mask as it will be overlapping the orbit lines. I considered simply adjusting the orbit lines to end below the label but decided to leave them in and mask them off.

The border and background I did with a single object. You may not have noticed, but all of the images so far have had a transparent background with just the objects drawn on it. This can cause some issues depending on how the image is rendered so we want to add a solid white background.

To do this I make a new background layer that sits at the very bottom of the layer stack. On this layer I draw a single large rectangle that stretches corner to corner across the entire image. I set the fill to white and the stroke to black with a 6px thickness. Due to the way Inkscape draws the stroke, half of that will be off the final image giving a 3px border. If you want it thicker or thinner, simply adjust the stroke width.

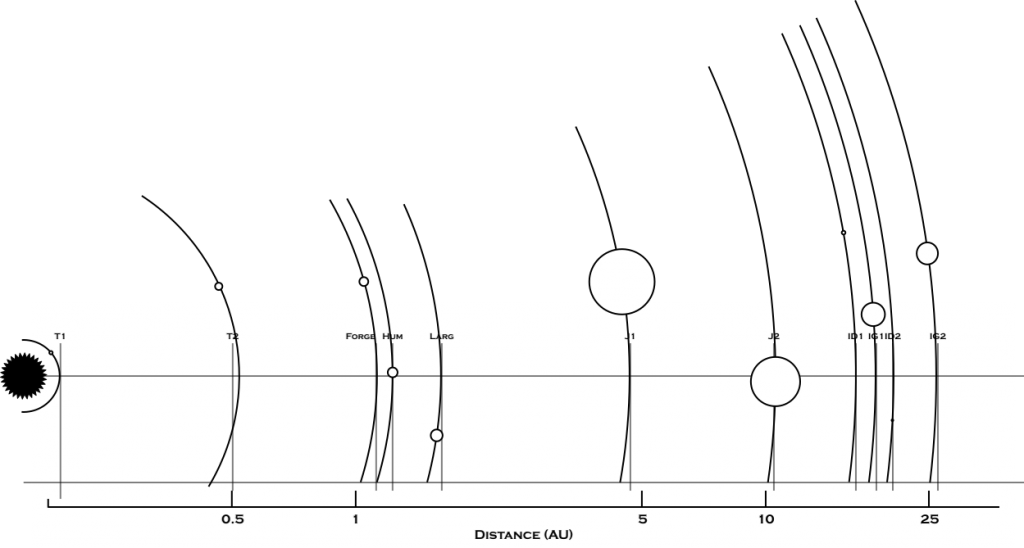
And now we’re done. Here’s the final image:

The final system map. Click for larger version

If you’d like to look at or play with the original SVG file of this map, they you can grab it here:

FochrikSystemMapDownload

Other touch-ups

Giving the planets some character

For this demo, I didn’t do anything special with the planets themselves. If you wanted to, you could add in cloud bands or rings on the giant planets to give them a little bit of character. Especially if they have features called out in their descriptions. I didn’t have any special descriptors so I left them as simple circles but that could be added in later.

The FTL Horizon

If I was doing this map for FrontierSpace, the other thing I would add in is a dashed arc at the position of the FTL Horizon, which in that game is the distance you need to be from the star in order to engage your Nova Drive to travel between the star systems. That would be an important bit of information for the map to include.

Asteroid belts

I also didn’t add in an asteroid belt in this system. If I did then I would determine the distances for the inner and outer boundaries of the belt and draw orbit circles on the guide layer at those distances. Then on the object layer I’d go in by hand and draw in all the asteroids. I work on a 2-in-1 laptop that has a stylus so I can actually flip my laptop into tablet mode and draw the asteroids with my stylus right on the screen. I find this much easier and faster than trying to do it with the mouse but it can be done that way (and I’ve done it that way in the past). There’s a bit more to it than that so I might do a mini article on drawing in asteroid belts.

Final thoughts

And that’s everything. I think the map turned out pretty well. I was actually surprised it only took a little less than an hour to draw it out once I had all the data. All told I probably spent about 2-2.5 hours creating the data and making the drawing. It would have taken a bit longer if I had had an asteroid belt to include or added details to the planets but that gives you an idea of the effort involved. It actually took me longer to do these two blog posts (5-6 hours total) than it took to actually do the work.

I still have one more post on the calendar system to do and that will come in March. I’d like to hear your comments, questions, or any suggestions you have about the process. What wasn’t clear? What would you like more information on? Did you try this yourself? If you did, share your results. Let me know below.

February 26, 2019 Tom Leave a comment

A New Star Ship Construction System – part 4 – Hull Types, Armor, and Sensor Systems

This is a continuation of the excerpts from the starship construction system. I had originally planned to have the how to draw a star system map post ready for today but I didn’t quite finish it. So I’m posting this one in its place and will have that one up next week.

This article will be about the various type of hulls that you can make you ship out of and the effects they have on the hull points and mass of the ship. In the new system I expand on the basic hull from the original rules to four different types that have different characteristics and costs.

While not related, I’m also including the section on the radar and energy sensors as that is another deviation from the standard system

Hull Type

There are four different hull types. Each type has a mass and cost associated with it depending on the hull type selected. Different hulls provide different amount of hull points for a given ship size.

Hull Type Cost multiplier Mass Multiplier Hull Point Multiplier
Light 35 cr * total volume 0.15 tons * total volume 0.6
Standard 50 cr * total volume 0.25 tons * total volume 1
Armored 100 cr * total volume 0.50 tons * total volume 1.4
Military 200 cr * total volume 0.40 tons * total volume 2

Light Hull – This is a light duty hull.  It costs and weighs less than a standard hull but only provides sixty percent of the hull points of a standard hull.

Standard Hull – This is the standard type of ship hull and provides the standard number of hull points.  This is the typical hull used on most civilian vessels

Armored Hull – This is the highest grade hull available to civilians.  It is twice as massive and twice as expensive as a standard hull and provides a forty percent increase in hull points over a standard hull.

Military Hull – Combining specialized materials and designs, the military grade hull is not available for civilian ships.  It is more expensive than even the armored hull although it doesn’t contain as much mass and provides double the number of hull points of a standard hull.

Example:  Obar Enterprises is designing a new mid-sized freighter that has 100 cargo units of space.  After selecting all the ship’s, the total volume of the ship is 18,453.2 cubic meters.  Selecting a standard hull gives a cost of 18,453.2 x 50 = 922,660 credits and a mass of 18,453.2 x 0.25 = 4613.3 tons.  This hull would have the standard number of hull points.

If the cost or mass were a concern, they could go with a light hull, which would have a cost of only 18,453.2 x 35 = 645,862 cr (saving nearly 300,000 cr) and have a mass of only 18,453.2 x 0.15 = 2767.98 tons saving nearly 2000 tons.  However, this hull would have a hull point multiplier of 0.6 or only 60% of the standard hull points.

Additional Armor

Sometimes even the strongest hull just isn’t enough and you want to add more armor to the ship. Once you have your base hull, you can add additional layers of protection to the ship as desired. This will greatly increase the cost and mass of your ship but won’t affect the volume.

You can add armor on to the ship to increase its hull points by up to 25% in 1% increments.  The cost of additional armor is 8 cr. per cubic meter of volume per percentage increase.  Thus to get a 5% HP increase it would cost you 40 cr. per cubic meter of the ship, nearly doubling the cost of a standard hull.  The armor adds an additional 0.016 tons of mass per cubic meter of volume per percentage increase.  Thus that 5% increase above would also add 0.08 tons per cubic meter of the volume of the ship.

The armor modifier for calculating the ships final hull points is just 1+(armor bonus/100).  So if my armor bonus is 20% the modifier is 1+(20/100) = 1.2.  This will be multiplied by the ship’s base hull points to determine the actual number of hull points the ship has.

Long Range Detectors

Radar

Radar systems are combination active/passive systems.  In active mode they send out pulses of radio waves and detect the reflected pulses.  In passive mode, they scan space for emissions from other ships.  The range of the radar system depends on its rating.  The higher the rating the more distant an object it can detect due to stronger emitters and more sensitive receivers.  It takes a lot of power and large transmitters to get returns from objects in the larger areas covered by the higher rated systems.  The listed range is the range for the active system.  In passive mode, the ranges are at least 10 times larger but can only detect targets that are radiating at radio frequencies.

Rating Range (km) Multiplier
1 300,000 1
2 600,000 8
3 900,000 27
4 1,200,000 64
5 1,500,000 125

Cost: 10,000 cr x Multiplier, mass: 15 tons x Multiplier, volume: 5 cu m x multiplier (7 cu m if aerodynamically streamlined)

Energy Sensors

These are broad spectrum radiation detectors that look at multiple wavelengths to detect radiation from ship systems.  They scan radio, optical, infrared, x-ray, and microwave wavelengths and have gamma-ray detectors to look for signatures from ships’ engines and power plants.  These are completely passive systems and like radar come in different ratings that have increased sensitivity.  The ranges listed are for detecting shielded, ship-sized energy sources against the cosmic background.  If an object is putting out energy emissions that are stronger than typical radiation leaked from ship systems, the detection range could be much larger.  For example, even a type 1 energy sensor suite will still be able to detect the system’s star at ranges of billions of kilometers.  Exact details are left up to the referee.

Rating Range (km) Multiplier
1 500,000 1
2 1,000,000 8
3 1,500,000 27
4 2,000,000 64
5 2,500,000 125

Cost: 200,000 cr x Multiplier, mass: 50 tons x Multiplier, volume: 20 cu m x multiplier

Thoughts

That’s it for the hull types, armor, and long range detectors. It’s a fairly simple change but allows for a wide range of ships with various characteristics and costs. Obviously the heavier hulls, armor, and larger sensors are going to require bigger, more expensive engines or suffer a performance penalty but sometimes you just need more hull points or a larger sensor range.

Share your thoughts, suggestions, and questions in the comment section below.

February 19, 2019 Tom 2 Comments

Building a Star System – Fochrik

In a couple of my timeline posts at the end of last week, I mentioned an annual competition on Hum in the Fochrik system, the homeworld of the Humma race in Star Frontiers. The tweets were as follows:

FY60.032 – Contestants, spectators, and reporters gather on Hum (Fochrik) for the annual Humma Jump Competition. Speculation is high that the current record in the standing long jump event of 38.272 meters will be surpassed this year. #SFTimeline

— Star Frontiers RPG (@StarFrontiers) February 7, 2019

FY60.034 – After two days of competition, Zonuul Usu of Larg (Fochrik) wins the Humma Jump Competition jumping 38.275m, beating the previous species record by 3 millimeters. Two others beat the previous record in the final round of competition but lost to Zonuul. #SFTimeline

— Star Frontiers RPG (@StarFrontiers) February 9, 2019

This immediately got me thinking about how the Hum calendar interacts with the Galactic Standard calendar of the Frontier and if the Rim had a different standard calendar.

Since in my Clarion calendar system post, I mentioned that I would probably do more calendar systems for other planets and in my last State of the Frontier post I said I would write about creating a system map, I thought I’d roll all of these thoughts and ideas into a series of “how to” posts as I flesh out the Fochrik system.

I’m planning on dividing this into three parts. In this first article, I’ll be talking about generating the astrophysical description of the system. We’ll go over what we know from published material, adding a bit to that, refining the details, and trying to generate a stable star system.

In the next post, I’ll actually walk you through the process of creating a system map for Fochrik like I did for the Duergan’s Star system.

In the third post, I’ll generate a calendar for the Fochrick system. I don’t know yet if all three planets will have a unique calendar or if Larg and Forge will base their calendar off of Hum’s. We’ll see when we get there. I’m not planning to address a standard Rim calendar at this time as I need to look over the other Rim systems first. That may be a future post.

Anyway, let’s get started.

What We Know

Let’s start with what we know from published materials, both original with TSR and material from the fan magazines. There isn’t much, but let’s assemble what we have.

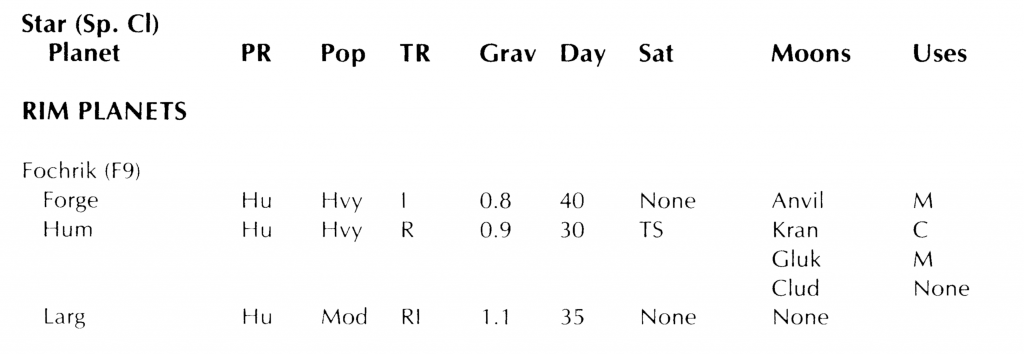
The Rim was introduced in TSR’s Zebulon’s Guide to Frontier Space, vol 1 as the area of space that the three new races introduced came from. It was specifically left vague in the supplement. Whether they intended to flesh it out more in later volumes that never were published we’ll never know. On page 50, in the “Planets of the Frontier” table we have the following entry for Fochrik:

For this series of posts, we’re interested in the stellar spectral type (F9), the number of known planets (three in this case) and their rotational period (the Day column which is given in hours). Also, the number of moons might be used in making the system map and we should probably consider them in making the calendars as well. The other information is not needed for this endeavor.

Beyond that, there is little said about the system in Zeb’s Guide. The worlds of the Frontier have little blurbs with interesting facts about each of them but there is nothing on any of the Rim worlds. We’re basically left with a blank slate.

In a Star Frontiersman article (issue 15), entitled Humma Hop Back, TheWebtroll talked about the race but gave no information on the star system. Tom Verrault did a little bit of work on the Humma in issue 13 of the Frontier Explorer were he fleshed out their racial description some more but again nothing was really mentioned about their star system. However in another article in that same issue, where he adds detail to the boon’sheh, a fan created race from the early Star Frontiersman issues, he places them with the humma in the Fochrik system with the humma forcibly relocating the boon’sheh to Larg from their mutual homeworld of Hum. But that’s all we have.

In the end, we just have the table entry for the system to work with. Which tells us we have three habitable planets, some moons, and their approximate rotation periods. We get to create everything else so let’s dive in.

Fochrik

We start with the star. It is given a spectral type of F9. That makes it a little more massive and brighter than the sun but not by much. I like to use the table on this page for my starting point of stellar masses and radii as it has broken the data down in to details for each spectral classification. Plus the author has gone through, and based on the spectral energy distribution, given you the RGB colors for the star. I’m a little leery of the radius data on that page but we won’t be using that in this analysis.

From that page we get a mass of the F9 star for 1.1 solar masses. Looking at the adjacent spectral types, F9 and G0, they have listed masses of 1.2 and 1.1 respectively so that gives us a range to work with and tells us that the F9 star is probably a bit heavier than 1.1 solar masses but within rounding errors. Plus there is scatter based on other factors as well so we have some room to wiggle about. Let’s do some quick calculations.

The mass of the sun is 1.989 × 1030 kg. so we have a range of 1.1 to 1.2 times that to work with or from 2.1879 × 1030 to 2.3868 × 1030 kg. Like I did for White Light, I want a few more decimal places so I’m going to roll some dice for the digits. I’ll keep the 2 before the decimal place, roll a d4 for the first digit, and then d10s for everything else. That will possibly let me go slightly outside the range but that’s fine. Here’s what we get:

I ended up rolling a d8 and dividing by 2 just so it was easier to see in the picture. I just rolled the dice and then went left to right as they fell on my desk to pick the order.

So we end up with a stellar mass of 2.21766549 × 1030 kg which probably has more decimal places than we need but that’s fine.

Size of the Habitable Zone

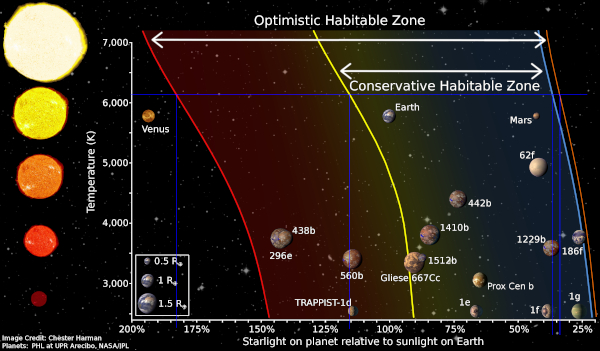
The next thing we need to know is the range of the habitable zone for an F9 star. We’ve got to squeeze three planets into that area. We don’t need to be exact, but we want some reference. For this Wikipedia has a good article on the habitable zone that you can read to determine the various factors that go into determining it. There is also a really great picture (reproduced here) that almost gives us what we need.

The only real problem with this image is that the x-axis is in relative flux on the planet rather than distance. But I can work with that to get values for Fochrik.

We start by getting the percentages for the edges of the habitable zones. This is done by drawing a line across at the temperature of Fochrik (6140 K) and then drawing lines down from those to the x axis like this (the blue lines)

This gives us a range of 178% to 34% for the optimistic habitable zone and a range of 115% to 36% for the conservative one. Now we just need to turn those into distances.

The amount of starlight on the planet is dependent on three things. The first is the temperature of the star (which we’re taking to be 6140K. We could figure it out exactly based on the mass but that is a close enough approximation). The second is the radius of the star. These two give us the total luminosity of the star, L, which is proportional to R2T4. The final bit, which we are trying to solve for, is the distance from the star. The amount of starlight received at a planet, F (flux), is proportional to the luminosity of the star divided by the distance squared, i.e. F~L/D2.

Combining those gives us that the amount of starlight at a planet, F, is proportional to R2T4 / D2. or D ~ sqrt(R2T4 / F). If we work in ratios to the solar temperature, solar radius, measure distances in AU (the distance from the earth to the sun), and enter fluxes as multiples of the flux at the earth (i.e. flux at earth =1, 200% = 2, 50% = 0.5, etc), everything works out.

For this exercise, we’re going to assume the radius of the star is the same as the sun. In reality, it’s probably a little bit larger but we’re not going to worry about that. So we can drop the R2 term. The ratio of the temperatures is just 6140/5780 = 1.062283737. That raised to the 4th power is 1.273392. Plugging in those number gives the following distances for the four flux percentages:

  • 178% = 0.8458 AU (inner edge of optimistic habitable zone)
  • 115% = 1.0523 AU (inner edge of conservative habitable zone)
  • 36% = 1.8807 AU (outer edge of conservative habitable zone)
  • 34% = 1.9353 AU (outer edge of optimistic habitable zone)

Those numbers seem about right. The star is brighter and hotter than the Sun so it makes sense that the habitable zone is a little further out than in the solar system.

Placing the Planets

Now that we know where the habitable zone is, we need to place the planets and add other details to the system. We start with the three known planets, Forge, Hum, and Larg.

The Habitable Worlds

Each of these planets is habitable, with fairly large populations. As such, they need to be at least somewhere within the habitable zone. Also, since they are relatively low gravity worlds, around 1g, they should probably be close to or in the conservative habitable zone as the optimistic one is more for “super earths” which these are not.

Forge is the innermost world of the three and the name itself implies that it’s a hot world. I’m going to place it just inside the conservative zone. It’s livable, but its a bit on the warm side. We’ll place it at 1.08 AU from Fochrik.

Hum is the humma homeworld. As such we’d expect it to have a relatively nice, comfortable climate. If we go back to the flux calculation from above and find the distance for 100% we get a distance of 1.13 AU. That’s a little too close to the 1.08 AU I picked for Forge so I’m going to move it out just a bit further than that and place it at 1.23 AU. It will be a bit cooler than Earth receiving only 84% the amount of starlight.

Finally, we have Larg. This has the smallest population, medium instead of heavy, so I’m taking that to mean that it probably has a less hospitable climate (in addition to the higher gravity). Plus, if we’re using the fan material from the Frontier Explorer, it’s where the humma deported the boon’sheh to. We’ll place this one out towards the outer edge of the conservative habitable zone at 1.61 AU.

Now that our habitable planets have been placed we need to fill the rest of the system. There are a number of ways you could do this. I have a really old program called StarGen that makes solar systems around F, G, & K type stars based on habitability ideas presented in a paper by the Rand corporation. It works pretty well but doesn’t take into account modern information as that paper is from the 60’s or 70’s if I remember correctly.

You could also use the star system creation system presented in the FrontierSpace Referee’s handbook. It’s a good system as well. However, for this system I’m just going to be arbitrary. I’ll roll some dice for distances but beyond that, I’m just going to pick what I want in the system.

The Inner Worlds

Let’s start close. What is inside the habitable planets? I’m going to place two small worlds in there. They are small, hot, and airless. They probably have mineable mineral resources but they are not very hospitable. We’ll place these worlds at .19 AU and 0.52 AU from Fochrick. To get those distances I simply rolled 4d10 and 9d10 respectively and divided the number by 100 to get the AU.

The Outer Worlds

Next let’s move out from the inner system and see what’s out in the outer reaches. We’re going to add in 6 more worlds outside the habitable zone. For now, I’m not planning on having an asteroid belt but that may change when we do some sanity checks below. We’re going to add the following planets to the system:

The truth is, it probably doesn’t matter how you generate the planets, their types and masses, and their distances. As long as you don’t repeat the same patterns over and over. The universe is vast and as modern exoplanet discoveries have shown, you can get all kinds of crazy systems. As a general rule, I allow anything to happen. Once. The more off the wall the idea is, the less likely I am to allow it to enter the setting twice but anything is possible once.

  • Jovian – 4.66 AU
  • Jovian – 10.59 AU
  • Ice dwarf – 16.58 AU
  • Ice giant – 18.13 AU
  • Ice dwarf – 20.53 AU
  • Ice giant – 26.01 AU

In each of these cases, to get the distance I created a number between 1 and 6.99 by rolling a d6 and two d10s. The d6 was the integer bit and the two d10s were the decimal bit. I then added that number on to the orbital distance of the previous planet. Like I said, this was going to be pretty arbitrary. Let’s keep going.

Orbital Periods

Now that the planets are all placed, we want to compute their orbital periods to know how long the length of their orbit is. While we don’t need this to create the map of the system. We want to do some sanity checks since the planetary placements were fairly arbitrary.

Orbital periods are given by Newton’s form of Kepler’s Third Law of Planetary motion, namely:

which I described in the Clarion Calendar post but P is the orbital period, a is the distance from the star, G is the gravitational constant, and M1 and M2 are the mass of the star and planet respectively. Since M1 >> M2, we’ll ignore M2 in our calculations.

You could do this by hand, or use a spreadsheet, or use an on-line calculator. I’m going to use this handy website that allows you to enter the values in a number of different units and does the math for you. I’m just going to leave the mass of the planet at 1 earth mass in the calculation. If I was going for full detail, I’d figure out the mass of each of the planets but this is really just an approximate sanity check. For example, if I set the mass of the first Jovian planet to 100 earth masses, it would lengthen the orbital period by only 10 hours, so it’s not something I’m going to worry about here.

Plugging in the values for the planetary orbital distance and the mass of the star we get the following data:

PlanetOrbital Distance (AU) Orbital Period (hours)
T10.19687.46
T20.523112.57
Forge1.139316.45
Hum1.2311323.3
Larg1.6116957.2
J14.6683501.4
J210.59286061
ID116.58560391
IG118.53662106
ID220.53772144
IG126.011101096

Planetary Names

I should really come up with names for the other planets but since this is the humma homeworld, the names should tie into their history and culture and I haven’t really thought too much about that yet. I’ll leave naming for a future post or as an exercise for the reader.

Mainly here I’m just looking to see that we don’t have any resonant periods with the two Jovian planets. With orbital periods in ratios such as 2:1, 3:2, & 3:1 we would have potential stability issues. My only concern is with the second jovian and the first ice dwarf. They are in a nearly 2:1 orbital resonance but that might actually be okay and why that planet is where it is. So I’m going to leave it alone. If I really wanted to check system stability, I’d generate the masses, starting positions and velocities, and then enter all of that into a simple n-body computer simulation and run it for a million years or so of simulated time to make sure nothing went crazy but I think this will be fine.

Planetary Sizes

Okay, while this isn’t strictly necessary to draw the system map, we might as well figure out how big each of the planets are (and their surface gravity. When I do the system map, I like to have both the distances to scale and the sizes of the planets to scale so if I want to do that, I need the sizes.

The equation we’ll be using for this is

where g is the acceleration due to gravity (m/s2), M is the mass of the planet (kg), r is the radius of the planet (m), and G is just the gravitational constant (6.67408 × 10⁻¹¹ m3 kg-1 s-2). Additionally we’ll want an equation relating the mass of the planet to its density which is just the volume of the sphere times the density or

where ρ is the density (kg/m3). While we could do this just with the mass, I like to make sure the physics work out for the type of planet so I like the densities to make sense and prefer to include it in the calculations. Combining those two equations gives us an equation that relates the gravity, the radius, and the density:

This is what we’ll be using to get the data we need.

Densities

As part of this we’ll need densities for the planets. We’ll just be picking those from reasonable ranges which are the following (in g/cm3):

  • Terrestrial (rocky) Planets – 3.5 – 5.7
  • Ice Dwarfs – 1.8 – 2.5
  • Ice Giants – 1.2 – 1.8
  • Jovians – 0.6 – 1.4+

To get it into the units we need (kg/m3 ) we just multiply by 1000. The Jovian planets may not have an upper density limit because once you get to be the size of Jupiter, adding more mass doesn’t change the radius much, it just increases the densities. Brown Dwarfs, which are 10-80 times Jupiter’s mass are still all about the same size.

We’ll use these density ranges to pick densities for the individual planets in the sections below.

The Habitable Planets

First up are the three habitable planets that we know the gravity on. In this case we need to rearrange the last equation to solve for r giving us:

A Note on Gravity

For Star Frontiers, I’ve adopted the conventions that 1g = 10 m/s2 rather than 9.8 m/s2 as on Earth.  It makes all the math in the end easier and there isn’t much difference.  I figure that if you have all the races coming from different worlds, it would make sense that they standardized on a round number instead of some arbitrary fraction.

All that’s left is to pick a density or each of the planets and start computing. Well, almost. I also want one more decimal place for the actual gravity of the planet. To get that I’ll roll d8-4 x 0.01 and add that to listed gravity to give me some variation that would round to the listed value.

The table below is what we ended up with. Interestingly, all the gravity adjustments I rolled were positive. I also selected the planets with the higher gravity to be a little more dense but modulated that somewhat due to the fact that planets that form closer to the star would have higher density as well. Thus the densities of these three planets are pretty close together.

NameGravity (g)Density (gm/cm3) Mass (Earth)Radius (km)
Forge0.815.320.60125,443.75
Hum0.915.430.81395,991.93
Larg1.125.551.46227,215.22

Hum turns out to be almost exactly the same size and mass as Venus, just a little further out in the system so it’s not as hot. Forge is smaller still by about 10% in radius and 75% in mass while Larg is about 13% larger in radius than the earth and almost 50% more massive.

Other Planets

Now lets due the rest of the planets in the system. In this case we have to pick two of the three values: radius, density (or mass), and surface gravity. I’m going to select the radius and density for each of these planets and then compute the mass and surface gravity. Surface gravity doesn’t exactly make sense for the giant planets (jovians and ice giants) but it is the gravity present if you were stopped at that radius at it’s upper atmosphere. Here’s the table:

Name Gravity (g)Density (gm/cm3)Mass (Earth)Radius (km)
T10.335.650.03492,064.55
T20.675.390.33734,468.50
J13.301.48525.8279,714.14
J21.550.92140.1460,108.51
ID10.142.220.01892,297.74
IG10.971.2119.90228,623.16
ID20.062.190.00181054.47
IG21.021.3518.47226,919.75

J1 is almost two times the mass of Jupiter while IG2 is a little smaller than Pluto. If you want to compare them exactly this Planetary Fact Sheet page gives the data for all the planets in the solar system.

Wrapping up for now

And that’s it for this entry. We have the number of planets in the system, mass data on the star, and orbital and size data on the planets. I’m fairly confident that we don’t have to worry about system stability issues (of course since I didn’t do a rigorous check, this will be the one time it doesn’t work 🙂 ).

In the next post, we’ll create a system map for Fochrik and walk through the process of doing so. If you have any questions or comments, let me know below.

February 12, 2019 Tom 3 Comments

Detailed Frontier Timeline – FY59.395 to FY60.025

Here’s the next installment of the timeline. This section include the events that will be considered the first battles of the Second Sathar War, namely the Battles of Volkos and Zebulon between ground and spaces forces of the UPF and the sathar at Volturnus in the Zebulon system.

After posting the last installment, I was asked if it would be possible to provide references to the sources I’m using to create the entries. I realized that would be a good idea so I’ve started adding reference notes to all the entries that come from other sources other than me just making them up for the timeline. I also wrote a short introduction to the timeline that explains the references that I’ve reproduced below.

I’ve gone back an annotated all the previous entries in the downloadable timeline document and where a reference occurs in the blog post, I’ve included the key for those references at the end of the post.

Introduction

The following timeline represents the events of the Second Sathar War as I designed them to act as a backdrop to various campaigns I am running.  I have a different timeline that runs the PCs though all the game modules in an appropriate order to progress their skill level but that is not this one.  This is somewhat of a more fiction-oriented timeline rather than on specifically designed to run PCs through.

One major aspect of this time line is that I’m using the Knight Hawks rules for interstellar travel, namely that it effectively takes 9 day to make an interstellar jump between systems (ignoring astrogation calculation times).  I also make the assumption that if you’re not stopping in a system, you only have to spend as much time in that system as the astrogation calculations take as you stay near jump speed during your transit.  If you assume 1 day per light year per the original Alpha Dawn rules, it would change the timing of many of these events, possibly significantly.

If you’re familiar with the timeline in the Zebulon’s Guide to Frontier Space, you’ll quickly notice that I don’t follow that much at all.  I pull some of the names and ideas but the timing and actual events follow my own muse.  Additionally, regardless of the source of the events, the exact dates are all of my creation.

In the events that follow, I’ve tried to annotate the source for names, dates, and events if they come from any of the material originally published by TSR.  Although I’m not going to annotate the system, planet, and common megacorp names as I assume those are common knowledge.  I will also try to annotate any material coming from the Star Frontiersman and Frontier Explorer Fanzines.  If you notice that I missed anything, let me know so I can fix it. 

Annotations that appear at the end of an entry refer to the entire entry.  If it appears in the middle, it applies just to the name that the annotation follows.  Each time an annotation first appears, there will be a footnote describing it.  I’ve also added an Appendix listing all the annotation codes.  If no particular annotation is associated with an entry you may assume I made the entry up out of whole cloth or extrapolated it from other events specifically for this timeline.

Timeline

As always, the data presented in this blog post cover only the new dates but the downloadable document at the end is cumulative over all the timeline posts up to this point.

Date (FY)Event
59.395 Subspace signal received at Laco from unknown location in Sathar space.  Images appear in the great pyramid showing a similar complex on a warm, swampy world with a large number of sathar and a bipedal insect race (Zuraqqor) working around the complex.
59.396 Despite efforts to keep the images contained, news and clips of the images race across the Frontier on the subspace network.  Scientists, politicians, and the general populous speculate as to the cause and meaning.
59.397 A new group, calling themselves the Anti-Satharian League (ZG), stage demonstrations on the major population centers of the Frontier and at the Council of Worlds, broadcasting excerpts from the Laco pyramid images and demanding increased military buildup for Spacefleet.
59.398 Completing its time in the Cassidine system, SF Nova departs Triad for the Dramune system to spend some time cooling rising tensions between Inner and Outer Reach.
59.399 A CDC scout ship, the Twilight Moon, returns from charting a jump route to the Rhianna system.  Due to preliminary geological findings, CDC decides to keep the route a secret and establish a mining outpost on the planet Alcazzar. (SF4)
59.400 Most businesses across the Frontier close a day early in anticipation of the big Founding Day celebrations tomorrow, allowing citizens and organizations some extra time to prepare.
60.001 – UPF Founding Day celebrations occur on most planets across the Frontier to celebrate 6 decades of peace.  However, there is a subtle undercurrent of concern due to the recent events on Laco.

– The first new sathar ship that will be committed to the coming conflict, a destroyer, emerges from Sathar Starship Construction Center (SSCC) #2, located in the as of yet unexplored (and unnamed) Liberty system.
60.002 – In wake of the Founding Day celebrations, the Frontier Peace Organization hold a rally outside the Council of Worlds headquarters demanding a reduction in Spacefleet and Landfleet operations.  Some small altercations occur with members of the Anti-Satharian League.

– Observance Day on Clarion (White Light) commemorates all who have fallen defending the system through history.  This year it also continues the UPF Founding Day celebration on the planet for an extra day.
60.003 UPF PG Virgo, together with the Pale militia (a frigate and 3 assault scouts), depart for the Zebulon system. Streel additionally sends a frigate, 4 corvettes, and 3 assault scouts to assist.
60.004 Council of Worlds reconvenes for its 60th session. Initial topics of debate include events on Laco and Zebulon and their implications for the future of the Frontier.
60.005 Fighting breaks out between Frontier Peace Organization and Anti-Satharian League supporters outside the Council of Worlds headquarters.  Local police have to resort to doze and tangler grenades and stun weapons to break up the fighting.  Over 4 dozen beings detained.
60.006 Sathar SSCC#4, near Fromeltar and Klaeok, completes construction of a light cruiser and 4 fighters.
60.007 SF Nova arrives in the Dramune System.  It will remain in system for 15 days as a show of force to help quell rising tensions between Inner and Outer Reach
60.008 Laco artifacts taken from the PGC chartered freighter, KSS Dawn’s Glow, anonymously arrive at the Triad Institute of Technology (TriTech) and are delivered to their originally intended recipients. (NCW)
60.009 The Sathar cleansing fleet arrives in the Zebulon system and begins decelerating towards Volturnus. (SF2)
60.010 The UPF fleet arrives in the Zebulon system and begins decelerating toward Volturnus and the sathar fleet. (SF2)
60.011 A small freighter, the KKSS Trader’s Gambit, misjumps travelling from K’aken-Kar to K’tsa-Kar and ends up in the Sundown system. Damaged engines force the crew to look for a planet to land on to effect repairs. (SF3)
60.012 – Battle of Volkos – Sathar ground troops advance on the ruins of the Eorna city of Volkos. A rag-tag army, composed of members of Volturnus’s native races and lead by members of the TSES Second Volturnus Expedition, manage to hold off the invaders. (SF2)

– Battle of Zebulon – UPF forces engage the Sathar fleet around Volturnus. Although the UPF forces are mostly smaller vessels, the sathar are driven off with only a frigate, 2 destroyers, and a heavy cruiser surviving.  UPF losses were 1 UPF LC and AS, 1 Streel Corvette, and 1 militia AS (SF2)
60.013 News of defeat at Zebulon reaches sathar space.  Clan infighting begins around debate of invasion and who should lead assault.  This will continue for several months.  At the same time all the clans begin building up their military.
60.014 – News of victory over sathar forces in the Zebulon system announced across the Frontier to mixed reaction.  Performance of the Assault Scout in its first major engagement with sathar forces is deemed a success.

– Pale militia and Spacefleet given priority at the Pale and Gran Quivera starship construction centers to replace vessels lost in the battle at Zebulon.
60.015 – The  KKSS Trader’s Gambit sets down on the planet Starmist in the Sundown system. (SF3)

– Having effected repairs from the battle with the sathar, the Pale militia and Streel ships depart Volturnus (Zebulon) to return to Pale (Truane’s Star) while the UPF forces remain on patrol.
60.016 – The Anti-Satharian League stages demonstrations on Pale, Gran Quivera, Triad, and Clarion demanding increased militarization and growth of Spacefleet

– The navigator and second master of the KKSS Trader’s Gambit, Maximillian Malligigg, makes contact with an intelligent race, the Heliopes, on the planet Starmist (Sundown). (SF3)
60.017 Leotia (SFKH0) Valentine Leotus, crown princess of Clarion (White Light), celebrates her 32nd birthday (18.5 earth years)
60.018 A listening station in the Kazak system in the Rim detect faint signals of sathar ships in the outer system.  Flight vessels are dispatched to investigate.
60.019 Repairs completed, the KKSS Trader’s Gambit leaves Starmist to attempt to return to charted Frontier space. (SF3)
60.020 The Flight vessels in Kazak arrive at the location of the sathar signals but find nothing more than a faint indication that ships had passed through the area days before.  Two ships are left on station while the rest return to base.
60.021 Winter begins in earnest on Alcazzar, delaying the start of CDC operations on the planet. The corporation hopes that this delay will throw off any competitor’s interest in the mineral rich system. (SF4)
60.022 SF Nova departs the Dramune system for the Fromeltar system
60.023 – The KKSS Trader’s Gambit successfully jumps back to the K’tsa-Kar system.

– The Pale militia arrives back home from the Zebulon system.
60.024 Scouting through the Zebulon system, a UPF frigate and assault scout find an ancient vessel in a distant solar orbit. Investigation reveals it to contain a cache of cryogenically stored Eorna eggs. If still viable, the eggs will secure the survival of that species. (SF3)
60.025 Delegates from the Pale militia are dispatched to testify at the Council of Worlds regarding events on Volturnus.
DetailedFrontierTimelineDownload

References

  • NCW – A New Can of Worms on-line game events
  • SF2 – Starspawn of Volturnus module
  • SF3 – Sundown on Starmist module
  • SF4 – Mission to Alcazzar module
  • SFKH0 – Warriors of White Light module
  • ZG – Zebulon’s Guide to Frontier Space, Vol 1
February 5, 2019 Tom Leave a comment

A New Starship Construction System – part 3 – Life Support

My previous posts about my new starship construction system generated a bunch of interest and several people expressed a desire to see more. So I thought I’d post up bits and pieces of this over a series of posts. I’ll start by posting the things that are new relative to the starship construction system in the Star Frontiers Knight Hawks Campaign Book.

I already posted the introduction the the “A New Starship Construction System” post back in early November. Although it wasn’t labeled as such, the “Starship Engines” post that came shortly after the first one was part 2 as that was taken from the new system as well.

The timing of these posts will be probably be fairly sporadic as I’m using them as filler between posts on other topics and when I’m working on things that I’m not ready to post about.

I’ve already posted about the engines. The next major change is the life support system which is the topic of this post. With each of these posts going forward, I’ll try to include some of the rationale and thinking behind the choices I made and the way I designed it. So let’s get going.

Design Considerations

One of the things that I found problematic with the life support system as described in the standard rules was that it always felt way too small. For example say you had a ship that could support 9 people. According the the standard rules, all of the life support equipment for the entire ship, including all the food, oxygen, and water for 200 days of operation would weigh only 9 kg (20 lbs)!

That 9 kg is split half and half between the equipment and the consumables so there is 4.5 kg (10 pounds) of equipment to get all that food, water, and air throughout the ship and then 4.5 kg of the food and water itself. Now I don’t know about you, but there is no way I can feed my family of 9 for a week, let alone 200 days on 10 lbs of food. Maybe if it was all just a nutrient pill that you took once a day that had all your calories, vitamins, and minerals. But I think even that is stretching it and definitely not very satisfying.

One could argue for transmutation/replicator technology ala Star Trek but that just doesn’t jive with the feel of Star Frontiers for me and I don’t want that in my game. Beside the rules state that the life support systems “include food storage and preparation, and water, atmosphere and wast processing and disposal.” (KHCB p 14) That sounds like it should include a bunch of machinery and storage space.

So looking at the life support systems I saw two things that needed to address. One was food storage and preparation, and the other was water, air, and waste circulation and processing. All of that was going to take up space. I needed to make sure the system had enough mass and volume associated with it to include all the various bits of machinery and storage and pipes and duct work needed to get the various bits around the ship as needed.

Another aspect was that I wanted it to be completely configurable by the ship designer. The default rules were for a 200 day supply in the system. Since I knew this new system was going to be bulkier, I wanted to give the option to go for a smaller system if you knew that was all your needed. For example, a shuttle, that just goes up and down from the ground to orbit probably doesn’t need a life support system that can go 200 days without recharging. It probably only needs a few days at most and so can have a much lighter system.

Related to that I wanted to have different types of system for shuttles, system ships, standard interstellar ships, and first class accommodations. Each of those have different requirements and therefore should have different costs, volumes, and masses.

Taking all of that into account results in the following system. The excerpt of the rules that follows assumes that you’ve determined the crew size and number of the various passenger cabins you will have on the ship before to select the life support system.

Life Support Equipment

Now that you know the number of crew and passengers, you can select the amount of life support equipment the ship needs. It is recommended that you have at least one backup life support system in case there are problems with (or damage to) the primary system.  The life support system includes a variety of systems such as air filtering and circulation, food preparation, sanitation facilities, and waste management.  Life support on starships are mostly a closed system, almost everything gets recycled.  However there are some consumables that do need to be replaced (mainly foodstuffs) every so often.

Your life support system needs to be at least large enough to support the crew and passengers.  Typically, ships are designed with a little extra capacity as a safety margin or for emergencies.  There are four basic levels of life support available for ships, depending on the ship’s needs:

Rudimentary – This is an air supply system only.  It doesn’t handle food or waste materials and just provides an air supply and air circulation system with filtering.  This is the life support system you find on launches, workpods, fighter craft, and other ships that are not designed to be occupied for a long time.

Basic – This level of life support adds basic food storage and preparation, sanitation facilities, and waste management to the air supply system of the rudimentary life support level.  Supplies are stored and consumed and waste material has to be removed regularly.  There is little to no recycling of materials except for air and water.  This level of life support is typical of shuttles and some short distance system ships that typically operate for only short periods of time between calling on bases where their life support can be resupplied and waste material removed.  It may also be found on some lifeboats.  While you could equip a starship with this type of life support system, making it large enough to support long missions uses up valuable space in the ship and tends to be more expensive in the long run.

Standard – This is the typical system for any starship.  It consists of complete air and water recycling, as well as recycling of waste material.  It typically includes some sort of hydroponics system for both growing fresh food and recycling carbon dioxide back into oxygen.  There are full food preparation facilities as well as complete sanitation facilities.  This level of life support is required for Journey class passenger accommodations.

Deluxe – This is a more advanced version of the Standard system.  It provides better recycling, larger food preparation facilities, more variety in the fresh foodstuffs, and better (nicer) sanitation and waste management facilities.  This level of life support is required for any First Class passenger accommodations.

A ship can have different life support levels for different parts of the ship.  This is quite common on passenger liners.  For example, if a passenger liner has 20 First Class cabins and 100 Journey class cabins.  It is not very likely that the owners will invest in Deluxe life support for the entire ship (although if they did, it would figure prominently in their advertising).  Rather they would invest in a Deluxe life support system to cover the First Class cabins and a standard system to cover the Journey Class cabins and the crew.

The volume listed for the life support system includes both the machinery and hardware for processing the air, water, food, and waste material as well as storage space for raw materials and duct work to move material around the ship.

Every life support system has two ratings.  The first is the maximum number of beings the system can support.  This determines the amount of mass and volume allocated for the life support machinery (pumps, filters, ducts, pipes, etc.).  The second is the maximum number of days that the system can support those beings without being refilled/recharged.  This determines the amount of volume committed to storage of life support supplies.

Base hardware costs and volumes per being supported

All values except base system volume are multiplied by the maximum number of beings the system can support at one time.

Type Cost Mass Base system volume Volume
Rudimentary 500 cr 0.2 tons 1 cu m 0.1 cu m *
Basic 1500 cr 2 tons 6 cu m 5 cu m
Standard 3000 cr 4 tons 15 cu. m 8 cu m
Deluxe 5,000 cr 6 tons 30 cu. m 10 cu m.

* This volume assumes you are equipping a small one or two room craft with this system like a fighter or launch.  If you try to put this into a larger ship the volume goes up by a factor of 10 for the ducting and pipes needed.

For example, our passenger liner has 20 First Class cabins and 100 Journey class cabins for crew and passengers.  It would need two life support systems.  The Deluxe system would support 20 beings.  It would cost 20 x 5000 = 100,000 cr, have a mass of 20 x 6 = 120 tons, and take up 30 (base volume) + 20 x 10 (volume per being) = 230 cubic meters.  The Standard system for the Journey class cabins would cost 100 x 3000 = 300,000 cr, have a mass of 100 x 4 = 400 tons and take up 15 + 100 x 8 = 815 cubic meters.  Thus the Standard system while being just a little more than 3x the size of the Deluxe system, supports 5x as many beings.

Supply cost per being per day

In addition to the base machinery costs, there is the cost of the food, air, and water needed for the beings on board.  Multiply each value times the maximum number of beings the system can support and then by the number of days you want to be able to support those beings without a reload/refill of the system.

Type Cost Mass Volume
Rudimentary 10 cr 0.05 tons .1 cu m
Basic 15 cr 0.15 tons .4 cu m
Standard 25 cr 0.1 tons .15 cu m
Deluxe 40 cr 0.15 tons .25 cu m

So if our passenger liner wanted to support its full complement of crew and passengers for 200 days without a resupply, the cost of the supplies and storage areas would be as follows:  For the Deluxe system the cost is 40cr x 20 beings x 200 days = 160,000 cr, the mass would be 0.15 tons x 20 x 200 = 600 tons, and the volume would be 0.25 cu m x 20 x 200 = 1000 cubic meters.  The standard system supplies would cost 25 cr x 100 beings x 200 days = 500,000 cr, the mass would be 0.1 tons x 100 x 200 = 2000 tons, and the volume would be 0.15 cu m x 100 x200 = 3000 cubic meters.

Thoughts and Comments

That’s the life support system rules in the the new system. Let me know what questions or thoughts you have in the comments below.

January 29, 2019 Tom Leave a comment

The Clarion Calendar

One of the things about sci-fi games that span multiple worlds is that each world has its own length of year and length of day that impact the way the planet operates. And while I’ve been pretty good about initially describing it for the worlds my on-line game has been set in, I’ve not been very good about keeping track of it during actual play.

I got to thinking about this some more as I was working on the Frontier Timeline. I needed an entry for a blank day and decided to make it the birthday of a notable person in the Frontier (Crown Princess Leotia Valentine Leotius of Clarion). And that got me to thinking about the time keeping on that planet.

Another thing that came out of this is the realization that so far, I’ve only really looked at this on planets that have really slow rotation periods. My online game has so far taken place on Pale in the Truane’s Star system which has a rotation period of about 55 hours and on Laco in the Dixon’s Star System which has a rotation period of about 60 hours. Clarion’s is 50 hours, 5 minutes. Which is funny to me since the length of a “Galactic Standard” day is only 20 hours. Maybe some day I’ll work on a system with a period close to that.

So this post is going to talk both about Clarion’s calendar and also about how I went about calculating it. We’ll start with what we know from published materials and work our way to a final calendar.

Stellar Data

From both the Expanded Game rules and the Warriors of White Light module, the star is described as a yellow-orange star. Zebulon’s Guide gives it a spectral type of F7 but that is a yellow-white star not a yellow-orange one. Yellow-orange would give it a spectral type of late G or early K so from notes I have in other places, I’ve assigned White Light the spectral type of K1.

This means that the star is about 72% the mass of our sun. The exact value I assigned is .72155 solar masses (actually I took it to a few more decimal places) or 1.43516×1030 kg.

Orbital Data

Orbital Distance

In the Warriors of White module there is this image of the White Light system:

Based on the scale on the image I estimated that the orbital distance of Clarion was about 93 million kilometers (for reference the Earth is about 150 million km from the sun). This makes sense for a K1 star that is less luminous than the Sun as a habitable planet would have to be closer. The exact value I gave for the semi-major axis of the orbit was 93,027,587 km. That was generated by simply rolling six d10s for the digits after 93. Had the first digit not been low, I might have rolled a d4-1 but I actually rolled a zero so I was happy.

Orbital Period

Now that we have the mass of the star and the orbital distance we can calculate the orbital period of the planet. This can be done simply by applying Newton’s form of Kepler’s Third Law of planetary motion:

Where we have the following:

  • P = the planet’s orbital period
  • a = the semi-major axis
  • G = the gravitational constant
  • M1 = the mass of the star
  • M2 = the mass of the planet (which we’ll ignore here as it is about half a million times smaller than M1)

I’m working in hours since I’ve decided that everyone in the Frontier uses that same unit of measure and it’s equal (for the convenience of us Earthlings playing the game) to an hour here on Earth. So an hour on Clarion is the same as an hour on Pale is the same as an hour on Gran Quivera (Prenglar system) is the same as an hour on Earth.

Plugging everything in in the correct units (left as an exercise for the reader) we get that the orbital period of Clarion around White Light is 5059.77 hours. This means that the “year” on Clarion is just under 253 Galactic Standard days; significantly shorter than the 400 Galactic Standard days in a Galactic Standard year (which is only ~91.3% of an Earth year). Compared to Earth, the year on Clarion is only 211 days long, about 58% of our year.

But we’re not quite done yet as we need to calculate that in terms of the local day.

Rotational Period

This one is easy. The Warriors of White Light module says that the rotation period of the planet is 50 hours and 5 minutes, with is just a little more precise than the 50 hours given in the Expanded Rules and Zebulon’s Guide so we’ll go with that number. I’m just going to leave it as is and not add any extra seconds on to it.

So if we take that value, it turns out that Clarion rotates 101.027 times every year. Or said another way, the year is 101.027 local days long. The fact that it was almost an integer number of days was a happy coincidence. I did not try to make that happen. I was pleasantly surprised when it did.

The Calendar

Okay, now we have everything we need to get the calendar set up. Well, almost everything. There is one more bit we need to do.

Clarion was settled by humans. Who we assume are somewhat like us Earthlings in that they work better on a 20-25 hour day than a 50 hour one. When the humans landed on Clarion, the decided to simply divide the long 50 hour diurnal period into two 25 hour days. They deal with the extra 5 minutes by adding in an hour the “night” period every 12 days and most people get a little extra rest that night.

Each of these 25 hour day periods are divided into a “day” period and a “night” period even though it may or may not be light or dark as one would expect by the name. Like the locals on Laco, they refer to the periods throughout a single diurnal cycle as “day-day” and “day-night” when the star is up and “night-day” and “night-night” when the star is down.

With this set up, there are 202.054 days in the year. They break it down as follows. (From here on out, unless specified, the term day refers to one of these 25 hour periods).

  • 1 week = 8 days (4 diurnal periods)
  • 1 month = 20 local days (10 diurnal periods)
  • 1 year contains 10 months with two special holidays occurring mid-year (between months 5 & 6) and on the last day of the year.
    • The mid-year day is Observance Day, set aside to remember and commemorate all those who have sacrificed for the survival and safety of the planet.
    • The end year holiday is Landing Day, commemorating the day the original settlers landed on the planet. In many ways it is also a celebration of the ruling Leotus family and is often the day for coronations of new monarchs or other events related to the ruling family.
  • Every 37 years, that 0.027 of a local day catches up with the calendar and they have a leap year. On that year, they add an extra day to both Observance Day and Landing day making each a 2 day holiday. The next such occurrence of the Clarion leap year occurs during FY 69.

Reckoning Age

One impact of the calendar is that people have a lot of birthdays. Because of the very short local year, and the fact that the rate that the settlers grow and mature is similar to us here on Earth, people on Clarion mature much slower than their “age” would indicate. A 16 year old Clarionite is only 9.25 Earth years old. You probably shouldn’t give them the keys to the hovercar.

Because of this, the early settlers established the age of 35 (in local years) as the age of majority on the planet. This roughly corresponds to someone that is 22.13 Galactic Standard years old (or 20.2 Earth years old). There has been a bit of a push in recent years to lower this to 30 local years but the movement has not gained much traction.

Crown Princess Leotia

Which brings me back to what started all of this in the first place – Crown Princess Leotia’s birthday. The Warriors of White Light module contains this little tidbit:

The current king, Leotus XIX, has ruled for 37 years and soon will no doubt abdicate in favor of his daughter, Leotia XX.

If you’re following along with my #SFTimeline posts on Twitter, and reading this on the day the post publishes (Jan 15, 2019), I’m going to spoil a timeline entry for next week:

FY60.017 – Leotia Valentine Leotus, crown princess of Clarion (White Light), celebrates her 32nd birthday (18.5 earth years) #SFTimeline

I’m taking the “soon” in the quote from the module to be within the next decade or so (GST) and have decided that it will probably occur during the 2-day Landing Day celebration in FY 69. I also want Leotia to be young but she will have had to reach her majority by then. So I decided that she is about to celebrate her 32nd birthday.

The abdication might have occurred sooner but by the time Leotia reaches her majority (which will occur on FY61.375, the Second Sathar War will be in full swing and Leotus XIX doesn’t feel that she’s quite up to that task at her young age and so decides to wait until the big celebration in FY69.

Final thoughts

I had a lot of fun working this out. I’ll probably be doing it for more of the Frontier worlds in the future, again probably tied to trying to tie a series of local events into my timeline project. Although I may go do Pale and Laco first as part of my game background.

Have you ever done this for any of your worlds? Do you think it adds to the verisimilitude of the game or is it just too much of a hassle? Is there anything I didn’t explain to your liking? Share your thoughts and ideas below.


January 15, 2019 Tom 1 Comment

Detailed Frontier Timeline – FY59.368 – FY59.394

Here is the next set of events from the detailed Frontier timeline. This covers the events that will eventually be considered the start of the Second Sathar War, namely the activation of the Glass Pyramid on Laco broadcasting a signal into sathar space as well as the activation of the sathar artifact on Volturnus calling the eventual sathar fleet to the Zebulon system.

The data presented in this blog post cover only the new dates but the downloadable document at the end is cumulative over all the timeline posts up to this point.

Date (FY)Event
59.368 An enclave of sathar, ostensibly survivors from the Great Sathar War, found and eliminated on Pale. Based on intelligence gathered, it is believed that there may still be other enclaves on the planet. Citizens are warned to be alert.
59.369 Initial investigation of the “Kraatar Incident” completed. Those responsible for the severe Vist’Lat actions shown to be under some sort of cybernetic control by Legrange. Vist’Lat cleared and restored to Commercial Council.
59.370 The Streel interstellar shuttle, SCSS Laco Purveyor, shot down while landing on Pale. Origin of blast unknown. A skirmish over the downed shuttle results in over a dozen mercenaries dead but no loss of Streel forces or the injured shuttle crew.
59.371 News from investigations on Pale indicate that the new breed of Quickdeath was bred by local, long-time exotic creature supplier and bounty hunter, Trey Mulden, for unknown reasons. Mulden’s location is currently unknown. If seen, call Star Law immediately.
59.372 Several research institutions and zoos across the Frontier, expecting quickdeath shipments from Mulden, received multiple examples of the new variety. Forewarned of potential issues, most were contained but word had not yet reached Clarion and one handler was severely injured trying to contain the unexpected extra creatures.
59.373 Despite efforts of the Family of One (FoO), data on the newly discovered brown dwarf is now available. The FoO reaction to the news fuels speculation that the K4 star is Yazira, the “lost” yazirian home system.
59.374 The Cassidine Development Corporation’s new prototype paramilitary freighter, the CDCSS Nightwind, goes missing on its maiden voyage.
59.375 A small freighter, operating under a Streel charter, is attacked and destroyed in the Dixon’s Star System.  Crew escapes in lifeboats and are rescued.  Streel claims attack was by PGC vessels.
59.376 StarPlay releases the newest holovid movie in the Hawc, Star Law Ranger franchise.
59.377 UPFS Admiral Clinton completes its refit. As the remaining ships in SF Nova come out of refit over the next two days, the strike force prepares for another tour of the Frontier.
59.378 The governments of Kawdl-Kit (K’tsa-Kar) and Ken’zah-Kit (K’aken-Kar) sign a mutual trade and defense agreement.  It is expected that the Zik-Kit (Kizk’-Kar) government with join the trade alliance in the near future.
59.379 The General Overall Development Corporation unveils the Yazira Dome on Hentz. This massive, 100 square kilometer habitat is claimed to enclose a biome identical to that on the lost Yazirian homeworld.
59.380 Strike Force Nova, after completing a long refit in Prenglar, departs for a tour of the vrusk loop of the Frontier.  First stop, Cassidine.
59.381 Spacefleet dispatches several ships (1 AC, 8 F, 2 LC, 2 DD, & 2 AS), designated Patrol Group Virgo, from Prenglar to Dixon’s Star to help put a dampener on rising Streel-PGC hostilities.
59.382 A Vrusk-owned shopping complex on Kidikit (Madderly’s Star) is destroyed by the explosion of several bombs.  Many beings injured but no fatalities. The Kraatar Liberation Corps claims responsibility.  There is concern over rekindling the Free World Rebellion tensions.
59.383 Despite budget delays and squabbling over the need for upgraded defenses, Fortress Kidikit (Madderly’s Star) reaches the 75% complete milestone.
59.384 Tensions in Dramune on the rise as Outer Reach industries continue to ignore and violate Inner Reach trademarks and patents.
59.385 Astronomers on Hargut (Gruna Goru) claim to have detected artificial signals from a system several light years beyond the Frontier. They begin organizing a petition to request that the UPF send and exploration mission.
59.386 Galactic Task Force mercenaries, working under PGC direction, attack three Streel archeology sites on Laco. Two are captured while the third is successfully defended by Streel personnel. Streel personnel at the captured sites are not harmed but evicted from the sites.
59.387 Glass Pyramid on Laco begins glowing with an unidentifiable energy source. After 20 minutes of increasing brightness, it releases a beam of energy nearly vertically. Beam consists of both electromagnetic energy across the full spectrum and subspace signals.
59.388 Unmarked Streel ships attack the KSS Dawn’s Glow hijacking cargo. Crew is left on immobilized ship to effect repairs and await rescue.
59.389 Subspace signal from Great Pyramid received in sathar space.

SF Nova arrives in Cassidine.  It will be in system for 9 days exercising with Task Force Cassidine.

A raid on a PGC dig site by unknown forces results in one dead and one PGC scientist captured. The PGC scientist, a former Streel employee, is later released and identifies the assailants as Streel employees.
59.390 A message, transmitted by an artifact left on Volturnus (Zebulon) is received at a sathar listening post alerting then to the space-faring activity in the Zebulon system and the detection and penetration of the artifact by technologically advanced races.

A subspace message is received on Pale from the presumed lost Second Volturnus Expedition explaining the sathar and pirate presence in the Zebulon system and warning of imminent attack from sathar forces. Immediate assistance is requested.

PG Virgo arrives at Laco and takes up patrol duties around the system.

A raid on a PGC records vault on Laco results in the loss of all backup data related to the Glass Pyramid activation. Suspected corporate espionage by Streel but no concrete proof exists.
59.391 Streel sub-orbital shuttle shot down on Laco. Assault scouts from PG Virgo are sent to investigate. Injured crew taken to Tyrell’s Landing.
59.392 Fighting breaks out between PGC, Streel, and CDC forces near the site of the downed shuttle over a newly discovered Tetrarch ruins site on Laco exposed by a recent landslide.

After several days of discussion, the sathar decide to send a “cleansing” fleet to Volturnus.
59.393 After deliberations between the Pale Government and the Council of Worlds about the message from the Zebulon system, UPF Patrol Group Virgo cuts its time in Dixon’s Star short and departs Laco for the Truane’s Star System on its way to Zebulon.
59.394 Sathar attack fleet (1 AC, 8 F, 2 HC, 2 LC, 6 DD, & 2 FF) depart sathar SCC#5 for Volturnus

Here’s the compiled file:

DetailedFrontierTimelineDownload

Let me know if you have any thoughts, questions, or comments on any of the events in the timeline.

January 2, 2019 Tom Leave a comment

PGC Records Vault – finished

Merry Christmas, Happy Holidays, and Season’s Greetings. Here’s a post just in time for you to enjoy as you’re snuggled up to your fireplace on Christmas Eve.

In my first post about the records vault, I provided the maps and room descriptions, then I posted a few robots that also make an appearance although I didn’t specifically call them out as part of this project. In this post I provide the rest of the information about the records vault as well as a PDF with the complete write-up of the location.

In this post we’ll add in the details on the staff, the main computer, how to get “official” access to the vault, and how the vault and its staff respond to external or internal threats or problems. Let’s get started.

Gaining Access

In order to gain access to the data in the records vault, a person or organization needs to file a request with the PGC headquarters on Laco, located in Point Glass. The request includes the dates they desire to visit, the number of people to visit the vault, and the research topic. If the request is granted, the requestor is given an appointment date and an access code that will allow them through the outer gatehouse.

Once inside the main building the visitors’ ID are checked by the security guard at the front desk and then on of the archivists are called to escort them to the research room. Each visitor is given a unique passcode to access the computer terminals. This code is keyed to the level of access (typically just public although private/full access is available to PGC employees) which determines which data in the vault they have access to. It is also used to record the queries in the system so that PGC can track who is searching for what information and the type of queries being performed.

The main computer only contains an index of all the data stored at the vault and provides an interface so that the user can search for the type of data they are looking for. Once found, the actual data is then requested. Once the request is submitted, one of the two data retrieval robots (area 6) is activated, goes down to the vault, retrieves the requested data cubes and brings them up, and places them in the data portals in the computer room (area 8). It takes 7-10 minutes from the time the request is submitted until the data is available. Once the data cubes are in place, the computer informs the user that the data are available and the researcher can begin searching and looking through the actual data for the information they need.

If a researcher has any questions, problems, or difficulties, they can page one of the archivists who will come over from their office (area 4) and attempt to help the researcher.

Repeated queries about classified/locked information may trigger the user to be locked out of the system. This typically only applies to queries on PGC corporate details and operations or some restricted Tetrarch data when using a public access account.

Robots

There are three types of robots at the records vault facility that help keep the facility running:

  • sixteen S-037 Security Robots
  • four M-022 Maintenance Robots
  • two G-092 Data Retrieval Robots

The details on each of these types of robots were given in the previous post. I’m not going to repeat them here.

Staff

The records vault nominally has a “daytime” staff of 10 PGC employees: the vault administrator and administrative assistant, two security officers, a roboticist/technician, and five researchers/archivists. In addition to the base staff, there are often outside researchers working with the data stored in the vault. The facility can accommodate up to six visitors.

During the “night” shift, there are just two security guards at the facility.  You can just reuse the stats for Nameer and Erich or create similar characters if the PCs decide to try a night raid on the facility.

Note:  Skill are taken from the “A Skilled Frontier” skill system published in Star Frontiersman issue 9 as that system provides some actual skills for the archivists to have.

Zat’zra K’tar

Vault Administrator/Lead Archivist

Vrusk, Male

STR/STA: 50/50   DEX/RS: 55/55   INT/LOG: 40/40   PER/LDR: 55/55

Skills:  History 4, Environmental 3, Politics 2, Computer 1

Equipment: chronocom, notebook, pen

Zat’zra is probably not the best of administrators or researchers which is probably why he’s assigned to this relatively out of the way records facility.  But that suits him just fine.  His administrative duties are light and he can spend his days working on his research.  He rarely leaves his office (area 3).

Weldon Tindal

Administrative Assistant

Human, Male

STR/STA: 30/30   DEX/RS: 50/45   INT/LOG: 55/55   PER/LDR: 45/45

Skills:  Law 2, Pop Culture 2, Persuasion 1, Projectile 1, Air vehicles 2, Literature 1

Equipment: chronocom, needler pistol, 2 needler clips

Weldon is bored out of his skull with his assignment here.  He has very little work to do as the facility is small and Zat’zra rarely has any assignments for him.  He can often be found in the break room chatting with whoever is in there.

Nameer Olnar

Head Security Officer

Yazirian, male

STR/STA: 45/45   DEX/RS: 65/65   INT/LOG: 75/75   PER/LDR: 50/50

Skills:  Beam 5, Melee 4, Unarmed combat 1, Thrown 1

Equipment:  chronocom, laser pistol, sonic stunner, sonic sword, 4 tangler grenades, albedo screen, military skeinsuit, power beltpack, 4 powerclips

Nameer is a career security officer and takes his assignment very seriously.  He considers any boring day a good one since there were no threats to the facility under his care.  While he takes his responsibility seriously, he also tries to keep the security requirements as much out of the way of the staff working at the vault as possible.

Erich Melchor

Security Officer

Human, male

STR/STA: 70/70   DEX/RS: 55/55   INT/LOG: 30/30   PER/LDR: 55/50

Skills: Beam 4, Unarmed Combat 2, Medic 1, Projectile 1, Technician 1

Equipment:  chronocom, laser pistol, electrostunner, albedo screen, military skiensuit, power belt pack, 4 power clips

Erich couldn’t be happier with his current assignment to man the front desk at the records vault.  Nothing ever happens and his busiest times are first thing after arriving and right before leaving for the day when he has to check all the visiting researchers in and out of the facility.  The rest of the day he typically spends reading or watching holovids at the front desk.

Pluami Krennta

Roboticist/Technician

Yazirian, female

STR/STA: 40/40   DEX/RS: 45/45   INT/LOG: 60/60   PER/LDR: 35/35

Skills:  Robotics 4, Computer 3, Technician 2, Enviromental 1

Equipment:  chronocom, techkit, robotcom kit, pocket tool, toxy-rad guage

While she doesn’t consider the records vault to be a plum assignment, Pluami can’t complain about the level of work or availability of interesting projects.  There are just enough robots at the facility that she has some maintenance that needs to be done each day alongside keeping the complex’s power system running in top shape.  When she does have some free time, she likes to peruse the vault’s vast data sets looking for interesting robotics and tech data.  She has starting looking through all the Tetrarch data for anything that might be robotics related and can often be found talking with Gh’dzz looking for new bits of data.

Kodub

Archivist

Dralasite, female

STR/STA: 35/35   DEX/RS: 35/35   INT/LOG: 55/55   PER/LDR: 35/35

Skills:  Economics 4, Philosophy/Theology 3, Law 1, Computers 2

Equipment:  chronocom

Kodub asked to be assigned to the records vault as she felt it would give her the best access to all the data she was interested in researching.  Not particularly interested in the Tetrarchs themselves, she studies how the presence of the ruins has shaped the economic structures on Laco.  She works out of the office on the main level (area 4).

Abigail Zemke

Archivist

Human, female

STR/STA: 50/50   DEX/RS: 55/55   INT/LOG: 55/50   PER/LDR: 45/45

Skills:  Space Science 4, Law 2, Pop Culture 1, History 1, Melee 1

Equipment:  chronocom, pocket tool, sonic knife w/powerclip

Abigail is a Laco native and grew up around the Tetrarch ruins at Point Glass.  She was always fascinated by the space motifs found in the ruins and works at the records vault studying the astronomical and physical data found in the ruins in an attempt to nail down the time period that the planet was occupied by the Tetrarchs.  She will be assigned as the PCs liaison when they arrive at the facility and has on office on the main level (area 4).

Gliprell Anthor

Archivist

Yaziran, female

STR/STA: 35/35   DEX/RS: 45/45   INT/LOG: 55/55   PER/LDR: 40/40

Skills:  Environmental 4, Psycho-social 3, History 2, Literature 2

Equipment:  chronocom

Gliprell is at the records facility studying Laco’s flora and fauna and how it has interacted and reacted to the presence of the Frontier races on the planet as well as the populace’s reactions to and interactions with the native life.  Her office is down in the records vault (area 5) as she is constantly accessing new data cubes and is not quite patient enough for the retrieval delay working on the main level.

Gh’dzz Kl’tak

Archivist

Vrusk, male

STR/STA: 50/50   DEX/RS: 45/45   INT/LOG: 65/65   PER/LDR: 50/50

Skills:  Literature 4, Robotics 2, Law 2, Xeno language (Tetrarchs) 1

Equipment: chronocom

Gh’dzz works out of the main level office (area 4) and is slowly researching the Tetrarch language.  His specific interest is literature and poetry but without understanding the language, it is kind of hard to tell what the writings are about.  Despite his main focus on literature, he also has an interest in robotics, specifically in task automation and keeps his eyes open for instances of that in the Tetrarch artifact data.

Yk’rtz T’tk

Archivist

Vrusk, female

STR/STA: 40/40   DEX/RS: 45/45   INT/LOG: 65/65   PER/LDR:70/70

Skills:  Structural Art 4, Visual Art 3, Environmental 2, History 1

Equipment: chronocom

Yk’rtz plays right into the stereotype of a vrusk art fanatic, animatedly interested in all forms of physical and visual art.  She works out of an office on the records vault level (area 4) where she is constantly reviewing the various artifact found across the planet.  She also studies the impact of these artifacts on the art produced by the residents of Laco looking for Tetrarch influences in modern culture.

Main Computer

The vault’s computer is housed on the main level of the complex (area 8) and can only be accessed by the research room (area 7). The computer is level 4 (115 FP) and has the following programs:

  • Analysis – 4
  • Communication – 1
  • Computer Security – 3
  • Information Storage – 5
  • Installation Security – 4
  • Language – 4
  • Life Support – 1
  • Maintenance – 1
  • Robot Management – 4

The installation security program controls the gate house, the door locks, all the security cameras, and the sonic stunner turrets throughout the compound. It does not control the security robots. It can issue orders but cannot disable them.

Similarly, the robot management program controls the maintenance and data retrieval robots but cannot control or disable the security robots, they are designed to operate independently of the main computer.

The computer itself does not contain the archived data. Rather the information storage program contains a giant, detailed index of the data archived at the site. The data are stored on data cubes that can be plugged into ports and then accessed via the various computer terminals throughout the building.  One of the main roles of the archivists at the site is to keep this index updated as new data arrives each week.

All terminals in the building are connected to the main computer and grant access based on the passcodes supplied when logging into the program. Visitors only have access to the analysis, information storage, and language programs while the base staff have access to the programs needed to perform their functions.

The defeating security subskill can be used at any terminal, but the bypassing security subskill can only be employed on the main computer itself in area 8. Any failed attempt to use either of these skills immediately locks the terminal and notifies the security officers.

Threat Response

The exact response to any sort of threat will depend on the location and nature of the threat itself, some common possibilities are provided in this section. Any intruders captured will be detained, questioned, and transported to the PGC headquarters at Point Glass for further processing.

For the purpose of threat response, authorized personnel are the regular vault staff, whose visual, biometric, and id card information are stored in the main computer and robots, and visitors holding/wearing a special passcard only available from the PGC headquarters in Point Glass and used by visiting PGC personnel. Authorized visitors are those issued a visitor badge at the security desk (main level – area 1a) upon arrival. Anyone else is considered unauthorized.

Exterior threats

A common, low-level threat is a vehicle attempting to gain entrance through the gatehouse without a proper code. In this case, the main PGC compound in Point Glass is contacted to verify that there is not some mistake. If the visitor’s bonifides can be established, they are allowed to enter. Otherwise, they are simply turned away and asked to exit the gatehouse and leave the area.

If an air-vehicle (aircar, jetcopter, etc.) attempts to land in the compound, they are warned away unless proper clearance codes are provided before approaching within 1000 meters of the compound. At the 1000-meter range they are warned that deadly force will be used if they do not alter course. If the vehicle does not veer off, the robots in the guard towers will all open fire at 500 meters with the heavy lasers set to 20 SEU (maximum) damage in an attempt to down the intruding vehicle.

A similar response will occur for any land vehicles that attempt to approach the compound by any means other than the main access road.

If any group designated as hostile by the security officers or the vault’s installation security program are visible inside the compound or are attempting to escape, the robots will use their weapons to attack the intruders using their weapons in an attempt to get them to surrender. Beings will be attacked using a 5 SEU damage setting while vehicles will be attacked using a 20 SEU setting. Fleeing parties will be attacked both inside and outside the compound until out of range.

Main level threats

If an authorized visitor is found wandering the halls, one of the security officers or archivists will come find them and offer them assistance and remind them they are only allowed access to the restrooms, the break room, and the research room. A second offence will result is a stiffer warning, and a third offence will result in them being escorted from the complex.

If the security cameras detect unauthorized personnel in any of the offices, the robotics lab, or the computer room, the security officers will respond immediately and attempt to subdue the intruders. If necessary, they can call on the security robot from the hallway to the elevator (main level – area 11) and from the hallway (area 3) or robot storage area in the deep vault (area 12). Note that it will take at least 5 minutes for robots to come up from the deep vault due to the elevator travel times unless a data retrieval robot is currently down in the vault, in which case it will only take 3 minutes.

If any unauthorized personnel penetrate the security lock (main level – area 10), both the security robot and the stunner turrets will immediately engage the intruder with their stunners attempting to subdue them. If stunning is not effective, the robot will switch to its laser weapon set at 5 SEU to encourage surrender and will fight to kill if the target does not surrender.

Deep vault threats

Any access to any portion of the deep vault by unauthorized personnel will be meet by an immediate response from the robots and stunner turrets. Like the security hallway on the main level, stunning attacks will be employed initially but if they fail, the robots will switch to deadly force. If the three robots already in the halls are deemed insufficient for the task, the six extra robots in area 12 will be activated and sent to assist.

Final Thoughts

This took a lot longer than I thought it would. And ended up being a bit bigger than I expected as well. It started as two pages of maps in my notebook and five paragraphs (including the combat robot stat block) of description. In the end the PDF file (attached below) is 16 pages long.

I ran my group through the location using the five paragraphs of notes. If any of them are reading this, they have probably realized by now that I completely forgot about the security robots inside the complex. It would have made their life a bit harder. The staff details are really the only bit I added after the fact. I knew they were all their but didn’t have details on any of them when I ran the game. Everything else was in my head if not written down when they went through the vault.

I hope you enjoy the location and the details provided and can use it in your game one way or another. As always, feel free to leave comments, questions, or suggestions below. Here’s the PDF with the full write-up.

Pan Galactic Records VaultDownload
December 24, 2018 Tom Leave a comment

Posts navigation

← Previous 1 … 9 10 11 … 13 Next →
Become a Patron!

Recent Posts

  • State of the Frontier – January 2024
  • Detailed Frontier Timeline – FY62.069 to FY62.99
  • State of the Frontier – August 2022
  • Battle of Hargut (Gruna Garu) – FY62.098
  • Archived Arcane Game Lore Posts – May 2013 to Dec 2014
  • A Look at Yachts and Privateers
  • Homeworld Bound – A Campaign Concept
  • Second Battle of Fromeltar (Terledrom) – FY62.083
  • Sample Star System Data
  • Detailed Frontier Timeline – FY62.038 to FY62.068

Categories

  • 3D Models
  • Adventures
  • Background
  • Creatures/Races
  • Deck Plans
  • Equipment
  • Game Design
  • General
  • Locations
  • Maps
  • NPCs
  • Optional Rules
  • Patreon-only
  • Project Overviews
  • Reviews
  • Setting Material
  • Starships
  • System Brief
  • Vehicles
  • Writing

Recent Comments

  • Tom on State of the Frontier – January 2024
  • Tom on State of the Frontier – January 2024
  • Tom on Star Map Generator – GUI Edition
  • David on Star Map Generator – GUI Edition
  • DM_Shroud on Star Map Generator – GUI Edition
  • Tom on Fighter Miniatures
  • Rlaybeast on Fighter Miniatures
  • Loguar on Detailed Frontier Timeline – FY62.069 to FY62.99
  • Loguar on Detailed Frontier Timeline – FY62.069 to FY62.99
  • Tom on Detailed Frontier Timeline – FY62.069 to FY62.99

Archives

  • January 2024 (1)
  • September 2022 (1)
  • August 2022 (9)
  • July 2022 (3)
  • June 2022 (3)
  • May 2022 (3)
  • June 2021 (1)
  • April 2021 (1)
  • February 2021 (4)
  • January 2021 (6)
  • December 2020 (5)
  • November 2020 (11)
  • October 2020 (4)
  • September 2020 (5)
  • August 2020 (4)
  • July 2020 (6)
  • June 2020 (5)
  • May 2020 (8)
  • April 2020 (5)
  • March 2020 (5)
  • February 2020 (5)
  • January 2020 (5)
  • December 2019 (7)
  • November 2019 (4)
  • October 2019 (6)
  • September 2019 (5)
  • August 2019 (6)
  • July 2019 (7)
  • June 2019 (5)
  • May 2019 (6)
  • April 2019 (7)
  • March 2019 (4)
  • February 2019 (5)
  • January 2019 (7)
  • December 2018 (5)
  • November 2018 (10)
  • October 2018 (4)
  • September 2018 (4)
  • August 2018 (5)
  • July 2018 (4)
  • June 2018 (4)
  • May 2018 (12)
  • December 2015 (1)
  • November 2015 (2)
  • December 2014 (4)
  • November 2014 (3)
  • June 2014 (1)
  • January 2014 (1)
  • July 2013 (1)
  • June 2013 (2)
  • May 2013 (3)

Meta

  • Log in
  • Entries feed
  • Comments feed
  • WordPress.org

Recent Posts

  • State of the Frontier – January 2024
  • Detailed Frontier Timeline – FY62.069 to FY62.99
  • State of the Frontier – August 2022
  • Battle of Hargut (Gruna Garu) – FY62.098
  • Archived Arcane Game Lore Posts – May 2013 to Dec 2014

Recent Comments

  • Tom on State of the Frontier – January 2024
  • Tom on State of the Frontier – January 2024
  • Tom on Star Map Generator – GUI Edition
  • David on Star Map Generator – GUI Edition
  • DM_Shroud on Star Map Generator – GUI Edition

Archives

  • January 2024 (1)
  • September 2022 (1)
  • August 2022 (9)
  • July 2022 (3)
  • June 2022 (3)
  • May 2022 (3)
  • June 2021 (1)
  • April 2021 (1)
  • February 2021 (4)
  • January 2021 (6)
  • December 2020 (5)
  • November 2020 (11)
  • October 2020 (4)
  • September 2020 (5)
  • August 2020 (4)
  • July 2020 (6)
  • June 2020 (5)
  • May 2020 (8)
  • April 2020 (5)
  • March 2020 (5)
  • February 2020 (5)
  • January 2020 (5)
  • December 2019 (7)
  • November 2019 (4)
  • October 2019 (6)
  • September 2019 (5)
  • August 2019 (6)
  • July 2019 (7)
  • June 2019 (5)
  • May 2019 (6)
  • April 2019 (7)
  • March 2019 (4)
  • February 2019 (5)
  • January 2019 (7)
  • December 2018 (5)
  • November 2018 (10)
  • October 2018 (4)
  • September 2018 (4)
  • August 2018 (5)
  • July 2018 (4)
  • June 2018 (4)
  • May 2018 (12)
  • December 2015 (1)
  • November 2015 (2)
  • December 2014 (4)
  • November 2014 (3)
  • June 2014 (1)
  • January 2014 (1)
  • July 2013 (1)
  • June 2013 (2)
  • May 2013 (3)

Categories

  • 3D Models
  • Adventures
  • Background
  • Creatures/Races
  • Deck Plans
  • Equipment
  • Game Design
  • General
  • Locations
  • Maps
  • NPCs
  • Optional Rules
  • Patreon-only
  • Project Overviews
  • Reviews
  • Setting Material
  • Starships
  • System Brief
  • Vehicles
  • Writing

Meta

  • Log in
  • Entries feed
  • Comments feed
  • WordPress.org
Powered by WordPress | theme Layout Builder