This was a fairly busy month with three major events. The first was the discovery of the YAS Royal Cloud by the HSS History’s Hope. This is going to send ripples through the yazirian society. The other two major events were the battles at Terledrom and Hargut. The loss of the starship construction center at Terledrom is a major blow to the UPF. Strike Force Nova is en route to hit a similar sized sathar shipyard and we’ll see what happens there next month.
Date (FY)
Events
62.069
Six more pilots graduate from the accelerated training program at Gollwin Academy. They take command of some of the fighters there and await the arrival of SG Alpha.
62.070
Both Sathar TG1 & SBF-E2 jump into the OFS020 system and begins decelerating. TG1 detects PG Probe Alpha almost immediately and takes measures to remain undetected by the UPF ships.
62.071
The HSS History’s Hope arrives in inner system of YS14 and begins the approach the ship broadcasting the mayday message. It seems to be floating in interplanetary space on highly elliptical orbit around the star.
62.072
– The UPF destroyer arrives at Kawdl-Kit (K’sta-Kar) and joins PG Vigilant.
– Arriving within visual range of the ancient yazirian vessel, the crew of the HSS History’s Hope confirms that it is indeed the YAS Royal Cloud, the only ark ship from the exodus not to arrive in the Frontier and which was carrying the imperial family of ancient Yazira.
– Inspection of the YAS Royal Cloud show that it is missing all of its engines and shows signs of blast damage on the aft part of the ship as well as serious weathering and impact damage from small objects and micro meteors.
– An assault scout is completed at the PGC shipyards (Gran Quivera, Prenglar) and joins TF Prenglar.
62.073
– TG2 jumps into the Liberty system as it is passing through.
– PG Probe Alpha successfully jumps back into the Fromeltar system without having detected the arrival of sathar SBF-E2 or TG1 entering the OFS020 system. They transmit the jump data to Spacefleet and begin decelerating and working on calculation for a return to that system and then beyond.
– After an animated discussion and deliberation, the crew of the HSS History’s Hope decides to not attempt boarding the YAS Royal Cloud. Deciding that a message about its discovery is too sensitive to broadcast, they choose to return to the Frontier to deliver it personally.
– After completing a close visual inspection of the YAS Royal Cloud, the HSS History’s Hope starts accelerating for a jump back to the YS12 system.
– A frigate is completed at the PGC shipyards (Gran Quivera, Prenglar). Together with the AS completed the day before, they are designated SG Beta and depart for the K’tsa-Kar system to join PG Vigilant
62.074
– Sathar TG1 and SBF-E2 met in the OFS020 system and all but the assault carrier from TG1 join SBF-E2. The assault carrier (TG1) departs for sathar SCC#4 (OFS111) while the other ships start accelerating for a jump into the Fromeltar system.
– An assault scout is finished at the Minotaur (Theseus) shipyards and departs for the Liberty system to join PG Liberty.
– Two fighters are completed at the Terledrom (Fromeltar) shipyards.
62.075
– TG2 is detected in the outer reaches of the Liberty system by PG Liberty. A heavy cruiser and destroyer are too much for a lone assault scout so they can only report the transit of the ships back to Spacefleet and request more support.
– PG Probe Beta arrives in the Zebulon system and begins decelerating toward Volturnus and working on jump calculations to plot a route directly to Kazak through the Xagyg Nebula.
– An assault scout is completed at the CDC shipyards (Triad, Cassidine) and begins patrol duties with FFC Squadron Eta.
62.076
– A frigate is completed at sathar SCC#4 (OFS111).
– PG Probe Gamma arrives in the Kizk-Kar system. It begins decelerating toward the planet and working on calculations for a jump to the binary star system FS56, the suspected route for sathar ships into the Kisk-Kar system.
62.077
– PG Probe Delta arrives in the K’aken-Kar system and begins decelerating toward the planet to confer with the militia assault scout crew. Work also begins on calculations for a jump to the FS33 system.
– SG Alpha arrives back at Gollwin Academy (Morgaine’s World, Prenglar) where it picks up 8 more fighters and departs for Lossend (Timeon).
62.078
– The HSS History’s Hope successfully jumps back into the YS12 system. The crew decides that they need to fully chart the route to YS14 before returning the Frontier and so begin decelerating and working on jump calculations back to that system.
– PG Liberty realizes that TG2 is not headed for the Waller Nexus system and on to Theseus but to some other destination. They relay this to Spacefleet.
62.079
SBF-E2 jumps into the Fromeltar system and begin decelerating toward Terldrom.
62.080
– SBF-E2 is detected by TF Cassidine. PG Probe Alpha aborts its jump back to OFS020 and heads to join the Task Force as it, the FFC squadron, and the Fromeltar militia prepare to meet the sathar fleet.
– Sathar fleet TG2 jumps out of the Liberty system (to OFS196).
62.081
– Two Fighters are completed at the Minotaur (Theseus) shipyards. They join the others manned by militia pilots under the direction of FFC Squadron Epsilon.
– Significantly outgunned, TF Cassidine regrets not requesting one of the minelayers in Prenglar to be transferred to Fromeltar. They hope to use the maneuverability of their smaller ships against the large number of capital ships in the sathar fleet.
62.082
– Calculations complete, PG Probe Beta begins accelerating for the jump to Kazak.
– Calculations complete, PG Probe Gamma begins accelerating for the jump to FS56.
– Calculations complete, PG Probe Delta begins accelerating for the jump to FS33.
62.083
– Sathar TG1 arrives at SCC#4.
– Second Battle of Terledrom (Fromeltar) – The sathar suffer more losses than expected but destroy the Terledrom shipyards, most of the UPF fighters in the system, and a militia assault scout.
– The fleeing sathar ships accelerate for a jump to OFS020 where they will make a high-speed run to sathar SCC#5 (OFS019).
62.084
– A frigate is completed at sathar SCC#10 (OFS174).
– TF Cassidine’s assault carrier, together with the Fromeltar militia frigate, are designated Shuttle Group Beta and depart for Dramune where the frigate will enter the shipyard for repairs and the carrier will continue on to Prenglar.
– One of the minelayers in TF Prenglar is detached and designated Shuttle Group Gamma. It departs to join TF Cassidine in Fromeltar.
62.085
After a careful review of the events of the Second Battle of Fromeltar, Spacefleet begins a program to arm and add defenses to all existing starship construction centers. Additionally, security is increased even further at all operating shipyards.
62.086
– SG Alpha arrives at Lossend where the eight fighters it is carrying are deployed as FFC Squadron Iota. SG Alpha then heads out for Theseus to pick up more fighters.
– An assault scout is completed at the PGC shipyards (Gran Quivera, Prenglar) and joins TF Prenglar.
62.087
– Calculations for the return jump to YS14 complete, the HSS History’s Hope begins accelerating for a jump back to that system.
– PG Probe Beta successfully jumps into the Kazak system. It begins decelerating and working on jump calculations for the return jump to Zebulon.
– PG Probe Gamma successfully jumps into FS56. They remain near jump speed while working on overhauls and jump calculations for the return jump to Kizk-Kar while they monitor for sathar signals in the system.
– PG Probe Delta successfully jumps into the FS33 system. With the jump back to K’aken-Kar already plotted by the militia, they remain near jump speed and begin working on jump calculations to the neutron star in OFS166 while they monitor for sathar signals in the system.
62.088
– Spacefleet changes PG Probe Beta’s orders and directs the to proceed immediately to OFS019 and monitor the system. They stark working on jump calculations for that system and maneuvering for a jump.
– A light cruiser is completed at sathar SCC#1 (OFS203) and joins SBF-A2.
– SBF-E2 jumps back into OFS020 where they remain near jump speed and begin a high-speed transit to SCC#5 (OFS019).
– Five fighters are completed at the PGC shipyards (Gran Quivera, Prenglar) and shuttled to Gollwin Academy.
62.089
– TG Beta arrives in the K’sta-Kar system from Prenglar and joins PG Vigilant.
– Sathar fleet TG2 jumps into the OFS203 system (Sathar SCC#1) and receive orders to remain near jump speed and vector to join SBF-A2 which begins acceleration for a jump to the Gruna Garu system.
– Assessment of resources and manufacturing capabilities complete, work begins on the long process of rebuilding the Terledrom (Fromeltar) starship construction center.
– Two more pilots graduate from the accelerating training program at Gollwin Academy. They continue working with the fighters at the academy while two other pilots are sent to Triad (Cassidine) to start training with FFC Squadron Eta.
62.090
The assault scout from Minotaur arrives in the Liberty system and joins PG Liberty.
62.091
PG Probe Beta jumps into the OFS019 system. They remain near jump speed as they begin working on calculations for a jump back to Kazak and monitoring for sathar signals in the system.
62.092
– The HSS History’s Hope successfully jumps back into the YS14 system completely charting the route to that system from YS12. They begin deceleration and jump calculations back to YS12 and then a return trip to Scree Fron.
– Calculations complete, PG Probe Delta successfully jumps into the OFS166 system containing the neutron star. They begin decelerating and working on calculations for a jump back to FS33 while monitoring for sathar signals.
– After only detecting signals from near one of the planets, Spacefleet orders PG Probe Beta to cautiously proceed to the inner system and examine exactly what is there. They alter their course to slowly drop into the system.
62.093
Deceleration and jump calculations complete, PG Probe Gamma begins accelerating for a jump back to the Kisk-Kar system.
62.094
– SBF-A2 (1 DD, 2 LC, 1 HC) jump into the Gruna Garu system and begin decelerating toward the planet.
– The Gruna Guru militia detects the inbound sathar ships just hours after they arrive in the system. Together with FFC Squadron Theta and the Yazira Squadron of civilian privateers, they prepare to defend against the sathar while notifying Spacefleet.
62.095
Sathar SCC#5 detects the inbound assault scouts of PG Probe Beta. The UPF ships notice a sharp decrease in transmissions from the planet but little else.
62.096
With the increased security the CNE Group infrastructure rollout has speed up and gone much more smoothly. As new areas are provided with service, customers are switching in droves away from the high prices of the Groth Energy Corporation.
62.097
– Calculations complete, and having not detected any sathar in the system, PG Probe Delta begins accelerating for a jump back to FS33.
– The two Spacefleet fighter pilots arrive at Triad (Cassidine).
62.098
– PG Probe Gamma successfully jumps back into the Kizk-Kar system and immediately begins decelerating and working on calculations for a jump back to FS56.
– Battle of Hargut (Gruna Garu) – UPF forces defeat the invading sathar but at great cost including the loss of the station around the planet.
Five fighters are completed at the CDC (Triad, Cassidine) shipyards.
62.099
– PG Probe Beta gets close enough to the planet to begin to detect details and discovers what seems to be a starship construction center as well as shuttles going between the station and planet. The SCC seems to be currently undefended.
– After several hours of observations, PG Probe Beta begins to accelerate away from the planet toward the outer system. They send a subspace radio message back to Spacefleet with their report.
– The damaged ships of the Yazira Squadron depart Hargut (Gruna Garu) for Prenglar and the shipyards there.
This was a busy month in the Frontier. The sathar probe into the Theseus system is intercepted and destroyed by the militia. The lost K’aken-Kar assault scout finally finds its way home and Spacefleet starts to get serious about locating the sathar routes into the Frontier and their starship construction centers. The UPF suffers a major blow to its production capabilities as saboteurs nearly completely destroy the Hentz (Araks) starship construction center. Finally, the HSS History’s Hope misjumps into an unplanned system and makes what might be a major yazirian cultural discovery.
Date (FY)
Events
62.038
Five fighters are completed at the CDC shipyards (Triad, Cassidine) and work begins on five more. Three of the fighters are immediately assigned to fill out FFC Squadron Eta while the other two are placed in storage.
62.039
The Second Battle of Theseus. The Theseus militia intercepts SFB-J2 and destroys, only suffering minimal damage.
62.040
– Jump calculations complete, the HSS History’s Hope begins the final accelerations and alignment for their next jump.
– Deceleration complete, SBF-A2 begins accelerating for the return jump to OFS203.
62.041
– Deceleration complete and with still no sign of sathar presence in the OFS020 system, PG Probe Alpha begins acceleration for a return jump to the Fromeltar system.
– The militia ships arrive back at Minotaur (Theseus) after the battle with the sathar and the damaged assault scout is immediately moved into the shipyard for repairs, bumping out a HS 5 ship undergoing maintenance.
– SG Alpha jumps into the Prenglar system. A ship carrying the new fighter pilot graduates boosts to meet up with carrier as work begins on calculations for the jump to Athor.
– A heavy cruiser is completed at SCC#5 (OFS19) and joins SBF-E2. The battle group, consisting of 2 C, 1 FF, 1 DD, 1 LC, & 2 HC depart for SCC#4 (OFS111).
– Three assault scouts are completed at the PGC shipyards (Gran Quivera, Prenglar) and join TF Prenglar. The shipyard space is released by Spacefleet back for pubic ship maintenance work.
62.042
The HSS History’s Hope successfully jumps into the new system which they are designation YS13. They begin deceleration an jump calculations for the return trip to YS12.
62.043
SBF-A2 is detected in the outer reaches of the Gruna Garu system but is too far away to be identified and just recorded as an unidentified vessel. Due to the on-going conflict, it is reported immediately to Spacefleet.
62.044
Two fighters completed at the Minotaur (Theseus) shipyards and join those manned by the militia under the direction of FFC Squadron Epsilon.
62.045
– After 13 days, the astrogator on the K’aken-Kar assault scout establishes that they are in FS33, the original destination for their first misjump. They begin work on calculations to jump back to their home system.
– SBF-A2 slips into the void but misjumps, overshooting its target and ending up in OFS198.
– Given the reports from the Gruna Garu system of unidentified vessels in the outer system, Spacefleet orders SG Alpha to deliver the fighters waiting at Hentz (Araks) to the Gruna Garu system.
62.046
– PG Probe Alpha slips into the Void but misjumps and doesn’t end up in the Fromeltar system. However, their comm systems light up almost immediately and they realize they have overshot their target and ended up in the Dramune system. They immediately begin decelerating and plotting a return jump to Fromeltar.
– SBF-A2 determines its location and begins plotting a jump back to OFS203.A light cruiser is completed at sathar SCC#4 (OFS111)
62.047
Starfleet puts out a Frontier-wide announcement looking for high level astrogators to participate in a high-paying, adventurous, but possibly dangerous classified project.
62.048
With CNE Group’s infrastructure rollout on Groth (Fromeltar) plagued by constant sabotage, the consortium brings in a large MercCo contingent as additional security and several investigative teams.
62.049
Despite the vagueness of the advertisement, Starfleet’s call for high level astrogators garners dozens of applicants in just two days. Screening of applicants begins immediately.
62.050
Three more pilots complete the accelerated training at Gollwin Academy. They are temporarily assigned to fighters at the Academy and start training with TF Prenglar while awaiting permanent assignment.
62.051
– The HSS History’s Hope misjumps and instead of ending up in YS12 are in an unknown system which they designate YS14. They begin immediately working on finding their position.
– The K’aken-Kar militia assault scout begins accelerating for the jump back to its home system.
– Four fighters are completed at the Hentz (Araks) shipyard and FFC Squadron Beta takes control of them and the other four fighters currently manned by the militia in preparation for the arrive of SG Alpha in a few days.
– Two fighters are completed at the Minotaur (Theseus) shipyards and join the partial squadron manned by the militia under the command of FFC Squadron Epsilon.
– SG Alpha jumps into the Araks system and begins deceleration towards Hentz to pick up the fighter stored there.
62.052
Sathar agents succeed in sabotaging the Hentz (Araks) starship construction center almost completely destroying it. Pieces of the SCC rain down on the planet. All ships in the center, including 4 civilian vessels, 2 assault scouts, & 4 fighters are destroyed. It will be years before the facility is back to full capacity.
62.053
In wake of the near total loss of the Hentz (Araks) SCC, Star Law launches an investigation into the Family of One’s management of the facility and their security measures. Security is tightened at all other SCCs.
62.054
– Sathar fleet TG1 jumps into the OFS138 system containing sathar SCC#3. It is joined by the frigate and heavy cruiser there and continues on toward OFS020.
– A destroyer is completed at sathar SCC#10 (OFS174).
– A HS:5 ship completes maintenance at the Minotaur (Theseus) SCC and the militia uses the space to begin construction of another frigate.
62.055
– After a full assessment of the damage to the Hentz (Araks) SCC, it is determined that existing center is effectively a total loss (98% damaged) and the decision is made to build a completely new structure. The limited capacity of the surviving center is dedicated to that work.
– SG Alpha arrives at the Hentz station and the eight pilots take control of their fighters and begin loading them onto the assault carrier for transport to Gruna Garu.
62.056
– The K’aken-Kar militia assault scout successfully jumps back into the K’aken-Kar system and begins decelerating toward home. All data from its travel are immediately transmitted to Spacefleet.
– With the fighters loaded, SG Alpha departs for Gruna Garu.
– The crew of the HSS History’s Hope detects a faint, intermittent radio signal emanating from somewhere in the YS14 system. While the astrogators continue to work on locating their position, other crew work on finding the source of the signal and understanding it.
62.057
– SBF-E2 arrives at SCC#4 (OFS111). The AC, LC, and 8 fighters are attached to the battle fleet and preparations are made for them to join TG1 in OFS020.
– An assault scout is completed at the PGC shipyards (Gran Quivera, Prenglar) and joins TF Prenglar.
62.058
– A heavy cruiser is completed at sathar SCC#10 (OFS174). Together with the destroyer completed four days earlier, they are designated TG2, and immediately departs for SCC#1 (OFS203).
– Three assault scouts are completed at the CDC shipyards (Triad, Cassidine). Designated Shuttle Group Beta, they depart immediately for Prenglar.
– Five fighters are completed at the PGC shipyards (Gran Quivera, Prenglar) and are transferred to Gollwin Academy.
62.059
PG Probe Alpha arrives back at Terledrom (Fromeltar). Two high level astrogators from TF Cassidine are transferred to the ships of PG Probe Alpha and it sets out once again to OFS020 to try to chart the jump back.
62.060
– SBF-A2 successfully arrives back at sathar SCC#1 (OFS203).
– The astrogators on the HSS History’s Hope identify their location as a system 9 light years from YS12 and begin plotting a jump back to the YS12 system.
– A Spacefleet destroyer is completed at the Minotaur (Theseus) shipyards. It departs to joint PG Vigilant in the K’sta-Kar system.
62.061
– With the screening of the initial astrogator candidates complete, Spacefleet organizes three new patrol groups, Probe Beta, Gamma, & Delta, each consisting of two assault scouts (drawn from TF Prenglar) with a level six astrogator on board.
– After a final briefing, the newly formed patrol groups are dispatched to try to discover the jump routes the sathar are using to enter the Frontier.
62.062
With more resources available now that their position has been determined, the crew of the HSS History’s Hope localizes the source of the mysterious signal to a planet in the inter system. It appears to be a FM radio signal and work begins on decoding it.
62.063
Security for CNE Group on Groth capture saboteurs attempting to disrupt their infrastructure rollout. As suspected the saboteurs were hired by the Groth Energy Corporation.
62.064
PG Probe Alpha jumps into the OFS020 system and immediately begins deceleration and jump calculations for the return to Fromeltar.
62.065
– Jump calculations complete, the HSS History’s Hope begins acceleration for the jump back to YS12.
– SBF-E2 departs sathar SCC#4 (OFS111) for a jump into the OFS020 system to join up with TG1.
– SG Alpha arrives at Hargut (Gruna Garu) delivering the fighters from Hentz which are formed into FFC Squadron Theta. The assault carrier departs to return to Prenglar.
62.066
– The crew of the HSS History’s Hope finally have a breakthrough on the signals from the inner system of YS14. To their surprise, it is a garbled mayday message in a very old Yazirian dialect.
– The old yazirian mayday identifies the ship as the Yazirian Ark Ship (YAS) Royal Cloud. The HSS History’s Hope immediately aborts the jump back to YS12 and starts heading to the inner system.
62.067
– Now 500 days since hatching, the Eorna young are still growing and thriving. The problems seem to have been all with the rogue Eorna and a new batch of eggs are prepared for hatching and plans begin to accelerate the population growth program.
– An assault scout is complete at the Outer Reach (Dramune) shipyard and departs for Morgaine’s World (Prenglar) to join TF Prenglar.
– All attempts at communication with the YAS Royal Cloud by the crew of the HSS History’s Hope receive no response.
62.068
– SG Beta arrives at Gollwin Academy and joins up with TF Prenglar, replacing several of the assault scouts that departed as part of the new patrol groups.
– The replacement destroyer for the Inner Reach (Dramune) militia is completed at the Outer Reach shipyards and departs across the system to Inner Reach. Outer Reach begins construction of a destroyer for themselves.
– Five more fighters and an assault scout are completed at the CDC (Cassidine, Triad) shipyards. The fighters are temporarily attached to FCC Squadron Eta while the assault scouts depart to join PG Vigilant.
This month both sides of the conflict are probing for new routes into enemy space with the Sathar looking for routes to Theseus and Gruna Garu and the UPF probing outward from Fromeltar. The lost militia scout begins to find its way home and the HSS History’s Hope continues its journey.
Both sides continue to build up their forces and the Sathar start a major reshuffling of their ships in preparation for a major change in tactics. The sathar continue with sabotage efforts around the Frontier. This month also sees the events of SF4: Mission to Alcazzar play out.
Date (FY)
Events
62.008
– The militia assault scout coming from Theseus arrives back at Pale station. The crew is debriefed, and the ship immediately begins duties.
– SG Alpha arrives at Gollwin Academy to pick up a shipment of fighters to be delivered to K’sta-Kar.
– Five fighters are completed at the Triad (Cassidine) SCC and work begins on five more.
62.009
After loading 8 fighters at Gollwin Academy, SG Alpha departs for K’sta-Kar.
62.010
– PG Liberty does not detect the return of SBF-J2 until they are nearly back to Snowball being tipped off my some of their Mhemne contacts. They radio the news of the fleet’s return back to Spacefleet.
– Construction is competed at the Minotaur (Theseus) shipyard of a HS: 7 civilian freighter. This is the first civilian ship competed since the beginning of the conflict. It was started before the conflict began.
62.011
– Arriving back at Snowball (Liberty) SBF-J2 spends a day replenishing supplies before heading back out of the system to complete charting the route to Theseus.
– Eight Academy pilots arrive at Theseus and take control of the waiting fighters. They form FFC Squadron Epsilon.
62.012
Jump calculations for the next leg complete, the HSS History’s Hope begins accelerating toward Void speed.
62.013
An assault scout is completed in the PGC (Gran Quivera, Prenglar) shipyards and joins TF Prenglar. Work begins on another assault scout.
62.014
– Two UPF assault scouts are completed at the CDC (Triad, Cassidine) shipyards. They are designated Patrol Group Probe Alpha and depart for the Fromeltar system to explore outward an attempt to find the sathar route into that system. Work begins on two more assault scouts.
– Two fighters are completed at the Minotaur (Theseus) station. One rounds out FFC Squadron Epsilon bringing it up to full strength and the other is manned by the militia supporting the FFC. Work begins on two more fighters.
– The CDC team arrives on Alcazzar. Within minutes of their landing, their transport, the Nightrunner, is attacked and forced to flee the system, stranding them on the planet. (SF4)
62.015
– After securing the CDC compound on Alcazzar, the strike team realizes that their only option for off-world communication will be at the Streel compound about 120 km away. As they prepare to depart, they are attacked by an aircar with Streel markings. (SF4)
– A UPF light cruiser, part of Task Force Meteor, is completed at the CDC shipyards (Triad, Cassidine). It departs immediately to join up with TF Cassidine in the Fromeltar system. Work is started on another light cruiser.
– After a day of travel over rugged terrain, and several encounters with the mega-fauna of Alcazzar, the CDC set up camp for the night. (SF4)
62.016
– As the CDC team sets out to continue its journey to the Streel compound, they are attacked by a large armed force of Streel vehicles. After an intense battle, the Streel forces are destroyed but the CDC team is down to a single vehicle. (SF4)
– The HSS History’s Hope successfully make the jump into the system they are now designating YS12. They begin deceleration and start calculations for the return jump to YS11.
– Entering the forest east of the Streel compound, the CDC explorer is bombarded by fruit pits from unseen assailants for a few seconds before the bombardment ends with chittering echoing through the forest. (SF4)
– A few hours after the fruit pit bombardment, the CDC team’s path is blocked by six individuals that they recognize as members of the planet’s sentient species. Recognizing the opportunity for allies against Streel, the team attempts to communicated with the natives. (SF4)
62.017
– Having established friendly relations with the natives of Alcazzar, the CDC team works with the natives to plan an attack on the Streel compound where over a hundred of the natives are being held and used as slave labor. (SF4)
– After nearly 70 days, the astrogator on the K’aken-Kar militia assault scout finally determines the ship’s location and discovers that they are well outside the Frontier. They begin plotting a jump to OFS167 to start the trek home.
62.018
An unauthorized aircar attempts to approach Spacefleet headquarters on Morgaine’s World. Refusing to divert, it is engaged and shot down but detonates upon impact causing considerable damage and several civilian casualties. The driver is incinerated in the blast.
62.019
With jump calculations about halfway done, the crew of the K’aken-Kar militia assault scout begin accelerating toward jump speed for the jump to OFS167, 5 light years away.
62.020
– After 3 days of planning and resting, the CDC team, together with the Alcazzar natives, launch an attack on the Streel mining compound. (SF4)
– The attacking CDC team manages to fuse the reactor of the Streel compound and get a message to the Nightrunner to pick them up back at the CDC compound in ten days. (SF4)
– Nine more pilots graduate from the accelerated training program. Eight depart for Triad (Cassidine) while the remaining pilot joins Task Force Prenglar.
62.021
– Deceleration into YS12 complete, the HSS History’s Hope begins accelerating for it’s jump back to YS11 while jump calculation continue.
– Four fighters are completed at the Hentz (Araks) shipyards. They are temporarily crewed by militia pilots under the supervision of PG Tranquility. Work begins on four more.
– Two fighters are completed at the Minotaur (Theseus) shipyards and work begins on two more.
62.022
A cutter is completed at sathar SCC#5 (OFS19)
62.023
An attempt is made to sabotage the starship construction center at Rupert’s Hole (Cassidine) but is thwarted by security personnel. The saboteur, a human, kills himself before he can be captured.
62.024
– SBF-J2 arrives in the Padda system and begins working on jump calculations to chart a route to the Theseus system.
– The K’aken-Kar militia assault scout successfully jumps into the OFS167 system. As the engineers start working on their engine overhauls, the astrogator gets to work plotting a jump to the neutron star in OFS166.
– A frigate is completed at sathar SCC#10 (OFS174)
62.025
SG Alpha arrives at K’sta-Kar delivering 8 fighters which become Frontier Fighter Corps Squadron Zeta. The crew is given 2 days of R&R before heading out for the Araks system. The assault scout joins PG Vigilant.
62.026
The HSS History’s Hope successfully jumps back to YS11 and begins deceleration and starts calculations for the jump back to YS12.
62.027
– PG Probe Alpha arrives at Terledrom (Fromeltar) and confers with leader from TF Cassidine and the local militia about the sathar incursion into the system. They decide to attempt to chart the route through the nebula to the double star system OFS020 a 6 light year jump.
– With their jump calculations nearly complete, the K’aken-Kar militia assault scout begins acceleration for the jump to OFS166.
62.028
– Jump calculations complete, sathar SBF-J2 begins accelerating for the jump into the Theseus system.
– A destroyer is completed at sathar SCC#1 (OFS203).
– Deciding to try a different tactic, the sathar begin a major fleet reshuffling. The ships (1 F, 1 FF, 1 HC, & 1 AC) at SCC#10 (OFS228), designated TG1 depart for SCC#3 (OFS138).
– Five fighters are completed at the PGC shipyards (Gran Quivera, Prenglar) and are transferred to Gollwin Academy while work begins on five more.
62.029
The 8 FFC pilots arrive at Cassidine and take command of the fighters stored there forming FFC Squadron Eta.
62.030
– The Nightrunner arrives back at Alcazzar and retrieves the CDC team. They slip out of the system avoiding Streel forces and return to Triad (Cassidine). (SF4)
– With assistance from the TF Cassidine astrogators, PG Probe Alpha completes jump calculations and begins accelerating for a jump to the OFS020 system.
62.031
SBF-A2 (1 LC) departs SSC#1 (OFS203) to attempt to chart a route to Gruna Garu.
62.032
The K’aken-Kar militia assault scouts misjumps once again and ends up in another unknown star system (FS33). They begin working on finding their location.
62.033
SBF-J2 successfully jumps into the Theseus system. It begins deceleration to turn around and jump back to the Padda system.
62.034
Eight more pilots graduate from the accelerated fighter training program at Gollwin Academy. They are to join SG Alpha as it passes through the system in 10 days to take control of the new fighters at Hentz (Araks).
62.035
– The HSS History’s Hope jumps back into the YS12 system and begins calculations for the next jump, a small star system 8 light years away. They remain near jump speed as the next system is in nearly a direct line to their current line of travel.
– PG Probe Alpha successfully jumps into the OFS020 system. They remain near jump speed and monitor the system for sathar presence while work begins on engine overhauls and calculations for the return jump to Fromeltar.
– A heavy cruiser is completed at sathar SCC#3 (OFS138).
62.036
– SBF-J2 is detected by a patrol of two assault scouts of the Theseus militia and detects them in return. It immediately begins altering its flight path to attempt to avoid an engagement.
– Loath to engage the light cruiser of SBF-J2 by themselves, the two Theseus assault scouts radio for backup and begin to trail the sathar ship. The rest of the militia immediately boosts to attempt to intercept the sathar.
– SBF-A2 successfully jumps into the Gruna Garu system. It begins deceleration out of the system plane to attempt to avoid detection while it plots the return jump.
62.037
After 2 days of no sathar detection, PG Probe Alpha begins deceleration in preparation for the return jump to Fromeltar.
This post takes us into Frontier Year 62. Things are relatively quiet with no major incursions by the sathar although they begin to step up sabotage attempts. The UPF continues to build up the Frontier Fighter Corps while replacing the ships lost in battle. The sathar are also working on replacing battle losses and commit additional resources to the war effort. They also continue to probe for new routes into the Frontier.
The HSS History’s Hope suffers a serious malfunction but recovers and continues on it’s way. This installment also sees the beginning of the events in the final module not already included, SF4: Mission to Alcazzar.
Date (FY)
Events
61.382
– SBF-J1 arrives back at SSC#10 (OFS228). The heavy cruiser under construction is moved out of the shipyard to make room for the damaged cruiser from the battle fleet.
– Work is completed on a UPF assault scout at the PGC shipyards (Gran Quivera, Prenglar) and it joins TF Prenglar at Morgaine’s World. Construction begins on another UPF assault scout.
61.383
SBF-J2 successfully jumps into the Waller Nexus system. It remains near void speed as the astrogators begin calculating the 7 light year jump to the Padda system.
61.384
– The HSS History’s Hope successfully jumps into the YS11 system. However, just minutes after the jump is completed and confirmed, a short circuit causes a fire to break out onboard. The fire is put out but not before it severely damages the hull reducing it to only 25% integrity.
– With its serious hull damage, the HSS History’s Hope begins to drift while the crew attempts repairs. After an hour an a half, the hull is patched and the ship resumes deceleration while the crew cleans up the ship. They begin calculations for the return jump to YS08.
– SG Alpha jumps into the Dramune system. It remains near jump speed and begin calculations for a jump to Fromeltar.
– Two UPF assault scouts are completed at the Hentz (Araks) shipyards. Their crews, having arrived with the FFC pilots take command of the ships immediately. They are given orders to remain in the Araks system for now and together with the FFC fighters are designated PG Tranquility. Work begins on two more assault scouts.
– A UPF fighter and assault scout, as well as the replacement assault scout for the Pale militia is completed at the Terledrom (Fromeltar) shipyards. The UPF battleship is moved into the shipyard for repairs and work begins on two more fighters.
– The second Pale assault scout is completed in the Minotaur (Theseus) shipyards and work begins on another assault scout for Spacefleet. The Pale assault scouts both depart immediately on high-speed transits to their home system.
61.385
The third assault scout for the Pale militia is completed at the CDC shipyards (Triad, Cassidine). With the new classified route linking Cassidine and Truane’s star the ship will be home after a single jump instead of the usual three. Spacefleet begins work on another assault scout
61.386
– After four days of work the damaged heavy cruiser emerges from sathar SCC#10 (OFS228) fully repaired and work resumes on the partially completed heavy cruiser that was moved out to make room.
– The assault scout from Dramune arrives and joins TF Cassidine.
61.387
Two assault scouts, replacements for the Zik-kit (Kizk-Kar) militia, emerge from the CDC shipyards (Triad, Cassidine) and begin a high-speed transit to their home system where they will join up with SF Meteor. Spacefleet begins work on a new destroyer.
61.388
SG Alpha jumps into the Fromeltar system and begins decelerating toward Terledrom to deliver the ships to Task Force Cassidine.
61.389
– Deceleration and jump calculations, along with as much damage clean-up as possible complete, the HSS History’s Hope begins accelerating for the return jump to YS08.
– Another group of 8 pilots graduate in the accelerated program at Gollwin Academy. They immediately depart for the Theseus system to take command of the fighters waiting there.
61.390
Calculations complete, SBF-J2 slips into the Void and successfully jumps to the Padda system. With the next jump being Theseus, they begin decelerating and work on calculations for a return jump to the Waller Nexus system.
61.391
– Four more fighters are completed at the Hentz (Araks) shipyards and their pilots take command of them, filling out FFC Squadron Beta.
– Two more fighters are competed at the Minotaur (Theseus) shipyards. They are crewed by militia pilots until the pilots en route from Gollwin Academy arrive.
61.392
– SG Alpha arrives at Terledrom (Fromeltar). Three of the fighters are transferred to TF Cassidine, while the other 8 are formed into FFC Squadron Gamma.
– A light cruiser is completed at Sathar SCC#5 (OFS19).
61.393
– After 40 days of operation, the CDC compound on Alcazzar (Rhianna), which had been producing at levels even higher than the previous season, suddenly goes silent. (SF4)
– SF Alpha departs for Prenglar to pick up more fighters.
61.394
– The HSS History’s Hope successfully jumps back to the YS08 system, completely mapping that route. Despite the recent fire, the crew decides to press on toward their target and begin decelerating and working on calculations for the jump back to YS11.
– The Pale militia assault scout arriving from Cassidine docks at Pale station. The crew is debriefed and the ship begins duties immediately.
– The UPF Battleship of TF Cassidine emerges from the Terledrom (Fromeltar) shipyards fully repaired. Work begins on 2 destroyers, a frigate and an assault scout.
61.395
Deceleration and calculations complete, SBF-J2 beings to accelerate for the jump back to the Waller Nexus system.
61.396
A UPF assault scout is completed at the Gran Quivera (Prenglar) shipyard and joins TF Prenglar. Work begins on another assault scout.
61.397
After months of negotiations, many energy suppliers on Terledrom (Fromeltar) and Inner Reach (Dramune) agree to join the Consolidated Nebula Energy Group. CNE begins major infrastructure rollouts on Groth (Terledrom).
61.398
Five fighters are completed in the PGC shipyards (Gran Quivera, Prenglar) and transferred to Gollwin Academy. Work begins on five more.
61.399
Successfully jumping in the Waller Nexus system, the sathar have fully plotted the jump route between Waller Nexus and Padda. SBF-J2 remains near jump speed and works on the jump back to the Liberty system.
61.400
Seven more pilots graduate in the accelerated cadet class at Gollwin Academy. They take command of fighters at the Academy, and together with the surviving fighter assigned to TF Prenglar form FFC Squadron Delta base out Morgaine’s World (Prenglar).
62.001
A strike team is assembled by CDC on Triad (Cassidine) and briefed on the Alcazzar project. They depart immediately for the Rhianna system to investigate. (SF4)
62.002
An attempt to sabotage the Inner Reach militia destroyer under construction at the Outer Reach (Dramune) shipyards is thwarted due to a last-minute tip off to the shipyard management. Star Law is called in to investigate.
62.003
– HSS History’s Hope successfully jumps back in YS11. They begin decelerating and begin work on jump calculations for the next leg of their journey, a 9 light year jump.
– The militia assault scout coming from Fromeltar arrives back at Pale station. The crew is debriefed the ship immediately resumes duties.
62.004
The sabotage attempt on the Inner Reach destroyer is quickly traced to agents tied to criminal organizations based on Outer Reach. However, the exact organization responsible is still unknown.
62.005
A frigate is completed at Sathar SCC#3 (OFS138)
62.006
– SBF-J2 successfully jumps back in the Liberty system completely charting the route between Liberty and Waller Nexus. They begin decelerating back toward Snowball.
– The Zik-Kit militia assault scouts arrive at their home station. After a day of debriefing, they begin patrol duties with SF Meteor.
– Sathar commit a portion of the production capacity of Sathar SCC#6 (OFS117) to the war effort and start ramping up production of frigates and destroyers at that center.
62.007
An inside source provides a tip to Star Law indicating that Malthar Enterprises, thought to be mostly destroyed after the events known as the “Dramune Run,” are connected with the recent sabotage attempt of the Inner Reach destroyer.
This post is only a bit over a year late. These are the events that I posted to twitter back in February of 2021 just before I stopped blogging. I’m finally getting them online. I also plan on resuming the daily Twitter posts of the events. starting on day FY61.382. If you want to get the daily updates, follow the @StarFrontiers account on twitter or the #SFTimeline hashtag. If you want to review everything that has happened, or are new to this series of posts, you can grab the PDF file linked at the bottom of the post that contains every entry in the timeline since I started it. Its up to 81 pages so there’s a bit of reading there.
Also, depending on how things go generating the timeline, I might start posting events using the GST calendar of the Frontier. Which means you’ll get 36 Frontier days worth of events every 30 Earth days as the GST calendar only has 20 hours per day instead of our 24. We’ll see if that actually pans out.
The events in this post include the two battles I posted the detail of early last year which are linked in their appropriate entries. With the conclusion of the Battle of Liberty, the war cools down for a while. The sathar are currently out of ships at the moment although they have dozens under construction. Both sides are now maneuvering to reposition and rebuild forces. Otherwise, not much happening in this post outside of the war events.
Date (FY)
Events
61.357
– Ten more pilots complete their fast-tracked certifications for the Frontier Fighter Corps. They immediately depart for Hentz (Araks).
– SBF-J2 (Liberty system) begin calculations for a jump to the Waller Nexus system.Spacefleet holds the space in anticipation of more ships finishing and beginning construction on a new battleship.
61.358
– Second Battle of Ken’zah-Kit (K’aken-Kar) – After nearly 2.5 hours of fighting TF Cassidine defeats SBF-J1 losing only a single fighter while the sathar only have a fighter and heavy cruiser surviving. Most of the UPF ships have damage requiring a shipyard to repair.
– The surviving sathar heavy cruiser and fighter from SBF-J1 accelerate for a jump to the K’sta-Kar system.
– The damaged UPF destroyer completes repairs in the Streel shipyards (Pale, Truane’s Star) and the ship that was moved out to make room resumes construction (it will be done in 23 days).
– SBF-E2 jumps into the Zebulon system. It remains at high speed and begins calculations for jump to Kazak.
– A HS:8 ship completes maintenance in the PGC shipyards (Gran Quivera, Prenglar). Spacefleet moves a couple of small ships in for maintenance to coordinate their completion with more ships finishing and beginning construction on a new battleship.
61.359
– Calculations for the jump back to YS07 complete, the HSS History’s Hope begins accelerating for the jump while the astrogators get a day of rest before double checking the figures on the way out.
– Sathar TG-1 jumps into the OFS136 system where SCC#3 is located as they continue on their journey to SCC#4 (OFS111)
– The battleship Admiral Dooltan and accompanying minelayer arrive at Zit-kit (Kisk-Kar) and join up with PG Meteor. With the addition of the battleship and minelayer, the fleet is now designated Task Force Meteor.
– After spending a day rearming, Task Force Cassidine splits up with the undamaged heavy and light cruiser, now designated Patrol Group Vigilant, departing in pursuit of the sathar heavy cruiser which is headed toward K’tsa-Kar.
– The main force of TF Cassidine, all needing time in a shipyard to fully repair, begin accelerating for a jump to the Kizk-Kar system and then on to Fromeltar. The Terledrom (Fromeltar) shipyard is notified that they will arrive on FY61.375 and begins making preparations to receive them.
– The Clarion (White Light) militia, at the request of Spacefleet, depart for a jump to K’sta-Kar to join up with PG Vigilant and patrol that system. The saurians send 3 of their 6 Battle Rays to assist.
61.360
– Calculations complete, SBF-J2 (LC & FF) begin accelerating from the Liberty system for a jump to the Waller Nexus system. PG Liberty detects the departure almost immediately and subspace radio the intel back to Spacefleet.
– Stationing 8 of the fighters at Fortress Pale as the first official squadron of the Frontier Fighter Corps, the second assault carrier currently with Strike Force Nova is designated as Shuttle Group Alpha and departs back to Triad (Cassidine) to start moving more fighters around the Frontier.
61.361
– PG Liberty are authorized to engage the outbound SBF-J2 if conditions are favorable. Several Mhemne Belter ships offer to assist although their outdated engines mean that they will only be able to make a single pass at the sathar vessels. The ships all boost for intercept.
– Four fighters are completed at the Hentz (Araks) shipyard. They are put into storage awaiting the arrival of the Spacefleet pilots. Construction beings on four more fighters.
– Two fighters are completed at the Minotaur (Theseus) shipyards for the Frontier Fighter Corps but are currently manned by the militia. Construction begins on two more fighters.
61.362
– SBF-E2 jumps into the Kazak system and begins calculations for a jump to OFS019 and SCC#5.
– Battle of Liberty – PG Liberty, augmented by Mhemne ships, engage the sathar in the outer system. The fight does not go well for the UPF who lose their frigate and an assault scout although they do manage to destroy the sathar frigate.
– After fighting the UPF in the Liberty system, the surviving sathar light cruiser of SBF-J2 continues on its course to jump to the Waller Nexus system.
61.363
– CDC staff arrive back on Alcazzar (Rhianna) in anticipation of the new mining season. (SF4)
– SBF-J1 jumps into the K’sta-Kar system. They remain at speed and begin calculations for a jump to FS33.
61.364
– The HSS History’s Hope successfully jumps back into the YS07 jump completely charting that route. They begin decelerating to turn around and jump back to YS08 to continue their journey forward.
– PG Vigilant and the Clarion militia both jump into the K’sta-Kar system from opposite directions. Keeping an eye on the retreating SBF-J1, they start deceleration toward Kwadl-Kit.
– TF Cassidine jumps into the Kizk-Kar system and begin calculations for the jump to Fromeltar. They transmit details of their recent battles to TF Meteor to share their experiences.
61.365
– SBF-E2 jumps back into the OFS019 system and begins decelerating toward SCC#5.
– SBF-J2 enters the Void and like the frigate before it, misjumps, this time ending up in the OFS196 system.
– Enough space has cleared in the CDC shipyard (Triad, Cassidine) to allow Spacefleet to begin construction on another battleship to replace one of the two lost in the Second Battle of New Pale.
61.366
– SBF-J1 jumps into the FS33 system and begins calculations for a jump to OFS166.
– Eight more fighters are completed at the PGC shipyards (Gran Quivera, Prenglar) and shuttled to Gollwin Academy. Spacefleet delays the start of construction of more fighters as production of the ships is outpacing training of pilots and they want to use the space for construction of another battleship.
61.367
– As OFS196 is a system in the sathar charts, being on the route to OFS203 and SCC#1, SBF-J2 determines it position after just two days. It decides to take the known route back to Liberty and try again.
– Enough space opens up in the PGC shipyards (Gran Quivera, Prenglar) for Spacefleet to begin construction on the second battleship to replace the second one lost in the Second Battle of New Pale.
61.368
– The HSS History’s Hope arrives in the inner system of YS07 where they will rest for a day before they begin accelerating for the jump back to YS08.
– Task Force Cassidine jumps into the Fromeltar system and begins a slow deceleration toward Terledrom and the shipyard there. They radio ahead that they are a few days early.
– Spacefleet resumes fighter construction in the PGC shipyards (Gran Quivera, Prenglar) but only producing five at a time instead of eight. The other 3 HS worth of space is dedicated to constructing an assault scout. Additionally, 3 more assault scouts are started in the CDC shipyards (Triad, Cassidine).
61.369
– PG Vigilant and the Clarion militia, together with the saurian battle rays, arrive in orbit around Kwadl-Kit (K’sta-Kar). They set up a patrol schedule to watch for new sathar threats.
– SBF-J1 jumps into the OFS166 system and begins calculations for a jump to OFS167.
– SG Alpha arrives back at the CDC shipyards (Triad, Cassidine). The fighters in storage are transferred to the carrier while they await the arrival of their pilots, scheduled to graduate from Gollwin Academy tomorrow.
61.370
– SBF-E2 arrives back at SSC#5 (OFS019). The heavy cruiser under construction is moved out of the shipyard to make room for the damaged one to receive the necessary repairs.
– Nine more pilots graduate in the accelerated cadet class at Gollwin Academy. They immediately depart to take command of the fighters currently sitting in storage at Triad (Cassidine).
61.371
SBF-J1 jumps into the OFS167 system and begins calculations for a jump to OFS169.
61.372
An attempt to explode a bomb at the Council of Worlds building while the council is in session is foiled by Star Law agents and local law enforcement. Unfortunately, none of the perpetrators survived. An investigation is launched immediately to track down the origin of the plot.
61.373
TF Cassidine arrives in orbit around Terledrom. There is currently 6 HS of open space in the shipyard and the heavily damaged frigate and fighter are moved in for repairs.
61.374
– The HSS History’s Hope jumps back to the YS08 system. They begin decelerating and working on the jump calculations for the next system, a binary system 5 ly away.
– SBF-J1 jumps into the OFS169 system and begins calculations for a jump to the OFS170 system.
– The K’aken-Kar militia assault scout, also in OFS169, happens to detect the heavy cruiser just hours after it jumps into the system. Realizing they are in sathar controlled space, the ship goes into as stealthy a mode as possible to avoid detection as they monitor the sathar vessel.
– SBF-J2 jumps back into the Liberty system.
– The TF Cassidine fighter in the Terledrom (Fromeltar) shipyard competes its repairs. The space is held in reserve for the larger ships needing repairs.
61.375
– Princess Leotia’s 35th birthday. Major celebrations are held all over Clarion (White Light) in commemoration of her coming of age. While her father had planned to step down and hand the government over to her during the ceremonies, this has been delayed due to the ongoing sathar conflict.
– SBF-J1 jumps into the OFS170 system and begins calculations for the final leg of their jump back to SSC#10 in the OFS228 system.
– PG Liberty detects the returning light cruiser and radios its presence back to Spacefleet.
– The damaged sathar heavy cruiser at SCC#5 (OFS019) completes repairs and construction is resumed on the new heavy cruiser.
61.376
Three UPF fighters are completed at the Terledrom (Fromeltar) shipyards. They are transferred to Task Force Cassidine. The shipyard space is held in reserve to fit the larger ships needing repair.
61.377
– SBF-J1 jumps back into the OFS228 system and begins decelerating toward SSC#10
– An assault scout is completed in the Outer Reach (Dramune) shipyards. It sets off immediately for the Fromeltar system to join TF Cassidine. Construction begins on a new assault scout.
61.378
– SBF-J2 arrives back in orbit around Snowball. After rearming, it sets off once again to try to jump to the Waller Nexus system.
– Calculations complete, the HSS History’s Hope begins accelerating to the next system on their route, which they designate as YS11.
– A UPF assault scout is completed at the CDC shipyards (Triad, Cassidine). This is the first of the replacement ships larger that a fighter to come out of the shipyards since the conflict began. 5 fighters are also completed and work begins on another AS and 5 fighters. The completed ships join SG Alpha.
– The first damaged frigate from TF Cassidine emerges from the shipyard at Terledrom (Fromeltar) fully repaired. The other frigate enters and work begins on it.
61.379
– The Frontier Fighter Corps pilots arrive at Hentz (Araks) to take command of their fighters there. There is some initial tension between the UPF and militia forces as the latter do not want to turn over control of the ships.
– The Spacefleet pilots arrive at Triad (Cassidine). They are immediately transferred to the carrier in SG Alpha where their ships are awaiting them. SG Alpha departs immediately for a jump to Dramune and then on to Fromeltar where the fighters are to be delivered.
– The Yazira Dome completes its second year of operation. With the on-going sathar conflict, travel has been curtailed and off-world yazirian visitors diminished but the Dome is still wildly popular with on-planet visitors.
– Detecting SBF-J2 outbound once again, PG Liberty sends a subspace message informing Spacefleet and continues to monitor the sathar ship.
– Calculations complete and checked, the HSS History’s Hope begins accelerating for the jump to the next system on their route, designated YS11.
61.380
– Sathar TG-1 arrives at SCC#4 (OFS111), joining the other ships there.
– After several back-and-forth communications, including a threat by Spacefleet to dispatch TF Prenglar to the Araks system to eliminate or take control of the militia, the Hentz militia turns over control of the Frontier Fighter Corps fighters to the UPF crews.
– The second damaged frigate from TF Cassidine completes repairs at the Terledrom (Fromeltar) shipyards. A new UPF assault scout, along with an assault scout for the local militia are also completed. This frees up enough space that TF Cassidine’s assault carrier can move in for repairs.
61.381
TF Cassidine’s assault carrier completes repairs at the Terledrom (Fromeltar) shipyards. There is not enough free space to move the battleship in, but that space will free up in three days. With 30% of the shipyard empty, the work crews can each get a full day off to rest over the next few days.
After nearly two and half hours of fighting, Task Force Cassidine defeated the invading sathar forces destroying all but a heavy cruiser and fighter which are currently departing the system. The ships of the task force are almost all heavily damaged but only a single fighter was lost in the battle, the pilot of which ejected safely and has been recovered.
Rak’tal-ka, StarPlay News
Okay, I thought the Second Battle of Kwadl-Kit was a long one, this one went even longer. Sorry about the delay in getting it out but it took a while to play out. Task Force Cassidine just seems to like these long, spread-out battles. The map is going to really shift around this time as this fight involves a long chase and at one point it’s happening on two different maps as the battle spreads out. I hope you enjoy the narration. I also think this might now be the longest blog post yet.
Background
Fresh from the battle with the other sathar force in the K’tsa-Kar system, Task Force Cassidine is ready to face this new sathar threat. While the presence of the militia assault scout that recently disappeared trying to probe the source of the sathar fleets would have been helpful, it would not have made a lot of difference in the fight.
After the recently losses in the K’tsa-Kar and Truane’s Star systems, SBF-J1, crewed by veterans of the campaign against the saurians, look to turn the tide and chalk up a victory for the sathar forces. The fleets are fairly evenly matched with the UPF forces leaning more toward the larger ships with the loss of their assault scouts and half of their fighters in the previous engagement.
Order of Battle
This is probably the most evenly matched battle, in terms of hull points and capabilities, of any fight yet in the war. Looking at hull points, the UPF are coming into this with a total of 435 HP of ship compared to the sathar’s 441. Three of the UPF ships are slightly damaged: one fighter only has 5 of 8 HP, a frigate is at 29 of 40, and the battleship has a damaged stasis screen. Those were all battle damage that couldn’t be repaired in space after their recent battle in the K’sta-Kar system. It will be interesting to see how this one plays out.
Spacefleet (Task Force Cassidine)
3 Fighters
2 Frigates
1 Light Cruiser
1 Assault Carrier
1 Heavy Cruiser
1 Battleship
Sathar
7 Fighters
1 Frigate
1 Destroyer
2 Light Cruisers
1 Assault Carrier
1 Heavy Cruiser
The Battle
Setup
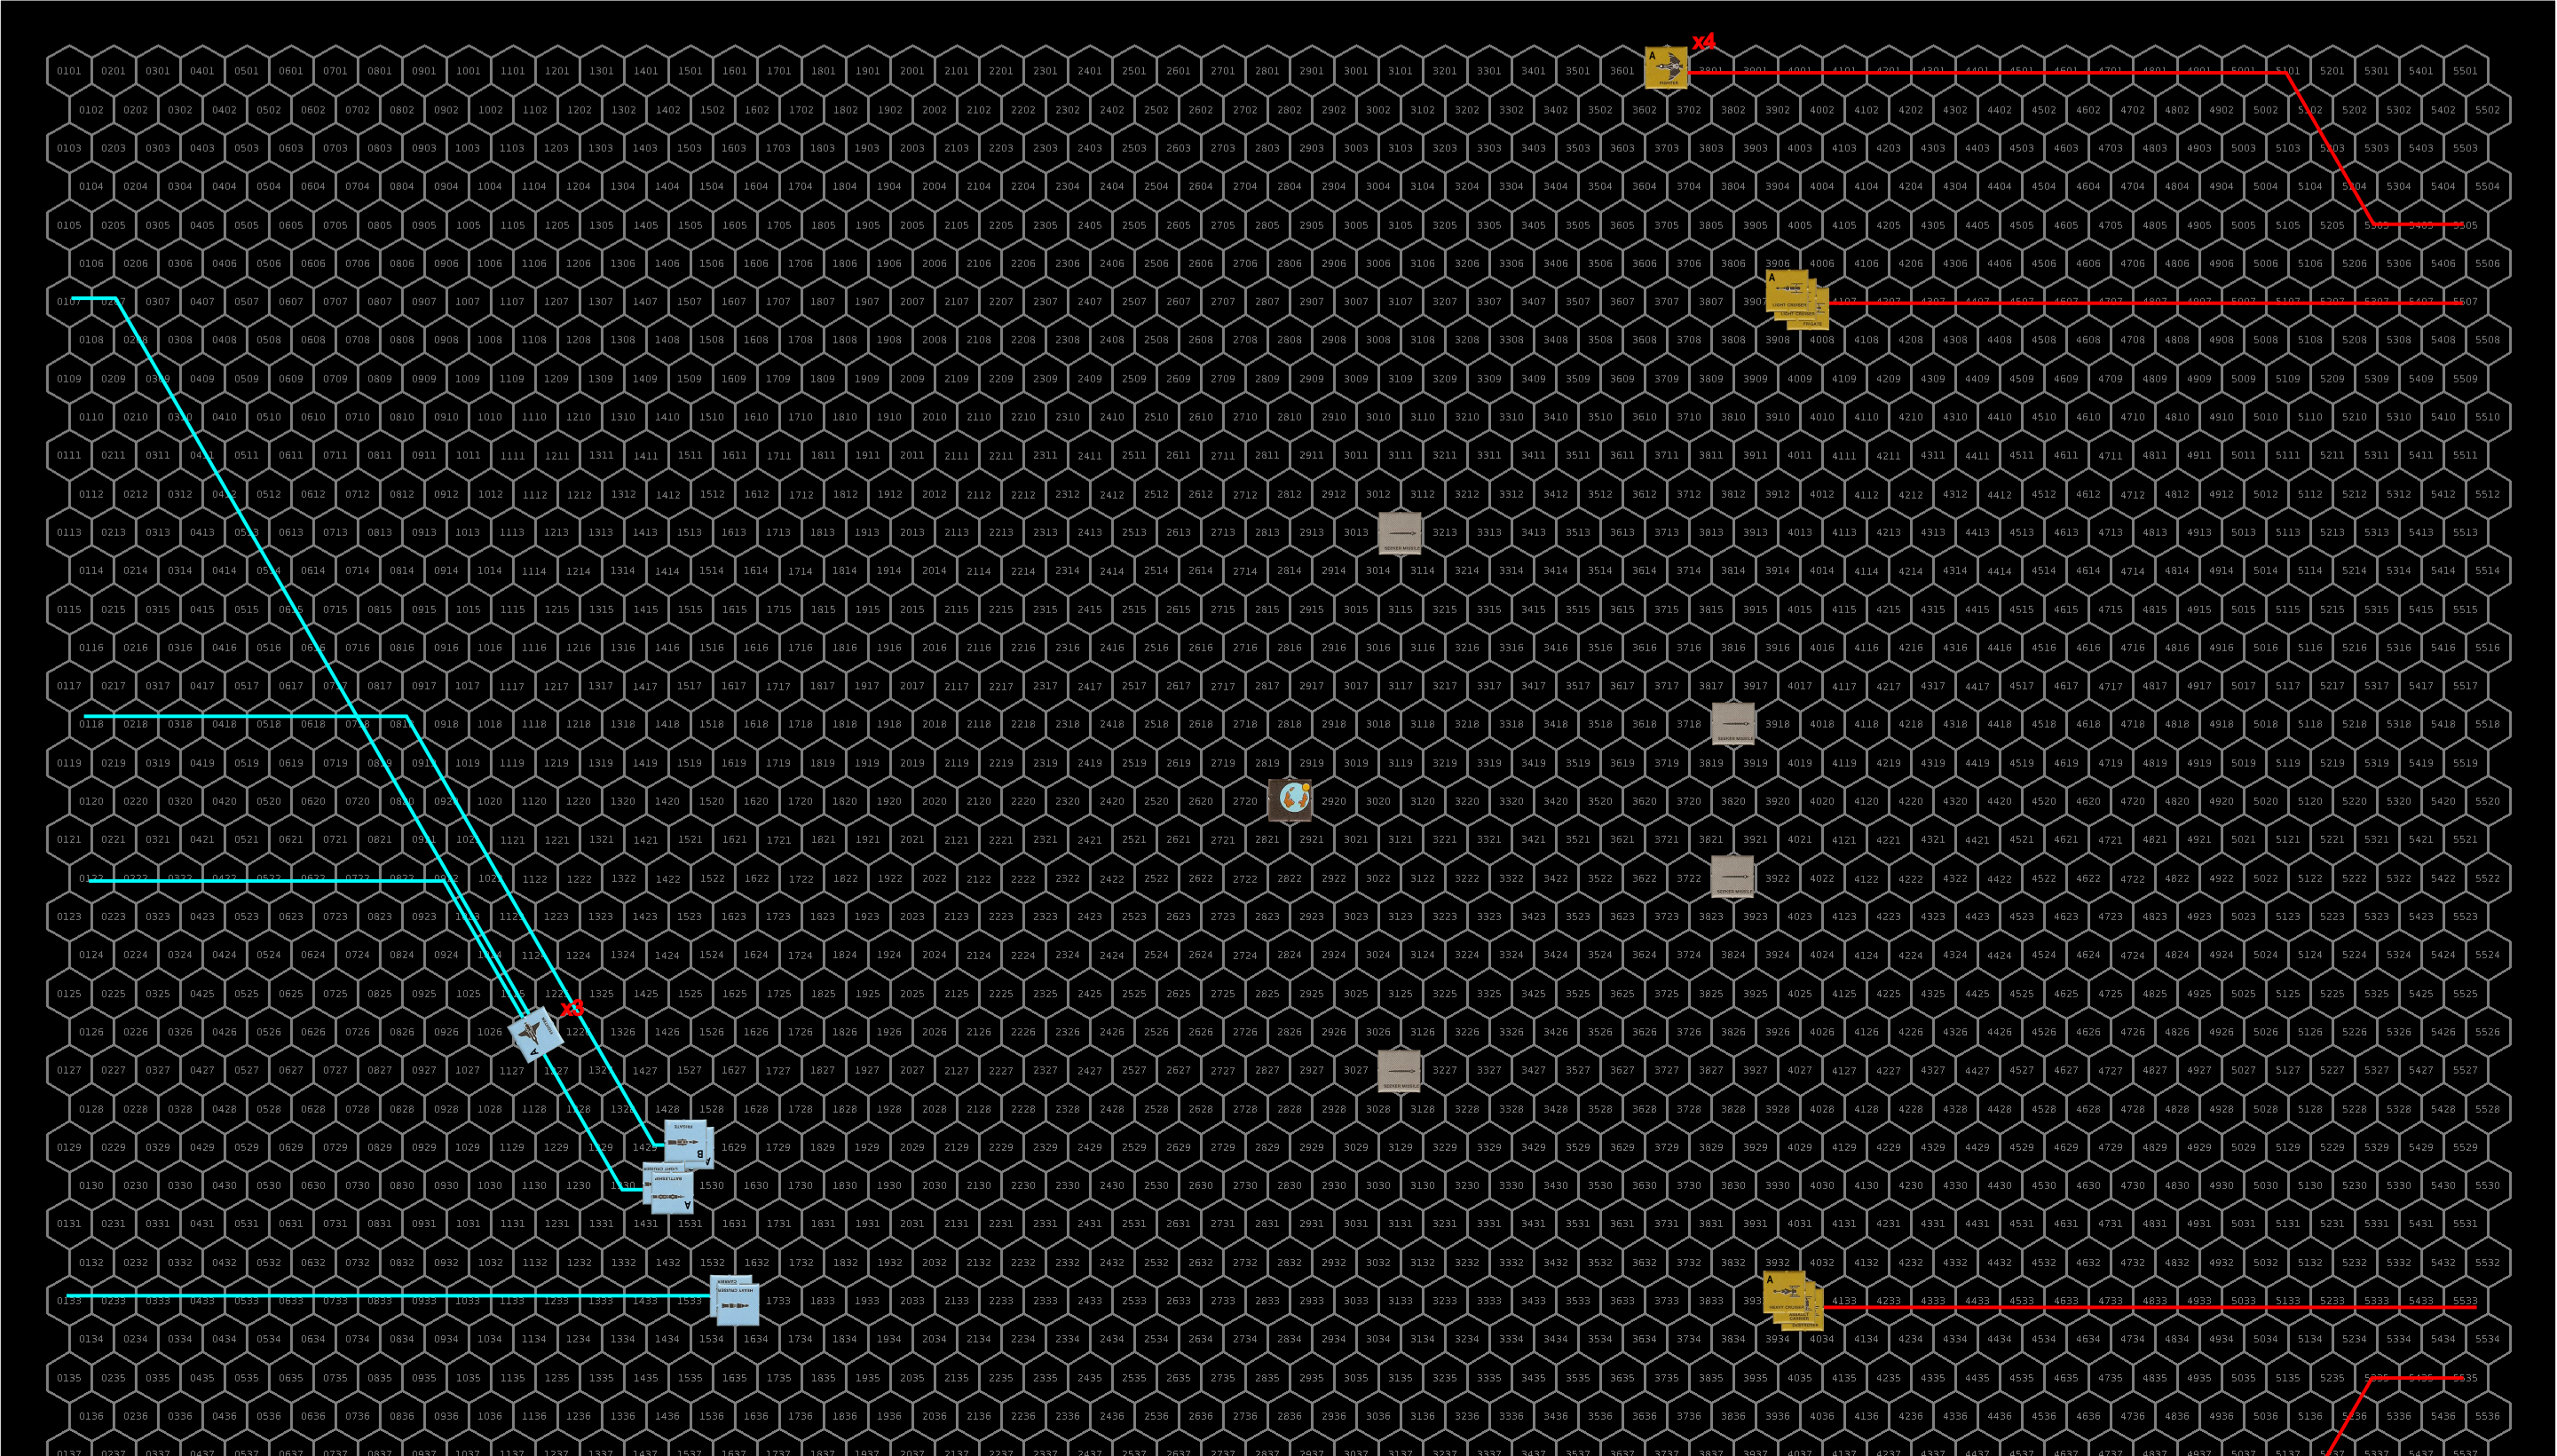
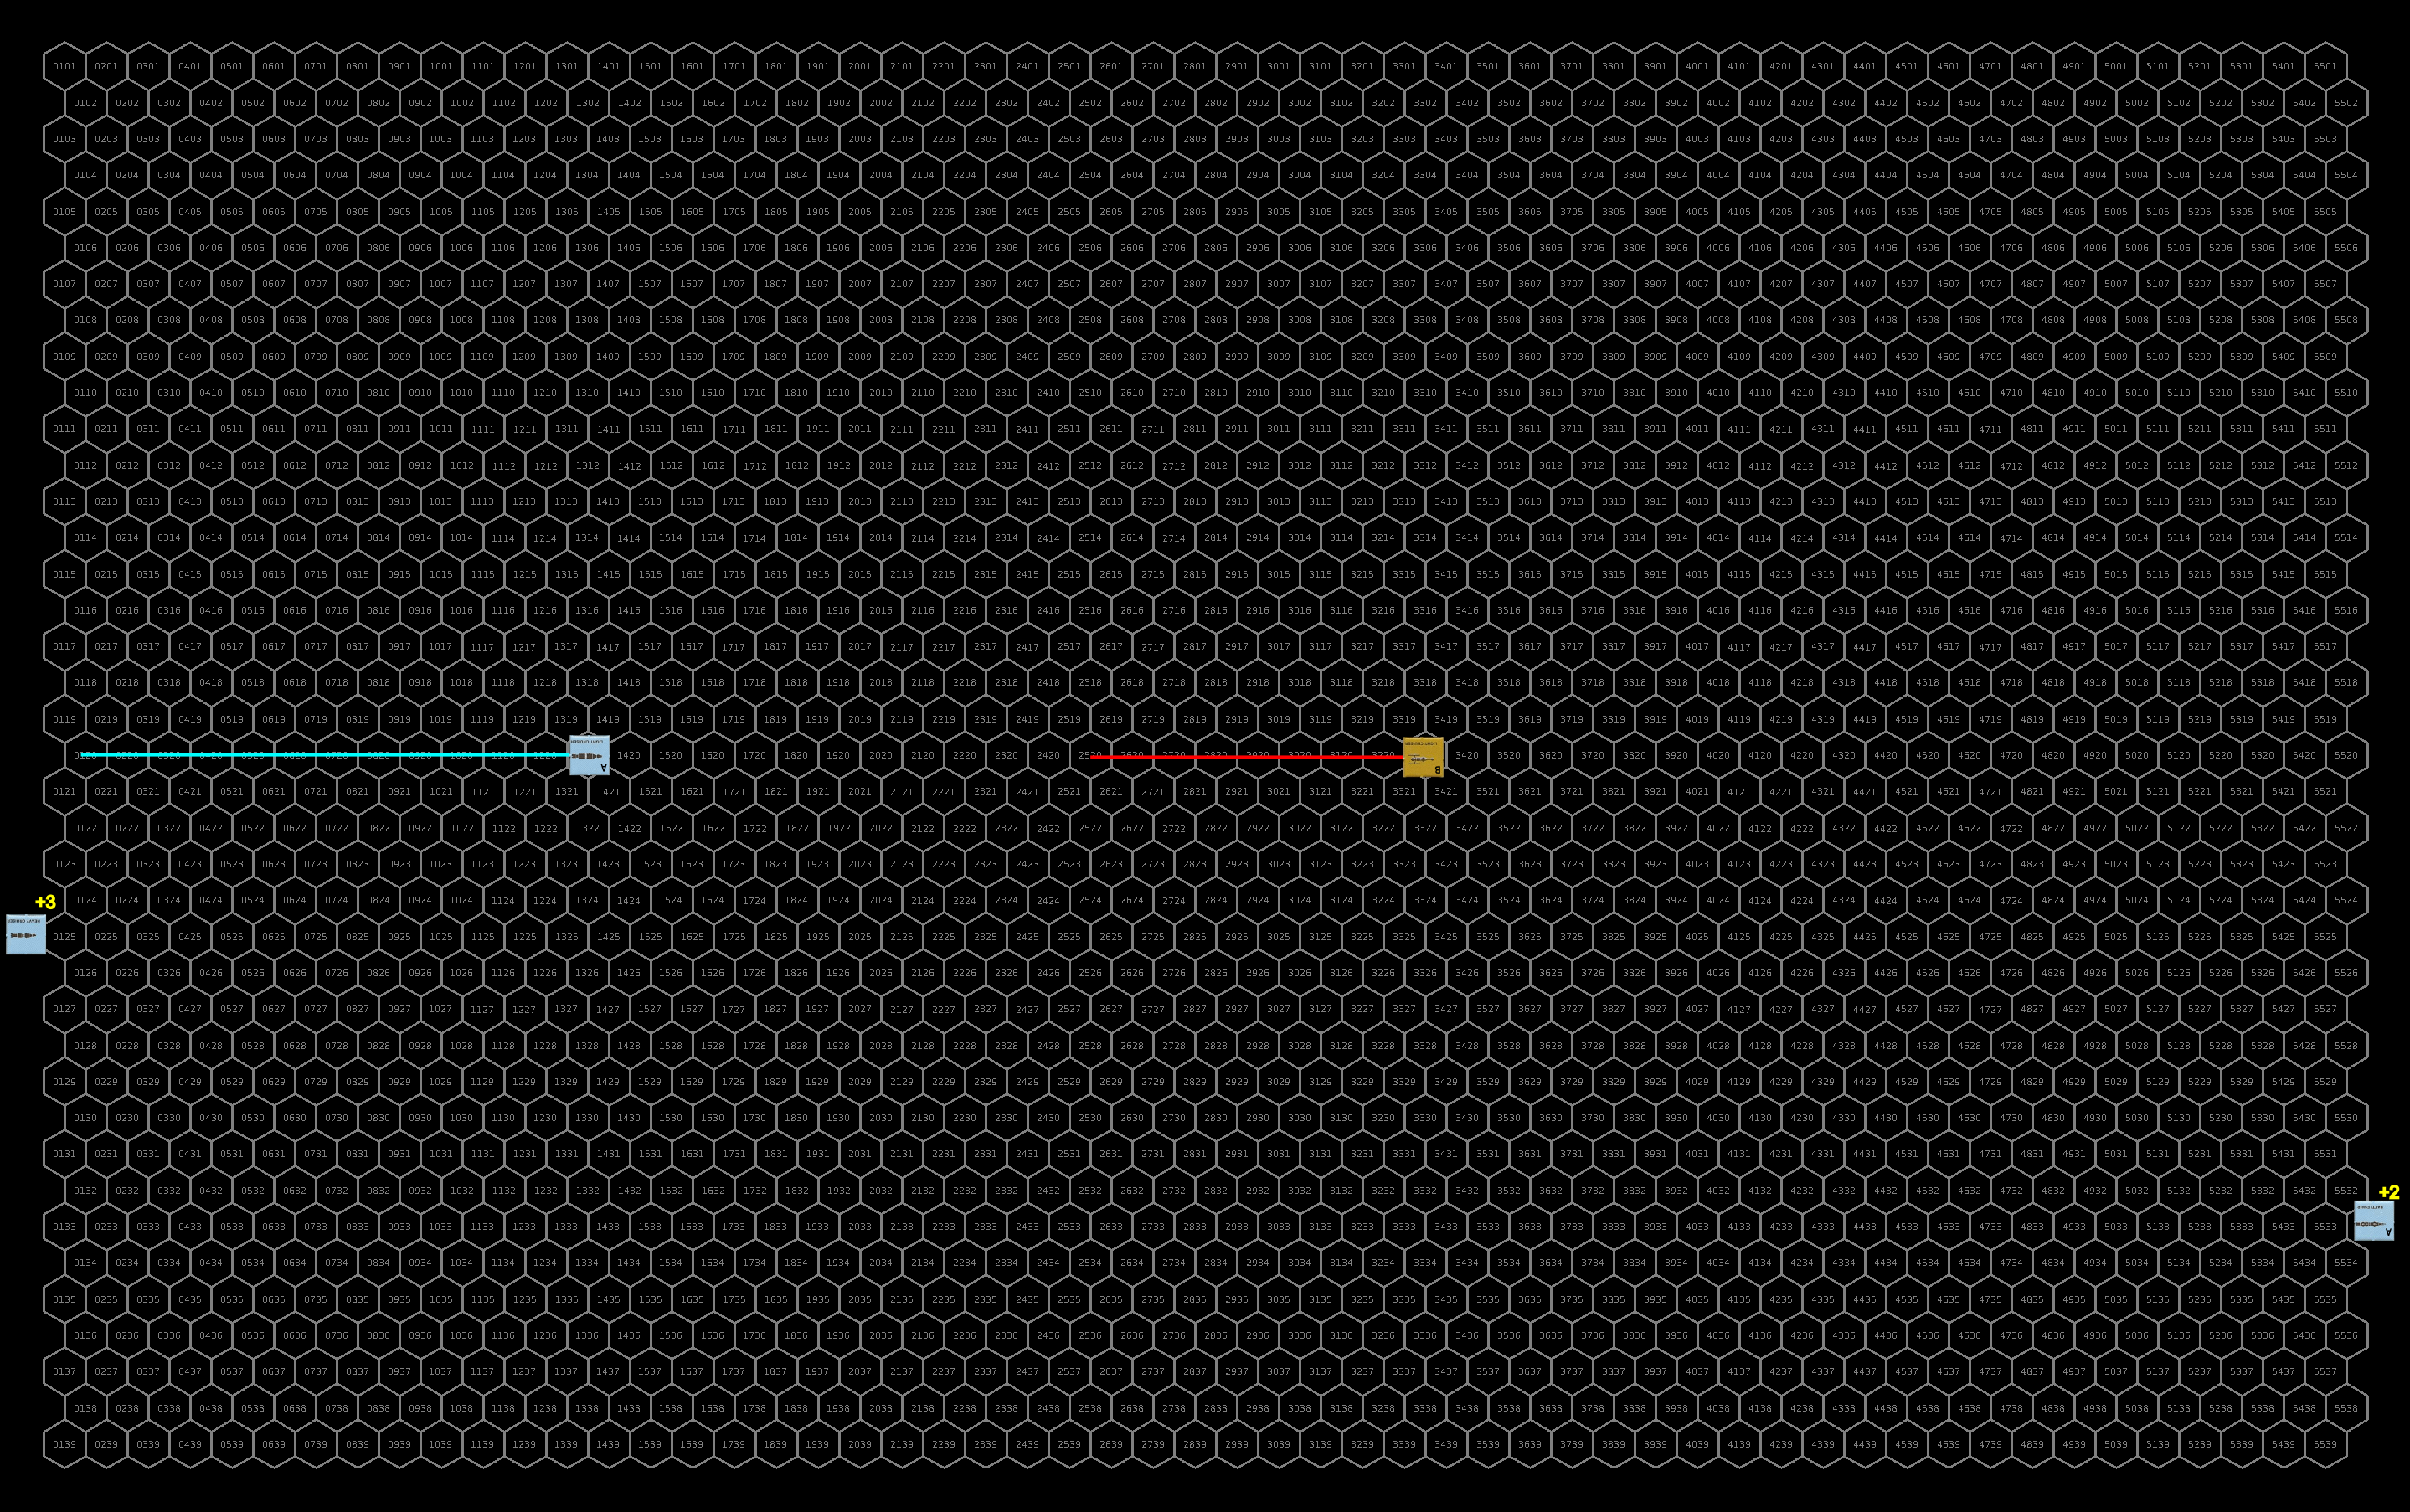
The UPF elect to battle near the planet although with no station left to defend, they start far back from the planet at a moderate speed of 15 for all ships, including the fighters. The two frigates form a battle group and the light cruiser and the battleship team up. Those two groups form the center of the battle line. The heavy cruiser escorts the assault carrier toward the bottom of the battle area while the three fighters form a flight near the top. They deploy four of the six seeker missiles available on the side of the planet the sathar will be approaching from. The heavy cruiser and battleship each retain one seeker missile in their magazines for deployment during the fight.
Like the UPF, the sathar come in at only a moderate speed to try to gauge the other side’s tactics and responses before committing. They too are only moving at speed 15 but are split up to go wide around the planet. The sathar heavy cruiser and assault carrier, escorted by a destroyer come in opposite their UPF counterparts with a flight of three fighters just off their wing. The light cruisers, escorted by a frigate, come in opposite the UPF fighters, with a flight of four fighters off their wing.
Initial positions of the ships. The seeker missiles are not shown. Click for full sized image.
Turn 1
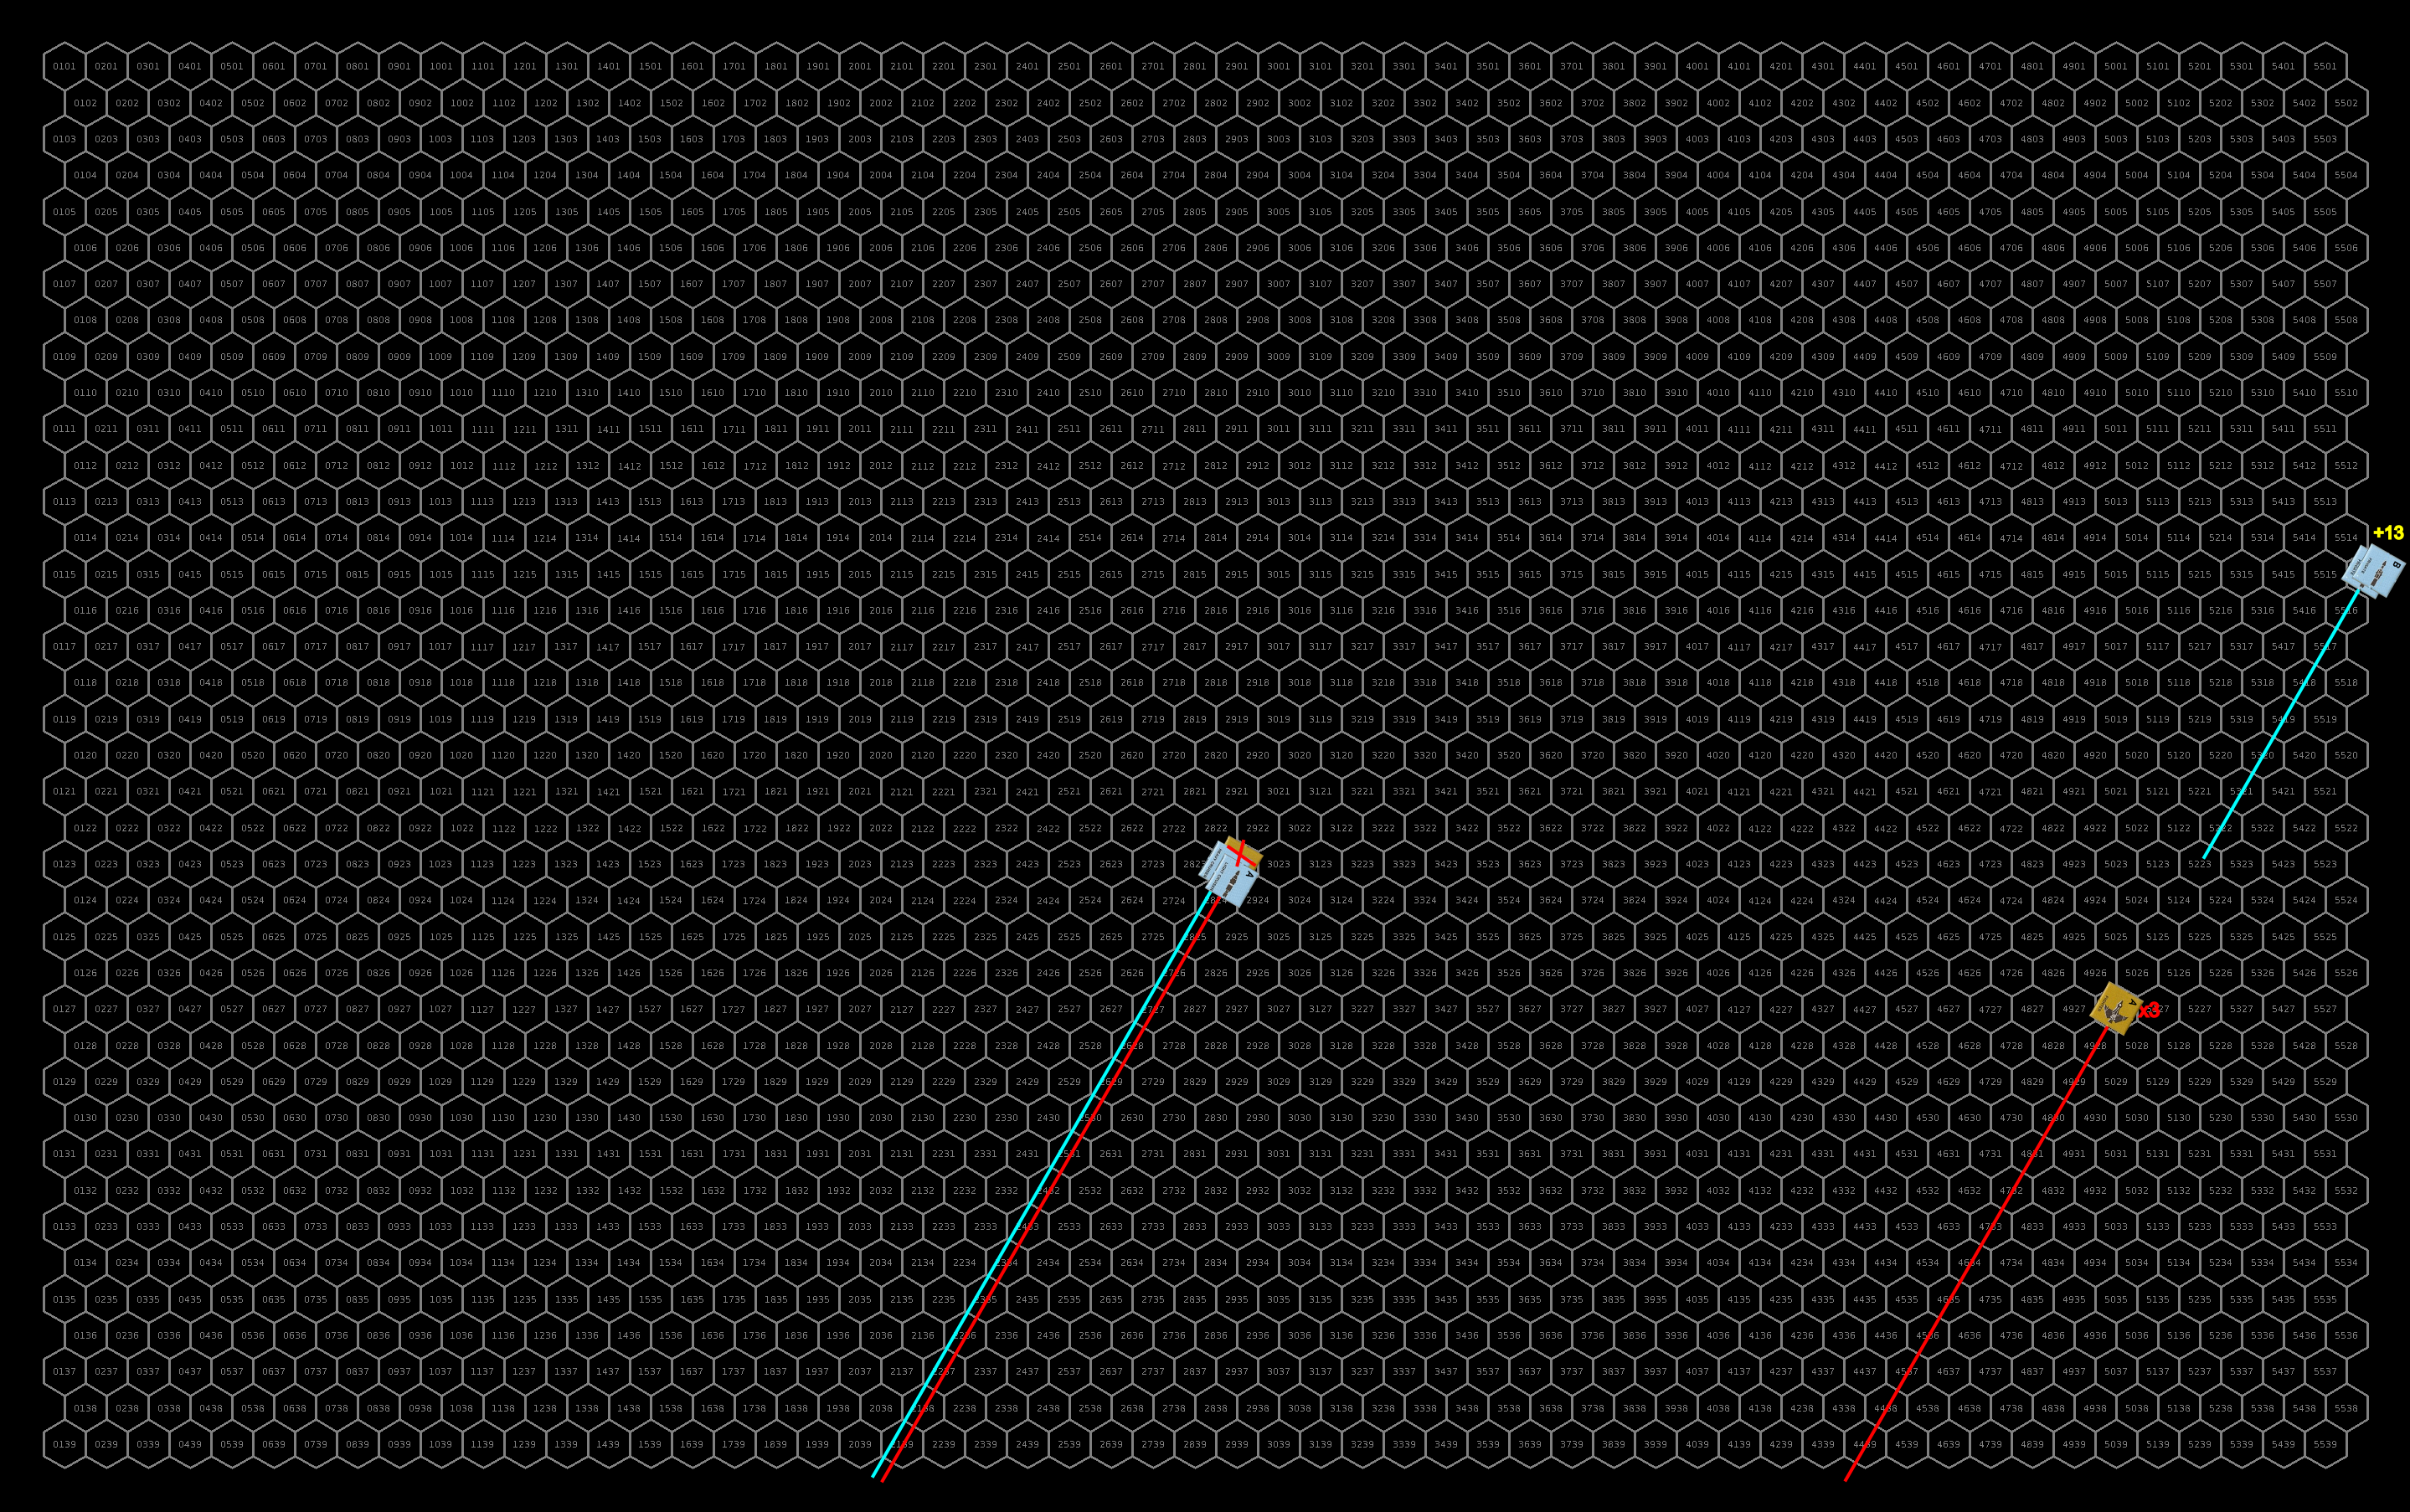
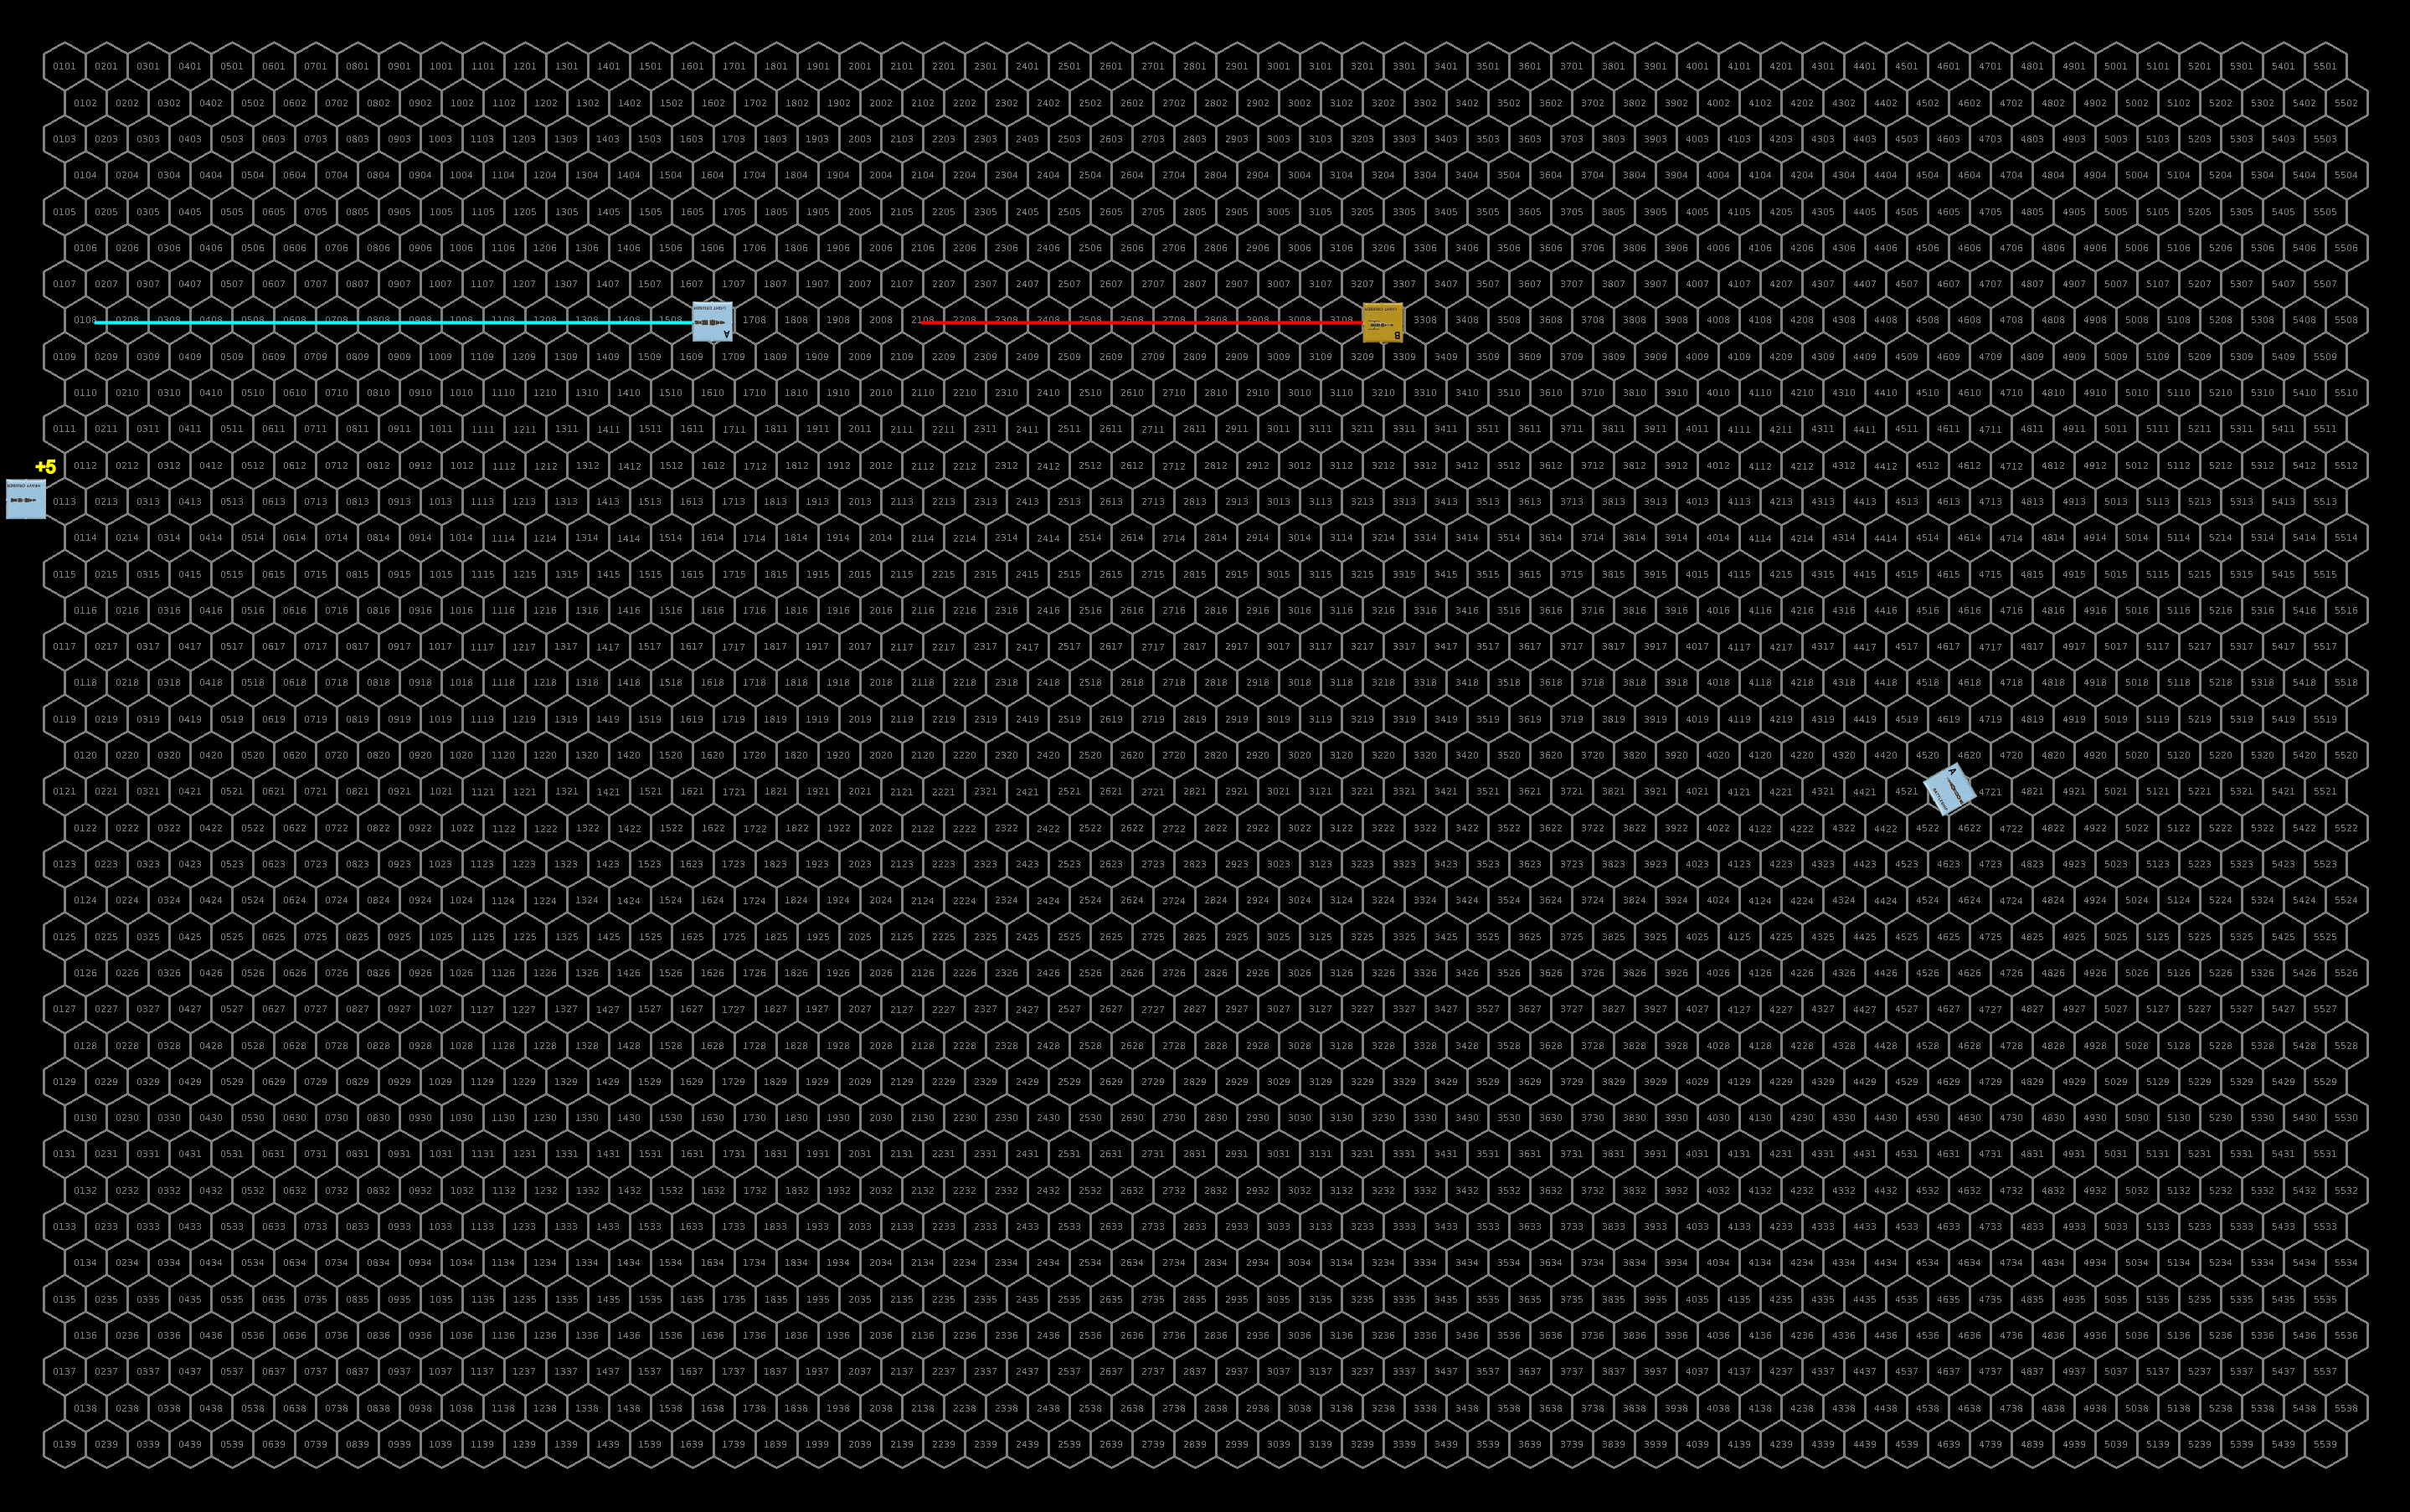
The sathar capital ships maintain their speed and advance on the UPF forces. The fighters accelerate to speed 20 and fly farther out on the wings of the formation.
The UPF ships converge toward the lower group of sathar capital ships. The heavy cruiser and assault carrier continue to advance at speed 15. The light cruiser and battleship accelerate to speed 17, the frigates to speed 19, the fighters to speed 20.
No shots are fired this round as the two forces remain out of range.
Positions after the first turn of maneuvering. Also the seeker missiles are shown on this one for reference. Unfortunately, the file was partially corrupted and the bottom of the map was cut off but the three sathar fighters just mirrored the maneuver of the fighters at the top of the map. Click for full size image.
Turn 2
The sathar all begin accelerating toward the UPF. The group centered around the heavy cruiser accelerates to speed 17 and flies straight at their UPF counterpart while their wing of fighters accelerates to 25 and makes a pass at the same group. All the sathar ships fire at the UPF assault carrier. The upper battle group accelerates to speed 18 and turns down toward the UPF forces while the upper flight of fighters accelerates to speed 25 and sets up for an attack run next turn as they are too far away to engage this round.
Defensive, the UPF ships all focus on the flight of three lower fighters with the UPF heavy cruiser taking a long-range shot with its disruptor cannon at the sathar destroyer. They don’t do too well and of the 17 shots fired at the three fighters, only one connects with each ship, knocking the hull integrity down by half on one, inducing a navigation control hit on a second, and knocking out the maneuvering on the third. The disruptor cannon shot at the destroyer also misses.
Offensively, the sathar fare a bit better. Two of the assault rockets hit the assault carrier knocking out half its engine capability and reducing its hull integrity by 17%. The sathar destroyer hits with its laser cannon further reducing the hull integrity of the UPF assault carrier by another 19%. The heavy cruiser’s distruptor cannon knocks out the assault carrier’s masking screen launcher.
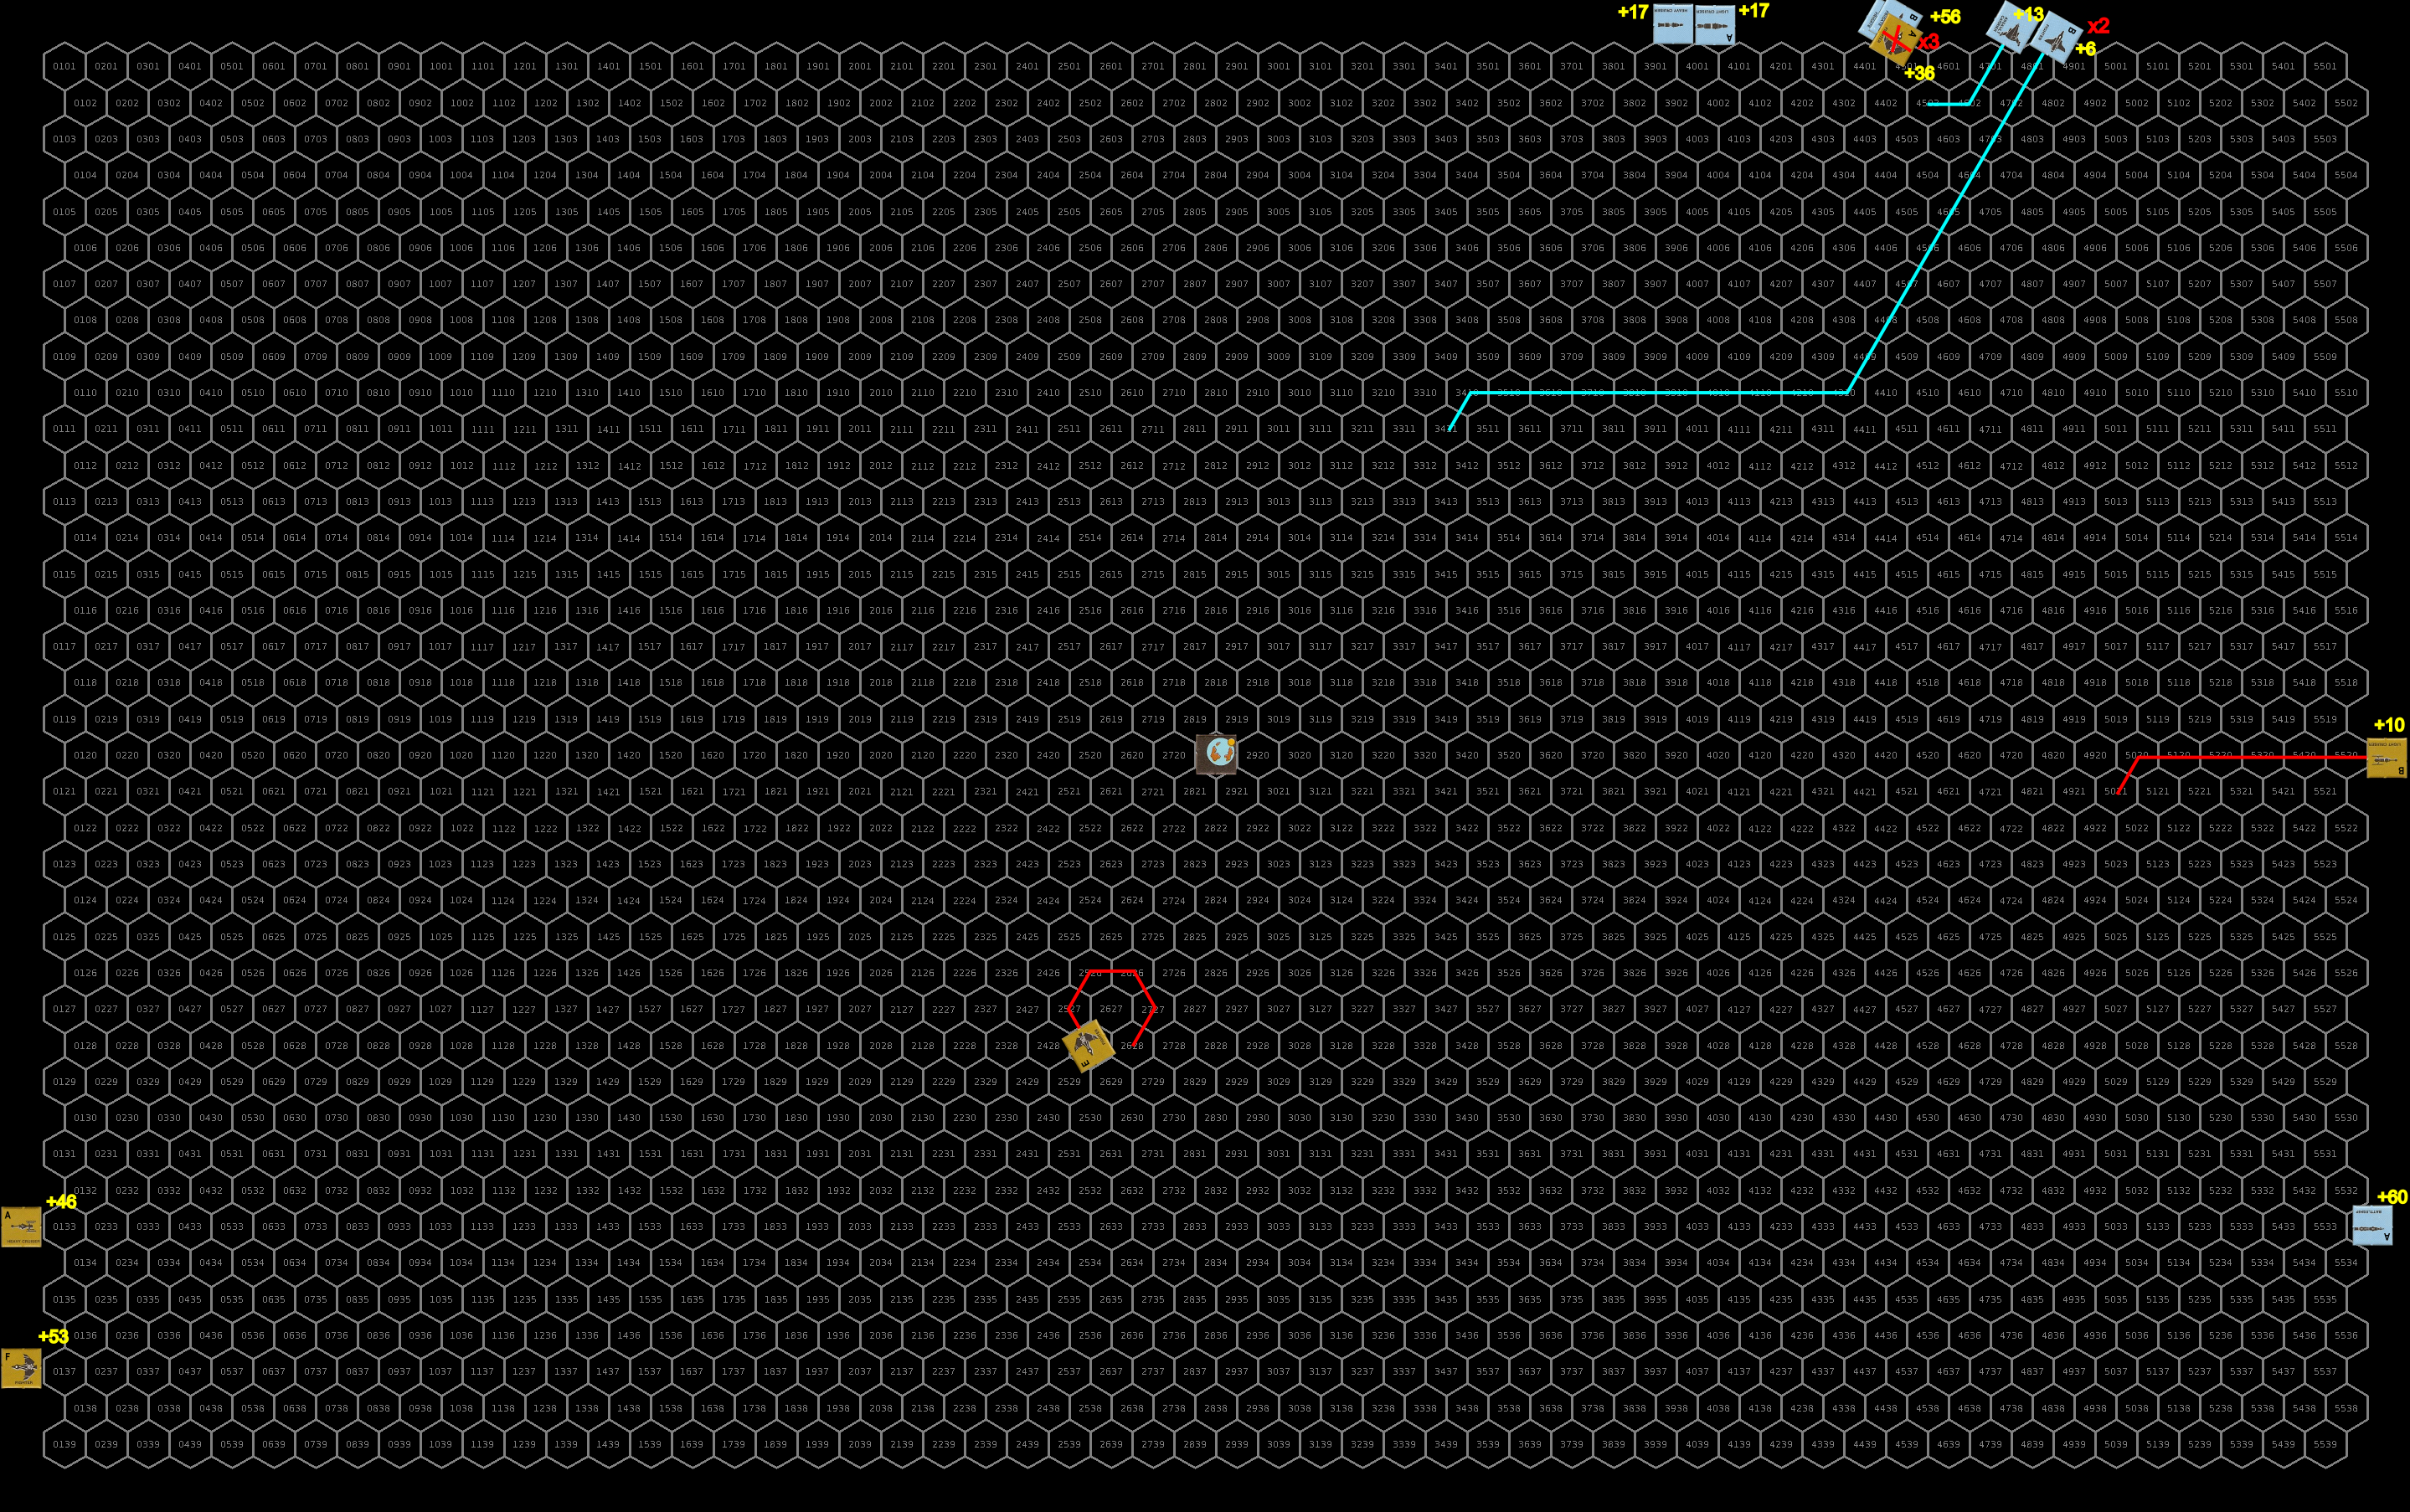
The larger UPF capital ships maintain their speeds and converge on the sathar battle group. The heavy cruiser and assault carrier fly right over the group turning up toward the planet at the end of their move. The battleship and light cruiser maneuver down to take point blank shots at the sathar as well. The frigates accelerate to speed 20 and come just in range of their rocket batteries while the fighters accelerate to speed 25 and make an assault rocket pass from below.
Defensively, the sathar ships continue to fire at the assault carrier with their energy weapons while they fire their three rocket batteries at the lead frigate. The frigate is hit by two of the rocket batteries reducing its hull integrity by 28% and knocking out a third of its maneuvering capability.
The assault carrier is hammered by the sathar’s weapons being hit by 2 electron, 2 laser, and one proton battery as wall as a laser and disruptor cannon. All told the damage knocks out all of the UPF assault carrier’s weapons, starts a fire, damages its combat control system, induces a navigation control failure, and reduces its hull integrity by another 13%.
Offensively the UPF focus on the sathar assault carrier and heavy cruiser with the frigates and fighters firing at the assault carrier and the other ships firing on the heavy cruiser.
Only one of the fighters hit the assault carrier but it scores a critical hull hit dropping the carrier’s hull integrity by 40%. The frigates combine to hit with a laser battery, laser cannon and rocket battery knocking out the carriers engines and further reducing its hull integrity by 7%.
The sathar heavy cruiser fares even worse being hit by a barrage of weapons from the UPF battleship, light cruiser and heavy cruiser. All told it is hit by all 3 distruptor cannons, 2 rocket batteries, 3 laser batteries, two proton batteries, and an electron battery. The damage knocks out the sathar heavy cruiser’s engines and maneuvering, ICM launcher, laser battery, proton screen and stasis screen, cuts it damage control ability in half, and starts a fire. Surprisingly, the weapons did little hull damage only reducing the ship’s hull integrity by 25%.
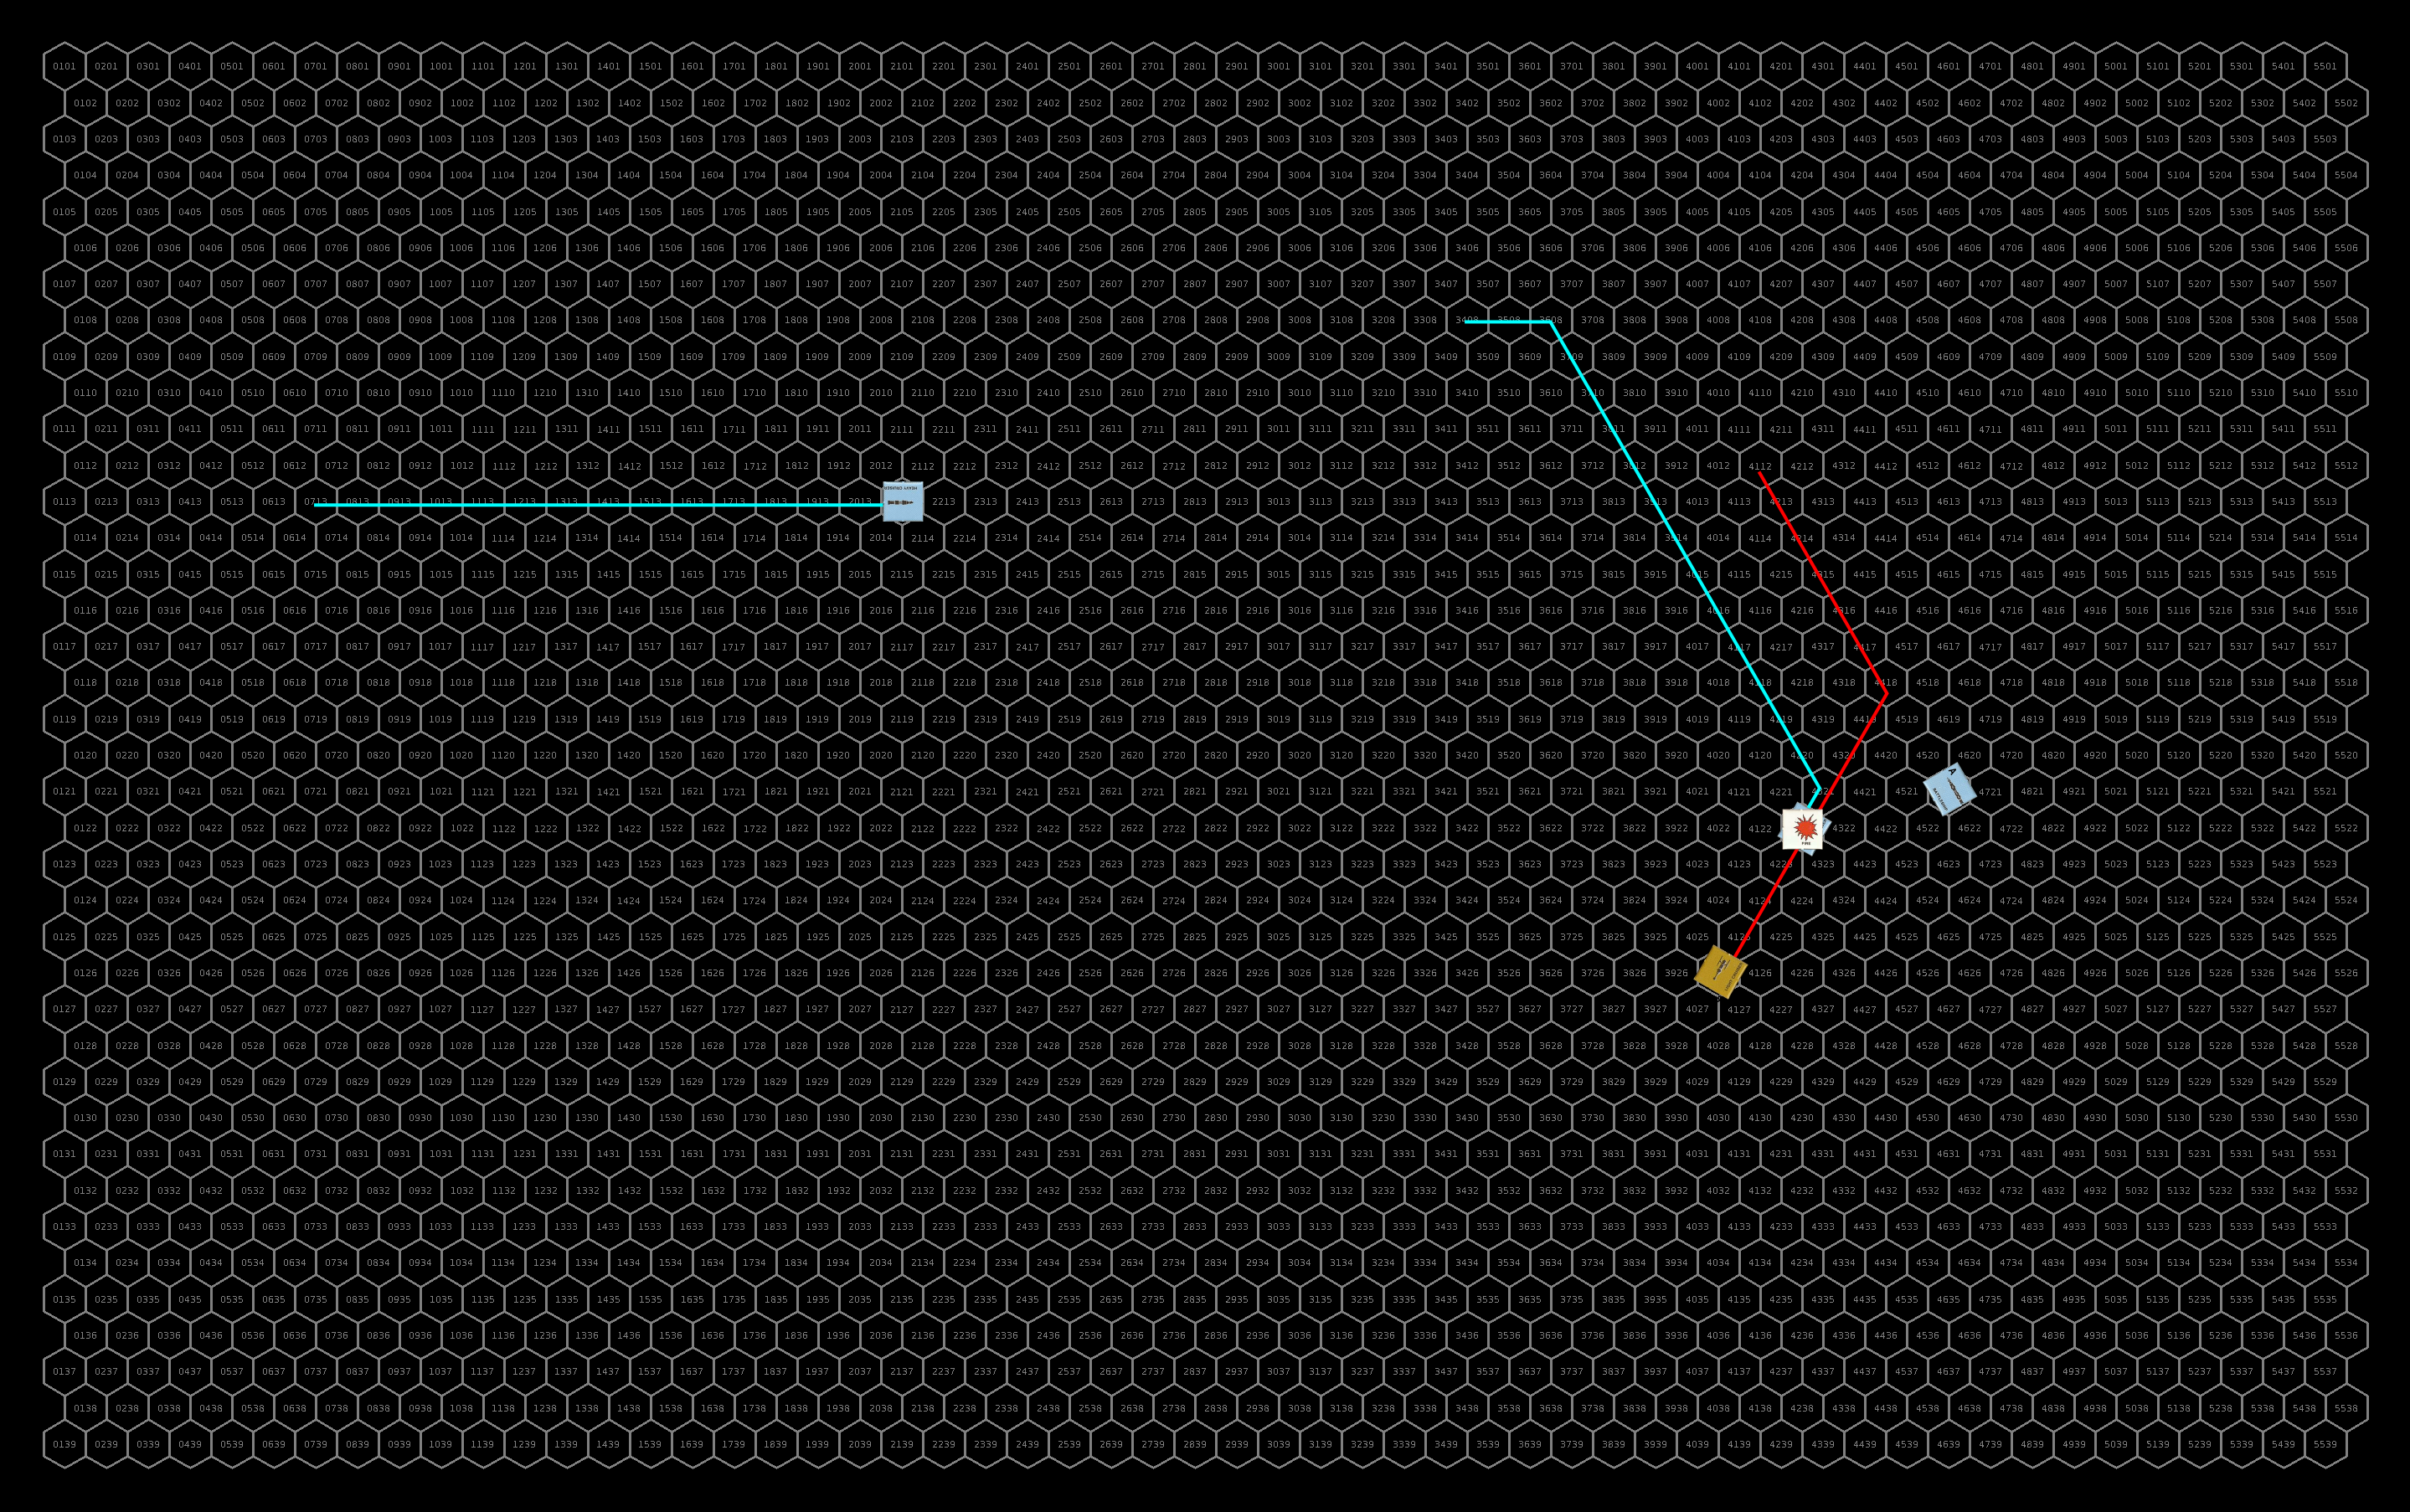
Positions and course after the first shots were fired. Click for full size image.
Turn 3
The sathar fighter and heavy cruiser, both with no MR, fly straight ahead (to the left). The fighter slows down to speed 20 while the heavy cruiser, with no ADF either, just stays at speed 17. The fighter with the navigation control hit slows to speed 20 and spins to port flying up toward the planet while the remaining fighter from the lower group accelerates to speed 20 and goes after the pair of UPF frigates. The other fighters also speed up to 30 hexes/turn and go after the frigates as well, both fighter groups looping around the planet.
The sathar assault carrier, with its navigation control hit, pull to starboard and with no ADF, flies up away from the main battle. The sathar destroyer loops around to go after the UPF frigates as well and the light cruisers and frigate decelerate back to 15 and light up for a shot at the UPF battleship. The fire on the UPF assault carrier damages its hull (5%).
Defensively, the UPF frigates fire their laser batteries at the fighters and rocket batteries at the destroyer while the other UPF ships concentrate all their fire on the lead sathar light cruiser.
The UPF frigates miss the fighters completely but hit the destroyer with two rocket batteries seriously damaging it and deducing its hull integrity by 72%. The other ships hit the sathar light cruiser with 2 laser, 2 rocket, 1 electron, and 1 proton battery knocking out its ICM launcher, engines, and stasis screen, starting a fire and reducing its hull integrity by 16%.
Offensively, the sathar fighters hit the lead UPF frigate with and assault rocket reducing its hull integrity by 43% and the second one with an assault rocket as well reducing its already damaged hull (from the previous battle) by 38%. The destroyer also hits the second UPF frigate with its electron battery and laser cannon knocking out the frigates engines.
The sathar frigate and light cruisers hammer the UPF battleship hitting it with 2 disruptor cannons, 2 proton batteries, 1 electron battery, and 2 torpedoes that slip through the battleship’s ICM screen. The weapons short circuit the battleship’s defensive system, reduce its maneuvering ability by half, knock out its proton battery and reduce its hull integrity by 66%.
The two UPF frigates, now heavily damaged, drift on their current course firing at the destroyer as they leave. The assault carrier also drifts but its navigation control hit causes it to pull to port. Despite its weakened hull, it holds together. The battleship also drifts away from the fight firing all its weapons at the damaged light cruiser.
The UPF heavy cruiser turns parallel to the course of the assault carrier but lines up for a direct shot with its disruptor cannon at the sathar destroyer. It fires its rocket battery and torpedo at the undamaged light cruiser and uses its energy batteries to fire on the sathar fighters. The light cruiser follows a similar path and firing at the same targets. The fighters loop up around the planet and come up behind the sathar frigate firing their assault rockets at it.
The fire on the sathar light cruiser and sathar heavy cruiser damages both ships’ hulls reducing their integrity by 13% and 11% respectively.
Defensively, the sathar ships continue to fire at the battleship, hoping to destroy it before it can fly out of range. The sathar assault carrier makes a long range attack at its UPF counterpart with its proton battery but misses. The sathar destroyer fires at the lead UPF frigate hitting with its electron and rocket batteries knocking out the frigate’s masking screen launcher and damaging its combat control system.
The battleship manages to get off lightly and is only hit by 2 distruptor cannons and a laser battery cutting its damage control capability in half and reducing its hull integrity by another 14%.
Offensively, the UPF battleships hits the lead sathar destroyer with its laser and 2 electron batteries and slips a torpedo through the cruiser’s ICM screen destroying it and scoring the first kill of the battle. The UPF heavy cruiser manages to get its torpedo through the other light cruiser’s ICM screen cutting the sathar ship’s maneuvering in half but otherwise missing.
The UPF fighters hit the sathar frigate with all three assault rockets destroying it completely. The sathar destroyer is hit by disruptor canons from the UPF light and heavy cruiser, as well as a laser battery and two rocket batteries from the frigates. The frigates also manage to get a torpedo through the destroyer’s ICM screen. The combined damage from the UPF weapons obliterates the sathar ship. The sathar fighters get away with only minor damage: one loses 60% of its engine capability, one has its damage control capabilities cut in half, and the third loses 38% of its hull integrity.
Repair Turn
As the ships work on repairs, the lead UPF frigate finds that it’s hull is too damaged to repair in space and must find a way to a shipyard with only 30% of its hull intact. The other frigate manages to repair a bit of its hull restoring 10% of its integrity. The UPF assault carrier puts out the on-board fire while the battleship repairs 3% of its hull.
The two sathar fighters with hull damage find that they need a shipyard to repair their hull as well with their hull integrity sitting at 62% and 50% respectively. The sathar assault carrier restores 11% of its hull integrity while the heavy cruiser gets its fire under control.
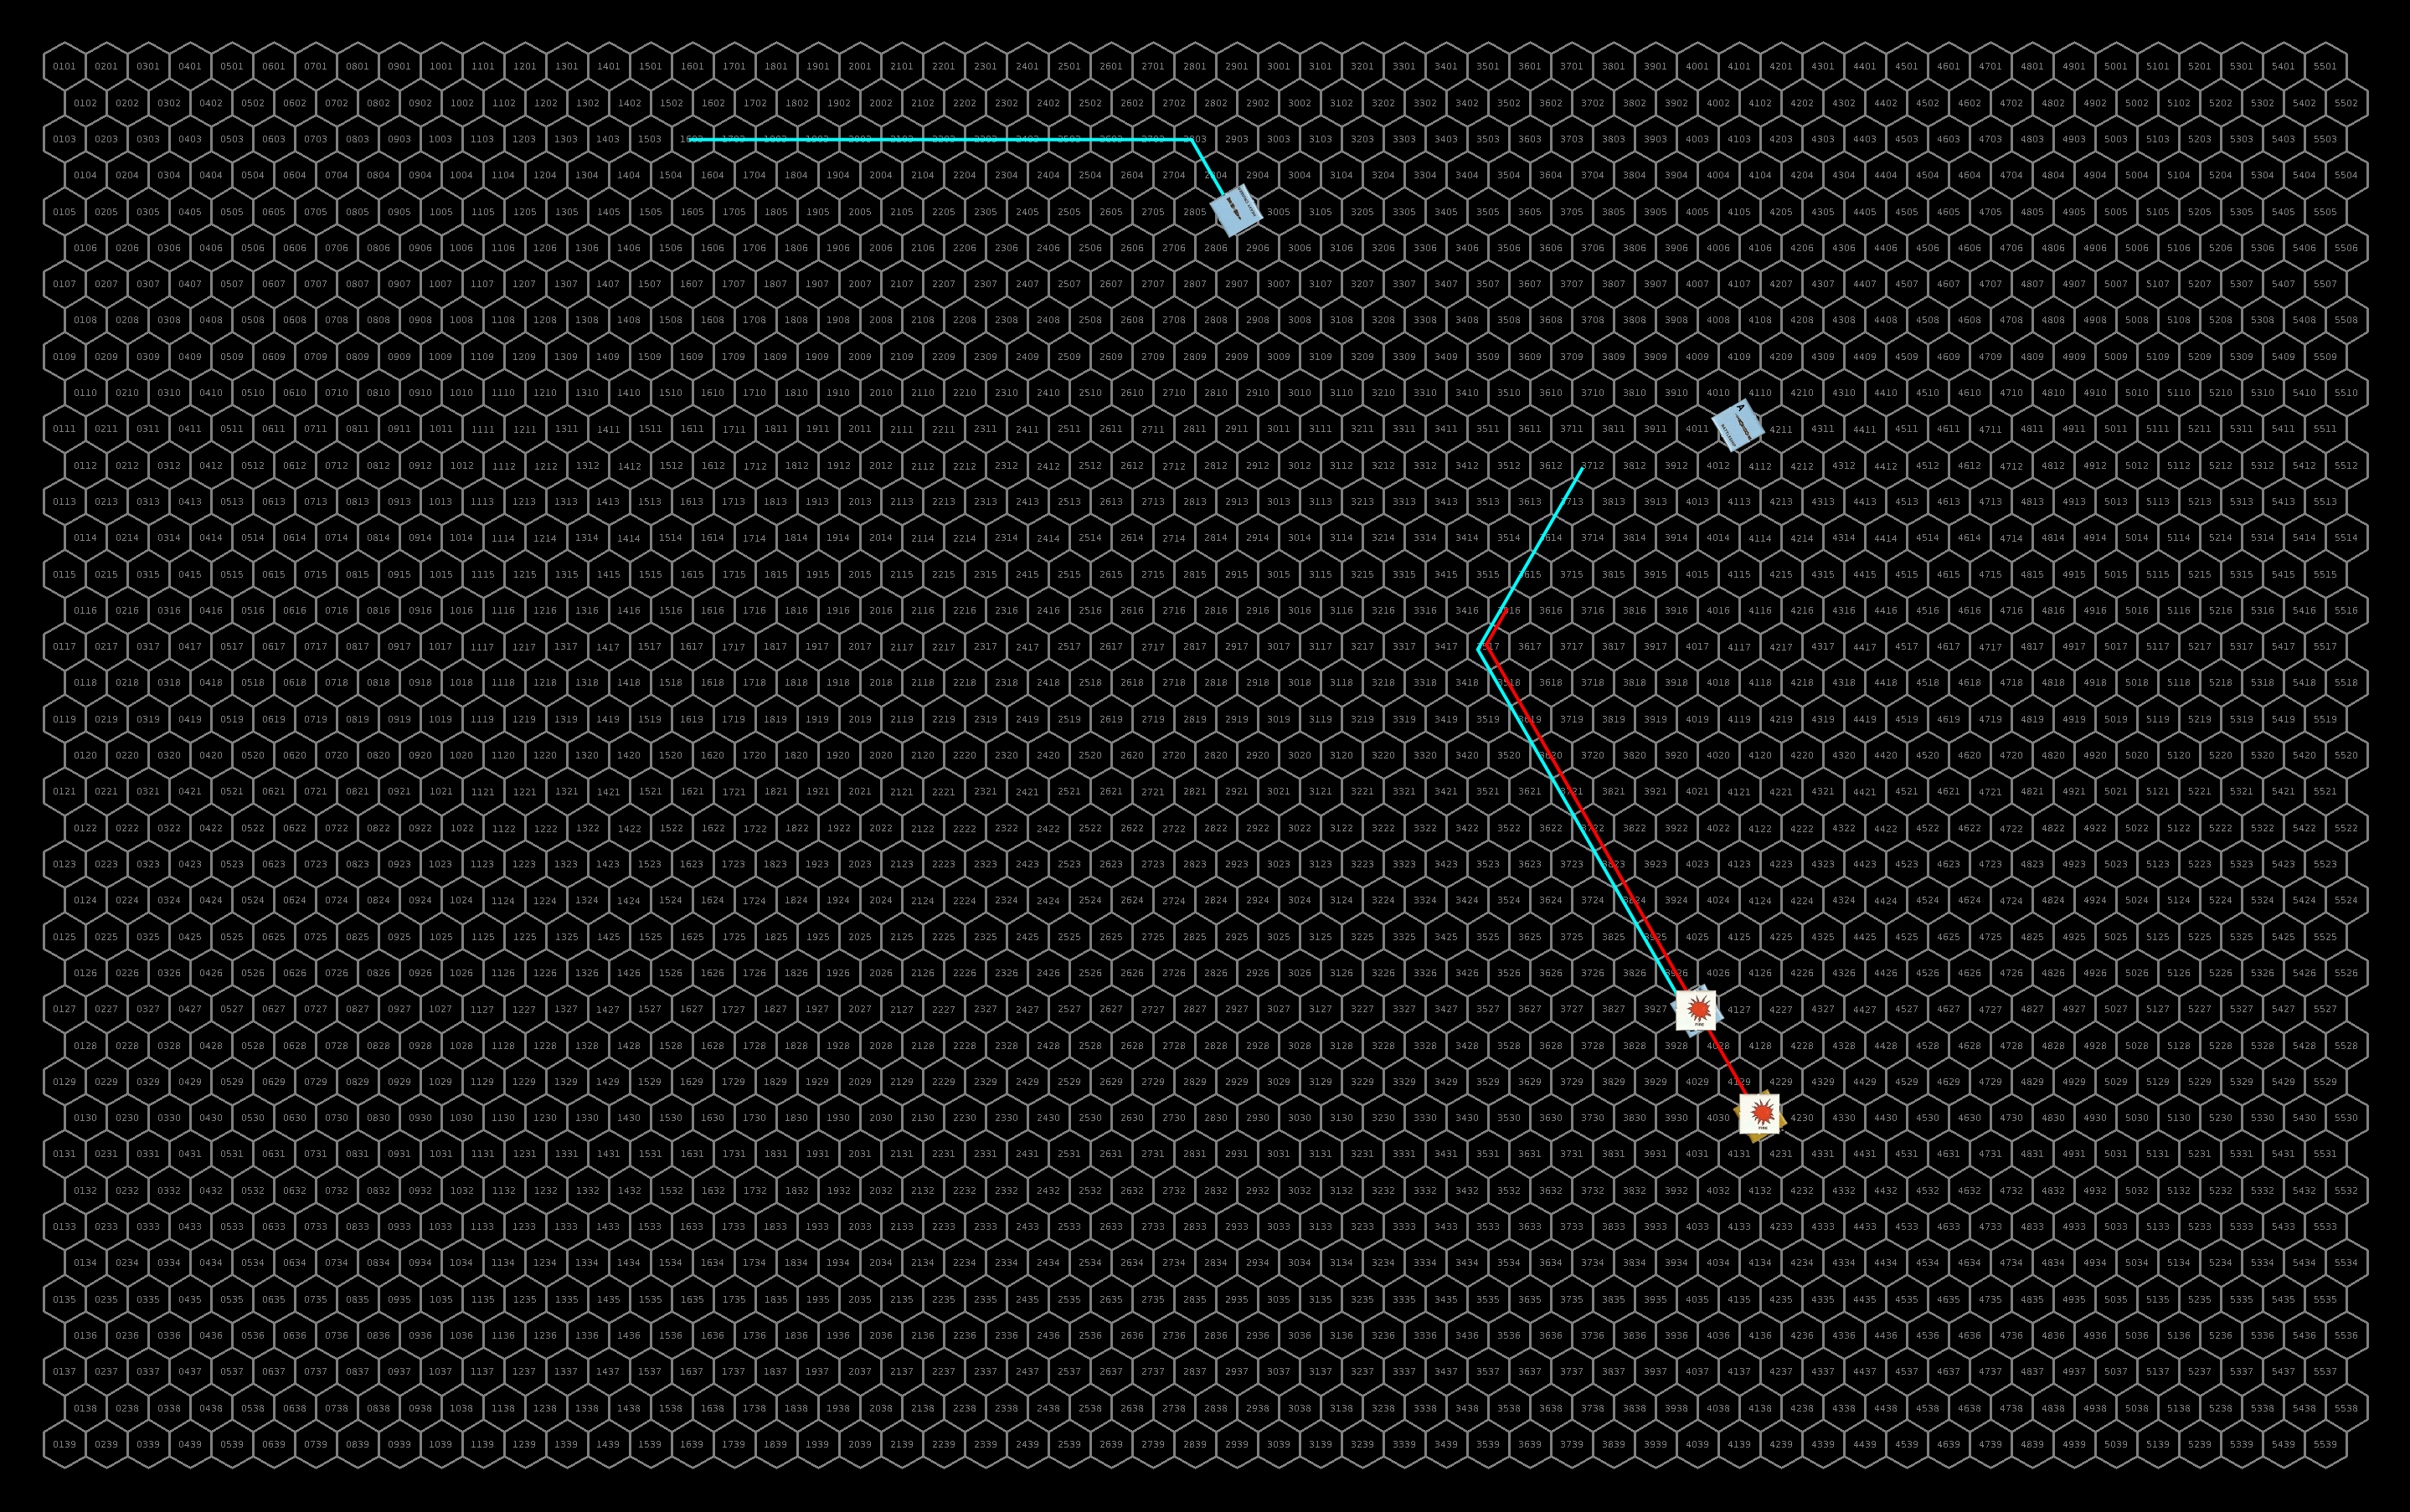
Courses and positions after a half hour of combat and repairs. Things are starting to scatter as ships are damaged and lose maneuvering capability and control or are too damaged to risk maneuvering. Ships moving off the map will have a yellow number by them showing how many hexes off the map they are. Click for full size image.
Turn 4
The flight of four sathar fighters all go after the UPF assault carrier hoping to finish it off. They loop around to make a direct assault and then fly off to chase after the UPF frigates. The lone fighter, after firing its last assault rocket at the heavy cruiser loops around and starts heading for its carrier to dock and rearm. The fighter with the navigation control damage loops to port and fires one of its assault rockets at a UPF fighter as it passes by. The remaining fighter, with no maneuvering, along with the sathar heavy cruiser in the same condition, continue to drift away from the fight. The sathar assault carrier, with its navigation control damage, pulls to starboard and passes distantly in front of the UPF cruisers and assault carrier. The remaining sathar light cruiser turns to go after the battleship hoping to finish it off.
Defensively, the UPF cruisers fire at the sathar fighters hoping to take them out before they can fire their assault rockets. The battleship fires at the light cruiser pursuing it and the frigates get a couple of distant shots at the sathar fighters.
The sathar light cruiser is hit by one of the battleship’s laser batteries and both electron batteries which score a critical hull hit (integrity reduced by 26%), knock out its ICM launcher, and damage its navigation control systems. Four of the five sathar fighters are hit by the UPF ships knocking the hull integrity down to half on one, destroying a second and damaging the assault rocket launcher on the other two (including the lone fighter going after the heavy cruiser).
Offensively, the two fighters with working assault rocket launchers firing at the assault carrier both miss while the sathar fighter with the navigation hit firing at the UPF fighter hits with its assault rocket destroying the UPF fighter, the first (and as it will turn out, only) UPF ship destroyed in the fight. The battleship is hit by the sathar light cruiser’s electron battery, proton battery, and distruptor cannon knocking out its proton screen, damaging its combat control system, and reducing its hull integrity by another 12% (only 11% remaining).
The two UPF frigates continue to drift and fire long distance shots at the fighters. The battleship drifts away from the light cruiser firing at it as it goes. The two UPF fighters loop around and take a run at the sathar light cruiser firing their last assault rockets. The UPF assault carrier pulls to starboard and runs parallel to its sathar counterpart while the UPF light and heavy cruisers maneuver directly onto the sathar assault carrier’s tail and take point blank shots with all their weapons.
Defensively, the sathar light cruiser fires at the battleship and the sathar assault carrier fires at the UPF light cruiser. The UPF light cruiser is hit by a rocket battery reducing its hull integrity by 17% while the battleship is hit by an electron battery knocking out its ICM launcher.
Offensively, the sathar light cruiser is hit by one of the battleship’s laser batteries knocking out its proton battery and by both assault rockets from the fighters which damage its combat control system and knock its hull integrity down by 20%. The lead UPF frigate manages to score a long range laser battery shot on the lead sathar fighter knocking out its assault rocket launcher. The UPF cruisers hit the sathar assault carrier with a distruptor cannon and a laser, electron, and rocket battery knocking out the carriers maneuvering, laser battery, and masking screen launcher and damaging its combat control system.
Maneuvering and positions after forty minutes of battle. The UPF are stating to score kills and the ships are really starting to scatter. Click for full size image.
Turn 5
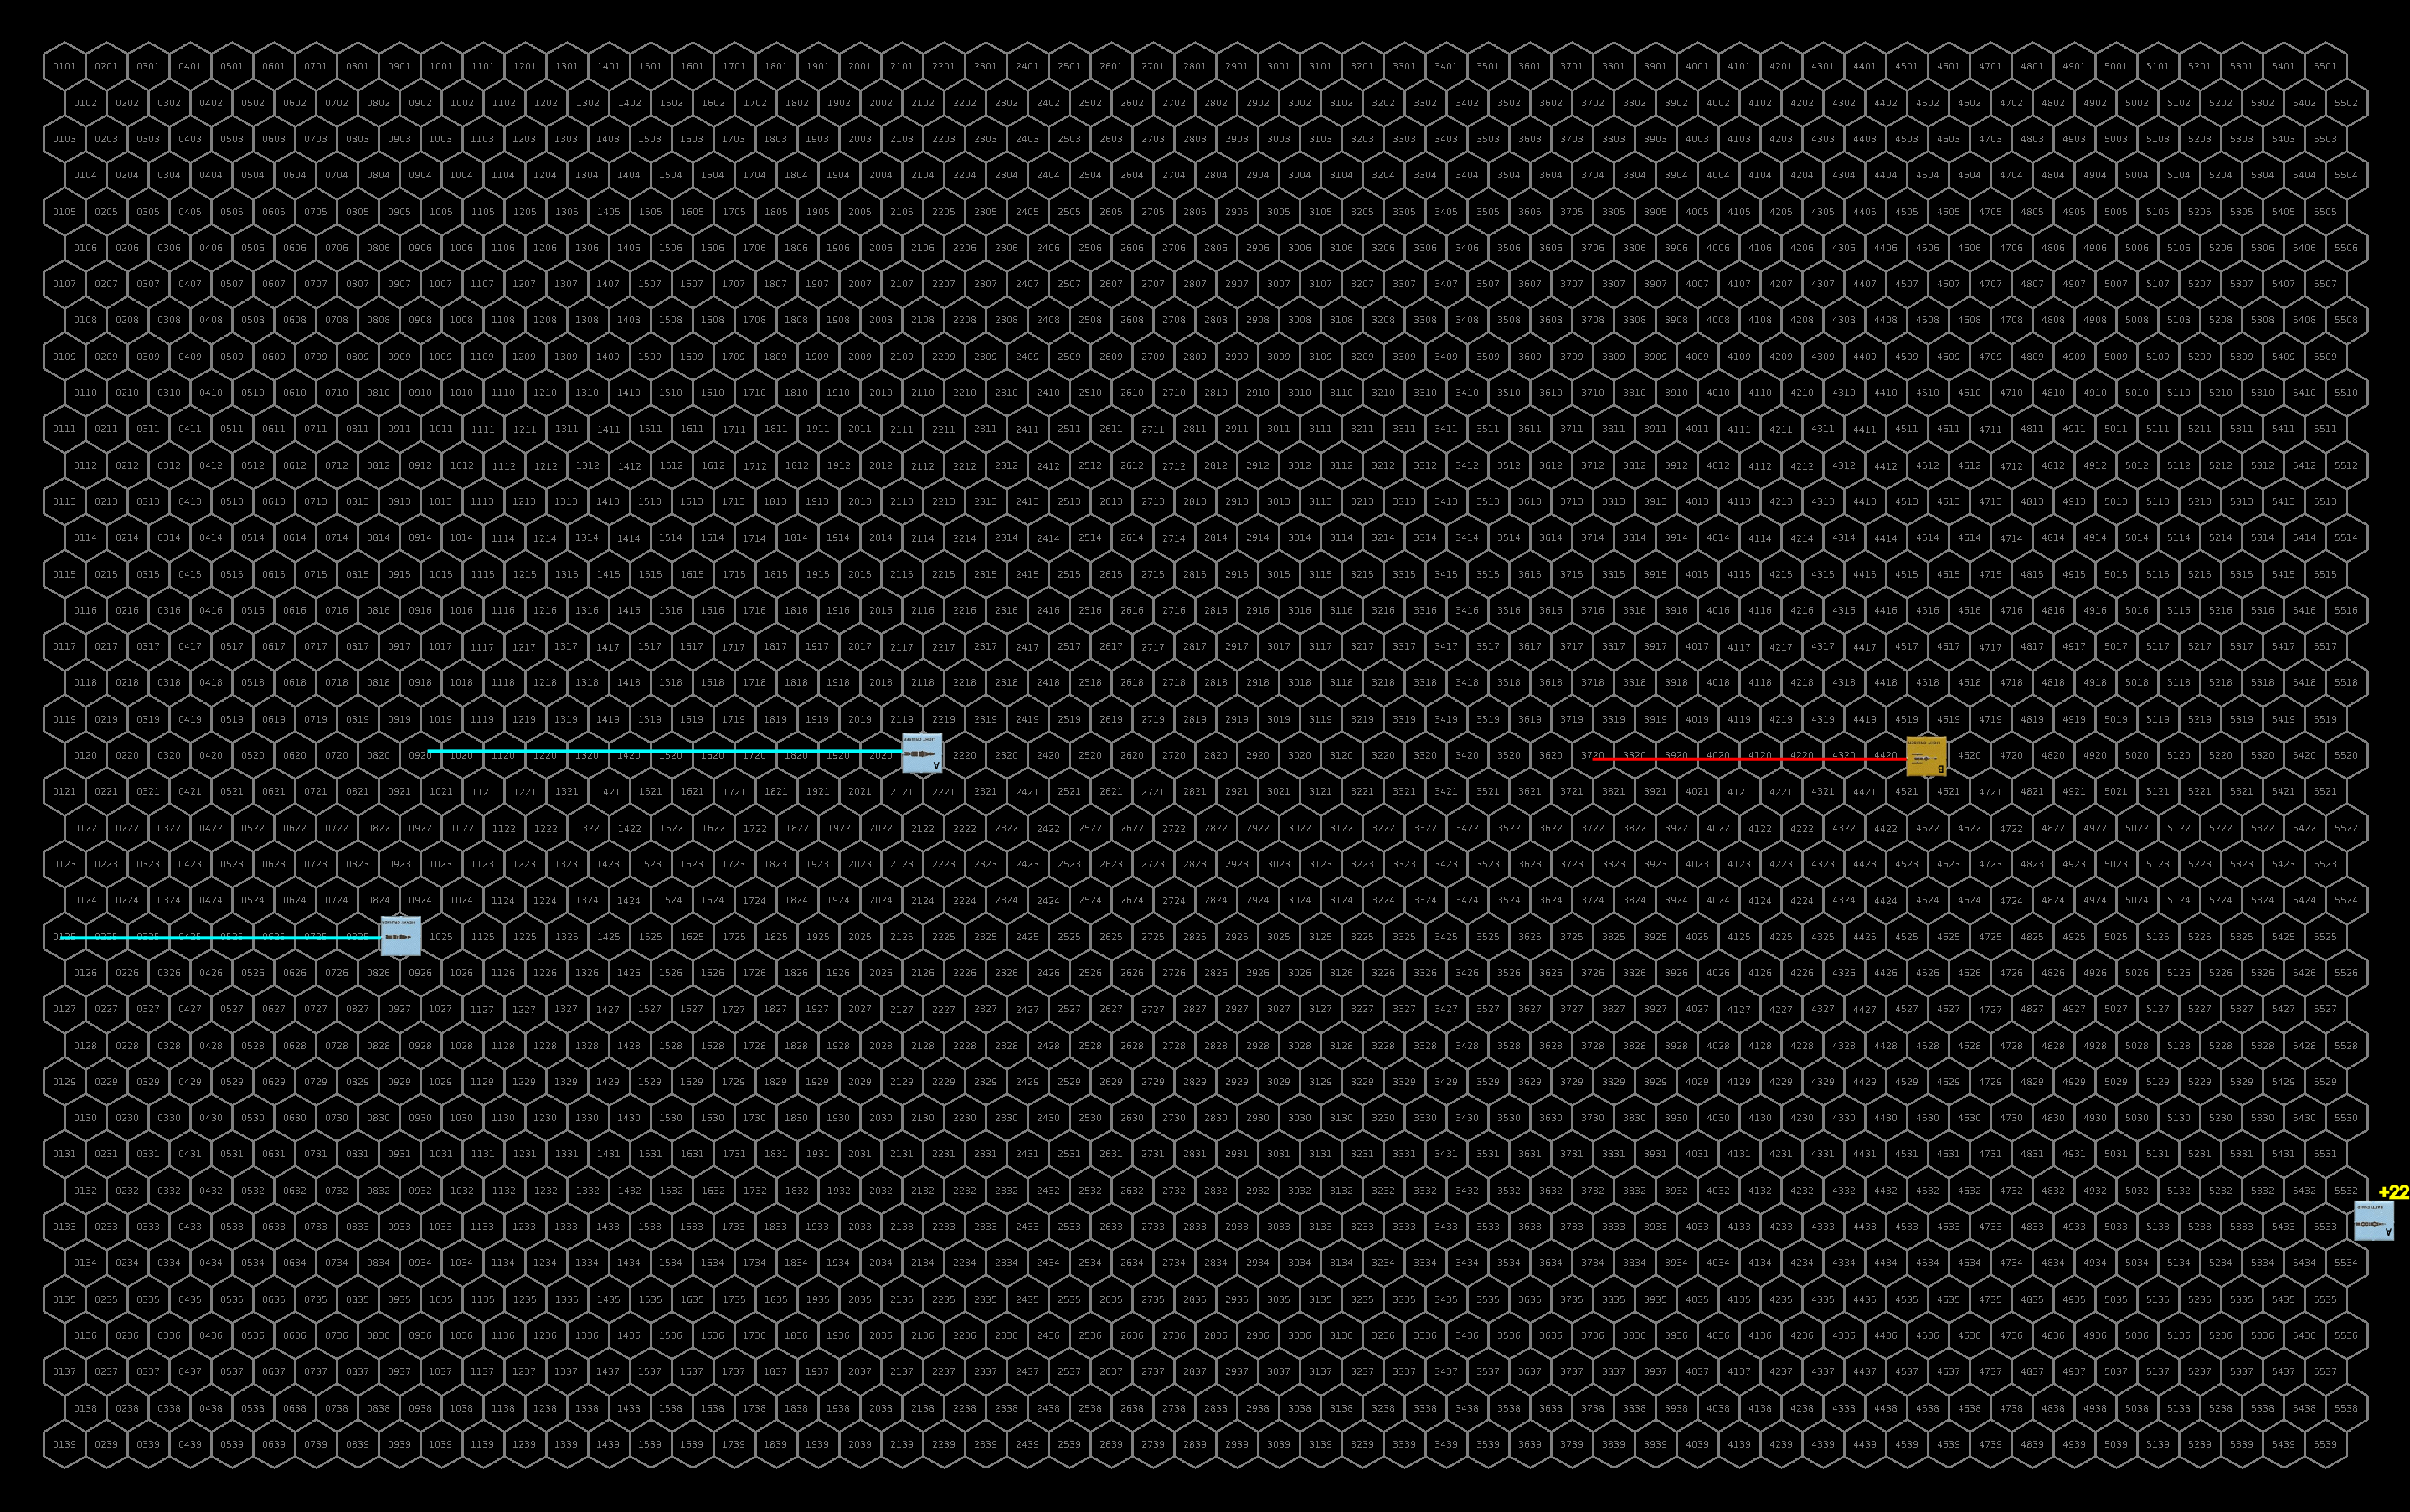
The group of three sathar fighters sets off after the two UPF frigates, the lone fighter, with its assault rocket launcher disabled, and realizing that the assault carrier is probably not going to survive the battle, attempts to ram the UPF light cruiser. The sathar light cruiser pulls to port and slows down, firing at the two UPF fighters. The other ships just continue to drift away with the assault carrier firing at the UPF light cruiser as it drifts.
Defensively, the UPF frigates fire at the remaining fighter with a working assault rocket launcher but miss. The UPF light cruiser fires at the oncoming fighter and destroys it before it can ram the larger ship. The UPF heavy cruiser hits the sathar assault carrier with its laser and rocket battery and reduces its hull integrity by another 36%.
Offensive, the sathar fighter misses the UPF frigate with its assault rocket while the sathar light cruiser hits one of the UPF fighters damaging its combat control system. The sathar assault carrier hits the UPF light cruiser with its proton and rocket battery short circuiting the cruiser’s defensive systems and reducing its hull integrity by 20%.
The UPF assault carrier’s loss of navigation control pulls it to starboard and the fighters, out of assault rockets, start heading back to the carrier to rearm. The heavy and light cruiser stay on the tail of the sathar assault carrier while the frigates and battleship continue to drift.
Defensively, the sathar assault carrier continues to fire on the UPF light cruiser hitting with its rocket battery for another 16% hull reduction on the cruiser. All other ships are out of range.
Offensively the UPF frigates fire at the pursuing fighters but miss. The UPF cruiser open fire on the sathar assault carrier and hit with 3 laser batteries, 2 proton batteries, an electron battery, a disruptor cannon, and two torpedoes completely destroying the sathar carrier.
This is the ships off the top of the main map (UPF cruisers and frigates, sathar assault carrier and fighters). The bottom row of hexes on this map exactly correspond to the top row of hexes on the main map (below). Click for full size image.Main battle map after turn 5. Things continue to spread out. Click for full size image.
Turn 6
With their carrier destroyed and being either out of weapons or their weapon system disabled, the three sathar fighters attempt to ram the UPF frigates. The sathar light cruiser pulls to starboard and accelerates back to speed 16, the lone fighter near the planet pulls to port with its navigation damage and the other two ships continue to drift away.
Defensively, the frigates fire everything they can at the incoming fighters hitting two with their laser batteries, the lead fighter for 75% of its hull and the second for a navigation hit but not enough to destroy them before they ram. Two fighters slam into the lead frigate and despite its damaged hull fail to destroy it only taking out 20% of the remaining 30% hull integrity. The third fighter hits the second frigate for a measly 5% of its hull integrity.
The UPF frigates and battleship continue to drift, the assault carrier pulls to port and the fighters continue to close on the carrier to rearm. The heavy and light cruiser start accelerating and turn to head after the sathar light cruiser. No shots are fired as everyone is out of range.
Repair Turn 2
The lead UPF frigate repairs the damage caused by the two ramming sathar fighters but can repair its hull no further. The other frigate repairs 12% of its hull integrity while the light cruiser repairs 3% of its. The assault carrier gets its navigation control system fixed as well as repairing 8% of its hull. The battleship repairs 5% of its hull and brings is damage control system fully back on-line.
The sathar light cruiser repairs its navigation control system while the heavy cruiser discovers that a shipyard will be required to bring its damage control system back fully on-line.
The upper map after an hour of fighting. The second blue line by the assault carrier should have fighters at the end of it but I forgot to move the tokens. Click for full size image.The main battle map after an hour. The poor sathar fighter can’t get is navigation system under control and is stuck near the planet. Click for full size image.
Turn 7
With its navigation control system repaired, the sathar light cruiser sets off at max acceleration to attempt to intercept the UPF battleship and finish it off. The damaged fighter comes to a stop near the planet as the pilot continues to work on its navigation control issues.
The UPF cruisers continue in pursuit of the sathar light cruiser while the assault carrier, its hull and navigation control fixed, starts to turn around and head back toward the planet. The two surviving fighters pull alongside the carrier and start docking procedures.
We’ve now shifted the map to track the sathar light cruiser pursing the battleship and the UPF cruisers pursing it. The other ships are effectively out of the battle. The planet is some 200,000 km off the left side of this map. Click for full size image.
Turn 8
The chase continues. The sathar light cruiser continues to close on the battleship but the UPF light cruiser, which had a slight speed advantage on the sathar light cruiser, continues to close on it as well as it starts to outdistance the older heavy cruiser that has a lower acceleration. The two UPF fighters dock with the assault carrier.
The gaps between the ships are narrowing. Click for full size image.
Turn 9
Since relative speed are all that matter, I’ve adjusted the speeds shown on the maps down so that the battleship is stopped and the other three ships have been scaled accordingly.
The chase continues as the light cruisers close on their targets. The UPF heavy cruiser is as close as it is going to get to the sathar ship unless the sathar vessel’s engines are damaged as the greater acceleration of the sathar light cruiser has allowed it to match speeds with the heavy cruiser. The UPF fighters are rearmed.
Repair Turn 3
The lead UPF frigate repairs some of its maneuvering while the other frigate repairs 10% of its hull. The UPF light cruiser also repairs 10% of its hull while the assault carrier brings its laser and proton battery back on-line. The battleship, expecting to have to defend against torpedoes from the the sathar light cruiser, gets its ICM launcher working again and repairs another 5% of its hull.
The lone sathar fighter repairs some of its maneuvering capability and starts to maneuver to meet up with the heavy cruiser. The sathar light cruiser repairs 13% of its hull while the heavy cruiser restores half of its engine capability and begins accelerating to out of the system.
The ships have almost come in range of the battleship. Speeds have been adjusted so that they are relative to the battleship being at rest. Click for full size image.
Turn 10
The sathar light cruiser continues to close on the battleship and the UPF light cruiser continues to close on the sathar light cruiser. The two UPF fighters, rearmed, launch from the assault carrier and go after the lone sathar fighter near the planet.
The heavy cruiser is now starting to fall behind. Click for full size image.
Turn 11
The UPF light cruiser continues to close the gap but it is looking like the sathar ship will get to the battleship before the UPF light cruiser can intercept it. The battleship, at relative rest to the other ships, rotates to face the direction it expects the sathar vessel to come from in order to bring its disruptor cannon to bear.
It’s taken nearly an hour, but the sathar light cruiser is nearly in range of the battleship with the UPF light cruiser in hot pursuit and gaining. Click for full size image.
Turn 12
Realizing it cannot quite get into torpedo range this round, the sathar light cruiser remains at its current speed staying at extreme range for the battleship’s defenses although this will also allow the UPF light cruiser a chance to close as well.
Defensively the battleships fires all of its energy weapons at the sathar vessel but they all go wide although one of the electron batteries would have hit except for the battleship’s damaged combat control system. The sathar light cruiser returns fire but also misses.
The UPF light cruiser and heavy cruiser close in on the sathar vessel but the heavy cruiser is still well out of range. The sathar ship fires once again at the battleship this time hitting with its distruptor cannon shorting out the battleships defenses and ICMs. The battleship and light cruiser return fire. The battleship connects with a LB damaging the sathar light cruiser’s hull (11%). The UPF light cruiser is still too far away and its shots go wide.
The UPF fighters hit the sathar fighter with one of their assault rockets knocking out it’s assault rocket launcher.
Repair Turn 4
The lead UPF frigate repairs its combat control system and is now as functional as it can be without getting to a shipyard to repair its heavily damaged hull. The other frigate restores more of its engine capability. The UPF light cruiser repairs 13% of its hull while the assault carrier also gets a minor hull repair restoring 1%. The battleship focuses all of its repairs on its hull, hoping to survive the oncoming attack and restores 13% of its hull integrity.
The sathar fighter under attack by the UPF fighters finally fixes its navigation control system while the other fighter restores some of its maneuverability. The UPF light cruiser fixes its combat control system and brings its proton battery back on-line in preparation for attacking the UPF Battleship.
Shots are fired as the ships once more come in range. Click for full size image.
Turn 13
The sathar light cruiser makes a pass on the battleship firing everything it can at the larger vessel and using its maximum acceleration. The lone sathar fighter, its navigation control issues solved, begins accelerating away from the planet, hoping to surviving the next two rounds of assault rocket fire from the two UPF fighters.
Defensively, the battleship and light cruiser try to take out the sathar light cruiser before it can inflict any more damage on the battleship. The UPF light cruiser, at nearly maximum range misses, while the battleship connects with 2 laser batteries, a proton battery, and its disruptor cannon slightly damaging the cruiser’s hull (8%), knocking out its laser battery and engines, and inducing a malfunction in its navigation control system.
The sathar light cruiser returns fire with all of its function weapons but in the excitement of the moment, the gunner all miss and the battleship escapes unscathed.
The UPF light cruiser closes to torpedo range on the sathar vessel and opens fire with everything it can. The heavy cruiser continues to close and the battleship fires a long range salvo at the now retreating sathar light cruiser. The fighters again fire at the lone sathar fighter, this time hitting it with one of their assault rockets and destroying it.
Defensively the sathar light cruiser now focuses on its pursuer and fires at the UPF light cruiser hitting with both its electron and proton battery inducing a fire and damaging the light cruiser’s damage control system.
Returning fire at the sathar light cruiser, the battleship misses and the UPF light cruiser hits with its laser, electron, and proton batteries damaging the ship’s hull (14%), knocking out its rocket battery, and damaging its combat control system.
The sathar light cruiser gets its shot and fails. It probably should have stayed closer to the battleship to get one more try. Click for full size image.
Turn 14
The sathar light cruiser pulls to port and holds together. The fire on the UPF light cruiser knocks out its laser battery.
Defensively, the battleship and light cruiser fire on the sathar ship. The battleship hits with an electron and proton battery starting a fire and knocking out its stasis screen. The light cruiser hits with its proton battery and disruptor cannon knocking out the sathar ship’s disruptor cannon and electron screen.
The sathar light cruiser fires at the UPF light cruiser but misses.
The UPF light cruiser continues to tail the sathar vessel closing to rocket battery range while the heavy cruiser starts catching up with the other ships. The fire on the sathar light cruiser damages its hull (6%)
The sathar light cruiser fires on the approaching UPF light cruiser hitting with its electron and proton battery damaging its hull (4%) and knockign out a third of its engine capability.
The UPF light cruiser hits the sathar ship with its electron and rocket batteries destroying it and ending the battle.
Final moves of the fight. Click for full size image.
Turn 15
The fire on UPF light cruiser damages its navigation control system.
Repair Turn 5
The UPF light cruiser gets its fire under control, the assault carrier repairs its rocket battery but discovers that any more repair of its engines will require a shipyard, and the battleship repairs another 11% of its hull.
The sathar heavy cruiser fully repairs its engines.
Final repairs
Battle repairs of the UPF ships continue over the next four and a half hours as the ships return to orbit around Ken’zah-Kit. In the end, the second UPF frigate can only get its hull up to 65% integrity, and the battleship can only get its hull up to 58%.
The lone sathar fighter meets up with the heavy cruiser and is attached to the hull of the larger vessel where it will remain until they get back to a shipyard. It’s maneuvering is fully repaired as the ships accelerate out of the ship. The heavy cruiser gets all of its systems repaired over the next four hours expect its hull which it is only able to restore to 81% outside a shipyard.
Lessons Learned
The sathar just can’t seem to catch a break and finish off the UPF ships. I though the light cruiser was going to finish off the battleship but rolled over 80 for every single attack so it missed completely. The battleship only had about 26 HP at that point. (On a whim I rerolled all the attacks and the second time it hit with a PB and RB, the latter did double damage and destroyed the battleship. But alas, that wasn’t the actual roll.) The same with the ramming of the frigates. I thought for sure the UPF frigate hit by two fighters was going to be destroyed, it only had 12 HP left but then I just rolled 8 on 2d10 for the hull damaged sustained. And it wouldn’t have done any good for the third one to hit it as I only rolled a measly 2 HP damage for that ship as well. There were several other times where I expected the sathar to get better hits but the dice were just against them. The UPF had bad spells as well but it didn’t seem to be at those critical, ship-finishing moments.
I considered having the light cruiser ram the battleship but the odds were in the favor of the battleship avoiding the ramming attempt and if it failed, the sathar ship would have been at point blank range for both the battleship and the oncoming UPF light cruiser so it didn’t try. Although it probably should have stayed a bit closer to the battleship as it ended its movement. But I really didn’t expect it to completely miss. This does have me thinking a bit about the ramming rules, however, so there may be a blog post about that when I have time to think on it some more.
The UPF are pretty beat up with the two cruisers and a fighter as the only ships not needing to go to a shipyard for repairs, but they only lost a single fighter. The sathar on the other hand lost everything expect a fighter and a heavy cruiser. Task Force Cassidine has now destroyed two major sathar fleets while only losing 3 assault scouts and 4 fighters.
There is one more battle coming up (in the Liberty system) and then things are going to quite down a bit as the sathar just don’t have very many ships surviving at the moment. They are done to just 9 fighters, 1 cutter, 2 frigates, 1 destroyer 2 light cruisers, 2 heavy cruisers, and two assault carriers but they are spread out all over the Frontier and the starship construction centers (and two are in the battle coming up in the Liberty system and may not survive). Its going to take some time to get them all together and build a few more ships.
This is only a week later than I had planned. I’ve gotten behind on updating the timeline entries and am still trying to catch up. I’ve had some big battles to play through and I just haven’t had the time to do so. There will be another battle coming in a few days as soon as I get it played out.
The timeline this month, like last, focuses almost exclusively on the maneuvering, battles, and logistics of the Second Sathar War. There are a few entries on the HSS History’s Hope but that is really the only not war related thread I’m tracking right now. This month saw a couple of battles. There was originally going to be one more but the UPF withdrew seeing as they faced almost certain destruction.
This month also sees the fast-track completion of pilots in the current class in the Gollwin Academy to service as pilots for all the new fighters coming out of the starship construction centers for the newly formed Frontier Fighter Corps. This is a process that will continue of the next several months until all the pilots are graduated or the class completes their current training.
There might be a bit of other, non-war stuff next month but not much. The next two posts after this one will be battle reports that I’ll get up as soon as I can. Depending on how those play out, there might not be much in the way of ships left to fight for a while so things will probably quiet down.
Date (FY)
Events
61.326
– Sathar SCC#4 (OFS111) completes 5 fighters.
– The K’aken-Kar assault scout jumps into its home system and begins decelerating toward Ken’zah-Kit.
– RG One settles into orbit around Zik-kit and joins up with the rest of PG Meteor already in orbit.
61.327
SG Alpha jumps into the Fromeltar system and begins calculations for the jump to the Kizk-Kar system. The pilot of the recently completed fighter takes on extra life support and begins boosting to join SG Alpha as it transits the system.
61.328
– SBF-J1 arrives at SCC#3 (OFS138). After a rapid reprovisioning, during which orders are issued to all existing sathar vessels, SBF-J1 departs the SCC and begins accelerating for a jump to the OFS137 system.
– Sathar EG-1 jumps out of the Liberty system but does not end up in the Waller Nexus system as expected. Rather it overshoots and arrives in the Padda (FS11) system instead. The astrogators begin working out where they are at.
61.329
– SBF-J3 jumps into the OFS168 system and begins calculations for a jump to the OFS167 system.
– SBF-E3 arrives at Stenmar (Kazak) and merges with SBF-E2.
– The fighter in the Fromeltar system joins up with RG Alpha as it crosses the system for its jump to Kizk-Kar.
61.330
– The HSS History’s Hope makes the jump and ends up in a binary system but it is not the two stars of YS07. While the engineers start to work on the engine overhauls, the astrogators try to figure out where they are.
– The lone K’aken-Kar militia assault scout arrives back in its home system and the crew stands down for some leave but remain on alert for rapid recall if needed.
61.331
– SG Alpha jumps into the Kizk-Kar system and begins deceleration toward Zik-Kit and PG Meteor.
– SBF-J3 jumps into the OFS167 system and begins calculations for a jump to OFS166.
– 2 UPF fighters are completed at both the Minotaur (Theseus) and Hentz (Arak) SCC and 2 more go into production in each location. The fighters are temporarily manned by the local militias until UPF pilots and be dispatched to the system.
61.332
Realizing that they need pilots for all the new fighters being produced, the current cadets at Gollwin academy are polled for volunteers for the Frontier Fighter Corps. Those that volunteer are put on a fast completion track to get their Pilot and Rocket Weapons certifications.
61.333
– SBF-J1 jumps into the OFS137 system and begins calculations for a jump to the OFS136 system.
– SBF-J3 jumps into the OFS166 system and begins calculations for the jump to FS33 to join up with SBF-B2.
– 11 UPF fighters are completed at the CDC shipyards (Triad, Cassidine). With no pilots ready, they are put into storage and Spacefleet temporarily gives the space over for commercial ship maintenance.
61.334
– A fighter and assault carrier are completed at SCC#10 (OFS174). Instead of starting another AC and fighter, construction begins on 2 destroyers and a frigate.
– The new sathar assault carrier at SCC#10 (OFS174) collects the 3 fighters in the system and begins a transit to SCC#4 (OFS111). The ships are designated Transit Group (TG) 1.
– Astrogators aboard the HSS History’s Hope work out their position and discover that they went nearly twice as far as they intended. The system is designated YS09 and they decide to take two smaller jumps to get back to YS07 to reduce the chance of error. They begin working on jump calculations for an 8 ly jump to the next system.
– 3 more fighters are completed at the Hentz (Araks) SCC for the Frontier Fighter Corps, 2 more go into production, the other slot being given over to commercial ship maintenance for now.
61.335
Initial calculations complete, the HSS History’s Hope begins accelerating for a jump to the first system on their way back to YS07, another binary system 8 lightyears away.
61.336
– SBF-J1 jumps into the OFS136 system and begins calculations for a jump to the FS56 system.
– SG Alpha arrives at Zit-Kit (Kizk-Kar). The fighters are stationed on the planet’s surface while the assault carrier begins preparations for a trip back to Prenglar to pick up more fighters.
– SBF-J3 jumps into the FS33 system and begins decelerating to join up with SBF-B2.
– 8 fighters are complete for the Frontier Fighter Corps at the PGC shipyard (Gran Quivera, Prenglar). They are shuttled over to Gollwin academy to serve as trainers for the accelerated pilot classes. Construction begins on 8 more.
61.337
– The astrogators in sathar EG-1 are able to localize their position. Being only a single jump from Theseus, they begin calculating a jump to that system first.
– SBF-E2 leaves orbit around Stenmar (Kazak) and begins accelerating for a jump to the Zebulon system and Strike Force Nova.
– SBF-B2 leaves orbit in the inner FS33 system and begins accelerating for a jump to the K’sta-Kar and Task Force Cassidine. SBF-J3 changes course to meet them enroute.
61.338
– After another 100 days of exploiting their secret jump route between Truane’s Star and Cassidine, Obar Enterprises has grossed another 1.47 million credits. In the year since charting the route they have grossed over 6.8 million and paid off the loan on their new freighter. Given the current crisis, they turn over the details of the jump route to Spacefleet.
– Initial jump calculations complete, sathar EG-1 starts accelerating for a jump to the Theseus system.
61.339
– SBF-J1 jumps into the FS56 system and begins calculations for a jump to the Kizk-Kar system.
– SBF-J3 meets up with SBF-B2 enroute to K’sta-Kar and merges into that battle group.
– Another UPF fighter is completed at the Hentz (Araks) shipyard. The extra capacity in the shipyard will be used for the next six days to accelerate construction on two of the other fighters to get all four fighters on the same schedule.
61.340
– The HSS History’s Hope successfully jumps into their target system which they designate YS10. They immediately begin working on engine overhauls and calculations for the 6 ly jump to return to YS07.
– The initial group of more advanced students at the Gollwin Academy (Morgaine’s World, Prenglar) complete their fast-track certification for the Frontier Fighter Corps. The ten of them are dispatched to Triad to take command of some of the fighters there.
61.341
SG Alpha jumps back into the Fromeltar system and begins calculations for a jump to Dramune.
61.342
– SBF-J1 jumps into the Kisk-Kar system and begins decelerating to engage PG Meteor.
– SBF-E2 jumps into the Zebulon system and begins decelerating to engage Strike Force Nova.
– SBF-B2 jumps into the K’sta-Kar system and begins decelerating to engage Task Force Cassidine.
– The sathar battle fleets are detected within hours of their arrival in their respective systems and alerts go out across the Frontier. Spacefleet is out gunned in nearly every case but is determined to stop the worms.
– Sathar EG-1 jumps into the Theseus system. They immediately begin decelerating to stay in the outer system and begin working on calculations for a jump back to the Padda system.
61.343
– Construction of the Spacefleet battleship, Admiral Dooltan, at the Pan Galactic starship construction center orbiting Gran Quivera (Prenglar) complete. With the new sathar offensive, Spacefleet starts construction of a light cruiser, frigate, and assault scout.
– 2 assault scouts of the Theseus militia detect the sathar frigate of EG-1 and immediately begin boosting to intercept the ship. An alert goes out and the other ships of the militia boost to intercept as well although they will be two days behind.
– Suspecting FS33 to be the origin of the sathar fleets jumping into the K’sta-Kar system, the K’aken-Kar militia assault scout starts working on calculations to chart a jump route to that system.
61.344
– Construction of the Spacefleet battleship, the Admiral R’kazk’tar, at the Cassidine Development Corporation starship construction center orbiting Triad (Cassidine) completed. The crew takes command of the ship and begins a short shakedown cruise in the system as they await the arrival of the fighter pilots and SG Alpha.
– With the completion of the Admiral R’kazk’tar, Spacefleet uses the space in the shipyard to begin construction of two destroyers and two assault scouts.
– With plans to send the Admiral R’kazk’tar to Truane’s Star, the Admiral Dooltan is ordered to the Fromeltar system and then on to Kisk-Kar to take command of Task Force Meteor if the patrol group survives the coming attack.
– Detecting the incoming militia assault scouts, sathar EG-1 change their deceleration profile to try to avoid the ships while they change direction for the return jump to Padda.
– Realizing that they have an opportunity to exploit the new jump route provided by Obar Enterprises, Spacefleet HQ orders Strike Force Nova and supporting militia ships to fall back to the Truane’s Star system and expect reinforcements.
61.345
– The HSS History’s Hope successfully jumps back into the YS07 system. They begin working on engine overhauls and calculations for a jump to return to YS08.
– SG Alpha jumps into the Dramune system and begins calculations for a jump to the Cassidine system.
– SBF-E2, detecting the departure of SF Nova, vector to follow them to the Truane’s Star system.
61.346
– Unable to avoid intercept by the 2 Theseus assault scouts, the sathar frigate turns to engage them. They transmit all their jump data back to SBF-J2 before engaging.
– Battle of Theseus – In a short, 20-minute battle, the sathar frigate managed to damage one of the assault scouts before being destroyed by a single volley of assault rockets and laser batteries from the 2 militia ships. The damaged assault scout heads to Minotaur for repairs.
– Calculations complete, the K’aken-Kar assault scout begins accelerating for a jump to FS33.
– Three more fighters for the Frontier Fighter Corp are completed in Theseus. Construction begins on 3 more.
61.347
– Second Battle of Kwadl-Kit – Though outgunned by the sathar, Task Force Cassidine put up an amazing defense and over the course of 1.5 hours completely destroys the sathar fleet. While almost no ship goes unscathed, they only lose 3 fighters and 3 assault scouts.
– SG Alpha jumps into the Cassidine system and begins vectoring for a jump to the Truane’s Star system using coordinates provided by battleship Admiral R’kazk’tar.
– After a detailed assessment of the strength of SFB-J1, PG Meteor and Spacefleet command decided that they cannot hold the Kizk-Kar system and the jump capable ships start accelerating for a jump to the Fromeltar system. The fighters go into hiding on the planet’s surface.
– Seeing PG Meteor departing, the sathar forces vector to intercept but the acceleration of the UPF ships is such that only the smaller sathar vessels could intercept which would give the advantage to Spacefleet. After a few hours of pursuit, they reverse course and settle into orbit once again around Zit-Kit.
61.348
– Sathar SCC#1 (OFS203) completes construction of a light cruiser.
– Arriving back at Minotaur (Theseus), the damaged militia assault scout is immediately put into the shipyard. A HS:7 ship under construction is moved out to make room.
– 5 fighters are completed at the CDC shipyards (Triad, Cassidine). Work begins on five more. These fighters are put in storage until crews can be obtained for them.
61.349
– SF Nova and its supporting militia ships jump into the Truane’s Star system and begin decelerating toward Pale.
– The group of 10 FFC pilots arrive at Triad (Cassidine) and take command of their fighters. They immediately take on extra life support and begin a high-g boost, together with the battleship Admiral R’kazk’tar, to join SG Alpha.
– After a day rearming, Task Force Cassidine begins acceleration for a jump to the K’aken-Kar system and then on to Kizk-Kar to engage the sathar forces there.
– The Theseus militia assault scout completes its repairs and the HS:7 ship is moved back in to resume work.
– The battleship Admiral Dooltan jumps into the Cassidine system, it remains at high speed to transit to Dramune.
61.350
– Joining up with SG Alpha, the fighters are quickly taken aboard the carrier and stowed for jump. The battleship, assault carrier, and fighters are designated Task Force Relief and prepare for level 2 risk jump to the Truane’s Star system.
– SBF-E2 jumps into the Truane’s Star system and begins decelerating toward New Pale. SF Nova and the local militia begin maneuvering to intercept.
– SBF-J1 departs orbit around Zit-Kit (Kisk-Kar) and begins accelerating for a jump to the K’aken-Kar system to intercept TF Cassidine.
– Detecting the departure of SBF-J1, PG Meteor puts its jump on hold and drifts in the outer system to observe.
– The UPF minelayer, currently in the Fromeltar system, begins accelerating for a jump to the Kisk-Kar system. It will join up with the Admiral Dooltan as it transits the Fromeltar system before making the jump.
61.351
– TF Relief jumps into the Truane’s Star system and begins a hard deceleration toward New Pale.
– The K’aken-Kar militia assault scout misjumps and instead of reaching FS33 ends up in an unknown star system (OFS169). They begin working on determining their location.
– With a HS:12 ship completing maintenance in the CDC (Triad, Cassidine) shipyards, Spacefleet starts work on 3 new assault scouts to replace those lost by Task Force Cassidine. The remaining space is used for civilian ship maintenance.
– The battleship Admiral Dooltan jumps into the Fromeltar system. It begins vectoring and performing jump calculations to take it to Kisk-Kar.
61.352
– The HSS History’s Hope makes the return jump to YS08 and begin decelerating toward the inner system as they once again overhaul engines and try to plot the route back to YS07.
– Seeing that SBF-J1 seems to be committed to jumping out of the Kisk-Kar system, PG Meteor changes course and starts to decelerate back toward Zit-Kit.
– A fighter is completed at the PGC shipyards (Gran Quivera, Prenglar). It is transferred to Gollwin Academy (Morgaine’s World, Prenglar) for use in training the accelerated cadets.
– Detecting TF Relief, the sathar reassess their position and despite being out gunned nearly two to one, press on toward New Pale and the UPF forces.
61.353
– Strike Force Nova and the Truane’s Star militia ships arrive back at the armed station orbiting New Pale (Truane’s Star). Just hours later, they are joined by TF Relief. The incoming sathar ships are only a day away.
– The UPF minelayer in the Fromeltar system joins up with the Admiral Dooltan and then continue on their way to the Kisk-Kar system to join with PG Meteor.
61.354
– Second Battle of New Pale – The UPF destroy or drive off most of SBF-E2 but both battleships, including the newly constructed Admiral R’kazk’tar, are destroyed in the fighting.
– The fleeing sathar ships accelerate for a jump back to the Zebulon system.
– The UPF destroyer damaged in the Second Battle of New Pale heads to the starship construction center on Pale for repairs.
– TF Cassidine jumps into the K’aken-Kar system. Alerted that SBF-J1 is headed their way, they begin decelerating toward the inner system instead of continuing on the Kisk-Kar.
– Another UPF fighter is completed at the Terledrom (Fromeltar) shipyard. It is temporarily manned by militia forces until Spacefleet can get fighter pilots to the system.
61.355
– SBF-J1 jumps into the K’aken-Kar system and begins decelerating to intercept TF Cassidine.
– The UPF battleship and minelayer jump into the Kisk-Kar system and start decelerating toward Zit-kit.
– The damaged UPF destroyer arrives at the Streel shipyard (Pale, Truane’s Star). A HS:6 ship under construction but nearly complete is temporarily moved out to provide priority access for the Spacefleet vessel.
61.356
– PG Meteor arrives back in orbit around Zit-Kit (Kisk-Kar).
– A HS:5 ships complete maintenance in the CDC shipyard (Triad, Cassidine). Spacefleet holds the space in anticipation of more ships finishing and beginning construction on a new battleship.
A new year and here’s the recap of the details happening in the Frontier over the past month.
The beginning of the month was the final battle of the initial sathar foray into the Frontier. There could have been a couple more but the sathar, being significantly outgunned, decided to fall back and retreat. Another sathar starship construction center joins the war effort and this month sees a lot of repositioning of ships as well as reclaiming control of the Liberty system. The sathar are getting ships into position for another major push in the coming month.
Early in the month, I started reporting all the movement of ships in and out of the UPF starship construction centers as Spacefleet took control of their operations. By mid-month, I realized that was a little much and scaled it back only reporting ships completed or started for Spacefleet and the militias. All the commercial construction and maintenance will not be mentioned.
Date (FY)
Events
61.295
– The HSS History’s Hope safely arrives in YS06 and begin working on a jump to the YS07 system.
– The CMS Osprey arrives back at Clarion and is quickly admitted into the shipyards for repair.
– TF Cassidine jumps into the K’aken-Kar system and begins decelerating toward Ken’zah-Kit. Once again they won’t make the initial engagement arriving a few days too late. However, they are determined to stop the sathar here if PG Meteor and the militia ships cannot.
– 15 HS of space opens in the CDC shipyards (Triad, Cassidine). Spacefleet starts construction on another light cruiser to finish filling the holes in their ranks and allows the Truane’s Star militia to begin construction of a final assault scout.
61.296
– With the loss of the Liberty system, and the massive losses in the initial foray into the Frontier, sathar forces and production from SCC#10 are committed to war effort against the Frontier. This adds 9 fighters, 3 FF, 5 DD, 3 LC, 2 HC, and 2 AC to the sathar roster in addition to the SCC’s production capacity.
– The CMS Osprey emerges from the Clarion shipyards fully repaired and ready for action once again. A small HS:4 yacht is moved in the SCC for maintenance.
– Battle of Ken’zah-Kit (K’aken-Kar) – The sathar obliterate the station with a single concentrated barrage but then are quickly destroyed by the combined UPF and militia forces. Besides the station, only a single militia assault scout was lost with damage to three other ships that will require time in a shipyard to repair.
– Sathar SCC#4 (OFS111) completes construction of a new frigate.
– Realizing that SF Nova will reach New Pale in time for the battle, and having a nearly 2:1 hull disadvantage against SF Nova, PG Virgo, and the remaining Truane’s Star militia, SBF-E2 reverse course and start plotting a jump back to Zebulon.
– 12 HS of space opens up in the CDC SCC (Triad, Cassidine). Construction is begun on two new assault scouts to replace those lost by the Kizk-Kar militia. The remaining space is given over to a HS:6 ship for annual maintenance.
– 22 HS of space opens up in the PGC shipyards (Gran Quivera, Prenglar). With Spacefleet’s immediate needs being met, they move two HS:11 ships in for maintenance.
61.297
– SF Nova arrives in orbit around New Pale. The crew spends the day resting from their hard trip as they watch the sathar begin to fall back. The remaining ships of PG Virgo are absorbed into the Strike Force.
– The White Light militia jumps back to their home system and begins deceleration toward Clarion.
– The UPF minelayer jumps into the Fromeltar system and begins decelerating to join up with the militia forces holding that system.
– With the loss of SBF-C1 in the K’aken-Kar system, and recognizing that they are out gunned by the UPF forces there, SBF-B2 does not jump to K’aken-Kar but begins decelerating back toward Kawdl-Kit in the K’sta-Kar system.
– With its engines repaired, SF Nova’s assault carrier, together with its four surviving fighters, begin a high-speed jump to catch up with the main group. At the same time PG Virgo’s carrier, leaving its 3 fighters behind, begins a transit back to Prenglar.
– The newly constructed sathar frigate at SCC#4 (OFS111) begins a transit to SCC#5 (OFS019)
– SBF-J1 (1 AC, 1 HC, 2 LC, 1 DD, 1FF, & 8 fighters) departs SCC#10 and begins a high-speed transit that will eventually take it to K’sta-Kar.
– SBF-J2 (1 HC, 1 LC, 3 DD, 2 FF) departs SCC#10 and begins a high-speed transit to the Liberty system.
– 8 HS of space opens in the Hentz (Araks) SCC for a total of 9 HS of open space. A small HS:9 freighter is moved in for maintenance.
– SBF-E1 jumps back into the Kazak system. They do not slow down and start plotting a jump back to SSC#5 in the OFS019 system.
– An additional 13 HS of space opens in the Hentz (Araks) SCC. A HS 11 mining ship is moved in for annual maintenance.
61.298
– After rearming the ships in the K’aken-Kar system, TF Cassidine and PG Meteor begin accelerating for a jump to the K’sta-Kar system to confront SBF-B2 or drive it out of the system.
– The damaged ships (a frigate & assault scout from PG Meteor and the surviving K’aken-Kar assault scout), designated Repair Group (RG) One are ordered to Fromeltar for repairs. They begin accelerating for a jump to Kizk-Kar.
– 13 HS of space opens in the PGC shipyards (Gran Quivera, Prenglar). A HS:12 ship is moved in for maintenance.
61.299
A small group of 8 civilian privateer vessels, hailing from the yazirian worlds of the Frontier and calling themselves the Yazira Squadron, arrive in orbit around Morgaine’s World (Prenglar) and request permission to assist Starfleet in the fight against the sathar.
61.300
– The HSS History’s Hope arrives in the YS07 system and begins decelerating toward the inner system. Back at the last system explored, they plan to spend a few days resting here before starting to chart new routes toward their destination.
– SBF-E2 jumps back into the Zebulon system and starts decelerating toward Volturnus.
– SBF-B2 settles back into a high orbit around Kawdl-Kit (K’sta-Kar).
– SBF-E1 jumps back into the OFS019 system and begins decelerating toward the starship construction center there for repairs.
– 8 HS of space opens in the PGC shipyards in Gran Quivera (for a total of 9 HS of space available). A HS:9 ship is moved in for maintenance.
61.301
– Worried that since the sathar have a route into Prenglar they may also have one to Gruna Garu, Spacefleet sends the Yazira Squadron back to Gruna Garu to bolster the defenses there.
– With the sathar mostly on the retreat at the moment, and based on the success of the fighters and assault scouts in the recent engagements, Spacefleet announces the creation of the Frontier Fighter Corps with a plan to station multiple squadrons of fighters in every system of the Frontier.
– As the first step of implementing the Frontier Fighter Corps, all currently available space in the Type I and II shipyards around the Frontier are used to start construction of new fighters. At the moment that means 2 are started in Hentz (Araks) and 2 in Minotaur (Theseus).
61.302
– The White Light militia arrive back in orbit around Clarion.
– The UPF minelayer arrives in orbit around Terledrom, joining up with the Fromeltar and Dramune militias.
– SF Nova’s Assault carrier jumps into the Dixon’s Star system and starts working on calculations for the jump to Truane’s Star. The carrier leaving PG Virgo also arrives in the system and starts working on calculations for the jump to Prenglar.
– The lone sathar frigate jumps into OFS110 and begins calculations for a jump to OFS022.
– SBF-J1 jumps into the OFS170 system and begins calculations for a jump to OFS169.
– SBF-J2 jumps into the OFS177 system and begins calculations for a jump to the Dayzer system (OFS178).
– Sathar SCC#5 (OFS019) completes construction of a cutter.
61.303
– SBF-J1 jumps into the OFS169 system and begins calculations for a jump to the OFS167 system.
– Task Force Cassidine and PG Meteor jump into the K’sta-Kar system and begin decelerating toward the sathar forces orbiting Kawdl-Kit.
– RG One arrives in the Kizk-Kar system and begin engine overhauls and plotting a jump to Fromeltar.
– 11 HS of space open up in the Triad (Cassidine) SSC. Work is begun on 11 fighters for the newly formed Frontier Fighter Corps. There are complaints that over half the SCC’s capacity are being used for Spacefleet but Spacefleet points out that some of that usage if for planetary militias as well.
– Deciding not to wait any longer, two HS:6 ships under construction in the Pale SCC (Truane’s Star) are moved out of the shipyard by Spacefleet to make room for the damaged light cruiser.
61.304
– The crew of the HSS History’s Hope start working on the next jump in their journey to a small red dwarf star. It’s a long one, just under 12 light years long jumping a big void of stars in this region of space. They designate their target system YS08.
– Detecting the inbound UPF forces, and recognizing that they are still outgunned, SBF-B2 decides to abandon K’tsa-Kar. They break orbit from Kawdl-Kit and begin accelerating to jump out of the system.
– 13 HS of space opens up in the Hentz (Araks) shipyard. Two HS:5 ships are moved in for maintenance and work begins on constructing 3 new fighters.
– 4 HS of space opens up in the Clarion (White Light) shipyard and a small HS:4 ship is moved in for maintenance.
– The sathar SCC#10 (OFS174) completes construction of a fighter.
61.305
– SF Nova’s assault carrier jumps into the Truane’s Star system and begin deceleration toward the rest of the Strike Force.
– The lone sathar frigate jumps into OFS022 and begins calculations for jump to OFS018.
– SBF-E1 arrives back at SCC#5 (OFS019) and is disbanded. The work halts on the heavy cruiser currently under construction and the damaged frigate and destroyer enter the shipyard for repairs.
– 6 HS of space opens up in the CDC SCC (Triad, Cassidine), with another 17 HS opening up tomorrow, the space is held to allow some larger ships to move in for maintenance.
– 9 HS of space opens in the Terledrom (Fromeltar) SCC. With RG One only a few days away, the space is held for those ships so that battle repairs can begin immediately when they arrive.
61.306
– SBF-J1 jumps into the OFS167 system and begins calculations for a jump to the OFS166 system.
– SBF-J2 jumps into the Dayzer system (OFS178) and begins calculations for a jump to the OFS179 system.
– 11 HS of space opens in the PGC shipyards (Gran Quivera, Prenglar). Spacefleet begins construction of 8 fighters and an assault scout using the available space.
61.307
– The lone sathar frigate jumps into OFS018 and begins calculations for jump to OFS019.
– The damaged sathar destroyer under repair at SCC#5 (OFS019) is finished and emerges from the shipyard ready for battle.
– SF Nova’s assault carrier arrives in orbit around Pale and rejoins the fleet. It collects the fighters left by PG Virgo as part of its compliment.
– The assault carrier from PG Virgo arrives back at Morgaine’s World (Prenglar). The crew is debriefed on their trip to the Rim and recent battle at New Pale (Truane’s Star).
– After four days of round-the-clock work by the engineers from the Pale SCC and SF Nova, the light cruiser emerges from the Streel shipyards fully repaired and ready for action. The two ships that were moved out to make room resume construction.
61.308
– SBF-J1 jumps into the OFS166 system. Upon arrival, their orders are changed, and they are ordered to proceed to SCC#3 (OFS138) instead of heading into K’tsa-Kar. They begin plotting a jump to OFS157.
– RG One arrives in the Fromeltar system and begins deceleration toward the shipyards at Terledrom.
– Task Force Cassidine and PG Meteor arrive in orbit around Kawdl-Kit, much to the relief of the planet’s populace.
– The damaged sathar frigate under repair at SCC#5 (OFS019) is finished and emerges from the shipyard ready for battle. The damaged heavy cruiser is moved in to begin the extensive hull repairs it needs.
61.309
– SBF-J2 jumps into the OFS179 system and begins calculations for a jump to the Liberty system (FS30).
– SBF-B2 jumps into the FS33 system and begins decelerating.
– After two days rest, the assault carrier at Morgaine’s World (Prenglar) is ordered to Triad (Cassidine) to await completion of the first fighters for the Frontier Fighter Corps and then to shuttle them to the Kizk-Kar system. It is designated Shuttle Group (SG) Alpha.
– 18 HS of space opens in the Hentz (Araks) SCC. A HS 14 ship is moved In for maintenance. Another fighter is started for Spacefleet and the remaining space is held for an upcoming ship maintenance.
61.310
– Jump calculations complete and verified, the HSS History’s Hop starts accelerating for the jump to YS08.
– Yazira Squadron arrives back in the Gruna Garu system where they join up with the local militia to coordinate the defense of that system.
– Strike Force Nova, together with the remaining ships of the Pale militia, leave Fortress Pale and begin accelerating toward the Zebulon system to engage the sathar forces now orbiting Volturnus.
61.311
– The lone sathar frigate jumps into OFS019 and begins decelerating toward SCC#5.
– SBF-J1 jumps into the OFS157 system and begin calculations for a jump to the OFS156 system.
– With the sathar apparently gone from the system, PG Meteor is ordered to the Kizk-Kar system where they will be supported by the fighters being delivered by SG Alpha and joined by their flagship, the battleship Admiral R’kazk’tar which will be completed in 33 days.
61.312
SBF-J2 jumps into the Liberty system and begins decelerating toward Snowball.
61.313
– PG Liberty and the Mhemne belters detect the sathar ships that have arrived in the system. An alert is immediately sent out to Spacefleet alerting them of the sathar presence.
– RG One arrives at the Terledrom shipyards (Fromeltar). The militia assault scout and UPF frigate are immediately moved into the shipyard to begin repairs.
– SBF-J1 jumps into the OFS156 system and begins calculations for a jump to the OFS155 system.
61.314
– SBF-B2 arrives in the inner system of FS33 where they await orders from the sathar high command.
– Recognizing that they are no match for the inbound sathar forces, PG Liberty, with the assistance of the Mhemne belters, go into hiding in the Liberty system to watch the sathar’s movements. Evacuations begin immediately on the L4 and L5 stations.
– Receiving the alert from PG Liberty, the Theseus militia ships in the White Light system depart Fortress Redoubt and begin accelerating for a jump home.
61.315
– The HSS History’s Hope successfully jumps into the YS08 system. They begin decelerating toward the inner system and working on engine overhauls.
– SBF-J1 jumps into the OFS155 system and begins calculations for a jump to OFS150.
– SF Nova and the Pale militia jump into the Zebulon system and begin decelerating toward Volturnus and the sathar forces.
– The K’akan-Kar militia assault scout completes its repairs in the Terledrom (Fromeltar) SCC. As it emerges the UPF assault scout is moved into its place.
61.316
– The sathar frigate arrives at SCC#5 (OFS019) joining up with the other ships there.
– SBF-J2 arrives in orbit around Snowball and finding the L4 station abandoned settle back into the berths there.
– Detecting SF Nova, SBF-E2 decides to avoid engagement and departs Volturnus and begins accelerating for a jump to the Kazak system.
– PG Meteor jumps into the K’aken-Kar system and begins working on calculations for the jump to Kizk-Kar.
– The UPF frigate and assault scout complete their repairs in the Terledrom shipyard and emerge once again ready for combat. A HS:6 ships is moved in for maintenance and Spacefleet begins construction of 3 fighters.
61.317
RG One, now fully repaired, departs Terledrom for the Kizk-Kar system. The Spacefleet vessels will remain in that system to await the arrival of the rest of PG Meteor while the militia ship will return to its home system.
61.318
– SBF-J1 jumps into the OFS156 system and begins calculations for a jump to the OFS146 system.
– SG Alpha arrives in orbit around Triad (Cassidine) just in time to pick up the five fighters completed in the CDC shipyards. The fighters are taken aboard the assault carrier which prepares to depart for the Kizk-Kar system the next day. Construction begins on five more fighters.
– After two days in the Liberty system, with no indication of any UPF presence, the heavy cruiser and 3 destroyers of SBF-J2 split off (now SBF-J3) and begin accelerating for a jump back to OFS179 leaving the light cruiser and 2 frigates in the system.
61.319
– Arriving at the inner system of YS08, the crew of the HSS History’s Hope begin working on calculations for the return jump to YS07.
– Taking several days longer than expected, the damaged sathar heavy cruiser emerges from SCC#5 (OFS019) fully functional once again. The hull of the heavy cruiser whose work was paused is moved back into the shipyard to resume construction.
61.320
– SBF-J1 jumps into the OFS146 system and begins calculations for a jump to SCC#3 (OFS138).
– SF Nova arrives and settles into orbit around Volturnus (Zebulon).
– PG Meteor arrives in the Kizk-Kar system and begins decelerating toward Zik-Kit.
– SBF-E3 (1 C, 1 FF, 1 DD, 1 HC) departs SCC#5 (OFS019) for a jump to Kazak to join up with SBF-E2.
61.321
SBF-E2 jumps into the Kazak system and begins decelerating toward Stenmar.
61.322
– RG One arrives in the Kizk-Kar system and the Spacefleet vessels start decelerating toward Zik-Kit while the militia assault scouts remains at speed and prepares for a jump back to its home system of K’aken-Kar.
– A fighter for the Frontier Fighter Corp is completed in the PGC shipyards (Gran Quivera, Prenglar) and construction begins immediately on another.
61.323
– The Theseus militia arrive back in orbit around Minotaur.
– SG Alpha jumps into the Dramune system and begins calculations for a jump to Fromeltar.
– SBF-J3 jumps into the OFS179 system and begins calculations for a jump to the OFS168 system.
– One of the sathar frigates in the Liberty system begins accelerating out from the inner system and appears to be on a course to jump to the Waller Nexus system. It is designated EG-1. PG Meteor could intercept from their hiding place in 2 days.
– Detecting the outbound sathar frigate, PG Liberty notifies Spacefleet and are told to let it pass but take it out if it returns to the system.
61.324
– SBF-J1 jumps into the OFS138 system and begins deceleration toward SCC#3.
– PG Meteor arrives in orbit around Zik-Kit (Kizk-Kar).
– A UPF fighter is completed in the Terledrom (Fromeltar) shipyards and construction begins immediately on another.
61.325
– Calculations complete, the HSS History’s Hope stars accelerating for the jump back to YS07.
– SBF-E2 arrives in orbit around Stenmar (Kazak).
– SBF-E3 jumps into the Kazak system and begins decelerating toward Stenmar and SBF-E2.
Obviously, as I’ve been playing through the battles and coordinating the movements of the UPF and sathar forces for the Detailed Frontier Timeline, the events and conditions surrounding the Second Sathar War have been on my mind. A lot.
While the rules in the Knight Hawks Campaign Books are really geared around a balanced war game, I’ve been porting the scenario over more to the RPG side and looking at it from that perspective. In this post, I thought I’d collect some of the ideas I’ve had along the way. The topics are not necessarily connected or in any particular order but all relate to the how the Second Sathar War would impact or play out in the Frontier. So let’s get started
The Rim
I already mentioned this in one of the battle reports, but I’m not really considering the Rim in my narrative beyond the two battles I’ve already reported. I’ve never sat down and worked out the starship construction capabilities of the Rim, the order of battle for the Flight (the Rim’s version of Spacefleet), or any of those logistical considerations.
When I set this scenario up, literally decades ago, I didn’t have a copy of Zebulon’s Guide so the Rim was never in my considerations. Since I’m really just playing out that setup from so many years ago, and I never did the background work necessary for the Rim, they just weren’t part of the plan. I’m really just assuming that their fortunes go the same as in the Frontier.
Civilian and Megacorp Ships
I think handling these other Frontier ships is the biggest issue that moving this from a war game over to the RPG side of things needs to consider and I’m not sure how I’m going to address it completely yet.
In looking at starship construction based on the listed starship construction centers in the Frontier, I’ve estimated that without any changes to the SCCs, there are probably about 2300 ships flying around the Frontier, which is probably low. But let’s use that number to start.
There are 23 worlds in the Frontier (including Volturnus), so if you just divide those ships out, that’s about 100 ships per world. That probably shifts around a bit, for example, Laco, in Dixon’s Star, is an outpost world with very low population, so it probably doesn’t have as many ships. Neither would Volturnus. And the more heavily populated worlds probably have a little more. Morgaine’s World in Prenglar is also an outpost but since that’s the home of Spacefleet, I give them just as many ships as at least a medium population planet and say that those are all the Spacefleet ships.
Plus there are the ships that the megacorps own. We know that Streel and Pan Galactic have military ships, it stands to reason that WarTech and CDC do as well and I even gave some to Trans Travel in my timeline. So some fraction of those 2300 ships are going to be military vessels owned by the megacorps. All of which could do some damage to sathar ships invading a system.
Finally, and what I really want to focus on, is that given that piracy is a concern for ships in the setting, even the “non-military” ships are going to be armed to some extent or another, even if it is just a laser battery or three on any ship HS 6 or larger.
Let’s assume for a minute that every ship in the Frontier has at least a laser battery. Now some won’t have any weapons but others will have more than one so it probably all averages out. What happens if 50 of these ships decide to not sit idly by while Spacefleet dukes it out out with the sathar but join the fight?
First, lets just look at the “average” hull damage done by a laser battery. On the damage table, there is a 10% change of double hull damage, a 35% chance of regular hull damage and a 55% chance of damaging some other system. The laser battery does 1d10 damage for an average of 5.5 hull points of normal damage and 11 points when double damage is called for. Multiplying that out by the percentage that they occur means that on average, ignoring the damage from system hits, a hit by a laser battery does 3 HP of damage (11 points 10% of the time, 5.5 points 35% of the time and 0 points 55% of the time).
At an average of 3 HP of damage per hit, 14 hits kill a frigate, 17 kill a destroyer, 24 kill a light cruiser, 25 kill an assault carrier, and 27 kill a heavy cruiser. Do you see where this is going?
The next question is how often do these laser batteries hit? The base “average” chance to hit with a laser battery is 50%. But since laser batteries suffer from range diffusion, it’s only that high if the ships are within 10,000 km (1 hex on the game map) of each other. Getting that close means that the sathar can use their rocket batteries and torpedoes against you if they want and since these are civilian ships, we’ll assume they try really hard to stay out of the range of those weapons. So they shoot from 50,000 km (5 hexes) away and have a chance to hit of only 25%. Which means that the average laser battery shot, factoring in the miss rate, does a little over 0.75 HP of damage any given round.
That doesn’t seem like a lot, but remember that is an average taking into account of all the probabilities and that is per ship. So let’s look at those 50 ships. If you take 50 ships, each doing ~0.75 HP each time they fire, you have a combined damage output of 37-38 HP. And since the laser battery can fire both offensively and defensively, that doubles to about 75 HP each round of combat. That’s enough damage to take out any single ship expect a heavy cruiser.
And the truth is, that there is a good chance that the HP damage output is actually larger. We have 100 shots (50 ships, 2x each) at 25% to hit. So 25 of those shots hit the target. 11.25 (45%) of those do hull damage while the other 13.75 (55%) do system damage. But if the system damage results calls for a hit on a system already destroyed, you get hull damage instead. Some of those system hits are going to shift over to the hull side and increase the damage. (I really should write a program to analyze this and get the actual numbers.)
The bottom line is that in any give turn, that swarm of civilian ships could take out any one large sathar ship, two frigates, or a swarm of fighters.
From the sathar side, there is really nothing you can do about this. You are looking at 25-50 targets (depending on how you distribute the laser batteries), each with 30 or more HP, and taking out 2 or 3 each round is not going to make much difference in their damage output. They will overwhelm you with sheer numbers. Death by a thousand cuts.
This is something that the war game doesn’t have to deal with but which will definitely come into play in an RPG-level look at the conflict. Maybe the civilian and mega-corps ships won’t get involved. But if their worlds are threatened, I don’t really see them not stepping up, at least a good number of them. And what if Spacefleet calls for a 3rd Common Muster? (There has to be something in the UPF charter about that.) Then they will be involved. The sathar are going to need more ships.
Starship Construction Centers
In the war game, ship construction and replacement is very abstracted. Every 20 days, the UPF get 2 fighters and/or assault scouts for each fortified station on the map and a capital ship for every fortress. The sathar just have a base 35% chance to replace every ship lost in the previous 20 days.
A big part of this project for me was to see how using the starship construction rules, combined with the distribution of UPF starship construction centers, and giving the sathar some SCCs as well, would play out in the logistics of what ships were available for combat. I knew this would drag things out as you couldn’t replace ships that quickly but wanted to see what would actually happen. We’ll find out as this plays out.
But, as the first battles have been fought, and the UPF is looking to replace ships, I started really looking at the distribution of the SCCs in the Frontier. Until now I had just taken them for granted and not though much about it. And for the most part, the type of construction center and its location make sense for the SCCs described in the book. Analyzing that (and maybe reorganizing them) may be another post in the future. But three of the SCCs stood out as a little odd. Let’s look at those from least troublesome to most (in my opinion).
Clarion (White Light)
This is a Type III SCC which means it can have up to 20 hull sizes (HS) of ships under construction but they cannot be military vessels and cannot have atomic drives.
To me, this feels a little bit odd. White Light is the nexus for jumps to four different systems so it’s a major hub system (and the only access to Theseus). Maybe because it is the setting for the Warirors of White Light adventures but it seems to me that there should be a more major construction center here.
However, with the Type II center just a system away in Theseus, and the fact that the main output of the planet is resources, not industrial products, maybe having a small shipyard is okay even if the planet does have a high population and is a major crossroads.
Outer Reach (Dramune)
Like at Clarion, the Outer Reach shipyard is a Type III SCC. There are a couple of things that stand out for me here.
One is the lack of an SCC at Inner Reach. Given the animosity between the two worlds, which is part of the canon background material before you even factor in the events of the Dramune Run module, and the fact that animosity has erupted into fighting in the past, if Outer Reach has a SCC, I would expect Inner Reach to have one as well. I don’t see them being willing to wait for ships to come in from Fromeltar or Cassidine, they would want to be able to build them themselves.
The other issue I have is the SCC class. As a Type III SCC, this shipyard is not supposed to have the capability to produce military vessels or ones that use atomic drives. But since this world is the home of a major crime syndicate, and supplies and supports pirates, I see this shipyard as where many of those pirate vessels, which are assault scouts, corvettes, and frigates, are created. Thus the shipyard can obviously handle military class vessels and atomic drives and should really be a Type II.
Because of this, for the Second Sathar War, I’m classifying this shipyard as a Type II-s (the s is for small). It can still only handle 20 HS of ships total like a Type III SCC, but like a Type II, can build ships with atomic drives and military ships up to HS 6 (i.e. destroyers).
Pale (Truane’s Star)
This is the one that baffles me the most. The rules say that this is another Type III shipyard. Pale is classified as a medium population, which tends to indicate a smaller shipyard, but its main economies are industry and resources, which would lend itself to ship building and therefore a larger SCC. Having a Type III SCC here just doesn’t make sense to me for a couple of reasons.
First, everyone knows that the sathar have a jump route into the Frontier that goes through Truane’s Star. This was the locus of the First Sathar War that resulted in the founding of the UPF. Spacefleet has a fortress here, it would stand to reason that there should be a good shipyard to build up ships here as well.
Second, and more important to me, this is the world where Streel is headquartered. We know they make ships, the corvette is designed by them, and they have a number of ships to fight against the ships of the Pan Galactic Corporation in the corporate wars. Assuming the shipyard at Gran Quivera (Prenglar) is owned by PGC where they have their headquarters, and the one at Triad (Cassidine) is owned by the Cassidine Development Corporation where they have theirs, if the #1 and #3 megacorps have Type I SCCs, then the #2 megacorp should have at least a Type II shipyard, If not a Type I. It’s a matter of corporate pride and sustainability. I mean, if they don’t have their own shipyard, PGC and CDC could just deny building them ships and they’d have to travel even farther afield to Hentz or Fromeltar to get ships build. It just doesn’t make sense.
I’m leaving it as a Type III SCC for the Second Sathar War in the timeline, but if I ever revisit the SCC distribution in the Frontier, I think Pale will be getting a bigger one.
Other Thoughts
It seems I had one more item that I wanted to talk about but it is slipping my mind at the moment and I didn’t write it down when the idea occurred to me to write this post a week or so ago. If it does come back to me, I’ll have a topic for a future post.
Overall, the sathar did not fare too well in their initial foray into the Frontier. In fact, if this was just the war game, they may very well have lost the game as I believe every retreat condition that the sathar players could have chosen have been met. Although if I was using those retreat conditions, I probably would have set things up a little differently and made a few different choices. However, I’m not using those conditions directly and the sathar have another wave of ships coming later this month. After that, however, it might be a while as they rebuild their forces.
This post has given me the idea for a few other posts that may show up in the future. The first looking at the distribution of starship construction centers in the Frontier (and probably the Rim) and another looking at the average damage output by the different ship types. The third one would be a look at exactly what is in the UPF Charter. We’ll see when or if those actually materialize.
Have you ever tried to incorporate, in detail, the Second Sathar War into your campaign? What assumptions did you make and what ideas did you incorporate? What other ideas should I consider? Let me know in the comments below.
This months sees the opening battles of the Second Sathar War. Maneuvers and engagement from this conflict overshadow nearly everything else happening in the Frontier as everyone watches the events unfold.
It is this conflict that I originally started this timeline to track so it will be heavily focused on the events of the battles and how the sides react for the next little while. Also things get really busy so there are a lot of entries every day this month. I think there are only 2 or 3 days that don’t have at least two entries and toward the end when the invasion starts, it’s rare to have a day with less than 5 or 6 entries. Links to battle reports on all the ship engagements are linked in the timeline.
On day 61.280, the arrivial of Strike Force Nova in the Prenglar system on the same day as the sathar fleet was pure coincidence. I had planned out the maneuvers of SF Nova separately from the sathar movements without consulting between the two. I was completely surprised when they ended up jumping in on the same day.
Settle in. This one is a bit of a read.
Date (FY)
Events
61.265
– After eight days of exercises with the crews of Fortress Kdikit, SF Nova departs Kdikit (Madderly’s Star) for a jump to Triad (Cassidine).
– PG Virgo arrives in the Zebulon system and begins work for the jump back to Pale (Truane’s Star).
61.266
– Sathar Fleet SBF-C1 (1 HC, 1 LC, 2 DD, & 1 FF) departs SCC#3 (OFS138) and begin accelerating for a jump to the OFS137 system.
– PG Liberty arrives at Snowball (Liberty) and joins up with PG Lancet. The assault scout in PG Lancet is transferred to PG Liberty, with the UPFS Flying Cloud (frigate), UPFS Eleanor Moraes, and UPF Backdoor (sathar scout ship) remaining attached to PG Lancet.
61.267
– The SF Meteor destroyers arrive at Lossend (Timeon).
– The CMS Osprey arrives back at Clarion. The ship is immediately put into the starship construction center for maintenance, repairs, and refits while the crew is given some much needed leave.
61.268
– Sathar Fleet SBF-B1 (1 HC, 1 LC, 2 DD, & 1 FF) departs the rendezvous point in OFS167 and begins accelerating for a jump to the OFS166 system.
– The HSS History’s Hope and escorts jump into the OFS222 system. They begin work on engine overhauls and jump calculations for the YS01 system.
61.269
– The SF Meteor destroyers depart Lossend (Timeon) and begin accelerating for a jump to the White Light system.
– After three days debriefing the commander of PG Liberty and introducing him to the Mhemne contacts, Captain Reider and PG Lancet depart Snowball (Liberty) for a jump back to the Waller Nexus system and a high speed transit to Minotaur (Theseus).
61.270
– Sathar Fleet SBF-A1 (2 HC, 2AC, 1 LC, 4 DD, 2 FF & 14 fighters) departs SCC#1 (OFS203) and begin accelerating for a jump to the FS12 system.
– PG Virgo arrives in the Truane’s Star system and begins decelerating toward Fortress Pale (Pale, Truane’s Star).
61.271
-= Sathar Fleets SBF-E1 (1 HC, 1 LC, 2 DD, & 1 FF) and SBF-F1 depart SCC#5 (OFS019) and begin accelerating for a jump to the Kazak system in the Rim.
– Sathar fleet SBF-C1 arrives in the OFS137 system. It maintains its high speed and begins calculations for a jump to OFS136.
61.272
– Sathar Fleet SBF-D1 (1 HC, 1 LC, 2 DD, & 1 FF) departs SCC#4 (OFS111) and begins accelerating for a jump to the OFS020 system.
– The HSS History’s Hope and escorts jump into the YS01 system. They detect transmissions from several other ships in the system. Hoping to avoid a confrontation, they begin work on engine overhauls and jump calculations for the YS02 system.
61.273
Sathar fleet SBF-B1 arrives in the OFS166 system. It maintains its high speed and begins calculations for a jump to FS33.
61.274
– Sathar fleet SBF-C1 arrives in the OFS136 system. It maintains its high speed and begins calculations for a jump to FS56.
– Strike Force Nova arrives at Triad (Cassidine). They will spend just 2 days in the system exercising with Task Force Cassidine before heading back to Morgaine’s World (Prenglar).
– PG Lancet arrives in the Waller Nexus system. They immediately begin work on overhauling the ships’ engines and plotting a jump to Padda.
61.275
– Sathar fleet SBF-A1 arrives in the FS12 system. It maintains its high speed and begins calculations for a jump to Prenglar.
– Another small fleet of sathar ships, consisting of 2 LC, 3 DD, & 1 FF, designated SBF-F2 arrive at SCC#5 (OFS019) from deeper in sathar controlled space.
– PG Virgo arrives at Fortress Pale (Pale, Truane’s Star). The crews are given a week of leave while the ships go into the starship construction center for repairs and maintenance.
61.276
– Sathar fleets SBF-E1 and SBF-F1 arrive in the Kazak system. SBF-F1 begins decelerating toward the inner system to engage the Rim forces there. SBF-E1 maintains its high speed and begins calculations for a jump to Zebulon.
– Sathar fleet SBF-B1 arrives in the FS33 system. It maintains its high speed and begins calculations for a jump to K’tsa-Kar.
– SF Nova leaves Triad (Cassidine) for a jump to Morgaine’s World (Prenglar)
61.277
– Sathar fleet SBF-D1 arrives in the OFS020 system. It maintains its high speed and begins calculations for a jump to Fromeltar.
– Sathar fleet SBF-C1 arrives in the FS56 system. It maintains its high speed and begins calculations for a jump to Kisk-Kar.
– The sathar fleet (SBF-F1) decelerating toward Stenmar (Kazak) are detected by Rim forces in the system (10 F, 3 AS, 2 FF, 2 DD, 1 LC), alerts go out to systems in the Rim and the Frontier.
– Just hours before the engine overhauls are complete and the HSS History’s Hope is ready to jump once again, the ship and her escorts are attacked by three unidentified vessels.
– A running battle ensues as the escorts attempt to screen the HSS History’s Hope long enough to make the jump. In the ensuing fight, one of the escort vessels is destroyed along with two of the attacking ships. The last attacker manages to get a hit in on the History’s Hopes engines but it is not enough to stop the ship and it slips into the Void.
– After the HSS History’s Hope jumps out of the YS01 system, the remaining escorts ships finish off the final attacker. After the fight, the escorts repair what damage they can and begin heading back to Scree Fron for repairs.
61.278
– Now in the YS02 system, the crew of the HSS History’s Hope works on repairing the battle damage to their ship and preparing for the next leg of their journey, a jump to the YS03 system.
– The 2 destroyers arrive at Fortress Redoubt (Clarion, White Light). They join with the other ships of PG Meteor which now consists of the two destroyers and 3 assault scouts.
– With the alert from the Kazak system, PG Virgo’s maintenance is fast tracked and the crews are recalled from leave after only 3 days.
61.279
PG Lancet makes the jump to the Padda system. Work begins immediately on the engines and calculations for the jump to Minotaur (Theseus).
61.280
– Sathar battle fleets appear in five different Frontier system within hours of one another and most begin decelerating towards the inhabited worlds in those systems. SBF-A1 arrives in the Prenglar system, SBF-B1 arrives in K’tsa-Kar, SBF-C1 arrives in Kizk-Kar, SBF-D1 arrives in Fromeltar, and SBF-E1 arrives in Zebulon.
– Unlike the other sathar fleets, SBF-E1 doesn’t slow down in Zebulon but prepares for a jump to the Truane’s Star system.
– Due to the alert sent out by forces in the Kazak system, these fleets are detected within hours of their arrival in system. Alerts are broadcast all across the Frontier.
– Task Force Cassidine, leaving its minelayer in the Cassidine system, departs on a high-speed risk jump to Dramune.
– PG Meteor is dispatched on a high risk run to reinforce the armed station at K’tsa-Kar as there is no militia in that system. The Clarion Royal Marines (1 FF, 4 AS) join PG Meteor.
– The two ZKKDA assault scouts, currently in K’aken-Kar also depart on a high risk run to the K’tsa-Kar system per the defense agreement.
– Both of the planetary militias of Dramune independently agree to make a high speed risk jump to the Fromeltar system to assist with the defense of that system, hoping to stop the sathar before they can get any further into the Frontier.
– Strike Force Nova arrives in the Prenglar system within hours of the sathar fleet appearing. They begin decelerating to engage the sathar fleet simultaneously with Task Force Prenglar.
– Sathar Fleet SBF-B2 (1 HC, 1 AC, 3 DD, 1 FF, 7 F) departs the rendezvous point in OFS167 and begins accelerating for a jump to the OFS166 system.
61.281
– Battle of Stenmar (Kazak) between Rim forces (1 LC, 2 DD, 2FF, 3 AS, 10 F & 1 fortified station) and SBF-F1. The sathar forces are completely destroyed and the Rim only lose 1 LC, 2 DD, and 1 AS with the station severely damaged. Word of the victory is broadcast across the Rim and Frontier.
– PG Lancet jumps back into the Theseus system and is dissolved. The UPFS Eleanor Moraes and UPFS Backdoor break off from the group and start decelerating toward Minotaur. The UPFS Flying Cloud remains at velocity and starts working on the jump to White Light.
– The last of the ships of PG Virgo emerge from their maintenance in the Streel shipyards (Pale, Truane’s Star). The crews go on high alert as they monitor the sathar progress across the Frontier. While cheered by the news of the Flight’s victory in Kazak, they mourn the loss of friends made while stationed in that system.
61.282
– The sathar forces from the Sauria system arrive back at their base, SCC#10 (OFS228) where they stand down to effect repairs from the recent campaign.
– Sathar fleet SBF-E1 jumps into the Truane’s Star system and begins decelerating toward Pale. The Truane’s Star militia, along with PG Virgo, prepare to meet them.
– Task Force Cassidine successfully jumps into the Dramune system, they maintain the high speed and start working on a risk jump to Fromeltar.
– The Dramune militias successfully jump into the Fromeltar system and begin decelerating toward Terledrom, the apparent destination of the sathar forces in that system.
– PG Meteor and the White Light militia successfully jump into the K’tsa-Kar system and begin decelerating toward the planet and sathar forces approaching it.
– The ZKKDA assault scouts also successfully arrive in the K’tsa-Kar system and race to join the fight.
61.283
– Sathar Fleets SBF-E2 (1 HC, 1 AC, 1 LC, 1 DD, 1 FF, & 8 fighters) and SBF-F2 depart SCC#5 (OFS019) and begin accelerating for a jump to the Kazak system in the Rim. After the initial loss in the Kazak system, the sathar commit their 4 new cutters to SBF-F2 to boost the strength of that fleet.
– Deciding that PG Liberty can provide advanced warning if sathar start to come from that direction, the Theseus militia, together with the remaining saurian forces in Theseus, begin accelerating for a jump to the White Light system.
61.284
– The HSS History’s Hope jumps to the YS03 system and begins preparations for a jump to YS05.
– Sathar fleet SBF-B2 arrives in the OFS166 system. It maintains its high speed and begins calculations for a jump to FS33.
– TF Cassidine makes the jump to the Fromeltar system and begin a hard deceleration. They won’t arrive in time for the initial battle but can engage any sathar forces remaining in the system if the militias cannot successfully hold the line.
61.285
– Battle of Zik-Kit (Kisk-Kar) – Overwhelmed by the forces of SBF-C1 the two militia assault scouts and the armed station are destroyed with only minimal damage to the sathar vessels.
– Battle of Terledrom (Fromeltar) – The combined militias of Dramune and Fromeltar quickly overwhelm the sathar forces in an intense 20-minute battle. The only loss is the Inner Reach destroyer with the 2 Outer Reach destroyers sustaining heavy damage.
– Battle of Kawdl-Kit (K’sta-Kar) With some amazing gunnery by the UPF and militia forces, the sathar fleet is reduced to scrap in just 20 minutes. However, before they are destroyed, they manage to obliterate the armed station orbiting Kawdl-Kit. No UPF or militia forces were lost although the CMS Osprey sustained some hull damage that will require a shipyard to repair.
– Battle of Gran Quivera (Prenglar) – Approaching cautiously due to the expected minefield, the sathar’s slow speed limits their maneuverability and they are overwhelmed by the combined forces of TF Prenglar and SF Nova in less than an hour. The UPF only lose 2 F, 5 AS, 1 DD, and 2 LC in the battle. Several other ships will require shipyard repairs.
61.286
– The UPFS Flying Cloud jumps into the White Light system. It maintains its high speed while performing engine overhauls and jump calculations to get to K’sta-Kar and join up with PG Meteor.
– The CMS Osprey leaves Kawdl-Kit and begins accelerating for a jump back to the shipyards orbiting Clarion. The White Light SCC has space for up to a HS 4 ship so space is held for the Osprey.
– A HS 8 freighter completes its annual maintenance at the Terledrom SCC giving a total of 12 HS of space in the SCC. The two Outer Reach frigates are immediately admitted for repairs.
– Orbiting high above Zik-Kit the sathar ships spend the day rearming but make no move toward the planet. All UPF and militia ships that were in battles the previous day also spend the day rearming and checking that all systems are ready to go.
– With the militias in control of the Fromeltar system, Task Force Cassidine immediately starts calculations and acceleration for a jump to the K’izk-Kar system.
61.287
– Sathar fleet SBF-B2 arrives in the FS33 system. It maintains its high speed and begins calculations for a jump to K’tsa-Kar.
– Battle of New Pale (Truane’s Star) – Sathar target the smaller UPF vessels to great effect destroying 5 fighters, 6 AS, and 1 LC while only losing a DD & LC. While their remaining ships are damaged, so are the remaining UPF vessels which are unable to purse as the sathar break off the fight.
– After finishing what battle repairs they can, the remnants of SBF-E1 start accelerating for a jump to the Zebulon system.
– SBF-C1 leaves orbit around Zit-Kit (Kizk-Kar) and begin accelerating for a jump to the Kaken-Kar system.
– Spacefleet now has several damaged ships in need of immediate repair and a need to replace ships lost in battles with the sathar. However, there is no space in most SCCs across the Frontier and especially in Prenglar.
– Given the state of the Frontier’s starship construction centers, and expecting things to get worse, Spacefleet addresses the Council of Worlds and requests that the Wartime Construction Control clause of the UPF charter be invoked. A relic of the original charter, it has never been invoked in the history of the UPF.
– Receiving word of the departure of SBF-C1, PG Meteor and the K’aken-Kar militia, now rearmed, begin accelerating for a jump to the K’aken-Kar system to meet the on-coming sathar forces.
61.288
– Sathar fleets SBF-E2 and SBF-F2 arrive in the Kazak system. SBF-F2 begins decelerating toward the inner system to engage the Rim forces there. SBF-E2 maintains its high speed and begins calculations for a jump to Zebulon.
– Shortly after their arrival in the Kazak system, the sathar fleets are detected and an alert is sent out. The Rim forces brace for another battle.
– Space clears in the Outer Reach (Dramune) SCC and construction starts on a new Destroyer for the Inner Reach militia.
– Space clears in the CDC shipyards orbiting Triad (Cassidine), Spacefleet convinces the shipyard managers to start construction of 5 fighters and another assault scout, preempting the regular construction schedule.
– One of the Outer Reach frigates completes its repairs in the Terledrom (Fromeltar) shipyard freeing up 5 HS of space.
61.289
– Receiving the alert from Kazak, Spacefleet realize they only have 10-11 days to reinforce Truane’s Star. Replenishing SF Nova’s order of battle with ships from TF Prenglar, but having to leave the damaged assault carrier and its fighters behind, it begins a high risk jump to Dixon’s Star and then on to Truane’s Star.
– Betting that Cassidine is safe, the third UPF Minelayer is ordered to Fromeltar. It begins accelerating for a jump to Dramune as the first leg of its trip.
– Realizing that there is still enough room in the Outer Reach (Dramune) SSC, Spacefleet gets construction started on a new assault scout before anything else can be moved in.
– The second Outer Reach frigate completes its repairs in the Terledrom (Fromeltar) shipyard freeing up 5 more HS of space. As HS 10 mining ship is moved in to the shipyard for its annual maintenance.
61.290
– Two-day end of year celebration on Hum begins. With the events currently happening in the Rim and Frontier, the celebrations are more subdued than normal.
– The HSS History’s Hope arrives in YS05 and begin preparations for the jump to YS06.
– Overhauls complete, the UPFS Flying Cloud jumps into the K’sta-Kar system. It remains at high speed working on calculations for a jump to K’aken-Kar with the rest of PG Meteor. It will be just a day behind them.
– More space opens up in the CDC shipyards (14 HS worth). However, having just bumped six ships ahead in the queue for Spacefleet, they resist efforts to start more military construction giving the space to a large freighter that has been waiting over a month for its annual maintenance.
– Space opens up in the Minotaur (Theseus) shipyards (6 HS worth). The Theseus government starts construction of a new destroyer for the militia although they suspect the hull will be assigned to Spacefleet.
– Space opens up (4 HS worth for a total of 6 free) in the Terledrom (Fromeltar) SCC. The Terledrom government alerts Spacefleet of the availability and starts construction on 2 assault scouts, one for Spacefleet and one for the militia.
– Space (8 HS) opens up in the PGC shipyard at Gran Quivera (Prenglar) as a freighter completes maintenance. After the recent battle, shipyard owners are more than happy to hold the space for Spacefleet. The damaged assault scout and frigate are moved in immediately and begin repairs.
– TF Cassidine jumps into the Kizk-Kar system. They don’t slow down but immediately begin working on engine overhauls and calculating a jump to K’aken-Kar.
61.291
– Sathar fleet SBF-E2 arrives in the Zebulon system. They don’t slow down but begin immediate calculations for a jump to the Truane’s Star system.
– Sathar fleet SBF-B2 arrives in the K’tsa-Kar system and starts decelerating toward the White Light Militia ships there. PG Meteor and the K’aken-Kar militia are less than 10 hours from jumping out of the system when the sathar are detected.
– Realizing that the K’aken-Kar militia will suffer the same fate as the K’izk-Kar militia if they return to face the sathar alone, PG Meteor continues with them for the jump to K’aken-Kar.
– SF Nova jumps into the Dixon’s Star system. Working feverishly on overhauls to the assault scouts’ engines, they begin calculating the jump to Truane’s Star.
– The UPF assault scout and frigate complete their hull repairs after a single day in the PGC shipyard (Gran Quivera, Prenglar) and return to active duty.
– Another 6 HS of space open up in the PGC shipyards (Gran Quivera, Prenglar) for a total of 16 HS of space available. The damaged assault carrier is moved into the shipyard to have its engines repaired.
– Realizing that they cannot withstand the incoming sathar force, the White Light militia starts plotting a jump back to their home system. They delay departure, however, acting as bait and hoping to draw SBF-B2 deeper into the system so they don’t jump immediately after PF Virgo or straight to White Light.
61.292
– SBF-C1 jumps into the K’aken-Kar system and begins decelerating toward the planet.
– PG Meteor and the K’aken-Kar militia jump into the K’aken-Kar system and begin decelerating to meet the sathar.
– The Theseus militia, along with the second saurian Ark Ship arrive in orbit around Clarion (White Light). The saurians join their sister ships in orbit while the Theseus militia confers with the Clarion Royal Marines and Fortress Redoubt to establish defensive plans.
– SBF-E1 jumps into the Zebulon system and establish contact with SBF-E2 relaying full details of their encounter. They start working on a jump to Kazak System and then back to SCC#5 (OFS019) for repairs.
– The UPF assault carrier’s engines complete their repairs. With 16 HS of space available at the PGC shipyards, Spacefleet begins construction on a fighter, an assault scout, and a light cruiser.
61.293
– Second Battle of Stenmar (Kazak) – seriously outgunned, the Rim forces are nearly all destroyed with only a single fighter surviving. They manage to take out a sathar light cruiser and cutter before being overwhelmed.
– The UPFS Flying Cloud jumps into the K’aken-Kar system. It remains at high speed to catch up with the rest of PG Meteor and will execute a hard deceleration to match speed with the group when it does.
– Having succeeded in drawing SBF-B2 into the K’sta-Kar system, the White Light militia, reluctant to abandon Kawdl-Kit, begins acceleration for their jump home.
– Seeing the White Light militia start to leave the system, SBF-B2 changes course and start accelerating for a jump to K’aken-Kar to join SBF-C1.
– The UPF minelayer jumps into the Dramune system. It doesn’t slow down but begins calculations for its jump to Fromeltar.
– Space (5HS) opens up in the Hentz (Araks) shipyards. It is not immediately filled as there is a larger ship waiting on maintenance.
61.294
– SBF-E2 jumps into the Truane’s Star system and begin decelerating toward New Pale.
– SF Nova arrives in the Truane’s Star system just hours after the sathar. Unfortunately, they arrived much farther out in the system than anticipated. They begin a fast run and hard deceleration toward New Pale in order to arrive before the sathar forces.
– Seeing more and more sathar ships arriving in the Frontier, the Council of Worlds stops blocking the activation the Wartime Construction Control (WCC) clause in the UPF Charter. Spacefleet is granted complete control of all starship construction centers in the Frontier.
– With the activation of the WCC clause, Spacefleet, with the assistance of Star Law, move to take control of the shipyards. They temporarily suspend any new maintenance work while they sort out the schedule and priorities.
– More space opens in several SCCs across the Frontier: 2 HS at Hentz (Araks) for a total of 7 HS, 18 HS at Rupert’s Hole (Cassidine) emptying that facility, 6 HS at Terledrom (Fromeltar) 12 HS at Gran Quivera (Prenglar), and 5 HS at Minotaur (Theseus)
– Working to replenish their immediate losses, Spacefleet takes control of the destroyer construction at Minotaur, and start construction of 2 assault scouts at Hentz, a light cruiser at Gran Quivera, and a fighter and assault scout at Terledrom.
– Lacking facilities to construct military vessels, the Rupert’s Hole SCC is designated for ship maintenance and two ships are moved in immediately. The other Type III SSCs at Pale & Clarion are given the same designation.
– Spacefleet also authorizes the start of construction for two assault scouts to replenish some of the ships lost by the Truane’s Star militia with the understanding that they may be deputized by Spacefleet during the conflict. Construction starts in Terledrom and Minotaur