In an unexpected and horrifying turn of events, the sathar fleet attacked the civilian orbital shipyard around Terledrom in their attack today before retreating from the system. The shipyard was completely destroyed along with all the ships under construction. Many of the crew and engineers were lost as well.
Task Force Cassidine, together with with the new Frontier Fighter Corps squadron and the militia drove off the attackers destroying five major vessels of the sathar fleet. UPF forces lost fourteen of the twenty fighters in the system and the militia lost one of its assault scouts. Luckily nearly all the crew were recovered. The militia frigate was significantly damaged as well and will be heading to Outer Reach in the Dramune system for repairs with the loss of the local shipyard.
Kat’kst’kll, Terledrom News Service
Background
Deciding on a change of tactics, the sathar launch a massive fleet at Fromeltar, larger than any of the fleets seen so far in the Frontier. Despite the increased size of the Fromeltar militia and the presence of Frontier Fighter Corps Squadron Gamma, these ships plus the depleted Task Force Cassidine are outgunned by the incoming sathar fleet. The UPF has more ships, 32 vs 21, but twenty of the UPF ships are fighters with another 7 being assault scouts. The UPF fleet only has 5 capital ships, a battleship, an assault carrier, and three frigates, compared to the 10 capital ships of the sathar fleet including four heavy cruisers.
However, unlike previous sorties into the Frontier, the primary target of this attack is not the ships of Spacefleet but rather the starship construction center in that system. This is only going to be a hit and run on the sathar’s part and they aren’t planning on a major engagement with the fleet. Three hours before the sathar ships reach the planet, the assault carrier deploys its fighters and turns to head home. It looks like the fighters are to be sacrificed.
Order of Battle
UPF
Task Force Cassidine
- 9 fighters
- 3 assault scouts
- 2 frigates
- 1 assault carrier
- 1 battleship
FFC Squadron Gamma
- 8 fighters
Terledrom Militia
- 3 fighters (manned for UPF)
- 4 assault scouts
- 1 frigate
- armed station
- Terledrom SCC
Sathar
- 9 fighters
- 2 cutters
- 3 frigates
- 1 destroyer
- 2 light cruisers
- 4 heavy cruisers
- 1 assault carrier (not participating in battle)
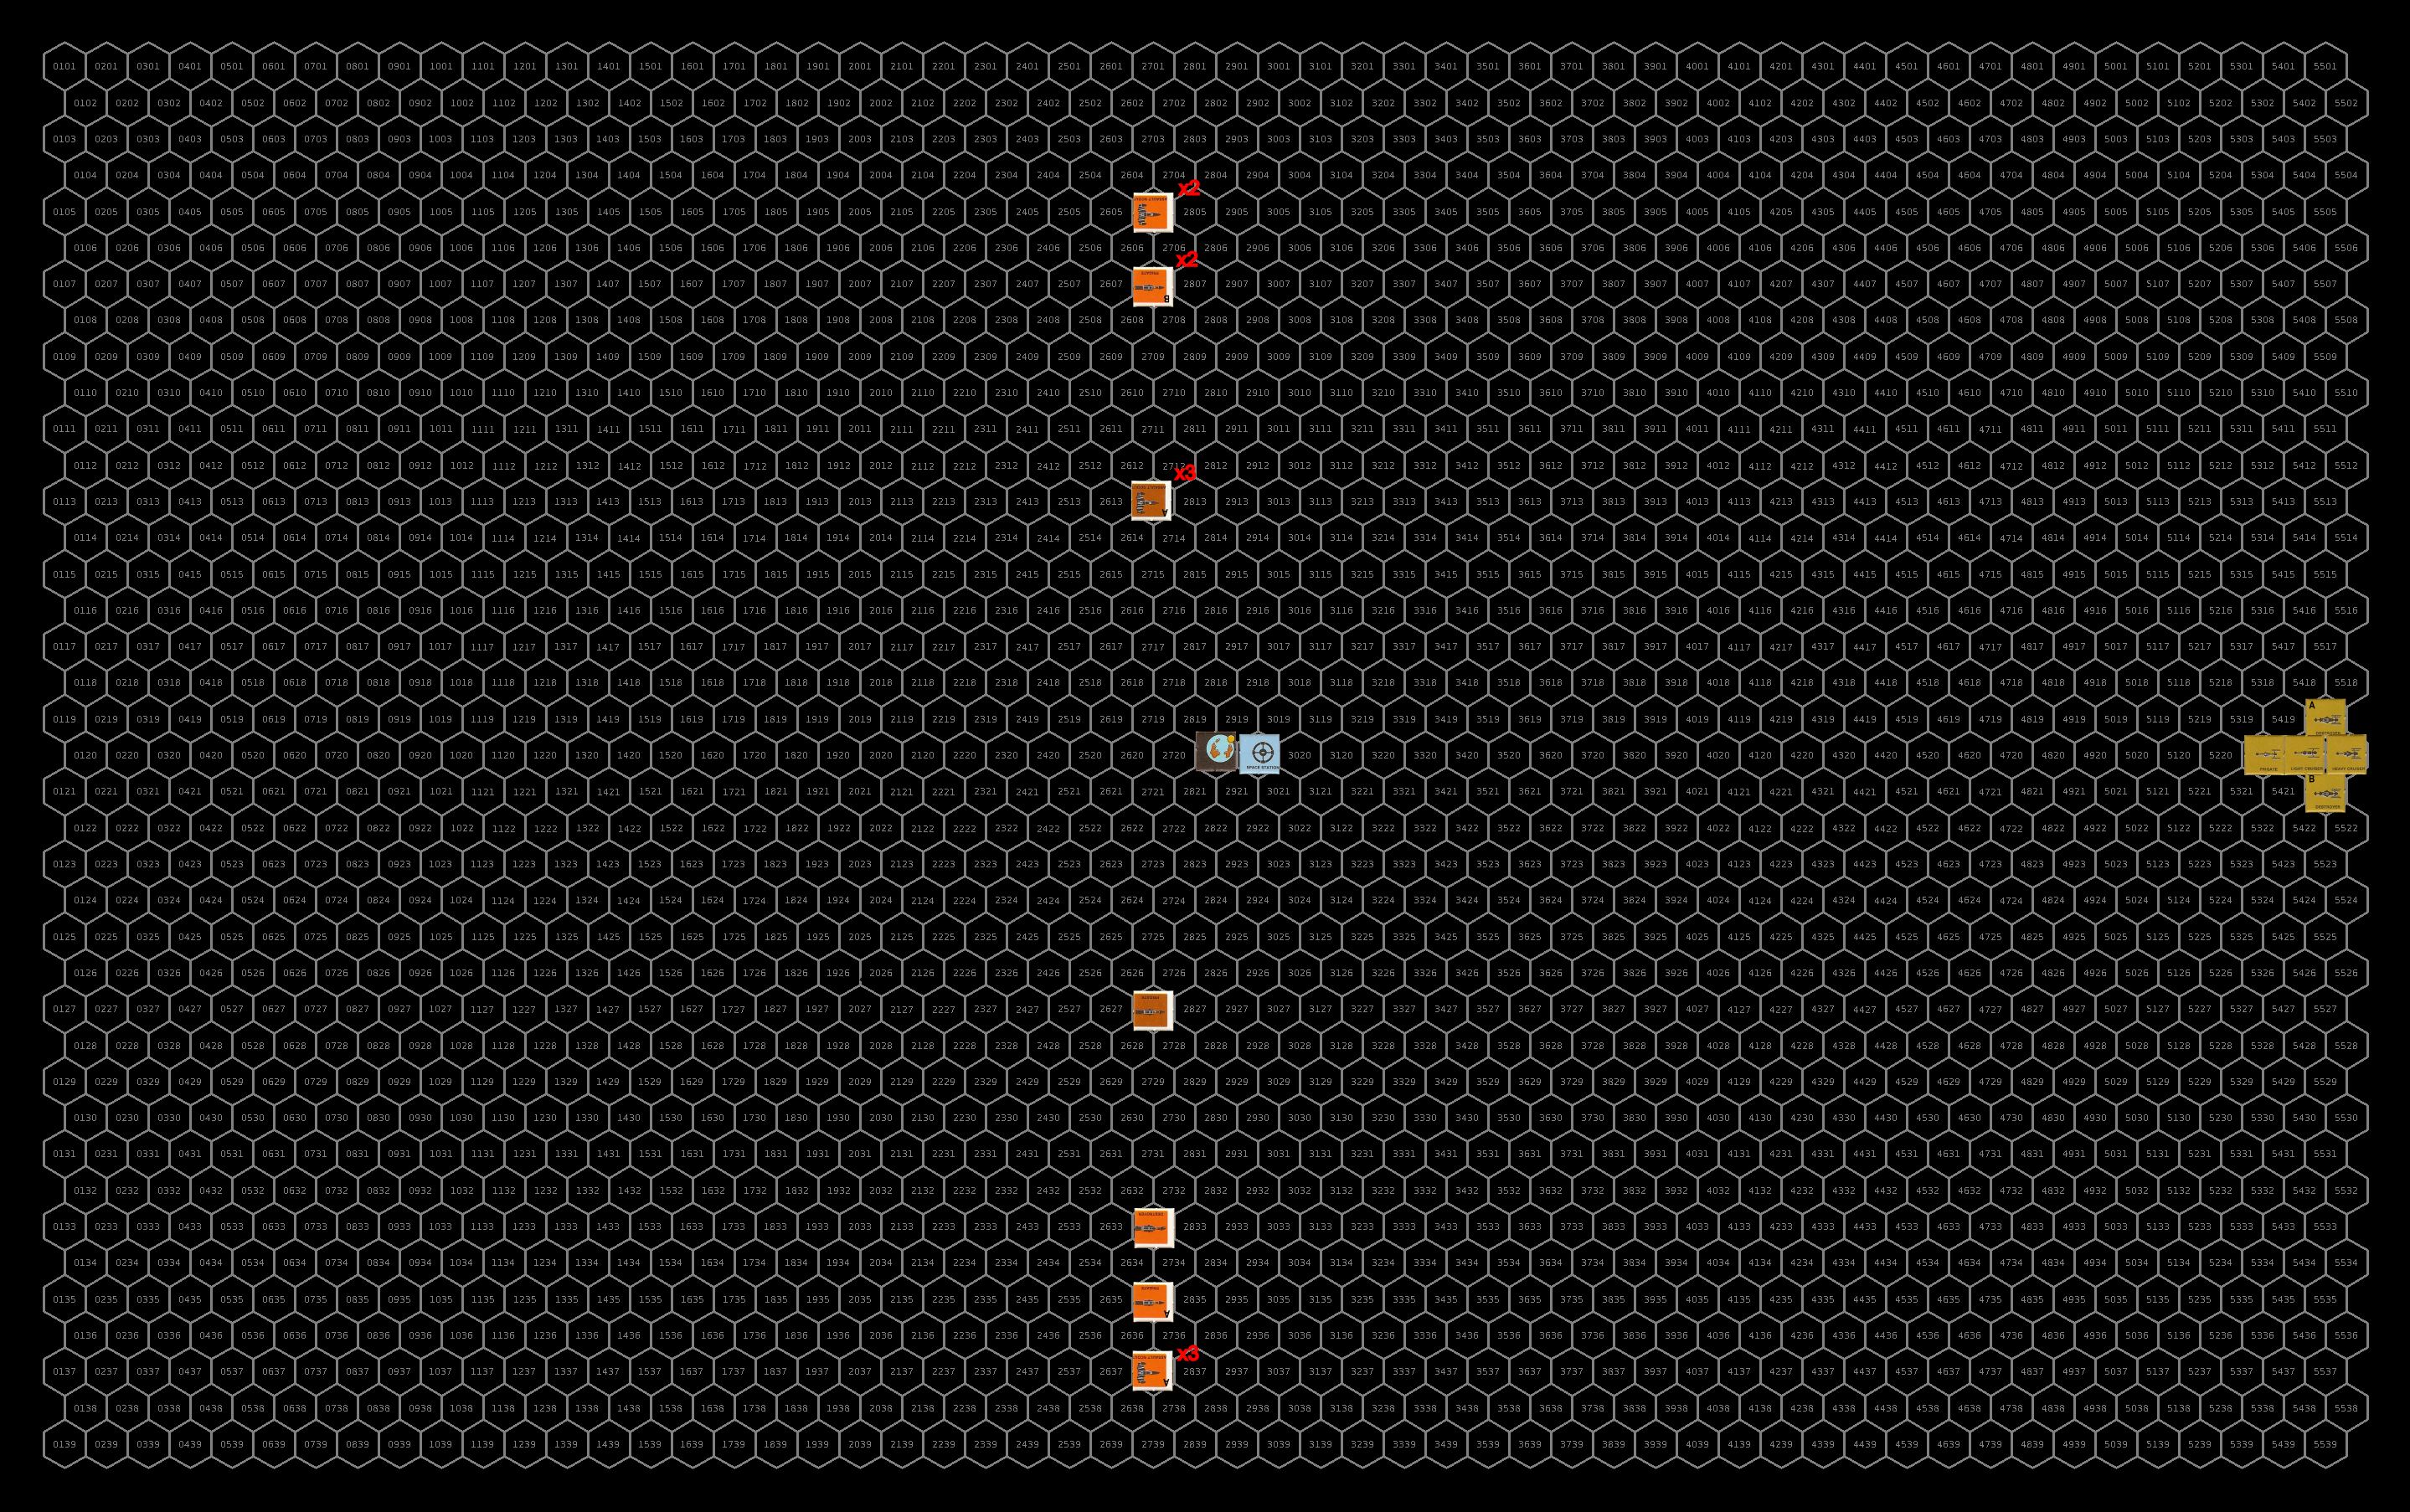
The Battle
Setup
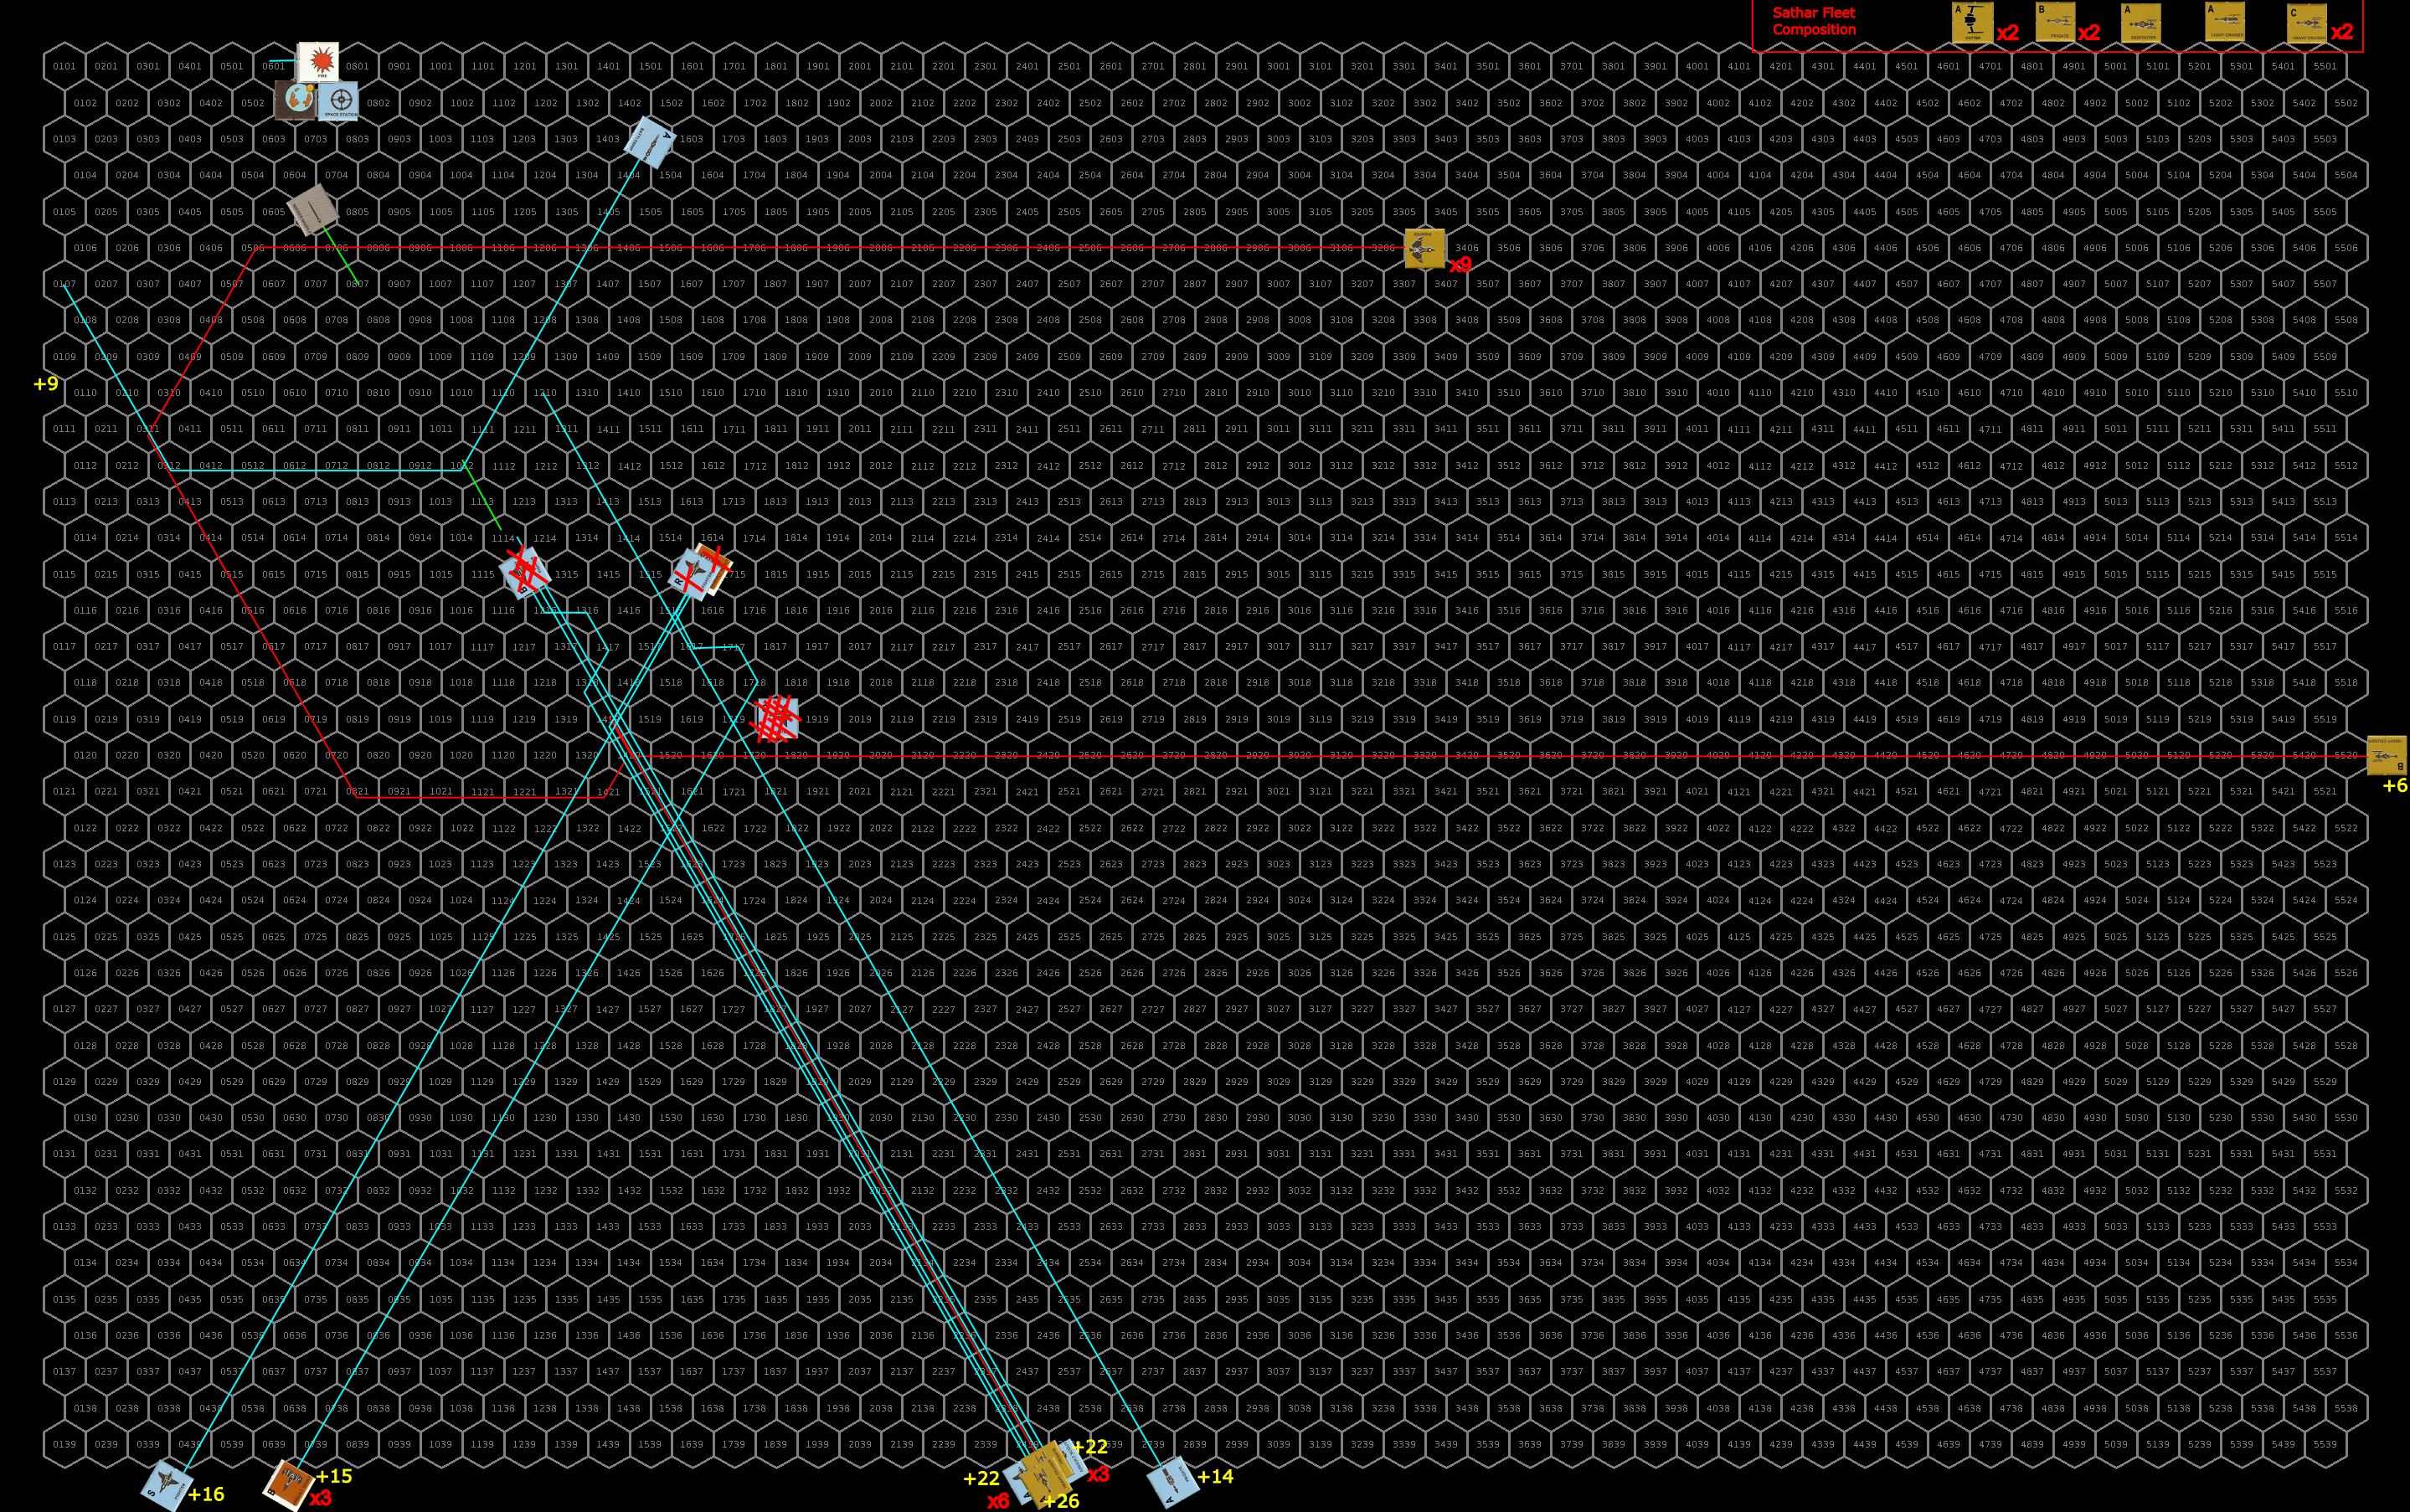
Unlike previous engagements, instead of continuing to slow as they approach the planet, two hours out, the sathar forces start accelerating instead of continuing to slow down. Additionally instead of dispersing out to engage the UPF forces, the fleet amasses into a single tight formation bearing directly on the planet. They enter the map at speed 44.
Caught by surprise by the sathar’s speedup, the UPF forces scramble to gain speed and because of this are somewhat out of position as the attack commences. The fighters and assault scouts have matched the sathar’s speed but the frigates have only achieved a speed of 35 while the battleship and assault carrier are at speed 20. The fighters form up into flights of 3 or 4 ships and the assault scout fly in pairs or trios.

Turn 1
The sathar stay as a group and accelerate with an ADF of 2 to a speed of 46. The armed station, expecting to be obliterated, fires its laser battery and rocket battery at a pair of fighters, hoping to reduce the assault rockets coming at it but both miss.
Surprisingly the sathar do not attack the armed station or continue on toward the UPF ships. Rather they swing around the planet, using the gravity of the planet to get an extra turn for the heavy cruisers and as they pass by, unload all of their firepower into the starship construction center orbiting behind the armed station. Defenseless, the SCC is pummeled by the sathar attacks.
Eight of the nine assault rockets connect with various parts of the shipyard, five of which do double damage reducing the hull integrity of the station by 35%. Six of the ten fired rocket batteries hit reducing the hull integrity by another 15%. Only four of the ten torpedoes connect and amazingly are not very effective, reducing the hull integrity by only another 11%. Four of the six disruptor cannons connect knocking out the station’s DCR, and reducing its hull integrity by another 7%. All four laser cannons hit dropping the hull integrity another 10%. Seven of the ten electron and proton batteries connect, inducing an electrical fire and reducing the hull integrity by another 4%. Finally, fifteen of the eighteen laser batteries connect reducing the hull integrity by another 17% leaving the station with just 1% of its hull integrity remaining. Finally, the heavy cruisers deploy some seeker missiles along their path to activate against pursing ships.
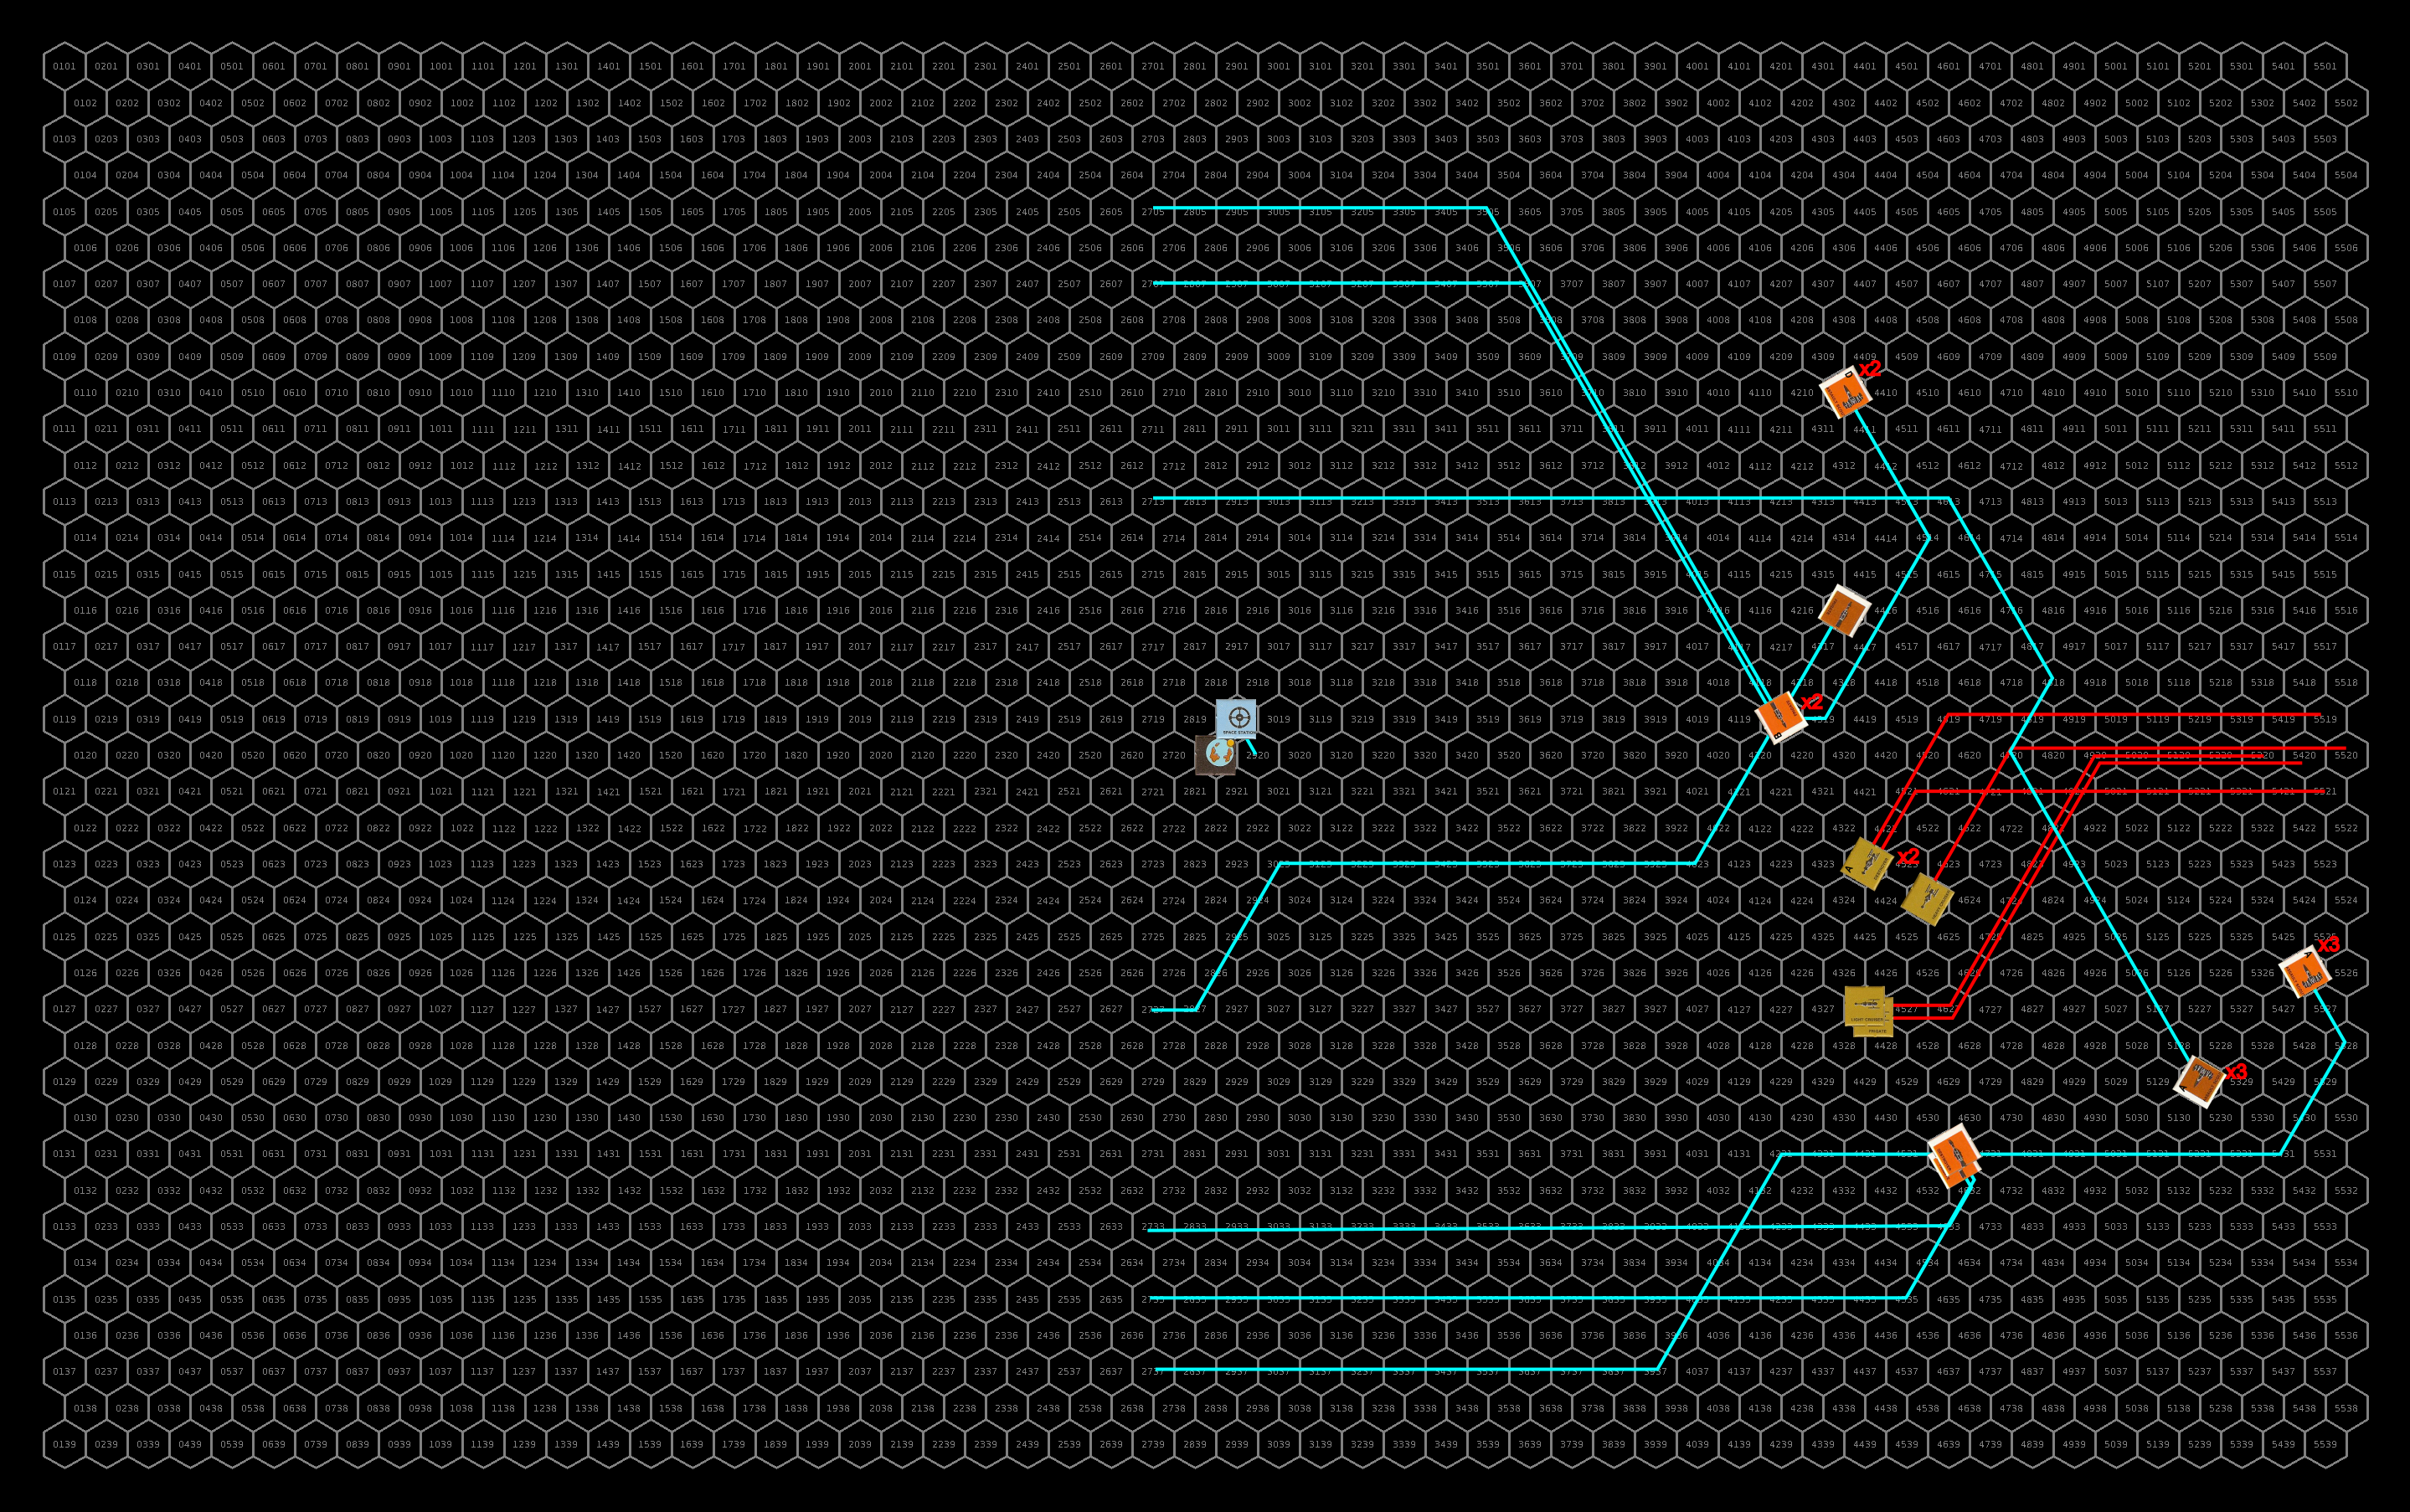
Enraged by the nearly complete destruction of the shipyard, its crews, and the ships inside, the UPF forces swarm after the fleeing sathar vessels. The only exception is the assault carrier which flies to get as far away from the sathar as possible. The battleship is moving too slow to get into range, and the two UPF frigates can’t get to optimal range but are at least able to bring some of their weapons to bear. The fire on the SCC knocks out half of its remaining hull integrity (3 of 600 HP left).
Recognizing the danger of all the fighters, the sathar concentrate their defensive fire on that threat. The defensive fire destroys four fighters and nearly destroys two more. It damages the engines on two fighters, and completely knocks out the engines on another. It knocks out the maneuvering system on one fighter and the assault rocket launcher on yet another. Finally, one of the fighters is hit damaging its combat control system.
The UPF ships return fire with a vengeance. The fighters concentrate on two of the heavy cruisers while the assault scouts focus one of the light cruisers. The frigates focus on one of their counterparts. The more distant frigates miss but the one close in with the fighters connects with its laser cannon and a torpedo. The don’t do as much damages as they could but still manage to take out 67% of the sathar frigate’s hull integrity (the LC only did 3 HP and the T, while rolling double damage, only did 24 HP).
The assault scouts miss with their laser batteries but connect with six of the seven assault rockets on the light cruiser knocking out its ICM launcher and damaging its maneuvering jets before the others slam into it and destroy it completely. The first heavy cruiser is hit by six of the eight assault rockets launched at it. The rockets take out just over half of its hull integrity, knock out its maneuvering, damage its engines, knock out its disruptor cannon, and cause a power short circuit knocking out all of its screens and ICMs. The second doesn’t fare as well. It is also hit by six assault rockets. The first three knock out about 56% of its hull integrity, the next two damage its engines and knock out its maneuvering. But the final assault rocket slams into the cruiser’s torpedo magazine causing a massive explosion that destroys the ship.
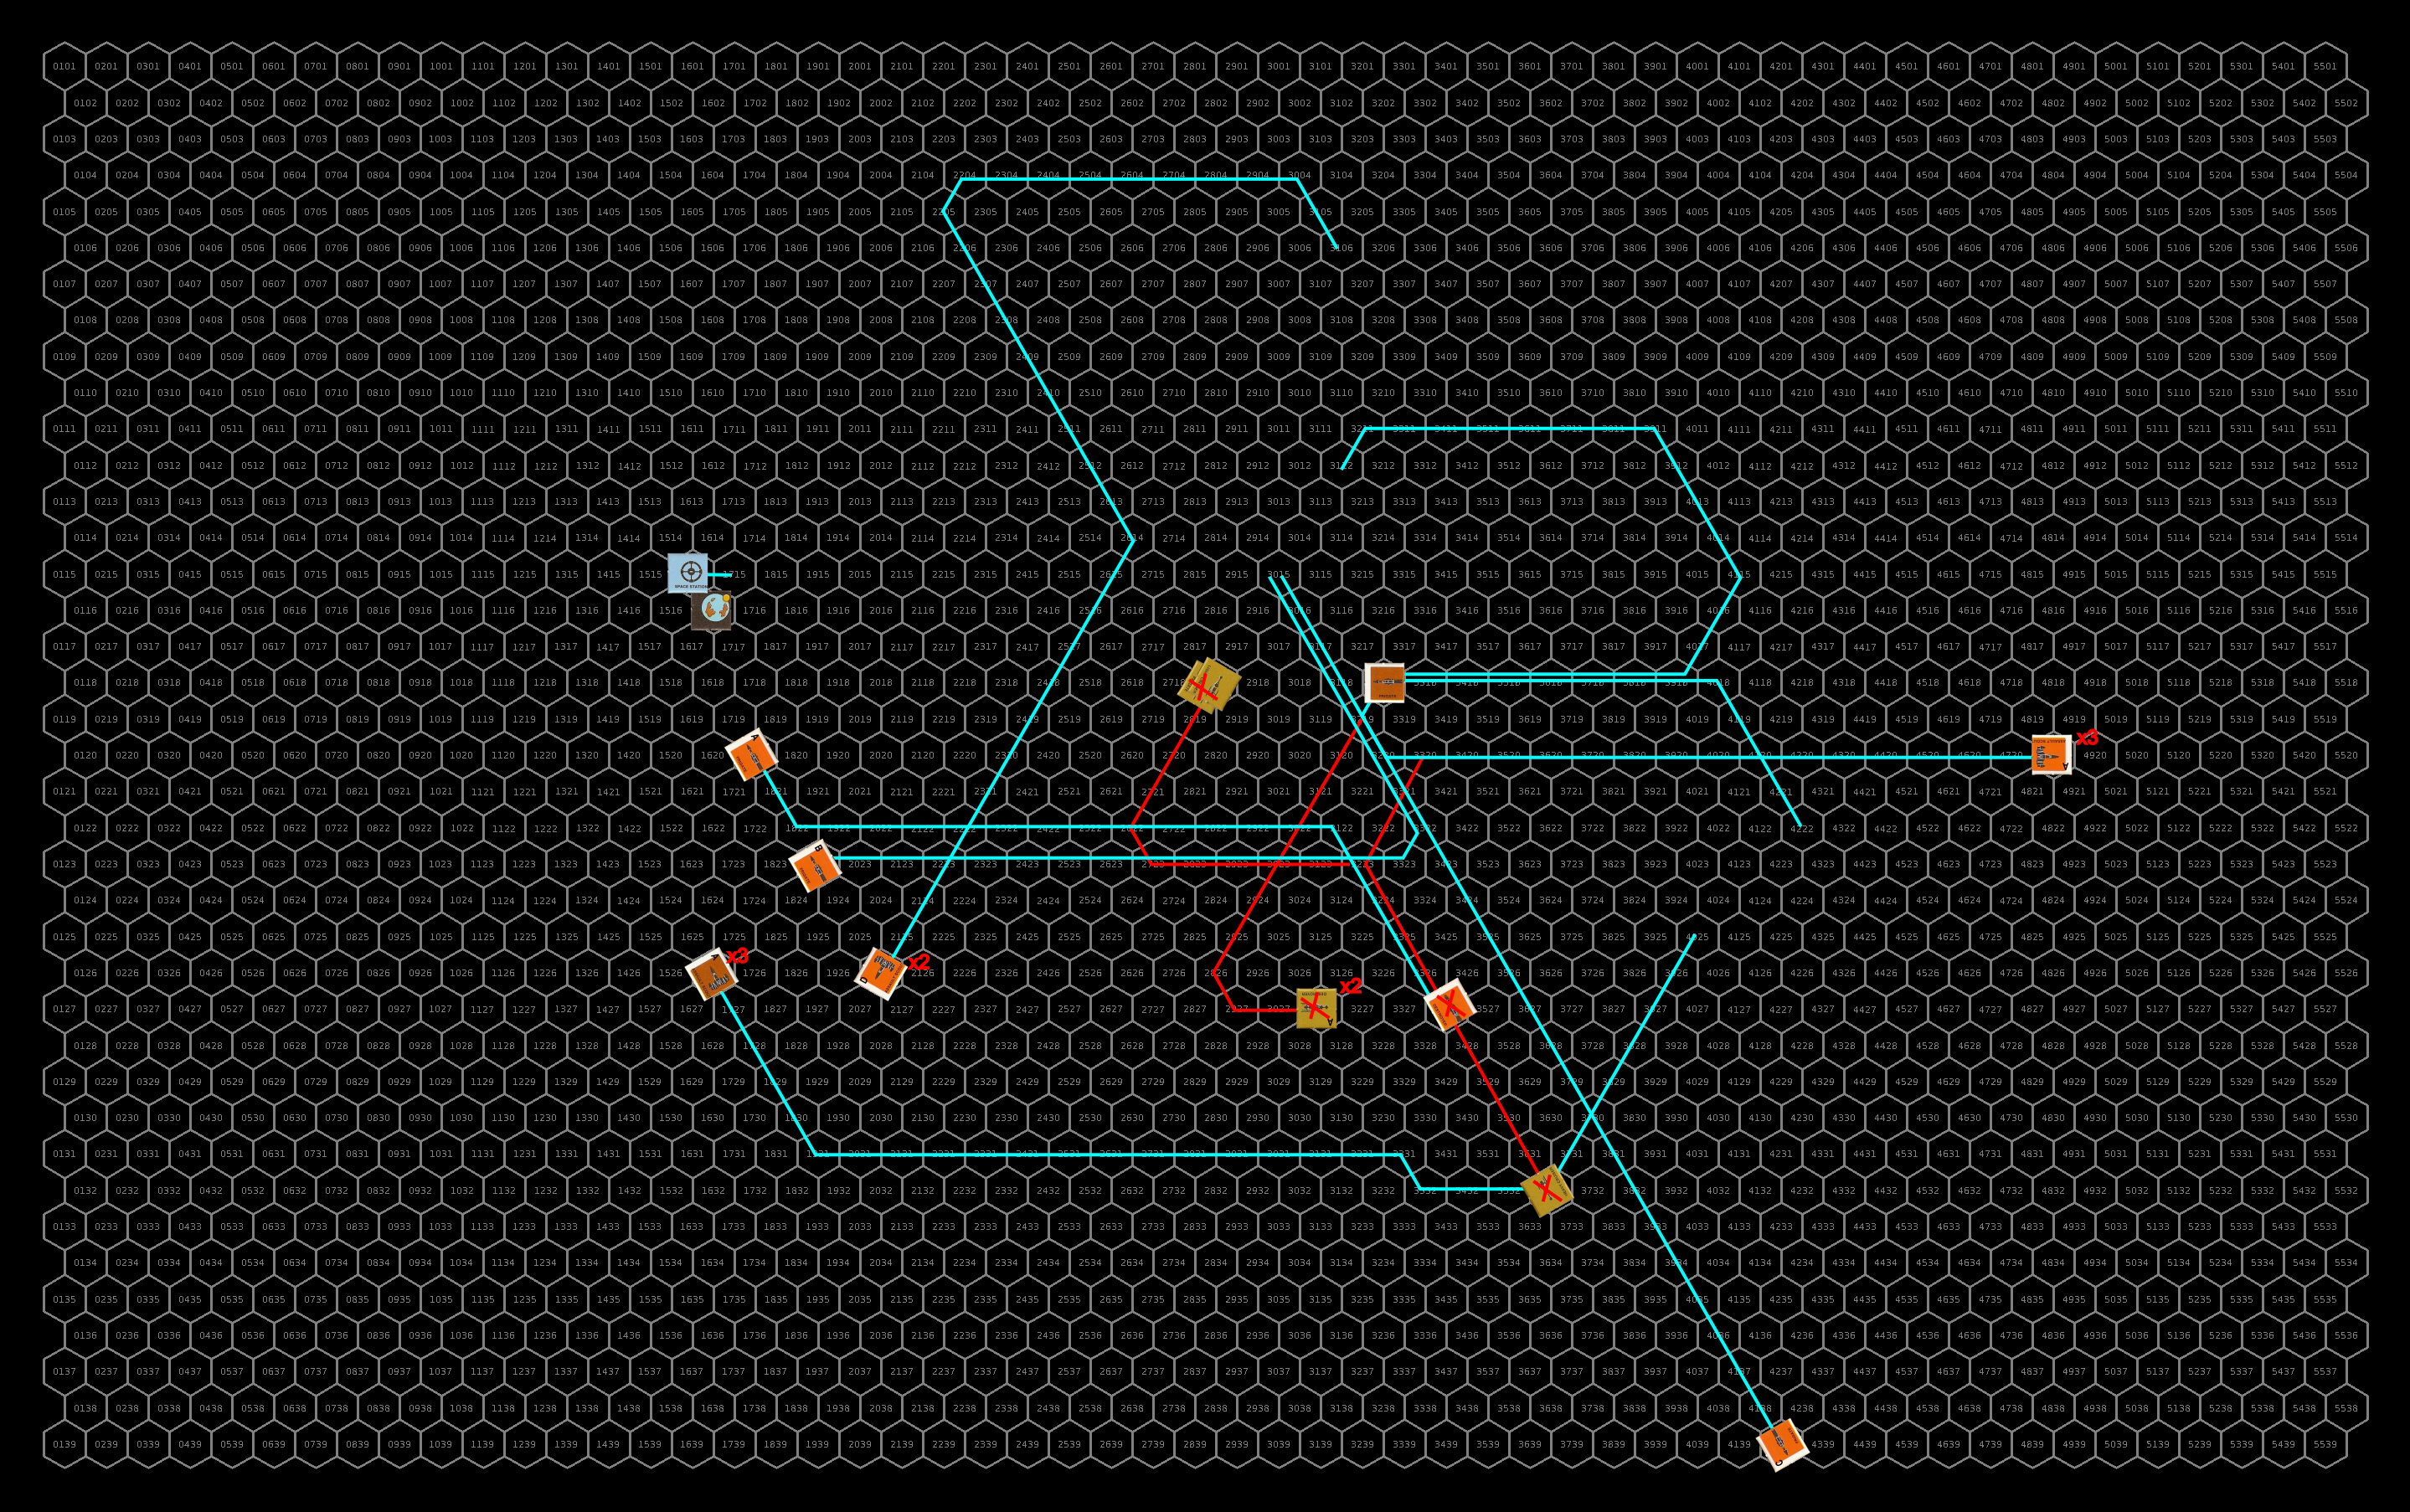
Turn 2
The sathar continue to effect their retreat from the system. The wounded heavy cruiser with no MR, accompanied by the wounded frigate accelerate by 1 (the HC’s max) and continue straight and the frigate doesn’t break up from the slight acceleration. The other capital ships make a turn to port, accelerate by two and begin to leave the inner system. The fighters loop back to make a pass at the battleship.
At the same time the sathar activate three of the seeker missiles that they had deployed last turn. The first one starts to accelerate toward the armed station. The second activates among all the fighters and assault scouts and targets the militia frigate in that group. The third goes after the UPF frigate just behind the larger group of ships chasing the sathar fleet. Both frigates fire off all of their ICMs in an attempt to intercept the incoming missile. The missile going after the UPF frigate manages to evade the seeker missile but the militia frigate isn’t so lucky. The missile slams home but mercifully doesn’t destroy the ship. It’s hull integrity is only reduced by 40% (only 16 points on 5d10).
Defensively, the armed station, UPF frigate A, and the battleship fire at the fighters while the other ships focus on the damaged heavy cruiser. The frigate connects with the lead fighter knocking out its AR launcher. The station misses but the battleship hit with 2 laser batteries destroying one fighter and knocking out the AR launcher on a second, and its disruptor cannon vaporizes a second fighter. The other frigates and assault scouts, firing on the damaged heavy cruiser, only manage to land two laser battery hits (from the militia frigate and assault scout) knocking out the cruisers PB and only scratching its hull (1 HP).
Offensively, the sathar fighters fire their assault rockets at the battleship, but the destruction of and damage to their wingworms distract them and only one of the five rockets connect damaging the battleship’s engines.
The fleeing sathar ships focus the energy battery weapons on the fighters behind them, while they focus their cannons and rocket batteries on the fighters in the lower group (C) along their flight path. They fire torpedoes at the frigate and assault scouts behind them as well. The assault scouts immediately start dodging in an attempt to evade the incoming torpedoes but the frigate, having expended its ICMs unsuccessfully on the seeker missile can only watch as the torpedo homes in.
While the torpedoes are only moderately successful, damaging the LC on the militia frigate and destroying one of the militia assault scouts, the energy weapons and rocket batteries are much more effective, completely destroying the fighters along the sathar flight path and destroying four fighters in the trailing groups. In addition, two more fighters are damaged (12% and 88% hull integrity left).
With the battleship too slow to catch the fleeing ships, and some of the assault scouts thrown off track trying to avoid the incoming torpedoes, the UPF cannot safely pursue the larger group of sathar vessels and go after the damaged ships to finish them off. Three of the assault scouts are able to pursue even with their evasive maneuvers and are joined by the four functional fighters. One fighter has its maneuvering damaged and just starts to decelerate. The sixth fighter cannot accelerate and tries to stay with the main group but falls behind and doesn’t come into weapon range. The frigates also pursue the damaged sathar ships but they are still at a speed disadvantage and fall a bit further behind. The battleship starts slowing down and staying near the station while the three militia assault scouts slow down as they are headed off in the wrong direction for pursuit but should be able to start to catch up soon. The assault carrier, now safe, begins slowing down and returning to the planet.
The starship construction center succumbs the fire and is completely destroyed. Defensively, the sathar heavy cruiser and frigate fire on the incoming fighters but all the shots go wide.
The UPF ships fire five assault rockets at the heavy cruiser and two at the frigate. They focus all their energy weapons at the frigate (3 LB from the Assault scouts and 2 LC & LB from the frigates). Four of the five assault rockets hit the heavy cruiser. All of them rip into the hull completely destroying the ship. Of the energy weapons fired at the frigate, only one of the assault scouts score a hit reducing the frigate’s hull integrity by 10%. One of the assault rockets knocks out the frigate’s LC while the other detonates in the core of the ship with a titanic explosion that consumes the entire ship (42 HP).
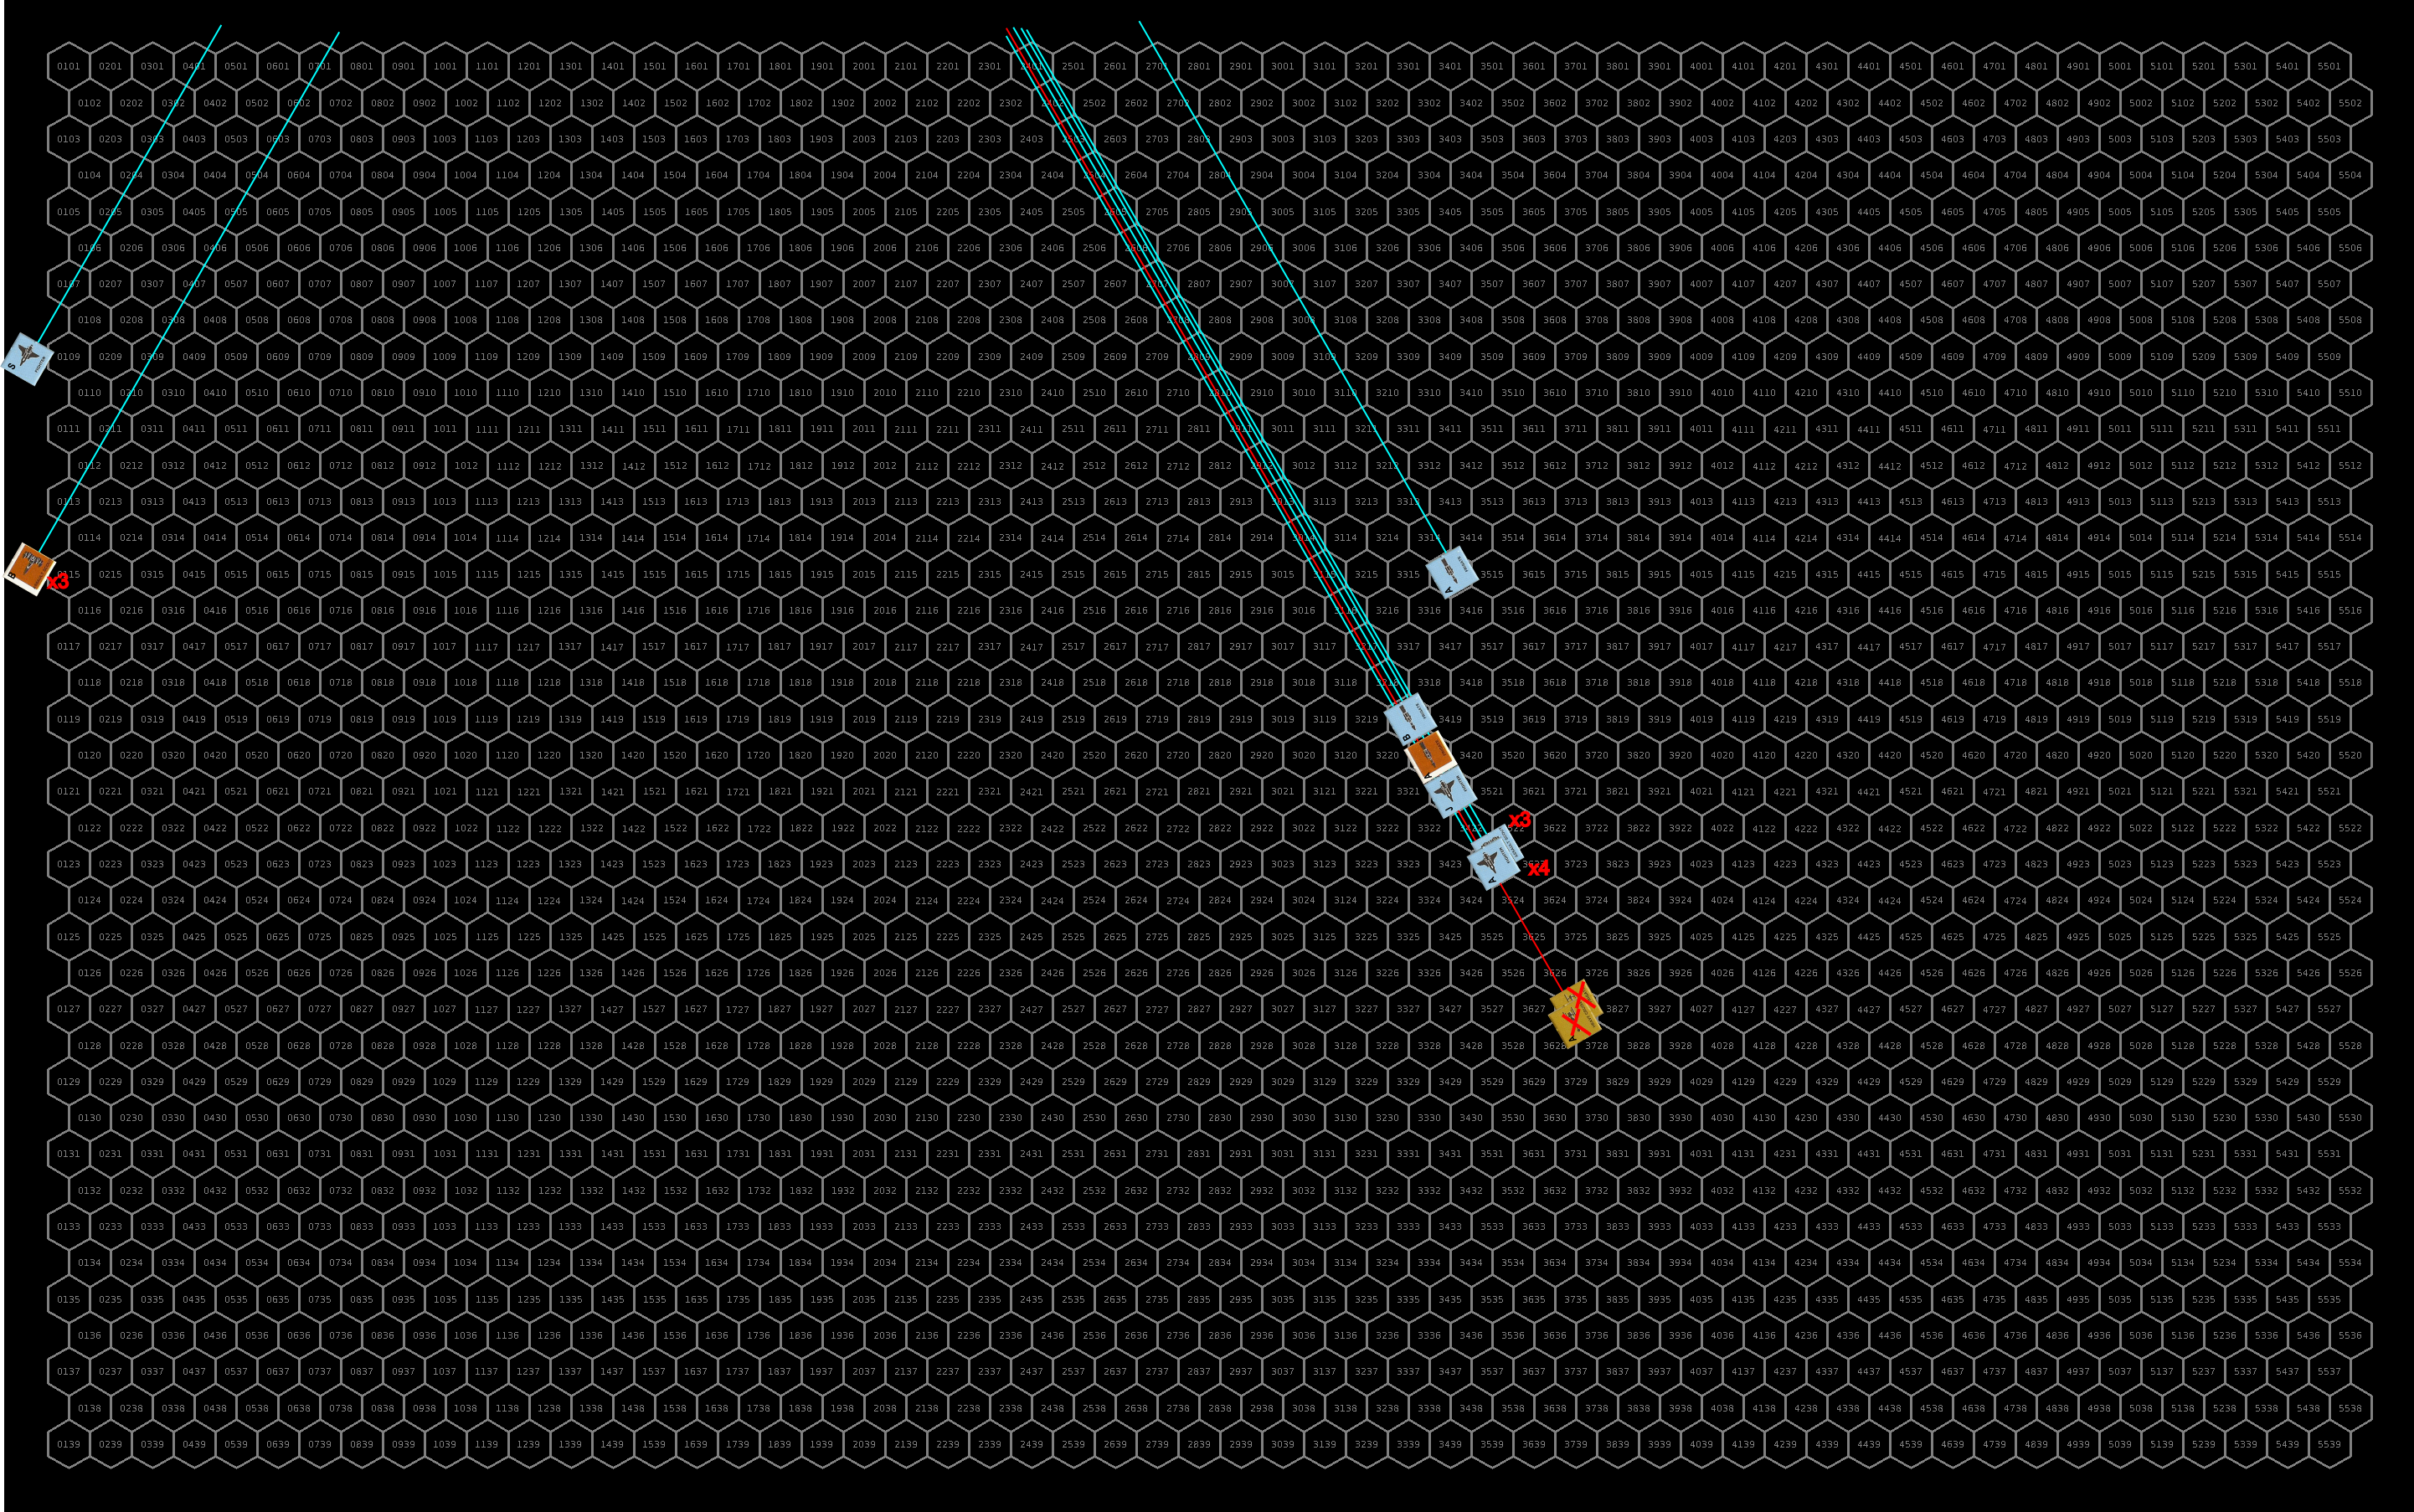
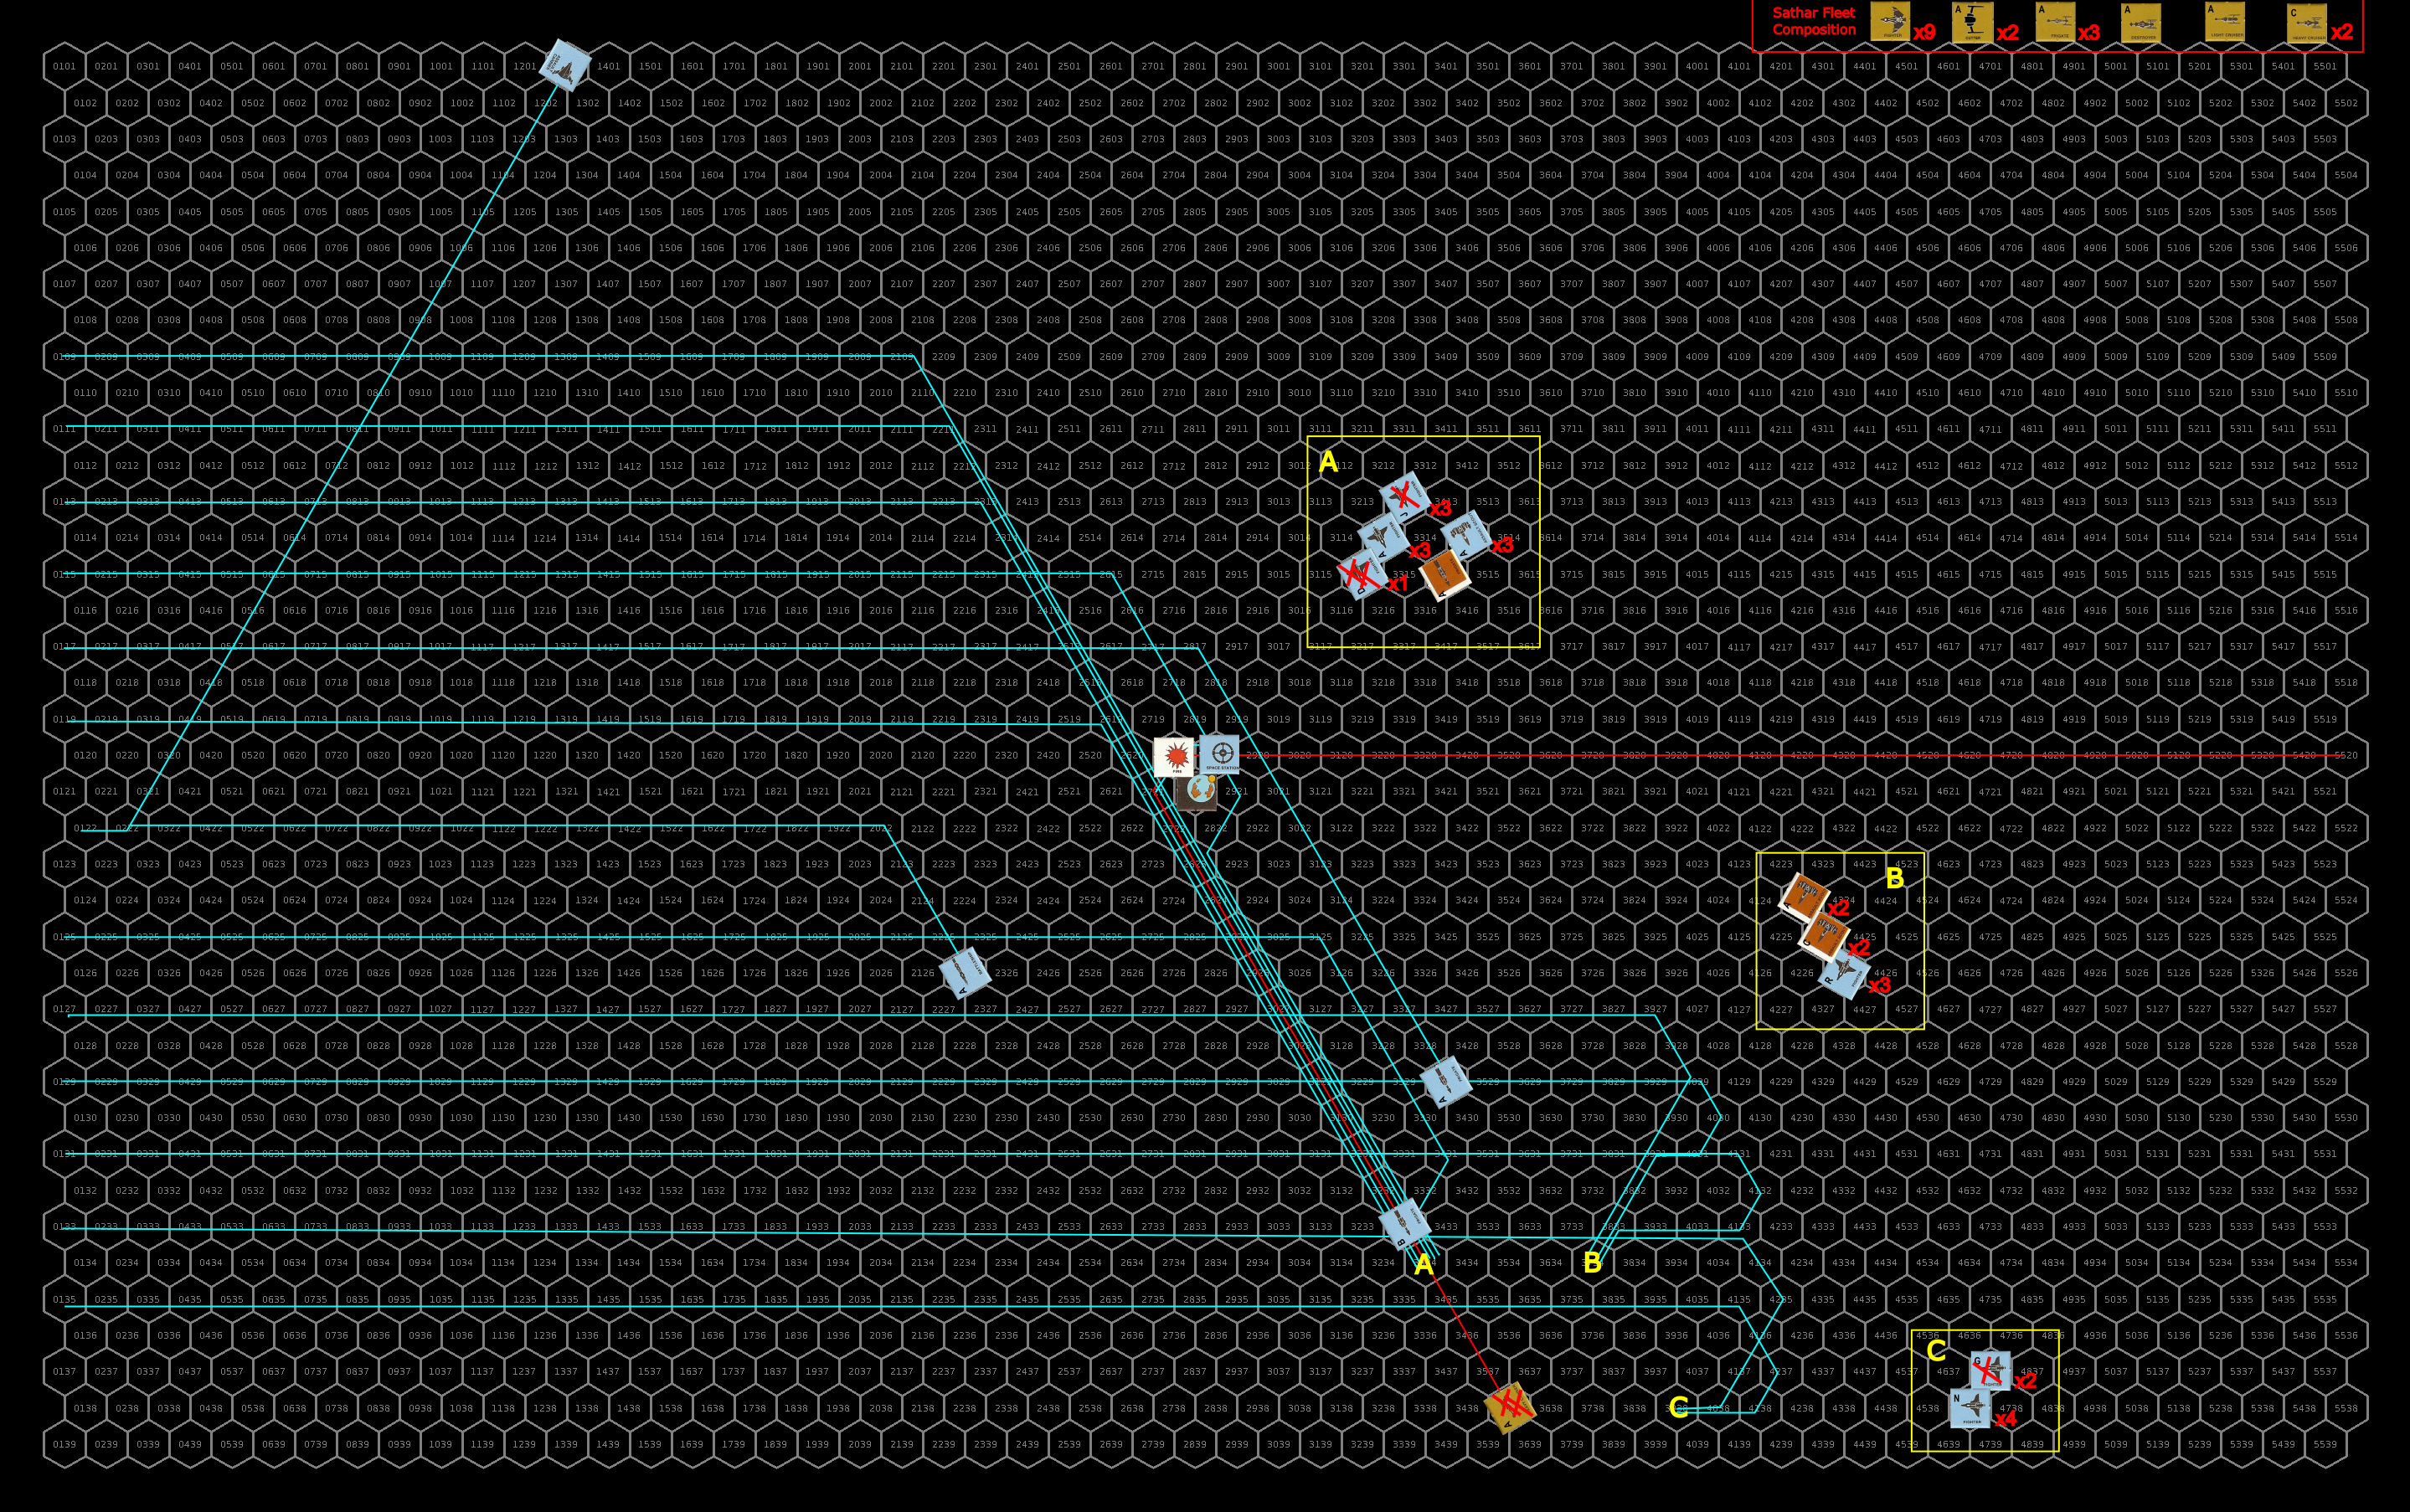
Turn 3
The remaining sathar ships continue to flee the system but activate their remaining seeker missile that they left by the planet. Both the newly activated one and the one activated the previous turn fly at the armed station. Firing ICMs to try to avoid an impact, one of the missiles is intercepted but the other one hits the station reducing its hull integrity by 30% but not destroying it. With the sathar ships now quite far away and retreating, the UPF calls off the pursuit and begins looking for survivors from the starship construction center.
Repairs
The only damage on the surviving sathar ships are damaged assault rocket launchers on two of the fighters which are quickly repaired once they rejoin the assault carrier.
Damage to the UPF ships is only a little more extensive. The battleship quickly repairs its damaged engines and the militia frigate is able to get its laser cannon back online immediately as well. Over the next hour an a half it is able to get its hull back up to 75% integrity but then hits a snag that can only be repaired in a shipyard.
The fighter with the lightly damaged engines also gets that under control immediately can begin decelerating with the rest of the fighter group. It takes nearly an hour for the fighter with the completely knocked out engines to get some engine power back and many hours for it to slow down enough to dock with the carrier where it is completely repaired. After an hour and half of work, the fighter with the damaged maneuvering jets restores some control and begins to head back to the carrier where it arrives a few hours later and is completely repaired. The fighters with damages hull carefully make their way back to the carrier where they are fully repaired.
Unfortunately, the damage to the station from the seeker missile are such that it would take tools and equipment from the shipyard to repair. Those repairs will take some time to effect now that the shipyard has been destroyed.
Aftermath
The sathar lost more ships than they had planned on, losing 34.5% of their hull points that they came into the battle with, 2 fighters, a frigate, a light cruiser and 2 heavy cruisers (286 HP of ships). That said, they accomplished their primary goal of destroying the starship construction center.
The UPF “only” lost 14 fighters (72% of the ships) and a militia assault scout (for a total of 135 HP) but the loss of the shipyard is going to be significant. Additionally, it lost the ships that were in the shipyard including an assault scout that would have been completed the next day, two fighters, and a frigate and destroyer under construction. There were also three civilian ships in the shipyard, a HS 11 ship undergoing maintenance, and HS 10 and HS 11 ships that were under construction and scheduled to be completed in 38 and 76 days respectively.
The remaining six fighters are all assigned to Frontier Fighter Corps Squadron Delta. The assault carrier is detached from TF Cassidine and with the militia frigate heads toward Dramune. The frigate will enter the shipyard there while the carrier will head to Prenglar to pick up more fighters to round out FCC Squadron Delta and replenish its compliment with TF Cassidine. Also, one of the minelayers at Prenglar will be heading to Fromeltar.
The shipyard situation is more serious. Work will begin to build a new shipyard but it will be years before it is back at capacity. Additionally, with the loss of the shipyard here at Terledrom and the one at Hentz (Araks), the UPF is going to start arming the shipyards, adding defenses, and increasing security.
Given that the UPF know the route to one of the active sathar shipyards in OFS019, the remnant of this battle group is headed there for defense while the sathar continue to rebuild their forces.
Lessons Learned
When I first conceived this scenario, I thought the sathar would come in hot, swing by the planet, take out the shipyard and then fly out of the system. And that went just about perfectly as far as destruction of the shipyard went. They did 594 HP of out the 600 HP the shipyard had and left it with a fire that took out the last 6 HP. And that was despite rolling poorly for the damage from the torpedoes.
However, as I was setting things up, I realized that with the limited ADF of the sathar since they were staying together as a group, the small fast UPF ships would be able to boost to the same speed and intercept the sathar. So I set it up that way and the sathar took more damage than they expected. The downside was that the UPF was just barely able to intercept the sathar on the first round which meant that they had to stay close and be subject to offensive fire from the sathar instead of making a run and turning out to be farther away. They could have done that a little bit (2-4 hexes) but I didn’t have them do so as they are new pilots and I chalked it up to inexperience.
I was surprised at how close to exact the damage done to the shipyard was. Since the shipyard as designed didn’t have weapons or defenses, the only non-hull hits possible were the fire and DCR. Equipping the shipyards with weapons and defenses will help to increase their survivability since the damage will be spread around. But not by much.
The sathar could have possibly wiped out the remaining UPF forces completely if they had stayed in the system but that would have been a long drawn out battle as it would have taken them a long time to slow back down. The shipyard was their target so they took it out and left.