The Fromeltar militia, supported by the the Inner Reach and Outer Reach militias from Dramune that arrived yesterday after a high-speed risk jump, engaged sathar forces today around Terledrom.
In an intense battle lasting only twenty minutes, the militia forces overwhelmed the sathar forces, which consisted of five capital ships. Militia forces sustained damage and causalities resulting in the lost of the Inner Reach militia destroyer and severe damage to both frigates of the Outer Reach militia.
A memorial service will be held tomorrow for the crew of the lost ship. Our hearts go out to their families and we thank them for their dedication to defending the Frontier.
The damaged frigates have been given top priority to move into the local shipyard for repairs as soon as space opens which is expected to occur tomorrow.
The surviving militia crews remain vigilant as we await the arrival of Task Force Cassidine some time tomorrow evening.
Kat’kst’kll, Terledrom News Service
Background
The Fromeltar system has one of the larger militias with a frigate and 3 assault scouts on the roster. When news of the sathar ships went out across the Frontier, both the Inner Reach and Outer Reach militias in the adjacent Dramune system decided that it was in their interest to help Fromeltar and both militias risk jumped to the system arriving a day in advance of the sathar forces. They hope to stop the worms here and prevent them from ever entering the Dramune system.
Similarly, Task Force Cassidine was dispatched by Spacefleet and ordered to make a high speed risk jump to the Fromeltar system. Unfortunately, coming from two systems away, they are still a day away from Terledrom when the militia forces engage the sathar. They will be able to clean up the remnants of the sathar fleet if the militias can’t hold the line, but won’t be any help in this battle. This fight will be completely between the UPF militias and the sathar.
Order of Battle
Militia Forces
With the arrival of the Dramune militias, the UPF have a definite hull point and ship number advantage although most of their ships are small.
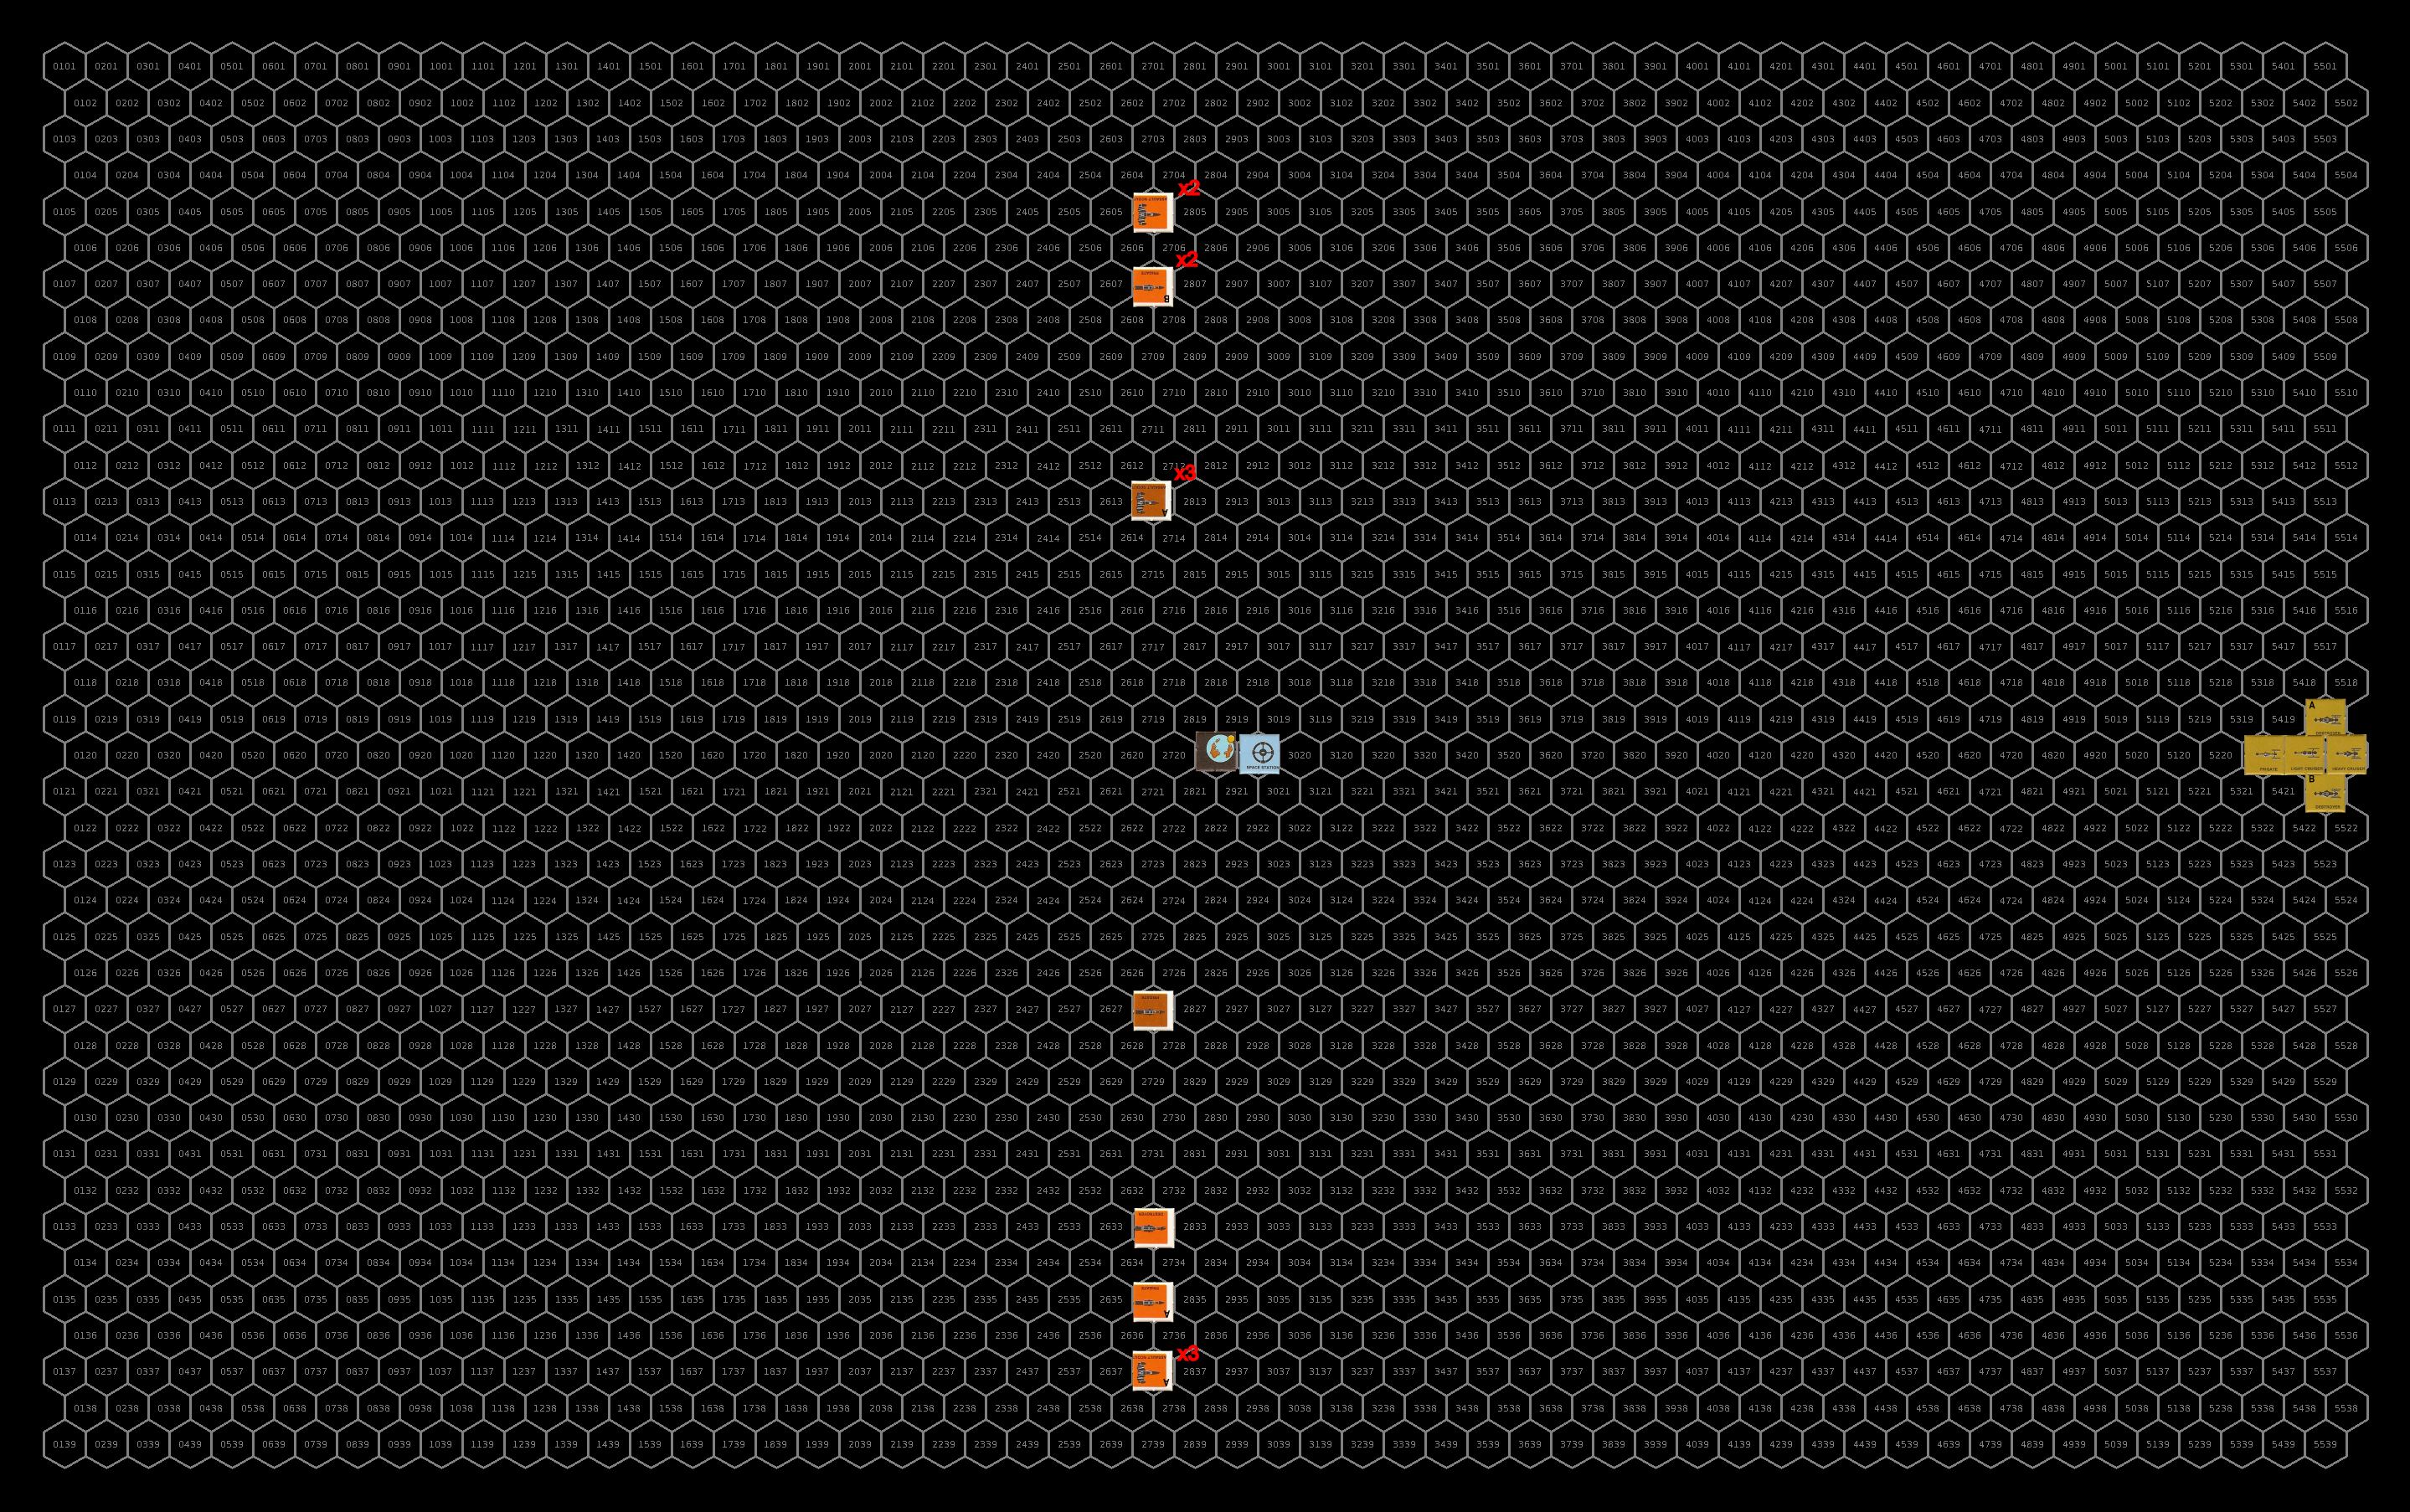
Terledrom (Fromeltar)
- 3 Assault Scouts
- 1 Frigate
- 1 Armed station
Inner Reach (Dramune)
- 3 Assault Scouts
- 1 Frigate
- 1 Destroyer
Outer Reach (Dramune)
- 2 Assault Scouts
- 2 Frigates
Sathar
- 1 Frigate
- 2 Destroyers
- 1 Light Cruiser
- 1 Heavy Cruiser
This is a standard mix that the sathar are employing to start off the battle. You’ll see it in several of the upcoming battles. While it should have been enough to deal with any of militias they encountered, they didn’t figure on high risk jumps to support neighboring systems.
The Battle
Setup
With the recent animosity between the two Dramune worlds, the ships from those respective militias line up on opposite sides of the planet with the Terledrom militia arrayed between them. The Outer Reach militia and Terledrom assault scouts are “above” the planet with the other ships “below”. The assault scouts have an initial speed of 30 while the capital ships start at speed 20. The station is at position 4 and orbiting counter clockwise.
The sathar start at speed 10 and are arranged in a diamond formation with the center consisting of a frigate in the lead, followed by the light and heavy cruisers with the destroyers above and below the main line. They are headed straight toward the planet.
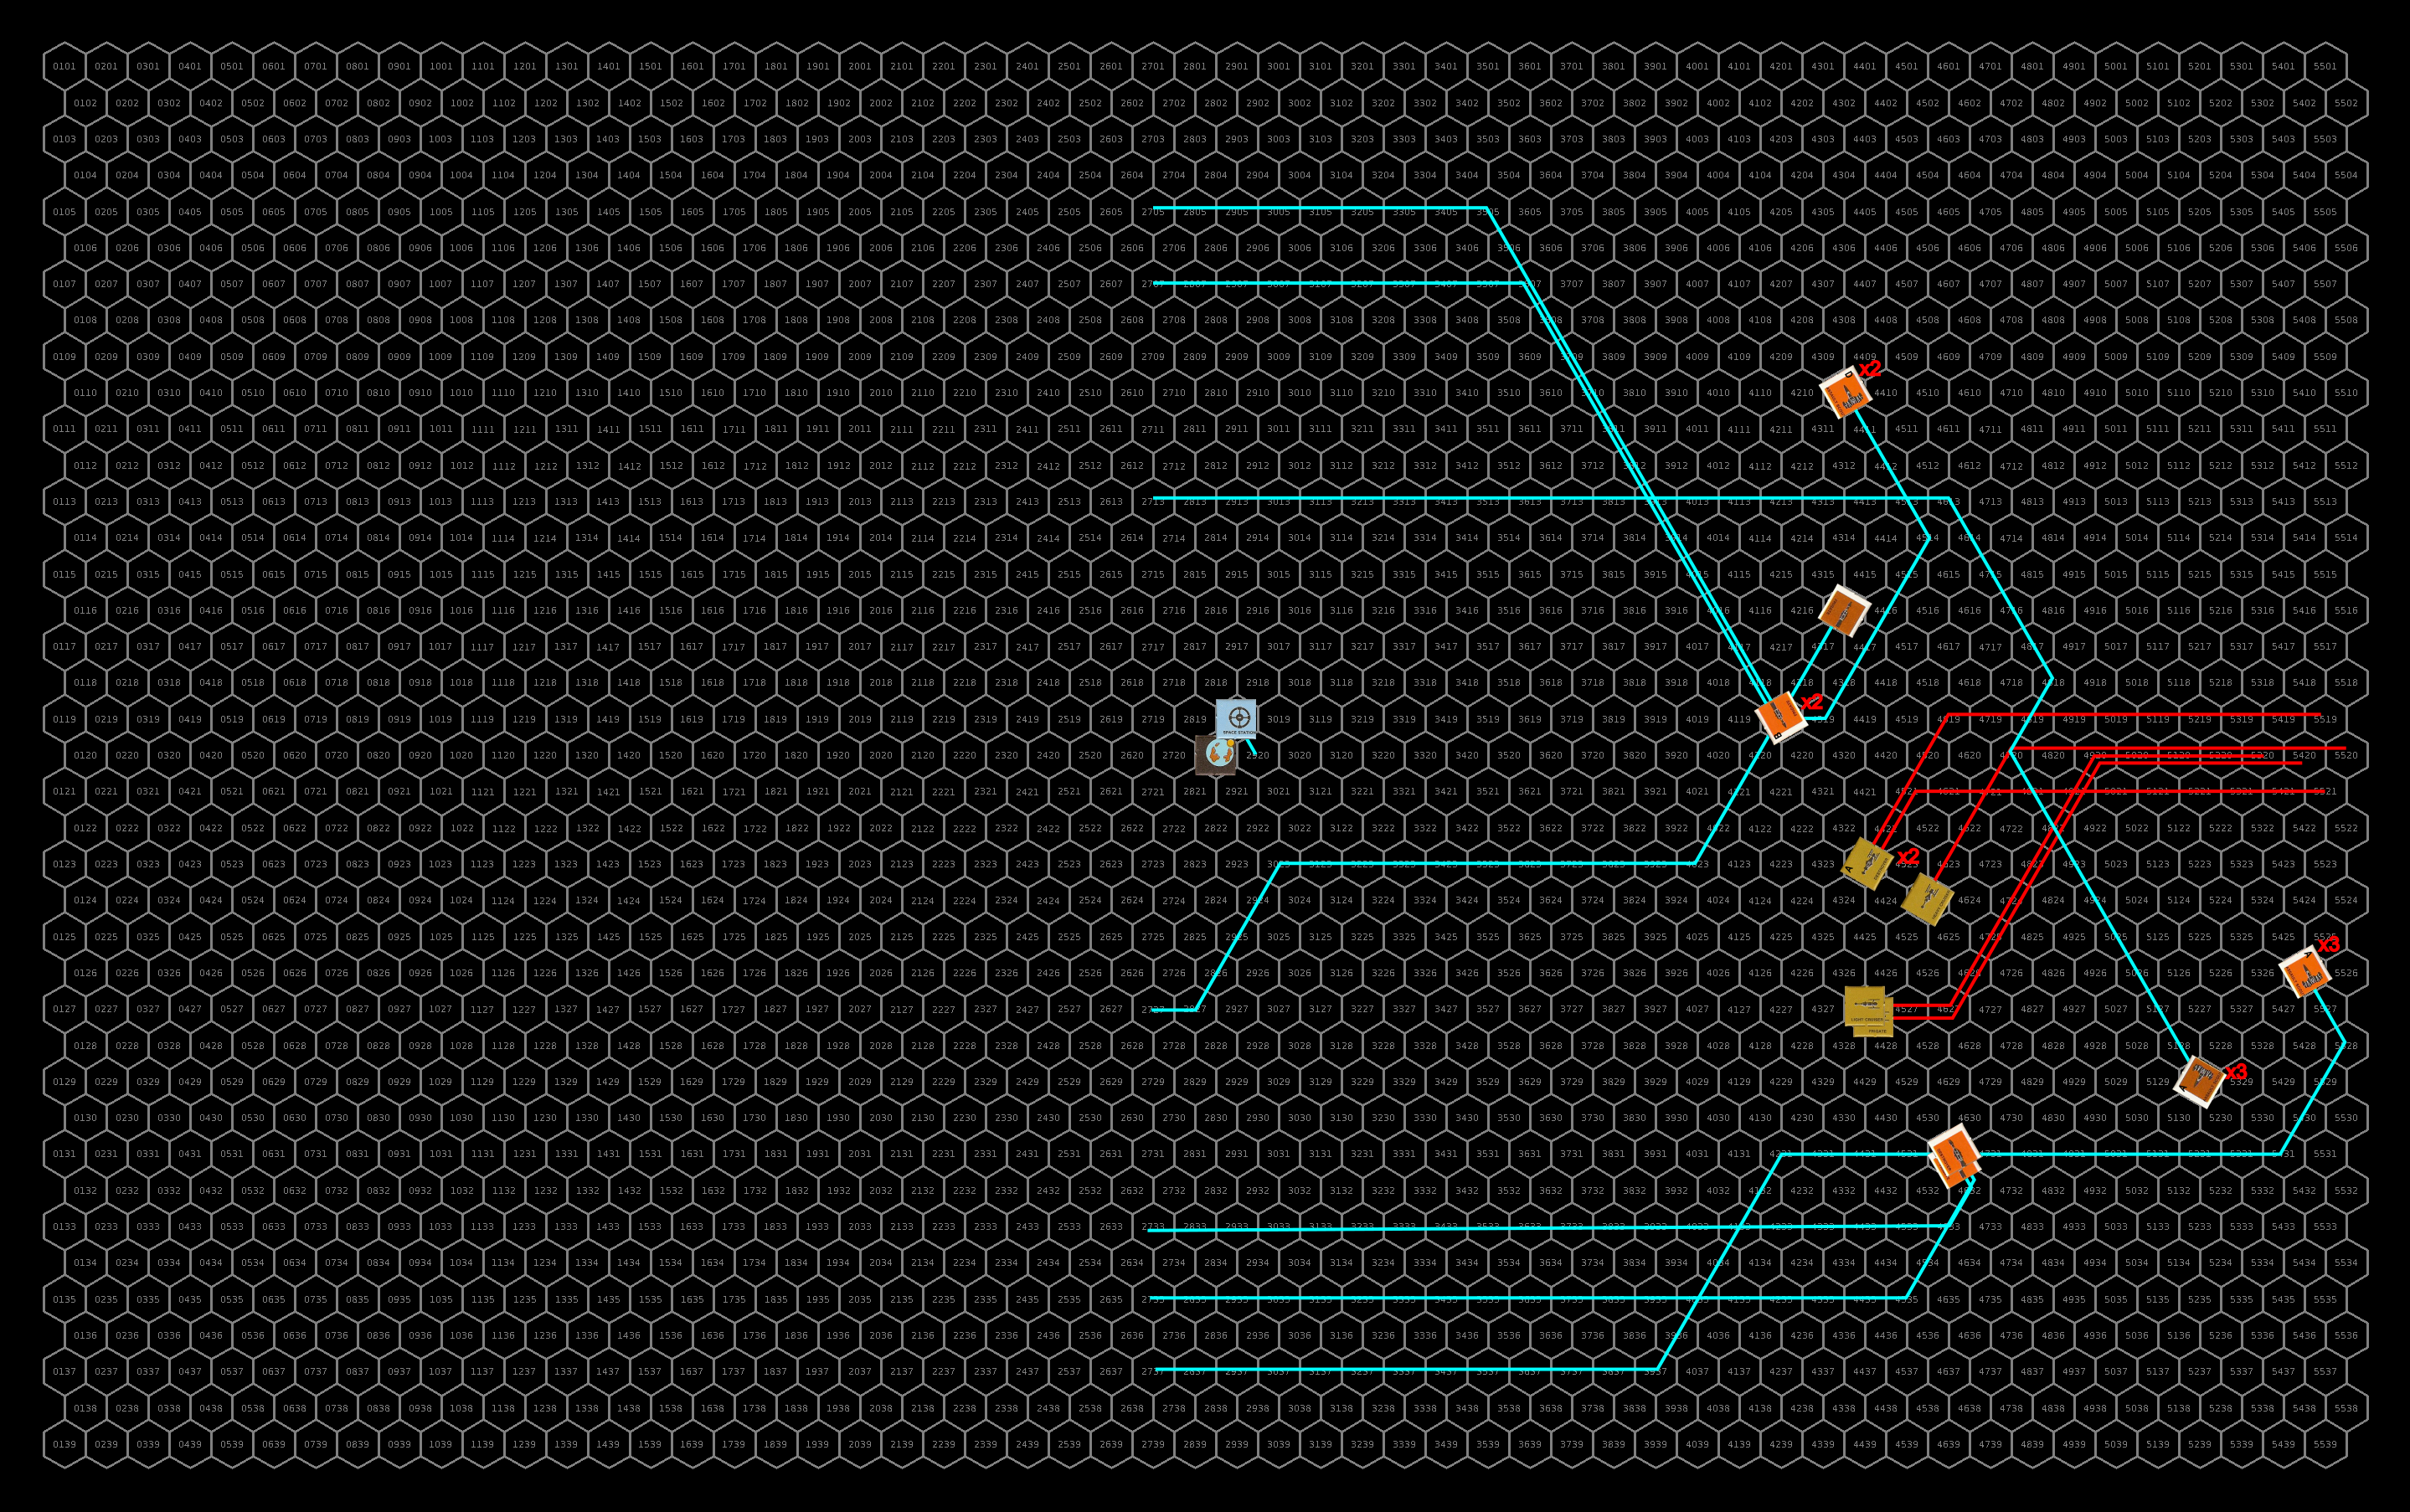
Turn 1
The sathar vessels accelerate and veer down to engage with the ships that are “below” the planet. However, due to the extreme range, no shots are fired.
The UPF sweep in closing in from both sides. The Outer Reach militia focuses on the two destroyers with the assault scouts making an assault rocket pass and then flying out of range of the sathar’s energy weapons while the frigates fly into torpedo range and keep their laser canons trained on the sathar vessels.
The Inner Reach militia converges on the sathar light cruiser, with the destroyer and frigate coming in from the aft port quarter and the assault scouts making a pass on the forward port quarter and then flying out of range to prepare for another pass.
The Terledrom assault scouts loop around and come in from behind to make a pass at the sathar heavy cruiser and then fly off. Trying to avoid a direct shot by the sathar frigate and light cruiser, the Terledrom frigate accelerates, rolls to port, and lines up for a shot on the sathar destroyers, electing to shoot at the same ones as the Inner Reach assault scouts.
Defensive fire by the sathar is practically ineffective with the only damage being the light cruiser’s electron battery which disables the ICM launcher on the Inner Reach destroyer.
The militia are much more effective.
The heavy cruiser is hit by 3 assault rockets damaging its combat control system and reducing its hull integrity by over half. One of the destroyers is hit by an assault rocket severely damaging it and reducing its hull integrity by nearly half. The other destroyer gets away nearly unscathed as both of the torpedoes fired at it are neutralized by its interceptor missiles (ICMs), only being scratched by a laser battery for minimal hull damage. The sathar light cruiser is hit by a torpedo, 2 assault rockets, and a laser battery taking out nearly half of its hull integrity and its ICM and torpedo launchers.
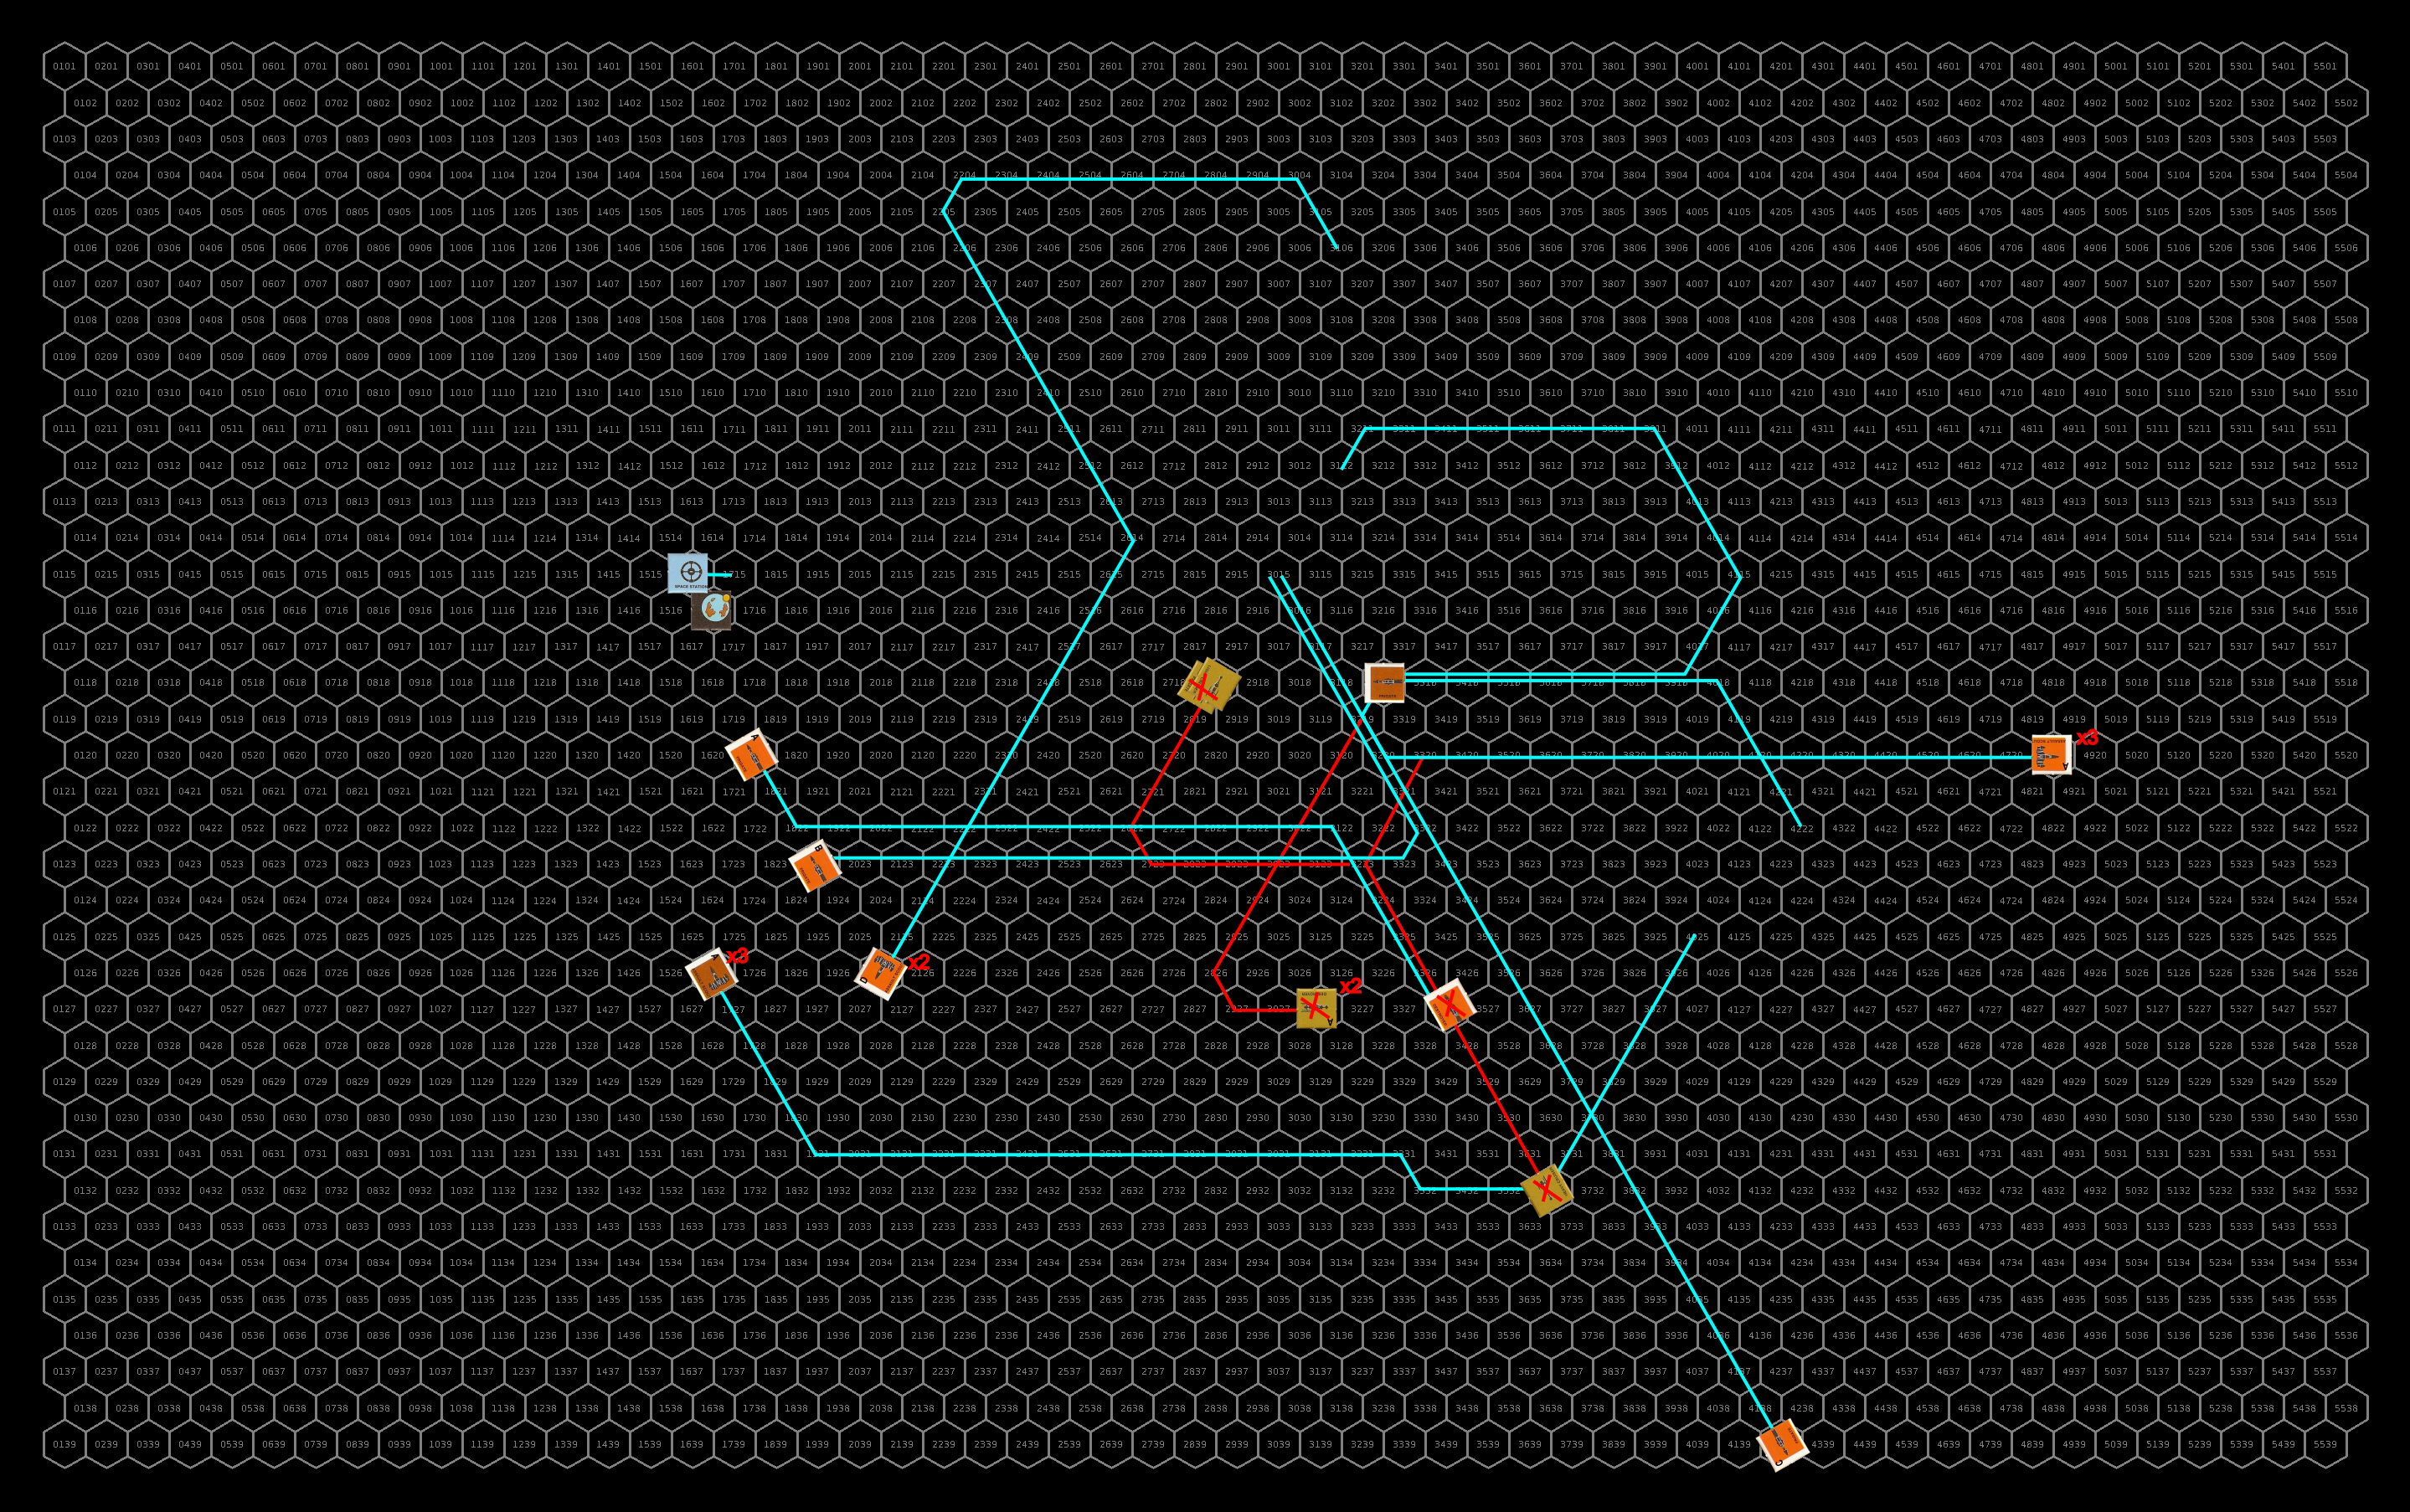
Turn 2
The sathar heavy cruiser turns to go after the Inner Reach frigate. The light cruiser and frigate turn to go after the Outer Reach frigates focusing all their fire on the leading one. The sathar destroyers swing around to go after the Inner Reach destroyer.
The defensive fire by the Inner Reach frigate and destroyer focuses on the sathar heavy cruiser and is devastating – hitting it with both laser batteries, both laser cannons, and a rocket battery knocking out the cruiser’s distruptor cannon before completely destroying the massive ship. The Outer Reach frigates are not quite as effective. Firing their laser canons at the lead sathar destroyer they only knock out its laser battery, The other weapons are fired at the frigate as it approaches and only do some minor hull damage even though they hit with two rocket batteries.
The sathar destroyers are quite effective hitting the Inner Reach destroyer with a laser cannon and two torpedoes which don’t have to worry about a screen of ICMs as the militia’s ICM launcher was damaged. The torpedos completely destroying the militia destroyer. Similarly, the sathar frigate and light cruiser focus their fire on the the lead Outer Reach frigate hitting it with a laser and distruptor cannon and a rocket battery knocking out all of its defensive systems and 75% of it’s hull integrity.
The Terledrom assault scouts loop around to fire at the lightly damaged destroyer. The Inner Reach assault scouts make a run on the sathar light cruiser. The Outer Reach frigates fire at the damaged sathar destroyer and the frigate with the heavily damaged one just drifting away from the battle as it fires. The Inner Reach frigate splits its fire using its laser cannon on the light cruiser and the other weapons at the damaged destroyer. The Terledrom frigate also loops around to fire at the light cruiser. The Outer Reach assault scouts loop around to fire at the frigate.
The sathar’s defensive fire is again mostly ineffective. The undamaged Outer Reach frigate is hit by several energy weapons from the frigate and light cruiser damaging its engines (both accelerating and maneuvering) and doing some significant hull damage (about 40% of the hull). The sathar destroyers fire at the Inner Reach frigate knocking out its ICM and torpedo launchers.
The return fire from the militia obliterates the last four sathar vessels. The frigate is hit by a rocket battery, two assault rockets, and two laser batteries knocking out its laser battery and doing enough hull damage to destroy a heavy cruiser. The damaged sathar destroyer is hit by a laser canon igniting an electrical fire and then a torpedo makes it through the ICM screen and hits a weapon magazine causing a massive explosion that destroys the ship. The undamaged destroyer is slammed by three different assault rockets that rip it to shreds (and a laser battery that knocks out some of its acceleration). Finally the light cruiser is hit by a laser battery starting a fire and then slammed by 3 assault rockets that rip its hull to pieces.
The savagery of the assault rocket damage surprised even the militia crews and the battle was over in less than 20 minutes.
Repairs
The damaged ships immediately begin working on battle repairs but the hull damage to the second Outer Reach frigate is beyond space repairs and needs to be completed in a shipyard. Similarly for the damage to that ship’s thrust. The other Outer Reach frigate is able to repair enough hull damage to prevent it from breaking up as it begins to maneuver and decelerate to return to the planet but it too will need time in the repair yards. The other ships are able to repair their minor damage over the next 2.5 hours.
Lessons Learned
I’ll admit, I expected this fight to go a bit longer and cause more damage to the militia. Between really good rolls for the militia and lousy rolls for the sathar, this fight was amazingly short.
Both sides leaned just how effective the assault rockets could be, especially if you roll well. The sathar seem to focus their ICMs on deflecting torpedoes but not the assault rockets which can do significant damage. Unfortunately for the other sathar fleets, this lesson was learned a little too late as all the sathar ships were obliterated in a single round and there was no time to transmit that information out. It wouldn’t have affected the other battles occurring today, but may have been useful for future encounters.
The sathar also learned (again) that they should probably focus on the smaller vessels to reduce that assault rocket threat. That information was transmitted from the Battle of Stenmar but the commanders of this battle fleet seems to have ignored it, focusing on the larger vessels first.
The militia were extremely lucky in this fight. It could have gone much worse. I rolled really bad for most of the sathar defensive fire which could have eliminated some militia ships before they could fire and the dice were extremely hot for the militia with double damage being generated for 6 assault rockets, 1 laser canon, 1 laser battery, and 1 torpedo. Even some of the regular damage rolls were really high (a torpedo hitting for 26 HP, laser batteries hitting for 9 & 10 HP, a RB hitting for 16 HP, and assault rockets hitting for 19 and 21 HP). Plus they took out the heavy cruiser before it even had a chance to deploy its more effective weapons. It only got one round of defensive fire and missed with everything.
On to the next battle being reported tomorrow.
One thought on “Battle of Terledrom (Fromeltar) – FY61.285”