In a short, high-speed battle around New Pale today, the invading sathar forces were destroyed or driven off by the militia and the augmented Strike Force Nova.
The victory was not with out cost, however, as both UPF battleships were destroyed in the fighting, along with one of the UPF fighters. While the sathar losses were much higher, we mourn the loss of the crews of those ships
Goolar Nadd, New Pale News
Background
With the arrival of Task Force Relief (battleship, assault carrier, and 10 fighters) and its merger with Strike Force Nova, the UPF and Truane’s Star militia outgun the invading sathar fleet nearly two to one. Despite these odds, the sathar continue on to engage the UPF forces although they aim for New Pale instead of Pale to avoid the UPF Fortress at that world.
Order of Battle
Pale Militia
- Armed Station
- 1 Assault Scout
- 1 Frigate
Strike Force Nova
- 17 Fighters
- 3 Assault Scouts
- 3 Frigates
- 1 Destroyer
- 3 Light Cruisers
- 2 Assault Carriers
- 2 Battleships
Sathar
- 8 Fighters
- 1 Cutter
- 2 Frigates
- 2 Destroyers
- 1 Light Cruiser
- 1 Assault Carrier
- 2 Heavy Cruisers
The Battle
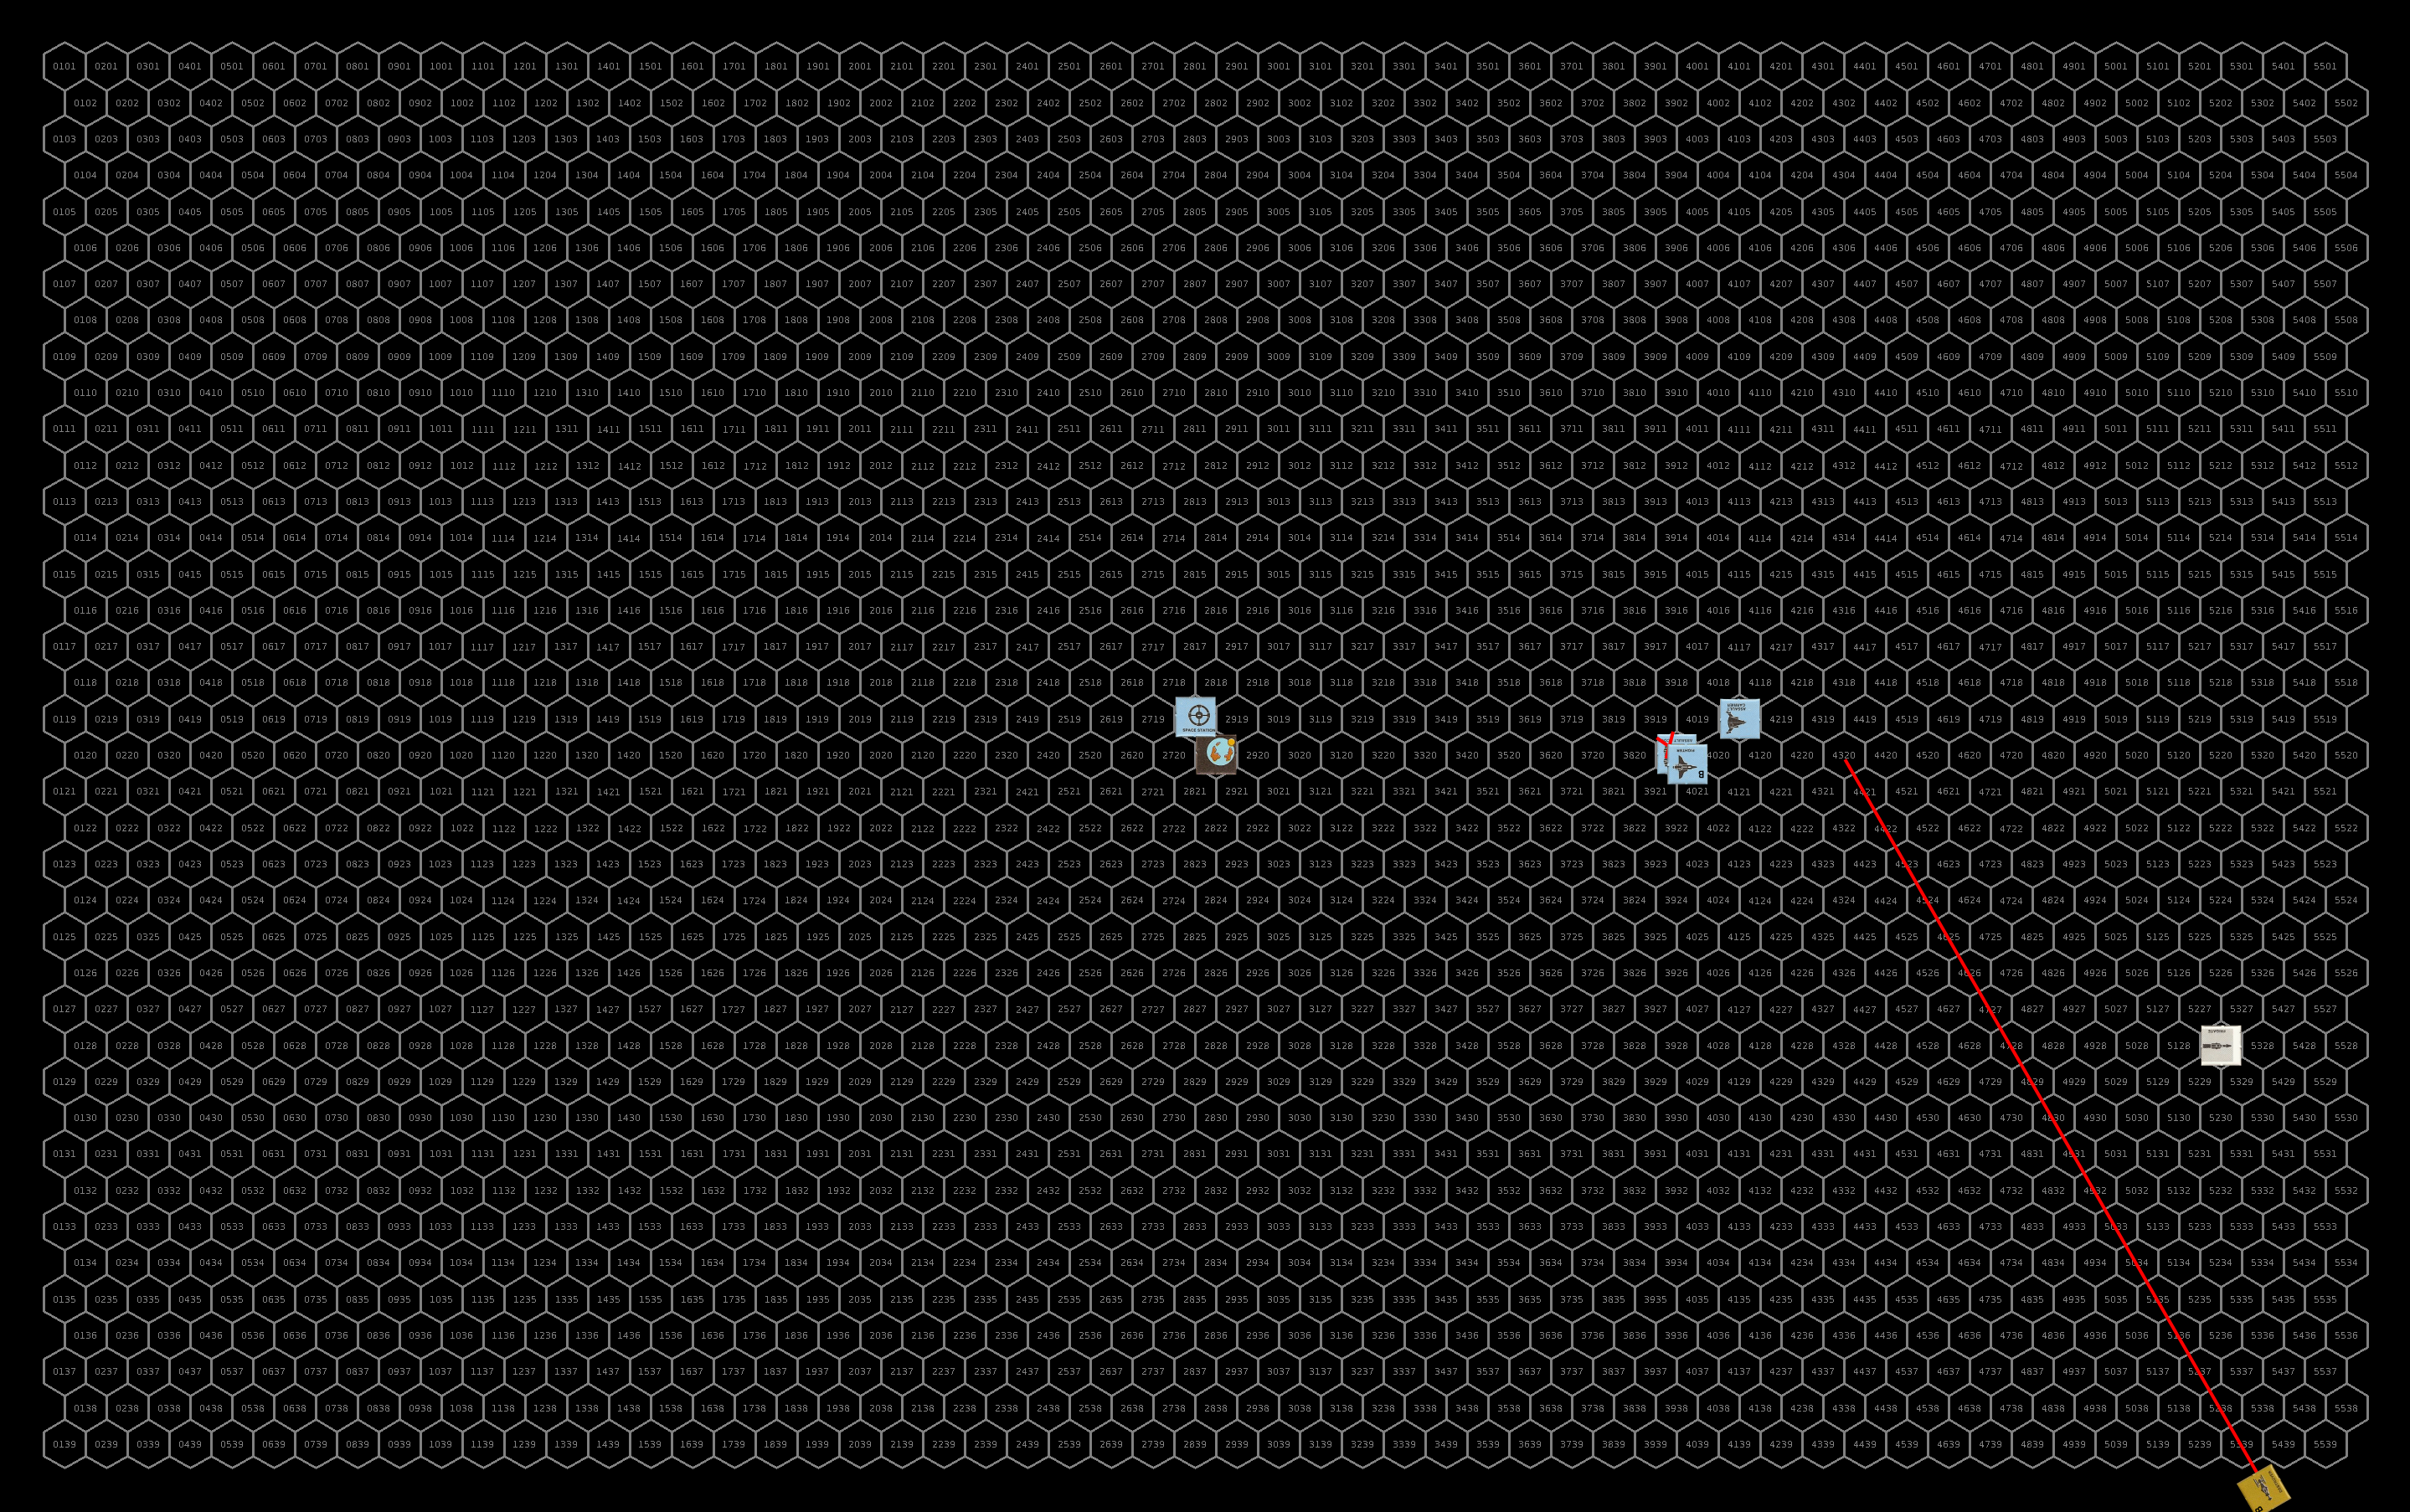
Setup
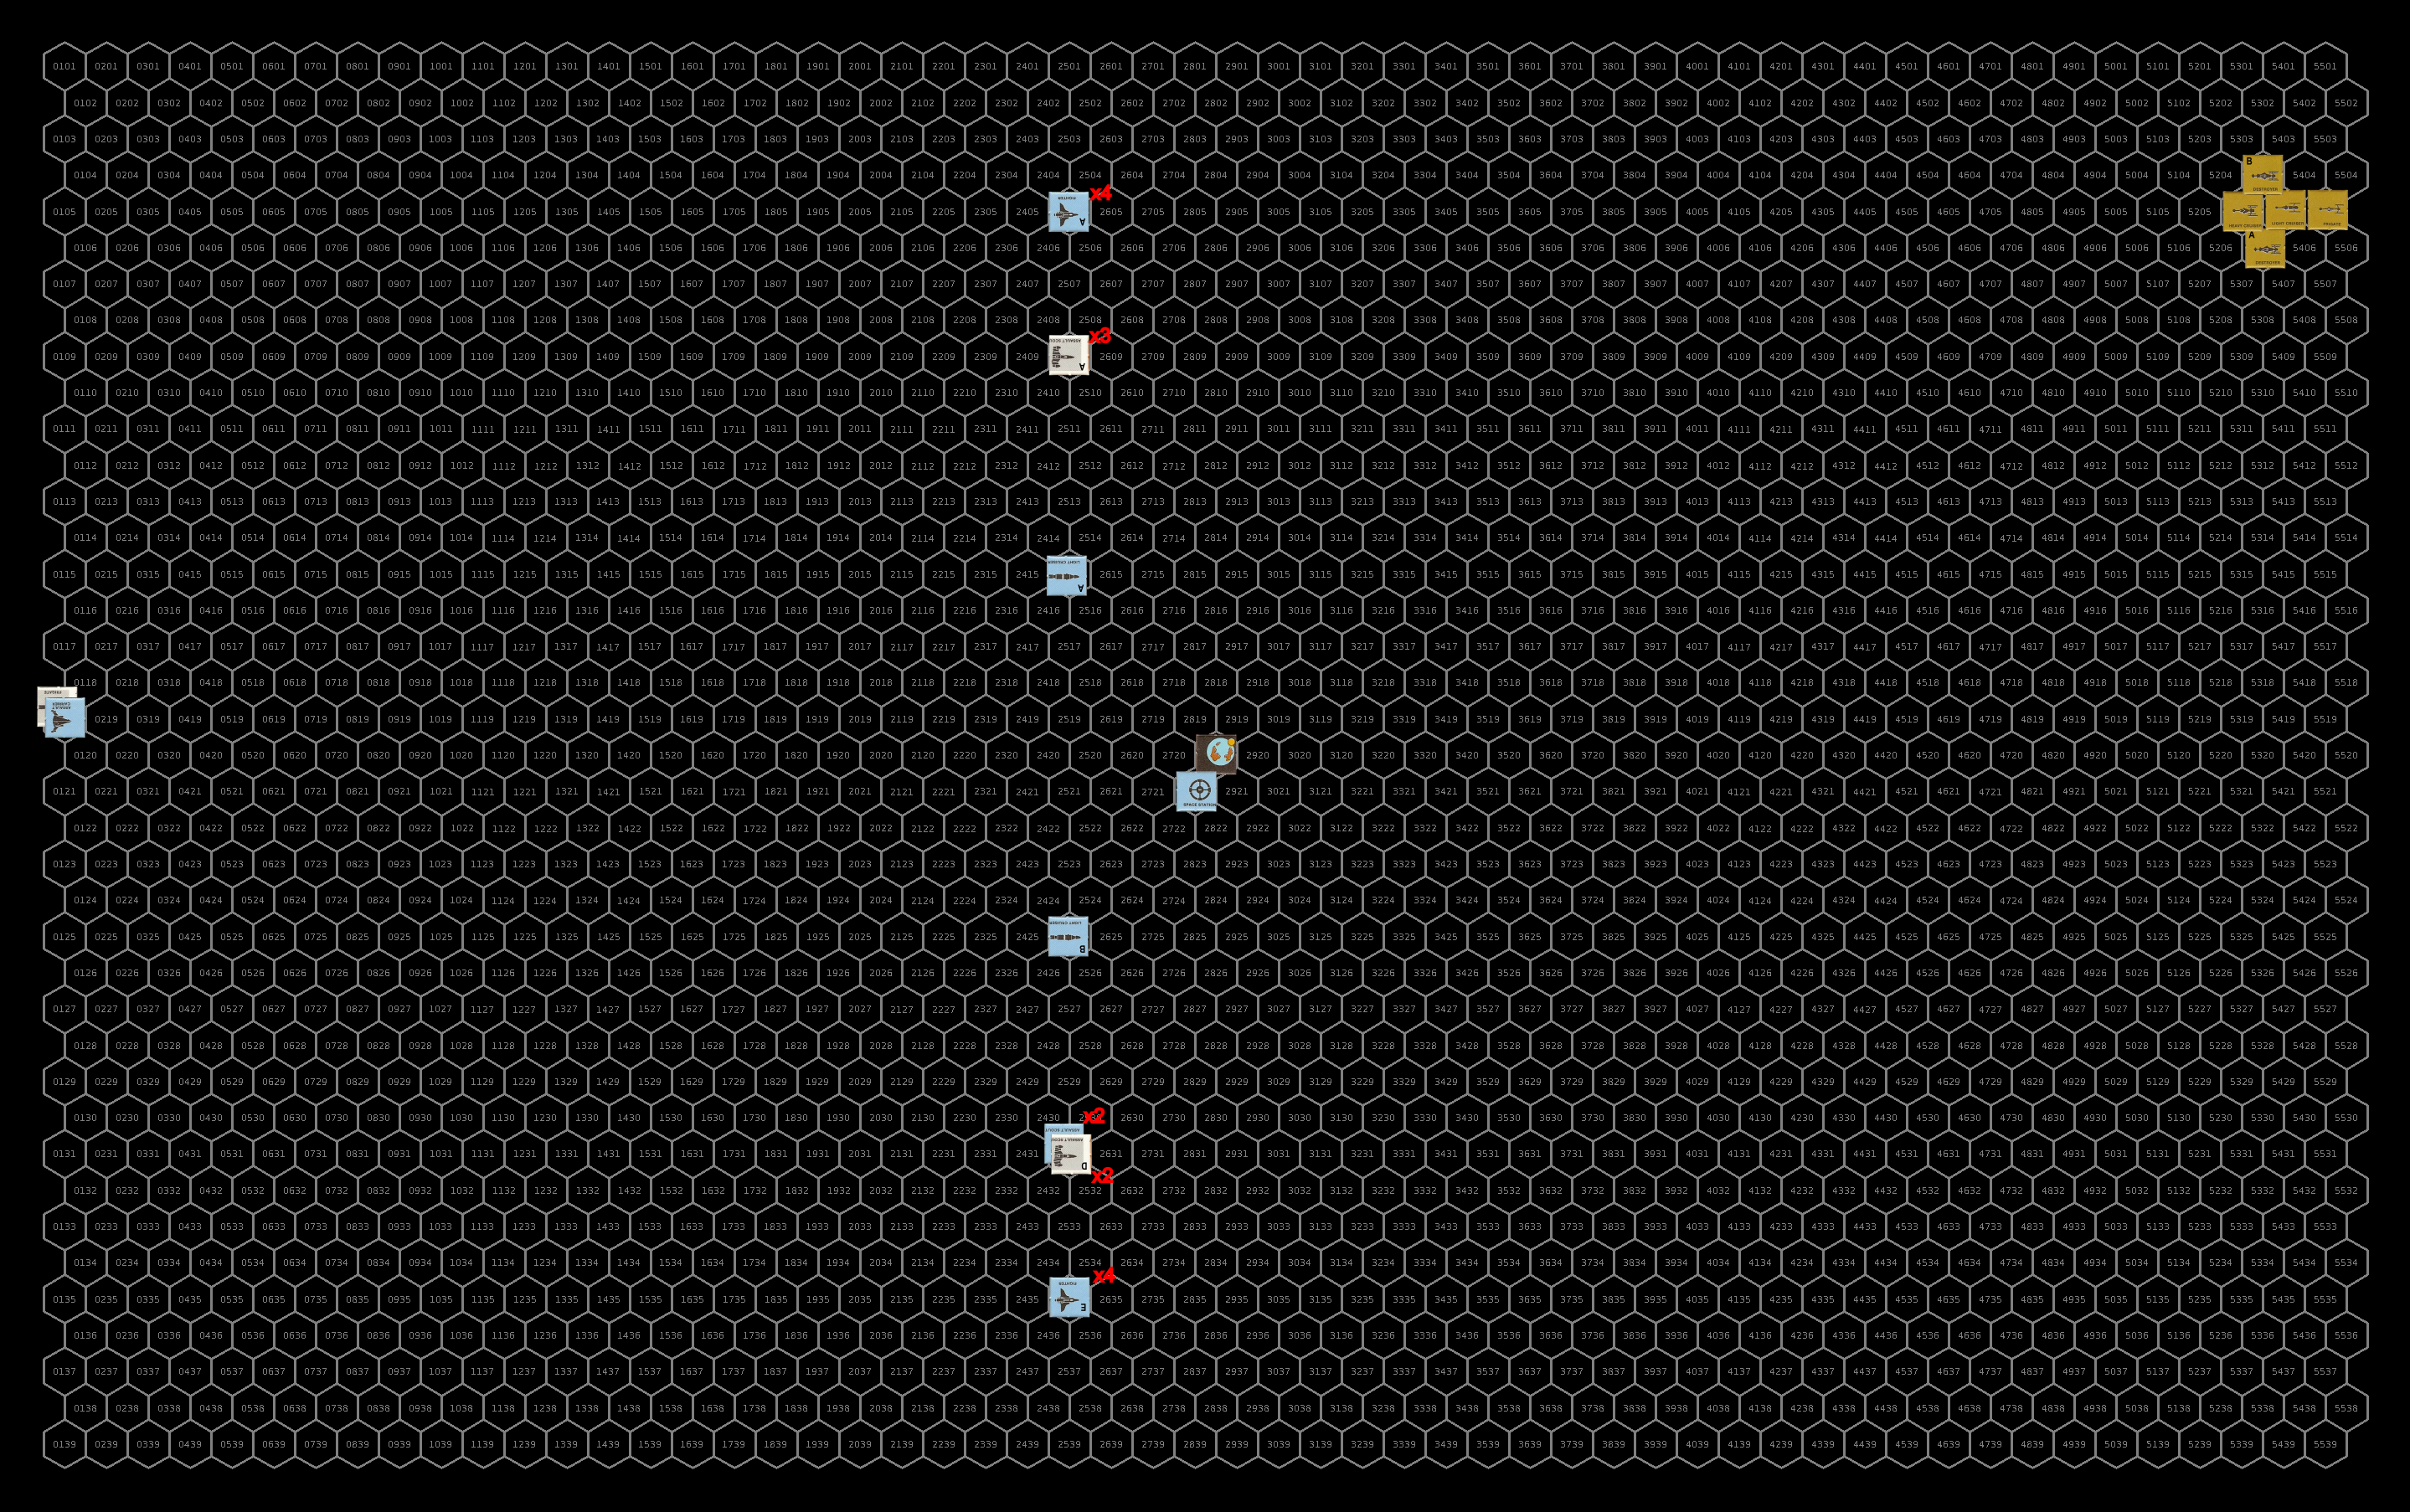
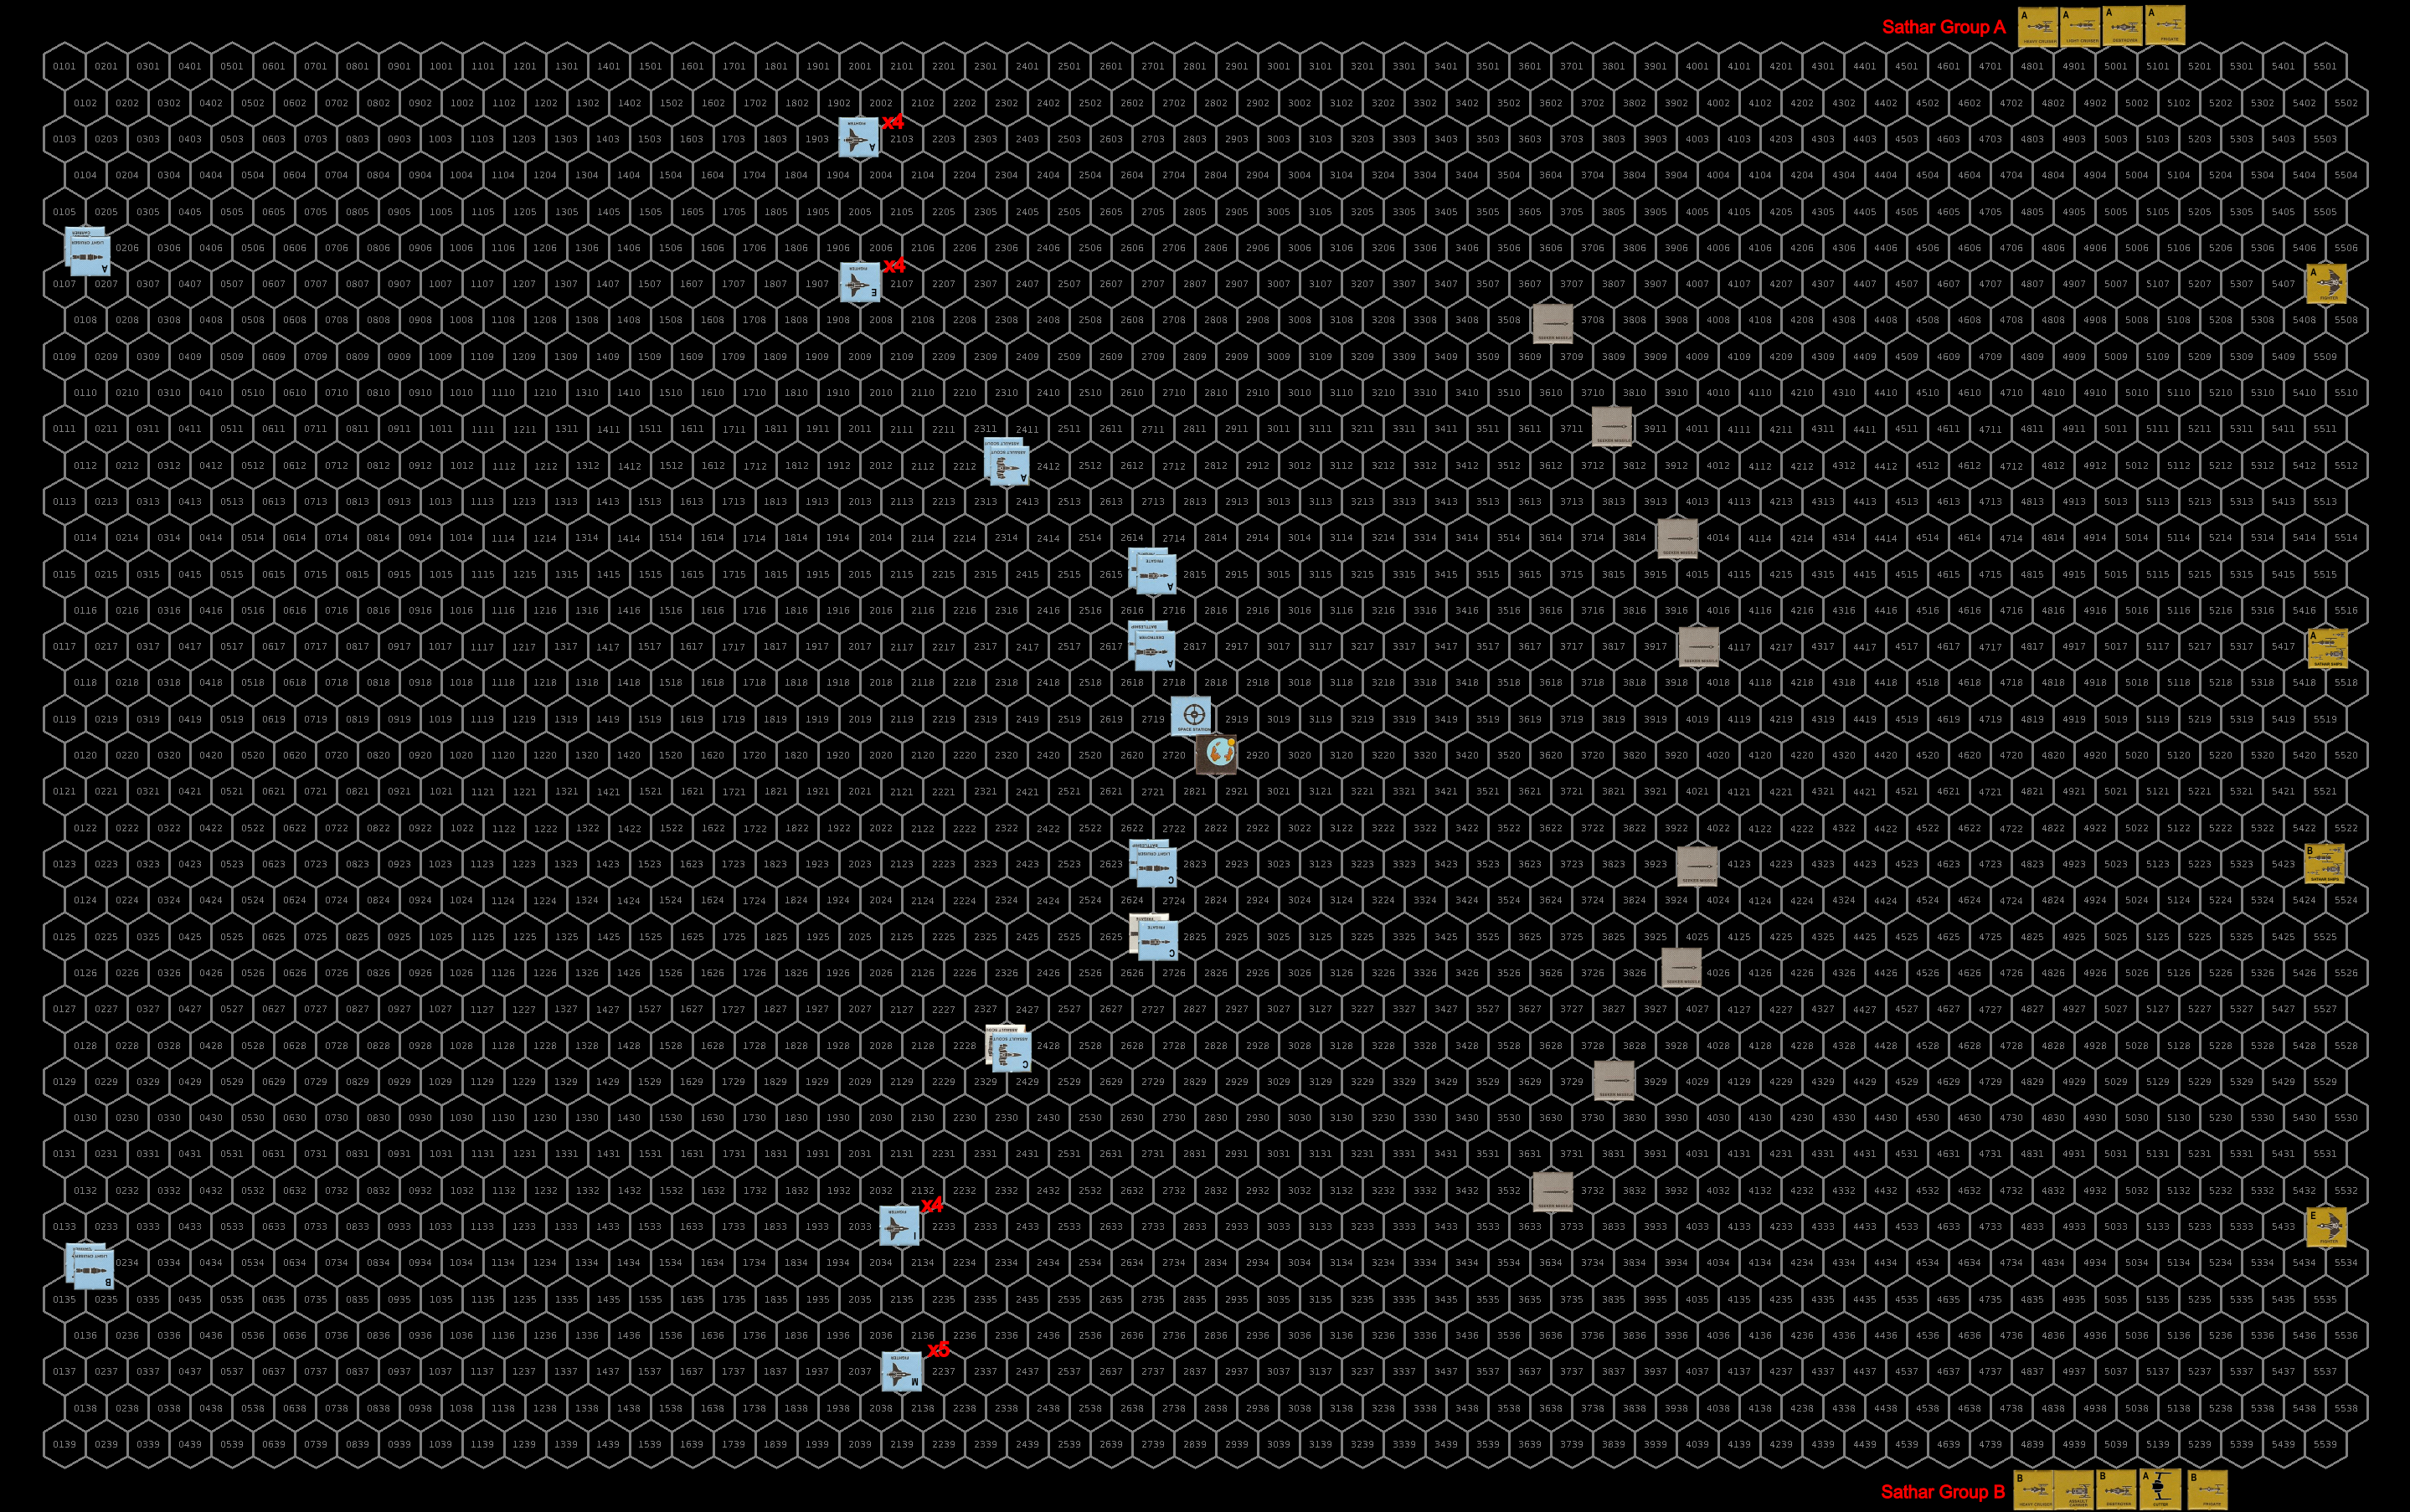
Expecting the sathar to make a run at the station as they have in other systems (and in the battle here over a month ago), the UPF position the battleships on either side of the planet, one supported by a destroyer and the other a light cruiser. Out from the battleships is a pair of frigates on each side with a pair of assault scouts out and slightly back from the frigates. There are two wings of fighters beyond and a bit back from each pair of assault scouts. The assault carriers, each escorted by a light cruiser, are far back from the planet. The capital ships and assault scouts are all moving at speed 15, the assault scouts are at speed 20, and the fighters are at speed 30. The eight seeker missiles from the two battleships are arrayed in an arc around the planet.
The sathar, recognizing that they are not going to win this fight, are planning a high speed pass hoping to take out the UPF battleships and assault carriers and then escaping the system. They line up in two groups directly opposite the battleships. The upper group is comprised of a heavy and light cruiser, a destroyer, and a frigate while the lower group is composed of a heavy cruiser, the assault carrier and cutter, and a destroyer and frigate. The fighters are divided into two flights of four, one on each wing. All of the sathar vessels come in much faster than the UPF expected and are moving at speed 35.
Turn 1
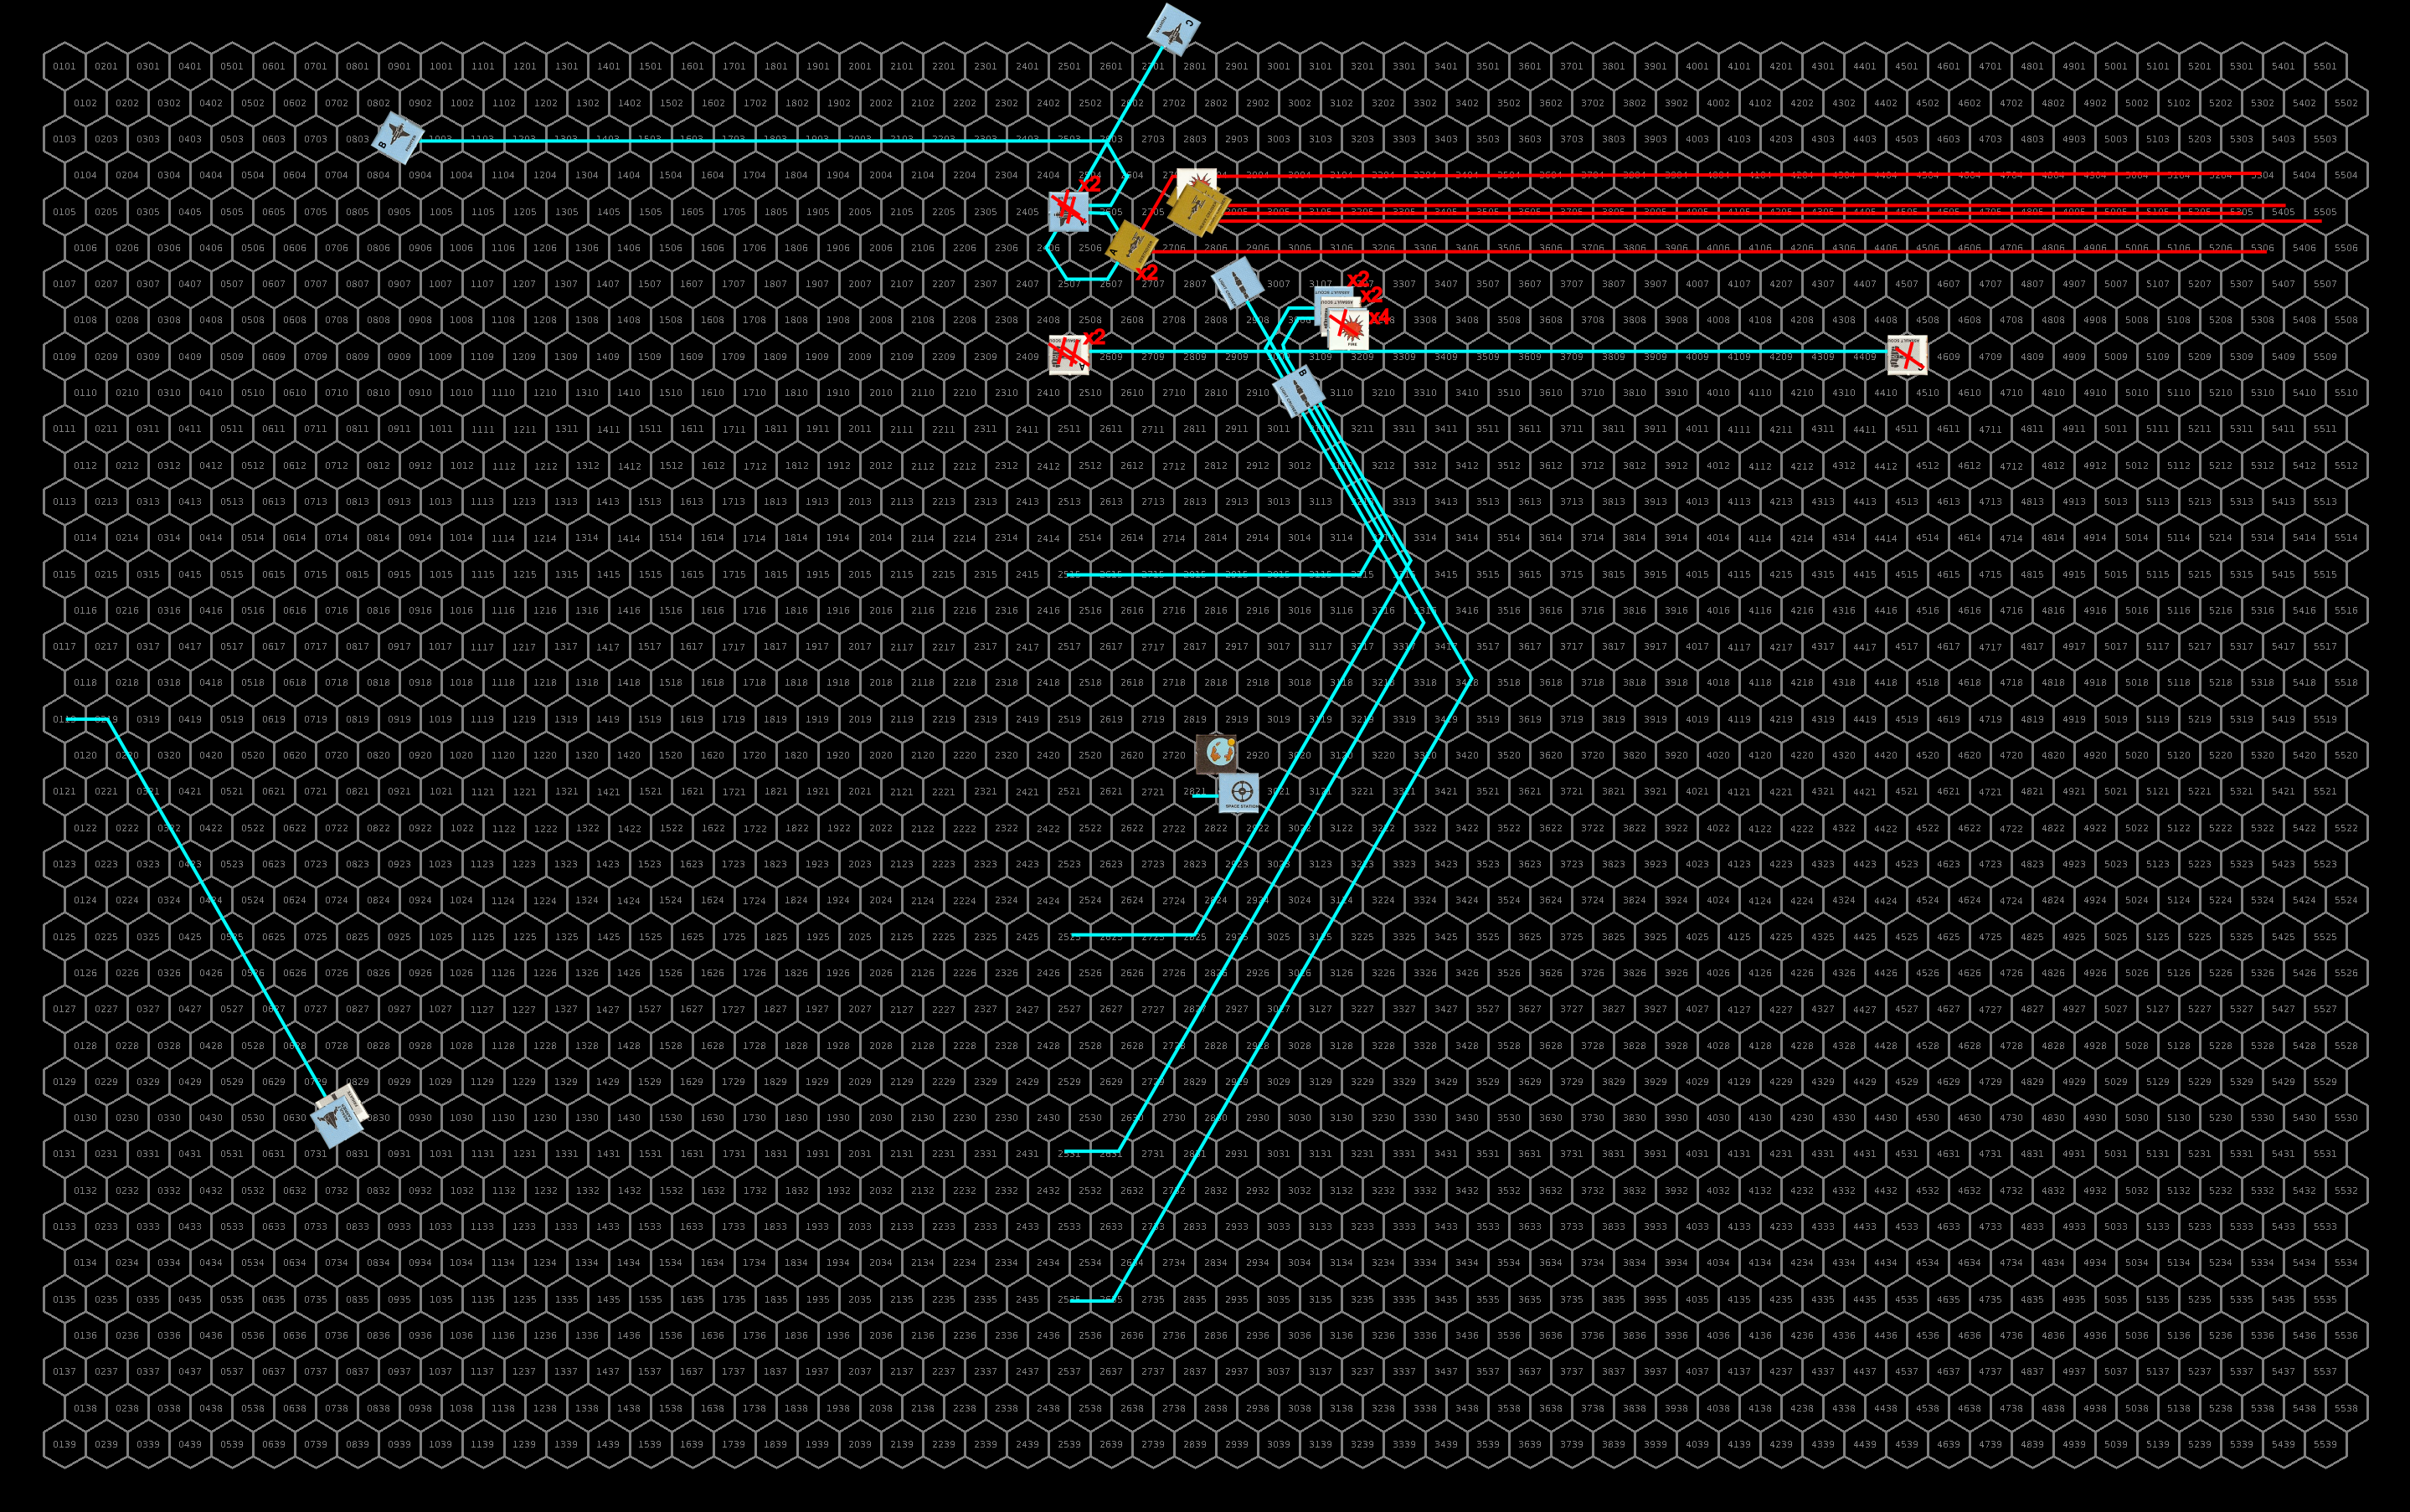
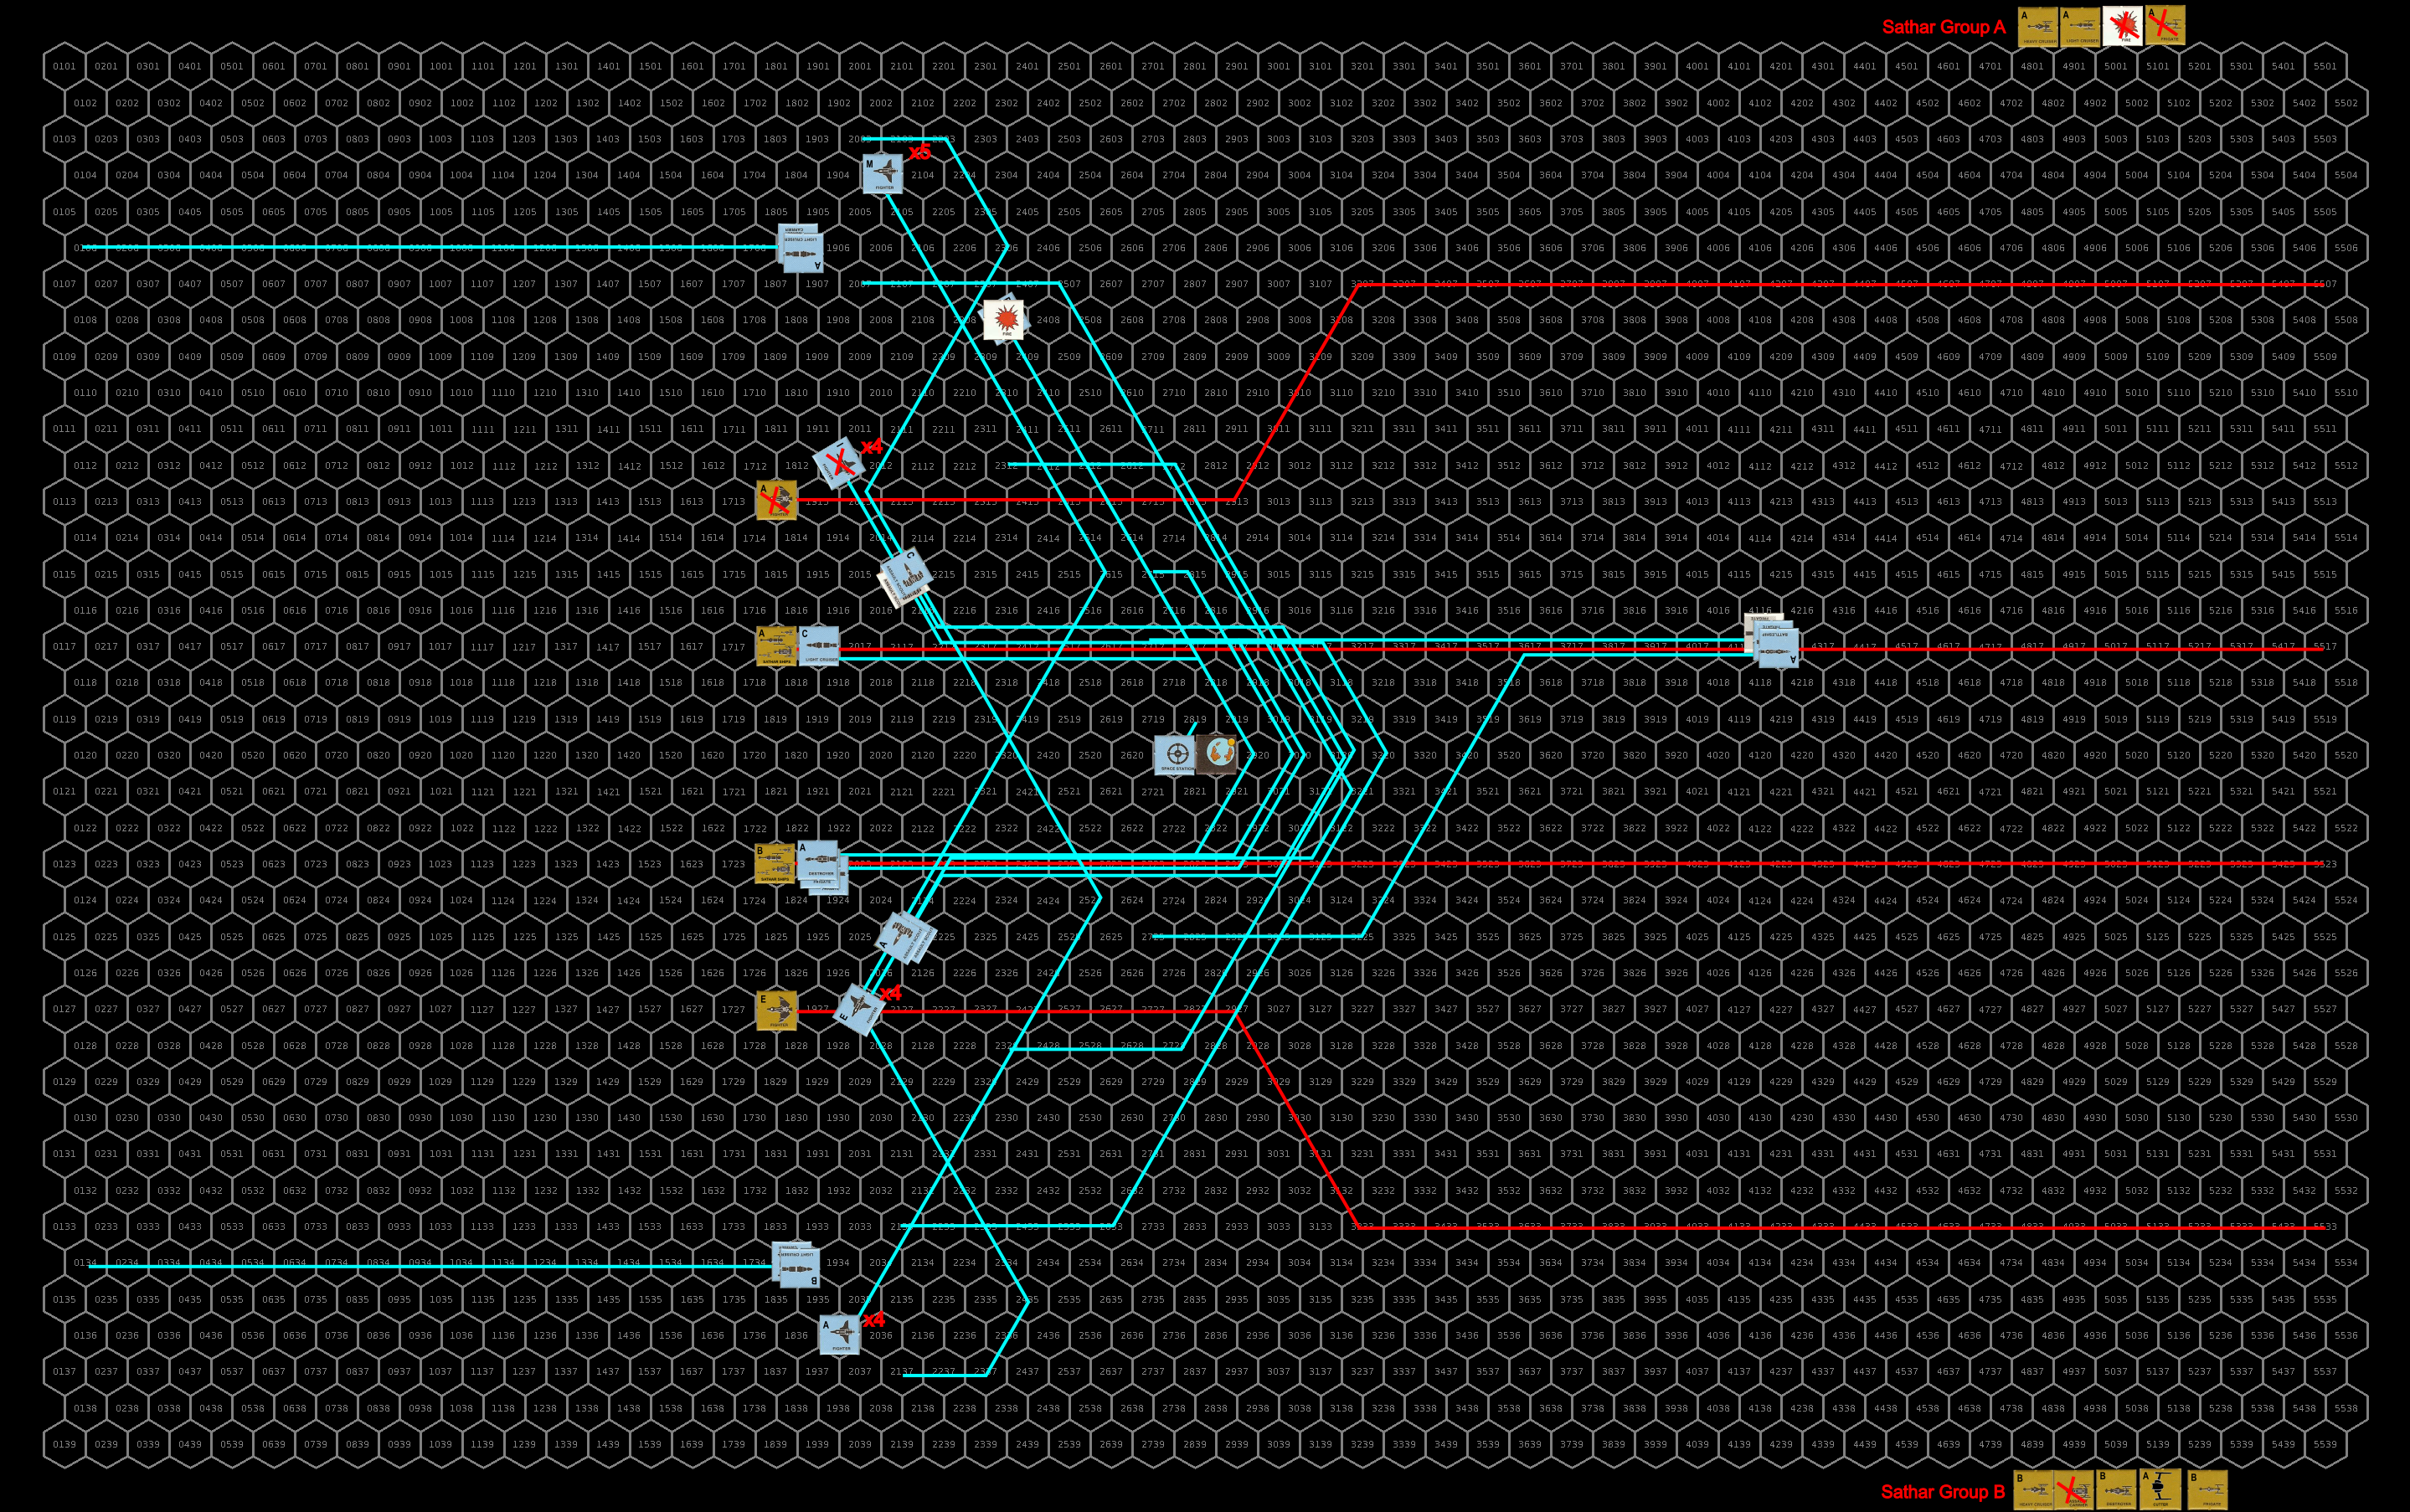
The sathar capital ships accelerate to speed 37 and fly straight at and past the UPF battleships. The fighters accelerate to speed 40 turning in to fire at the battleships as well.
Defensively the assault scouts and frigates fire their laser batteries at the fighters and the frigates fire their rocket batteries at their sathar counterparts in each group. The battleship and destroyer in the upper group, along with the station, fire at the sathar destroyer, while the battleship and light cruiser in the lower group fire at the assault carrier.
The defensive fire at the sathar fighters is fairly ineffective, slightly damaging the engines on three fighters and knocking the hull integrity down to 38% on two others. However, none are destroyed and all are able to fire their assault rockets at the battleships.
The sathar frigate in the upper group is hit by a rocket battery knocking out 30% of its hull while the sathar frigate in the lower group is hit by two rocket batteries knocking out its laser battery and slightly damaging its maneuvering.
The destroyer in the upper group is pummeled by the UPF destroyer and battleship being hit with 2 laser batteries, 3 electron batteries, a proton battery, a rocket battery and the cannons from both ships. In the end, it has it defenses knocked off-line, its electron battery and engines knocked out, a hit to its combat controls system, its hull integrity reduced by 68%, and a fire breaks out on-board.
The assault carrier in the lower group doesn’t fare much better. It is hit by 2 laser batteries, an electron battery, 2 proton batteries, a disruptor cannon and a rocket battery. It loses its laser battery and 65% of its hull integrity.
The sathar unload all of their weapons at the battleship they fly over with the battleships firing 3 ICMs at each incoming torpedo.
The Admiral Clinton (upper battleship) is hammered. All 4 assault rockets from the fighters hit knocking out its engines and maneuvering capability and reducing its hull integrity by 22%. The sathar frigate hits it with its laser cannon knocking out the battleship’s disruptor cannon. The sathar destroyer hits with its laser cannon, rocket battery, and a torpedo that slipped through the ICM screen knocking out the battleship’s torpedo and ICM launchers and knocking the hull integrity down another 16%. The sathar light cruiser lands a series of hull hits with its disruptor cannon and electron and rocket batteries reducing the battleships hull by another 28%. Finally, the sathar heavy cruiser hits with its laser, electron, and proton batteries as well as its disruptor cannon knocking out the battleship’s proton screen, damaging its combat control system and reduces its hull integrity by another 28%. In the end, the Admiral Clinton has only 6% of its hull integrity left.
The sathar is the lower group were not as effective firing on the new UPF battleship, the Admiral R’kazk’tar. Only one of the four assault rockets connect knocking out the battleship’s disruptor cannon while the cutter misses completely. The sathar frigate hits with everything but its torpedo knocking out the battleship’s torpedo and ICM launcher and knocking half of its engines off-line. The sathar destroyer hits will everything expect its torpedo inducing an on-board fire and knocking out 35% of the battleship’s hull integrity. The sathar assault carrier scores a minor (<2%) hull hit with its laser battery while the sathar heavy cruiser only hits with it’s laser battery and disruptor cannon cutting the battleship’s maneuvering in half and knocking the hull integrity down another 13%.
Each sathar heavy cruiser deploys a single seeker missile, about 40,000 km behind their final positions where they expect the UPF to end the movement to fire their torpedoes at maximum range.
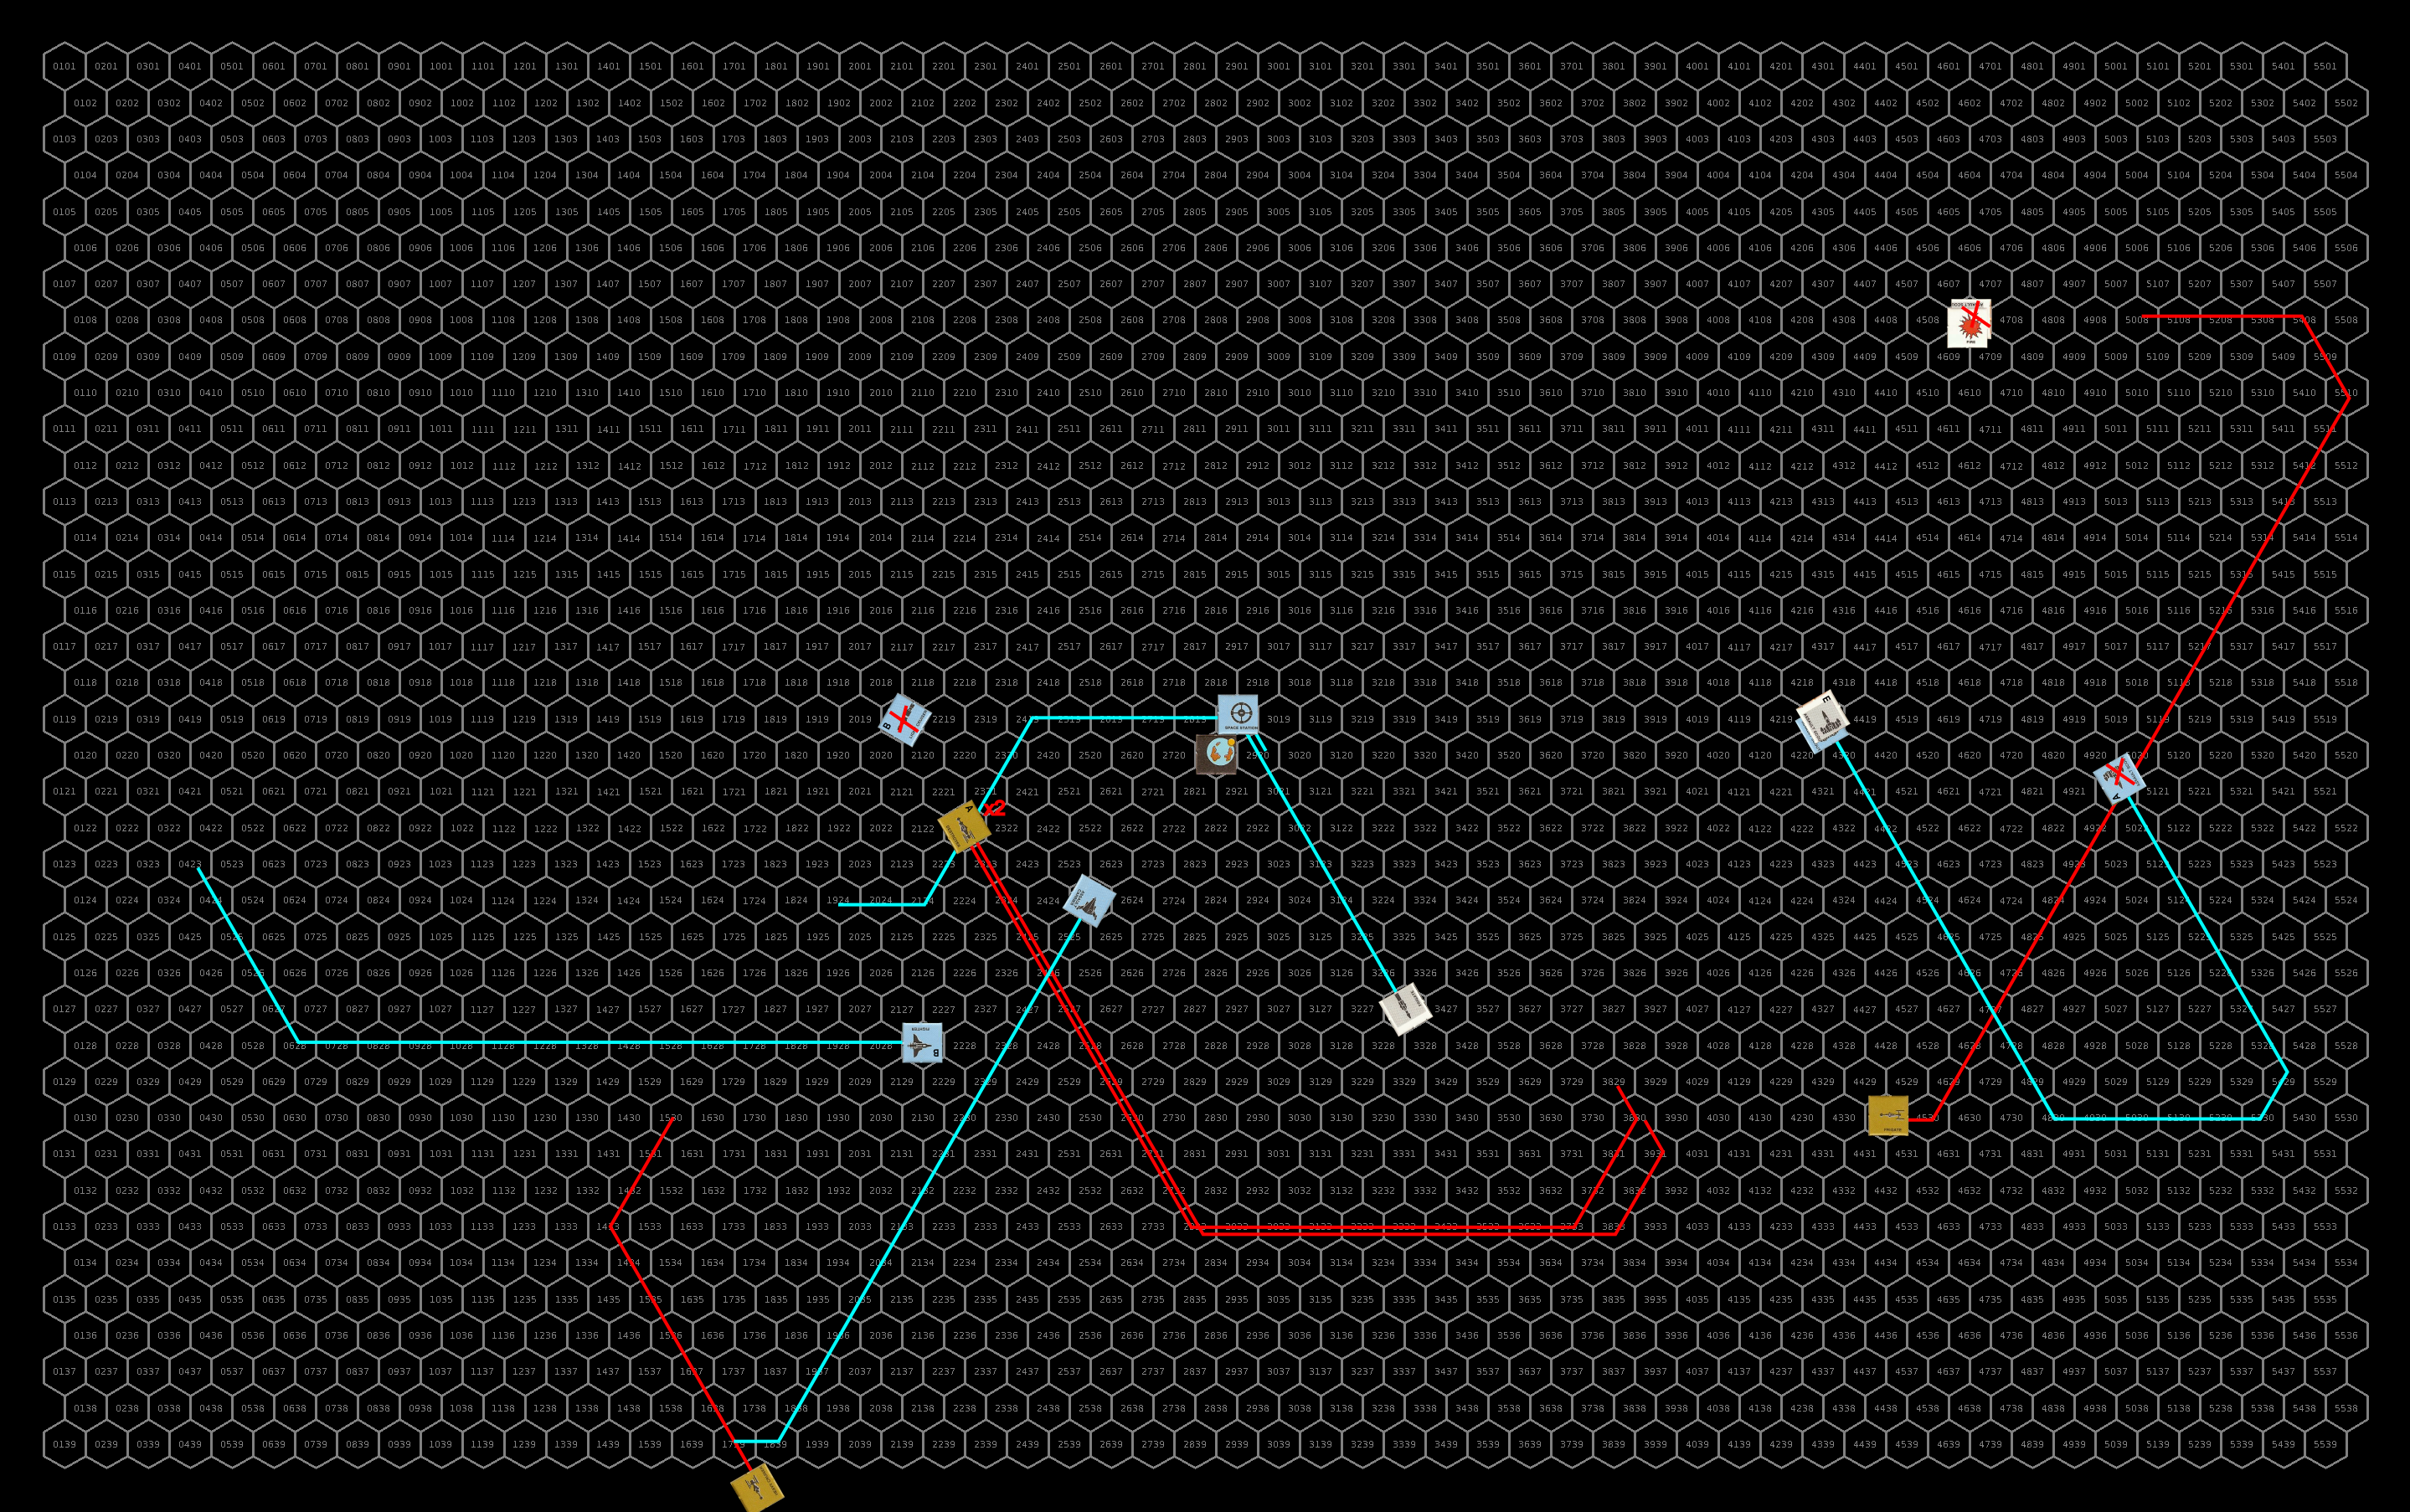
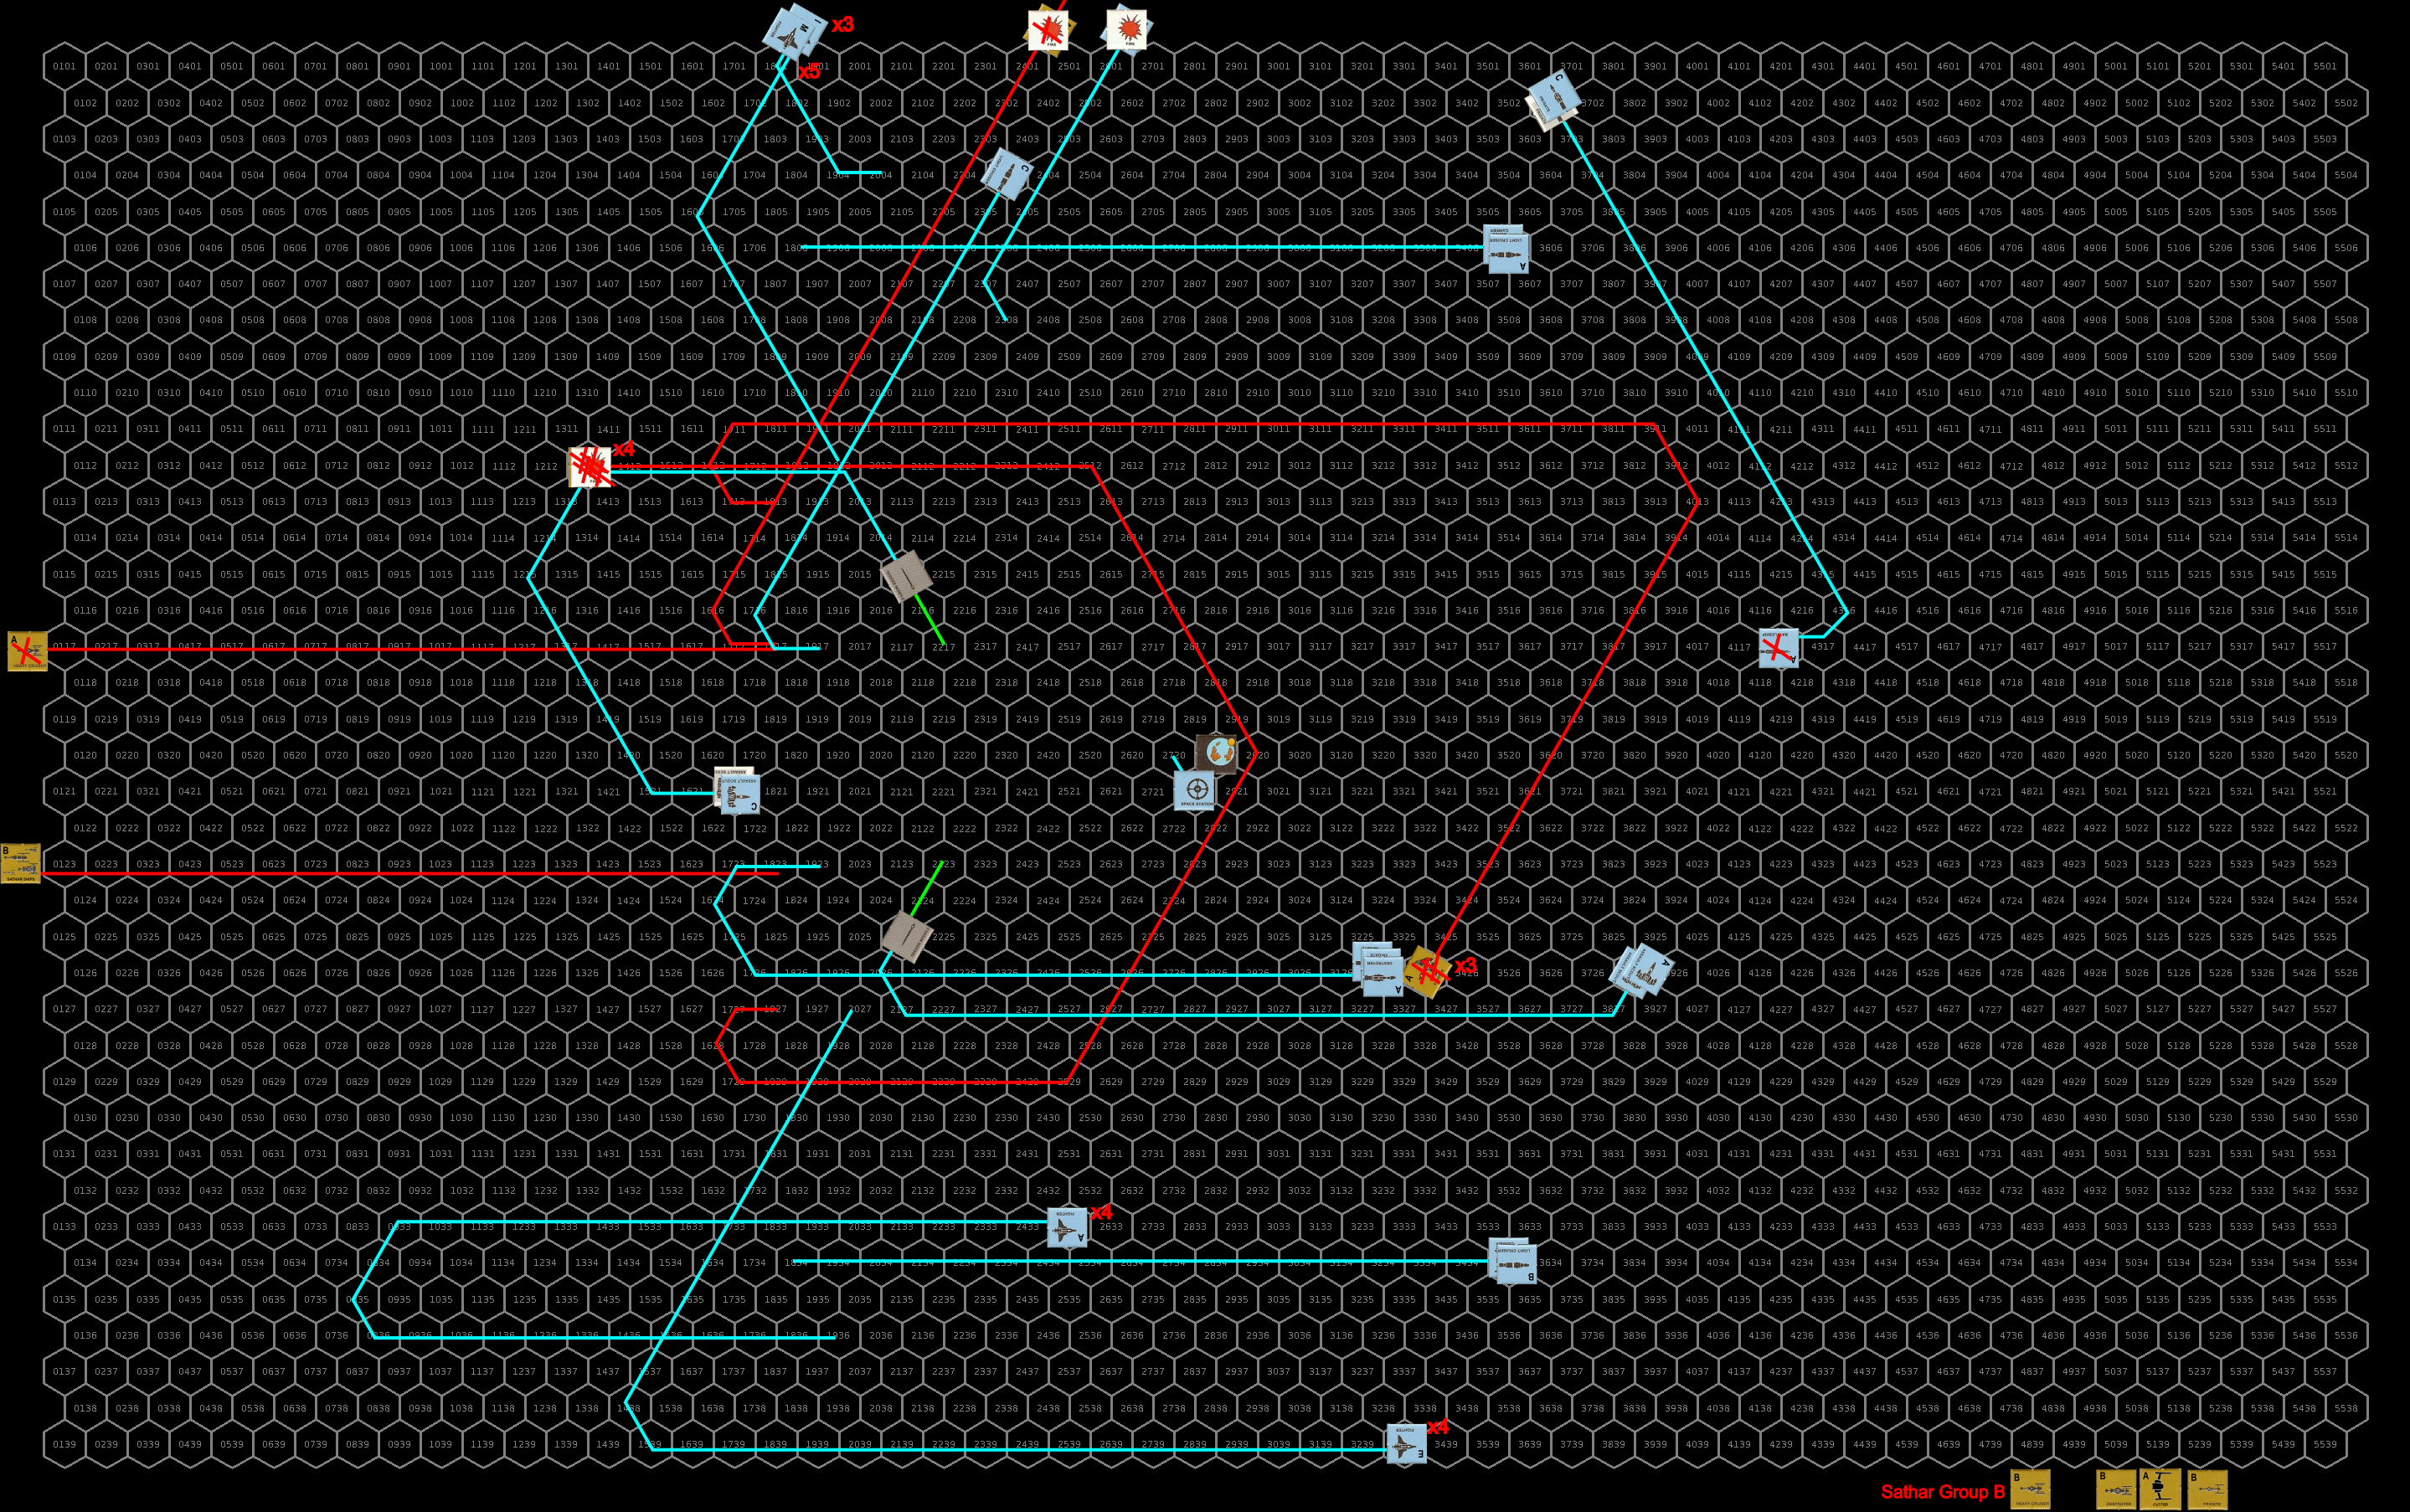
The seriously wounded battleship drifts away from the fight and two frigates join it as escorts. The other battleship, its MR reduced by half, turns and uses the gravity of New Pale to gain an extra turn. The other ships also loop around the planet, accelerating as much as possible to come around and bring all their weapons to bear on the various sathar vessels. The fighters split their fire between the heavy cruiser and frigate in the upper group, and the heavy cruiser and assault carrier in the lower group, assisted by the assault scouts firing on the heavy cruisers as well. The other ships focus their fire on the smaller more maneuverable ships. The assault carriers and their escorts accelerate and cross the sathar battle line hoping to get out of the maneuvering arc of the larger ships. They fire what weapons they can at the sathar fighters. The fire on the sathar destroyer knocks out its laser cannon.
Defensively, the upper flight of sathar ships focus their particle battery weapons at the damaged battleship, hoping to finish it off but they all miss. They use their laser batteries defensively against the fighters destroying one, nearly destroying another, lightly damaging the engines on a third. They fire their rocket batteries at the light cruiser but they all miss.
In the lower group of sathar ships, all the beam weapons are focused on the fighters but only one hits damaging the fighter’s combat control system while the rocket batteries are fired at the UPF destroyer but they all miss as well.
The upper UPF assault carrier connected with its laser and proton battery destroying one fighter and knocking out the assault rocket launcher on the other. The lower assault carrier hits with it’s proton battery and almost takes out a figher but it manages to hold togheter. The carrier’s light cruiser escort hits the same fighter with its laser battery, damaging the fighter’s engines, and a different fighter with it’s proton battery damaging its maneuverability.
The sathar heavy cruiser in the upper group is hit by 5 assault rockets and a laser battery from the fighters and assault scouts which damage its combat control system, short circuits its defenses, and reduces its hull integrity by 98% nearly destroying it.
The sathar heavy cruiser in the lower group gets away fairly unscathed as it is only hit by 3 assault rockets from the fighters and assault scouts knocking out its ICM launcher and maneuvering and reducing its hull integrity by 16%.
The sathar frigate in the upper group is hit by 2 assault rockets from the fighters as well as an electron batter, disruptor cannon, and torpedo from the light cruiser which knock out its defenses before the torpedo destroyers the ship.
The final fighter flight hits the upper sathar assault carrier with four assault rockets destroying it. while the sathar destroyer is destroyed by its UPF counterpart which hit with its laser and rocket batteries as well as torpedo that got through the ICM screen.
The sathar frigate in the lower group is hit by its UPF counterpart with a laser battery that damages its maneuvering and a torpedo that slips through the ICM screen but only manages to take out the frigate’s laser battery.
Turn 2
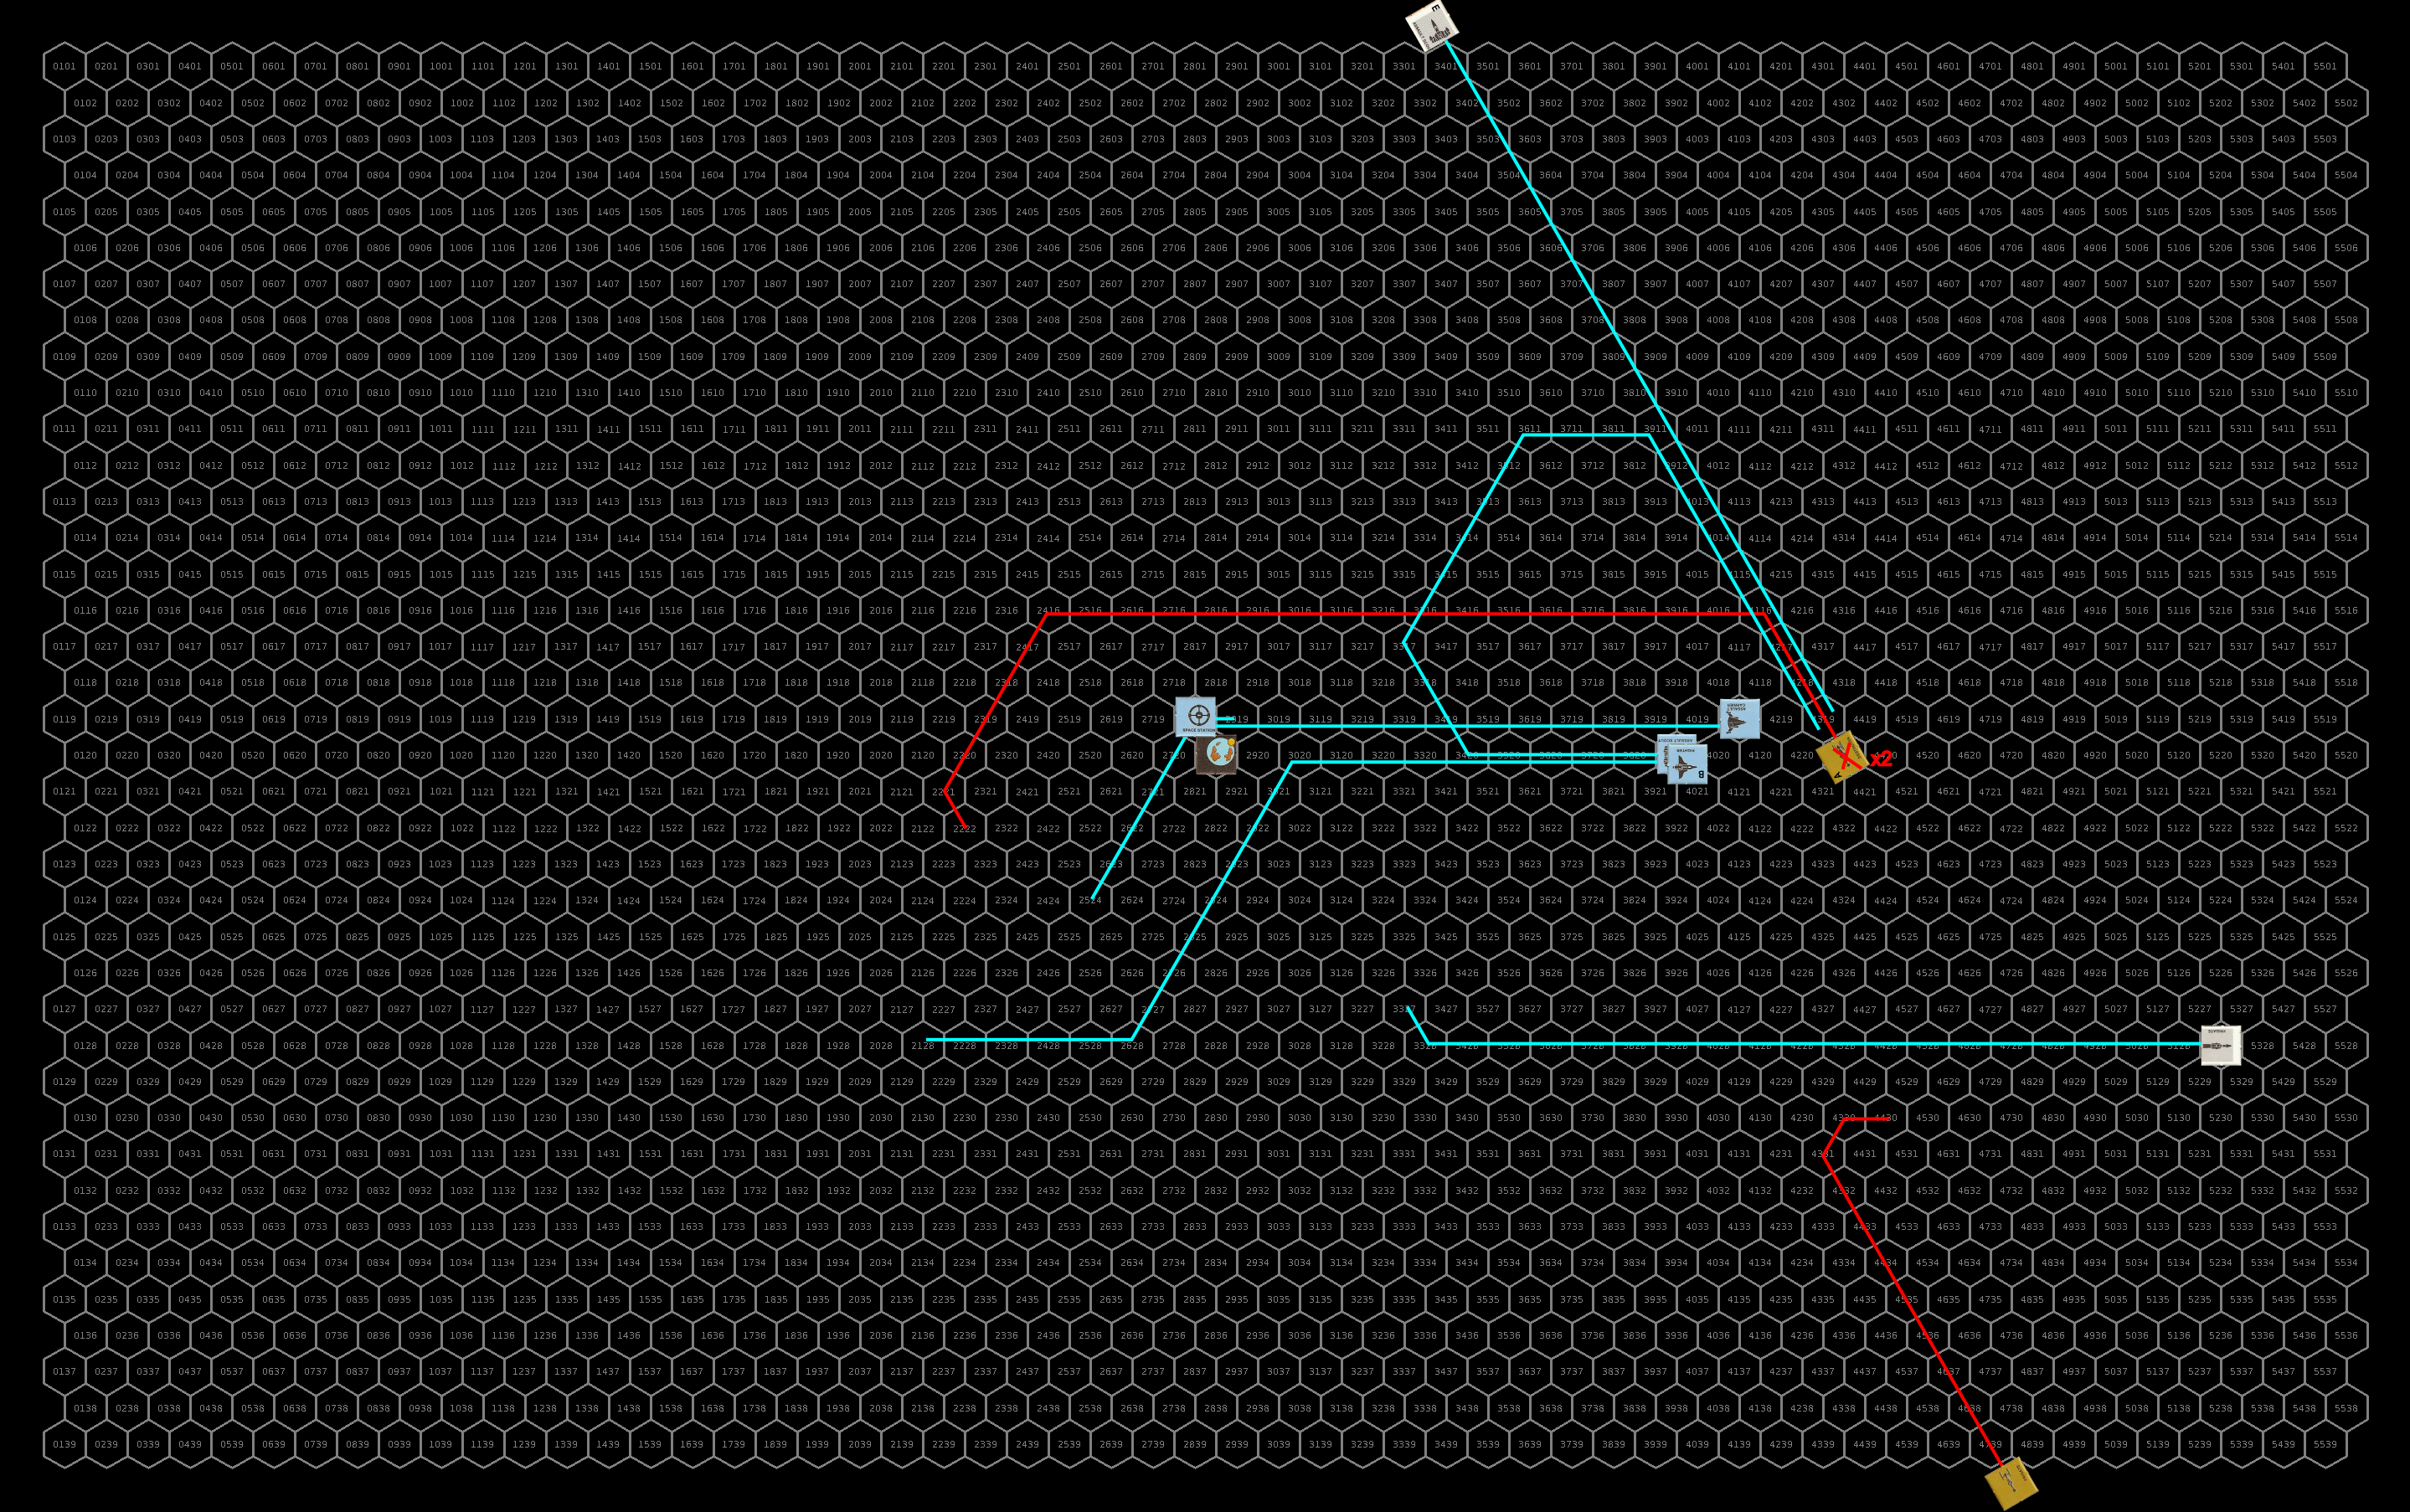
With the assault carrier destroyed, the sathar fighters are stranded and so continue the attack on the battleships. The flight that lost a fighter loops around to go after the heavily wounded battleship (Admiral Clinton) while the other group goes after the less damaged one. The heavily damaged heavy cruiser just drifts away from the battle while the light cruiser from the upper group turns to make a pass at the less damaged battleship (Admiral R’kazk’tar) as it accelerates away from the battle. The lower group, minus the destroyed assault carrier, just accelerate straight away from the battle at the heavy cruiser’s max acceleration (it has 0 MR), staying in formation. They fire on the UPF destroyer as they fly away. The fire on the Admiral R’kazk’tar induces a navigation control hit.
The sathar also activate the two seeker missiles they deployed the previous round. Unfortunately for the sathar, the UPF did not react as expected and the only ships nearby are the assault scouts. Each seeker missile goes after one of the assault scouts but they both miss.
Defensively, the battleships fire at the incoming fighters as do the assault scouts and the frigates escorting the heavily damaged battleship. They are assisted by the station and the lower assault carrier and it’s escort. Together the UPF ships manage to destroy two of the three fighters headed for the Admiral Clinton and two of the four headed for the Admiral R’kazk’tar, inducing a fire on a third.
The upper light cruiser and assault carrier fire at the light cruiser as it passes. It is hit by 2 laser, an electron, and 2 rocket batteries damaging its combat control system and engines, knocking out its ICM launcher and reducing its hull integrity by 23%.
The lone light cruiser fires at the drifting heavy cruiser connecting with a rocket battery and its disruptor cannon destroying the heavily damaged sathar vessel.
Finally, the group of frigates and destroyer focus their fire on the fleeing heavy cruiser from the lower group connecting with 3 laser batteries, a rocket battery and a laser cannon damaging the heavy cruiser’s combat control system and reducing its hull integrity by 46%.
Offensively, the surviving figher manages to hit the Admiral Clinton with its assault rocket destroying the battleship. The Admiral R’kazk’tar is hit by an assault rocket from the two fighers and a torpededo from the light cruiser reducing its hull integrity by another 36%.
The fire from the remaining ships are focused on the UPF destroyer. It is hit by 4 laser batteries and an electron battery which knock out its masking screen launcher, short circuit its defensive systems, and reduces its hull integrity by 46%.
The surviving battleship, with its navigation control damage and seriously damaged hull, pulls to starboard but manages to hold together. Given the speed differentials, and despite the greater acceleration of the smaller UPF ships, Spacefleet decides to not purse the main surviving group of sathar vessels but the upper two flight of fighters do go after the lone light cruiser. The assault scouts and the frigate and destroyer group go after the surviving sathar fighters. The fire on the sathar fighter induces a navigation control hit. The fire on the light cruiser cause 9 HP of damage.
Defensively, the sathar light cruiser fires at the incoming fighters but only manages to hit one with a proton battery lightly damaging its hull.
Offensively, the UPF fighters hit the light cruiser with all eight assault rockets destroying it while the frigates and destroyer destroy two of the three surviving fighters with the remaining fighter having its combat control system damaged, its assault rocket launcher knocked out, its hull integrity reduced by 38% and a fire started onboard.
Turn 3
The fire on the battleship burns through the hull reducing its hull integrity by another 10%. Its navigation control damage causes the large ship to pull to port and the strain on its severely damaged hull causes it to break apart destroying the vessel after only 10 days of active duty. The remaining sathar fighter is obliterated by the combined fire of the destroyer and frigates.
Repair Turn 1
The lightly damaged fighters manage to repair their systems almost immediately and the destroyer manages to repair some of its hull. The sathar heavy cruiser manages to repair some of its hull as well.
Final Repairs
After another hour and a half the damaged UPF destroyer manages to fix as much as it can in space. All of its systems are fixed but the hull is stuck at 66% integrity and it will need to get into the starship construction center at Pale to complete repairs.
After another hour the sathar heavy cruiser has repaired enough of its hull that the surviving ships resume their acceleration out of the system. Another 2.5 hours later, it has repaired as much as it can outside of a shipyard. All of the internals systems are back online but it’s hull is stuck at 75% integrity until it gets back to SSC#5 for final repairs.
Lessons Learned
I knew the sathar were going to lose this one but I expected them to do a little better than they did. They managed to take out the two battleships, part of their primary objective, but didn’t do as much collateral damage as I was expecting/hoping they would. Part of that was the dice were just not cooperative, especially on the defensive fire round of the UPF move in turn one. I rolled a bunch of 80’s on the sathar’s to hit rolls and nothing really connected. Although the same thing happened to the UPF at another point so I guess it evens out.
The sathar misjudged the positions on the first round and were unable to make pass at the assault carriers like they wanted. They managed to get some ships out of the battle but not as many as I was hoping they would. The UPF really cleaned up.
The loss of the battleships will be significant, those won’t be replaced anytime soon. It will be interesting to see how that affects the fights going forward.
What are your thoughts on the battle? Share in the comments below.