After a nearly an hour of intense battle around New Pale, militia and UPF forces manage to drive off the invading sathar fleet destroying two sathar vessels and seriously damaging the other three.
Unfortunately, due to heavy losses and critical damage, the UPF and militia forces were unable to pursue the fleeing sathar ships which began accelerating out of the system for a jump back to Zebulon shortly after the battle ended.
While the sathar have been driven off, the losses around New Pale represent the most damage to militia forces yet seen in this conflict and the second highest loss of ships overall, coming in only after the massive battle at Prenglar two days ago.
Goolar Nadd, New Pale News
Background
The Truane’s Star militia is supported by the remaining elements of Patrol Group Virgo which just returned from being stationed in the Kazak system in the Rim days before the sathar fleets appeared. Bolstered by the Spacefleet forces, and having seen the success of the UPF forces in the other systems two days prior, confidence is high that they can defeat the sathar ships.
The sathar have learned from those other engagements as well. Knowing that there is a second fleet en route just 11 days behind them, this battle fleet has some very specific orders: Eliminate the fighters and assault scouts!
Order of Battle
Truane’s Star Militia
- 4 Assault Scouts
- 1 Frigate
Note that this is one more assault scout than described in the order of battle for the game in the KH Campaign Book. They captured this assault scout from the Star Devil pirates early in the timeline so it is available in the fight.
UPF – PG Virgo
- 8 Fighters
- 2 Assault Scouts
- 2 Light Cruisers
- 1 Assault Carrier
Sathar
- 1 Frigate
- 2 Destroyers
- 1 Light Cruiser
- 1 Heavy Cruiser
The Battle
Setup
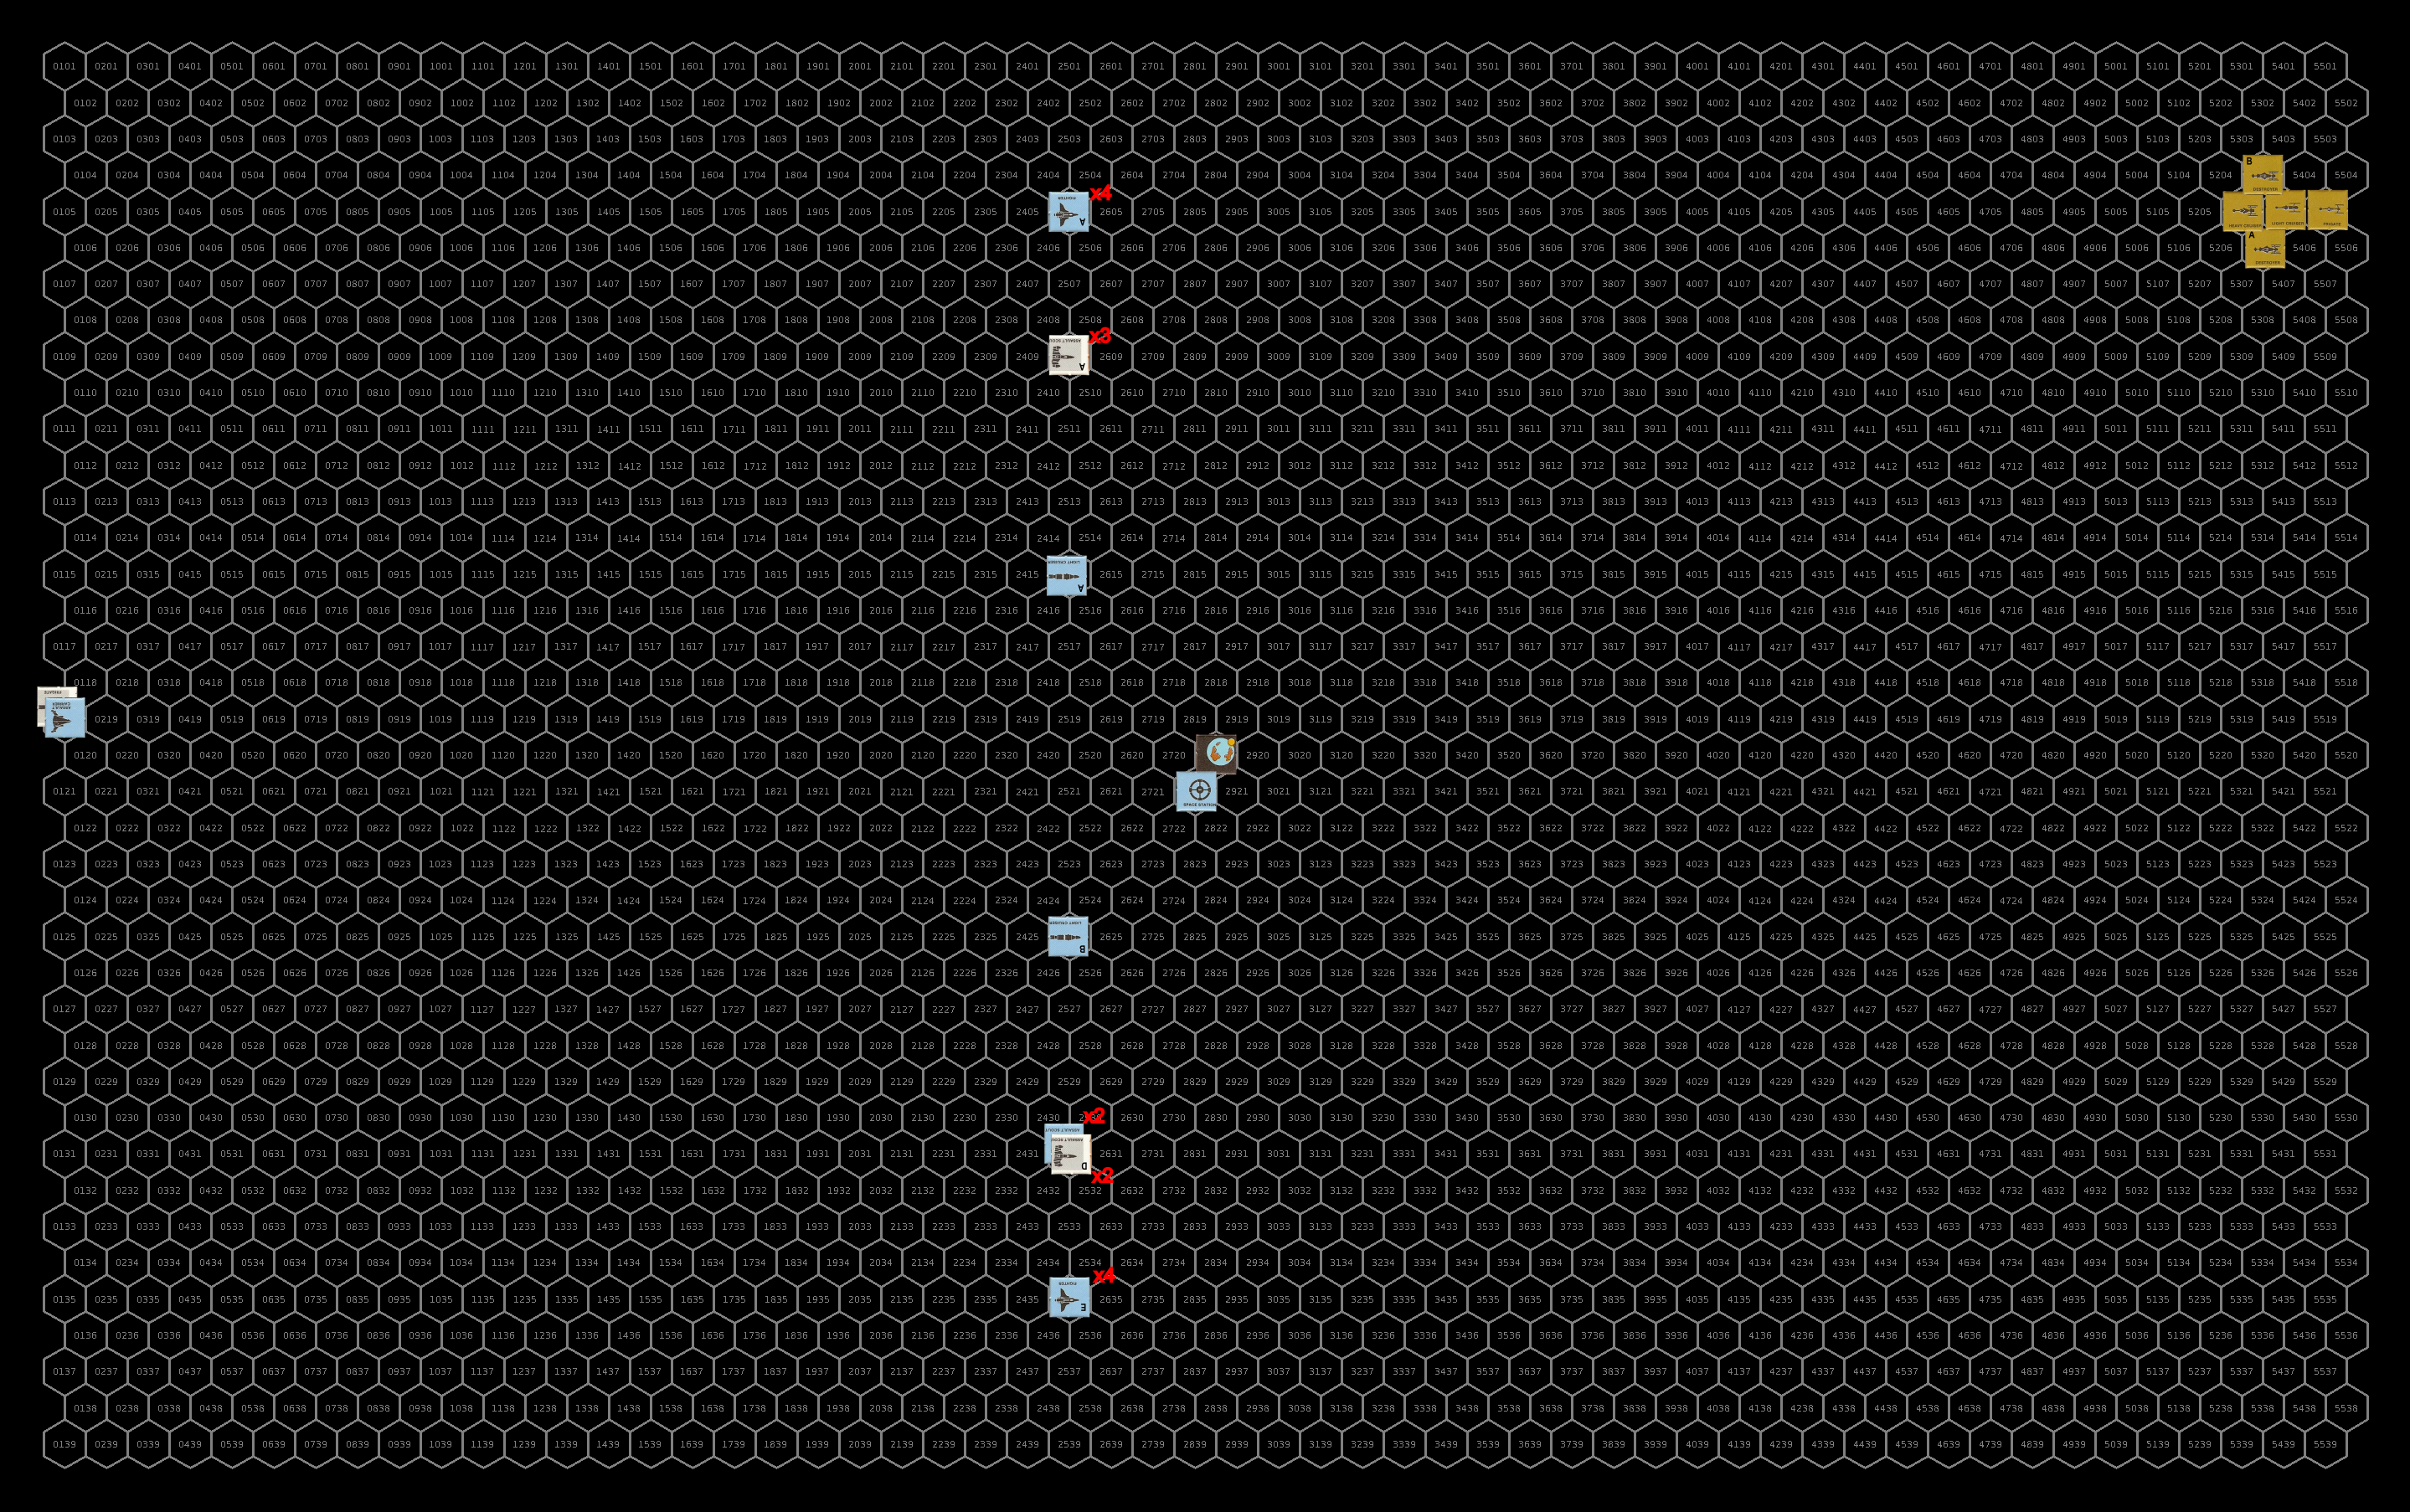
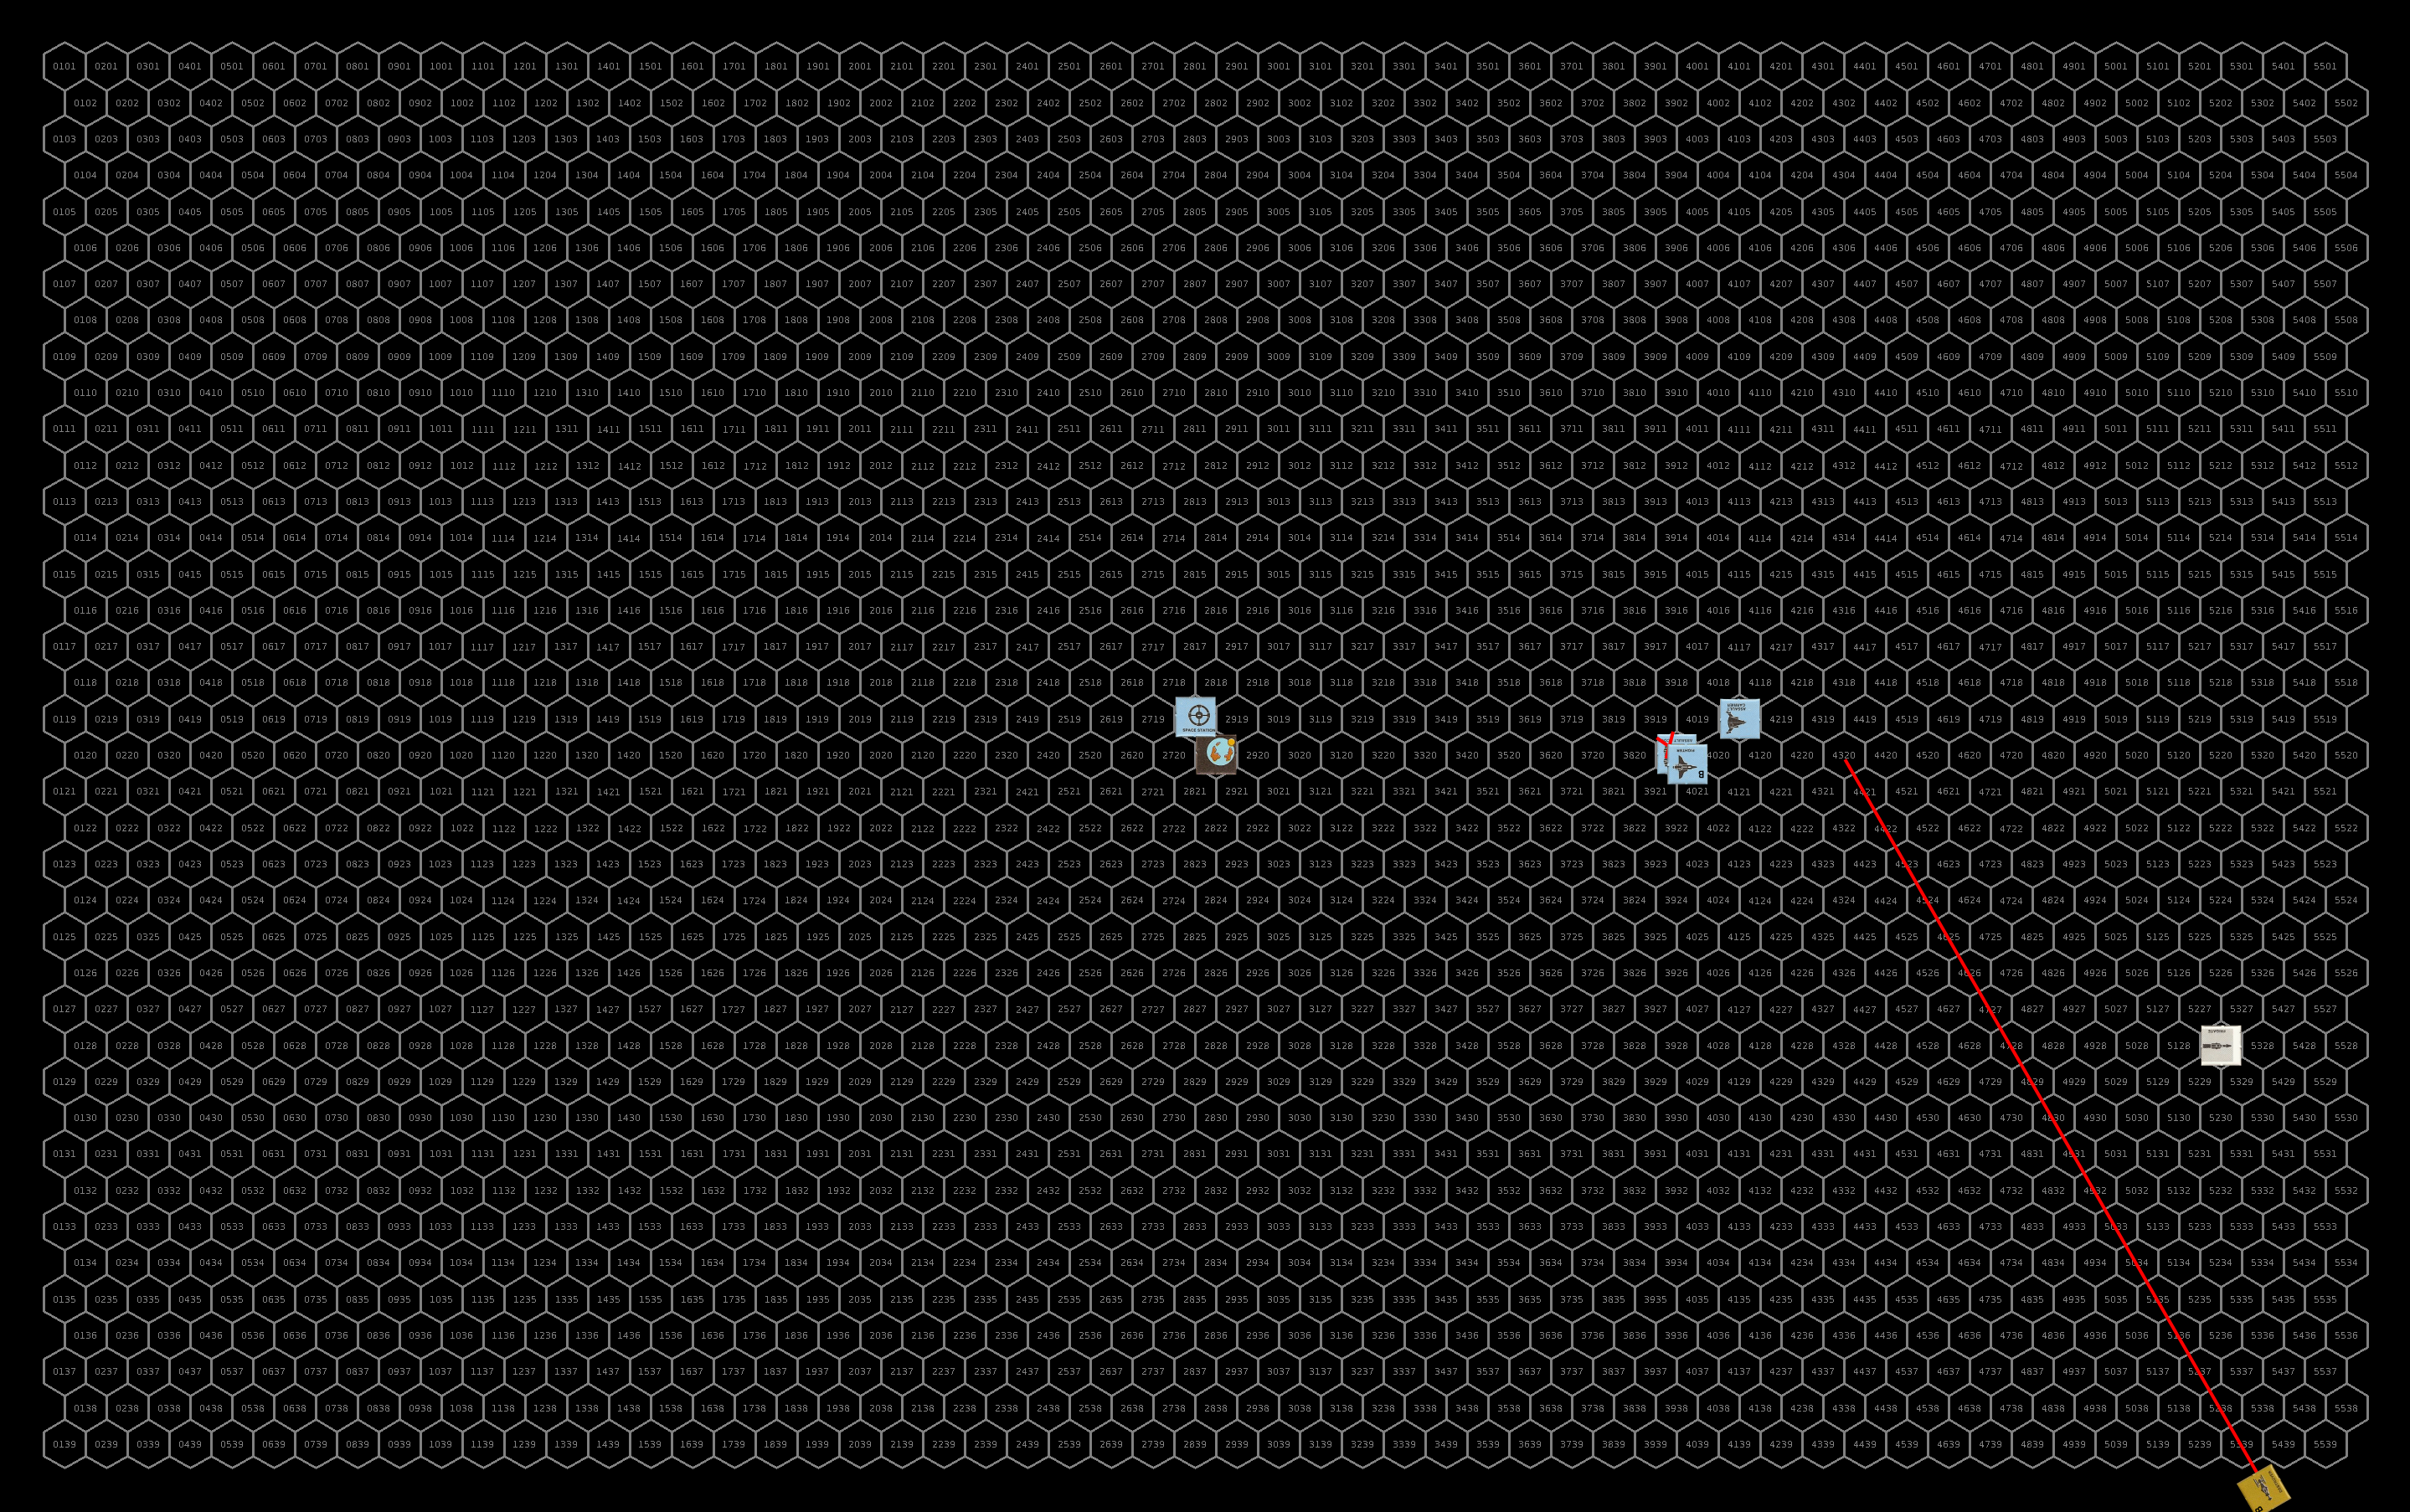
The UPF and militia forces, deploying tactics that have worked in the other systems, set up in a broad line with the smaller ships on the outside, the two LC near the station at speed 15, with the assault scouts split into a flight of 4 (below the planet) and 3 (above), both groups at speed 20, and a flight of 4 fighters on either wing at speed 25. The assault carrier is on the far side of the planet orbiting at speed 10 with the militia frigate acting as escort. The station is in on the far side of the planet from the approaching sathar and orbiting counter clockwise.
The sathar, however, are not using the tactics they have used in other systems. With their new directive, they come in fast, high above the planet at a speed of 25! Additionally, they are formed up in an inverted form of their standard diamond formation with the heavier ships leading and headed straight for the upper group of fighters.
Turn 1
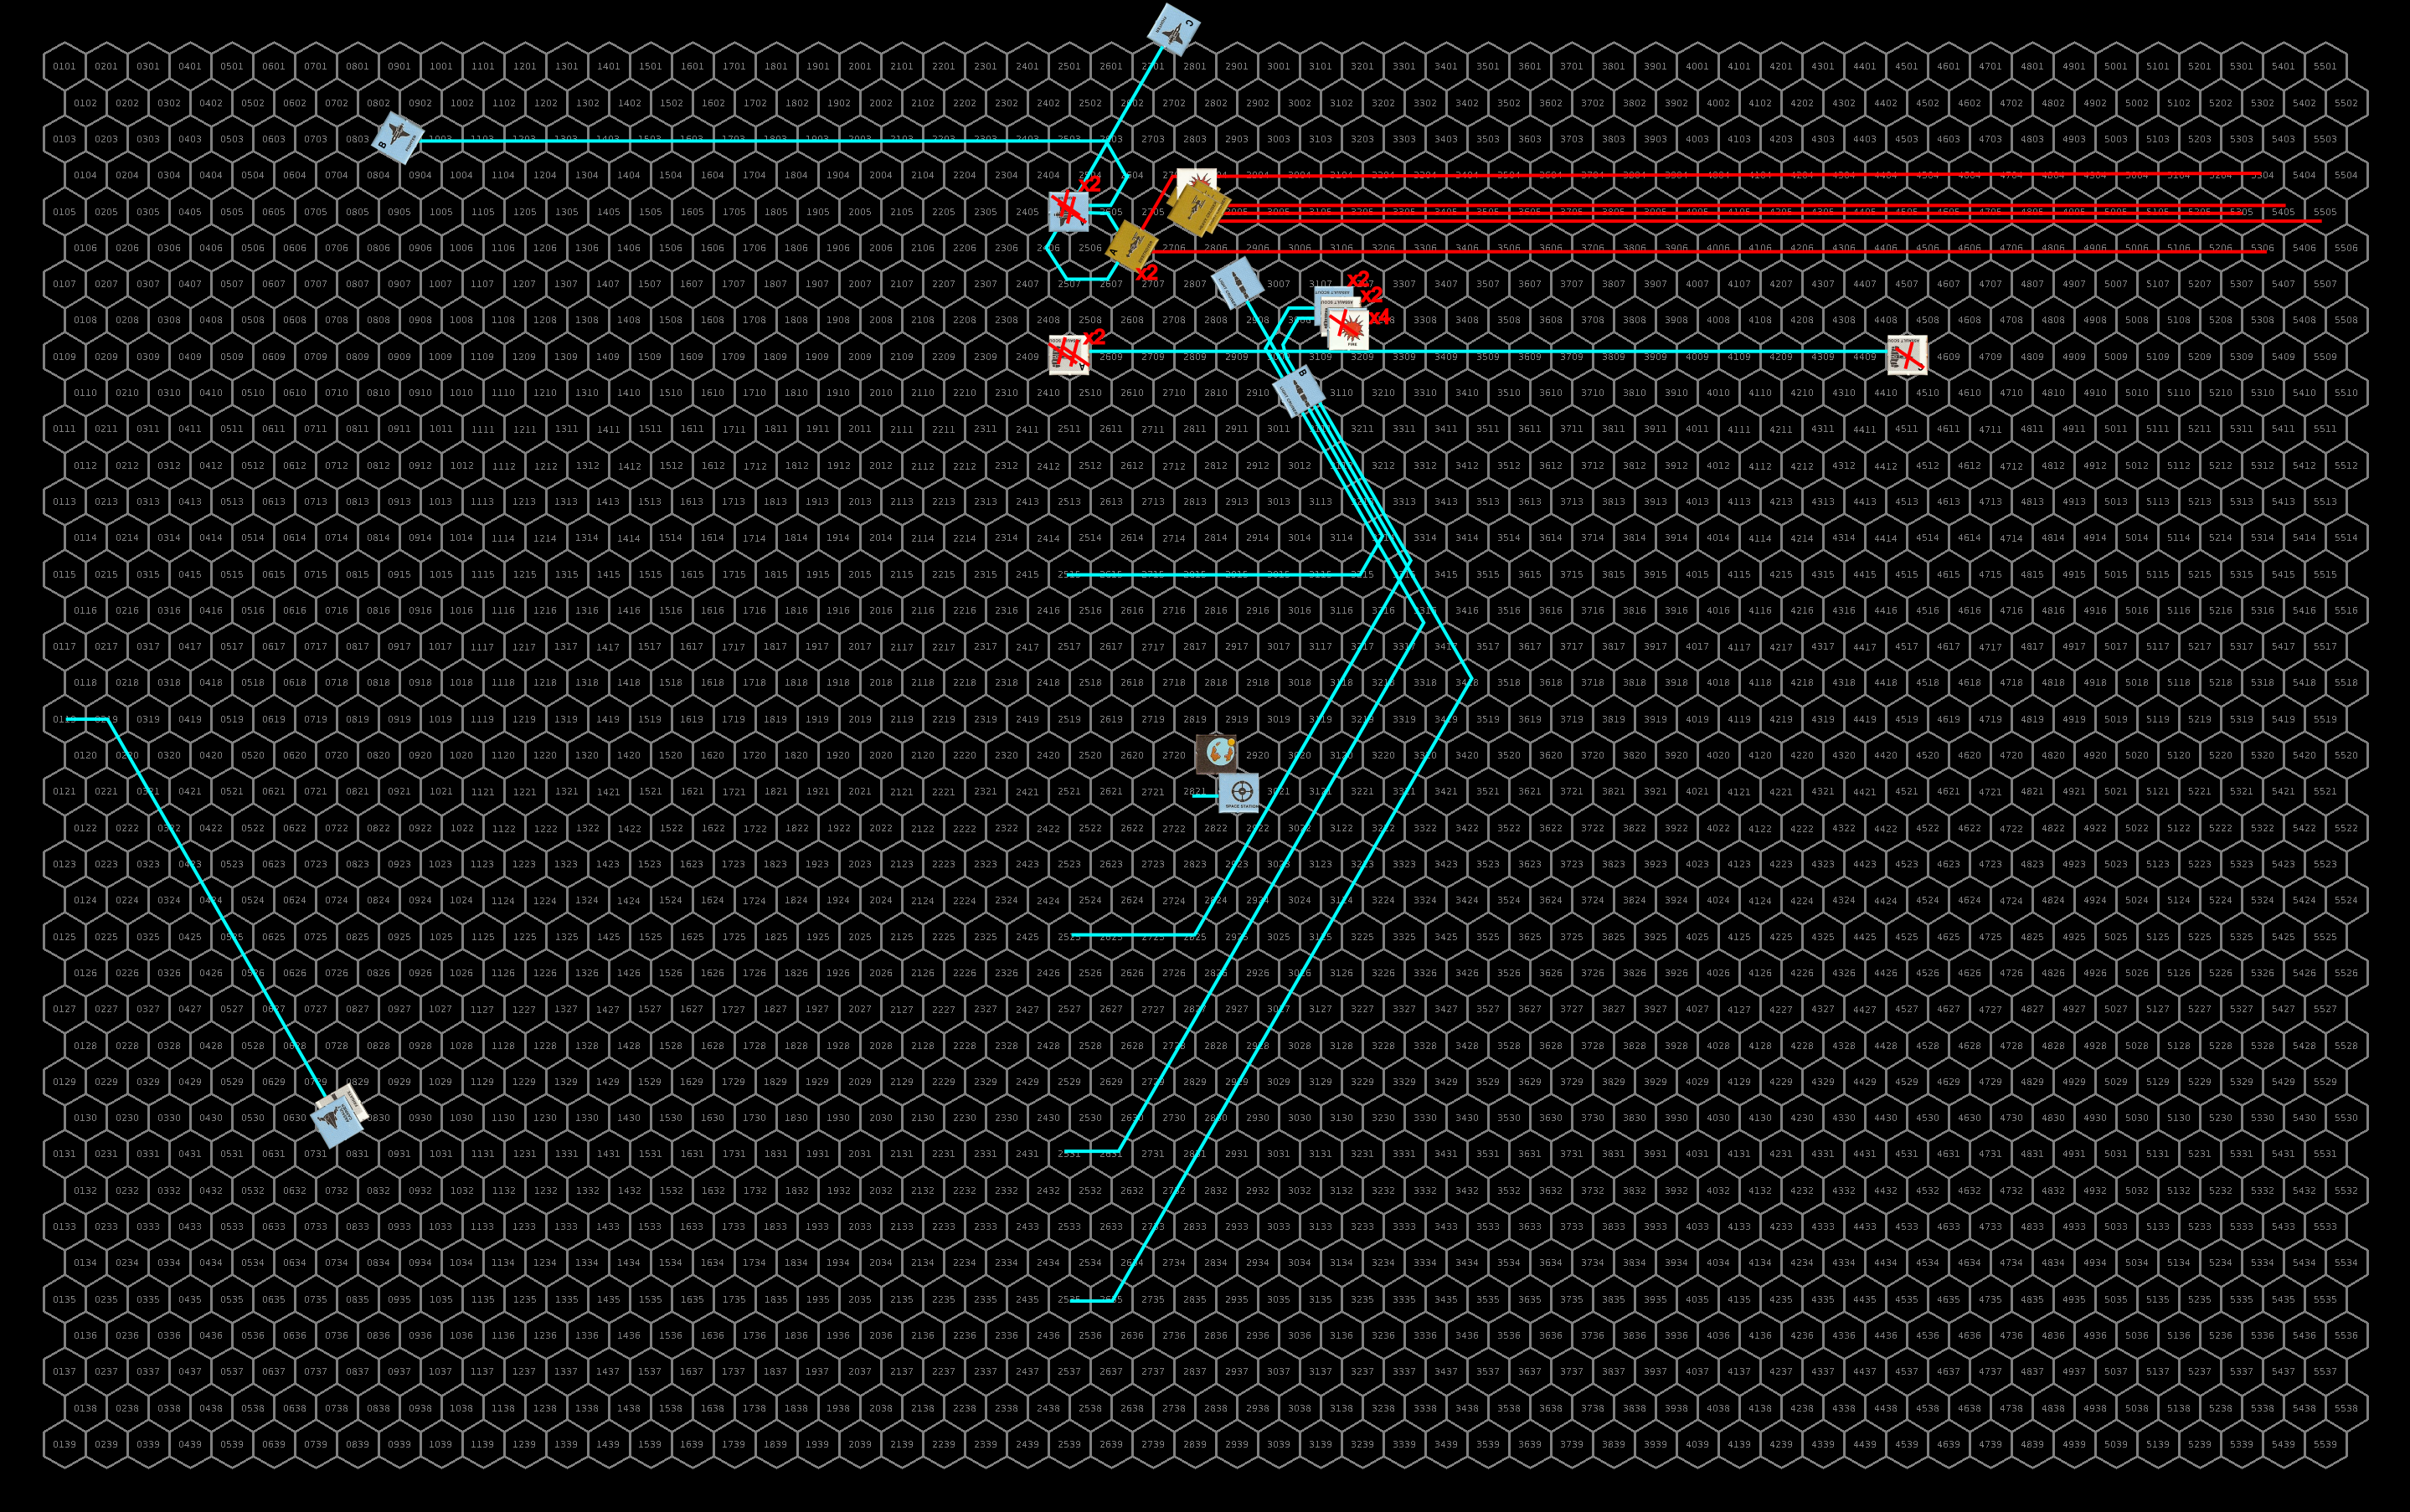
The sathar ships advance straight at the fighters and at the last moment turn toward the upper group of assault scouts. The heavy cruiser remains at speed 25, while the light cruiser and frigate accelerate by 1 and 2 respectively to join up with the larger ship. They fire all weapons expect their torpedoes at the flight of 4 fighters. The destroyers accelerate to speed 27 and 28 and join up directing all their fire at the flight of assault scouts.
Defensively only the upper light cruiser and flight of assault scouts are in range and they fire everything at the lead destroyer. Only the light cruiser connects with its laser battery doing some minor hull damage.
The sathar open with a devastating barrage at the smaller ships. The light cruiser’s disruptor cannon vaporizes the lead fighter, while the disruptor cannon from the heavy cruiser knocks out the assault rocket launcher on his wingman. The third fighter is hit by a pair of laser batteries and the sathar frigate’s laser cannon damaging its acceleration and navigation control system and nearly destroying it. The final fighter is hit by an electron battery and destroyed.
The destroyers do just as well. The lead militia assault scout is hit by a laser battery, electron battery, and laser canon destroying it. The second assault scout is hit by a laser battery and laser cannon and also destroyed. The last assault scout in the group is hit by an electron battery and rocket battery knocking out its assault rocket launcher and nearly destroying the ship.
The sathar have done well, eliminating four ships and knocking out the assault rocket launchers on two others and severely damaging the last. Caught off-guard by the speed of the sathar advance and initial devastation, the UPF and militia forces scramble to react.
The surviving assault scout, heavily damaged, just drifts away from the battle at speed 20. The fighter with the damaged navigation control system pulls a hard turn to starboard remaining at speed 25 and flies away from the battle. Luckily, it doesn’t break up from the maneuver. The other fighter, relatively undamaged but unable to fight due to the loss of its assault rocket launcher, loops away from the sathar ships back toward the assault carrier and slows to speed 20.
The assault carrier and frigate accelerate to speed 12 and turn away from the oncoming ships. All of the other UPF and militia ships loop around and head toward the group of sathar ships centered on the heavy cruiser, the ships coming from below the station accelerating to get in range.
Defensively, the sathar continue to focus on the smaller ships firing all their energy battery weapons at the incoming fighters and their cannons at the wounded assault scout as it drifts by. They fire their rocket batteries at the light cruiser that has come into range.
All five cannons hit the assault scout causing a fire and damage to its maneuvering and damage control system before destroying it. Three of the five rocket batteries slam into the UPF light cruiser disabling its ICM launcher, completely knocking out its maneuvering and doing significant hull damage. The lead fighter is hit by a laser battery reducing its acceleration ability while the shots at the second fighter completely miss. The third fighter is hit by a laser and electron battery and destroyed. The final fighter takes a hit from an electron battery which starts an electrical fire on-board.
The surviving fighters with operational assault rockets fire at the light cruiser, three of which hit doing significant hull damage and causing a power short circuit knocking out its screens and ICMS. The assault scouts and more distant light cruiser fire at the heavy cruiser. Only two of the assault rockets from the assault scouts hit but cause significant hull damage (65% of total). The light cruiser hits with its laser battery and disruptor canon knocking out the heavy cruiser’s distruptor canon and acceleration capability. The other light cruiser hits the sathar frigate with its laser, electron, and proton batteries knocking out most of its acceleration ability and causing a fire.
Turn 2
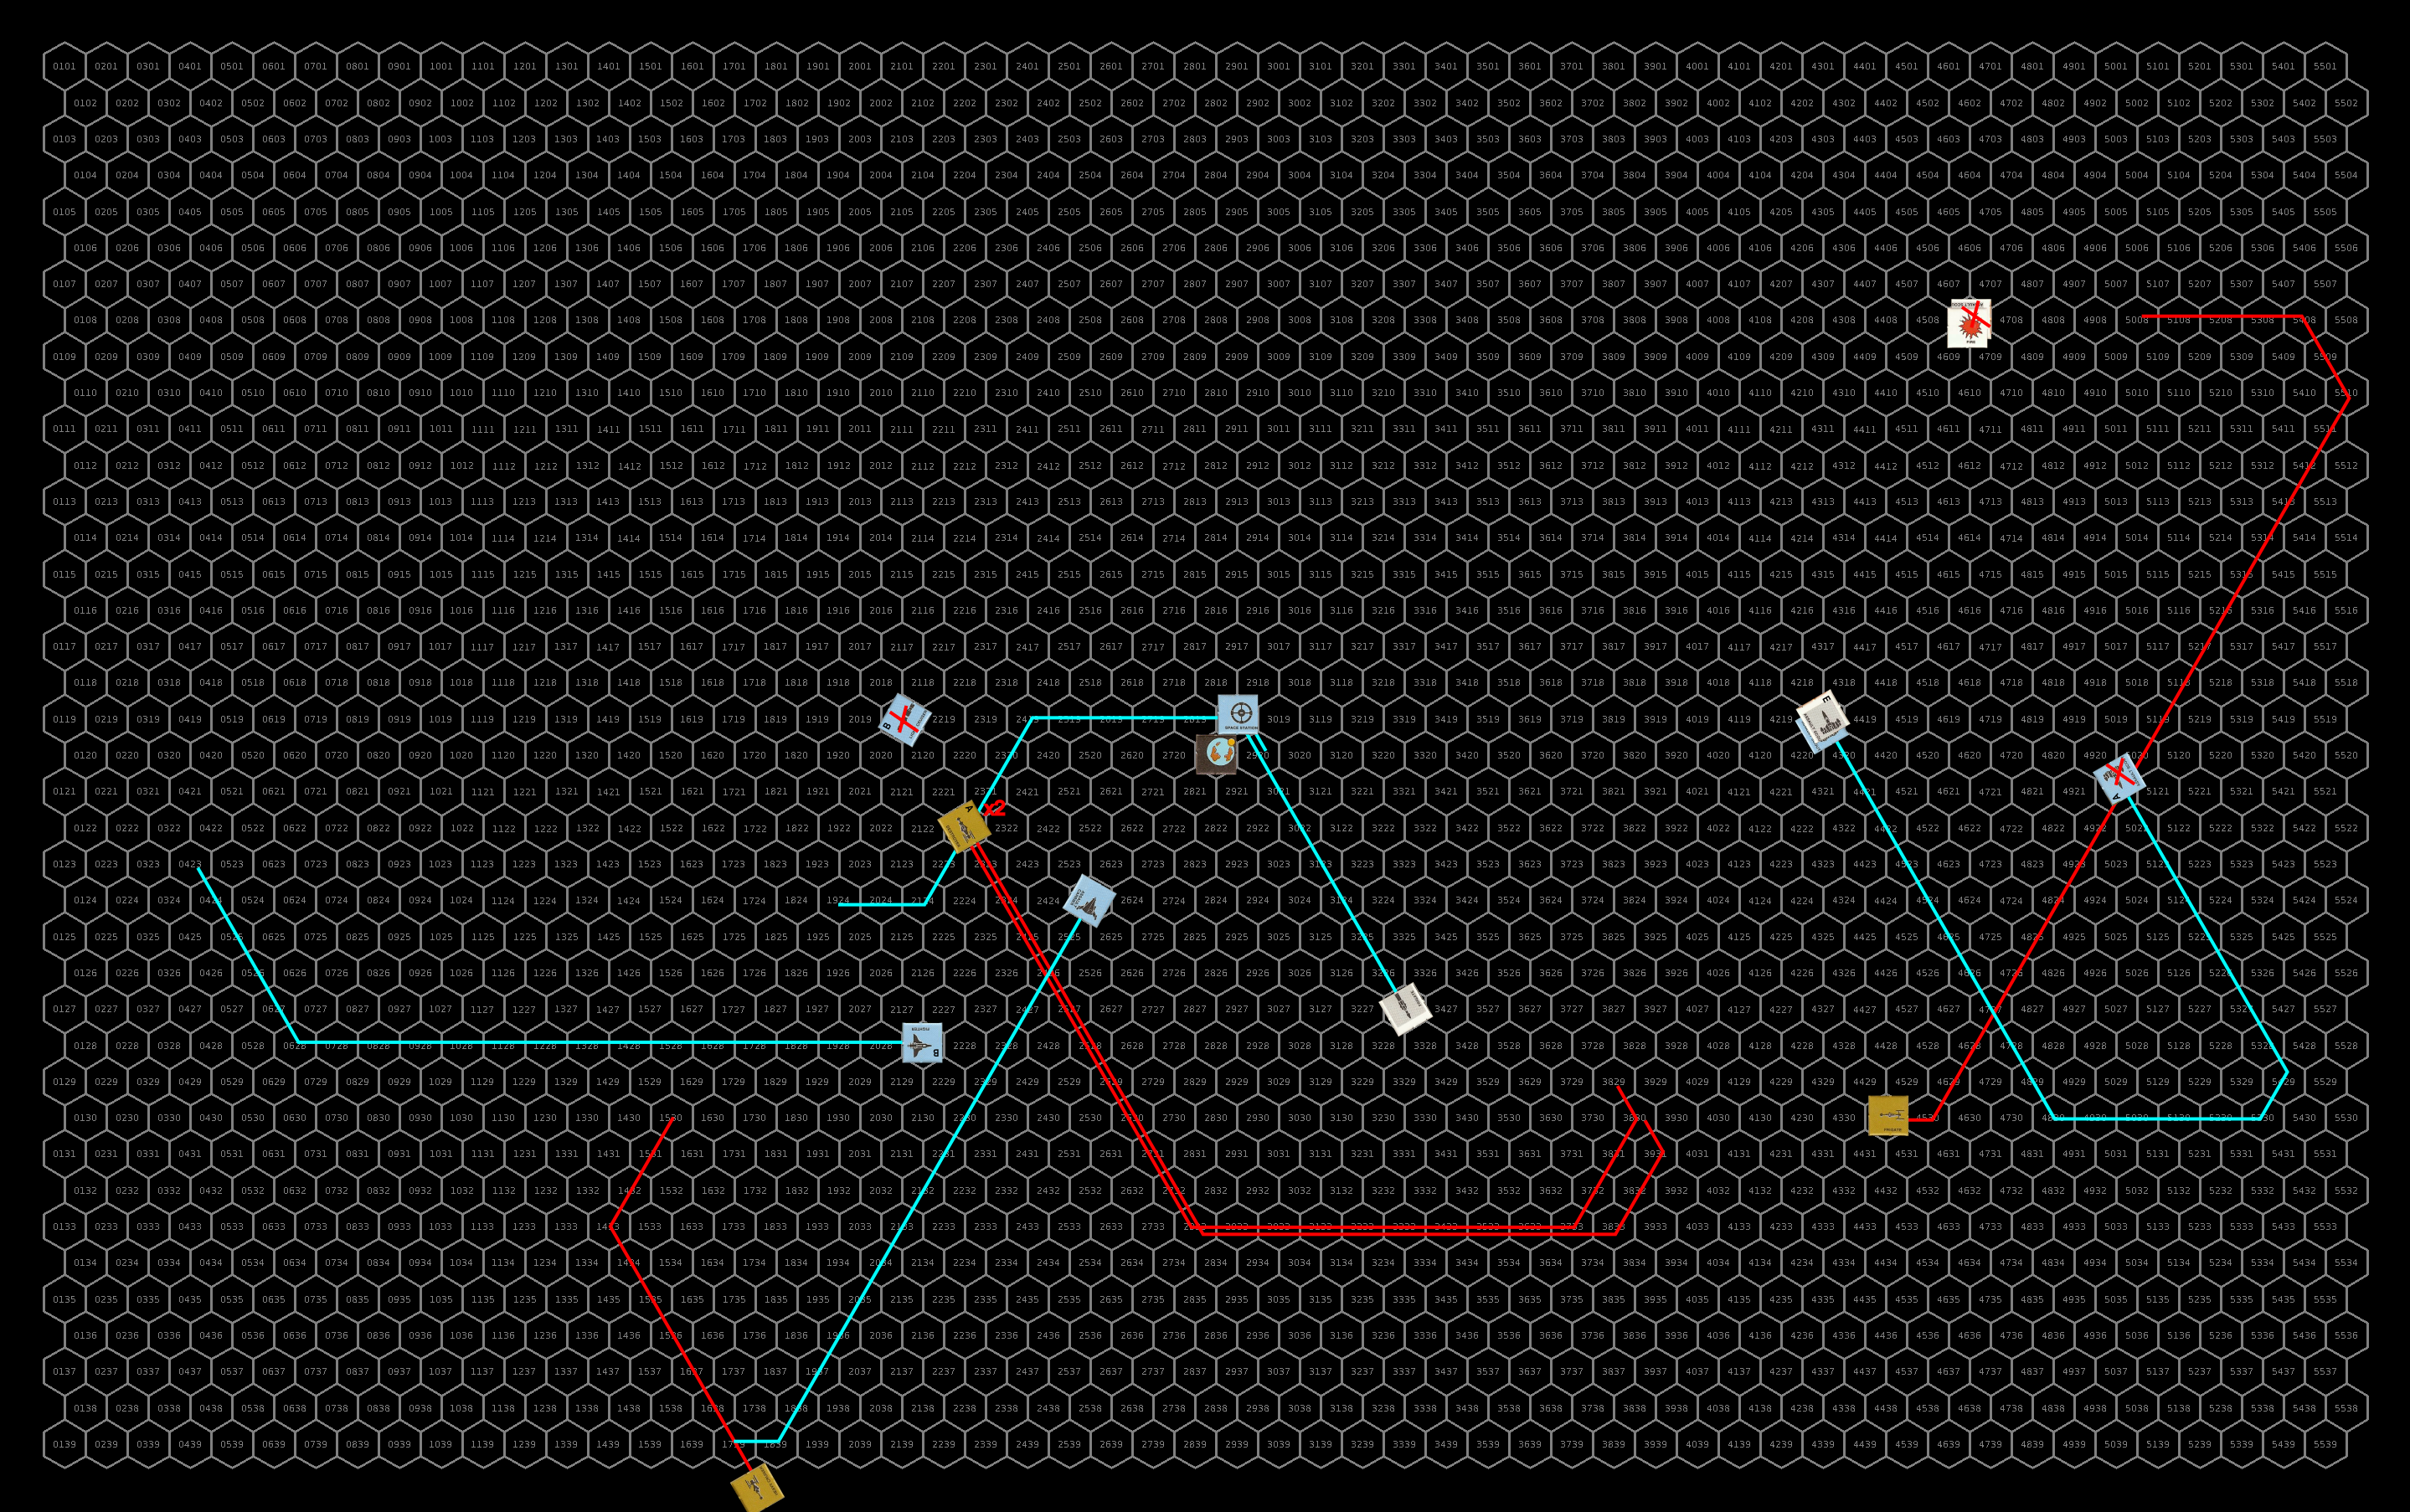
Unable to accelerate, the sathar heavy cruiser drifts down toward the assault carrier. It fires at the militia assault scouts with its energy weapons and its rocket weapons at the damaged light cruiser. The sathar destroyers decelerate and make a run at the undamaged light cruiser. The sathar light cruiser and frigate loop around and fire all their energy weapons and rocket batteries at the fighters and UPF assault scouts while they fire their torpedoes at the damaged light cruiser. The fire on the UPF fighter burns through over half of the small ship’s hull.
Defensively, the two UPF light cruisers focus their fire on their sathar counterpart hitting with multiple weapons reducing its acceleration ability, inducing a navigation control failure, knocking out its ICMs, and doing more damage to its hull but not destroying it. The assault scouts fire at the sathar frigate and hit with 2 laser batteries causing some minor hull damage. The station fires at one of the destroyers as they pass but misses and the assault carrier and militia frigate take long range shots at the heavy cruiser but also miss.
The militia assault scouts are both hit by a laser battery which knocks out all the maneuvering capability on one and slight reduces the maneuvering on the other. The lead (damaged) UPF light cruiser is hit by a rocket battery and torpedo doing some minor hull damage and shorting out its screens and ICMs. The trailing UPF light cruiser is pummeled by the destroyers having its screens and ICMs disabled and losing over half of its hull integrity.
The three fighters are each hit with a battery weapon destroying one, reducing the damage control capability on the second, and damaging the navigation control system on the third. The two UPF assault scouts are hit by a rocket battery and distruptor cannon respectively that knock out just over half of the first’s hull integrity and damages the assault rocket launcher on the second.
The seriously damaged fighter (off the top of the map) continues to spin out of control but still manages to hold together. The fighter with the disabled assault rocket launcher continues to approach the assault carrier, and the other fighter with the navigation control spins hard to starboard and flies off the top of the map. The assault carrier accelerates to speed 14 and loops down under the path of the heavy cruiser. The militia frigate splits off from the assault carrier and turns to engage the heavy cruiser. The lead light cruiser, its maneuvering knocked out, decelerates to speed 12 and drifts straight, currently out of the fight but trying not to get too far away. The other light cruiser turns to follow the heavy cruiser and manages to hold together through the maneuvering. The militia assault scout with no maneuvering left, decelerates as much as possible to avoid passing the sathar light cruiser and coming in range of its disruptor cannon. Unfortunately, it is now only 10,000 km away. The fighters still in the fight fire at the frigate while the assault scouts fire at the light cruiser. The fire on the sathar frigate does some minor hull damage.
Defensively the frigate and light cruiser fire at the assault scouts and fighters, destroying one of the fighters and seriously damaging the hull of the non-maneuvering assault scout and causing a fire on the same ship. The heavy cruiser fires at the militia frigate and knocks out its masking screens and reduces its acceleration ability.
Offensively, the frigate is hit by one assault rocket knocking out its laser battery, the light cruiser is hit by an assault rocket and two laser batteries destroying it, and the heavy cruiser is hit by the militia frigate’s laser canon knocking out its ICMs.

Turn 3
The sathar frigate accelerates and makes a pass at the assault scouts. The destroyers loop around to fire at the UPF light cruiser, and the heavy cruiser turns to strafe the assault carrier and flies out of the battle. The fire on the UPF assault scout burns through the hull destroying it.
Defensively, the assault scouts fire at the frigate and hit with a laser battery knocking out its laser canon. The station scores a long distance hit on the lead sathar destroyer knocking out its ICM launcher. The assault carrier hits the heavy cruiser knocking out its maneuvering engines. All other defensive fire misses.
Offensively, the sathar frigate hits the lead assault scout with a rocket battery, destroying it but misses with the torpedo aimed at the other assault scout. The sathar destroyers hit the UPF light cruiser with nearly everything, including both rocket batteries and torpedoes, and destroy it. The heavy cruiser hits the assault carrier with all of its energy battery weapons but the torpedo is intercepted by ICMs launched by the carrier. The hits knock out its navigation control system and causing some minor hull damage.
The two UPF fighters off the map continue to spin out of control but the damaged one doesn’t break up. The assault scouts make another run at the sathar frigate. The militia frigate strafes the sathar destroyers focusing its fire on the lead one and then loops around the planet. The lone UPF fighter continues to follow the assault carrier. The light cruiser off the map slows to speed 9. The assault carrier’s damaged navigation control system pulls it to port and it fires at the lead sathar destroyer as it passes by. The fire on the sathar frigate does some minor hull damage.
Defensively, the sathar destroyers fire at the militia frigate and while the lead frigate misses, the other hits with its laser and electron batteries knocking out the frigates laser cannon and maneuvering engines The defensive fire at the assault scouts miss.
The assault scouts hit the sathar frigate with a laser battery and assault rocket damaging its hull and knocking out its masking screens. From all the shots at the lead sathar destroyer, it is hit by a proton, rocket, and laser battery doing some significant hull damage.
Repair Turn
Almost every ship in the fight has some damage at this point. The only one that isn’t is one of the sathar destroyers.
On the UPF side, the fighter trailing the assault carrier, as well as the second UPF assault scout, repair their assault rocket launchers. The fighter that’s been spinning out of control from the beginning of the fight manages to repair its navigation control system as does the assault carrier. The carrier also repairs some of its hull. The militia frigate restores some of its maneuverability as does the light cruiser off the map. Unfortunately, the light cruiser’s hull repair runs into significant problems and its hull can only be repaired in a shipyard.
The sathar frigate puts out the fire while the other two ships repair some of their hull damage.
Turn 4
The sathar heavy cruiser, unable to maneuver and not wanting to risk acceleration and breaking up with its weakened hull, continues to drift away from the fight (its already off the map). The frigate, out of rocket weapons and with its energy weapons knocked out, is unable to fight and turns to follow the heavy cruiser, accelerating as much as possible with its damaged engines. The destroyers loop around the planet and strafe the assault scouts each firing all their energy weapons (their rockets and torpedoes are depleted) at a different assault scout.
Defensively, all ships fire at the lead sathar destroyer. The assault carrier and station hit knocking out its navigation control system and electron battery and causing some minor hull damage.
The lead sathar destroyer hits the surviving militia assault scout with it’s laser canon nearly destroying it. The other destroyer hits the UPF assault scout knocking out half of its hull integrity with it’s laser battery and damaging its combat control system with its electron battery.
The seriously wounded UPF ships continue to drift away from the battle or spin out of control while those that can, converge on the sathar destroyers again firing at the lead destroyer. The light cruiser (off the map) accelerates and starts to turn back toward the battle now that it has some maneuvering capability restored. With its limited maneuverability the militia frigate turns and takes long distance shots at the destroyers.
Defensively the destroyers fire their laser cannons at the militia frigate (which miss) and their energy batteries at the fighter and assault scout. Th trailing destroyer hits the assault scout with its electron battery slightly damaging its hull.
The UPF fighter and assault scout both hit the lead destroyer with their assault rockets. The fighter, frustrated at being out of the battle from the start, scores a massive hit knocking out nearly half of the destroyer’s hull integrity. The other assault rocket damages the destroyer’s combat control system. The gunner on the militia frigate lands an amazing long distance shot with the laser battery scoring a maximum damage hit and destroying the sathar vessel.
Turn 5
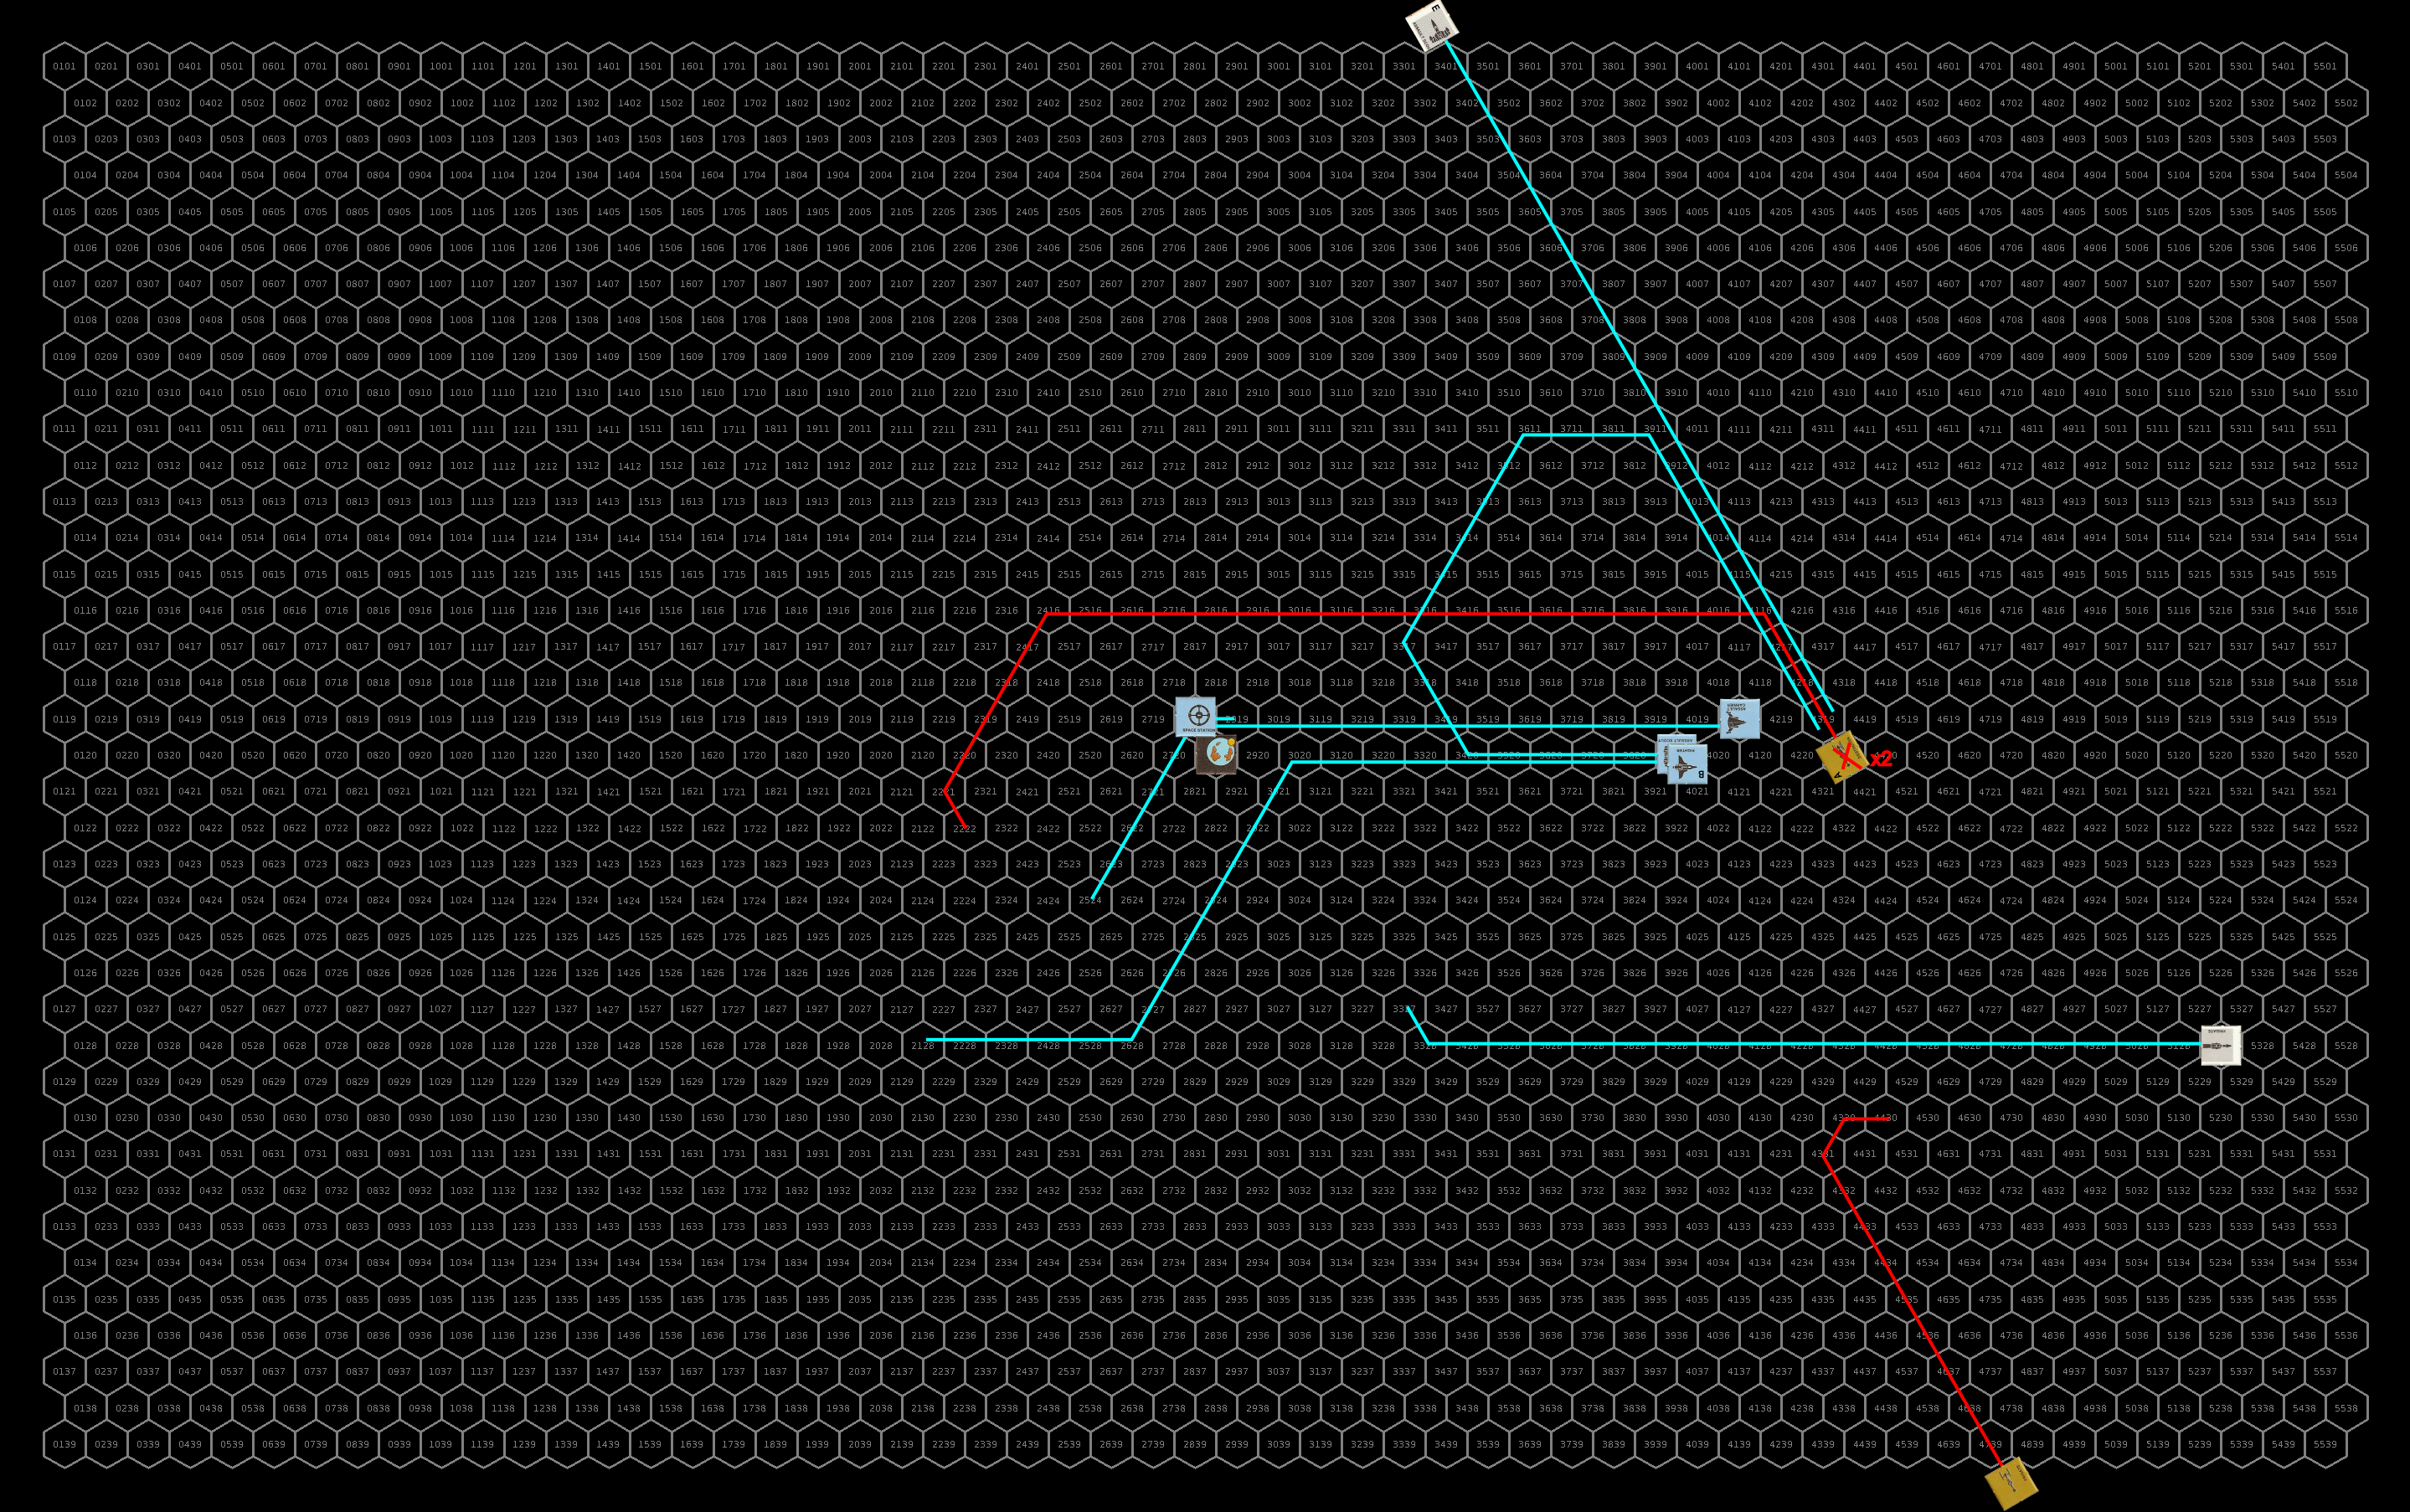
Knowing that it can out run the assault carrier, the destroyer fires its laser battery at the fighter and electron battery at the assault scout attempting to take them out of the fight and accelerates at maximum thrust to fly off after the heavy cruiser and frigate.
The assault scout and assault carrier return fire hitting with all of their batteries damaging the destroyer’s engines slightly and weakening its hull. The sathar’s electron battery connects with the UPF assault scout and destroys it. The laser battery misses the fighter.
With all of their ships damaged (expect the fighter) and many seriously out of position, the UPF commander calls off the pursuit of the sathar ships. The surviving UPF and militia vessels begin repairs and return the station.
Repairs
Over the course of the next thee hours, the UPF repair what they can and the assault carrier collects its scattered fighters. In the end most of the ships are fully repaired but the UPF light cruiser has hull damage that will require time in the shipyard.
The sathar form up and manage to repair most of their systems but all three ship have hull damage that will require time in a starship construction center to fully fix. While the damage to the destroyer is relatively minor (only 24% of its hull), the damage to the frigate and heavy cruiser is much more significant, 43% and 61%. Since they lost the fight here, they cannot use the local shipyard and must return to SCC#5 for repairs. They start accelerating out of the system being careful of the heavy cruiser’s hull.
Lessons Learned
When they want to, the sathar can do significant damage to the smaller UPF ships. Their tactics worked out quite well. In fact, much better than I expected. I really thought the UPF would win this one and eliminate all the sathar ships but would take significant damage. I never expected that the sathar would get away with three of their ships, although heavily damaged. The time to get those ships back into the fight will be much shorter than having to build new ones.
While the UPF and militia “won” and drove off the sathar, this was really a victory for the sathar in many ways as well. In the end, if you factor in the damage that requires a shipyard to fix, the sathar lost 198 hull points in this fight while the UPF and militia lost 228. If you just look at ships destroyed, then the sathar lost 2 ships for a total of 120 hull points while the UPF lost 12 ships, most of them fighters and assault scouts, totaling 200 hull points. Either way the sathar came out ahead. And they achieved their goal of taking out most of the assault rocket capability of the UPF forces in this system in advance of the next sathar attack in 11 days. While it doesn’t make up for the beatings they took in some of the other systems, it is definitely a boost to their morale.
There really isn’t much the UPF could have done differently other than be placed a little closer together for mutual support. The small fighters and assault scouts had no defense against the initial onslaught and paid the price. The only real defense there would have been to be further back from the station but then the sathar may have made a run at the station instead. This battle will definitely shift the tactics of both sides, at least somewhat. We’ll have to see what develops.
One thought on “Battle of New Pale (Truane’s Star) – FY61.287”