It’s taken me a long time to get to this point but I finally have sketches of the ship embedded in the center of the Outpost Osiris asteroid. These are my initial roughs that I will fill in with details as I complete the write-ups.
The scale on the images is 5 meters to the square. This ship is quite large with a “wingspan” of nearly 200m and a length of over 300m. It consists of five decks each of various sizes. I’m going to try to do a 3D render of the shape of the ship at some point.
The bold outer outline in each of the following images represents the outer hull of the middle deck (deck 3). It is shown on each of the images to allow you to compare the other decks to the overall size of the ship.
Only parts of the ship are going to be physically accessible in the module. Other parts are fused with the rock of the asteroid or crystalline structures piercing through the body of the ship in the central cavity of the asteroid. I’ll be deciding exactly what is obstructed and what isn’t as I work on the module details. I know for sure that the engines are not accessible and that the phase shield room (deck 3) and power core (deck 4) are undamaged as is the starboard airlock. Some of the robot storage areas will be accessible as will at least one cryo bay (so the characters can find some desiccated Pursale remains) but beyond that, I haven’t decided what to make accessible. That will come at a future date.
So here are the five decks of the ship, from bottom to top.
Deck 1 – Shuttle bays
This deck primarily contains 8 shuttle bays, a storage area, and the ship’s two underbelly laser batteries. The large engines out on the wings also extend down to this part of the ship but are not accessible from here. The large storage area here contained colonization supplies.
Deck 2 – Robots and Tech
This deck has another large storage area for colonization supplies, as well as the robot storage areas and a tech shop. There are also two more shuttle bays on this level as well as the first of many cryo bays containing rows and rows of the (once) frozen colonists.
Deck 3 – Crew Deck
This is the largest deck of the ship. It contains the engineering section, access to the engines and the crew quarters for the active crew. There is a large garden area, dining an food storage, as well as several cryo chambers. There is also an aft observation deck, forward sensors, and the ships two forward facing laser batteries. The airlocks are also on this level as are some of the ship’s workpods. The phase shield generator is located on this deck in the very center of the ship.
Deck 4 – Cryo Bays and Power
This deck consists almost completely of cryo storage bays containing colonists in frozen storage. The only other ship system on this level is the ship’s power core, which amazingly wasn’t destroyed when the ship unphased into the asteroid.
Deck 5 – Bridge
This deck contains the ship’s bridge and medical facilities, a few more smaller cryo bays, as well as the ship’s launches and some more workpods. It also has the upper laser battery.
Next Steps
This is the ship as built when fleeing the Pursale homeworld and fully functional. By the time the PCs discover it, it has been embedded in the asteroid of millenia. Many of the parts of the ship are fused with either the rocks of the asteroid or crystalline structures in the central cavity. All of the crew and colonists are long dead however some of the robots, along with some parts of the ship’s machinery has survived.
The next step is to figure out which parts of the ship are still accessible and create the actual maps for the game along with the description of the various areas.
The intention of this part of the adventure is for the players to make their way onto the ship, overcoming the last of the ship’s defenses, and attempt to obtain the phase shield generator off the ship and install it on their own. They then need to feel the outpost as their tampering has caused the ship’s power core to enter a self-destruct mode that cannot be stopped.
The details of the ship are still fairly malleable so let me know if there are any major ship systems or details that you think I missed.
This post is going up a day late. Partially because I didn’t finish what I had wanted to post yesterday in time, and partially because time got away from me working on issue 24 of the Frontier Explorer (which is almost done). So I didn’t have a post ready yesterday
My original plan was to post my sketches of the Pursale ship entombed in the center of the Outpost Osiris asteroid. But in looking at those I realized a couple of things:
I had used the wrong scale grid when building the original sketches. Interestingly enough when I applied the correct grid to the maps, all the corridors I had free-handed in that were off the original, wrong grid, matched up almost perfectly with the correct grid. I guess subconsciously I knew there was something wrong.
I forgot a few fairly important parts of the ship, for example airlocks.
That means I need to rework the sketches before they are ready to present. That’s this week’s project.
In the mean time, I rooted around in my old folders and found some old location maps that I drew way back in the late 80’s as a teenager when I was actively playing Star Frontiers in high school. I’d probably draw them differently now, but they definitely hold a bit of nostalgia.
I’m presenting them in this post as-is. These are simply scans of the original hand-drawn maps that were created on 8.5×11 quad-ruled graph paper. (I even think I still have some of the original pads as I bought a big box of them back in the day.) I’ll be providing a little bit of commentary but not much. I actually have write-ups for some of them but I’ll hold that for a later post when I have a chance to review them and update them to remove any glaring errors I made as a teenager when I first concocted them. For all of the images, you can click on them to get the full 200dpi resolution version (each one is about 5 MB in size).
Conference Center
This one is a portion of a large area map. It is inside a clear, domed area which I think was supposed to be on an asteroid or moon but given the layout, needs some significant gravity. This location is the basis of a murder mystery adventure. I’ll definitely be updating and writing this one up at some point in the future.
Pirate Base
This location consists of three maps, and as far as I can tell, I don’t have any sort of write-up for this one. Although it is supposed to be in an asteroid. Probably inspired by the idea of the Planaron pirate base from Warrior of White Light. Do with it as you will.
Upper Level
This is the main level with the main entrance via the airlock in the lower left. I think this one has some serious scale issues. According to the scale at the bottom, one square is 10 meters. Which makes those passages large enough to drive trucks down. It probably should be 2m per square.
Lower Level
This is the officer level with private facilities, also two different escape routes, one via the airlock in the upper left to a tunnel through the asteroid and the secret exit in the upper right
Secret Escape Bay
The pirate officers have an assault scout stashed away in a hidden bunker. That ship is 21.5 squares long which gives more credence to the 1 square is 2m scale hypothesis. I vaguely remember painstakingly drawing that assault scout based on the image on the little Knight Hawks chit.
Sathar Training Base
Our last location is a set of two maps detailing a sathar training base. I’m pretty sure this one was inspired by the sathar training base in the Sundown on Starmist module. I have a write-up for this one as well that I will post in the future once I’ve had a chance to review it.
Surface Level
This is nestled in a forested area and has a number of features that stick up through the trees. I was also inspired to draw a profile view (lower right) that is looking from the bottom of the map towards the top.
Lower Level
This is the actual base and built completely underground. The defense turret is automated and has a magazine that feeds the rocket launcher and recoilless rifles mounted on the defense dome.
Other Locations
I have several other maps of other locations I developed back in the day, and even more recently. There are only one or two of the older ones that I would consider useful. Most of them were way too far fetched and fantastical for any game I’d run today but I guess made sense to my teen-aged self.
I hope you enjoyed this little walk down memory lane with me. Let me know what you think of these maps and which if any you’d like to see detailed out first. Feel free to use these maps in your own games if you want.
In the mean time, I need to get back to working on the alien ship for the Ghost Ship Osiris module. See you next week.
Here is the next set of entries in the detailed Frontier timeline. This month includes the beginning of the events in the Sundown on Starmist module, the beginning of the final campaign of the sathar against the saurians in the their corner of space, as well as the commencement of hostilities by sathar agents against military targets throughout the Frontier.
Date (FY)
Event
60.054
Waiting for decisions from the Council of Worlds and Spacefleet, PGC dispatches several vessels from Gran Quivera (Prenglar) to Dixon’s Star to serve as a corporate militia in the system.
60.055
Sathar
SCC#3, near Kizk-Kar, completes production of a frigate.
60.056
The small raid (1 LC, 2DD)
launched by Clan Z arrives in Kizk-Kar system. With SF Nova in system, the
UPF ships soundly defeat the sathar ships in the first official battle of
what will come to be called the Second Sathar War. SF Nova extends its stay in the system for
an extra 7 days.
60.057
Council
of Worlds envoys arrive at Volturnus (Zebulon) to meet with leaders of the
various native races.
60.058
* In wake of the recent sathar attack and activity, the Zik-Kit (Kizk’-Kar) government joins the trade and defense alliance with Kawdl-Kit (K’tsa-Kar) and Ken’zah-Kit (K’aken-Kar)
* News of the failed raid on Kisk-Kar reaches sathar space. The premature action and its failure curries disfavor and Clan Z falls out of favor, losing any chance to leading the attack on the Frontier.
60.059
Careful
examination of the Eorna eggs has determined that they are, in fact, viable.
Eorna on Volturnus (Zebulon) celebrate and declare the day of discovery to be
known as the Day of Life to be remembered just as the Day of Doom.
60.060
Members of the Second Volturnus
Expedition depart Volturnus to return to Pale.
60.061
Sathar SCC in the
Liberty system completes construction of half a dozen fighters.
60.062
Rim Coalition delegation arrives at
Gran Quivera (Prenglar).
60.063
Sathar vessels
from the Liberty system arrive at the staging area to await assignments.
60.064
Rim delegation begins meeting with the
Council of Worlds to discuss the sathar situation and the mutual defense of
the Frontier and Rim.
60.065
* Supplies intended for Fortress Kdikit in Madderly’s Star are stolen/destroyed by pirates while in route to the construction site.
* SF Nova departs Kisk-Kar for the K’aken-Kar system.
60.066
After several space
battles, sathar forces overcome the saurian defenses in the Dayzer system and bombard New Kischen (FE004) obliterating
the saurian settlements on the planet.
60.067
The first of
Spacefleet’s Talnor-D (FE004) communication ships, the UPFS Nexus, emerges
from the shipyard at Gran Quivera (Prenglar).
It begins a 30-day shakedown cruise with Task Force Prenglar.
60.068
Sathar forces in the
Tischen system finally overcome the saurian defense forces and launch a
planetary bombardment of Kzz-ten (FE004) destroying the settlements on that
planet. The defense of both the
Tischen and Dayzer systems have put a serious dent in the sathar resources
for the campaign, buying the saurians some time to bolster Sauria’s (FE004)
defenses and work to complete the Great Ark project.
60.069
Second Volturnus
Expedition members arrive back at Pale to a hero’s welcome and receive
recognition for their work in repelling the sathar attacks in that system.
60.070
* Sathar agents in the Frontier begin stepping up activities, especially focused on military and technological sabotage.
* An anti-Streel group, funded by sathar agents, strike at the Streel SCC around Pale, reducing capacity by 63% while repairs are made. Several ships under construction are damaged but the militia Assault Scout miraculously escapes unscathed.
60.071
Two small flights
of three Saurian Battle Rays (FE004) each are dispatched to investigate the
state of the Tischen and Dayzer systems and determine the strength of sathar
forces.
60.072
CEO of Streel, Hilo Headrow (ZG) signs
deal with his friend from the Great Sathar War, Esper Henshaw (ZG), CEO of
MerCo, for MerCo to supply several teams to increase the security at the
Streel starship construction center orbiting Pale (Truane’s Star) while
Streel investigates the source of the recent attack.
60.073
SF Nova arrives
in the K’aken-Kar system and will remain in system for 8 days.
60.074
Initial damage assessment of the Pale
(Truane’s Star) starship construction center reveals that the damage was not
as extensive as originally thought. Materials and equipment shuttled up from
the surface quickly bring production capacity back to 58%. Work begins to
restore full capacity.
60.075
A mountaineering
survival team, calling themselves the Spire Dragons, begin their attempt to
traverse coast to summit and climb Mt. Spire (Lossend, Timeon) (ZG)
completely on foot. The team consists
of members of all seven Frontier and Rim species with the goal that a member
of each species will reach the top of the Frontier’s highest peak.
60.076
Medical Services
Organization issues another alert about the drug Ixiol, stating that the use
of the drug on Triad (Cassidine) has reached dangerous levels and is impacting
work and economic activity on the planet.
They call for the Council of Worlds and Star Law to investigate the
production and trade of the drug.
60.077
* An independent freighter in the Gruna Garu system claims sighting of an unknown vessel, roughly the size of a light cruiser bearing UPF markings but not matching any known UPF vessel type.
* Spacefleet dismisses the sighting as inaccurate claiming no vessel of that type in its inventory and dispatch a small patrol group (a frigate and 2 assault scouts) from Prenglar to investigate.
60.078
* Maximillian Malligigg takes possession of the VSS Last Legs, a small freighter, and with a small crew and scouting party leaves for Starmist. (SF3)
* Sathar reinforcements arrive in the Tischen system.
60.079
Members of the
Second Volturnus Expedition summoned to the Council of Worlds to testify of
events on Volturnus (Zebulon) leading to the Battle of Volkos
60.080
* Sathar reinforcements arrive in the Dayzer system.
* Saurian scout ships arrive in the Tischen and Dayzer systems and begin to probe the systems while avoiding sathar forces.
60.081
SF Nova departs
K’aken-Kar for the K’tsa-Kar system.
60.082
After months of
fundraising, a new organization, The Yazira Heritage Foundation, purchases
and begins refitting a small vessel to use as an exploration ship. Their goal is to reach the star that rumors
claim is Yazira.
60.083
Sathar launch a
probing raid into the Sauria system to test saurian defenses. The two-destroyer task force is quickly
destroyed by a wing of saurian Battle Rays.
Here is the complete, cumulative timeline as a PDF:
This post should have come out yesterday but life has been quite crazy for me the last few days (and weeks really).
Looking Back
For the most part I accomplished everything I set out to do. I got the Sathar Cave System and Hum Calendar published as well as the updated engine data for the new starship construction system. What I didn’t get to at all, once, again, is the Pursale ship for the Ghost Ship Osiris module.
Most of my spare time this last month was eaten up by working on the Frontier Explorer. So much so that my buffer of articles has been completely used up and I’m writing this one a day late. The good news is that the issue is almost done.
The other thing that suffered a bit this last month, especially toward the end, was the Frontier Timeline posts on Twitter. There were a few days that I was so busy that posting the event (or two) for those days completely slipped my mind and they didn’t get posted until the next day. The summary post with all the events from the last month will be coming out tomorrow along with the updated comprehensive document (which is starting to get quite large. This month saw the beginning of the end in the the Saurian sector of space as the sathar begin their final push to eliminate the Saurians.
Looking Forward
The end of April will mark the first full year of my blog. I’m amazed it’s been that long already and I’m very grateful to all my readers and supporters. Toward the end of the month or possibly in early May I’ll do a “year in review” post. The exact timing is a little uncertain as I’ll be traveling during that time frame. Early May is my 25th wedding anniversary and my wife and I will be gone starting in late April on a two week vacation including a 7 day cruise where I will have little to no internet access. So we’ll see what I can get queued up before I leave.
While not directly related to the blog, April will see the publication of issue 24 of the Frontier Explorer. I’ll be sure to post a link here when it is available.
As I already mentioned, tomorrow will see the next Detailed Frontier Timeline post. Beyond that I’m not really sure what the month will bring. I think that regardless of how far I get, I’ll be posting at least the sketches of the Pursale ship as that will give me some incentive to get back to that project. I also have some setting “fluff” pieces that have been on my mind for a while that I might flesh out and publish.
On the starship construction system, I now think I have everything I need to have it work as a replacement for the standard system in Star Frontiers. There are some other tweaks I want to make to the system but it is otherwise good to go. I think I’ll start publishing the details specs for a number of standard ships from the game in the new system as I work on cleaning up the write-up of the system.
I also think that I now have everything for the Death at Rosegard adventure as well and it’s time for me to fully write that up. I’m sure I’ll discover lots of little bits and pieces I’ve left off as I go so that may take some time to finish.
The other thing I’ve been thinking about is designing one or more small, introductory adventures for Star Frontiers. Something that can take someone completely unfamiliar with the game and walk them through the basic game mechanics. I’m thinking at least two small adventures: the first a solo introductory adventure for someone completely new to the game, and the second a simple adventure that can be used to introduce others to the core of the game. The idea is still percolating in my brain but the beginnings might happen this month. We’ll just have to wait and see.
Once again thank you to everyone reading the blog and especially to those supporting me on Patron. I really appreciate the feedback and support you provide.
This post is a result of me thinking about the smaller ships: shuttles, fighters, even assault scouts. But especially the tiny hull size one and two ships. We’re going to look at an expansion of the engine size chart presented in part 2, adding in some new sizes and more data on the existing engines.
The first thing I was contemplating, and that I’ve know for a while, is that the Class A engines were way overpowered for the very small craft. If you took the stats for a fighter, it comes out to a total mass of about 263 tons. The thrust for a Class A Atomic or Chemical drive is 6250 and an Ion drive has a thrust of 3000. That mean the maximum potential ADF is 23.7 for the atomic and chemical drives and 11.4 for the ion drive. Well over the 6 ADF maximum and the 5 ADF specified for the ships. These smaller ships could easily get by with much smaller engines and still have the same performance. It had always been my intention to add in the smaller engine sizes.
The other issue that has been nagging at me lately is docking, specifically in bays inside a larger vessel. The system takes this into account and allocates bay sizes based on the size of the ship and includes the mass of the docked ships in the ADF calculation. Except the final sizes of the ships don’t include size or mass of the engines! I had originally hand-waved that away saying that the engines were rated to propel themselves plus provide X amount of thrust depending on the size and type of engine. For the larger ships, that’s fine. The engines are external to the ship and it’s really not going to dock inside anything else. But for the little ships, this is an issue and I need mass and volume values to make it all work out.
So that’s the task for today: Calculate the data for some smaller engines for the little ships, and come up with mass and volume values for all the engine types.
And then we can properly build and design assault carriers to hold our fighters (and maybe our assault scouts) and any ship that has one or more shuttles it houses internally. So let’s get started.
Smaller Engines
Gemini and Apollo rocket engines from Wikipedia
This is actually the easy part. I intended to make two additional sizes of engines, one about half the performance of the Class A engine, and a second one at half the performance of that.
The hardest bit for me was coming up with a nomenclature. Do I go with the engine size labels from model rocketry (1/2A, 1/4A) to match the A, B, and C sizes of model rockets? Or do I go the battery route and call them AA, and AAA engines. In the end, I decided to go the battery route. So the Class AA engine has about half the performance of the Class A engine, and the Class AAA engine about 1/4 the performance.
The only real constraint I had was that I wanted at Class AAA engine to still provide and ADF of 5 to the standard UPF fighter. Since that fighter has a mass of 274 tons (when configure, it has to provide a thrust of at least 1370.
The thrust ratios between the Class A, B, & C engines are on the order of 3-4. If I maintained that same ratio, then our AA engine at best would only have a thrust rating of 6250/9 = 694, about 700 which is too small. Of course 2 of them would give us the required thrust but all the depictions of the smaller ships are single-engined and I wanted to go with that.
So instead of going down by thirds, decided to go down by halves. Actually a little more in the case of the step from Class A to Class AA with the atomic and chemical drives. With that decision made, it was time to work out the values. That gives us the following table.
Engine Performance Table
Class A
Class AA
Class AAA
Engine Type
Thrust
Cost (cr)
Thrust
Cost (cr)
Thrust
Cost (cr)
Chemical
6,250
50,000
3,000
28,000
1,500
15,000
Ion
3,000
100,000
1,500
55,000
750
30,000
Atomic
6,250
250,000
3,000
130,000
1,500
70,000
The values for the Class A engines are simply taken from the original post and provided for comparison. Additionally, we need the cost of fuel for each of these new engines types.
Fuel Cost Table
Engine Type
Class A
Class AA
Class AAA
Chemical
300
150
75
Ion
5
3
2
Atomic
10,000
6,000
3,000
As with the larger engines, the atomic engines require the atomic fuel pellet at the prices listed plus a load of Chemical fuel as well.
Unlike the larger atomic engines, which can hold more than a single fuel load, the AA and AAA atomic engines can only hold a single load. Additionally, the smaller ion engines can only hold 5,000 fuel units instead of 10,000 like their full-sized siblings.
Volumes and Masses
Now for the harder part. Generating volumes and masses for these various engines.
Engine Volume
There really isn’t much go to on here. I could look at the miniatures, but they were created more for style than with any eye for consistency between the ships. There are also a few drawing in the game books that might be used as a reference. In the end, I did the following.
I started with my 3D model of the assault scout which is based on the drawings of the ship all through the books. I then assumed that this plus the wing of the assault scout represented the volume of the engine plus the fuel tanks needed to hold the three units of fuel for the engine. This gave me a volume, based on my models of 657 cubic meters. We’ll round that down to 600 cubic meters and call it good. That’s the volume of a Class A atomic engine and its associated fuel tanks.
Now, anyone who looks at real rockets will immediately realize that that isn’t a lot of volume for fuel. For example, the space shuttle’s external tank had a volume of just over 2000 cubic meters. And that’s enough to make one trip up, not one and back, let alone three trips. So we’re dealing with some amazing rocket propellant here (and really cheap too). But that’s okay, I’m willing to have handwavium as a fuel additive in our rockets.
The next thing we need is a scaling relation for the larger (and smaller) engines. It has to account for the larger fuel load in the larger engines, And remembering that for the atomic engines, we can hold additional loads over the three in the Class A engines. At the very least, it has to scale up as the thrust scales. But I want to add a little more on top of that.
At one point in the past, I had made 3D models of Class A, B, & C atomic engines. At some point when I created them, I had some rationale for why they were the size they were. I don’t remember that rationale now (and it may have been purely aesthetic), but I figured I could at least look at them and see what the relationships were.
In the end I decided that the scaling for the volumes would be 1.45 times the scaling in the thrust. That would provide a baseline and then I’d adjust the numbers slightly to get nice “round” numbers (i.e. 2800 instead of 2782.5). On the smaller engines, I adjusted things up bit making the engines slightly larger to account for “minimum” sizes for some of the components and fuel tanks. I also made some adjustments to the various types of engines to account for the type and amount of fuel they carry.
Engine Mass
This one was much easier as it was to be based off of the volume. In this case I just assumed an “average” density for each type of engine and its fuel. The question was what to pick.
Modern rocket fuels are actually very light, on the order of 0.7-1.0 tons per cubic meter, less dense than water. And liquid hydrogen, the primary fuel in ion engines, is amazing light at only 0.07 tons per cubic meter. On the other hand, the actual engine parts are going to be much more dense to withstand the forces and pressures being exerted.
So in the end I compromised. Chemical engines would have an average density of 2 tons/cubic meter, ion engines would be 1.5 to reflect their much lighter fuel, and atomic engines would be 2.5 to represent the additional components that give them their special properties.
Engine Data
With all of those items figured out we can now build the full data table on each of the engine types.
Chemical Engines
Size
Thrust
Cost (cr)
Fuel Cost (cr)
Volume (m3)
Mass (tons)
AAA
1,500
15,000
75
100
200
AA
3,000
28,000
150
200
400
A
6,250
50,000
300
400
800
B
20,000
175,000
1,000
2,000
4,000
C
80,000
770,000
4,200
12,000
24,000
Ion Engines
Size
Thrust
Cost (cr)
Fuel Cost (cr)
Volume (m3)
Mass (tons)
AAA
750
30,000
2
100
150
AA
1,500
55,000
3
200
300
A
3,000
100,000
5
500
750
B
10,000
400,000
17
2,500
3,750
C
40,000
200,000
70
15,000
22,500
Atomic Engines
Size
Thrust
Cost (cr)
Fuel Cost (cr)
Volume (m3)
Mass (tons)
AAA
1,500
70,000
3,000
100
250
AA
3,000
130,000
6,000
200
500
A
6,250
250,000
10,000
600
1500
B
20,000
400,000
32,000
2,800
7,000
C
80,000
6,000,000
125,000
16,000
40,000
Impacts
So how does this impact our smaller ships? Most importantly, I want to see what it does for fighters and digger shuttles, the two small ships that are explicitly included inside larger vessels.
Using this system before the changes to the engines, we had the following characteristics for the two ships:
Fighter – mass: 274 tons, volume: 136 m3, 1 Class A Atomic engine, Max loaded ADF: 22.8
Digger shuttle – mass: 1330 tons, volume: 641 m3, 1 Class A Chemical engine, Max loaded ADF: 4.7
If we were to just update these vessels with the data for the original engines, the volume of the fighter would jump to 736 m3 with a mass of 1774 tons, an increase of 441% and 547% respectively. The digger shuttle isn’t quite as bad as it was bigger to begin with but it would increase to 1041 m3 and 2130 tons, increases of 62% and 60%.
However, these ships don’t need this large of an engine. If its occupants could handle it, the Class A engines on the fighter give it a maximum possible ADF of 22.8. Since it is only supposed to have an ADF of 5, we can swap out the Class A engine for a Class AAA engine. It will still have a maximum ADF of 5.5. With that change, the the fighter now has a volume of 236 m3 (a 74% increase) and a mass of 524 tons (a 91% increase). Still larger, but much more reasonable and easier to pack into our assault carriers. It also reduces the cost of the fighter by 180,000 credits. Since the original cost was 528,151 cr., reducing that by 180,000 is a savings of 34%. And that makes the bean counters at Spacefleet happy.
The default Class A chemical engine on the digger shuttle gives it a maximum ADF of 4.7, well within the species limit of 5. However, it only really needs an ADF of at least 2 to get on and off planets, so here we can get away with a Class AA chemical engine. This still leaves the shuttle with a max ADF of 2.3, reduces the cost of the shuttle by 22,000 cr., and put the final volume and mass at 841 m3 and 1730 tons (increases of 32% and 30% over the original), making them easier to store in the mining ships. Since the digger shuttle was original 140,320 cr., the 22,000 cr. reduction saves nearly 16% off the cost of the shuttle.
And for the curious, the Assault Scout has a volume and mass of 3455 m3 and 2458 tons. Adding in its two Class A atomic engines brings its total volume up to 4655 m3 and total mass up to 5558 tons (increases of 35% and 126%). That makes it 20x larger and 11x more massive than a fighter. So it’s not unreasonable that special carriers might be designed to transport the larger ships.
Final Thoughts
I definitely like the direction of this change. The size of the fuel storage is probably unreasonably small, but that’s just going to be part of the fiction of our science fiction. The exact values might change as this sees a bit more play but I think it serves as a solid baseline to build on.
What are your thoughts and ideas on this update to the engines? Let me know in the comments below.
With work on the next issue of the Frontier Explorer happening, it’s taking me a bit longer to get to these posts than I had hopped but progress is being made. And I haven’t yet fallen behind.
Today we build the calendar system for Hum, the humma homeworld in the Fochrik system, which we have been detailing in the previous posts (part 1, part 2) in this series.
In the first part of this series, we established the following facts about Hum:
From Zebulon’s Guide to Frontier Space
Rotational period: 30 hours (we’re going to refine this a bit later on)
Surface gravity: 0.9g (which we increased the precision on to 0.91g)
3 moons: Kran, Gluk, & Clud
From our calculations:
Orbital Distance: 1.23 AU
Orbital Period: 11323.3 hours
Density: 5.43 gm/cm3
Mass: 0.8139 Earth masses
Radius: 5,991.93 km
Of those parameters, we won’t be using the surface gravity, radius, or orbital distance in this analysis but we will be using the rest.
The Moons
I ignored the moons in the early parts of this series but now they become important so we need to detail them out a little bit more. Just as the orbital period of the Earth’s moon defines the concept of a month for us, given that this is the humma homeworld, the orbital periods of Hum’s moons would probably play a roll in defining their calendar system as well. So lets figure out the data on Hum’s moons.
All we really have to start with is the fact that there are three moons and their order (assuming the first one listed is the closest). Beyond that, we can really do whatever we want. That said, we have a few considerations to keep in mind.
First, Hum is smaller than Earth (about the size of Venus) and so has a smaller gravitational pull. This just means that the larger the moon, the more it will cause the planet to “wobble” about their common center of gravity. So we may not want any moon to be too big. It also means that if the moons have to be too far away, they might have escaped the planet’s gravity well. This latter point shouldn’t be an issue but is something to keep in mind.
Second, the moons will all mutually interact gravitationally. Which means if we have strong orbital resonances (orbital periods in small integer ratios), or if they have very close passes (with “close” depending on their relative sizes) as they orbit, the moon system may be unstable and not have survived to the present day.
So while we can pick anything we want, we should keep those ideas in mind. Now ideally, after picking the parameters for the moons and their orbits, I would generate orbital data for them all and run them through several hundred thousand or several million years of orbits to confirm stability but I didn’t do that. So we’ll just hope what we come up with something that makes sense and works.
The other thing to consider is what role we want to attribute to the moons in regards to the calendar system. This will have an impact on the orbital periods we pick.
Kran
From here on out we’ll be calculating time in hours and using the Galactic Standard Hour (which equals one Earth hour) as the value. In truth, there is no real reason for the humma to have an hour (or minutes or seconds for that matter) that correspond to that but it as useful measure to discuss the topic. There’s only so much new information you can wrap your mind about.
Kran is the innermost moon of the system. It will have the shortest orbital period of the three. As such, I decided that this moon would also be the smallest and associated with the “week” concept on Hum.
Since I want the “week” to be something on the order of 5 to 10 local days, and as I have no real reason to prefer one value of another, I’ll just roll 1d6+4 to get the value. I rolled a 5 so a Hum week is 9 local days long. Since the local day is 30 hours (from Zeb’s Guide), the week is 270 hours long. I want the orbital period of Kran to be something near this value so I just rolled four d10s to refine the number. The first one, I subtracted 5 from to get a number to add or subtract from 270, and the next 3 were just read as digits to represent the first 3 digits after the decimal place.
I rolled a 5 for the first die which meant no offset and then I got a 6, a 10(0), and a 4 so the orbital period of Kran is 270.604 hours. I realized later in the process that I should have probably given a bit more range the the +/- die but it’s fine as it is.
We’re also going to want to have a mass for the moon as that will have a small impact on its orbital distance. Since I wanted this moon to be small but still basically spherical, I just arbitrarily picked a size that was near to the size of the asteroid Ceres. I rolled some dice to pick exact values (although now I don’t remember exactly the rationale behind what I rolled) and came up with a value of 0.0125 times the mass of the Moon.
To get the size of the moon given its mass, we need its density. Referring back to the possible densities of the planets from the original article, I wanted to pick something in the 2-6 gm/cm3 range. So I rolled a d4+1 for the integer part and some d10s to get two decimal places and came up with a density of 2.71 gm/cm3 for the moon.
Okay, now we’re all set to calculate the final values. Determining the radius is straightforward, we’re just back to this equation:
Only we’re solving for that r in there instead of M. That gives us a radius of 432.51 km. Next we want the orbital distance which takes us back to this equation:
where we are solving for a. M1 is the mass of the planet, and M2 is the mass of the moon. Again I used this handy website but since you can’t actually solve for a, I had to try various distances until I got the period to match. So it might have actually been faster to do the math on my calculator but oh well. We end up with a result of 198,336.5 km as the orbital distance for Kran.
For reference the diameter of Earth’s moon is 3474.2 km, almost exactly 8 times bigger, and it’s orbital distance is on average 384,400 km, so Kran is nearly twice as close.
Gluk & Clud
I’m not going to go over every detail of the other two moons but suffice it to say I followed the same procedure for each of those. The only constraints I had was that I wanted Gluk to be the largest of the three moons and have it’s orbital period correspond to between 1/8 to 1/14 of a year to represent the month concept. Clud was going to be way out there and orbit only about 4 times a year to correspond to the seasons.
After working through all the math we get the following results for each of the moons:
Name
Orbital Period (hrs)
Orbital Distance (km)
Mass (moon)
Density (gm/cm3)
Radius (km)
Kran
270.604
198,336.5
0.0125
2.71
432.5
Gluk
1,026.836
483,757.2
0.5237
3.14
1,430.2
Clud
2,826.842
948,883.7
0.2413
3.46
1,069.5
This image shows the sizes of the moons relative to each other and to Earth’s Moon. The image on the left shows their actual physical sizes if they were all side by side. The image on the right shows their apparent sizes as seen from the surface of Hum (assuming the Moon was dropped in at the proper distance).
The moons are all physically smaller than the Earth’s moon by quite a bit and appear smaller in the sky. Also, notice that because Kran is so much closer than the other moons, although it is physically the smallest, it appears almost as big as Gluk and larger than Clud.
Hum’s Rotation Period
One more thing we need to establish is the actual rotation period of Hum. The information in Zeb’s Guide said it was 30 hours. However, I want to add a few more decimal places but still have it round to 30. So employing my usual method, I rolled d10-6 (to get a value between -5 and +4) and then two d10s for decimal places. I then added that to 30 to get the actual rotation period in hours. I ended up with 30.09 hours.
The Calendar
Now that we have all the physical data we need, we can get on to the actual purpose of this post, determining the calendar of the planet Hum.
Length of Year
The first thing to determine is the length of the year in local days. We have the orbital period of the planet (11,323.3 hours – about 30% longer than an earth year and 41.5% longer than the Frontiers’ Galactic Standard Year) and the rotation period of the planet (30.09 hours) so we just divide and find that the Hum year is 376.3144 local days long.
In local day terms, the year is only a bit longer than an Earth year, just 11 days more. It also tells us we’re going to need leap years, about every third year. We’ll come back to that.
In the previous sections, with the exception of the moon Kran, I sort of glossed over the relationship between the orbital periods of the moons as they relate to the length of the Hum year. Now let’s look at that in detail.
A Week on Hum
The inner moon Kran has an orbital period of 270.604 hours. Dividing this by the length of a day (30.09) hours, we get that Kran orbits every 8.993 days. That’s almost exactly 9 days. In fact, amazingly close to to exactly 9 days. Which is why I said above, I should have allowed for a bit more variation.
You might be suspicious of how well these orbital periods line up. The exact values selected were not completely arbitrary. I picked approximate values based on what I wanted to see and then let the dice tweak them slightly. And then I also manually tuned them a bit more. For example, I actually rolled 30.06 hours as the rotational period of the planet but when working out the leap years, liked the values I got for 30.09 hours better and went with that. So it’s no coincidence that the numbers come out so close. Maybe too close.
But that’s fine, sometimes you get lucky. So we’ll define a week on Hum to be 9 days long. At some point the start of first day of the week corresponds to the full Kran on the meridian but since the cycles slowly drift, that only occurs every once in a while and the phases slowly move through the week.
Comparing Kran’s orbital period to the year, we see that it makes 41.84 orbits each year so a typical year is almost 42 weeks long.
A Hum Month
If we compare the orbital period of the moon Gluk to the length of day we see that it’s orbital period corresponds to 34.125 days. And comparing it to the planet’s orbital period, it makes 11.02737 orbits in a single year.
Since I’m going to tie the concept of a month to the orbit of Gluck, a nominal month is 34 days long and there are 11 months in the year. There might be some variation like on Earth but this works as a base line.
With eleven 34-day months, that accounts for 374 of the 376.31 days of the year, leaving 2 extra days in the calendar. I’m going to assign one of those days to one of the months making it 35 days long (in the spring) and the other will be a holiday celebrating the passing/new year and will occur at the end of summer which will be when the Hum calendar year ends.
A Seasonal Moon
That leaves us with Clud. It’s orbit is 93.95 days long and it orbits 4.006 times each year, completing one orbit every season. Since the timing of its orbit doesn’t quite line up with the planet’s orbital period, the timing of the full phase of this moon slowly shifts (by just over half a day a year) over the centuries but the humma have tracked this for millennia and know the pattern.
Leap Years
All that’s left is to deal with that pesky 0.3144 days left over after each year. Multiplying by 3 gives us 0.943 days, which is just enough to be considered another day. Thus every third year, the end of year holiday is a two day event instead of a single day adding an extra day on that particular year but not part of any month.
It’s not quite a full day though and so every 51 years, the deviations add up enough that the extra day is not added to the calendar, just like on Earth when we don’t add in the leap day on years divisible by 100.
Finally, there is one more minor correction and that occurs every 1530 years. On that year, which would normally be a year the extra day is skipped, the extra day is included (just like including the leap day here on Earth in years that are divisible by 400 as occurred in the year 2000). This has only occurred once since this calendar was established and the next one won’t occur for another 172 years.
The Final Calendar
So the final Hum calendar looks like this:
One week is 9 days long – in modern times it is a 6 day work week with a 3 day weekend
Each year has 11 months plus one holiday at the end of the year to celebrate the harvest and ring in the new year. This feast day/beginning of the new year corresponds to the end of the Hum summer (what we would call fall)
One month consists of 34 days, or nearly 4 weeks. The exception to this is the 5th month which is 35 days long. This occurs during the planting season giving one more day in that month.
Every three years there is a leap day, extending the harvest holiday into a 2 day event instead of a single day.
Except that every 51 years, the leap day is skipped and every 1530 years the day that would be skipped is included.
One more thing we need is to anchor this calendar with the Frontier standard calendar. To do that I’m going to say that the start of Hum year 2898 will coincide with FY60.124 and that year is a leap year so the end of year celebration (that starts on FY61.290) will last two days.
Last Thoughts
I realized as I was typing this up, that I didn’t account for the difference between sidereal and synodic periods for the moons. The orbital periods listed are really the synodic periods (as seen from the surface of Hum) but I treated them like the sidereal periods for computing orbital distances. Which means the distances are a bit off. The differences would be relatively small but that’s something I should revisit in the future. The rotation period for Hum is definitely the solar period (noon to noon) and not the sidereal period.
Otherwise, this is a pretty good description of Hum and its moons and a reasonable calendar for the system. I didn’t touch on Forge or Larg, the two other inhabited worlds in the Fochrik system. I’m assuming this calendar predates the humma’s space age and so is the foundation of any other calendar system on the other worlds. How it was adapted might be another article in the future but for now is left as an exercise for the reader.
What do you think of the calendar system presented? What would you have done differently? What do you like? Let me know in the comments below.
I believe this is the last major piece of the of the Death at Rosegard adventure that I haven’t yet published so let’s get to it.
An old, abandoned mine
In my setting, the Streele Mining corporation is the forerunner of the Streel Corporation. Hilo Headrow did a lot for survivors and refugees, during and after the occupation, and quickly rose to take control of the company. As corporate interests widened from just mining, the company was renamed.
Located some 30-40 km northeast of Rosegard is an abandoned Streele Mining corporation mine. It has been abandoned since before the Great Sathar War. Sometime after the war, an enclave of sathar survivors found the mine and have set up shop. They mainly are lying very low but send out scouts into the surrounding area and are the ones that were controlling the operative at the Streel mine near Rosegard. In addition, they were in contact with Trey Mulden to do the cybernuk breeding.
Let’s start with a map
This map was drawn by hand on my old Samsung Galaxy Note Pro 12.2 tablet. I added the shading and the letters (but not the numbers) in Gimp for this post.
In addition to the labeled locations which are described below, there is a mostly destroyed and overgrown mining complex just outside the entrance. Bits and pieces of walls and foundations still exist but there really isn’t much there.
Area
Descriptions
Aircar landing pad – while mainly filled with debris and rusted out vehicles from over 50 years ago when this mine was shut down, there is space for an aircar to land. The sathar have an old model aircar that may or may not currently be at the base. It was used by the sathar that was contacting the agent at Rosegard. If the PC’s captured or defeated that sathar, the aircar is not present.
Pool – This is a clear water pool that the sathar sometimes use for swimming but is primarily a source of drinking water.
Work area
Food Production (a) – This building contains a series of terrarium-like containers that have a variety of small bugs and other creatures growing in them. Additionally there are some hydroponic vats growing plants. None of these seem to be native to Pale. There is a single sathar working here. The sathar does not have a weapon but does have a communicator.
Tech lab (b) – This building contains what appears to be a technician or robotics lab although alien in nature. What appears to be a half assembled robot sits on one worktable and other tables contain various gadgets in various states of construction. One of the items looks like a nearly complete Cybernuk headset. There are 3 sathar technicians here. Two of them are armed (laser pistol with 2 power clips) while the other has a communicator.
Food Storage (c) – This is a climate controlled building with a freezer section. It contains a large numbers the creatures and plants from the food production building but preserved for storage. There is several months’ worth of food here.
Supply storage (d)- This area contains a wide variety of physical and technical materials ranging from various electronic parts to tubing, to wires, to chemicals. Most of the materials look to be frontier in origin but some are definitely alien in appearance.
Nuk pen (e)- This pen contains three cybernuks with no cybernetic attachments. It is locked with a level 1 lock simply to keep the nuks inside. When opened, the nuks will charge out an attack the PCs. An INT check will alert the PCs that something alive is inside. Wall and door have 100 structure points.
Nuk Pen (f) – This pen contains a single nuk with the cyber attachment. It is locked with a level 1 lock to keep the nuk inside. When opened, the nuk will charge out and attack the PCs. An INT check will alert the PCs that something alive is inside. If this cybernuk is released first, the other three will start bashing against the wall and door trying to get out to come to its aid (controlled by cyber implant).
Power plant and water processing – This is a geothermal power generator (type II). Cabling runs from here back to area 3 that has been partially hidden by debris and rubble on the floor. Additionally there is a large water processing facility here with fillers and processing system. Pipes run from here to areas 5, 6, 7, & 9 from here along the ceiling. There are two Sathar technician here. One of the sathar is armed (laser pistol with 2 power clips) while the other has a communicator.
Small Slime Pool – This pool houses four sathar. There are small bins by the pool that hold the personal effects of the sathar that call this pool home. Each has a backpack with a food jar, a small communicator, and two of them have laser pistols with two power packs each. There are currently two sathar in the pool.
backpack, communicator, food jar
empty
empty
backpack, food jar, laser pistol with 2 power clips
Large Slime Pool – Similar to area five, this larger pool houses eight sathar. There are currently four in the pool. The contents of the bins are:
Empty
Backpack, food jar, laser pistol with 2 power clips
Empty
Empty
Backpack, food jar, communicator
Backpack, food jar, laser pistol with 2 power clips
Empty
Backpack, food jar, laser pistol with 2 power clips
Large Slime Pool – Similar to area five, this larger pool houses eight sathar. There are currently four in the pool. The contents of the bins are:
Empty
Empty
Backpack, food jar, laser pistol with 2 power clips
Empty
Backpack, food jar, communicator
Empty
Backpack, food jar, communicator
Backpack, food jar, laser pistol with 2 power clips
Robot storage – This storage area holds a dozen completed combat robots. While the parts are Frontier sourced, the design is definitely alien. Characters have a –10% modifier to attempt any skills on these robots
Leader Slime Pool – This is the personal slime pool of the compound’s leader. This is a middle caste sathar. There is a bin here with the leader’s personal belongings which contains a backpack, a laser pistol with 4 power clips, an inertia screen with a power beltpack, two food jars, a communicator, and a small computer.
Initial status of the mine
The mine is not on
alert for intrusion. It was fairly
recently set up and does not have a lot of security features installed yet as
the sathar began immediate production of the combat robots and food.
One of the residents is the controller for the agent at Rosegard and possibly was captured or killed by the PC’s. If it wasn’t, add in another sathar to area 5 (small slime pool). Another is out returning from the Trey Mulden’s compound. The second sathar will arrive back 5d10x10 minutes after the PCs enter the compound.
When the PCs first arrive, there are two sathar returning to area 7 from area 3 after being on duty that the PC will encounter in the passageway between those two areas when they first enter it. The next duty rotation is not scheduled to occur for another 1d5 hours at which point two of the sathar in area 6 will be headed to area 4.
None of the doors,
except to the nuk pens, are locked.
Sathar
Reaction to PCs Arrival
Before
the sathar are alerted
When the PCs enter one of the buildings with sathar in it, immediately start combat. Those sathar that are armed will draw their weapon the first round but cannot fire until the second round. They will begin to attack the PCs as soon as they are able. Sathar with communicators will attempt to alert the rest of the compound. It takes them one turn to open their backpack, one turn to grab the communicator, and the third turn to send the message. The alert message will go out on the sathar’s action during the third turn. If the PCs eliminate that sathar before then, no alert goes out. Otherwise, consider the compound to be alerted going forward.
When the PCs enter
one of the pool areas containing the lower caste sathar, there is only a 5%
chance that one of the sathar is not in the water. Regardless, the sathar will notice the PCs
immediately and react. The will start
exiting the pool at the rate of 1d2 sathar per round (to represent different
distances from the edge of the water) starting on round 2. Once they have left the pool, it will take
them one round to reach the bins and grab their backpacks unless the PCs block
their way. On the round after reaching
the bins, those sathar that are armed may begin firing; those with communicators
will simply grab their communication device and begin to activate it. They can send an alert out as their action on
their next turn (3rd after exiting
the water).
Sathar with
communicators will engage in melee combat (two attacks per round) with their
bare tentacles once the alert has been sent or immediately if the alert has
already gone out.
After
the sathar are alerted
Once the alert has
gone out, any sathar encountered will be ready and attack immediately upon
seeing the PCs.
Any sathar in the
slime pools will immediate move toward area 8 where they will begin activating
the combat robots at the rate of one every other turn. They will remain there until all the robots
are activated. At that point they will
proceed up through the cavern complex looking for the invaders. The leader will hang back sending the robots
and other sathar to engage the PCs. If
the PCs arrive at area 8 before all the robots are activated, the robots that
are active and those sathar that are armed will engage them while the others
continue to activate the remaining robots.
As the robots are activated, they will be sent to engage immediately.
The sathar in area 4
will take cover and immediately attack the PCs if they enter the generator and
processing facility. They will get one
free round of attacks on the PCs before the PCs can react.
The sathar in the
food processing facility will head across the cavern to the tech lab when the
alert is sounded (if they are not the one sounding the alarm) and will either
engage the PCs from behind if they are in the tech lab or wait with the sathar
in the tech lab until the PCs or the main body of sathar arrives.
The sathar in the
tech lab will be waiting for the PCs if they arrive before the main body of
sathar and robots. There is a 10% chance
that they will have been able to reassemble the laser pistol being modified on
the workbench. The sathar using it will
have a 10% penalty to hit as is hasn’t been fully converted. If the PCs take a long time to get to the
tech lab after the alert is sounded, raise the probability to 20%.
Sathar
tactics
As the sathar are under-armed, they will try to attack from cover or ambush if at all possible. If they have robots with them, they will send the robots in the fore to take damage from the PCs’ weapons. If a sathar is in danger of being captured or thinks they will die, they will attempt to close with one or more of the PCs and trigger the self-destruct in their laser pistol (if they have one). When the self-destruct goes off, treat it as a fragmentation grenade doing a number of d10 worth of damage equal to the SEU remaining in the clip. If the clip is empty it will still do 1d10 points of damage. PCs get a RS check to take half damage and intertia screens and skiensuits halve the damage as well.
Here is the next installment in the detailed Frontier timeline. This month’s entries include the posts that prompted the “How to build a star system” posts earlier in the month. The sathar are beginning to ramp up their forces while the Frontier is still debating what to do about the “Sathar Situation” on Volturnus.
Date (FY)
Event
60.026
Envoy delegation from the Council of Worlds is dispatched from Gran Quivera (Prenglar) to go to Volturnus (Zebulon) to meet with the races of that world.
60.027
The KSS Trader’s
Gambit arrives at Kawdl-Kit (K’tsa-Kar).
60.028
Maximillian Malligigg has a piece of
fused metal he found on Starmist analyzed and learns it is the result of
nuclear fusion. He begins securing
funds to purchase a ship and return to Starmist in advance of an official
expedition. (SF3)
60.029
Members of the
Second Volturnus Expedition raid a small outpost discovered in the logs of
Slave City One that was a hideout for the Star Devil. While the Star Devil was not there,
valuable information about the Star Devil’s dealings in the Frontier are
uncovered.
60.030
Worried about the events in the Zebulon
system, the Rim Coalition increases spending for the Flight by 50%. Delegation dispatched to the Council of
Worlds from Faire (Capella) to encourage that the Frontier take the Sathar
threat seriously.
60.031
– The remnants of the sathar’s Zebulon fleet reaches sathar space arriving at the system containing sathar starship construction center #5
– Another destroyer is completed at the sathar starship construction center in the Liberty system.
60.032
Contestants, spectators, and reporters
gather on Hum (Fochrik) for the annual Humma Jump Competition. Speculation is high that the current record
in the standing long jump event of 38.272 meters will be surpassed this year.
60.033
Universal
Households unveils its new fashion line at its annual show on Hakosoar (Scree
Fron) which is transmitted via subspace radio to all systems in the
Frontier. Products immediately go on
sale across the Frontier as competitors race to match the new style.
60.034
After two days of competition, Zonuul
Usu of Larg (Fochrik) wins the Humma Jump Competition with a jump of 38.275m,
beating the previous species record by 3 millimeters. Two others beat the previous record in the
final round of competition but lost to Zonuul.
60.035
SF
Nova arrives in Fromeltar system; it will be in system for 4 days
60.036
Initial examinations reveal that the
Eorna egg cache does in fact contain viable eggs. While overjoyed that they
no longer face extinction as a species, concerns about the societal impact of
introducing the new Eorna are raised. (SF2)
60.037
Synthetics
Corporation announces a new brand of sports drink that provides the necessary
electrolytes for all Frontier and Rim races.
Included in the line is a “Hyper Humma” variation with 10x
the flavor enhancers to appeal to their deadened sense of taste. It quickly
becomes a point of bravado for members of the other race to attempt to
consume the “Hyper Humma” variations.
60.038
Interplanetary Industries CEO Harlon
Thow spotted wearing a never before seen style of toxy-rad gauge that is
slimmer and more compact than previous styles. Rumors circulate that it is a new device
soon to be released by the company.
60.039
In its first 60
days of operation, the Yazira Dome has had over 1 million visitors, mostly
inhabitants of Hentz (Araks). Many across the Frontier denounce the Family of
One for not allowing non-yazirian visitors to the planet and the Dome.
60.040
Sathar vessels are dispatched from the
Liberty system toward a staging area somewhere near the Frontier.
60.041
Sathar Clan Z
vessels, previously in route to sathar starship construction center #3 are
diverted by clan leaders toward Kizk-Kar.
60.042
Sathar forces, operating in Saurian(DM103) space, launch simultaneous assaults against saurian forces in the Tischen (FE004) and Dayzer (FE004) systems.
60.043
Several Streel
compounds on Laco (Dixon’s Star) are captured by Galactic Task Force teams
and Streel employees are forced to evacuate and return to the Streel
headquarter compound in Tyrell’s Landing.
60.044
SF Nova departs Fromeltar
for Kizk-Kar
60.045
The Rim
delegation arrives on Pale (Truane’s Star) for a short stopover to meet with
the Pale government about the sathar situation.
60.046
Another destroyer is
completed in the SCC in the Liberty system.
60.047
Pale militia
delegation testifies before the Council of Worlds on Gran Quivera (Prenglar)
as to the events of the Battles of Zebulon and Volturnus. Debate and deliberation on the need for
increased military buildup continues.
60.048
Rim Coalition delegation departs Pale
(Truane’s Star) to continue on to Gran Quivera (Prenglar) to meet with The
Council of Worlds
60.049
Based on
information obtained from the Star Devil lair on Volturnus (Zebulon), the
Pale government raids and seizes assets from several business connected with
the Star Devil pirate organization.
60.050
SF Nova arrives in
Kizk-Kar. Will be in-system for 8 days
60.051
Several
PGC vessels, just arriving in the Dixon’s Star system en route to Laco are
destroyed by unknown vessels.
60.052
PGC representatives appear
before the Council of Worlds requesting Spacefleet aid to protect their
vessels in the Dixon’s Star system from suspected Streel aggression.
60.053
Proving
the rumors correct, Interplanetary Industries announces a new line of
wearable monitoring devices including a new toxy-rad gauge matching the one
spotted on CEO Harlon Thow several days earlier. The new line boasts extended battery life
and greater accuracy in a smaller package.
For those of you that read these “state of the Frontier” posts, you probably realize that my plans got turned all upside down this month. The plan was to focus on Ghost Ship Osiris and the Death at Rosegard adventures with maybe some other items in the background. Well, the background jumped to foreground and then the month was over.
Looking Back
I had intended to work on the Ghost Ship Osiris adventure but for the most part that didn’t happen. I did get some initial sketches done of the Pursale ship. But I’m not completely happy with them and they definitely need some work.
Death at Rosegard didn’t even get touched. I honestly don’t think I even thought about it this month. I have now added it to my list of draft posts, however, and so it will be bugging me to get it finished now when I look at active projects.
What did come to the forefront was the beginning of the “Create a Star System” series. Triggered by a couple of posts I made on the timeline project, that series got stuck in my brain and seriously worked on. This month we got the details on creating the system data and actually drawing the map (including a video of the drawing process). The drawing of the map didn’t take as long as I expected but it took me a lot longer to actually do the write-up in the posts than I was anticipating.
I also posted a short bit on my new starship construction system covering hull types, armor, and sensors systems. Those are the last of the pieces of the system that differ significantly from the standard starship components in the core Star Frontiers Knight Hawks rules. I’ve been thinking about the system and realize I need a little bit more work on the engines so there is one more post on that before I can pull it all together.
Behind the scenes, the timeline project continues unabated. I also started working on pulling the next issue of the Frontier Explorer together, more on a management side, but things are progressing.
Looking Forward
So what’s in store for this month? We’ll start the month off with the now usual timeline post. I have entries for half the days this month (up through the 12th and a few random days after that) plus about half of April as well. So at some point in the next week or so I’ll be sitting down to flesh out the rest of the events happening over the next 30-60 days in the Frontier. We’re still a bit away from the massive Sathar fleets showing up in the Frontier but the activity is starting to heat up.
Now that I missed it last month, I plan on getting the sathar inhabited cave system finished and out this month. It really just needs some work cleaning up the map so I really don’t have an excuse.
After that, I intend to finish up the “Building a Star System” series with the Fochrik system’s calendar. That will wrap up that series for now.
I’m not sure what the 4th post of the month will be. Most likely it will be the last little bit about the engines in the new starship construction system. I’ll be working on the Pursale ship but I don’t know that I’ll have anything ready to go on that before the month is out unless I do a post just about the sketches and general design. Or it could be that something else grabs my interest and I run with that. We’ll see where it falls out.
The other thing I’ll be working on behind the scenes are the Frontier Explorer and another fanzine. There will be a big push on my part this month to get the next issue of the Frontier Explorer ready since we plan on releasing it in April. Keep your eyes on the magazine’s website for more details as they come out. We have all the articles we need, we just need to finish polishing our new layout. I’ve also been asked to head up another fanzine, this one more focused on general OSR topics and probably more fantasy focused. It’s in its infant stages but I have a big team and plan on leveraging my Frontier Explorer experience to put them to work and minimize what I need to do. More director than front-line worker bee. There will be more information on that in the coming months as well.
I think that’s it for now. I had a good month and am looking forward to a busy but exciting March. See you all around the Frontier.
Okay, in my last post on this topic, we generated all of the data needed to draw out a system map for the Fochrik star system. If you haven’t read the previous entry, you might want to but it’s not necessary. The next step is to take that data and turn it into the actual image. This post will cover that process. Let’s dive right in.
The Data
First a quick summary of the data for the system that we generated last time. While we won’t need all of this for the map, but it’s good to have it all summarized in one place. For generating the system map, we’re only going to need the orbital distance and the planet’s radius.
Name
Orbital Distance (AU)
Orbital Period (hrs)
Gravity (g)
Mass (Earth)
Radius (km)
T1
0.19
687.46
0.33
0.0349
2,064.55
T2
0.52
3,112.57
0.67
0.3373
4,468.50
Forge
1.13
9,316.45
0.81
0.6012
5,443.75
Hum
1.23
11,323.3
0.91
0.8139
5,991.92
Larg
1.61
16,957.2
1.12
1.4622
7,215.22
J1
4.66
83,501.4
3.30
525.82
79,714.14
J2
10.59
286,061
1.55
140.14
60,108.51
ID1
16.58
560,391
0.14
0.0189
2,297.74
IG1
18.53
662,106
0.97
19.902
28,62316
ID2
20.53
772,144
0.06
0.0018
1,054.47
IG1
26.01
1,101,096
1.02
18.472
26,919.75
When drawing the map, we want the distances to be all on the same scale. However, we cannot use a simple linear scale in most cases as that would put all the inner planets right on top of each other if we want to see the outer planets on the same image. You can see this in the following diagram that has a linear distance scale.
Fochrik system planetary distances on a linear scale. Click for larger image.
As you can see, those inner planets are bunched up pretty close together while the outer planets have huge gaps. We want to spread out the inner planets while compressing the outer ones but still have the relative scale be correct. To do that we need to shift from a linear scale to a logarithmic one.
To get on a log scale, we are just going to take the base 10 logarithm (the ‘log’ key on your calculator) of each of the orbital distances and use that value to draw the distances. First I’ll present the numbers and then another simple drawing.
Name
Orbital Distance (AU)
Orbital Distance (log(AU))
Scaled Distance
T1
0.19
-0.7212
14
T2
0.52
-0.2840
233
Forge
1.13
0.0531
401
Hum
1.23
0.0899
420
Larg
1.61
0.2087
479
J1
4.66
0.6684
709
J2
10.59
1.0249
887
ID1
16.58
1.2196
985
IG1
18.53
1.2679
1009
ID2
20.53
1.3124
1031
IG2
26.01
1.4151
1083
We can’t quite use the log(AU) values as the smaller numbers generate negative values (I’m not going to do a math lecture here. If you’re interested in why, you can check out this Wikipedia article). So we need to scale those numbers somehow. The scaled distance value in the table above was calculated by taking the log(AU) distances, adding 0.75 and then multiplying by 500. We’ll use these values to create the plot.
As you can see, the range of values is greatly compressed which allows things to be a bit more evenly spaced. The only issue with this scale is that zero (i.e. the position of the star) has a value of negative infinity so we’ll have to pick some arbitrary distance to separate them. However, since we’re just trying to show the relative position of the planets, that’s not too big of a problem. Here’s the simple plot we get:
Orbital distances on a log scale. Click for larger image.
This scale compresses the outer planets a bit but helps us spread out the inner planets which are the ones we’re more interested in anyway.
Drawing the Map
With the numbers above, we have all the information we need to create the map. The last thing to decide is if we are going do make a horizontal map (oriented like the diagrams above or the map in the Clarion Calendar post) or a vertical one (like in the Duergan’s Star post). For this map, I’m going to make a horizontal map simply because all of the “along the way” image will fit better into the post than a vertical one will. However, the process applies just as well to a vertical map, you just have to rotate everything 90 degrees.
I’ll be building the map in Inkscape, my vector drawing program of choice and it will be a simple black and white drawing so it shouldn’t be too complicated.
Here’s a video I made of the map building process if you want to watch it in real time, It’s about 53 and a half minutes long and completely unedited so you can see all my mistakes and fumbling around. If you don’t want to watch the video, I’ve described all the steps below.
Laying the ground work
To start, we want to set up the basic image and some guides for us to work with. I’ve decided to make the image 1200×400 pixels in size so I create a blank document of that size to work with. I also turn on a rectangular grid to help with position items. This grid will get turned on and off as needed during the drawing process.
I’m going to use the logarithmic distance scale for my planet spacing so I then import that image into my document and position it accordingly.
Finally, I draw a guide line down the middle of the image so I know where the center line is. After this initial setup, the image looks like:
I’ve shifted the imported image just slightly so that it’s 10 pixels to the right of where it was in the original. I wanted a little more space between the star and the first planet. Since I’ll be measuring the scaled distances from the left edge of the image, this means I’ll have to add 30 pixels to the values in the table above for the final radii of the orbits.
All of the above was done on the initial default layer. I then create three more layers: one for the orbits, one for the objects (star and planets), and a third for the labels. I like to work in lots of layers as it makes it easy to turn bits and pieces on and off and add in effects if needed.
The star and the orbits
The next step is to draw in the star itself and then start adding arcs for the orbits. The symbol for Fochrik is created using the star and polygon tool in the star setting with corners set to 30 and spoke ratio set to 0.8. This is drawn on the object layer.
Next I hide the objects layer and move to the orbits layer. Here I use the circle tool to draw in the first orbit. Clicking on the point where the center guide meets the edge of the image I then drag out the circle holding down the shift and the control keys until it reaches out to the position of the guide line for the planet T1.
Holding the control key down makes the circle drawn have integer ratios between the x and y directions allowing you get a proportional circle. Holding down the shift key makes your initial click point the center of the circle instead of the upper left corner of the box enclosing the circle. Once I have the circle drawn to approximately the correct size, I use the spinner boxes for Rx and Ry (the x and y radii) to set the exact radii (44 px in this case). The fill of the circle is set to transparent, the stoke is set to black with a thickness of 2 pixels.
Inkscape allows you to draw off the edge of the image so we drew a whole circle for this first orbit. Since we will be copying and scaling this up, we don’t want our circles going way off to the left. We can turn the full circle into an arc by grabbing the small circular mark on the drawn circle (it’s at the 3 o’clock position) and moving it clockwise to break the circle. I move it down to just past the 6 o’clock position. Then I go back and grab the other small circle node at 3 o’clock and move it up to just before the 12 o’clock position. This gives us a half circle which is all we need.
Now it’s just a matter of duplicating that arc and setting the correct radii for each one. As we move out we’ll want to adjust the size of the arc so it’s not sticking up well above or below the edge of the image just to make things a little cleaner on our drawing canvas.
We can duplicate a selected object by pressing Control-D. Then we just go up and set the Rx and Ry values based on the scaled distance values in the table above (remembering to add 30 to each one). You have to remember to have the circle tool selected while you do this or you can’t set the radii.
Once that is done, we have an image that looks something like this:
Notice how the arcs are going high. They will be cut off when we export the final image. They were originally also going low as well but they have been adjusted (at a later step) and I didn’t export an image while I was drawing them.
You might also notice that the arc for the planet T2 is not lined up with it’s guide line. That is because as I was drawing it, I noticed a discrepancy between where the guide line was and where the arc was drawn based on the scaled distance values. I originally though there was an error in the scaled distance but it turns out I just drew my guide sketch wrong. It’s always good to double check your work.
Drawing the planets
We’ve got our orbits, now we need to draw the planets. This will be done on the planet layer so we switch to that layer now.
Like the orbits, we want the planets to all be on the same scale. This obviously can’t be the same scale as the orbits or we wouldn’t be able to see them since they’d just be dots on the page. To pick the initial scale, I just let the radius of the circle we’re going to draw be equal to the radius of of the planet (in km) listed in the table divided by 2000. I computed each of these values and wrote them down on a piece of scratch paper to have them handy.
Depending on how you have Inkscape set up, when you draw in the first circle, you’ll notice that you just get an arc instead of a full circle. That was my case as I have Inkscape set to remember the last setting for the tool and use that instead of resetting to the default. I find that more useful. But we need to reset the tool to draw circles. This is done by finding the Start and End boxes (up by the Rx and Ry boxes) and setting them to 0 and 360 respectively. Now we’re drawing circles again. Also you’ll want to set the fill to white instead of transparent.
I then just move to an arbitrary point on each planet’s orbit, draw a small circle and then set Rx and Ry to be the values determined for that planet. It doesn’t matter exactly where you draw them as we’ll go back and properly position them once they are all drawn.
When you start doing this, you’ll quickly notice that the scale we’ve picked is simply too small for the small terrestrial planets. In the case of a few of them, you can’t even see the disk as it is smaller than thickness of the line we drew for the orbit. To solve this we simply double the radii of these planets. However, that would make the giant and Jovian planets too big if we doubled them as well. So we’re just going to have to have different scales. The terrestrial and ice dwarf planets will be to scale with each other as will the giant and Jovian planets but the smaller planets will be twice as big as they would be if they were to scale with the larger planets.
The last step of drawing the planets is to place them at an appropriate position on their orbit circle. There are two requirements here. One is that the disk of the planet should be centered on the orbit line. The other is that for planets with close orbits, they are spread out across the image so that when we add labels there won’t be any overlap. To make this easier you should turn off the grid that we set up at the beginning so the software isn’t trying to snap your circles to positions you don’t want.
Once that is done, we have an image that looks something like this:
You’ll notice that even doubling the scale, some of those planets are pretty tiny. In fact, you might not even be able to see ice dwarf 2 unless you click on the image above to get the full sized one. But that’s okay.
Adding labels
The next step is to label everything. There are a few things we want to put in our labels. The most obvious is the name of the planet. I still haven’t come up with official names for the planets but that doesn’t matter for the purposes of demonstrating the mapping technique. The other thing we need to do is add the scale for the system map. Finally we’ll add a label for the system. I’ll be using the Copperplate Gothic Bold font for my lettering.
Let’s start with the scale. If you watched the video, you’ll know that I actually did this way back at the beginning of the process. Since it was already there in the imported image, all I had to do was trace it. Once it was drawn in and had the numbers, I put the “Distance (AU)” label on and then moved everything down as close to the bottom of the image as I wanted it.
The labels on the the scale are drawn with a height of 16px for the numbers and 20px for the label. What you choose is arbitrary and it should be picked to match the size of the drawing. You don’t want it too small but you don’t want it too large either.
However, at this point, I didn’t like the orbit lines crossing over the scale and I went back and adjusted them so that they stopped just before touching it. If you look closely in the previous image, you’ll see another guide line that sits just above the scale that all the orbit lines touch. I drew this line in and then, using the circle tool, adjusted the end of the arc of each orbit line to just touch that line, which is why they don’t extend below the image.
Turning off the layer with the guides and the scale image gives us the following at this point. I’ve also now only exported the actual drawing so everything is trimmed appropriately.
Next we label the planets. For each planet I’m going to put the name in using a 20px high font and then centered under the name, put its orbital distance in a 10px high font. Again still using Copperplate Gothic Bold. I had originally intended to just type both and then change the font size of the distance but found that I couldn’t adjust the vertical spacing like I wanted to. So instead I created two text objects, one for each line, used the alignment tools to get them lined up, and then grouped the label for each planet into a single object so I can move it around easier later.
It doesn’t really matter exactly where you put the labels to begin with as you’ll be moving them around once they are done and you have their exact sizes. Just go through and add them for each planet. Then, once they are in the drawing, move and position them so that you like the placement. This may also involve moving the position of the planet’s disk on the orbit line to get a spacing you want.
Typically for the smaller planets, I like to place label so the center of name is aligned with the center of the disk. For the large planets, I tend to set it to the lower left or right corner depending on the exact positioning. I just do this by eye. You want to avoid having the text run over the orbit lines as much as you can but in some cases it’s unavoidable. Just place the names where it looks good to you. On a vertical map, I’ll often try to center the name of the planet under the planet’s disk.
Now we have to deal with the text that is overlapping the orbit lines. This often makes the text hard to read so we need to mask out the orbit lines under the text. Your text layer should be positioned above the orbit layer. If it isn’t you’ll need to move it up in the layer stack. What we’ll do is draw some white rectangles to hide the orbit line below the text. I like to set their opacity to about 75-80% so the orbit lines slightly peek through but you can make them fully opaque if you prefer. Drawing the rectangles can either be done on a new mask layer that is placed directly under the labels layer or in the labels layer itself.
In this image I drew the rectangles directly into the labels layer. Using the rectangle tool I just drew in a small rectangle over the orbit lines in each location there was overlap between the text and the lines. You’ll want to make the rectangle extend just a bit below and above the text. Exactly how much depends on how much space you want between the lines and the text and is a matter of taste. As you draw the rectangles, they are placed above the text so you need to send them to the bottom of the z-order for the layer so they are behind the text instead.
If you draw on a new mask layer, then you don’t have to worry about moving the z-order of the boxes as they will all be between the orbit lines and the text. You also don’t have to worry about the opacity on the individual boxes but can adjust the opacity of the entire layer all at once. This is typically how I do the masks but for some reason didn’t on this particular drawing. Probably due to the fact that I was recording and it slipped my mind.
We are almost done. At this point our image looks like this:
Finishing touches
The only thing left to add is the label for the system, a border, and a white background.
We’ll put the label in the upper left. We want this to be large so we’ll use a 32px high font. We’ll also need to add a mask as it will be overlapping the orbit lines. I considered simply adjusting the orbit lines to end below the label but decided to leave them in and mask them off.
The border and background I did with a single object. You may not have noticed, but all of the images so far have had a transparent background with just the objects drawn on it. This can cause some issues depending on how the image is rendered so we want to add a solid white background.
To do this I make a new background layer that sits at the very bottom of the layer stack. On this layer I draw a single large rectangle that stretches corner to corner across the entire image. I set the fill to white and the stroke to black with a 6px thickness. Due to the way Inkscape draws the stroke, half of that will be off the final image giving a 3px border. If you want it thicker or thinner, simply adjust the stroke width.
And now we’re done. Here’s the final image:
The final system map. Click for larger version
If you’d like to look at or play with the original SVG file of this map, they you can grab it here:
For this demo, I didn’t do anything special with the planets themselves. If you wanted to, you could add in cloud bands or rings on the giant planets to give them a little bit of character. Especially if they have features called out in their descriptions. I didn’t have any special descriptors so I left them as simple circles but that could be added in later.
The FTL Horizon
If I was doing this map for FrontierSpace, the other thing I would add in is a dashed arc at the position of the FTL Horizon, which in that game is the distance you need to be from the star in order to engage your Nova Drive to travel between the star systems. That would be an important bit of information for the map to include.
Asteroid belts
I also didn’t add in an asteroid belt in this system. If I did then I would determine the distances for the inner and outer boundaries of the belt and draw orbit circles on the guide layer at those distances. Then on the object layer I’d go in by hand and draw in all the asteroids. I work on a 2-in-1 laptop that has a stylus so I can actually flip my laptop into tablet mode and draw the asteroids with my stylus right on the screen. I find this much easier and faster than trying to do it with the mouse but it can be done that way (and I’ve done it that way in the past). There’s a bit more to it than that so I might do a mini article on drawing in asteroid belts.
Final thoughts
And that’s everything. I think the map turned out pretty well. I was actually surprised it only took a little less than an hour to draw it out once I had all the data. All told I probably spent about 2-2.5 hours creating the data and making the drawing. It would have taken a bit longer if I had had an asteroid belt to include or added details to the planets but that gives you an idea of the effort involved. It actually took me longer to do these two blog posts (5-6 hours total) than it took to actually do the work.
I still have one more post on the calendar system to do and that will come in March. I’d like to hear your comments, questions, or any suggestions you have about the process. What wasn’t clear? What would you like more information on? Did you try this yourself? If you did, share your results. Let me know below.


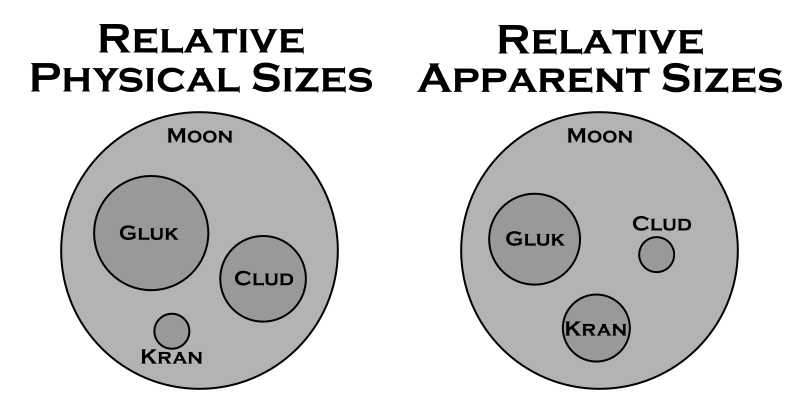
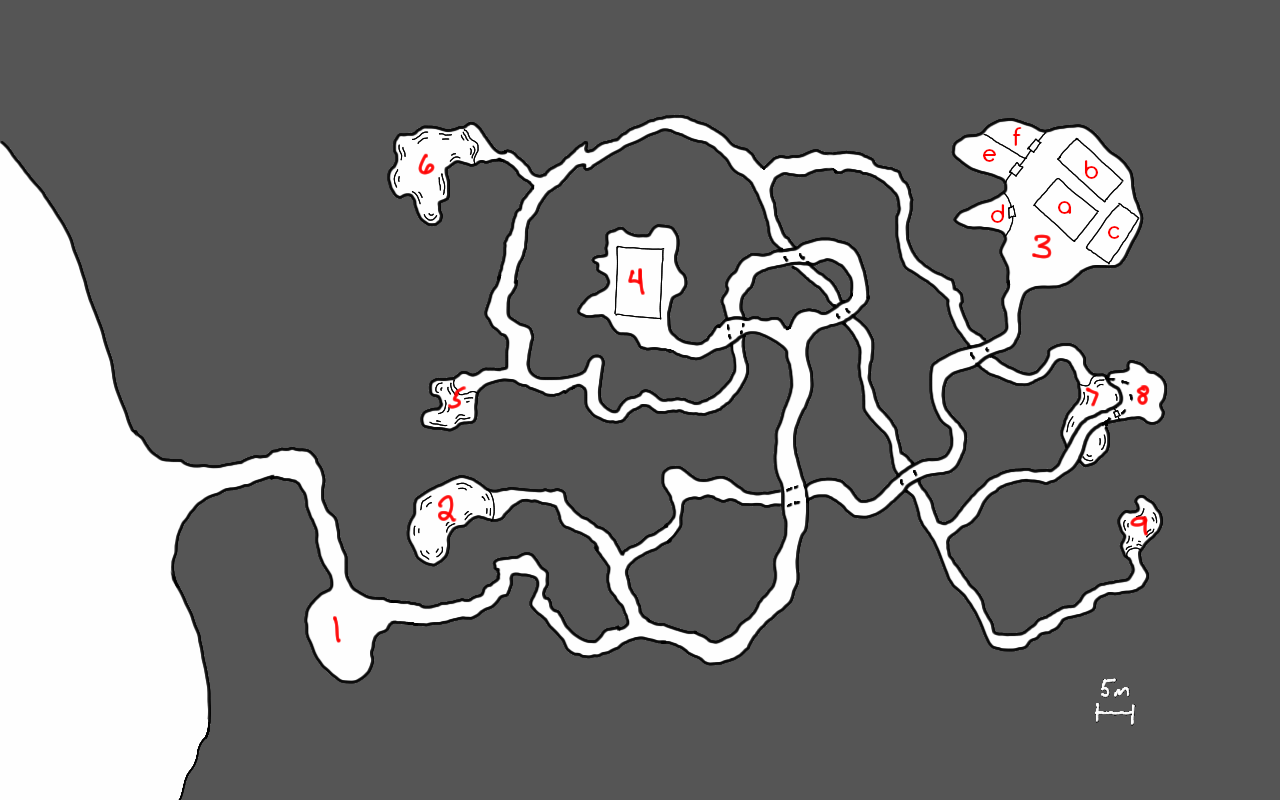


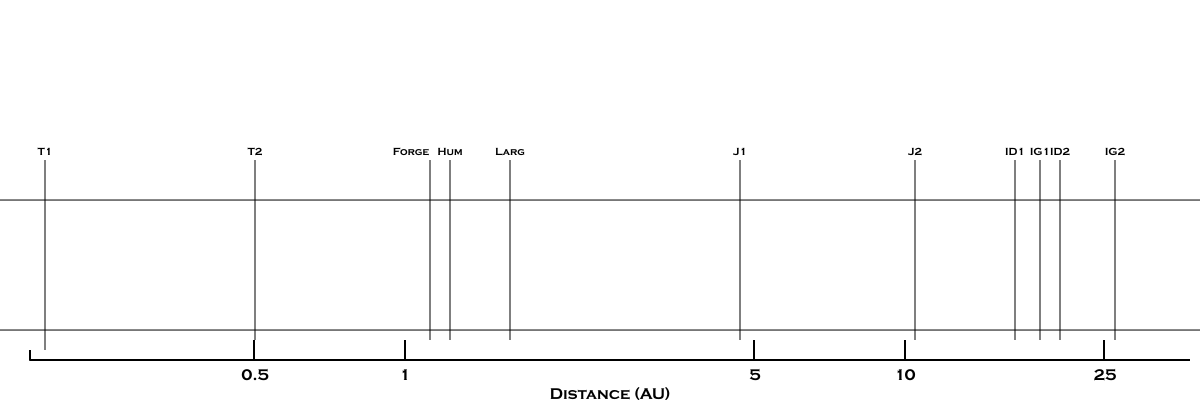
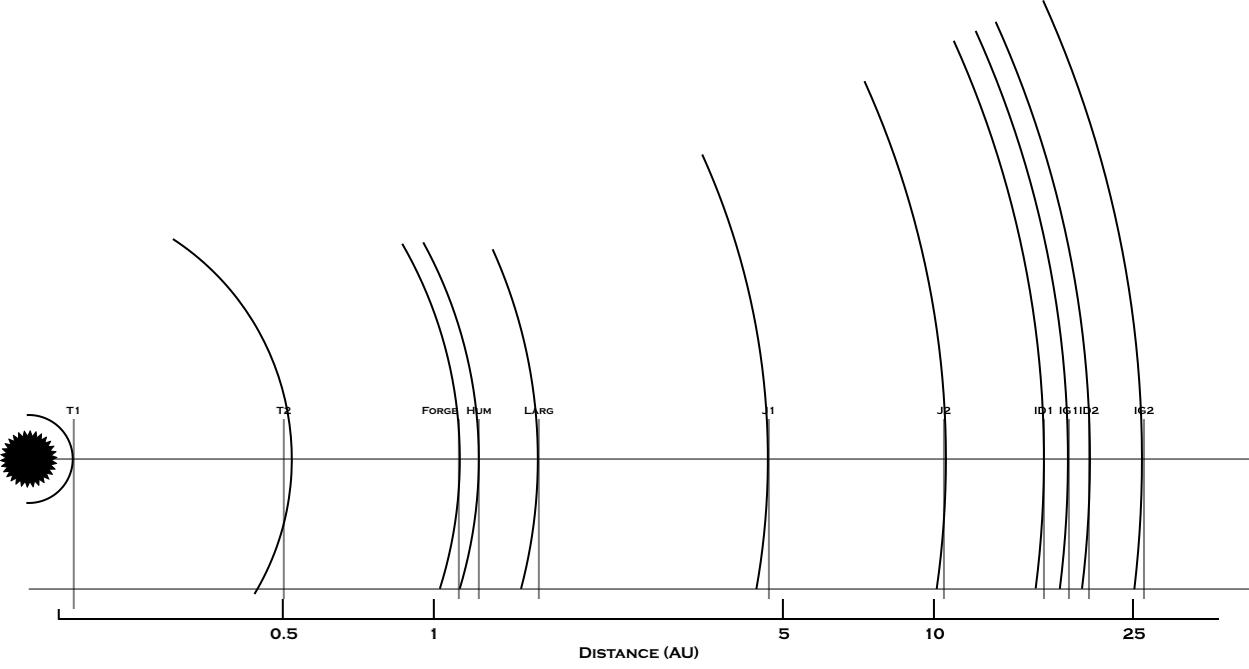


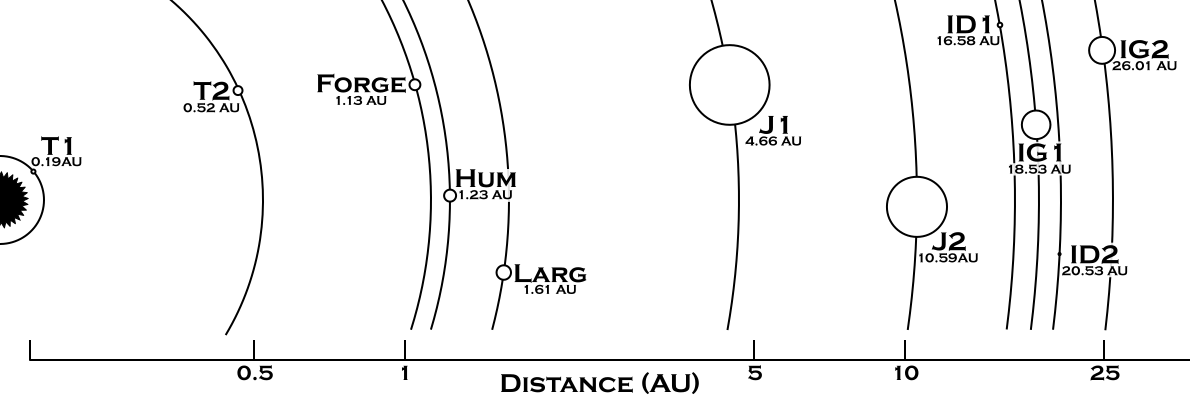
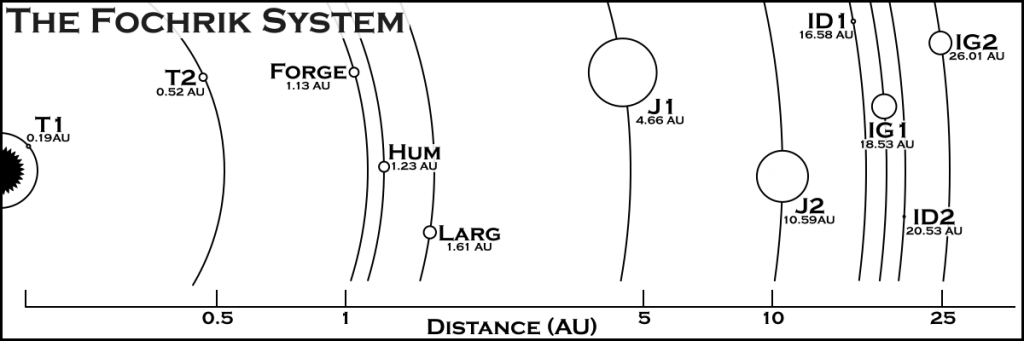