The Expanding Frontier

Creating Sci-fi RPG Resources

  • Home
  • Order Eclipse Glasses
  • Order a Map
  • Order Miniatures
  • Supporters
  • About
  • Bio
  • Home
  • Order Eclipse Glasses
  • Order a Map
  • Order Miniatures
  • Supporters
  • About
  • Bio

Category Archives: Maps

Sathar Cave System

I believe this is the last major piece of the of the Death at Rosegard adventure that I haven’t yet published so let’s get to it.

An old, abandoned mine

In my setting, the Streele Mining corporation is the forerunner of the Streel Corporation. Hilo Headrow did a lot for survivors and refugees, during and after the occupation, and quickly rose to take control of the company. As corporate interests widened from just mining, the company was renamed.

Located some 30-40 km northeast of Rosegard is an abandoned Streele Mining corporation mine. It has been abandoned since before the Great Sathar War. Sometime after the war, an enclave of sathar survivors found the mine and have set up shop. They mainly are lying very low but send out scouts into the surrounding area and are the ones that were controlling the operative at the Streel mine near Rosegard. In addition, they were in contact with Trey Mulden to do the cybernuk breeding.

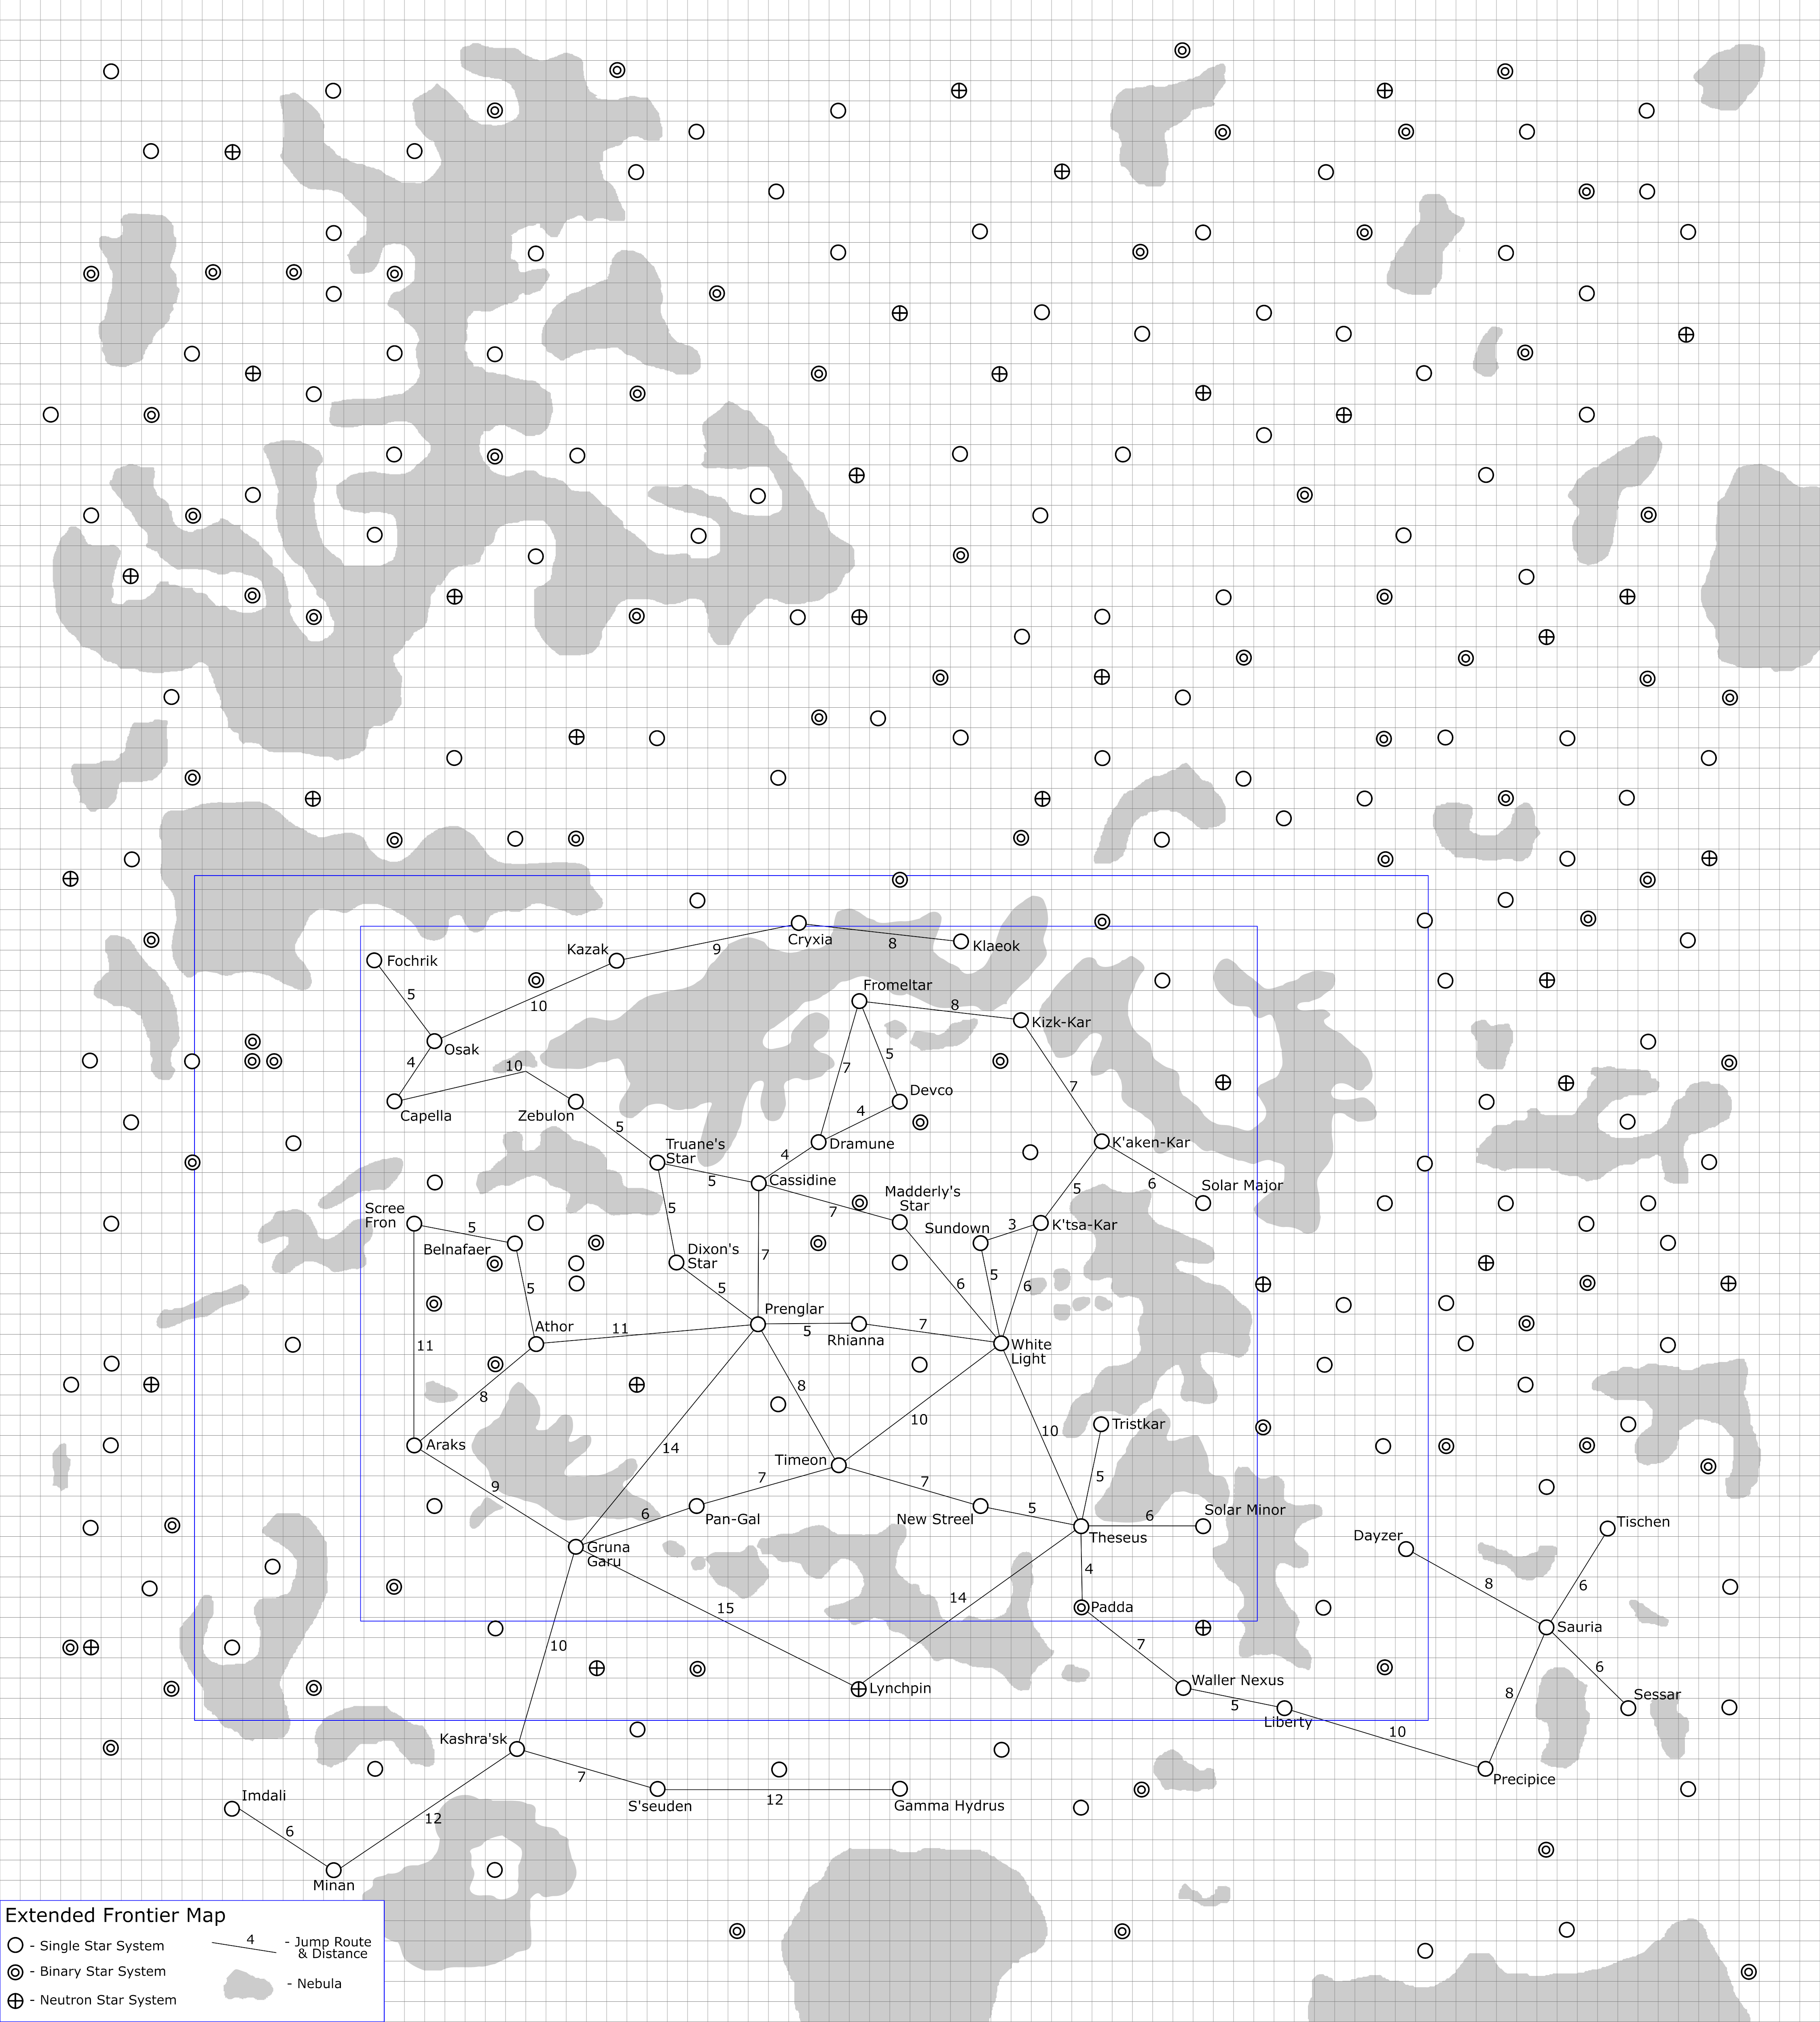
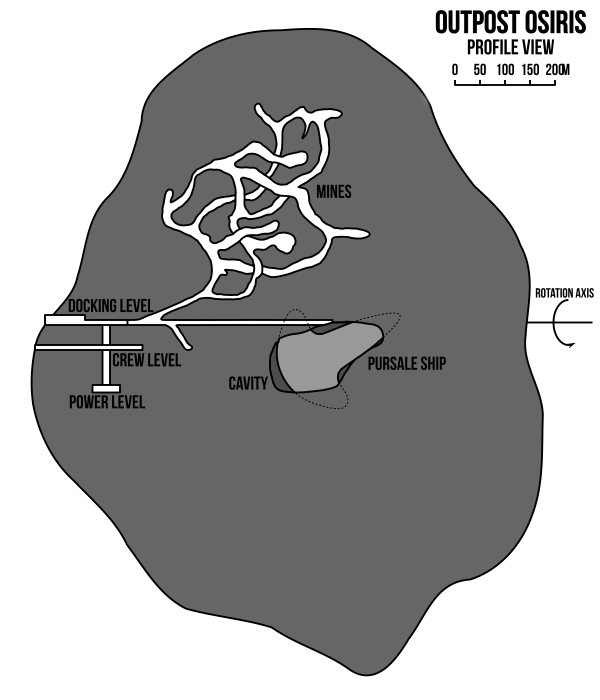
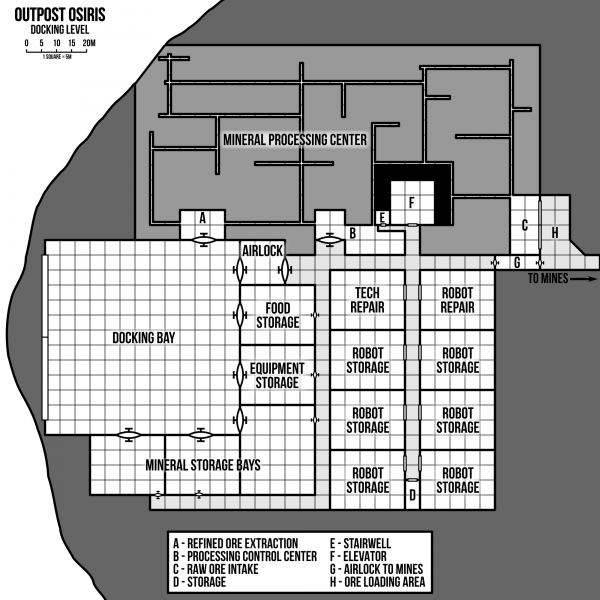
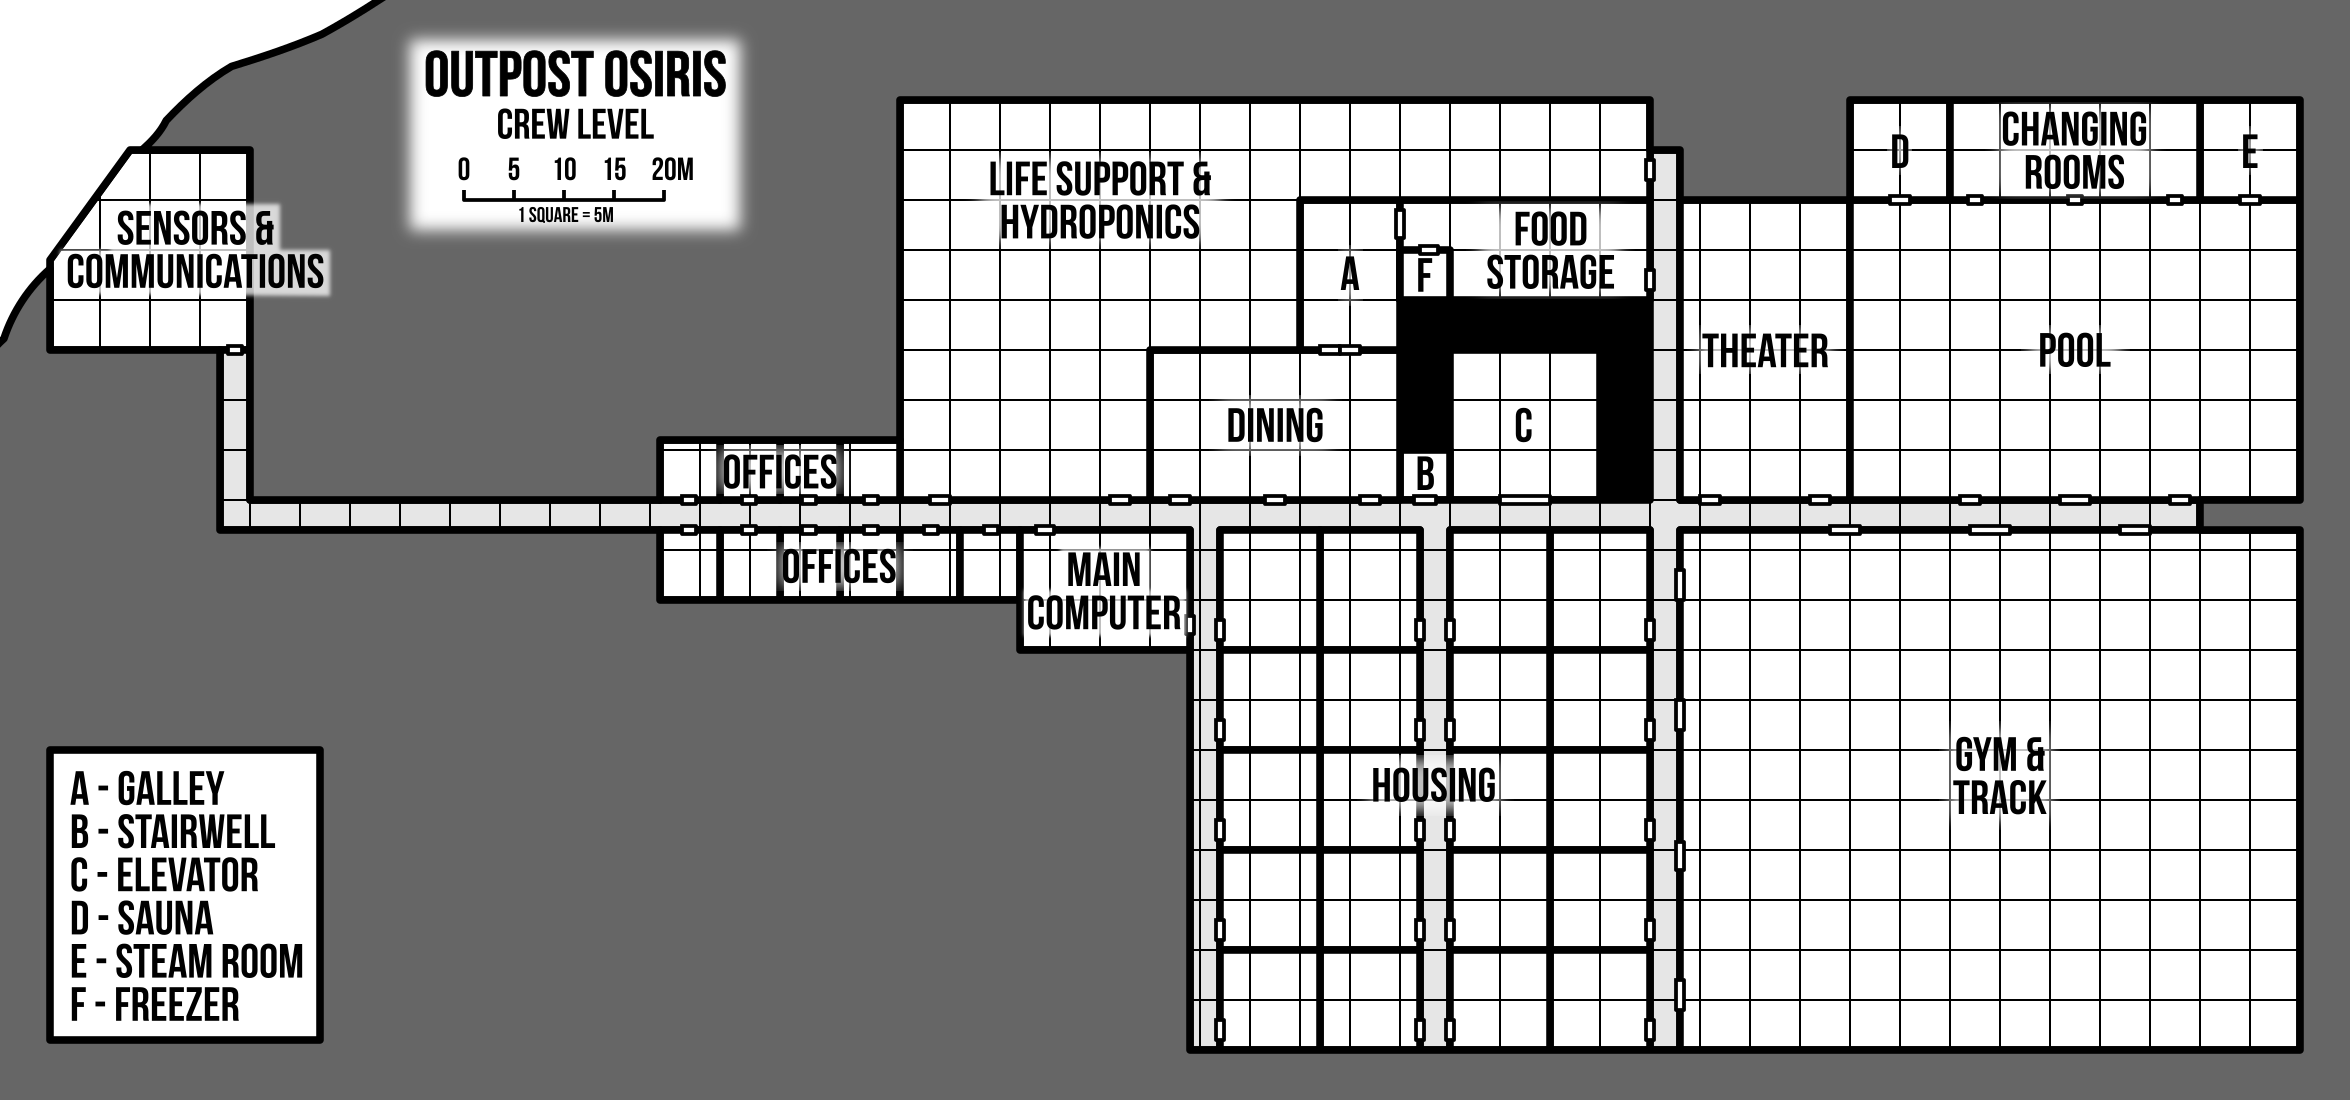
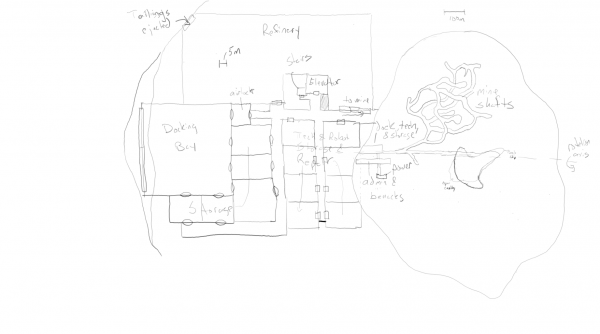
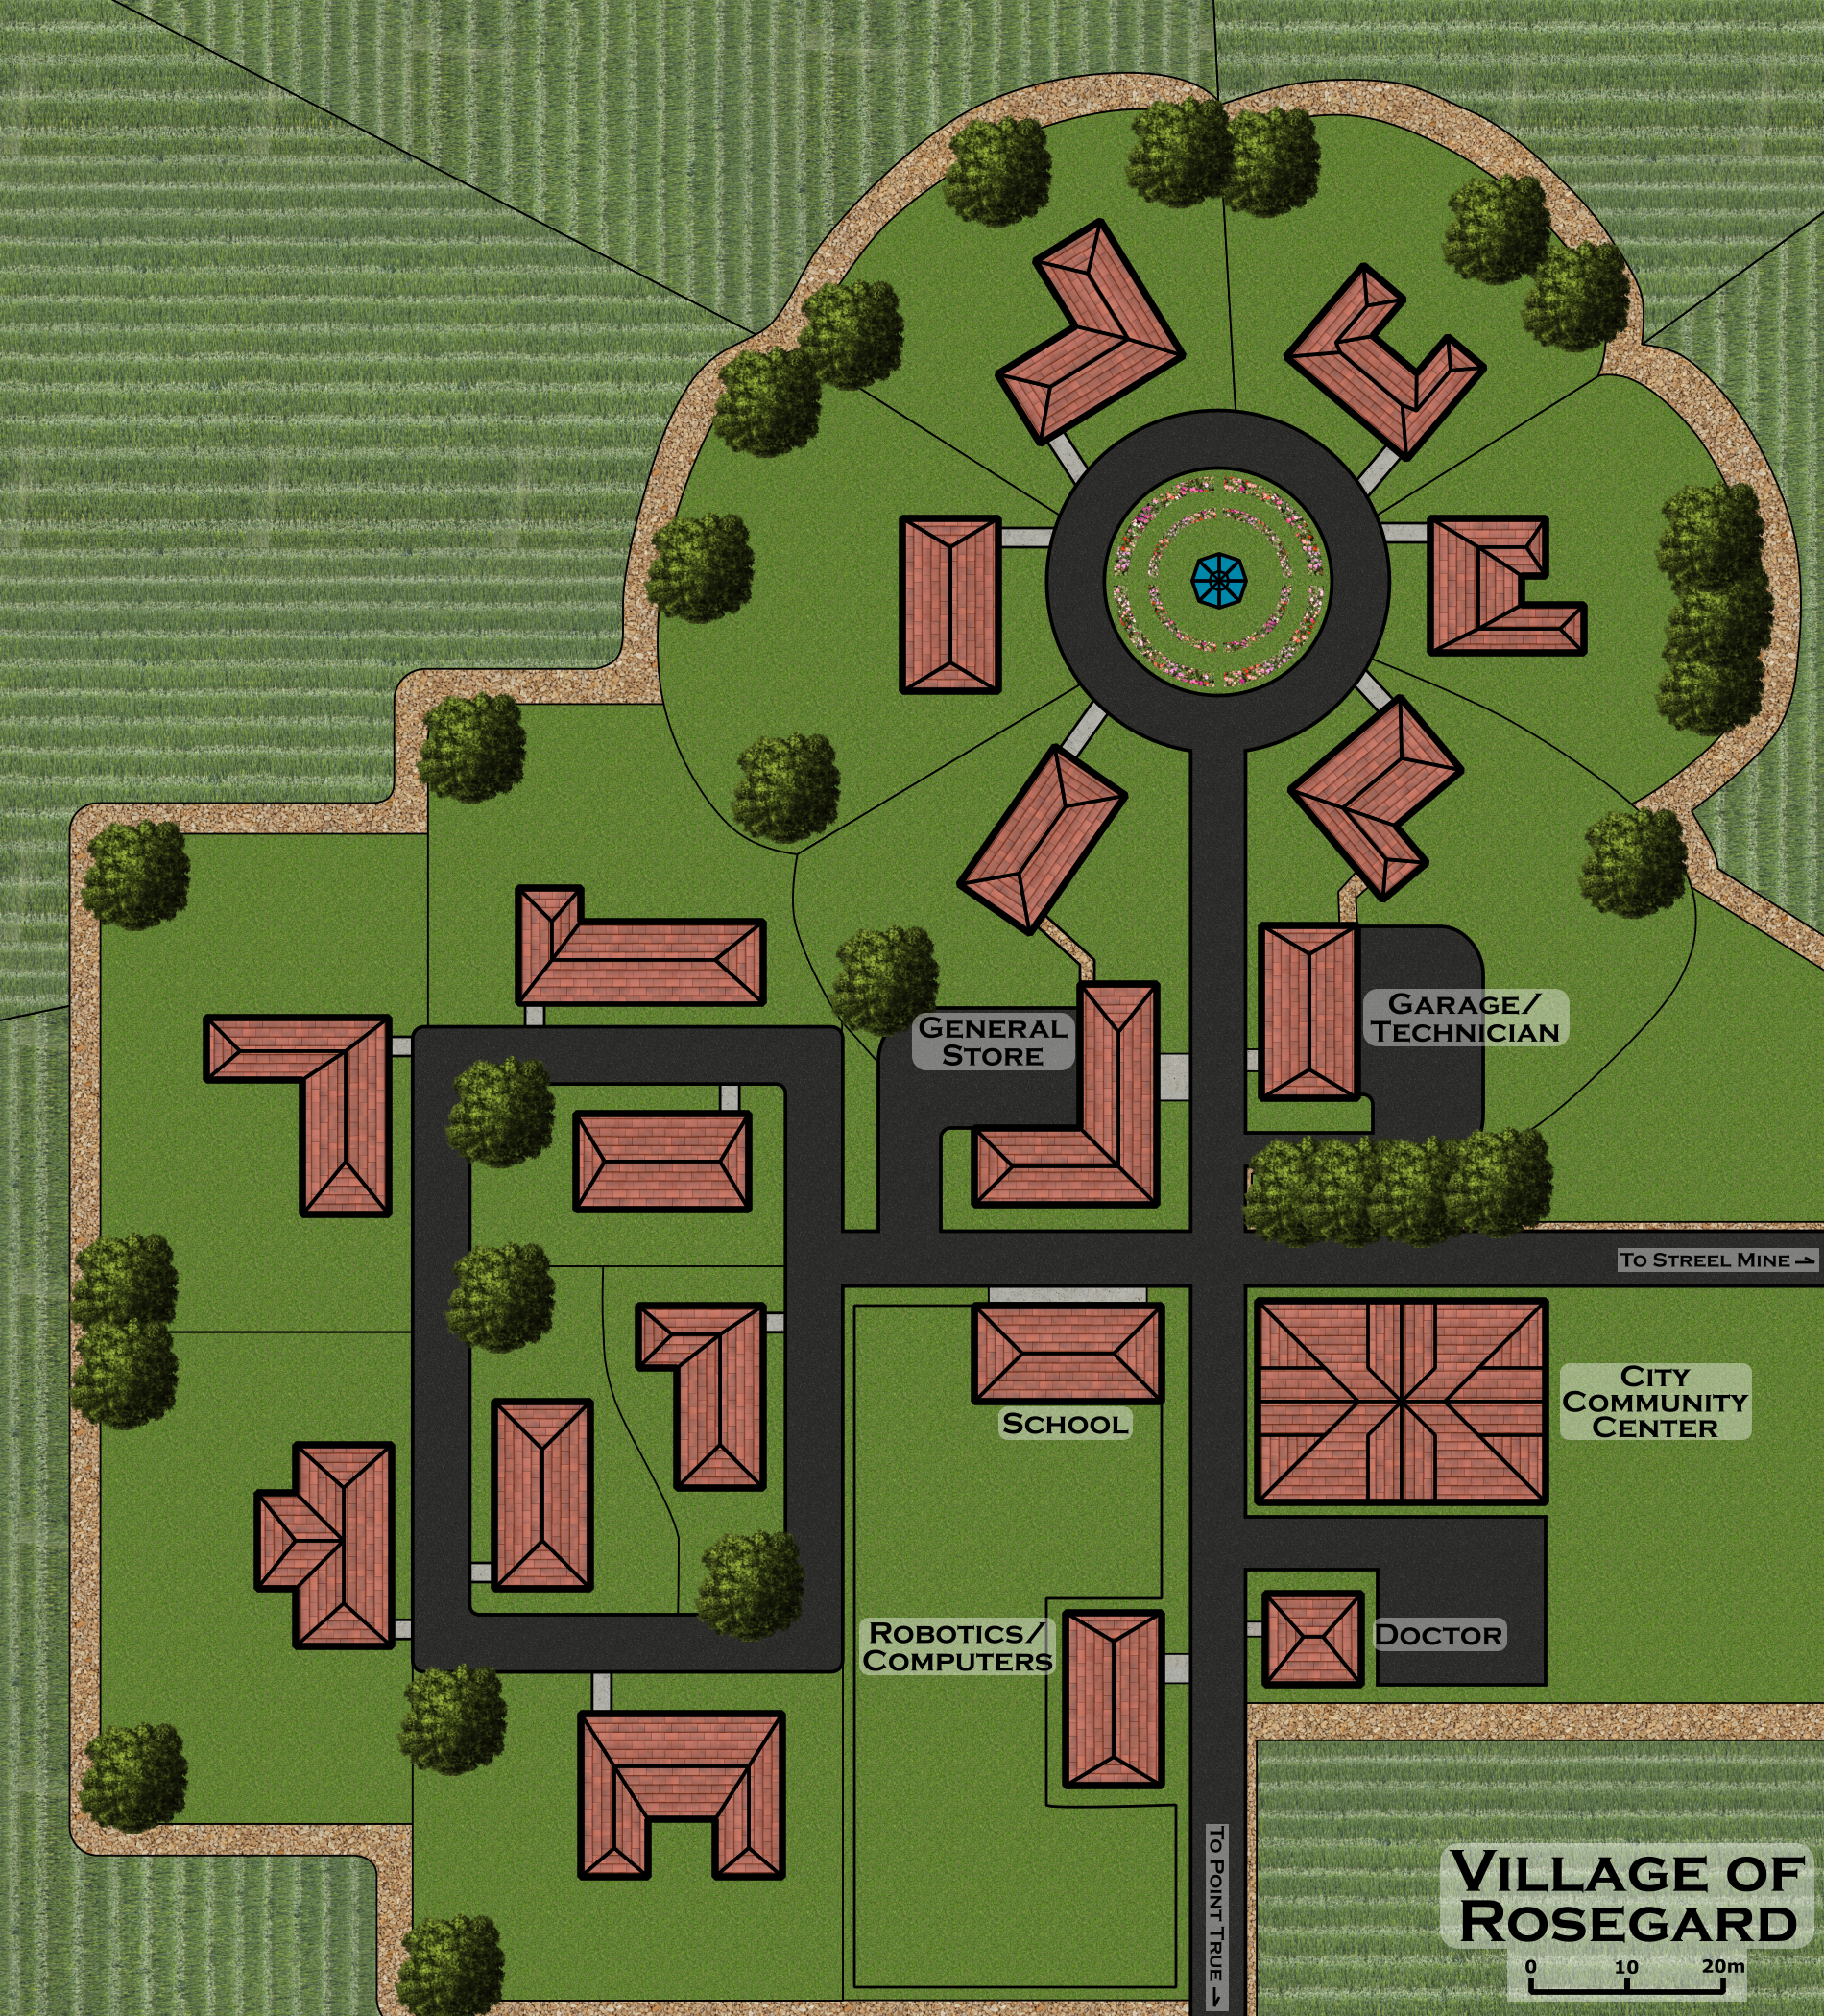
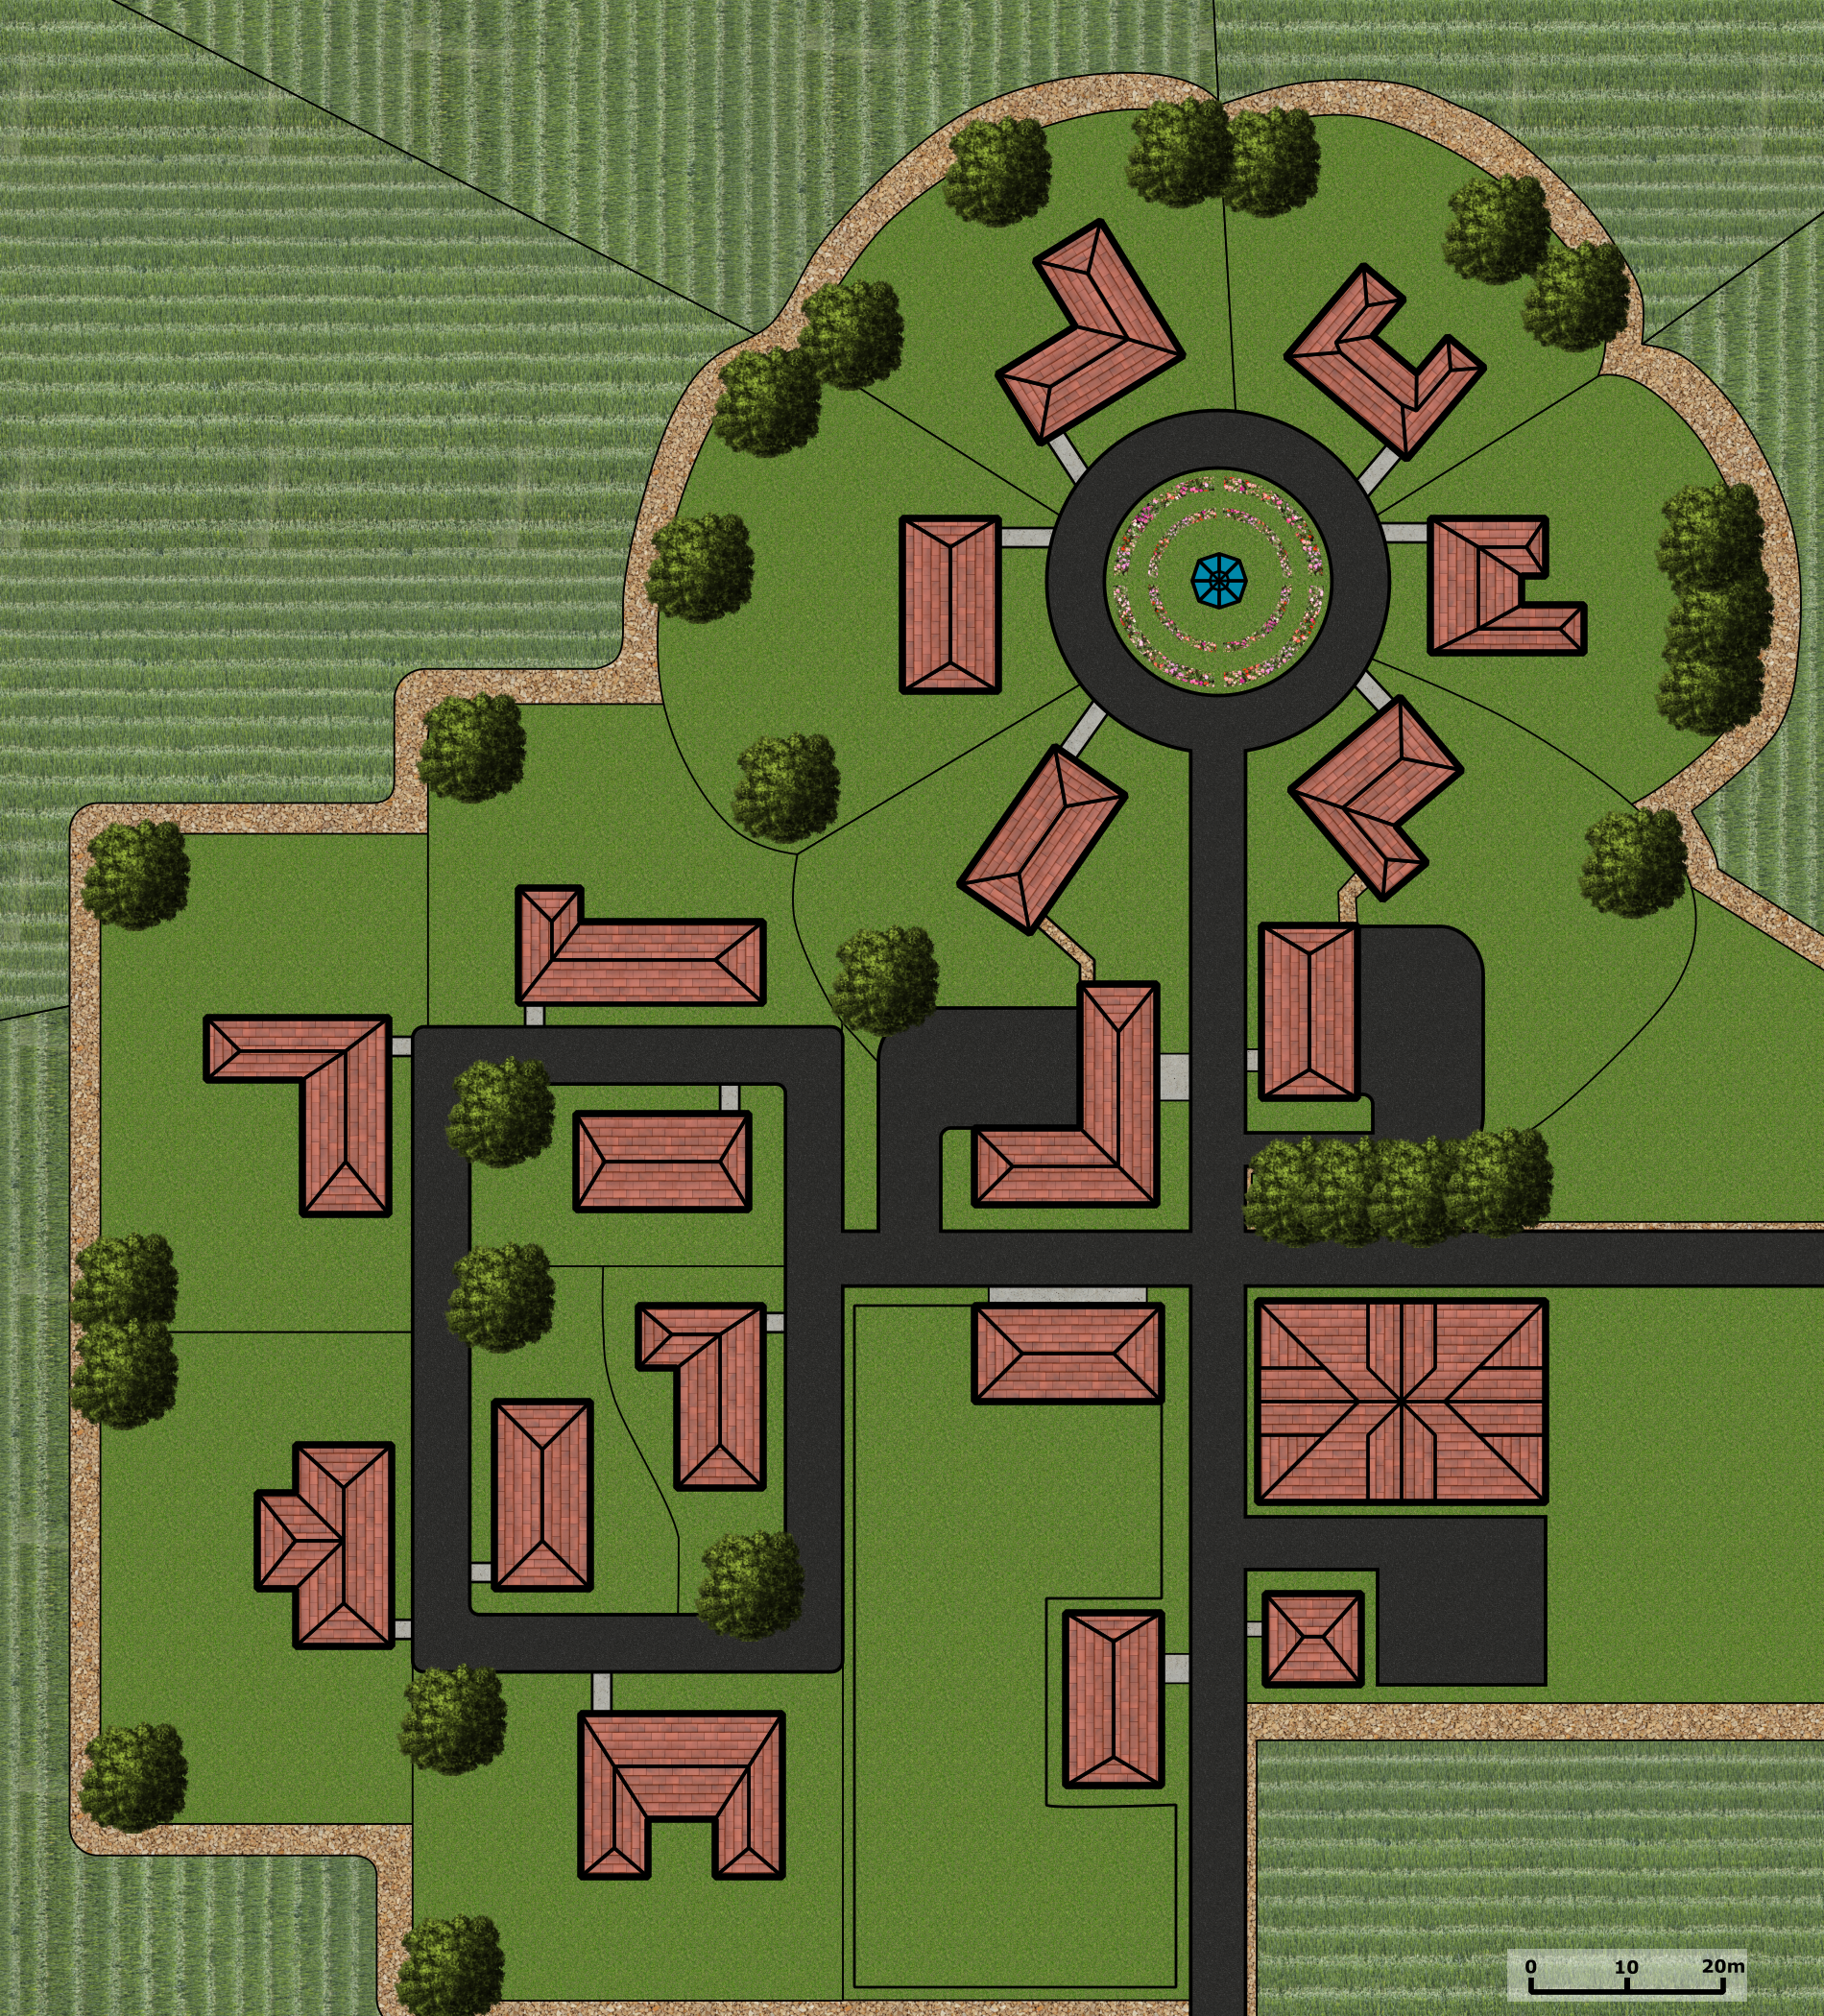
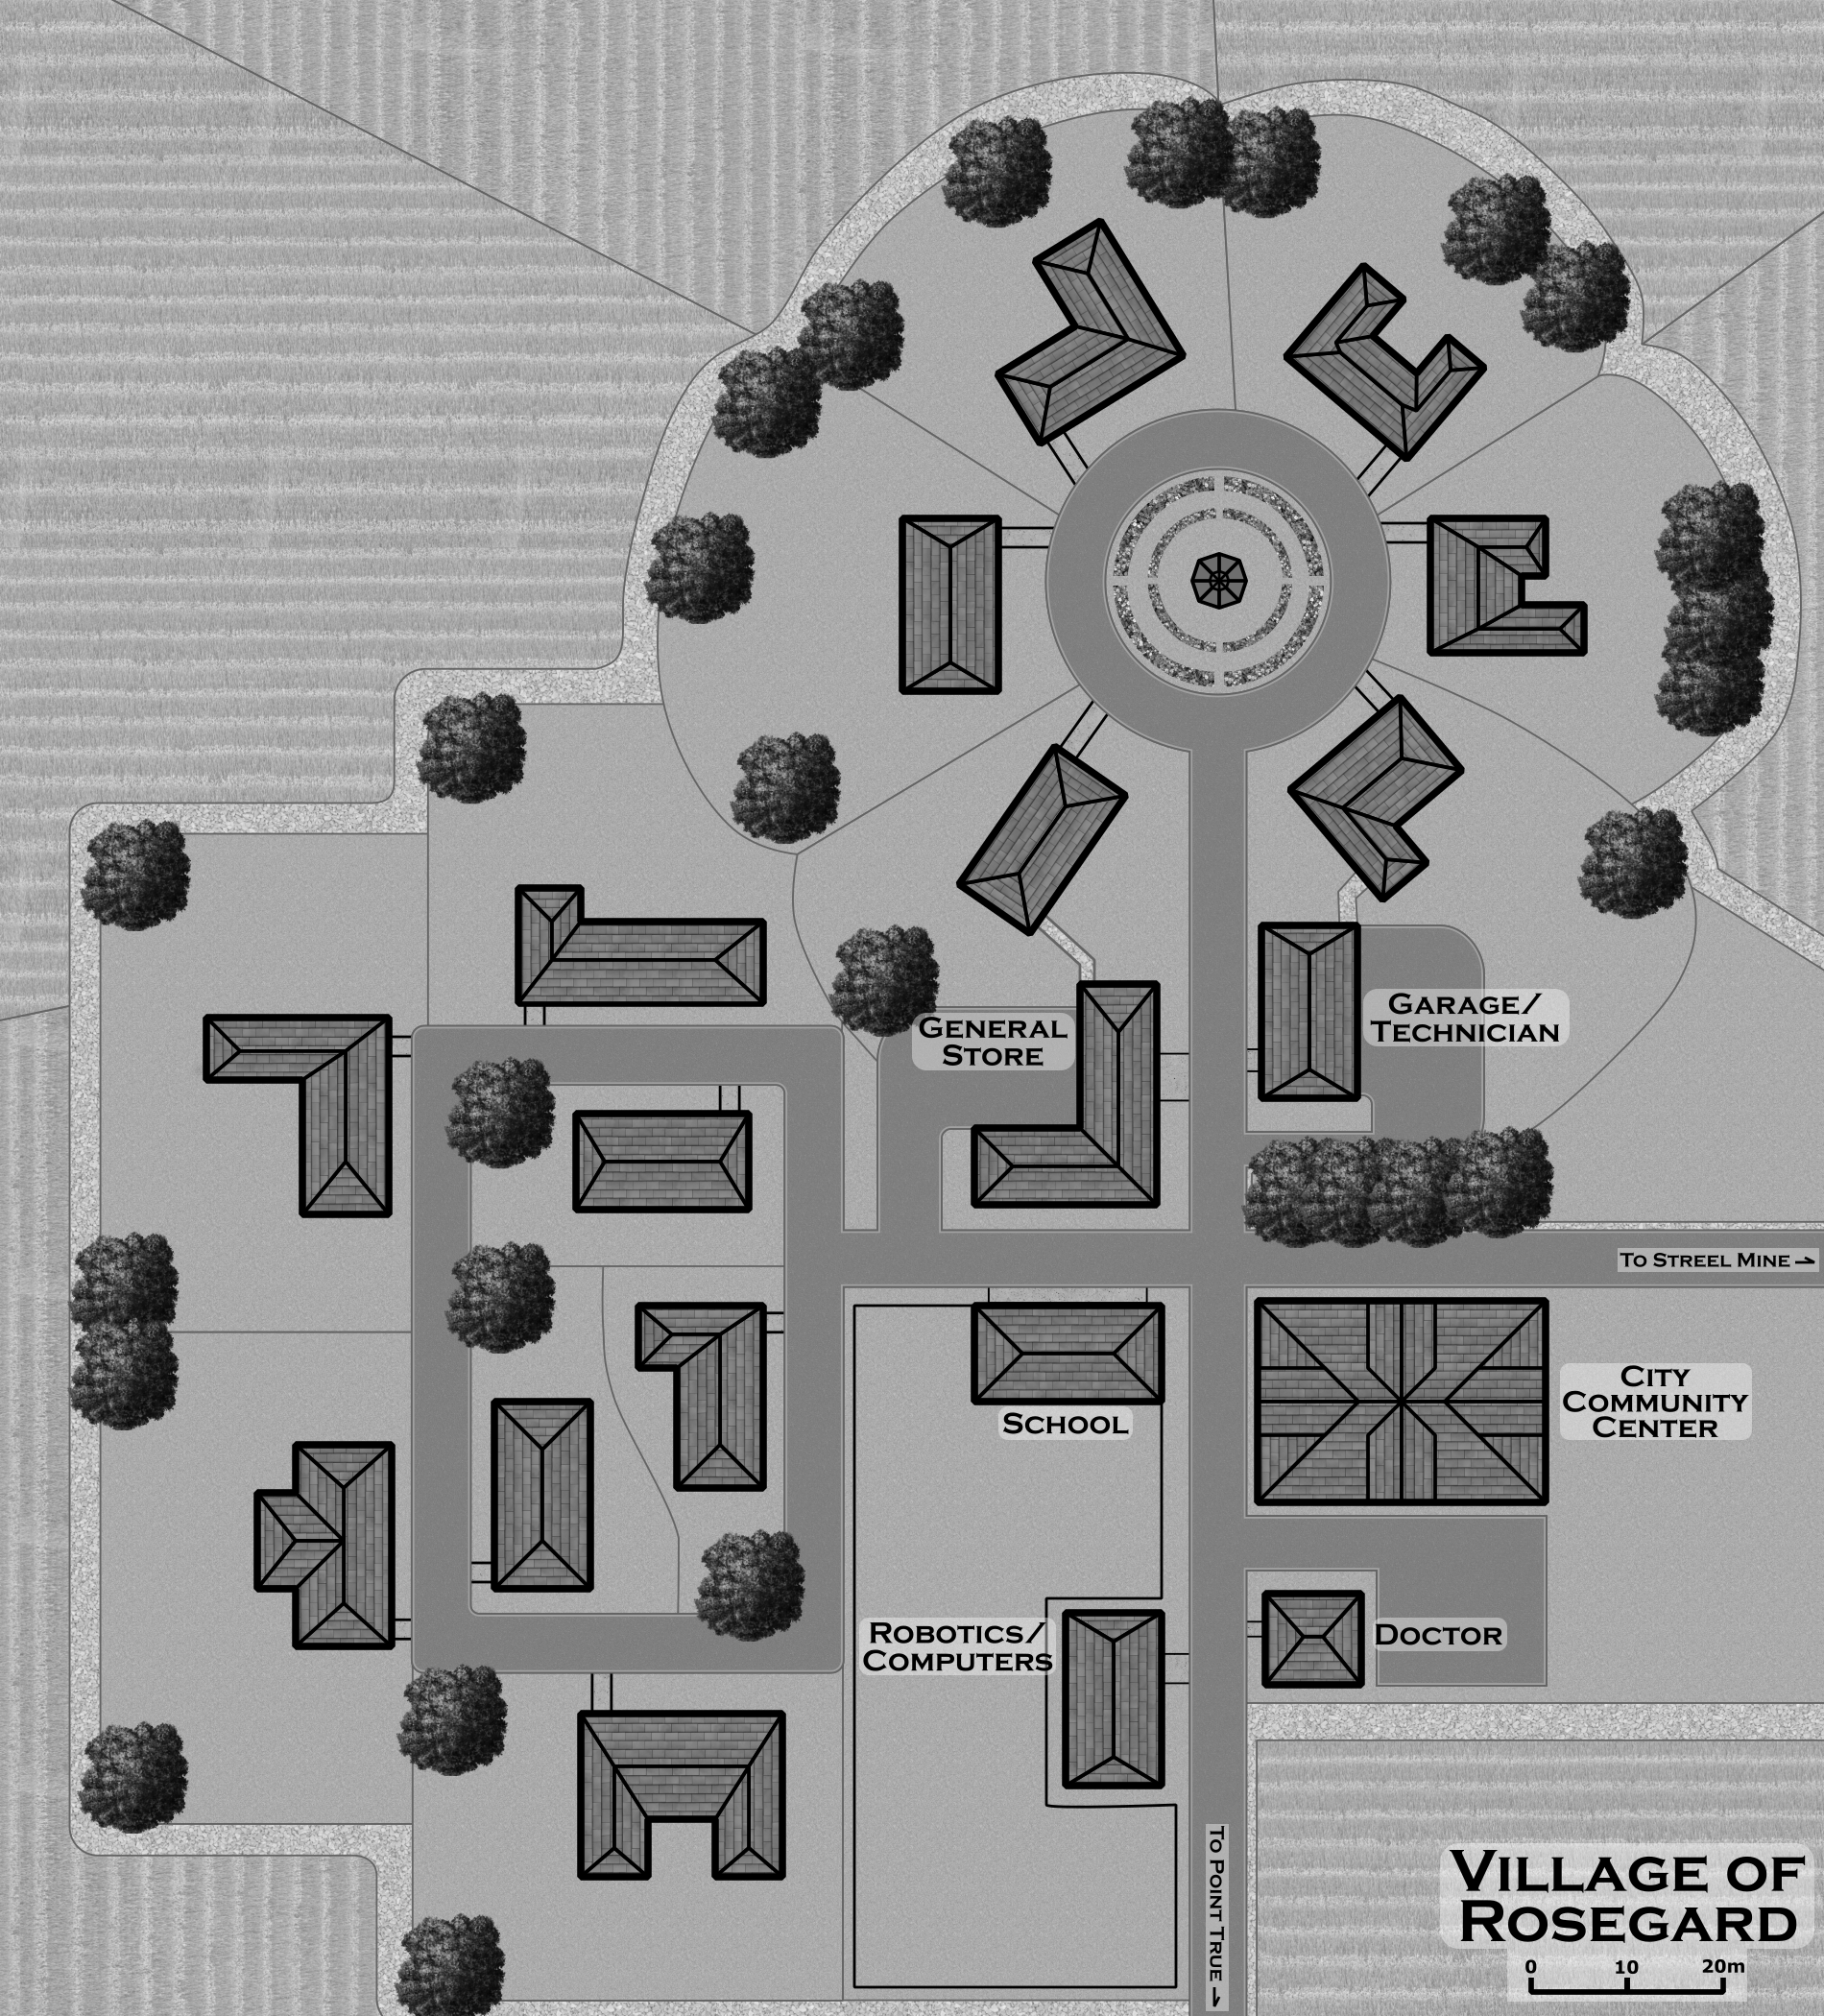
Let’s start with a map

This map was drawn by hand on my old Samsung Galaxy Note Pro 12.2 tablet. I added the shading and the letters (but not the numbers) in Gimp for this post.

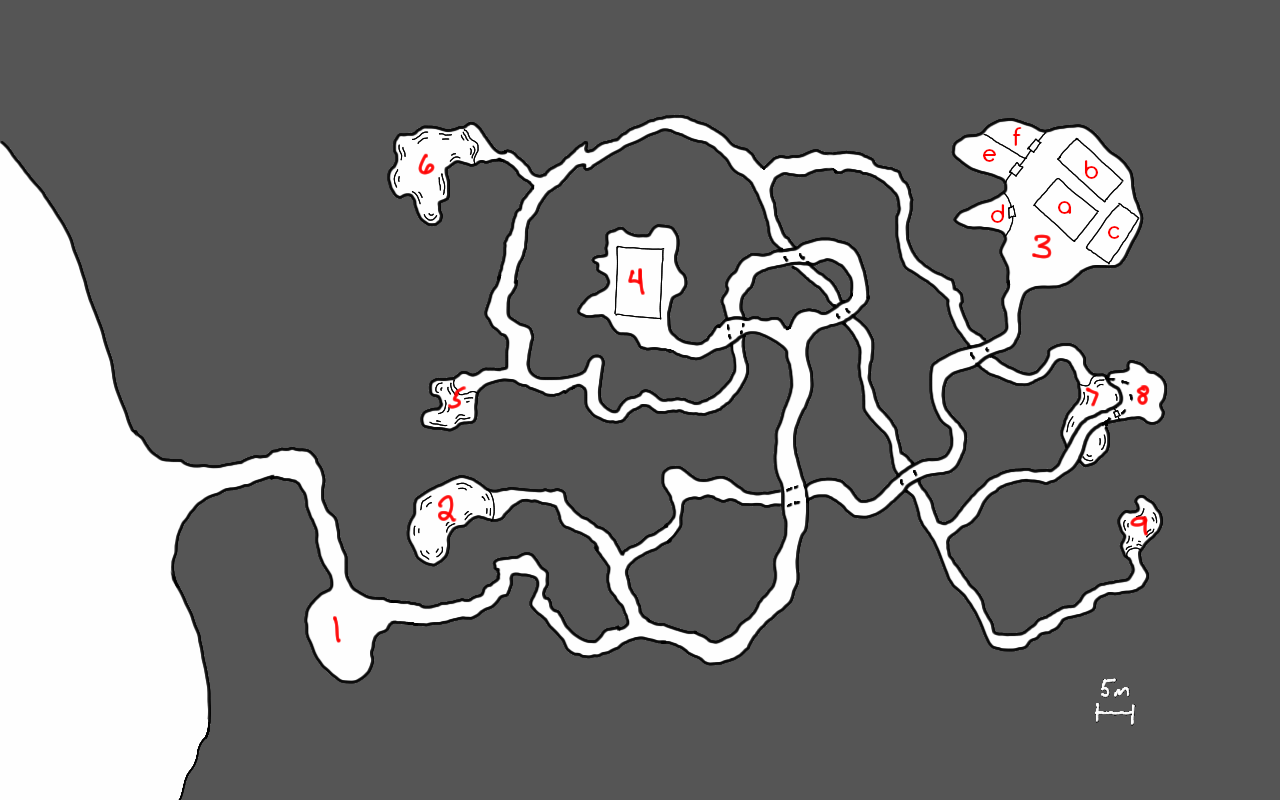
In addition to the labeled locations which are described below, there is a mostly destroyed and overgrown mining complex just outside the entrance. Bits and pieces of walls and foundations still exist but there really isn’t much there.

Area Descriptions

  1. Aircar landing pad – while mainly filled with debris and rusted out vehicles from over 50 years ago when this mine was shut down, there is space for an aircar to land. The sathar have an old model aircar that may or may not currently be at the base. It was used by the sathar that was contacting the agent at Rosegard. If the PC’s captured or defeated that sathar, the aircar is not present.
  2. Pool – This is a clear water pool that the sathar sometimes use for swimming but is primarily a source of drinking water.
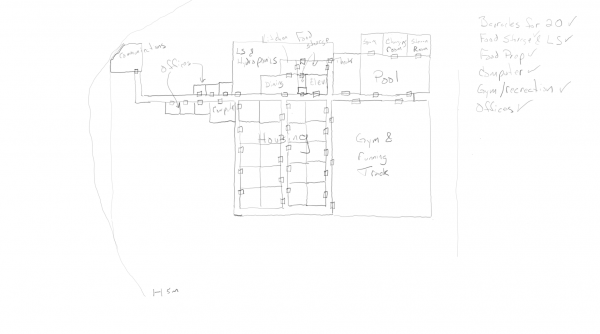
  3. Work area
    1. Food Production (a) – This building contains a series of terrarium-like containers that have a variety of small bugs and other creatures growing in them. Additionally there are some hydroponic vats growing plants. None of these seem to be native to Pale.  There is a single sathar working here.  The sathar does not have a weapon but does have a communicator.
    2. Tech lab (b) – This building contains what appears to be a technician or robotics lab although alien in nature. What appears to be a half assembled robot sits on one worktable and other tables contain various gadgets in various states of construction. One of the items looks like a nearly complete Cybernuk headset. There are 3 sathar technicians here.  Two of them are armed (laser pistol with 2 power clips) while the other has a communicator.
    3. Food Storage (c) – This is a climate controlled building with a freezer section.  It contains a large numbers the creatures and plants from the food production building but preserved for storage. There is several months’ worth of food here.
    4. Supply storage (d)- This area contains a wide variety of physical and technical materials ranging from various electronic parts to tubing, to wires, to chemicals. Most of the materials look to be frontier in origin but some are definitely alien in appearance.
    5. Nuk pen (e)- This pen contains three cybernuks with no cybernetic attachments.  It is locked with a level 1 lock simply to keep the nuks inside.  When opened, the nuks will charge out an attack the PCs.  An INT check will alert the PCs that something alive is inside.  Wall and door have 100 structure points.
    6. Nuk Pen (f) – This pen contains a single nuk with the cyber attachment.  It is locked with a level 1 lock to keep the nuk inside.  When opened, the nuk will charge out and attack the PCs.  An INT check will alert the PCs that something alive is inside.  If this cybernuk is released first, the other three will start bashing against the wall and door trying to get out to come to its aid (controlled by cyber implant).
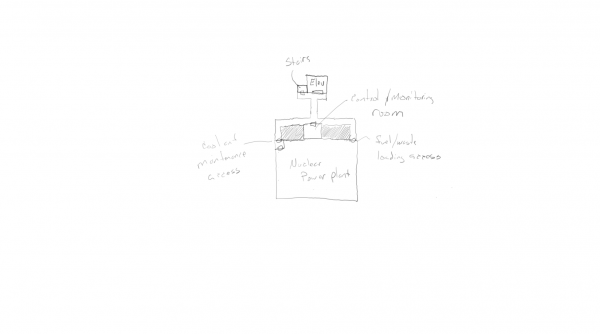
  4. Power plant and water processing – This is a geothermal power generator (type II). Cabling runs from here back to area 3 that has been partially hidden by debris and rubble on the floor.  Additionally there is a large water processing facility here with fillers and processing system. Pipes run from here to areas 5, 6, 7, & 9 from here along the ceiling. There are two Sathar technician here.  One of the sathar is armed (laser pistol with 2 power clips) while the other has a communicator.
  5. Small Slime Pool – This pool houses four sathar.  There are small bins by the pool that hold the personal effects of the sathar that call this pool home.  Each has a backpack with a food jar, a small communicator, and two of them have laser pistols with two power packs each.  There are currently two sathar in the pool.
    1. backpack, communicator, food jar
    2. empty
    3. empty
    4. backpack, food jar, laser pistol with 2 power clips
  6. Large Slime Pool – Similar to area five, this larger pool houses eight sathar.  There are currently four in the pool. The contents of the bins are:
    1. Empty
    2. Backpack, food jar, laser pistol with 2 power clips
    3. Empty
    4. Empty
    5. Backpack, food jar, communicator
    6. Backpack, food jar, laser pistol with 2 power clips
    7. Empty
    8. Backpack, food jar, laser pistol with 2 power clips
  7. Large Slime Pool – Similar to area five, this larger pool houses eight sathar.  There are currently four in the pool.  The contents of the bins are:
    1. Empty
    2. Empty
    3. Backpack, food jar, laser pistol with 2 power clips
    4. Empty
    5. Backpack, food jar, communicator
    6. Empty
    7. Backpack, food jar, communicator
    8. Backpack, food jar, laser pistol with 2 power clips
  8. Robot storage – This storage area holds a dozen completed combat robots.  While the parts are Frontier sourced, the design is definitely alien. Characters have a –10% modifier to attempt any skills on these robots
  9. Leader Slime Pool – This is the personal slime pool of the compound’s leader.  This is a middle caste sathar.  There is a bin here with the leader’s personal belongings which contains a backpack, a laser pistol with 4 power clips, an inertia screen with a power beltpack, two food jars, a communicator, and a small computer.

Initial status of the mine

The mine is not on alert for intrusion.  It was fairly recently set up and does not have a lot of security features installed yet as the sathar began immediate production of the combat robots and food.

One of the residents is the controller for the agent at Rosegard and possibly was captured or killed by the PC’s.  If it wasn’t, add in another sathar to area 5 (small slime pool). Another is out returning from the Trey Mulden’s compound.  The second sathar will arrive back 5d10x10 minutes after the PCs enter the compound.

When the PCs first arrive, there are two sathar returning to area 7 from area 3 after being on duty that the PC will encounter in the passageway between those two areas when they first enter it. The next duty rotation is not scheduled to occur for another 1d5 hours at which point two of the sathar in area 6 will be headed to area 4.

None of the doors, except to the nuk pens, are locked. 

Sathar Reaction to PCs Arrival

Before the sathar are alerted

When the PCs enter one of the buildings with sathar in it, immediately start combat.  Those sathar that are armed will draw their weapon the first round but cannot fire until the second round.  They will begin to attack the PCs as soon as they are able.  Sathar with communicators will attempt to alert the rest of the compound.  It takes them one turn to open their backpack, one turn to grab the communicator, and the third turn to send the message.  The alert message will go out on the sathar’s action during the third turn.  If the PCs eliminate that sathar before then, no alert goes out.  Otherwise, consider the compound to be alerted going forward.

When the PCs enter one of the pool areas containing the lower caste sathar, there is only a 5% chance that one of the sathar is not in the water.  Regardless, the sathar will notice the PCs immediately and react.  The will start exiting the pool at the rate of 1d2 sathar per round (to represent different distances from the edge of the water) starting on round 2.  Once they have left the pool, it will take them one round to reach the bins and grab their backpacks unless the PCs block their way.  On the round after reaching the bins, those sathar that are armed may begin firing; those with communicators will simply grab their communication device and begin to activate it.  They can send an alert out as their action on their next turn (3rd after exiting the water).

Sathar with communicators will engage in melee combat (two attacks per round) with their bare tentacles once the alert has been sent or immediately if the alert has already gone out.

After the sathar are alerted

Once the alert has gone out, any sathar encountered will be ready and attack immediately upon seeing the PCs. 

Any sathar in the slime pools will immediate move toward area 8 where they will begin activating the combat robots at the rate of one every other turn.  They will remain there until all the robots are activated.  At that point they will proceed up through the cavern complex looking for the invaders.  The leader will hang back sending the robots and other sathar to engage the PCs.  If the PCs arrive at area 8 before all the robots are activated, the robots that are active and those sathar that are armed will engage them while the others continue to activate the remaining robots.  As the robots are activated, they will be sent to engage immediately.

The sathar in area 4 will take cover and immediately attack the PCs if they enter the generator and processing facility.  They will get one free round of attacks on the PCs before the PCs can react.

The sathar in the food processing facility will head across the cavern to the tech lab when the alert is sounded (if they are not the one sounding the alarm) and will either engage the PCs from behind if they are in the tech lab or wait with the sathar in the tech lab until the PCs or the main body of sathar arrives.

The sathar in the tech lab will be waiting for the PCs if they arrive before the main body of sathar and robots.  There is a 10% chance that they will have been able to reassemble the laser pistol being modified on the workbench.  The sathar using it will have a 10% penalty to hit as is hasn’t been fully converted.  If the PCs take a long time to get to the tech lab after the alert is sounded, raise the probability to 20%.

Sathar tactics

As the sathar are under-armed, they will try to attack from cover or ambush if at all possible.  If they have robots with them, they will send the robots in the fore to take damage from the PCs’ weapons.  If a sathar is in danger of being captured or thinks they will die, they will attempt to close with one or more of the PCs and trigger the self-destruct in their laser pistol (if they have one).  When the self-destruct goes off, treat it as a fragmentation grenade doing a number of d10 worth of damage equal to the SEU remaining in the clip.  If the clip is empty it will still do 1d10 points of damage.  PCs get a RS check to take half damage and intertia screens and skiensuits halve the damage as well.

Stats

Sathar Leader

STR/STA:  50/50
DEX/RS:  60/50
INT/LOG:  55/55
PER/LDR:  55/70
PS: 3
IM: 5
RW: 30
MW: 30

Skills:  Beam 4, Tech 3, Enviro 2, Unarmed 3, Robotics 2, Melee 1

Equipment:  backpack, a laser pistol with 4 power clips, an inertia screen with a power beltpack, two food jars, a communicator, and a small computer

Regular Sathar

STR/STA:  40/40
DEX/RS:  45/45
INT/LOG:  45/45
PER/LDR:  45/55
PS: 2
IM: 5
RW: 23
MW: 23

Skills:  Beam 2, Robotics or Technician or Environmental 2, Melee 1, Unarmed 1

Equipment: backpack, food jar, laser pistol with 2 power clips or communicator

Combat Robots

Type: Combat
Level: 2
STA: 100
Move: 120 m/turn
Attack: 50
Damage: 2d10 hands or 5d10 laser
Programs: Attack/Defense, Security Lock
Equipment: Laser pistol, power beltpack


March 12, 2019 Tom 3 Comments

How to Draw a System Map

Okay, in my last post on this topic, we generated all of the data needed to draw out a system map for the Fochrik star system. If you haven’t read the previous entry, you might want to but it’s not necessary. The next step is to take that data and turn it into the actual image. This post will cover that process. Let’s dive right in.

The Data

First a quick summary of the data for the system that we generated last time. While we won’t need all of this for the map, but it’s good to have it all summarized in one place. For generating the system map, we’re only going to need the orbital distance and the planet’s radius.

NameOrbital
Distance (AU)
Orbital
Period (hrs)
Gravity (g)Mass (Earth)Radius (km)
T10.19687.460.330.03492,064.55
T20.523,112.570.670.33734,468.50
Forge1.139,316.450.810.60125,443.75
Hum1.2311,323.30.910.81395,991.92
Larg1.6116,957.21.121.46227,215.22
J14.6683,501.43.30525.8279,714.14
J210.59286,0611.55140.1460,108.51
ID116.58560,3910.140.01892,297.74
IG118.53662,1060.9719.90228,62316
ID220.53772,1440.060.00181,054.47
IG126.011,101,0961.0218.47226,919.75

When drawing the map, we want the distances to be all on the same scale. However, we cannot use a simple linear scale in most cases as that would put all the inner planets right on top of each other if we want to see the outer planets on the same image. You can see this in the following diagram that has a linear distance scale.

Fochrik system planetary distances on a linear scale. Click for larger image.

As you can see, those inner planets are bunched up pretty close together while the outer planets have huge gaps. We want to spread out the inner planets while compressing the outer ones but still have the relative scale be correct. To do that we need to shift from a linear scale to a logarithmic one.

To get on a log scale, we are just going to take the base 10 logarithm (the ‘log’ key on your calculator) of each of the orbital distances and use that value to draw the distances. First I’ll present the numbers and then another simple drawing.

NameOrbital Distance (AU)Orbital Distance (log(AU))Scaled Distance
T1 0.19-0.721214
T2 0.52 -0.2840233
Forge 1.13 0.0531401
Hum 1.23 0.0899420
Larg 1.61 0.2087479
J1 4.66 0.6684709
J2 10.59 1.0249887
ID116.581.2196985
IG118.531.26791009
ID220.531.31241031
IG226.011.41511083

We can’t quite use the log(AU) values as the smaller numbers generate negative values (I’m not going to do a math lecture here. If you’re interested in why, you can check out this Wikipedia article). So we need to scale those numbers somehow. The scaled distance value in the table above was calculated by taking the log(AU) distances, adding 0.75 and then multiplying by 500. We’ll use these values to create the plot.

As you can see, the range of values is greatly compressed which allows things to be a bit more evenly spaced. The only issue with this scale is that zero (i.e. the position of the star) has a value of negative infinity so we’ll have to pick some arbitrary distance to separate them. However, since we’re just trying to show the relative position of the planets, that’s not too big of a problem. Here’s the simple plot we get:

Orbital distances on a log scale. Click for larger image.

This scale compresses the outer planets a bit but helps us spread out the inner planets which are the ones we’re more interested in anyway.

Drawing the Map

With the numbers above, we have all the information we need to create the map. The last thing to decide is if we are going do make a horizontal map (oriented like the diagrams above or the map in the Clarion Calendar post) or a vertical one (like in the Duergan’s Star post). For this map, I’m going to make a horizontal map simply because all of the “along the way” image will fit better into the post than a vertical one will. However, the process applies just as well to a vertical map, you just have to rotate everything 90 degrees.

I’ll be building the map in Inkscape, my vector drawing program of choice and it will be a simple black and white drawing so it shouldn’t be too complicated.

Here’s a video I made of the map building process if you want to watch it in real time, It’s about 53 and a half minutes long and completely unedited so you can see all my mistakes and fumbling around. If you don’t want to watch the video, I’ve described all the steps below.

Laying the ground work

To start, we want to set up the basic image and some guides for us to work with. I’ve decided to make the image 1200×400 pixels in size so I create a blank document of that size to work with. I also turn on a rectangular grid to help with position items. This grid will get turned on and off as needed during the drawing process.

I’m going to use the logarithmic distance scale for my planet spacing so I then import that image into my document and position it accordingly.

Finally, I draw a guide line down the middle of the image so I know where the center line is. After this initial setup, the image looks like:

I’ve shifted the imported image just slightly so that it’s 10 pixels to the right of where it was in the original. I wanted a little more space between the star and the first planet. Since I’ll be measuring the scaled distances from the left edge of the image, this means I’ll have to add 30 pixels to the values in the table above for the final radii of the orbits.

All of the above was done on the initial default layer. I then create three more layers: one for the orbits, one for the objects (star and planets), and a third for the labels. I like to work in lots of layers as it makes it easy to turn bits and pieces on and off and add in effects if needed.

The star and the orbits

The next step is to draw in the star itself and then start adding arcs for the orbits. The symbol for Fochrik is created using the star and polygon tool in the star setting with corners set to 30 and spoke ratio set to 0.8. This is drawn on the object layer.

Next I hide the objects layer and move to the orbits layer. Here I use the circle tool to draw in the first orbit. Clicking on the point where the center guide meets the edge of the image I then drag out the circle holding down the shift and the control keys until it reaches out to the position of the guide line for the planet T1.

Holding the control key down makes the circle drawn have integer ratios between the x and y directions allowing you get a proportional circle. Holding down the shift key makes your initial click point the center of the circle instead of the upper left corner of the box enclosing the circle. Once I have the circle drawn to approximately the correct size, I use the spinner boxes for Rx and Ry (the x and y radii) to set the exact radii (44 px in this case). The fill of the circle is set to transparent, the stoke is set to black with a thickness of 2 pixels.

Inkscape allows you to draw off the edge of the image so we drew a whole circle for this first orbit. Since we will be copying and scaling this up, we don’t want our circles going way off to the left. We can turn the full circle into an arc by grabbing the small circular mark on the drawn circle (it’s at the 3 o’clock position) and moving it clockwise to break the circle. I move it down to just past the 6 o’clock position. Then I go back and grab the other small circle node at 3 o’clock and move it up to just before the 12 o’clock position. This gives us a half circle which is all we need.

Now it’s just a matter of duplicating that arc and setting the correct radii for each one. As we move out we’ll want to adjust the size of the arc so it’s not sticking up well above or below the edge of the image just to make things a little cleaner on our drawing canvas.

We can duplicate a selected object by pressing Control-D. Then we just go up and set the Rx and Ry values based on the scaled distance values in the table above (remembering to add 30 to each one). You have to remember to have the circle tool selected while you do this or you can’t set the radii.

Once that is done, we have an image that looks something like this:

Notice how the arcs are going high. They will be cut off when we export the final image. They were originally also going low as well but they have been adjusted (at a later step) and I didn’t export an image while I was drawing them.

You might also notice that the arc for the planet T2 is not lined up with it’s guide line. That is because as I was drawing it, I noticed a discrepancy between where the guide line was and where the arc was drawn based on the scaled distance values. I originally though there was an error in the scaled distance but it turns out I just drew my guide sketch wrong. It’s always good to double check your work.

Drawing the planets

We’ve got our orbits, now we need to draw the planets. This will be done on the planet layer so we switch to that layer now.

Like the orbits, we want the planets to all be on the same scale. This obviously can’t be the same scale as the orbits or we wouldn’t be able to see them since they’d just be dots on the page. To pick the initial scale, I just let the radius of the circle we’re going to draw be equal to the radius of of the planet (in km) listed in the table divided by 2000. I computed each of these values and wrote them down on a piece of scratch paper to have them handy.

Depending on how you have Inkscape set up, when you draw in the first circle, you’ll notice that you just get an arc instead of a full circle. That was my case as I have Inkscape set to remember the last setting for the tool and use that instead of resetting to the default. I find that more useful. But we need to reset the tool to draw circles. This is done by finding the Start and End boxes (up by the Rx and Ry boxes) and setting them to 0 and 360 respectively. Now we’re drawing circles again. Also you’ll want to set the fill to white instead of transparent.

I then just move to an arbitrary point on each planet’s orbit, draw a small circle and then set Rx and Ry to be the values determined for that planet. It doesn’t matter exactly where you draw them as we’ll go back and properly position them once they are all drawn.

When you start doing this, you’ll quickly notice that the scale we’ve picked is simply too small for the small terrestrial planets. In the case of a few of them, you can’t even see the disk as it is smaller than thickness of the line we drew for the orbit. To solve this we simply double the radii of these planets. However, that would make the giant and Jovian planets too big if we doubled them as well. So we’re just going to have to have different scales. The terrestrial and ice dwarf planets will be to scale with each other as will the giant and Jovian planets but the smaller planets will be twice as big as they would be if they were to scale with the larger planets.

The last step of drawing the planets is to place them at an appropriate position on their orbit circle. There are two requirements here. One is that the disk of the planet should be centered on the orbit line. The other is that for planets with close orbits, they are spread out across the image so that when we add labels there won’t be any overlap. To make this easier you should turn off the grid that we set up at the beginning so the software isn’t trying to snap your circles to positions you don’t want.

Once that is done, we have an image that looks something like this:

You’ll notice that even doubling the scale, some of those planets are pretty tiny. In fact, you might not even be able to see ice dwarf 2 unless you click on the image above to get the full sized one. But that’s okay.

Adding labels

The next step is to label everything. There are a few things we want to put in our labels. The most obvious is the name of the planet. I still haven’t come up with official names for the planets but that doesn’t matter for the purposes of demonstrating the mapping technique. The other thing we need to do is add the scale for the system map. Finally we’ll add a label for the system. I’ll be using the Copperplate Gothic Bold font for my lettering.

Let’s start with the scale. If you watched the video, you’ll know that I actually did this way back at the beginning of the process. Since it was already there in the imported image, all I had to do was trace it. Once it was drawn in and had the numbers, I put the “Distance (AU)” label on and then moved everything down as close to the bottom of the image as I wanted it.

The labels on the the scale are drawn with a height of 16px for the numbers and 20px for the label. What you choose is arbitrary and it should be picked to match the size of the drawing. You don’t want it too small but you don’t want it too large either.

However, at this point, I didn’t like the orbit lines crossing over the scale and I went back and adjusted them so that they stopped just before touching it. If you look closely in the previous image, you’ll see another guide line that sits just above the scale that all the orbit lines touch. I drew this line in and then, using the circle tool, adjusted the end of the arc of each orbit line to just touch that line, which is why they don’t extend below the image.

Turning off the layer with the guides and the scale image gives us the following at this point. I’ve also now only exported the actual drawing so everything is trimmed appropriately.

Next we label the planets. For each planet I’m going to put the name in using a 20px high font and then centered under the name, put its orbital distance in a 10px high font. Again still using Copperplate Gothic Bold. I had originally intended to just type both and then change the font size of the distance but found that I couldn’t adjust the vertical spacing like I wanted to. So instead I created two text objects, one for each line, used the alignment tools to get them lined up, and then grouped the label for each planet into a single object so I can move it around easier later.

It doesn’t really matter exactly where you put the labels to begin with as you’ll be moving them around once they are done and you have their exact sizes. Just go through and add them for each planet. Then, once they are in the drawing, move and position them so that you like the placement. This may also involve moving the position of the planet’s disk on the orbit line to get a spacing you want.

Typically for the smaller planets, I like to place label so the center of name is aligned with the center of the disk. For the large planets, I tend to set it to the lower left or right corner depending on the exact positioning. I just do this by eye. You want to avoid having the text run over the orbit lines as much as you can but in some cases it’s unavoidable. Just place the names where it looks good to you. On a vertical map, I’ll often try to center the name of the planet under the planet’s disk.

Now we have to deal with the text that is overlapping the orbit lines. This often makes the text hard to read so we need to mask out the orbit lines under the text. Your text layer should be positioned above the orbit layer. If it isn’t you’ll need to move it up in the layer stack. What we’ll do is draw some white rectangles to hide the orbit line below the text. I like to set their opacity to about 75-80% so the orbit lines slightly peek through but you can make them fully opaque if you prefer. Drawing the rectangles can either be done on a new mask layer that is placed directly under the labels layer or in the labels layer itself.

In this image I drew the rectangles directly into the labels layer. Using the rectangle tool I just drew in a small rectangle over the orbit lines in each location there was overlap between the text and the lines. You’ll want to make the rectangle extend just a bit below and above the text. Exactly how much depends on how much space you want between the lines and the text and is a matter of taste. As you draw the rectangles, they are placed above the text so you need to send them to the bottom of the z-order for the layer so they are behind the text instead.

If you draw on a new mask layer, then you don’t have to worry about moving the z-order of the boxes as they will all be between the orbit lines and the text. You also don’t have to worry about the opacity on the individual boxes but can adjust the opacity of the entire layer all at once. This is typically how I do the masks but for some reason didn’t on this particular drawing. Probably due to the fact that I was recording and it slipped my mind.

We are almost done. At this point our image looks like this:

Finishing touches

The only thing left to add is the label for the system, a border, and a white background.

We’ll put the label in the upper left. We want this to be large so we’ll use a 32px high font. We’ll also need to add a mask as it will be overlapping the orbit lines. I considered simply adjusting the orbit lines to end below the label but decided to leave them in and mask them off.

The border and background I did with a single object. You may not have noticed, but all of the images so far have had a transparent background with just the objects drawn on it. This can cause some issues depending on how the image is rendered so we want to add a solid white background.

To do this I make a new background layer that sits at the very bottom of the layer stack. On this layer I draw a single large rectangle that stretches corner to corner across the entire image. I set the fill to white and the stroke to black with a 6px thickness. Due to the way Inkscape draws the stroke, half of that will be off the final image giving a 3px border. If you want it thicker or thinner, simply adjust the stroke width.

And now we’re done. Here’s the final image:

The final system map. Click for larger version

If you’d like to look at or play with the original SVG file of this map, they you can grab it here:

FochrikSystemMapDownload

Other touch-ups

Giving the planets some character

For this demo, I didn’t do anything special with the planets themselves. If you wanted to, you could add in cloud bands or rings on the giant planets to give them a little bit of character. Especially if they have features called out in their descriptions. I didn’t have any special descriptors so I left them as simple circles but that could be added in later.

The FTL Horizon

If I was doing this map for FrontierSpace, the other thing I would add in is a dashed arc at the position of the FTL Horizon, which in that game is the distance you need to be from the star in order to engage your Nova Drive to travel between the star systems. That would be an important bit of information for the map to include.

Asteroid belts

I also didn’t add in an asteroid belt in this system. If I did then I would determine the distances for the inner and outer boundaries of the belt and draw orbit circles on the guide layer at those distances. Then on the object layer I’d go in by hand and draw in all the asteroids. I work on a 2-in-1 laptop that has a stylus so I can actually flip my laptop into tablet mode and draw the asteroids with my stylus right on the screen. I find this much easier and faster than trying to do it with the mouse but it can be done that way (and I’ve done it that way in the past). There’s a bit more to it than that so I might do a mini article on drawing in asteroid belts.

Final thoughts

And that’s everything. I think the map turned out pretty well. I was actually surprised it only took a little less than an hour to draw it out once I had all the data. All told I probably spent about 2-2.5 hours creating the data and making the drawing. It would have taken a bit longer if I had had an asteroid belt to include or added details to the planets but that gives you an idea of the effort involved. It actually took me longer to do these two blog posts (5-6 hours total) than it took to actually do the work.

I still have one more post on the calendar system to do and that will come in March. I’d like to hear your comments, questions, or any suggestions you have about the process. What wasn’t clear? What would you like more information on? Did you try this yourself? If you did, share your results. Let me know below.

February 26, 2019 Tom Leave a comment

PGC Records Vault – part 1

While I had planned on presenting this all at once, I’ve decided to make this a two-parter (or maybe more).  Mainly because it turned out to be a bit bigger than I was anticipating.

I used this location in my on-line game.  For the game, all of my notes consisted of these three maps, and five paragraphs of notes including a partial stat block for the security robots.  Just writing up the room descriptions has ballooned to around 7 pages without the maps.  And I still need to write up all the stats for the robots and NPCs.  I always forget how much additional work is required to take something from your notes and transform it into something usable by others.

So this will take a bit longer than I had planned but in the end you’ll have a fun little location your characters can raid if desired.  In may game this was set on Laco but you could have another of these records vaults anywhere you want in your campaign.

For this part, I’ll be presenting the maps and room descriptions.  The other details will come in later posts.

Pan Galactic Records Vault on Laco

Nestled in the mountains to the northeast of Point Glass, the Pan Galactic Corporation has a records archive dug deep into the mountain to protect backups of all the data gathered by the company on Laco.  The vault houses hundreds of thousands of data cubes containing copies of data collected over the past 80 years of the company’s presence on the planet.  Content ranges from details on the Glass Pyramids, to data on local flora and fauna, to records from archaeology sites, and even detailed weather and climate data.

While parts of the data can be had at various locations around the planet, the only place where every bit is stored together is at the records vault and at PGC headquarters on Gran Quivera.  Because of this, PGC does allow a limited number of researchers access to the unclassified data in the archives.

 Exterior Compound

The main entrance to the vault is a structure built into a sheer cliff face in the side of the mountain. Surrounding this main building is a high (5m) wall topped by six guard towers.  Entrance through the wall is by a large gatehouse structure.  Inside the wall is the main building, a garage, and a power plant. A schematic of the external compound can be seen in the map below. 

1 – Gatehouse, wall, and guard towers – The gatehouse is a large enclosed structure with doors on each end.  It is easily large enough to accommodate an explorer or hover or ground transport.  Inside the gate house are several security cameras as well as a computer-controlled laser rifle, sonic stunner, and grenade launcher filled with doze and tangler grenades (10 each).  The weapons are connected to the complex’s power plant and have unlimited ammunition.

To enter, the outer doors open, the vehicle enters the gatehouse, and then the outer door closes. The driver is queried for passcodes for entrance via a terminal on a movable arm that adjusts for the height of the vehicle.  Once supplied, the inner door opens allowing the vehicle to proceed. 

If no proper codes are presented, security personnel in the main building are alerted.  If no threat is detected, the outer doors will re-open allowing the vehicle to exit.  If, on the other hand, the vehicle or occupants are deemed a threat, the outer doors do not re-open and the security personnel can use the weapons in the receiving area to disable the vehicle and incapacitate the occupants.

The outer wall of the compound is constructed of reinforced plastisteel and stands 5 meters tall and is a meter thick.  It is built into the mountain and completely surrounds the vault complex.

The guard towers stand an additional 5 meters over the wall and have access ladders on the inside of the wall.  Each tower contains a heavy laser operated by a level 4 security robot (see stats below). The heavy laser is powered by the compound’s power plant but also has a100 SEU powerpack as backup and can fire both inside and outside the compound.

The robots will respond to any threat against the compound and attempt to disable any vehicle deemed to be a threat that is attempting to leave the compound or escape from the gatehouse.  The robots are nominally controlled by the compound’s main computer but all PGC staff can override the computer commands.

For combat purposes, the walls, doors, and towers are considered to have 300 structure points.

2 – Garage– The garage is a single large building with two double doors on each end.  Any vehicle that can make it through the gatehouse can easily fit inside.  In addition to parking space, there is also a small work area with tools for field repairs and a small desk.

Whenever a vehicle is admitted into the gatehouse, the compound’s technician and robotics expert comes out to the garage to greet the arrivals and get their vehicle situated into a parking area and hooked up to recharge its parabatteries.

There are typically at least 3 vehicles here at all time:  two aircars and a ground car, all bearing the Pan Galactic Corporation’s corporate logo.  In addition, there could be up to five other private vehicles if researchers are visiting the facility.

3 – Power plant – This is the complex’s power source. It is a small generator situated over a natural geothermal vent.  The location of this vent was a major factor in selecting this location for the vault. It is a Type III generator capable of supplying up to 2000 SEU/hour,more than enough to power the complex. In addition, there are solar arrays on the roof that supply an additional 250 SEU/hour during the daylight hours.

The doors closest to the gatehouse provide maintenance access to the generator itself.  The other doors also provide maintenance access but are also the entrance to a small control room allowing the technician to monitor the status of the generator.

4 – Main vault building – This is the main vault complex.  There are windows on the side of the building on either side of the door.  The building is about 4 meters tall and built into the side of the mountain.  It extends dozens of meters into the mountain and then descends hundreds of meters into the bedrock of the area.  It is described in detail in the next section.

Main Level

This is the main level of the records vault where most of the staff and all visitors spend their time.  Every room on this level, including the hallways, have at least one security camera and an intercom panel.  Locations of the security cameras will be given in the room descriptions.  Unless otherwise stated, the intercom panel is located right inside the door.

1 – Main Entrance – This is the main reception area for the vault.  The room is well lit and relatively spacious.  It is divided by a desk (1a)behind which sits one of the vaults two security guards.  To the left and right are double doors that lead further back into the complex. These doors have level 3 security locks that key to the ID badges of the PGC staff.  There is another door behind the security desk.

When visitors arrive, the security guard calls back to one of the archivists who then come out and take the visitors back to the Research Room (area 7). 

1a – Security Desk – This is the work location for one of the two security guards on duty.  The desk is a about 1.2m in height and the guard sits on a raised chair behind it and has a computer terminal to work on.

Access to this area is via a door into the breakroom (area 2).  This door also has a level 3security lock.  The only way to get directly between the main entrance and the area behind the desk is to climb over the desk, there are no openings.

2 – Breakroom/Kitchenette– This is the main communal area for the complex.  It contains several tables and chairs as well as a refrigerator & freezer, oven and range, sink, microwaves, storage cupboards, and several vending machines. There is a security camera mounted in the lower right corner of the room (closest to area 8).

3 – Office –This office contains the desks for the two office staff and the computer &robotics technician.  The half of the room farthest from the door is separated by a wall and door into a private office for the vault’s administrator. The other two desks are in the main area. The door to this room is a level 2 security lock and the door to the administrator’s office has a level 3 lock.

Each desk has a computer terminal with access to all the information in the systems main computer.  The bypass security skill cannot be performed on these terminals.

There is a security camera mounted over the door to the storage room (area 3a) and an intercom panel right inside the entrance.

3a – Storage –This storage room contains a variety of office supplies and small electronics and computer parts.

4 – Office –This office contains four desks in an open plan.  The desks are for the security officer not manning the front desk (area 1a), and three of the site’s research librarians and archivists. 

Each desk contains a terminal that connects to the vault’s main computer.  Like the terminals in the other office (area 3), these terminals have full access to the computer’s systems.  In addition, the security officer’s desk has a second monitor that contains feeds from all the various security cameras around the complex.

4a – Storage –This storage room has a level 4 lock that keys only to the two security officers’ and the site administrators badges plus their fingerprint.  Inside is a small weapons locker containing

  • 6 doze grenades
  • 6 tangler grenades
  • 2 laser rifles
  • 10 power clips
  • 2 sonic stunners
  • 2 electrostunners
  • 2 power beltpacks

5 – Restrooms– This room contains three restroom stalls that cater to the anatomy of the various Frontier races.  In the outer room are several sinks and paper towel dispensers.  There is a camera in the outer area to the right just in side the door that can see the sinks but not into the restrooms proper.

6 – Robot Storage/Workroom – This area is the robotics storage and maintenance room.  Along the wall are recharging and storage bays for eight robots.  Typically, six of the bays are occupied by four maintenance robots and two data retrieval robots.  Occasionally, the other two bays may be occupied by security robots.  The center of the room is a workspace for repairing and maintaining the site’s robots.  There is the equivalent of a robotcom kit scattered throughout the room. 

The door to his room has a level 2 lock that is keyed to the badges of the site administrator, the security officers, and the technician.  It will also open automatically for any of the site’s robots entering and exiting.  The security camera in this room is mounted in the corner opposite the door above the robot recharging bays.

7 – Research Room – This room has six desks with computer terminals along the walls.  Each terminal provides access to the computer limited by the passcode provided. This is where visitors to the vault spend their time working on their research.  The entrance to this room from the hall is not locked.  The security camera is located in the upper right corner of the room.

8 – Computer Room – This room houses the vaults main computer as well as a number of data cube ports allowing more data to be connected as needed.  The computer itself is arrange around the outer walls of the room and there are a dozen pedestals in the center of the room that can have data cubes set into them. There are two terminals to allow direct access to the computer in this room.

The door to this room has a level 4 security lock that only opens for the site administrator and the computer technician.  It will also open for either of the two data retrieval robots when they are bringing data cubes from the vault to be placed on the various pedestals in the room for the researchers to access.  The room contains two security cameras: one in the corner near the door and the second in the opposite corner.

9 – Hallway –This is the main hallway of the vault that connects the various rooms.  It has two security cameras located in the corners near the Robot Storage/Workroom (area 6) and the Computer Room (area 8)that can see everywhere in the hall.

10 – Security Lock – This room functions as an airlock to secure access to the vault.  Both doors contain level 3security locks that key to any of the site’s staff.  The doors will also open for any of the site’s robots.  Only one door may be open at any time and must be closed to open the other door.  This is a mechanical design and not electronic and cannot be bypassed.  Each door takes two rounds to open.

11 – Hallway –This long hallway extends from the Security Lock to the elevator that descends to the data vault proper.  It has a pair of armed security cameras as shown on the map. Each camera has a sonic stunner connected to the vault’s power grid and cannot run out of ammunition unless the power is shut off.  Additionally, there is a security robot sitting in the center of the hallway that will attack any non PGC staff that enter this restricted area.

12 – Elevator –  This large elevator connects the upper main level to the lower vault.  It takes two minutes to traverse the 200 meters between the two levels.

13 – Stairwell– This is a long flight of stairs that runs parallel to the elevator shaft connecting the upper and lower levels allowing for access and escape from the vault level in the case of a power loss or malfunction of the elevator.  It’s not so bad going down but coming up is a bit of a climb.

Deep Vault

This is where the records are actually stored.  This level is located 200 meters below the main level and is dug into the mountain’s bedrock.

1 – Elevator– This is the elevator access on the lower vault level.

2 – Stairwell– This area is the bottom of the long stairwell from the upper level.

3 – Hallway –This large hallway connects all the offices and data vaults on this level with the elevator and stairwell.  There are a number of security cameras armed with sonic stunners placed throughout this hallway to cover all the various locations. Like the ones in the hallway on the main level (area 11), they are connected to the vault’s power grid and controlled by the main computer.

In addition to the security camera turrets, there are three security robots that rove about the hallway patrolling the area.  These robots will attack anyone who is not a member of the PGC staff immediately attempting to incapacitate them.

4 – Office –This office contains a desk with a computer terminal.  In addition, there are four data cube port pedestals along the wall near the door. A security camera is mounted right above the door.  These offices are used by the PGC researchers working with the data.  They have direct access to the data in the vaults and do not have to wait for the robots to retrieve the data cubes.  They are also used when working on sensitive PGC classified information so that the data does not leave the vault area.  This office is currently being used by one of the vault staff.

5 – Office –This office is identical to area 4 although rotated 90 degrees.  It is currently in use by one of the PGC staff.

6 – Office –This office is a mirror image of area 5 and is currently unoccupied.

7 – Restrooms– Similar to the restrooms on the main level, this area is for use by the researchers working down in the vault.

8 – Data Vault 1 – The data vault room, unlike the rest of the complex, has 4m high ceilings instead of the standard 3m height. Most of the room is taken up by a compact shelving unit to maximize the storage space.  All the shelves in this room move on a series of tracks on the floor and access is only available to one set of shelves at a time.  A control pad on the side of each shelf allows for access, causing all the shelves to move to open up a walkway where needed. It takes 30 seconds for the shelves to move once activated.  They can also be moved by the main computer

On any given shelf there are rows of filing boxes that are coded and labeled.  The labels contain both a barcode, an alphanumeric code, and a short description.  In each box are the data cubes containing the data specified by the barcode.  A box will typically have from one to five data cubes inside.

There are four security cameras in each room, one in each corner.  They cannot see down into the open passageway between the shelves but can see everything in the area on either side of the shelves.  The doors to this room are protected with a level 2 lock that keys to any of the site’s staff and will also open for any of the site’s robots as well.

This vault is used to store all data related to the flora and fauna of Laco.

9 – Data Vault 2 –This vault is identical in construction to Data Vault 1 and holds all data related to the geology and climate of Laco as well as any astronomical data related to the Dixon’s Star system.

10 – Data Vault 3 –This vault is identical in construction to Data Vault 1 and holds all the socio-political data about Laco, such as information on the culture and other corporations, and all PGC corporate data.

11 – Data Vault 4 – This vault is identical in construction to Data Vault 1.  This data holds all the collected information on the Techrachs and related sites that have been collected on the planet.  The data on the Glass Pyramid activation will be stored in this vault.

12 – Security Robot Storage – This room is a storage and recharging station for the security robots in use around the complex. There are ten charging stations here. There are six security robots in the charging stations that can be activated by the main computer if a threat is detected.  The door to this room is locked with a level3 security lock that is accessible only by the site administrator, the security officers, and the roboticist.  The door will open automatically for any of the security robots.

Closing Thoughts

If you’d like a PDF version of this location, you can download the file linked below.  I’ll post updated versions of this as I add to it in later posts.

Pan Galactic Records VaultDownload

As usual, if you have any questions, comments, or suggestions, let me know in the comments section.

December 11, 2018 Tom 1 Comment

Expanded Frontier Map

Happy Halloween!  In my “State of the Frontier” post last week, I mentioned that I was working on updating an old map that I had created many years (i.e. decades) ago for use as my main campaign map of the Frontier region.  Today, I’m posting the (near) final version of that map. Along with a bit of history and explanation.

Background

The original map was hand drawn in the late 80’s on six 8.5″x11″ pieces of quad-ruled graph paper and then taped together.  I’ve kept it in a cardboard poster tube all these years when I haven’t actually been using it.  Right now it’s rolled up inside out to try to get some of the decades of bend rolled out the other direction.

The map was drawn back before I acquired a personal copy of Zebulon’s Guide to Frontier Space, Vol 1.  I didn’t get my first copy of that until 1992, many years after Star Frontiers went out of print.  My copy was actually a gift from some fellow role-players. 

I had, however, looked at a Zeb’s Guide and its beautiful map at some point before I drew mine.  There are too many similarities between the area just around the Frontier in my map and the Zeb’s map to chalk up to mere coincidence.  The two most noticeable are the star cluster to the upper left of the Frontier and the neutron star just below it.  I would have had zero reason to put a cluster like that (I had four stars and the Zeb’s Guide map had 3) anywhere, let alone there, if I had not seen the published map at some point.  And I had exactly the same use for the neutron star system at the location of Lynchpin as the published timeline had.  I had a different route to it but the idea was there from a perusal of Zeb’s Guide in a bookstore.

I have now updated my map to better match the map in Zebulon’s Guide as well as included some additional fan created maps of the areas of space the Saurians and S’sessu come from.  These changes mainly affect the area below the Frontier and to the right of Liberty system (from the Beyond the Frontier modules).

There are a few differences.  Most importantly is the location of the new systems described in the published modules.  I place the Rhianna (Mission to Alcazzar) and Starmist (Sundown on Starmist) systems in the locations specified in the modules, not where the Zeb’s Guide map places them.  I always thought it was strange that they would move them from the published locations.  In truth, only Rhianna was given a general location (inside the loop formed by Cassidine, Timeon, and White Light) but given the way Starmist was discovered (by emergency landing which I took to mean from a mis-jump), I don’t think the Zeb’s Guide location (outside the main Frontier) makes sense for that system and I like mine better (and the system I chose was left off the Zeb’s map completely!).  My location for the Belnafaer system (Bugs in the System) only differs by one star from the Zeb’s map and both correspond to the module description.  For now I’ve left it where I originally placed it but might move it for consistency.  Finally, the location of the Tristkar system (Dark Side of the Moon) is exactly where Zeb’s Guide places it.  From the description in the module, the location of the Solar Major system would make a little more sense but since I didn’t actually have this system on my map originally, using the Zeb’s Guide location works just fine.

Second, I don’t have the plague worlds from Zeb’s Guide (the system I choose for Rhianna is actually Zeb’s Delta plague world).  On my map they are just unexplored systems.

Finally, while I don’t normally use the MegaCorp systems in my campaign I’ve included them for completeness.  I’ve also redrawn the nebulae in the Frontier region to more match the ones drawn in the Zeb’s Guide map and added in the Rim planets.

On the side of fan produced materials, I’ve added in the locations of the Saurian and S’sessu worlds from maps published in issues 4 and 16 of the Frontier Explorer and adjusted my map accordingly.

The New Map

So with that introduction, here’s the updated map.

Expanded map of the Frontier Sector with the systems from Zeb's Guide, the modules and some fan creations added in.
Updated map of the Frontier. Click for the full-sized image.

The smaller blue box is the area covered by the original Frontier map and the large blue box is the area covered by the Zeb’s Guide map. 

This is very much a “player-facing” map.  It doesn’t contain secret jump routes (with the exception of the one between Truane’s Star to Cassidine that I forgot to remove 🙂 ) that are known to the UPF, MegaCorps, pirates, or the sathar.  If I was using it for my game, there are even parts of this map that I would not use (i.e. the MegaCorp planets, and S’sessu and Saurian space) at least not to begin with as those are discovered in game.  I’ve set the map up with all these bits and pieces on separate layers so that I can turn them on and off as needed.

The map extends more upward from the Frontier than down because the Vast Expanse, an area that I consider to be fairly devoid of stars, is “down” and exploration is easier (due to shorter jump distances) in the “up” direction.  You can see the much lower density of stars in that direction.  It gets even worse going further off the map.

While I still have some small tweaking to do on this map, mainly with labeling, it is completely usable. 

Future Work

While this is a completely functional map, it’s not super pretty.  One of the things I’d like to do is give it a color makeover so it looks more like the maps that my star sector generator program produces.  Those maps look like this:

Click for full-sized image

However, that might have to wait for a while.  Although when I get to it, it will make a pretty awesome poster.

The actual next step is to work out the logistics of the Second Sathar War and the sathar assault on the Frontier.  The sathar are out there on that Extended Frontier map although I didn’t show their systems and jump routes.  Given that I know know all the jump routes, I can start figuring out how long it would take for them to maneuver and launch offensives and resupply their ships from their starship construction centers.  Some exploration by the UPF and well placed raids could significantly influence the outcome of the conflict.

If you have any thoughts or comments on the map, let me know.

Update: Just saw today that the RPG Blog Carnival topic for November (hosted by Nuketown) is “All These Worlds …”.  My post was a day early (and I didn’t know the topic or I might have waited) but it’s close enough that I think it applies.  So this post is part of this month’s blog carnival and I might have some more related posts in the coming weeks.

October 31, 2018 Tom 9 Comments

Outpost Osiris

I had intended to have this post up on the first but I’ve been a been sick and under the weather.  I’m mostly recovered and back to work.  This is the follow on post to my Osiris Base – Rough Sketches post where I present the final maps.

In working on the Ghost Ship Osiris module, the next portion of the adventure deals with the PCs rescuing the mining and administrative crew at the outpost from several Pursale robots that the scavenger crew set loose.  In order to write that part of the adventure, I needed a map of the base. 

I presented the rough sketches I did in the previous post.  This one presents the final versions based on those sketches, along with some short descriptions of changes made.  Details of the individual rooms will be in the final module.  So let’s take a look:

Asteroid Cross-section

First up we’ll start with the cross-section map showing where everything is placed relative to one another.

Cross section of the asteroid showing the three inhabited levels, the mines, and the central cavity with the Pursale ship.
Click for full sized image

The asteroid is a fairly small one for the outer belt, measuring only 1.4 km long and 1 km wide.  Nova Vista was interested in it because of the anomalous readings generated by the presence of the Pursale ship at its core, although they didn’t know the cause at the time.

The main docking and mining level is on the asteroid’s rotation axis to facilitate ships docking with the base. “Below” that are the crew’s living level and the power level.

The mines mostly run through the upper part of the asteroid (as displayed on the map) although a shaft has been started into the “lower” section.

Finally there is a shaft that runs straight into the heart of the asteroid to intersect with the cavity containing the Pursale ship.

Docking/Mining Level

This level contains the base’s docking bay as well as the mining facilities, storage, and technical facilities.

Docking bay on the
Click for full size image

This level ended up almost exactly as I sketched it out.  The only real tweaks were to the exact sizes of some of the room.

I just realized that I need to tweak this map just a bit as it looks like the docking bay is inside the asteroid.  In reality it sticks out a bit and the silhouette is part of the asteroid that sticks out below it.

Crew Level

This level holds the living and recreation areas for the crew as well as the base’s main computer, offices, and communications and sensor arrays.

Map of crew level.  Offices and sensor systems on the left, housing in the middle, and recreation facilities to the right.  Life support, food storage, and dining at the middle top.
Click for full sized image

This level ended up being a little “shorter” that I had sketched it out.  When I started drawing in the rooms, I realized that the individual apartments in the housing area were a little large.  As is, the smaller ones are about 1000 square feet and the four larger ones about 1,200 square feet.  Plenty big enough for a single person.

I had also drawn the offices a little big as well, but even drawn smaller in this map they are very spacious.

The sensor and communications room is off by itself since it needs to be on the surface of the asteroid. 

Power Level

Power level.  Elevator and stairwell at the top connected by a short corridor to the control room and maintenance and fuel access areas.  The reactor itself is at the bottom.
click for full sized image

This level is quite simple and just holds the base’s nuclear reactor.

The reactor is fairly self contained but does have a maintenance access airlock as well as a fuel loading/waste removal port.

Other Features

The mine shafts don’t have a map as they are twisty, turny, and loop back on themselves in three dimensions as the mining followed the ore veins through the rock. 

The Pursale ship will be mapped separately in a future post once I figure out what the inside of it looks like.  I’ll leave it for you to speculate which end is the front and which is the back.

What’s Next?

Next on the docket for the Ghost Ship Osiris adventure is to detail what is happening in the base when the PCs arrive and what they have to do to secure the base.  I’ll be generating the base staff, along with their locations and conditions. 

While I’m working on that, I have some more notes from the Death at Rosegard adventure to write up and post as well.

If you have any questions, comments, or suggestions on the maps, feel free to let me know below.

October 4, 2018 Tom 2 Comments

Osiris Base – Rough Sketches

I’ve been working on roughing out the map for Osiris Base and thought I’d share the rough sketches with you.  Especially since I won’t have much to post for a while as I work on the final versions of these maps.

Starting with this part of the project, I’ve started working out a new workflow.  I recently purchased a new laptop, so instead of an really old (7+ years) netbook with an Atom processor, I’ve got a shiny new Lenovo Yoga 730.  These images were drawn on the touch screen of that laptop in tablet mode using a Lenovo Active Pen 2 Stylus and using the Autodesk Sketchbook app. 

Previously I used to do my sketches on my Samsung Galaxy Note Pro 12.2″ tablet.  Then I would transfer it to my desktop and work on the final images.  The new laptop allows my to do the initial sketches and final work all on the same computer.  The laptop is more powerful than both my tablet and my old desktop so it was been really nice to work on.

Enough about the setup, on to the sketches.

Overview and Main Level

Osiris base is carved out of an asteroid in the outer belt of the Duergan’s Star System that I detailed in the last post.  This first sketch shows and overview of the asteroid and the relative positions of the various parts of the base, along with a detail of the docking and processing level.  This level houses the ore processing plant, technical facilities, docking bay, and ore and supply storage areas.  Access to the mines themselves is on this level

Composite image showing a profile view of the asteroid superimposed on the plans for the docking level
Click for full sized image.

Crew Level

This level houses the crew quarters along with the base’s computer system, life support system, offices, and recreation facilities.

Second level containing living quarters and recreation facilities.
Click for full sized image.

Power Station Level

This level simply houses the nuclear generator that powers the complex.  It is buried deep within the asteroid away from the crew level.

Power level
Click for full sized image.

Suggestions/Comments

That’s it so far.  The ship buried in the core of the asteroid (seen on the overview map) will be detailed in a different section of the adventure so I’ll work on that later.  I also don’t plan on detail the mines as they twist and turn through three dimensions as they followed the richer ores.

If you have any suggestions or comments as to things that I forgot or should include in the map, feel free to let me know in the comments below.  I’ll probably think of some as I start working on the details.  When I first started, I forgot to add in the ore processing facility.  I was posting sketchs on a Google Plus community when I realized I had overlooked that major detail.  Luckily it was easy enough to add in.

As I mentioned at the beginning, there probably won’t be any major posts for a while while I work on these maps.  I need to develop a process to match the style of maps that Bill has already produced for FrontierSpace so that things look consistent.  I don’t know how long that will take.  I’ll try to keep you posted as I go.

September 20, 2018 Tom 1 Comment

The Village of Rosegard

Originally, I had planned to have one more Mapping Rosegard video here that covered adding in the labels for the roads and making the black and white version of the map you’ll see below but for some reason, the audio didn’t record, only the video.  Since I didn’t want (or really have the time) to do a voice over, and it’s not that important of a topic, I decided just to drop it.  Also, it is something I can easily cover in a future series.

So instead, you’re getting the post that I had originally planned for the beginning of next week, the final maps along with the write-up on the town proper.

Rosegard

Final rosegard map in full color with labels
The final Rosegard map. Click for full sized image (~6MB)

History

Rosegard is located about 400 km northwest of Point True.  It was founded shortly after the Great Sathar War as part of the resettlement effort initiated by the Pale government.  It originally consisted of six human families that set up homesteads in the valley using the agriculture subsidies the government provided to encourage development of farming to supply food for the population.  Over time, the small village has grown to include 13 families, many of the additional families are children of the original settlers that went away to school and then returned.

While there is no shortage of technology in the village, it is still primarily an agricultural center.  Most of the actual agriculture work is done by robots but supervised by the towns inhabitants.  The technological specialists in town keep the robots, vehicles, and computer systems running to manage the farm production.   Every week, trucks arrive to pick up crops to take into the larger population centers to sell.

About 18 years ago, one of the villagers was up exploring in the mountains and discovered a vein of gold that had been revealed by some recent erosion.  Lacking the infrastructure to properly mine the valuable resource themselves, the village brokered a deal with Streel (formerly known as Streele Mining before the war) to lease the company the rights to the mine.  The mine proved to be more lucrative than either party imagined and is still active to this day.

The village’s income from the mine amounts to several million credits every year.  That money is held in trust and used to maintain the village infrastructure, pay for primary and secondary education for all of the village youth, and other expenses as needed.

There is a very good relationship between the workers at the mine and the city.  In addition to providing additional revenue to the village, the mine employs the village’s technical workers (the technician, roboticist, and computer specialist) to help assist with work at the mine in addition to their own staff. The mine staff also takes advantage of the medical facilities provided in the village.  Reciprocally, the village invites the mine staff down for any town activities and has integrated them as part of the community.  The youth often go up to the mine to see operations there and the mine staff often come down to teach mini-lectures in the village school.

Inhabitants

Original Homesteading Families

These are the senior members of the community who originally founded it.  Their houses are located around the circular loop at the north end of town.  These families primarily work the agriculture portion of the village’s activities.

  • Genio & Kathy Washy – Genio is the town mayor. They have two older children living at home.  They live in the home on the same plot as the General Store.  Kathy is a horticulturist and is responsible for tending the rose hedges in the central part around the gazebo.  It is these rose gardens that gave the village its name.
  • Martin & Jenne Lexand – They have two children living at home. They live in the home on the same plot as the Technician shop/Garage.
  • Steven & Janie Hite – They have three kids living at home.
  • Matthua & Julie Colly – They have three kids living at home.
  • Jon & Jessa Smeson – They have a single child living at home
  • Reme & Kayelyn Marte – The youngest of the original settlers, they still have four children living at home

Newer Families

These families are younger, many of them being the older kids of the earlier settlers.  Their houses are built around the block on the west side of town.

  • Rickern & Mikaela Bennez – Mikaela is the second child of Jon & Jessa Smeson and the town’s roboticist having studied at Pale University. Rickern helps manage the Smeson farm.  They have three children.
  • Mese & Braealyn Washy – Mese is the oldest child of Genio & Kathy Washy. They run the town’s General Store and have three kids, ages 17, 14, & 12 who also help out at the store when not in school.
  • Larroy & Camryn Tinnett – Camryn is the daughter of Steven & Janie Hite and is the town’s computer specialist having studied at the Triad Institute of Technology. Larroy is a veterinarian and works with the village doctor.  They have a single daughter, Allyssa, age 12.
  • Rickey & Ilana Cooker – Rickey and Ilana met Camryn at school and she convinced them to move to Pale when she returned home. Ilana is the town doctor and also has some veterinarian skills.  Rickey helps work the Hite farm with his in-laws.  They have four kids.
  • Benjoe & Abbil Leray – Benjoe is a childhood friend of Rickern Bennez and became enamored of the quite life in Rosegard when visiting one year. Both he and Abbil are teachers and work at the village’s school.  They have five children
  • Joshua & Miya Welley – Josh and Miya are the newest members of the village and the only ones that didn’t have an immediate connection when then arrived. As the village grew, the need for a city clerk arose and Miya was hired to handle the administrative affairs of the growing village.  She works in the City Center handling a wide variety of tasks for the town.  Joshua is a teacher and works with the Leray’s in the town’s school.
  • Mikkel & Danielle Lexand – Mikkel is the son of Martin and Jenne Lexand and is the town’s technician running the garage/tech shop in town. Danielle helps out on the Lexand farm.  They have one child.

City Buildings

General Store

This building contains a wide variety of goods that are used regularly by the small village.  While a lot of the supplies are foodstuffs and farming supplies, there are a number of small high tech wares as well.  Larger items, such as robots, most weapons, and vehicles, have to be special ordered in from Point True but the store has access to the full Streel and PGC catalog and anything ordered will arrive in 2-4 days.

Technician/Garage

This is where Mikkel keeps all the village’s vehicles and equipment running.  It has room inside to work on three vehicles at any one time.  It is a fully equipped and modern repair shop and any Technician skill checks performed using this area gain a +10% bonus.

City Community Center

This large building consists of two stories, unlike all the other buildings in town.  The lower level is a large gathering hall used for town activities and celebrations.  The upper level contains the city offices where Miya works as well as the village’s central computer system.  There are also half a dozen guest rooms that function as the village’s inn when they have overnight visitors.  While most of the rooms can be used by any race, one of them is specifically appointed with furniture designed for the Vrusk anatomy.  Across the street to the north, and directly east of the building are large grass fields used for outdoor activities as well.

School

The village’s school is where the younger kids spend their day getting their primary education.  It is divided into several small classrooms where specialized classes can be presented dependent on age and ability level.  Because of the small number of children in the village, there are not really “traditional” classes and each child has a workstation where they receive individual and tailored instruction based on their needs and interests.  The school is very high tech and state-of-the-art.  A lot of the village’s mine revenue has gone into its education facilities.  As such the children in the village are often smarter and sharper than would be expected for their age.

Computer/Robotics Shop

Mikaela and Camryn share this building to work on the villages computers and robots.  While the building is mostly given over to tech space to work on the various agriculture robots used by the village, there is also some space given over to computer repair as well.  This building also houses a backup computer system for the village.  If PC’s are looking for computer or robotic parts, they are more likely to find them here than at the General Store.  The facilities here are top notch and any computer or robotics repair or upgrade attempts receive a +10% skill bonus.

Doctor’s Office

This small office has a small operating room, and three patient rooms in addition to the foyer and waiting area.  Dr. Cooker has a small office here as well.  The building is designed for patients of the core four races and while they do handle veterinary duties, those occur on location outside the office.  Like the other areas in the town, the facilities here are of an higher than average grade and all medical checks made in the facility gain a +10% skill bonus.


Alternate maps

In addition to the main map above, I created one with no labels and another one in black and white.  These two maps are presented below.

No Labels

Final full color map with labels removed
Final map with the labels removed. Click for full sized image (~6MB)

Black & White

Black and white version of full map with labels
Final Rosegard map in black and white (with labels) – Click for full sized image (~2MB)

And that’s it for Rosegard for now.  Next up I’ll be shifting gears back to the Ghost Ship Osiris module and you’ll be getting some information on the star system the adventure takes place in.

September 6, 2018 Tom Leave a comment

Mapping Rosegard – Part 4

In this segment we finish up the map by adding in some small details such as driveways, a fence around the school yard, a scale, and then add in the labels on the public buildings.  The earlier videos can be found here: part 1, part 2, part 3.

With the map finished we export the final finished version.


I will be doing one more video related to this map and then will post the final map for everyone to use if they wish.

September 3, 2018 Tom Leave a comment

Mapping Rosegard – Part 3

In this segment, I show how I add in the textures for the lawns, asphalt for the road, farm fields and some gravel paths and borders around the grass to keep the lawns and the farm fields separate.  I also add in a couple trees (more will get added later.

You can check out part 1 and part 2 if you haven’t watched them yet.

I’ll finish up the landscaping before recording part 4 where I’ll add in the labels and any finishing touches to the map.

August 31, 2018 Tom Leave a comment

Mapping Rosegard – Part 2

This is part 2 of the video series outlining the creation of the final Rosegard map. If you haven’t watched it yet, here is part 1.

In this segment, I create a custom pattern to use for the roof tiles of the buildings and then create a few of the buildings in the town to show how it will be done, including one of the buildings around the loop at the top of the map that is not aligned NS-EW like the others.

Let me know if you have any questions, comments, or suggestions below.

August 28, 2018 Tom Leave a comment

Posts navigation

← Previous 1 2 3 4 Next →
Become a Patron!

Recent Posts

  • State of the Frontier – January 2024
  • Detailed Frontier Timeline – FY62.069 to FY62.99
  • State of the Frontier – August 2022
  • Battle of Hargut (Gruna Garu) – FY62.098
  • Archived Arcane Game Lore Posts – May 2013 to Dec 2014
  • A Look at Yachts and Privateers
  • Homeworld Bound – A Campaign Concept
  • Second Battle of Fromeltar (Terledrom) – FY62.083
  • Sample Star System Data
  • Detailed Frontier Timeline – FY62.038 to FY62.068

Categories

  • 3D Models
  • Adventures
  • Background
  • Creatures/Races
  • Deck Plans
  • Equipment
  • Game Design
  • General
  • Locations
  • Maps
  • NPCs
  • Optional Rules
  • Patreon-only
  • Project Overviews
  • Reviews
  • Setting Material
  • Starships
  • System Brief
  • Vehicles
  • Writing

Recent Comments

  • Tom on State of the Frontier – January 2024
  • Tom on State of the Frontier – January 2024
  • Tom on Star Map Generator – GUI Edition
  • David on Star Map Generator – GUI Edition
  • DM_Shroud on Star Map Generator – GUI Edition
  • Tom on Fighter Miniatures
  • Rlaybeast on Fighter Miniatures
  • Loguar on Detailed Frontier Timeline – FY62.069 to FY62.99
  • Loguar on Detailed Frontier Timeline – FY62.069 to FY62.99
  • Tom on Detailed Frontier Timeline – FY62.069 to FY62.99

Archives

  • January 2024 (1)
  • September 2022 (1)
  • August 2022 (9)
  • July 2022 (3)
  • June 2022 (3)
  • May 2022 (3)
  • June 2021 (1)
  • April 2021 (1)
  • February 2021 (4)
  • January 2021 (6)
  • December 2020 (5)
  • November 2020 (11)
  • October 2020 (4)
  • September 2020 (5)
  • August 2020 (4)
  • July 2020 (6)
  • June 2020 (5)
  • May 2020 (8)
  • April 2020 (5)
  • March 2020 (5)
  • February 2020 (5)
  • January 2020 (5)
  • December 2019 (7)
  • November 2019 (4)
  • October 2019 (6)
  • September 2019 (5)
  • August 2019 (6)
  • July 2019 (7)
  • June 2019 (5)
  • May 2019 (6)
  • April 2019 (7)
  • March 2019 (4)
  • February 2019 (5)
  • January 2019 (7)
  • December 2018 (5)
  • November 2018 (10)
  • October 2018 (4)
  • September 2018 (4)
  • August 2018 (5)
  • July 2018 (4)
  • June 2018 (4)
  • May 2018 (12)
  • December 2015 (1)
  • November 2015 (2)
  • December 2014 (4)
  • November 2014 (3)
  • June 2014 (1)
  • January 2014 (1)
  • July 2013 (1)
  • June 2013 (2)
  • May 2013 (3)

Meta

  • Log in
  • Entries feed
  • Comments feed
  • WordPress.org

Recent Posts

  • State of the Frontier – January 2024
  • Detailed Frontier Timeline – FY62.069 to FY62.99
  • State of the Frontier – August 2022
  • Battle of Hargut (Gruna Garu) – FY62.098
  • Archived Arcane Game Lore Posts – May 2013 to Dec 2014

Recent Comments

  • Tom on State of the Frontier – January 2024
  • Tom on State of the Frontier – January 2024
  • Tom on Star Map Generator – GUI Edition
  • David on Star Map Generator – GUI Edition
  • DM_Shroud on Star Map Generator – GUI Edition

Archives

  • January 2024 (1)
  • September 2022 (1)
  • August 2022 (9)
  • July 2022 (3)
  • June 2022 (3)
  • May 2022 (3)
  • June 2021 (1)
  • April 2021 (1)
  • February 2021 (4)
  • January 2021 (6)
  • December 2020 (5)
  • November 2020 (11)
  • October 2020 (4)
  • September 2020 (5)
  • August 2020 (4)
  • July 2020 (6)
  • June 2020 (5)
  • May 2020 (8)
  • April 2020 (5)
  • March 2020 (5)
  • February 2020 (5)
  • January 2020 (5)
  • December 2019 (7)
  • November 2019 (4)
  • October 2019 (6)
  • September 2019 (5)
  • August 2019 (6)
  • July 2019 (7)
  • June 2019 (5)
  • May 2019 (6)
  • April 2019 (7)
  • March 2019 (4)
  • February 2019 (5)
  • January 2019 (7)
  • December 2018 (5)
  • November 2018 (10)
  • October 2018 (4)
  • September 2018 (4)
  • August 2018 (5)
  • July 2018 (4)
  • June 2018 (4)
  • May 2018 (12)
  • December 2015 (1)
  • November 2015 (2)
  • December 2014 (4)
  • November 2014 (3)
  • June 2014 (1)
  • January 2014 (1)
  • July 2013 (1)
  • June 2013 (2)
  • May 2013 (3)

Categories

  • 3D Models
  • Adventures
  • Background
  • Creatures/Races
  • Deck Plans
  • Equipment
  • Game Design
  • General
  • Locations
  • Maps
  • NPCs
  • Optional Rules
  • Patreon-only
  • Project Overviews
  • Reviews
  • Setting Material
  • Starships
  • System Brief
  • Vehicles
  • Writing

Meta

  • Log in
  • Entries feed
  • Comments feed
  • WordPress.org
Powered by WordPress | theme Layout Builder