The Expanding Frontier

Creating Sci-fi RPG Resources

  • Home
  • Order a Map
  • Order Miniatures
  • Supporters
  • About
  • Bio

Tag Archives: starship

Starship Construction in the Frontier

Way back in issue 10 of the Frontier Explorer (has it really been over 5 years?!?) I wrote an article entitled “How Many Ships Are There?” (p.27) where I examined the number of starships that could be supported in the Frontier given the stated number of starship construction centers and the ship construction and maintenance rules.  The answer came out to be around 1500 ships, not a lot to spread around the 17 systems and Spacefleet.
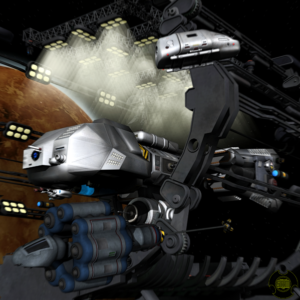
Starship construction image by Scott Mulder

In that article I talked about some of the implications of that small number and some of the ways you could increase the number of ships flying around.  If you haven’t already read that article, I recommend you do so as I’ll be building on some of the work there. Although it’s not necessary to follow along.

While I’m very much in favor of small ship numbers, I think that even this is too small for the setting and in this post I’m going to examine the numbers and methods of ship production and maintenance and see what impacts that has on ship numbers.

At least part of the desire to look at these numbers stems from some campaign background work I’m doing related to the Second Sathar War and how the Frontier would respond to the new Sathar incursion.  So let’s get started.

The Baseline

To start with, we need to have an idea of what the base production and maintenance rate in the Frontier is so we can see how changes we make affect that.

When I wrote the article for the Frontier Explorer, I created a Python program that would simulate the starship construction centers, their waiting queues, and handle all the book keeping. That is how I generated the numbers for that article. So the first step was to dust that off and get familiar with the code again. If you’re interested, it is in this GitHub repository. There is no documentation and it’s really rough but you’re free to play around with it.

There are actually two different programs in there. One is the simulation I used for this post and the Frontier Explorer article and the other is one I’m using to keep track and generate the sathar starship construction efforts for the Detailed Frontier Timeline project. Both are really rough (although I do have some unit tests). Caveat emptor.

Since we’re just going to be looking at variations, I’m not trying to reproduce the exact numbers from the Frontier Explorer article. In fact, I’m going to use a very different distribution that gives me more ships as a baseline than the number from that article.

For this article, the distribution I’m going to use is one that has roughly equal numbers of ships hull size 1 to 10 (~6.6% each) and then falling off beyond 10 so that there is only about a .5% chance of building a HS 20 ship. This weighs the distribution toward smaller ships. As I pointed out in the original article, the smaller the average hull size of the ships flying around the Frontier, the more ships the canonical starship construction centers (SCCs) can support. The average hull size of ship produced is 6.5.

I’m also making a few other assumptions. First, I’m treating these all as civilian ships, so any ship can be built at any SCC as long as it is less than that SCC’s maximum hull size limit. Also, I’m not factoring the hull availability rules into the simulation. I’m assuming any size hull is always available. Finally, I’m ignoring the “only system ships” restriction on the smaller Class III construction centers. I’m only interested in counts, not types.

The other “feature” of the simulation is that it doesn’t really handle the queuing of hulls waiting to be built in the best manner. It simply looks at the available space and finds the next ship in the list that will fit. What this means is that larger ships tend to get passed over as there is never any room for them. This also tends to skew the ships sizes toward the smaller hull sizes over time.
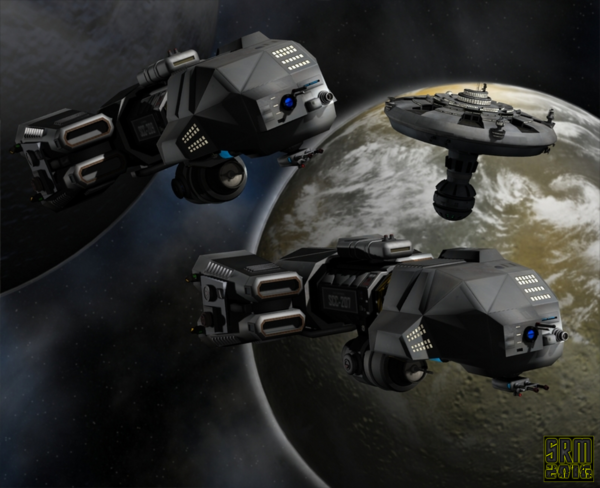
Image by Scott Mulder

With this ship distribution and those assumptions, the SSCs listed on page 9 of the Knight Hawks Campaign book can support about 2300 ships. Which is already a significant improvement over the 1500 ships from the original article. If you’re curious, reversing the distribution (ramping up to HS 11 and flat thereafter, only allows the system to support about 1250 ships).

Supporting More Ships

Now with that baseline, let’s look at increasing the number of ships we can support. There are several factors that go into the final number: total capacity, ship size distribution, construction time, and maintenance time.

I’m not going to play with construction time. That actually would have little effect on the total number as the steady state is purely based on the other factors, which are somewhat related to each other. Let’s look at some options.

Double the Number of SCCs
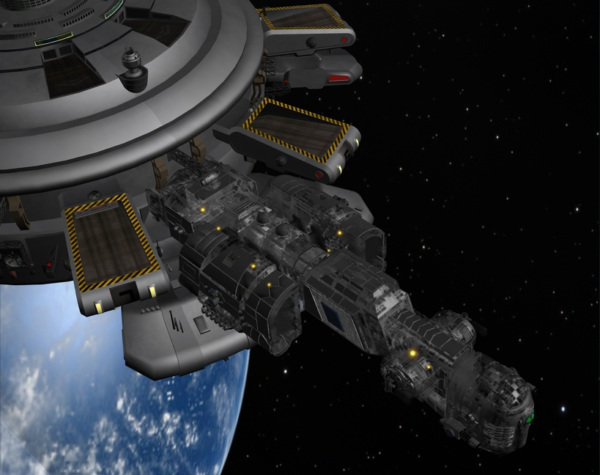
Image by Scott Mulder

The canonical set of SCCs has a total capacity of 510 point of hull size across the nine lists construction centers that can be under construction or in maintenance. Let’s start by just doubling that number. Let’s add 9 more SCCs across the Frontier that are clones of the existing nine. We’ll keep the other parameters the same and start up a new simulation.

Running the simulation with the increased number of SCCs results in the Frontier being able to support about 4100 ships, and increase of 1800 ships of about 80%. It doesn’t double as the increased capacity allows a few more larger ships to get built right at the beginning and the average hull size of ships produced jumps from 6.5 to 7. Since the average HS is larger, the total number is less than 2x based on the 2x capacity.

Planetary Small Ship SCCs

What if we try increasing capacity in another way. Instead of just cloning the existing SCCs, let’s give each planet a small SCC that can only build ships up to HS 5 and can handle 20 hull size points of ships at a time. This represents each planet being able to build and maintain it’s own fleet of shuttlecraft and small system ships separate from the main SCC.

If you drop those 22 SCCs (I didn’t give one to Volturnus) into the Frontier, that adds in another 440 hull size points of capacity. Since we should skew to smaller hull sizes being built, we would expect to get a good increase in the number of ships, possibly more than double. Unfortunately, that isn’t what happens. since we didn’t change the distribution of ships we’re drawing from, these small SCCs get underutilized. The total only goes up to about 2400.

I think a bit of this is a queueing problem so let’s just run a simulation with only those new SCCs, but using the same input distribution. I this case we get the system sustaining an additional 300 ships with an average hull size of 3. Still not exactly what I was expecting.

But that distribution doesn’t really make sense. And I think there is still some sort of bug in my code that isn’t doing the queuing properly. So let’s give these smaller SCCs their own queue and distribution. We’ll only pick ships from HS 1-5 for them to build and just make it a flat 20% chance of each hull size. Running that simulation give us that the smaller SCCs can support ~7000 additional ships with an average hull size 2.9. Dividing that between the 22 planets gives us an additional ~320 ships per planet.
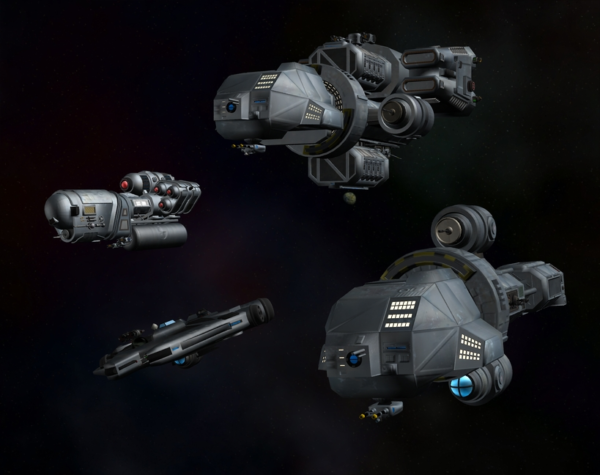
Image by Scott Mulder (this was used in my Star Clash card game.

That definitely points to something strange happening with the queue when using all the SCCs in a single run. It’s supposed to be dropping the larger ships that are getting passed over after a while but that doesn’t seem to be happening. Or at least not fast enough to fill the smaller SCCs. I’m definitely going to have to look into the queue system I’m using and this may impact the baseline numbers as well (increasing them).

But that means that adding in these small SCCs at each planet increases then number of ships that we can have flying around from 2300 to nearly 9300, an increase of 400%. They are mostly small ships but that may be what you need for all the transport to and from the surface of the planet and within a star system.

Reducing Maintenance

The previous 2 variations just looked at increasing SCC capacity. What if we look at simply reducing the amount of maintenance that a ship needs in a SCC. If ships have to spend less time in the SCC for repairs, then that space is available for new ship construction.

The KH rules say a ship needs to come in every year for 1d10+HS days of repair. And every year they don’t adds a 5% chance of failure of a critical system on a jump and when they do finally get in adds 1d10 days of repair per year missed.

Let’s reduce that. For this try, we’re going to say that they only have to come in once every five years, and that it is still only 1d10+HS days of work to get the maintenance done. Maybe routine maintenance by the crew is enough. Maybe there are dedicated “repair yards” that can handle the work the other years. Whatever the reason is, we are not tying up the limited SCC space with ships undergoing maintenance. We’re going to jump straight to five year so we can see if this is a large effect or not.

Going back to our baseline configuration with just the canonical SCCs and the original ship distribution, this new maintenance requirement results in a new ship count of 6500 ships with an average hull size of 7.0. That’s an increase of ~280%. So we’re getting more and slightly bigger ships. I knew going in that the maintenance was the true bottleneck. I didn’t get quite as many more ships as I was expecting but it’s a significant increase.

However, the simulations I’ve been running only simulate 100 standard years. That’s usually more than enough time to reach a steady state and longer than the history of the UPF at the time of the Second Sathar War. Interestingly, in this simulation, it never really reached that steady state, the numbers of ships were still going up at the end of the simulation. So for fun, I rand both the baseline and the low maintenance option again for a 200 year simulation.

In that case, we did reach a steady state of the number of ships in the low maintenance simulation of 8500 ships with an average HS of 7.1. The baseline sim only went up to 2850 ships with an average HS of 6.25. We got more ships but on average they are smaller. So the low maintenance option represents an increase of 300% over that new baseline. But it’s going to take the Frontier some time to get to that level.

Conclusions

As expected, increasing the number of SCCs increases the number of ships that can be supported. The simulations have given some number to those increases. What I wasn’t expecting was the impact the queuing system I was using would have on the outcome. Obviously a queue that generates ships of the appropriate size for a given SCC distribution can have an effect on the final numbers.

What we found was that just doubling the number of SCCs with the same capacity profile basically doubled the number of ships. That’s probably a good rule of thumb. But if we increase the capacity and limit the ships to smaller hull sizes, we get a huge increase in the number of ships. Limiting the ships to HS 5 or less and with only an 86% increase in production capacity, resulted in a 400% increase in the number of ships.

The other unsurprising bit was that reducing the amount of maintenance required resulted in more ships being supported, I was expecting a nearly linear increase but that wasn’t the case. At least partially because we ended up with more of the larger ships which reduces the total capacity. What was surprising was in the low maintenance model, 100 years of simulation wasn’t enough to reach a steady state on the number of ships.

The truth is, you can have as many ships flying around as you want. If you have more, you can add flavor to your game to describe the extra ship construction capacity any way you want. Then just take the rules as written as the resources available to the PCs. There is more capacity out there, they just can’t access it.

What’s Next?

There are still more things to explore on this topic. Probably the most obvious is looking more closely as the algorithm I’m using to queue up the ships. That apparently has a bigger impact that I was realizing. It was supposed to model the process described in the rules for getting a ship into an SCC but maybe it’s not doing that well enough.

The other aspect might just be the ship distribution I’m generating. Another area to explore is looking more closely at the number and types of ships that are out there flying around and building up a “realistic” distribution based on that. I have looked at that issue in the past and maybe will do a post about it. It produces a different distribution than the one I used here but I’m not sure I really captured everything.

Another thing to consider is the distribution of SCCs. I did some fairly arbitrary changes for this article just to look at gross effects. A more nuanced look at increased capacity might be interesting.

What ideas do you have? Are there specific things you’d like me to explore? Let me know in the comments below.
April 28, 2020 Tom 4 Comments

Scavenger Transport 3D Model – part 3 – Final Details and 3D Printing

In part 2, we ended with the final version of the hull model for the Scavenger Transport and all that was left was to add in some of the details, most notably the doors and other bits that extended through the hull.  After that, it is just “decorations” to add a little character.

Finishing the Physical Model

Adding in the bay doors was straightforward.  They are just basically rectangles after all.  For the smaller shuttle and workpod bay doors toward the back on the lower level, I added a split vertically down the middle for the doors to open and swing outward on the sides.  For the larger cargo and runabout bay doors, I decided that they would open top and bottom so the seam detail runs horizontally.  In the case of the cargo bay doors, the lower portion of the door can double as a loading ramp if necessary.

Next I wanted to break up the hull a bit so it wasn’t so plain and I created a little triangular design that I placed on the lower and middle decks for and aft of the ion cannon as well as on the wings.  I then added a cylindrical structure on either side of the second level.  Next, I added a bit of a domed structure on top of the runabout bay.  Finally I created some large (2m diameter) portholes and placed them on the back of the ship on deck two between the cargo bay and runabout bay.  These are positions to be in the rec room at the back of that level and the two cabins back there as well.

back view of the ship with the added details
Back of the ship with the bay doors and portholes. You can also see some of the other details mentioned earlier.

At this point I was looking at the model and thinking it was looking pretty good and then I realized:  I forgot to add in all the bits and pieces that stick out through the hull!  Again these were fairly straightforward as they are fairly simple shapes.  I tweaked the block that was the sensor array extension as it was sticking too far out.  The rocket launcher (deck 1, starboard side) may get some tubes added to it for the missiles to launch out of in the future, but for now, I just left it as a solid block.  I also rounded the edges of the airlock a bit.

Speaking of the airlock, after adding it in, I realized it was really poorly placed.  It’s right up against the wing and behind the front part of the engine.  Luckily the wing didn’t overlap it at all.  I didn’t even consider it’s placement when I made the wing so I was lucky I didn’t have to go back and tweak that.  It probably would have been better to put it on the lower level toward the front of the ship.  I guess the engineers weren’t thinking too hard about how the engines were going to be placed when they designed the fuselage :-).  However, its poor placement gives a bit of flavor and something to hassle the crew with (and for them to grumble about).  It truth, it’s more of a backup measure anyway since the ship isn’t designed to actually dock at stations but rather pull up next to them and transfer via the shuttles and open cargo bay doors.  So in practice it’s only a minor annoyance.

Once I had these last structures added, the ship was all done.

Front view of the ship with all the details addedAlternate front view of the other side of the ship

3D Printing

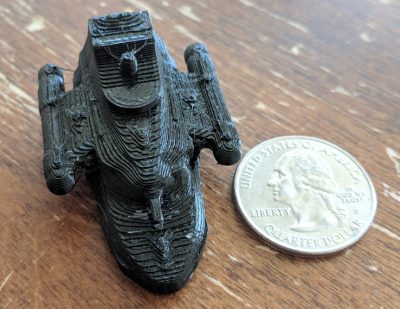
With the physical model done, it was time to start testing out 3D prints.  I started with a simple small, low resolution print.  This was done at 0.2mm/layer and at the native scale of the model (1/1000 scale).  It only took about 50 minutes.

small low resolution print of the model with a quarter for scale comparisonYou can definitely see the print layers on the model.  There are also hints of the details on the body, wings and engines although the size of the features are such that they just don’t show up at at this scale.  This particular print was done with the bottom of the ship on the build plate.  That may not be the best way to print as we’ll see in a minute.

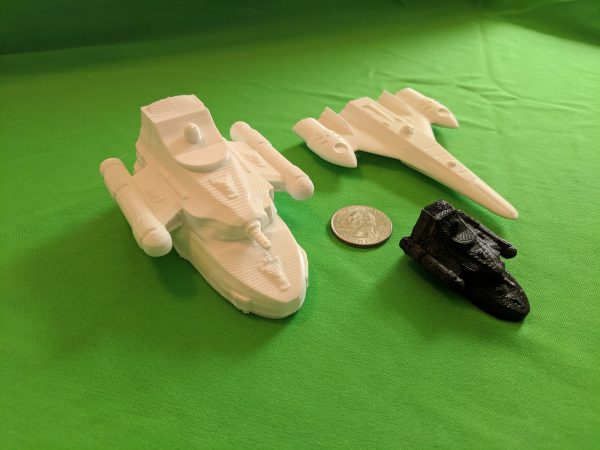
Since it look good enough small, it was time to scale it up.  The next print was a 1/500th scale print, double the size of this one.  Again I printed at 0.2mm/layer and with the bottom of the ship on the build plate.  Although this time I switched to white plastic.  Here’s a picture of that print, together with the smaller black print, our trusty quarter, and a Star Frontiers Assault Scout model at the same scale as the larger print.  This print took about 5 and a half hours

Comparison of the larger print to the original small one.If you look closely at the larger print, you can still see the layer lines although since the print is bigger, they are not as pronounced.  You can also see the turrets on the laser battery print at this scale.  They were just too tiny to print on the smaller scale.  You’ll also notice that the assault scout model in the back looks super smooth.  That is because it was printed at 0.1mm/layer and was printed standing up.

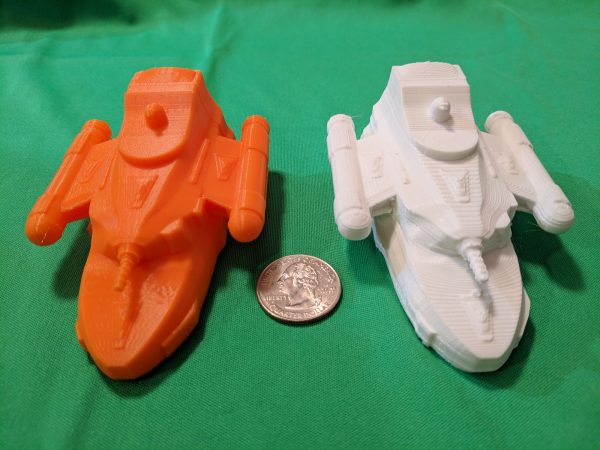
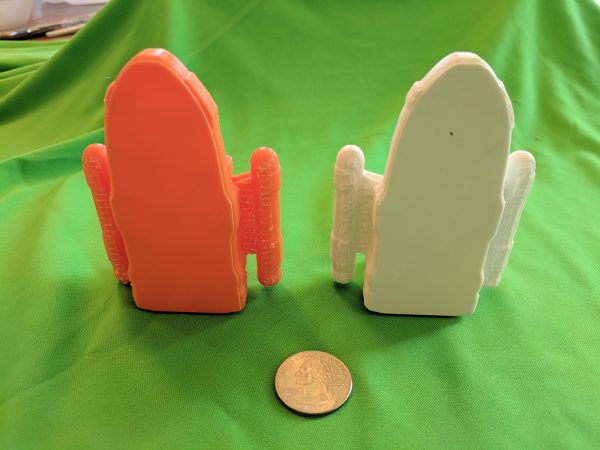
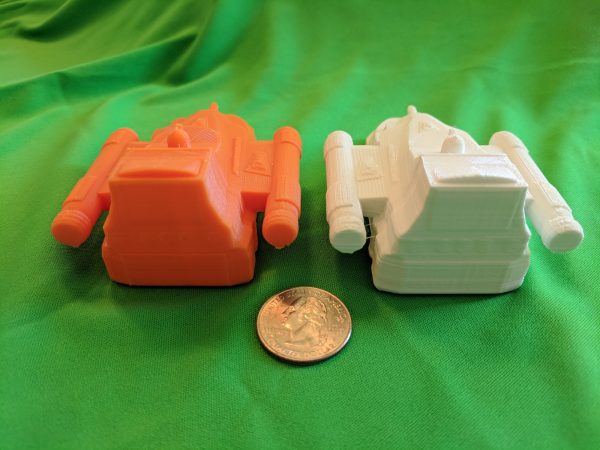
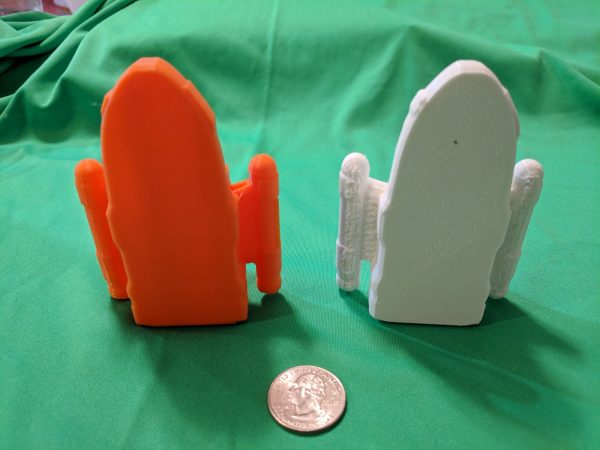
So that’s the next thing to try.  My 7-year-old son really liked the ship and wanted an orange one (that’s his favorite color).  Since I have a spool of orange filament for my printer just to print things for him, I swapped out the white for orange, flipped the model on it’s back, and started a 0.1mm/layer print.  Here is the result, five and quarter hours later:

While bottom printed 0.2mm model compared to back printed 0.1mm modelThe surface on this one is much cleaner.  That is partially due to the smaller print layers and partially due to the orientation of the layers relative to the model, but more of the latter.  A 0.2mm print in this orientation would look pretty good too.  The bigger difference, however, is the backs and undersides of the models.  Let’s take a look at those.  Here are the undersides:

bottoms of the two modelsThe lighting could be better but you’ll notice that the bottoms of the wings and engines on the white model are really rough.  That is partially due to the fact that I didn’t completely clean them up but also due to the nature of 3D printing.  Since each layer has to be placed on the layer below, if you have a floating bit of your model with nothing under it, the printer prints support material to get up to that that point where it can start printing the model.  So in the white model, a bunch of support material had to be printed to support the engines and wings.  Most of that will clean off with some effort using an sharp knife and sandpaper (and my Dremel) but it’s not completely clean. On the orange model, we don’t have that problem and the engines and wings look really good and there was nothing to remove.  However …

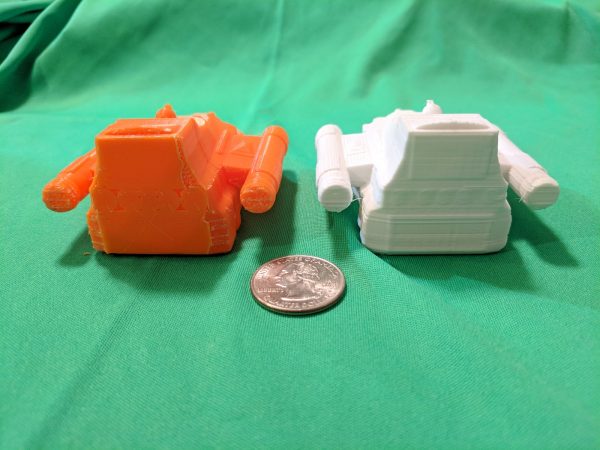
back of the two modelsthe back of the orange print has some issues.  Granted the back of the white one isn’t the best, as you can see some issues with the layers of the print being slightly misaligned (I need to re-tighten the belts that drive the print head or slow down the print).  However, you can see the detail of the bay doors and the portholes (barely, they should probably have been a bit thicker for printing).

On the orange print, this was the side toward the build plate and so had to have supports to the parts of the model that were suspended.  In this case that is the back of the engine and wing as well as parts of the back of the ship.  The bits on the engine and wings again are not completely cleaned up but they are flat surfaces in is orientation and much smaller surfaces as well.  They will be much easier to clean up than the rough sections on the white print.

The back of the ship is a different matter.  The surfaces of the cargo and runabout bay doors were the only parts actually touching the build plate.  The rest of the back of the ship and the portholes were raised slightly.  Because of that the printer had to lay down support material.  However, because they were only slightly raised (like one or two 0.1mm layers), there really wasn’t that much room to print support material and it is all fused together.  It could probably be cleaned up with some work but it would be pretty tough.

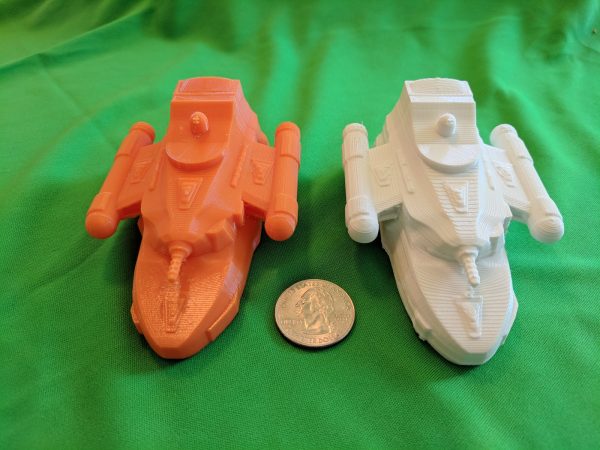
Finally I did a last print at the higher 0.1mm/layer resolution with the ship on it’s bottom (same orientation as the white print) just so see how that higher resolution affected the look.

two models printed in the same orientation but one with high resolutionAs you can see, the to surfaces are much cleaner in this print. In fact, I would be very satisfied with that print surface on the model.  Here’s the bottoms and backs:

Bottom surfaces of the two ships, one printed at 0.1mmBack of the two ships one printed at 0.1mmThose bottom surfaces are still fairly rough although I think they are better on the higher resolution print.  The back of the higher resolution print is definitely cleaner.

I think the print with the ship on it’s back is still the better way to go, but barely.  It’s a tough call and I could be convinced otherwise.  To address the problem with the support material on the back of the ship, I have a couple of options.  One is to just remove all the surface features on the back of the ship completely.  That would give a flat surface to print and would eliminate the problem but you would lose the details on that part of the unpainted model (you could always paint them back on).  Another option would be to just eliminate the portholes.  There is enough relief to the doors that you could trim the support material from around them.  The rest of the back of the ship might be a bit rough but it is an easily accessible area to sand and clean up.  The final option would be to increase the relief on everything, both the doors and the portholes, so that there is a bit more space there making the support material easier to clean off.  I haven’t decided which route I’ll take yet but I’ll probably do some experimenting to try out the different options.

Going Forward

My Patreon supporters have already received a copy of the model file as it currently exists (that’s one of the perks of being a supporter).  At some point I’ll put the model up for purchase for those that would like to get a copy (That will be on DrivethruRPG and either here or my New Frontier Games website).  I’ll also make 3D printed models available.  That will come once I’m comfortable with the way the prints are coming out.

The next step for the model is to back to the digital model and paint it so it can be used in 3D renders.  I need to add textures and materials to the model to give it color and life.  However, I’m going to put that bit on hold for bit as it’s not really needed for the module (and I want to go over the Blender tutorial on how to do all of that stuff.  I have some experience from the assault scout but it was very trial and error).  So this project will probably go on hold for a few weeks while I work on some other bits and pieces.

Bill is also working on the final versions of the deck plans and I’ll post a copy of those once they are available.

Let me know if you have any questions, comments, or suggestions below.

June 8, 2018 Tom Leave a comment

Scavenger Transport 3D Model – part 2 – The Basic Hull

More progress on the ship model.  If you haven’t read part one of this series, that describes how I laid out a model of the interior of the ship as a skeleton to build the hull around.  In this post, I’ll actually start building the ship out.  Let’s dive right in.

Try 1

I started by pulling the skeleton model I exported from OpenSCAD into Blender.  The first thing I noticed is that Blender likes to work on really small scales.  The model isn’t that big, only about 50mm long, half that wide and tall but it was was huge in the default view port.  I had to zoom way back.

Skeleton model imported into blender(If the text on that image looks a little small, that’s because its a screen capture of my entire 4k monitor’s screen.  It’s a 43″ screen so I work at full resolution for maximum screen space.)

With that loaded, I can start forming the hull around it.  It all starts with a cube.  I created a cube the height of the cargo bay and then stretched, extruded, and molded it to fit around all the rooms and sections of the lowest level.  Once that was done, I extruded part of the top of that level up to form the basis of the hull around the middle deck and then stretched and molded it to properly fit.  Finally I did the same thing for the uppermost layer.

In modeling the hull, I had it extending out beyond the bay doors on the sides and back so that they were inset from the hull slightly.  The circular bridge area on the upper deck was modeled as a separate piece.

With the hull done, I created a model for the ion cannon and the laser battery and placed them in their appropriate positions on the model.  When I was done, it looked like this.

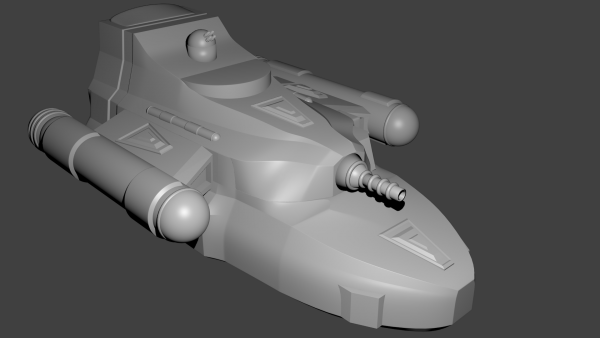
Model hull covering all the decks with the ion cannon and laser battery added.It looks pretty good.  But for some reason, I just didn’t like it.  I think a big part of it was that it felt too smooth.  I could have turned that down a bit but I still didn’t like the shape.  There were bits of the hull that just looked weird up close and had somewhat strange geometries.  One was the the bit of hull on the left and right side of the bridge “window” area.  If you look closely at the image, you can see that it dips back down between the outer edge of the hull and the bridge proper.  There were some other areas like that on the back of the ship and around the hanger bay doors as well.

So like all good prototypes, I threw it out and started over.  The only thing I kept was the bridge, the laser battery, and the ion cannon.

Try 2

With a little more experience under my belt, I decided to start over and try again.  I kept the original version around in case try 2 was worse but I didn’t expect it to be.  This time around I decided that instead of trying to do the hull as a single piece of geometry, that I would break it up in to connecting pieces. While I had originally planed to do five pieces (one for each deck and two for the spaces between decks), I ended up only doing two overlapping pieces as you’ll see below.

This time around I decided to make the outer hull on the back and side be flush with the cargo, shuttle, workpod, and runabout bay doors.  I’ll probably add a bit of overhang to those but that detail will be added to the exterior instead of built into the basic hull shape.

Again I started with the bottom of the ship.  The process was the same but I made some different design decisions.  I also was much more careful about coordinates when pushing, squeezing, extruding, and scaling parts of the hull.  There were a number of times that I realized I had done something wrong and destroyed my symmetry.  Each time that happened, I went back and fixed it.  This is something that I didn’t do on the first attempt.  I probably should have worked on just half the ship and mirrored it but it seemed to make more sense at the time to do it the way I did.  (I also should have taken more screenshots as I was working on the model to show the stages but I didn’t.  I’ll try to be better next time.)

Regardless, I created a lower deck model that I was much happier with than the first one.  Once that was done, I started a second section of the hull and modeled everything on the second level except raising it to the full four meter height of the room containing the machinery for the ion cannon or the area that would connect the engineering spaces to the engines proper.  The former would be done as part of the connection between deck 2 and 3 and the latter when I actually modeled the engines.

Once I was happy with the second deck it was time to connect the two.  My original plan had been to created a completely separate piece of geometry to make the connection but sitting here with the two pieces in front of me, I decided to just extend the top of the lower deck and form it into the shape I wanted.  So I extruded the bits under the second deck up and got to shaping the hull.  In the end I didn’t just stop this modeling at the bottom of deck 2 but because of some of the feature that I wanted to continue extending, parts were modeled all the way up to the top of the second deck.  Satisfied with that, it was time to move on to deck 3.

Again, the original plan was a separate piece of geometry but since this level was fairly simple, I decided to just extend the top of level 2 upward.  I was several hours into the project at this point and feeling comfortable with the tools so it went fairly quickly.

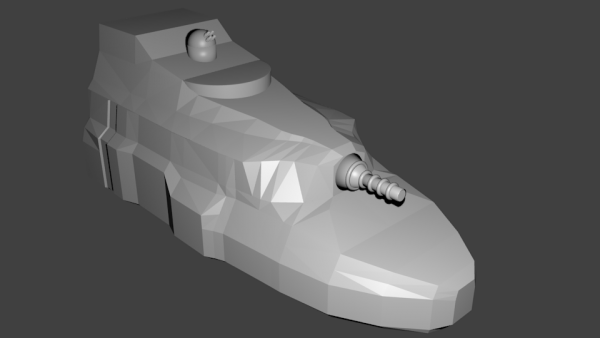
Since the bridge area, laser battery, and ion cannon were already done, I just had to turn them on.  Doing so made me realize that the area where the cannon was attached felt a little two boxy so I tweaked the design a bit there.  I also needed to tweak the geometry around the bridge to expose a bit more of it.  With that done, I ended up with this model for my second attempt.

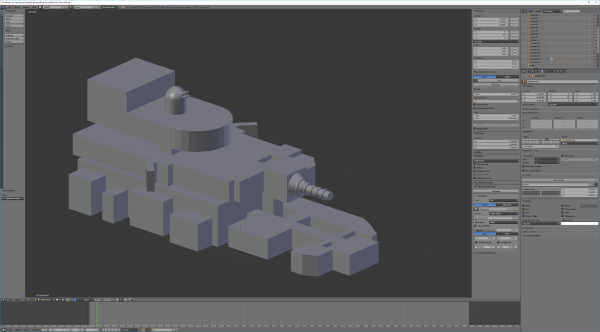
Unsmoothed geometry for the second model attemptYou’ll notice that this one is much blockier than that first one.  In that first attempt I had already applied some smoothing filters before exporting the image.  I had not yet done so on this one and had first planned on leaving this one as is. I thought this looked pretty good so I even exported this as a 3D model and did a small test print.

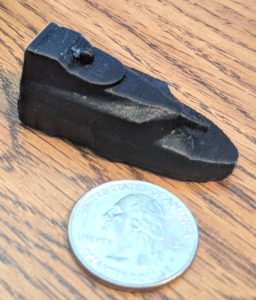
Small test 3D print of the model. The model is about twice the lenght of a quarter and about 3/4 of the size of the quarter in width and height.I was quite happy how the print turned out.  The barrels on the laser battery were too small to print at this scale (1/1000) but otherwise it looked pretty good.

However, looking at the actual model some more I decided I didn’t like it so faceted.  Plus if you look at the back of the ship, there is that little bit of contouring that is pushing in a bit.  That section fills the space between the doors for the shuttle and workpod bays.  I decided that I wanted that to be a feature that ran all the way up the ship.

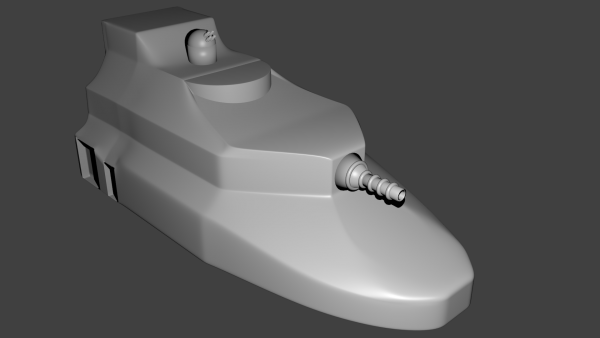
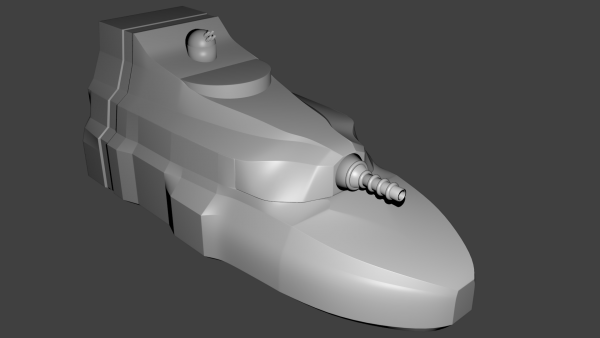
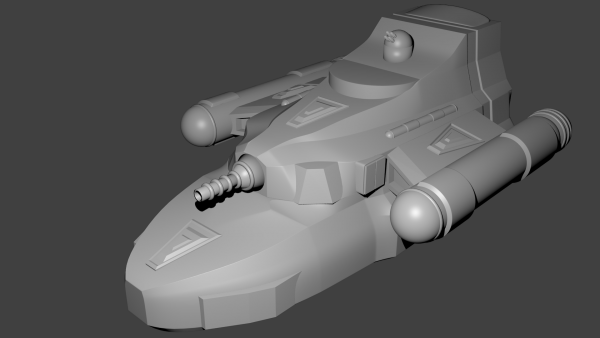
So I went back into the model and started tweaking.  First I modified bottom part of the upper deck geometry to continue running that feature all the way up the aft portion of the ship.  This was actually fairly easy as at this point in the ship, the outer edge of the hull is well beyond the interior walls.  After that was added, I started smoothing out the surface and adding edges and features in where I wanted the model to have sharp edges.  I ended up with the following model.

Smoothed model of the second try.The one thing that adding the smoothing did was somewhat highlight the fact that it is two different pieces of geometry.  You can see a slight seam between the two pieces in the area under the ion cannon. It runs around the front of the ship and back to the point just in front of the bulge mid-ship on the lower deck (that bulge is the location of the reflec screen on this side of the ship) where it turns upward to the top of the second deck.

This seam is not visible in the unsmoothed version as it is an artifact of the extra facets added to the geometry to make it smooth.  It’s something I’ll need to clean up.  I haven’t decided exactly how I’m going to do it but I have two options.  One is to go in and tweak the geometry so that the two pieces (with the smoothing) line up better.  That is actually what I did on the back half of the ship.  You can’t see the seam back there.  The other is to put surface details, such as pipes, equipment, etc. that run over that area of the ship to mask the region affected.  It will probably end up being a combination of those options in the end but that is for later.

The other thing you can’t see in this image is that there is a bit of hull under the lower deck.  It actually extends about a half a meter below the deck but it is beveled inward so it doesn’t really show up in the angle of this view.  And the bit that is visible (just below the front of the bow and below the parts jutting out a little on the side) are in shadow from the lighting.  This extension allows for some machinery and piping beneath the hull and the addition of landing pads as well.

Now that the outer hull is done, it’s time to add the engines.

The Engines

I didn’t really have any ideas for a design on the engines, I just knew they needed to be big and were going to be outboard on either side of the ship.  So what I decided to do was use the engines depicted on that map at the end of the last post as a model.  I imported that image into Blender to use as a reference and got to work.  Here it is again.

another ship deck plan in the final style for the module.I’m going to match the silhouette of those engines at the top and bottom.  In this case, I am only going to model one engine and then mirror it to the other side of the ship.

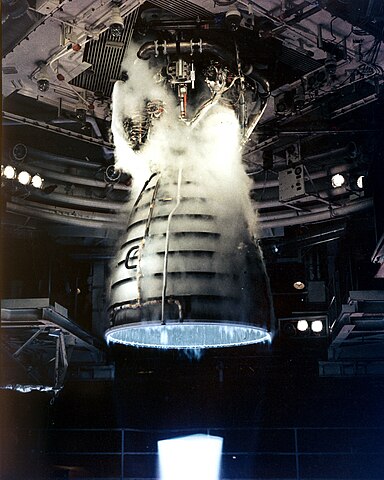
The engine design is fairly simple.  It’s mainly a cylinder with a spherical cap at the front and an exhaust cone at the back.  Plus some decorations along the side. I made a couple of variations on this image for the model.   First, the exhaust cone at the back is symmetrical on my model  I might go back and add that curve to it later but for now I left it alone.  I also added some tori around the exhaust cone section of the ship reminiscent of the ribbing on current day rocket engines.

https://commons.wikimedia.org/wiki/File:Shuttle_Main_Engine_Test_Firing.jpg
Image of the test firing of a Space Shuttle main engine. (click image to link to original on Wikimedia).

I also added one around the connection point between the cylinder and the sphere at the front of the engine (to mask the seam that shows up there when I applied the smoothing 🙂 ).

For those bits of geometry sticking out on the sides, I modeled them as extensions that ran a little more than half way around the engine instead of all the way around.

To connect the engines to the ship, I created some simple swept forward “wings”.  All of these pieces were then smoothed and added to the model.  With that done, I had the final model of the base hull ready to go.

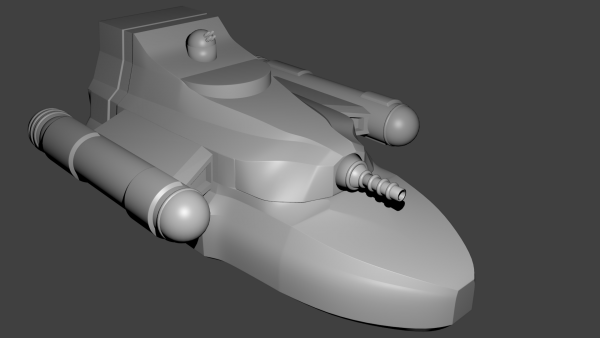
Final model of the basic hull with the engines and "wings".


What’s Next

Now that the base hull is done, it’s time to add the details.  That will be the subject of the next post.  First up will be those bits of the interior rooms that actually extend beyond the hull.  On the side face in these images, the grapple launcher extends a bit out of the bow of the ship.  On the other side we have the rocket battery launcher on deck 1 and the sensor array and airlock on deck two.

After that, I need to add in all the bay doors on decks one and three.  That will complete the full basic structure of the ship. At this point I’m going to do another 3D print.  At the small scale that I used for the first test print, that is all the detail that might show up.  Any other smaller details would only show up on a larger print.

Once those final necessary features are added on, I’ll go through and add some other details and features to break up the completely smooth surfaces just a little as well as some recessed landing gear on the bottom of the ship.  While the ship doesn’t normally dock or land on planets, it is capable of landing on smaller, very low gravity objects so I need to add that feature in.

So what do you think about the design?  Any additional features you think should be included? Let me know in the comments below.
June 5, 2018 Tom 1 Comment

Scavenger Transport 3D Model – part 1 – The Skeleton

Now that the basic deck plans are done, I want to make a 3D model of the ship.  I’m going to be posting this as a series of small articles as I work on the model so you can see the bits and pieces as they happen.  Let’s get started.

I’m going to be trying something new for this model. Well, new for me at least.  I’m going to attempt to create the model in Blender.  I’ve used Blender a bit in the past but only to add materials and textures to an existing model that I created somewhere else.  Never to completely create the model from scratch.  In the past I’ve done all my models in another program called OpenSCAD.  It has some features that I really like (as described in this post on the Arcane Game Lore Blog).  But it also is fairly simple and I’d like to have the extra control an options available in Blender.  If you want to see some of the other things I’ve created, check out the 3D Modeling/Printing category over on the Arcane Game Lore Blog.  That includes several posts I’ve made on the subject.

So we’ll see how this goes.  I’ve been working through a Blender fundamentals tutorial on Pluralsight and feel comfortable with the basics that I think I’ll need to create this model.  If all else fails, I can fall back on OpenSCAD.  In truth I’ll be using both of those tools in this project since I can export objects from OpenSCAD into Blender.  So for parts and pieces that make more sense to create in OpenSCAD, I’ll be using that.

The Skeleton

For this ship, the first step was to lay out all the interior pieces in their proper size and position.  This is what I’m calling the skeleton of the ship.  Once that is done, I can build the hull around the interior structure so that it is all properly contained.

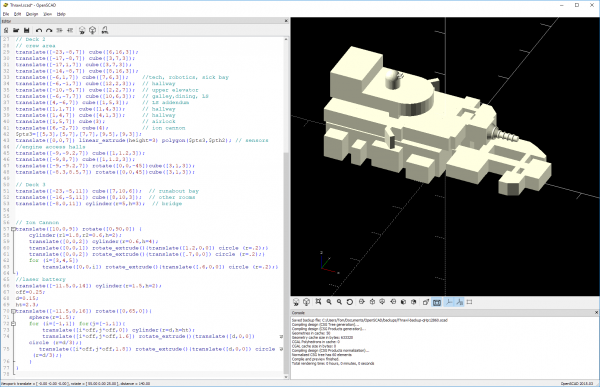
This is one of those cases where OpenSCAD is just going to be so much easier to use then Blender.  Since we’re talking about adding in basic geometric shapes in very specific, defined positions, the programming interface to OpenSCAD that allows me to specify the position and dimensions of basic shapes like cubes, cylinders, and spheres is exactly what I need.

I work on these models at 1/1000 scale.  The default units in OpenSCAD are millimeters so I just use the sizes of the rooms in meters as my values in the functions.  This naturally gives me that scale.  I can always scale it up (or down) later as needed.  For tabletop minis to be used in a tactical game, I typically create the model at 1/3000 scale so I just have to scale the final model by 1/3.  For display models, I can scale it to anything I want.

Deck 1

To begin, I just pulled up the deck plan for deck 1 (the lower deck, see this post) to use as a reference.  OpenSCAD needs an origin so I selected the center of the grid to be (0,0) in the horizontal directions and the bottom of the deck to be 0 in the vertical direction.  I could just have easily selected the lower left of the deck plan but thinking ahead, I knew I would want the origin on the center-line when I got into Blender so I chose appropriately.  I then just started adding in boxes to represent the various rooms in the ship.

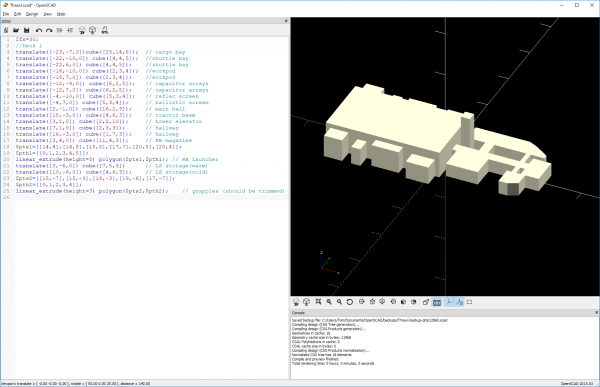
The cargo bay is 6 meters tall.  The little side rooms off of it are not quite as tall ranging from 3-5 meters in height. The forward section of this deck has 3 meter tall rooms.  And the elevator shaft connecting this deck to the upper one can be extended 10 meters up to intersect the middle deck.  Here’s what things look like after adding in this first deck.

Basic structure of lower deck rendered in 3DOn the left is the OpenSCAD code.  On the right is the actual render of the code as a 3D model.  The large block sticking up high in the middle is the elevator shaft to the next level up.

Deck 2

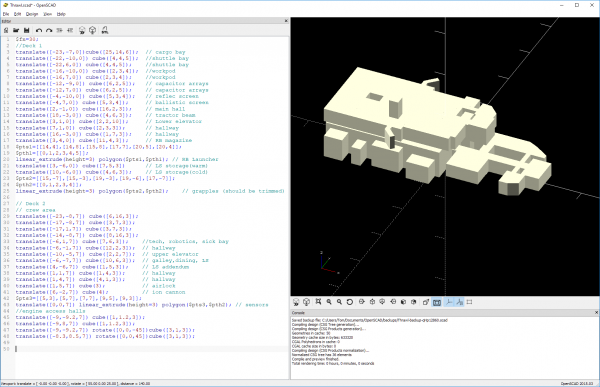
On the first level, I added in each room individually.  On the middle level, there are a lot of rooms that are adjacent forming large blocks.  These areas I just added as single large bits as there was no need to make them all individual.  This model I’m creating is just really a sort of wire-frame and will not be part of the final model.  It’s more of a guide.  The room for the Ion Cannon machinery is 4m tall instead of the standard 3m and is so represented in the model.  Here’s the model after this deck has been added.

Render of decks 1 and 2 of the 3D modelThose little bits sticking out on the sides are the access tunnels to the engines.  Those might very well change as I start modeling but for now, I’m just reproducing what’s on the sketches I drew.  Somewhere out there will be engines.  Again the bit sticking up is the elevator shaft to the next level.

Deck 3

Finally we need to add in the upper deck.  This one has the 6m high runabout bay aft with all the other decks being 3m in height including the round bridge area.  Again this deck has a bunch of adjacent rooms that form large blocks.  In fact, it only took three shapes to model this: the large block for the runabout bay, a cylinder for the bridge, and an block connecting the two to represent the other rooms.  Here’s the model with deck 3 added.

Render of all of the interior decks of the 3D model.Nothing really exciting here.  Although now you can see how the ship sort of tapers toward the middle and the back as you go up to the higher levels.

Weapons

Finally, I wanted to add in the exterior weapons: the Ion Cannon and the Laser Battery.  So I went in and modeled those to scale and put them on the ship.  Having these exterior elements will help me to get the hull placed properly.  With the weapons added, I now have a completed model of the interior of the ship as well as some of the exterior features I need to account for.  Here’s the final model.

Final render with the weapons added.Making the weapons was kind of fun.  I may just export those out to use in Blender.  It depends on how hard it is to make the tori around the barrels.

And Done (for now)

Now that the model is done, I can create an actual 3D object and export it for use in Blender.  That’s it for this segment of the modelling process.  Next time I’ll pull this skeleton model into Blender and start shaping the actual hull around it.

Let me know if you have any questions, comments, or suggestions in the comment section below.

May 30, 2018 Tom 1 Comment

Scavenger Transport for FrontierSpace

I’ve been working on the antagonist’s ship for the Ghost Ship Osiris module and now have the basic ship design down.  This is a larger vessel, used by Thrawl and his scavenger crew to collect materials around the frontier and transport them for sale.  It’s relatively well armed and with the larger crew, can even take on smaller vessels if it wants to.  I still haven’t come up with an actual name for Thrawl’s specific instance of this ship but am simply calling the general ship type the Scavenger Transport.  In this post I’ll talk about how I designed the ship.

Initial ship specifications

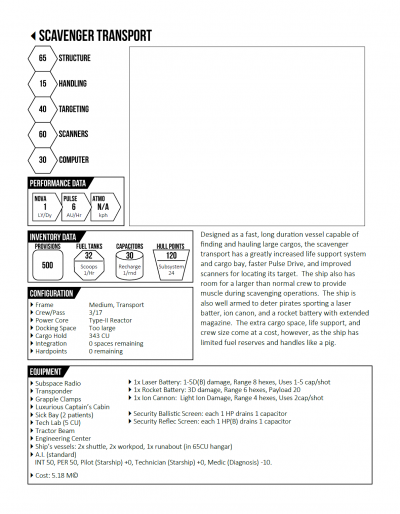
character sheet for ship
The spec sheet for the Scavenger Transport. Here’s a PDF version (492 kB)

It starts by deciding exactly the roll the ship is to play.  I knew I wanted it to have a large cargo area, a bigger than normal crew (to provide muscle in scavenging operations), be relatively well armed, and relatively fast for a vessel of its size.  The last bit is because in the module, it needs to be on par speed-wise with the PCs’ ship.  And a fast, armed ship isn’t too bad for a crew that works a bit on the shady side of the law.  Also the ship has to be able to carry a smaller personal runabout for the captain, again needed for plot reasons.

Given that basic plan, I sat down with the FrontierSpace rules and started picking out systems and features of the ship.  Now to be honest, I had a bit of behind the scenes help as Bill has created a spreadsheet to use for basic ship design that helps a lot.  That tool is not generally available but I believe Bill is working on a more detailed starship generation system that the basics provided in the core rules.  In any case, I was able to determine all of the ships systems, components, and statistics using the spreadsheet.  Using that information, I created a basic ship characteristic sheet.

There’s no picture of the ship yet as I haven’t completely designed it and don’t know what it looks like.  But now that we have the specifications for the ship, we can start working on the deck plans.

Initial sketches

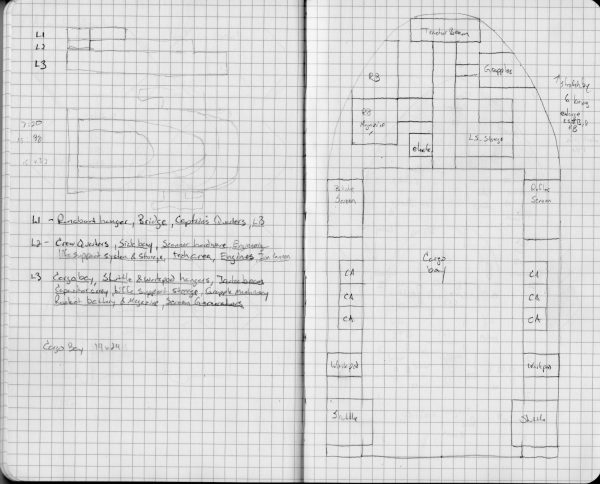
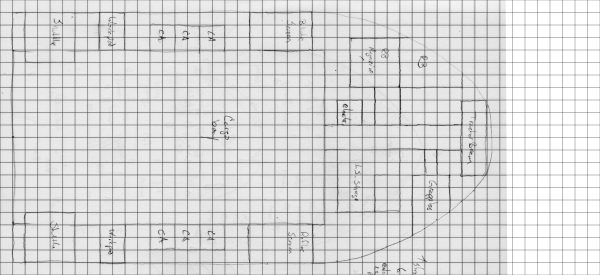
As I do with most of my ship designs, I start with paper and pencil.  I have a nice little Moleskin graph paper notebook that I use to sketch out ideas and designs in so I started by drawing a side and top view of roughly what I wanted the ship to look like.  It can be seen here in the upper left of this scan of two of the pages from the notebook (Note: on this an all other images in this post, you can click on them to get them at their full resolution).

Scan of two pages of graph paper with preliminary sketchs of the ship's design and lower deck
Scan of two page of my design notebook showing the rough sketch of the ship (top and side views) plus whats on each deck (on the left) and the lower deck sketch on the right

The initial plan was to have three decks, each smaller than the one below forming a somewhat pyramidal or wedge shape.  The larger box in the back that spans the upper two levels was to be the hangar for the runabout.  The lower level would be taller than the other levels as it contains the cargo bay.

Once I had the basic outline, I started mapping out what I wanted each level to contain.  I basically went through all the specifications and figured out which deck the machinery, storage, and hardware would be for each of those systems.  You can see that list in the middle of the first page.

The basic breakdown was this:

  • Level 1 (bottom) – Cargo bay, shuttles and workpods, and many of the ship’s weapons and defenses along with other bulky systems such as life support and power storage.
  • Level 2 (middle) – Crew quarters and living space, sensors, ion cannon, engineering and tech spaces
  • Level 3 (top) – bridge, runabout, captains quarters, and laser battery

Now that I had the basic plan, it was time to start getting into details.  I started with the lower, largest level which can be seen on the second page of the scan above.  On limitation of working in my notebook (which is 8.25×5 inches, 5 squares to the inch) is that there is only so much space to draw in.  I probably should have sketched at 2m/square but did the sketch at 1m/square.

I stared by working out the cargo bay size.  Assuming that one CU from the game rules is about a cubic meter, I figured out how big the cargo bay needed to be (see the notation on the left page) give that the bay itself was 6m in height.  From there I started adding in the other features that were supposed to be on the ship.

After I finished this deck I compared it to the top view sketch that I created.  I realized that the width matched pretty well assuming that the sketch was done at 3m/square except that the detailed sketch was 6m too short.  So I made a note about that (on the upper right) to remind me to stretch it out a bit when I finally got down to drawing it.  With the lower level done and an approximate scale, I started in on the next two levels.

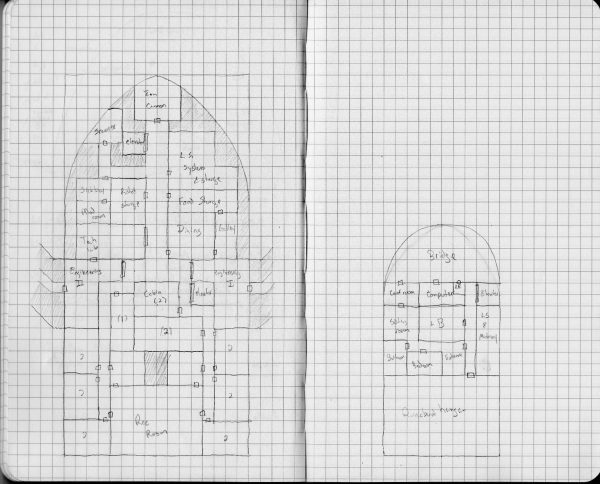
Scan of the two notebook pages with the sketch of the middle and upper decks of the ships
The middle (left) and upper (right) decks of the Scavenger Transport, to scale with the initial, lower deck

I actually skipped deck 2 to start and did the upper deck first.  The reason for this is that I needed to know where the deck access would be so I could connect everything up.  I knew I wanted the bridge at the front of the deck spanning the entire width and the runabout hanger at the back.  The Laser Battery is actually mounted at the top of the ship so I put it in the center of the deck.  I wanted a conference/meeting room off the bridge that was also connected to the captain’s suite.  Picking the left side for the conference room determined where the Captain’s Suite would be.  That put the elevator on the right and I added in the main computer, some life support space and small toilet off the bridge.  This deck was done.

On deck two, I knew I wanted to put the crew cabins and living area in the back of the ship and the working areas center and forward.  I actually started this level by putting in the two elevators (one to the deck below and one to the deck above) so I knew how the rest of the design had to work around them.

Next I added in the engineering spaces around where I wanted the engine access tunnels to be.  Then came the location of the Ion Cannon (which extends out the front of this deck, not shown) at the front of the deck and then just started filling in details.

Also you might notice that I don’t have the roundabout hanger extending down into deck 2.  It would have filled the space where the rec room is and a bit more.  That was because as I was doing the sketches, I didn’t look back at my side view (the deck sketches were done several weeks after I made that side view sketch) and I completely forgot that that was my intention.  So I decided to just extend it up more instead of down, making the ship even more pyramidal in shape.

Now, if you’re paying attention, you may have noticed that I forgot a fairly important feature that any good spaceship needs.  (I probably forgot several but one is definitely going to be added in).  Can you spot it?  I’ll call it out when I get to drawing up the level it occurs on.

Slightly more detailed drawings

With the sketches done, it is time to start in on final drawings.  I do my drawings in Inkscape and if these were going to be the final plans for this ship, they would end up with much more detail that you’ll see here.  However, I knew that for this ship at least, I would be sending of the drawings to Bill to create the final version.  The reason is that he has a specific style that he has used for ships in FrontierSpace that I can’t quite recreate yet.  He had already done the PCs’ ship for this module in that style so I needed him to do the final drawings to match.  More on this later.  But that means that all I really need to do is get a good working drawing with the spaces mapped out for him to work from.

I like do do these drawings at 50 pixels per meter and 100 dpi.  This is mainly due the fact that I started doing maps in Inkscape to digitally recreate some of the original Star Frontiers maps and those maps were all a two squares per inch.  Give the preponderance of virtual table tops and the need for maps for those systems, I should probably shift to 70 pixels per square since that seems to be the default for those systems.  However, since Inkscape is a vector drawing program, it’s really easy to scale the final map up (by 40%) to reach the desired scale.  So I’ll probably stick with what I’m using since the math is easier.

Anyway, I start by laying down a grid.  I know how big the ship is going to be so I create an image that is big enough to hold the ship plus 1 square larger on each side.  Inkscape has a great extension to draw grids (Extension->Render->Grids->Cartesian Grid) so just use that to make the base grid:

a simple cartesian grid 48 squares wide and 22 squares high

Next I import the scans of my sketches and place them on a layer behind the grid.  I have to rotate and scale the sketches so that they match the grid I just created.  The sketch for the cargo deck looks like this:

grid with the sketch of the cargo deck scaled properly behind itYou’ll notice that the sketch doesn’t go all the way to the end of the grid.  Remember I said I needed to stretch it out?  The final grid is larger than the sketch to accommodate that.

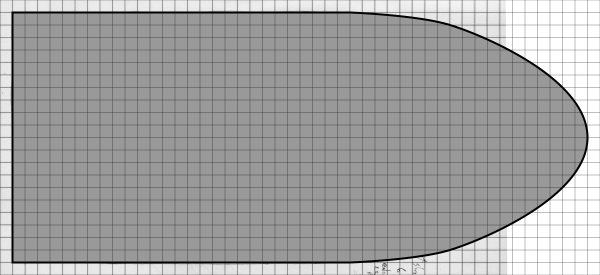
Next we lay in the outer hull.  This is done on a separate layer.  In the final drawings, the hull will probably have some final thickness and shape to it but for now, It’s just going to enclose the space where the rooms and passages will be.  Some may stick out slightly but it provides the overall shape.

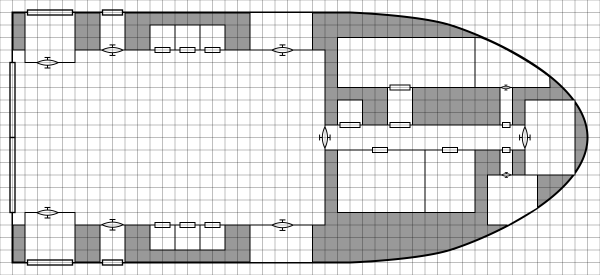
The basic hull overlayed on the sketchStarting a new layer, I turn off the gray fill on the hull (so I can see the sketch, I could also just play with the opacity if I wanted) and start drawing in the rooms and adding doors.  Once that is all done, I turn the gray fill on the hull back on (I’ve also turned off the sketch in the background.)

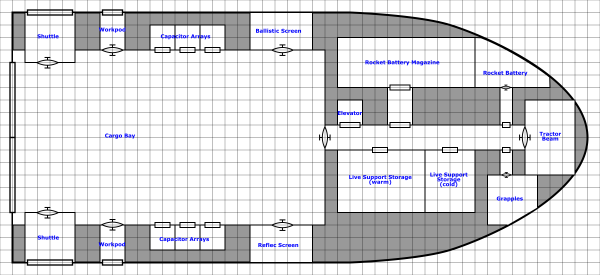
cargo deck with rooms and doors addedNow, if I were working on the final versions, I’d next go in and add details to all the rooms: consoles, chairs, desks, beds, whatever the room required to show it’s use and function.  However, as I’m just sketching out space, this is good enough for now.  So we add some labels to indicate what the rooms are:

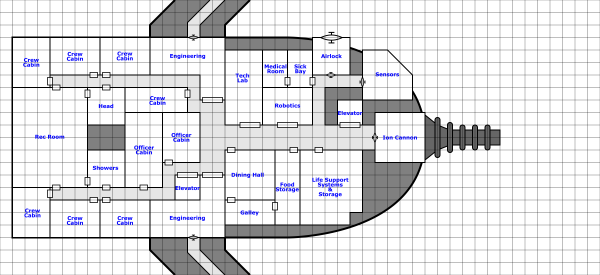
final plan for deck 1 with labels on the roomsNow that deck one is finished, it’s time to do deck 2.  This is where I realized I was missing something important.  Besides the ship bays and the cargo doors, there’s no way to get in and out of the ship.  I seem to have forgotten the airlock.  Now originally I was going to just run a passage and airlock through the side of the ship near the dining room/galley in the space labeled food storage, but as I started drawing the plans I realized I had more room over by the sensors than I thought based on the sketch and was able to add it in there.  The final deck two looks like this:

Middle crew deck plans with rooms and labels (and an ion cannon)On this deck, the sensor and airlock extend outside the edges of the hull boundary I drew.  This ship isn’t designed for atmospheric flight so that’s not a big deal.  I also added in the barrel of the ion cannon  I didn’t add in the engine areas, just a small passage headed out to them.  The engine compartment will probably actually start right on the edge of this map or just off it.  They aren’t all that far away from the ships.

From looking at these plans, you may have noticed that there seems to be an awful lot of life support and food storage space.  That is intentional.  If you look back at the ship stat sheet, you notice that it has expanded life support.  The ship is designed to be able to spend a long time out in space without returning to port so it needs lots of space to store food, air, and water as it doesn’t have a complete recycling system, only a partial one.

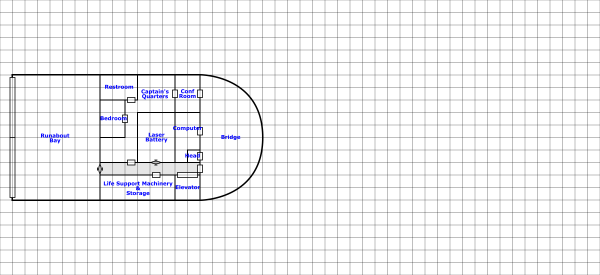
Finally, the top deck.  This one’s not that interesting, just a bunch of rooms with a small passage connecting them.

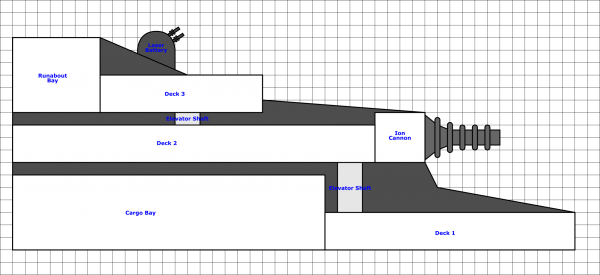
Upper deck with the bridge, captain's suite, and runabout hangerFinally we need a cross section view that shows how all these things are placed in relation to each other vertically.  As I said before, the cargo bay and the runabout hangar are going to be taller than the rest of the rooms on the ship, each with a 6m tall ceiling (most of the rooms off the cargo bay will be this height as well).  The other rooms are going to be 3m in height.

The other decision I had to make was how much space to place between the decks.  When I’m building ships for Star Frontiers, I typically use 2m between decks.  However, for this ship, I decided that the minimum spacing would be 1m (you’ll see why I say minimum in a minute).  That gives room for piping, duct work, machinery and such between the levels.  That’s also what that big 2x3m area in the middle of the living quarters section is for, to allow for connections between the lower and upper levels.

With that in mind, I drew a rough side view of the ship and placed the decks, elevator shafts and other bits in there relative positions:

cross section of the ship with the decks in their respective locationsYou can see in the front of the ship, there is a lot of space between the lower deck and the deck above. That’s why the 1m was only a minimum. You can also see the laser battery there at the top.  The outline of the ship at this point is really rough and I’ll updated it later once I have all the details.

Next Steps

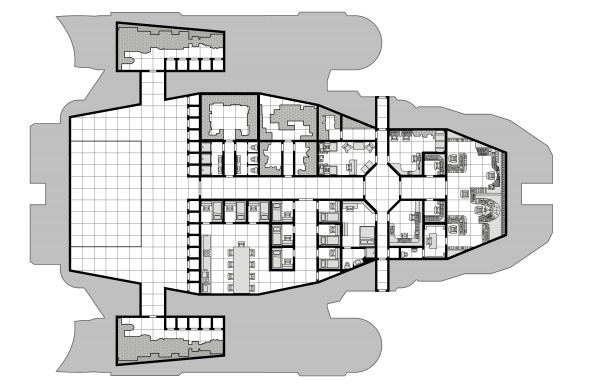
With the basic plans done, I’ve sent them off to Bill to get the final treatment.  He was quite excited to see the ship and get to work on the plans so hopefully I’ll have those back relatively soon.  I’ll post them when he sends them to me.  In case you haven’t seen his deck plan style, here’s the PCs’ ship from the game in Bill’s FrontierSpace style.

another ship deck plan in the final style for the module.I now have the original drawing for this particular ship so I’ll be working in the future to be able to match it for future drawings.

My plan at this point is to start producing a 3D model of the ship.  With the basic plans and design done, I can start working on a model that accurately reflects it’s shape.  There will be a bit of back and forth between me and Bill as I work on this so that the outline on the deck plans and the model match.  Expect the next big post in this series to be on the creation of that model.  I’ve been working on brushing up my Blender skills as I’m going to attempt to create the model with that software instead of OpenSCAD which I’ve used for all my models in the past.  I like the programmatic aspect of OpenSCAD but Blender provides much more flexibility.  However, I might do a hybrid approach like I did with the Assault Scout model I used in the Assault Scout Technical Manual.

So there you go.  A new ship. It can actually be used as is in your games if you want.  Everything from here on out is details.  Let me know if you have any questions, comments, or suggestions in the comment section below.


May 28, 2018 Tom 1 Comment

Patreon-only Test Post

To view this content, you must be a member of Tom Stephens's Patreon at $2 or more
Unlock with Patreon Unlock with Patreon
Already a qualifying Patreon member? Refresh to access this content.
May 10, 2018 Tom 1 Comment

Outline for the Sathar Assault Carrier Project

Silhouette of the Sathar Assault Carrier.  Short squat body with a spherical bow with four engines mounted on struts away from the body.As I was thinking about this project, I realized that if you are a player in a campaign and your GM uses any of my sathar material (probably a Star Frontiers campaign), this entire project is one giant spoiler.  Although if you’ve already read through my Sathar Destroyer Technical Manual, then there will only be a few new things in this project beyond the decks themselves.  Those are the bits I’m going to call out with the spoiler icon in all future posts on this subject as I’m going to assume that anyone here has read the technical manual.  If you haven’t read the Sathar Destroyer Technical Manual, then the following warning applies to the entire series.  You’ve been warned.

blue triangle with gold excalemation mark in the middle

Now that that’s out of the way, let’s get started.

Sathar Assault Carrier

Project Tag: SatharAC

Overview

This is a project in the vein of my Sathar Destroyer and UPF Assault Scout technical manuals.  It will cover in detail, including maps for every deck, the interior of the Sathar Assault Carrier.  The design of the assault carrier will be based on the game stats and (roughly) the silhouette from the game rules but with my twist on how the sathar design and use their ships.

In addition to the physical design of the ship I include information about how the ship typically operates and information about the larger divisions of the sathar military (beyond that detailed in the destroyer technical manual).

Finally, I’ll include, either as part of this document or as a pair of separate documents, deck plans for the shuttles and fighters used by the assault carrier.  I provided basic information on the shuttles in the Sathar Destroyer Technical Manual but no deck plans.  I aim to correct that.

I’ll also be creating a 3D model of this ship.

Materials Needed

  • Ship design overview
  • Description of Sathar military structure
  • Fighter deck plan and write-up
  • Shuttle deck plan and write-up
  • Ship crew roster
  • Description and stats for any robots on the ship
  • Plans for each unique ship deck and description
  • Ship silhouette/cross-section showing deck arrangement
  • 3D model of ships (one each of the following for the assault carrier, fighters, and shuttles)
    • basic STL file for printing
    • Blender file with materials and coloration for 3D graphics
  • Complete technical manual write-up describing each deck and the ship’s operation

Last Words

That’s the basic outline for this project.  The assault carrier is a big ship.  Based on the game rules, it’s about 380-475 meters long.  I’m suspecting it will be closer to the smaller end but still, that’s going to be a lot of decks to create.  However, many of them will be identical but used multiple times throughout the ship.  It may actually end up having fewer unique decks than the destroyer did but we’ll see how this all falls out in the end.

If you have any thoughts or comments on this particular project, let me know in the comments below.
May 8, 2018 Tom Leave a comment
Become a Patron!

Recent Posts

  • Detailed Frontier Timeline – FY61.357 to FY61.381
  • Back to Blogging
  • Moonbright Stinger Miniature and Model (aka The Gullwind)
  • State of the Frontier – April 2021
  • Battle of Liberty – FY61.362
  • Second Battle of Ken’zah-Kit (K’aken-Kar) – FY61.358
  • Detailed Frontier Timeline – FY61.326 to FY61.356
  • Second Battle of New Pale (Truane’s Star) – FY61.354
  • State of the Frontier – Jan 2021
  • Spacefleet Naming Conventions

Categories

  • 3D Models
  • Adventures
  • Background
  • Creatures/Races
  • Deck Plans
  • Equipment
  • General
  • Locations
  • Maps
  • NPCs
  • Optional Rules
  • Patreon-only
  • Project Overviews
  • Reviews
  • Setting Material
  • Starships
  • System Brief
  • Vehicles
  • Writing

Recent Comments

  • Frank Patnaude on Thoughts on the Second Sathar War
  • Frank Patnaude on Thoughts on the Second Sathar War
  • Detailed Frontier Timeline – FY61.357 to FY61.381 – The Expanding Frontier on Second Battle of Ken’zah-Kit (K’aken-Kar) – FY61.358
  • Back to Blogging – The Expanding Frontier on HSS History’s Hope Deck Plans – part 1
  • Dominic Pelletier on Maps and Counters
  • Cian Shay on A New Starship Construction System – part 5 – Engines Revisited
  • ANDREW LAWTON on Moonbright Stinger Miniature and Model (aka The Gullwind)
  • Aemon Aylward on Moonbright Stinger Miniature and Model (aka The Gullwind)
  • ANDREW LAWTON on Freighter Model and Miniature
  • ANDREW LAWTON on Moonbright Stinger Miniature and Model (aka The Gullwind)

Archives

  • May 2022 (2)
  • June 2021 (1)
  • April 2021 (1)
  • February 2021 (4)
  • January 2021 (6)
  • December 2020 (5)
  • November 2020 (11)
  • October 2020 (4)
  • September 2020 (5)
  • August 2020 (4)
  • July 2020 (6)
  • June 2020 (5)
  • May 2020 (8)
  • April 2020 (5)
  • March 2020 (5)
  • February 2020 (5)
  • January 2020 (5)
  • December 2019 (7)
  • November 2019 (4)
  • October 2019 (6)
  • September 2019 (5)
  • August 2019 (6)
  • July 2019 (7)
  • June 2019 (5)
  • May 2019 (6)
  • April 2019 (7)
  • March 2019 (4)
  • February 2019 (5)
  • January 2019 (7)
  • December 2018 (5)
  • November 2018 (10)
  • October 2018 (4)
  • September 2018 (4)
  • August 2018 (5)
  • July 2018 (4)
  • June 2018 (4)
  • May 2018 (12)

Meta

  • Log in
  • Entries feed
  • Comments feed
  • WordPress.org
Powered by WordPress | theme Layout Builder