The Expanding Frontier

Creating Sci-fi RPG Resources

  • Home
  • Order a Map
  • Order Miniatures
  • Supporters
  • About
  • Bio

Tag Archives: Battle Report

Second Battle of Fromeltar (Terledrom) – FY62.083

In an unexpected and horrifying turn of events, the sathar fleet attacked the civilian orbital shipyard around Terledrom in their attack today before retreating from the system. The shipyard was completely destroyed along with all the ships under construction. Many of the crew and engineers were lost as well.

Task Force Cassidine, together with with the new Frontier Fighter Corps squadron and the militia drove off the attackers destroying five major vessels of the sathar fleet. UPF forces lost fourteen of the twenty fighters in the system and the militia lost one of its assault scouts. Luckily nearly all the crew were recovered. The militia frigate was significantly damaged as well and will be heading to Outer Reach in the Dramune system for repairs with the loss of the local shipyard.

Kat’kst’kll, Terledrom News Service

Background

Deciding on a change of tactics, the sathar launch a massive fleet at Fromeltar, larger than any of the fleets seen so far in the Frontier.  Despite the increased size of the Fromeltar militia and the presence of Frontier Fighter Corps Squadron Gamma, these ships plus the depleted Task Force Cassidine are outgunned by the incoming sathar fleet.  The UPF has more ships, 32 vs 21, but twenty of the UPF ships are fighters with another 7 being assault scouts.  The UPF fleet only has 5 capital ships, a battleship, an assault carrier, and three frigates, compared to the 10 capital ships of the sathar fleet including four heavy cruisers.

However, unlike previous sorties into the Frontier, the primary target of this attack is not the ships of Spacefleet but rather the starship construction center in that system.  This is only going to be a hit and run on the sathar’s part and they aren’t planning on a major engagement with the fleet.  Three hours before the sathar ships reach the planet, the assault carrier deploys its fighters and turns to head home.  It looks like the fighters are to be sacrificed.

Order of Battle

UPF

Task Force Cassidine

  • 9 fighters
  • 3 assault scouts
  • 2 frigates
  • 1 assault carrier
  • 1 battleship

FFC Squadron Gamma

  • 8 fighters

Terledrom Militia

  • 3 fighters (manned for UPF)
  • 4 assault scouts
  • 1 frigate
  • armed station
  • Terledrom SCC

Sathar

  • 9 fighters
  • 2 cutters
  • 3 frigates
  • 1 destroyer
  • 2 light cruisers
  • 4 heavy cruisers
  • 1 assault carrier (not participating in battle)

The Battle

Setup

Unlike previous engagements, instead of continuing to slow as they approach the planet, two hours out, the sathar forces start accelerating instead of continuing to slow down.  Additionally instead of dispersing out to engage the UPF forces, the fleet amasses into a single tight formation bearing directly on the planet.  They enter the map at speed 44.

Caught by surprise by the sathar’s speedup, the UPF forces scramble to gain speed and because of this are somewhat out of position as the attack commences.  The fighters and assault scouts have matched the sathar’s speed but the frigates have only achieved a speed of 35 while the battleship and assault carrier are at speed 20.  The fighters form up into flights of 3 or 4 ships and the assault scout fly in pairs or trios.

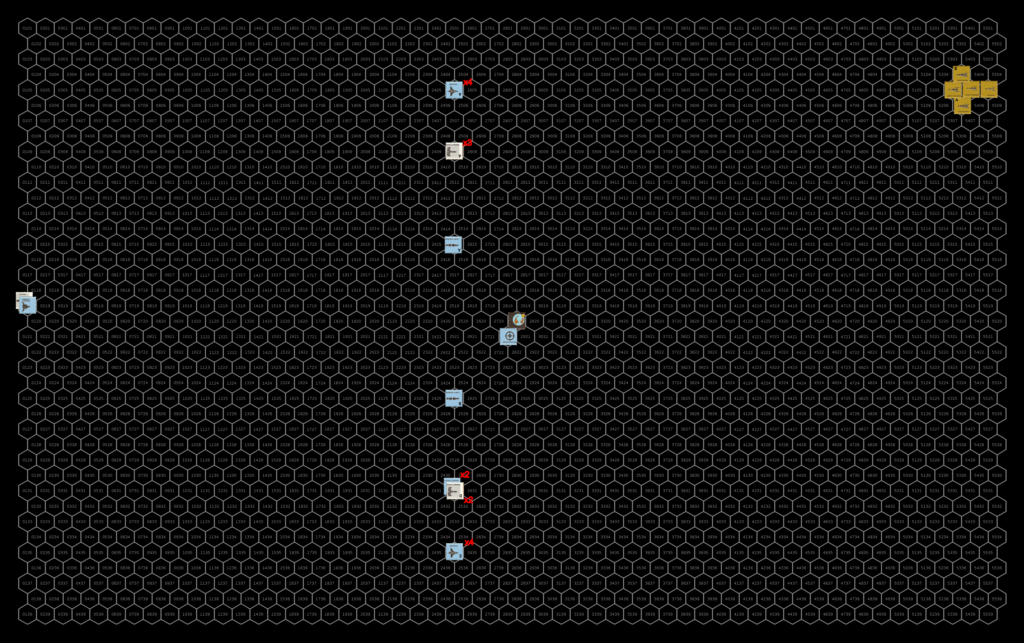
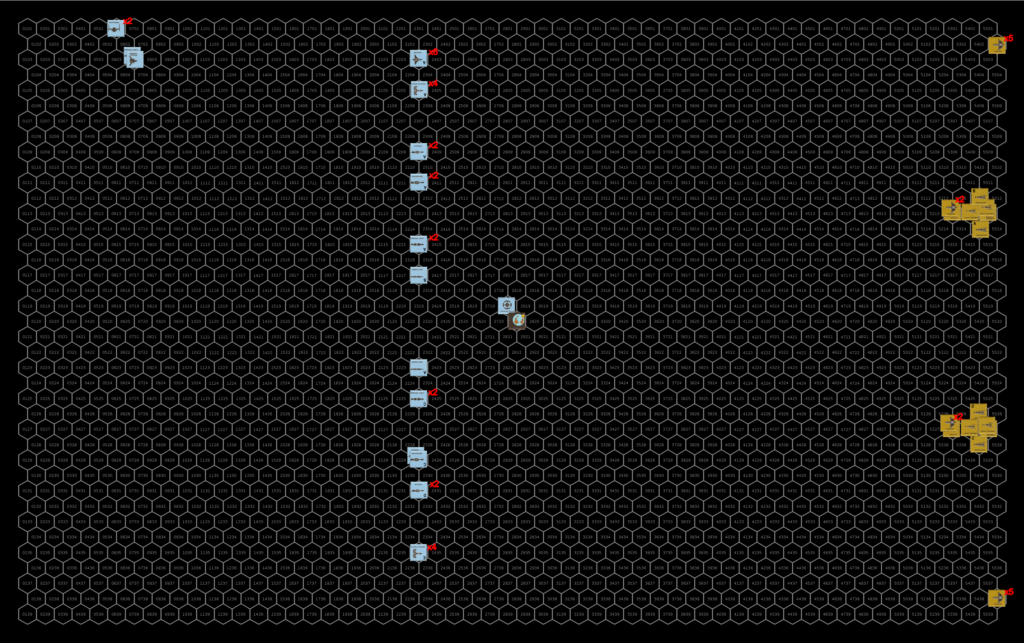
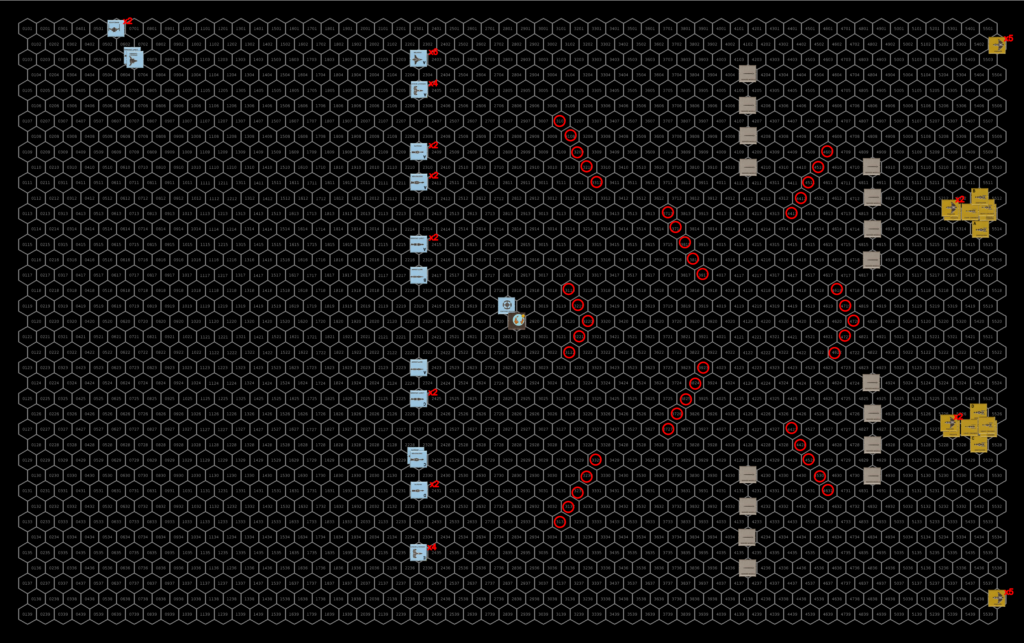
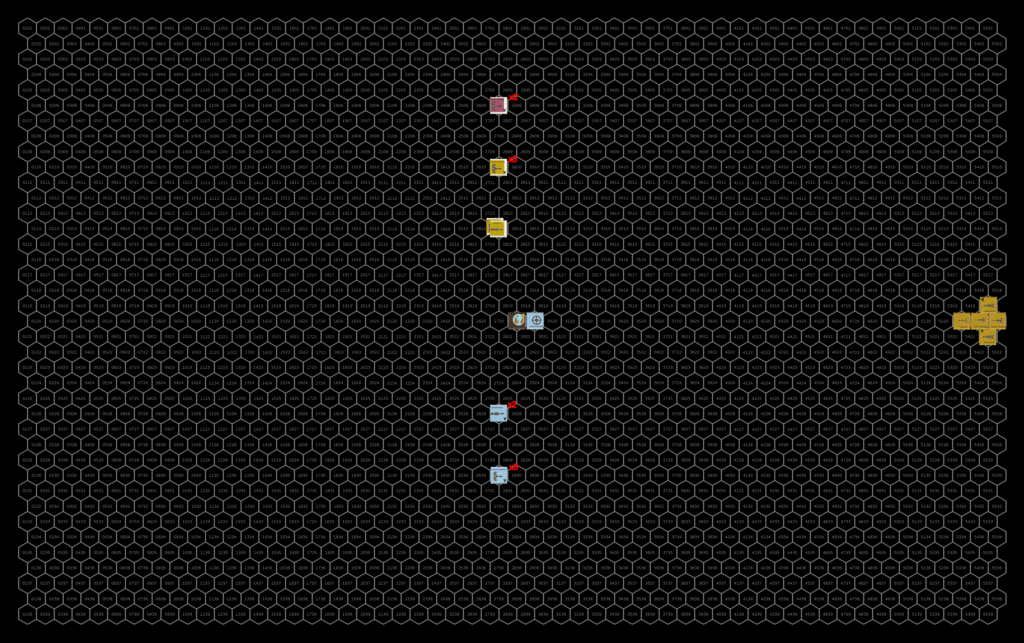
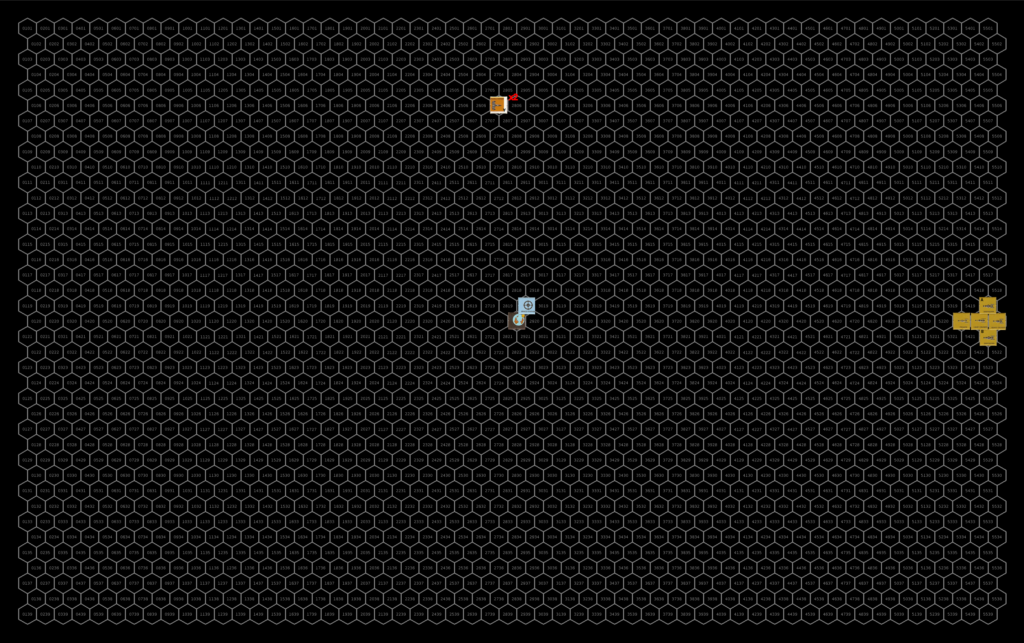
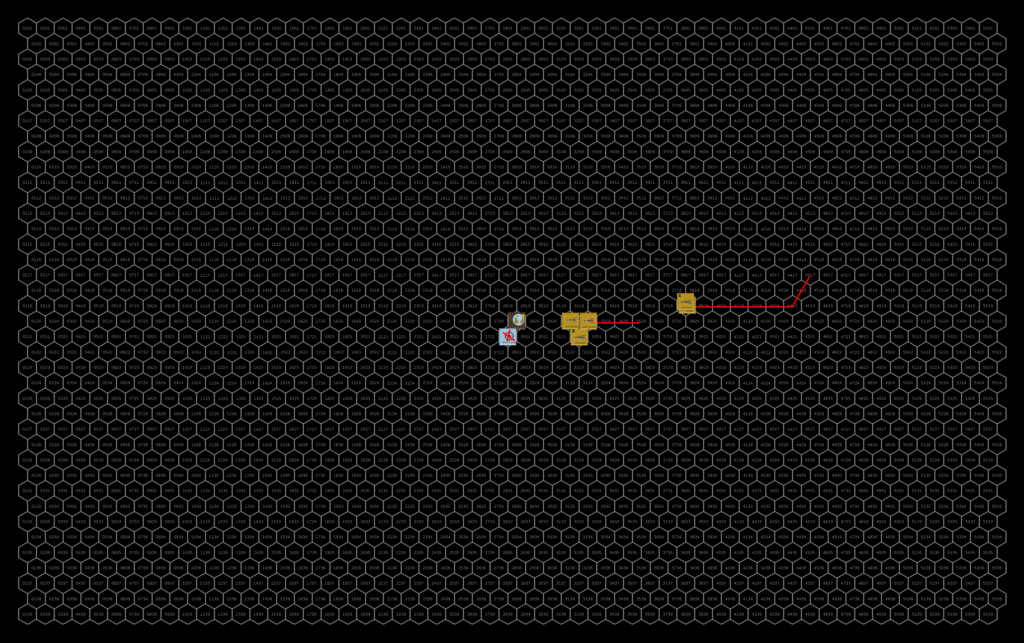
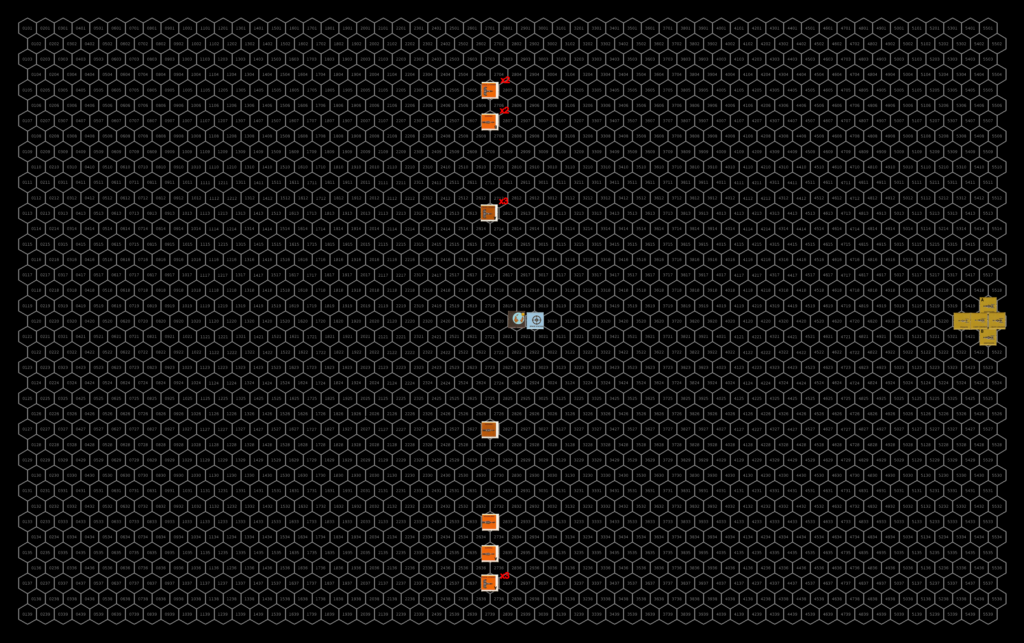
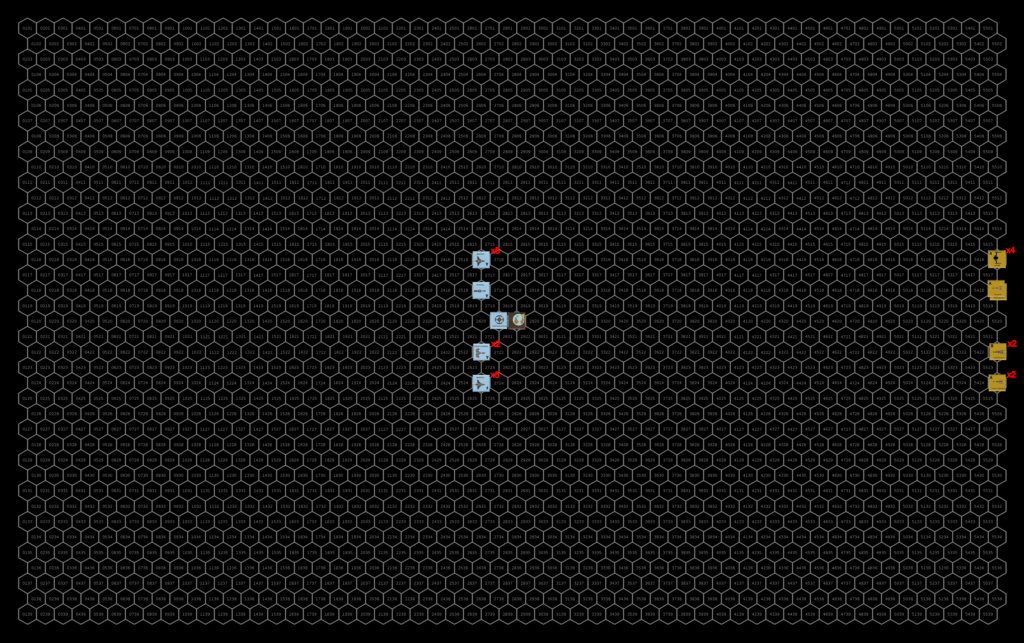
Positions at the start of the battle. The sathar are all massed into a single hex with the composition shown in the upper right box. The gray background space station is the starship construction center and the blue background one is the armed station in the system. Click for full size image.

Turn 1

The sathar stay as a group and accelerate with an ADF of 2 to a speed of 46. The armed station, expecting to be obliterated, fires its laser battery and rocket battery at a pair of fighters, hoping to reduce the assault rockets coming at it but both miss. 

Surprisingly the sathar do not attack the armed station or continue on toward the UPF ships. Rather they swing around the planet, using the gravity of the planet to get an extra turn for the heavy cruisers and as they pass by, unload all of their firepower into the starship construction center orbiting behind the armed station.  Defenseless, the SCC is pummeled by the sathar attacks.

Eight of the nine assault rockets connect with various parts of the shipyard, five of which do double damage reducing the hull integrity of the station by 35%.  Six of the ten fired rocket batteries hit reducing the hull integrity by another 15%.  Only four of the ten torpedoes connect and amazingly are not very effective, reducing the hull integrity by only another 11%.  Four of the six disruptor cannons connect knocking out the station’s DCR, and reducing its hull integrity by another 7%.  All four laser cannons hit dropping the hull integrity another 10%.  Seven of the ten electron and proton batteries connect, inducing an electrical fire and reducing the hull integrity by another 4%.  Finally, fifteen of the eighteen laser batteries connect reducing the hull integrity by another 17% leaving the station with just 1% of its hull integrity remaining.  Finally, the heavy cruisers deploy some seeker missiles along their path to activate against pursing ships.

Enraged by the nearly complete destruction of the shipyard, its crews, and the ships inside, the UPF forces swarm after the fleeing sathar vessels.  The only exception is the assault carrier which flies to get as far away from the sathar as possible. The battleship is moving too slow to get into range, and the two UPF frigates can’t get to optimal range but are at least able to bring some of their weapons to bear.  The fire on the SCC knocks out half of its remaining hull integrity (3 of 600 HP left).

Recognizing the danger of all the fighters, the sathar concentrate their defensive fire on that threat.  The defensive fire destroys four fighters and nearly destroys two more.  It damages the engines on two fighters, and completely knocks out the engines on another.  It knocks out the maneuvering system on one fighter and the assault rocket launcher on yet another.  Finally, one of the fighters is hit damaging its combat control system.

The UPF ships return fire with a vengeance.  The fighters concentrate on two of the heavy cruisers while the assault scouts focus one of the light cruisers.  The frigates focus on one of their counterparts.  The more distant frigates miss but the one close in with the fighters connects with its laser cannon and a torpedo.  The don’t do as much damages as they could but still manage to take out 67% of the sathar frigate’s hull integrity (the LC only did 3 HP and the T, while rolling double damage, only did 24 HP).

The assault scouts miss with their laser batteries but connect with six of the seven assault rockets on the light cruiser knocking out its ICM launcher and damaging its maneuvering jets before the others slam into it and destroy it completely.  The first heavy cruiser is hit by six of the eight assault rockets launched at it.  The rockets take out just over half of its hull integrity, knock out its maneuvering, damage its engines, knock out its disruptor cannon, and cause a power short circuit knocking out all of its screens and ICMs. The second doesn’t fare as well.  It is also hit by six assault rockets.  The first three knock out about 56% of its hull integrity, the next two damage its engines and knock out its maneuvering.  But the final assault rocket slams into the cruiser’s torpedo magazine causing a massive explosion that destroys the ship.

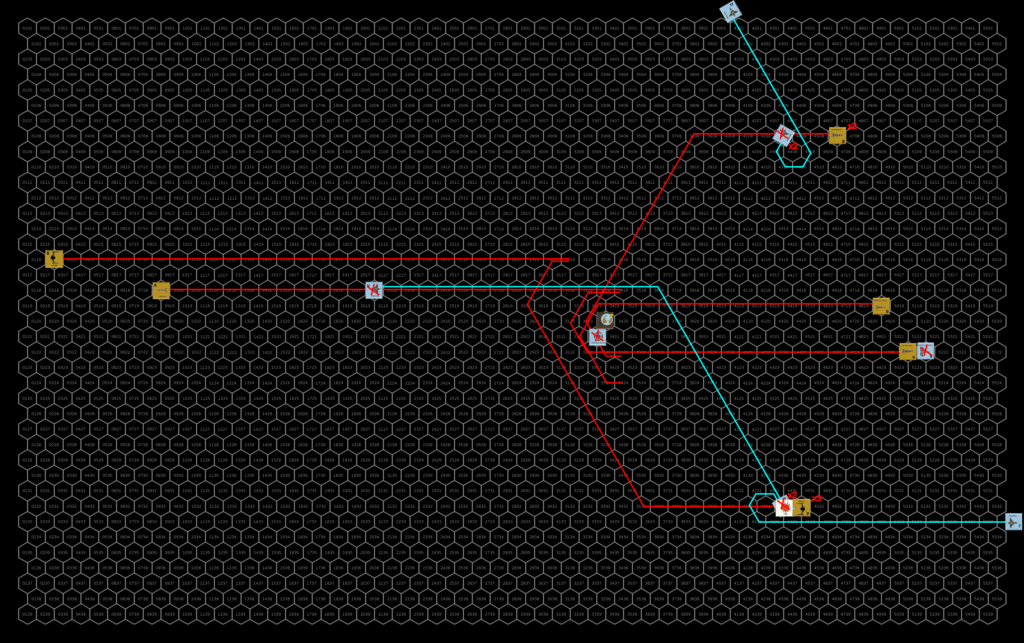
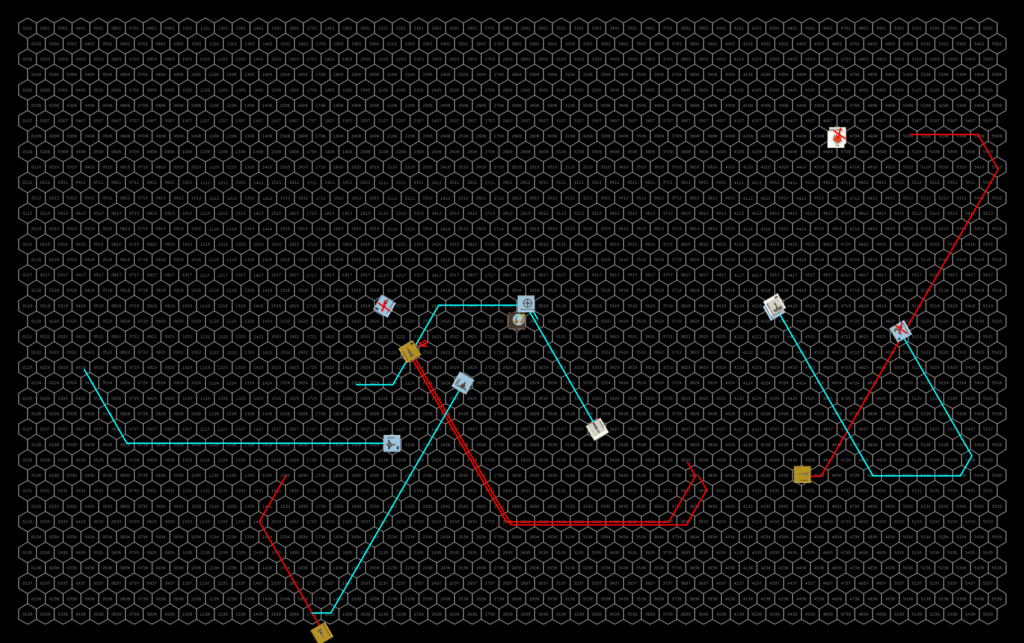
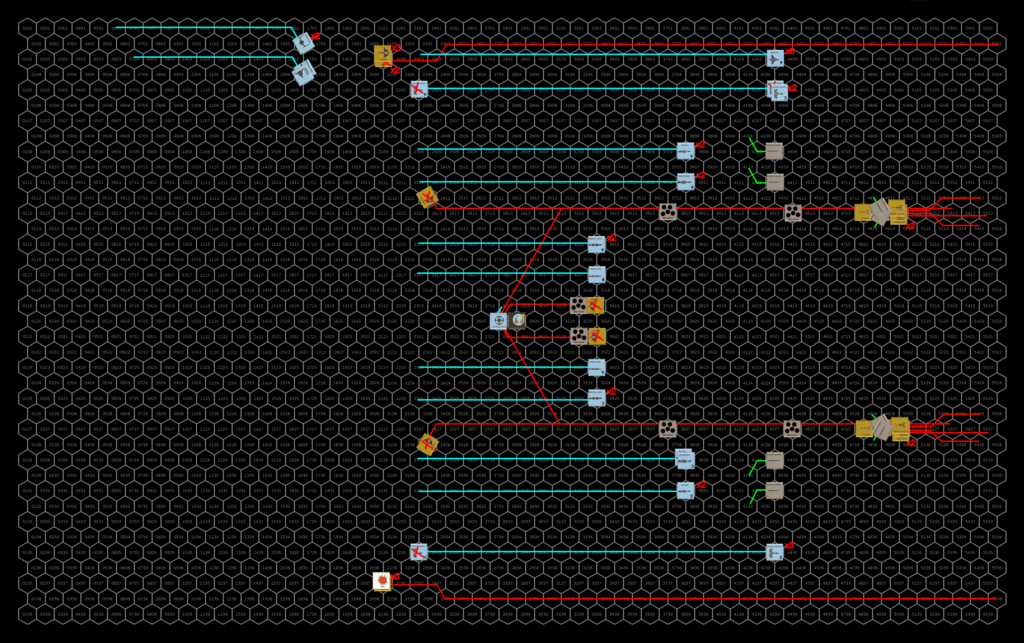
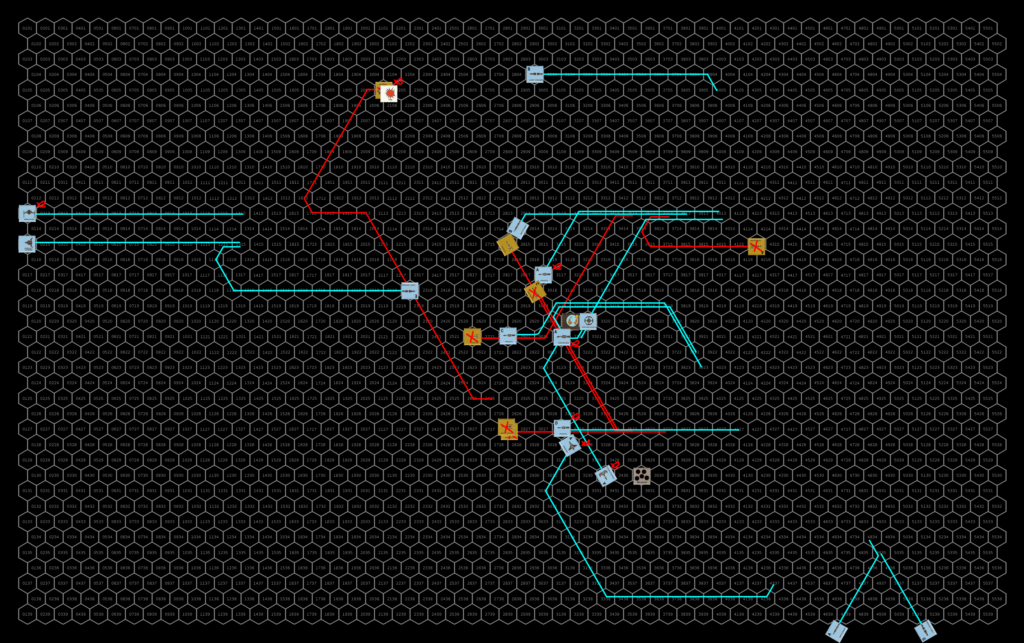
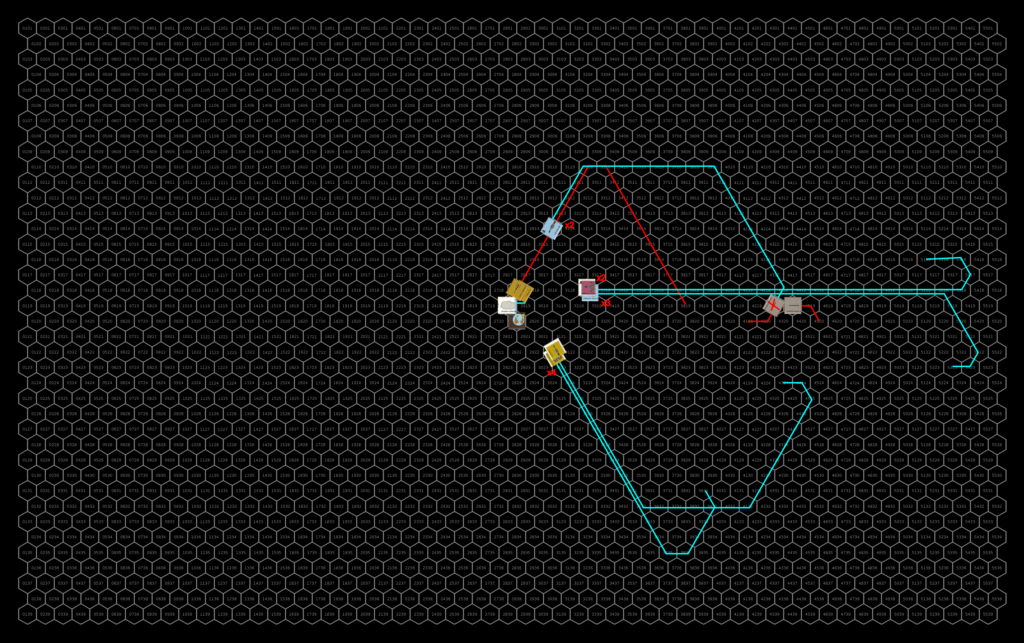
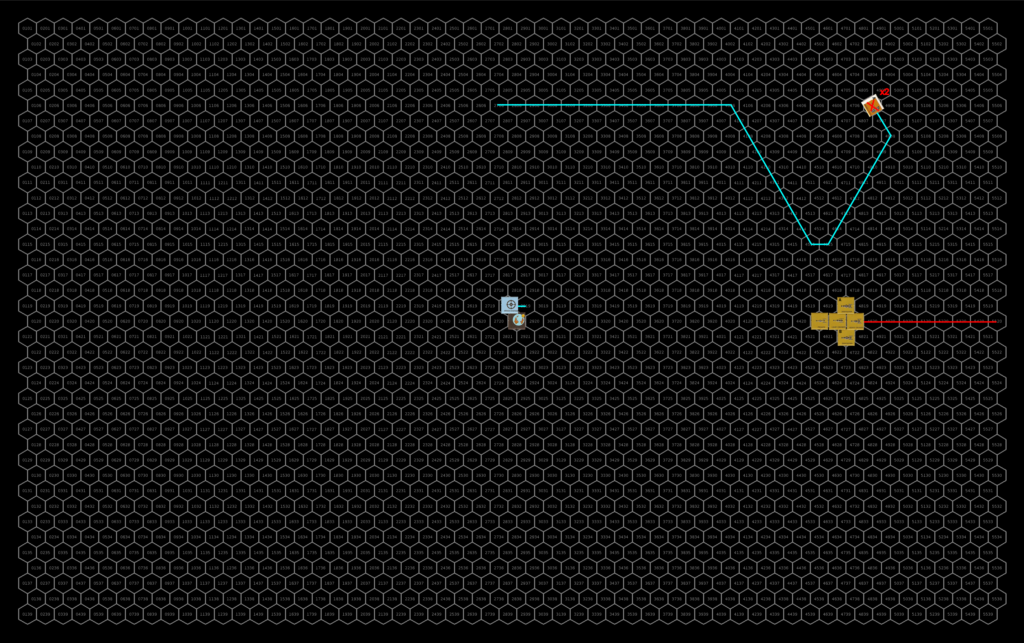
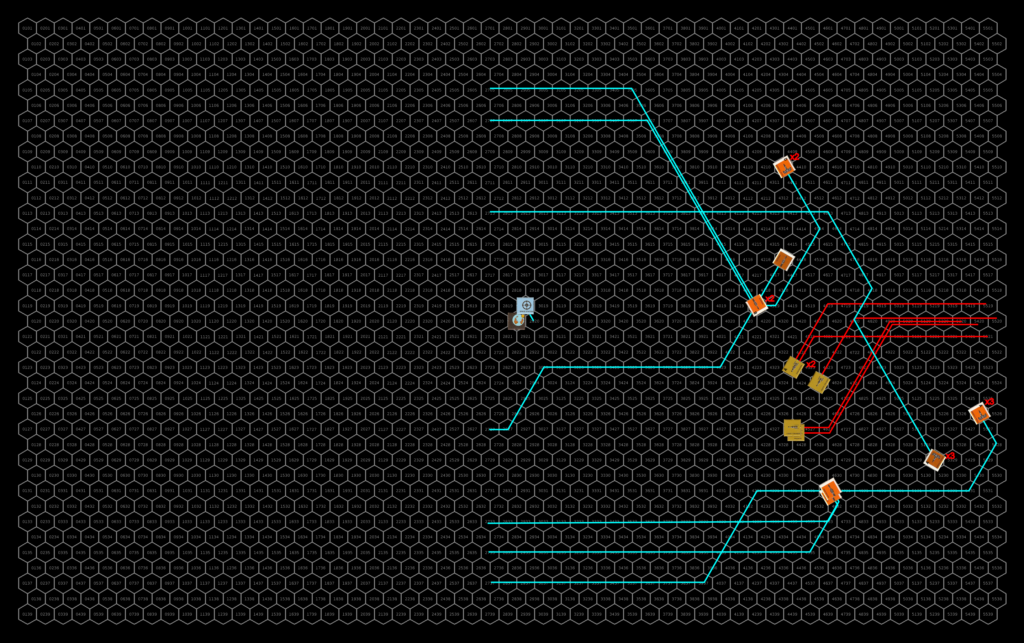
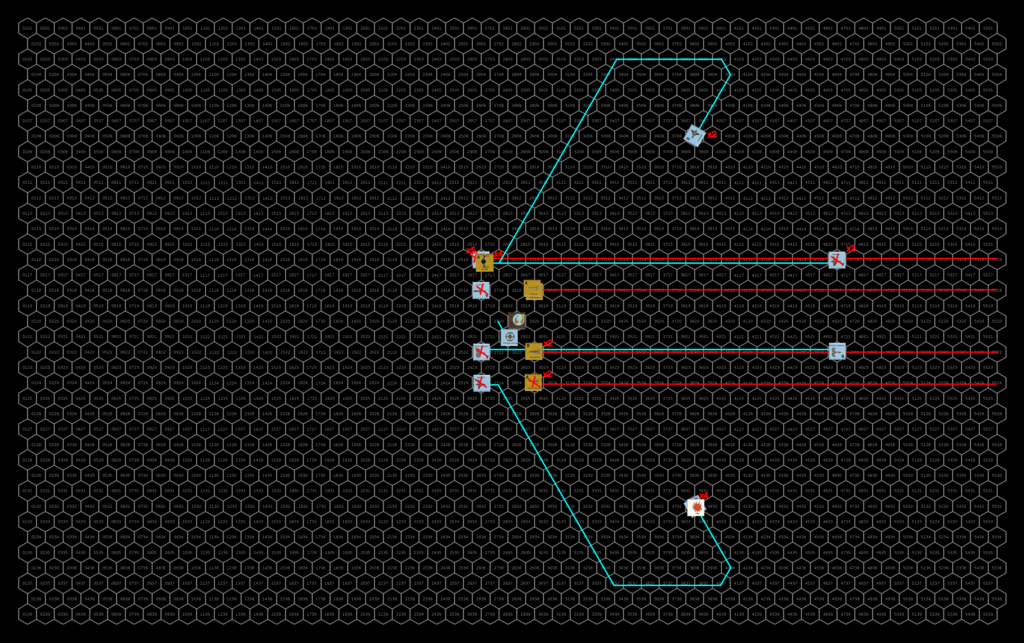
Courses and positions after the first round. The UPF ships show in the yellow boxes are positioned at the corresponding letter on the map. Their facing is as given in the boxes. Click for larger image.

Turn 2

The sathar continue to effect their retreat from the system.  The wounded heavy cruiser with no MR, accompanied by the wounded frigate accelerate by 1 (the HC’s max) and continue straight and the frigate doesn’t break up from the slight acceleration.  The other capital ships make a turn to port, accelerate by two and begin to leave the inner system.  The fighters loop back to make a pass at the battleship.

At the same time the sathar activate three of the seeker missiles that they had deployed last turn. The first one starts to accelerate toward the armed station.  The second activates among all the fighters and assault scouts and targets the militia frigate in that group. The third goes after the UPF frigate just behind the larger group of ships chasing the sathar fleet.  Both frigates fire off all of their ICMs in an attempt to intercept the incoming missile.  The missile going after the UPF frigate manages to evade the seeker missile but the militia frigate isn’t so lucky.  The missile slams home but mercifully doesn’t destroy the ship.  It’s hull integrity is only reduced by 40% (only 16 points on 5d10).

Defensively, the armed station, UPF frigate A, and the battleship fire at the fighters while the other ships focus on the damaged heavy cruiser.  The frigate connects with the lead fighter knocking out its AR launcher.  The station misses but the battleship hit with 2 laser batteries destroying one fighter and knocking out the AR launcher on a second, and its disruptor cannon vaporizes a second fighter.  The other frigates and assault scouts, firing on the damaged heavy cruiser, only manage to land two laser battery hits (from the militia frigate and assault scout) knocking out the cruisers PB and only scratching its hull (1 HP).

Offensively, the sathar fighters fire their assault rockets at the battleship, but the destruction of and damage to their wingworms distract them and only one of the five rockets connect damaging the battleship’s engines.

The fleeing sathar ships focus the energy battery weapons on the fighters behind them, while they focus their cannons and rocket batteries on the fighters in the lower group (C) along their flight path.  They fire torpedoes at the frigate and assault scouts behind them as well.  The assault scouts immediately start dodging in an attempt to evade the incoming torpedoes but the frigate, having expended its ICMs unsuccessfully on the seeker missile can only watch as the torpedo homes in.

While the torpedoes are only moderately successful, damaging the LC on the militia frigate and destroying one of the militia assault scouts, the energy weapons and rocket batteries are much more effective, completely destroying the fighters along the sathar flight path and destroying four fighters in the trailing groups.  In addition, two more fighters are damaged (12% and 88% hull integrity left).

With the battleship too slow to catch the fleeing ships, and some of the assault scouts thrown off track trying to avoid the incoming torpedoes, the UPF cannot safely pursue the larger group of sathar vessels and go after the damaged ships to finish them off.  Three of the assault scouts are able to pursue even with their evasive maneuvers and are joined by the four functional fighters.  One fighter has its maneuvering damaged and just starts to decelerate.  The sixth fighter cannot accelerate and tries to stay with the main group but falls behind and doesn’t come into weapon range.  The frigates also pursue the damaged sathar ships but they are still at a speed disadvantage and fall a bit further behind.  The battleship starts slowing down and staying near the station while the three militia assault scouts slow down as they are headed off in the wrong direction for pursuit but should be able to start to catch up soon.  The assault carrier, now safe, begins slowing down and returning to the planet.

The starship construction center succumbs the fire and is completely destroyed.  Defensively, the sathar heavy cruiser and frigate fire on the incoming fighters but all the shots go wide.

The UPF ships fire five assault rockets at the heavy cruiser and two at the frigate.  They focus all their energy weapons at the frigate (3 LB from the Assault scouts and 2 LC & LB from the frigates).   Four of the five assault rockets hit the heavy cruiser.  All of them rip into the hull completely destroying the ship.  Of the energy weapons fired at the frigate, only one of the assault scouts score a hit reducing the frigate’s hull integrity by 10%.  One of the assault rockets knocks out the frigate’s LC while the other detonates in the core of the ship with a titanic explosion that consumes the entire ship (42 HP).

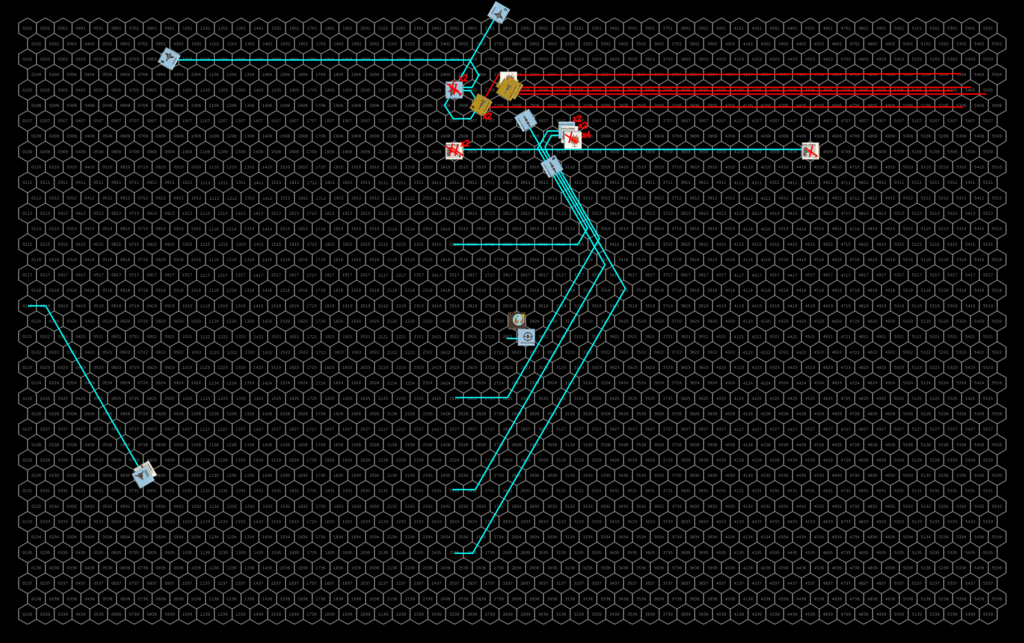
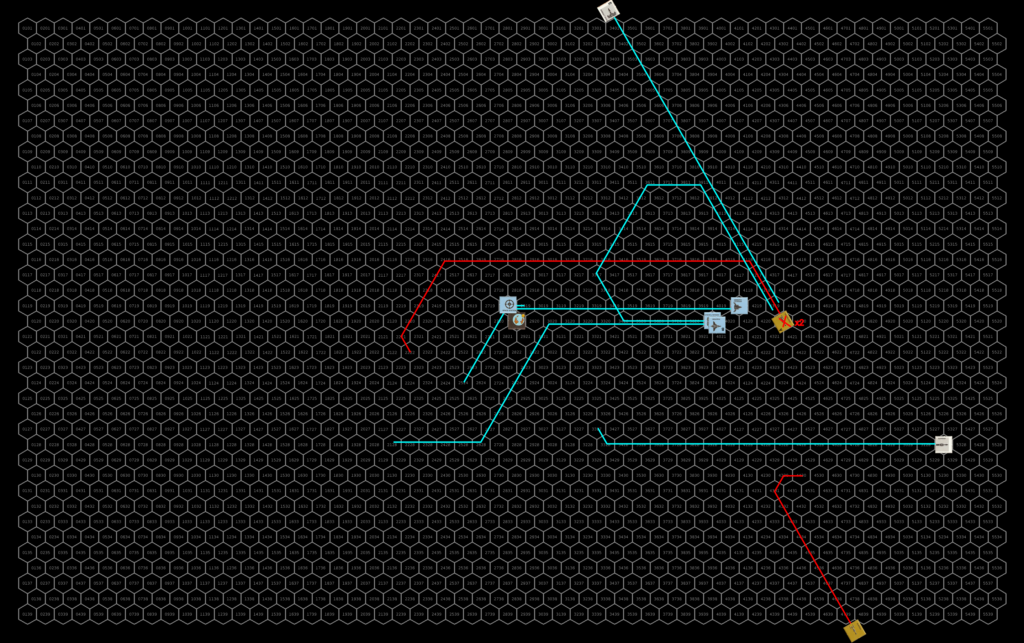
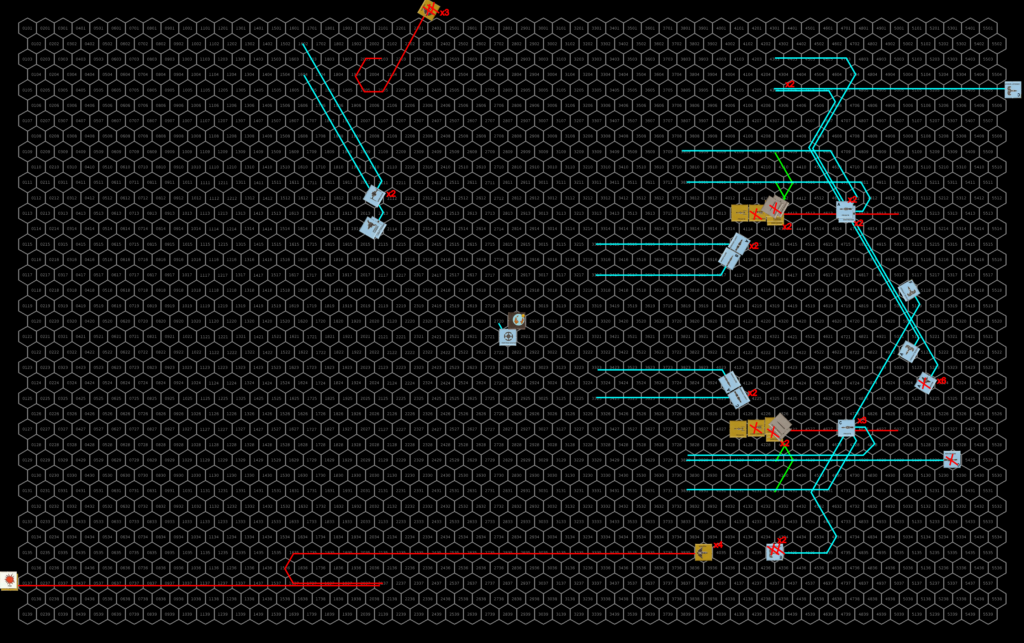
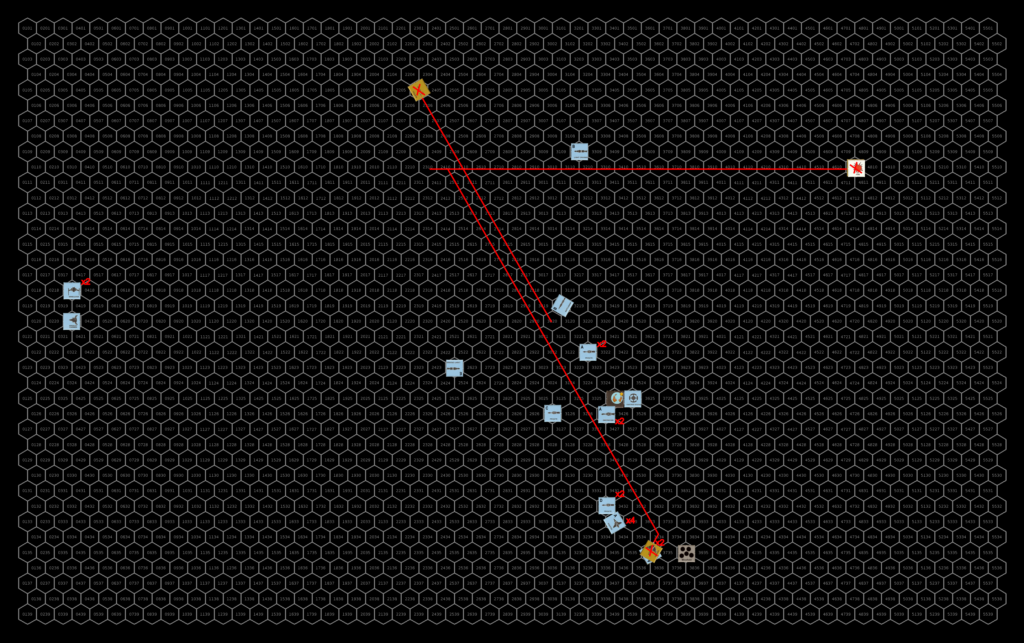
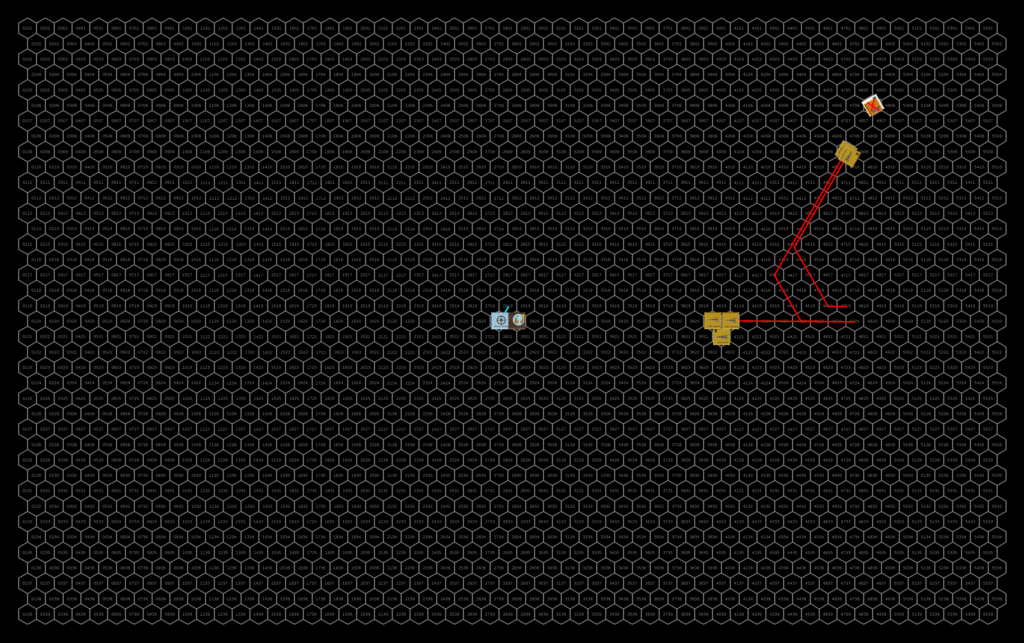
Upper half of the map. The yellow numbers indicate how many hexes off the map the ship is along the direction they were traveling. Click for larger image.
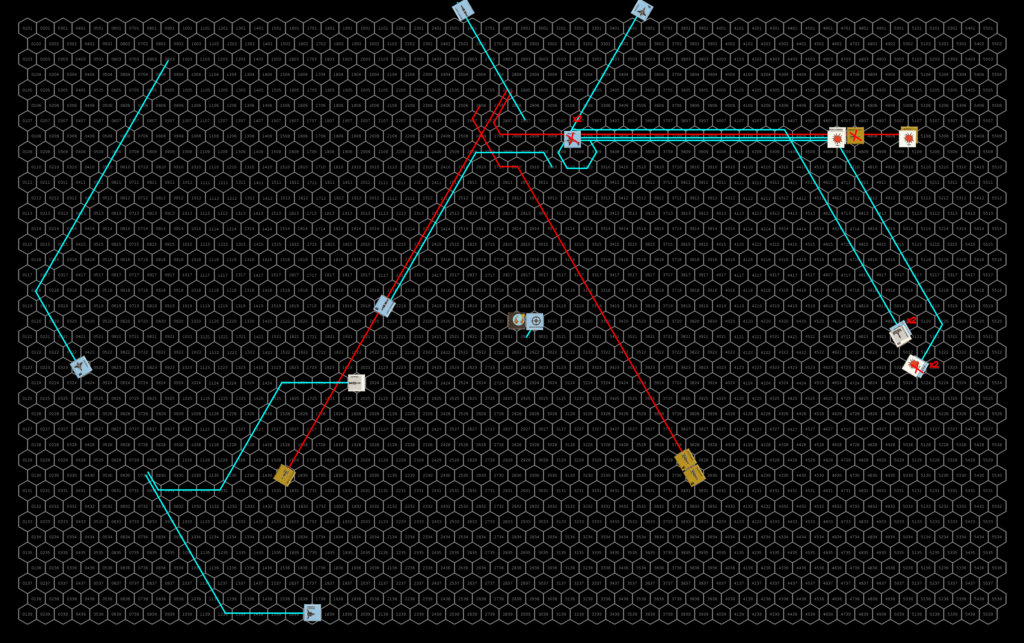
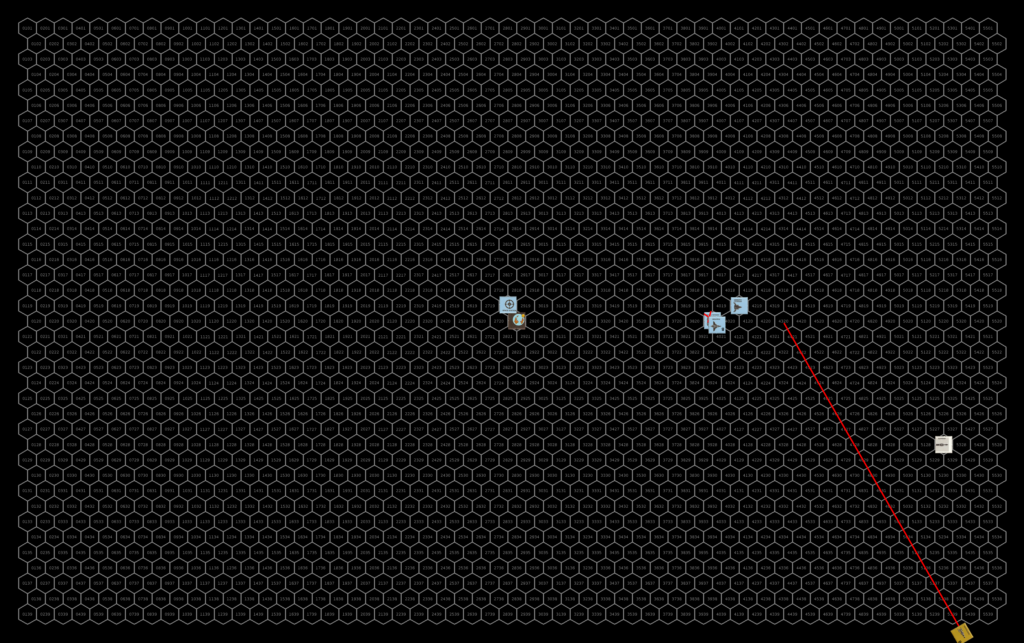
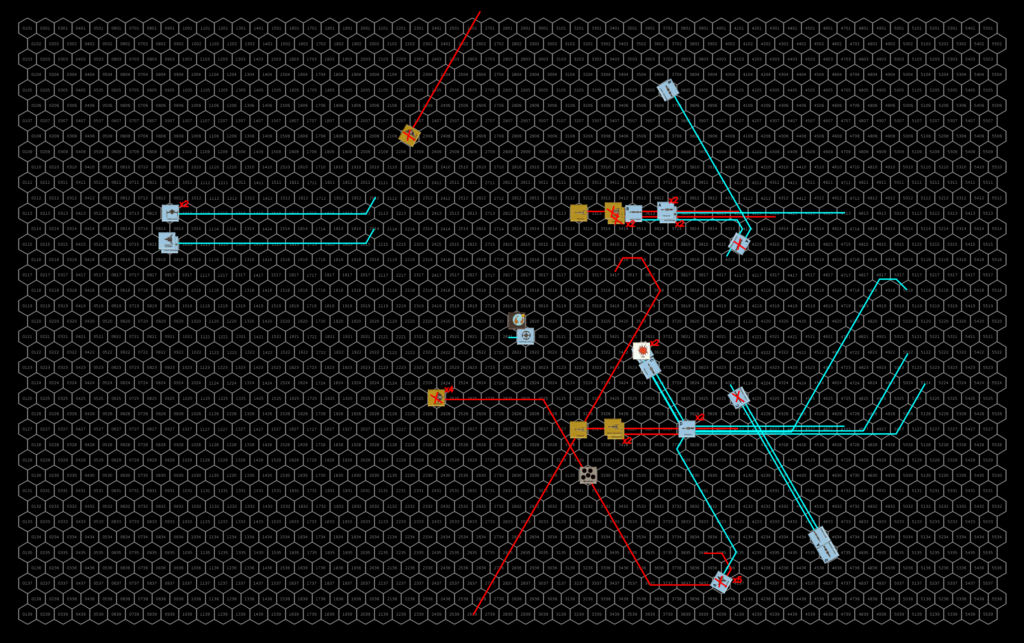
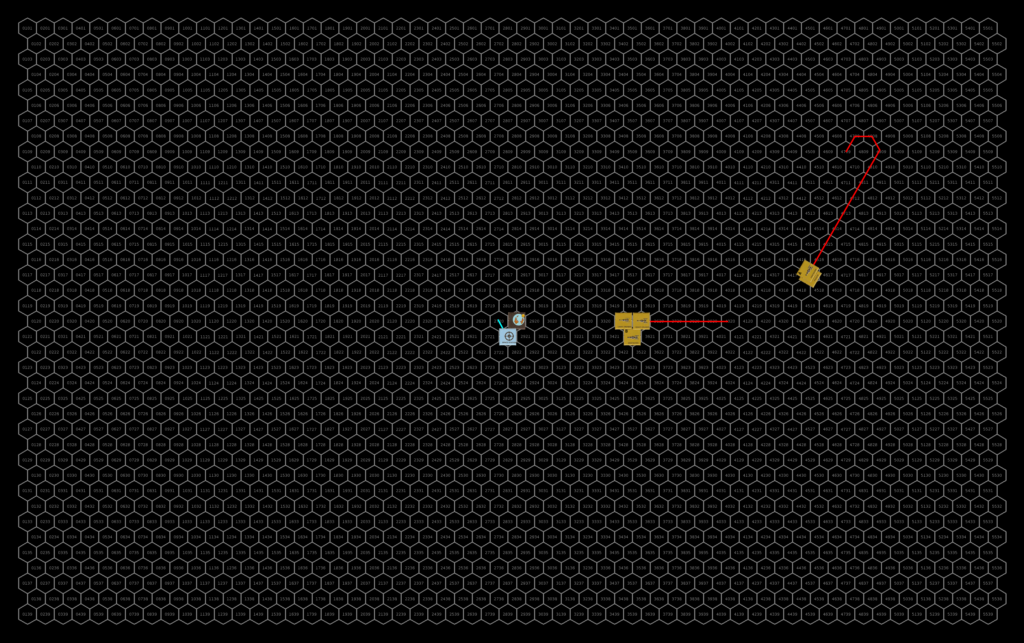
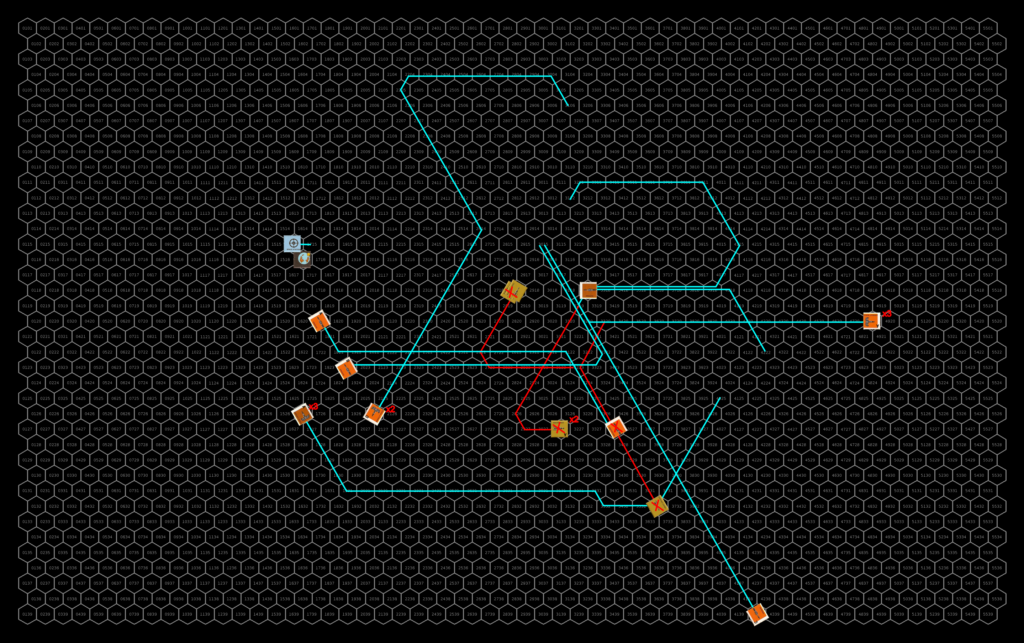
Lower map. The top row of this map is the same as the bottom row of the upper map. Click for the full-size image.

Turn 3

The remaining sathar ships continue to flee the system but activate their remaining seeker missile that they left by the planet.  Both the newly activated one and the one activated the previous turn fly at the armed station.  Firing ICMs to try to avoid an impact, one of the missiles is intercepted but the other one hits the station reducing its hull integrity by 30% but not destroying it.  With the sathar ships now quite far away and retreating, the UPF calls off the pursuit and begins looking for survivors from the starship construction center.

Repairs

The only damage on the surviving sathar ships are damaged assault rocket launchers on two of the fighters which are quickly repaired once they rejoin the assault carrier.

Damage to the UPF ships is only a little more extensive.  The battleship quickly repairs its damaged engines and the militia frigate is able to get its laser cannon back online immediately as well.  Over the next hour an a half it is able to get its hull back up to 75% integrity but then hits a snag that can only be repaired in a shipyard. 

The fighter with the lightly damaged engines also gets that under control immediately can begin decelerating with the rest of the fighter group.  It takes nearly an hour for the fighter with the completely knocked out engines to get some engine power back and many hours for it to slow down enough to dock with the carrier where it is completely repaired.  After an hour and half of work, the fighter with the damaged maneuvering jets restores some control and begins to head back to the carrier where it arrives a few hours later and is completely repaired.  The fighters with damages hull carefully make their way back to the carrier where they are fully repaired. 

Unfortunately, the damage to the station from the seeker missile are such that it would take tools and equipment from the shipyard to repair.  Those repairs will take some time to effect now that the shipyard has been destroyed.

Aftermath

The sathar lost more ships than they had planned on, losing 34.5% of their hull points that they came into the battle with, 2 fighters, a frigate, a light cruiser and 2 heavy cruisers (286 HP of ships).  That said, they accomplished their primary goal of destroying the starship construction center.

The UPF “only” lost 14 fighters (72% of the ships) and a militia assault scout (for a total of 135 HP) but the loss of the shipyard is going to be significant.  Additionally, it lost the ships that were in the shipyard including an assault scout that would have been completed the next day, two fighters, and a frigate and destroyer under construction.  There were also three civilian ships in the shipyard, a HS 11 ship undergoing maintenance, and HS 10 and HS 11 ships that were under construction and scheduled to be completed in 38 and 76 days respectively. 

The remaining six fighters are all assigned to Frontier Fighter Corps Squadron Delta.  The assault carrier is detached from TF Cassidine and with the militia frigate heads toward Dramune.  The frigate will enter the shipyard there while the carrier will head to Prenglar to pick up more fighters to round out FCC Squadron Delta and replenish its compliment with TF Cassidine.  Also, one of the minelayers at Prenglar will be heading to Fromeltar.

The shipyard situation is more serious.  Work will begin to build a new shipyard but it will be years before it is back at capacity.  Additionally, with the loss of the shipyard here at Terledrom and the one at Hentz (Araks), the UPF is going to start arming the shipyards, adding defenses, and increasing security.

Given that the UPF know the route to one of the active sathar shipyards in OFS019, the remnant of this battle group is headed there for defense while the sathar continue to rebuild their forces.

Lessons Learned

When I first conceived this scenario, I thought the sathar would come in hot, swing by the planet, take out the shipyard and then fly out of the system.  And that went just about perfectly as far as destruction of the shipyard went.  They did 594 HP of out the 600 HP the shipyard had and left it with a fire that took out the last 6 HP. And that was despite rolling poorly for the damage from the torpedoes.

However, as I was setting things up, I realized that with the limited ADF of the sathar since they were staying together as a group, the small fast UPF ships would be able to boost to the same speed and intercept the sathar.  So I set it up that way and the sathar took more damage than they expected.  The downside was that the UPF was just barely able to intercept the sathar on the first round which meant that they had to stay close and be subject to offensive fire from the sathar instead of making a run and turning out to be farther away.  They could have done that a little bit (2-4 hexes) but I didn’t have them do so as they are new pilots and I chalked it up to inexperience.

I was surprised at how close to exact the damage done to the shipyard was.  Since the shipyard as designed didn’t have weapons or defenses, the only non-hull hits possible were the fire and DCR.  Equipping the shipyards with weapons and defenses will help to increase their survivability since the damage will be spread around.  But not by much.

The sathar could have possibly wiped out the remaining UPF forces completely if they had stayed in the system but that would have been a long drawn out battle as it would have taken them a long time to slow back down. The shipyard was their target so they took it out and left.
August 15, 2022 Tom 5 Comments

Second Battle of Stenmar (Kazak) – FY61.293

This will be the last battle I report that occurs in the Rim. I had these two battles set up in the timeline already so I’ve been reporting them. And while I really should have handled the sathar and Rim interaction in this timeline, the truth is I have never really worked out what the Rim has in terms of ships and ship production capability. So that will have to be a project for a future date.

A second sathar force was engaged today in the space around Stenmar by the surviving Flight elements in the system. Lacking reinforcements from the core Rim systems, the Flight forces were severely outnumbered and succumbed quickly to the sathar onslaught with only a single fighter surviving to seek shelter in the outer system. Before being overwhelmed, Flight forces managed to destroy a sathar light cruiser and a new vessel never seen in the Rim before.

Limited reports from the battle indicate this new sathar vessel falls in size between an assault scout and a frigate and seems to sport dual laser batteries. Not much more is known due to the limited engagement and savagery of the sathar attack.

Kaarln Duggart – Stenmar News Syndicate

Background

Intended to reinforce the original fleet sent to the Kazak system, this battle fleet was already preparing to depart when the first battle occurred. Surprised by the initial resistance in the Kazak system, the sathar committed their four new Cutter-class vessels to the conflict as well to boost the firepower of the fleet.

Worried about sathar incursions into the core Rim worlds, no reinforcements for the Kazak system were readily available so the surviving elements of the Flight from the first battle were all that remained to face the new onslaught. Seriously outgunned, they hope to pull off another victory relying on the success they had in the first battle with their assault rocket attacks.

The sathar have other plans.

Order of Battle

The Flight

  • 10 Fighters
  • 2 Assault Scouts
  • 1 Frigate
  • 1 Fortified Station

Sathar

  • 4 Cutters
  • 1 Frigate
  • 3 Destroyers
  • 2 Light Cruisers

The Battle

Setup

The station is on the side of the planet directly opposite the sathar, orbiting counter clockwise. The Rim forces form up close to the planet with the frigate and a wing of 5 fighters above the planet and the assault scouts and remaining fighters below the planet. They are all moving at speed 20.

Having learned from the engagement at New Pale (Truane’s Star) four days earlier, the sathar forces come in fast, starting at speed 25. They form up directly opposite the Flight forces allowing them to bring their forward firing cannons to bear in the initial engagement, knowing that in later phases of the battle, this might not be possible due to the higher maneuverability of the Rim ships. The cutters form a flight to square off against the upper flight of fighters, a frigate and destroyer line up opposite the Rim’s frigate, the remaining two destroyers go after the assault scouts and the light cruisers plan to take on the lower group of fighters.

Initial setup for the conflict. Click for full size image.

Turn 1

The sathar all fly straight toward their intended targets. The cutters accelerate to speed 29 to come into point blank range with their laser batteries while all the other ships accelerate slightly to speed 26 to bring them within range for their rocket batteries.

Defensively the frigate and station fire at the sathar frigate hitting with a laser cannon and rocket battery from the frigate and a laser battery from the station. They manage to damage the frigate’s engines, knock out its masking screen launcher, and reduce its hull integrity by over half from a well placed hit with the rocket battery. The assault scouts fire at the lead destroyer and manage to inflict some minor hull damage with one of their laser batteries.

The sathar cutters open fire on the upper flight of fighters with their dual laser batteries, nearly destroying the lead fighter, damaging and reducing the maneuverability of her wingman, and destroying a third fighter. They missed the other two.

The sathar destroyer hit the Rim frigate with its laser weapons starting a fire and damaging the ship’s engines. The gunners on the sathar frigate must be veterans or well trained as they landed a hit on the Rim frigate with nearly every weapon fired, only missing with the laser battery. They knocked out the Rim vessel’s masking screen and damaged it’s hull with the laser cannon and rocket battery before it was obliterated by the torpedo.

The two fighters and remaining assault scout, all seriously damaged, just drift forward. The other fighters accelerate to 25 and loop around remaining out of range of the sathar energy weapons. They all fire at their closest target as they fly out.

Defensively the sathar continue to fire at the same targets expect that the frigate and two of the destroyers shift their fire to the station. The cutters finish off the two wounded fighters in the upper group and hit a third for serious hull damage an a navigation control hit. The fourth fighter remains unscathed. The light cruisers are not as effective with the first hitting one fighter for some minor hull damage, and another knocking out its engines. The other light cruiser misses with all weapons. While the destroyers both miss the station, the frigate hits with is laser and rocket battery doing some significant hull damage.

The assault scout hits the lead sathar destroyer with its assault rocket damaging its maneuvering. One of the cutters is hit with 2 assault rockets damaging its engines and nearly destroying it. The lead light cruiser is hit by all four assault rockets which rip through the hull destroying it.

Initial round of combat. Click for full size image.

Turn 2

The damaged sathar cutter and frigate drift away from the battle hoping to survive and get repairs done while the other ships finish off the Rim forces. All the other sathar ships loop around the planet to attack both the station and the surviving Flight vessels.

The surviving cutters loop around to go after the larger group of fighters below the planet. The two destroyers go after the group of fighters above the planet. The remaining light cruiser and third destroyer go after the Rim assault scout. The ships use their energy weapons on the smaller ships while firing their rocket batteries and torpedoes at the station.

Defensively the station fires at the cutter and frigate that are drifting away attempting to finish them off. The laser battery hits the cutter inducing a navigation control hit while the rocket battery hits the frigate knocking out some of its acceleration ability. The assault scout fires at the destroyer chasing it cause some significant hull damage with its laser battery.

The lead sathar destroyer in the upper flight only hits the lead Rim fighter with its laser battery inducing a loss of navigation control. The other destroyer is much more effective hitting with all three energy weapons destroying the other fighter.

The cutters eliminate two of the four fighters in the lower group, completely missed a third, and damaged the navigation control system on the the fourth. The third sathar destroyer hit the lone assault scout with its laser canon, destroying the smaller vessel.

The station fires all its ICMs at the incoming torpedoes. Despite this, 3 of the 5 torpedoes, and an equal number of rocket batteries slam into the station from different directions completely destroying it.

The lone Rim fighter above the planet, spinning out of control, manages to line up for a shot on the sathar destroyers, but the destroyers hit it with an electron battery that knocks out the assault rocket launcher before it can fire. The undamaged fighter in the lower group, hoping to eliminate the crippled ships to prevent their repair and subsequent use, races off after the damaged frigate and cutter, unfortunately, it is hit by two laser batteries from the cutters, destroying it before it can catch the crippled ships. The final fighter, its navigation control system damaged, spins to port and manages to get an oblique shot with it assault rocket launcher at one of the cutters, scoring serious hull damage on the ship (just over 60% of its total). Amazing, the fighter flies through the barrage of laser batteries unscathed.

Positions and courses at the end of the second round of combat. Click for full size image.

Turn 3

The damaged seriously damaged cutter with the navigation control damage pull a hard turn to port and breaks up from the strain of the maneuver. The sathar light cruiser and destroyer chase down the fighter that escaped the cutters and eliminate it with their energy weapons. The sathar allow the other fighter to escape.

Repairs

The damaged Rim fighter gets its navigation system repaired and, realizing it is no match for the combined sathar fleet, heads out to the outer system to find somewhere to take shelter.

Over the next hour and a half, the sathar repair what damage they can. All of the damage to internal systems are repaired but the three ships with hull damage (a cutter, the frigate, and a destroyer) all require time in a starship construction center to fully repair, the cutter and frigate are seriously damaged with less than half of the their hull integrity intact while the destroyer only has a small bit of damage.

Lessons Learned

The Rim leaders were forcibly reminded that while the fighters and assault scouts pack a serious offensive punch, they have little to no defensive capability and quickly succumbed to the overwhelming sathar fire without being able to return much of their own. With a lack of capital ships by Flight, the sathar effectively got two shots for every one that the Rim forces had.

The rapid advance of the sathar forces, here and at New Pale, have shown that the Rim and UPF fighters are quite vulnerable to a first strike by sathar forces that target them. They are going to have to stand off further from the beginning of the battle in future engagements so that the sathar cannot have that first strike advantage.

The sathar cutters seem to be effective against the small ships with their pairs of laser batteries and could proved to be quite useful in an anti-fighter role.

November 29, 2020 Tom 1 Comment

Battle of New Pale (Truane’s Star) – FY61.287

This battle actually occurred two days ago in the timeline. However, since I was still catching up on the battles from the opening day of the conflict, this posting got delayed. Going forward, the battles will be much less frequent and the battle reports will arrive on they day they occur.

After a nearly an hour of intense battle around New Pale, militia and UPF forces manage to drive off the invading sathar fleet destroying two sathar vessels and seriously damaging the other three.

Unfortunately, due to heavy losses and critical damage, the UPF and militia forces were unable to pursue the fleeing sathar ships which began accelerating out of the system for a jump back to Zebulon shortly after the battle ended.

While the sathar have been driven off, the losses around New Pale represent the most damage to militia forces yet seen in this conflict and the second highest loss of ships overall, coming in only after the massive battle at Prenglar two days ago.

Goolar Nadd, New Pale News

Background

The Truane’s Star militia is supported by the remaining elements of Patrol Group Virgo which just returned from being stationed in the Kazak system in the Rim days before the sathar fleets appeared. Bolstered by the Spacefleet forces, and having seen the success of the UPF forces in the other systems two days prior, confidence is high that they can defeat the sathar ships.

The sathar have learned from those other engagements as well. Knowing that there is a second fleet en route just 11 days behind them, this battle fleet has some very specific orders: Eliminate the fighters and assault scouts!

Order of Battle

Had Patrol Group Virgo not been in the system, and the militia not had the extra assault scout, this would have been the scenario I presented as “A Pale Prospect” in the Stand Your Ground article in issue 3 of the Frontier Explorer (p30) back in 2013. Before starting this timeline project, this is how I thought the first fight in Truane’s Star would play out.

However, the additional ships completely change the dynamics and with the sathar’s new tactics, this turned out to be the most interesting battle for me so far as it did not go at all as I expected. And the high speeds meant that the ships were flying everywhere on the map.

Truane’s Star Militia

  • 4 Assault Scouts
  • 1 Frigate

Note that this is one more assault scout than described in the order of battle for the game in the KH Campaign Book. They captured this assault scout from the Star Devil pirates early in the timeline so it is available in the fight.

UPF – PG Virgo

  • 8 Fighters
  • 2 Assault Scouts
  • 2 Light Cruisers
  • 1 Assault Carrier

Sathar

  • 1 Frigate
  • 2 Destroyers
  • 1 Light Cruiser
  • 1 Heavy Cruiser

The Battle

Setup

The UPF and militia forces, deploying tactics that have worked in the other systems, set up in a broad line with the smaller ships on the outside, the two LC near the station at speed 15, with the assault scouts split into a flight of 4 (below the planet) and 3 (above), both groups at speed 20, and a flight of 4 fighters on either wing at speed 25.  The assault carrier is on the far side of the planet orbiting at speed 10 with the militia frigate acting as escort.  The station is in on the far side of the planet from the approaching sathar and orbiting counter clockwise.

The sathar, however, are not using the tactics they have used in other systems. With their new directive, they come in fast, high above the planet at a speed of 25! Additionally, they are formed up in an inverted form of their standard diamond formation with the heavier ships leading and headed straight for the upper group of fighters.

Initial positions of the UPF and sathar forces. Click for full size image.

Turn 1

The sathar ships advance straight at the fighters and at the last moment turn toward the upper group of assault scouts. The heavy cruiser remains at speed 25, while the light cruiser and frigate accelerate by 1 and 2 respectively to join up with the larger ship. They fire all weapons expect their torpedoes at the flight of 4 fighters. The destroyers accelerate to speed 27 and 28 and join up directing all their fire at the flight of assault scouts.

Defensively only the upper light cruiser and flight of assault scouts are in range and they fire everything at the lead destroyer. Only the light cruiser connects with its laser battery doing some minor hull damage.

The sathar open with a devastating barrage at the smaller ships. The light cruiser’s disruptor cannon vaporizes the lead fighter, while the disruptor cannon from the heavy cruiser knocks out the assault rocket launcher on his wingman. The third fighter is hit by a pair of laser batteries and the sathar frigate’s laser cannon damaging its acceleration and navigation control system and nearly destroying it. The final fighter is hit by an electron battery and destroyed.

The destroyers do just as well. The lead militia assault scout is hit by a laser battery, electron battery, and laser canon destroying it. The second assault scout is hit by a laser battery and laser cannon and also destroyed. The last assault scout in the group is hit by an electron battery and rocket battery knocking out its assault rocket launcher and nearly destroying the ship.

The sathar have done well, eliminating four ships and knocking out the assault rocket launchers on two others and severely damaging the last. Caught off-guard by the speed of the sathar advance and initial devastation, the UPF and militia forces scramble to react.

The surviving assault scout, heavily damaged, just drifts away from the battle at speed 20. The fighter with the damaged navigation control system pulls a hard turn to starboard remaining at speed 25 and flies away from the battle. Luckily, it doesn’t break up from the maneuver. The other fighter, relatively undamaged but unable to fight due to the loss of its assault rocket launcher, loops away from the sathar ships back toward the assault carrier and slows to speed 20.

The assault carrier and frigate accelerate to speed 12 and turn away from the oncoming ships. All of the other UPF and militia ships loop around and head toward the group of sathar ships centered on the heavy cruiser, the ships coming from below the station accelerating to get in range.

Defensively, the sathar continue to focus on the smaller ships firing all their energy battery weapons at the incoming fighters and their cannons at the wounded assault scout as it drifts by. They fire their rocket batteries at the light cruiser that has come into range.

All five cannons hit the assault scout causing a fire and damage to its maneuvering and damage control system before destroying it. Three of the five rocket batteries slam into the UPF light cruiser disabling its ICM launcher, completely knocking out its maneuvering and doing significant hull damage. The lead fighter is hit by a laser battery reducing its acceleration ability while the shots at the second fighter completely miss. The third fighter is hit by a laser and electron battery and destroyed. The final fighter takes a hit from an electron battery which starts an electrical fire on-board.

The surviving fighters with operational assault rockets fire at the light cruiser, three of which hit doing significant hull damage and causing a power short circuit knocking out its screens and ICMS. The assault scouts and more distant light cruiser fire at the heavy cruiser. Only two of the assault rockets from the assault scouts hit but cause significant hull damage (65% of total). The light cruiser hits with its laser battery and disruptor canon knocking out the heavy cruiser’s distruptor canon and acceleration capability. The other light cruiser hits the sathar frigate with its laser, electron, and proton batteries knocking out most of its acceleration ability and causing a fire.

Positions and courses of the ships at the beginning of the battle. Click for full image.

Turn 2

Unable to accelerate, the sathar heavy cruiser drifts down toward the assault carrier. It fires at the militia assault scouts with its energy weapons and its rocket weapons at the damaged light cruiser. The sathar destroyers decelerate and make a run at the undamaged light cruiser. The sathar light cruiser and frigate loop around and fire all their energy weapons and rocket batteries at the fighters and UPF assault scouts while they fire their torpedoes at the damaged light cruiser. The fire on the UPF fighter burns through over half of the small ship’s hull.

Defensively, the two UPF light cruisers focus their fire on their sathar counterpart hitting with multiple weapons reducing its acceleration ability, inducing a navigation control failure, knocking out its ICMs, and doing more damage to its hull but not destroying it. The assault scouts fire at the sathar frigate and hit with 2 laser batteries causing some minor hull damage. The station fires at one of the destroyers as they pass but misses and the assault carrier and militia frigate take long range shots at the heavy cruiser but also miss.

The militia assault scouts are both hit by a laser battery which knocks out all the maneuvering capability on one and slight reduces the maneuvering on the other. The lead (damaged) UPF light cruiser is hit by a rocket battery and torpedo doing some minor hull damage and shorting out its screens and ICMs. The trailing UPF light cruiser is pummeled by the destroyers having its screens and ICMs disabled and losing over half of its hull integrity.

The three fighters are each hit with a battery weapon destroying one, reducing the damage control capability on the second, and damaging the navigation control system on the third. The two UPF assault scouts are hit by a rocket battery and distruptor cannon respectively that knock out just over half of the first’s hull integrity and damages the assault rocket launcher on the second.

The seriously damaged fighter (off the top of the map) continues to spin out of control but still manages to hold together. The fighter with the disabled assault rocket launcher continues to approach the assault carrier, and the other fighter with the navigation control spins hard to starboard and flies off the top of the map. The assault carrier accelerates to speed 14 and loops down under the path of the heavy cruiser. The militia frigate splits off from the assault carrier and turns to engage the heavy cruiser. The lead light cruiser, its maneuvering knocked out, decelerates to speed 12 and drifts straight, currently out of the fight but trying not to get too far away. The other light cruiser turns to follow the heavy cruiser and manages to hold together through the maneuvering. The militia assault scout with no maneuvering left, decelerates as much as possible to avoid passing the sathar light cruiser and coming in range of its disruptor cannon. Unfortunately, it is now only 10,000 km away. The fighters still in the fight fire at the frigate while the assault scouts fire at the light cruiser. The fire on the sathar frigate does some minor hull damage.

Defensively the frigate and light cruiser fire at the assault scouts and fighters, destroying one of the fighters and seriously damaging the hull of the non-maneuvering assault scout and causing a fire on the same ship. The heavy cruiser fires at the militia frigate and knocks out its masking screens and reduces its acceleration ability.

Offensively, the frigate is hit by one assault rocket knocking out its laser battery, the light cruiser is hit by an assault rocket and two laser batteries destroying it, and the heavy cruiser is hit by the militia frigate’s laser canon knocking out its ICMs.

Courses and final positions after 20 minutes of fighting. Click for full image.

Turn 3

The sathar frigate accelerates and makes a pass at the assault scouts. The destroyers loop around to fire at the UPF light cruiser, and the heavy cruiser turns to strafe the assault carrier and flies out of the battle. The fire on the UPF assault scout burns through the hull destroying it.

Defensively, the assault scouts fire at the frigate and hit with a laser battery knocking out its laser canon. The station scores a long distance hit on the lead sathar destroyer knocking out its ICM launcher. The assault carrier hits the heavy cruiser knocking out its maneuvering engines. All other defensive fire misses.

Offensively, the sathar frigate hits the lead assault scout with a rocket battery, destroying it but misses with the torpedo aimed at the other assault scout. The sathar destroyers hit the UPF light cruiser with nearly everything, including both rocket batteries and torpedoes, and destroy it. The heavy cruiser hits the assault carrier with all of its energy battery weapons but the torpedo is intercepted by ICMs launched by the carrier. The hits knock out its navigation control system and causing some minor hull damage.

The two UPF fighters off the map continue to spin out of control but the damaged one doesn’t break up. The assault scouts make another run at the sathar frigate. The militia frigate strafes the sathar destroyers focusing its fire on the lead one and then loops around the planet. The lone UPF fighter continues to follow the assault carrier. The light cruiser off the map slows to speed 9. The assault carrier’s damaged navigation control system pulls it to port and it fires at the lead sathar destroyer as it passes by. The fire on the sathar frigate does some minor hull damage.

Defensively, the sathar destroyers fire at the militia frigate and while the lead frigate misses, the other hits with its laser and electron batteries knocking out the frigates laser cannon and maneuvering engines The defensive fire at the assault scouts miss.

The assault scouts hit the sathar frigate with a laser battery and assault rocket damaging its hull and knocking out its masking screens. From all the shots at the lead sathar destroyer, it is hit by a proton, rocket, and laser battery doing some significant hull damage.

Positions and courses at the end of the first half hour of battle. Click for full image.

Repair Turn

Almost every ship in the fight has some damage at this point. The only one that isn’t is one of the sathar destroyers.

On the UPF side, the fighter trailing the assault carrier, as well as the second UPF assault scout, repair their assault rocket launchers. The fighter that’s been spinning out of control from the beginning of the fight manages to repair its navigation control system as does the assault carrier. The carrier also repairs some of its hull. The militia frigate restores some of its maneuverability as does the light cruiser off the map. Unfortunately, the light cruiser’s hull repair runs into significant problems and its hull can only be repaired in a shipyard.

The sathar frigate puts out the fire while the other two ships repair some of their hull damage.

Turn 4

The sathar heavy cruiser, unable to maneuver and not wanting to risk acceleration and breaking up with its weakened hull, continues to drift away from the fight (its already off the map). The frigate, out of rocket weapons and with its energy weapons knocked out, is unable to fight and turns to follow the heavy cruiser, accelerating as much as possible with its damaged engines. The destroyers loop around the planet and strafe the assault scouts each firing all their energy weapons (their rockets and torpedoes are depleted) at a different assault scout.

Defensively, all ships fire at the lead sathar destroyer. The assault carrier and station hit knocking out its navigation control system and electron battery and causing some minor hull damage.

The lead sathar destroyer hits the surviving militia assault scout with it’s laser canon nearly destroying it. The other destroyer hits the UPF assault scout knocking out half of its hull integrity with it’s laser battery and damaging its combat control system with its electron battery.

The seriously wounded UPF ships continue to drift away from the battle or spin out of control while those that can, converge on the sathar destroyers again firing at the lead destroyer. The light cruiser (off the map) accelerates and starts to turn back toward the battle now that it has some maneuvering capability restored. With its limited maneuverability the militia frigate turns and takes long distance shots at the destroyers.

Defensively the destroyers fire their laser cannons at the militia frigate (which miss) and their energy batteries at the fighter and assault scout. Th trailing destroyer hits the assault scout with its electron battery slightly damaging its hull.

The UPF fighter and assault scout both hit the lead destroyer with their assault rockets. The fighter, frustrated at being out of the battle from the start, scores a massive hit knocking out nearly half of the destroyer’s hull integrity. The other assault rocket damages the destroyer’s combat control system. The gunner on the militia frigate lands an amazing long distance shot with the laser battery scoring a maximum damage hit and destroying the sathar vessel.

Positions and paths at the end of the fourth round of combat. There aren’t too many ships left and many have left the battle. Click for full sized image.

Turn 5

Knowing that it can out run the assault carrier, the destroyer fires its laser battery at the fighter and electron battery at the assault scout attempting to take them out of the fight and accelerates at maximum thrust to fly off after the heavy cruiser and frigate.

The assault scout and assault carrier return fire hitting with all of their batteries damaging the destroyer’s engines slightly and weakening its hull. The sathar’s electron battery connects with the UPF assault scout and destroys it. The laser battery misses the fighter.

With all of their ships damaged (expect the fighter) and many seriously out of position, the UPF commander calls off the pursuit of the sathar ships. The surviving UPF and militia vessels begin repairs and return the station.

Final ship positions and path as the sathar retreat. Click for full sized image.

Repairs

Over the course of the next thee hours, the UPF repair what they can and the assault carrier collects its scattered fighters. In the end most of the ships are fully repaired but the UPF light cruiser has hull damage that will require time in the shipyard.

The sathar form up and manage to repair most of their systems but all three ship have hull damage that will require time in a starship construction center to fully fix. While the damage to the destroyer is relatively minor (only 24% of its hull), the damage to the frigate and heavy cruiser is much more significant, 43% and 61%. Since they lost the fight here, they cannot use the local shipyard and must return to SCC#5 for repairs. They start accelerating out of the system being careful of the heavy cruiser’s hull.

Lessons Learned

When they want to, the sathar can do significant damage to the smaller UPF ships. Their tactics worked out quite well. In fact, much better than I expected. I really thought the UPF would win this one and eliminate all the sathar ships but would take significant damage. I never expected that the sathar would get away with three of their ships, although heavily damaged. The time to get those ships back into the fight will be much shorter than having to build new ones.

While the UPF and militia “won” and drove off the sathar, this was really a victory for the sathar in many ways as well. In the end, if you factor in the damage that requires a shipyard to fix, the sathar lost 198 hull points in this fight while the UPF and militia lost 228. If you just look at ships destroyed, then the sathar lost 2 ships for a total of 120 hull points while the UPF lost 12 ships, most of them fighters and assault scouts, totaling 200 hull points. Either way the sathar came out ahead. And they achieved their goal of taking out most of the assault rocket capability of the UPF forces in this system in advance of the next sathar attack in 11 days. While it doesn’t make up for the beatings they took in some of the other systems, it is definitely a boost to their morale.

There really isn’t much the UPF could have done differently other than be placed a little closer together for mutual support. The small fighters and assault scouts had no defense against the initial onslaught and paid the price. The only real defense there would have been to be further back from the station but then the sathar may have made a run at the station instead. This battle will definitely shift the tactics of both sides, at least somewhat. We’ll have to see what develops.

November 25, 2020 Tom 1 Comment

Battle of Gran Quivera (Prenglar) – FY61.285

This is a big one and the last of the opening battles of the war. There is one more battle post coming tomorrow for a battle on FY61.287 that would have been posted yesterday but I’m still getting caught up. There are a few more fights coming soon but it will be a while before the next ones after that. Settle in, this is going to be a long write-up.

A major battle occurred today in the space around Gran Quivera between UPF forces and a massive sathar fleet that was more than twice the size of the fleets reported in the other systems.

Task Force Prenglar, aided by the timely arrival of Strike Force Nova returning from the Cassidine system, met the sathar forces as they approached the planet. After nearly an hour of fighting, and suffering major casualties, Spacefleet forces defeated the sathar invaders.

Frustrated by the inability to immediately get the more seriously damaged ships into the PGC shipyards for repairs, Spacefleet has sent a delegation to the Council of Worlds demanding activation of the Wartime Construction Control clause of the UPF charter that would grant them full control of all starship construction centers in the Frontier.

Kami Hemsley, Frontier News Network

Background

The sathar launched their biggest fleet of the opening offensive at Gran Quivera, hoping to strike at the heart of the Frontier and sever the various segments of the Frontier joined by this core system. With a fleet double the size of the ones appearing in the outer systems, and supported by a pair of assault carriers each carrying seven fighters, the sathar fleet outgunned Task Force Prenglar by a decent margin. Their only major concern were the two minelayers that were part of the Task Force. They fully expected to win this fight. And they may well have.

Unfortunately for the sathar, Strike Force Nova was already en route to the Prenglar system after an extended patrol of the Frontier and arrived in the system just hours after the sathar fleet was detected. With two of the Frontier’s major fleets to deal with, the tables turned and the sathar were now facing a superior foe. When news of the arrival of Strike Force Nova in the system reached the sathar commanders, they no longer expected to win, but they were committed to doing as much damage as possible.

Order of Battle

This is easily the largest battle I’ve ever played. And to make it even more complex I ran it all with the Advanced Combat rules. I’ve found that using the Basic Combat rules just makes the fights boring with the only option being hull damage. This one is going to be a doozie.

Task Force Prenglar

  • 5 Assault Scouts
  • 3 Frigates
  • 2 Destroyers
  • 2 Minelayers
  • 3 Light Cruisers
  • 1 Battleship
  • 1 Fortified Station

Strike Force Nova

  • 6 Fighters
  • 3 Assault Scouts
  • 2 Frigates
  • 1 Destroyer
  • 2 Light Cruisers
  • 1 Assault Carrier
  • 1 Battleship

Sathar

  • 14 Fighters
  • 2 Frigates
  • 4 Destroyers
  • 2 Light Cruisers
  • 2 Heavy Cruisers
  • 2 Assault Carriers

The Battle

Setup

Everyone knows that it’s a literal minefield between the sathar and the planet, the question for both sides is how the sathar are going to attempt to navigate it.

The UPF set up in a battle line with the center anchored by the battleships and light cruisers, with the destroyers, frigates, and assault scouts out from there on either side of the planet.  SF Nova’s fighters are on the far wing above the planet.  The line is positioned slightly behind the planet to allow the sathar to commit before the UPF move into the fray.  The larger capital ships are moving at speed 10, the smaller capital ships at speed 15, and the fighters and assault scouts are moving at speed 20.  The assault carrier, escorted by a light cruiser, along with the minelayers, are far behind the line above the planet and moving at speed 10.  They plan to orbit out there and hopefully stay out of the fighting.  In advance of the fight, the UPF have deployed all 40 mines from the two minelayers as well as all 16 seeker missiles (4 from each minelayer and battleship).

The sathar set up their capital ships in two of their “diamond” formations with some modifications.  The HC is joined by an AC and there are two fighters with each of the frigates.  In addition, there are two flights of 5 fighters on the far wings.  The capital ships are all moving at a cautious speed of 5 while all the fighters are moving at speed 30.  The sathar suspect that the fighters on the wings will fly around the mines while the ones with the capitals ships are intended to be used as sacrificial probes to clear a path to the planet and beyond.  The sathar intend to punch through and fight on the far side of the planet where they believe the mine threat to be smaller.

The initial positions of all the ships. Click for full size image.
And here is the starting positions with the mine field (red circles) and seeker missiles (grey counters) shown. Click for full size image.

Turn 1

The two sathar diamond formations advance maintaining their initial speed with the destroyers on the wings flying in to close the formation with the heavy cruiser and assault carriers.  The two flights of fighters on the wings accelerate to speed 35 and make a run at the assault scout squadrons on each wing.  The other four fighter fly ahead of the diamond formations and as they approach the planet, split up with one from each pair looping around the planet and making a pass at the station (accelerating to 35) while the other two remain at speed 30 and turn at the last minute to line up on the destroyers.

Unfortunately for the fighters in the middle, but per the sathar plans, each pair trips 3 different sets of mines that the UPF had laid out.  Unsurprisingly, all four fighters are obliterated. However, they have done their job and cleared a path through the minefield for the capital ships.

Defensively, the assault scouts all fire their laser batteries at the fighters. The more distant UPF frigates and destroyers also target the fighters in an attempt to destroy them before they can fire their assault rockets.  The assault scouts manage to destroy the lead fighter in the upper flight while another has its navigation controls damaged and one has its maneuvering engines knocked out.  The frigates and destroyers score some long-distance hits nearly destroying another fighter and causing an electrical fire on the one with its maneuvering knocked out (in the lower flight).

On the upper flight all four surviving fighters hit with their assault rockets seriously damaging two assault scouts and destroying a third.  The fourth assault rocket knocks out the assault rocket launcher on the last assault scout.  On the lower flight, only 3 assault rockets hit, two on the lead assault scout knocking out its LB and nearly destroying it.  The other assault rocket slams into the trailing assault scout and it is destroyed.

With the sathar’s cautious movement placing their ships right in the middle of some of the seeker missile deployments, the UPF active two seeker missiles on either side of the sathar formations.  Both missiles in each group home in on the light cruiser in each formation.  The UPF also activate 2 seeker missiles in the more distant groups that they expect will intercept the formations on the next turn.  The sathar light cruisers fire ICMs at the incoming seeker missile in an attempt to nullify the threat.  Both missiles aimed at the upper light cruiser miss.  One headed for the lower light cruiser is destroyed by the ICMs while the fourth missile slams home dropping the hull integrity of that ship to less than half.

The UPF ships on the battle line advance maintaining their speed with all of the ships preparing to engage on the next turn while the assault scouts get some maximum range shots with their laser batteries on this turn.  The minelayers, assault carrier and light cruiser advance and turn in their orbit and fire at the fighters, attempting to take them out.

The fire on the sathar fighter damages its combat control system.

Defensively the sathar ships fire all their energy weapons at long range at the lead assault scout in each flight.  The upper assault scout is hit by a laser battery from the frigate and proton battery from the assault carrier destroying it.  None of the shots at the lower flight of assault scouts hit but the particle weapons from the light cruiser and assault carrier come close. 

Offensively, only one of the assault scouts in the lower flight connects with the sathar’s frigate damaging its acceleration. One of the minelayers’ laser batteries connects with one of the damaged fighters destroying it, while the UPF’s assault carrier takes out a second fighter with its laser battery and the light cruiser takes out the navigation control system on a third.

Paths and positions for the first round of combat. Triggered mines are marked with a new counter I made for the fight. Paths of seeker missiles are shown in green. Click for full size image.

Turn 2

The sathar capital ship formations accelerate to speed 7 and each focuses all their fire at the closest UPF destroyer while preparing to defend against the incoming seeker missiles.  The upper flight of fighters, two out of three of which have navigation control hits, spin a bit out of control but manage to line up briefly to fire their assault rockets at the assault carrier.  The lower flight of fighters split up with the main group of 4 going after the assault scouts and the other one (with a fire and no maneuvering ability) just flies straight and out of the battle.  All the fighters slow to speed 30.

Defensively, the minelayer and assault carrier group, as well as the lower flight of assault scouts, fire at the fighters attacking them while all other ships focus on the closest sathar frigate.

In the upper flight of sathar fighters, the UPF manage to destroy two of the fighters before they get their shots off. The third puts an assault rocket into the assault carrier damaging its acceleration.

The assault scouts in the lower flight all miss as they fire on the incoming fighters. The fighters on the other hand do a bit better hitting two of the assault scouts with assault rockets and destroying both of them.

The UPF capital ships fare no better than the assault scouts with only a single destroyer hitting the frigate in the lower formation with a laser battery doing some minor hull damage.

The sathar only manage to do a bit better. With all the weapons being brought to bare, the upper UPF destroyer is hit by 3 laser batteries and an electron battery slightly damaging its hull and knocking out all of its weapons except its rocket battery. The lower UPF destroyer doesn’t get off so easy as, despite firing ICMs at it, the torpedo from the sathar frigate hits nearly destroying it. It is also hit by an electron battery from the assault carrier that does a bit more hull damage.

The seeker missiles all home in on the closest heavy cruiser. The cruisers fire 3 ICMs at each incoming seeker missile. Against the upper formation, one of the seeker missiles miss while the other connects damaging the cruiser’s acceleration. On the lower heavy cruiser, one of the missiles is intercepted by the ICMs while the other impacts the cruiser and takes out nearly half of its hull integrity.

With its hull nearly destroyed, one of the UPF assault scouts in the upper flight drifts off the map and out of the fight taking a long distances shot at the sathar frigate as if flies away. Similarly, the seriously damaged destroyer just drifts by the sathar formation firing everything at the frigate as it passes by.

The UPF fighters accelerate to 25 and make an assault rocket pass at the sathar heavy cruiser in the upper formation before darting out of range and preparing for another run. The 2 surviving assault scouts in both the upper and lower flights make a similar run (remaining at speed 20) but fire at the assault carriers in each sathar formation.

The surviving frigates and destroyers loop around behind the sathar ships and focus their fire on the assault carriers as well.  Defensively, the sathar ships fire ICMs at the incoming torpedoes.

The UPF battleships & light cruisers all slow to speed 8 and turn in to focus fire on the sathar light cruisers. The light cruiser, assault carrier, and minelayers continue their speed 10 orbit away from the battle.

The fire on the sathar fighter knocks out half of its damage control system.

Defensively, the sathar fire at a number of ships instead of really focusing on a few. In the upper group, the destroyers, assault carrier, and heavy cruiser spread their energy weapon fire across all the fighters, attempting to take them out before they can bring their assault rockets to bear. The destroyers in the upper group only hit with a single laser battery and electron battery seriously damaging the hull on one fighter and knocking out the assault rocket launcher on another. The heavy cruiser hits a third fighter with its laser battery but only scratches the hull slightly. The assault carrier does a little better and it laser battery destroys one of the UPF fighters. With the fighters and battleship out of range, the heavy cruiser and assault carrier fire their rocket batteries at the lead UPF light cruiser. Both hit taking out nearly half of the light cruiser’s hull. The frigate and light cruiser in this upper group focus their fire on the UPF battleship. While the frigate completely misses, the light cruiser hits with a laser, electron, and proton battery each doing damage to the battleship’s hull.

In the lower group, the sathar frigate fires at the damaged UPF destroyer as it flies by and hits with its rocket battery destroying it. The lower destroyers fire at the lead UPF light cruiser and one hits with a rocket battery causing some significant hull damage. The light cruiser fires at the battleship hitting with its laser and proton batteries knocking out the battleship’s maneuvering engines and damaging its navigation control system. The heavy cruiser and assault carrier split their fire with the energy weapons targeting one of the UPF frigates and the rocket batteries going after the lead light cruiser in the bottom flight. The rocket batteries both hit knocking out most of the ship’s acceleration and seriously damaging its hull dropping the hull integrity to less than half. The UPF frigate is hit by two laser batteries and a proton battery causing some hull damage, completely knocking out its acceleration, and damaging its maneuverability.

The four surviving UPF fighters all hit the sathar heavy cruiser in the upper formation with their assault rockets, destroying it.

The assault carrier in the upper group is hit by a laser canon, electron battery, and two torpedoes that slip through the ICM screen knocking out the carrier’s masking screen and ICM launcher, causing a power short circuit in its defenses, and taking out a third of its hull integrity.

The assault carrier in the lower group is hit by a laser cannon, two torpedoes, and an assault rocket. One of the torpedoes damages the carrier’s combat control system before it is destroyed by the other weapons.

The sathar light cruiser in the upper group is pummeled by the weapons from the two UPF light cruisers and the battleship being hit by a distruptor cannon, 2 laser, 3 electron, 2 proton, and 2 rocket batteries as well as a torpedo that slipped through the ICM screen. It suffers damage to its hull and a number of systems before finally being destroyed by an electron battery hit from the battleship.

The light cruiser in the lower group doesn’t fare any better. While it is only hit by 2 laser, 1 electron, 1 proton, and 2 rocket batteries, being already damaged by a seeker missile hit it is destroyed as the last rocket battery from the battleship impacts the hull.

Ships and positions after the second round of combat. Click for full sized image.

Turn 3

We’ve started to whittle down the number of ships on both sides at this point (either through destroying them or damaging them enough that they are out of the fight) so each turn will go a bit faster. But on the flip side, damage to acceleration and maneuvering means that the ship squadrons are going to be breaking up so maneuvering will become more complex and chaotic. There is still a lot to be done.

The sathar capital ships all accelerate to speed 9 and fire at the closest light cruisers, splitting shots between the each pair. The surviving fighter group decelerates to 25 and loops around to make a pass at the station.  Unfortunately for them, they pass through another mined hex. Finally, the single surviving fighter that flew off the top of the map comes screaming back in at speed 32 and fires its assault rocket at one of the minelayers.

Defensively, the UPF battleships fire at the assault carrier or heavy cruiser in the sathar formation they are targeting. The light cruisers each pick a sathar destroyer and focus their fire on that ship. The frigates and destroyers spread their fire around the same ships. The minelayer and assault carrier group fires at the lone fighter. The mines are not very effective only damaging the assault rocket launcher on a single fighter; the other four make it through the minefield unscathed. The station fires on the incoming fighters.

The surviving sathar assault carrier is savaged by shots from the battleship and a pair of UPF frigates knocking out over half of its hull integrity, a laser battery, its maneuvering engines, and its navigation controls system. The lead destroyer in the upper group has over half of its hull integrity knocked out by the lead light cruiser while the trailing light cruiser and a UPF destroyer hit the trailing destroyer in this group damaging its maneuvering and damage control systems, disabling its ICM launcher, and nearly ripping the hull to shreds.

In the lower group of sathar ships, the UPF battleship and frigate completely miss the heavy cruiser. The lead sathar destroyer is hit by one of the UPF light cruisers knocking out its ICM launcher and damaging its combat control system. The other destroyer is hit by the other UPF light cruiser and a frigate for some serious hull damage. The station misses the incoming fighters but one of the minelayers hits the lone fighter destroying it before it can fire its assault rocket.

Having survived the barrage of defensive fire, the sathar open fire on the light cruisers and station. The station is hit by 2 assault rockets which damage its combat control system and score a significant hull hit. The lead UPF light cruiser in the upper group, already damaged, is hit by two laser batteries and a torpedo from the sathar frigate which destroy it. The second light cruiser in that group are hit by multiple weapons from the sathar assault carrier and one of the destroyers including a rocket battery and torpedo suffering only a minute bit of hull damage but significant damage to its acceleration and maneuvering and damage to its combat control system.

In the lower group the lead UPF light cruiser, again already heavily damaged, is hit by a laser battery and torpedo from the sathar frigate knocking its proton battery before the cruiser is destroyed by the torpedo. The second light cruiser takes a beating from the other sathar destroyer and the heavy cruiser being hit by 2 laser, 1 proton, 1 electron, and 2 rocket batteries as well as a torpedo. Knocking out over half of the light cruiser’s hull integrity, the shots also knock out its distruptor cannon and ICM launcher as well as damage its maneuvering capabilities.

The two surviving assault scouts, only one of which has a working assault rocket launcher, join up and make a pass at the sathar heavy cruiser. The UPF fighters make an assault rocket run on the sathar destroyers in the lower group where they are joined by the lower flight of UPF frigates. One of these frigates, whose acceleration is damaged, turns off to follow the assault scouts while the other two slow down to speed 9. The frigate and destroyer group slow to speed 10 and the frigates fire at the assault carrier while the destroyers each target a different sathar destroyer. Screening the smaller ships behind it, the upper battleship slows to speed 9 and pulls to within 10,000 km of the sathar vessels firing on the assault carrier. The damaged light cruiser in the upper group, with reduced maneuvering and a navigation control hit, turn to port and maintains its speed taking a long-distance shot at the assault carrier. The seriously damaged light cruiser in the lower group just drifts away from the battle followed by the battleship that has had its maneuvering systems knocked out. They fire long-range shots at the sathar heavy cruiser. The minelayer and assault scout group accelerates to speed 11 and turn away from the oncoming sathar vessels. They, together with the station, fire at the group of sathar fighters. The fire on the sathar fighter that has now drifted off the map damages its navigation control system.

Defensively, the sathar ships in the upper group fire everything at the battleship knocking out one of its laser batteries and causing some significant hull damage (a quarter of its total hull integrity). In the lower group the heavy cruiser and frigate fire at the incoming fighters while the destroyers target the assault scouts. One of the fighters has its assault rocket launcher disabled, taking it out of the fight, one is hit by a electron battery for some minor hull damaged and a third is hit by a laser battery, destroying the small ship. The lead assault scout it hit by an electron battery starting an electrical fire on board and the other is hit by an electron battery serious damaging it’s hull (dropping it below half integrity).

Despite the long-distance shots, one of the sathar fighters his hit by a laser battery damaging its combat control system and the UPF assault carrier scores an electron battery hit on another, destroying it. The surviving sathar heavy cruiser is only hit by the single assault rocket and an electron and proton battery knocking out its maneuvering and doing some minor hull damage. The lead sathar destroyer in the lower group gets off fairly easy as well being hit by a laser cannon and battery which damage in maneuverability and disable its laser battery. The other destroyer takes a bit more damage being hit by two assault rockets and two laser cannons dropping its hull integrity by more than half and damaging its acceleration and combat control systems.

The ships in the upper group are not so lucky. While the lead destroyer survives, it suffers a significant hull hit, has its electron battery disabled, and suffers a navigation control hit. The other destroyer is hit by every weapon fired by the trailing UPF destroyer completely obliterating the ship. The assault carrier doesn’t fare any better being hit by 10 different weapons from the battleship and two frigates and is completely destroyed.

Positions and course after a half hour of battle. Click for full size image.

Repair Turn

On the UPF side, the station manages to repair its reduced damage control repair system bringing it fully back on-line. The assault scout with the fire manages to extinguish it before it can do any damage. The other two assault scouts (one of which is off the map) both repair some of their hull damage as does the heavy damaged light cruiser and one of the battleships. The other battleship repairs its navigation controls system and restores some of its maneuvering ability. The upper light cruiser also repairs it’s navigation control system. The two damaged fighters both manage to restore their assault rocket launchers bringing them back into the fight. One of the UPF frigates restores some of its acceleration while one of the destroyers repairs its laser cannon. The assault carrier attempts to repair its damage acceleration but something goes seriously wrong and it seems that it is going to require a shipyard to fix properly.

For the sathar, the lone fighter way off the map gets its fire under control and the frigate in the upper group repairs its laser canon. The other ships all attempt to repair some of their hull damage (and most succeed although the destroyer with the navigation control damage does not).

Turn 4

The two sathar frigates and the less damaged sathar destroyer from the lower group all accelerate and turn to make an attack pass at the station. The destroyer in the upper group with the navigation control system damage makes a hard turn to port. Unfortunately, its severely damaged hull cannot stand the strain and the ship breaks apart. The sathar heavy cruiser and final surviving destroyer just drift forward firing at the assault scouts. The fighters fly out to attempt a run on the UPF minelayers.

Defensively, the UPF focus on just a two of the ships headed toward the station and the fighters. The first target is the sathar frigate from the upper group. All of the ships above the planet fire at that ship, which is really their only target. While the UPF frigates miss completely, the battleship and destroyers land a series of blows. However, despite hitting with 8 different weapons including a rocket battery and two laser canons, the frigate survives the blast suffering a near 75% hull integrity loss, a defensive power short circuit, and damage to its repair ability and maneuverability.

The UPF ships below the planet, together with the station, fire at the destroyer approaching the station from that direction. It is hit by 3 laser batteries and a laser cannon knocking out nearly half of its hull integrity and maneuverability.

Finally, the minelayer and assault carrier group fire at the incoming fighters reducing the acceleration and maneuverability of one, damaging the hull and knocking out the maneuverability of a second and destroying a third.

The surviving sathar fighters fire at one of the minelayers damaging its combat control system and inflicting some hull damage. The wounded and drifting destroyer and heavy cruiser fire at the assault scouts damaging the repair systems on both of them. While the frigate coming in from above misses the station completely, the ships coming up from below do much better hitting with both laser canons, a laser and rocket battery, and slipping a torpedo through the ICM screen. The station suffers a power short circuit in its defenses with the other weapons ripping into its hull including a massive explosion by the torpedo. All told, the station loses over half of its hull integrity.

The minelayers and assault carriers continue to accelerate away from the fight while the undamaged light cruiser loops back to engage the oncoming sathar ships. In an attempt to finish the fight, the UPF ships all spread out to target different sathar vessels. The assault scouts slingshot around the planet and make a run at the heavy cruiser which is also targeted by the UPF fighters. One of the UPF frigates and the destroyers chase down the frigate from the upper flight. Two of the UPF frigates go after the destroyer that made a run at the station, the battleship goes after the other sathar frigate, and the other two frigates go after the wounded destroyer with the heavy cruiser. The seriously damaged UPF light cruiser continues to drift away from the battle while the other turns to go after the surviving sathar fighters. The other UPF battleship, some navigation control restored, accelerates and turns back toward the planet as it slowly rejoins the fight.

The sathar all fire at the ships attacking them. The UPF battleship suffers some minor hull damage from a laser battery hit, one of the UPF frigates attacking the upper destroyer has its navigation control system damaged, and three of the UPF fighters are hit for a slight damage to maneuvering on one, a navigation hit on a second and the assault rocket launcher knocked out on a third. The most serious damage was one of the frigates near the sathar heavy cruiser being hit with a rocket battery that destroyed half of its hull integrity.

The sathar frigate from the original upper flight of ships, barely holding together as it is, is hit by two laser cannons and a laser battery, destroying it. The other frigate, despite being hit by 1 laser, 1 proton, and 2 electron batteries, as well as a distruptor cannon from the battleship, manages to pull through with only minor hull damage but also having its laser cannon knocked off-line, it acceleration reduced, and its maneuvering completely knocked out. The sathar destroyer that just attacked the station is hit with 2 laser canons, a laser battery, and two rocket batteries destroying it. The other destroyer is hit by a laser cannon, laser battery, and 2 rocket batteries. It too is destroyed. The heavy cruiser is hit by 3 of the 4 assault rockets that were fired at it and breaks apart as the explosions rips through the hull. The light cruiser manages to get a long distance hit on one of the sathar fighters igniting an electrical fire.

Positions and courses after the fourth round of combat. Note that the map has been shifted slightly to keep the minelayers and assault carrier on the map. The battleship and light cruiser at the bottom have moved off the map although the battleship is slowly maneuvering to come back to the fight (I’m tracking it on a separate map). Click for full size image.

Turn 5

The sathar fighter with the fire also has no maneuvering capability (or assault rockets left) and just drifts by the UPF light cruiser passing with 10,000 km of the larger ship which hits it with a laser and electron battery destroying it.

The other sathar fighter, also out of assault rockets, accelerates to sped 27 and attempts to ram one of the UPF assault scouts. It is intercepted by multiple hits from several ships that vaporize it.

The sathar frigate, having no maneuverability, accelerates to speed 15 to try to clear away from the UPF ships. However, between the battleship, the undamaged light cruiser and the frigates that were nearby, it is hit by 10 different weapons and destroyed.

The only surviving sathar vessel at this point is the lone fighter that was damaged on the first round of combat and has been drifting away for the past 40 minutes with no maneuverability. The two surviving assault scouts chase it down over the next couple of hours and eliminate it.

Ship positions at the end of the battle when the last sathar ship was destroyed. The map is shifted again to keep the sathar frigate attempting to flee on the map. Click for full size version.

Whew! That was quite a battle. And this is probably the longest post yet on the site clocking in a just around 5750 words.

Repairs

With most of the UPF ships damaged to some extent or another, it is six hours before all the battle damage that can be repaired has been. By then the lone sathar fighter has been destroyed and all of the ships return to take up orbit around the planet.

In the end, four vessels have damage that requires shipyard work to repair. On is the fortified station, having been reduced to less than 40% of it’s hull capacity, it is only back to 57% capacity before problems arise that require outside assistance. The assault scout severely damaged early, that drifted out of the battle, is only able to restore 80% of its hull and one of the frigates has a small hole in the hull that just refuses a patch.

The other ship is the assault carrier assigned to Strike Force Nova which suffered permanent damage to it acceleration. If it and its four surviving fighters remain with the Strike Force, they will not be able to execute any high speed risk jumps until that is repaired.

Lessons Learned

While the sathar played it well using the fighters to clear paths through the minefield, and did a good job targeting the assault scouts early to reduce the assault rocket threat, they were a bit too timid trying to traverse the minefield and came into the battle with not enough speed to clear it quickly. This severely hampered their combat options and it turned into a shooting gallery for the UPF ships which were free to maneuver. Had Strike Force Nova not been in the system, their tactics might have been sufficient and though they would have suffered some loses traversing the minefield, more ships would have made it across to really engage with the UPF. Next time they are in a system with minelayers, they might try something different.

One thing I completely forgot were the seeker missiles on the sathar heavy cruisers. After the fact I realized that I could probably have deployed them on round 2 or 3 and activated them to keep the UPF ships circling around in the mined area on their toes and possibly affected their maneuvering. If nothing else, they may very well have impacted the station and possibly have destroyed it. You would think that with the UPF seeker missiles flying around I would have remembered the sathar ones but it completely slipped my mind until I was doing this write-up.

The ability to maneuver in the minefield, as well as the superior numbers allowing them to focus their fire on more ships, really served the UPF well as they were able to whittle down the sathar ships and use their weapons to full effect. While they suffered some serious losses in numbers of small ships and the loss of the two light cruisers and destroyer, yhey gave much better than they took and definitely came out ahead.

The only real problem is that now most of the UPF force is in the center of the Frontier at Prenglar, while the sathar forces are on the periphery. It’s going to take some time to get ships where they are needed but at the same time, knowing that the sathar could strike at Prenglar again at any time, they have to keep forces here to defend this core world.

November 24, 2020 Tom Leave a comment

Battle of Kawdl-Kit (K’tsa-Kar) – FY61.285

Due to the amazing skill of the Clarion and Ken’zah-Kit militias and UPF Spacefleet crews, the sathar invaders were quickly overwhelmed but not before they managed to destroy the armed station orbiting the planet.

Rescue operations are ongoing for the station’s crew and the hearts of the people of Kawdl-Kit go out in sympathy to the families of those who lost their lives and gratitude to the militias of the neighboring systems who came to their defense.

The CMS Osprey is the only ship that experienced lasting damage and will be returning home to effect repairs due to the lack of a starship construction center here in the K’aken-Kar system.

Vah’zen’rk – Kawdk-Kit Global Reporting

Background

While K’tsa-Kar doesn’t have any militia of its own, the K’aken-Kar assault scouts, under the ZKKDA, risk jump into the system to help defend it.  From the other direction, the available ships of Patrol Group Meteor, along with the Clarion Royal Marines, arrive from White light.  Both groups make a high speed risk jump to get there in time. The UPF have many more ships than the sathar but only a slight hull point advantage (and that’s only if you count the armed station) as most of the ships are small assault scouts.  This might be a tough battle.

While the sathar were only expecting to fight the armed station, they are confident that they can handle the swarm of small ships.

Order of Battle

K’aken-Kar Militia

  • 2 assault scouts
  • 1 armed station

White Light Militia

  • 4 assault scouts
  • 1 frigate

This is +1 assault scout compared to the Order of Battle in the Knight Hawks Campaign book due to events occurring in the timeline.

UPF – PG Meteor

  • 3 assault scouts
  • 2 destroyers

Sathar

  • 1 frigate
  • 2 destroyers
  • 1 light cruiser
  • 1 heavy cruiser

The Battle

Setup

The militia ships deploy above the planet with the Clarion frigate and a single assault scout taking the inner position, the other Clarion assault scouts (lead by the CMS Osprey) out from there and the two K’aken-Kar assault scouts on the wing.  Below the planet the two UPF destroyers form a flight with the three assault scouts on the wing.  The assault scout groups are moving at speed 30 while the capital ships (and the single assault scout) are moving at 20.  The station is orbiting counter clockwise.

As they have done in the other systems, the sathar are formed into their diamond pattern with the frigate, LC, & HC in the middle and the destroyers on the sides.  However, unlike in the other systems, the sathar are moving at a speed of 15.

Initial positions at the start of the battle. Click for full sized image.

Turn 1

The sathar frigate, light cruiser, and heavy cruiser accelerate to speed 17 and at the last minute, turn to head toward the K’aken-Kar assault scouts.  The destroyers accelerate to 18 and 16 respectively to remain in the diamond formation.  Unknown to the UPF forces, the sathar heavy cruiser deploys its seeker missiles along its route.  The sathar ships all fire at maximum range at the station.

The station returns fire defensively with its laser battery but given the extreme range misses. The sathar, on the other hand, have a good maximum range shot with both the light cruiser and closer destroyer connecting with their cannons and a laser battery each. The station has its laser battery knocked out and nearly half of its hull integrity destroyed.

With the sathar turning toward the militia ships, the UPF vessels loop around and hit the heavy cruiser from behind which fires ICMs at the incoming torpedoes.  The Clarion militia ships maneuver to stay out of the forward firing arc of the sathar vessels and unleash everything at the sathar destroyer closest to the station, which fires ICMs at the torpedoe from the frigate as well.  The Kaken-Kar militia ships pass in front of the sathar ships but out of range of their canons and loop around to hit the destroyer on the far side of the formation.  With its laser battery damaged, the station deploys a masking screen.

Defensively, the sathar light cruiser, frigate, and destroyer further from the planet fire at the K’aken-Kar assault scouts hoping to take them out of the fight before they can engage. The destroyer closer to the planet fires at the Osprey, and the heavy cruiser fires at the lead UPF assault scout. The lead K’aken-Kar assault scout is hit by two laser batteries damaging its hull while its sister ship is hit by an electron battery knocking its laser battery off-line. The CMS Osprey is hit by an electron battery damaging its hull and the lead UPF assault scout is hit by another electron battery causing serious hull damage and reducing the hull integrity to less than half.

The training of the the UPF and militia forces is evident as they press home their attack. All three assault rockets connect with the heavy cruiser along with two laser batteries and two electron batteries knocking out various weapons and other systems and doing some hull damage. But the gunnery award goes to the torpedo gunner on the second destroyer. They threaded their missile through the ICM screen and impacted it right above what must have been the heavy cruiser’s torpedo magazine. The resulting explosion ripped the ship apart. The destroyer targeted by the White Light militia was hit by three of the four assault rockets and four of the five laser batteries knocking out it laser cannon and masking screens before ripping the ship to shreds. The K’aken-Kar militia, not to be shown up, hit the other destroyer with both assault rockets, each scoring critical hits and between the two of them destroying the sathar vessel.

Positions and maneuvers for the first 10 minutes of battle. Click for full sized image.

Turn 2

The two remaining sathar ships loop around and bring everything to bear on the station, the light cruiser accelerating to speed 18.  The station fires a screen of ICMs at the incoming torpedoes.  The sathar also activate the seeker missiles laid down by the heavy cruiser which both go after the UPF destroyers.

Defensively, the UPF ships focus their fire at the sathar frigate. Most of the fire is ineffective with only one of the UPF destroyer connecting with a laser battery damaging the frigates engines and the CMS Flitter scoring an amazing maximum-range laser battery shot that takes out a quarter of the frigate’s hull integrity.

The sathar ships manage to hit the station with a disruptor cannon and laser battery from the light cruiser and the frigate hits with its missile weapons. The hits sabotage the station’s damage control systems and reduce its hull integrity to almost nothing. Between the two UPF destroyers, they fire a massive swarm of ICMs at the incoming sathar seeker missile and manage to catch it before it can impact one of the ships.

All of the UPF and militia ships loop around and converge on the sathar vessels firing everything they have at them with the assault scouts focusing on the light cruiser while the capital ships focus on the frigate.

As the station pulls away, the sathar ships fire at it once more and while the frigate misses completely, the light cruiser hits with every weapon except its laser battery, destroying the station which begins to break apart.

Angered by the loss of the station, the assault scouts, while only hitting with one of their laser batteries, connect with eight of the nine assault rockets fired doing enough damage to destroy the light cruiser two times over. The sathar frigate is hit by two laser canons and a laser battery causing an electrical fire and damaging its hull. Then one of the torpedoes slips through the defensive screen of ICMs slamming into the ship and destroying it.

After twenty short minutes, the battle is over.

Positions and maneuvering at the end of the battle. Click for full sized image.

Repairs

Over the next hour and a half, most of the ships are able to repair their damage. However, part of the hull damage to the CMS Osprey is beyond a battlefield repair and will need to be handled in a ship yard. With the system secured, the Osprey begins acceleration and calculations for a jump back to Clarion.

Lessons Learned

This didn’t go anything like I expected. Defensive fire by the sathar on the first round was not all that great. When I rolled the attacks and damage results, I thought the lead K’aken-Kar assault scout was going to be destroyed as both laser batteries did hull damage and one of them was a double damage roll. But when I rolled the damage, I rolled a 2 for the double damage die and a 1 for the regular damage so instead of suffering the 15+ HP of damage I was expecting and being destroyed, it only suffered 5.

Then there was the UPF fire that turn which was the exact opposite. At first I thought the heavy cruiser was going to get off easy since none of the assault rockets did hull damage and only one electron battery did (although that was for 10 HP, the maximum). I thought it was going to get off with a bunch of ancillary and weapon damage but then I rolled a hit with the torpedo, rolled double damage, and then rolled 35 on 4d10 for a total of 70 HP from that single hit. That combined with the 10 it had suffered from the electron battery was enough to destroy it.

The other ships did just as well with two double damage laser battery hits on the first destroyer (one of which did 20, the maximum possible) and both assault rockets by the K’aken-Kar militia at the other destroyer doing double damage and just enough (52/50 HP) to destroy it. With 3 of the 5 sathar ships destroyed on the first turn, the UPF victory was assured. The only question was if the station would survive as the sathar were gunning for it.

I was amazed at how well I rolled for the UPF attacks and damage. Had they not rolled so well, this fight might have gone very differently. I think the UPF would still have won, but they would have suffered significantly more losses.

November 23, 2020 Tom Leave a comment

Battle of Zik-kit (Kizk’-Kar) – FY61.285

Facing overwhelming odds, the local militia assault scouts are annihilated after inflicting serious but non-fatal damage on one of the sathar vessels. The sathar then proceeded to destroy the armed station orbiting the planet as they approached and settled into orbit themselves.

Strangely, they have made no move against the planetary surface as they did against Pale 62 years ago. Rather, they remain in a high orbit around the planet. The population of Zik-kit wait in fear of what may come.

T’katt’ska – Zit-kit Wire News

Background

The rules of engagement for militia ships is that they have to make at least one attack against the sathar when defending their home system before they can retreat, after which they just become part of Spacefleet if the stations in their system are destroyed.

With the K’aken-Kar militia head off to help in the K’tsa-Kar system, and the Fromeltar milita tied up with sathar forces in their own system, the two assault scouts are left to face the on-coming sathar attack by themselves.

With no chance against the overwhelming odds, the plan was to get an assault rocket shot off at the sathar ships and slip away to the K’aken-Kar system where they hoped to meet up with other ships as reinforcements.

Order of Battle

This setup is the one presented as the Hopelessly Outgunned scenario in the “Make a Run For It” article found in issue 1 of the Frontier Explorer (p37). As I mentioned in the Battle of Terledrom post, I’ve had this opening planned for a while.

Militia Forces

  • 2 Assault Scouts
  • 1 Armed station

Sathar

  • 1 Frigate
  • 2 Destroyers
  • 1 Light Cruisers
  • 1 Heavy Cruiser

The Battle

Setup

The militia assault scouts are high above the planet moving at speed 30 and planing on swooping in on the sathar from above. The station is orbiting counterclockwise (I always roll randomly to see which hex the station happens to be in to start).

The sathar appear in their diamond formation with the frigate, light cruiser, & heavy cruiser in the center and a destroyer on each wing. They are moving at speed 10.

Ship positions at the start of the conflict. Click for larger image.

Turn 1

The sathar advance, decelerating to speed 8 as they approach the planet. The assault scouts accelerate to speed 32 and sweep in to make a maximum range assault rocket attack on the upper destroyer.

Defensively the sathar focus all of their fire on the lead assault scout hitting it with a laser battery (from the heavy cruiser), and two electron batteries (one from each cruiser) doing a total of 16 HP of damage destroying the assault scout before it has a chance to fire.

The surviving assault scout hits with its assault rocket taking out nearly half of the destroyer’s hull integrity.

Positions and paths after the first 10 minutes of combat. Click for full sized image.

Turn 2

The sathar frigate and damaged destroyer turn off from the main group and pursue the remaining assault scout, which now regrets not using its full acceleration previously as it is in range of torpedoes and rocket batteries from both ships.  The other three ships continue toward the station and decelerate to speed 7. Unfortunately, the assault scout misses its defensive laser battery attack on the destroyer.

The sathar frigate and destroyer fire their energy weapons and rocket batteries at the assault scout but elect not to fire torpedoes. Unfortunately for the militia ship, the sathar gunners are well trained and the small ship is hit by both laser canons, a laser battery, an electron battery, and a rocket battery. Together the weapons start an electrical fire, take out the ship’s combat controls system, and do enough hull damage to destroy three assault scouts. The small ship is nothing more than a small debris cloud.

The station is at the extreme range of the light cruiser’s particle weapons but they all miss.

Positions after the second round of combat and destruction of the militia ships. Click for full sized image.

Turn 3

With the militia ship destroyed, the frigate matches speed with the destroyer (11) the two ships loop around to return to the main group.  The rest of the sathar vessels decelerate to 5 as they approach the planet.  With the station shielded by the body of the planet, no shots are fired.

As the station emerges from behind the limb of the planet, the closer sathar vessels fire their energy weapons at it hitting with a laser canon, laser battery, electron battery, and proton battery and reducing the station’s hull integrity by nearly half. The station returns fire with its laser battery but misses.

Positions after the first half hour of combat. Click for full image

Repair Turn

The sathar destroyer and the station both manage to repair a bit of their hull.

Turn 4

The sathar ships closest to the planet decelerate to speed 3 as they approach.  The other two ships decelerate to speed 8 and turn toward the station and planet.

With the sathar vessels just out of rocket battery range, the station fires its laser battery at the approaching destroyer but misses.

All of the sathar ships fire their energy weapons at the station and the light cruiser and destroyer fire torpedoes.  The station fires 2 interceptor missiles at each torpedo.  Unfortunately, both torpedoes hit as well as several of the energy weapons. The weapons damage several of the station’s system but more importantly, overcome the station’s hull integrity and it breaks apart as the sathar ships settle into orbit around the planet.

Sathar positions at the end of the battle. Click for full image.

Repairs

The only damaged ship is the sathar destroyer and it works to fully repair its hull damage over the next hour.

Lessons Learned

Two assault scouts are no match for a massed group of capital ships. Against a single, isolated opponent they are probably fine but not up against a large group as they were here. To survive and escape to fight another day, they should have just taken a maximum range shot with the laser batteries and flown away. They had the speed and acceleration advantage over the sathar ships and would have made it, possibly unscathe but also probably not inflicting any damage on the sathar. However, they wanted a shot at the destroyer (and with 2 AR and 2 LB had a reasonable chance to take it out or at least do significant damage) and got a little too close.

Plus, the dice for the sathar were hot for this fight and the Frontier forces couldn’t hit the broadside of a barn with their energy weapons.  The elimination of the assault scout before it could fire was pure luck of the dice that every weapon did hull damage.  I wouldn’t have expected the two electron batteries to both do hull damage but they did and it was just enough to take out the small ship. 

This one goes to the sathar.

November 22, 2020 Tom Leave a comment

Battle of Terledrom (Fromeltar) – FY61.285

There are four battles occurring on this day in the timeline and I debated which one to post first. I settled on this one as it was interesting for how quickly it was over. The other three, plus the battle that occurs on day FY61.287, will be showing up one a day for the next four days.

The Fromeltar militia, supported by the the Inner Reach and Outer Reach militias from Dramune that arrived yesterday after a high-speed risk jump, engaged sathar forces today around Terledrom.

In an intense battle lasting only twenty minutes, the militia forces overwhelmed the sathar forces, which consisted of five capital ships. Militia forces sustained damage and causalities resulting in the lost of the Inner Reach militia destroyer and severe damage to both frigates of the Outer Reach militia.

A memorial service will be held tomorrow for the crew of the lost ship. Our hearts go out to their families and we thank them for their dedication to defending the Frontier.

The damaged frigates have been given top priority to move into the local shipyard for repairs as soon as space opens which is expected to occur tomorrow.

The surviving militia crews remain vigilant as we await the arrival of Task Force Cassidine some time tomorrow evening.

Kat’kst’kll, Terledrom News Service

Background

The Fromeltar system has one of the larger militias with a frigate and 3 assault scouts on the roster. When news of the sathar ships went out across the Frontier, both the Inner Reach and Outer Reach militias in the adjacent Dramune system decided that it was in their interest to help Fromeltar and both militias risk jumped to the system arriving a day in advance of the sathar forces. They hope to stop the worms here and prevent them from ever entering the Dramune system.

Similarly, Task Force Cassidine was dispatched by Spacefleet and ordered to make a high speed risk jump to the Fromeltar system. Unfortunately, coming from two systems away, they are still a day away from Terledrom when the militia forces engage the sathar. They will be able to clean up the remnants of the sathar fleet if the militias can’t hold the line, but won’t be any help in this battle. This fight will be completely between the UPF militias and the sathar.

All of the battles are going to be run using the Advanced Combat Rules from the Tactical Operations manual and the combat table that represents the “average” skills. It would be interesting to run this using the specific skills provided by the Second Sathar War rules for the different groups (or even individual skills per ship), but I decided that would be just one more complication that I didn’t want to have to track.

Order of Battle

This setup is nearly identical to the Banding Together Knight Hawks encounter that I published back in Jan 2013 in issue 3 of the Frontier Explorer (p30). The only difference is that in that scenario, there was an additional UPF destroyer. This opening gambit by the sathar and the UPF response is something I’ve been thinking about playing out for a while now and that article and some of the others I’ll reference were specifically based on this opening of the Second Sathar War. As you’ll see, the UPF ship isn’t needed.

Militia Forces

With the arrival of the Dramune militias, the UPF have a definite hull point and ship number advantage although most of their ships are small.

Terledrom (Fromeltar)

  • 3 Assault Scouts
  • 1 Frigate
  • 1 Armed station

Inner Reach (Dramune)

  • 3 Assault Scouts
  • 1 Frigate
  • 1 Destroyer

Outer Reach (Dramune)

  • 2 Assault Scouts
  • 2 Frigates

Sathar

  • 1 Frigate
  • 2 Destroyers
  • 1 Light Cruiser
  • 1 Heavy Cruiser

This is a standard mix that the sathar are employing to start off the battle. You’ll see it in several of the upcoming battles. While it should have been enough to deal with any of militias they encountered, they didn’t figure on high risk jumps to support neighboring systems.

The Battle

Setup

With the recent animosity between the two Dramune worlds, the ships from those respective militias line up on opposite sides of the planet with the Terledrom militia arrayed between them.  The Outer Reach militia and Terledrom assault scouts are “above” the planet with the other ships “below”.  The assault scouts have an initial speed of 30 while the capital ships start at speed 20.  The station is at position 4 and orbiting counter clockwise.

The sathar start at speed 10 and are arranged in a diamond formation with the center consisting of a frigate in the lead, followed by the light and heavy cruisers with the destroyers above and below the main line. They are headed straight toward the planet.

Starting positions for the battle. Click for full sized version.

Turn 1

The sathar vessels accelerate and veer down to engage with the ships that are “below” the planet. However, due to the extreme range, no shots are fired.

The UPF sweep in closing in from both sides. The Outer Reach militia focuses on the two destroyers with the assault scouts making an assault rocket pass and then flying out of range of the sathar’s energy weapons while the frigates fly into torpedo range and keep their laser canons trained on the sathar vessels.

The Inner Reach militia converges on the sathar light cruiser, with the destroyer and frigate coming in from the aft port quarter and the assault scouts making a pass on the forward port quarter and then flying out of range to prepare for another pass.

The Terledrom assault scouts loop around and come in from behind to make a pass at the sathar heavy cruiser and then fly off. Trying to avoid a direct shot by the sathar frigate and light cruiser, the Terledrom frigate accelerates, rolls to port, and lines up for a shot on the sathar destroyers, electing to shoot at the same ones as the Inner Reach assault scouts.

Defensive fire by the sathar is practically ineffective with the only damage being the light cruiser’s electron battery which disables the ICM launcher on the Inner Reach destroyer.

The militia are much more effective.

The heavy cruiser is hit by 3 assault rockets damaging its combat control system and reducing its hull integrity by over half. One of the destroyers is hit by an assault rocket severely damaging it and reducing its hull integrity by nearly half. The other destroyer gets away nearly unscathed as both of the torpedoes fired at it are neutralized by its interceptor missiles (ICMs), only being scratched by a laser battery for minimal hull damage. The sathar light cruiser is hit by a torpedo, 2 assault rockets, and a laser battery taking out nearly half of its hull integrity and its ICM and torpedo launchers.

Ship positions and paths at the end of turn 1. Click for full sized image.

Turn 2

The sathar heavy cruiser turns to go after the Inner Reach frigate. The light cruiser and frigate turn to go after the Outer Reach frigates focusing all their fire on the leading one. The sathar destroyers swing around to go after the Inner Reach destroyer.

The defensive fire by the Inner Reach frigate and destroyer focuses on the sathar heavy cruiser and is devastating – hitting it with both laser batteries, both laser cannons, and a rocket battery knocking out the cruiser’s distruptor cannon before completely destroying the massive ship. The Outer Reach frigates are not quite as effective. Firing their laser canons at the lead sathar destroyer they only knock out its laser battery, The other weapons are fired at the frigate as it approaches and only do some minor hull damage even though they hit with two rocket batteries.

The sathar destroyers are quite effective hitting the Inner Reach destroyer with a laser cannon and two torpedoes which don’t have to worry about a screen of ICMs as the militia’s ICM launcher was damaged. The torpedos completely destroying the militia destroyer. Similarly, the sathar frigate and light cruiser focus their fire on the the lead Outer Reach frigate hitting it with a laser and distruptor cannon and a rocket battery knocking out all of its defensive systems and 75% of it’s hull integrity.

The Terledrom assault scouts loop around to fire at the lightly damaged destroyer. The Inner Reach assault scouts make a run on the sathar light cruiser. The Outer Reach frigates fire at the damaged sathar destroyer and the frigate with the heavily damaged one just drifting away from the battle as it fires. The Inner Reach frigate splits its fire using its laser cannon on the light cruiser and the other weapons at the damaged destroyer. The Terledrom frigate also loops around to fire at the light cruiser. The Outer Reach assault scouts loop around to fire at the frigate.

The sathar’s defensive fire is again mostly ineffective. The undamaged Outer Reach frigate is hit by several energy weapons from the frigate and light cruiser damaging its engines (both accelerating and maneuvering) and doing some significant hull damage (about 40% of the hull). The sathar destroyers fire at the Inner Reach frigate knocking out its ICM and torpedo launchers.

The return fire from the militia obliterates the last four sathar vessels. The frigate is hit by a rocket battery, two assault rockets, and two laser batteries knocking out its laser battery and doing enough hull damage to destroy a heavy cruiser. The damaged sathar destroyer is hit by a laser canon igniting an electrical fire and then a torpedo makes it through the ICM screen and hits a weapon magazine causing a massive explosion that destroys the ship. The undamaged destroyer is slammed by three different assault rockets that rip it to shreds (and a laser battery that knocks out some of its acceleration). Finally the light cruiser is hit by a laser battery starting a fire and then slammed by 3 assault rockets that rip its hull to pieces.

The savagery of the assault rocket damage surprised even the militia crews and the battle was over in less than 20 minutes.

Ship positions and paths at the end of the battle. The map has shifted to keep the drifting Outer Reach destroyer on the map for visualization. Click for full sized image.

Repairs

The damaged ships immediately begin working on battle repairs but the hull damage to the second Outer Reach frigate is beyond space repairs and needs to be completed in a shipyard. Similarly for the damage to that ship’s thrust. The other Outer Reach frigate is able to repair enough hull damage to prevent it from breaking up as it begins to maneuver and decelerate to return to the planet but it too will need time in the repair yards. The other ships are able to repair their minor damage over the next 2.5 hours.

Lessons Learned

I’ll admit, I expected this fight to go a bit longer and cause more damage to the militia. Between really good rolls for the militia and lousy rolls for the sathar, this fight was amazingly short.

Both sides leaned just how effective the assault rockets could be, especially if you roll well. The sathar seem to focus their ICMs on deflecting torpedoes but not the assault rockets which can do significant damage. Unfortunately for the other sathar fleets, this lesson was learned a little too late as all the sathar ships were obliterated in a single round and there was no time to transmit that information out. It wouldn’t have affected the other battles occurring today, but may have been useful for future encounters.

The sathar also learned (again) that they should probably focus on the smaller vessels to reduce that assault rocket threat. That information was transmitted from the Battle of Stenmar but the commanders of this battle fleet seems to have ignored it, focusing on the larger vessels first.

The militia were extremely lucky in this fight. It could have gone much worse. I rolled really bad for most of the sathar defensive fire which could have eliminated some militia ships before they could fire and the dice were extremely hot for the militia with double damage being generated for 6 assault rockets, 1 laser canon, 1 laser battery, and 1 torpedo. Even some of the regular damage rolls were really high (a torpedo hitting for 26 HP, laser batteries hitting for 9 & 10 HP, a RB hitting for 16 HP, and assault rockets hitting for 19 and 21 HP). Plus they took out the heavy cruiser before it even had a chance to deploy its more effective weapons. It only got one round of defensive fire and missed with everything.

On to the next battle being reported tomorrow.

November 21, 2020 Tom 1 Comment
Become a Patron!

Recent Posts

  • Detailed Frontier Timeline – FY62.069 to FY62.99
  • State of the Frontier – August 2022
  • Battle of Hargut (Gruna Garu) – FY62.098
  • Archived Arcane Game Lore Posts – May 2013 to Dec 2014
  • A Look at Yachts and Privateers
  • Homeworld Bound – A Campaign Concept
  • Second Battle of Fromeltar (Terledrom) – FY62.083
  • Sample Star System Data
  • Detailed Frontier Timeline – FY62.038 to FY62.068
  • State of the Frontier – July 2022

Categories

  • 3D Models
  • Adventures
  • Background
  • Creatures/Races
  • Deck Plans
  • Equipment
  • Game Design
  • General
  • Locations
  • Maps
  • NPCs
  • Optional Rules
  • Patreon-only
  • Project Overviews
  • Reviews
  • Setting Material
  • Starships
  • System Brief
  • Vehicles
  • Writing

Recent Comments

  • Loguar on Detailed Frontier Timeline – FY62.069 to FY62.99
  • Loguar on Detailed Frontier Timeline – FY62.069 to FY62.99
  • Tom on Detailed Frontier Timeline – FY62.069 to FY62.99
  • Rook on Maps and Counters
  • Loguar on Detailed Frontier Timeline – FY62.069 to FY62.99
  • Tom on Detailed Frontier Timeline – FY62.069 to FY62.99
  • Tom on Second Battle of Fromeltar (Terledrom) – FY62.083
  • Loguar on Detailed Frontier Timeline – FY62.069 to FY62.99
  • Loguar on Second Battle of Fromeltar (Terledrom) – FY62.083
  • Aemon Aylward on Sample Star System Data

Archives

  • September 2022 (1)
  • August 2022 (9)
  • July 2022 (3)
  • June 2022 (3)
  • May 2022 (3)
  • June 2021 (1)
  • April 2021 (1)
  • February 2021 (4)
  • January 2021 (6)
  • December 2020 (5)
  • November 2020 (11)
  • October 2020 (4)
  • September 2020 (5)
  • August 2020 (4)
  • July 2020 (6)
  • June 2020 (5)
  • May 2020 (8)
  • April 2020 (5)
  • March 2020 (5)
  • February 2020 (5)
  • January 2020 (5)
  • December 2019 (7)
  • November 2019 (4)
  • October 2019 (6)
  • September 2019 (5)
  • August 2019 (6)
  • July 2019 (7)
  • June 2019 (5)
  • May 2019 (6)
  • April 2019 (7)
  • March 2019 (4)
  • February 2019 (5)
  • January 2019 (7)
  • December 2018 (5)
  • November 2018 (10)
  • October 2018 (4)
  • September 2018 (4)
  • August 2018 (5)
  • July 2018 (4)
  • June 2018 (4)
  • May 2018 (12)
  • December 2015 (1)
  • November 2015 (2)
  • December 2014 (4)
  • November 2014 (3)
  • June 2014 (1)
  • January 2014 (1)
  • July 2013 (1)
  • June 2013 (2)
  • May 2013 (3)

Meta

  • Log in
  • Entries feed
  • Comments feed
  • WordPress.org
Powered by WordPress | theme Layout Builder