I originally had a different post, the write-up of my players’ venture into the GODCo bio-lab, scheduled for today, but decided to bump it to next week in favor of getting this one up and getting some feedback.
Some Background
The Detailed Frontier Timeline project has reached the point where the events of the Second Sathar War game presented in the Knight Hawks Campaign Book play out in the timeline with the sathar’s main assault on the Frontier. The whole timeline project was originally conceived as a way for me to track, in a “realistic” manner the movement and construction of ships for that event (i.e. using the ship construction rules and rules for void jumping.).
As such, the initial round of events will look very similar to the opening of that game. But after that, things will start to diverge from the way the game plays in a number of ways.
First, I’ll be using the Void Jumping rules for travel times instead of the times portrayed on the Frontier Deployment Map this is part of that game.
Second, the Order of Battle for both sides is slightly different from what was presented in the rules. Although not by much. The timeline events have tweaked things so that the White Light and Truane’s Star militias have an extra assault scout or two, the UPF unattached ships are a slightly different mix, and the sathar have the cutter class ship. I tried to set up the ship construction so the sathar had the ships listed in the game and I came pretty close. They ended up with a few more fighters and an extra destroyer.
Third, reinforcements for both sides will come from the various starship construction centers around the Frontier and in sathar space rather than the arbitrary rules presented as part of the printed game. The sathar have a fully functioning ship construction pipeline that will continue to churn out ships, although they did just lose the starship construction center in the Liberty system. The UPF have a few ships already under construction (2 battleships, 1 light cruiser, an assault carrier and 6 fighters) but otherwise are going to need to get a production pipeline going.
Finally, I’ll be factoring in my take on various political situations across the Frontier as well as involvement of civilian and megacorp ships that may get involved in the conflict. This will also affect the ship construction to some effect.
The Second Sathar War game rules as printed are actually a good balance for a game to be played out over a short period of time but probably don’t represent how things would play out in “real” life in the Frontier. For one thing, a more realistic ship construction system will probably make it a much more drawn out affair, which is what I wanted to explore with the timeline project.
As the battles occur across the Frontier, it was always my intention to play them out with the tactical battle rules to see which side won and have the sides react accordingly. The results of those battles and the basic reactions will be the entries you see in the timeline.
Last week, I posted the question to the Star Frontiers Facebook group if they would like to see more detailed summaries of the battles more than just who won, what ships were lost, etc. There was definite interest and so this series of posts was formed. The format may evolve as I do more of these but here I’ll be posting write-ups of the battles, probably in a couple of different formats, but at the very least with turn by turn synopses (and maps) to show how it went.
Except for this one, which is coming out nearly a month early, the plan is for each of these posts to come out on the same day as I post that day’s timeline update to Twitter. Although when I have several battles the same day, I might just post one a day to spread them out. It is my intention that these are going to be “off schedule posts” that probably won’t count as one of my regular weekly posts (expect for this one and maybe the 4! for the battles that will come starting the Saturday before Thanksgiving in the U.S.). After the first few battles that open the conflict, they are going to start to spread out as ships begin to repair and maneuver.
Posting on the day the battle occurs, this battle wouldn’t show up until November 17th, but I’m posting it early to get feedback on the format and what people would like to see in the posts going forward. Please share your thoughts in the comments. You can consider this a “sneak peek” into some of the timeline events.
In addition to just being a “play report” of how the battles went for me, each one will include the order of battle for the various sides that you can set up and play at your own table. They won’t always be balanced encounters, but it would be interesting to see how you and your groups handle the various tactical challenges.
Anyway, we’ll see how it goes. On to the first battle.
Battle of Stenmar – FY61.281
While I had not planned on figuring in fighting in the Rim as part of this project, and haven’t really been tracking (or even really thought about) Rim ships and the organization of the Flight, part of the Timeline has dealt with events in the Rim and the Kazak system as it pertains to the discovery of the sathar construction center in OFS019 and the trip to Kazak by Strike Force Nova. As such, I had a list of Rim ships that were in the Kazak system. Plus, it’s a natural entry point into the Rim and is traversed by the sathar to get to Zebulon on my star maps. So it makes sense that the sathar would send ships to control this system. And since I already knew what ships were there, I designed some sathar fleets to attack this system. This is the write-up of the attack on Kazak that opened the conflict for the sathar. Plus using this as the first trial write-up doesn’t spoil the events of the conflict in the Frontier.
The ships for this scenario are not part of the order of battle for the Second Sathar War game presented in the Campaign Book but are extra to that. So what happens here doesn’t exactly impact the playing out of that larger scenario. Maybe at some point I’ll go back and work out the details of the fighting in the Rim.
This battle occurs on FY61.281 in the timeline, the day after sathar ships are detected entering the Frontier systems.
Order of Battle
Here are the ships on each side. I did not really plan this (I built the sathar fleet before I went back and looked to see what Rim ships I had placed in Kazak) but it turned out the sides were fairly even.
Rim Forces
- 10 Fighters
- 3 Assault Scouts (AS)
- 2 Frigates (FF)
- 2 Destroyers (DD)
- 1 Light Cruiser (LC)
- 1 Fortified Station
All told there were 18 ships plus the station with a total of 515 hull points. Definitely weighted to the smaller ships.
Sathar Forces
- 8 Fighters
- 2 Frigates
- 4 Destroyers
- 1 Light Cruiser
- 1 Heavy Cruiser (HC)
- 1 Assault Carrier (AC)
The sathar had 17 ships with a total of 569 hull points and more capital ships.
The Fight
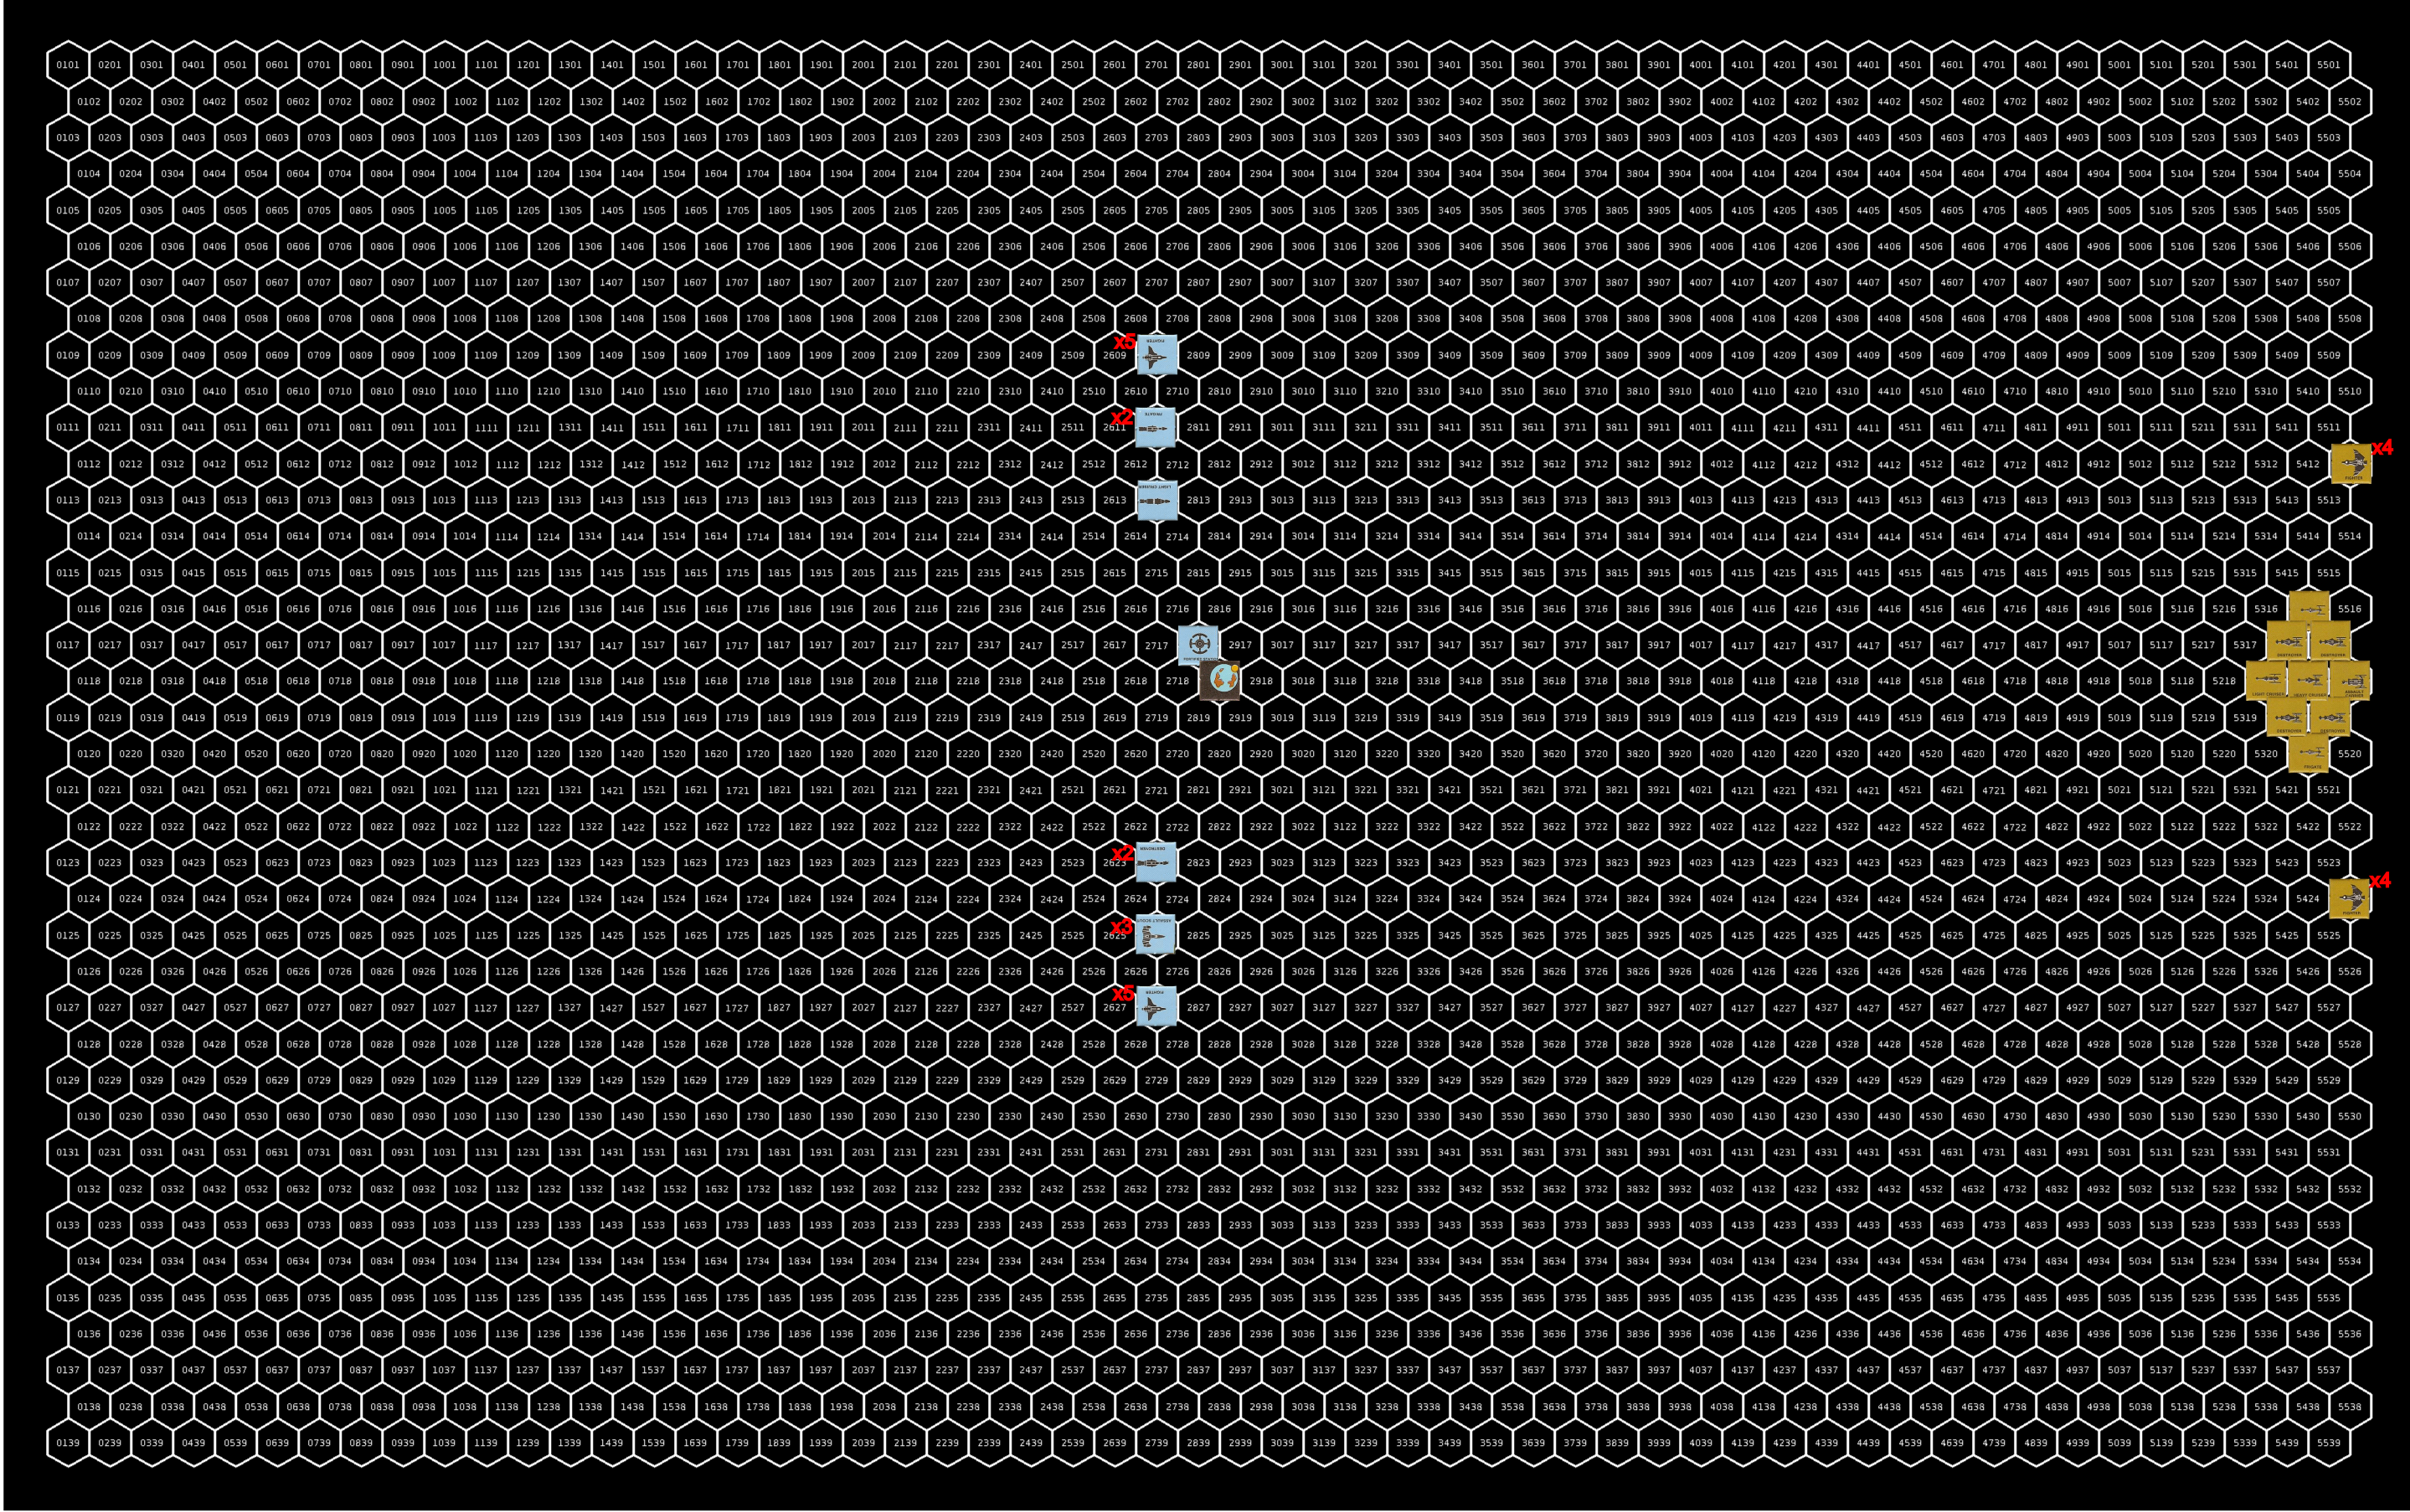
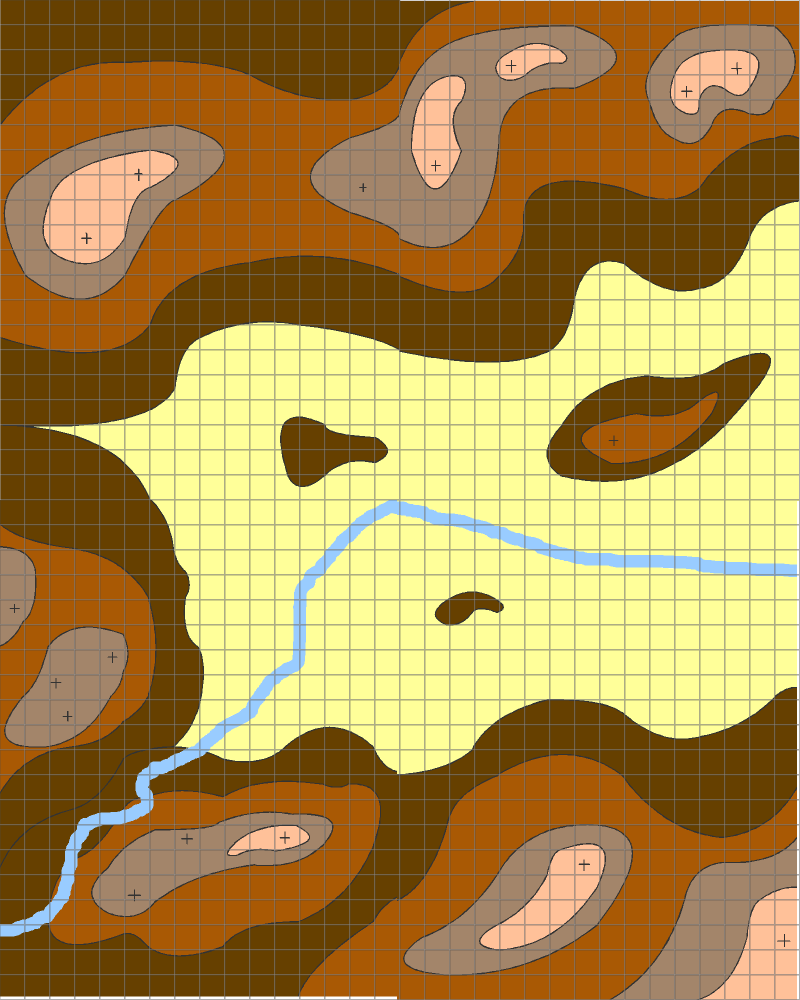
Setup
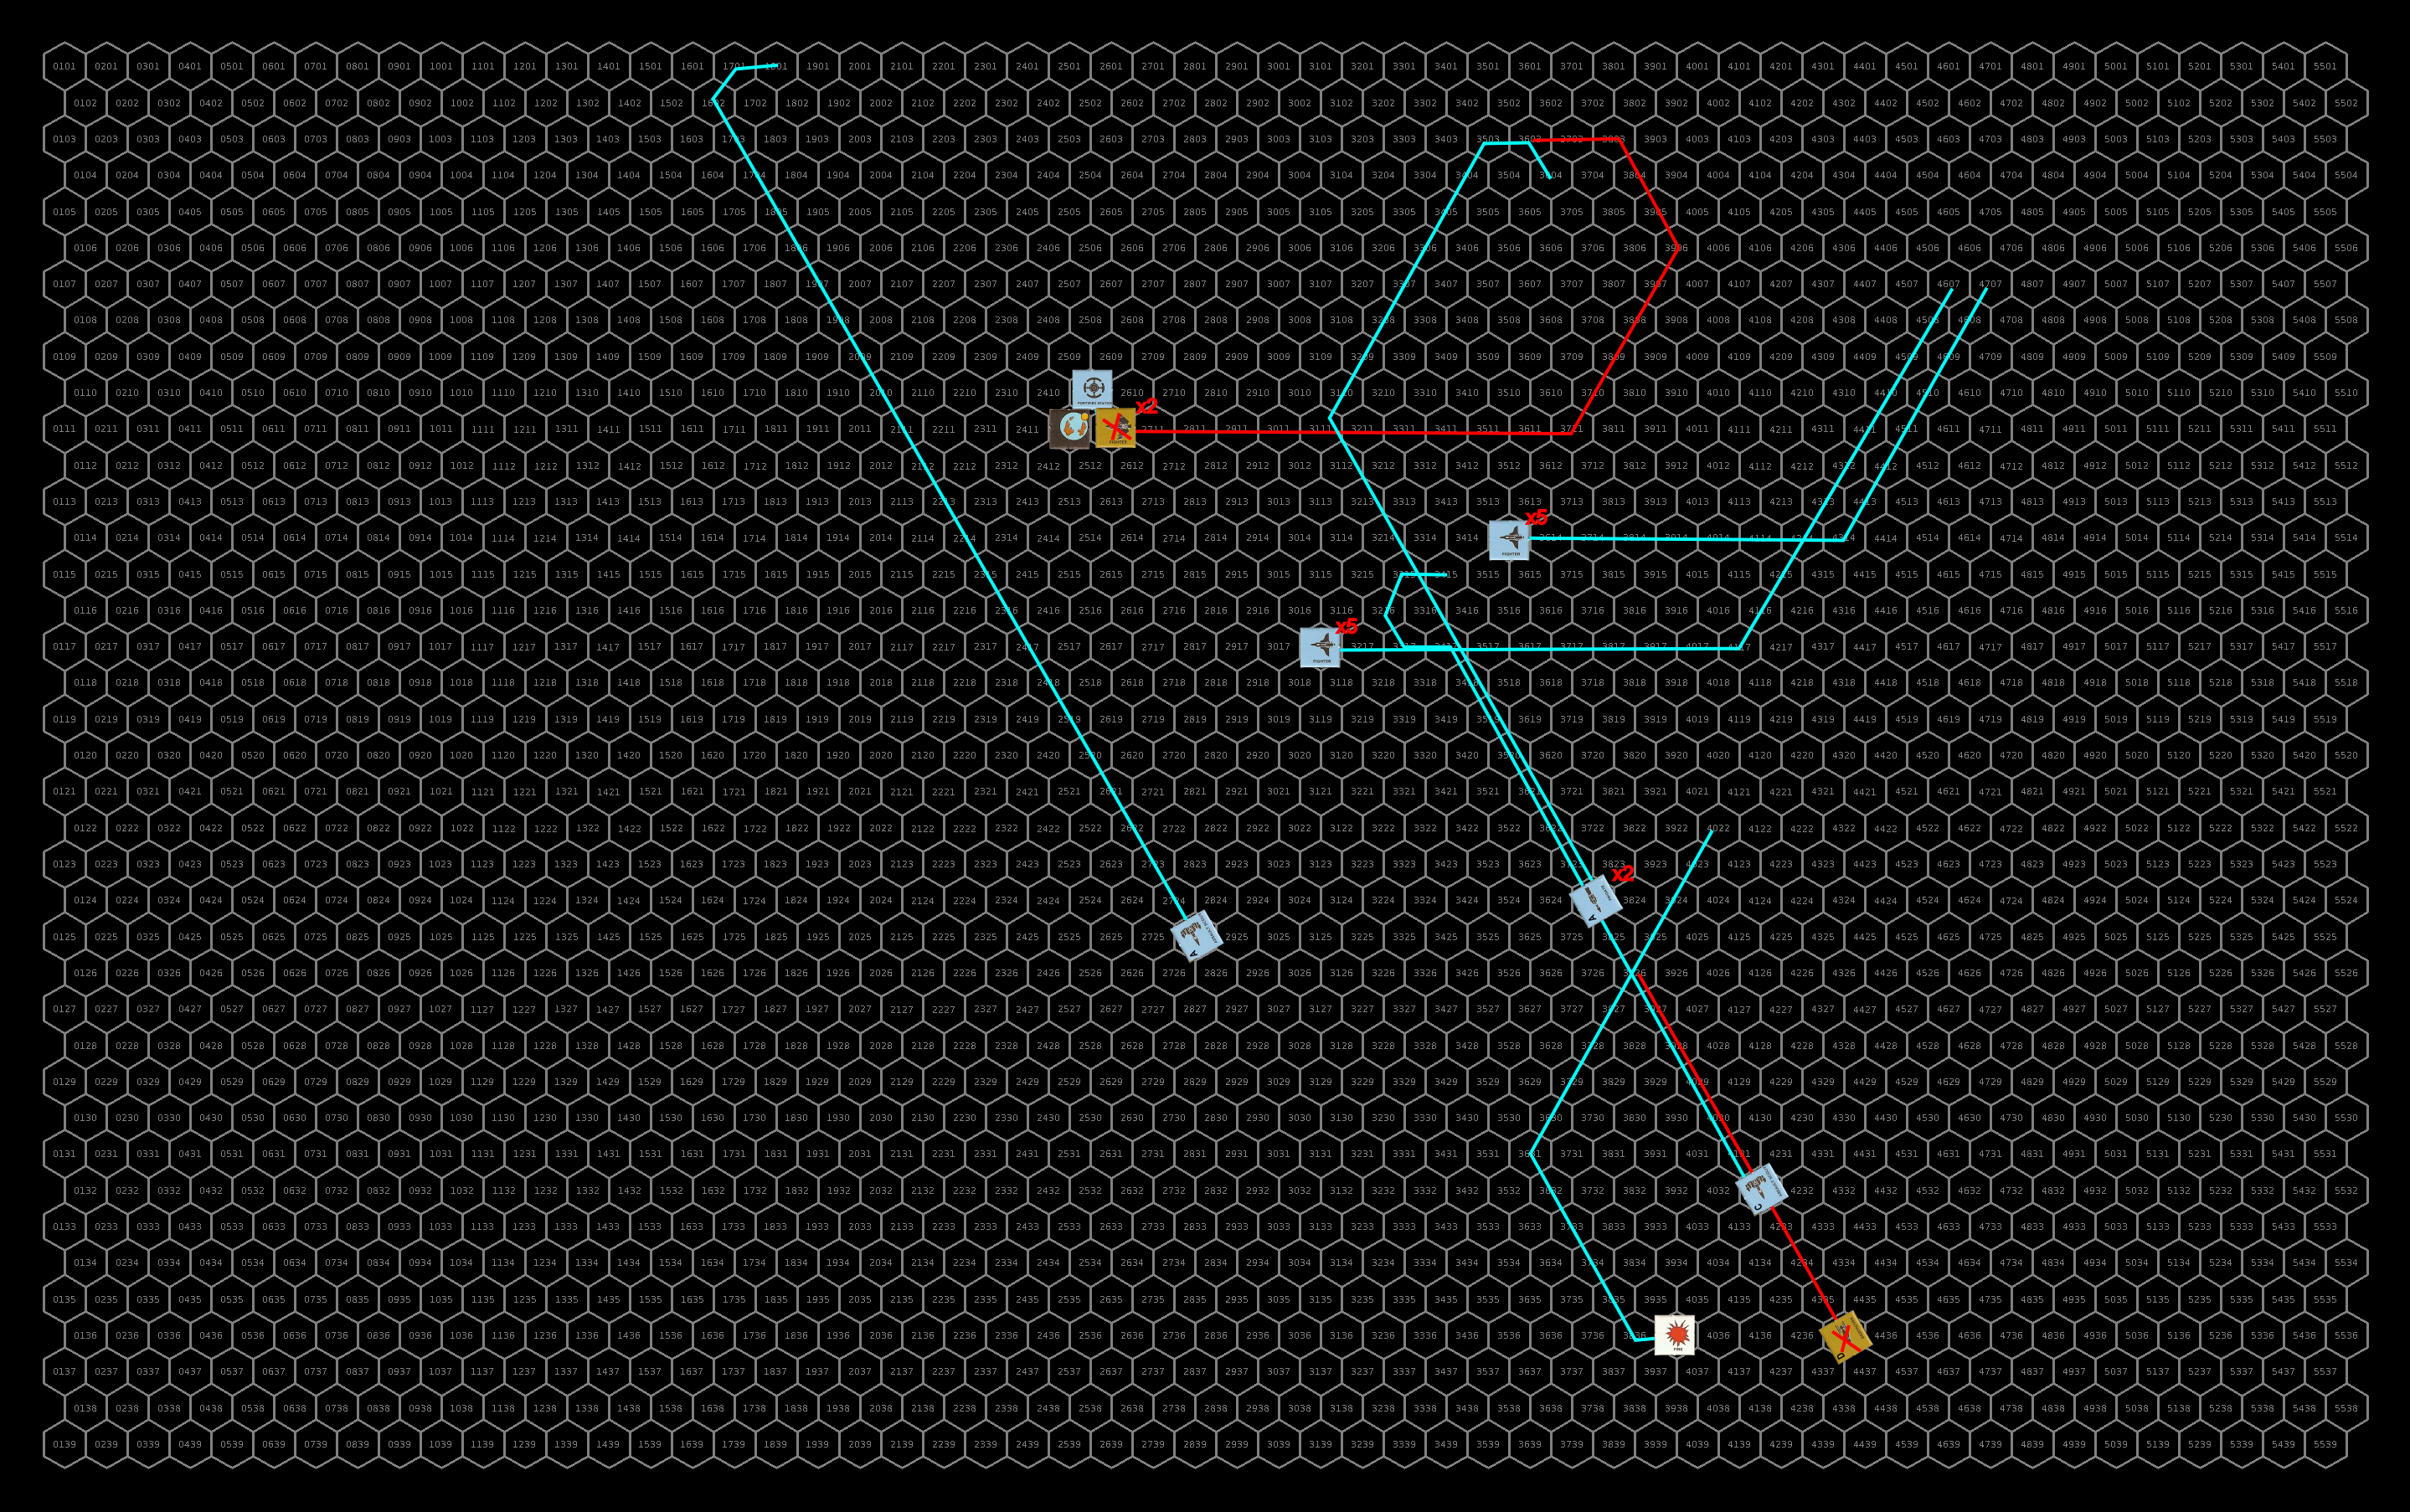
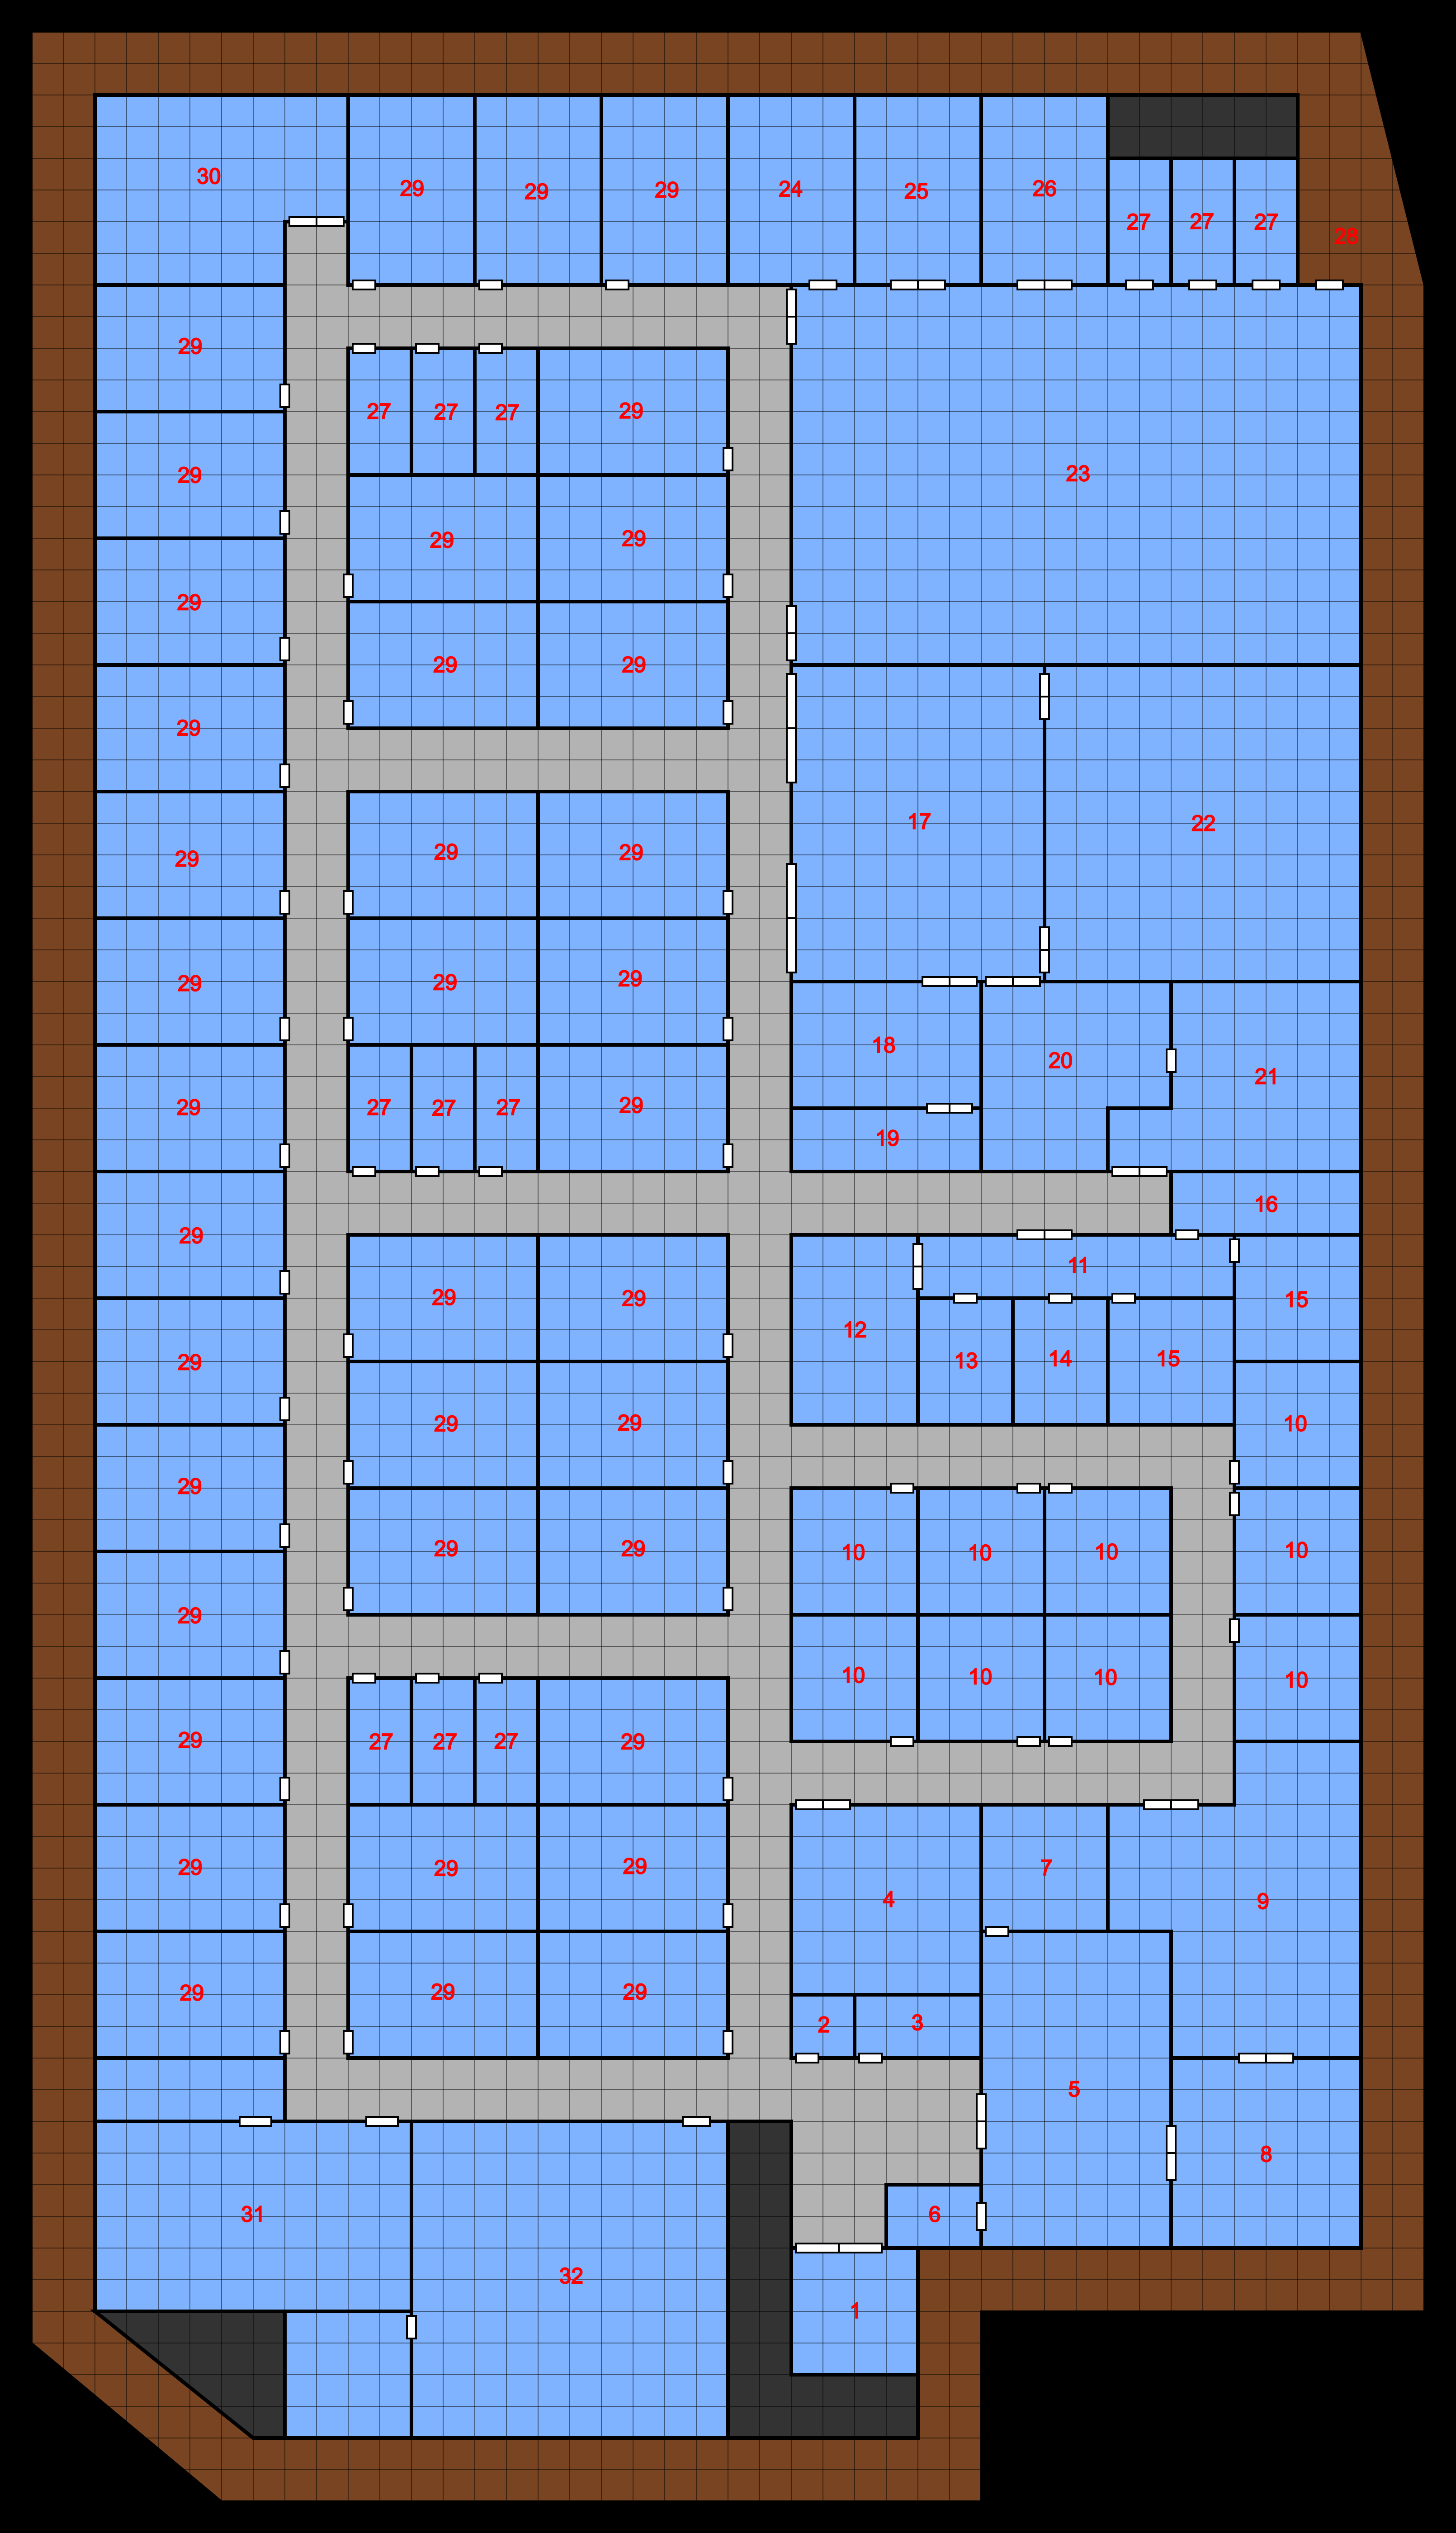
The Rim forces arrayed in a line slightly behind the planet and station and divided into several groups according to ship type. From top to bottom there was a flight of 5 fighters, the 3 assault scouts, and the light cruiser above the planet and then the 2 destroyers, the 2 frigates, and the remaining five fighters. The fighters were moving at speed 25, the assault scouts and frigates at 20, and the light cruiser and destroyers were moving at speed 15
The sathar’s main battle group was arrayed to directly approach the planet in a flying diamond. The middle row was the light cruiser, the heavy cruiser, and then the assault carrier. Outside of those ships were the four destroyers, 2 on each side, and then a frigate on either side forming the tip. All of these ships were moving at speed 10. The fighters were arranged into two flights of 4 fighters and positioned further out on the wings. They were traveling at speed 20 The setup looked like this:
Turn 1
The main sathar battle group began decelerating toward the planet (slowing to speed 8), looking to make a concerted attack on the station as it came around from behind the planet. The sathar fighters accelerate to speed 25 and swing out further on the wings to prepare to swing in on the next turn and make their attack while staying out of the forward firing arc of the Rim forces.
The Rim forces decided to ignore the fighters and focus on the main battle group. The fighters accelerated to speed 30, flew in to make a maximum range attack with their assault rockets on the two frigates on the wings and then sweep back out of range of the capital ships’ main weapons. The assault scouts accelerated to 25 and executed a similar maneuver but aiming for the lead destroyer on their side of the formation. The frigates, with less maneuverability than the smaller ships accelerated to speed 23, swept past the main sathar formation, and then doubled back to attack the tail destroyer on that side of the formation. The remaining ships (LC & 2 DD) accelerated to speed 17 and turned in to attack the light cruiser. All the Rim ships stayed at least 4 hexes away from the sathar ships to remain out of range of their rocket batteries.
The sathar decide to ignore the smaller ships and focus on the Rim’s capital ships. However, the longer range and apparently poor training of sathar forces result in little damage to the Rim ships with the LC only sustaining 11 HP of damage and one of the frigates taking a hit to its combat controls system. All the other shots at the Rim ships, including several shots at one of the destroyers, missed completely.
The Rim ships were much more effective. The results were as follows:
- The sathar frigate on the left flank (“top” of the diamond) is hit by 3 of the 5 assault rockets (AR) taking 14 HP of damage, losing 2 ADF, and having it’s masking screen launcher knocked out
- The sathar frigate on the left flank (“bottom” of the diamond) is hit by 4 of 5 AR taking 28 HP of damage, losing 1 MR, and having it’s torpedo launcher knocked out.
- The sathar destroyer on the right flank fires two ICMs at each of the incoming torpedoes (which miss) and is hit by 2 laser batteries (LB) for 8 HP and has its masking screen launcher knocked out
- The sathar destroyer on the left flank is hit by 3 LB and 2 AR from the three AS and is completely destroyed with one of the LB and AR each doing double hull damage.
- The sathar light cruiser fires two ICMs at each incoming torpedo (only the one from the Rim LC hits) and is hit by a number of weapons resulting in a loss of 2 ADF, a navigation control hit, a combat control system hit, its disruptor canon damaged, and a loss of 60 HP (the torpedo did double damage for a total of 52 points)
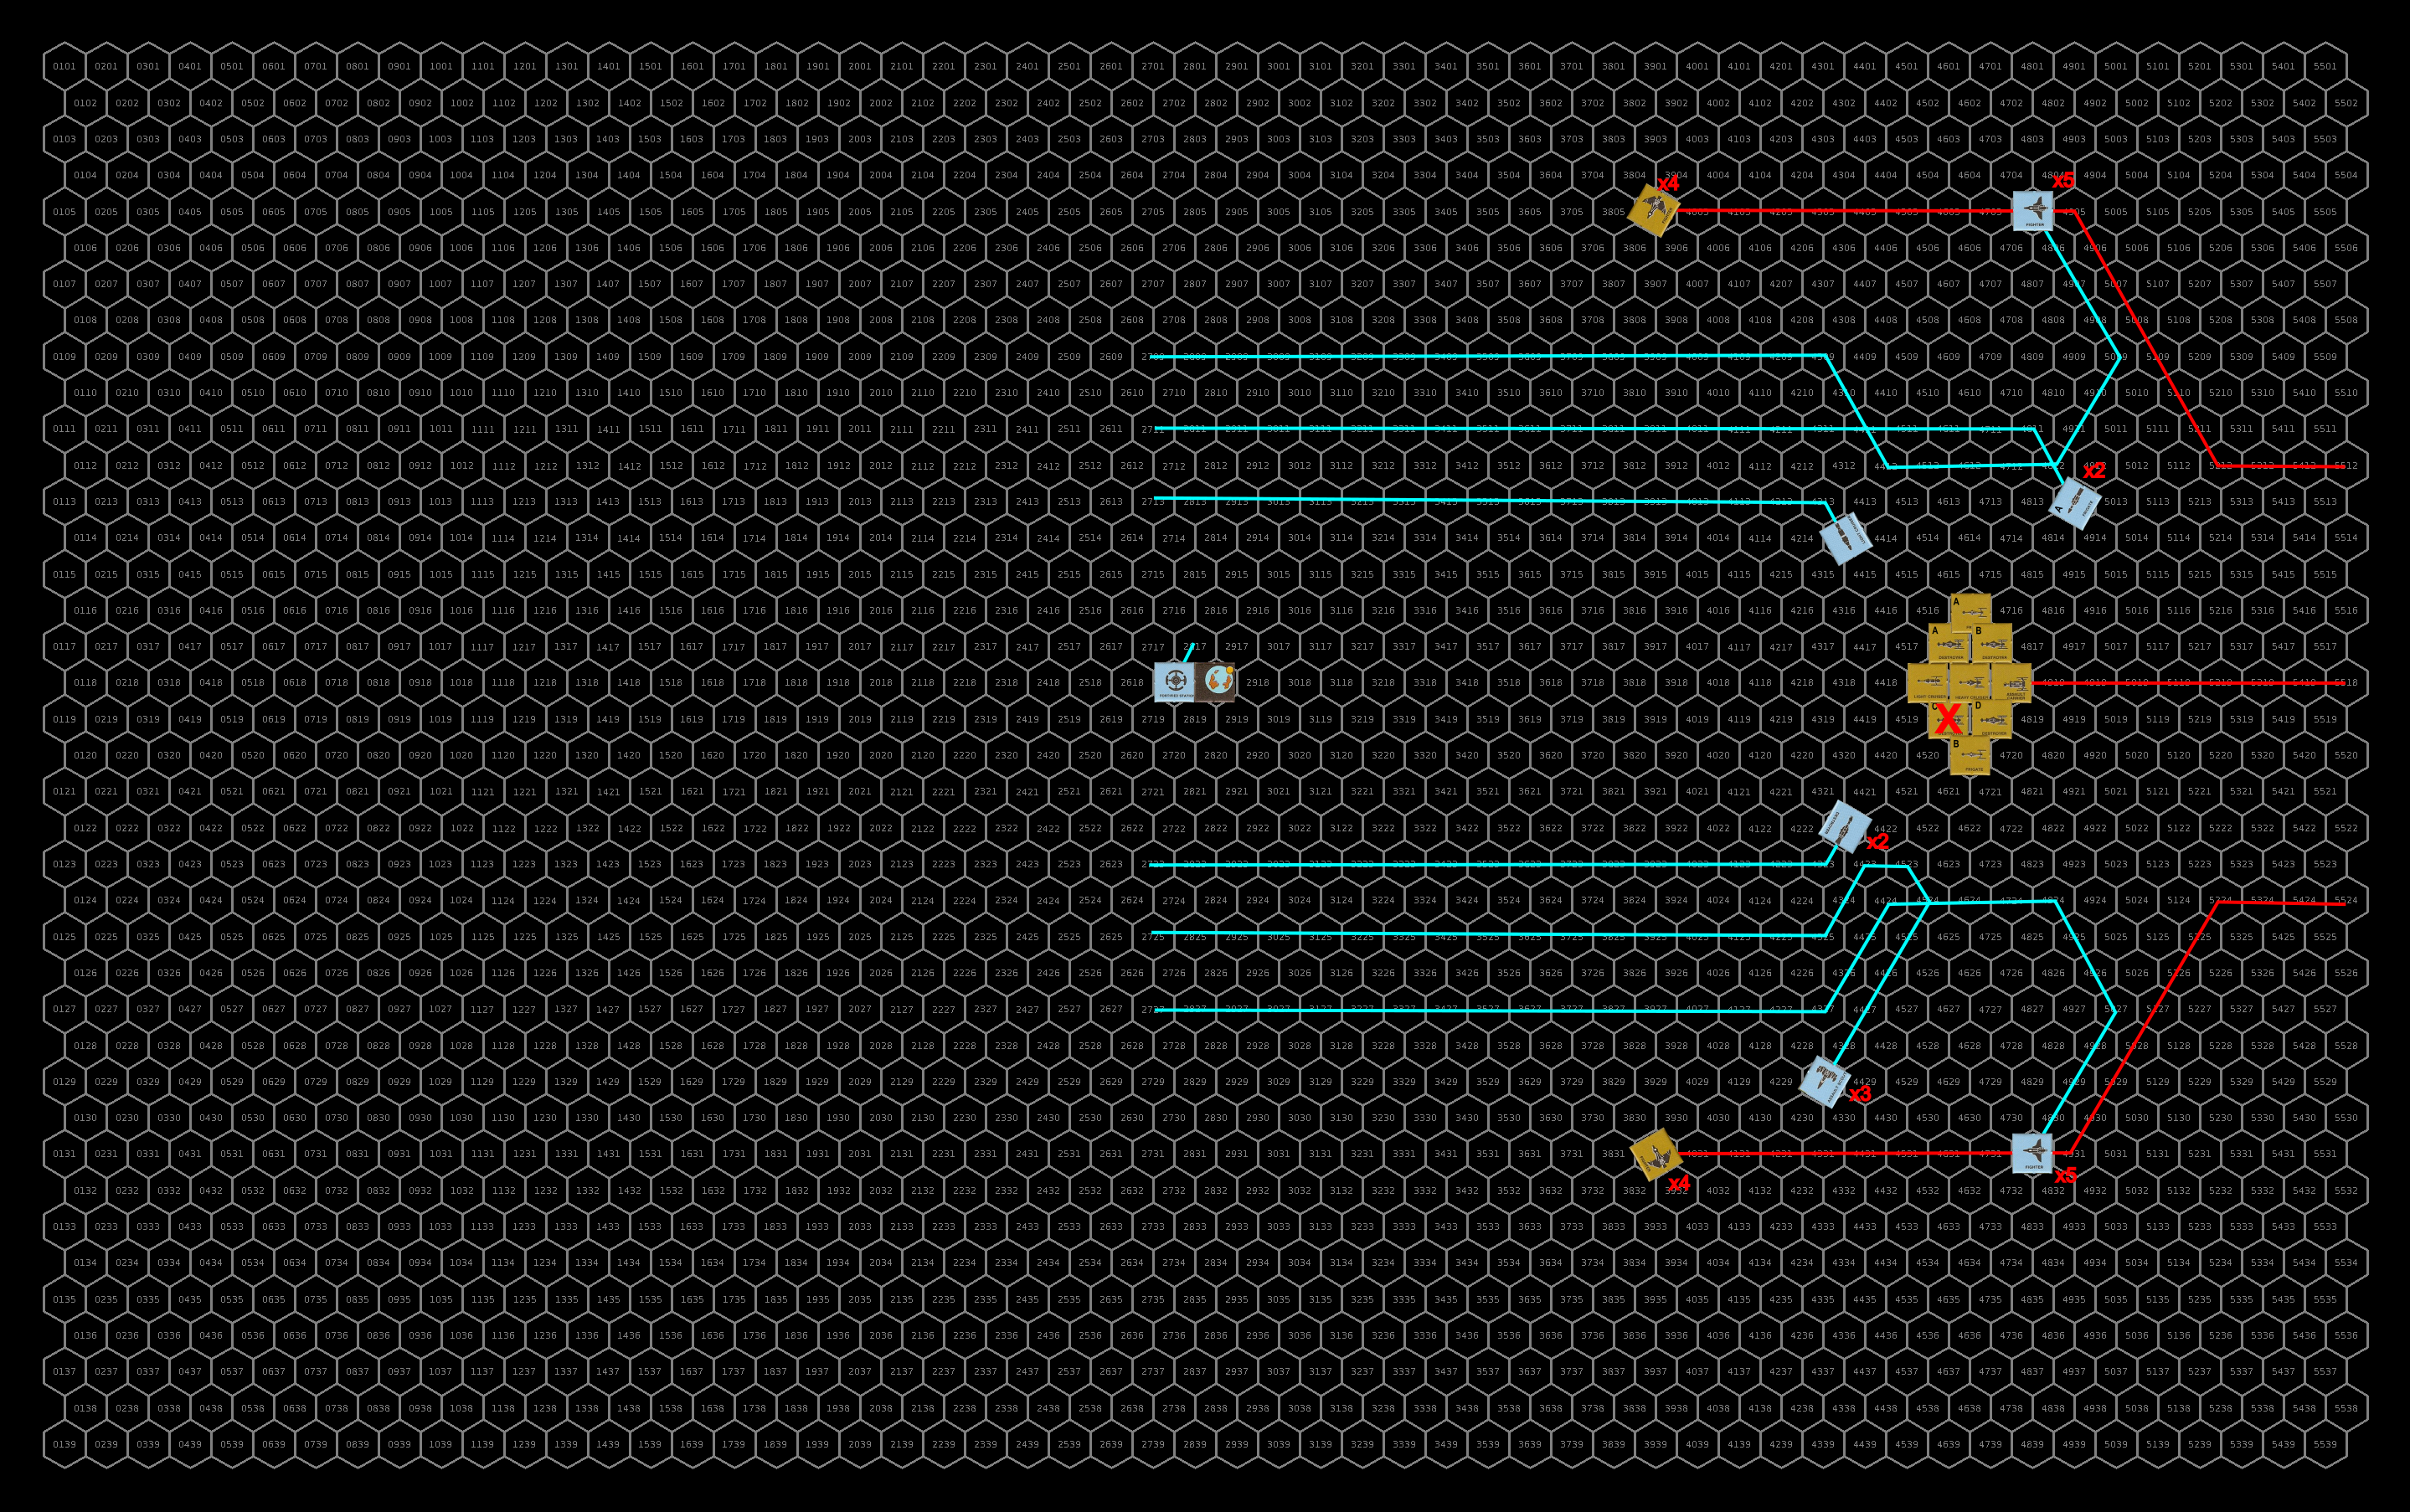
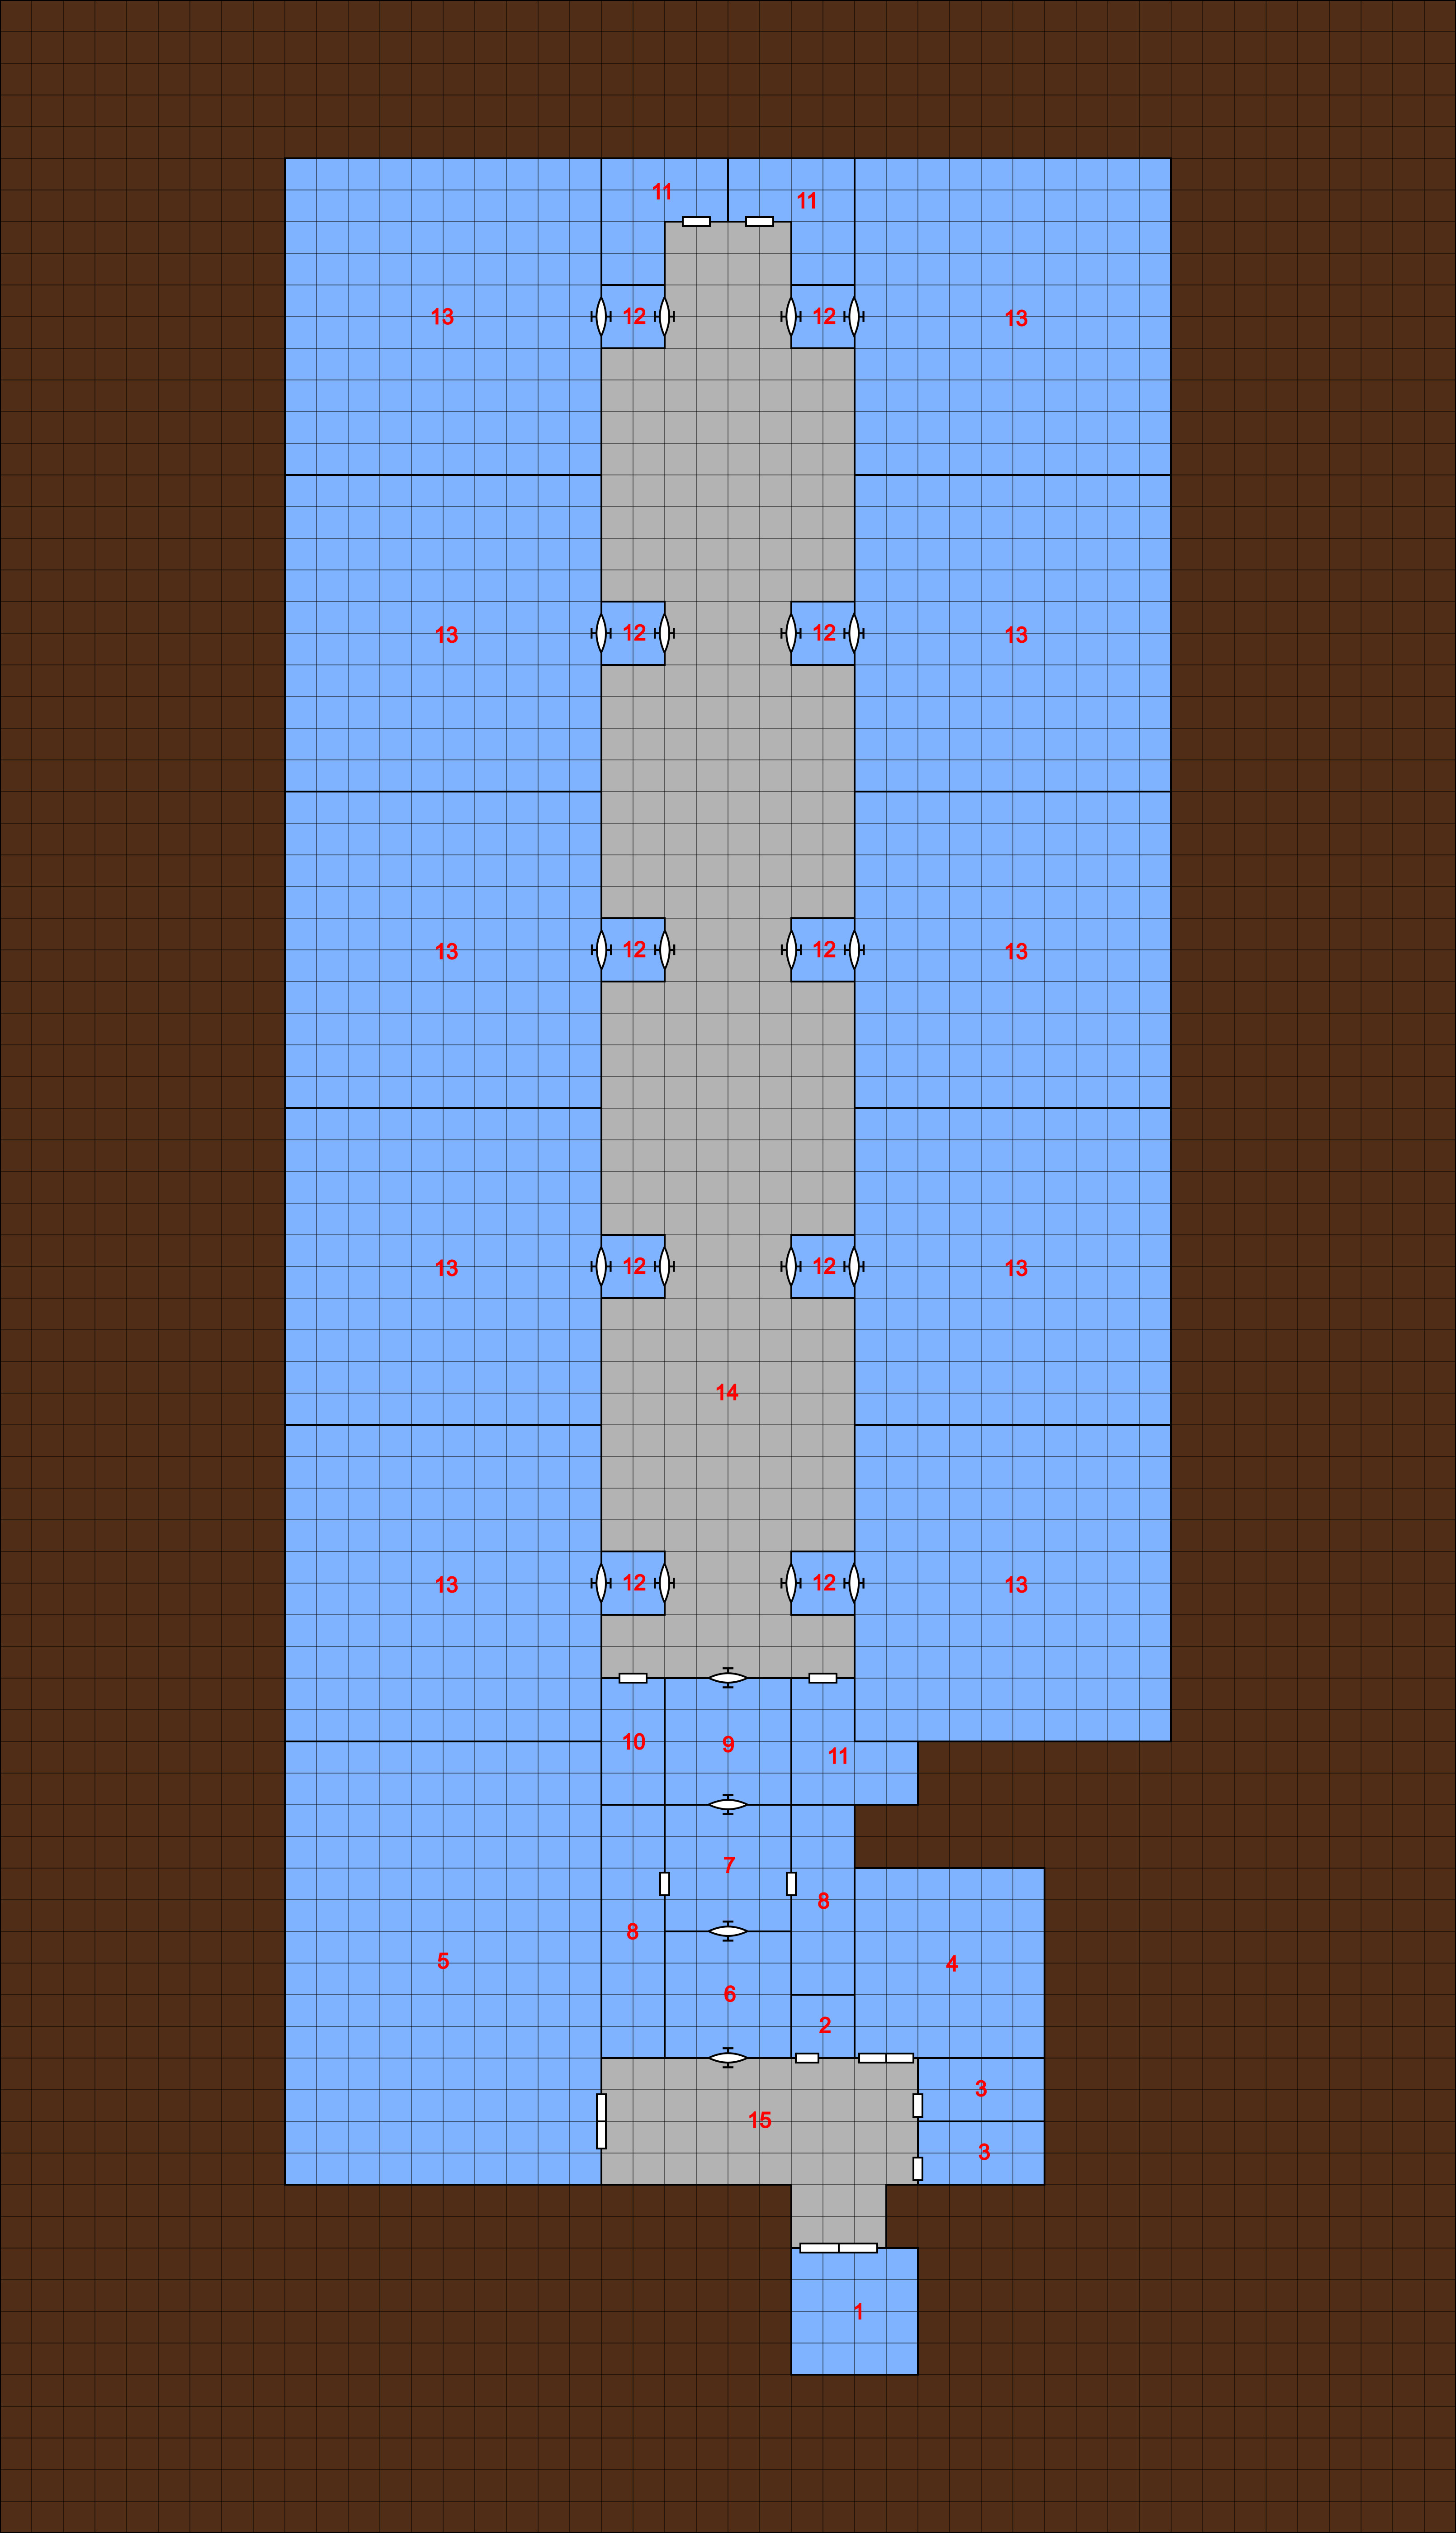
At then end of the turn, the ships were arrange as shown in the following map (with their movement marked). Destroyed ships marked with a red X.
Turn 2
The sathar fighters on the left wing swoop in and unload into one of the UPF destroyers and then fly out of range to line up for another run. The frigate on that same flank, not expecting to survive the round, given the damage it sustained, turns and attempts to ram one of the destroyers. The rest of the ships turn and take on the Rim’s light cruisers.
Defensively, the assault scouts score a single hit on one of the fighters near them taking out its AR launch, effectively neutering it. The destroyers, seeing the frigate coming in for a ramming attempt, fire everything they have at it. One of the rocket batteries connects and the frigate flies apart before gets too close. The Rim frigates continue to fire at the destroyer they had already damaged doing 7 more HP of damage, and knocking out its MR and electron battery. The Rim light cruiser attempts to eliminate the damaged frigate before it can fire. It only causes 9 HP of damage but does knock out its MR and causes an electrical fire on board.
The sathar fighters firing on the destroyers unload all 4 AR at a single destroyer which all hit doing 65 HP of damage, destroying it. They caused a power short circuit as well but it was moot at that point. The rest of the ship unloaded all their ordinance in to the Rim light cruiser. It survived the 3 AR that hit from the fighters (knocking out its LB, all its MR, and 7 HP), the shots from the frigate (knocking out is combat control system), the shots from the destroyers (knocking out 1 MR and 22 more HP), but the sathar heavy cruiser finally overwhelmed it (knocking out its PS, a power short circuit, and a final 39 HP).
One flight of Rim fighters make a pass at the sathar heavy cruiser while the remaining Rim ships converge from various directions to make a pass at the sathar assault carrier. The fire on the sathar frigate causes another 7 HP of damage.
The sathar heavy cruiser fires at the incoming fighters with its EB doing 2 HP to one of them and a LB hit triggers a fire on another. All of the other sathar ship fire at the Rim destroyer doing 35 HP, -2 ADF, and a combat control hit.
Offensively, all 5 AR fired at the sathar HC hit knocking out 1 MR and the combat control system and doing a total of 85 HP of damage destroying it. Between the fighters and assault scouts, the sathar AC is hit with 6 of the 8 AR fired knocking out a LB, the ICM and masking screen launchers, and doing 83 HP of damage, destroying it. The Rim destroyer’s EB started an electrical fire and the LC from the frigate did an additional 26 HP of damage but the assault carrier was just scrap at that point.
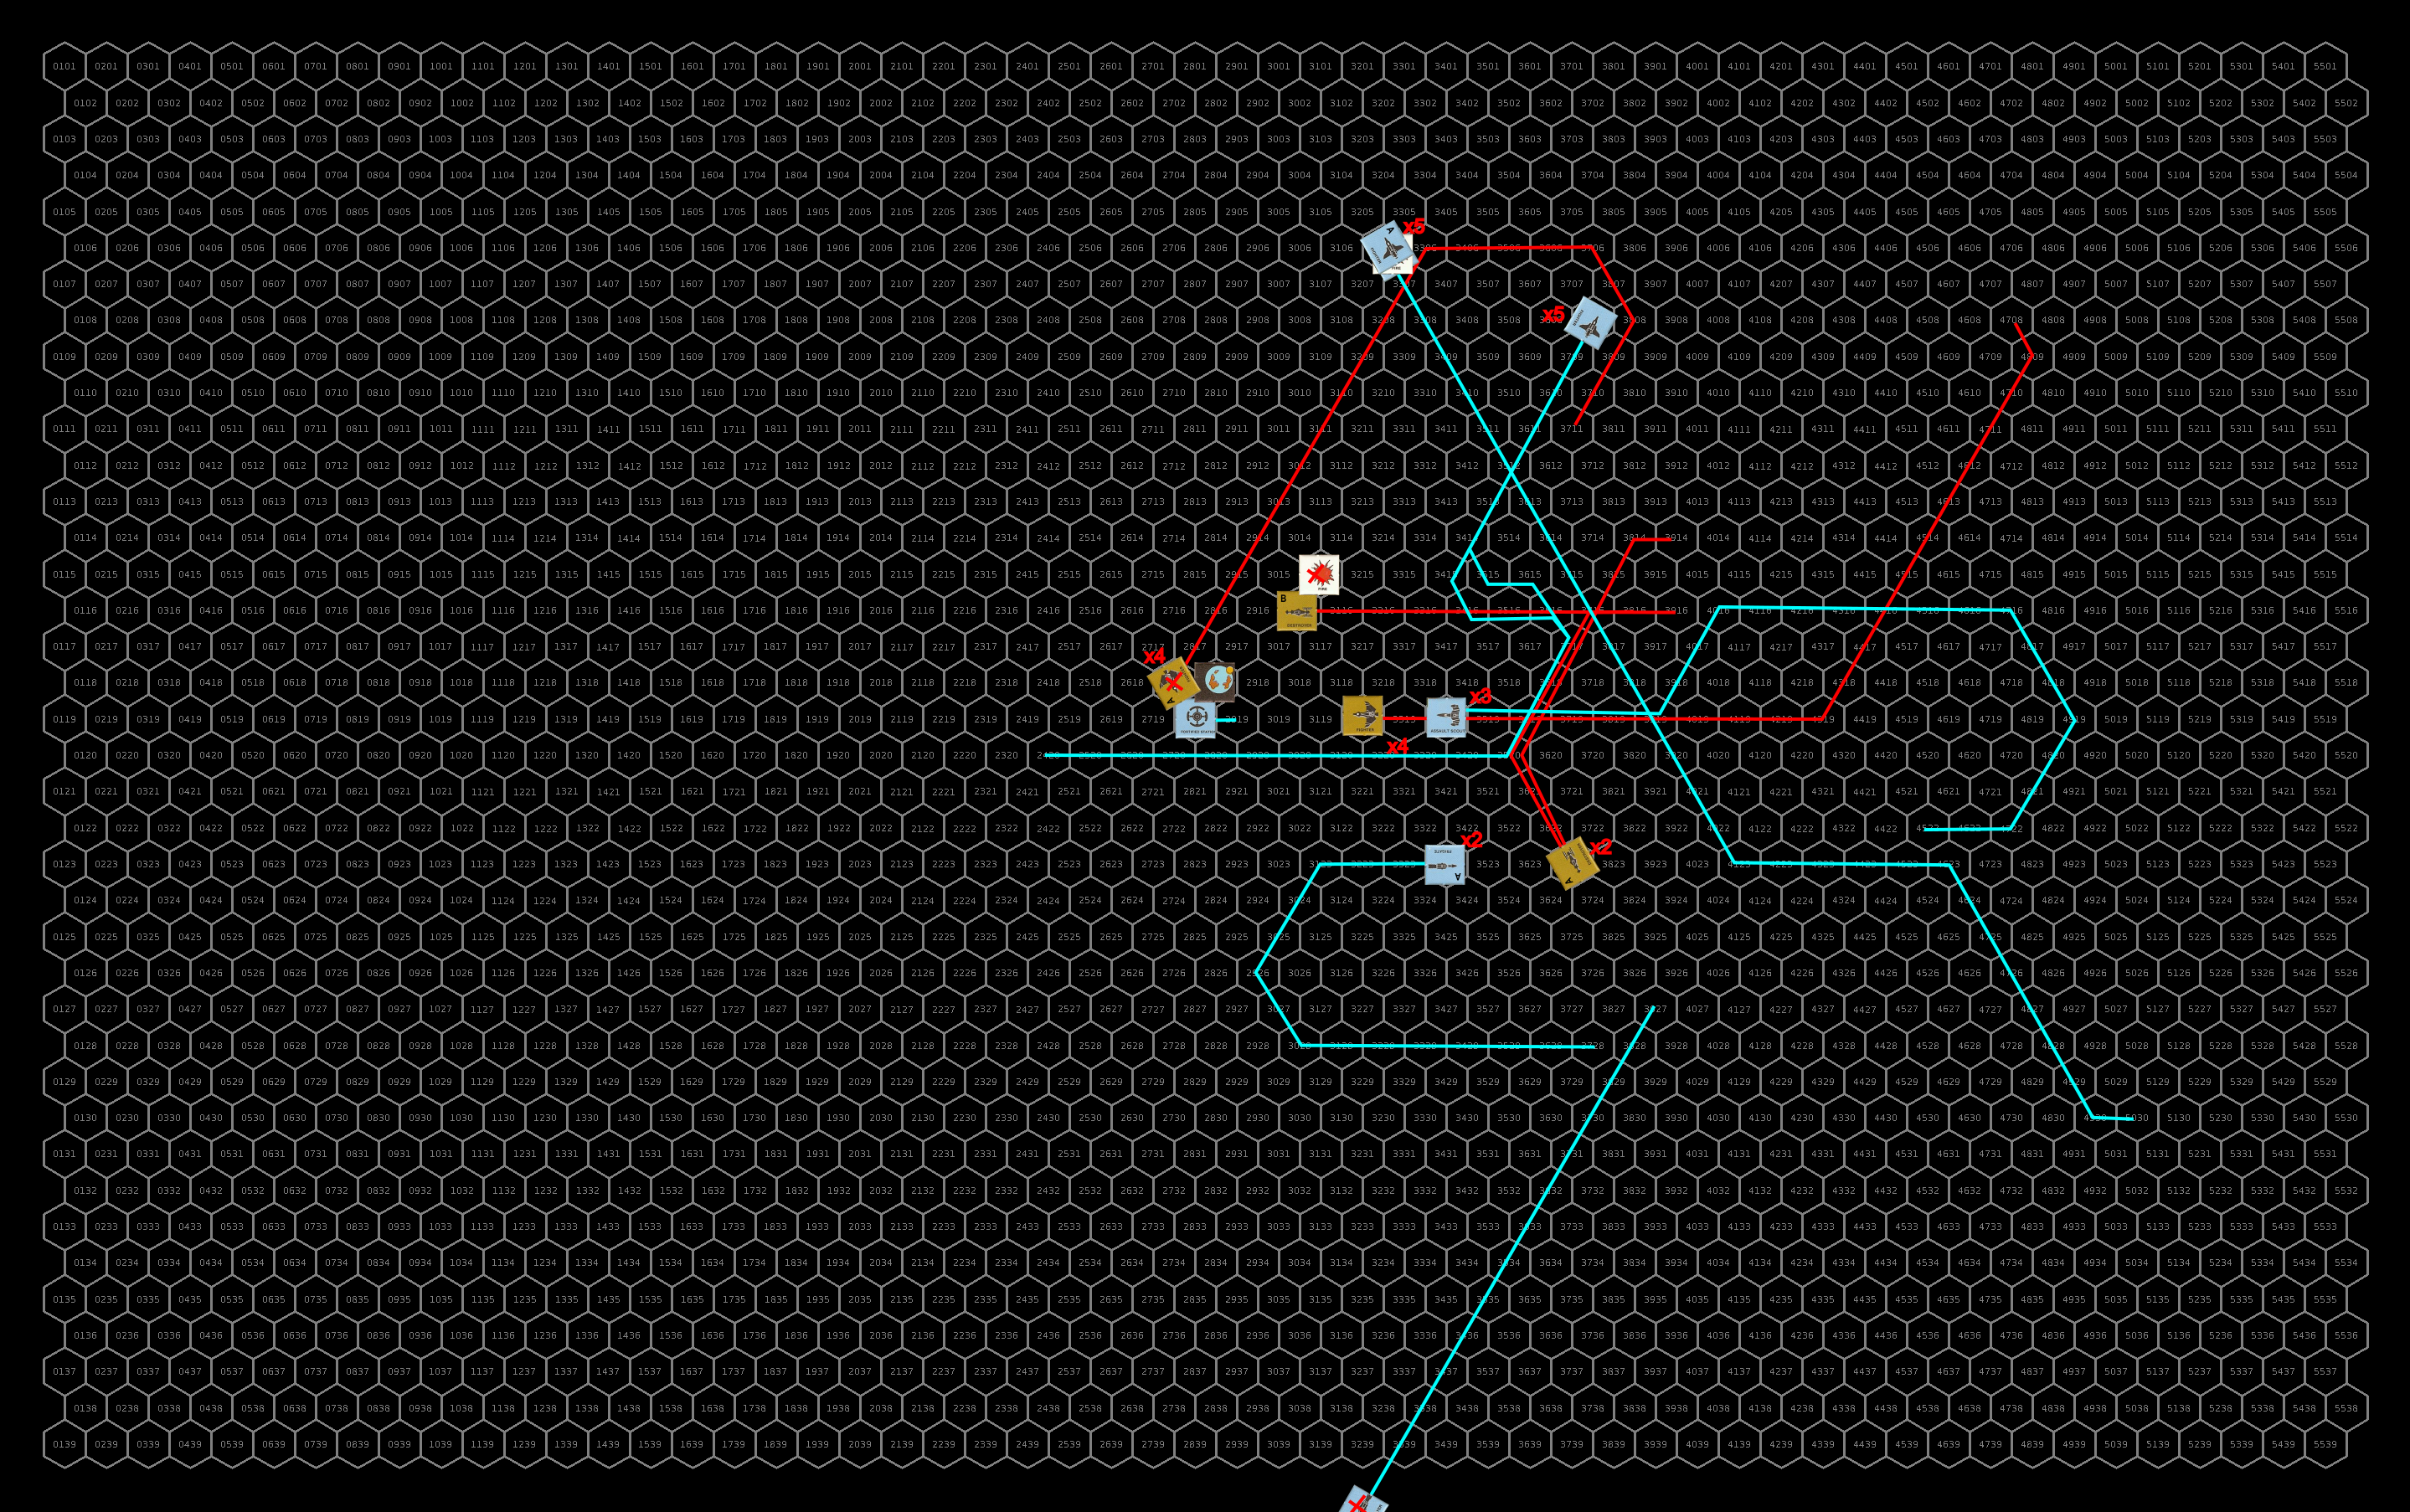
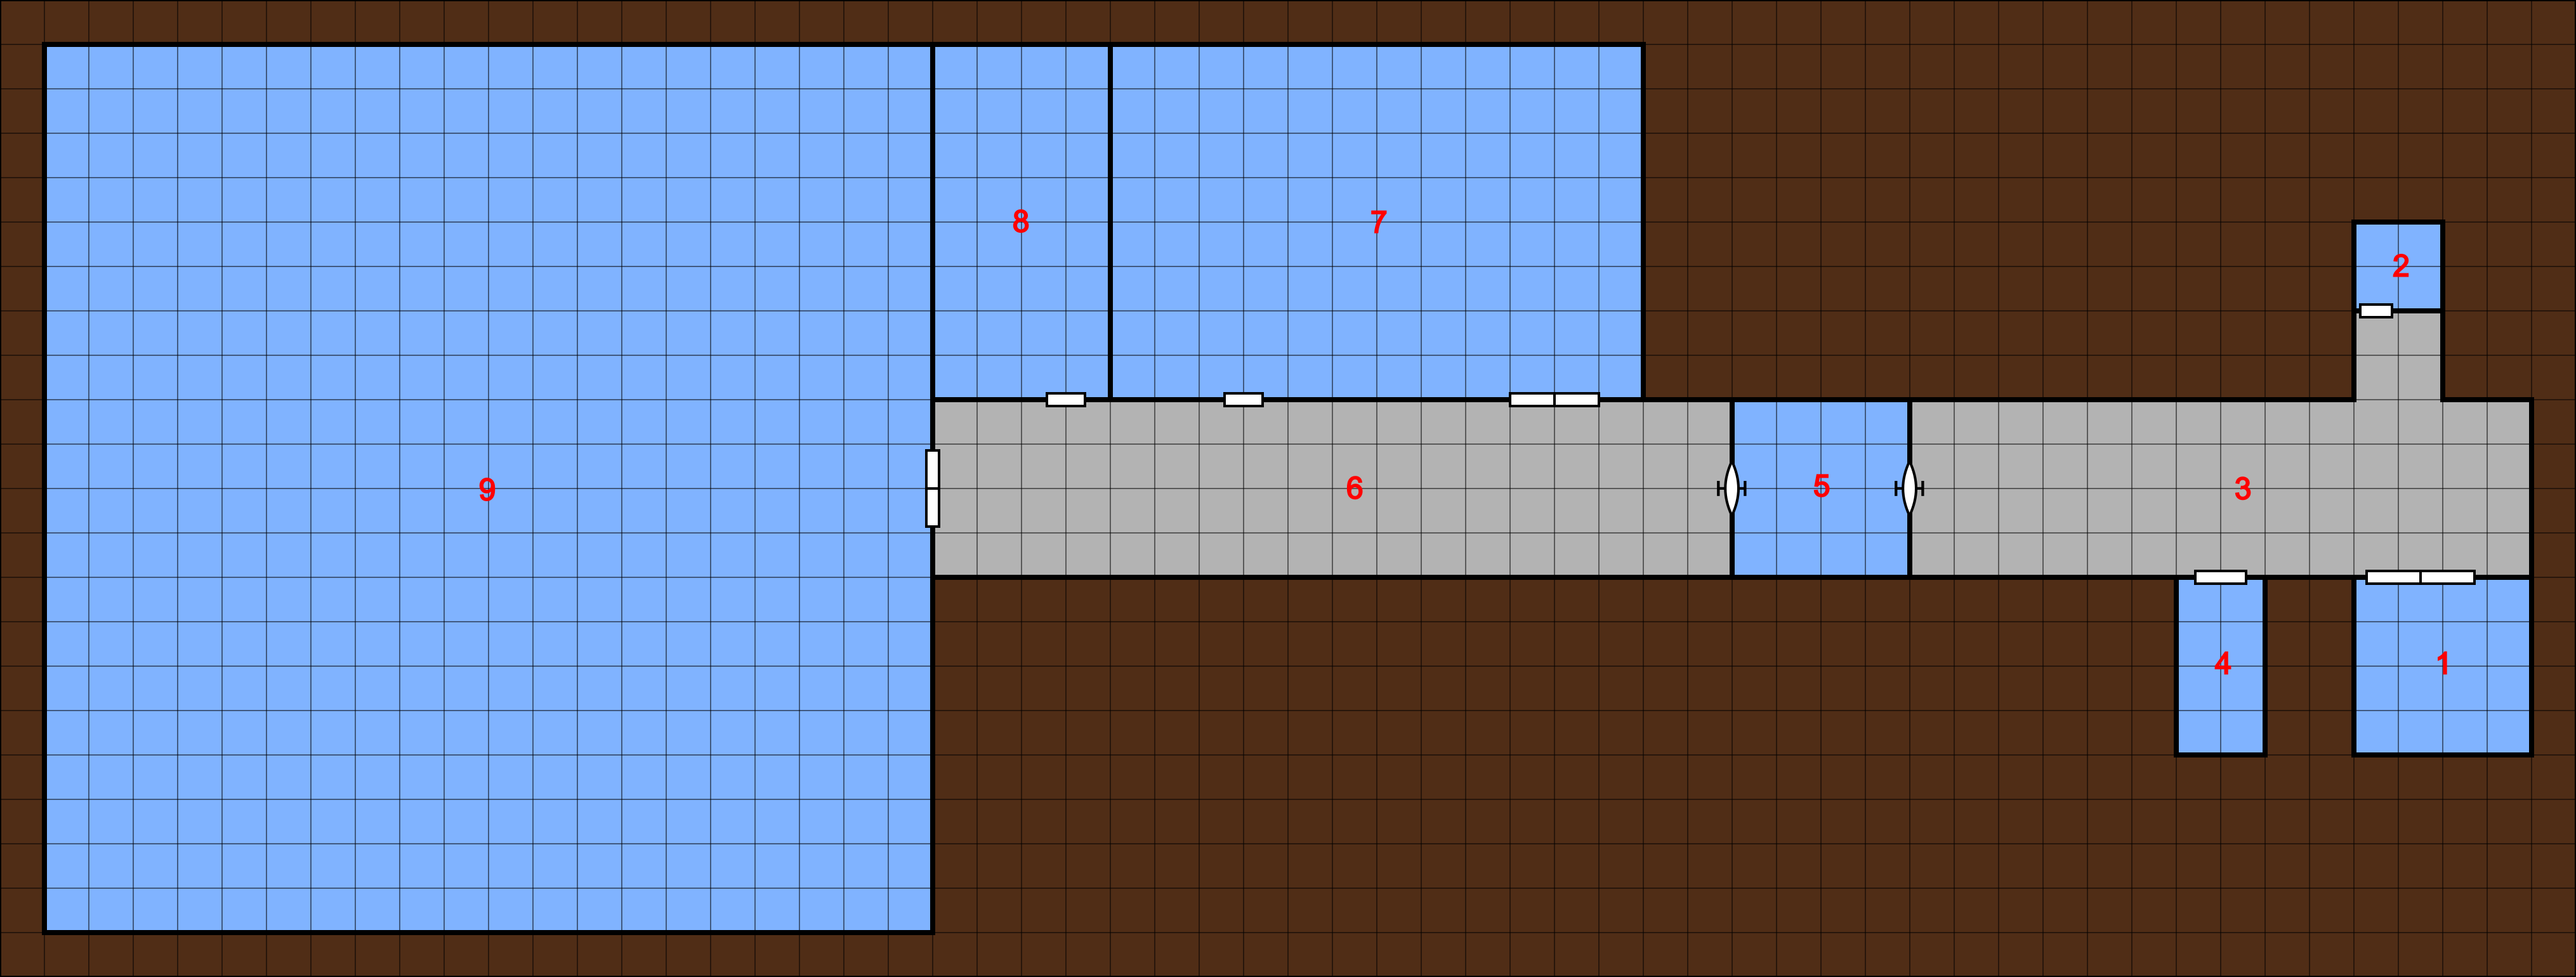
Here are the ships at then end of this turn:

Turn 3
The sathar fighters all converge on the station to fire their assault rockets. The sathar frigate with the fire, and the destroyer that has had its MR knocked out drift forward toward the station. The destroyer accelerates slightly to bring it’s torpedoes in range this round. The undamaged sathar destroyers turn and go after the remaining Rim destroyer. The Rim fighter with the fire suffers 2 HP of damage.
Defensively, the station fires at the three closest fighters with working weapons systems. all three shots hit knocking out the AR launcher on one of the fighters and destroying the other two. The assault scouts fire their laser batteries at the other flight of sathar fighters as they fly by but all the shots miss. The Rim frigates and destroyer fire at one of the sathar destroyers knocking out its LB and EB and doing 12 HP of damage.
Only the 4 distant fighters can fire at the station but 3 of the 4 AR hit doing 82 HP of damage. The ICMs from the station neutralized the torpedo from the destroyer and frigate and all the rest of those ships’ weapons miss. The shots at the Rim destroyer as less effective than hoped. They knocked out 2 MR, the MS system, and caused a power short circuit but only did 7 HP of damage.
The Rim frigates and one flight of fighters go after the sathar destroyers, the other flight of fighters go after the two damaged sathar ships near the station, and the assault scouts split their attacks firing their AR at the destroyers and their LB at the undamaged flight of sathar fighters. The station fires at the two fighters closest to it. The damaged Rim destroyer, unable to maneuver, drifts of the map hoping to slip away and survive the battle.
Defensively, the sathar destroyers fire their energy weapons at the retreating Rim destroyer starting a fire that is snuffed out when the other weapons do a total of 16 HP destroying the damage vessel. The fire their RBs at one of the frigates and both hit knocking out its MS and doing 14 HP of damage. The sathar ships near the station fire at the station but all miss.
The Rim forces have another stellar round with their assault rockets. The flight of fighters fire at one of the undamaged destroyers hitting with 4 of the 5 AR taking out the destroyers ADF, MS, and doing 16 HP of damage. The assault scouts fire at the other destroyer and hit will 2 of the 3 AR doing 24 HP of damage and knocking out 1 MR. All of the LB shots at the fighters miss, however. The Rim frigates fire at the same destroy targeted by the assault scouts and hit for 18 more HP and knocking out 2 ADF. The station manages to destroy one of the nearby fighters (leaving a single fighter with no AR in that flight). The fighters going going after the damaged sathar frigate and destroyer split apart momentarily to line up their shots with 2 fighters firing at the frigate and 3 at the destroyer. All 3 AR hit the destroyer doing 22 HP and knocking out 2 ADF. One of the AR hits the frigate doing 14 HP and destroying that ship.
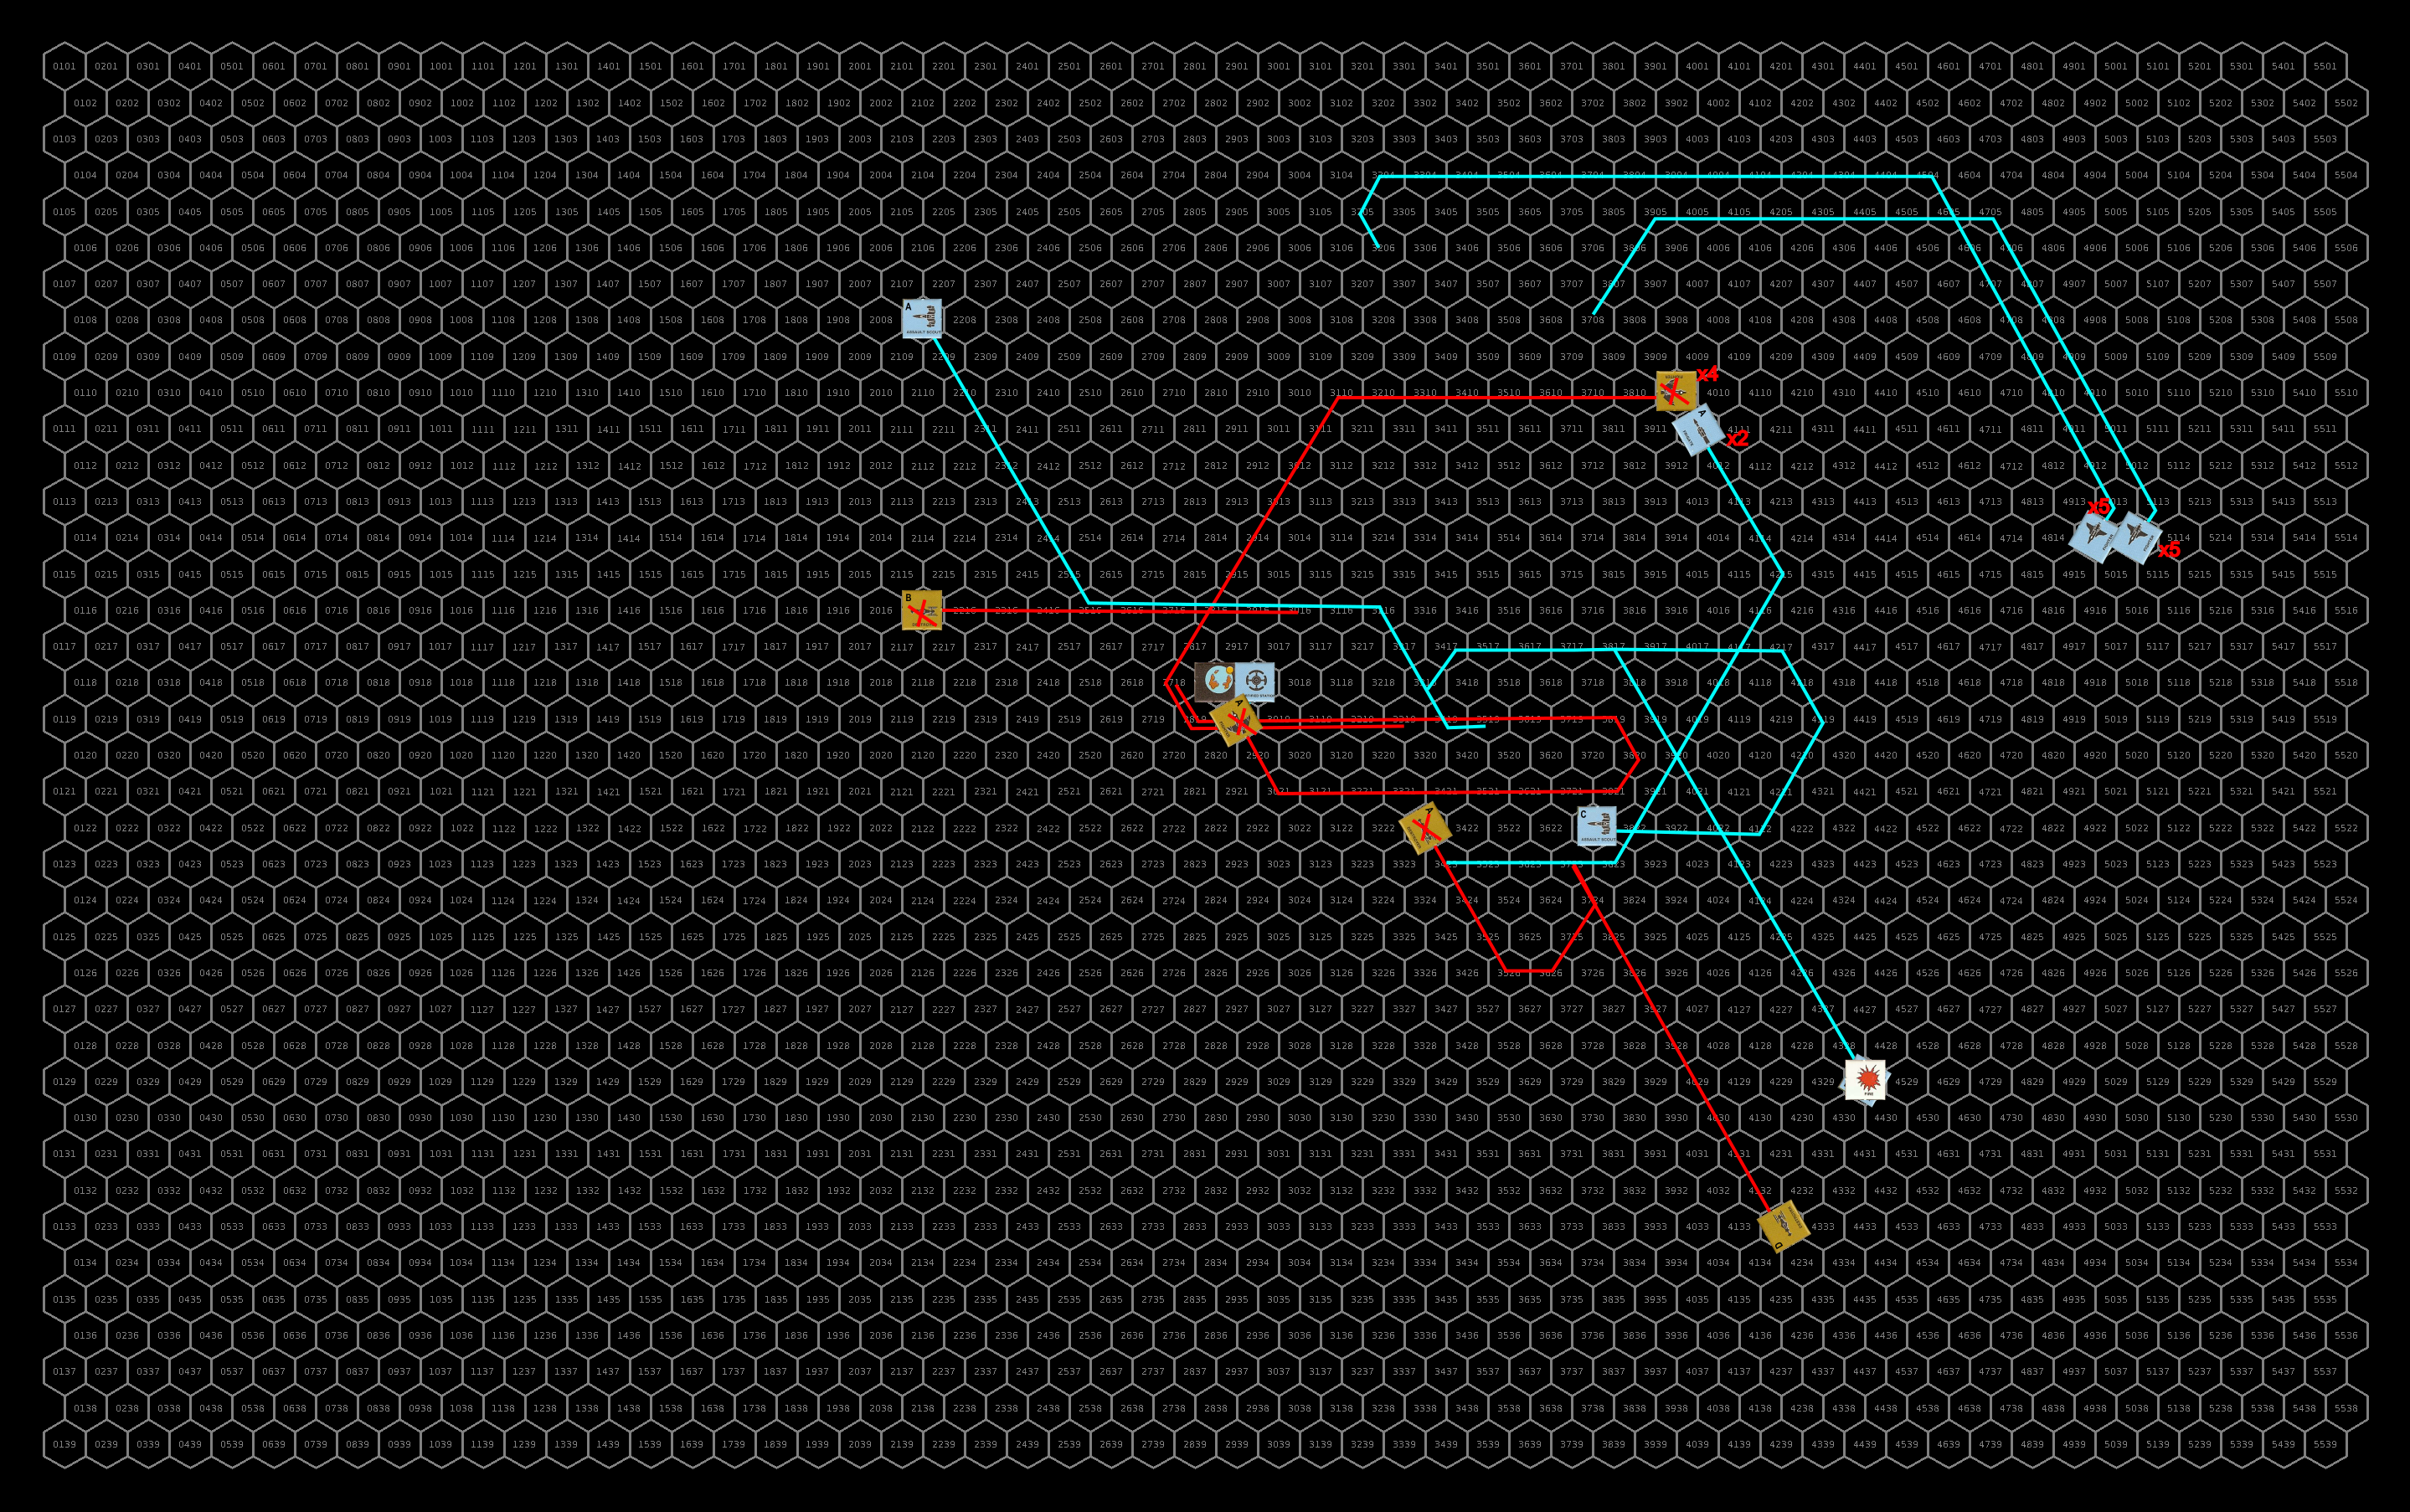
At the end of the turn, the ship were here:
Repairs
Several of the ships were able to enact repairs with the Rim fighter putting out its fire, the Rim frigate repairing 9 HP, and the station repairing 3 HP. The sathar destroyers were able to each repair some of their hull damage (10, 4, and 7 HP respectively).
Turn 4
At this point he Rim forces know they have a victory, as all the of the sathar ships (except a few fighters) are heavily damaged. It’s just a matter of cleaning up and protecting the heavily damaged station.
Only one of the sathar destroyers can maneuver and it loops back to fire on the Rim frigates, the other two just drift along on their current course. The fighter with the damaged AR launcher (it couldn’t get it repaired) loops around and attempts to ram the station. The other sathar fighters fire their last ARs at the station and loop away.
Defensively, the Rim assault scouts fire at the undamaged fighters but only one LB hits doing 5 HP of damage. The station also fires at these fighers (judging that the AR are more deadly than the ramming fighter). The Rim frigates fire at the destroyer closing on them and knock out all it’s MR and do 31 HP of damage, just 1 HP shy of destroying it before it could fire.
The lone sathar fighter rams the station for 4 HP of damage and 2 of the 4 AR from the other fighters hit doing 43 more HP of damage. The damage destroyer drifting by manages to hit with its LB causing a power short circuit and knocking out the the station’s screens and ICM launcher. The destroyer firing at the Rim frigate hits with its LB and EB knocking out 1 ADF and half of the frigates DCR.
Out of assault rockets, the Rim fighters start decelerating to dock with the station and execute some big loops away from all the capital ships. The assault scouts split up to each go after a damaged destroyer with their last AR. The frigates, suspecting that the sathar fighters might attempt to ram the station, pursue those ships in an attempt to eliminate them.
Defensively the sathar destroyer drifting off the bottom of the map is the only one to hit, its EB causing a fire on the assault scout.
The Rim assault scout firing at the destroyer now closest to the station hits with its AR doing 28 HP and destroying the sathar vessel. The assault scout targeting the destroyer drifting to the left also hits for 23 HP and destroys. it. The last assault scout, gunners distracted by the fire, miss completely. The frigate are not as successful as they had hoped, only hitting two of the fighters but both are obliterated (20 HP from a LC and 24 from an RB – both did double damage).
At then end of the turn, the battle looked like this:
Turn 5
The remaining sathar destroyer continues to drift away and the two remaining fighter loop back and attempt to ram the station (which only has 14 HP left). The fire on the AS damages its DCR cutting it in half.
The Rim frigates fire at the two remaining sathar fighters and destroy them before they can ram the station. The burning assault scout fires at the drifting destroyer doing 8 HP.
The Rim fighters continue to decelerate and approach the station. All the other ships set off in pursuit of the last destroyer, only two of the assault scouts coming in range this round.
The sathar destroyer fires at the non-burning assault scout and hits with its EB knocking out 1 MR point but both AS hit the destroyer with their LBs doing a total of 14 HP and destroying it.
With the battle over, the ships positions were:
Wrapping Up
The fire on the assault scout continued to burn while repairs were attempted but caused a disastrous fire knocking out the assault scout’s ADF and MR and damaging its combat control system. Unable to put the fire out, over the next 20 minutes the assault scout succumbs to the fire as it eventually burns through the hull destroying the ship.
The other damaged ships manage to repair the minor damage they sustained. After 3.5 hours of work, the station manages to restore 33 HP before running in to a snag that will require outside assistance to get past and repair more.
Aftermath
The sathar tactics for this fight was basically “go for the heavies,” ignoring the smaller ships and going for the larger ships first. With all the Rim fighters and assault scouts flying around with their assault rockets, this was probably the wrong idea. We’ll see if any of the lessons learned were able to be transmitted out before the sathar were destroyed.
The Rim forces, capitalizing on lessons learned at the two fights in the Zebulon system over the past year and half, used the maneuverability of those smaller vessels to stay out of range of the sathar’s heavier weapons and inflict punishing damage. They Rim forces also heavily concentrated their attacks, preferring to focus on only a few ships each turn instead of spreading everything around. This resulted in a bit of over kill a few times (especially on the sathar assault carrier) but payed off in the end.
The sathar lost all 17 vessels totaling 569 HP. While the Rim only lost 4 ships, they were mostly capital ships totaling 185 HP. Plus the station only has 47 of its original 140 HP left. If the sathar had paid just a little more attention to the station (going after it earlier with the fighters or the one maneuverable destroyer going after the station instead of the frigates) they might well have destroyed it as it was down to only 14 HP at the end of the fight.
Speaking of the damaged station, the rules for the Second Sathar War game don’t give any guidance on how you repair station hull points if they fail a DCR roll. I’ve decided to apply the following rule throughout this write-up. A station (in a system that doesn’t have a starship construction center) can repair 10 HP a day after failing a DCR check for hull repair after a battle starting on the day after the battle occurred. If it is in a system with a SCC, the full repair ability of the SCC can be applied to the station. We’ll see how that goes.
News of the victory against the sathar was quickly broadcast across the Rim and Frontier as fast as subspace radio messages could traverse the intervening distances.
Sathar forces were engaged today by elements of the Flight around Stenmar in the Kazak system. After nearly an hour of fighting, the Rim forces were victorious destroying all the sathar ships but suffering serious losses themselves.
Sources within the Flight say that the sathar fleet consisted of single heavy and light cruiser, four destroyers, two frigates, and an assault carrier with eight fighters. It is believed that they originated from the recently discovered sathar occupied system OFS019.
The Flight lost a light cruiser, two destroyers, and an assault scout in the battle. Additionally the fortified station orbiting Stenmar was severely damaged and almost destroyed in the fighting. Repairs to the station are on-going but may take some time to complete.
Flight forces across the Rim are on high alert for other possible sathar activity.
Kaarln Duggart – Stenmar News Syndicate
Details of tactics used by both sides and the outcomes were transmitted to Flight and Spacefleet forces as well. Spacefleet and militia vessels across the Frontier, especially those facing an imminent fight with other sathar fleets in just a few days, eagerly studied the data and updated their plans and tactics.
The first battle in the Rim was a success for the Flight but who knows what else the sathar have in store. The first fights in the Frontier are only days away as the sathar ships decelerate into four of the UPF’s systems.
Last Thoughts
This is probably the longest post I’ve made yet on this site. And it was only a medium-to-large fight. The battle at Prenglar (in a few days in the timeline) is going to be a doozie as it involves Task Force Prenglar, Strike Force Nova, and a sathar fleet even bigger than this one.
What do you think of this style of write-up? Too technical and too much detail? Not enough? What would make it more interesting or enjoyable? Would you rather just see a narration of the fight instead of the details of each bit of combat? Please share your thoughts in the comments below.
