The Expanding Frontier

Creating Sci-fi RPG Resources

  • Home
  • Order a Map
  • Order Miniatures
  • Supporters
  • About
  • Bio

Category Archives: Setting Material

CDC MV-043 Mining Ship

The MV-043 is a small, HS 5 mining ship designed to work independently on both small and large worlds.  Streamlined for planetary landings, the ship carries and orbital processing lab that allows it to process any resources found and bring them back to civilization in its 20 cargo unit hold.

The ship has 10 mining robots and a digger shuttle for mining operations and its support system can support up to 12 beings for 200 days.  It carries two laser batteries for self defense.  It’s ship’s vehicles include a small lifeboat and launch and a workpod.

CDC built a number of these vessels in its early days and continued to manufacture them at a low level as it opened new worlds.  The ships often doubled as exploration scouts – seeking out new worlds and collecting their resources.

The full ship stats are:

Hull Size: 5
HP: 24
ADF: 1 (loaded), 3 (empty)
MR: 1 (loaded), 3 (empty)
DCR: 38
Engines: 2 Class A Atomic Engines
Fuel Capacity: 3 full loads per engine
Accommodations: 12 Journey Class
Life Support:
– Primary: standard system – 12 beings, 200 days
– Backup: standard system – 12 beings, 200 days
Communication & Detection Equipment: Videocom radio with a master and 2 secondary control screens, Subspace Radio , Intercom (2 master control panels, 20 standard panels, 10 speaker panels), Radar – Type I, Energy Sensors – Type I, Skin Senors, Camera system
Computer Level: 4   FP: 138
Computer Programs: Atomic Drives 4, Life Support 1, Backup Life Support 1, Alarm 2, Computer Lockout 4, Damage Control 2, Astrogation 4, Laser Battery 1, Laser Battery 1, Communication 2, Information Storage 2, Installation Security 2, Skin Sensors 1, Maintenance 2, Cameras 1, Robot Management 4, Cargo Arm 2, Orbital Processing Control
Ship’s Vehicles: small launch, small lifeboat, workpod, digger shuttle
Other Equipment: cargo arm, orbital processing center, 10 mining robots, complete backup computer and life support system
Weapons: LB (x2)
Defenses: RH
Control Spaces: 8
Cargo Capacity: 20 cargo units (3000 cubic meters)
Volume: 7313 cubic meters (total), 2343 cubic meters (inhabited)
Unloaded Mass: 3848 tons
Loaded Mass: 9848 tons
Crew Size: 8 (nominal)
ADF per Fuel Load: 1269 (loaded), 3248 (unloaded)
Cost: new: 2,478,412  r. (unfueled)

The ship currently available has been in service for 19 years and is currently missing the following items:

  • all vehicles including the digger shuttle
  • the mining robots
  • all life support supplies
  • the backup computer

In its current state, the ship is selling for 1,292,284 cr. 

November 19, 2018 Tom Leave a comment

PGC FF-02 Military Frigate

The FF-02 was an early model frigate designed and built shortly after the Great Sathar War as the newly formed UPF worked to build up it’s Spacefleet to defend against another sathar incursion that never happened.  A mainstay of the early fleet, a large number of these ships were build in the early days of the UPF.

Many have been lost over the years to skirmishes with pirates over the intervening decades with a few even showing up in pirate fleets, having been captured or salvaged.  Those remaining in service within Spacefleet are getting up in years and are being decommissioned in favor of newer, updated models.  Some have gone to planetary militias, and other to the escort fleets of the larger mega-corps.  A few, fully stripped of military hardware, have gone to private buyers as well.

PGC FF-02 Military Frigate

The frigate is the smallest and fastest (ADF 4) of the capital ships in Spacefleet.  Packing nearly the same punch as the slightly larger destroyers, these ships were quicker to build and their added maneuverability gave them a desirable advantage.

The frigate sports a laser cannon, laser battery, and rocket battery and torpedo launchers.  It has a standard reflective hull, masking screen launcher, and small interceptor missile cluster for defense.

The PGC FF-02 was built with older armored hull technology that provided extra hull strength at the cost of increased mass.  Newer models are being built with newer military spec hulls that provide even more hull strength and less weight, increasing maneuverability.

The full ship specs are:

Hull Size: 5
HP: 39
ADF: 4
MR: 4
DCR: 70
Engines: 2 Class B Atomic Engines
Fuel Capacity: 6 full loads per engine
Accommodations: 35 Journey Class
Life Support:
– Primary: standard system – 35 beings, 200 days
– Backup: standard system – 35 beings, 200 days
Communication & Detection Equipment: Videocom radio with a master and five secondary control screens, Subspace Radio , Intercom (4 master control panels, 100 standard panels, 20 speaker panels), Radar – Type I, Energy Sensors – Type I, Skin Senors, Camera system, White Noise Broadcaster
Computer Level: 4   FP: 176
Computer Programs: Atomic Drives 5, Life Support 1, Backup Life Support 1, Alarm 2, Computer Lockout 4, Damage Control 2, Astrogation 4, Laser Cannon 1, Laser Battery 1, Rocket Battery 2, Torpedo 3, ICM 3, Communication 2, Information Storage 2, Installation Security 5, Skin Sensors 1, Maintenance 2, Cameras 1, Robot Management 4
Ship’s Vehicles: small launch, large launch, 2 large lifeboats, 10 escape pods, 2 workpods
Other Equipment: complete backup computer and life support system
Weapons: LC, LB, RB(x4), T(x2)
Defenses: RH, MS (x2), ICM (x4)
Control Spaces: 16
Cargo Capacity: 2 cargo units (300 cubic meters)
Volume: 9320 cubic meters (total), 7063 cubic meters (inhabited)
Unloaded Mass: 9196 tons
Loaded Mass: 9796 tons
Crew Size: 25 (nominal)
ADF per Fuel Load: 4083
Cost: new: 5,810,168 cr. (unfueled)

The ship currently available is one of the early editions, produced just a few years after the Great Sathar War and is 53 years old.  It has been stripped of all military grade hardware and a lot of other parts.  Currently it is missing the following components:

  • Laser Cannon
  • Rocket Battery Salvos
  • Torpedo Launcher and salvos
  • Masking screen salvos
  • ICM salvos
  • Energy sensors
  • the backup computer
  • all life support supplies
  • the 14 robots giving the boosted DCR
  • White Noise Broadcaster
  • all of the ship’s vehicles
  • all 10 escape pods

This stripped down hull is available for 1,762,663 credits.

With the missing damage control robots and a minimal crew of 6, the ship is rated at a DCR of 37 instead of 70. Additionally, in it stripped down state, the hull has a current ADF of 5+.  The final ADF will depend on the systems the buyer adds back in.

November 14, 2018 Tom Leave a comment

Expanded Frontier Map

Happy Halloween!  In my “State of the Frontier” post last week, I mentioned that I was working on updating an old map that I had created many years (i.e. decades) ago for use as my main campaign map of the Frontier region.  Today, I’m posting the (near) final version of that map. Along with a bit of history and explanation.

Background

The original map was hand drawn in the late 80’s on six 8.5″x11″ pieces of quad-ruled graph paper and then taped together.  I’ve kept it in a cardboard poster tube all these years when I haven’t actually been using it.  Right now it’s rolled up inside out to try to get some of the decades of bend rolled out the other direction.

The map was drawn back before I acquired a personal copy of Zebulon’s Guide to Frontier Space, Vol 1.  I didn’t get my first copy of that until 1992, many years after Star Frontiers went out of print.  My copy was actually a gift from some fellow role-players. 

I had, however, looked at a Zeb’s Guide and its beautiful map at some point before I drew mine.  There are too many similarities between the area just around the Frontier in my map and the Zeb’s map to chalk up to mere coincidence.  The two most noticeable are the star cluster to the upper left of the Frontier and the neutron star just below it.  I would have had zero reason to put a cluster like that (I had four stars and the Zeb’s Guide map had 3) anywhere, let alone there, if I had not seen the published map at some point.  And I had exactly the same use for the neutron star system at the location of Lynchpin as the published timeline had.  I had a different route to it but the idea was there from a perusal of Zeb’s Guide in a bookstore.

I have now updated my map to better match the map in Zebulon’s Guide as well as included some additional fan created maps of the areas of space the Saurians and S’sessu come from.  These changes mainly affect the area below the Frontier and to the right of Liberty system (from the Beyond the Frontier modules).

There are a few differences.  Most importantly is the location of the new systems described in the published modules.  I place the Rhianna (Mission to Alcazzar) and Starmist (Sundown on Starmist) systems in the locations specified in the modules, not where the Zeb’s Guide map places them.  I always thought it was strange that they would move them from the published locations.  In truth, only Rhianna was given a general location (inside the loop formed by Cassidine, Timeon, and White Light) but given the way Starmist was discovered (by emergency landing which I took to mean from a mis-jump), I don’t think the Zeb’s Guide location (outside the main Frontier) makes sense for that system and I like mine better (and the system I chose was left off the Zeb’s map completely!).  My location for the Belnafaer system (Bugs in the System) only differs by one star from the Zeb’s map and both correspond to the module description.  For now I’ve left it where I originally placed it but might move it for consistency.  Finally, the location of the Tristkar system (Dark Side of the Moon) is exactly where Zeb’s Guide places it.  From the description in the module, the location of the Solar Major system would make a little more sense but since I didn’t actually have this system on my map originally, using the Zeb’s Guide location works just fine.

Second, I don’t have the plague worlds from Zeb’s Guide (the system I choose for Rhianna is actually Zeb’s Delta plague world).  On my map they are just unexplored systems.

Finally, while I don’t normally use the MegaCorp systems in my campaign I’ve included them for completeness.  I’ve also redrawn the nebulae in the Frontier region to more match the ones drawn in the Zeb’s Guide map and added in the Rim planets.

On the side of fan produced materials, I’ve added in the locations of the Saurian and S’sessu worlds from maps published in issues 4 and 16 of the Frontier Explorer and adjusted my map accordingly.

The New Map

So with that introduction, here’s the updated map.

Expanded map of the Frontier Sector with the systems from Zeb's Guide, the modules and some fan creations added in.
Updated map of the Frontier. Click for the full-sized image.

The smaller blue box is the area covered by the original Frontier map and the large blue box is the area covered by the Zeb’s Guide map. 

This is very much a “player-facing” map.  It doesn’t contain secret jump routes (with the exception of the one between Truane’s Star to Cassidine that I forgot to remove 🙂 ) that are known to the UPF, MegaCorps, pirates, or the sathar.  If I was using it for my game, there are even parts of this map that I would not use (i.e. the MegaCorp planets, and S’sessu and Saurian space) at least not to begin with as those are discovered in game.  I’ve set the map up with all these bits and pieces on separate layers so that I can turn them on and off as needed.

The map extends more upward from the Frontier than down because the Vast Expanse, an area that I consider to be fairly devoid of stars, is “down” and exploration is easier (due to shorter jump distances) in the “up” direction.  You can see the much lower density of stars in that direction.  It gets even worse going further off the map.

While I still have some small tweaking to do on this map, mainly with labeling, it is completely usable. 

Future Work

While this is a completely functional map, it’s not super pretty.  One of the things I’d like to do is give it a color makeover so it looks more like the maps that my star sector generator program produces.  Those maps look like this:

Click for full-sized image

However, that might have to wait for a while.  Although when I get to it, it will make a pretty awesome poster.

The actual next step is to work out the logistics of the Second Sathar War and the sathar assault on the Frontier.  The sathar are out there on that Extended Frontier map although I didn’t show their systems and jump routes.  Given that I know know all the jump routes, I can start figuring out how long it would take for them to maneuver and launch offensives and resupply their ships from their starship construction centers.  Some exploration by the UPF and well placed raids could significantly influence the outcome of the conflict.

If you have any thoughts or comments on the map, let me know.

Update: Just saw today that the RPG Blog Carnival topic for November (hosted by Nuketown) is “All These Worlds …”.  My post was a day early (and I didn’t know the topic or I might have waited) but it’s close enough that I think it applies.  So this post is part of this month’s blog carnival and I might have some more related posts in the coming weeks.

October 31, 2018 Tom 9 Comments

Alyssa Tinett

I had intended for Alyssa to play a larger role in the Death at Rosegard adventure when I ran it for my group.  But, like many of the things GMs put into their adventures, the party didn’t really take an interest in her.  I used her for the first role she was supposed to play and then I forgot about using her later on.  So it is at least partially on me. 

Alyssa is the daughter of Larroy & Camryn Tinett, the village’s vet and computer specialist respectively.  Her maternal grandparents also live in the village, Steven & Janie Hite.  She is very intelligent, inquisitive, and adventurous.  She is also an only child.

Alyssa Tinett

Picture of Alyssa in shorts, shirt, and shoes.  Her hair is in a ponytail and she has a sword at her side.
Sketch by Danae Stephens

Physically, Alyssa is about 137 cm (4’6″) tall and weighs about 32 kg (70 lbs). She has long brown hair that reaches her mid-back which she typically wears in a pony tail. She has green eyes, and a light tan complexion.

She has her mother’s interest in computers and has picked up quite a bit of experience helping around her mom’s shop. 

Alyssa is curious and friendly and a xenophile, very interested in the non-human races of the Frontier.  As such, she likes to visit the Streel mine compound and talk to the staff there.  She has befriended the resident geologist, a yazirian named Talnor Malon, who has been teaching her how to sword fight, probably against her parents wishes. 

Note: If any of my players are reading this, they may notice that I describe Talnor here as a geologist.  In the game when I ran it I made him the roboticist but that was a mistake I made when introducing him and just went with it (as it really doesn’t affect the game much at all).  He was supposed to be the geologist and I just read my notes wrong.

Stats

STR/STA: 25/25
DEX/RS: 45/45
INT/LOG: 60/65
PER/LDR: 60/60
Skills: Computer – 1, Melee (sword only) – 1

In The Adventure

Introduction

When the PCs arrive in town, there will be a party going on at the city center and the PCs will be flagged down by one of the mine staff and escorted inside to join the celebrations.

The event is a birthday party for Alyssa who is turning 12. When the PCs enter, she will be seen across the hall in a pale blue summer dress. Despite her feminine attire she will be engaged in a mock sword fight with a boy that looks to be a year or two older and a few inches taller than her. She is also winning.  Any yazirian PC will notice that she is wielding her sword as a yazirian would wield a kha’dan (yazirian honor blade).

When Alyssa notices the PCs, she will let out a loud squeal of excitement, abandon the sword fight, and race over to talk with the PCs, especially the non-human ones. She will be full of questions and youthful curiosity but her questions will be very intelligent.

Regular interactions

As the PCs investigate and interact with the town, Alyssa will tail around with them if they let her.  She will mostly stay out of the way but will try to strike up conversations when they are not busy and will provide information if asked.  She received a short sword from Talnor as a birthday present and will be conspicuously wearing it whenever she is out and about.

Up until now she has typically gone by the nickname “Ali” and most of the townspeople will call or refer to her by that name.  However, now that she’s 12, she wants to go by her full name and will always introduce herself as Alyssa and correct anyone that calls her Ali.  The exception to that are her grandparents, they still get to call her Ali.

Leaving Town

When the PCs leave the village, she will attempt to hide in the back of their explorer. Unless the characters are explicitly looking or being careful to prevent it, she will not be discovered until they are many hours away from town.  For each hour of travel, there is a 5% cumulative chance that she will be discovered (i.e. 5% after one hour, 10% after 2 hours, and so on).

Because she ranges round the town and mine so much, she won’t be missed until near the end of the day that the PCs leave.  At which point, if they haven’t discovered her and let the village know that she is with them, they will get a call on their radiophone asking if they have seen her.  At which point she will accidentally give herself away in the back of the vehicle.

Alyssa has dressed and packed for an adventure.  She is wearing jeans, shirt and boot, and has a backpack containing a jacket, 2 liters of water, 4 days of travel rations, an all-weather blanket, a compass, a pocket tool, and a change of clothes.  She also has a chronocom and the short sword she received from Talnor on her birthday.

She wants to have an adventure and will do anything she can to convince the PCs to let her stay with them.  The referee should play up her excitement, desire to explore and learn, and willingness to help the PCs anyway she can to try to convince them to keep her with them as long as possible.

Further Interactions

What the PCs do with her is up to them.  Depending on when they discover her and where they are at, they can return to the village delaying what they were working on or can decide to keep her with them. 

Returning her home will result in a severe scolding for her from her parents and profuse thanks to the PCs for keeping her safe.  The longer they keep her with them, the less profuse the thanks will be, however, as her family will be worried about her.

On the other hand, if the PCs keep Allysa with them, she will be obedient and helpful, although very curious and inquisitive about what they are doing.  She realizes she is there only at their whim and wants to stay on the PCs’ good side.  It’s up to the referee to decide on the final responses and repercussions from the village and Streel for whatever course the PCs choose.

October 8, 2018 Tom 1 Comment

Duergan’s Star

Duergan’s Star system is where the Ghost Ship Osiris adventure takes place.  Part of the module is a short write-up of the system.  Presented here for you enjoyment.

There might be a few tweaks to this after Bill looks over it but for the most part this is the final description of the star system.  Bill wrote most of the background, I primarily did the astronomical data.

Duergan’s Star System

History

In -391 GFT, a starship from a distant point of origin crashed on a terrestrial world orbiting a yellow star. The Hawthorne was a rather large science research vessel that supported a crew of 100 Human scientists and technicians. The captain of the vessel, Dr. Duergan Mindner, identified it as a safe place to set down the failing ship, saving its crew but stranding them far from home. This was the first time Humans set foot on any of the worlds of the Frontier sector, and would become the start of their long legacy of influence. Just under 40 years later, Human migration vessels began their voyage from afar to make these worlds their homes.

Today, Hawthorne and Parnell have heavy Human populations. These two habitable planets reside within the habitable zone of the system’s primary Star. Its people share a cultural and economic brotherhood with those of the Kassel and Bhant Systems, the three comprising a region known as “The Ring,” a central hub of cultural, corporate, industrial, and economic activity for the Galactic Federation.

The local government of Duergan’s Star, headquartered on Parnell, is a member of the Galactic Federation and has been since its founding. The Federation keeps a naval garrison here and operates three navigational buoys, providing secure trade routes to Kassel (4 LY away), Bhant (4 LY away), and Krighton (11 LY away, gateway to the Asimaar Prelacy).

Star System

Schematic map of the star system with the star at the top and each of the planets and asteroid belts as described in the text
Duergan’s Star System. Planets are to scale with one another and the orbital distances are to scale on a logarithmically scaled axis

The star itself is a yellow G7V main sequence star with a mass of 0.9 galactic standard solar masses (1.795×1030kg).  It has a luminosity of 0.693 stellar luminosities (2.69×1026 W) and a diameter of 0.93 standard diameters (1.29 million km).  Its surface temperature is 5472K.

Most of the star system is relatively close to the planet (less than 13 AU) but it has one distant world in the outer reaches.  The Duergan’s Star system contains two asteroid belts, two habitable planets, an ice giant planet, and three other worlds.  The FTL horizon is at 1.5 AU, 0.38 and 0.65 AU beyond the two habitable planets.

Inner Belt

The inner belt is a very high density asteroid belt filled with smaller objects that orbit between 0.2 and 0.4 AU from Duergan’s Star.  There are considerable resources to be found by those that work the belt and numerous ships can be found here.

Wescott

Wescott is a large terrestrial planet orbiting 0.5 AU from the star.  It has a surface gravity of 1.6g and is 1.34 standard diameters in size. It has six small moons that are asteroids captured from the inner belt.  Its surface is covered with large impact craters – witness to regular bombardment by strays from the inner belt.

Hawthorne

Hawthorne was the first planet settled by humanity in the frontier.  Despite its long history and large urban sprawls, Hawthorne is a remarkably clean planet.  Founded by scientists who understood the need to be careful with their new world, the people have maintained that tradition over the centuries.

Hawthorne is a higher than average density world,  Although it has a diameter of 11,097.9 km (0.87 standard), it has a surface gravity of 1.1g.  It orbits 0.85 AU from the primary and has a warm pleasant climate with a day lasting 26.5 standard hours.  It has four small moons.

Parnell

Parnell was settled much later after the Hawthorne colony was well established.  Parnell is an ocean world with only a few very small island continents.  These islands are completely covered with cities and overpopulated.  The climate is very mild but not cold.  The large oceans result in a bit more greenhouse warming and the planet is warmer than a typical terrestrial planet at this distance from its primary.

Parnell orbits 1.12 AU from Duergan’s Star and has a diameter of 8164 km.  Its surface gravity is 0.9g and it rotates once every 21.3 hours.  It has two moons.  The mild climate, low gravity, and abundant beaches make tourism a major industry on the planet.

Outer Belt

The outer asteroid belt is not as dense and the inner belt (rating only a moderate density) but the individual objects in this belt are individually very large, often bordering on being minor planets themselves.  Outpost Osiris is located on a medium sized asteroid in this belt.  The belt is fairly wide with objects in this belt having orbits ranging from 1.6 to 2.8 AU from the star.  Like the inner belt, there are considerable resources here and many mining operations are scattered throughout the belt.

Dungannon

Orbiting at a distance of 5.24 AU from Duergan’s Star, Dungannon is a dwarf planetoid 6250.5 km in diameter.  It has a surface gravity of 0.53g and spins on its axis once every 75.5 hours.  Dunganon has single large moon that is tidally locked to the planet (orbiting and also rotating once every 75.5 hours).  This moon has a surface gravity of just under 0.1g.  It has a diameter of 1722.2 km.

Coombs

Coombs is the system’s only Jovian planet and is classified as an Ice Jovian being composed of more methane and ammonia than pure hydrogen gas.  It orbits 12.12 AU from the star, and has a diameter of 44646.7 km.  It rotates once every 18 hours and has 37 moons ranging in size from small asteroids to o jects that are small worlds in their own right.

Winterbourne

The final, distant object in the system to be classified as a planet is the small dwarf planetoid Winterbourne.  This cold, frigid planet orbits 78.83 AU from the star.  It has a diameter of 3954.4 km and a surface gravity of only 0.21g.  Like Dungannon, it rotates very slowly completing one rotation every 76.2 hours.  Winterbourne is a solitary object with no moons.  Lost in the clutter of small objects in the outer system, Winterbourne has only been considered a full plant for the past 43 years.

The following table summarizes the planetary data for the primary objects in the Duergan’s Star system.

Name Type Distance (AU) Diameter Gravity (g) Moons Period (hrs) Description
Inner Belt Asteroids 0.2-0.4 small, very dense asteroid field
Wescott Terrestrial Planet 0.50 1.34 1.60 6 44.1
Hawthorne Terrestrial Planet 0.85 0.87 1.10 4 26.5 Walled, urban sprawls. Clean
Parnell Terrestrial Planet 1.12 0.64 0.90 2 21.3 Vast Oceans.  Overpopulated island cities
Outer Belt Asteroids 1.6-2.8 Huge, moderate density
Dungannon Dwarf Planetoid 5.24 0.49 0.53 1 75.5
Coombs Jovian:Ice 12.12 3.50 4.60 37 18.0
Winterbourne Dwarf Planetoid 78.83 0.31 0.21 0 76.2


September 12, 2018 Tom Leave a comment

The Village of Rosegard

Originally, I had planned to have one more Mapping Rosegard video here that covered adding in the labels for the roads and making the black and white version of the map you’ll see below but for some reason, the audio didn’t record, only the video.  Since I didn’t want (or really have the time) to do a voice over, and it’s not that important of a topic, I decided just to drop it.  Also, it is something I can easily cover in a future series.

So instead, you’re getting the post that I had originally planned for the beginning of next week, the final maps along with the write-up on the town proper.

Rosegard

Final rosegard map in full color with labels
The final Rosegard map. Click for full sized image (~6MB)

History

Rosegard is located about 400 km northwest of Point True.  It was founded shortly after the Great Sathar War as part of the resettlement effort initiated by the Pale government.  It originally consisted of six human families that set up homesteads in the valley using the agriculture subsidies the government provided to encourage development of farming to supply food for the population.  Over time, the small village has grown to include 13 families, many of the additional families are children of the original settlers that went away to school and then returned.

While there is no shortage of technology in the village, it is still primarily an agricultural center.  Most of the actual agriculture work is done by robots but supervised by the towns inhabitants.  The technological specialists in town keep the robots, vehicles, and computer systems running to manage the farm production.   Every week, trucks arrive to pick up crops to take into the larger population centers to sell.

About 18 years ago, one of the villagers was up exploring in the mountains and discovered a vein of gold that had been revealed by some recent erosion.  Lacking the infrastructure to properly mine the valuable resource themselves, the village brokered a deal with Streel (formerly known as Streele Mining before the war) to lease the company the rights to the mine.  The mine proved to be more lucrative than either party imagined and is still active to this day.

The village’s income from the mine amounts to several million credits every year.  That money is held in trust and used to maintain the village infrastructure, pay for primary and secondary education for all of the village youth, and other expenses as needed.

There is a very good relationship between the workers at the mine and the city.  In addition to providing additional revenue to the village, the mine employs the village’s technical workers (the technician, roboticist, and computer specialist) to help assist with work at the mine in addition to their own staff. The mine staff also takes advantage of the medical facilities provided in the village.  Reciprocally, the village invites the mine staff down for any town activities and has integrated them as part of the community.  The youth often go up to the mine to see operations there and the mine staff often come down to teach mini-lectures in the village school.

Inhabitants

Original Homesteading Families

These are the senior members of the community who originally founded it.  Their houses are located around the circular loop at the north end of town.  These families primarily work the agriculture portion of the village’s activities.

  • Genio & Kathy Washy – Genio is the town mayor. They have two older children living at home.  They live in the home on the same plot as the General Store.  Kathy is a horticulturist and is responsible for tending the rose hedges in the central part around the gazebo.  It is these rose gardens that gave the village its name.
  • Martin & Jenne Lexand – They have two children living at home. They live in the home on the same plot as the Technician shop/Garage.
  • Steven & Janie Hite – They have three kids living at home.
  • Matthua & Julie Colly – They have three kids living at home.
  • Jon & Jessa Smeson – They have a single child living at home
  • Reme & Kayelyn Marte – The youngest of the original settlers, they still have four children living at home

Newer Families

These families are younger, many of them being the older kids of the earlier settlers.  Their houses are built around the block on the west side of town.

  • Rickern & Mikaela Bennez – Mikaela is the second child of Jon & Jessa Smeson and the town’s roboticist having studied at Pale University. Rickern helps manage the Smeson farm.  They have three children.
  • Mese & Braealyn Washy – Mese is the oldest child of Genio & Kathy Washy. They run the town’s General Store and have three kids, ages 17, 14, & 12 who also help out at the store when not in school.
  • Larroy & Camryn Tinnett – Camryn is the daughter of Steven & Janie Hite and is the town’s computer specialist having studied at the Triad Institute of Technology. Larroy is a veterinarian and works with the village doctor.  They have a single daughter, Allyssa, age 12.
  • Rickey & Ilana Cooker – Rickey and Ilana met Camryn at school and she convinced them to move to Pale when she returned home. Ilana is the town doctor and also has some veterinarian skills.  Rickey helps work the Hite farm with his in-laws.  They have four kids.
  • Benjoe & Abbil Leray – Benjoe is a childhood friend of Rickern Bennez and became enamored of the quite life in Rosegard when visiting one year. Both he and Abbil are teachers and work at the village’s school.  They have five children
  • Joshua & Miya Welley – Josh and Miya are the newest members of the village and the only ones that didn’t have an immediate connection when then arrived. As the village grew, the need for a city clerk arose and Miya was hired to handle the administrative affairs of the growing village.  She works in the City Center handling a wide variety of tasks for the town.  Joshua is a teacher and works with the Leray’s in the town’s school.
  • Mikkel & Danielle Lexand – Mikkel is the son of Martin and Jenne Lexand and is the town’s technician running the garage/tech shop in town. Danielle helps out on the Lexand farm.  They have one child.

City Buildings

General Store

This building contains a wide variety of goods that are used regularly by the small village.  While a lot of the supplies are foodstuffs and farming supplies, there are a number of small high tech wares as well.  Larger items, such as robots, most weapons, and vehicles, have to be special ordered in from Point True but the store has access to the full Streel and PGC catalog and anything ordered will arrive in 2-4 days.

Technician/Garage

This is where Mikkel keeps all the village’s vehicles and equipment running.  It has room inside to work on three vehicles at any one time.  It is a fully equipped and modern repair shop and any Technician skill checks performed using this area gain a +10% bonus.

City Community Center

This large building consists of two stories, unlike all the other buildings in town.  The lower level is a large gathering hall used for town activities and celebrations.  The upper level contains the city offices where Miya works as well as the village’s central computer system.  There are also half a dozen guest rooms that function as the village’s inn when they have overnight visitors.  While most of the rooms can be used by any race, one of them is specifically appointed with furniture designed for the Vrusk anatomy.  Across the street to the north, and directly east of the building are large grass fields used for outdoor activities as well.

School

The village’s school is where the younger kids spend their day getting their primary education.  It is divided into several small classrooms where specialized classes can be presented dependent on age and ability level.  Because of the small number of children in the village, there are not really “traditional” classes and each child has a workstation where they receive individual and tailored instruction based on their needs and interests.  The school is very high tech and state-of-the-art.  A lot of the village’s mine revenue has gone into its education facilities.  As such the children in the village are often smarter and sharper than would be expected for their age.

Computer/Robotics Shop

Mikaela and Camryn share this building to work on the villages computers and robots.  While the building is mostly given over to tech space to work on the various agriculture robots used by the village, there is also some space given over to computer repair as well.  This building also houses a backup computer system for the village.  If PC’s are looking for computer or robotic parts, they are more likely to find them here than at the General Store.  The facilities here are top notch and any computer or robotics repair or upgrade attempts receive a +10% skill bonus.

Doctor’s Office

This small office has a small operating room, and three patient rooms in addition to the foyer and waiting area.  Dr. Cooker has a small office here as well.  The building is designed for patients of the core four races and while they do handle veterinary duties, those occur on location outside the office.  Like the other areas in the town, the facilities here are of an higher than average grade and all medical checks made in the facility gain a +10% skill bonus.


Alternate maps

In addition to the main map above, I created one with no labels and another one in black and white.  These two maps are presented below.

No Labels

Final full color map with labels removed
Final map with the labels removed. Click for full sized image (~6MB)

Black & White

Black and white version of full map with labels
Final Rosegard map in black and white (with labels) – Click for full sized image (~2MB)

And that’s it for Rosegard for now.  Next up I’ll be shifting gears back to the Ghost Ship Osiris module and you’ll be getting some information on the star system the adventure takes place in.

September 6, 2018 Tom Leave a comment

Pursale [Work in Progress]

I was working on the one of the sections of the Ghost Ship Osiris module and it includes an alien robot.  I realized that to do the alien robot justice, I needed to know the race that created it.  So I busted out the Alien Species rules from the FrontierSpace Referee’s Handbook (p. 98) to give me some ideas.  I didn’t need a completely functional race as they are all dead (at least the ones you encounter in this adventure) but only a rough physical description.  The write-up below is what I came up with.

The following is the Referee’s write-up on the race to be included in the module.  It’s a working draft, hence the work in progress flag in the title.  It will probably go through some revisions as we flesh the module out a bit more and Bill chimes in.  I’ll also probably add more to the physical description as we go.

Pursale

Physical Description

The Pursale are a large omvinorous species. They are quite massive, over 3 meters in length (front to back) with six legs, two arms, and a short squat “head”. Their main body is typically 3-3.5 meters in length, 1-1.5m in width and about a meter in height. They weigh in at about 2-3 tons.

The Pursale’s head, which sits at the front of the body, contains its mouth, another set of olfactory organs, and is where the sensory stalks are attached. The mouth sits low on the head which can be bent downward to touch the ground. It has no upward range of motion beyond the horizontal.

Rising up from their head are two slender, long (about 1.2m) appendages that end in their sensory clusters. Each cluster contains an eye as well as olfactory and auditory organs.  The sensory stalks are also flexible and can be positioned as high or as low as they can reach. Typically held high and wide, the Pursale have excellent depth perception and directional hearing.

Their legs are relatively short (about 0.7m long) keeping the body low to the ground but each one ends in a four-toed foot.

The Pursale’s brain is not located in its head but rather further back in the body just behind the creature’s arms. The arms themselves are attached just behind the neck. The arms look like longer skinnier legs, 1.2m in length each ending in a hand with three fingers and an opposable thumb. The Pursale’s shoulder joints have a full 360 degree range of motion.

History

The Pursale are descended from large plains-grazing animals on their homeworld. For millennia, their technology developed slowly and was primarily focused on food-production and medicine. Over time they slowly developed spaceflight and colonized the other semi-habitable planet in their star system which they terraformed into a food production world.

They had just recently discovered FTL travel capabilities when one of their outposts was discovered by the Thazzar, a war-like race bent on conquering known space. Luckily for the Pursale, a ship managed to escape the Thazzar attack and warn the home world of the pending danger.

While not a war-like race, they learned quickly. However, with only a single industrial star system, they were no match for the much larger Thazzar forces. In the last years of the war, Pursale scientists developed a new technology, the phase shield, that allowed material affected by the shield to pass through normal matter and remain unaffected.

Unfortunately for the Pursale, this discovery came too late to turn the tide of war. However, it did provide a way for some ships to escape damage from the Thazzar weapons. In an effort to save their race from destruction, a number of colony ships were built and equipped with this new, although unperfected, technology. These ships were launched in many directions in the hope that some would escape and be able to rebuild the Pursale society.

Relation to the Module

The ship embedded in the Osiris asteroid is one of these colony ships. Unfortunately, the second system it arrived in, now known as Duergan’s Star in the frontier, was occupied at the time by a Thazzar battle cruiser that detected the ship and pursued it. Using its phase shield, the Pursale vessel attempted to hid inside the Osiris asteroid which they discovered to be partially hollow.

That was when the final tragedy struck. While hiding, the phase shield temporarily failed, fusing the ship with the rock and permanently disabling it, dooming the crew and colonists. Not all of the ship was destroyed and there are portions that are not fused with the surrounding rock. The ship lay dormant and entombed for millennia until it was discovered by the miners on Outpost Osiris.

When the ship was entered, some of its security systems were activated prompting the call for help. The scavengers’ activities on the ship have also activated more of the defenses that are now threatening the lives of the outpost’s crew.

Robots

Once I had the physical description of the Pursale, I was ready to create the robots.  There are actually two different robots (at least) that the PCs will encounter as part of the adventure.  The first is the basic combat robot.  The scavengers took one (or more depending on play balance) of these and activate them in an attempt to drive the PCs off their ship.  The second is a command and control warbot that is coordinating the efforts of several combat robots within the confines of Outpost Osiris itself.

Pursale Combat Robot

Frame:  Medium
STR:  50
AGL:  45
CRD:  60
PER:  45
INT:  50
BP:  100
INIT:  2
Move:  12, Walking
Docking:  4CU

Skills:  Marksman +5, Warrior +0

Equipment:  Audio/Visual, IR, motion, & lifeform scanners, communicator, military grade reflec & sonic screens, laser rifle, distruptor, 2x 100 EU backpack.

Weapons: Laser Rifle, Distruptor

Description:  This robot is like no other you have ever seen in the Frontier.  It has a short squat body with six legs and two arms extending from the sides of the body near the front.  Extending up from the front of the body are two long slender stalks, about 1.2 m in length that end in sensor clusters.  Attached to the back, are what appear to be power packs.  The arms end in manipulator hands that have three fingers and a thumb.  Each arm has some sort of weapon built into it.

Referee Notes:  The left arm has a built in laser rifle while the right one is sporting a distrutpor.  These robots look like miniature, metallic versions of the Pursale and are designed for front line combat.

Pursale Combat Coordinator Warbot

Frame:  Huge
STR:  100
AGL:  60
CRD:  70
PER:  65
INT:  65
BP:  500
INIT:  3
Move:  13, Walking
Docking:  15CU

Skills:  Commander +10 (Violent Plan), Marksman +0, Warrior +0

Equipment:  Audio/Visual, IR, motion,, vocal & lifeform scanners, communicator, computer link, military grade reflec & ballistic screens, 800EU power source, military grade armor, comm jammer

Weapons: Heavy Laser, Devastator, Grenade rifle with 4 EMP, 4 tangler, 8 smoke, & 8 frag grenades

Description:  At first glance, this robot is basically a larger version of the combat robot, roughly the size of the Pursale themselves. It is heavily armored and has a number of large weapons mounted on (and into) its “arms”.

Referee Notes:  The left arm has a built in heavy laser while the right one is sporting the devastator and grenade rifle.  It has a computer link to allow coordination with a central control point but can operate independently.  It can coordinate the operations of up to 64 Combat robots at any given time.

When directing the robots it controls, it has the equivalent of the Commander skill benefit Violent plan (+5 to hit, +2 damage) and uses it effectively during its operations.

It uses its grenades to attempt to disable or pin enemies and reduce visibility for its opponents.  The robots can see right through the smoke from the smoke grenades and both the Combat Coordinator Warbot and the Combat Robot are shielded against the EMP blasts from the grenades the Combat Coordinator Warbot carries.

Images

The jury is still out on the final look for the Pursale.  I handed off the physical description above to my resident biology artist (aka my daughter) and she came back with a few possible sketches of what these things might look like based on the description I gave her.  Here are some possible options:

Insectoid:

Puffy:

Leafy:

(she actually called this one Butterfly)

The interesting thing is that I didn’t give her any direction at all.  I was actually thinking more of a leathery, rough body like an elephant or rhino or a smoother leathery body like a seal or hippo.

In any case, work is progressing.  I’ve basically finished section 3 of the module and have sent it out to my Patreon supporters.  If you’d like to get the early releases, consider supporting me on Patreon.

What do you think about the race and robots?  What physical description came to mind when you read the write-up above?  Let me know in the comments below and it might get incorporated into the final version.

August 9, 2018 Tom Leave a comment

Void Sickness

Traveling through hyperspace ain’t like dusting crops, boy!

  • Han Solo, Star Wars

While a little out of context (Han was actually referring to astrogation calculations), the quote still applies – faster than light (FTL) travel is not just a walk in the park.

In this post, I want to look at a mechanic for FTL induced illness, which I’ll be calling Void Sickness.  The name comes because I created this mechanic for my Star Frontiers games where FTL travel is accomplished by traveling through “The Void” or “Void Jumping”.  In that game, you accelerate up to speed (1% the speed of light) and then make a nearly instantaneous transition into and out of the Void to cross many light years.  The rules are a little vague on the actual duration but I’ve always used 1 second per light year.  When you re-emerge you are in a new star system (hopefully your destination if you got the astrogation correct).

But what happens physiologically when you make the transition?  You are entering, even if it is briefly, a dimension your body wasn’t designed for.  It’s natural that your body may have an adverse reaction to the transition.

During the Jump

First there is the physical manifestations during the brief time in the Void.  I always describe this as a confusion of the senses.  You can feel colors, hear tastes, see sound, etc.  And it could be different for different species or even individuals within a species.  I often use this picture to describe the visual sensations.

Negative image of a ship cockpit with colors and gradients shifted to produce an unnatural color palette.But what I want to talk about today is what happens after you exit the Void.

Aftereffects

Many games don’t worry about this.  They just assume that the PCs and others can experience FTL travel with no worries or side effects.  And that is absolutely fine.  If having potentially negative consequences of FTL travel is not something you want in your game, then you don’t have to have it.  But if you do, this is a possible mechanic you can use.

In my case, I wanted to add a potential downside to FTL travel that starts out fairly benign and uncommon but becomes worse the more and more you travel.  Until it possibly reaches a point that you simply don’t want to make any more interstellar trips unless you absolutely have to.  Here’s what I came up with.

Void Sickness

Void Sickness is not an uncommon effect of FTL travel and some people are more susceptible to it than others.  But even if you are susceptible to it, it doesn’t affect you on every trip.  It is also a condition that worsens, with both increased susceptibility and symptoms, the more times you engage in FTL travel.

I’ll present this as a percentage based system (since that is what Star Frontiers, which I originally developed it for, uses) but you can easily convert this to a d20 or other system if you want.

Original Version

This is the original version of Void Sickness I developed.  It’s actually pretty harsh, I’ll present a much milder version below.

To see if you are susceptible to Void Sickness you need to make a check against your Stamina (or CON or the equivalent from your system).  Since STA in Star Frontiers typically ranges from 30-70, you make a STA+20 check the first time you make a Void Jump.  If you make the roll, you do not suffer from Void Sickness on this trip and your base chance to avoid Void Sickness on all other jumps starts at 95% (i.e. if you roll a 95 or lower on d100 you are not sick).

If you fail this roll, you are susceptible to Void Sickness.  You suffer from the sickness on this trip and your base chance to avoid it on future trips is equal to your STA score.  Thus you are much more likely to succumb to it in the future.

On all future FTL trips, you make a roll against your resistance score.  If you succeed, you do not suffer from Void Sickness for that trip.  If you fail, you do suffer and your resistance score is reduced by one.

The impact of the Void Sickness is determined by the amount you failed your roll.  The difference between your roll and your resistance score determines both the strength of the effect and its duration.  This value becomes the penalty you suffer on all skill and ability checks and it lasts for that many hours.

For example: Drod, a dralasite, has a STA of 50 and is making his first interstellar trip.  He checks for his susceptibility to Void sickness by rolling a d100 and rolls an 76 which is 6 points higher than this initial check (50+20 = 70).  He is susceptible to Void Sickness and going forward his resistance score is only 50.  For this trip he suffers a relatively mild case and only has a -6 modifier to his skills and abilities for the next 6 hours.  If on a future trip,if  he were to fail the resistance roll again, his resistance would drop to 49.

A Milder Form

In its original form, the Void Sickness is something that everyone will succumb to eventually if they take enough interstellar trips and if you have a string of bad luck, you could succumb to it fairly quickly.  If you want the effect to be fairly rare, and slower acting when someone does have it, you can use the following variation.  With this form, it is probably something the PCs will never have to deal with but you could have Void Sickness in your campaign as setting material to use on NPCs.

In this form, the base chance the first time you make a jump is a flat 95% on a d100.  If you roll less than that you don’t have the sickness and never will.  You never have to roll again.  If you do fail the roll, you have a mild case this time (you are not going to fail by more than 5 points) and your resistance roll going forward is equal to whatever you rolled this time. (i.e. if you rolled a 98, your resistance chance for all future trips starts at 98). The effects and increase in susceptibility are as before.

Mitigations

If the occurrence of this illness is common, there will probably be a number of ways to deal with it from drugs that boost your immunity to other drugs that mitigate the effects.  If the occurrence is more rare, there may only be drugs to mitigate symptoms and there may not be anything specifically for Void Sickness but only the use of regular drugs to treat the symptoms.  Here are some that I use in my game.  All these are required to be administered by someone with the Medic skill.

VoidBoost

Cost: 25 credits

VoidBoost is designed to improve a being’s immunity and resistance to Void Sickness.  If administered prior to the Void Jump, VoidBoost raises the recipient’s resistance to Void Sickness by 20 to a maximum of 95%.  Only a single dose of VoidBoost can be administered for any given trip.  Additional doses have no effect.

Most starliners stock this medication for their passengers.  It is either provided for free as part of the passage fare or at a discounted cost.

VoidBlock

Cost: 40 credits

VoidBlock is a broad spectrum medicine designed to reduce the effects of the symptoms of Void Sickness.  It has no effect on the duration.  It works by reducing the penalty to ability and skill checks due to Void Sickness.  VoidBlock reduces the negative modifier associated with Void Sickness by 1d10+10 for 20 hours.  No more than one dose can be taken in a 20 hour period.  Any doses taken beyond the first in that time automatically have no effect.  VoidBlock cannot be taken in conjunction with VoidReduce.  If it is, neither drug has any effect.

Most starliners stock this medication for their passengers.  It is either provided for free as part of the passage fare or at a discounted cost.

VoidReduce

Cost: 35 Credits

Void Reduce is designed to reduce the duration of the effects of Void Sickness.  It has no effect on they actual impact of the symptoms.  A dose of VoidReduce decreases the duration of Void Sickness by 1d10+10 hours.  Only one dose of VoidReduce can be taken for any given occurrence of Void Sickness.  Any additional doses automatically have no effect.  VoidReduce cannot be take in conjunction with VoidBlock.  If it is, neither drug has any effect.

Most starliners stock this medication for their passengers.  It is either provided for free as part of the passage fare or at a discounted cost.

Other Medications

Depending on your game system there may be other medications already in the game that can mitigate some of the effects of Void Sickness.  You can make a judgement based on the effects of the drugs in your game.  For Star Frontiers, I allow the following:

  • Biocort – one dose of Biocort reduces the duration of Void Sickness by 1d5+5 hours. Only one dose of Biocort can be applied for a given occurrence of Void Sickness.  If administered with VoidBlock or VoidReduce, Biocort has no effect.
  • Stimdose – one dose of Stimdose reduces the effects of Void sickness by 1d5+5 for 10 hours.  Only one dose of Stimdose can be administered in a 20 hour period as per the standard rules.  If administered with VoidBlock or VoidReduce, Stimdose has no effect.
  • Neutrad (from Zeb’s Guide) – one dose of Neutrad reduces the effects of Void Sickness by 1d5 points and its duration by 1d5 hours.  Only one dose of Neutrad can be administered for any given case of Void Sickness.  However, if administered with any other medication, none of the other medications have any effect.

Side note:  Due to the way Neutrad affects Void Sickness, scientists believe that Void Sickness is some form of temporary radiation poisoning but the exact form of radiation is unknown and not reproducible outside of a Void jump.  Many companies contract with ships to carry small micro experiments that run during the Void jump in an attempt to understand the cause of this illness.

Converting to Other Systems

Adapting this to another system is fairly straightforward.

If you want to use this in a d20 or 3d6 based system, You could simply multiply the relevant ability score by 3, 4, or 5 to get the initial base percentage for Void Sickness resistance if you wanted to keep with the d100 percentage system outlined.  The multiplier would depend on how likely you want the occurrence to be but by default I’d use 4 as that maps the closest to the ability score range that I designed against.  In any other system just use a suitable modifier.

If you don’t want to use the percentage based system but use the core mechanic from your system, simply reduce the percentage by the appropriate multiplier.  e.g. for a d20 based system simply divide the resistance chance by five (and subtract that from 20 for a roll-over success system like D&D to get the target number.)  Penalties can still be just the difference between the roll and the target and the duration becomes the difference times the modifier used.  If you are using a 3d6 system the percentages don’t map as closely but it still works.  The net effect would be for a slower initial deterioration followed by a very rapid final decline.  If you are using a game with a dice pool system, a little more work would be required to convert the mechanic.

The hardest part to adapt would be the slow deterioration of the resistance chance.  Instead of a reduction on every failure, you could implement a reduction after every N failures, where N is probably the multiplier used elsewhere.  Or you could require a CON (or equivalent) check each time they suffer from Void Sickness.  If they fail, their resistance weakens.  If they succeed, their resistance doesn’t change.

Final Thoughts

I created this illness primarily as background flavor for my setting.  It’s not something I ever expect the PCs to suffer from.  Unless they want to.  If the PC’s background is such that they would have taken interstellar trips before the game starts, I give them the option to automatically select susceptibility if they want or to just roll.  It was more designed as something that NPCs could suffer from and that the PCs would have to deal with in that manner.  I also intended to use in some of the stories I was writing at the time (and that I may someday get back to).

Have you ever done anything similar in your games?  Does this sound like something you might use in the future?  Share your ideas, suggestions, and thoughts in the comments below.

June 12, 2018 Tom Leave a comment

Designing Out Loud – Void Jumping

This post originally appeared on the now-defunct Arcane Game Lore blog.

This post is running a little behind as I’ve been swamped with end of semester projects. One down, two to go.  Next week’s post might get impacted as well.

My last two articles (one, two), part of the November RPG blog carnival, talked about the unexpected in Void Jump travel. In this article I want to discuss some more details about Void travel in my game and the mechanics that will be used.  Or at least what I am considering for a first pass.

Some Constraints

Gravity Wells

In my universe, Void travel cannot start or stop anywhere.  If you are too close to a large mass, the gravitational field of that object prevents void jumping.  This was somewhat inspired by Larry Niven’s hyperspace.  I liked the idea of having to worry about the large masses that you are traveling by.  Unlike Niven’s hyperspace, getting too close doesn’t cause anything bad to happen, it just bounces you back into real space or prevents you from initiating a Void jump at all. Of course if the object is close, directly ahead, and you’re moving fast, things could get scary.

This has a couple of implications for FTL travel.  First, you have to get away from everything.  I have an exact forumulation for it but for a solar sized star, you need to get about 4 AU away from the star before you can jump.  Starting at a planet about 1 AU away, it takes abut 84 hours of acceleration at 1g to get out that far.  This means that at a minimum, if everything is aligned properly and everything works, a single insterstellar jump will take about seven days (assuming a 24 hour day).

Next, it means you only have to be accurate in your direction vector enough to hit that sphere around your target star where Void travel doesn’t work.  As long as you’re lined up well enough, you’ll drop out of the Void when you hit that gravity well.  This places an upper limit on how accurate you need to be.  Now, the question is, can you get out of the Void on your own or do you have to hit one of these gravity wells to come out of the Void?  I’m leaning toward the following combination.  You can get out on your own, but it’s much harder than being pulled out naturally by hitting a gravity well.  In this scenario, you want to try to hit the target gravity well when you can.

This also means that locations close to the mass source (star or large planet) are “shielded” by the “no jump zone”.  Any arriving ship or fleet has to arrive outside that zone so there will be advanced warning before they get to their destination (at least if anyone is looking).

Everything is Moving

Another constraint is that nothing is ever in the same place twice.  Planets orbit their stars which are orbiting the galactic center and moving relative to each other.  This means that no two jumps are ever exactly the same.  A jump from one planet to another, repeated just a few weeks later, means that both the start point and the destination as moved.  It won’t be by much, but if you remember from my last article, even a little bit of error can result in a huge wrong location.

So every jump needs its direction vector recalculated before you can start.  The good news is that this actually isn’t a very hard calculation.  Or rather it is a hard calculation but a good computer can do it relatively quickly.  There is a lot of data that goes into it but for game purposes, I’ve decided that the calculation can be done in under an hour.  All you need is your start time, your start location, and a good astronomical database that has the information about your departure and destination system.  However …

Getting Lined Up is Hard

Figuring out where you need to go is easy,  determining if you are actually going there is another story.  The problem is the same as the one above, everything is moving.  There is not really an absolute reference frame.  The problem is that you don’t just need to know your position relative to the star your leaving but relative to all the stars in the sector.  And it’s not really the position that matters but rather your velocity vector.  How are you moving relative to all of these objects? And how do you determine this direction down to arcsecond (or sub arcsecond) accuracy?

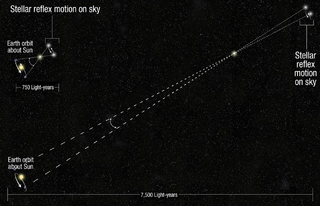
This can be overcome by the fact that you are moving quite a bit to get out of the gravity well.  As you move along your path, nearby stars will appear to move relative to more distant ones.  This is called parallax.  By measuring how much each of the stars move, and which direction they move, you can determine your vector in space relative to your departure and destination star.

There are some things to remember when trying to measure parallax.  First, you have to move quite a ways to measure any shift at all in stars; they are really far away.  Second, when you first start out, you’re not moving very fast so you don’t move very much between measurements.  This means that the more accurate of a measurement you need, the longer it is going to take as you need to have larger and larger baselines to measure small parallax angles.  You get these longer baselines by waiting longer and by accelerating so you’re moving faster and covering these distances faster.

What is the Jump Process?

Given all of this, what does a typical Void jump look like in game.

First, the astrogator computes the jump vector.  For this he needs to know the time of departure.  Plus or minus a few hours doesn’t make much difference.  This takes about an hour of time on the ship’s computer or could be requested from a central astrogation computer on the system’s data network if it exists.

Next the ship points in the general direction of the target system and begins accelerating.  Images are taken of the stars being measured for parallax.  As the ship continues to accelerate and covers more distance, new pictures are taken and the parallax measurements are made.  From this the course can be adjusted to make it more accurate.  This is repeated until the course is accurate enough.

Once the ship is lined up and the minimum jump distance is reached, the ship can engage whatever technology enables the jump and shifts to the Void, makes the trip, and emerges in the destination system.

At this point more standard navigation techniques can be used to decelerate and travel to the destination system.

How to Trigger a Jump

You may have noticed that I kind of glossed over actually making the jump.  That is going to depend on the setting.  Star Frontiers does it by hitting 1% the speed of light (of course that begs the question, 1% of c relative to what?).

For my world/game, the ability to enter the Void is controlled by a “Jump Field Generator”.  When you want to enter the Void, you turn this device on and it envelops the ship in a field that allows the ship to shift into the Void and make the jump.  Turning it off takes you out of the Void.

How Long Does it Take?

This really depends on the setting.  How fast can the ships accelerate?  What is the minimum jump distance? How long does it take to line up the ship?

If you want to use this idea, you’ll have to answer that for your own setting.  I’ll give you my answers.

How fast can ships accelerate?

For my setting, there is no artificial gravity.  Thus to get simulated gravity on a ship it has to accelerate.  But you also can’t accelerate too quickly or everyone gets squished.  By default, ships tend to travel by accelerating and decelerating at one standard gravity which in my setting is defined as 10 m/s/s for simplicity.  This means that accelerations are relatively low and it takes time to get from place to place.

What is the minimum jump distance?

For my setting, I’ve decided that the local gravitational acceleration (from everything smaller than the galaxy itself) has to be less than some specific value which I don’t remember off the top of my head as I’m writing this.  For a star like the sun, this distance works out to something like 4.05 AU.  At one standard gravity of acceleration, it takes about 84 hours to go from a planet at 1 AU out to the jump distance.  This sets a minimum time for a jump.

How long does it take to line up the ship?

I’ve thought a bit about this but I’m going to invoke a bit of handwavium here toward the end for the fine details.  There are several factors that go into it.

The first question is how accurate of a parallax angle can you measure. Modern systems dedicated to this can measure parallaxes of 10 micro arcseconds with lots of data on a 2 AU baseline (diameter of the Earth’s orbit) over five years.  So it is reasonable that the ships should be able to achieve 10 mili-arcsecond accuracy (1000x worse) on the same baseline. After all, they should have at least equivalent sized telescopes and detectors.  They just lack the time frame.  So we should be able to measure o.o1 arcsecond parallaxes on a 2AU baseline or 0.1 arcsec parallaxes on a 0.2AU baseline.

The next question is how big of a target are we trying to hit.  Assuming you have to hit the “no jump zone” around a solar sized star, that target is a direct function of the distance.  For a star 5 light years away, that 4 AU radius target corresponds to a direction accuracy of 2.6 arc seconds.  So if we can measure 0.1 arcseconds in 0.2 AU of travel, let’s assume that we should be able to get our course vector accurate to 2.6 arcseconds in about 0.4 AU (0.2 AU to get the first vector, adjust, and 0.2 AU to verify).

So how long does it take to travel 0.4 AU assuming 1g acceleration and starting at rest? 30.43 hours

Now a 10 ly jump requires an accuracy of 1.3 arcseconds.  The question is, how long should this take to dial in the desired accuracy?  I’m fond of inverse square laws so I’d say that double the accuracy requires 4 times the distance.  That means you have to travel 1.6 AU to get enough measurements and course corrections to achieve the desired accuracy.  Traveling 1.6 AU from rest requires about 60 hours.

Here’s where I will apply the handwavium quite liberally.  I could easily pick some numbers and justify the accuracy needed to achieve a jump and compute the travel time exactly needed to achieve that accuracy for a given distance.  And I could even provide the forumulas.  But it would be kind of messy.  However, I want something quick and simple.  I could present the data in a table to look up.  And I might do that as a later optional rule for those that want more realistic values.

But what I really want is something quick and simple that is easy to remember. And I want a 10 light year jump to take longer to line up than it takes to get out to the minimum jump distance.  I also want it to become unpractical to make really, really long jumps.  So let’s set the time required to line up the ship to the distance to be traveled, in light years squared in hours or 10 hours whichever is longer.  Or for those that like formulas:

Time = (d in ly)^2 hours

So a jump of one to three light years would take 10 hours to line up.  A five light year jump would take 25 hours, and a 10 light year jump would take 100 hours.

Putting it all together

That was a very long winded explanation for what in the end is actually a simple result.

If you want to make a Void Jump for distance of 9 light years or less, it takes 80 hours (notice I rounded it down to 80 hours from the 84 I was quoting above) to get out to the minimum jump distance at which point you are lined up and can make the jump.

If your want to make a Void Jump for a distance of greater than 9 light years, it takes the number of light years squared in hours to get the ship lined up accurately enough.  At which point you can safely make the jump.

Variations

Obviously that “simple” solution is based on starting at rest at a planet 1AU from the star and needing to get out to 4 AU before you can jump.  There are lots of variations on this scenario that you can imagine that will vary the time.  Possibilities include:

  • You’re starting further out in the system, maybe already beyond the minimum jump distance.
  • Instead of heading straight outward from the star, your destination is actually on the opposite side of the star and so instead of having to travel 3 AU to get to the minimum jump distance you have to travel up to 5 AU (if starting at 1 AU) or maybe even 8 AU if you’re on the other edge and have to go all the way across
  • A combination of both of the above.  You’re outside the gravity well but the jump vector crosses it so you have to move to get a different line to your destination
  • You get attacked or encounter something and have to maneuver while getting lined up.  Now you’re all messed up and you have to start over.
  • What if you accelerate at a higher (or lower) rate?
  • What if you don’t spend enough time lining up?

Are there any other variations that come to mind?  Are there any concepts that I should have explained better?  Is there something I overlooked?  Let me know in the comments below?

December 2, 2015 Tom 1 Comment

Your Final Destination – Exiting a Void Jump – November Blog Carnival – part 2

This post originally appeared on the now-defunct Arcane Game Lore blog.

RPG Blog Carnival Logo

My last post on Void Sickness along with reading Mike Bourke’s second portal article (I’m still a week behind but I’m catching up!), got me thinking about another aspect of Void travel that I like to use but which I don’t see talked that much about: where you come out on the other end.  And since I’m approaching it as something you can’t completely control, the exact location is somewhat unpredictable and can have unexpected results.  So this will be another entry into the November RPG Blog Carnival.  Enjoy.

Never the Same Place Twice

Last time I played with the Disruption parameter.  This time I want to talk about Repeatability.  When I was defining void travel in the previous post, I stated that the repeatability was “vague” which was defined as “A new Portal from the same origin may be directable to some point near where the old one was” in the original portal article that sparked my first post.  In his second article, he added, “but the exact same destination is unreachable” to the end of that when he summarized the detailed definitions.  In that second post I liked the definition he gave for “unpredictable” which was “A new Portal from the same origin will connect with another point completely at random, uncontrollably, within the destination plane of existence, perhaps restricted to a significant region.”

My idea of void travel falls somewhere between those two.  It’s not that reaching the exact same location is impossible, it’s just very unlikely.  You’ll always end up close (on a cosmic scale) unless you make a major mistake but probably not in the same location.  And in truth the chances of actually starting in the same place are slim to none as well depending on your definitions of location and the scale of what constitutes the “same origin” (Are you measuring in meters, kilometers, or AU?).  Given the two summarized definitions I’m actually leaning a little more toward unpredictable but both work.  The point is, the place you come out is always going to be different.  Let’s look at that and what it may mean for your game.

Non-repeatability

So why is it not possible to come out in the same spot?  From my perspective this comes down to two factors that related to how I treat void travel.  In my interpretation of how void travel works, whatever vector you have in the real universe when you enter the void is the vector you maintain in the void.  You can’t change your direction and you move in a “straight” line.  Which means you need to be lined up exactly right or you’re going to go way off course.

Stay on Target

Just how exactly do you need to be lined up?  Let’s look at a couple of examples.  Take a piece of paper.  Draw a small dot on it no larger than half a millimeter.  Now hold that up at arm’s length.  See how big that dot is?  Depending on the size of your dot and the length of your arm, that dot covers an angle of about 2-3 arc minutes.  If your direction vector were off by that much, how far off would you be at your destination?

I’m going to be generous and assume you drew a small dot and have a long arm and go with the 2 arc minute number.  Assuming you make a small void jump, say 4.3 light years, the distance to the nearest solar type star, Alpha Centauri, you’d be off target by only 5.5 billion kilometers.  Space is big, that’s not too bad, right?  Well, that’s about 36.7 Astronomical Units (the distance between the Earth and the Sun).  Which means if you were shooting for Earth, you’d be out by Pluto.  Depending on how fast your ship is, that may take a while to compensate for.

But an error of 2 arc minutes is pretty big.  We can do better than that.  Let’s say we can get our error down to the size of an arc second (1 degree = 60 arc minutes = 3600 arc seconds).  That’s equivalent to putting your dot about 24 feet (7.2m) away.  If we do that and make the same jump to Alpha Centauri, we’d still be off by about 46 million kilometers or 0.3 AU, roughly the distance between the Earth and Venus at closest approach.  (By the way, an error of 1 arc second means your ship moved laterally 4.8 mm after traveling 1 kilometer).  And if you make a jump twice as far, the error will be twice as large as it is really just the direction error (in radians) multiplied by the distance traveled.  Double the distance, double the offset.

Just based on that, you can see that you’re probably not going to come out at the same place at your destination no matter how hard you try.  Getting your vector to that accuracy is going to take some effort.  But there is another effect, the time spent in the void.

How Good is Your Clock?

The other aspect of determining your position is how long you spend in the void and how far you travel in a given amount of time.  If there are errors in your time keeping, this will translate into errors in the distance traveled.

Let’s use the example I gave in my earlier post: void travel occurs at the rate of one light year per second.  Now, a light year is 9.4607×10¹² km.  That means that an error of a millisecond equal a distance of 9.4607×10⁹ km (63 AU, roughly twice the distance to Neptune).  A microsecond error reduced that by a factor of 1000 and an error of only a nanosecond reduces that by another factor of 1000 or down to an error of only 9460.7 km, less than the diameter of the Earth.

Modern computers can get to about a 10 nanosecond resolution which means an accuracy of about 95,000 km roughly 1/4 the distance to the moon.  Depending on the technology you allow in your setting (and what you allow to work in the void), the accuracy could be better or worse than this.  But even with a microsecond error, the distance you’ll be off is only 0.063 AU.

So while there is an effect, and you probably won’t end up in the same spot, it is much less than the effect you can expect from an error in the velocity vector.  Depending on the story you’re trying to tell, that may or may not be negligible.

Impact on Your Game

We’ve seen what the scale of the effect is, what impact does that have on your game?  While the details will depend on you exact setting, here are three ideas off the top of my head.

Travel times

Given the natural variation in arrival locations, you are typically going to be off target which means the actual travel time to the destination is going to vary.  It will no longer be “three days” but “three to four days”.  You can’t really plan on exact time tables.

To put some numbers to that, assume you were off by the 0.3AU distance from earlier.  Assuming your ship is traveling at 1% the speed of light (3,000 km/s, just under 11 million km per hour), it will take you about 4.25 hours to cover that extra distance.  If you’re off by more or going slower, it will take even longer (and that’s ignoring a bunch of real world physics about changing direction and such which will only add to the time).

This means that you have to plan for and account for the extra time and it may add tension to a situation.  We only have 100 hours to reach the destination and stop the “big event”.  The jump and associated travel time takes 80+2d10 hours to just get to the location where the big event will happen.  Do the characters arrive with hours to spare or are they landing with only minutes until they have to spring into action?  What impacts will this have on their preparations? Will it limit what they can do or bring to bear in the situation?

Space Piracy

Again ignoring real world physics of matching velocities in space, the result of non-repeatability of void jumps means you’re probably not going to have space pirates lurking in the outer system for ships to appear and then pounce on them.  Even if you had hundreds of ships entering a system every day, the odds of one appearing near where a pirate vessel was lurking is really, really small.  The pirate ship could sit out there for years and never have an encounter.  This means that piracy, if it occurs, will happen near the population centers, at remote, fixed outposts, or on the outbound leg of a journey before the void jump when the routes are much more predictable.

Arriving in Formation

Remember this scene from Return of the Jedi? (0:43-1:04 is the relevant part if you don’t want to watch the whole thing).

That just isn’t going to happen with void jumping.  Even assuming that you can get the velocity vector the same for all the ships, which might be hard but could be possible (although not with everyone dodging in and out among each other like the fighters in the beginning of that clip) the timing variations between the ship computers will scatter everyone across tens of thousands of kilometers of space.  You will need time to regroup.  Which means you probably want to appear further out in the system to allow yourself that time which in turns means longer travel to your destination and a greater chance for discovery.

Or if you do allow for piracy to occur in the outer reaches of the system,  merchants and their escorts may be separated on arrival.  The convoy scattered across space.  Can the escorts get back to their charges before the pirates attack or do they only arrive in time to extract revenge for damage done?

Void Travel is Unpredictable

From the above thoughts, it’s fairly obvious that this method of FTL travel has the potential to add some randomness and unpredictability into your game.  Whether to add tension or just flavor, there is no real reason that void travel should be routine.  Are there other ideas for impacts that come to mind because of the unpredictability?  Let us know in the comments below.


Comments

Mike Bourke – November 24, 2015 at 11:28 am

There’s an obvious solution: the very short void jump. You arrive and find yourself 30 AU away from where you want to be? Jump for long enough to travel 29 AU. This distance is short enough that the final error will be relatively small.

Now, I happen to think that this tactic, while eminently sensible, is not as desirable as the additional flavor that the randomness gives. That leads me to suggesting that in order to make a jump, a ship has to utilize a minimum amount of power or more, which in turn means that there is a minimum jump distance.

This wouldn’t completely eliminate the viability of the tactic; it would mean that the most practical approach is to aim for a point half your anticipated error away from whatever the minimum jump distance is. For convenience, let’s say that your maximum error is 10AU per light year, and you are jumping 20 light-years, and that the minimum jump is 150 AU:

10 AU x 20 light years is 200 AU maximum error. Half that is 100 AU, so that’s the mean error that you will experience. But that leaves you too close to make the minimum jump, so you move that destination point out by the minimum, and aim to arrive 250 AU away. That means that your range of arrival points is 250±100 AU – so even if you get as close to your ultimate destination as possible, you are still a minimum jump away, and might be as much as 350AU.

The thing is that picking just any point that far away is not good enough; you would need some standard navigational reference points from which to get your precise distance for the second jump. Observations would take time, and without standard references, you might have to wait for weeks, months, or years for the objects you are measuring (presumably outer planets) to have moved enough to permit navigation.

And standard reference points for a jump means that your arrival point is a much smaller volume of space – making piracy possible after all. Not easy, but not entirely out of the question, either.

Mike Bourke – November 24, 2015 at 6:58 pm

Alternately, maybe a ship develops some sort of energy “charge” that simply delays making another jump for a period of time. That would prevent the “stop short and recalibrate” dodge – if there’s a deadline involved.

Tom – November 24, 2015 at 9:26 pm

Yes, both of those are possible implications as well. I like the minimum power required idea. I didn’t include it here but I also utilize limit on gravity wells. Kind of like Larry Niven’s hyperspace. You can’t get too close to a large mass and still have your void jump system work. This actually counter acts some of the implications depending on how you implement it. I think that will be another void jumping article at some point.

November 24, 2015 Tom 2 Comments

Posts navigation

← Previous 1 … 8 9
Become a Patron!

Recent Posts

  • Detailed Frontier Timeline – FY62.069 to FY62.99
  • State of the Frontier – August 2022
  • Battle of Hargut (Gruna Garu) – FY62.098
  • Archived Arcane Game Lore Posts – May 2013 to Dec 2014
  • A Look at Yachts and Privateers
  • Homeworld Bound – A Campaign Concept
  • Second Battle of Fromeltar (Terledrom) – FY62.083
  • Sample Star System Data
  • Detailed Frontier Timeline – FY62.038 to FY62.068
  • State of the Frontier – July 2022

Categories

  • 3D Models
  • Adventures
  • Background
  • Creatures/Races
  • Deck Plans
  • Equipment
  • Game Design
  • General
  • Locations
  • Maps
  • NPCs
  • Optional Rules
  • Patreon-only
  • Project Overviews
  • Reviews
  • Setting Material
  • Starships
  • System Brief
  • Vehicles
  • Writing

Recent Comments

  • Loguar on Detailed Frontier Timeline – FY62.069 to FY62.99
  • Loguar on Detailed Frontier Timeline – FY62.069 to FY62.99
  • Tom on Detailed Frontier Timeline – FY62.069 to FY62.99
  • Rook on Maps and Counters
  • Loguar on Detailed Frontier Timeline – FY62.069 to FY62.99
  • Tom on Detailed Frontier Timeline – FY62.069 to FY62.99
  • Tom on Second Battle of Fromeltar (Terledrom) – FY62.083
  • Loguar on Detailed Frontier Timeline – FY62.069 to FY62.99
  • Loguar on Second Battle of Fromeltar (Terledrom) – FY62.083
  • Aemon Aylward on Sample Star System Data

Archives

  • September 2022 (1)
  • August 2022 (9)
  • July 2022 (3)
  • June 2022 (3)
  • May 2022 (3)
  • June 2021 (1)
  • April 2021 (1)
  • February 2021 (4)
  • January 2021 (6)
  • December 2020 (5)
  • November 2020 (11)
  • October 2020 (4)
  • September 2020 (5)
  • August 2020 (4)
  • July 2020 (6)
  • June 2020 (5)
  • May 2020 (8)
  • April 2020 (5)
  • March 2020 (5)
  • February 2020 (5)
  • January 2020 (5)
  • December 2019 (7)
  • November 2019 (4)
  • October 2019 (6)
  • September 2019 (5)
  • August 2019 (6)
  • July 2019 (7)
  • June 2019 (5)
  • May 2019 (6)
  • April 2019 (7)
  • March 2019 (4)
  • February 2019 (5)
  • January 2019 (7)
  • December 2018 (5)
  • November 2018 (10)
  • October 2018 (4)
  • September 2018 (4)
  • August 2018 (5)
  • July 2018 (4)
  • June 2018 (4)
  • May 2018 (12)
  • December 2015 (1)
  • November 2015 (2)
  • December 2014 (4)
  • November 2014 (3)
  • June 2014 (1)
  • January 2014 (1)
  • July 2013 (1)
  • June 2013 (2)
  • May 2013 (3)

Meta

  • Log in
  • Entries feed
  • Comments feed
  • WordPress.org
Powered by WordPress | theme Layout Builder