The Expanding Frontier

Creating Sci-fi RPG Resources

  • Home
  • Order Eclipse Glasses
  • Order a Map
  • Order Miniatures
  • Supporters
  • About
  • Bio

Tag Archives: Star Frontiers

Battle of Gran Quivera (Prenglar) – FY61.285

This is a big one and the last of the opening battles of the war. There is one more battle post coming tomorrow for a battle on FY61.287 that would have been posted yesterday but I’m still getting caught up. There are a few more fights coming soon but it will be a while before the next ones after that. Settle in, this is going to be a long write-up.

A major battle occurred today in the space around Gran Quivera between UPF forces and a massive sathar fleet that was more than twice the size of the fleets reported in the other systems.

Task Force Prenglar, aided by the timely arrival of Strike Force Nova returning from the Cassidine system, met the sathar forces as they approached the planet. After nearly an hour of fighting, and suffering major casualties, Spacefleet forces defeated the sathar invaders.

Frustrated by the inability to immediately get the more seriously damaged ships into the PGC shipyards for repairs, Spacefleet has sent a delegation to the Council of Worlds demanding activation of the Wartime Construction Control clause of the UPF charter that would grant them full control of all starship construction centers in the Frontier.

Kami Hemsley, Frontier News Network

Background

The sathar launched their biggest fleet of the opening offensive at Gran Quivera, hoping to strike at the heart of the Frontier and sever the various segments of the Frontier joined by this core system. With a fleet double the size of the ones appearing in the outer systems, and supported by a pair of assault carriers each carrying seven fighters, the sathar fleet outgunned Task Force Prenglar by a decent margin. Their only major concern were the two minelayers that were part of the Task Force. They fully expected to win this fight. And they may well have.

Unfortunately for the sathar, Strike Force Nova was already en route to the Prenglar system after an extended patrol of the Frontier and arrived in the system just hours after the sathar fleet was detected. With two of the Frontier’s major fleets to deal with, the tables turned and the sathar were now facing a superior foe. When news of the arrival of Strike Force Nova in the system reached the sathar commanders, they no longer expected to win, but they were committed to doing as much damage as possible.

Order of Battle

This is easily the largest battle I’ve ever played. And to make it even more complex I ran it all with the Advanced Combat rules. I’ve found that using the Basic Combat rules just makes the fights boring with the only option being hull damage. This one is going to be a doozie.

Task Force Prenglar

  • 5 Assault Scouts
  • 3 Frigates
  • 2 Destroyers
  • 2 Minelayers
  • 3 Light Cruisers
  • 1 Battleship
  • 1 Fortified Station

Strike Force Nova

  • 6 Fighters
  • 3 Assault Scouts
  • 2 Frigates
  • 1 Destroyer
  • 2 Light Cruisers
  • 1 Assault Carrier
  • 1 Battleship

Sathar

  • 14 Fighters
  • 2 Frigates
  • 4 Destroyers
  • 2 Light Cruisers
  • 2 Heavy Cruisers
  • 2 Assault Carriers

The Battle

Setup

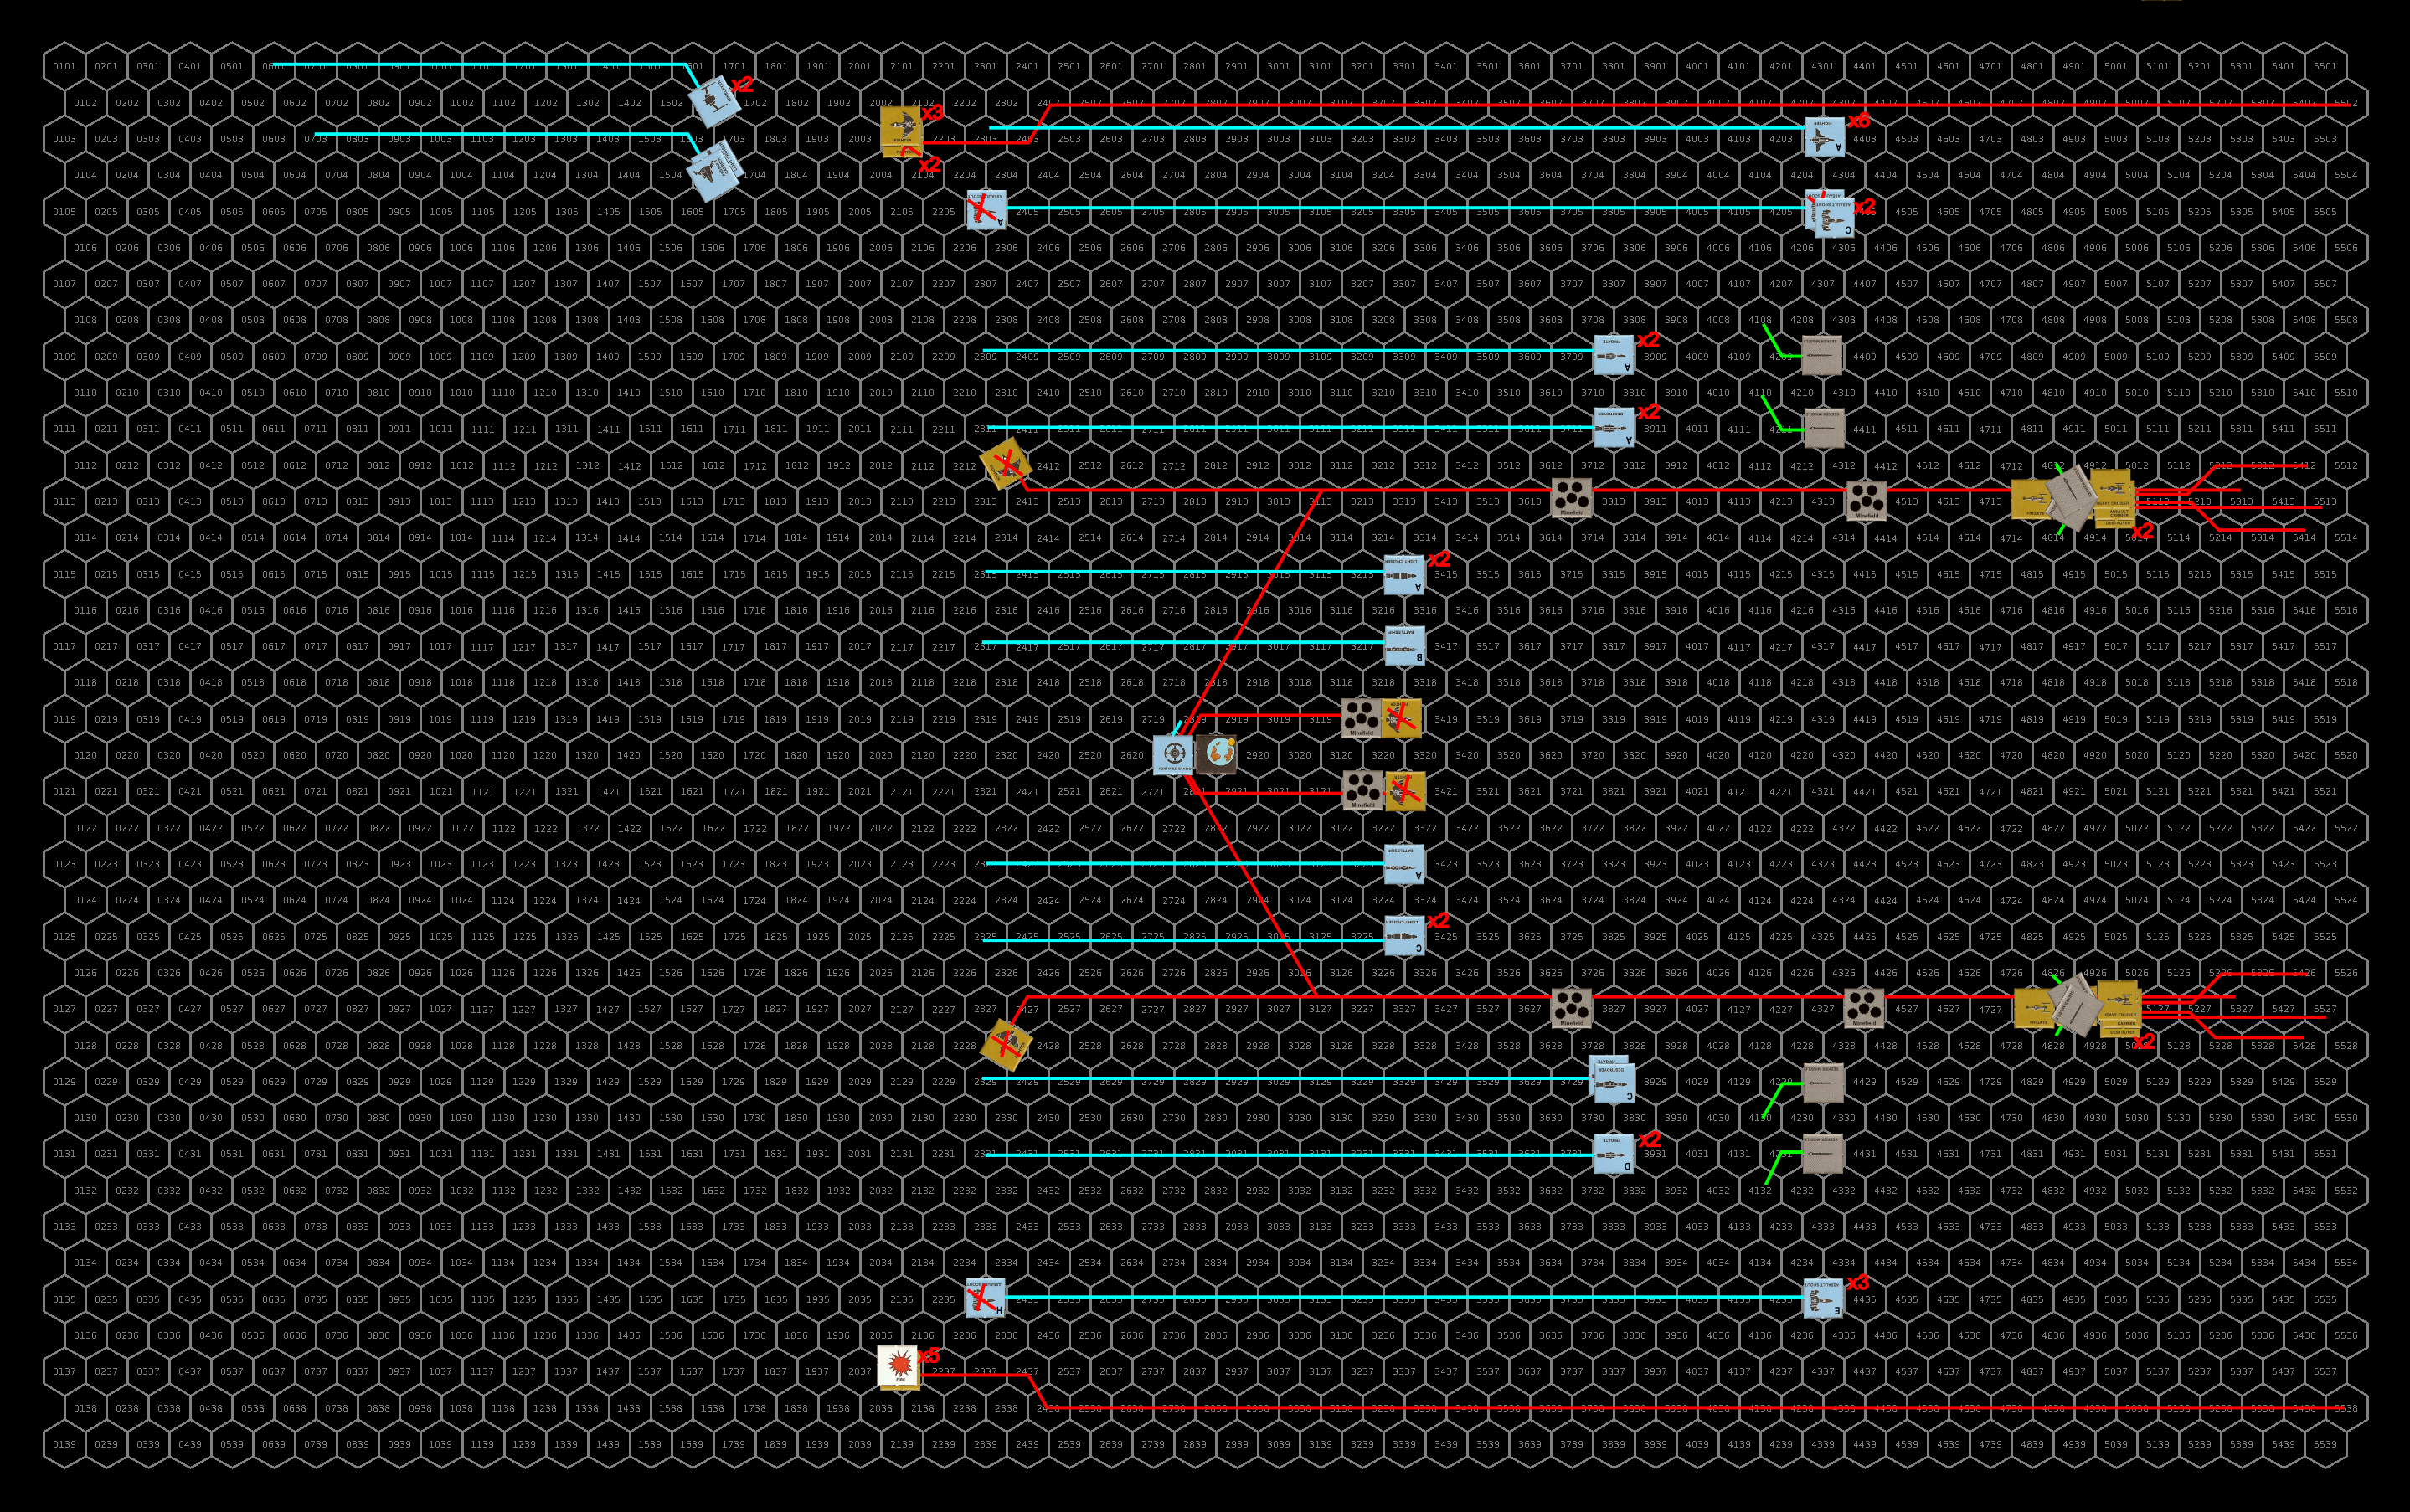
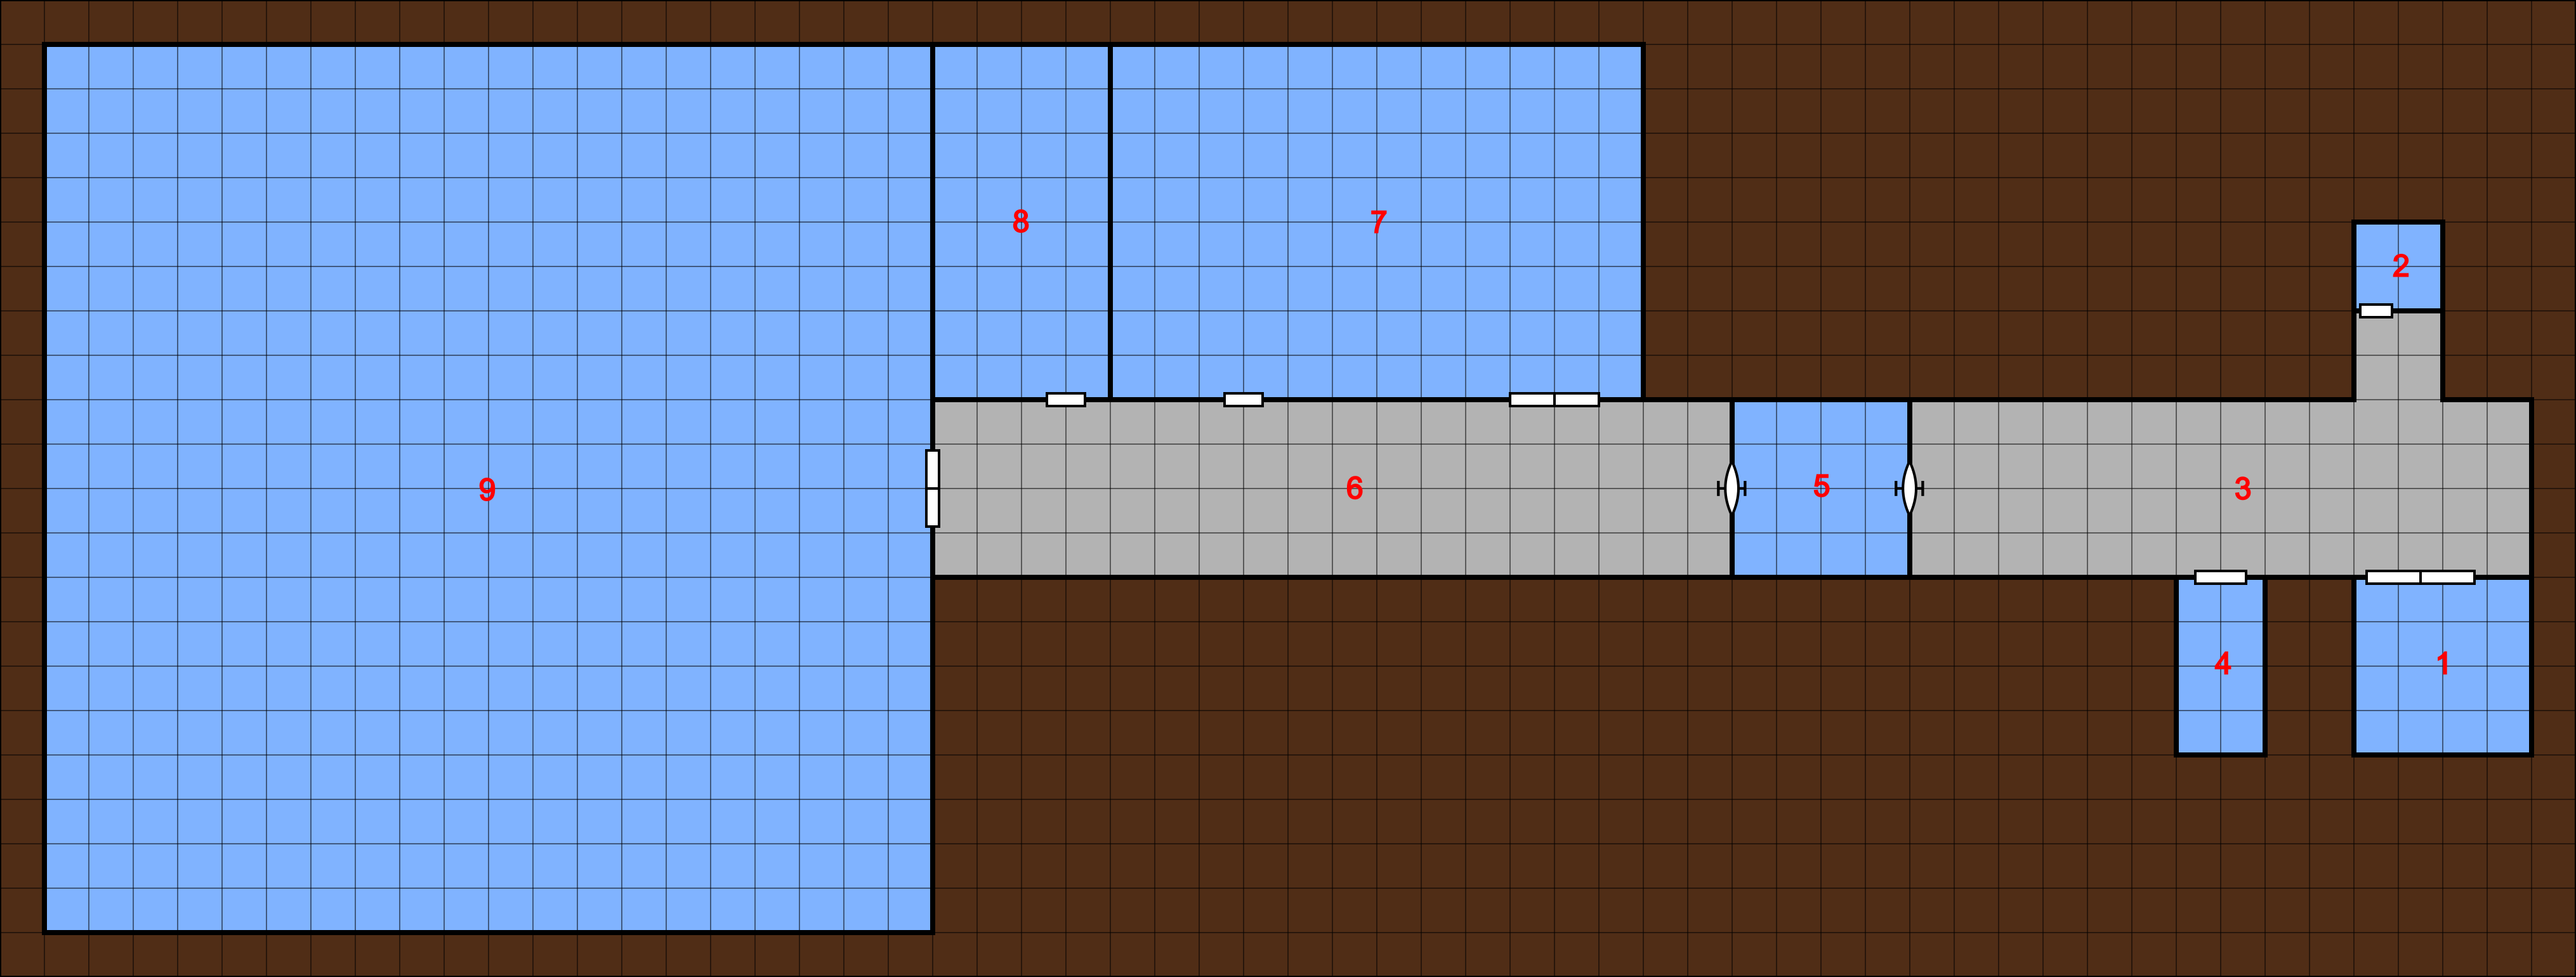
Everyone knows that it’s a literal minefield between the sathar and the planet, the question for both sides is how the sathar are going to attempt to navigate it.

The UPF set up in a battle line with the center anchored by the battleships and light cruisers, with the destroyers, frigates, and assault scouts out from there on either side of the planet.  SF Nova’s fighters are on the far wing above the planet.  The line is positioned slightly behind the planet to allow the sathar to commit before the UPF move into the fray.  The larger capital ships are moving at speed 10, the smaller capital ships at speed 15, and the fighters and assault scouts are moving at speed 20.  The assault carrier, escorted by a light cruiser, along with the minelayers, are far behind the line above the planet and moving at speed 10.  They plan to orbit out there and hopefully stay out of the fighting.  In advance of the fight, the UPF have deployed all 40 mines from the two minelayers as well as all 16 seeker missiles (4 from each minelayer and battleship).

The sathar set up their capital ships in two of their “diamond” formations with some modifications.  The HC is joined by an AC and there are two fighters with each of the frigates.  In addition, there are two flights of 5 fighters on the far wings.  The capital ships are all moving at a cautious speed of 5 while all the fighters are moving at speed 30.  The sathar suspect that the fighters on the wings will fly around the mines while the ones with the capitals ships are intended to be used as sacrificial probes to clear a path to the planet and beyond.  The sathar intend to punch through and fight on the far side of the planet where they believe the mine threat to be smaller.
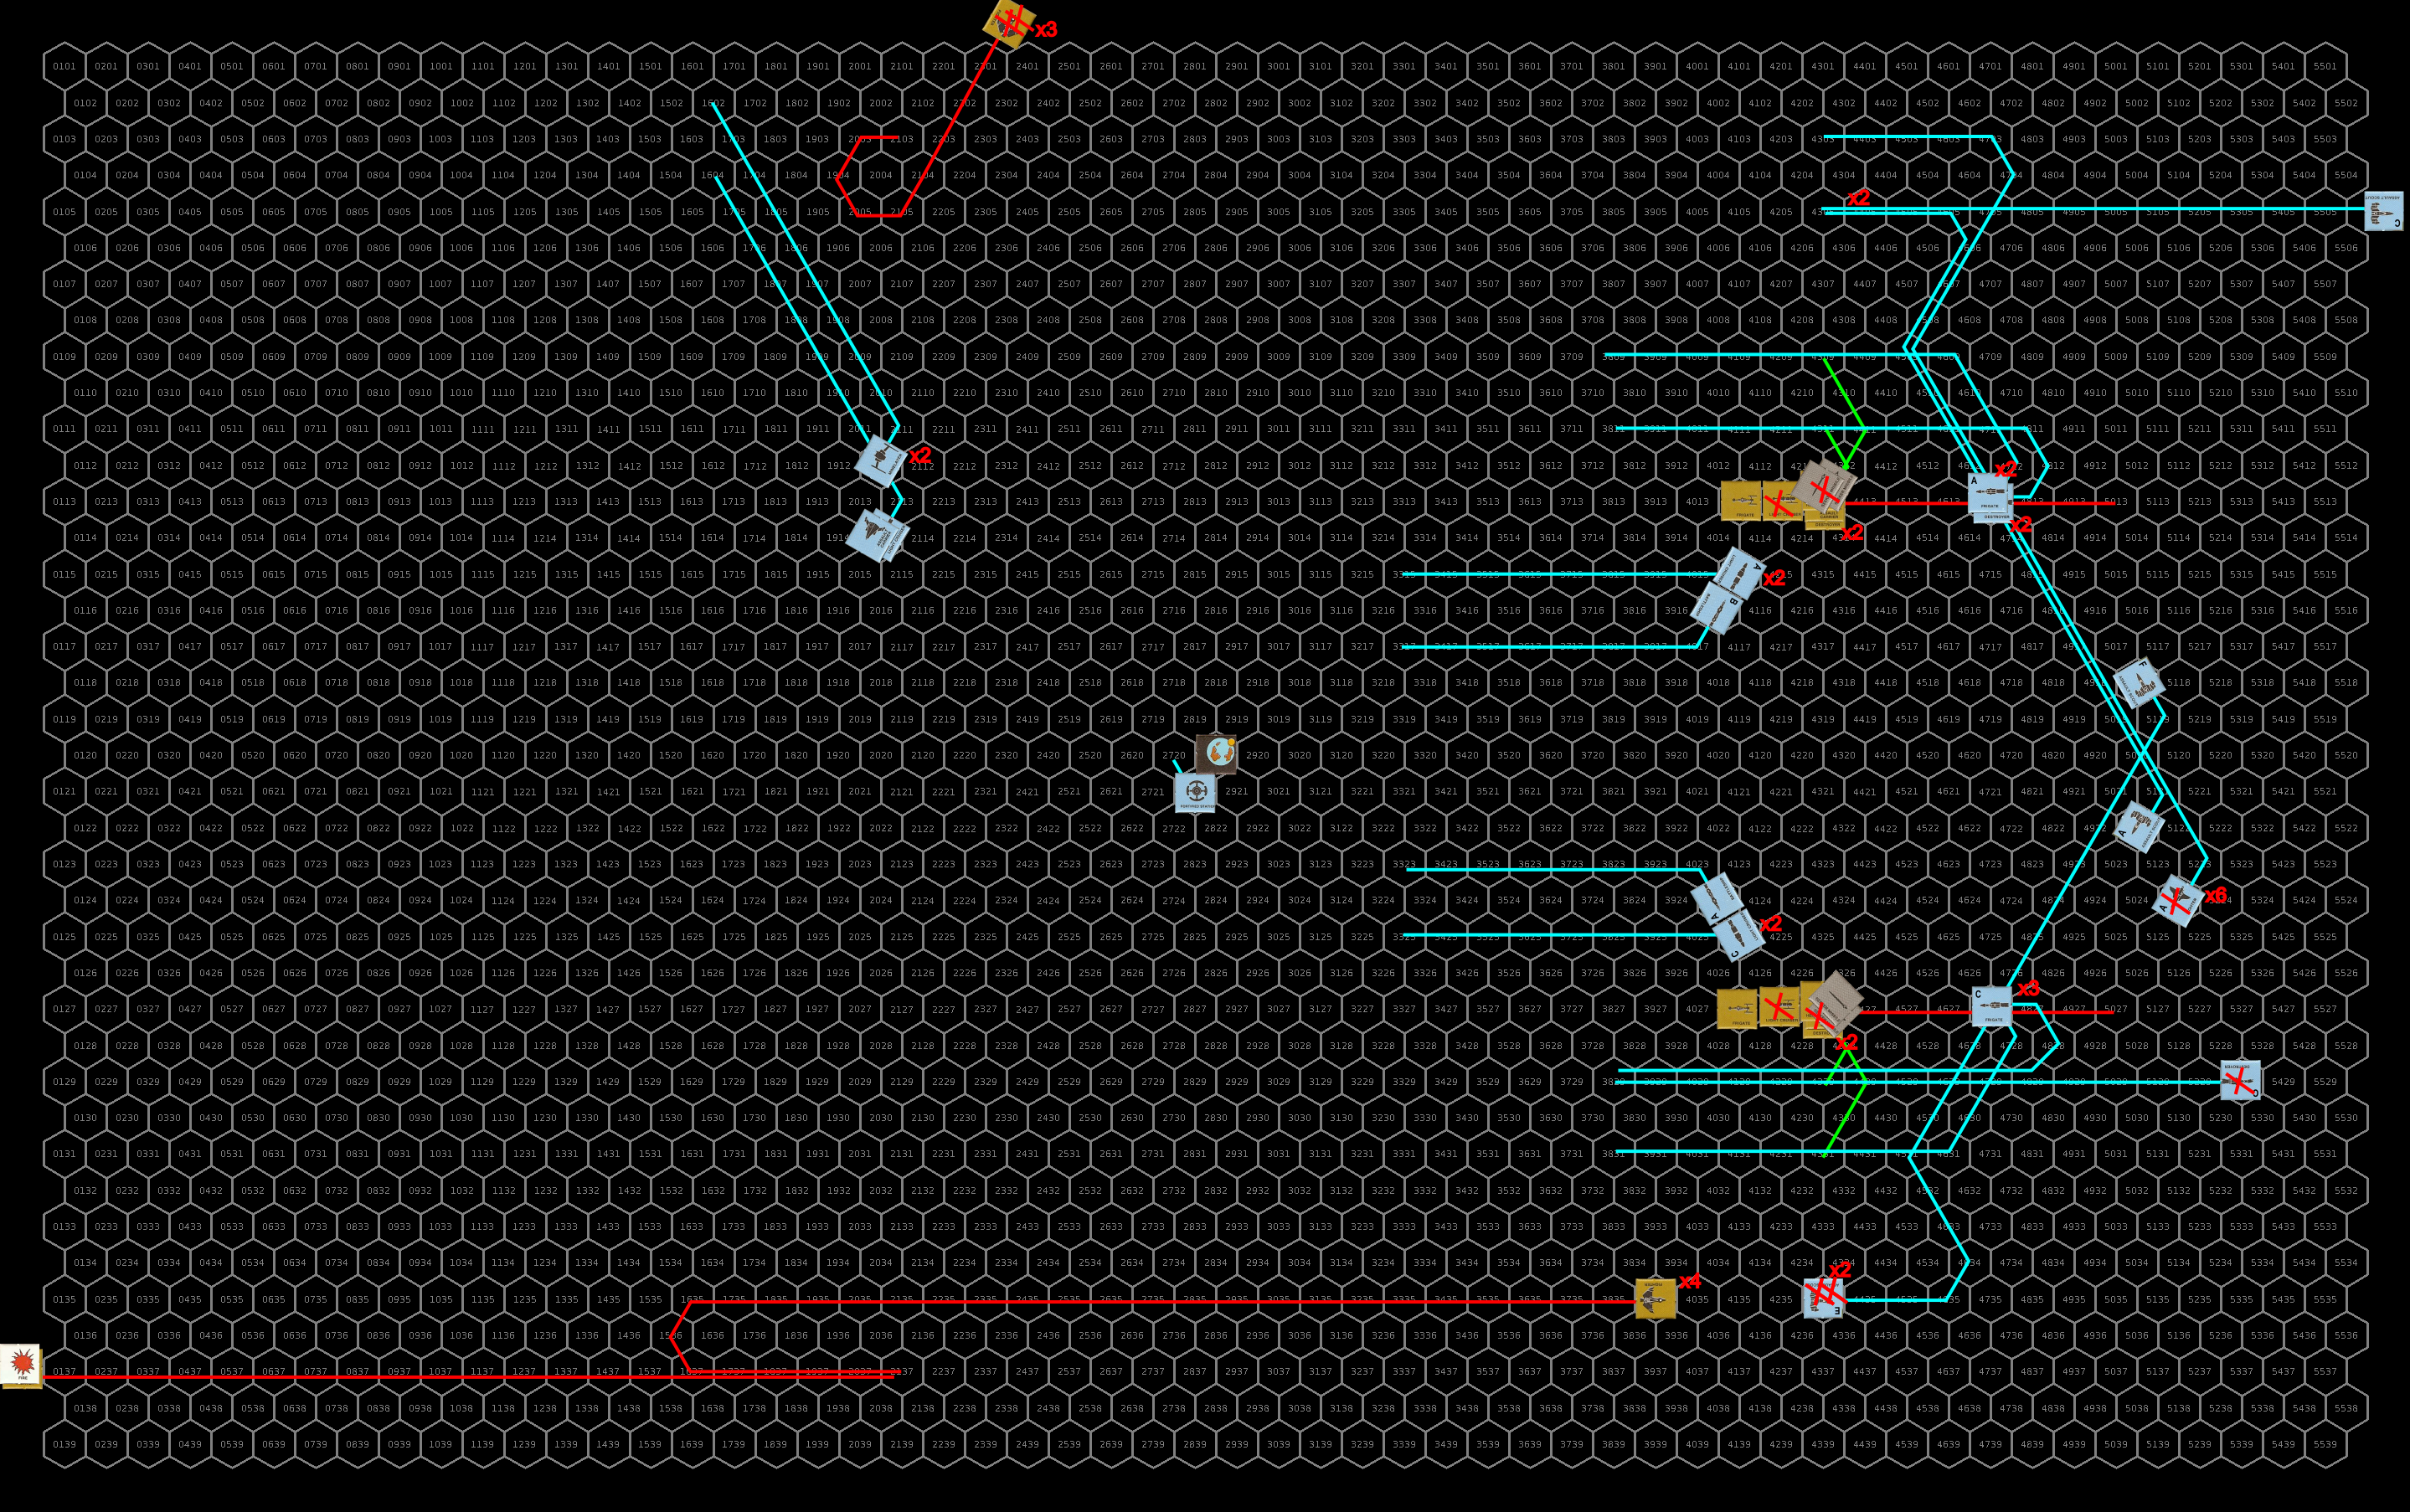
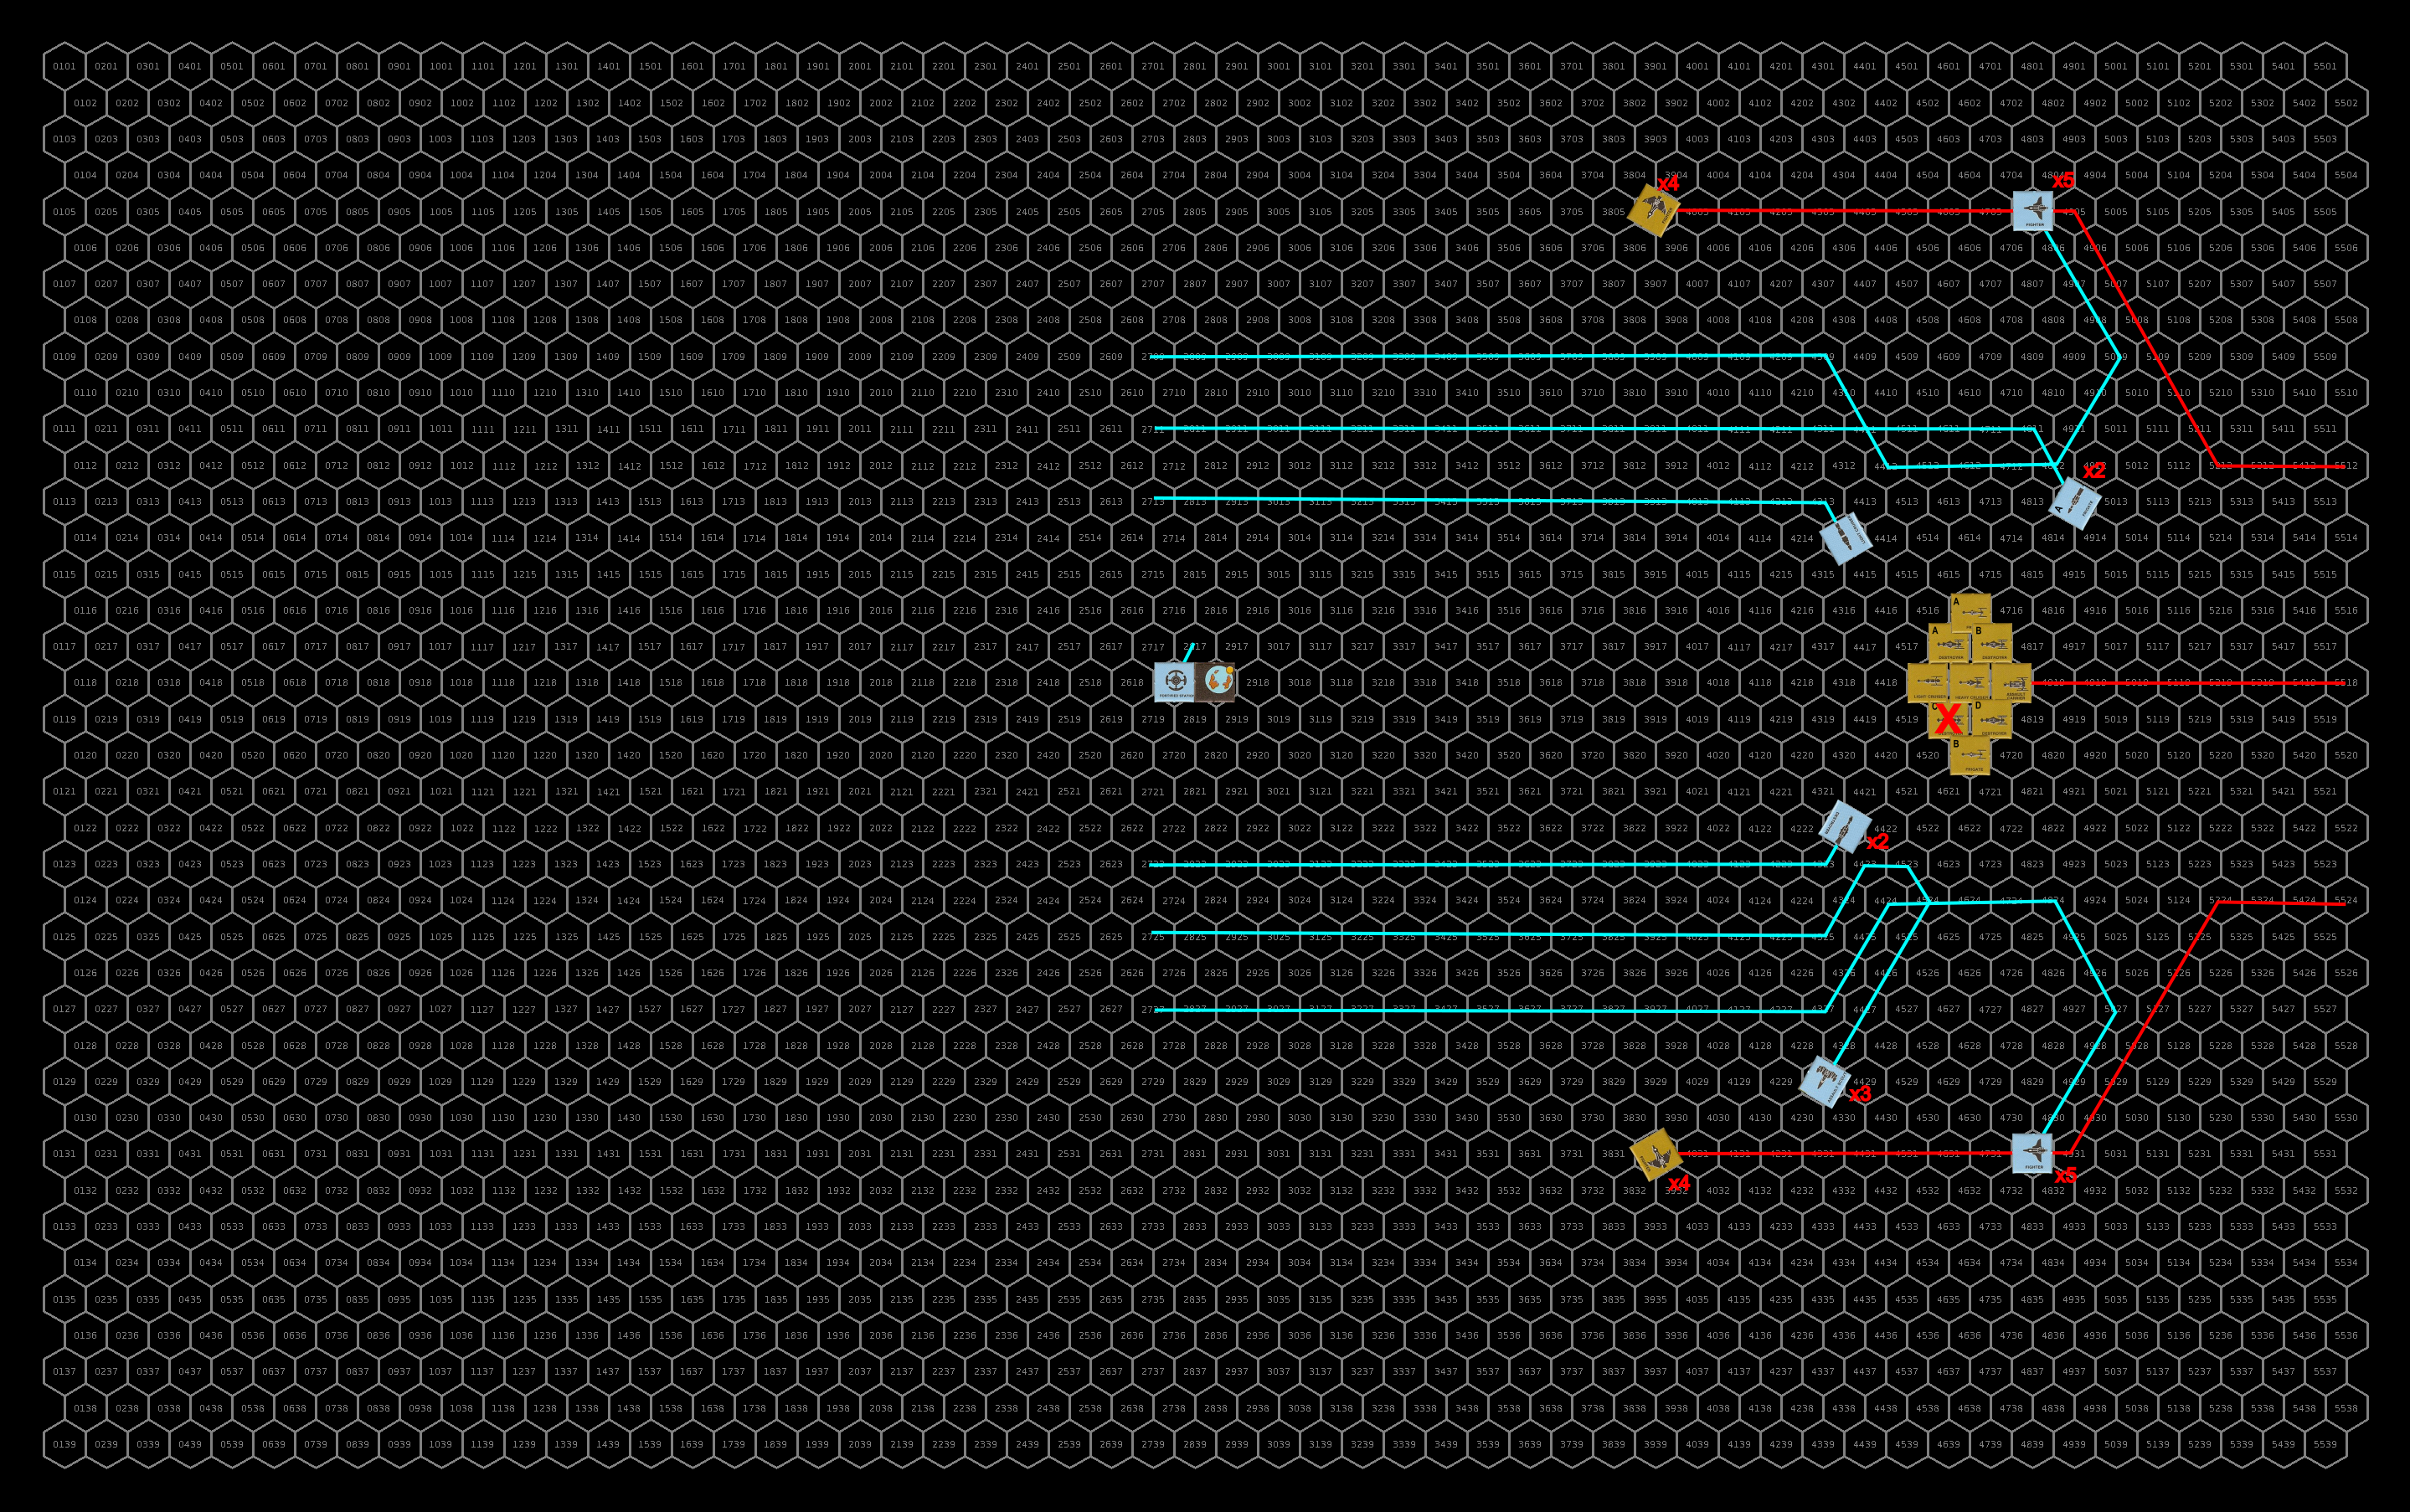
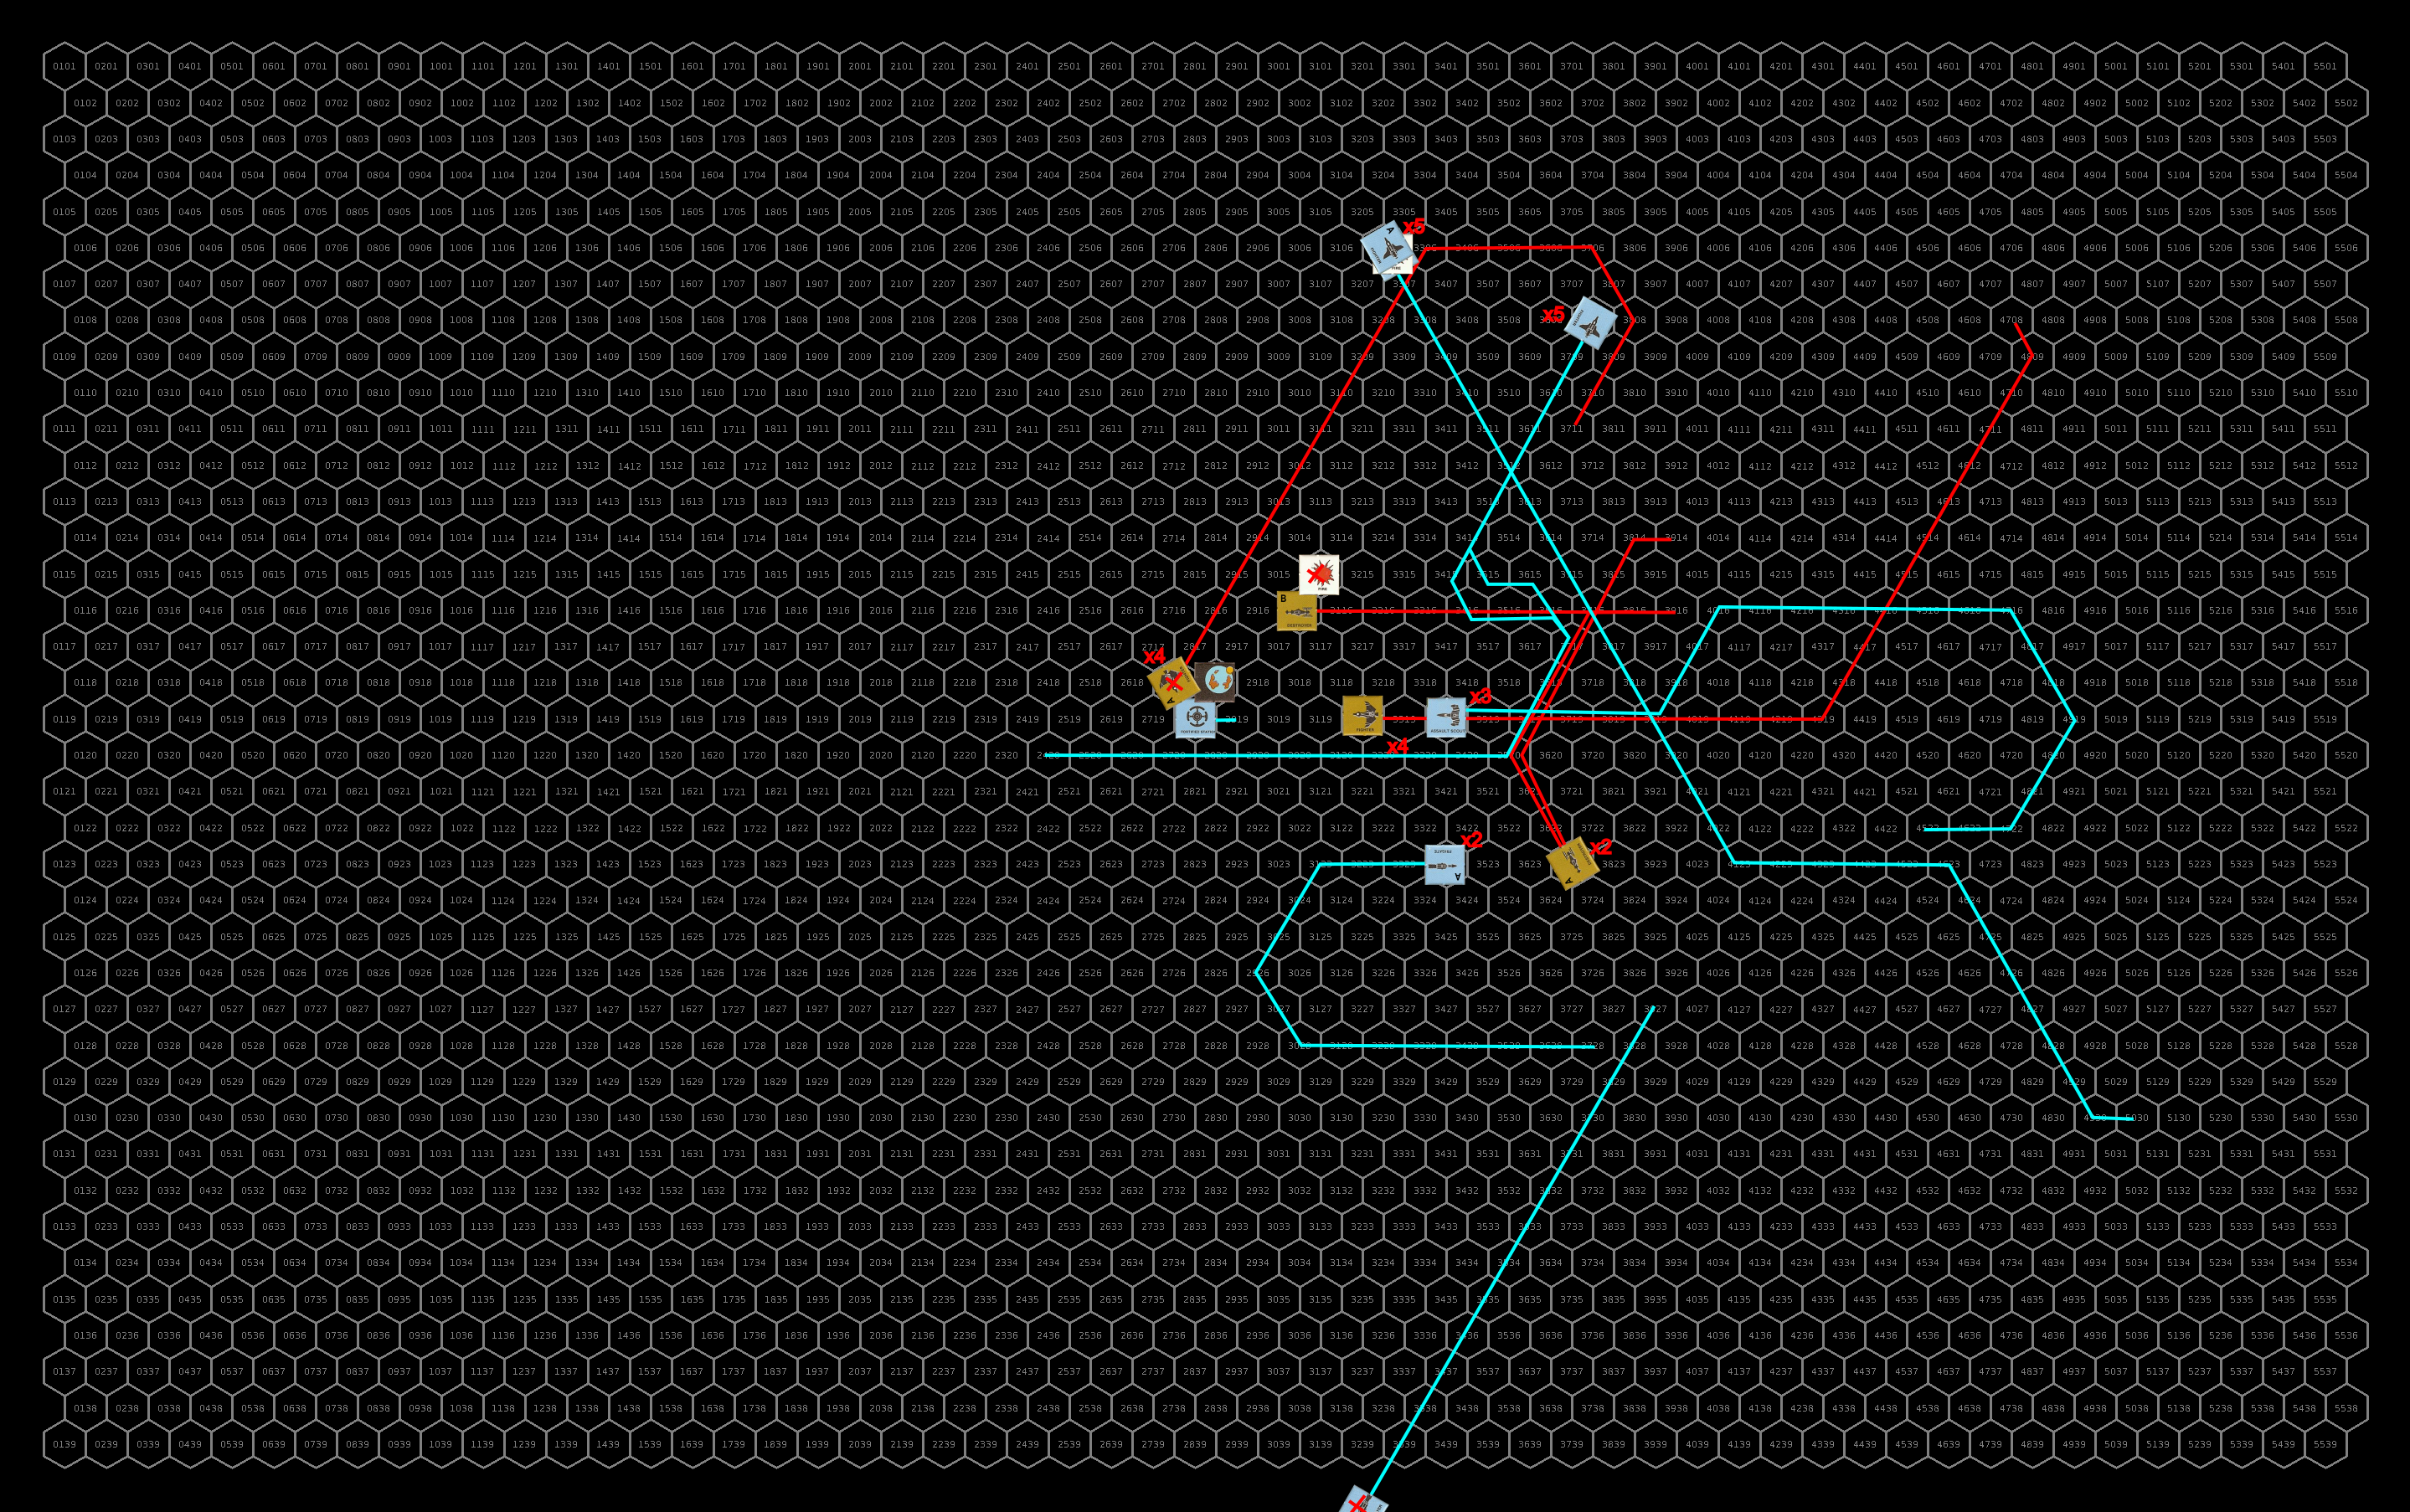
The initial positions of all the ships. Click for full size image.
And here is the starting positions with the mine field (red circles) and seeker missiles (grey counters) shown. Click for full size image.

Turn 1

The two sathar diamond formations advance maintaining their initial speed with the destroyers on the wings flying in to close the formation with the heavy cruiser and assault carriers.  The two flights of fighters on the wings accelerate to speed 35 and make a run at the assault scout squadrons on each wing.  The other four fighter fly ahead of the diamond formations and as they approach the planet, split up with one from each pair looping around the planet and making a pass at the station (accelerating to 35) while the other two remain at speed 30 and turn at the last minute to line up on the destroyers.

Unfortunately for the fighters in the middle, but per the sathar plans, each pair trips 3 different sets of mines that the UPF had laid out.  Unsurprisingly, all four fighters are obliterated. However, they have done their job and cleared a path through the minefield for the capital ships.

Defensively, the assault scouts all fire their laser batteries at the fighters. The more distant UPF frigates and destroyers also target the fighters in an attempt to destroy them before they can fire their assault rockets.  The assault scouts manage to destroy the lead fighter in the upper flight while another has its navigation controls damaged and one has its maneuvering engines knocked out.  The frigates and destroyers score some long-distance hits nearly destroying another fighter and causing an electrical fire on the one with its maneuvering knocked out (in the lower flight).

On the upper flight all four surviving fighters hit with their assault rockets seriously damaging two assault scouts and destroying a third.  The fourth assault rocket knocks out the assault rocket launcher on the last assault scout.  On the lower flight, only 3 assault rockets hit, two on the lead assault scout knocking out its LB and nearly destroying it.  The other assault rocket slams into the trailing assault scout and it is destroyed.

With the sathar’s cautious movement placing their ships right in the middle of some of the seeker missile deployments, the UPF active two seeker missiles on either side of the sathar formations.  Both missiles in each group home in on the light cruiser in each formation.  The UPF also activate 2 seeker missiles in the more distant groups that they expect will intercept the formations on the next turn.  The sathar light cruisers fire ICMs at the incoming seeker missile in an attempt to nullify the threat.  Both missiles aimed at the upper light cruiser miss.  One headed for the lower light cruiser is destroyed by the ICMs while the fourth missile slams home dropping the hull integrity of that ship to less than half.

The UPF ships on the battle line advance maintaining their speed with all of the ships preparing to engage on the next turn while the assault scouts get some maximum range shots with their laser batteries on this turn.  The minelayers, assault carrier and light cruiser advance and turn in their orbit and fire at the fighters, attempting to take them out.

The fire on the sathar fighter damages its combat control system.

Defensively the sathar ships fire all their energy weapons at long range at the lead assault scout in each flight.  The upper assault scout is hit by a laser battery from the frigate and proton battery from the assault carrier destroying it.  None of the shots at the lower flight of assault scouts hit but the particle weapons from the light cruiser and assault carrier come close. 

Offensively, only one of the assault scouts in the lower flight connects with the sathar’s frigate damaging its acceleration. One of the minelayers’ laser batteries connects with one of the damaged fighters destroying it, while the UPF’s assault carrier takes out a second fighter with its laser battery and the light cruiser takes out the navigation control system on a third.

Paths and positions for the first round of combat. Triggered mines are marked with a new counter I made for the fight. Paths of seeker missiles are shown in green. Click for full size image.

Turn 2

The sathar capital ship formations accelerate to speed 7 and each focuses all their fire at the closest UPF destroyer while preparing to defend against the incoming seeker missiles.  The upper flight of fighters, two out of three of which have navigation control hits, spin a bit out of control but manage to line up briefly to fire their assault rockets at the assault carrier.  The lower flight of fighters split up with the main group of 4 going after the assault scouts and the other one (with a fire and no maneuvering ability) just flies straight and out of the battle.  All the fighters slow to speed 30.

Defensively, the minelayer and assault carrier group, as well as the lower flight of assault scouts, fire at the fighters attacking them while all other ships focus on the closest sathar frigate.

In the upper flight of sathar fighters, the UPF manage to destroy two of the fighters before they get their shots off. The third puts an assault rocket into the assault carrier damaging its acceleration.

The assault scouts in the lower flight all miss as they fire on the incoming fighters. The fighters on the other hand do a bit better hitting two of the assault scouts with assault rockets and destroying both of them.

The UPF capital ships fare no better than the assault scouts with only a single destroyer hitting the frigate in the lower formation with a laser battery doing some minor hull damage.

The sathar only manage to do a bit better. With all the weapons being brought to bare, the upper UPF destroyer is hit by 3 laser batteries and an electron battery slightly damaging its hull and knocking out all of its weapons except its rocket battery. The lower UPF destroyer doesn’t get off so easy as, despite firing ICMs at it, the torpedo from the sathar frigate hits nearly destroying it. It is also hit by an electron battery from the assault carrier that does a bit more hull damage.

The seeker missiles all home in on the closest heavy cruiser. The cruisers fire 3 ICMs at each incoming seeker missile. Against the upper formation, one of the seeker missiles miss while the other connects damaging the cruiser’s acceleration. On the lower heavy cruiser, one of the missiles is intercepted by the ICMs while the other impacts the cruiser and takes out nearly half of its hull integrity.

With its hull nearly destroyed, one of the UPF assault scouts in the upper flight drifts off the map and out of the fight taking a long distances shot at the sathar frigate as if flies away. Similarly, the seriously damaged destroyer just drifts by the sathar formation firing everything at the frigate as it passes by.

The UPF fighters accelerate to 25 and make an assault rocket pass at the sathar heavy cruiser in the upper formation before darting out of range and preparing for another run. The 2 surviving assault scouts in both the upper and lower flights make a similar run (remaining at speed 20) but fire at the assault carriers in each sathar formation.

The surviving frigates and destroyers loop around behind the sathar ships and focus their fire on the assault carriers as well.  Defensively, the sathar ships fire ICMs at the incoming torpedoes.

The UPF battleships & light cruisers all slow to speed 8 and turn in to focus fire on the sathar light cruisers. The light cruiser, assault carrier, and minelayers continue their speed 10 orbit away from the battle.

The fire on the sathar fighter knocks out half of its damage control system.

Defensively, the sathar fire at a number of ships instead of really focusing on a few. In the upper group, the destroyers, assault carrier, and heavy cruiser spread their energy weapon fire across all the fighters, attempting to take them out before they can bring their assault rockets to bear. The destroyers in the upper group only hit with a single laser battery and electron battery seriously damaging the hull on one fighter and knocking out the assault rocket launcher on another. The heavy cruiser hits a third fighter with its laser battery but only scratches the hull slightly. The assault carrier does a little better and it laser battery destroys one of the UPF fighters. With the fighters and battleship out of range, the heavy cruiser and assault carrier fire their rocket batteries at the lead UPF light cruiser. Both hit taking out nearly half of the light cruiser’s hull. The frigate and light cruiser in this upper group focus their fire on the UPF battleship. While the frigate completely misses, the light cruiser hits with a laser, electron, and proton battery each doing damage to the battleship’s hull.

In the lower group, the sathar frigate fires at the damaged UPF destroyer as it flies by and hits with its rocket battery destroying it. The lower destroyers fire at the lead UPF light cruiser and one hits with a rocket battery causing some significant hull damage. The light cruiser fires at the battleship hitting with its laser and proton batteries knocking out the battleship’s maneuvering engines and damaging its navigation control system. The heavy cruiser and assault carrier split their fire with the energy weapons targeting one of the UPF frigates and the rocket batteries going after the lead light cruiser in the bottom flight. The rocket batteries both hit knocking out most of the ship’s acceleration and seriously damaging its hull dropping the hull integrity to less than half. The UPF frigate is hit by two laser batteries and a proton battery causing some hull damage, completely knocking out its acceleration, and damaging its maneuverability.

The four surviving UPF fighters all hit the sathar heavy cruiser in the upper formation with their assault rockets, destroying it.

The assault carrier in the upper group is hit by a laser canon, electron battery, and two torpedoes that slip through the ICM screen knocking out the carrier’s masking screen and ICM launcher, causing a power short circuit in its defenses, and taking out a third of its hull integrity.

The assault carrier in the lower group is hit by a laser cannon, two torpedoes, and an assault rocket. One of the torpedoes damages the carrier’s combat control system before it is destroyed by the other weapons.

The sathar light cruiser in the upper group is pummeled by the weapons from the two UPF light cruisers and the battleship being hit by a distruptor cannon, 2 laser, 3 electron, 2 proton, and 2 rocket batteries as well as a torpedo that slipped through the ICM screen. It suffers damage to its hull and a number of systems before finally being destroyed by an electron battery hit from the battleship.

The light cruiser in the lower group doesn’t fare any better. While it is only hit by 2 laser, 1 electron, 1 proton, and 2 rocket batteries, being already damaged by a seeker missile hit it is destroyed as the last rocket battery from the battleship impacts the hull.
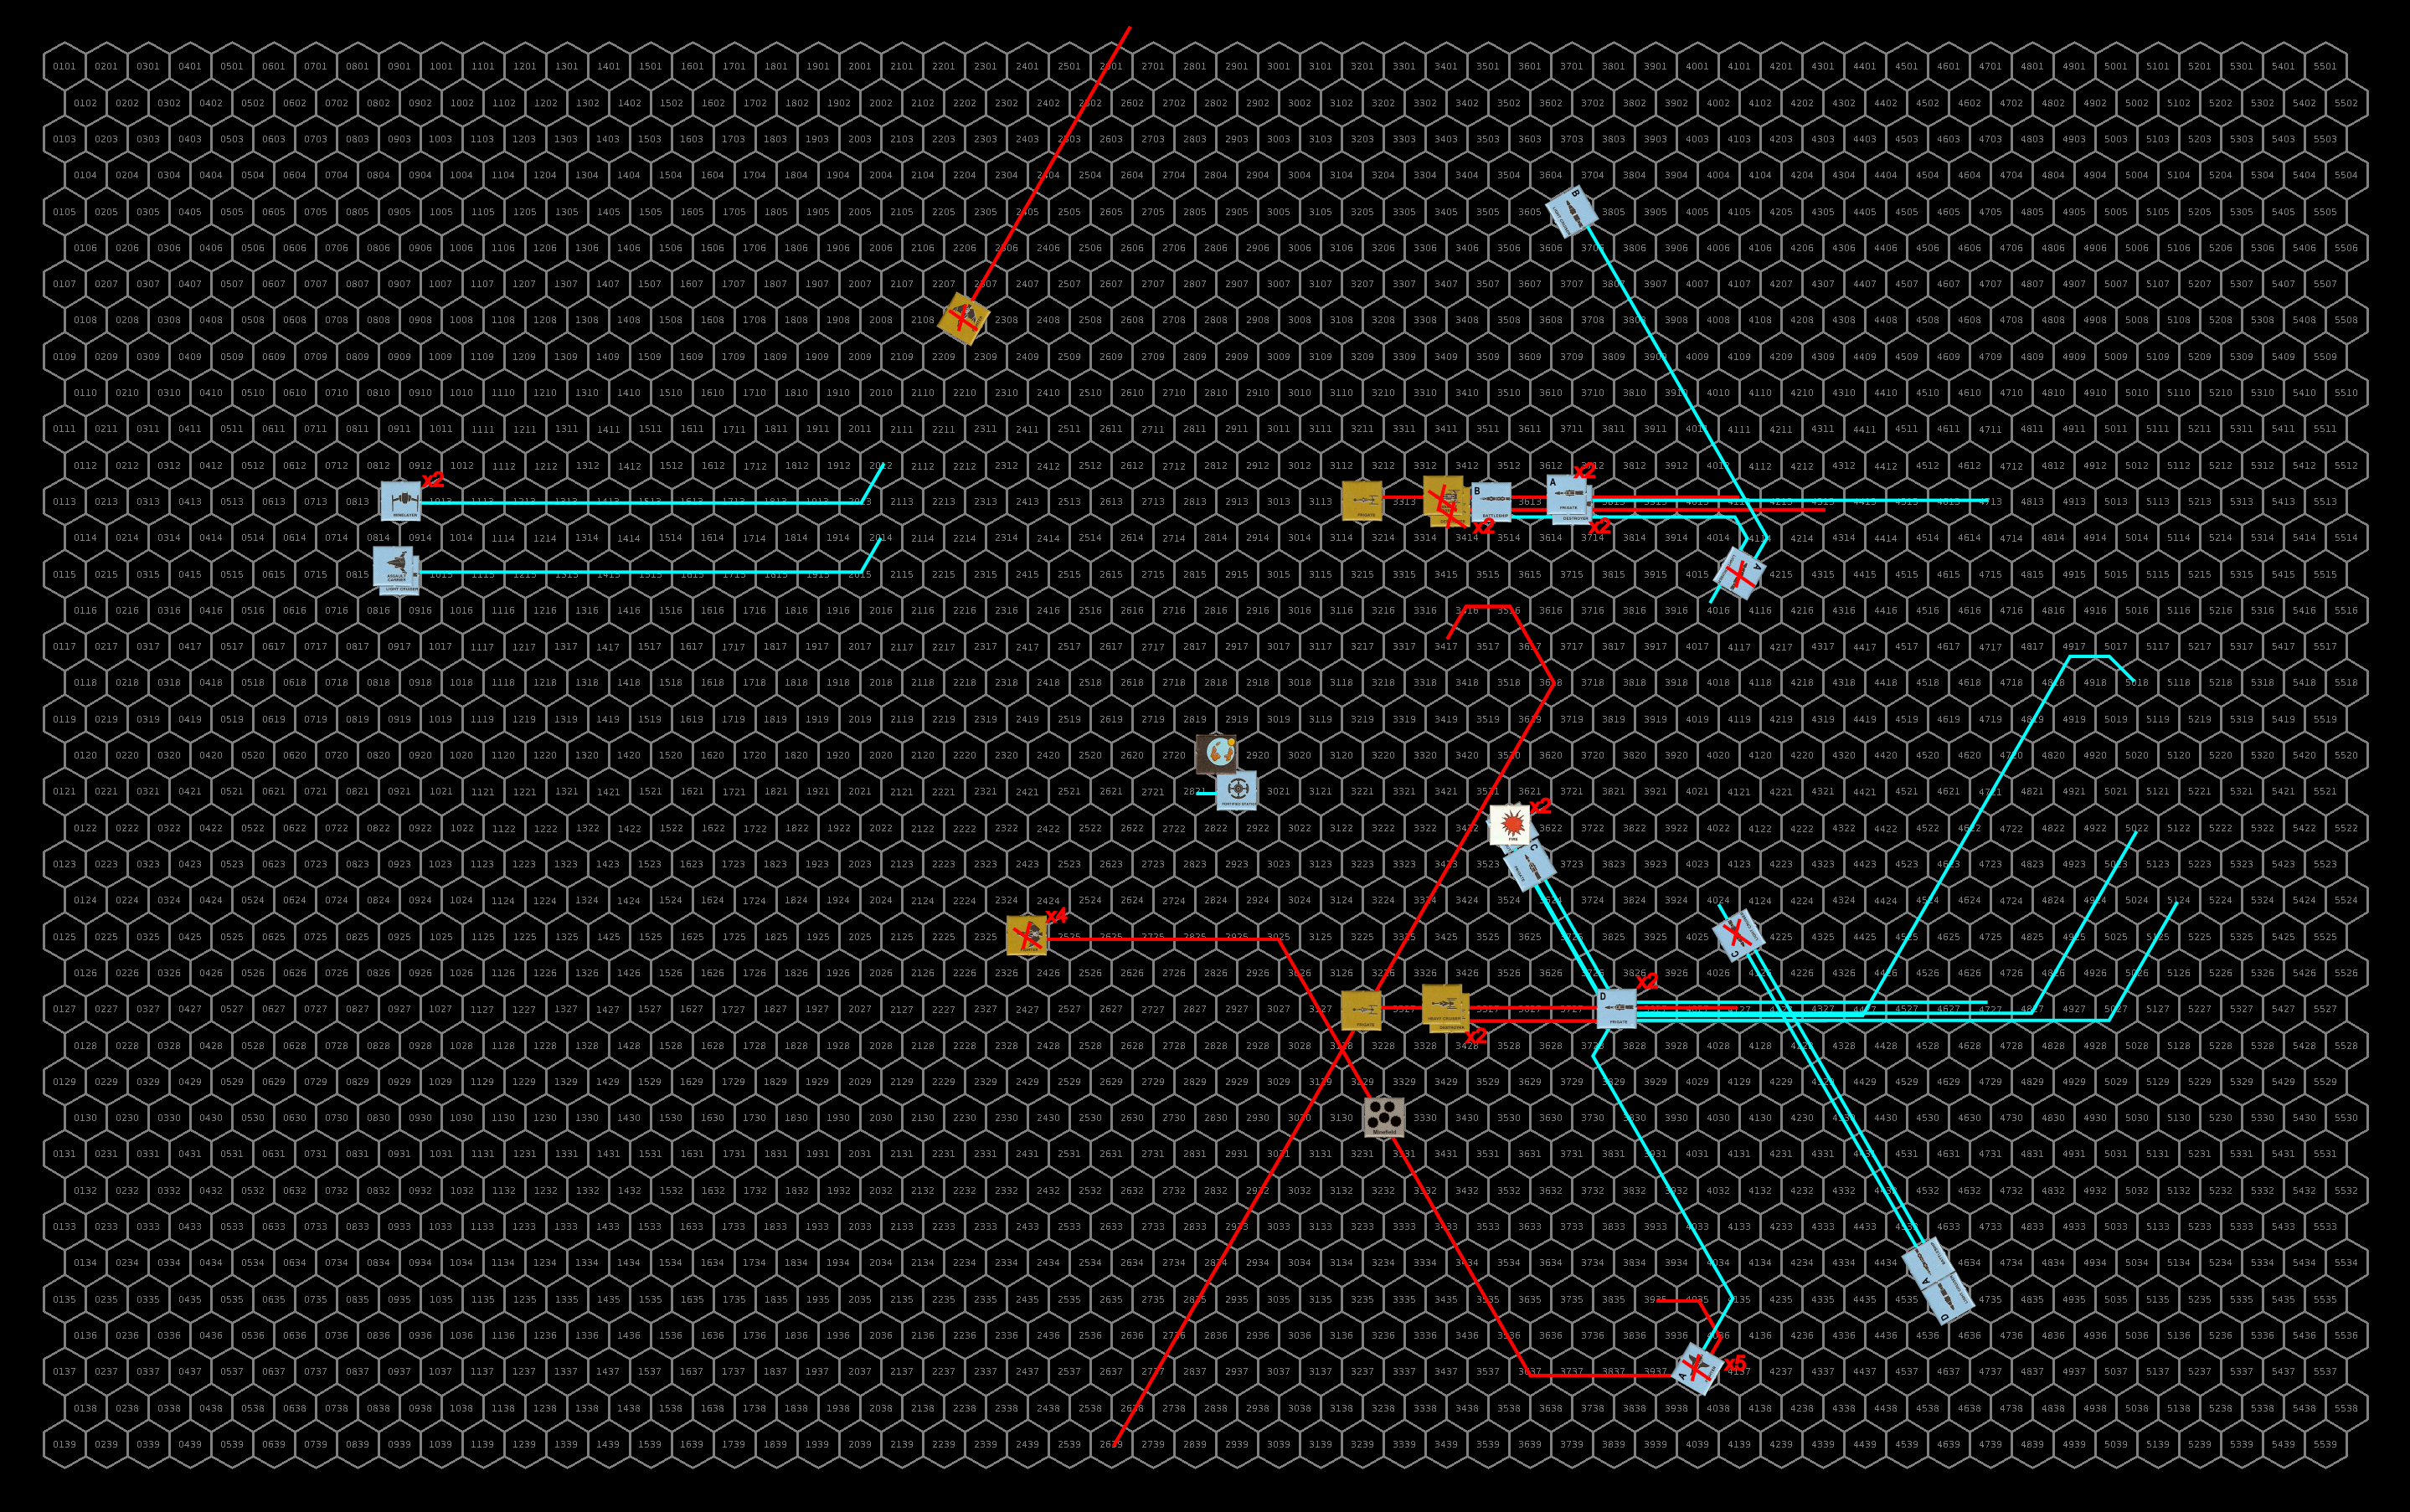
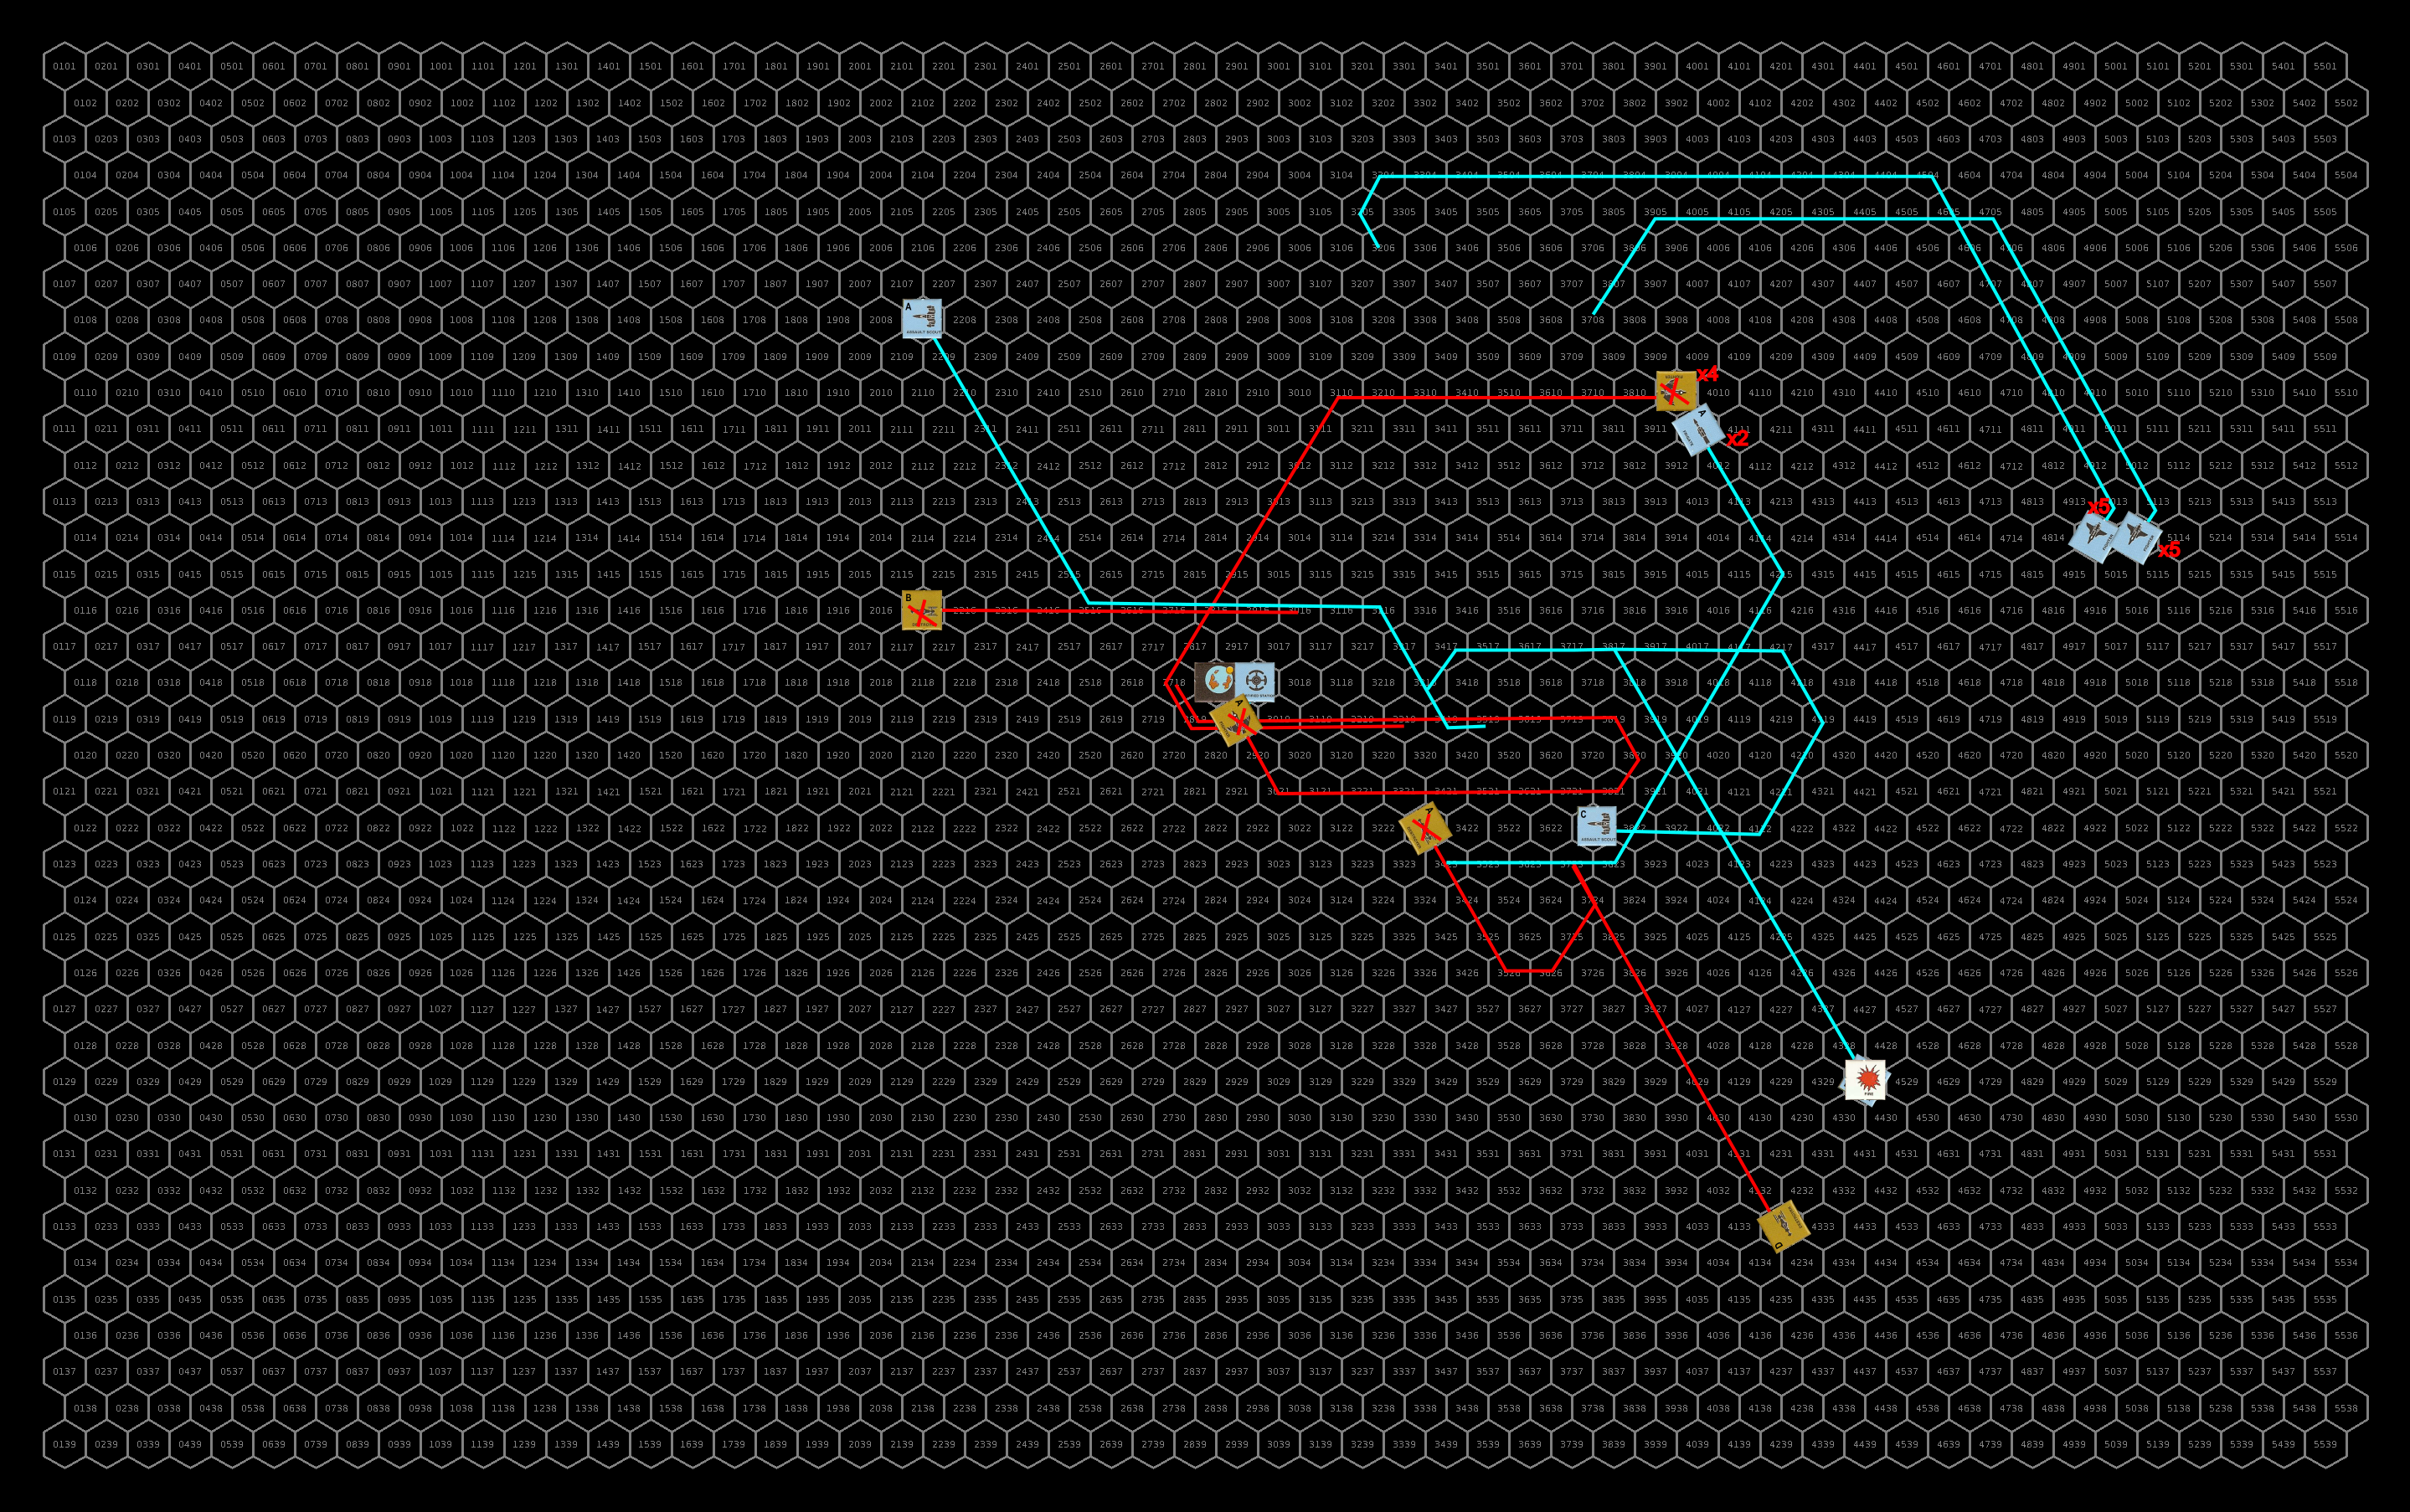
Ships and positions after the second round of combat. Click for full sized image.

Turn 3

We’ve started to whittle down the number of ships on both sides at this point (either through destroying them or damaging them enough that they are out of the fight) so each turn will go a bit faster. But on the flip side, damage to acceleration and maneuvering means that the ship squadrons are going to be breaking up so maneuvering will become more complex and chaotic. There is still a lot to be done.

The sathar capital ships all accelerate to speed 9 and fire at the closest light cruisers, splitting shots between the each pair. The surviving fighter group decelerates to 25 and loops around to make a pass at the station.  Unfortunately for them, they pass through another mined hex. Finally, the single surviving fighter that flew off the top of the map comes screaming back in at speed 32 and fires its assault rocket at one of the minelayers.

Defensively, the UPF battleships fire at the assault carrier or heavy cruiser in the sathar formation they are targeting. The light cruisers each pick a sathar destroyer and focus their fire on that ship. The frigates and destroyers spread their fire around the same ships. The minelayer and assault carrier group fires at the lone fighter. The mines are not very effective only damaging the assault rocket launcher on a single fighter; the other four make it through the minefield unscathed. The station fires on the incoming fighters.

The surviving sathar assault carrier is savaged by shots from the battleship and a pair of UPF frigates knocking out over half of its hull integrity, a laser battery, its maneuvering engines, and its navigation controls system. The lead destroyer in the upper group has over half of its hull integrity knocked out by the lead light cruiser while the trailing light cruiser and a UPF destroyer hit the trailing destroyer in this group damaging its maneuvering and damage control systems, disabling its ICM launcher, and nearly ripping the hull to shreds.

In the lower group of sathar ships, the UPF battleship and frigate completely miss the heavy cruiser. The lead sathar destroyer is hit by one of the UPF light cruisers knocking out its ICM launcher and damaging its combat control system. The other destroyer is hit by the other UPF light cruiser and a frigate for some serious hull damage. The station misses the incoming fighters but one of the minelayers hits the lone fighter destroying it before it can fire its assault rocket.

Having survived the barrage of defensive fire, the sathar open fire on the light cruisers and station. The station is hit by 2 assault rockets which damage its combat control system and score a significant hull hit. The lead UPF light cruiser in the upper group, already damaged, is hit by two laser batteries and a torpedo from the sathar frigate which destroy it. The second light cruiser in that group are hit by multiple weapons from the sathar assault carrier and one of the destroyers including a rocket battery and torpedo suffering only a minute bit of hull damage but significant damage to its acceleration and maneuvering and damage to its combat control system.

In the lower group the lead UPF light cruiser, again already heavily damaged, is hit by a laser battery and torpedo from the sathar frigate knocking its proton battery before the cruiser is destroyed by the torpedo. The second light cruiser takes a beating from the other sathar destroyer and the heavy cruiser being hit by 2 laser, 1 proton, 1 electron, and 2 rocket batteries as well as a torpedo. Knocking out over half of the light cruiser’s hull integrity, the shots also knock out its distruptor cannon and ICM launcher as well as damage its maneuvering capabilities.

The two surviving assault scouts, only one of which has a working assault rocket launcher, join up and make a pass at the sathar heavy cruiser. The UPF fighters make an assault rocket run on the sathar destroyers in the lower group where they are joined by the lower flight of UPF frigates. One of these frigates, whose acceleration is damaged, turns off to follow the assault scouts while the other two slow down to speed 9. The frigate and destroyer group slow to speed 10 and the frigates fire at the assault carrier while the destroyers each target a different sathar destroyer. Screening the smaller ships behind it, the upper battleship slows to speed 9 and pulls to within 10,000 km of the sathar vessels firing on the assault carrier. The damaged light cruiser in the upper group, with reduced maneuvering and a navigation control hit, turn to port and maintains its speed taking a long-distance shot at the assault carrier. The seriously damaged light cruiser in the lower group just drifts away from the battle followed by the battleship that has had its maneuvering systems knocked out. They fire long-range shots at the sathar heavy cruiser. The minelayer and assault scout group accelerates to speed 11 and turn away from the oncoming sathar vessels. They, together with the station, fire at the group of sathar fighters. The fire on the sathar fighter that has now drifted off the map damages its navigation control system.

Defensively, the sathar ships in the upper group fire everything at the battleship knocking out one of its laser batteries and causing some significant hull damage (a quarter of its total hull integrity). In the lower group the heavy cruiser and frigate fire at the incoming fighters while the destroyers target the assault scouts. One of the fighters has its assault rocket launcher disabled, taking it out of the fight, one is hit by a electron battery for some minor hull damaged and a third is hit by a laser battery, destroying the small ship. The lead assault scout it hit by an electron battery starting an electrical fire on board and the other is hit by an electron battery serious damaging it’s hull (dropping it below half integrity).

Despite the long-distance shots, one of the sathar fighters his hit by a laser battery damaging its combat control system and the UPF assault carrier scores an electron battery hit on another, destroying it. The surviving sathar heavy cruiser is only hit by the single assault rocket and an electron and proton battery knocking out its maneuvering and doing some minor hull damage. The lead sathar destroyer in the lower group gets off fairly easy as well being hit by a laser cannon and battery which damage in maneuverability and disable its laser battery. The other destroyer takes a bit more damage being hit by two assault rockets and two laser cannons dropping its hull integrity by more than half and damaging its acceleration and combat control systems.

The ships in the upper group are not so lucky. While the lead destroyer survives, it suffers a significant hull hit, has its electron battery disabled, and suffers a navigation control hit. The other destroyer is hit by every weapon fired by the trailing UPF destroyer completely obliterating the ship. The assault carrier doesn’t fare any better being hit by 10 different weapons from the battleship and two frigates and is completely destroyed.

Positions and course after a half hour of battle. Click for full size image.

Repair Turn

On the UPF side, the station manages to repair its reduced damage control repair system bringing it fully back on-line. The assault scout with the fire manages to extinguish it before it can do any damage. The other two assault scouts (one of which is off the map) both repair some of their hull damage as does the heavy damaged light cruiser and one of the battleships. The other battleship repairs its navigation controls system and restores some of its maneuvering ability. The upper light cruiser also repairs it’s navigation control system. The two damaged fighters both manage to restore their assault rocket launchers bringing them back into the fight. One of the UPF frigates restores some of its acceleration while one of the destroyers repairs its laser cannon. The assault carrier attempts to repair its damage acceleration but something goes seriously wrong and it seems that it is going to require a shipyard to fix properly.

For the sathar, the lone fighter way off the map gets its fire under control and the frigate in the upper group repairs its laser canon. The other ships all attempt to repair some of their hull damage (and most succeed although the destroyer with the navigation control damage does not).
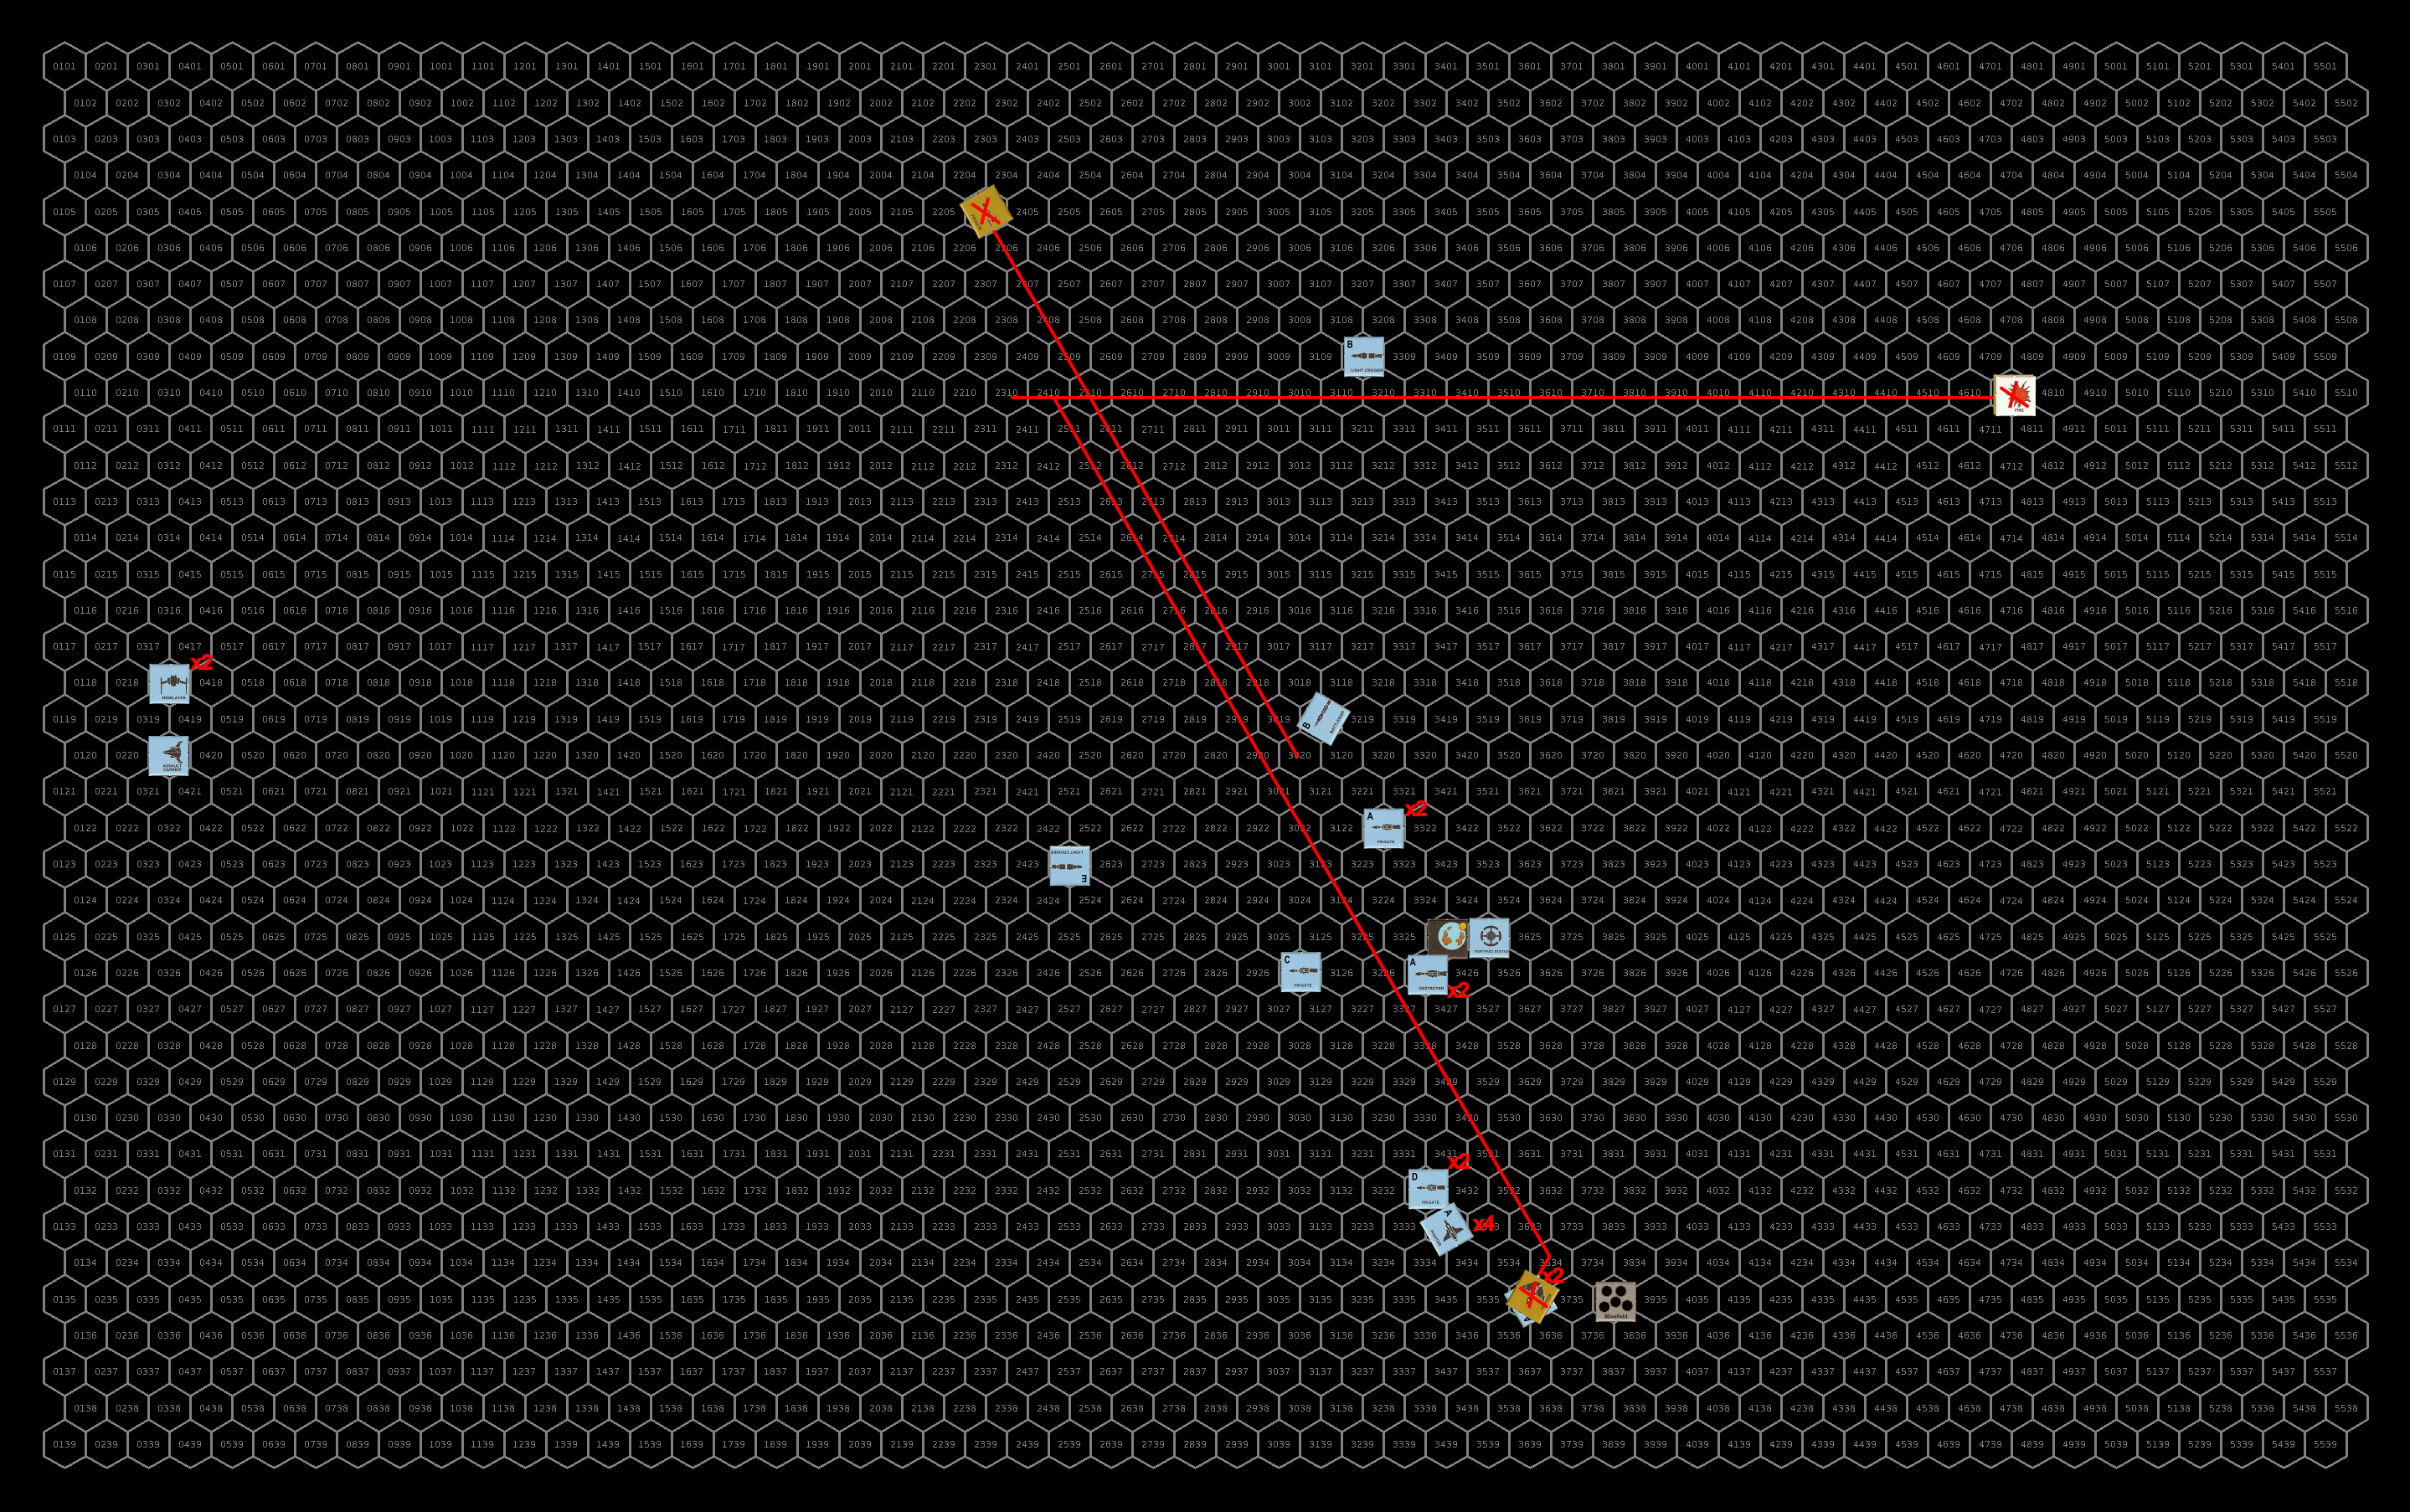
Turn 4

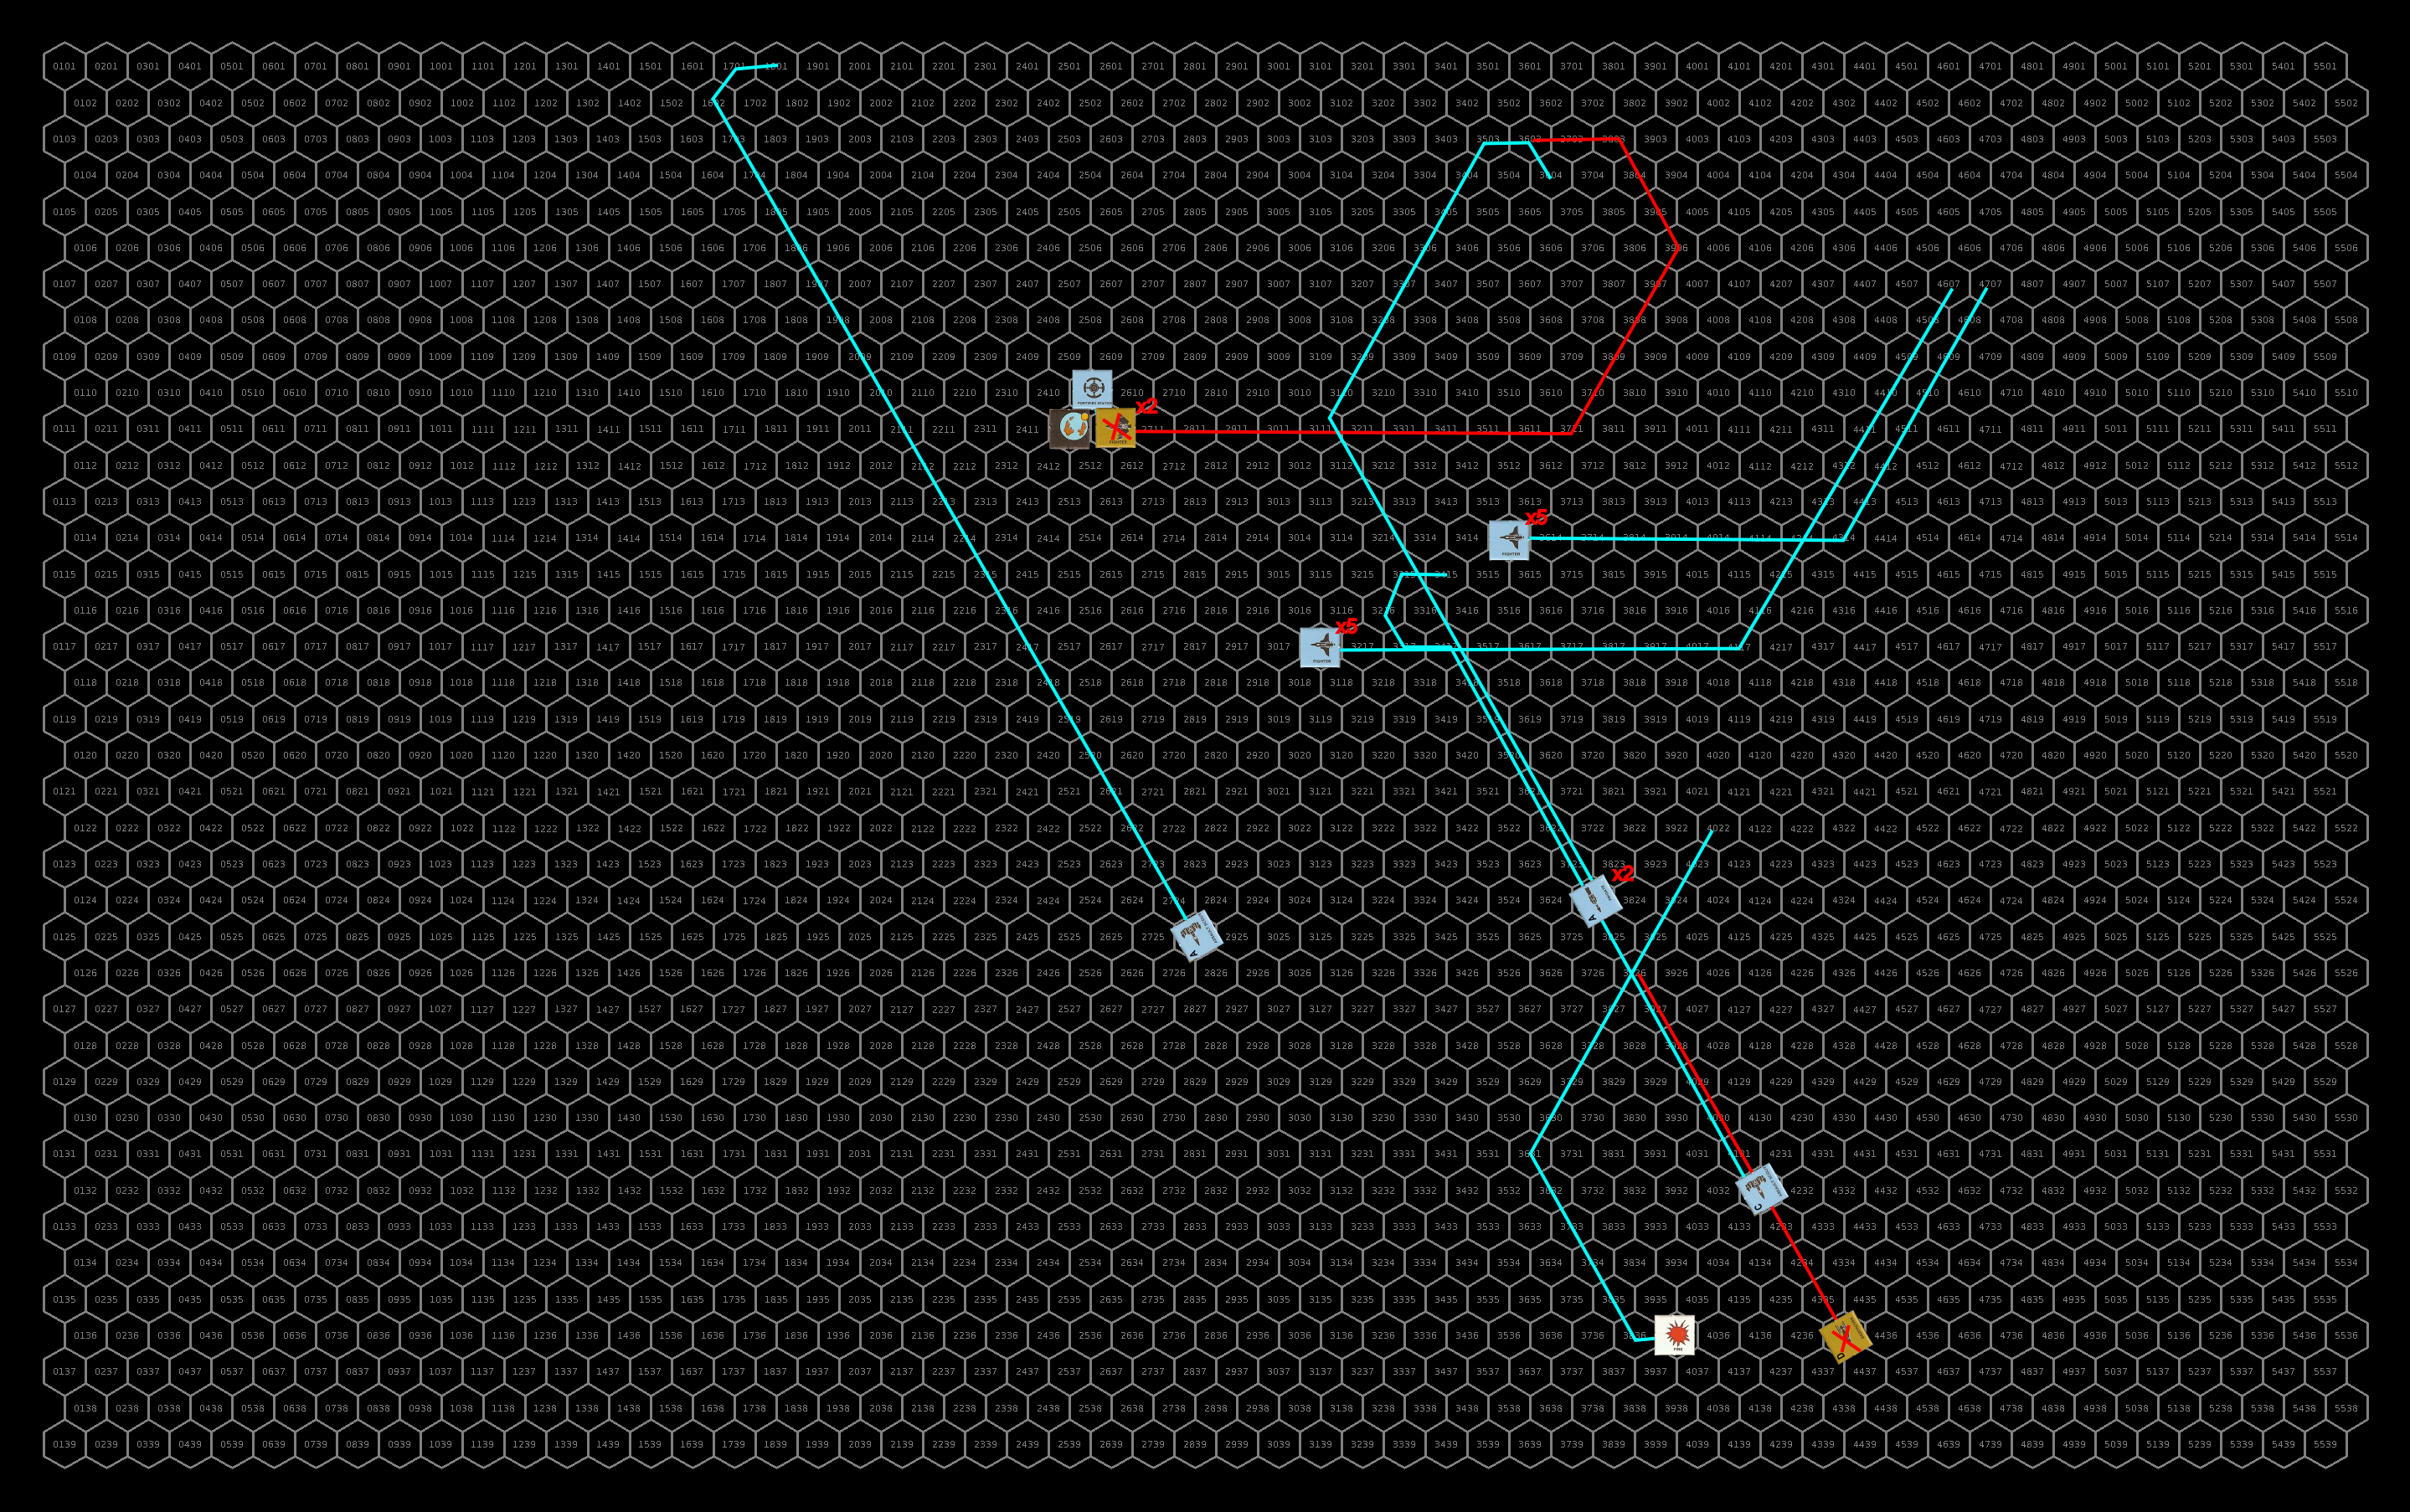
The two sathar frigates and the less damaged sathar destroyer from the lower group all accelerate and turn to make an attack pass at the station. The destroyer in the upper group with the navigation control system damage makes a hard turn to port. Unfortunately, its severely damaged hull cannot stand the strain and the ship breaks apart. The sathar heavy cruiser and final surviving destroyer just drift forward firing at the assault scouts. The fighters fly out to attempt a run on the UPF minelayers.

Defensively, the UPF focus on just a two of the ships headed toward the station and the fighters. The first target is the sathar frigate from the upper group. All of the ships above the planet fire at that ship, which is really their only target. While the UPF frigates miss completely, the battleship and destroyers land a series of blows. However, despite hitting with 8 different weapons including a rocket battery and two laser canons, the frigate survives the blast suffering a near 75% hull integrity loss, a defensive power short circuit, and damage to its repair ability and maneuverability.

The UPF ships below the planet, together with the station, fire at the destroyer approaching the station from that direction. It is hit by 3 laser batteries and a laser cannon knocking out nearly half of its hull integrity and maneuverability.

Finally, the minelayer and assault carrier group fire at the incoming fighters reducing the acceleration and maneuverability of one, damaging the hull and knocking out the maneuverability of a second and destroying a third.

The surviving sathar fighters fire at one of the minelayers damaging its combat control system and inflicting some hull damage. The wounded and drifting destroyer and heavy cruiser fire at the assault scouts damaging the repair systems on both of them. While the frigate coming in from above misses the station completely, the ships coming up from below do much better hitting with both laser canons, a laser and rocket battery, and slipping a torpedo through the ICM screen. The station suffers a power short circuit in its defenses with the other weapons ripping into its hull including a massive explosion by the torpedo. All told, the station loses over half of its hull integrity.

The minelayers and assault carriers continue to accelerate away from the fight while the undamaged light cruiser loops back to engage the oncoming sathar ships. In an attempt to finish the fight, the UPF ships all spread out to target different sathar vessels. The assault scouts slingshot around the planet and make a run at the heavy cruiser which is also targeted by the UPF fighters. One of the UPF frigates and the destroyers chase down the frigate from the upper flight. Two of the UPF frigates go after the destroyer that made a run at the station, the battleship goes after the other sathar frigate, and the other two frigates go after the wounded destroyer with the heavy cruiser. The seriously damaged UPF light cruiser continues to drift away from the battle while the other turns to go after the surviving sathar fighters. The other UPF battleship, some navigation control restored, accelerates and turns back toward the planet as it slowly rejoins the fight.

The sathar all fire at the ships attacking them. The UPF battleship suffers some minor hull damage from a laser battery hit, one of the UPF frigates attacking the upper destroyer has its navigation control system damaged, and three of the UPF fighters are hit for a slight damage to maneuvering on one, a navigation hit on a second and the assault rocket launcher knocked out on a third. The most serious damage was one of the frigates near the sathar heavy cruiser being hit with a rocket battery that destroyed half of its hull integrity.

The sathar frigate from the original upper flight of ships, barely holding together as it is, is hit by two laser cannons and a laser battery, destroying it. The other frigate, despite being hit by 1 laser, 1 proton, and 2 electron batteries, as well as a distruptor cannon from the battleship, manages to pull through with only minor hull damage but also having its laser cannon knocked off-line, it acceleration reduced, and its maneuvering completely knocked out. The sathar destroyer that just attacked the station is hit with 2 laser canons, a laser battery, and two rocket batteries destroying it. The other destroyer is hit by a laser cannon, laser battery, and 2 rocket batteries. It too is destroyed. The heavy cruiser is hit by 3 of the 4 assault rockets that were fired at it and breaks apart as the explosions rips through the hull. The light cruiser manages to get a long distance hit on one of the sathar fighters igniting an electrical fire.

Positions and courses after the fourth round of combat. Note that the map has been shifted slightly to keep the minelayers and assault carrier on the map. The battleship and light cruiser at the bottom have moved off the map although the battleship is slowly maneuvering to come back to the fight (I’m tracking it on a separate map). Click for full size image.

Turn 5

The sathar fighter with the fire also has no maneuvering capability (or assault rockets left) and just drifts by the UPF light cruiser passing with 10,000 km of the larger ship which hits it with a laser and electron battery destroying it.

The other sathar fighter, also out of assault rockets, accelerates to sped 27 and attempts to ram one of the UPF assault scouts. It is intercepted by multiple hits from several ships that vaporize it.

The sathar frigate, having no maneuverability, accelerates to speed 15 to try to clear away from the UPF ships. However, between the battleship, the undamaged light cruiser and the frigates that were nearby, it is hit by 10 different weapons and destroyed.

The only surviving sathar vessel at this point is the lone fighter that was damaged on the first round of combat and has been drifting away for the past 40 minutes with no maneuverability. The two surviving assault scouts chase it down over the next couple of hours and eliminate it.

Ship positions at the end of the battle when the last sathar ship was destroyed. The map is shifted again to keep the sathar frigate attempting to flee on the map. Click for full size version.

Whew! That was quite a battle. And this is probably the longest post yet on the site clocking in a just around 5750 words.

Repairs

With most of the UPF ships damaged to some extent or another, it is six hours before all the battle damage that can be repaired has been. By then the lone sathar fighter has been destroyed and all of the ships return to take up orbit around the planet.

In the end, four vessels have damage that requires shipyard work to repair. On is the fortified station, having been reduced to less than 40% of it’s hull capacity, it is only back to 57% capacity before problems arise that require outside assistance. The assault scout severely damaged early, that drifted out of the battle, is only able to restore 80% of its hull and one of the frigates has a small hole in the hull that just refuses a patch.

The other ship is the assault carrier assigned to Strike Force Nova which suffered permanent damage to it acceleration. If it and its four surviving fighters remain with the Strike Force, they will not be able to execute any high speed risk jumps until that is repaired.

Lessons Learned

While the sathar played it well using the fighters to clear paths through the minefield, and did a good job targeting the assault scouts early to reduce the assault rocket threat, they were a bit too timid trying to traverse the minefield and came into the battle with not enough speed to clear it quickly. This severely hampered their combat options and it turned into a shooting gallery for the UPF ships which were free to maneuver. Had Strike Force Nova not been in the system, their tactics might have been sufficient and though they would have suffered some loses traversing the minefield, more ships would have made it across to really engage with the UPF. Next time they are in a system with minelayers, they might try something different.

One thing I completely forgot were the seeker missiles on the sathar heavy cruisers. After the fact I realized that I could probably have deployed them on round 2 or 3 and activated them to keep the UPF ships circling around in the mined area on their toes and possibly affected their maneuvering. If nothing else, they may very well have impacted the station and possibly have destroyed it. You would think that with the UPF seeker missiles flying around I would have remembered the sathar ones but it completely slipped my mind until I was doing this write-up.

The ability to maneuver in the minefield, as well as the superior numbers allowing them to focus their fire on more ships, really served the UPF well as they were able to whittle down the sathar ships and use their weapons to full effect. While they suffered some serious losses in numbers of small ships and the loss of the two light cruisers and destroyer, yhey gave much better than they took and definitely came out ahead.

The only real problem is that now most of the UPF force is in the center of the Frontier at Prenglar, while the sathar forces are on the periphery. It’s going to take some time to get ships where they are needed but at the same time, knowing that the sathar could strike at Prenglar again at any time, they have to keep forces here to defend this core world.

November 24, 2020 Tom Leave a comment

Sathar Starship Construction Centers

I had planned to do an article on an alternate set of astrogation rules, but as I started looking at it, it was going to require more time than I had to get it done properly. So that one will come at some point in the future.

If you’re following the Star Frontiers Twitter feed, you know that yesterday started the main events of the Second Sathar War. A lot of my free time has been spent working on that and staying far enough ahead that I can get the battle posts up, track the ship movements, record and schedule repairs and new ship construction, and figure out strategy and tactics as they shift after each encounter. In fact, if I hadn’t posted it early to get some feedback, the Battle of Stenmar post I did a while back would have been today’s post as the tweet about that battle will be going up at some point today. Tracking all the ship movements and playing out the battles is keeping me busy. Who knew that managing a Frontier-wide battle for both sides would be so much work! 🙂

Given that the Second Sathar War narration is where my focus is right now, I thought I’d do a related post and talk about the Sathar starship construction centers (SCCs) in my version of the setting.

Some Background

Placing the SCCs

If you have looked closely at the Extended Frontier Map, you already know the locations of these SCCs – they are marked on the referee version of the map. And as I mentioned in the posts about the creation of that map, the sathar worlds and jump routes were originally laid down decades ago. I modified them slightly to account for the Zeb’s Guide data and fan material that I included in the map as the latter hadn’t been produced and I didn’t own a copy of the former when I made the original map as a teenager.

On that original map, only the first five SCCs were marked. I had originally created the map to help track the exact project I’m doing now as part of the Detailed Frontier Timeline, namely track the Second Sathar War from a ship construction and movement perspective with the RPG rules rather than the board game rules in in the Campaign Book. It was also made for a exploration campaign where the PC would go out to expand the borders of the Frontier and look for the sathar worlds but that’s a different set of posts. Because of that, I only included the five SCCs that I envisioned participating in the conflict and which is why those five, closest to the Frontier, have the first five numbers and not the ones deeper in sathar controlled space which arguably were created first. If I ever go back and rework everything, I might change the numbering.

When I was setting up the Detailed Frontier Timeline project and making the Extended Frontier Map, I realized that I needed to add in a few more SCCs in the other parts of sathar-controlled space to handle all the other ship construction needed by their empire. That got me up through the ninth SCC. I then realized they needed one to manage the fight against the Saurians and so added in the tenth one. So while they are numbered in order of creation, it was their creation in my head for the setting, not their creation dates in the timeline.

Sathar Ship Hull Sizes

Another item of note relative to the SCCs is the hull sizes I use for each of the sathar ships. These are slightly different than the values I use for the UPF ships but all fall within the range of sizes given for each class of ship on page 5 of the Knight Hawks Campaign Book. The sizes I use for the sathar ships are:

  • Fighter – HS:1
  • Cutter – HS:4
  • Frigate – HS:5
  • Destroyer – HS:6
  • Light Cruiser – HS: 14
  • Assault Carrier – HS:16
  • Heavy Cruiser – HS: 18

In the timeline the cutter is a new ship type that will see action first in the Rim and later in the Frontier. The specs for the ship can be found on page 6 of Frontier Explorer issue 2.

It’s my take that the larger sathar ships are a bit bulkier than the corresponding UPF version. So sathar light cruisers are HS:14 while the UPF ones are HS:12, the sathar assault carriers are HS:16 while the UPF ones are HS: 14, and the sathar heavy cruiser is HS:18 compared to the single UPF heavy cruiser which is HS:16. Even the sathar destroyer is actually HS:6+ being just a bit larger than the standard HS:6 volume but not enough to actually be HS:7.

The reason for this is the role I have for these larger ships. In addition to being mainline fighting ships, the larger capital ships also double as troop transports. You can see this in the Sathar Destroyer Technical Manual. Someday I’ll detail out the light and heavy cruisers similarly. In any case, this makes the sathar ships a bit bulkier and take a bit longer to produce. They aren’t being used for the troop transport role at the beginning of the war but the capability is there. While this doesn’t have any impact on the actual battles, it does impact the starship construction centers and so needed to be spelled out.

The Starship Construction Centers

In this section, we will look at each of those starship construction centers in turn to talk about their capacity, production queues, and main focus.

If you’ve been following along with the Detailed Frontier Timeline and playing close attention, you could probably reconstruct the production queues of SSCs two through five as I’ve been posting the ships that were produced there as part of the timeline. SCC#1 has just come online and only produced a single ship (a light cruiser) so it’s full queue hasn’t been revealed and SCC#10 will soon be shifting from the Saurian conflict, which has ended, to the Second Sathar War. The first ship out of that SCC (a fighter) to participate in the SSW will complete construction in early December (FY61.304).

The production queues for SSCs one to five were specifically set up to try to produce the sathar Order of Battle from page 55 of the Knight Hawks Campaign Book at the time I started up the war in the timeline. I started with an initial semi-random “seed” of ships, modified for the encounters in the Detailed Frontier Timeline (like the fight a Volturnus), and then allowed the SSCs to crank out ships. I came pretty close with only a few more fighters (most of which I destroyed in the fight in the Liberty system) and one extra destroyer. I have a small computer program that allows me to run the production queues and add (and remove) SCCs as needed to produce the ships so I don’t have to do it by hand.

Okay, let’s look at these construction centers. Directions for the locations of the SCCs are given on the Extended Frontier map assuming the top of the map is “north.”

SCC#1

Location: OFS203 (“S” of Prenglar)

Capacity: 48 HS worth of ships

Production Queue:

  • 42 HS of capacity dedicated to the production of light cruisers (3 under construction at any one time), staggered to produce a new LC every 140 days
  • 6 HS of capacity dedicated to the production of destroyers, one every 180 days

Notes: This is the newest of the starship construction centers with its first ship being produced on FY61.208. It is at the far end on the sathar jump routes (without passing through the Frontier). It was constructed specifically to be a jump off and repair point to strike right into the heart of the Frontier at Prenglar.

The recent loss of SSC#2 and the Liberty system has actually isolated this SSC from the others. Ships produced here (or headed here) will have to pass through the Liberty system. This will give the UPF a chance to detect these ships if they try to get into the Frontier anywhere other than Prenglar.

SCC#2

Location: FS30 – now Liberty (“SE” of Theseus)

Capacity: 46 HS

Production Queue:

  • 16 HS of capacity devoted to production of assault carriers, one very 480 days
  • 24 HS of capacity devoted to production of destroyers (six under production at any one time), staggered to complete one every 45 days
  • 6 HS of capacity split between production of fighters and destroyers. Produces 6 fighters in 30 days, then a destroyer 180 days later, than back to fighters.

Notes: This SCC has been operating for a while and is responsible for the production of most of the destroyers seen in the Frontier recently and present in the fleets in the initial attacks in the Second Sathar War and produced some that were used against the saurians. It was also the driving force behind the exploration that established the sathar jump routes over to SCC#1 and in to S’esseu space.

In the notes in the SFKH4 module The War Machine (the Beyond the Frontier series), it said that this SCC was responsible for about 20% of the ships in the second sathar war. This is why I went with five SCCs when creating the original map.

This SCC was lost just recently along with a large number of fighters in the events of the SFKH4 module which wrapped up on FY61.40, only 40 days before the first sathar ships appeared in the Frontier to start the Second Sathar War. It will be interesting to see how things play out with the loss of this system, but that was always intended from the start.

SCC#3

Location: OFS138 (“NE” from Kizk-Kar)

Capacity: 59 HS

Production Queue:

  • 54 HS of capacity devoted to heavy cruiser production (three under production at any one time), staggered to produce one HC every 180 days
  • 5 HS of production dedicated to frigate production, one completed every 150 days

Notes: This is an older SCC as well and originally fueled the sathar exploration on the eastern side of the Frontier that resulted in the discovery of the saurians and the Mhemne.

Now focused on the battle with the Frontier, this SCC is responsible for the construction of the majority of heavy cruisers present in the early days of the conflict.

SCC#4

Location: OFS111 (“N” of Fromeltar)

Capacity: 49 HS

Production Queue:

  • 16 HS of capacity dedicated to assault carrier production, one every 480 days
  • 28 HS of capacity dedicated to light cruiser production (two under production at any one time), staggered to produce one every 210 days
  • 5 HS of capacity dedicated to frigate and fighter production, completing 5 fighters in 30 days, then a frigate 150 days later and then back to fighters.

Notes: This is a older SCC established after the First Sathar War to explore more into the Frontier sector and the Rim. The route to Zebulon has been known for hundreds of years but most of the other routes are fairly new.

SCC#5

Location: OFS019 (“N” of Truane’s Star/Zebulon)

Capacity: 50 HS

Production Queue:

  • 28 HS of capacity dedicated to light cruiser production (two under production at any one time), staggered to produce one every 210 days
  • 18 HS of capacity dedicated to heavy cruiser production one every 540 days
  • 4 HP of capacity dedicate to cutter production, one every 120 days

Notes: This is a newer SCC set up to provide ships for fighting in the Rim and the Frontier and built as part of the preparation for the Second Sathar War.

The cutter is a new ship that the sathar have developed partially in response to the UPF’s assault scout. It is not battle tested and at the start of the Second Sathar War, only 4 have been produced. They will see first blood in the Second Battle of Stenmar (coming on FY61.293).

SCC#6

Location: OFS117 (upper left center of Extended Frontier Map)

Capacity: 200 HS

Production Queue: Random, mostly non-military ships

Notes: This SCC is located in orbit around what in my game is the sathar homeworld. It is larger than even the largest SCC in the Frontier but is not currently involved in the SSW conflict, although that may change. This SCC primarily is responsible for producing “civilian” ships that the sathar use for non-military purposes.

It did, however, supply the ships that comprised SBF-F1 and SBF-F2 that attacked Stenmar (in the Kazak system) in the Detailed Frontier Timeline. Since those battles were outside the scope of the simulation I was working on (I’m ignoring the Rim), I had the ships for the fight in the Rim come from somewhere other than the five main SCCs.

SCC#7

Location: OFS101 (upper right of Extended Frontier Map)

Capacity: 75 HS

Production Queue: random, “civilian” ships

Notes: This is a new SCC and is currently focused on producing “civilian” ships and ships for exploration to the “NE” of the sathar homeworld. Not currently involved in SSW production.

SCC#8

Location: OFS097 (“N” of OFS117)

Capacity: 75 HS

Production Queue: random, “civilian” ships

Notes: This is another SCC that is producing civilian ships for the day-to-day operation of the sathar worlds. Not currently involved in SSW production.

SCC#9

Location: OFS064 (upper center of Extended Frontier Map)

Capacity: 75 HS

Production Queue: random, military and exploration vessels

Notes: This SCC is focused on an active campaign to explore the upper left corner of the Extended Frontier Map. It was ships from this system that many years ago discovered the Tetrach complex on OFS070 that the Discovery Squadron went looking for and which was contacted by the complex on Laco (Dixon’s Star) back at the end of FY59. It was actually this signal, plus the events of Volturnus, that kicked off the Second Sathar War.

The sathar are currently trying to find a way through the large nebula in this region as they have detected signals from another race on the other side of the nebula that they intend to conquer. It is not currently producing ships for the SSW and probably will not be used for that purpose at it is focused on a different threat.

SCC#10

Location: OFS174 (“E” of White Light)

Capacity: 60 HS

Production Queue:

  • 18 HS of capacity dedicated to heavy cruiser production, one every 540 days
  • 16 HS of capacity dedicated to assault carrier production, one every 480 days
  • 14 HS of capacity dedicated to light cruiser production, one every 420 days
  • 6 HS of capacity dedicated to destroyer production, one every 180 days
  • 5 HS of capacity dedicated to frigate production, one every 150 days
  • 1 HS of capacity dedicated to fighter production, one every 30 days

Notes: This SCC is producing some of every type of main-line sathar warship. For the past several years, it has been focused on the war with the saurians and is responsible for producing most of the ships that destroyed their worlds.

Being already focused on military production, and with the campaign against the saurians now ended (finished on FY61.282) and the loss of the SCC in the Liberty system, this SCC will shortly be added to war effort against the Frontier (officially on FY61.296).

Last Thoughts

Those are the sathar starship construction centers scattered about. All told, there are 737 HS of capacity across the 10 SCCs. It’s about 45% more capacity than in the Frontier, although more spread out. It is also more focused on military ships. The UPF has 430 HS of capacity that can produce military vessels and another 80 HS of capacity that can produce civilian ships and do maintenance.

As the battles play out, the sathar may shift the production queues to different mixes going forward (e.g. they have lost most of their destroyer production) but we’ll have to see how the upcoming battles play out. Look for the first play report later this week and running into next week as the initial battles occur around the Frontier.

How do you see the sathar starship construction being set up and handled? Have you every attempted anything like this for your game? Or have you been more sensible and just hand-waved it? Share your thoughts in the comments below.

November 17, 2020 Tom 5 Comments

HSS History’s Hope – The 3D Model

Not much has happened in the way of progress for the HSS History’s Hope in the Detailed Frontier Timeline. The crew decided to go back to the Frontier for maintenance after their radar system failed during a jump. They were surprised to meet ships to escort them in YS01, the last system they had reported the jump route for and they and their escorts were attacked on the way home to the Scree Fron system. After maintenance was completed, they started on their way back out and have just arrived back in YS01. The adventure continues.

However, as I’ve mentioned in previous posts, I’ve been working on the 3D model of the HSS History’s Hope. This is now completed. I’m still working on the deck plans, which I’ll save for a future post. The reason I held off on doing those was because I suspected they would change slightly when I made the model. And I was correct, based on the hull design, there was a little more room for some of the ship bays which I expanded.

I’m making a series of videos showing my process while creating the deck plans, much like I did for the Rosegard maps. Once that is all done, I’ll post the deck plans and videos and start working on the Technical Manual for the ship.

But for now, let’s look at

The 3D Model

This is the front/top of the ship. I started the model by building the “skeleton” of the ship, namely putting in all the decks as I had sketched them out. I then wrapped a smoother hull around that skeleton to get the outline you see here.

I played a little with some different shapes to smooth out the profile but in the end decided to go with this simpler model. It’s a ship that while capable of planetary landings, isn’t really designed for it. There is some streamlining and thought given to atmospheric travel, it’s not a lot.

The ship stands 61 meters tall and is 30 meters wide (ignoring the engines and struts) and 13 meters thick (plus another 3.5 meters for the astrogation dome – this side, and the laser battery – far side) down where the engines attach.

Let look at some of the features.

Already mentioned, the big dome on this side of the ship is the astrogation dome. The ship has a deluxe astrogation suite so there is a 2-meter diameter telescope inside that 4-meter diameter dome

All the little circles are portholes, mostly in the crew cabins and common areas of the ship. Each of those are 1 meter in diameter. The row of what look like holes in the hull above and to the left of the astrogation dome are small cutouts in the hull to allow for portholes in the dining/lounge area of the ship.

Below the astrogation dome is the main cargo bay doors of the ship. These open, hinged at the bottom to lay down and form a ramp up into the ship.

The other noticeable feature on this side of the ship is the bit at the bottom of the upper wide section of the ship, This is the airlock, which sticks out a bit from the ship and has a bit of hull built up around it to reduce drag when flying through an atmosphere. I’ll admit that this was probably more of a cosmetic addition rather than a necessary one. I had a nice airlock structure from the UPF Light Cruiser model that I wanted to reuse so I did. I could have made it more flush with the hull but decided not to.

Looking at the other side of the ship we see the laser battery on the widest part of the ship.

Below that are the bays for the ships’ launch, the work pod, atmoprobes, and landing drone. There is a remote probe bay door opposite the landing drone bay (on the other side of the ship) but it doesn’t show up in either of these projections.

The feature sticking out on the right of the upper wide portion of the ship is the lifeboat bay.

Astute observers will notice that I used the same engines from the assault scout. I’ve decided that after their introduction for the assault scout, this model design for Class A atomic engines has become fairly standard, at least on ships that want to be able to operate in atmospheres.

And that’s it for the model.

Printing

With the model in hand, it’s time to print it. I created the model, as usual at 1/1000th scale with 1mm on the model representing 1 meter on the actual ship. Normally I then export the final STL at 1/3000th scale which is the scale I’ve decided to use for my ships. However, this time I forgot to scale it down in the final model. But that’s not a big deal as I can do that in the printing software.

I started by printing a 1/3000th scale version of the ship. You can see it here with a pair of hull size 6 ships printed at that same scale, the sathar destroyer and the CDCSS Nightwind, a freighter. The other ship I have at that scale, the hull size 10 agriculture ship, is nearly twice the size of the destroyer so I left it out of the image (There is a picture of the Nightwind and sathar destroyer next to the ag ship in the linked post).

To scale comparison of the HS:6 CDCSS Nightwind (left), HS:4 HSS History’s Hope (middle) and a HS:6 sathar destroyer (right)

After printing that one, I printed one at 1/2000th scale, which is the scale I use to print the small assault scout miniatures. You can see the History’s Hope next to a Swift assault scout in the following image.

To scale models of the HSS History’s Hope (left) and a Swift Class Assault Scout (right)

You can see that the engines are the same size (although they are rotated 90 degrees on the History’s Hope). Also if you look closely at the left side of the History’s Hope model, you can see the cut out in the hull for the remote probe launch bay that I mentioned above that wasn’t visible in the renders.

Looking at these small models, I’ve noticed that I need to put a few more supports on the undersides of the engines as they are not printing as clean or as straight as I’d like. But you only really notice on these zoomed in image. You have to remember that that assault scout is just 1″ tall.

What’s Next?

I’ve sent out the model file for this ship to may Patreon supporters. I’m planning on getting this one, along with the agriculture ship, UPF Freighter, and sathar fighter models, uploaded and available on DriveThruRPG with the rest of the models already there sometime later in the month. I really just need to sit down and upload them.

For the History’s Hope, I’m working on making digital deck plans as I’ve already noted. I have them all sketched out in my notebook, I just need to make the files. Then I’ll be doing a complete technical manual write-up for the ship with all it’s details. Which means I need to make a full color render of this ship like I did for the Swift Class assault scout. Any suggestions on a color scheme?

On the modeling front, it’s probably time for me to tackle the Privateer models. I’m getting the itch to do some more modeling so that will probably be where I scratch it to start.

What are your thoughts on the model and the ship? Let me know in the comments below.

November 10, 2020 Tom Leave a comment

Detailed Frontier Timeline – FY61.234 to FY61.264

This month sees the conclusion of the Beyond the Frontier series of modules (SFKH2-4) with UPF forces driving out the sathar from the FS30 system which is named Liberty. They also destroy a sathar starship construction center which will cripple the sathar efforts in the Frontier in the coming conflict, the wheels of which are already turning.

Also this month, the HSS History’s Hope makes it back to Frontier space for some much needed maintenance and starts back out to hopefully completely their voyage of discovery and the Saurians begin to set up an initial settlement on Clarion in the White Light system.

The last day of the month sees additional sathar ships arriving at their forward posts in preparation for the coming conflict. Next month with see the sathar forces set in motion and the opening shots of the Second Sathar War. If you want to follow along as events unfold, remember that I post the daily updates on Twitter. These posts are just the monthly summaries. As the battles play out, I’ll be doing posts on the day they occur as I described in my State of the Frontier post a couple of days ago. You can see a sneak peek (if you haven’t already) of these battle posts in the Battle of Stenmar post from a couple of weeks ago. That battle actually occurs on day FY61.281 but I provided it early to get feedback on the format.

Here are the most recent events in the timeline.

Date (FY)Events
61.234– Investigating the wreckage of the ships that attacked the HSS History’s Hope points to the involvement of the Family of One but the evidence is inconclusive.  The ships repair what damage they can and resume preparations for the jump to OFS224.

– On-board preparations complete, the first shuttle loads of materials for their new settlement depart the 7th saurian Ark Ship for the surface of Clarion.

– Within hours of their landing, protesters arrive at the saurian settlement site and attempt to disrupt the operations.  However, the Clarion Royal Constabulary, already on-site to maintain order, quickly gets the situation under control.
61.235The HSS History’s Hope jumps to the OFS224 system on high alert.  However, there is no indication of hostile forces and they begin preparation for the jump to Scree Fron.
61.236– Two destroyers, slated to join Strike Force Meteor, are completed in the Hentz (Araks) shipyards.  They begin a shakedown cruise to Prenglar via the Gruna Garu system.

– Strike Force Nova jumps into the White Light System and begins decelerating toward Clarion.

– The UPF ships under Command Reider in the FS30 system initiate Operation Cracker to attack and draw off the sathar ships from the occupied Mhemne L4 station.

– The ensuing battle of Operation Cracker manages to destroy many the remaining sathar fighters in the system which seemed to have very poor pilots.  The sathar LC and AC retreat to the strong defenses of the planet’s moon.

– Simultaneous with Operation Cracker, the CMS Osprey, UPFS Eleanor Moraes and the two captured sathar shuttles lift off from the surface of Snowball and approach the L4 station. 

– Gaining access to the L4 station, the UPF/Mhemne forces wage a running battle with the sathar forces occupying the station in an attempt to capture it before the sathar can destroy the station and kill the inhabitants.

– Having successfully captured the L4 station, the UPF and Mhemne forces brace for a sathar counterattack.

– Instead of attacking, the sathar abandon their positions on Snowball’s moon, the planet’s surface, and head to the L5 station.  All sathar installations are destroyed by nuclear blast.  Surprisingly, the Mhemne installations and cities are not destroyed.

– After collecting fighters at the L5 station, the remaining ships begin accelerating for a jump out of the system. As they leave L5 station, the sathar ships under construction at the L5 station are destroyed by explosions.

– After waiting to ensure the sathar don’t double back, Commander Reider pursues the sathar vessels as they continue to accelerate.  The sathar send their inexperienced fighters after the UPF ships which are destroyed in the ensuing fight.  The UPF remain safely out of range of the sathar ships’ heavier weapons as they trail them out of the system.

– Sathar SCC#4 (OFS111) completes a frigate
61.237After a week of additional patrols in the FS26 system, PG Meteor begins acceleration for a jump back to the Theseus system.
61.238Due to the scrutiny after the rubies deliver, Obar Enterprises takes some lower profile cargos for the next few runs on their secret jump route between Truane’s Star and Cassidine.  While not as profitable as the last few runs, they still gross 1.365 million credits.
61.239News of the events in the FS30 system leak to the public on Gran Quivera (Prenglar).  The Frontier Peace Organization stage a protest outside the Council of Worlds building demanding a cease of hostilities against the sathar and a stop to Spacefleet expansion.
61.240– The HSS History’s Hope and her remaining escorts jump in the Scree Fron system and begin decelerating to Hakosaur.

– Strike Force Nova arrives at Clarion and settles into berths at Fortress Redoubt.  They open communications with the commanders of the saurian vessels to arrange a meeting between the ship captains to discuss sathar tactics observed by both forces.

– The sathar HC and AC from FS30 jump into the OFS179 system, they maintain their high velocity and begin calculations for a jump to the OFS 168 system.  Commander Reider turns his ships around to return to the inner system.
61.241Responding to the activities of the Frontier Peace Organization, the Anti-Satharian League stage a counter protest demanding even greater Spacefleet and Star Law funding.  The two groups clash and the Port Loren police have to intervene to stop the fighting.
61.242– The commanders of the Strike Force Nova vessels meet with their saurian counterparts.  Over the next 6 days, they host each other on the various ships and stations and trade intelligence on the sathar.

– While most of the information on the sathar flows from the saurians to the UPF, the recent experiences of the Discovery Squadron provide some information to flow the other direction
61.243After months of negotiations, the Consolidated Nebula Energy Group has signed on all the independent power distributors on Groth (Fromeltar) and many distributors on Terledrom (Fromeltar) and Inner Reach (Dramune).  They continue to recruit others and begin sending delegates to other systems as well.
61.244The HSS History’s Hope arrives back at Hakosaur and lands at the starship repair facility on the surface.  While the ship goes in for maintenance, the crew take a much-deserved rest and spend time with their families.
61.245The two UPF destroyers arrive at Hargut (Gruna Garu), while the rest of the crew takes a bit of shore leave, the astrogators get to work immediately on the calculations for the long jump to Prenglar.
61.246– The sathar forces in the Sauria system, having finished the cleansing of that system, begin accelerating for a jump to the Tischen system, the first leg of a journey back to their base in OFS228, the site of another sathar starship construction center (SCC#10)

– PG Meteor arrives back at Minotaur Station (Theseus).  They transmit their findings in FS26 back to UPF Headquarters.  The crews are given 3 days of shore leave.

– The sathar HC and AC from FS30 arrive in OFS168.  They begin calculations for a jump to OFS167.
61.247– Initial jump calculations complete, the two UPF destroyers at Hargut (Gruna Garu) leave the station and begin accelerating for their jump to Prenglar.

– Commander Reider arrives back at Snowball with PG Lancet.  The CMS Osprey is released to return back to Clarion (White Light).  It begins accelerating for a jump back to Waller Nexus. 
61.248– Meetings with the saurians complete, Strike Force Nova departs Fortress Redoubt and begins accelerating for a jump to Madderly’s Star.

– Calculations complete, the sathar HC and AC in OFS168 jump into the OFS167 system.  The begin decelerating to join the other ships rendezvoused there.
61.249PG Meteor in split apart once more.  3 Assault scouts, keeping the PG Meteor designation, leave Minotaur station and begin accelerating for a jump to Clarion (White Light).  The frigate and remaining assault scout, designated PG Liberty, start accelerating for a jump to Padda.
61.250– The FS30 system, in consultation with the Mhemne population, is named the Liberty system in UPF records.

– After over a year on patrol, PG Virgo departs the Kazak system to return to the Frontier.  It will make a high-speed transit back to Pale (Truane’s Star).
61.251After a week of ship maintenance and crew leave, the HSS History’s Hope emerges from the starship repair facility with a clean bill of health.  The crew prepares to depart once again into the Yazira sector to continue their voyage of discovery.
61.252The CMS Osprey arrives in the Waller Nexus system.  They maintain their high velocity and begin calculations for a jump to the Padda system.
61.253Preparations complete, and fully restocked with food and fuel, the HSS History’s Hope, along with three other vessels acting as escorts, leave Hakosaur (Screen Fron) for a jump to OFS224.  They plan to make another high-speed transit back to YS07 to continue their exploration.
61.254PG Liberty arrives in the Padda system where they maintain their high velocity and begin calculations for a jump to the Waller Nexus system.
61.255– Sathar SCC#3 (OFS138) completes a heavy cruiser and frigate.  These are the last of the ships that will comprise the initial volley of what will come to be known as the Second Sathar War.

– PG Virgo jumps into the Osak system and begins calculations for the jump to the Capella system.
61.256– The two destroyers designated as part of SF Meteor arrive at Gollwin Station (Morgaine’s World, Prenglar).

– The CMS Osprey arrives in the Padda system and establishes contact with PG Liberty briefing them on the events in the Liberty system.  They maintain their high velocity and begin calculations for a jump back to Theseus.
61.257SF Nova arrives at the new Fortress Kdikit (Kdikit, Madderly’s Star).  They begin a series of maneuvers to fine tune the station’s tracking systems.
61.258– PG Meteor arrives at Fortress Redoubt (Clarion, White Light).  UPF High Command decides to station the patrol group there indefinitely while the remainder of the ships for the strike force are completed.  They will assemble here as they are finished.

– The SF Meteor destroyers are dispatched from Gollwin Academy (Morgaine’s World, Prenglar) with orders to join up with the other ships in White Light.  They begin accelerating for a jump to Timeon.

– PG Liberty jump into the Waller Nexus system.  They begin calculations for their final jump to the Liberty system.

– The CMS Osprey jumps into the Theseus system.  Deciding to head straight home, they continue at high velocity across the system and begin calculations for the jump to White Light.

– The HSS History’s Hope and her escorts jump into the OFS224 system.  They begin overhauling the ships’ engines and calculating their jump to OFS221.
61.259After several weeks of intensive work, the first saurian dwellings on Clarion (White Light) are completed and ready to be occupied.  They just need the power generator to be finished.
61.260PG Virgo jump into the Capella system and begins work for the jump back to the Zebulon system.
61.261PG Liberty jumps into the Liberty system and begins decelerating toward Snowball.
61.262The first power generator at the saurian settlement is completed and brought on-line.  The construction crews can now move into permanent residences and begin working on expanding the settlement.
61.263– The CMS Osprey jumps into the White Light system and begins decelerating toward Clarion and home.

– The HSS History’s Hope and her escorts jump into the OFS221 system and begin work on jump calculations for the jump to OFS222 and work on overhauling the ships’ engines.
61.264A small fleet of sathar ships, consisting of 1 HC, 1 AC, 1 LC, 4 DD, 2 FF, and 8 fighters), designated Sathar Battle Fleet F1 (SBF-F1) arrive at SCC#5 (OFS019) from deeper in sathar controlled space.

The full timeline for download:

DetailedFrontierTimelineDownload
November 3, 2020 Tom 1 Comment

Skills For Hire – Lab Crawl

So last week I wrote up the location of the GODCo bio-lab. This week we’re going to look at what my players found when they got there. First I’ll provide my game notes with the details of what had changed, and then so a short write-up of the players’ actions. “Lab Crawl” is the title I gave this scenario in my notes.

Background

GODCo has been operating the lab on Pale for about 20 years now.  The lab is a location the GODCo scientists are studying the Pale flora and fauna and looking for ways to adapt various yazirian plant species to the environment as well as improving flora and fauna used by Frontiersmen to be more adaptable to the Pale climates.

A few days ago the quarterly supply delivery to the “secret” base left but the drivers and vehicles (two ground trucks) never returned.  Yesterday an aircar flew out to the site and was shot at by the site’s defenses (heavy laser).  The PCs are being sent in (on the ground) to investigate. Their objectives are:

  • Figure out what happened
  • Rescue any personnel trapped and still alive in the lab
  • Secure the site if possible.

What Happened

In my game, there are still sathar on Pale from the First Sathar War (referred to as the Great Sathar War on Pale as the second one is just now brewing). While a few of the sathar on the planet are holdovers from the war, many more have actually slipped to the surface over the intervening years. They have been working to subvert the society and develop new bio-weapons (e.g. lesser quickdeath, sathar poison squirrel). It is to do some work on the poison squirrel that they have capture the lab.

A few weeks ago, a team of sathar attacked and captured the base. They needed access to the equipment and facilities to complete some work that they had been doing in more makeshift labs elsewhere on the planet. The staff that survived the attack are being held as prisoners and used as test subjects (and food) for the creatures they brought with them.

Changes From Last Post

In my previous post, I described the lab during “normal” operations. Here is what changed when the PCs arrived

Staff

There are only 1d5+5 of the original 44 staff members still alive, all scientists. They are locked individually in the living quarters and isolated from one another. They are all malnourished and weak. They will not be able to assist the PCs in any fighting.

I put them in the rooms farthest from the elevator/stairs but you could put them anywhere. The sathar have changed the computer security system so that none of the staff ID cards work to open the living quarters doors.

Vehicles

There is a ground transport in the garage (area 3, ground level). It is only partially unloaded.

Robots

All of the security robots were destroyed in the original attack. The sathar have reprogrammed all the maintenance and service robots to have attack/destroy programs and will attack any non-sathar beings on sight. These robots are all level 3 and have only their mechanical hands as weapons. The security locks have all been removed by the sathar as they modified them. They have the following stats:

STA: 100 ATT: 60 IM: 6 DMG: 2d10 Move: 30 m/turn

The remaining robots are located in the following areas:

  • 2 service robots – Ground Level in hallway (area 5)
  • 4 maintenance robots – Level 1 area 30. There is a random 10% change per minute that one will emerge and go about some maintenance task. If attacked, it can summon the others.
  • 4 maintenance robots – Level 2 area 11 (at the far end of the lab area). There is a random 10% change per minute that one will emerge and go about some maintenance task. If attacked, it can summon the others. They can also be called by the sathar on this level.

Sathar

There are 10 sathar at the facility.

Two are security officers and will be in the security office on that level (area 8). If the robots start fighting they will emerge and attack the intruders. These sathar have laser pistols with 3 power clips and a level 3 skill. Their stats are:

STA: 45 ATT: 50 IM: 5 DMG: 2d10 PS: 3 Move: 30 m/turn

The other eight are in the lab areas on level 2. Divide as desired among 3 labs. These are all scientists and will only have improvised melee weapons when attacked but do have a level 1 melee skill. Stats for these sathar are:

STA: 40 ATT: 30 IM: 4 DMG: 1d10 PS: 2 Move: 30 m/turn

In addition to the sathar on level 2, there are a number of sathar attack monsters with them in some of the labs. There are 2 cybernuks in one of the bio-labs, although only one has the cyber implant, and a caged juvenile quick death in another (use the Lesser Quickdeath stats).  A third lab has a cage containing 10 tailless squirrels.  If freed, any of these creatures will attack the PCs.  If they can, the sathar scientists will release the creatures into the lab hall (area 14) to attack the PCs as part of their defense.

Place the sathar and creatures in the labs as desired. In my game, I had them all in labs on the right side of the map. The first lab had 3 sathar, the second had 2 sathar and the nuks, the third had 3 sathar and the squirrels, and the fourth lab had the quick-death.

Other Notes

The computer is level 4 with a level 3 computer security program.  Lab doors have level 5 locks, bedrooms have level 1 locks.

Something got out and the power generator level is overgrown with a blue fungus/moss that is mildly toxic to the touch (S1/T20) toxin. This is currently growing on all the walls on level 3, part of the stairwell between level 2 and 3, and in the elevator shaft near level 3.  It has not yet traveled to Level 1 or 2.  Due to the fungus, the power occasionally will short out and brownouts occur occasionally around the lab.  There is a 5% chance any minute that the power will temporarily go out or lights will dim in any given room.

Loose Ends

Some things I left open ended and which didn’t really come up when playing that you can flesh out as desired for your game:

  1. Where’s the other ground truck? There were two in the convoy but only one is here. I honestly forgot about there being two when I was running it but it never came up directly. This is an opportunity to expand the scope of this encounter if you want your PCs to possibly pursue the sathar across the planet.
  2. The fungus/moss on the generator level – Was this something the sathar brought with them? Was it something GODCo was working on?

Running the Adventure

This adventure played out over two game sessions.

The PCs had no idea there were sathar involved when they were hired. The job was simply to go to the lab, investigate what happened, rescuing any survivors, and secure the facility. GODCo offered a generous bonus of 500 cr. per staff member recovered alive.

After about six hours of travel, mostly in an explorer, the PCs arrived at the facility to find the gate closed. As they got close to the site, however, they noticed that no radio communications were working. The site appeared deserted. The humma decided to jump the fence and got shot at by the heavy laser for his trouble. Luckily, it missed him. He was able to open the main gate and the explorer entered the compound.

They gained access to the garage and discovered the partially emptied ground transport. Exiting into the hall, they were attacked by the robot stationed there. They took some damage but were able to quickly deactivate the robot. (Since the sathar removed the security lock, I only required a DEX roll – the robot was attacking them after all – to switch it off. Their roboticist has a high DEX but still missed a few of the rolls throughout the adventure.)

As they rounded the barracks (not knowing what they were) they encountered the other robot and after starting to engage that, the two sathar emerged and started firing at them. A well tossed tangler grenade captured both sathar (although one was killed by laser fire the same round). Realizing it was caught and the robot deactivated, the captured sathar committed suicide.

Clearing the rest of the level, they opted to take the stairs down and not alert anyone else by using the elevator. As they emerged into the hall on level 1 they experienced their first brownout of the power. They entered the security office and found a number of CCTV cameras looking at different parts of the lab including the hallways on level 1 and one into each lab on level 2. They saw the 8 sathar and the attack creature but didn’t know where in the complex those images were coming from.

Examing the hallways, they ran into two maintenance robots coming out of area 30 on the fall left hall way. A fight ensued with those robots and the other two that were called out of room 30 after the fight was engaged. They managed to deactivate two of the robots while the other two were destroyed.

The fighting was occurring at the end of the hall by area 30 and the prisoners in the rooms there heard them and tried to get their attention. They proceeded to open (via tech or brute force, depending on the player) each of the doors and discovered that 9 of the scientists were still alive, although is fairly poor shape.

From the scientists they got the information about the attack and current situation as they understood it. They also learned that the brownouts only started occurring after the sathar arrived. Speculation began on what the sathar were doing that needed that much power.

With the scientists found, they shepherded them up to the surface, planning on driving them out in the ground transport. At this point a discussion ensued on what was next. Fighting sathar is a job for Star Law and really above their pay grade and several PCs were all for bugging out with the scientists, reporting what they found, collecting their rewards and walking away. However, one of the PCs is a member of the Anti-Satharian League (ASL) and floated the idea that they might be able to get some reward from that group for the sathar if they took them out themselves.

In the end, they decided that the Anti-Satharian League PC would drive the scientists out and call in for medical pickup once he got out of the radio jamming. He would report the sathar presence and request instructions from Galactic Task Force (GTF). He’d also contact the ASL and see what he could negotiate. That discussion ended the first session.

Session 2 started with finalizing the plan. While the ASL PC headed out with the scientists, the other PCs set about exploring the rest of level 1. They realized part of the way through that they should have asked the scientists for a tour. Meanwhile, the PC with the scientists, after about 40 minutes of driving, got out of the jamming range. Calling in GTF immediately dispatched some flying transports to pick up the scientists and told him to stand by on the sathar situation. While he waited, he called ASL and got the same response. After a few minutes, GTF told him that if the team chose to go in after the sathar, they would be deputized by Star Law for the operation (Star Law couldn’t get anyone there for many hours and didn’t want the sathar to get away) and offered a bonus of 1500 cr. each. Just after that conversation, he was called by his ASL contact and offered a 250 cr. reward for each sathar killed plus and additional 500 cr for any sathar data collected from the computer systems.

With the offers in hand, he headed back to the compound once the medical team arrived to escort the scientists. Having been gone a couple of hours, the rest of the team was getting a bit antsy and debated exploring the generator level but decided to be patient and wait. They also reprogrammed the two maintenance robots to obey them and attack sathar while they were waiting. When the offers were presented, they decided to take on the sathar and collect the reward from both sources.

Not wanting to walk down 50 m of stairs, and figuring they had the drop on the sathar, they opted to take the elevator. They quickly examined the areas outside the decontamination airlocks on that level. Hoping to reduce the odds, they hacked into the life support and ventilation systems for the labs (all 10 individually) and dropped a doze grenade into each system to try to knock out the sathar. They had to do all 10 because they didn’t know which system went to which lab or even which labs the sathar were in. Luckily they had 11 doze grenades between the 5 PCs.

Doze grenades dropped and hoping they worked, they went through the cleaning rooms into the lab area. Upon entering and seeing into the labs, they found that the sathar in the lab with the cybernuks had been knocked out but the other were still up and about.

They rushed the robots over to the first lab and had them block the door preventing the sathar from exiting while the PCs headed down the the third lab where the three sathar were working with the tailless squirrels. As they were approaching, the sathar let the squirrels out and there were suddenly several critters attacking most of the PCs.

On the second round of the fight, the four robots emerged from the robot storage area and started to advance on the PCs as well. An on the next round they realized the flaw with having the robots block the sathar in the first lab as one of the sathar deactivated one of the two robots.

With enemy both in front of them and behind, they started to fall back and regroup trying to deactivate robots, kill sathar, and fight the squirrel critters. A well placed frag grenade managed to kill most of the squirrels as they fell back but not before a couple of the PCs were bitten and poisoned.

Just as they were starting to get the situation under control, one of the sathar in the nuk lab woke up (I had rolled for the time each were going to be out and rolled low for that one). After spending a round trying to rouse its comrade (with no success), it then headed to the doors to let the nuks out into the fight.

The sathar and squirrels turned out to be the easy targets with the nuks and robots providing the most challenge. They managed to take out the sathar that had freed the nuks before it could let the quickdeath out or things might have been really bad for the team. As it was, two of the team members, wounded and cornered, retreated into the lab that the squirrels had come out of pursued by one of the robots. They trapped one of the nuks in the entrance to another lab, and then finished off or deactivated the remaining robots and creatures.

When the fighting was over, they had deactivated two more robots, killed seven sathar, 10 squirrels and one nuk. The last sathar never woke up and they hit it with a StayDose to keep it sedated. They left the trapped quickdeath and nuk for StarLaw and GODCo to deal with. They decided to report that there were only 7 sathar (they had miscounted) and secret the live sathar away to turn over to the Anti-Satharian League for a 2000 cr. reward.

It was touch and go there in the middle of the battle with a couple of PCs getting down to single digit STA, but they pulled through in the end. Each PC ended up with 6 XP and 3600 cr. They also ended up with 7 damaged service and maintenance robots that they took with them as well.

Final Thoughts

It was a good adventure. It just took longer to finish than I had hoped due to scheduling conflicts (on my part) and not being able to get it all done in a single session (or I would have posted this sooner).

I actually completely forgot about the quickdeath in the heat of the battle which is why the sathar didn’t immediately make a bee-line for that lab to try to get it out. But that was probably just as well. Had the quickdeath came into the fray it might have been too much. As it is, the fight went well. They PCs were a little worried there for a bit, but managed to pull it out in the end. I actually thought the squirrel were going to do a bit more damage but the frag grenade really did a number on them, only three of the 10 survived the initial blast.

The activating and deactivating of the robots was a bit of humor (at least for me) during the big fight. There was a bit of a go around of the sathar turning their robots off, them trying to turn the sathar robots off and also trying to turn their back on, and fighting the robots that weren’t deactivated. And the moment when I said that the sathar turned their first robot off definitely seemed to catch them off guard and ratchet up the tension.

This will be the the last Skills for Hire post for a while. As I talked about in my “What I need is … more focus” post back in August, I have a lot of things going on and that was the main cause of the scheduling conflicts. As such, I’ve decided to put the game on hiatus for now. My players are going to take up the GM mantle and run games for each other in the meantime but I won’t be doing anything for a while.

Did you like the adventure? What might you have done differently? What changes or additions would you make? How could you use this in your game? Let me know your thoughts in the comments.

October 27, 2020 Tom Leave a comment

SSW – Battle of Stenmar (Kazak) – FY61.281

I originally had a different post, the write-up of my players’ venture into the GODCo bio-lab, scheduled for today, but decided to bump it to next week in favor of getting this one up and getting some feedback.

Some Background

The Detailed Frontier Timeline project has reached the point where the events of the Second Sathar War game presented in the Knight Hawks Campaign Book play out in the timeline with the sathar’s main assault on the Frontier. The whole timeline project was originally conceived as a way for me to track, in a “realistic” manner the movement and construction of ships for that event (i.e. using the ship construction rules and rules for void jumping.).

As such, the initial round of events will look very similar to the opening of that game. But after that, things will start to diverge from the way the game plays in a number of ways.

First, I’ll be using the Void Jumping rules for travel times instead of the times portrayed on the Frontier Deployment Map this is part of that game.

Second, the Order of Battle for both sides is slightly different from what was presented in the rules. Although not by much. The timeline events have tweaked things so that the White Light and Truane’s Star militias have an extra assault scout or two, the UPF unattached ships are a slightly different mix, and the sathar have the cutter class ship. I tried to set up the ship construction so the sathar had the ships listed in the game and I came pretty close. They ended up with a few more fighters and an extra destroyer.

Third, reinforcements for both sides will come from the various starship construction centers around the Frontier and in sathar space rather than the arbitrary rules presented as part of the printed game. The sathar have a fully functioning ship construction pipeline that will continue to churn out ships, although they did just lose the starship construction center in the Liberty system. The UPF have a few ships already under construction (2 battleships, 1 light cruiser, an assault carrier and 6 fighters) but otherwise are going to need to get a production pipeline going.

Finally, I’ll be factoring in my take on various political situations across the Frontier as well as involvement of civilian and megacorp ships that may get involved in the conflict. This will also affect the ship construction to some effect.

The Second Sathar War game rules as printed are actually a good balance for a game to be played out over a short period of time but probably don’t represent how things would play out in “real” life in the Frontier. For one thing, a more realistic ship construction system will probably make it a much more drawn out affair, which is what I wanted to explore with the timeline project.

As the battles occur across the Frontier, it was always my intention to play them out with the tactical battle rules to see which side won and have the sides react accordingly. The results of those battles and the basic reactions will be the entries you see in the timeline.

Last week, I posted the question to the Star Frontiers Facebook group if they would like to see more detailed summaries of the battles more than just who won, what ships were lost, etc. There was definite interest and so this series of posts was formed. The format may evolve as I do more of these but here I’ll be posting write-ups of the battles, probably in a couple of different formats, but at the very least with turn by turn synopses (and maps) to show how it went.

Except for this one, which is coming out nearly a month early, the plan is for each of these posts to come out on the same day as I post that day’s timeline update to Twitter. Although when I have several battles the same day, I might just post one a day to spread them out. It is my intention that these are going to be “off schedule posts” that probably won’t count as one of my regular weekly posts (expect for this one and maybe the 4! for the battles that will come starting the Saturday before Thanksgiving in the U.S.). After the first few battles that open the conflict, they are going to start to spread out as ships begin to repair and maneuver.

Posting on the day the battle occurs, this battle wouldn’t show up until November 17th, but I’m posting it early to get feedback on the format and what people would like to see in the posts going forward. Please share your thoughts in the comments. You can consider this a “sneak peek” into some of the timeline events.

In addition to just being a “play report” of how the battles went for me, each one will include the order of battle for the various sides that you can set up and play at your own table. They won’t always be balanced encounters, but it would be interesting to see how you and your groups handle the various tactical challenges.

Anyway, we’ll see how it goes. On to the first battle.

Battle of Stenmar – FY61.281

While I had not planned on figuring in fighting in the Rim as part of this project, and haven’t really been tracking (or even really thought about) Rim ships and the organization of the Flight, part of the Timeline has dealt with events in the Rim and the Kazak system as it pertains to the discovery of the sathar construction center in OFS019 and the trip to Kazak by Strike Force Nova. As such, I had a list of Rim ships that were in the Kazak system. Plus, it’s a natural entry point into the Rim and is traversed by the sathar to get to Zebulon on my star maps. So it makes sense that the sathar would send ships to control this system. And since I already knew what ships were there, I designed some sathar fleets to attack this system. This is the write-up of the attack on Kazak that opened the conflict for the sathar. Plus using this as the first trial write-up doesn’t spoil the events of the conflict in the Frontier.

The ships for this scenario are not part of the order of battle for the Second Sathar War game presented in the Campaign Book but are extra to that. So what happens here doesn’t exactly impact the playing out of that larger scenario. Maybe at some point I’ll go back and work out the details of the fighting in the Rim.

This battle occurs on FY61.281 in the timeline, the day after sathar ships are detected entering the Frontier systems.

Order of Battle

Here are the ships on each side. I did not really plan this (I built the sathar fleet before I went back and looked to see what Rim ships I had placed in Kazak) but it turned out the sides were fairly even.

Rim Forces

  • 10 Fighters
  • 3 Assault Scouts (AS)
  • 2 Frigates (FF)
  • 2 Destroyers (DD)
  • 1 Light Cruiser (LC)
  • 1 Fortified Station

All told there were 18 ships plus the station with a total of 515 hull points. Definitely weighted to the smaller ships.

Sathar Forces

  • 8 Fighters
  • 2 Frigates
  • 4 Destroyers
  • 1 Light Cruiser
  • 1 Heavy Cruiser (HC)
  • 1 Assault Carrier (AC)

The sathar had 17 ships with a total of 569 hull points and more capital ships.

The Fight

Setup

The Rim forces arrayed in a line slightly behind the planet and station and divided into several groups according to ship type. From top to bottom there was a flight of 5 fighters, the 3 assault scouts, and the light cruiser above the planet and then the 2 destroyers, the 2 frigates, and the remaining five fighters. The fighters were moving at speed 25, the assault scouts and frigates at 20, and the light cruiser and destroyers were moving at speed 15

The sathar’s main battle group was arrayed to directly approach the planet in a flying diamond. The middle row was the light cruiser, the heavy cruiser, and then the assault carrier. Outside of those ships were the four destroyers, 2 on each side, and then a frigate on either side forming the tip. All of these ships were moving at speed 10. The fighters were arranged into two flights of 4 fighters and positioned further out on the wings. They were traveling at speed 20 The setup looked like this:

Setup for the Battle of Stenmar. Click for full-sized image.

Turn 1

The main sathar battle group began decelerating toward the planet (slowing to speed 8), looking to make a concerted attack on the station as it came around from behind the planet. The sathar fighters accelerate to speed 25 and swing out further on the wings to prepare to swing in on the next turn and make their attack while staying out of the forward firing arc of the Rim forces.

The Rim forces decided to ignore the fighters and focus on the main battle group. The fighters accelerated to speed 30, flew in to make a maximum range attack with their assault rockets on the two frigates on the wings and then sweep back out of range of the capital ships’ main weapons. The assault scouts accelerated to 25 and executed a similar maneuver but aiming for the lead destroyer on their side of the formation. The frigates, with less maneuverability than the smaller ships accelerated to speed 23, swept past the main sathar formation, and then doubled back to attack the tail destroyer on that side of the formation. The remaining ships (LC & 2 DD) accelerated to speed 17 and turned in to attack the light cruiser. All the Rim ships stayed at least 4 hexes away from the sathar ships to remain out of range of their rocket batteries.

The sathar decide to ignore the smaller ships and focus on the Rim’s capital ships. However, the longer range and apparently poor training of sathar forces result in little damage to the Rim ships with the LC only sustaining 11 HP of damage and one of the frigates taking a hit to its combat controls system. All the other shots at the Rim ships, including several shots at one of the destroyers, missed completely.

The Rim ships were much more effective. The results were as follows:

  • The sathar frigate on the left flank (“top” of the diamond) is hit by 3 of the 5 assault rockets (AR) taking 14 HP of damage, losing 2 ADF, and having it’s masking screen launcher knocked out
  • The sathar frigate on the left flank (“bottom” of the diamond) is hit by 4 of 5 AR taking 28 HP of damage, losing 1 MR, and having it’s torpedo launcher knocked out.
  • The sathar destroyer on the right flank fires two ICMs at each of the incoming torpedoes (which miss) and is hit by 2 laser batteries (LB) for 8 HP and has its masking screen launcher knocked out
  • The sathar destroyer on the left flank is hit by 3 LB and 2 AR from the three AS and is completely destroyed with one of the LB and AR each doing double hull damage. 
  • The sathar light cruiser fires two ICMs at each incoming torpedo  (only the one from the Rim LC hits) and is hit by a number of weapons resulting in a loss of 2 ADF, a navigation control hit, a combat control system hit, its disruptor canon damaged, and a loss of 60 HP (the torpedo did double damage for a total of 52 points)

At then end of the turn, the ships were arrange as shown in the following map (with their movement marked). Destroyed ships marked with a red X.

Result. after the first turn.Click for full-sized image.

Turn 2

The sathar fighters on the left wing swoop in and unload into one of the UPF destroyers and then fly out of range to line up for another run. The frigate on that same flank, not expecting to survive the round, given the damage it sustained, turns and attempts to ram one of the destroyers. The rest of the ships turn and take on the Rim’s light cruisers.

Defensively, the assault scouts score a single hit on one of the fighters near them taking out its AR launch, effectively neutering it. The destroyers, seeing the frigate coming in for a ramming attempt, fire everything they have at it. One of the rocket batteries connects and the frigate flies apart before gets too close. The Rim frigates continue to fire at the destroyer they had already damaged doing 7 more HP of damage, and knocking out its MR and electron battery. The Rim light cruiser attempts to eliminate the damaged frigate before it can fire. It only causes 9 HP of damage but does knock out its MR and causes an electrical fire on board.

The sathar fighters firing on the destroyers unload all 4 AR at a single destroyer which all hit doing 65 HP of damage, destroying it. They caused a power short circuit as well but it was moot at that point. The rest of the ship unloaded all their ordinance in to the Rim light cruiser. It survived the 3 AR that hit from the fighters (knocking out its LB, all its MR, and 7 HP), the shots from the frigate (knocking out is combat control system), the shots from the destroyers (knocking out 1 MR and 22 more HP), but the sathar heavy cruiser finally overwhelmed it (knocking out its PS, a power short circuit, and a final 39 HP).

One flight of Rim fighters make a pass at the sathar heavy cruiser while the remaining Rim ships converge from various directions to make a pass at the sathar assault carrier. The fire on the sathar frigate causes another 7 HP of damage.

The sathar heavy cruiser fires at the incoming fighters with its EB doing 2 HP to one of them and a LB hit triggers a fire on another. All of the other sathar ship fire at the Rim destroyer doing 35 HP, -2 ADF, and a combat control hit.

Offensively, all 5 AR fired at the sathar HC hit knocking out 1 MR and the combat control system and doing a total of 85 HP of damage destroying it. Between the fighters and assault scouts, the sathar AC is hit with 6 of the 8 AR fired knocking out a LB, the ICM and masking screen launchers, and doing 83 HP of damage, destroying it. The Rim destroyer’s EB started an electrical fire and the LC from the frigate did an additional 26 HP of damage but the assault carrier was just scrap at that point.

Here are the ships at then end of this turn:

Positions after turn 2. Click for full-sized image.

Turn 3

The sathar fighters all converge on the station to fire their assault rockets. The sathar frigate with the fire, and the destroyer that has had its MR knocked out drift forward toward the station. The destroyer accelerates slightly to bring it’s torpedoes in range this round. The undamaged sathar destroyers turn and go after the remaining Rim destroyer. The Rim fighter with the fire suffers 2 HP of damage.

Defensively, the station fires at the three closest fighters with working weapons systems. all three shots hit knocking out the AR launcher on one of the fighters and destroying the other two. The assault scouts fire their laser batteries at the other flight of sathar fighters as they fly by but all the shots miss. The Rim frigates and destroyer fire at one of the sathar destroyers knocking out its LB and EB and doing 12 HP of damage.

Only the 4 distant fighters can fire at the station but 3 of the 4 AR hit doing 82 HP of damage. The ICMs from the station neutralized the torpedo from the destroyer and frigate and all the rest of those ships’ weapons miss. The shots at the Rim destroyer as less effective than hoped. They knocked out 2 MR, the MS system, and caused a power short circuit but only did 7 HP of damage.

The Rim frigates and one flight of fighters go after the sathar destroyers, the other flight of fighters go after the two damaged sathar ships near the station, and the assault scouts split their attacks firing their AR at the destroyers and their LB at the undamaged flight of sathar fighters. The station fires at the two fighters closest to it. The damaged Rim destroyer, unable to maneuver, drifts of the map hoping to slip away and survive the battle.

Defensively, the sathar destroyers fire their energy weapons at the retreating Rim destroyer starting a fire that is snuffed out when the other weapons do a total of 16 HP destroying the damage vessel. The fire their RBs at one of the frigates and both hit knocking out its MS and doing 14 HP of damage. The sathar ships near the station fire at the station but all miss.

The Rim forces have another stellar round with their assault rockets. The flight of fighters fire at one of the undamaged destroyers hitting with 4 of the 5 AR taking out the destroyers ADF, MS, and doing 16 HP of damage. The assault scouts fire at the other destroyer and hit will 2 of the 3 AR doing 24 HP of damage and knocking out 1 MR. All of the LB shots at the fighters miss, however. The Rim frigates fire at the same destroy targeted by the assault scouts and hit for 18 more HP and knocking out 2 ADF. The station manages to destroy one of the nearby fighters (leaving a single fighter with no AR in that flight). The fighters going going after the damaged sathar frigate and destroyer split apart momentarily to line up their shots with 2 fighters firing at the frigate and 3 at the destroyer. All 3 AR hit the destroyer doing 22 HP and knocking out 2 ADF. One of the AR hits the frigate doing 14 HP and destroying that ship.

At the end of the turn, the ship were here:

Positions after turn 2. (I forgot to move the station forward). Click for full-sized image.

Repairs

Several of the ships were able to enact repairs with the Rim fighter putting out its fire, the Rim frigate repairing 9 HP, and the station repairing 3 HP. The sathar destroyers were able to each repair some of their hull damage (10, 4, and 7 HP respectively).

Turn 4

At this point he Rim forces know they have a victory, as all the of the sathar ships (except a few fighters) are heavily damaged. It’s just a matter of cleaning up and protecting the heavily damaged station.

Only one of the sathar destroyers can maneuver and it loops back to fire on the Rim frigates, the other two just drift along on their current course. The fighter with the damaged AR launcher (it couldn’t get it repaired) loops around and attempts to ram the station. The other sathar fighters fire their last ARs at the station and loop away.

Defensively, the Rim assault scouts fire at the undamaged fighters but only one LB hits doing 5 HP of damage. The station also fires at these fighers (judging that the AR are more deadly than the ramming fighter). The Rim frigates fire at the destroyer closing on them and knock out all it’s MR and do 31 HP of damage, just 1 HP shy of destroying it before it could fire.

The lone sathar fighter rams the station for 4 HP of damage and 2 of the 4 AR from the other fighters hit doing 43 more HP of damage. The damage destroyer drifting by manages to hit with its LB causing a power short circuit and knocking out the the station’s screens and ICM launcher. The destroyer firing at the Rim frigate hits with its LB and EB knocking out 1 ADF and half of the frigates DCR.

Out of assault rockets, the Rim fighters start decelerating to dock with the station and execute some big loops away from all the capital ships. The assault scouts split up to each go after a damaged destroyer with their last AR. The frigates, suspecting that the sathar fighters might attempt to ram the station, pursue those ships in an attempt to eliminate them.

Defensively the sathar destroyer drifting off the bottom of the map is the only one to hit, its EB causing a fire on the assault scout.

The Rim assault scout firing at the destroyer now closest to the station hits with its AR doing 28 HP and destroying the sathar vessel. The assault scout targeting the destroyer drifting to the left also hits for 23 HP and destroys. it. The last assault scout, gunners distracted by the fire, miss completely. The frigate are not as successful as they had hoped, only hitting two of the fighters but both are obliterated (20 HP from a LC and 24 from an RB – both did double damage).

At then end of the turn, the battle looked like this:

Battle map after round 4. Click for full-sized version.

Turn 5

The remaining sathar destroyer continues to drift away and the two remaining fighter loop back and attempt to ram the station (which only has 14 HP left). The fire on the AS damages its DCR cutting it in half.

The Rim frigates fire at the two remaining sathar fighters and destroy them before they can ram the station. The burning assault scout fires at the drifting destroyer doing 8 HP.

The Rim fighters continue to decelerate and approach the station. All the other ships set off in pursuit of the last destroyer, only two of the assault scouts coming in range this round.

The sathar destroyer fires at the non-burning assault scout and hits with its EB knocking out 1 MR point but both AS hit the destroyer with their LBs doing a total of 14 HP and destroying it.

With the battle over, the ships positions were:

Map at the end of the fight. The counters were shifted to pursue the drifting destroyer. Click for full-sized version.

Wrapping Up

The fire on the assault scout continued to burn while repairs were attempted but caused a disastrous fire knocking out the assault scout’s ADF and MR and damaging its combat control system. Unable to put the fire out, over the next 20 minutes the assault scout succumbs to the fire as it eventually burns through the hull destroying the ship.

The other damaged ships manage to repair the minor damage they sustained. After 3.5 hours of work, the station manages to restore 33 HP before running in to a snag that will require outside assistance to get past and repair more.

Aftermath

The sathar tactics for this fight was basically “go for the heavies,” ignoring the smaller ships and going for the larger ships first. With all the Rim fighters and assault scouts flying around with their assault rockets, this was probably the wrong idea. We’ll see if any of the lessons learned were able to be transmitted out before the sathar were destroyed.

The Rim forces, capitalizing on lessons learned at the two fights in the Zebulon system over the past year and half, used the maneuverability of those smaller vessels to stay out of range of the sathar’s heavier weapons and inflict punishing damage. They Rim forces also heavily concentrated their attacks, preferring to focus on only a few ships each turn instead of spreading everything around. This resulted in a bit of over kill a few times (especially on the sathar assault carrier) but payed off in the end.

The sathar lost all 17 vessels totaling 569 HP. While the Rim only lost 4 ships, they were mostly capital ships totaling 185 HP. Plus the station only has 47 of its original 140 HP left. If the sathar had paid just a little more attention to the station (going after it earlier with the fighters or the one maneuverable destroyer going after the station instead of the frigates) they might well have destroyed it as it was down to only 14 HP at the end of the fight.

Speaking of the damaged station, the rules for the Second Sathar War game don’t give any guidance on how you repair station hull points if they fail a DCR roll. I’ve decided to apply the following rule throughout this write-up. A station (in a system that doesn’t have a starship construction center) can repair 10 HP a day after failing a DCR check for hull repair after a battle starting on the day after the battle occurred. If it is in a system with a SCC, the full repair ability of the SCC can be applied to the station. We’ll see how that goes.

News of the victory against the sathar was quickly broadcast across the Rim and Frontier as fast as subspace radio messages could traverse the intervening distances.

Sathar forces were engaged today by elements of the Flight around Stenmar in the Kazak system. After nearly an hour of fighting, the Rim forces were victorious destroying all the sathar ships but suffering serious losses themselves.

Sources within the Flight say that the sathar fleet consisted of single heavy and light cruiser, four destroyers, two frigates, and an assault carrier with eight fighters. It is believed that they originated from the recently discovered sathar occupied system OFS019.

The Flight lost a light cruiser, two destroyers, and an assault scout in the battle. Additionally the fortified station orbiting Stenmar was severely damaged and almost destroyed in the fighting. Repairs to the station are on-going but may take some time to complete.

Flight forces across the Rim are on high alert for other possible sathar activity.

Kaarln Duggart – Stenmar News Syndicate

Details of tactics used by both sides and the outcomes were transmitted to Flight and Spacefleet forces as well. Spacefleet and militia vessels across the Frontier, especially those facing an imminent fight with other sathar fleets in just a few days, eagerly studied the data and updated their plans and tactics.

The first battle in the Rim was a success for the Flight but who knows what else the sathar have in store. The first fights in the Frontier are only days away as the sathar ships decelerate into four of the UPF’s systems.

Last Thoughts

This is probably the longest post I’ve made yet on this site. And it was only a medium-to-large fight. The battle at Prenglar (in a few days in the timeline) is going to be a doozie as it involves Task Force Prenglar, Strike Force Nova, and a sathar fleet even bigger than this one.

What do you think of this style of write-up? Too technical and too much detail? Not enough? What would make it more interesting or enjoyable? Would you rather just see a narration of the fight instead of the details of each bit of combat? Please share your thoughts in the comments below.

October 20, 2020 Tom 5 Comments

GODCo Bio-Lab

In the mountains, about five hours west of Navin’s Mill on Pale, the Greater Overall Development Corporation (GODCo) has a a semi-secret bio-lab. Everyone knows it there, or at least that it exists, if not its exact location, what is not known is exactly what type of research is done there.

And the truth isn’t all that exciting. As the Frontier’s preeminent terraforming company, GODCo has research labs all over the Frontier looking at adapting species, both flora and fauna, to the environments of the worlds inhabited by the Frontier races. And adapting the local flora and fauna for use by the Frontier races as well. This particular lab on Pale was looking at ways to better adapt some of the yaririan food crops to better live and thrive in Pale’s cooler climate with its yellower sun.

The secrecy around the bio-lab is institutional, not necessarily due to the work being done there. GODCo is always very secretive about its work as a way to avoid competition. Especially here on the Streel Corporation’s homeworld.

Location

Click for full-sized image

The lab is located in the mountains west of Navin’s Mill on Pale. Access is by paved roads and then a rough ground track (for the last 100 km). The total travel time from Navin’s Mill is about about five hours. While it’s possible to land an aircar at the facility, this form of access is rarely used.

The lab is built underground in the side of a mountain. Only a small structure is visible on the surface. This was done partially to take advantage of a geothermal power source discovered there, partially to make it easier to regulate the temperature in the labs, and partially to help maintain the secrecy of the lab by not having everything out in the open. The lab has been in operation for over 20 years.

Lab Staff

As part of GODCo’s veil of secrecy, all of the staff currently working at the lab live on-site. The non-science staff rotate in and out regularly while the scientists typically stay longer for the duration of there experimental work. The lab’s staff consists of:

  • Lab admin and assistant admin
  • 20 scientists
  • 8 security personnel
  • 2 power technicians
  • 2 roboticists
  • 2 computer technicians
  • 4 general technicians
  • 4 hospitality staff (cooks, recreation, etc)

In addition to the 44 staff members, there are 8 security, 12 maintenance, and 4 service robots at the facility.

Floor Plans

The lab itself consists of four levels. Except for the ground level, which is the only visible level on the surface, all of the levels are built into caverns that have been carved out of the mountain. The following sections give details on each level.

The various room descriptions are intentionally left fairly generic. Feel free to embellish or modify them to suit your game and campaign. Unless otherwise specified, all doors in the complex have level 1 locks that open to the staff ID badges.

Each of these maps are produce at 140 DPI, two squares to the inch with a scale of 1 meter per square. They should be able to be imported directly into your virtual table top of choice is you so desire.

Ground level

The only part of the complex visible on the surface, this level consists of the outer fence, a garage and storage facility, a security office, barracks for some of the security personnel, and an elevator and stairwell descending to the below-ground levels.

The contour lines on the following maps represent 1 meter elevation gains.

Exterior View

Exterior view. Click for full image. There is an unlabeled version as well.

This is the exterior view of the facility. The labeled items are:

  1. Access Road – This two meter wide access road is a gravel and pressed dirt road winding up the mountain.
  2. Wall and Gate – The wall surrounding the compound is 3 meters tall. The gate stands a little taller at 4 meters and can be opened (inward) to allow vehicular access.
  3. Garage – This garage is big enough to hold a ground truck for unloading when supplies are delivered (typically monthly). The roof here is 5 meters tall instead of the 4 meters of the rest of the building (the light gray area).
  4. Roof Access – This is a taller portion of the roof (total height 6 meters) that provides access to the roof from the stairwell below.
  5. Doors – Other than the garage, this is the only access into the building.
  6. Elevator Roof and Heavy Laser Mount – This is the roof of the elevator shaft. It extends an additional 4 meters above the lower roof and has a ladder to allow access. On top of this part of the building is a heavy laser that is connected to the complex’s power supply and computer.

Interior View

Interior view. Click for full sized version. There is also an unlabeled version.

This is the inside of the ground level of the complex. The labeled rooms and areas are described below:

  1. Access Road – as described above
  2. Wall and Gate – as described above
  3. Garage – Large enough for a ground transport, there are some tools and a parabattery recharging station here.
  4. Storage – This room is used as storage to unload arrive ground transport and hold supplies for which there isn’t room in the main underground facility. There will be a variety of lab and medical supplies, as well as food and housekeeping supplies in this room at any given time
  5. Hallway – This is the main hall of this level.
  6. Barracks – These are double bunk room for the four security personnel currently working on this level.
  7. Stairwell – This is long helical stairwell that descends to the lower levels of the complex. The stairs also extend up to the roof access (#4 in the exterior view). There are small landings every 10 meters of decent going down. Primarily used only in emergencies.
  8. Security Office – This is the security office for this level with a computer terminal as well as video feeds from external and internal cameras. This room has a level 2 lock.
  9. Elevator – This large elevator is the main mode of travel between the various levels of the complex. It is capable of holding up to 16 beings at once or carrying large freight or pieces of equipment. It travels 10 meters every 6 seconds.

Level 1 – Housing and Recreation

This level is located 20 meters below the surface. It extends deep into the mountain and houses all the housing, recreation, and office space of the facility along with things like the computer, tech shop, medical bays, and life support system.

Level 1. Click for full sized version. There is also a version without labels
  1. Elevator – This large elevator connects the various levels. It travels 10 meters every 6 seconds.
  2. Stairs – This is the stairwell that connects the levels of the complex.
  3. Security Office – This is the main security office for the entire complex. It has video feeds from security cameras on all levels of the complex as well as a computer terminal. This room has a level 2 lock.
  4. Administrator’s Office – This office is plushly decorated and has a small conference table and chairs in addition to the working desk. The desk contains reports of the work from the various labs as well as other administrative reports. This office has a level 3 lock.
  5. Tech/Robotics Shop – This is workshop for working on the complex’s computers, robots, and other mechanical items. It is well stocked and has high quality equipment. Any tech skill to work on machines, robots, or computers gains a +10% bonus when performed here.
  6. Storage – This room contains supplies and equipment for use in the repair shop.
  7. Main Computer – This room houses the main computer for the complex. There is an admin terminal here in the room. The room has a level 4 lock.
  8. Life Support Systems – This room houses the machinery that runs the life support system for this level and level 3. It contains water and air filtration and circulation systems.
  9. Garden – This room is filled with solar spectrum lamps and contains both hydroponic gardens growing food for the complex as well as just a relaxation garden with grass, flowers, and small shrubs.
  10. Offices – These rooms are offices for some of the higher ranked scientists. Each is decorated (and cluttered) according to the whims of the owner.
  11. Medical Bay Entrance – This small hallway provides access to the various rooms in the medical bay
  12. Operating Room – This room is a full surgical room. Any surgery skills performed here get a +10% bonus.
  13. Medical Office – This is the main office of the complex’s medical officer when they are not working down in the lab level.
  14. Exam Room – Typical doctor’s office exam room
  15. Sick Rooms – These two rooms are used to isolate sick members of the staff while they recover or away transport back to Navin’s Mill or Point True.
  16. Medical Storage – This room contains all the supplies needed by the medic for the exam room, sick rooms, and operating rooms. It contains the equivalent of 10 medkits plus any other supplies needed.
  17. Dining/Common Room – This room contains tables and chairs as well as a few couches and recliners There is a bay door/counter area between here and area 18 that can be opened for serving food in addition to the regular doors connecting the two areas.
  18. Kitchen – This is where all the food preparation is done
  19. Pantry – This is where most of the food for the complex is store. Part the room is a walk in freezer.
  20. Library – This room houses a collection of books as well as a computer terminal with access to the complex’s information storage program.
  21. Conference room – This room contains several tables and chairs. It also has a video screen for calls outside the facility as needed.
  22. Theater – This room is a large theater/lecture hall where the staff can watch movies or listen to presentations. Used for staff meetings and relaxation, the entire off-duty staff can fit in this room at once.
  23. Gym – This room contains a variety of mats and equipment for recreation.
  24. Sauna – This is a large sauna for use by the staff. Controls are in the wall by the door.
  25. Steam Room – Popular with the dralasite staff, this steam room allows for the addition of scents and other substances to be added to the steam system. Controls are by the door.
  26. Weight Room – This room contains a number of weights, weight machines and other exercise equipment for use by the staff.
  27. Restrooms/showers – Located throughout the facility, each of these rooms contains showers and lavatory facilities usable by the Frontier races.
  28. Cave/Running Track – Outside of the actual building, the residents have access to a running track that runs the perimeter of the cavern that the complex in built into. the floor has been smoothed and a track laid down but the walls and ceiling are still rough-hewn stone, although obviously cut and not natural. There is lighting along the entire length of the track.
  29. Living Quarters – These rooms are the living quarters for all of the staff. Each contains a bed, sofa, table and chairs. While the layout of each room is basically the same, each is decorated according to the taste of the tenant.
  30. Robot Storage – This is where the robots that work on this level and the ground level in the facility are kept when they are not working. It contains small bays for each robot that contain the recharging stations.
  31. Assistant Administrator Apartment – This is a luxury apartment for the assistant admin. It has it’s own private bathroom. This room has a level 2 lock.
  32. Administrator’s Apartment – This very luxurious apartment belongs to the administrator of the facility. It has it’s own private bath as part of the suite. This room has a level 3 lock.

Level 2 – Labs

This level houses the labs where the actual work of the facility is done. It is located an additional 50 meters below level 1. There are a total of ten labs on the level. The entire lab area is accessed through a series of decontamination chambers and then each lab is accessed through a separate airlock.

Level 2. Click for full sized version. There is also a version without labels.
  1. Elevator – This is the location of the elevator on this level.
  2. Stairs – This is the location of the stairwell on this level.
  3. Restrooms – These are the restrooms for this level.
  4. Conference Room – A large conference room for this level so that those working don’t need to go up the upper level for meetings or as a second room if the first one is in use.
  5. Life Support Systems – This room houses the life support systems and air filtration systems for this level. There are 11 systems here. Ten are independent systems that handle the cleaning and filtering of the air for each of the 10 labs. The other system handles all the other rooms.
  6. Cleaning room – This room contains large fans and scrubbers to remove most loose dirt and other contaminants from those entering the lab area. The floor is covered with sticky tiles that pull dirt off the bottom of shoes as you walk through the room. The inner door will not open until a full cleaning cycle has been completed.
  7. Changing Room – This room is where those going into the lab change into their lab suits and other gear.
  8. Clean Room Suit Storage – These rooms contain the clean room suits, lab coats, and other gear to be worn in the labs.
  9. Decontamination Room – This room does a final cleaning of any one or anything entering the lab area to remove any final contaminates. The inner door will not open until a full cleaning cycle has occured.
  10. Storage – This room contains lab supplies and other equipment that has passed through the decontamination process for use in the various labs.
  11. Robot Storage – These rooms are the storage area and charging stations for the robots that work on this level.
  12. Lab Entrance – These rooms are mini airlocks that provide the final security lock to prevent material from traveling into or out of the labs. These rooms have transparent walls so that you can see those inside. These doors have level 5 locks and can only be opened by those scientists working in the specific lab.
  13. Labs – Each lab is set up to work on an individual experiment. The walls facing the hall (area 14) are glass so that you can see into each lab area.
  14. Lab Hall – This hallway is inside the clean area and allows access to each of the labs and to the robot storage areas.
  15. Outer Hall – This hallway is outside the clean area and allows access to the elevator, stairs, life support systems, and conference room.

Level 3 – Power Generation

This level only houses the power generator. It is an additional 150 meters below the lab level. It’s quite a hike if you have to use the stairs.

Level 3. Click for full sized version. There is also a version without labels.
  1. Elevator – The location of the elevator on this level
  2. Stairs – The stair access on this level
  3. Outer Hall – Hallway connecting elevator and stairs with the robot storage area (#4) and the airlock into the generator area (#5).
  4. Robot Storage – This is the storage and charging area for robots working on this level.
  5. Airlock – Separates the power system from the access area to prevent anything crossing the boundary into the main facility. The locks on this door are level 4 and only open to the power techs.
  6. Inner Hall – Hallway connecting the airlock to the power generator
  7. Parabattery Bank – This room is full of racks of Type IV parabatteries. This is the backup power system for the facility that kicks in when there is not enough power being generated by the main generator or it is off-line for service. These parabatteries are charged when the generator is running.
  8. Control Room – A manual control room that allows for monitoring of the power generator in room 9 and the use of power throughout the facility.
  9. Power Generator. This is a Type III generator that is hooked in to a geothermal vent discovered in mountain. This rooms houses all the machinery, pumps, and transformers needed to power the facility.

Using The Lab In Game

That’s the basic write-up for the facility. I’ve left it fairly adaptable so that you can have whatever research you want going on. In my game, I had them working on yazirian food crops and a small yazirian pet, but you can have it be as innocent or sinister as you want GODCo to be in your campaign. And of course, you don’t have to leave this facility on Pale, you could move (or clone) it anywhere you need this type of facility on your game.

Next week I’ll do the write-up of how I actually used this lab for my Skills For Hire game. This is the “normal” operation. It was anything but normal when the players arrived.

How do you like the lab? What did I forget to include or what would make it a better location? Let me know in the comments below.

October 13, 2020 Tom 1 Comment

Detailed Frontier Timeline – FY61.204 to FY61.233

Here comes the next installment of the detailed Frontier Timeline. The HSS History’s Hope is returning back home for it’s annual maintenance and gets waylaid, the UPFS Eleanor Moraes and CMS Osprey discover the sathar starship construction center in the FS30 system, and the Saurians start the process of settling into the Frontier.

We are drawing closer and closer to the launch of the sathar attack into the Frontier that will come to be known as the Second Sathar War. As I was starting to work ahead on that I realized that since back in mid April, I had forgotten to post the updates about the sathar ship construction and movement of sathar ships outside the Frontier. All of the craziness that result from COVID-19 resulted in me dropping the ball on these posts. The funny thing is, when I started this project nearly two years ago, these were the very posts and bits of information that I started the project to track. Seeing how the sathar moved ships around in preparation for and during the battle what the inspiration for the project in the first place. It’s kind of ironic that that is what I lost track of. The other stuff was just supposed to be filler around these posts, but these other threads seem to have taken on lives of their own.

I’ve gone back and fixed that error. In the final document at the bottom of the page, the posts (which start on FY61.068) that I missed posting to Twitter and in the monthly updates are highlighted in a blue font. I’ve assembled them into a separate table below so that you can see them all together if you don’t want to search for them in the document and see them in their context. These missed updates include almost all of the positioning of sathar forces before the commencement of the invasion. Going forward, things will be included as regular updates and posts and I won’t have to backfill.

I also realized, as I’m completing the events of the SFKH4 – The War Machine module, that in the time line, the Liberty System, which is the location of that adventure, is still unnamed and only known as FS30 on the star maps. So I’ve gone back through the document and changed all reference to the Liberty system to FS30. The name change actually occurs in the coming month and is an event that will be in the next update.

The Lost Events

Date (FY)Events
61.068A new sathar starship construction center comes on-line and begins producing ships.  This new center is located in a system “south” of Prenglar, OFS203.  It is designated SCC#1.
61.081Sathar SCC#2 (FS30) produces 6 fighters
61.096Sathar SCC#2 (FS30) produces a destroyer
61.105Sathar SCC#3 (OFS138) produces a frigate
61.116Sathar SCC#4 (OFS111) produces a frigate
61.1283 sathar ships (1 DD, 1 LC, 1 AC, designated transit group TG 1) depart SCC#5 (OFS19) and begin accelerating for a high-speed transit to SCC#4 (OFS111).
61.141A destroyer is completed in the sathar SCC#3 (FS30)
61.146The sathar SCC#4 (OFS111) completes 5 fighters.
61.148The ships of sathar TG1 arrive at SCC#4 (OFS111).  The destroyer remains in the system while the remaining ships are joined by 12 fighters (housed in the assault carrier) and another light cruiser.  TG1 begins acceleration for a high-speed transit to SCC#3 (OFS 136).
61.150A sathar frigate leaves SCC#4 (OFS111) and begins a high speed transit to SCC#5 (OFS019)
61.170The sathar frigate arrives at SCC#5 (OFS019)
61.172The ships of sathar TG1 arrive at SCC#3 (OFS136).  They are joined by another assault carrier (with 8 fighters), 3 heavy cruisers, and 3 frigates.  They depart immediately and begin accelerating for a high-speed transit to OFS167.
61.173The Sathar battle fleet arrives in orbit around Edge (Precipice).  They meet no resistance and begin bombing the planet.
61.175Destruction of the saurian world Edge (Precipice) complete, the sathar battle fleet begins acceleration to return to the Sauria system.
61.180Several sathar ships (1 AC, 1 HC, 1 LC, & 6 fighters, designated TG2) leave SCC#2 (FS30) and begin accelerating for a high-speed transit to new SCC#1 (OFS203).
61.182The sathar SCC#5 (OFS019) completes a cutter and light cruiser.
61.184The sathar fleet arrives back at Kischen (Sauria).  They begin an aggressive patrol of the system looking for any survivors or other ships that escaped their initial attack.
61.186The Sathar SCC#2 (FS30) completes a destroyer.  It along with six others, depart the SCC and begin accelerating for a high-speed transit to OFS 167.
61.193Sathar Transit Group 1 arrive in the inner system of OFS167.  They begin patrolling the system and waiting for other ships to arrive.
61.194– Sathar TG1 is reformed consisting of 1 AC (with 6 fighters), 1 HC, 1 LC, and 1 frigate.  It departs OFS167 immediately for a high-speed transit to SCC#1 (OFS203)

– A new transit group (TG3) is formed from the ships at OFS167. Consisting of 1 HC, 1 AC and 7 fighters, it begins accelerating for a high-speed transit to SCC#2 (FS30).
61.200Sathar Transit Group 2 (1 AC, 1 HC, 4 DD, & 8 fighters), arrive at the newly operating SCC#1 (OFS203)

That covers everything I missed in months past. I missed a few events in this month’s activities as I was doing the Twitter posts but they will just be included in the regular update below. The events I missed posting on Twitter will be highlighted in italics.

The Regular Update

Date (FY)Events
61.204After two days of preparation, the UPFS Eleanor Moraes, CMS Osprey, and the sathar scout ship (now named the UPFS Backdoor) lift off from Mahg Mar and begin accelerating toward the FS 30 system using the captured astrogation data. (SFKH4)
61.205After over a week of deliberations, discussions, and subspace communications all of the Frontier, Princess Leotia of Clarions extends a formal invitation from her world to the Saurians to set up an initial settlement there.
61.206– PG Meteor successfully jumps into the White Light system.  They do not slow down but immediately begin calculations for the 10 light year jump to Theseus.

– The second saurian Ark ships joins the first one in orbit around Minotaur and delegates from that ship join the discussions.
61.207– Two UPF Frigates slated for SF Meteor are completed in the Minotaur (Theseus) shipyards.  They begin a short shakedown cruise while they wait for the arrive of the assault scouts in PG Meteor.

– After two days of internal discussions, the saurians agree to send one of the ark ships to White Light for direct discussions about settling on Clarion, at least initially.  Princess Leotia offers to accompany them personally on their vessel as a show of good faith.
61.208– The UPFS Eleanor Moraes, CMS Osprey, and UPFS Backdoor successfully jump into the FS30 system.  They begin decelerating toward the location of the sathar base, codenamed Base Alpha. (SFKH4)

– The first ship, a light cruiser, is completed at the new sathar SCC#1 (OFS203) south of Prenglar.
61.209– The HSS History’s Hope jumps into the YS03 system and begins work on the jump back to YS02.

– Sathar Transit Group 3 arrives at SCC#2 (FS30)
61.210After 3 days of preparation, the 7th saurian Ark Ship leaves orbit around Minotaur and begins accelerating for a jump to the White Light system.
61.211Jump calculations complete, PG Meteor jumps to the Theseus system and begins decelerating toward Minotaur.
61.212– After four days of deceleration, the UPF ships approach the location of Base Alpha in the FS30 system.  They realize that the base is a small assault carrier.  Leaving the other ships behind, the captured sathar scout ship (UPFS Backdoor) approaches the carrier. (SFKH4)

– The UPFS Backdoor is pulled in to a docking bay of the sathar carrier.  After an intense battle through the decks of the sathar vessel, the crew manages to capture the ship and eject its engines before they can overload and destroy the vessel.   (SFKH4)
61.213Several ships, independently dispatched by members of the True Yaziria society, arrive in YS01.  They discover several Family of One vessels in the system patrolling for the eventual arrival of the HSS History’s Hope as it returns to the Frontier.
61.214– The HSS History’s Hope jumps to the YS02 system arriving safely.  They begin work to make the jump back to YS01.

– The True Yaziria ships engage the Family of One ships destroying one, crippling another, and driving off the remaining two.  The FoO ships are trailed until they jump out of the YS01 system.

– Four sathar fighters arrive from the inner system to investigate the explosions of the sathar carrier’s engines.  A battle ensues between the CMS Osprey, UPF Eleanor Moraes, UPFS Backdoor, and the sathar fighters.  The UPF forces win but the Moraes is severely damaged. (SFKH4)
61.215– The 7th saurian Ark Ship jumps into the White Light system and begins decelerating toward Clarion.  Princess Leotia radios ahead to alert her father of their arrival.

– PG Meteor arrives at Minotaur station, the assault scout crews are given two days of rest before they are given their next assignment.  The two frigates join the assault scouts, and the ships are temporarily assigned to the Frontier Expeditionary Force under Commander Reider.
61.216After two days of engine overhauls and repairs, a small chemically propelled rocket approaches the UPF ships in the FS30 system.  Capturing the rocket, they determine that it is a message requesting a meeting from some unknown group.  They radio back to FEF headquarters. (SFKH4)
61.217– The UPF forces in FS30 receive orders from Commander Reider to make contact with whomever sent the rocket and learn as much about the sathar in the system as possible.  He is personally bringing reinforcements.

– PG Meteor is split into two groups.  One (a frigate and 4 AS) are sent to the FS26 system to see if any sathar ships were pursuing the saurians and establish a forward screen there.  The other (a frigate and 2 AS), commanded by Commander Reider, depart for the trip to FS30.

– After completing preparations, the crew of the UPFS Eleanor Moraes depart for the rendezvous point indicated by the map in the rocket.  (SFKH4)
61.218The full White Light Militia, sans the CMS Osprey, boost out from Clarion station to meet the saurian Ark Ship.

– The sathar SCC#1 (OFS218) completes a frigate.
61.219– With everything ready to go, the crew of the HSS History’s Hope prepares to jump back to the YS01 system.  They go on high alert as this is the system they were attacked in before and are worried that there will be trouble again.

– Jumping in to the YS01 system, the crew of the HSS History’s Hope detect radio signals from several different ships. Initially concerned, they soon realize that these ships are there as escorts, not antagonists. Work begins on jump calculations as the ships in the inner system accelerate to join them.

– The Eleanor Moraes crew arrives at the rendezvous point, a small asteroid that has been hollowed out into a space station.  After docking they meet with a new race, called the Mhemne. (SFKH4)

– Two sathar destroyers arrive at SCC#3 (OFS138) and join the forces there.
61.220– The 7th saurian Ark Ship, together with the White Light militia, settle into orbit around Clarion.  Preparations are begun to send a delegation to the surface.

– After a day of negotiations, the UPF forces and the Mhemne reach an agreement to work against the sathar in the system.  They plan to slip to the surface of the planet (Snowball) and contact the resistance there and investigate the sathar factories on the surface. (SFKH4)
61.221– SF Nova prepares to depart the K’aken-Kar system and begins accelerating toward the K’tsa-Kar system.

– UPF forces descend to the surface of Snowball (FS30). After fighting off a Sathar hovercraft, they make contact with the Mhemne resistance on the surface. (SFKH4)

– After consulting with Commander Reider, the UPF forces, assisted by the Mhemne resistance, begin a series of raids on the sathar factories on the surface of Snowball to disrupt sathar operations while they wait for PG Lancet to arrive in system. (SFKH4)

– Descending to the surface of Clarion (White Light), the saurian delegation are met by King Leotus and Princess Leotia as welcome guests.  The next several days are spent in meetings, festivities, and other activities to introduce the saurians to the Clarion culture.
61.222– The larger portion of PG Meteor (retaining the PG Meteor designation) arrive in the FS26 system.  They don’t detect any sathar signals but do detect the saurian beacon.  They begin decelerating toward the inner system.

– The smaller portion of PG Meteor, now designated PG Lancet, arrive in the Padda system.  They begin calculations for a jump to the Waller Nexus system without slowing down.
61.223After two days of discussions, the saurian delegation, escorted by Princess Leotia, begin a multi-day tour of Clarion to look for sites where the saurians could set up a permanent settlement.
61.224– Joined by the True Yaziria escort vessels, the HSS History’s Hope jumps to the OFS222 system.  They immediately begin engine overhauls and plotting the next jump to OFS221.

– The last sathar Transit Group, TG1, arrives at sathar SCC#1 (OFS203).  All ships stand down and complete any maintenance needed after their recent maneuvers.
61.225After training the Mhemne resistance fighters, the combined UPF/Mhemne force make their first raid on a sathar factory.  Catching the factory unprepared, they overwhelm the defenses and manage to capture one of the sathar shuttles. (SFKH4)
61.226PG Meteor arrives in the inner system of FS26.  The ships split up to begin exploring the planets there while remaining alert for sathar vessels.
61.227– After completing engine overhauls and the astrogation calculations, PG Lancet jumps into the Waller Nexus system.  The immediately begin work to jump to the FS30 system, again without slowing down.

– Resting a day after their first assault, the UPF/Mhemne force on the surface of Snowball attack a second sathar factory.  This fight proves to be a bit more challenging as the factory is on alert after the first attack.  The factory is destroyed but the attacking forces are unable to capture another shuttle. (SFKH4)
61.228After 5 days of guided exploration, the saurians decide on a location in the southern hemisphere of Clarion that is about a quarter of the way around the planet from Valencia, Clarion’s capital.  They return to their ships to begin preparations for establishing the settlement.
61.229– After another day of rest, the UPF/Mhemne forces attack the third known sathar factory.  This is the most vicious fight yet and the sathar forces intentionally destroy all the shuttles when it is apparent they will lose the fight. (SFKH4)

– Strike Force Nova settles into orbit around Kwadl-Kik (K’tsa-Kar).  They will remain here for only 2 days before continuing on to Clarion (White Light) to meet the saurians in that system.

– HSS History’s Hope and escorts jump to the neutron star system OFS221. While there was a hint of ship radio signals, it is lost in the natural radio noise from the pulsar.  Work begins on engine overhauls and jump calculations for the trip to OFS224.
61.230After four days examining all the planets in the inner system of FS26, the ships of PG Meteor settle into orbit around one of the two habitable planet in the system to compare notes and prepare for a departure back to Theseus.
61.231SF Nova departs Kwadl-Kik (K’tsa-Kar) for Clarion (White Light)
61.232PG Lancet completes their preparations and jumps into the FS30 system.  They begin decelerating toward the inner system and establish communications with the UPF forces there.
61.233– After four days of searching, the UPF/Mhemne forces on Snowball find another sathar factory.  After a bloody and desperate fight, the UPF/Mhemne forces gain control of the factory and manage to capture an additional shuttle before it can be destroyed by the sathar forces. (SFKH4)

– One day before the ships are ready to jump to OFS224, the HSS History’s Hope and escorts are attacked by 3 unknown vessels (2 corvettes and a Lightspeed Lady class privateer). In the ensuing battle, two of the escorts are destroyed and the History’s Hope is damaged, but they manage to destroy the attackers

Here’s the full file with all the updates:

DetailedFrontierTimelineDownload

October 6, 2020 Tom 1 Comment

Maps and Counters

It has been a crazy week and I’ve not had any time to sit down and work on anything new. That should change starting today (although I have the next Frontier Explorer next looming over me still). But that doesn’t help for today’s post.

As such, I thought I’d round up all the Star Frontiers maps and counter scans that I have and make them available at one central location (namely this post). Some of these were up before and I took off-line a couple of years ago when WotC had us put the Frontier Explorer on hiatus. Others are ones I’ve done for myself or others over the years. Many of these are linked from various places around the but I’ve never really made a centralized directory.

Counters

Let’s start with the counters. I have scans of both the Alpha Dawn Counters and the Knight Hawks counters at a number of different resolutions. You can download the ones you want to use. Most of these are saved as .PNG files which is a lossless compression format, as opposed to JPEG which is lossy. That means that the files are going to be fairly large, especially at the higher resolutions, and that you get all the detail from the original counters.

AD Counters

I’ve never really scanned in the AD counters. I found a good scan of them years ago and have always just used those. One of these days I’ll get around to making my own scans from like-new, unpunched counter sheet that I have. But until then, this one is quite good.

  • An older scan (by someone else) stored in JPG format (400 DPI – 2.7MB)

KH Counters

  • Full Sheet – 100 DPI (1.3 MB)
  • Full Sheet – 200 DPI (5.4 MB)
  • Full Sheet – 300 DPI (16 MB)
  • Full Sheet – 400 DPI (23 MB)
  • Full Sheet – 600 DPI (46 MB)

I’ve also made a zip file (1.1 MB) with all of the KH counters (and a few of the AD ones) cut out at 100 DPI that you can download. Additionally, you can get the individual counters from that zip file (and a link to the file as well) on this page.

Maps

That’s all the counters. Over the years I’ve done a number of maps as well. Some of them are already linked and shared here on this blog. Others, mostly recreations of the original maps from the game, I’ve posted in various locations around the web as I’ve created them.

Scans

First, let’s look at a couple of scanned maps. Namely the cover maps of SF0: Crash on Volturnus that give the deck plans of the Serena Dawn and the surface map of Volturnus. I have both of these as either PNG (full resolution) or JPG (smaller size).

  • Serena Dawn – full – PNG (3.8 MB)
  • Serena Dawn – full – JPG (492 kB)
  • Volturnus – full – PNG (3.9 MB)
  • Volturnus – full – JPG (607 kB)

I have scans of the Port Loren map from the Alpha Dawn rules and the station map from the Knight Hawks rules but I’ve also created remastered versions of those which are much better. We’ll look at those below.

I also have a scan of the Frontier Deployment Map which is the outside cover of the SFKH1: Warriors of White Light module and is used in the Second Sathar War strategic game from the Knight Hawks Campaign Book. This one is just saved as a JPG.

  • Frontier Deployment Map – JPG (360 kB) – Roughly 100 DPI

Finally, I have the two halves of the Zebulon’s Guide to Frontier Space map of the Frontier. I never actually stitched these two together. These are stored as BMP (bit map) files, another lossless compression algorithm. I don’t think I did the original scans and don’t remember where I got them from.

  • Zeb’s Guide map – left half (5.5 MB)
  • Zeb’s Guide map – right half (5.5 MB)

Remastered

Let’s look at my remastered maps. These are maps that I’ve recreated as original digital creations. Most of these maps were created as scalable vector graphics (SVG) files and then exported as PNGs at 100 DPI which was more than enough resolution for what was drawn. I can always re-export them at any resolution I want.

Let’s start with the big maps. These are all 50 pixels to the square and two squares to the inch. These are faithful recreations of the original maps matching colors, fonts, shapes, etc. as close as I could get them.

  • Port Loren map – (990 kB) – This is the big poster map from Alpha Dawn
  • Station map – (1.68 MB) – This is the big station complex on the back of the space map from the Knight Hawks set.
  • Station Commercial – no cut (1.7MB) – This is the left half of the station map including the bit of the zoo area cut off by the diagonal zig-zag.
  • Station Residential – no cut (175 kB) – This is the right half of the station map including the bit cut off by the diagonal zig-zag.
  • Port Loren Starport map (539 kB) – I created this remastered version to match the same colors and styling as the original Port Loren map, but the design of the map was done by someone else, whose name I can no longer find. If anyone knows the original creator, let me know.

Those are the main maps on the two posters. I’ve also done some of the smaller maps from the posters as well

  • Town map – (16 kB) – this was used for “Slave City One” from the module SF1: Volturnus, Planet of Mystery. I actually recreated it for an adventure we published in issue 1 of the Frontier Explorer.
  • Assault Scout Deck Plans – green (26 kB) – This is from the Knight Hawks poster map and is a remastered version of the original assault scout deck
  • Assault Scout Deck Plans – blue (29 kB) – The same as above but blue.
  • Knight Hawks battle map – black on white (40 kB) – A computer generated hex grid matching the KH battle map, including hex numbers. This one is black lines on a white background
  • Knight Hawks battle map – white on black (40 kB) – Same as above but with the colors inverted.

Finally, I have a set of maps that were created by Tom Verreault. One is a remastered version of the mountain terrain map from the back of the big AD poster map. The others are an expanded area that connect the first one and then a big map of all four together as a single file.

  • Mountain A map (31 kB)
  • Mountain B map (39 kB)
  • Mountain C map (45 kB) – this is the original from the AD map
  • Mountain D map (32 kB)
  • Full map (81 kB) – The four maps above combined

Final Thoughts

I hope you can find these useful. I probably have a few more that I’m not finding at the moment. If I do find others, I’ll update this post or make another one. I do have a number of other image and logos I’ve created over the years. I considered adding them here but decided they really deserve their own post so look for those in the future.

Some day I plan on remastering all the terrain maps from the back of the AD map but I’ve just never gotten around to it.

September 22, 2020 Tom 4 Comments

Void Jumping, Acceleration, and Other FTL Nuggets

This post is going to get a little bit math heavy toward the middle. Just warning you now.

The idea for this post stemmed from a recent discussion on the Star Frontiers: Alive and Well Facebook group talking about the accelerations involved in faster than light (FTL) travel in that game. I’ve written about this many times over the years on forum posts but since I can’t seem to find those posts (I think some of them at least are on the now defunct forums at starfrontiers.org), I’m going to do it one more time here on this blog as a permanent reference. But before I dig into the details of the math and physics, I’m going to share some links to other posts I’ve made that I do still have.

Other Posts

First up we have a post from 2010 on Void Jumping on my Star Frontiers Network site. I don’t think this article is linked from anywhere anymore so this will help to bring it back to life. This essay talks about some of the issues associated with making a Star Frontiers style void jump for FTL travel. This essay was the basis for the sci-fi novel, Discovery, that I published back in 2011 (has it really been that long!).

Next, in 2015, when I was still writing on the Arcane Game Lore blog, I did a series of posts on Void travel that expanded and refined those ideas a little more in the direction of a personal sci-fi game I work on off and on. The first two of these posts were actually part of the November 2015 RPG Blog carnival.

  • The first is an article on Void Travel Sickness. Not really relevant to this discussion but fun none-the-less and falls under the “nuggets” heading.
  • The second, Your Final Destination – Exiting a Void Jump, talks about variations in your arrival at your destination. The blog carnival topic that month was “Surprises” and both of these articles were things that could add surprises or randomness to your FTL travel. I actually recommend you read this one after the next one as it talks about things at the end of the journey but it can be read first.
  • The third (and final) article in that set was part of my “Designing out Loud” series of articles where I talked about game design decisions and ideas. This one was entitled “Designing Out Loud – Void Jumping” and expanded on the ideas in my 2010 article.

While you don’t necessarily need to read those article to follow along with the following, it definitely wouldn’t hurt.

Void Jumping

The concept of the Void Jump was introduced with the Knight Hawks supplement in Star Frontiers. In the original rules (renamed to Alpha Dawn when the Knight Hawks rules came out), there were no spaceship rules and it just said to treat interstellar travel at the rate of 1 light year per day.

So how does it work? According to the rules, you make a jump by leaving your starting point and accelerating until you reach 1% the speed of light. At that point you “jump” into the Void. To get out of the Void, you just have to slow down slightly. While you’re in the Void, you travel amazingly fast, on the order of 1 light year per second (The rules don’t actually so but imply something close to that so that’s the value I use). Once you jump into your destination system, you swing the ship around and start decelerating. Remember, there is no artificial gravity in Star Frontiers so this acceleration and deceleration is what provides gravity in the ships. Most ships make these trips accelerating at 1g.

So how long does this take? For these calculations, we’ll take 1 g to be equal to 10 meters per second squared (m/s/s) of acceleration. On Earth we define 1 g to be 9.82 m/s/s but rounding up to 10 just makes everything easier and its less than a 2% difference.

Okay, here comes the math.

If you start at rest, your velocity at any given time is just:

v(t) = at

where v is velocity (in m/s), a is acceleration (in m/s/s), and t is time (in seconds). Technically v and a are vectors but we’ll just worry about speed, not direction.

Now, the void jump occurs at 1% the speed of light. We’ll take the speed of light to be 300,000,000 m/s. It’s really 299,792,458 m/s but we’ll again round up to make the math easier. The difference is less than 0.07%. Good enough for this discussion. 1% of that is just 3,000,000 m/s. That’s our target velocity.

Since our acceleration is 10 m/s/s, dividing 3,000,000 m/s by 10 m/s/s gives us 300,000 s of acceleration needed to reach jump speed. That works out to 83 hours and 20 minutes of acceleration. Given that a standard day in Star Frontiers is 20 hours long, that is 4.17 days.

That’s the time to get up to jump speed. It takes that much time to slow down on the other side as well. Which means at a minimum, an interstellar jump takes 8 and 1/3 days, assuming everything lines up perfectly (see the Exiting the Void Jump article for things that might lengthen that).

That’s the time required. What about distances covered? The equation for position is just the integral of the velocity equation above. Again, for starting at rest, and assuming that you measure the distance from your starting point, your position at any given time is given by:

x(t) = \frac{1}{2}at^2

where x is your position in meters. We know what t is from the velocity equation above is 300,000 s. a is just 10 m/s/s. Plugging these in gives us a distance traveled of 450 billion meters or 450 million kilometers. (A lot of people forget that factor of a half and end up with the wrong number.) Now the distance from the Earth to the Sun, called an Astronomical Unit (AU), is 150 million kilometers (again I’m rounding, the actual value is 149,597,871 km so the rounding is less than 0.3%).

So in those 4.17 days of acceleration, you traveled 3 AU. If you started at Earth and headed straight out from the sun, you’d be 4 AU from the Sun. That’s most of the way from Earth’s orbit to Jupiter’s orbit (at a distance of 5.2 AU from the Sun). That distance puts you well beyond the main asteroid belt which ends at 3.3 AU.

Now, these numbers all change if you use a different acceleration. Doing those calculations is left as an exercise for the reader.

ADF and the Board Game Rules

The above all works just fine. The problem comes when you start looking at the rules for the spaceship combat board game and try to rationalize those rules with the math above.

From the board game, we have that one hex is 10,000 km and one turn in the game is 10 minutes of time. Added to that is the ship’s statistic, the Acceleration/Deceleration Factor (ADF) which is described as the number of hexes that a ship can speed up or slow down in a given turn. The fastest ships (fighters and assault scouts) have and ADF of 5.

Let’s look at some numbers. First, what is Void jump speed on the game map. Well, jump speed is 3,000,000 m/s or 3,000 km/s. Since a turn is 10 minutes or 600 seconds, that works out to 1,800,000 km/turn. Given that a hex is 10,000 km across, that works out to a speed of 180 hexes per turn. Since the game map is only 54 hexes wide, you’ll never get to that speed in the game.

The problem comes when people start looking at ADF as acceleration in gees, i.e. that 1 ADF = 1g of acceleration. If you make that assumption, then accelerating at 1 ADF per turn, it would take you 180 turns to get to jump speed from rest. 180 turns at 10 minutes per turn means that it would take just 1,800 minutes, or 30 hours, significantly faster than the 83.33 hours calculated above. Obviously 1 ADF cannot equal 1 g.

So let’s work that out. 1 ADF represents a change of velocity of 10,000 km per 10 minutes in 10 minutes (or 100 km/min/min). That’s an acceleration, just not in the normal units of m/s/s. So lets convert them:

\frac{10,000 km}{10 min * 10 min} = \frac{100 km}{min^2} = \frac{100,000 m}{60 s * 60 s} = 27.778 \frac{m}{s^2} = 2.78 g

So we see that 1 ADF is really 2.78 g of acceleration. You’re not going to sustain that for 30 hours and have anyone in any sort of condition to function unless severe precautions are taken. Heck, even sustaining that for 1 turn (10 minutes) is going to be rough. It’s doable, that amount of acceleration and duration is roughly equivalent of a launch to low Earth orbit with modern rockets, but you wouldn’t want to keep it up for a long time.

That also raises another issue. 5 ADF is actually 13.89 g of acceleration. And Star Frontiers doesn’t have any sort of artificial gravity tech. Pulling those kind of maneuvers is a little unrealistic. (There are discussions about using interia screen tech to help with this but that’s a different article.)

There are a couple of solutions to this. One, which is the one I use and which is probably the simplest, is a willing suspension of disbelief. The board game rules are just that, rules for a board game that simulates (sort of) spaceship combat. There are other issues with the board game physics besides this one, so I don’t expect it to represent “reality”. It’s a fun way to approximately simulate spaceship combat.

Another option, which immediately removes the 1 ADF not equaling 1 g issues, is to change the size of the hexes in the board game. Simply saying that they are 3,600 km in size instead of 10,000 km, makes 1 ADF = 1 g. If you keep the range of weapons the same (measured in hexes as they are described in the game rules, the only thing that really changes is that any planet counters you put on the map have to take up 7 hexes instead of just 1. And it might tweak the gravity rules a bit, but not significantly. This doesn’t solve some of the other problems, however. That’s a whole different post as well.

How I Apply This In Game

So how do I use this?

Basic Application

For most ships, I assume that they have two astrogators that can work in alternating shifts around the clock to do jump calculations. Since the rules say it takes 10 hours of calculation per light year traveled. And since it takes over 80 hours of travel time to get to jump speed. This means that any jump of 8 light years or less takes the same amount of time, namely 8.5 days, which I typically round up to 9 for maneuvering around the station and slight variations in arrival location (see my linked posts). And actually, since I round this up to 9 days, it play it that jumps of 9 light years or less all take 9 days, regardless of distance. Each light year beyond 9 adds a half of day of travel time to allow for the calculations. This is how I calculate the travel times for ships in my Detailed Frontier Timeline.

Again that assumes that they have two astrogators. If not, jumps take significantly longer, namely one day per light year traveled, plus 4.5 days to slow down at the destination, with a minimum of 9 days total travel. So in this case, jumps of five light years or less take 9 days, and each additionally light year adds a day on to the jump time.

Now I do allow the jump calculations to be started before the ship leaves it’s berth, assuming the crew knows when they plan to leave (to within a day or so). But because the planets and stars are always in motion, and the jump calculations have to be done for each specific jump, no more than half the calculations can be done in advance. The rest must be done “in flight.” For me this represents the tweaking and refining of the ship’s course in preparing for the jump that I discuss in the other articles I linked. But that means that even for a ship with a single astrogator, they can reduce the flight time if the astrogator gets started before they leave on the longer jumps.

Traversing multiple systems in a single trip

Another aspect of this is what I like to call the “high speed transit.” This occurs when the ship wants to traverse several star systems but doesn’t need to stop in each one. In this case, the first jump starts as usual, but once they traverse the Void the first time things change.

In each system after the first, until they reach the final system that they want to stop in, they don’t decelerate, at least not appreciably. But rather remain near jump speed, either drifting or, if they want gravity, decelerating for a few hours, flipping around and accelerating, and repeating until they are ready to jump. During this time the astrogators work on the jump and the engineers do any needed engine overhauls. The amount of time spent in system is just the longest of those two activities. Once that’s done, they nudge into the next system and repeat until they arrive at the destination system where it then takes 4.5 days to slow down.

Let’s look at an example: The UPFS Stiletto, an assault scout, is on patrol in Truane’s Star and has orders to get to Dramune as quickly as possible. This route has 4 jumps:

  • Truane’s Star to Dixon’s Star – 5 light years
  • Dixon’s Star to Prenglar – 5 light years
  • Prenglar to Cassidine – 7 light years
  • Cassidine to Dramune – 4 light years

Using normal jumps, these are all less than 9 light years so each jump would take 9 days for a total of 36 days.

Rather than do this, let’s look at what this takes using the high speed transit option. According to the rules, engine overhauls take 60 hours minus 1d10 hours for each engineer level. The rules also say that Spacefleet ships typically have level 4 engineers. That means that on average, it will take 38 hours to overhaul each engine. We’ll assume that there are 2 astrogators and 2 engineers onboard the Stiletto. This is what a high speed transit looks like in this scenario:

  • Accelerate out from Truane’s Star – 4.5 days – plenty of time to do the 50 hours astrogation calculations
  • Transit Dixon’s Star – astrogation calculations take 50 hours (2.5 days of round-the-clock work), engine overhauls only take 38 hours of work, but since there is only one engineer per engine, they have to sleep. So these are the slow part, taking 4 days – so after 4 days, they jump to Prenglar
  • Transit Prenglar – astrogation will take 70 hours (3.5 days of round-the-clock work). This one is closer but the 4 days of engine overhauls is still the limiting factor. After 4 days they jump to Cassidine.
  • Transit Cassidine – Here the astrogation calculations only take 40 hours (2 days of round-the-clock work) and the astrogators get a bit of a break while the engineers finish up. After 4 days, they make the jump to Dramune
  • Decelerate in Dramune – it takes 4.5 days to slow down and arrive at Inner Reach.

All told, this trip takes only 21 days instead of the baseline 36, saving 15 days of travel. The crew might be a little tired, but they made it without taking any risks.

If you only had 1 astrogator and two engineers, one level 3 and one level 2 (more likely on a merchant ship or PC ship), the transit looks like this:

  • Accelerate from Truane’s Star – 4.5 days, same as before. We assume the astrogator got started before they left.
  • Transit Dixon’s Star – Astrogation takes 5 days, engine overhauls take 43.5 for the level 3 engineer and 49 for the level 2 engineer. The level 3 engineer can help the other engineer once they are done so the total time to do the overhauls is five days – Time in system 5 days.
  • Transit Prenglar – In this case the limit is the astrogation which takes 7 days. Time in system, 7 days.
  • Transit Cassidine – This time the astrogators win and the jump is waiting on the engineers – Time in system, 5 days.
  • Decelerate in Dramune – 4.5 days.

Total time: 26 days. Takes a little longer but still faster than the base 36 hours. If there was only one engineer, it would actually take longer than 9 days per system as one engineer just can’t do engine overhauls on two engines in each system that fast (unless they are level 5 or 6). You might as well stop over in the station each time unless you have a reason not to go into a system.

Final Thoughts

That’s it for this post. There are other aspects of the travel that I could talk about such as vector movement, the process of lining up for a jump, what happens to your calculations and alignment when you have to maneuver for a combat or something else, and a discussion on how long those alignment efforts take anyway. Some of those ideas I touched on in the posts I linked. I might look at these again in a future post or two as well.

What are your thoughts? What questions do you have? Share them in the comment section below.

September 15, 2020 Tom 1 Comment

Posts navigation

← Previous 1 2 3 … 13 Next →
Become a Patron!

Recent Posts

  • State of the Frontier – January 2024
  • Detailed Frontier Timeline – FY62.069 to FY62.99
  • State of the Frontier – August 2022
  • Battle of Hargut (Gruna Garu) – FY62.098
  • Archived Arcane Game Lore Posts – May 2013 to Dec 2014
  • A Look at Yachts and Privateers
  • Homeworld Bound – A Campaign Concept
  • Second Battle of Fromeltar (Terledrom) – FY62.083
  • Sample Star System Data
  • Detailed Frontier Timeline – FY62.038 to FY62.068

Categories

  • 3D Models
  • Adventures
  • Background
  • Creatures/Races
  • Deck Plans
  • Equipment
  • Game Design
  • General
  • Locations
  • Maps
  • NPCs
  • Optional Rules
  • Patreon-only
  • Project Overviews
  • Reviews
  • Setting Material
  • Starships
  • System Brief
  • Vehicles
  • Writing

Recent Comments

  • Tom on State of the Frontier – January 2024
  • Tom on State of the Frontier – January 2024
  • Tom on Star Map Generator – GUI Edition
  • David on Star Map Generator – GUI Edition
  • DM_Shroud on Star Map Generator – GUI Edition
  • Tom on Fighter Miniatures
  • Rlaybeast on Fighter Miniatures
  • Loguar on Detailed Frontier Timeline – FY62.069 to FY62.99
  • Loguar on Detailed Frontier Timeline – FY62.069 to FY62.99
  • Tom on Detailed Frontier Timeline – FY62.069 to FY62.99

Archives

  • January 2024 (1)
  • September 2022 (1)
  • August 2022 (9)
  • July 2022 (3)
  • June 2022 (3)
  • May 2022 (3)
  • June 2021 (1)
  • April 2021 (1)
  • February 2021 (4)
  • January 2021 (6)
  • December 2020 (5)
  • November 2020 (11)
  • October 2020 (4)
  • September 2020 (5)
  • August 2020 (4)
  • July 2020 (6)
  • June 2020 (5)
  • May 2020 (8)
  • April 2020 (5)
  • March 2020 (5)
  • February 2020 (5)
  • January 2020 (5)
  • December 2019 (7)
  • November 2019 (4)
  • October 2019 (6)
  • September 2019 (5)
  • August 2019 (6)
  • July 2019 (7)
  • June 2019 (5)
  • May 2019 (6)
  • April 2019 (7)
  • March 2019 (4)
  • February 2019 (5)
  • January 2019 (7)
  • December 2018 (5)
  • November 2018 (10)
  • October 2018 (4)
  • September 2018 (4)
  • August 2018 (5)
  • July 2018 (4)
  • June 2018 (4)
  • May 2018 (12)
  • December 2015 (1)
  • November 2015 (2)
  • December 2014 (4)
  • November 2014 (3)
  • June 2014 (1)
  • January 2014 (1)
  • July 2013 (1)
  • June 2013 (2)
  • May 2013 (3)

Meta

  • Log in
  • Entries feed
  • Comments feed
  • WordPress.org

Recent Posts

  • State of the Frontier – January 2024
  • Detailed Frontier Timeline – FY62.069 to FY62.99
  • State of the Frontier – August 2022
  • Battle of Hargut (Gruna Garu) – FY62.098
  • Archived Arcane Game Lore Posts – May 2013 to Dec 2014

Recent Comments

  • Tom on State of the Frontier – January 2024
  • Tom on State of the Frontier – January 2024
  • Tom on Star Map Generator – GUI Edition
  • David on Star Map Generator – GUI Edition
  • DM_Shroud on Star Map Generator – GUI Edition

Archives

  • January 2024 (1)
  • September 2022 (1)
  • August 2022 (9)
  • July 2022 (3)
  • June 2022 (3)
  • May 2022 (3)
  • June 2021 (1)
  • April 2021 (1)
  • February 2021 (4)
  • January 2021 (6)
  • December 2020 (5)
  • November 2020 (11)
  • October 2020 (4)
  • September 2020 (5)
  • August 2020 (4)
  • July 2020 (6)
  • June 2020 (5)
  • May 2020 (8)
  • April 2020 (5)
  • March 2020 (5)
  • February 2020 (5)
  • January 2020 (5)
  • December 2019 (7)
  • November 2019 (4)
  • October 2019 (6)
  • September 2019 (5)
  • August 2019 (6)
  • July 2019 (7)
  • June 2019 (5)
  • May 2019 (6)
  • April 2019 (7)
  • March 2019 (4)
  • February 2019 (5)
  • January 2019 (7)
  • December 2018 (5)
  • November 2018 (10)
  • October 2018 (4)
  • September 2018 (4)
  • August 2018 (5)
  • July 2018 (4)
  • June 2018 (4)
  • May 2018 (12)
  • December 2015 (1)
  • November 2015 (2)
  • December 2014 (4)
  • November 2014 (3)
  • June 2014 (1)
  • January 2014 (1)
  • July 2013 (1)
  • June 2013 (2)
  • May 2013 (3)

Categories

  • 3D Models
  • Adventures
  • Background
  • Creatures/Races
  • Deck Plans
  • Equipment
  • Game Design
  • General
  • Locations
  • Maps
  • NPCs
  • Optional Rules
  • Patreon-only
  • Project Overviews
  • Reviews
  • Setting Material
  • Starships
  • System Brief
  • Vehicles
  • Writing

Meta

  • Log in
  • Entries feed
  • Comments feed
  • WordPress.org
Powered by WordPress | theme Layout Builder