This will be the last battle I report that occurs in the Rim. I had these two battles set up in the timeline already so I’ve been reporting them. And while I really should have handled the sathar and Rim interaction in this timeline, the truth is I have never really worked out what the Rim has in terms of ships and ship production capability. So that will have to be a project for a future date.
A second sathar force was engaged today in the space around Stenmar by the surviving Flight elements in the system. Lacking reinforcements from the core Rim systems, the Flight forces were severely outnumbered and succumbed quickly to the sathar onslaught with only a single fighter surviving to seek shelter in the outer system. Before being overwhelmed, Flight forces managed to destroy a sathar light cruiser and a new vessel never seen in the Rim before.
Limited reports from the battle indicate this new sathar vessel falls in size between an assault scout and a frigate and seems to sport dual laser batteries. Not much more is known due to the limited engagement and savagery of the sathar attack.
Kaarln Duggart – Stenmar News Syndicate
Background
Intended to reinforce the original fleet sent to the Kazak system, this battle fleet was already preparing to depart when the first battle occurred. Surprised by the initial resistance in the Kazak system, the sathar committed their four new Cutter-class vessels to the conflict as well to boost the firepower of the fleet.
Worried about sathar incursions into the core Rim worlds, no reinforcements for the Kazak system were readily available so the surviving elements of the Flight from the first battle were all that remained to face the new onslaught. Seriously outgunned, they hope to pull off another victory relying on the success they had in the first battle with their assault rocket attacks.
The sathar have other plans.
Order of Battle
The Flight
10 Fighters
2 Assault Scouts
1 Frigate
1 Fortified Station
Sathar
4 Cutters
1 Frigate
3 Destroyers
2 Light Cruisers
The Battle
Setup
The station is on the side of the planet directly opposite the sathar, orbiting counter clockwise. The Rim forces form up close to the planet with the frigate and a wing of 5 fighters above the planet and the assault scouts and remaining fighters below the planet. They are all moving at speed 20.
Having learned from the engagement at New Pale (Truane’s Star) four days earlier, the sathar forces come in fast, starting at speed 25. They form up directly opposite the Flight forces allowing them to bring their forward firing cannons to bear in the initial engagement, knowing that in later phases of the battle, this might not be possible due to the higher maneuverability of the Rim ships. The cutters form a flight to square off against the upper flight of fighters, a frigate and destroyer line up opposite the Rim’s frigate, the remaining two destroyers go after the assault scouts and the light cruisers plan to take on the lower group of fighters.
Initial setup for the conflict. Click for full size image.
Turn 1
The sathar all fly straight toward their intended targets. The cutters accelerate to speed 29 to come into point blank range with their laser batteries while all the other ships accelerate slightly to speed 26 to bring them within range for their rocket batteries.
Defensively the frigate and station fire at the sathar frigate hitting with a laser cannon and rocket battery from the frigate and a laser battery from the station. They manage to damage the frigate’s engines, knock out its masking screen launcher, and reduce its hull integrity by over half from a well placed hit with the rocket battery. The assault scouts fire at the lead destroyer and manage to inflict some minor hull damage with one of their laser batteries.
The sathar cutters open fire on the upper flight of fighters with their dual laser batteries, nearly destroying the lead fighter, damaging and reducing the maneuverability of her wingman, and destroying a third fighter. They missed the other two.
The sathar destroyer hit the Rim frigate with its laser weapons starting a fire and damaging the ship’s engines. The gunners on the sathar frigate must be veterans or well trained as they landed a hit on the Rim frigate with nearly every weapon fired, only missing with the laser battery. They knocked out the Rim vessel’s masking screen and damaged it’s hull with the laser cannon and rocket battery before it was obliterated by the torpedo.
The two fighters and remaining assault scout, all seriously damaged, just drift forward. The other fighters accelerate to 25 and loop around remaining out of range of the sathar energy weapons. They all fire at their closest target as they fly out.
Defensively the sathar continue to fire at the same targets expect that the frigate and two of the destroyers shift their fire to the station. The cutters finish off the two wounded fighters in the upper group and hit a third for serious hull damage an a navigation control hit. The fourth fighter remains unscathed. The light cruisers are not as effective with the first hitting one fighter for some minor hull damage, and another knocking out its engines. The other light cruiser misses with all weapons. While the destroyers both miss the station, the frigate hits with is laser and rocket battery doing some significant hull damage.
The assault scout hits the lead sathar destroyer with its assault rocket damaging its maneuvering. One of the cutters is hit with 2 assault rockets damaging its engines and nearly destroying it. The lead light cruiser is hit by all four assault rockets which rip through the hull destroying it.
Initial round of combat. Click for full size image.
Turn 2
The damaged sathar cutter and frigate drift away from the battle hoping to survive and get repairs done while the other ships finish off the Rim forces. All the other sathar ships loop around the planet to attack both the station and the surviving Flight vessels.
The surviving cutters loop around to go after the larger group of fighters below the planet. The two destroyers go after the group of fighters above the planet. The remaining light cruiser and third destroyer go after the Rim assault scout. The ships use their energy weapons on the smaller ships while firing their rocket batteries and torpedoes at the station.
Defensively the station fires at the cutter and frigate that are drifting away attempting to finish them off. The laser battery hits the cutter inducing a navigation control hit while the rocket battery hits the frigate knocking out some of its acceleration ability. The assault scout fires at the destroyer chasing it cause some significant hull damage with its laser battery.
The lead sathar destroyer in the upper flight only hits the lead Rim fighter with its laser battery inducing a loss of navigation control. The other destroyer is much more effective hitting with all three energy weapons destroying the other fighter.
The cutters eliminate two of the four fighters in the lower group, completely missed a third, and damaged the navigation control system on the the fourth. The third sathar destroyer hit the lone assault scout with its laser canon, destroying the smaller vessel.
The station fires all its ICMs at the incoming torpedoes. Despite this, 3 of the 5 torpedoes, and an equal number of rocket batteries slam into the station from different directions completely destroying it.
The lone Rim fighter above the planet, spinning out of control, manages to line up for a shot on the sathar destroyers, but the destroyers hit it with an electron battery that knocks out the assault rocket launcher before it can fire. The undamaged fighter in the lower group, hoping to eliminate the crippled ships to prevent their repair and subsequent use, races off after the damaged frigate and cutter, unfortunately, it is hit by two laser batteries from the cutters, destroying it before it can catch the crippled ships. The final fighter, its navigation control system damaged, spins to port and manages to get an oblique shot with it assault rocket launcher at one of the cutters, scoring serious hull damage on the ship (just over 60% of its total). Amazing, the fighter flies through the barrage of laser batteries unscathed.
Positions and courses at the end of the second round of combat. Click for full size image.
Turn 3
The damaged seriously damaged cutter with the navigation control damage pull a hard turn to port and breaks up from the strain of the maneuver. The sathar light cruiser and destroyer chase down the fighter that escaped the cutters and eliminate it with their energy weapons. The sathar allow the other fighter to escape.
Repairs
The damaged Rim fighter gets its navigation system repaired and, realizing it is no match for the combined sathar fleet, heads out to the outer system to find somewhere to take shelter.
Over the next hour and a half, the sathar repair what damage they can. All of the damage to internal systems are repaired but the three ships with hull damage (a cutter, the frigate, and a destroyer) all require time in a starship construction center to fully repair, the cutter and frigate are seriously damaged with less than half of the their hull integrity intact while the destroyer only has a small bit of damage.
Lessons Learned
The Rim leaders were forcibly reminded that while the fighters and assault scouts pack a serious offensive punch, they have little to no defensive capability and quickly succumbed to the overwhelming sathar fire without being able to return much of their own. With a lack of capital ships by Flight, the sathar effectively got two shots for every one that the Rim forces had.
The rapid advance of the sathar forces, here and at New Pale, have shown that the Rim and UPF fighters are quite vulnerable to a first strike by sathar forces that target them. They are going to have to stand off further from the beginning of the battle in future engagements so that the sathar cannot have that first strike advantage.
The sathar cutters seem to be effective against the small ships with their pairs of laser batteries and could proved to be quite useful in an anti-fighter role.
This battle actually occurred two days ago in the timeline. However, since I was still catching up on the battles from the opening day of the conflict, this posting got delayed. Going forward, the battles will be much less frequent and the battle reports will arrive on they day they occur.
After a nearly an hour of intense battle around New Pale, militia and UPF forces manage to drive off the invading sathar fleet destroying two sathar vessels and seriously damaging the other three.
Unfortunately, due to heavy losses and critical damage, the UPF and militia forces were unable to pursue the fleeing sathar ships which began accelerating out of the system for a jump back to Zebulon shortly after the battle ended.
While the sathar have been driven off, the losses around New Pale represent the most damage to militia forces yet seen in this conflict and the second highest loss of ships overall, coming in only after the massive battle at Prenglar two days ago.
Goolar Nadd, New Pale News
Background
The Truane’s Star militia is supported by the remaining elements of Patrol Group Virgo which just returned from being stationed in the Kazak system in the Rim days before the sathar fleets appeared. Bolstered by the Spacefleet forces, and having seen the success of the UPF forces in the other systems two days prior, confidence is high that they can defeat the sathar ships.
The sathar have learned from those other engagements as well. Knowing that there is a second fleet en route just 11 days behind them, this battle fleet has some very specific orders: Eliminate the fighters and assault scouts!
Order of Battle
Had Patrol Group Virgo not been in the system, and the militia not had the extra assault scout, this would have been the scenario I presented as “A Pale Prospect” in the Stand Your Ground article in issue 3 of the Frontier Explorer (p30) back in 2013. Before starting this timeline project, this is how I thought the first fight in Truane’s Star would play out.
However, the additional ships completely change the dynamics and with the sathar’s new tactics, this turned out to be the most interesting battle for me so far as it did not go at all as I expected. And the high speeds meant that the ships were flying everywhere on the map.
Truane’s Star Militia
4 Assault Scouts
1 Frigate
Note that this is one more assault scout than described in the order of battle for the game in the KH Campaign Book. They captured this assault scout from the Star Devil pirates early in the timeline so it is available in the fight.
UPF – PG Virgo
8 Fighters
2 Assault Scouts
2 Light Cruisers
1 Assault Carrier
Sathar
1 Frigate
2 Destroyers
1 Light Cruiser
1 Heavy Cruiser
The Battle
Setup
The UPF and militia forces, deploying tactics that have worked in the other systems, set up in a broad line with the smaller ships on the outside, the two LC near the station at speed 15, with the assault scouts split into a flight of 4 (below the planet) and 3 (above), both groups at speed 20, and a flight of 4 fighters on either wing at speed 25. The assault carrier is on the far side of the planet orbiting at speed 10 with the militia frigate acting as escort. The station is in on the far side of the planet from the approaching sathar and orbiting counter clockwise.
The sathar, however, are not using the tactics they have used in other systems. With their new directive, they come in fast, high above the planet at a speed of 25! Additionally, they are formed up in an inverted form of their standard diamond formation with the heavier ships leading and headed straight for the upper group of fighters.
Initial positions of the UPF and sathar forces. Click for full size image.
Turn 1
The sathar ships advance straight at the fighters and at the last moment turn toward the upper group of assault scouts. The heavy cruiser remains at speed 25, while the light cruiser and frigate accelerate by 1 and 2 respectively to join up with the larger ship. They fire all weapons expect their torpedoes at the flight of 4 fighters. The destroyers accelerate to speed 27 and 28 and join up directing all their fire at the flight of assault scouts.
Defensively only the upper light cruiser and flight of assault scouts are in range and they fire everything at the lead destroyer. Only the light cruiser connects with its laser battery doing some minor hull damage.
The sathar open with a devastating barrage at the smaller ships. The light cruiser’s disruptor cannon vaporizes the lead fighter, while the disruptor cannon from the heavy cruiser knocks out the assault rocket launcher on his wingman. The third fighter is hit by a pair of laser batteries and the sathar frigate’s laser cannon damaging its acceleration and navigation control system and nearly destroying it. The final fighter is hit by an electron battery and destroyed.
The destroyers do just as well. The lead militia assault scout is hit by a laser battery, electron battery, and laser canon destroying it. The second assault scout is hit by a laser battery and laser cannon and also destroyed. The last assault scout in the group is hit by an electron battery and rocket battery knocking out its assault rocket launcher and nearly destroying the ship.
The sathar have done well, eliminating four ships and knocking out the assault rocket launchers on two others and severely damaging the last. Caught off-guard by the speed of the sathar advance and initial devastation, the UPF and militia forces scramble to react.
The surviving assault scout, heavily damaged, just drifts away from the battle at speed 20. The fighter with the damaged navigation control system pulls a hard turn to starboard remaining at speed 25 and flies away from the battle. Luckily, it doesn’t break up from the maneuver. The other fighter, relatively undamaged but unable to fight due to the loss of its assault rocket launcher, loops away from the sathar ships back toward the assault carrier and slows to speed 20.
The assault carrier and frigate accelerate to speed 12 and turn away from the oncoming ships. All of the other UPF and militia ships loop around and head toward the group of sathar ships centered on the heavy cruiser, the ships coming from below the station accelerating to get in range.
Defensively, the sathar continue to focus on the smaller ships firing all their energy battery weapons at the incoming fighters and their cannons at the wounded assault scout as it drifts by. They fire their rocket batteries at the light cruiser that has come into range.
All five cannons hit the assault scout causing a fire and damage to its maneuvering and damage control system before destroying it. Three of the five rocket batteries slam into the UPF light cruiser disabling its ICM launcher, completely knocking out its maneuvering and doing significant hull damage. The lead fighter is hit by a laser battery reducing its acceleration ability while the shots at the second fighter completely miss. The third fighter is hit by a laser and electron battery and destroyed. The final fighter takes a hit from an electron battery which starts an electrical fire on-board.
The surviving fighters with operational assault rockets fire at the light cruiser, three of which hit doing significant hull damage and causing a power short circuit knocking out its screens and ICMS. The assault scouts and more distant light cruiser fire at the heavy cruiser. Only two of the assault rockets from the assault scouts hit but cause significant hull damage (65% of total). The light cruiser hits with its laser battery and disruptor canon knocking out the heavy cruiser’s distruptor canon and acceleration capability. The other light cruiser hits the sathar frigate with its laser, electron, and proton batteries knocking out most of its acceleration ability and causing a fire.
Positions and courses of the ships at the beginning of the battle. Click for full image.
Turn 2
Unable to accelerate, the sathar heavy cruiser drifts down toward the assault carrier. It fires at the militia assault scouts with its energy weapons and its rocket weapons at the damaged light cruiser. The sathar destroyers decelerate and make a run at the undamaged light cruiser. The sathar light cruiser and frigate loop around and fire all their energy weapons and rocket batteries at the fighters and UPF assault scouts while they fire their torpedoes at the damaged light cruiser. The fire on the UPF fighter burns through over half of the small ship’s hull.
Defensively, the two UPF light cruisers focus their fire on their sathar counterpart hitting with multiple weapons reducing its acceleration ability, inducing a navigation control failure, knocking out its ICMs, and doing more damage to its hull but not destroying it. The assault scouts fire at the sathar frigate and hit with 2 laser batteries causing some minor hull damage. The station fires at one of the destroyers as they pass but misses and the assault carrier and militia frigate take long range shots at the heavy cruiser but also miss.
The militia assault scouts are both hit by a laser battery which knocks out all the maneuvering capability on one and slight reduces the maneuvering on the other. The lead (damaged) UPF light cruiser is hit by a rocket battery and torpedo doing some minor hull damage and shorting out its screens and ICMs. The trailing UPF light cruiser is pummeled by the destroyers having its screens and ICMs disabled and losing over half of its hull integrity.
The three fighters are each hit with a battery weapon destroying one, reducing the damage control capability on the second, and damaging the navigation control system on the third. The two UPF assault scouts are hit by a rocket battery and distruptor cannon respectively that knock out just over half of the first’s hull integrity and damages the assault rocket launcher on the second.
The seriously damaged fighter (off the top of the map) continues to spin out of control but still manages to hold together. The fighter with the disabled assault rocket launcher continues to approach the assault carrier, and the other fighter with the navigation control spins hard to starboard and flies off the top of the map. The assault carrier accelerates to speed 14 and loops down under the path of the heavy cruiser. The militia frigate splits off from the assault carrier and turns to engage the heavy cruiser. The lead light cruiser, its maneuvering knocked out, decelerates to speed 12 and drifts straight, currently out of the fight but trying not to get too far away. The other light cruiser turns to follow the heavy cruiser and manages to hold together through the maneuvering. The militia assault scout with no maneuvering left, decelerates as much as possible to avoid passing the sathar light cruiser and coming in range of its disruptor cannon. Unfortunately, it is now only 10,000 km away. The fighters still in the fight fire at the frigate while the assault scouts fire at the light cruiser. The fire on the sathar frigate does some minor hull damage.
Defensively the frigate and light cruiser fire at the assault scouts and fighters, destroying one of the fighters and seriously damaging the hull of the non-maneuvering assault scout and causing a fire on the same ship. The heavy cruiser fires at the militia frigate and knocks out its masking screens and reduces its acceleration ability.
Offensively, the frigate is hit by one assault rocket knocking out its laser battery, the light cruiser is hit by an assault rocket and two laser batteries destroying it, and the heavy cruiser is hit by the militia frigate’s laser canon knocking out its ICMs.
Courses and final positions after 20 minutes of fighting. Click for full image.
Turn 3
The sathar frigate accelerates and makes a pass at the assault scouts. The destroyers loop around to fire at the UPF light cruiser, and the heavy cruiser turns to strafe the assault carrier and flies out of the battle. The fire on the UPF assault scout burns through the hull destroying it.
Defensively, the assault scouts fire at the frigate and hit with a laser battery knocking out its laser canon. The station scores a long distance hit on the lead sathar destroyer knocking out its ICM launcher. The assault carrier hits the heavy cruiser knocking out its maneuvering engines. All other defensive fire misses.
Offensively, the sathar frigate hits the lead assault scout with a rocket battery, destroying it but misses with the torpedo aimed at the other assault scout. The sathar destroyers hit the UPF light cruiser with nearly everything, including both rocket batteries and torpedoes, and destroy it. The heavy cruiser hits the assault carrier with all of its energy battery weapons but the torpedo is intercepted by ICMs launched by the carrier. The hits knock out its navigation control system and causing some minor hull damage.
The two UPF fighters off the map continue to spin out of control but the damaged one doesn’t break up. The assault scouts make another run at the sathar frigate. The militia frigate strafes the sathar destroyers focusing its fire on the lead one and then loops around the planet. The lone UPF fighter continues to follow the assault carrier. The light cruiser off the map slows to speed 9. The assault carrier’s damaged navigation control system pulls it to port and it fires at the lead sathar destroyer as it passes by. The fire on the sathar frigate does some minor hull damage.
Defensively, the sathar destroyers fire at the militia frigate and while the lead frigate misses, the other hits with its laser and electron batteries knocking out the frigates laser cannon and maneuvering engines The defensive fire at the assault scouts miss.
The assault scouts hit the sathar frigate with a laser battery and assault rocket damaging its hull and knocking out its masking screens. From all the shots at the lead sathar destroyer, it is hit by a proton, rocket, and laser battery doing some significant hull damage.
Positions and courses at the end of the first half hour of battle. Click for full image.
Repair Turn
Almost every ship in the fight has some damage at this point. The only one that isn’t is one of the sathar destroyers.
On the UPF side, the fighter trailing the assault carrier, as well as the second UPF assault scout, repair their assault rocket launchers. The fighter that’s been spinning out of control from the beginning of the fight manages to repair its navigation control system as does the assault carrier. The carrier also repairs some of its hull. The militia frigate restores some of its maneuverability as does the light cruiser off the map. Unfortunately, the light cruiser’s hull repair runs into significant problems and its hull can only be repaired in a shipyard.
The sathar frigate puts out the fire while the other two ships repair some of their hull damage.
Turn 4
The sathar heavy cruiser, unable to maneuver and not wanting to risk acceleration and breaking up with its weakened hull, continues to drift away from the fight (its already off the map). The frigate, out of rocket weapons and with its energy weapons knocked out, is unable to fight and turns to follow the heavy cruiser, accelerating as much as possible with its damaged engines. The destroyers loop around the planet and strafe the assault scouts each firing all their energy weapons (their rockets and torpedoes are depleted) at a different assault scout.
Defensively, all ships fire at the lead sathar destroyer. The assault carrier and station hit knocking out its navigation control system and electron battery and causing some minor hull damage.
The lead sathar destroyer hits the surviving militia assault scout with it’s laser canon nearly destroying it. The other destroyer hits the UPF assault scout knocking out half of its hull integrity with it’s laser battery and damaging its combat control system with its electron battery.
The seriously wounded UPF ships continue to drift away from the battle or spin out of control while those that can, converge on the sathar destroyers again firing at the lead destroyer. The light cruiser (off the map) accelerates and starts to turn back toward the battle now that it has some maneuvering capability restored. With its limited maneuverability the militia frigate turns and takes long distance shots at the destroyers.
Defensively the destroyers fire their laser cannons at the militia frigate (which miss) and their energy batteries at the fighter and assault scout. Th trailing destroyer hits the assault scout with its electron battery slightly damaging its hull.
The UPF fighter and assault scout both hit the lead destroyer with their assault rockets. The fighter, frustrated at being out of the battle from the start, scores a massive hit knocking out nearly half of the destroyer’s hull integrity. The other assault rocket damages the destroyer’s combat control system. The gunner on the militia frigate lands an amazing long distance shot with the laser battery scoring a maximum damage hit and destroying the sathar vessel.
Positions and paths at the end of the fourth round of combat. There aren’t too many ships left and many have left the battle. Click for full sized image.
Turn 5
Knowing that it can out run the assault carrier, the destroyer fires its laser battery at the fighter and electron battery at the assault scout attempting to take them out of the fight and accelerates at maximum thrust to fly off after the heavy cruiser and frigate.
The assault scout and assault carrier return fire hitting with all of their batteries damaging the destroyer’s engines slightly and weakening its hull. The sathar’s electron battery connects with the UPF assault scout and destroys it. The laser battery misses the fighter.
With all of their ships damaged (expect the fighter) and many seriously out of position, the UPF commander calls off the pursuit of the sathar ships. The surviving UPF and militia vessels begin repairs and return the station.
Final ship positions and path as the sathar retreat. Click for full sized image.
Repairs
Over the course of the next thee hours, the UPF repair what they can and the assault carrier collects its scattered fighters. In the end most of the ships are fully repaired but the UPF light cruiser has hull damage that will require time in the shipyard.
The sathar form up and manage to repair most of their systems but all three ship have hull damage that will require time in a starship construction center to fully fix. While the damage to the destroyer is relatively minor (only 24% of its hull), the damage to the frigate and heavy cruiser is much more significant, 43% and 61%. Since they lost the fight here, they cannot use the local shipyard and must return to SCC#5 for repairs. They start accelerating out of the system being careful of the heavy cruiser’s hull.
Lessons Learned
When they want to, the sathar can do significant damage to the smaller UPF ships. Their tactics worked out quite well. In fact, much better than I expected. I really thought the UPF would win this one and eliminate all the sathar ships but would take significant damage. I never expected that the sathar would get away with three of their ships, although heavily damaged. The time to get those ships back into the fight will be much shorter than having to build new ones.
While the UPF and militia “won” and drove off the sathar, this was really a victory for the sathar in many ways as well. In the end, if you factor in the damage that requires a shipyard to fix, the sathar lost 198 hull points in this fight while the UPF and militia lost 228. If you just look at ships destroyed, then the sathar lost 2 ships for a total of 120 hull points while the UPF lost 12 ships, most of them fighters and assault scouts, totaling 200 hull points. Either way the sathar came out ahead. And they achieved their goal of taking out most of the assault rocket capability of the UPF forces in this system in advance of the next sathar attack in 11 days. While it doesn’t make up for the beatings they took in some of the other systems, it is definitely a boost to their morale.
There really isn’t much the UPF could have done differently other than be placed a little closer together for mutual support. The small fighters and assault scouts had no defense against the initial onslaught and paid the price. The only real defense there would have been to be further back from the station but then the sathar may have made a run at the station instead. This battle will definitely shift the tactics of both sides, at least somewhat. We’ll have to see what develops.
Due to the amazing skill of the Clarion and Ken’zah-Kit militias and UPF Spacefleet crews, the sathar invaders were quickly overwhelmed but not before they managed to destroy the armed station orbiting the planet.
Rescue operations are ongoing for the station’s crew and the hearts of the people of Kawdl-Kit go out in sympathy to the families of those who lost their lives and gratitude to the militias of the neighboring systems who came to their defense.
The CMS Osprey is the only ship that experienced lasting damage and will be returning home to effect repairs due to the lack of a starship construction center here in the K’aken-Kar system.
Vah’zen’rk – Kawdk-Kit Global Reporting
Background
While K’tsa-Kar doesn’t have any militia of its own, the K’aken-Kar assault scouts, under the ZKKDA, risk jump into the system to help defend it. From the other direction, the available ships of Patrol Group Meteor, along with the Clarion Royal Marines, arrive from White light. Both groups make a high speed risk jump to get there in time. The UPF have many more ships than the sathar but only a slight hull point advantage (and that’s only if you count the armed station) as most of the ships are small assault scouts. This might be a tough battle.
While the sathar were only expecting to fight the armed station, they are confident that they can handle the swarm of small ships.
Order of Battle
K’aken-Kar Militia
2 assault scouts
1 armed station
White Light Militia
4 assault scouts
1 frigate
This is +1 assault scout compared to the Order of Battle in the Knight Hawks Campaign book due to events occurring in the timeline.
UPF – PG Meteor
3 assault scouts
2 destroyers
Sathar
1 frigate
2 destroyers
1 light cruiser
1 heavy cruiser
The Battle
Setup
The militia ships deploy above the planet with the Clarion frigate and a single assault scout taking the inner position, the other Clarion assault scouts (lead by the CMS Osprey) out from there and the two K’aken-Kar assault scouts on the wing. Below the planet the two UPF destroyers form a flight with the three assault scouts on the wing. The assault scout groups are moving at speed 30 while the capital ships (and the single assault scout) are moving at 20. The station is orbiting counter clockwise.
As they have done in the other systems, the sathar are formed into their diamond pattern with the frigate, LC, & HC in the middle and the destroyers on the sides. However, unlike in the other systems, the sathar are moving at a speed of 15.
Initial positions at the start of the battle. Click for full sized image.
Turn 1
The sathar frigate, light cruiser, and heavy cruiser accelerate to speed 17 and at the last minute, turn to head toward the K’aken-Kar assault scouts. The destroyers accelerate to 18 and 16 respectively to remain in the diamond formation. Unknown to the UPF forces, the sathar heavy cruiser deploys its seeker missiles along its route. The sathar ships all fire at maximum range at the station.
The station returns fire defensively with its laser battery but given the extreme range misses. The sathar, on the other hand, have a good maximum range shot with both the light cruiser and closer destroyer connecting with their cannons and a laser battery each. The station has its laser battery knocked out and nearly half of its hull integrity destroyed.
With the sathar turning toward the militia ships, the UPF vessels loop around and hit the heavy cruiser from behind which fires ICMs at the incoming torpedoes. The Clarion militia ships maneuver to stay out of the forward firing arc of the sathar vessels and unleash everything at the sathar destroyer closest to the station, which fires ICMs at the torpedoe from the frigate as well. The Kaken-Kar militia ships pass in front of the sathar ships but out of range of their canons and loop around to hit the destroyer on the far side of the formation. With its laser battery damaged, the station deploys a masking screen.
Defensively, the sathar light cruiser, frigate, and destroyer further from the planet fire at the K’aken-Kar assault scouts hoping to take them out of the fight before they can engage. The destroyer closer to the planet fires at the Osprey, and the heavy cruiser fires at the lead UPF assault scout. The lead K’aken-Kar assault scout is hit by two laser batteries damaging its hull while its sister ship is hit by an electron battery knocking its laser battery off-line. The CMS Osprey is hit by an electron battery damaging its hull and the lead UPF assault scout is hit by another electron battery causing serious hull damage and reducing the hull integrity to less than half.
The training of the the UPF and militia forces is evident as they press home their attack. All three assault rockets connect with the heavy cruiser along with two laser batteries and two electron batteries knocking out various weapons and other systems and doing some hull damage. But the gunnery award goes to the torpedo gunner on the second destroyer. They threaded their missile through the ICM screen and impacted it right above what must have been the heavy cruiser’s torpedo magazine. The resulting explosion ripped the ship apart. The destroyer targeted by the White Light militia was hit by three of the four assault rockets and four of the five laser batteries knocking out it laser cannon and masking screens before ripping the ship to shreds. The K’aken-Kar militia, not to be shown up, hit the other destroyer with both assault rockets, each scoring critical hits and between the two of them destroying the sathar vessel.
Positions and maneuvers for the first 10 minutes of battle. Click for full sized image.
Turn 2
The two remaining sathar ships loop around and bring everything to bear on the station, the light cruiser accelerating to speed 18. The station fires a screen of ICMs at the incoming torpedoes. The sathar also activate the seeker missiles laid down by the heavy cruiser which both go after the UPF destroyers.
Defensively, the UPF ships focus their fire at the sathar frigate. Most of the fire is ineffective with only one of the UPF destroyer connecting with a laser battery damaging the frigates engines and the CMS Flitter scoring an amazing maximum-range laser battery shot that takes out a quarter of the frigate’s hull integrity.
The sathar ships manage to hit the station with a disruptor cannon and laser battery from the light cruiser and the frigate hits with its missile weapons. The hits sabotage the station’s damage control systems and reduce its hull integrity to almost nothing. Between the two UPF destroyers, they fire a massive swarm of ICMs at the incoming sathar seeker missile and manage to catch it before it can impact one of the ships.
All of the UPF and militia ships loop around and converge on the sathar vessels firing everything they have at them with the assault scouts focusing on the light cruiser while the capital ships focus on the frigate.
As the station pulls away, the sathar ships fire at it once more and while the frigate misses completely, the light cruiser hits with every weapon except its laser battery, destroying the station which begins to break apart.
Angered by the loss of the station, the assault scouts, while only hitting with one of their laser batteries, connect with eight of the nine assault rockets fired doing enough damage to destroy the light cruiser two times over. The sathar frigate is hit by two laser canons and a laser battery causing an electrical fire and damaging its hull. Then one of the torpedoes slips through the defensive screen of ICMs slamming into the ship and destroying it.
After twenty short minutes, the battle is over.
Positions and maneuvering at the end of the battle. Click for full sized image.
Repairs
Over the next hour and a half, most of the ships are able to repair their damage. However, part of the hull damage to the CMS Osprey is beyond a battlefield repair and will need to be handled in a ship yard. With the system secured, the Osprey begins acceleration and calculations for a jump back to Clarion.
Lessons Learned
This didn’t go anything like I expected. Defensive fire by the sathar on the first round was not all that great. When I rolled the attacks and damage results, I thought the lead K’aken-Kar assault scout was going to be destroyed as both laser batteries did hull damage and one of them was a double damage roll. But when I rolled the damage, I rolled a 2 for the double damage die and a 1 for the regular damage so instead of suffering the 15+ HP of damage I was expecting and being destroyed, it only suffered 5.
Then there was the UPF fire that turn which was the exact opposite. At first I thought the heavy cruiser was going to get off easy since none of the assault rockets did hull damage and only one electron battery did (although that was for 10 HP, the maximum). I thought it was going to get off with a bunch of ancillary and weapon damage but then I rolled a hit with the torpedo, rolled double damage, and then rolled 35 on 4d10 for a total of 70 HP from that single hit. That combined with the 10 it had suffered from the electron battery was enough to destroy it.
The other ships did just as well with two double damage laser battery hits on the first destroyer (one of which did 20, the maximum possible) and both assault rockets by the K’aken-Kar militia at the other destroyer doing double damage and just enough (52/50 HP) to destroy it. With 3 of the 5 sathar ships destroyed on the first turn, the UPF victory was assured. The only question was if the station would survive as the sathar were gunning for it.
I was amazed at how well I rolled for the UPF attacks and damage. Had they not rolled so well, this fight might have gone very differently. I think the UPF would still have won, but they would have suffered significantly more losses.
Facing overwhelming odds, the local militia assault scouts are annihilated after inflicting serious but non-fatal damage on one of the sathar vessels. The sathar then proceeded to destroy the armed station orbiting the planet as they approached and settled into orbit themselves.
Strangely, they have made no move against the planetary surface as they did against Pale 62 years ago. Rather, they remain in a high orbit around the planet. The population of Zik-kit wait in fear of what may come.
T’katt’ska – Zit-kit Wire News
Background
The rules of engagement for militia ships is that they have to make at least one attack against the sathar when defending their home system before they can retreat, after which they just become part of Spacefleet if the stations in their system are destroyed.
With the K’aken-Kar militia head off to help in the K’tsa-Kar system, and the Fromeltar milita tied up with sathar forces in their own system, the two assault scouts are left to face the on-coming sathar attack by themselves.
With no chance against the overwhelming odds, the plan was to get an assault rocket shot off at the sathar ships and slip away to the K’aken-Kar system where they hoped to meet up with other ships as reinforcements.
Order of Battle
This setup is the one presented as the Hopelessly Outgunned scenario in the “Make a Run For It” article found in issue 1 of the Frontier Explorer (p37). As I mentioned in the Battle of Terledrom post, I’ve had this opening planned for a while.
Militia Forces
2 Assault Scouts
1 Armed station
Sathar
1 Frigate
2 Destroyers
1 Light Cruisers
1 Heavy Cruiser
The Battle
Setup
The militia assault scouts are high above the planet moving at speed 30 and planing on swooping in on the sathar from above. The station is orbiting counterclockwise (I always roll randomly to see which hex the station happens to be in to start).
The sathar appear in their diamond formation with the frigate, light cruiser, & heavy cruiser in the center and a destroyer on each wing. They are moving at speed 10.
Ship positions at the start of the conflict. Click for larger image.
Turn 1
The sathar advance, decelerating to speed 8 as they approach the planet. The assault scouts accelerate to speed 32 and sweep in to make a maximum range assault rocket attack on the upper destroyer.
Defensively the sathar focus all of their fire on the lead assault scout hitting it with a laser battery (from the heavy cruiser), and two electron batteries (one from each cruiser) doing a total of 16 HP of damage destroying the assault scout before it has a chance to fire.
The surviving assault scout hits with its assault rocket taking out nearly half of the destroyer’s hull integrity.
Positions and paths after the first 10 minutes of combat. Click for full sized image.
Turn 2
The sathar frigate and damaged destroyer turn off from the main group and pursue the remaining assault scout, which now regrets not using its full acceleration previously as it is in range of torpedoes and rocket batteries from both ships. The other three ships continue toward the station and decelerate to speed 7. Unfortunately, the assault scout misses its defensive laser battery attack on the destroyer.
The sathar frigate and destroyer fire their energy weapons and rocket batteries at the assault scout but elect not to fire torpedoes. Unfortunately for the militia ship, the sathar gunners are well trained and the small ship is hit by both laser canons, a laser battery, an electron battery, and a rocket battery. Together the weapons start an electrical fire, take out the ship’s combat controls system, and do enough hull damage to destroy three assault scouts. The small ship is nothing more than a small debris cloud.
The station is at the extreme range of the light cruiser’s particle weapons but they all miss.
Positions after the second round of combat and destruction of the militia ships. Click for full sized image.
Turn 3
With the militia ship destroyed, the frigate matches speed with the destroyer (11) the two ships loop around to return to the main group. The rest of the sathar vessels decelerate to 5 as they approach the planet. With the station shielded by the body of the planet, no shots are fired.
As the station emerges from behind the limb of the planet, the closer sathar vessels fire their energy weapons at it hitting with a laser canon, laser battery, electron battery, and proton battery and reducing the station’s hull integrity by nearly half. The station returns fire with its laser battery but misses.
Positions after the first half hour of combat. Click for full image
Repair Turn
The sathar destroyer and the station both manage to repair a bit of their hull.
Turn 4
The sathar ships closest to the planet decelerate to speed 3 as they approach. The other two ships decelerate to speed 8 and turn toward the station and planet.
With the sathar vessels just out of rocket battery range, the station fires its laser battery at the approaching destroyer but misses.
All of the sathar ships fire their energy weapons at the station and the light cruiser and destroyer fire torpedoes. The station fires 2 interceptor missiles at each torpedo. Unfortunately, both torpedoes hit as well as several of the energy weapons. The weapons damage several of the station’s system but more importantly, overcome the station’s hull integrity and it breaks apart as the sathar ships settle into orbit around the planet.
Sathar positions at the end of the battle. Click for full image.
Repairs
The only damaged ship is the sathar destroyer and it works to fully repair its hull damage over the next hour.
Lessons Learned
Two assault scouts are no match for a massed group of capital ships. Against a single, isolated opponent they are probably fine but not up against a large group as they were here. To survive and escape to fight another day, they should have just taken a maximum range shot with the laser batteries and flown away. They had the speed and acceleration advantage over the sathar ships and would have made it, possibly unscathe but also probably not inflicting any damage on the sathar. However, they wanted a shot at the destroyer (and with 2 AR and 2 LB had a reasonable chance to take it out or at least do significant damage) and got a little too close.
Plus, the dice for the sathar were hot for this fight and the Frontier forces couldn’t hit the broadside of a barn with their energy weapons. The elimination of the assault scout before it could fire was pure luck of the dice that every weapon did hull damage. I wouldn’t have expected the two electron batteries to both do hull damage but they did and it was just enough to take out the small ship.
There are four battles occurring on this day in the timeline and I debated which one to post first. I settled on this one as it was interesting for how quickly it was over. The other three, plus the battle that occurs on day FY61.287, will be showing up one a day for the next four days.
The Fromeltar militia, supported by the the Inner Reach and Outer Reach militias from Dramune that arrived yesterday after a high-speed risk jump, engaged sathar forces today around Terledrom.
In an intense battle lasting only twenty minutes, the militia forces overwhelmed the sathar forces, which consisted of five capital ships. Militia forces sustained damage and causalities resulting in the lost of the Inner Reach militia destroyer and severe damage to both frigates of the Outer Reach militia.
A memorial service will be held tomorrow for the crew of the lost ship. Our hearts go out to their families and we thank them for their dedication to defending the Frontier.
The damaged frigates have been given top priority to move into the local shipyard for repairs as soon as space opens which is expected to occur tomorrow.
The surviving militia crews remain vigilant as we await the arrival of Task Force Cassidine some time tomorrow evening.
Kat’kst’kll, Terledrom News Service
Background
The Fromeltar system has one of the larger militias with a frigate and 3 assault scouts on the roster. When news of the sathar ships went out across the Frontier, both the Inner Reach and Outer Reach militias in the adjacent Dramune system decided that it was in their interest to help Fromeltar and both militias risk jumped to the system arriving a day in advance of the sathar forces. They hope to stop the worms here and prevent them from ever entering the Dramune system.
Similarly, Task Force Cassidine was dispatched by Spacefleet and ordered to make a high speed risk jump to the Fromeltar system. Unfortunately, coming from two systems away, they are still a day away from Terledrom when the militia forces engage the sathar. They will be able to clean up the remnants of the sathar fleet if the militias can’t hold the line, but won’t be any help in this battle. This fight will be completely between the UPF militias and the sathar.
All of the battles are going to be run using the Advanced Combat Rules from the Tactical Operations manual and the combat table that represents the “average” skills. It would be interesting to run this using the specific skills provided by the Second Sathar War rules for the different groups (or even individual skills per ship), but I decided that would be just one more complication that I didn’t want to have to track.
Order of Battle
This setup is nearly identical to the Banding Together Knight Hawks encounter that I published back in Jan 2013 in issue 3 of the Frontier Explorer (p30). The only difference is that in that scenario, there was an additional UPF destroyer. This opening gambit by the sathar and the UPF response is something I’ve been thinking about playing out for a while now and that article and some of the others I’ll reference were specifically based on this opening of the Second Sathar War. As you’ll see, the UPF ship isn’t needed.
Militia Forces
With the arrival of the Dramune militias, the UPF have a definite hull point and ship number advantage although most of their ships are small.
Terledrom (Fromeltar)
3 Assault Scouts
1 Frigate
1 Armed station
Inner Reach (Dramune)
3 Assault Scouts
1 Frigate
1 Destroyer
Outer Reach (Dramune)
2 Assault Scouts
2 Frigates
Sathar
1 Frigate
2 Destroyers
1 Light Cruiser
1 Heavy Cruiser
This is a standard mix that the sathar are employing to start off the battle. You’ll see it in several of the upcoming battles. While it should have been enough to deal with any of militias they encountered, they didn’t figure on high risk jumps to support neighboring systems.
The Battle
Setup
With the recent animosity between the two Dramune worlds, the ships from those respective militias line up on opposite sides of the planet with the Terledrom militia arrayed between them. The Outer Reach militia and Terledrom assault scouts are “above” the planet with the other ships “below”. The assault scouts have an initial speed of 30 while the capital ships start at speed 20. The station is at position 4 and orbiting counter clockwise.
The sathar start at speed 10 and are arranged in a diamond formation with the center consisting of a frigate in the lead, followed by the light and heavy cruisers with the destroyers above and below the main line. They are headed straight toward the planet.
Starting positions for the battle. Click for full sized version.
Turn 1
The sathar vessels accelerate and veer down to engage with the ships that are “below” the planet. However, due to the extreme range, no shots are fired.
The UPF sweep in closing in from both sides. The Outer Reach militia focuses on the two destroyers with the assault scouts making an assault rocket pass and then flying out of range of the sathar’s energy weapons while the frigates fly into torpedo range and keep their laser canons trained on the sathar vessels.
The Inner Reach militia converges on the sathar light cruiser, with the destroyer and frigate coming in from the aft port quarter and the assault scouts making a pass on the forward port quarter and then flying out of range to prepare for another pass.
The Terledrom assault scouts loop around and come in from behind to make a pass at the sathar heavy cruiser and then fly off. Trying to avoid a direct shot by the sathar frigate and light cruiser, the Terledrom frigate accelerates, rolls to port, and lines up for a shot on the sathar destroyers, electing to shoot at the same ones as the Inner Reach assault scouts.
Defensive fire by the sathar is practically ineffective with the only damage being the light cruiser’s electron battery which disables the ICM launcher on the Inner Reach destroyer.
The militia are much more effective.
The heavy cruiser is hit by 3 assault rockets damaging its combat control system and reducing its hull integrity by over half. One of the destroyers is hit by an assault rocket severely damaging it and reducing its hull integrity by nearly half. The other destroyer gets away nearly unscathed as both of the torpedoes fired at it are neutralized by its interceptor missiles (ICMs), only being scratched by a laser battery for minimal hull damage. The sathar light cruiser is hit by a torpedo, 2 assault rockets, and a laser battery taking out nearly half of its hull integrity and its ICM and torpedo launchers.
Ship positions and paths at the end of turn 1. Click for full sized image.
Turn 2
The sathar heavy cruiser turns to go after the Inner Reach frigate. The light cruiser and frigate turn to go after the Outer Reach frigates focusing all their fire on the leading one. The sathar destroyers swing around to go after the Inner Reach destroyer.
The defensive fire by the Inner Reach frigate and destroyer focuses on the sathar heavy cruiser and is devastating – hitting it with both laser batteries, both laser cannons, and a rocket battery knocking out the cruiser’s distruptor cannon before completely destroying the massive ship. The Outer Reach frigates are not quite as effective. Firing their laser canons at the lead sathar destroyer they only knock out its laser battery, The other weapons are fired at the frigate as it approaches and only do some minor hull damage even though they hit with two rocket batteries.
The sathar destroyers are quite effective hitting the Inner Reach destroyer with a laser cannon and two torpedoes which don’t have to worry about a screen of ICMs as the militia’s ICM launcher was damaged. The torpedos completely destroying the militia destroyer. Similarly, the sathar frigate and light cruiser focus their fire on the the lead Outer Reach frigate hitting it with a laser and distruptor cannon and a rocket battery knocking out all of its defensive systems and 75% of it’s hull integrity.
The Terledrom assault scouts loop around to fire at the lightly damaged destroyer. The Inner Reach assault scouts make a run on the sathar light cruiser. The Outer Reach frigates fire at the damaged sathar destroyer and the frigate with the heavily damaged one just drifting away from the battle as it fires. The Inner Reach frigate splits its fire using its laser cannon on the light cruiser and the other weapons at the damaged destroyer. The Terledrom frigate also loops around to fire at the light cruiser. The Outer Reach assault scouts loop around to fire at the frigate.
The sathar’s defensive fire is again mostly ineffective. The undamaged Outer Reach frigate is hit by several energy weapons from the frigate and light cruiser damaging its engines (both accelerating and maneuvering) and doing some significant hull damage (about 40% of the hull). The sathar destroyers fire at the Inner Reach frigate knocking out its ICM and torpedo launchers.
The return fire from the militia obliterates the last four sathar vessels. The frigate is hit by a rocket battery, two assault rockets, and two laser batteries knocking out its laser battery and doing enough hull damage to destroy a heavy cruiser. The damaged sathar destroyer is hit by a laser canon igniting an electrical fire and then a torpedo makes it through the ICM screen and hits a weapon magazine causing a massive explosion that destroys the ship. The undamaged destroyer is slammed by three different assault rockets that rip it to shreds (and a laser battery that knocks out some of its acceleration). Finally the light cruiser is hit by a laser battery starting a fire and then slammed by 3 assault rockets that rip its hull to pieces.
The savagery of the assault rocket damage surprised even the militia crews and the battle was over in less than 20 minutes.
Ship positions and paths at the end of the battle. The map has shifted to keep the drifting Outer Reach destroyer on the map for visualization. Click for full sized image.
Repairs
The damaged ships immediately begin working on battle repairs but the hull damage to the second Outer Reach frigate is beyond space repairs and needs to be completed in a shipyard. Similarly for the damage to that ship’s thrust. The other Outer Reach frigate is able to repair enough hull damage to prevent it from breaking up as it begins to maneuver and decelerate to return to the planet but it too will need time in the repair yards. The other ships are able to repair their minor damage over the next 2.5 hours.
Lessons Learned
I’ll admit, I expected this fight to go a bit longer and cause more damage to the militia. Between really good rolls for the militia and lousy rolls for the sathar, this fight was amazingly short.
Both sides leaned just how effective the assault rockets could be, especially if you roll well. The sathar seem to focus their ICMs on deflecting torpedoes but not the assault rockets which can do significant damage. Unfortunately for the other sathar fleets, this lesson was learned a little too late as all the sathar ships were obliterated in a single round and there was no time to transmit that information out. It wouldn’t have affected the other battles occurring today, but may have been useful for future encounters.
The sathar also learned (again) that they should probably focus on the smaller vessels to reduce that assault rocket threat. That information was transmitted from the Battle of Stenmar but the commanders of this battle fleet seems to have ignored it, focusing on the larger vessels first.
The militia were extremely lucky in this fight. It could have gone much worse. I rolled really bad for most of the sathar defensive fire which could have eliminated some militia ships before they could fire and the dice were extremely hot for the militia with double damage being generated for 6 assault rockets, 1 laser canon, 1 laser battery, and 1 torpedo. Even some of the regular damage rolls were really high (a torpedo hitting for 26 HP, laser batteries hitting for 9 & 10 HP, a RB hitting for 16 HP, and assault rockets hitting for 19 and 21 HP). Plus they took out the heavy cruiser before it even had a chance to deploy its more effective weapons. It only got one round of defensive fire and missed with everything.
So last week I wrote up the location of the GODCo bio-lab. This week we’re going to look at what my players found when they got there. First I’ll provide my game notes with the details of what had changed, and then so a short write-up of the players’ actions. “Lab Crawl” is the title I gave this scenario in my notes.
Background
GODCo has been operating the lab on Pale for about 20 years now. The lab is a location the GODCo scientists are studying the Pale flora and fauna and looking for ways to adapt various yazirian plant species to the environment as well as improving flora and fauna used by Frontiersmen to be more adaptable to the Pale climates.
A few days ago the quarterly supply delivery to the “secret” base left but the drivers and vehicles (two ground trucks) never returned. Yesterday an aircar flew out to the site and was shot at by the site’s defenses (heavy laser). The PCs are being sent in (on the ground) to investigate. Their objectives are:
Figure out what happened
Rescue any personnel trapped and still alive in the lab
Secure the site if possible.
What Happened
In my game, there are still sathar on Pale from the First Sathar War (referred to as the Great Sathar War on Pale as the second one is just now brewing). While a few of the sathar on the planet are holdovers from the war, many more have actually slipped to the surface over the intervening years. They have been working to subvert the society and develop new bio-weapons (e.g. lesser quickdeath, sathar poison squirrel). It is to do some work on the poison squirrel that they have capture the lab.
A few weeks ago, a team of sathar attacked and captured the base. They needed access to the equipment and facilities to complete some work that they had been doing in more makeshift labs elsewhere on the planet. The staff that survived the attack are being held as prisoners and used as test subjects (and food) for the creatures they brought with them.
Changes From Last Post
In my previous post, I described the lab during “normal” operations. Here is what changed when the PCs arrived
Staff
There are only 1d5+5 of the original 44 staff members still alive, all scientists. They are locked individually in the living quarters and isolated from one another. They are all malnourished and weak. They will not be able to assist the PCs in any fighting.
I put them in the rooms farthest from the elevator/stairs but you could put them anywhere. The sathar have changed the computer security system so that none of the staff ID cards work to open the living quarters doors.
Vehicles
There is a ground transport in the garage (area 3, ground level). It is only partially unloaded.
Robots
All of the security robots were destroyed in the original attack. The sathar have reprogrammed all the maintenance and service robots to have attack/destroy programs and will attack any non-sathar beings on sight. These robots are all level 3 and have only their mechanical hands as weapons. The security locks have all been removed by the sathar as they modified them. They have the following stats:
STA: 100 ATT: 60 IM: 6 DMG: 2d10 Move: 30 m/turn
The remaining robots are located in the following areas:
2 service robots – Ground Level in hallway (area 5)
4 maintenance robots – Level 1 area 30. There is a random 10% change per minute that one will emerge and go about some maintenance task. If attacked, it can summon the others.
4 maintenance robots – Level 2 area 11 (at the far end of the lab area). There is a random 10% change per minute that one will emerge and go about some maintenance task. If attacked, it can summon the others. They can also be called by the sathar on this level.
Sathar
There are 10 sathar at the facility.
Two are security officers and will be in the security office on that level (area 8). If the robots start fighting they will emerge and attack the intruders. These sathar have laser pistols with 3 power clips and a level 3 skill. Their stats are:
The other eight are in the lab areas on level 2. Divide as desired among 3 labs. These are all scientists and will only have improvised melee weapons when attacked but do have a level 1 melee skill. Stats for these sathar are:
In addition to the sathar on level 2, there are a number of sathar attack monsters with them in some of the labs. There are 2 cybernuks in one of the bio-labs, although only one has the cyber implant, and a caged juvenile quick death in another (use the Lesser Quickdeath stats). A third lab has a cage containing 10 tailless squirrels. If freed, any of these creatures will attack the PCs. If they can, the sathar scientists will release the creatures into the lab hall (area 14) to attack the PCs as part of their defense.
Place the sathar and creatures in the labs as desired. In my game, I had them all in labs on the right side of the map. The first lab had 3 sathar, the second had 2 sathar and the nuks, the third had 3 sathar and the squirrels, and the fourth lab had the quick-death.
Other Notes
The computer is level 4 with a level 3 computer security program. Lab doors have level 5 locks, bedrooms have level 1 locks.
Something got out and the power generator level is overgrown with a blue fungus/moss that is mildly toxic to the touch (S1/T20) toxin. This is currently growing on all the walls on level 3, part of the stairwell between level 2 and 3, and in the elevator shaft near level 3. It has not yet traveled to Level 1 or 2. Due to the fungus, the power occasionally will short out and brownouts occur occasionally around the lab. There is a 5% chance any minute that the power will temporarily go out or lights will dim in any given room.
Loose Ends
Some things I left open ended and which didn’t really come up when playing that you can flesh out as desired for your game:
Where’s the other ground truck? There were two in the convoy but only one is here. I honestly forgot about there being two when I was running it but it never came up directly. This is an opportunity to expand the scope of this encounter if you want your PCs to possibly pursue the sathar across the planet.
The fungus/moss on the generator level – Was this something the sathar brought with them? Was it something GODCo was working on?
Running the Adventure
This adventure played out over two game sessions.
The PCs had no idea there were sathar involved when they were hired. The job was simply to go to the lab, investigate what happened, rescuing any survivors, and secure the facility. GODCo offered a generous bonus of 500 cr. per staff member recovered alive.
After about six hours of travel, mostly in an explorer, the PCs arrived at the facility to find the gate closed. As they got close to the site, however, they noticed that no radio communications were working. The site appeared deserted. The humma decided to jump the fence and got shot at by the heavy laser for his trouble. Luckily, it missed him. He was able to open the main gate and the explorer entered the compound.
They gained access to the garage and discovered the partially emptied ground transport. Exiting into the hall, they were attacked by the robot stationed there. They took some damage but were able to quickly deactivate the robot. (Since the sathar removed the security lock, I only required a DEX roll – the robot was attacking them after all – to switch it off. Their roboticist has a high DEX but still missed a few of the rolls throughout the adventure.)
As they rounded the barracks (not knowing what they were) they encountered the other robot and after starting to engage that, the two sathar emerged and started firing at them. A well tossed tangler grenade captured both sathar (although one was killed by laser fire the same round). Realizing it was caught and the robot deactivated, the captured sathar committed suicide.
Clearing the rest of the level, they opted to take the stairs down and not alert anyone else by using the elevator. As they emerged into the hall on level 1 they experienced their first brownout of the power. They entered the security office and found a number of CCTV cameras looking at different parts of the lab including the hallways on level 1 and one into each lab on level 2. They saw the 8 sathar and the attack creature but didn’t know where in the complex those images were coming from.
Examing the hallways, they ran into two maintenance robots coming out of area 30 on the fall left hall way. A fight ensued with those robots and the other two that were called out of room 30 after the fight was engaged. They managed to deactivate two of the robots while the other two were destroyed.
The fighting was occurring at the end of the hall by area 30 and the prisoners in the rooms there heard them and tried to get their attention. They proceeded to open (via tech or brute force, depending on the player) each of the doors and discovered that 9 of the scientists were still alive, although is fairly poor shape.
From the scientists they got the information about the attack and current situation as they understood it. They also learned that the brownouts only started occurring after the sathar arrived. Speculation began on what the sathar were doing that needed that much power.
With the scientists found, they shepherded them up to the surface, planning on driving them out in the ground transport. At this point a discussion ensued on what was next. Fighting sathar is a job for Star Law and really above their pay grade and several PCs were all for bugging out with the scientists, reporting what they found, collecting their rewards and walking away. However, one of the PCs is a member of the Anti-Satharian League (ASL) and floated the idea that they might be able to get some reward from that group for the sathar if they took them out themselves.
In the end, they decided that the Anti-Satharian League PC would drive the scientists out and call in for medical pickup once he got out of the radio jamming. He would report the sathar presence and request instructions from Galactic Task Force (GTF). He’d also contact the ASL and see what he could negotiate. That discussion ended the first session.
Session 2 started with finalizing the plan. While the ASL PC headed out with the scientists, the other PCs set about exploring the rest of level 1. They realized part of the way through that they should have asked the scientists for a tour. Meanwhile, the PC with the scientists, after about 40 minutes of driving, got out of the jamming range. Calling in GTF immediately dispatched some flying transports to pick up the scientists and told him to stand by on the sathar situation. While he waited, he called ASL and got the same response. After a few minutes, GTF told him that if the team chose to go in after the sathar, they would be deputized by Star Law for the operation (Star Law couldn’t get anyone there for many hours and didn’t want the sathar to get away) and offered a bonus of 1500 cr. each. Just after that conversation, he was called by his ASL contact and offered a 250 cr. reward for each sathar killed plus and additional 500 cr for any sathar data collected from the computer systems.
With the offers in hand, he headed back to the compound once the medical team arrived to escort the scientists. Having been gone a couple of hours, the rest of the team was getting a bit antsy and debated exploring the generator level but decided to be patient and wait. They also reprogrammed the two maintenance robots to obey them and attack sathar while they were waiting. When the offers were presented, they decided to take on the sathar and collect the reward from both sources.
Not wanting to walk down 50 m of stairs, and figuring they had the drop on the sathar, they opted to take the elevator. They quickly examined the areas outside the decontamination airlocks on that level. Hoping to reduce the odds, they hacked into the life support and ventilation systems for the labs (all 10 individually) and dropped a doze grenade into each system to try to knock out the sathar. They had to do all 10 because they didn’t know which system went to which lab or even which labs the sathar were in. Luckily they had 11 doze grenades between the 5 PCs.
Doze grenades dropped and hoping they worked, they went through the cleaning rooms into the lab area. Upon entering and seeing into the labs, they found that the sathar in the lab with the cybernuks had been knocked out but the other were still up and about.
They rushed the robots over to the first lab and had them block the door preventing the sathar from exiting while the PCs headed down the the third lab where the three sathar were working with the tailless squirrels. As they were approaching, the sathar let the squirrels out and there were suddenly several critters attacking most of the PCs.
On the second round of the fight, the four robots emerged from the robot storage area and started to advance on the PCs as well. An on the next round they realized the flaw with having the robots block the sathar in the first lab as one of the sathar deactivated one of the two robots.
With enemy both in front of them and behind, they started to fall back and regroup trying to deactivate robots, kill sathar, and fight the squirrel critters. A well placed frag grenade managed to kill most of the squirrels as they fell back but not before a couple of the PCs were bitten and poisoned.
Just as they were starting to get the situation under control, one of the sathar in the nuk lab woke up (I had rolled for the time each were going to be out and rolled low for that one). After spending a round trying to rouse its comrade (with no success), it then headed to the doors to let the nuks out into the fight.
The sathar and squirrels turned out to be the easy targets with the nuks and robots providing the most challenge. They managed to take out the sathar that had freed the nuks before it could let the quickdeath out or things might have been really bad for the team. As it was, two of the team members, wounded and cornered, retreated into the lab that the squirrels had come out of pursued by one of the robots. They trapped one of the nuks in the entrance to another lab, and then finished off or deactivated the remaining robots and creatures.
When the fighting was over, they had deactivated two more robots, killed seven sathar, 10 squirrels and one nuk. The last sathar never woke up and they hit it with a StayDose to keep it sedated. They left the trapped quickdeath and nuk for StarLaw and GODCo to deal with. They decided to report that there were only 7 sathar (they had miscounted) and secret the live sathar away to turn over to the Anti-Satharian League for a 2000 cr. reward.
It was touch and go there in the middle of the battle with a couple of PCs getting down to single digit STA, but they pulled through in the end. Each PC ended up with 6 XP and 3600 cr. They also ended up with 7 damaged service and maintenance robots that they took with them as well.
Final Thoughts
It was a good adventure. It just took longer to finish than I had hoped due to scheduling conflicts (on my part) and not being able to get it all done in a single session (or I would have posted this sooner).
I actually completely forgot about the quickdeath in the heat of the battle which is why the sathar didn’t immediately make a bee-line for that lab to try to get it out. But that was probably just as well. Had the quickdeath came into the fray it might have been too much. As it is, the fight went well. They PCs were a little worried there for a bit, but managed to pull it out in the end. I actually thought the squirrel were going to do a bit more damage but the frag grenade really did a number on them, only three of the 10 survived the initial blast.
The activating and deactivating of the robots was a bit of humor (at least for me) during the big fight. There was a bit of a go around of the sathar turning their robots off, them trying to turn the sathar robots off and also trying to turn their back on, and fighting the robots that weren’t deactivated. And the moment when I said that the sathar turned their first robot off definitely seemed to catch them off guard and ratchet up the tension.
This will be the the last Skills for Hire post for a while. As I talked about in my “What I need is … more focus” post back in August, I have a lot of things going on and that was the main cause of the scheduling conflicts. As such, I’ve decided to put the game on hiatus for now. My players are going to take up the GM mantle and run games for each other in the meantime but I won’t be doing anything for a while.
Did you like the adventure? What might you have done differently? What changes or additions would you make? How could you use this in your game? Let me know your thoughts in the comments.
I always forget how long it takes me to get back into my regular routine after a big family vacation. Which is why this post is going up a little later in the day than normal.
Two weeks ago the players in my Skills for Hire game finished this adventure so it’s time to post up the adventure notes. This time around, I’m going to post them as is, exactly as I have them written down, so you can see what I was working off of. I’ll also provide a quick summary of the way it actually played out. Hopefully in the next few weeks I’ll get the audio of the session on-line as well.
Adventure Outline
What follows are my notes for the adventure, as I had them written down for me to use. As you’ll see, there isn’t a lot there, just some basic notes and names and general events that I wanted to happen. These are literally my crib notes.
The setup
The daughter (Brandi) of a prominent politician (Carter Albach, wife: Melody) has been kidnapped by organized crime bosses that the politician won’t bow to. The police, probably in the crime lord’s pay, are taking too long and not making progress. The mercenaries are being hired to get the young woman (22 years old) back.
Major segments
This list was my original idea of the major segments of the adventure, the PCs pretty much skipped over 2 and 4 was really short as well due to the actions they took.
Finding the location
Surveillance
Springing her free
Getting safely home
Details
She’s being held in a manor house in Myra’s Beach. The manor is owned by a yazirian, Gornar Welnat, who owns several of the larger hotels/resorts in the city. He is also the head of a local organized crime operation, the Tristars.
Tristars are a known organization in the city but no one knows exactly the extent of their operations. Some members are known for generally bullying but there are other members that are more into more sophisticated endeavors including controlling some of the local police and businesses in town.
Brandi and her friend (Jula Keray) were visiting Myra’s Beach for the weekend and met up with a group of others their age. Heading back to their hotel from the beach with two young men (Karl, tall blond, & Christian, shorter, dark haired), they were accosted by a group of thugs who hit them with a doze grenade. Jula woke up alone a few minutes later in the small street where they were ambushed. Neither Bandi nor the two young men (who are part of the gang) were anywhere to be seen.
This list was the breadcrumb trail that I had envisioned for them finding the location of the Julia at the manor. They mostly skipped over #2 but otherwise this was the path first session of the adventure took (except for #6; they didn’t find that out until they were in the manor).
Showing that mark around will identify the Tristar group but people won’t say much about it beyond that it’s a local group/gang. They either don’t know anything or are afraid to talk.
After poking around, the team will get accosted by a group of young thugs from the Tristars
Capture of one of the members will point them to a bar where they hang out.
At the bar they can catch a middle level member of the gang (dralasite, Garzdan) that can point them to the manor.
Brandi is being held in the upper rooms of the left tower.
The manor
As I noted in my write-up of the manor, a lot of specifics were left unstated so the Referee could customize it as needed for their adventure. This section was my specifics for this adventure and the PCs I had on hand. I didn’t want it too tough as they are early level characters but I didn’t want it too easy either.
Level 2 locks on offices
Level 1 locks on bedrooms except on master bedroom – level 4 there
The door to the room where Brandi is being held is level 3
During the day, there are typically 15-20 beings in the manor. Mostly business men or staff with a five being security detail in the manor and five more about the grounds. There are 2 security robots, 4 maintenance robots, and 2 service robots.
At night, there are 8 people living at the manor, Brandi, and a 2 man security detail in the building and four on the grounds. Plus the 2 security robots.
Running the Adventure
That was everything. Combined with the work I had done on the city of Myha’s Beach, the Brekstoone Manor, and the Tristars, that was what I used to run the adventure.
When I was creating the adventure, I suspected that in this case, the challenge was going to require to sessions. I just didn’t see a way for them to get through it all in a single 4-hour block. And it turned out I was right.
I had my biggest group yet for the first session with 8 players. However, due to audio difficulties, one of the players had to drop out. The PCs got to their start point in Myha’s Beach, and after talking with Jula, investigated the location of the attack. They correctly surmised that the two young men were part of the organization that had captured Brandi.
A pair of characters then went looking for groups that were rivals of the Tristars (something I hadn’t anticipated and had to make up on the spot). However, their investigation rolls went so badly that they found a group of Tristars instead and a fight ensued (#3 from above). They wounded several of the thugs and drove three of the four off. The fourth had been knocked out so they took him back to their base of operations for questioning. Under Telol, he revealed the location of a couple places that the Tristars liked to hang out (#4) as well as some other information about the organization including his contact up the line.
They picked one of the locations (the closer one), a restaurant/bar near the old town and planned a raid. Three of the team members went in and got a table to scope out the establishment and try to identify the upper level member identified. The others took up positions around the building including Joey, the humma, watching the back door.
Only about 1/3 of the beings in restaurant were members of the Tristars but they were are clustered to a side of the dining area. With their target identified, the three PCs in the building all tossed doze grenades into the area where the Tristars were seated. At this point pandemonium ensued as the diners all tried to get out of what appeared to be a battle scene. Luckily for the PCs all but 3 of the gang members succumbed to the doze gas. Unfortunately, their target (a dralasite) was one that didn’t. They waded in with stunsticks and electrostunners while other PCs tried to get into the building through the outflow of panicked diners.
Despite several successful attacks on the target, he hadn’t be knocked out, although they had knocked out the other two gang members. At that point, one of the PCs who had gotten in from the outside, a vrusk, fired his laser rifle into the ceiling (set at 1 SEU) and bellowed “Stop!” A very successful (rolled a 1) Leadership check and everyone in the building froze, including their target as he was about to slip out the door into the kitchens. The other PCs hit him once again and he collapsed. Scooping the dralasite up, they slipped out through the kitchen and the back door. They made their way to a place they could be picked up by aircar and flew back to their base of operations.
Questioning the new prisoner with Telol, they learned that he was not involved in any way with, nor had any knowledge of, the kidnapping but that if it had happened, they would probably be holding the girl in Brekstoone Manor. They also gained a bit more information about the organization. That ended the first session.
The second session opened with them trying to decide how to best assault the Manor. Calling several different pizza parlors to schedule a delivery to the manor gates at the same time to create a diversion, they went around to the forested region of the grounds and used the trees, the yazirian gliding ability, and some rope to get them over the walls and onto the grounds. Slipping through the forest, they watched the house from the edge of the trees where they discovered two security robots making rounds around the manor and the occasional random patrol by a human guard as well.
Timing the robot patrol, the roboticist dashed across the open space and attempted to disable the lead robot. Failing to remove the security lock on his first attempt, the robot smacked him with it’s hands doing a good amount of damage. The roboticist got the security lock off on the next round and after taking some more damage, disabled the robot. They dragged it into the garage and everyone else joined them there. In the garage they found a nice sports car, and explorer, and two hoverbikes. I considered having the robot sound an alarm, but since they were doing so well, I decided to give them until the second robot came back around and would have it sound the alarm. But they got under cover before it spotted them.
When the second robot came around they jump it in the same manner. The only complication was that just as that was happening the human guard came walking around the manor from the opposite direction. Luckily, one of the PCs was waiting for this and hit him with anesthetic needler darts and knocked him out. Dragging him in the garage along with the other robot, they relieved the guard of his id card and keys and the roboticist went to work reprogramming the robots to go patrol the outer wall instead of around the manor (They didn’t have time to do anything more complicated and didn’t want the robots completely off-line.
Using the guard’s keys, they entered the manor from the back on both the main level and the first floor balcony. Carefully working through the rooms of the manor, they found someone in the library who they stunned and tied up. They heard noises coming from the stairs to the basement and posted a guard there. They also heard noises from one of the offices on the second floor. Tossing in a doze grenade, they knocked out the occupant there. That turned out to be the security offices and since the occupant didn’t have time to react, the computer was still logged in. They were able to turn off all the door locks and alarms.
Checking the rest of the rooms they discovered that this floor was just offices and took the elevator up to level 3. While one group covered the hallways, a couple of PCs opened on of the doors to discover a bedroom. The noise of the door opening woke the person sleeping and the first PC took a shot with his needler rifle and while he hit, it did not knock the occupant back out. Kneeling down so the person behind him could take a shot as well, he discovered that it was the humma who only had a laser rifle and no non-lethal weapons. The humma took a shot (3 SEU) and hit the occupant squarely in the chest who cried out from the injury. They asked th injured occupant where the girl was and he told them across the hall. The first PC then took another shot with the needler and this time knocked out the occupant. However, the occupant’s chronocom came to life asking if he was okay. They texted back that he was fine.
Quickly moving across they hall, they tried the door into the tower and found a small sitting room with stairs going up. Ascending the stairs they found Brandi sitting on her bed in the room at the top of the tower. First thinking that they were more Tristar goons, she gave them a bit of lip but after discovering who they were, she went with them.
While they were in the tower getting Brandi, Gornar, the owner of the Manor and head of the Tristars, came out of his suite, electrostunner in hand to investigate the noises come from the room right below his bedroom (and he didn’t believe the text). However, the group watching the hall were ready and got the drop on him. Hitting him with an electrostunner of their own and knocking him out.
They left him lying on the floor and made their way down to the ground floor of the manor. While they were searching the building, the roboticist had finished reprogramming the robots, parked the explorer blocking the front door with the explorer’s side door open, and then went into the building. They made their way to the front door and loaded Brandi and part of the team into the explorer. The others went out the back door to the garage and some took the sports car while one of them climbed on a hoverbike.
They they headed for the main gate of the grounds and back into the city. They were expecting to have to ram the gate with the explorer but the gate’s sensors recognized the vehicles and opened for them. They ducked into the the first public parking area near the grounds and the beach and called for their aircar pickup. Being the middle of the night, there was only one other car in the parking lot and no one to be seen nearby. They dumped the keys to the Tristar’s vehicles in the lone car, loaded into the aircars, and flew back to Point True.
Amazingly, they managed to do the entire adventure without actually killing anyone. It was a close thing in the manor and they definitely roughed up a few people but no one was actually killed. It was a fun adventure and I enjoyed seeing how they PCs handled the various situations.
For the first session of the game, I wanted to keep things fairly simple as we’re still getting a feel for the format, and how much can be done in a single session. So we started with a fairly basic scenario, a young girl has gone lost in the mountains near her home and the PCs are hired out to find her (hopefully alive) and bring her home.
Long time readers of the blog, and those that listened to the beginning of the “A New Can of Worms” actual play, will recognize some of the setting and characters. I’ll start with an outline of the adventure, and then talk about the players and how they handled things.
Lost in the Mountains
Background
Alyssa Tinnett, a young woman in the village of Rosegard, went out “adventuring” in the region around the village after school last day-day. She took her “adventuring pack”, which included a small tent and sleeping bag, rations, water, rope, an all-weather blanket, and a pocket tool. She also took her sword, a gift from the yazirian Talnor at the Streel mine compound, which he has been teaching her how to use. She’s done this in the past and typically returns before it gets dark and the next night-day cycle starts. This time she didn’t return.
It’s late fall on Pale and as a farming village, the citizens are quite busy bringing in the harvest. Her parents and grandparents went out searching for her but were hampered by the darkness of the Pale night. They put out a job request to several mercenary companies in Point True and the contract was picked up by Galactic Task Force (GTF). The PCs were assigned to the job.
What happened
Alyssa’s Campsite. Click for larger image.
Her adventure started out like all her other ones. In this case, after playing in the woods with some of her friends for a while, she went north from the village while her friends returned home. She intended to check out the artificial dome that the sathar agent at the Streel compound was using as a drop point and then continue further north to the small canyon in the mountains to the north. She got to the small camping site that some of the older kids had once set up in the canyon and got her tent set up. After that, she shouldered her pack and started further up the canyon.
A short time later, she heard the sounds of something behind her but nothing was immediately visible. A few minutes later, she got to the top of a small rise in the canyon and looking back saw a pair of large bird creatures, something akin to a giant (1m tall) chicken. She recognized them as Nuks from some that had been killed around the village several months ago. With her way back to the campsite cut off, she began hurrying up the canyon looking for a place she could hide out.
The entrance to the cave. The ramp is about a 45 degree slope. Click for larger image.
After a while, she came to a steep rock formation that she thought that the nuks wouldn’t be able to scramble up and climbed to the top of it where she found the entrance to a cave. Exploring a bit into the cave, the slope on the inside was even steeper and extended nearly 100 meters into the mountain. Turning back to the entrance, she saw the nuks at the base of the slope. One of them jumped up trying to get at her but slipped back down. She retreated further into the cave but after a half hour and the nuks not leaving, she got bored and decided to do a little spelunking.
Carefully descending the steep interior slope, the cave opened up into a wide long cavern with some side passages branching off to the left. Following one of these side passages, she discovered another large cavern, although not as big as the first. However, as she moved out into the center of that cavern she must have disturbed something as she passed the entrance because there was a large crash and several tons of boulders tumbled down nearly completely blocking the entrance. There was a small opening, but too small for her to fit through.
After searching around for an hour or more, she couldn’t find any way out of this room back the way she had come. There was a passage to her left, and another straight ahead. The first was on her level but the second was up a 20 meter cliff that angled back out over the ground beneath it that she couldn’t find a way up. Exhausted, she curled up in her all-weather blanket and went to sleep, planning to continue looking for a way out in the morning.
Adventure Outline
The adventure consists of several small steps and encounters that I outlined as follows:
Area around Point True. The locations to the NE of Rosegard are locations from the A New Can of Worms game. Click image for larger version.
This occurs in the GTF headquarters at Point True. The PCs are given the basic information from the Background section above and allowed to requisition any equipment (within reason) that they feel they will need. They are told that they will receive their regular daily pay rate (20 cr/day for my new players) and a 100cr bonus each if the girl is found.
If none of the PCs ask for it, their handler issues them an radiophone in addition to any other gear they request. Once they have their gear, they are flown by aircar to Rosegard. As each aircar can take 3 PCs, there may be more than one. It’s a 30 minute aircar ride but a 4-5 hour drive. The aircar drivers will remain with the aircars at the city center while the PCs are out exploring.
Meeting with the family
This part of the adventure mostly occurs in the city hall building of Rosegard. As they land they are met by the mayor, Genio Washy, Alyssa’s parents, Larroy & Camryn Tinnett, and Alyssa’s grandparents, Steven & Janie Hite.
During this discussion they PCs can learn any of the “What happened” information that the parents might know as well as anything about Alyssa from her background. They know she went north as she told some of her friends and they told the parents when Alyssa didn’t return. They can also learn about the connection Alyssa has with Talnor from the Streel compound.
Tracking Alyssa
This bit of the adventure occurs in the valley surrounding Rosegard as depicted in the map below. I drew the map with Inkarte which doesn’t really have sci-fi assets so it has a bit more of a fantasy feel but I whipped this up in about 30 minutes (mostly relearning the interface as I haven’t used it in years). I then added the annotations in GIMP.
This is the referee version of the map with all the relevant locations marked. Click the image for a full sized version. There is a player version with none of the annotations as well.
The sathar dome is the natural place to start and the villagers can give exact coordinates for its location. It’s about 10 km from the village. The PCs can either walk there (a couple of hours) or have the aircar(s) drop them off (a few minutes). The dome itself is a light-weight, fiberglass pole frame, with a cloth covering. It looks like it was once naturally camouflaged but the grasses and such on it have died and it now stands out against the terrain. It is very light-weight and is about 3 meters in diameter. It is staked down to prevent blowing away but lifting it up reveals that there is nothing under it.
The terrain north of the sathar dome. Click for larger image.
Alyssa’s tracks are easy to find and the PCs can start tracking her north. The terrain is very wild and untouched as only the villagers occasionally come up here. There are small game trails in places and Alyssa seems to be following them and making for the small creeks running through the valley. She’s not trying to hide her tracks so they are relatively easy to follow as the paths have pockets of sand where the tracks are very visible. The waterways are 1-2 meters wide and at most a few tens of centimeters deep. They flow north to south on the map (into the valley from the canyons and then down out the bottom of the map).
Some time after the PCs leave the sathar dome, but before the reach the creek, they will encounter a young sathodragon. As they come up over a rise, it will be on another rise about 150-200 meters away. The sathodragon will see them and rush to attack. If it drops below 50 STA, it will try to retreat and escape.
Shortly after they cross the creeks for the first time, Alyssa’s tracks will be joined by those of two nuks. This will continue until they find her campsite and the destroyed tent with lots of nuk tracks around. As they follow her tracks from the campsite, the nuk tracks will continue to follow her prints.
A bit further on, she seems to become aware of the nuks behind her and the tracks indicate that she’s moving faster and at one point, as the path goes right along the edge of the creek, they vanish. She jumped sideways into the water and then went 20-30 meters upstream in the water before emerging. The nuk tracks are confused at this point but they eventually found her tracks upstream and continued to follow her.
Sometime after the campsite but before the PCs reach the cave entrance, they have an encounter with a pair of Pale mountain lions. On is waiting in ambush near the path and the other is another 20-30 meters up the mountain waiting to pounce as well. If either is reduced to less than half stamina, they will both retreat and try to flee.
Fighting the nuks
Eventually the PCs will arrive at the entrance to the cave. The two nuks are milling around here still not having given up the pursuit even though it’s been nearly 20 hours. When they see the PCs they will immediately rush to attack and will continue attacking until killed.
Exploring the cave
With the nuks dispatched, the PCs are now free to enter the cave. It should be obvious from the lack of tracks leading away and the fact that the nuks were hanging around trying to get up the slope, that Alyssa went in.
I based the cavern roughly on Carlsbad Caverns in Carlsbad, New Mexico. I downloaded a map of the Carlsbad Caverns and then modified it slightly for use in the game. The original map can be found here. Below is the map I used for the game with the relevant locations marked. I took some liberties with the elevations but otherwise used the map as is. If you’ve never been to Carlsbad, you have a long steep decent into the main cave. It’s fairly open in real life, and I closed it up in the adventure, but the blue path is the switchback path you take to get down to the bottom as it is very steep going straight down.
The map of the cave system. Click for full sized image.
As the PCs are exploring, remember that the only light they have is what they brought with them. They are not going to have large vistas and in some cases may not be able to see the other end of the cave.
If they are calling out as they explore, Alyssa will respond when they are by the cave-in location. There is a small opening, about 15-20 cm in diameter that they can look through and see her once she comes over to it. They will not be able to move the rocks as several of them are quite large (read tons). They can move some but not make the opening any bigger. Given time and effort, a dralasite without any gear could squeeze through the opening to get to her but she still can’t get out.
Alyssa will explain to the PCs about what happened and tell them about what looks like an exit at the top of the cliff on the other side of the room she is in. She hasn’t explored the large room in the upper left of the map yet as she will have just woken up when the PCs arrive.
Eventually, the PCs will find a way to the cliff face and can get her out. It’s 15-20 meters down and an overhang above the room floor where Alyssa is located. They will need to figure out a way to get down to her and get her back up (hopefully they brought rope).
Returning home
With Alyssa safe, the PCs just need to get back to Rosegard with her. If they think of it, they can simply call for the aircar(s) to pick them up. If they think to do this, the aircars will arrive in about 15 minutes and there is enough room for one to land at a time and load them up.
If they decide to hike back, they will have an encounter with either a quickdeath (from the AD rules) or a pack of lesser quickdeath. It’s up to you based on the abilities and strengths of the party. Obviously, their main objective should be to protect Alyssa. The quickdeaths will retreat if severely wounded or if one of the pack is killed.
Once returned, the village and family will be quite thankful. Alyssa will get a serious scolding from her parents. If the PCs wish to stay for the evening, there will be an impromptu celebration party in their honor. Several of the Streel mine employees, including Talnor, will come down for this. Talnor will also give Alyssa a talking to which she will appear to take more seriously than the warning from her parents. While a bit shaken by her ordeal, the resiliency of youth will quickly kick in erasing the worst of teh adventure and her natural xenophilia will kick in. She will spend a good portion of the party trying to talk to any of the non-human PCs and find out more about them, where they are from, etc.
Rewards
The PCs will get the 20cr of their pay and the 100cr each for returning Alyssa. In addition, there is a 250cr bounty on each nuk that they can split between the group. If they managed to kill the young sathodragon, that is worth another 1000cr to split between the PCs. Finally, if they managed to kill any quickdeaths, those carry a bounty of 2000cr each.
Of course they need documented proof to claim the rewards. Photographs of the corpses (taken with their chronocoms) will suffice. If they don’t have any documentation, the villagers are willing to send someone up to the locations the PCs give them to get pictures for them. GTF will give them the money immediately even though it will take a few days for the Pale government to issue the reward, which will then just go straight to GTF.
Additionally, the PCs should receive 1-3 XP for the adventure depending on how well they did.
How It Played Out
When I ran this, we had three PCs: Dhuggo (dralasite), Arzdran Garvox (yazirian), and Joey Rufus (humma). They picked up some weapons and gear at GTF HQ and headed out.
After meeting with the parents, they also talked with Alyssa’s friends that had been in the woods with her. After stern words from Joey to Alyssa’s folks about their parenting techniques, the team head up to the dome where they picked up Alyssa’s trail and started off. None of the PCs actually had a tracking skill but two of them had Scout as a secondary skill area so they only had minor penalties since the trail was easy to follow.
The fight with the sathodragon went fairly quickly, Joey used his jumping ability to good effect to get behind it and keep it at a distance while Arzdran and Dhuggo fired on it with their lasers. Wounded, the sathodragon fled into the trees and escaped leaving a trail of blood. The sathodragon didn’t do too well only scoring a single hit on Joey. Joey applied first aid to himself (he’s the medic) and was nearly back to full STA. They marked the spot and continued on. The idea was that if Alyssa’s trail ended and looked like the sathodragon had gotten her, they would come back and track it to its lair to try to find her body.
Continuing to follow Alyssa’s trail they found the nuk tracks and the destroyed tent. Getting a bit worried, they hustled on. Luckily, Joey made a INT roll and noticed the closer mountain lion waiting in ambush for them. Again employing his jumping racial ability, he sprung over the lurking cat landing a few meters beyond it and unloading into it with his laser rifle. Then he notice the one further up the mountain beyond him. He was now between them with his teammates some 20 meters away. However, startled by his jump, and wounded by the laser fire from Joey and Arzdran, the mountain lions decided this was too much work and bounded off, leaving the PCs alone.
The fight with the nuks didn’t go as well. As the creatures rushed the PCs, Arzdran got a shot off wounding one. Joey jumped over them again to the base of the slope up to the cave entrance. The wounded one went after Dhuggo (wielding his nightstick) and the other one turned around to go after Joey. The PCs were doing well, severely injuring the one attacking Dhuggo, but then Dhuggo got a little cocky and started showing off (the player said he started pointing to the mountains, Babe Ruth style, before making his attack) and missed horribly (rolled a 97). The nuk on the other hand didn’t miss and took a bite out of his arm. They managed to finish off the nuks but Dhuggo took a total of 30 STA damage and Joey was wounded a bit more.
As Arzdran examined the cave entrance and kept watch, Joey did a bit of rough field surgery getting Dhuggo patched up and back on his feet.
They then entered the cave and decided to go left once they got to the cave floor. So they almost immediately found the cave-in. Having been calling for Alyssa, she responded to them and they were able to talk to her through the rockfall. She told them about the cliff on the other side of the room she was in. As Joey and Arzdran set off further into the cave complex to try to find a route to her, Dhuggo passed Alyssa all his gear through the small opening and started squeezing his way through.
After taking some twists and turns the others found their way to the top of the cliff where they could see Dhuggo sitting and talking to Alyssa down below. Using rope they brought with them (they had asked about climbing gear back at the GTF HQ and I had told them they shouldn’t need it so I retconed them having it since the reason they didn’t have it was my fault), they hauled Alyssa and Dhuggo up and made their way back to the cave entrance where they called the aircar to come pick them up. It was a little tight with five in a vehicle built for four but Dhuggo and Alyssa were both small and so they made it work.
Getting back to the village, they learned about the bounty on the sathar creatures and one of the villagers offered to go back to where the nuks were to get pictures as proof. They stuck around for the impromptu celebration and the after a while, with a few hours to kill before the day was over and they needed to head back, had the aircar drive fly them up to where they had the fight with the young sathodragon.
Tracking it back to it’s lair, they tossed in a couple of doze grenades which knocked it out completely. They tied it up and called back to HQ to ask if they wanted the thing alive. Receiving an affirmative, they were told that a flying transport truck would be there in an hour to collect it and to hang tight. In the mean time the doze gas wore off and the creature struggled to get free but they had done a good job with the knots (I believe someone rolled a 01) and in its weakened state it couldn’t escape. Joey injected it with a StayDose to try to knock it out which seemed to work. Securing it in the bed of the airtruck when it arrived, they followed the truck back for a while to make sure everything was good an then flew ahead to base to get back home.
All told it took us about 3 hours to play through this.
Thoughts
That’s the adventure and how it played out. I’m still working on getting the audio and video of the game session on-line. So at some point in the future, you’ll be able to listen (or watch) how it ran.
What I’d be interested in is what you think about the information presented for running the adventure. How was the format? Would it be helpful to me organized differently? If you were running this, is there information you would want that wasn’t there? Are there details missing? On the flip side, did I include too much in places? Is there anything too constraining?
Tell me what you think and how I could improve these write-ups in the comments below.
I can’t believe it’s been three months since I last looked at this. I’ve really been distracted by the 3D modeling and miniature creation project. I’m not quite done with the battleship miniature so that will have to wait another week (or more, it’s taking longer than I expected). With this post we are going to cover all the remaining modules and wrap up the module based campaign.
When we last left our intrepid adventurers, they had either just returned from Alcazzar or finished up some other mission for CDC and had arrived in the White Light system, probably on Clarion station. They have shiny new level 1 spaceship skills and are hopefully itching to start using them. It’s time to recruit them into the Clarion Royal Marines!
Warriors of White Light
The cover of this module was a map for the Second Sathar War game from the Campaign Book.
SFKH0: Warriors of White Light is the first of the Knight Hawks modules that incorporates both the Alpha Dawn and Knight Hawks skills and includes bits of the spaceship combat game as part of the play.
The module is designed to give the characters experience with various aspects of the Knight Hawks rules including ship combat, zero-g and space suit operations, and a chance to battle the sathar once again.
The module includes five mini adventures that are designed to be interspersed between descriptions of routine patrol and inspection duty. The first is just a routine inspections where they discover weapons to being smuggled to anti-crown forces on the surface of Clarion. The second presents a ship controlled by a mad cybot that hit hurling toward Clarion station. The third is a raid on a pirate base in the system. The fourth encounter has the PCs pitted against a sathar boarding force that is trying to capture their ship. The final encounter is a boardgame scenario where the milita battle a sathar raid.
I’d play this module as presented. As the Referee you have to add in a few more routine encounters that don’t really go anyway to help make the scenarios presented stand out but you don’t want to spend too much time on it, just enough to that the players appreciate the excitement.
By the end of the module, the PCs will have earned between 15-30 XP. I’ll be giving the sample characters 25. Unless the preform poorly, this is enough for all of them to have level 2 skills by the time they play the scenario with the sathar boarding force. By the end of the module, they should have all achieved level 2 in their spaceship skills and the gunners may even be at level 3.
The Question of What is Next
Until this morning, I would have said Dramune Run (SFKH1). It is the next module in the series and we’ve been playing them mostly in order so that makes logical sense. But as I was thinking about writing this post, I realized that that might not be the best order. So we’ll start by looking at what to do if you do want to run Dramune Run next and they I’ll discuss the alternate option that I’ll be using.
If you want to run Dramune Run as the next module, you’ll need to add in a few more adventures between the end of the Warriors of White Light (WoWL) module and Dramune Run. In that module, the PCs will be flying a hull size 6 ship, which requires at least a level 3 Pilot skill and our pilot PC is only level 2. They probably need about 15-30 more XP to get there (My sample PC, Dolnab, needs 20 more after WoWL).
There are plenty of options here. You could run more adventures like those presented in the WoWL module. The main thing here would be to come up with some new scenarios and not just reuse the same ideas. White Light and Clarion have been favorite topics of the authors in the Frontier Explorer fanzine and we’ve even been running a “Warriors of White Light 2.0” series in the magazine (starting in issue 22). You could mine these for ideas of adventures on Clarion station (issue 23), in the White Light system (issue 23), and even one that involves the freighter from the first encounter that takes them across the Frontier to Cassidine and back (issue 24). We took a bit of hiatus from the series in issues 25 & 26 but there are still some articles in the queue so you can expect more to come. These adventures and ideas should get the PCs up to a level 3 pilot skill and then they are ready to tackle the Dramune Run.
However, as I was thinking about this, I felt that there was a better way to run the modules. In addition to requiring a few more adventures to get the PCs ready for the Dramune Run module, the module ends with them owning a ship. At that point, it’s pretty hard to get the PCs to not just want to go off adventuring in their ship and the remaining modules are not really conductive to that. Instead, let’s save the Dramune Run for the climax of the campaign and start by going a different direction.
Beyond the Frontier
The last three Star Frontiers modules published by TSR comprise the Beyond the Frontier series. The modules are:
SFKH2: Mutiny on the Eleanor Moraes
SFKH3: Face of the Enemy
SFKH4: The War Machine
Much like the Volturnus series of Alpha Dawn adventures, these modules take the characters to new worlds to meet new races and confront the sathar, just on a larger scale.
The advantage of going with these modules before Dramune Run is that they make a nice progression from a power level perspective and the PCs can actually be assigned to the mission as part of their commission in the Clarion Royal Marines. It can just be their next assignment.
From a power perspective, the PCs only need a level 2 piloting skill to be the backup pilot on the UPFS Eleanor Moraes, a HS 3 exploration vessel. If anything, the PCs are going to be better skilled than the pre-gens provided with the module. They can start right away without any intermediate adventures needed. And participation in these adventures will give them more than enough experience to be at the correct level for the Dramune Run.
The PCs will be part of the Frontier Expeditionary Force (I should make a patch for that organization) which is composed of civilians and Spacefleet members. It’s completely reasonable that the government of Clarion, which has a high standing in the Council of Worlds, would volunteer some of its decorated Royal Marines to be part of the endeavor. Pushing the boundaries of the Frontier helps to ensure the security of their world. The PCs are a natural choice given their recent experiences in the WoWL module’s scenarios.
Again, these modules can be run as presented. I’m going just discuss them briefly to summarize what happens and the XP gained.
SFKH2: Mutiny on the Eleanor Moraes
This module starts of the series with the PCs out exploring the world of Mahg Mar in the Waller Nexus system when the First Officer, Bill Terry, mutinies, takes control of the ship, and destroys their exploration airship. It is up to the PCs to traverse the wilderness between them and recapture the Eleanor Moraes before Terry destroys it and kills the remaining crew.
This adventure requires a wide mix of skills and will give the PCs a chance to use some of the environmentalist skills developed back on Volturnus (and hopefully improved upon on some of the intervening adventures). It also requires use of their technological skill and weapons skills and, due to the rough trip back to the ship, gives the medic a chance to shine as well.
Hopefully the PCs recapture the ship intact but regardless, when the call goes out about the events on the planet, they learn that their old ship, the CMS Osprey, is being dispatched to assist and will arrive in a few weeks with supplies and repair materials. They just have to hold out until then.
This modules gives out 6-18 XP depending on how the PCs perform in their trek back to the ship and in the capture of the ship itself. I’ll be awarding our sample characters 15 XP.
SFKH3: The Face of the Enemy
This module also takes place on Mahg Mar, after the Osprey arrives but before the repairs to the Eleanor Moraes are complete. In this adventure the PCs once again make contact with a native intelligent race on the planet, something they have had a lot of practice with throughout the campaign (Volturnus, Starmist, and Alcazzar). Along the way they discover evidence of sathar presence on the planet and capture a small, hull size 2 sathar scout ship. The climax of the adventure is a Void jump to a new system (FS30) and a raid on a modified sathar assault carrier and the chance to capture sathar prisoners and the assault carrier itself.
The module awards 5-17 XP depending on how the PCs do. I’ll be awarding our team 14 points for this adventure. They’ve now earned enough XP to increase their Knight Hawks skills even more as well as possibly increase some of their other skills. With the sathar ship captured, they are ready to take on the final part of the series.
SFKH4: The War Machine
In the War Machine, the PCs are going to make contact with the technological race native to the FS30 system and hopefully drive the sathar from the system, capturing or destroying the sathar starship construction center based in the system.
This module involves both character and ship action as well as diplomacy and problem solving. After fighting off a small squadron of sathar fighters, the PCs are contacted by the native race in the system to arrange a meeting. While the team has had several first contact scenarios, this one is unique in that the species being contacted has active interplanetary spaceflight capabilities. After making contact they proceed to the planet’s surface and attack a sathar processing plant. After that they mount an attack on the sathar ships and shipyard. If successful, the Mhemne (the native race) are liberated and the sathar facilities are destroyed along with several sathar ships, reducing their combat capacity in the upcoming (or possibly on-going) Second Sathar War. The system is renamed the Liberty system (the module doesn’t say what the Mhemne’s name for it was) and the PCs are hailed as liberators and heros.
This module awards from 9 to 26 XP based on performance but if the PC’s are performing down near the 9 XP level, they may not succeed as they are making a lot of mistakes and losing valuable resources. We’ll give then 22 XP for this module.
Back to the Frontier
That end the Beyond the Frontier series of adventures. By the time it’s all over, the PCs have been gone for several months. Upon their return to Clarion, they can collect their back pay which should be a considerable amount of cash. It’s now time for the final adventure in the module campaign,
The Dramune Run
At this point the PCs have level 3 spaceship skills and reputations as heroes and outstanding members of the Clarion Royal Marines in addition to their other exploits across the Frontier. Just the type of people Garlus Tylappar needs to help him.
The initial encounter of this adventure can occur at any point after the PCs are back on Clarion station. They’ll probably be given a few days to a few weeks of leave after returning from the Liberty system. Garlus should approach them during this down time to make his pitch. He should lean on their reputations and show a knowledge of their exploits in making his case (but nothing that would not be known through public media).
This module also just plays out as written. The PCs will help get the Gullwind repaired and into space. They will fight off pirates on the way to Dramune and then be captured and escape from Darkworld station rescuing the Chukkahs and exposing the Malthar’s plans.
The XP awards for this module range from 20 to 43 with a possible 5 XP for the astrogator and up to 120 XP divided by the number of PCs for rescuing Chukkahs. I’ll be awarding our team a total of 48 XP each.
The End
And that wraps up the module campaign. The PCs now have a ship, and after the Beyond the Frontier series, a reasonably large chunk of cash to get them started. If they want to continuing adventuring or take up the life of merchants you can extend the campaign for as long as you want.
The Final Characters
These are the final skill levels of the characters at the end of Dramune Run.
Born on Inner Reach, Dramune. Dolnab loves to tinker with computers and also play flight simulator games.
Name: Michaella
Race: Human, F
STR/STA: 55/55
DEX/RS: 64/61
INT/LOG: 50/50
PER/LDR: 40/40
XP: 294/299
PSA – Military
Skills: Beam 6, Melee 6, Environmental 2, Thrown 4, Martial Arts 4, Medic 2, Projectile 3, Energy Weapons 3
Notes:
Born on Minotaur, Theseus. Michaella grew up as the youngest of seven with six older brothers. She learned to shoot and hold her own with her brothers’ rough-housing at a young age.
Born on Gran Quivera, Prenglar. T’vor used to hang aout at the University of Prenglar as a kid and chat up the tech professors. He loves to hack computers and robots and can usually get anything working, eventually. He also has a deep interest in astronomy.
Final Thoughts
I don’t really have much to add. What are your thoughts and ideas on the way the campaign was laid out? Feel free to comment below.
It’s been kind of a crazy week for me and while I’ve been working on things behind the scenes, between travel for work and getting caught back up once I got home, I haven’t had a lot of free time. Plus I’ve been in a fiction-writing mood and while I’ve broken the 50k word mark on my manuscript, I don’t really want to post anything from this very rough draft.
So today I’m going to post a new project overview for another adventure. This is another one that I’ve actually run before, at least partially, but this version will be a bit more fleshed out. Some of the bits and pieces are already online, like the Ship Dock Crew Lounge I posted last week, which was originally designed as a location this adventure. So let’s dive into this.
Asset Recovery
Project Tag: Asset Recovery
Level
An adventure for 4-6 moderately advanced Star Frontiers characters with level 2-3 Knight Hawks skills. One of the PC’s should be a level 3 pilot in order to fly the ship in the adventure.
The adventure is designed for a single session and was originally run as part of an on-line con back in 2012. This version is slightly expanded.
Premise
The PCs work for the Cassidine Development Corporation (CDC) as troubleshooters that are assigned missions to solve problems for the corporation around the Frontier. A starship prototype, which vanished six months ago, has suddenly turned up under a new name. The PCs are assigned to recover it for CDC and return it to Triad in the Cassidine system
Basic Story
The CDCSS Nightwind is a prototype, para-military freighter that finished completion six months ago at the CDC shipyards orbiting Triad. On its maiden voyage and shakedown cruise, the ship supposedly misjumped on it’s way to Prenglar and disappeared. Now six months later, it has reappeared in the Theseus system registered as the Timeon Star Ship (TSS) Stargift.
The misjump to Prenglar wasn’t a misjump at all but a calculated jump by the astrogator to take the ship astray. Together with the chief engineer, and one of the gunners, they took control of the ship with the help of a pirate vessel at the end of the jump. The three original crew members are listed as the ship’s owners under pseudonyms and the ship is listed as found in the Timeon system and claimed under salvage laws. The Nightwind’s current crew have loaded a shipment of air cars and are awaiting several cargo units worth of StarPlay robots for delivery to the K’sta-Kar system.
The PCs will need to determine if the ship is legitimately salvage or not (it isn’t) gain access to and control of the ship, and successfully return it to the Cassidine system. There is another ship (an East Indiaman Freighter) in the system allied with the Nightwind’s current crew, as well as those that might help the PCs. If they get control of the ship, there will be a pirate ambush waiting for them on the route back to Cassidine.
One of the features of this adventure, in a nod to long time Star Frontiers players, is that one of the ships currently docked at Minotaur Station is the IRSS Gullwind, before the Dramune Run module. This crew and ship are potential allies of the PCs. The Gullwind and the East Indiaman are docked in adjacent berths with the Nightwind (sharing the same crew lounge area).
The two main parts of the adventure are figuring out how to get onboard the Nightwind and then a mini dungeon crawl with the PCs traversing the various decks of the Nightwind trying to capture/incapacitate the crew and take control of the ship while being opposed by the crew and security robots.
Some basic responses to possible player options for getting on the Nightwind.
Stats for Knight Hawks encounter (optional) on the trip back to Cassidine.
Last Thoughts
I have scattered notes for a lot of the pieces of this adventure in notebooks and digital files. Part of the purpose of this project is to get it all collected into a single cohesive form. I already have the beginnings of an adventure outline and I’ll be fleshing that out and posting bits in the months to come.
I ran this as part of an on-line con many years ago and due to some technical difficulties getting started, we ran out of time and the team only got as far as getting onto the ship. But fun was had. I’d like to run this again and so there may be an opportunity for a one-shot on-line session in the coming months and my ultimate goal is actually go to a gaming convention and running this there. I’m looking at Gary Con in 2020 in Lake Geneva, or maybe ORCCON 2020 in LA. Although I may have to wait to go to a con later in the year as ORCCON is just before my birthday and Gary Con is just before a potential work trip to South Africa. We’ll see how it goes.
I also already have a 3D model of this ship. The model was made directly from the deck plans published in the Frontier Explorer so it matches the irregular deck structure exactly as detailed. It’s even one of the few minis I’ve actually painted (although I can’t seem to find it at the moment, my boys have probably made off with it).
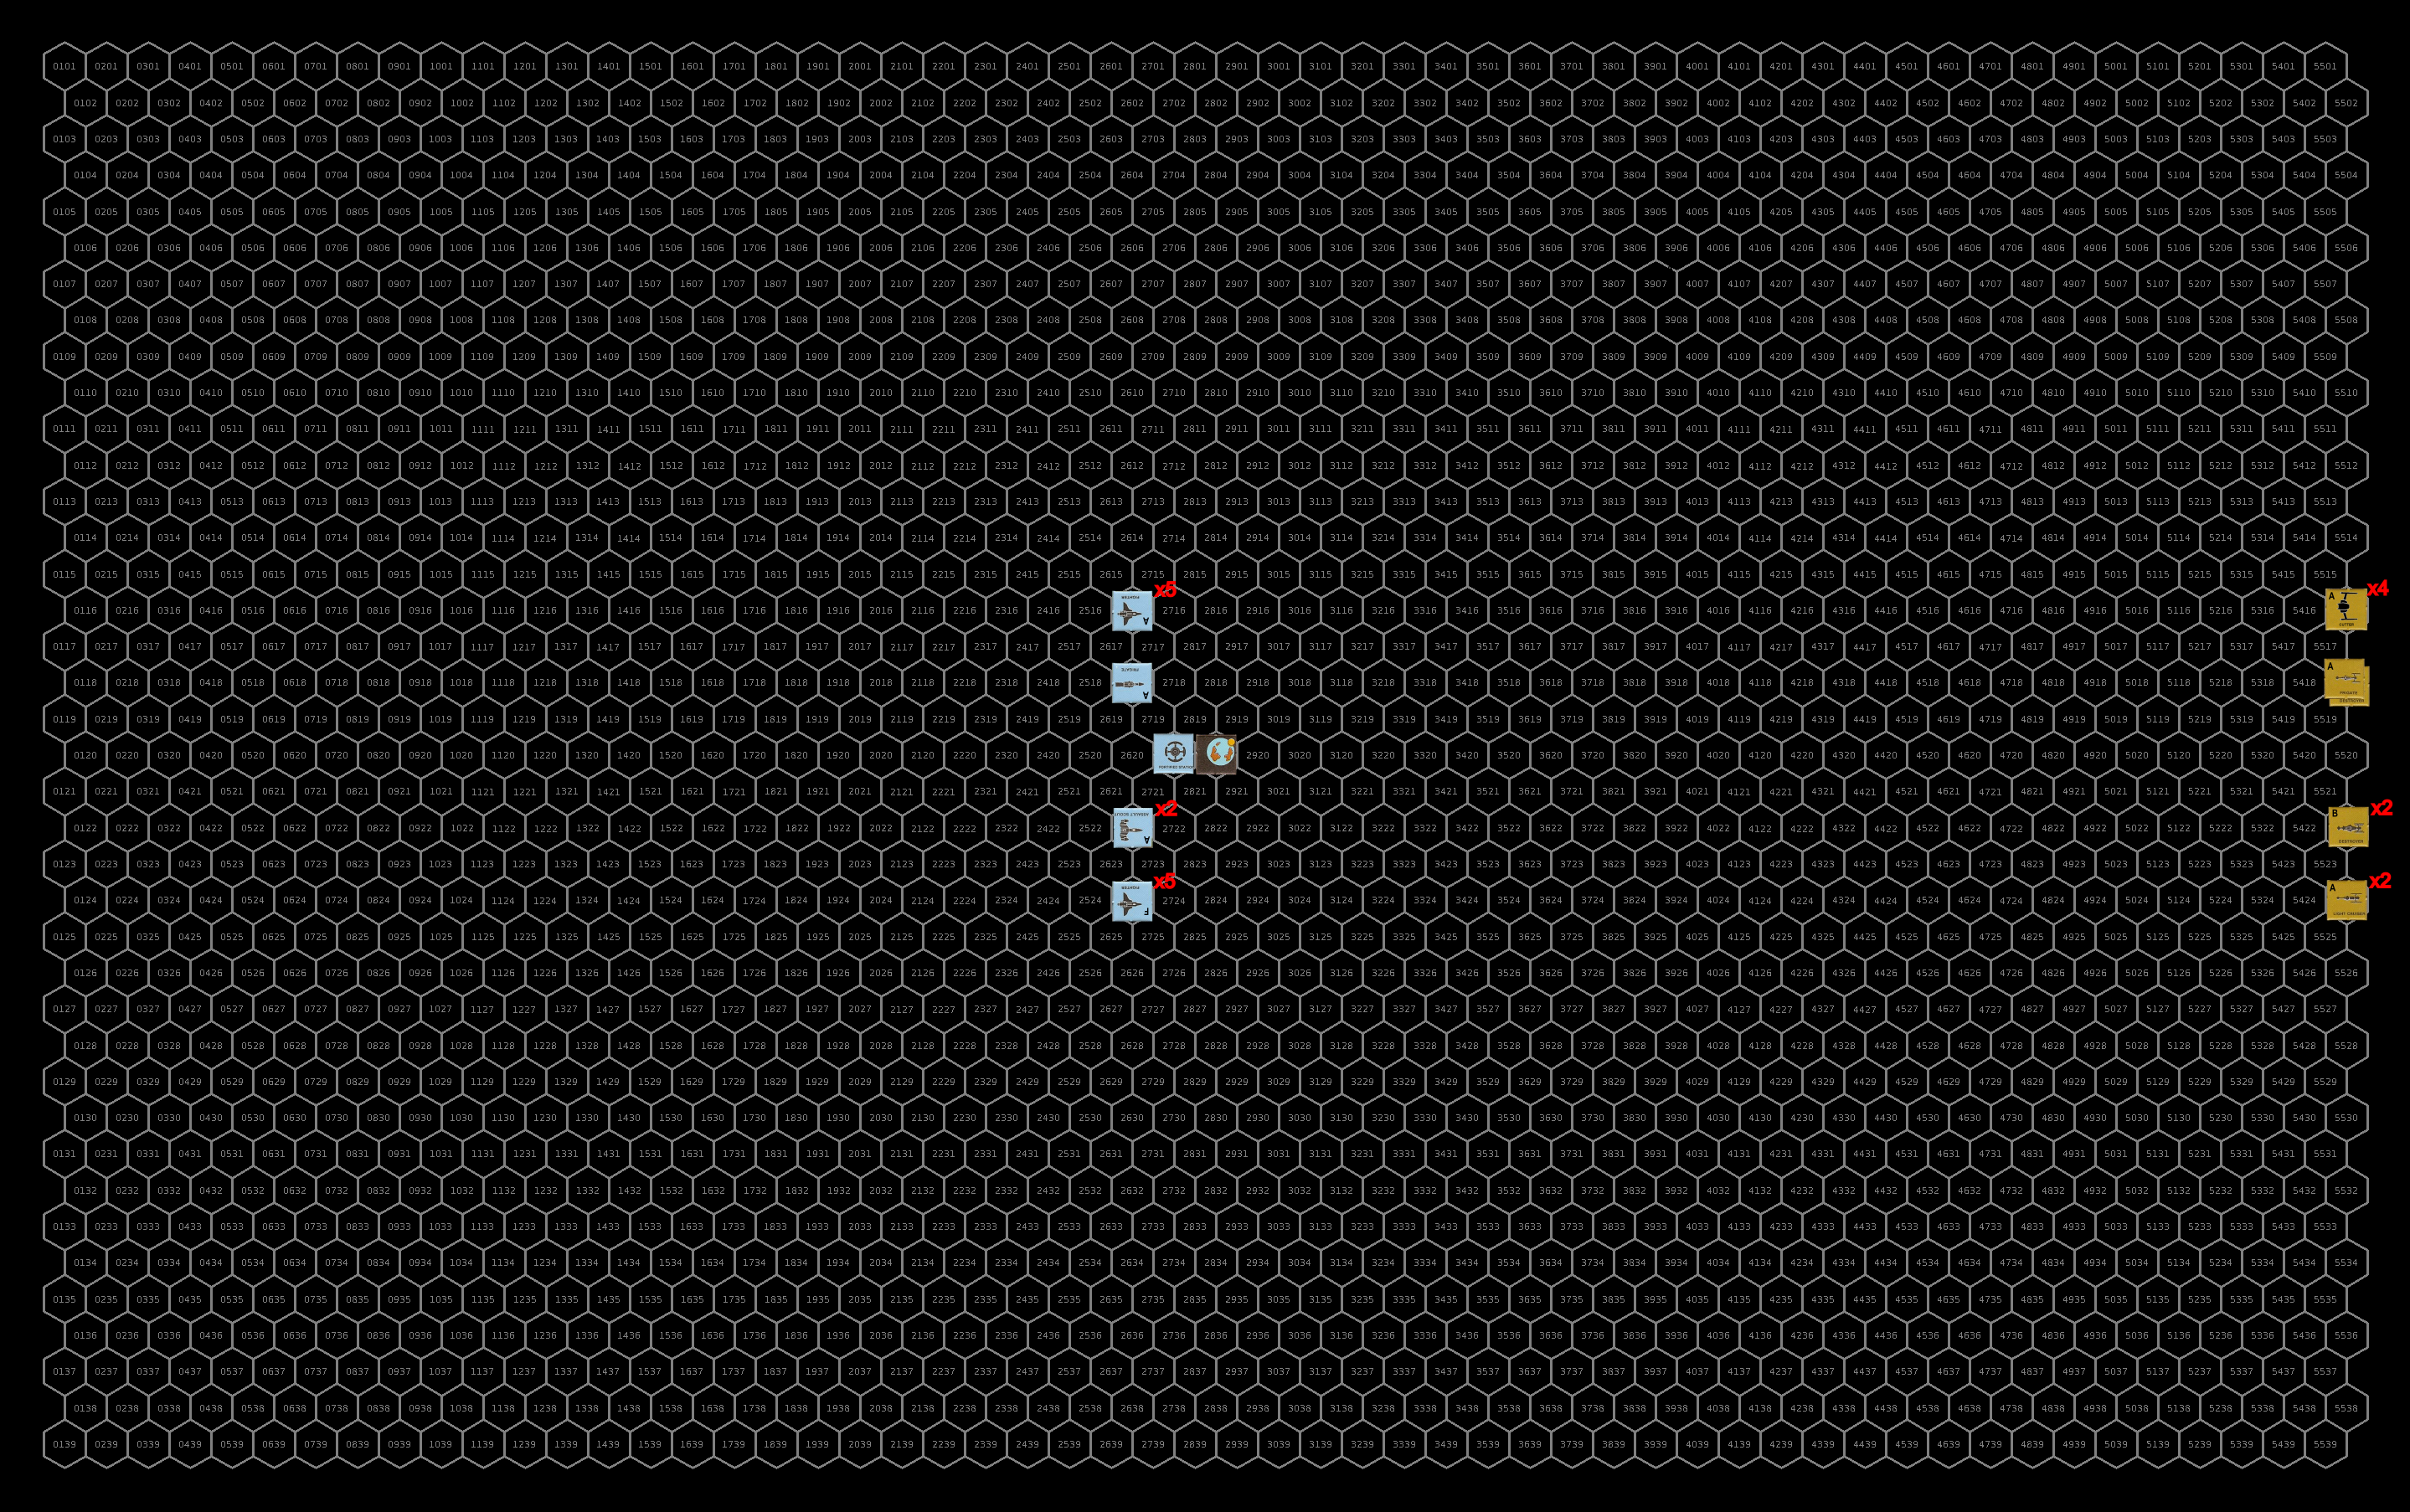

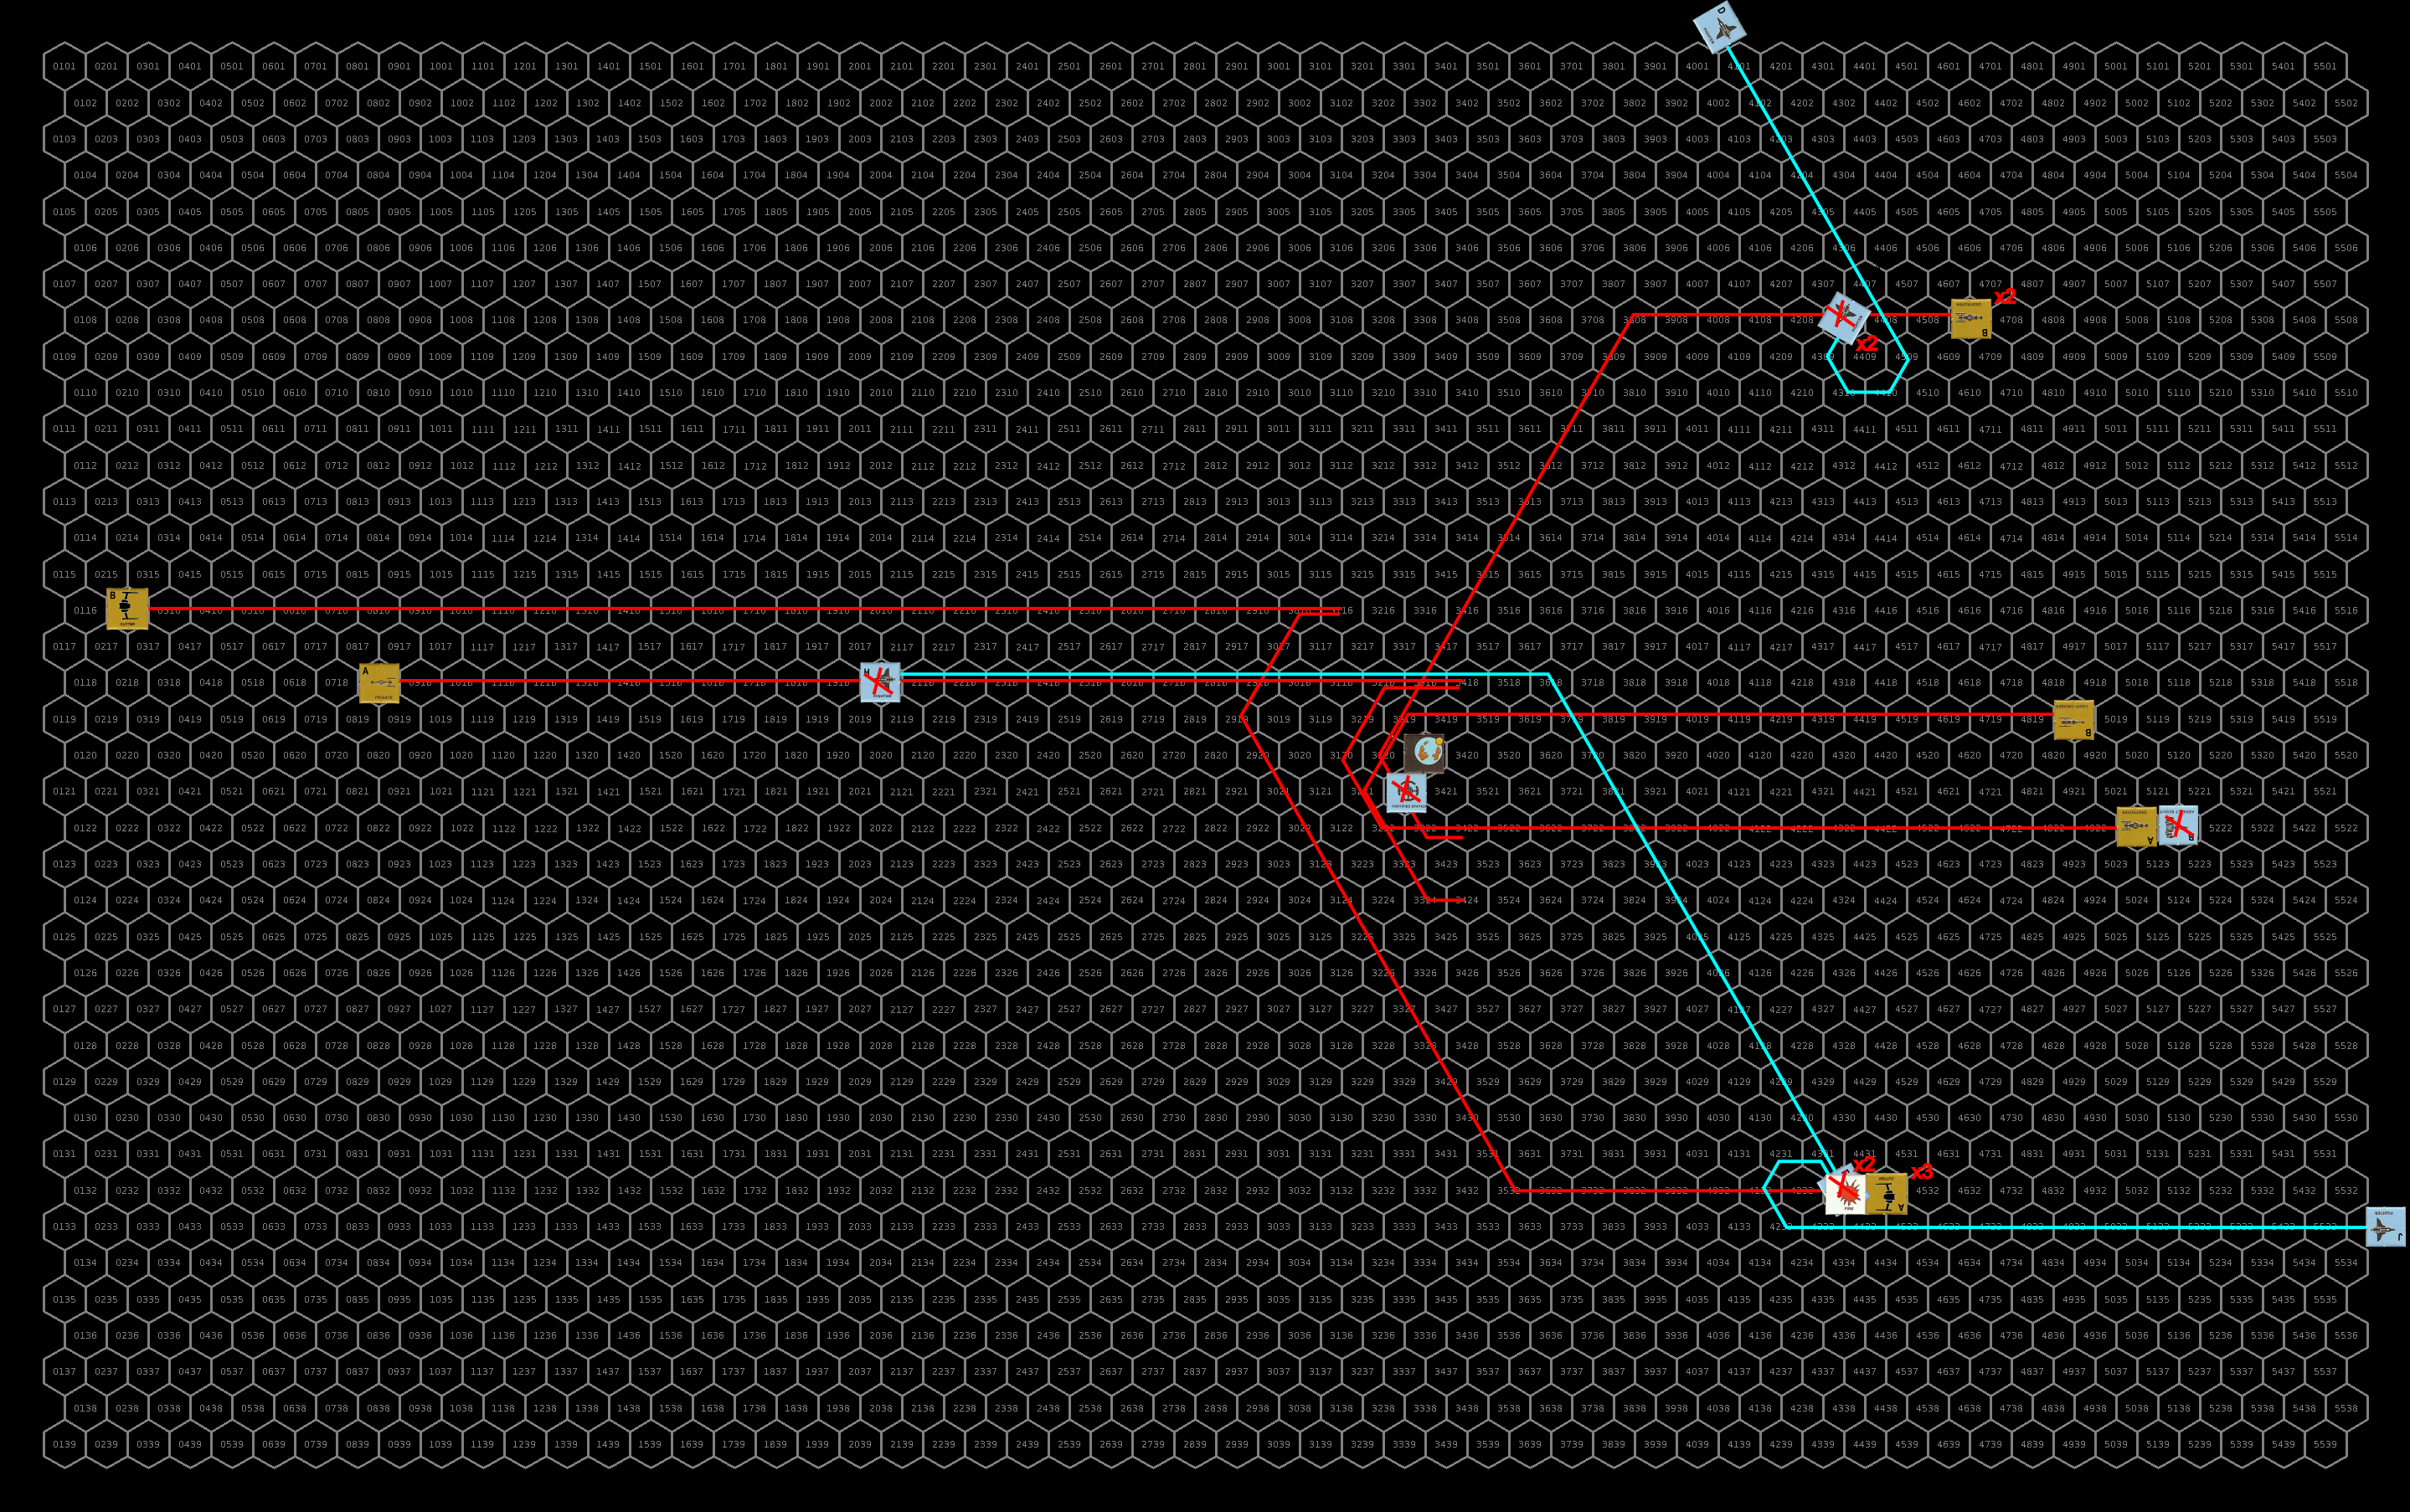
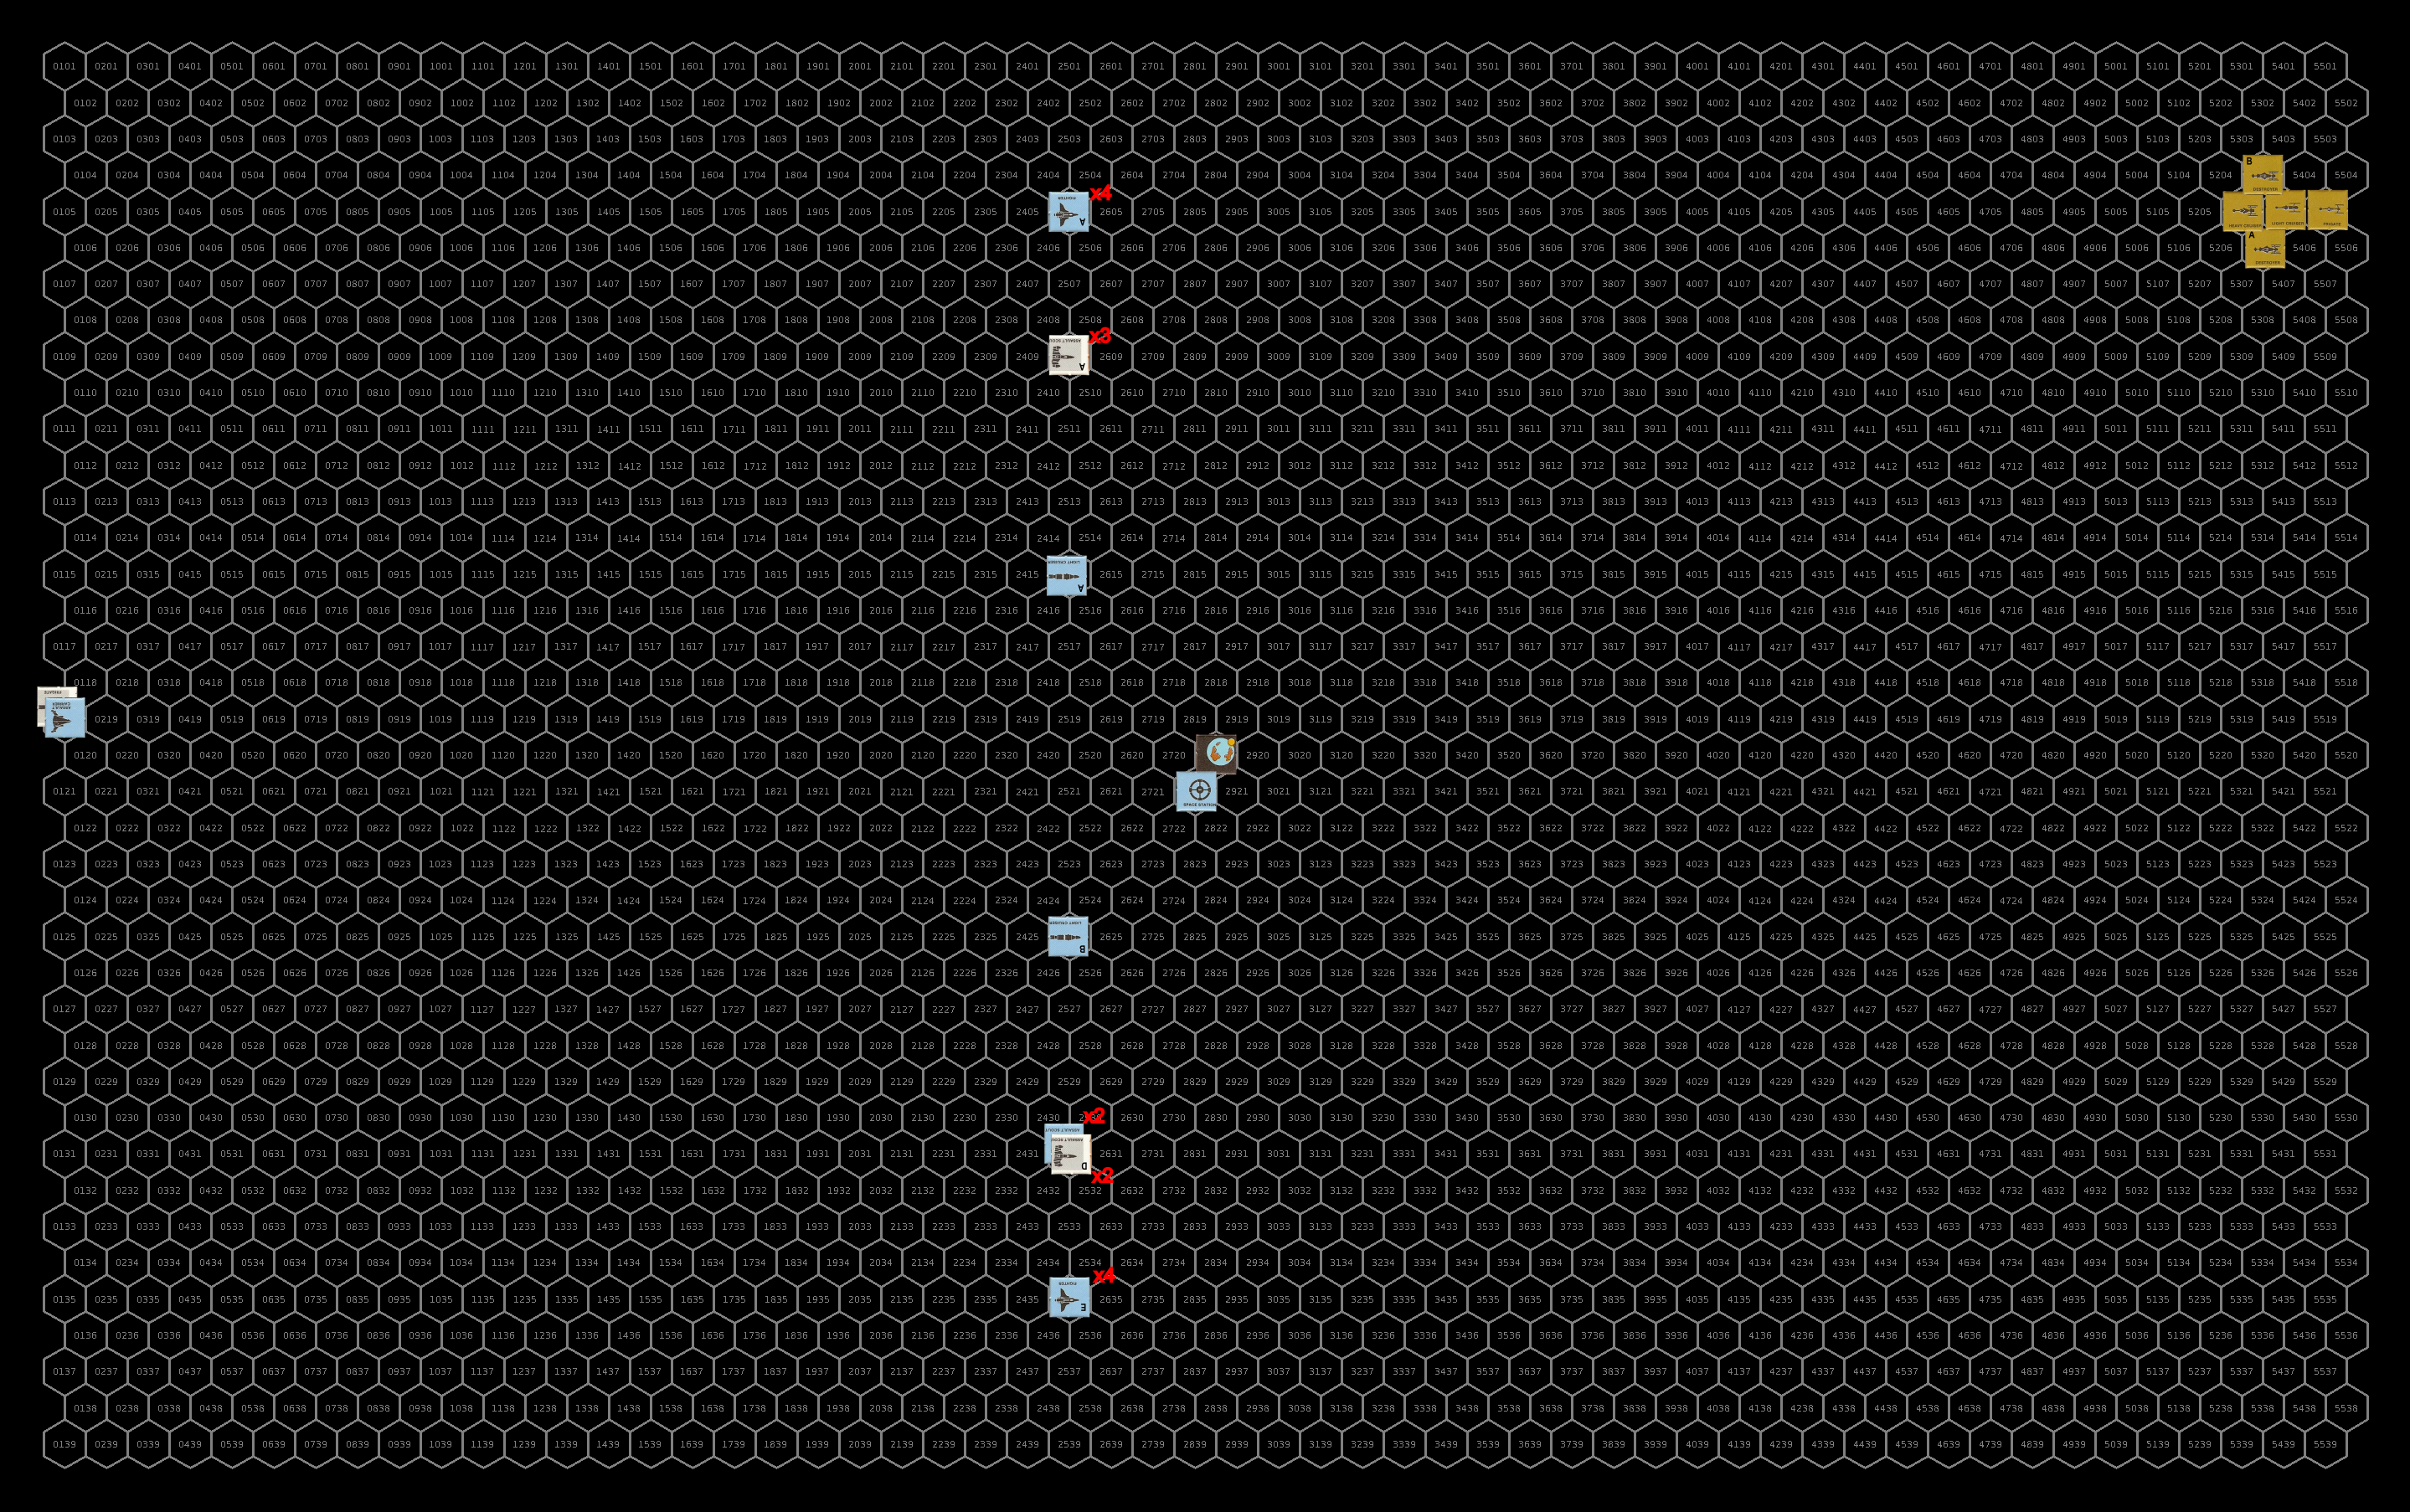
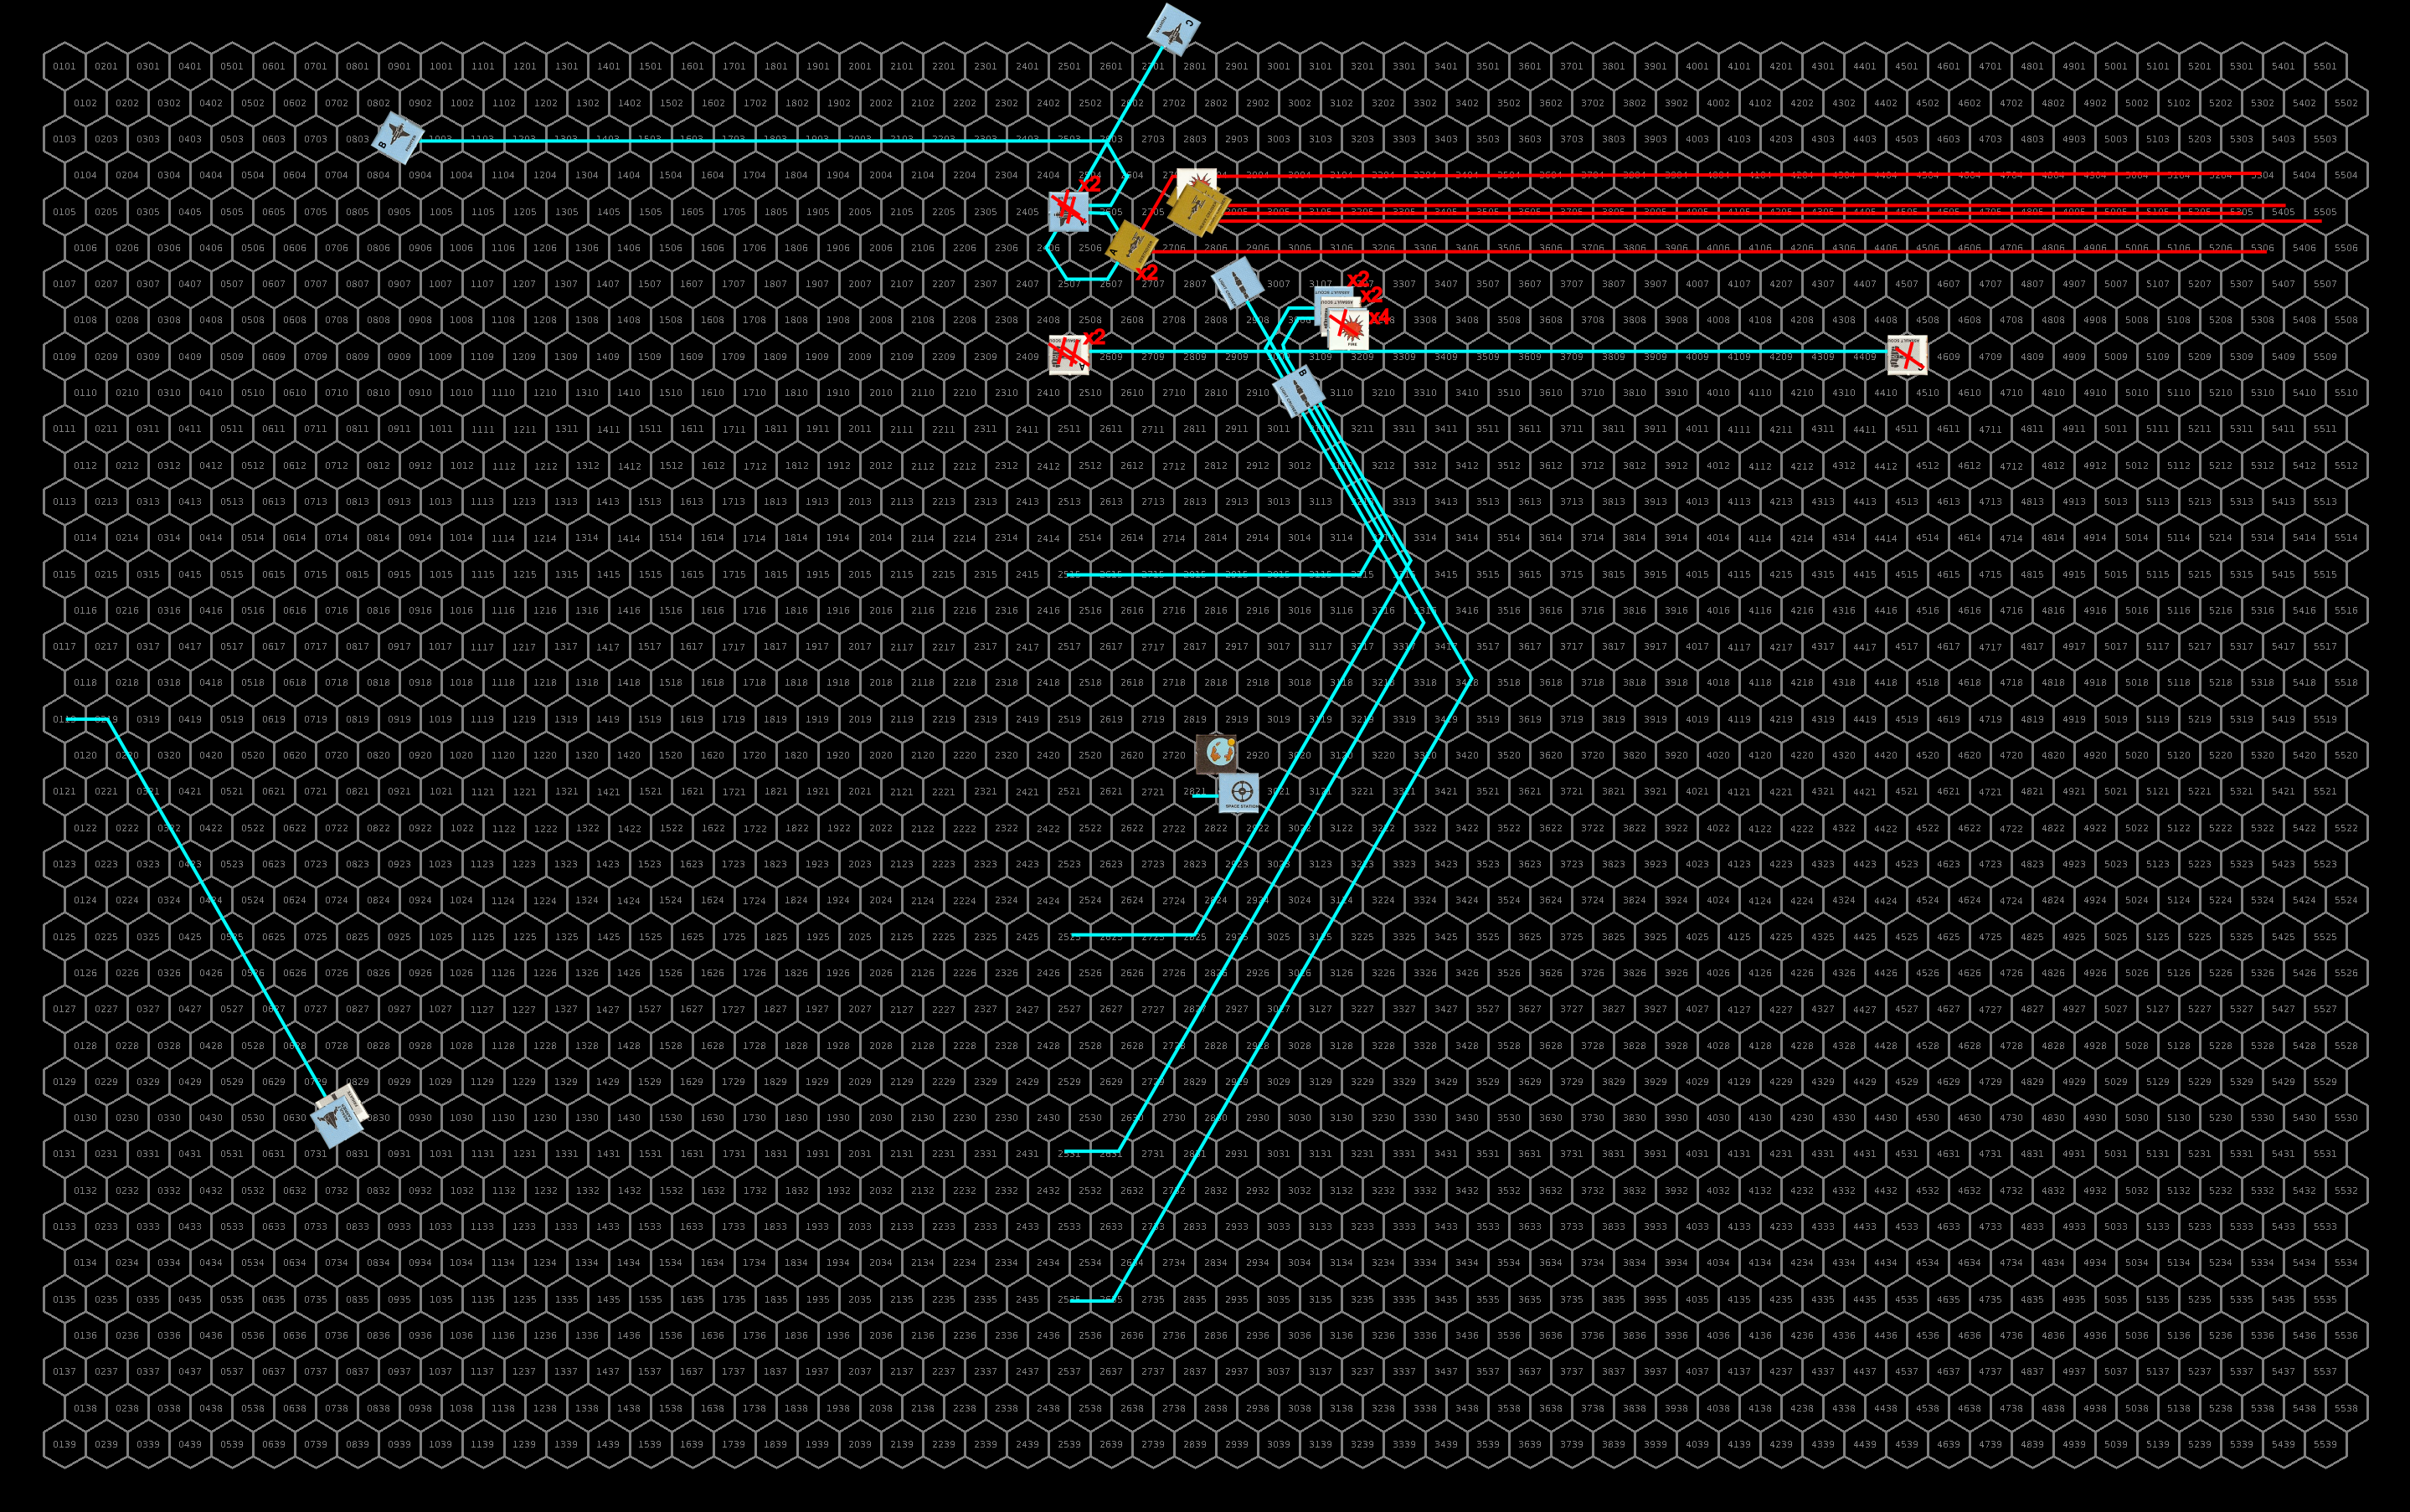

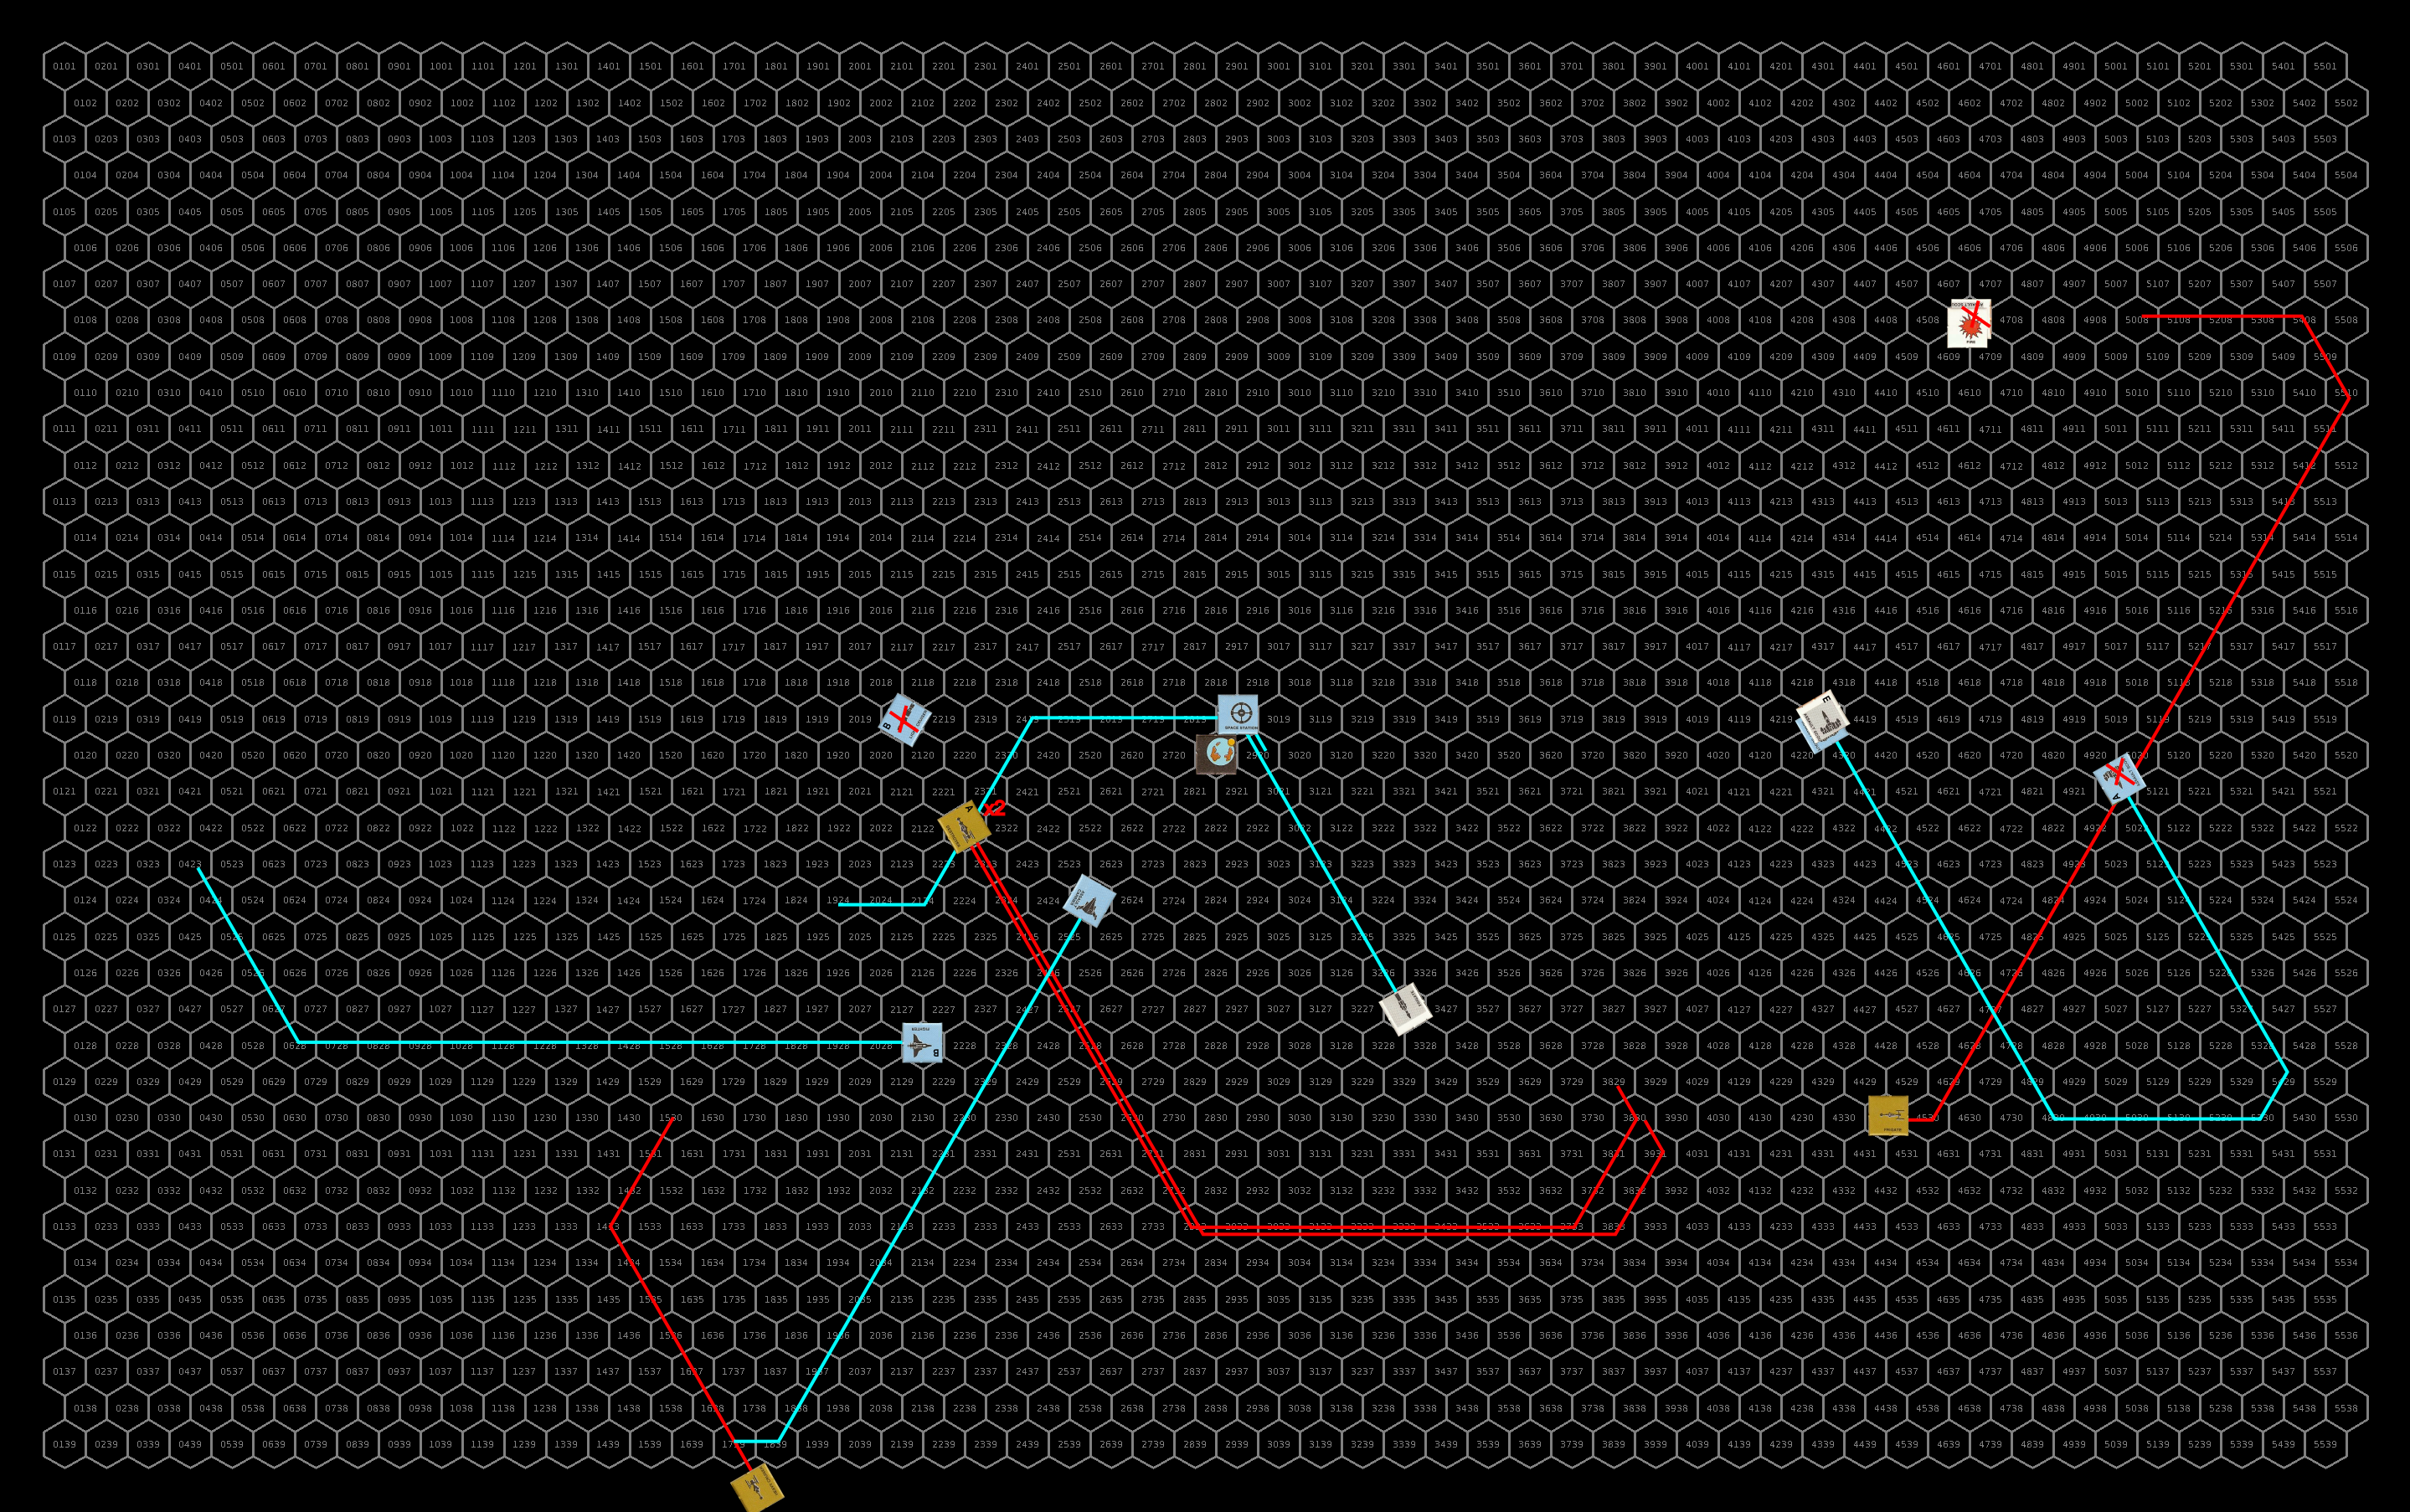
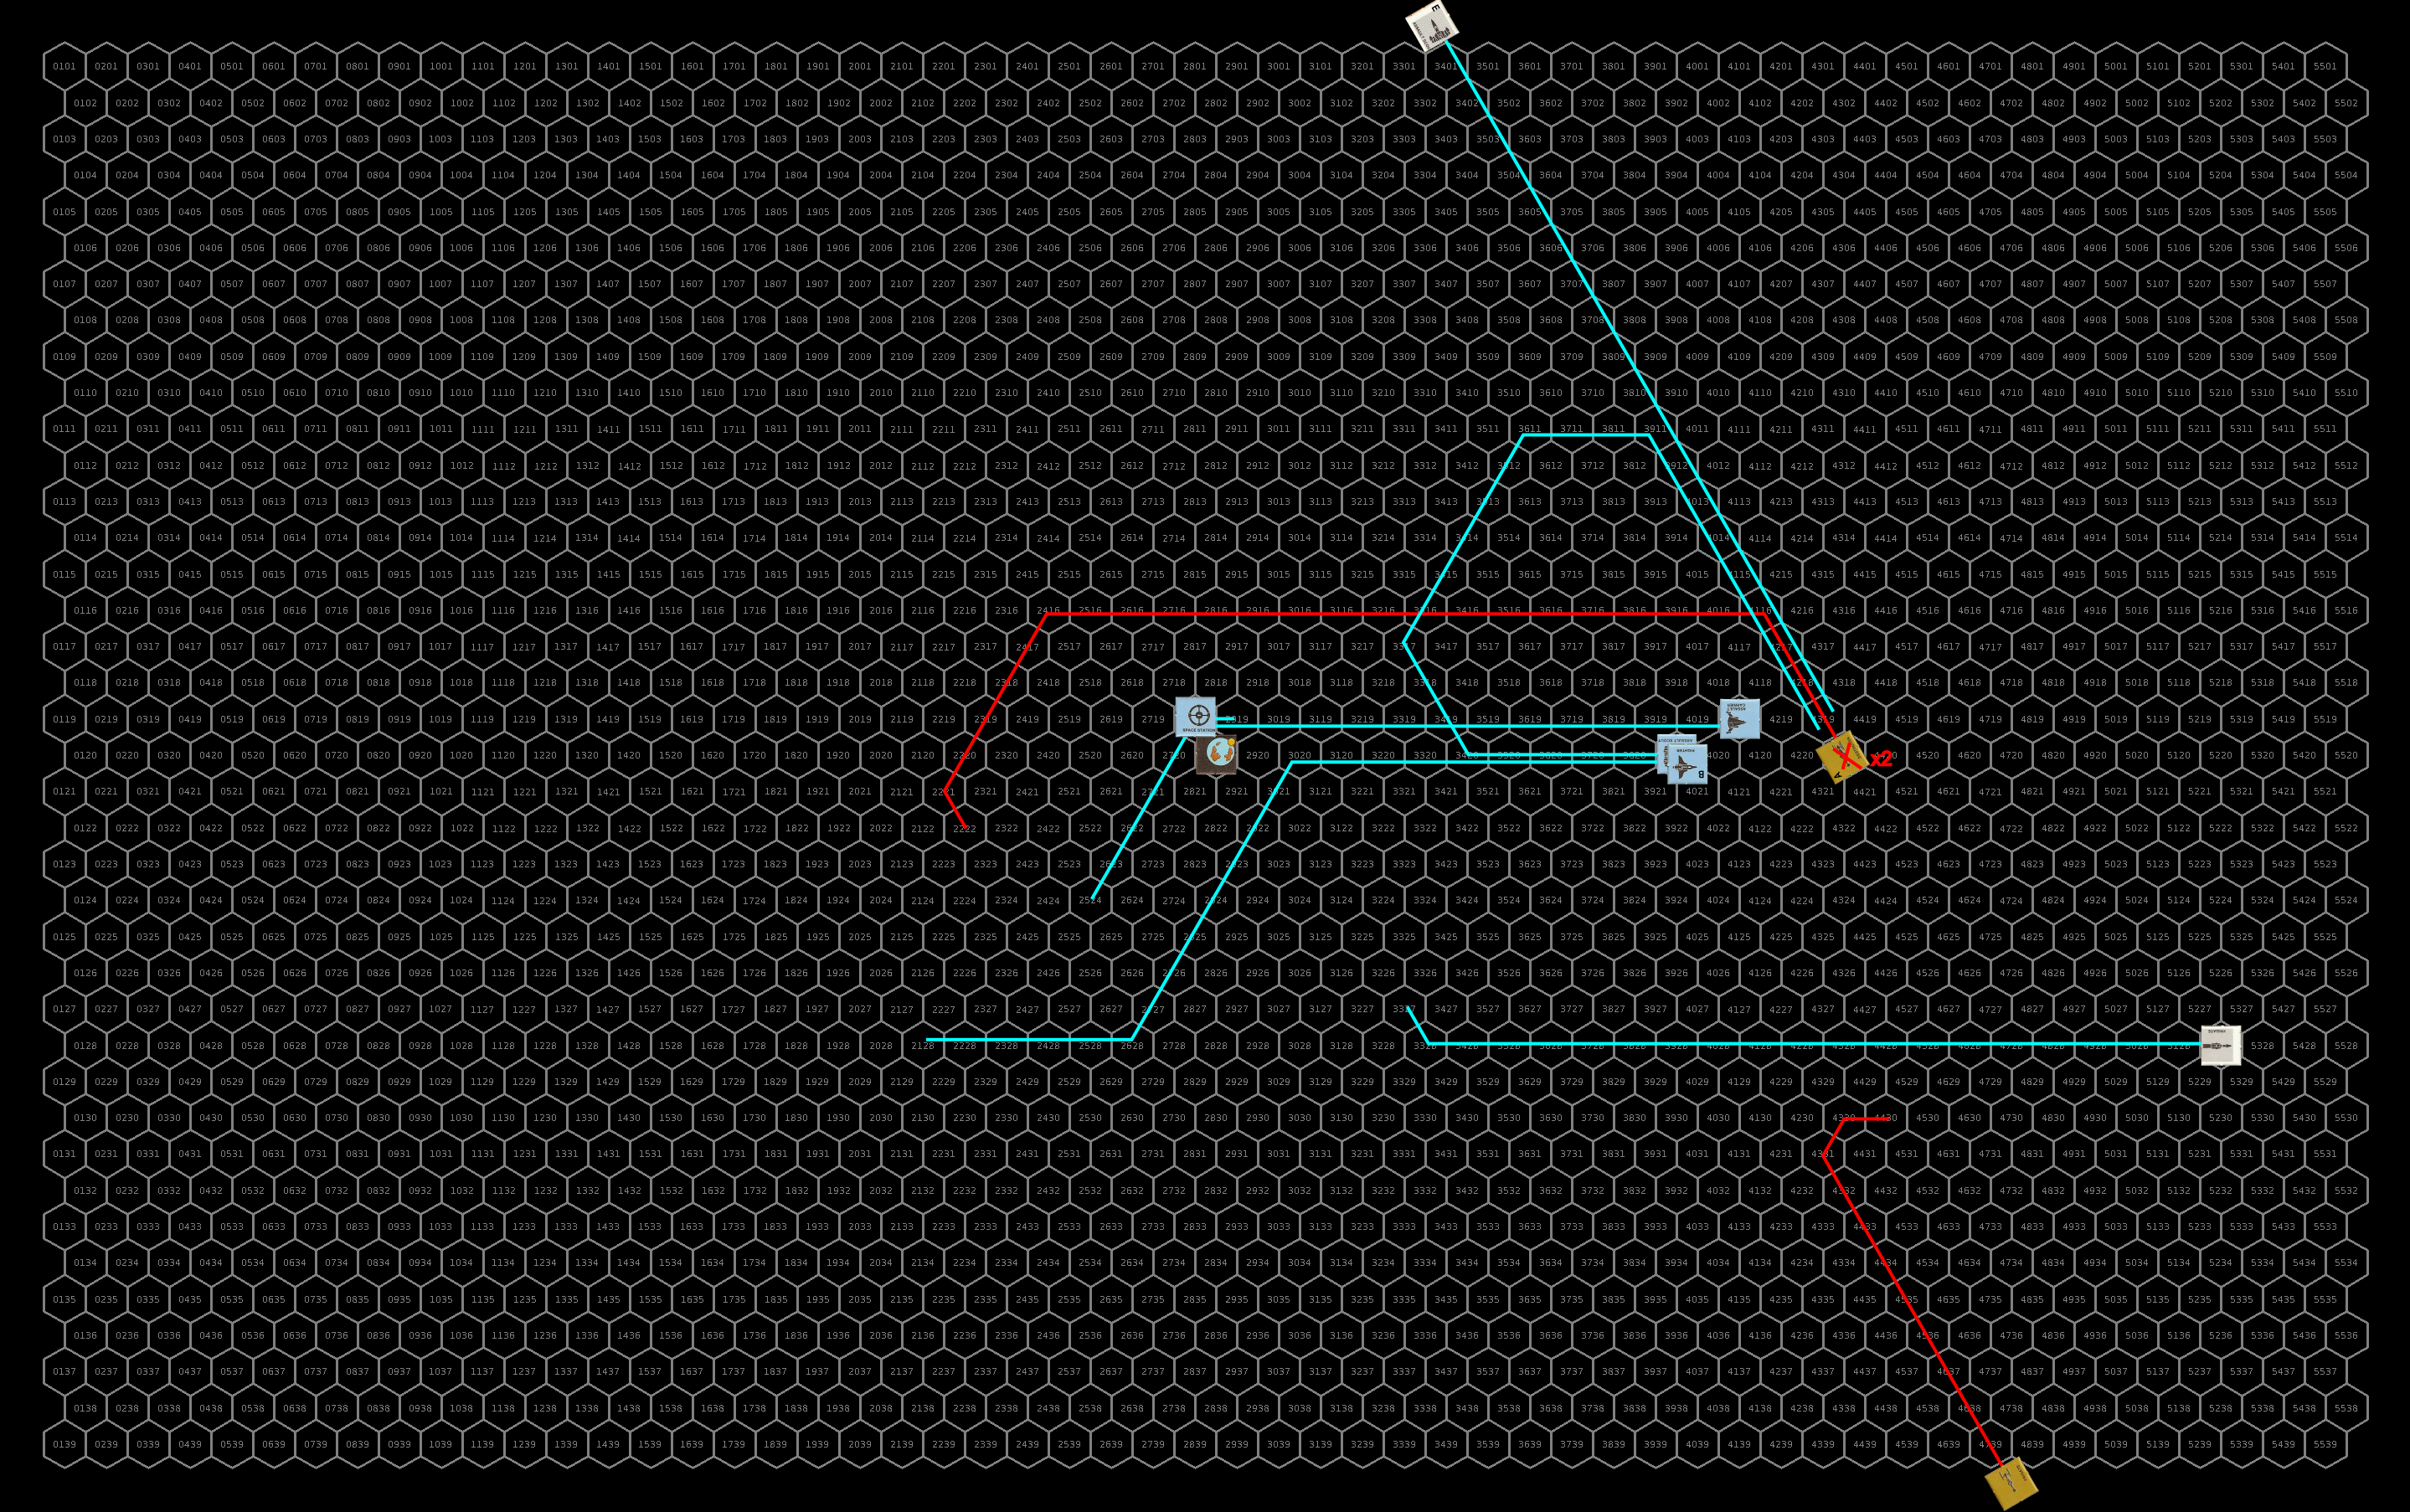
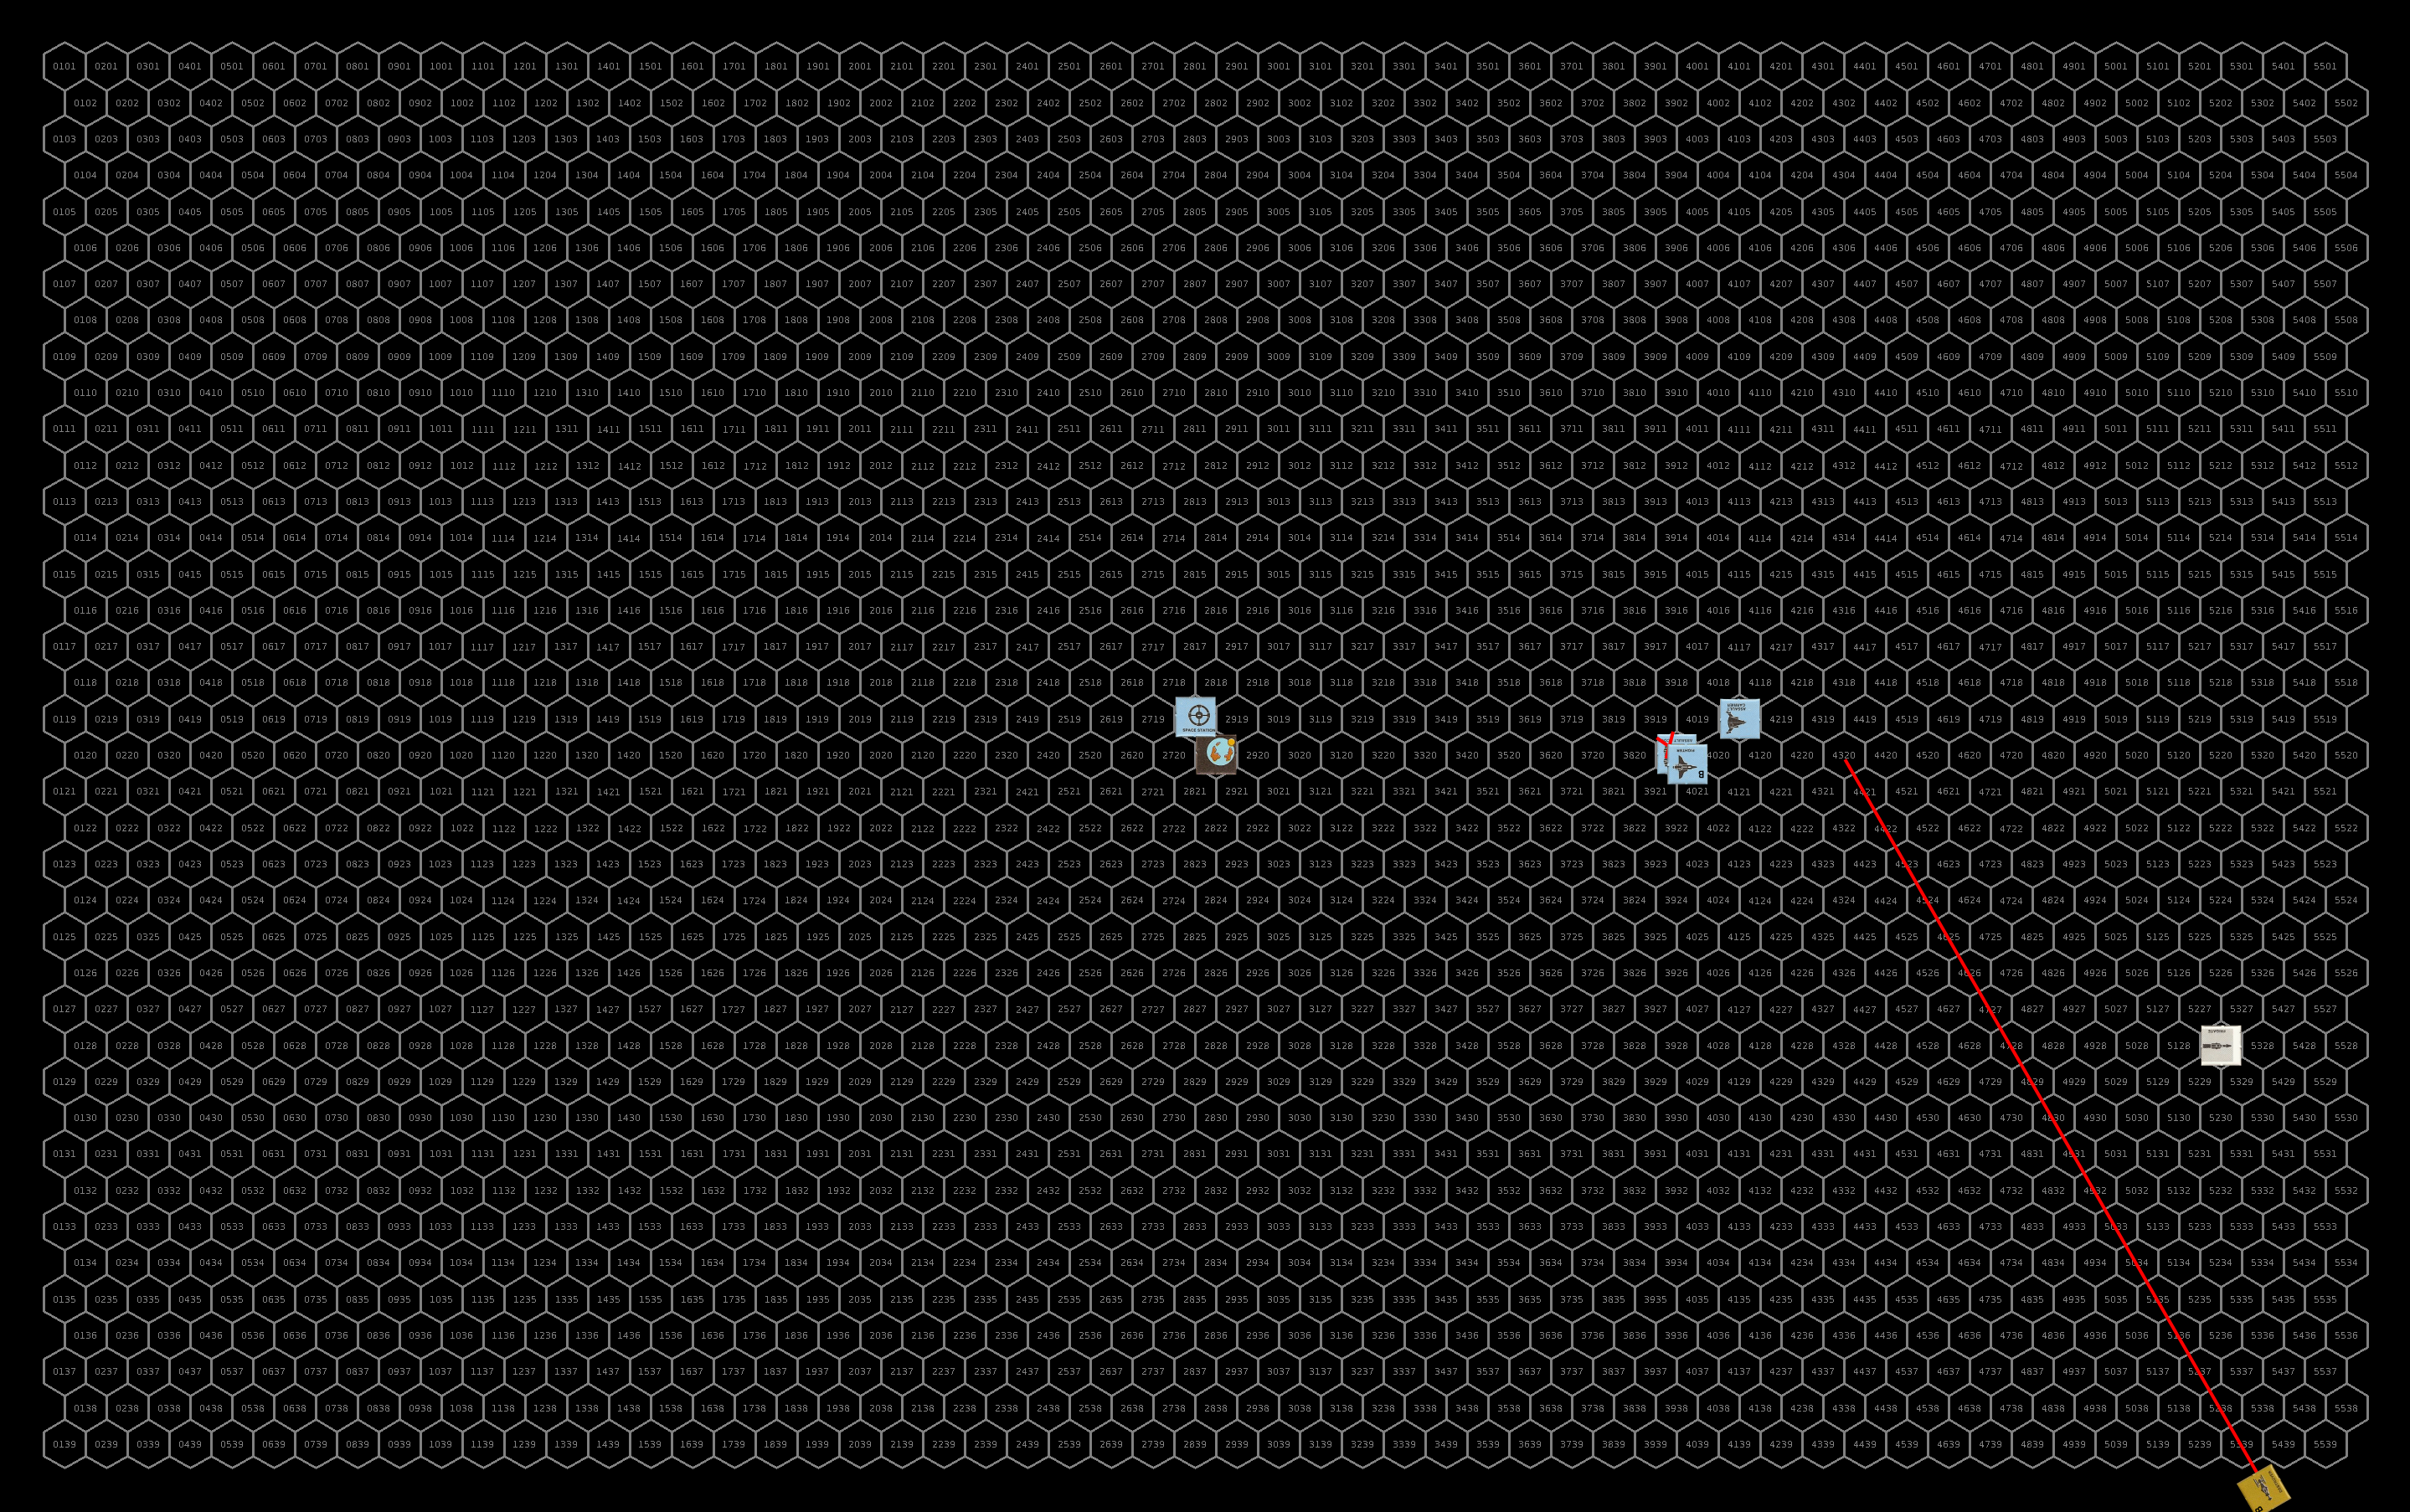

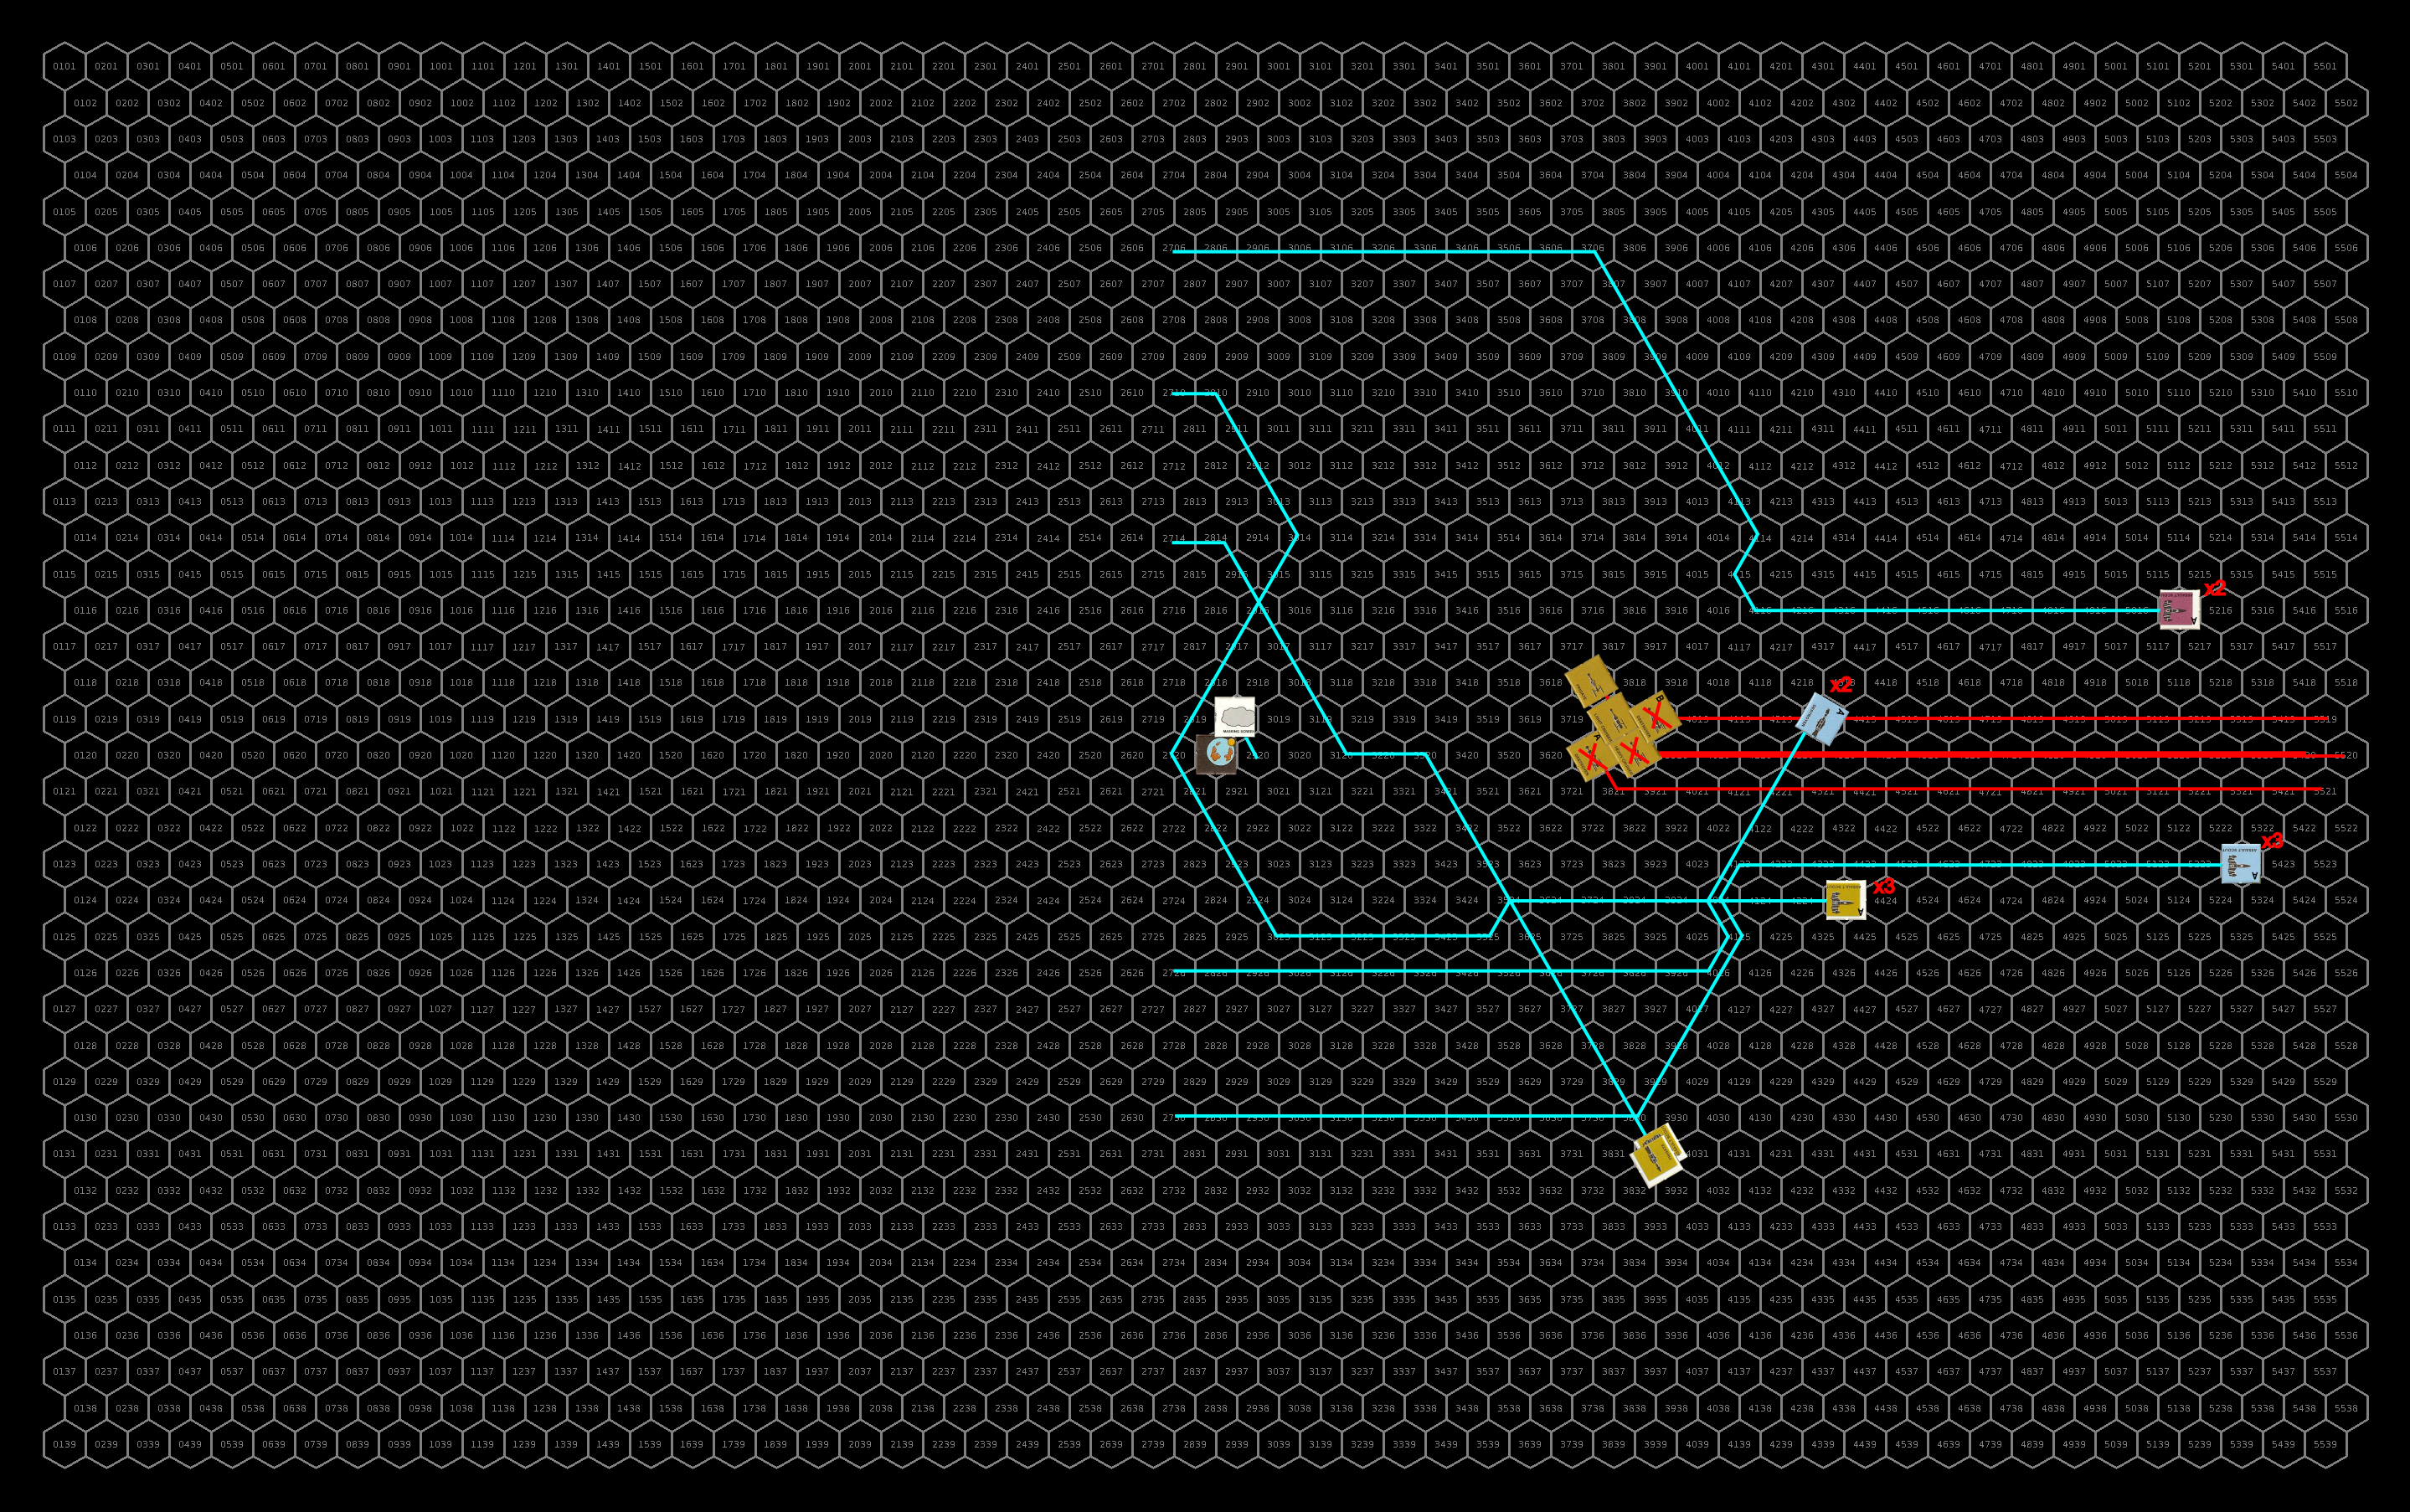

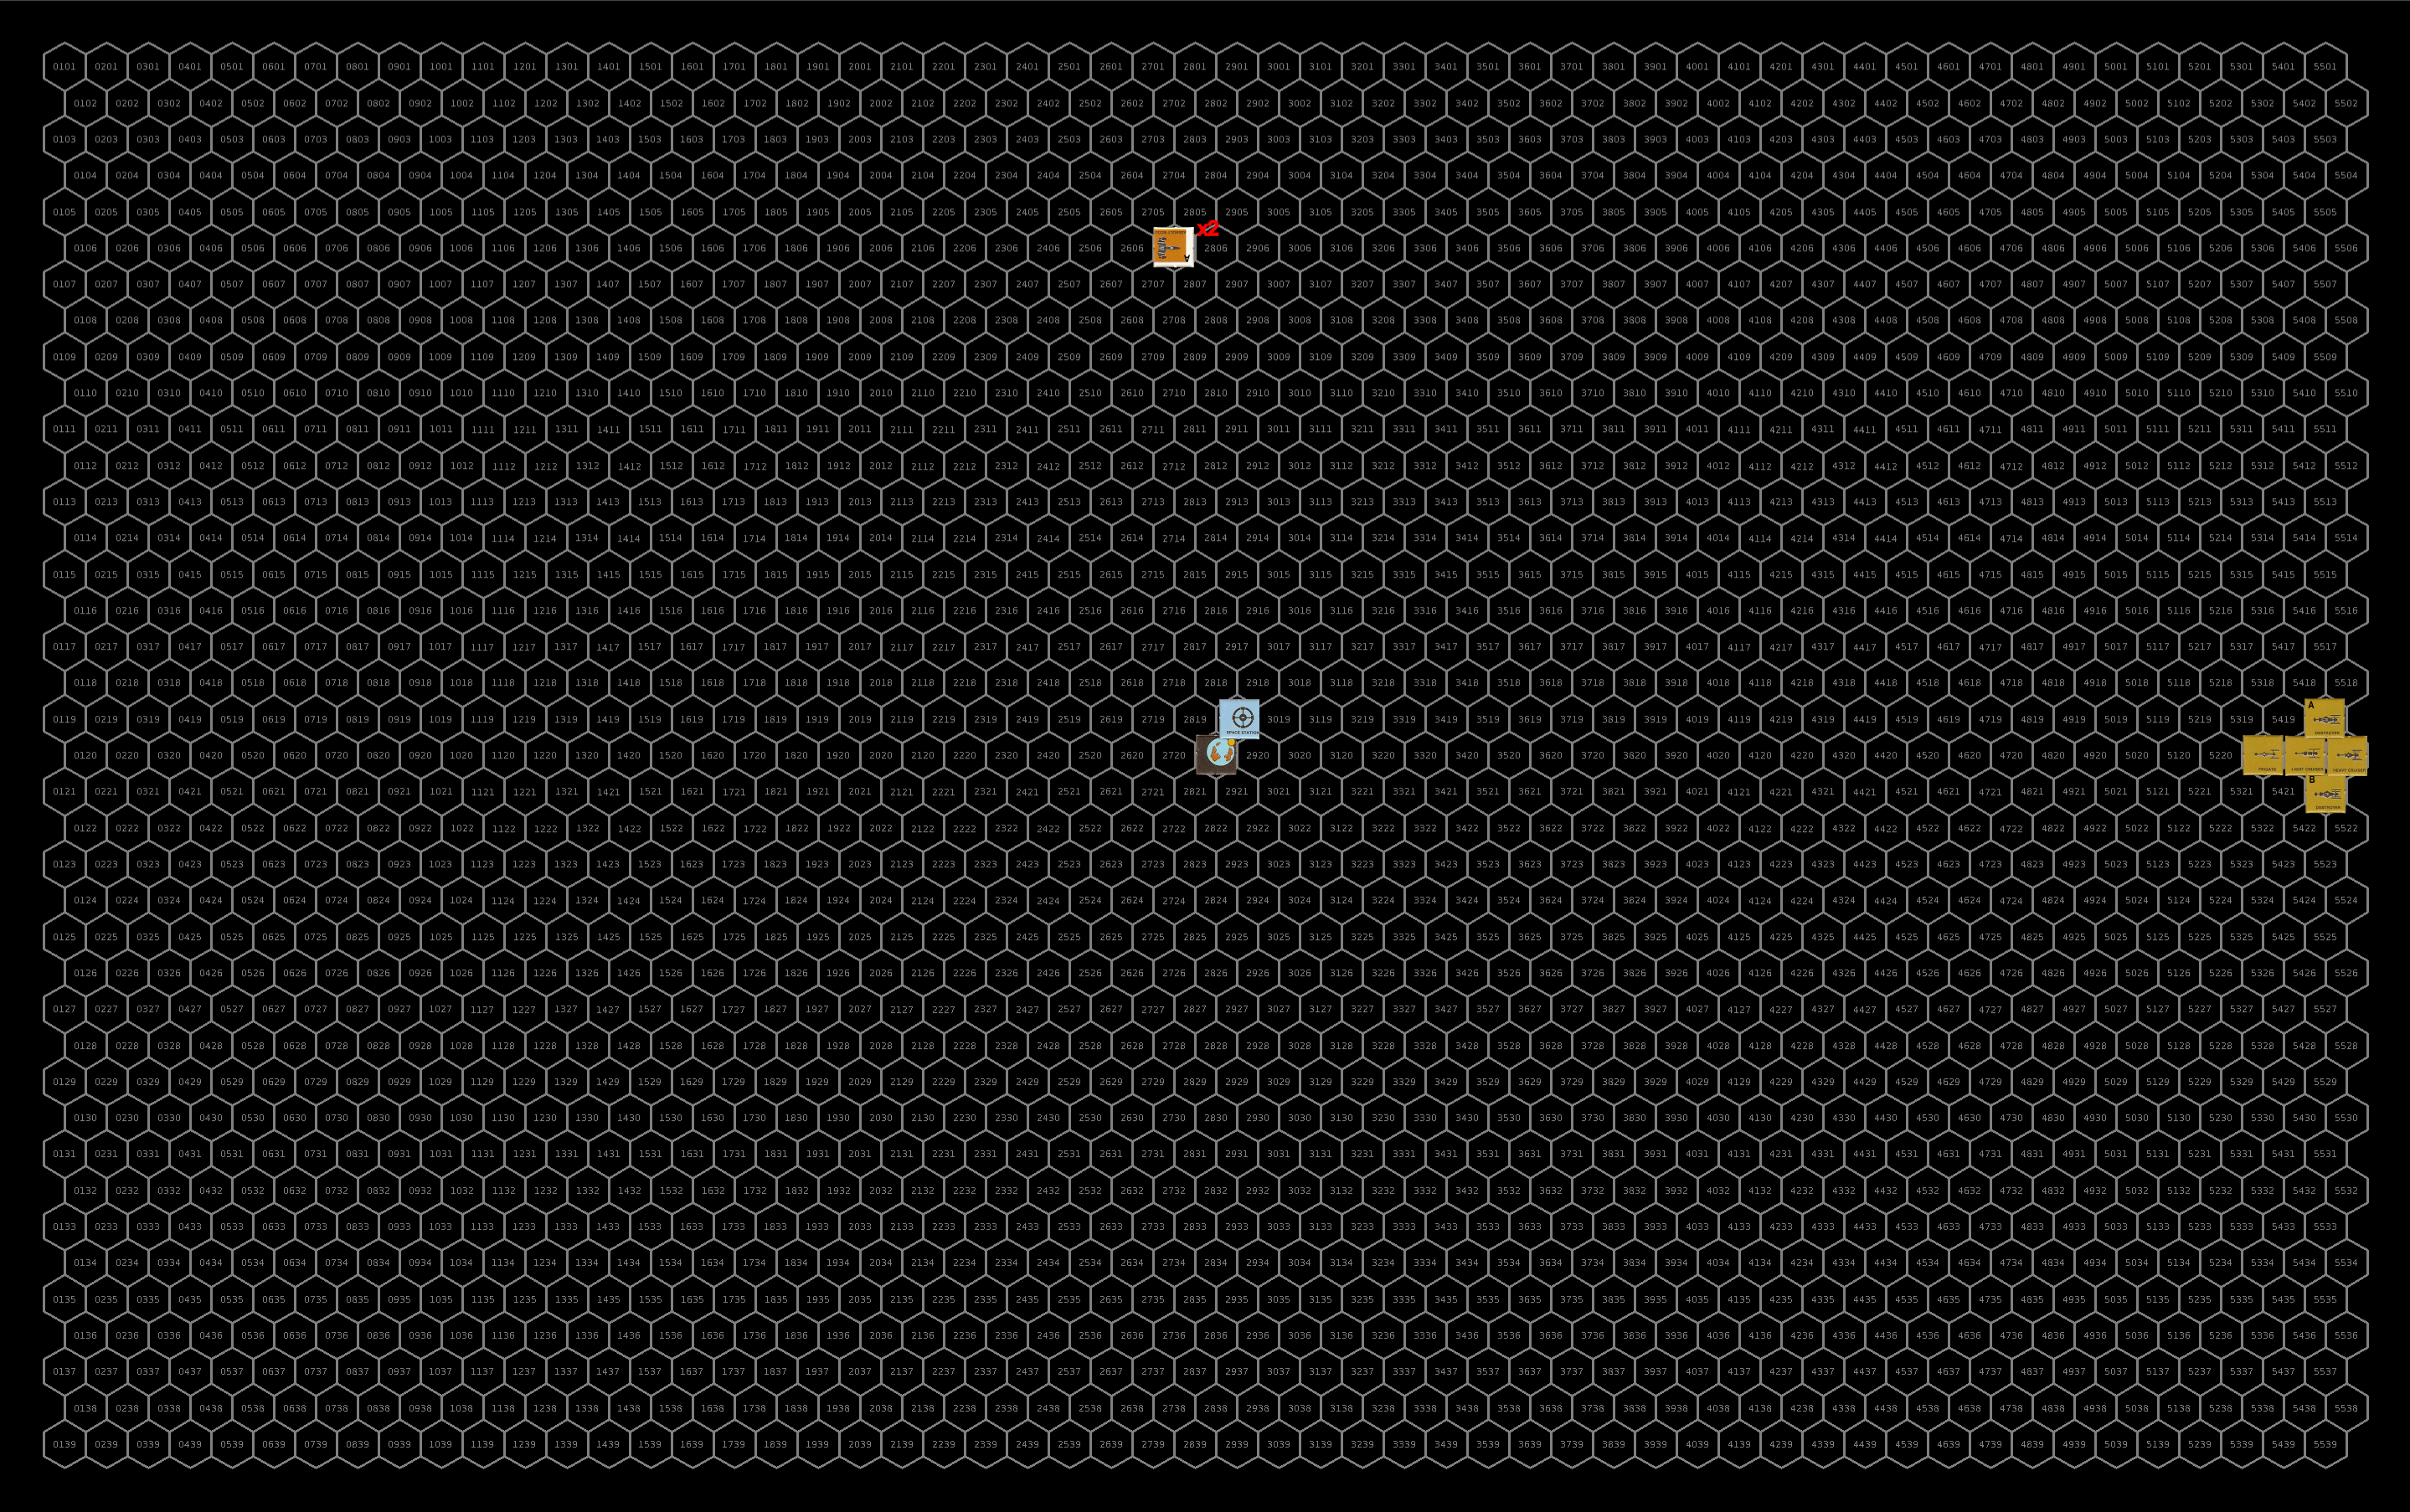
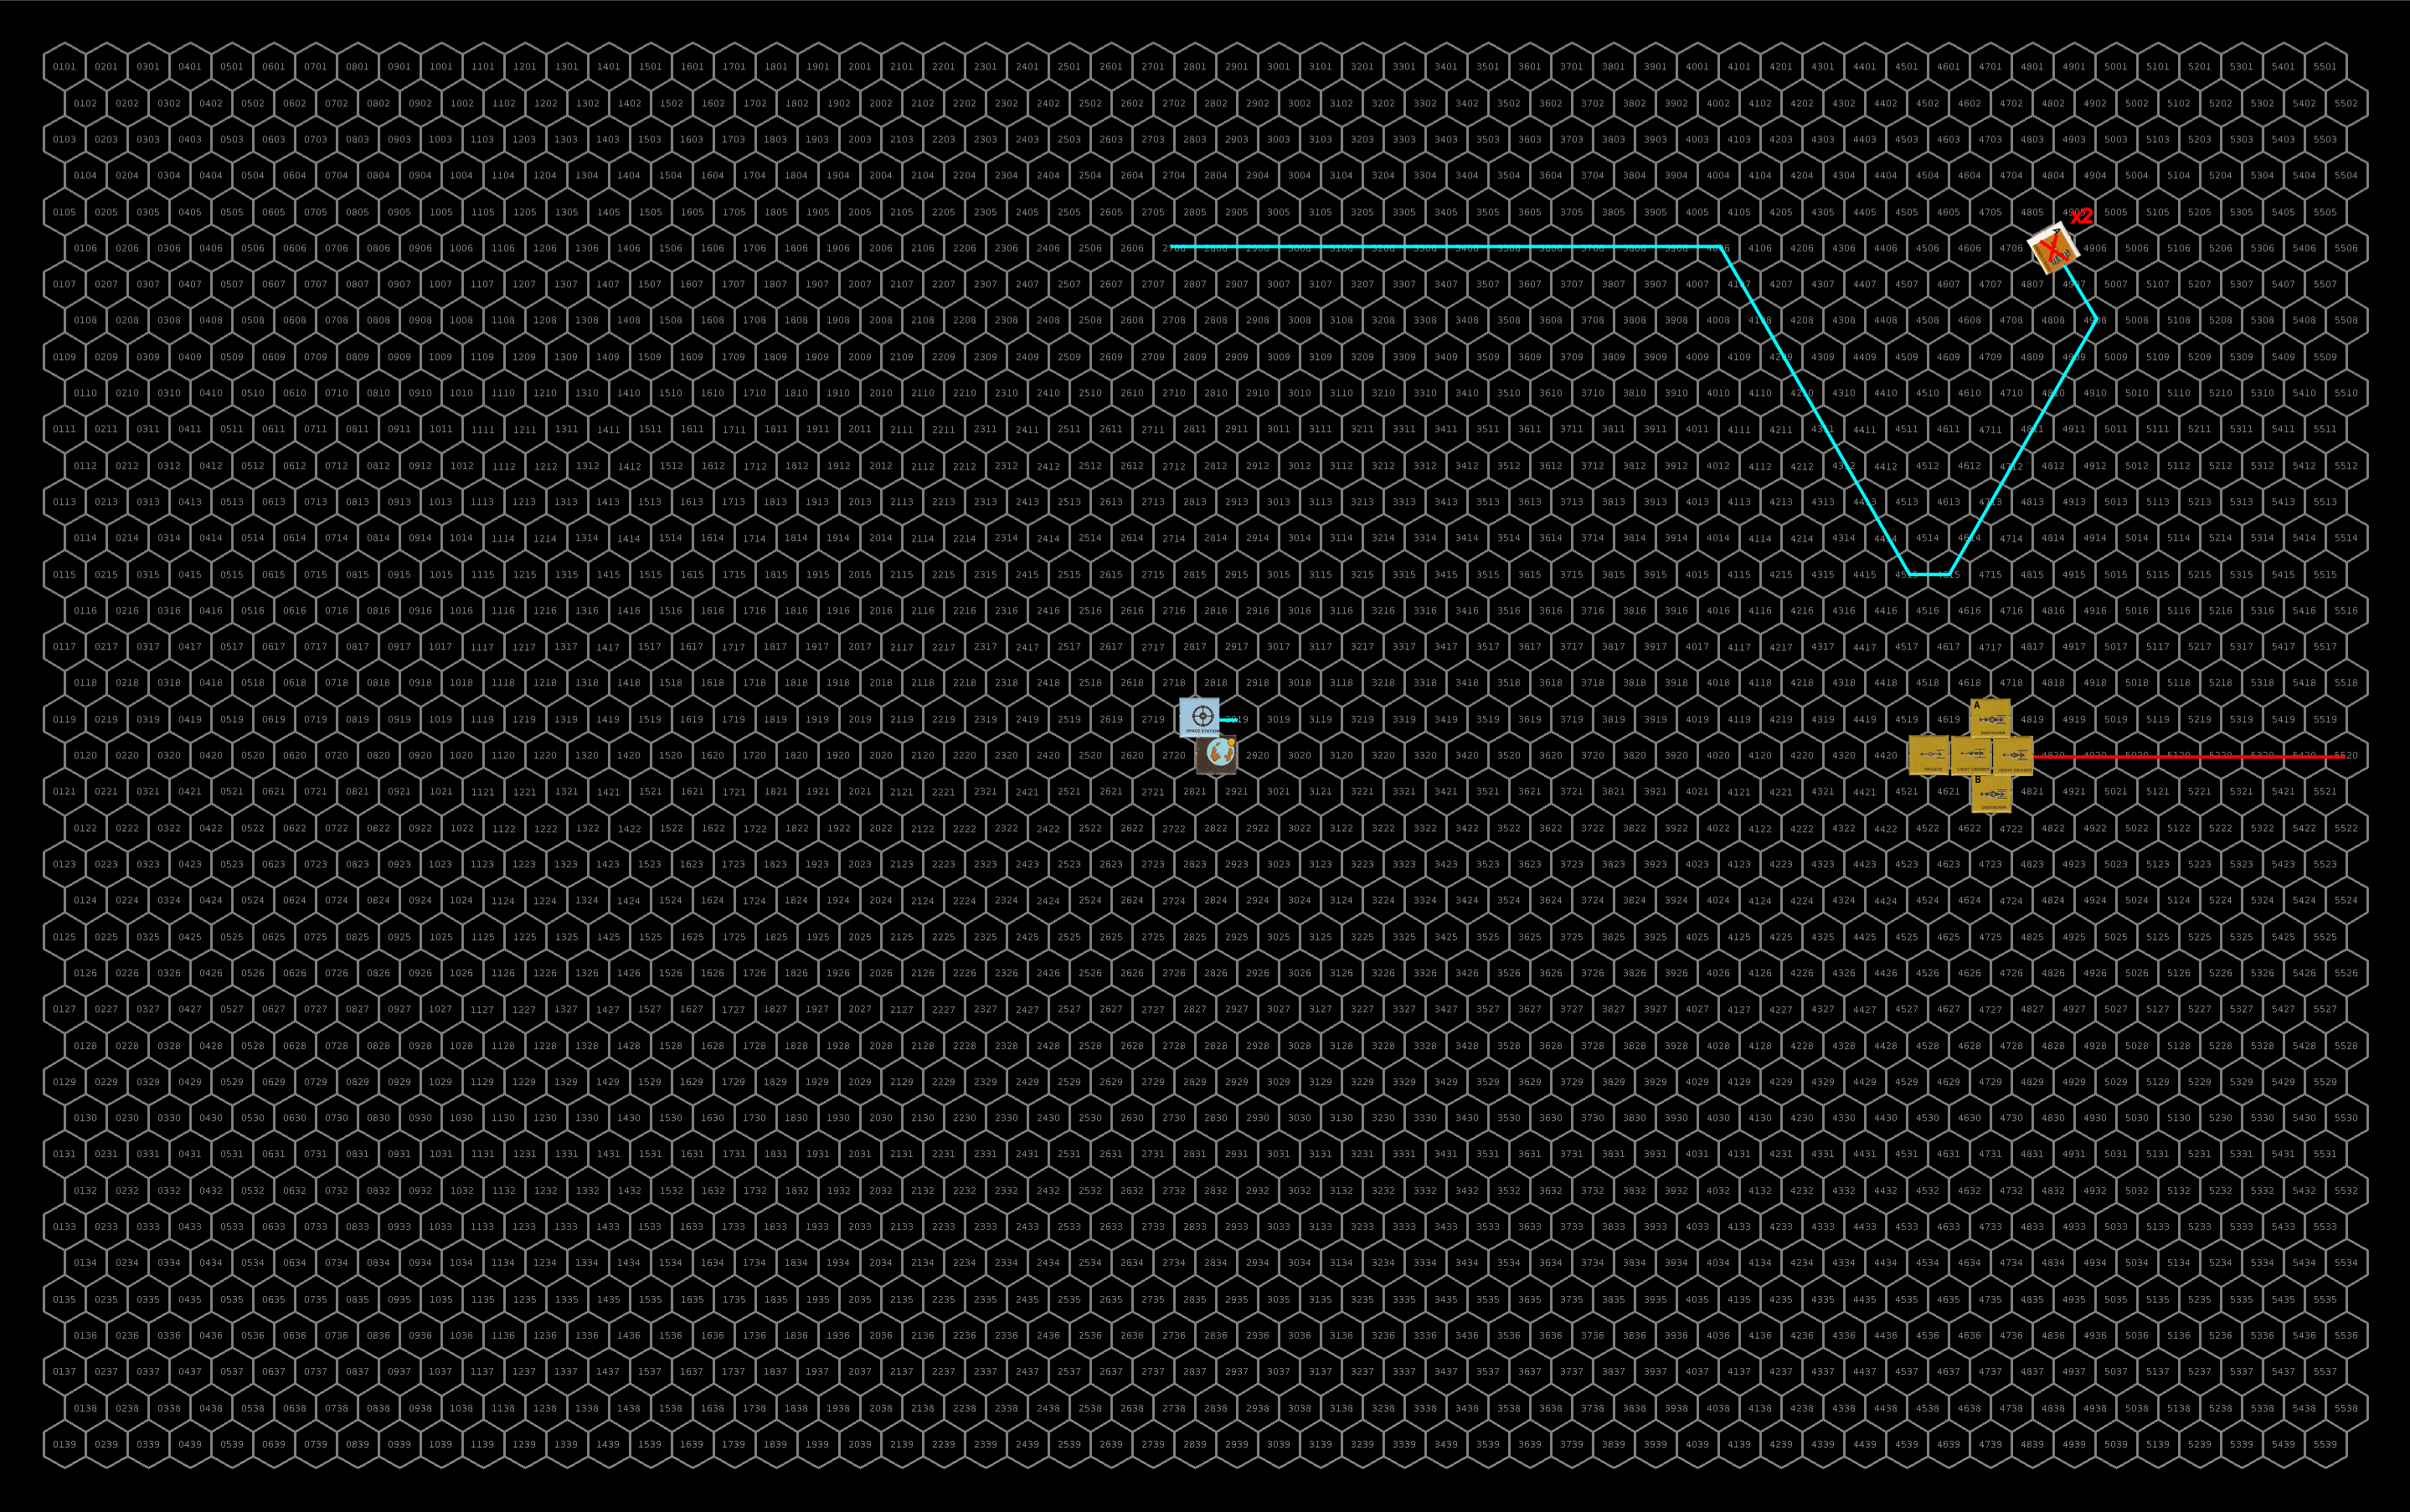
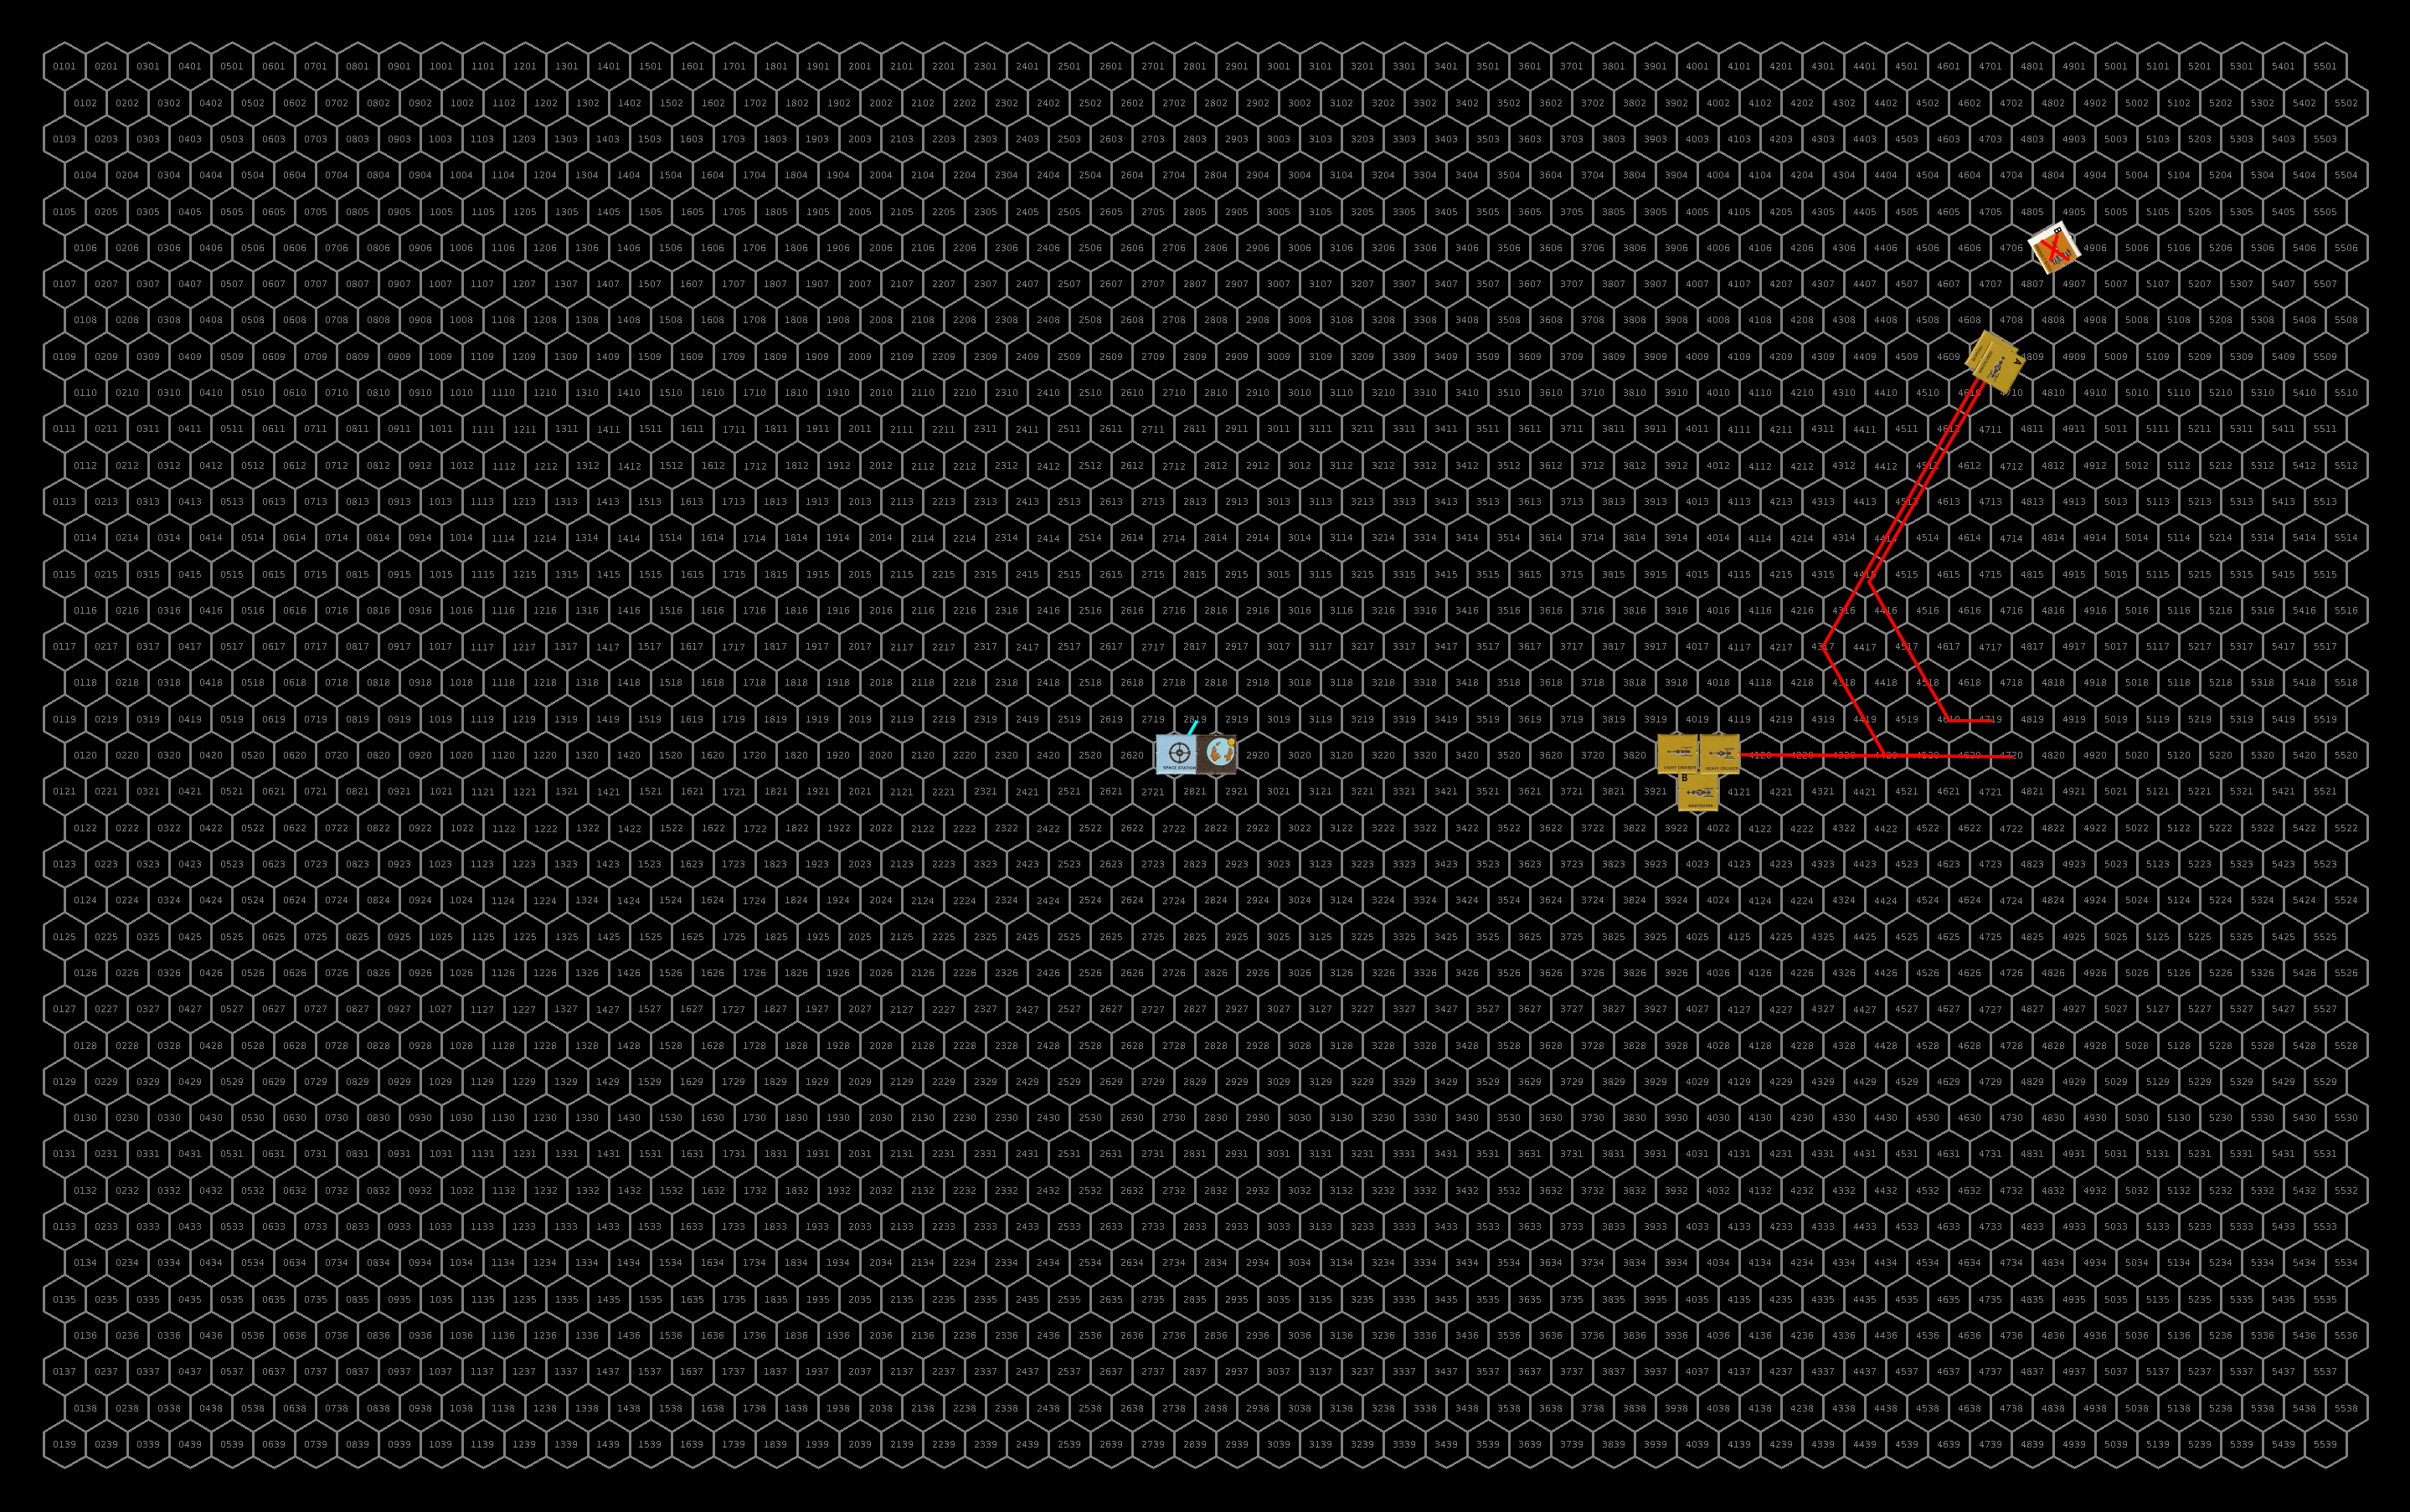
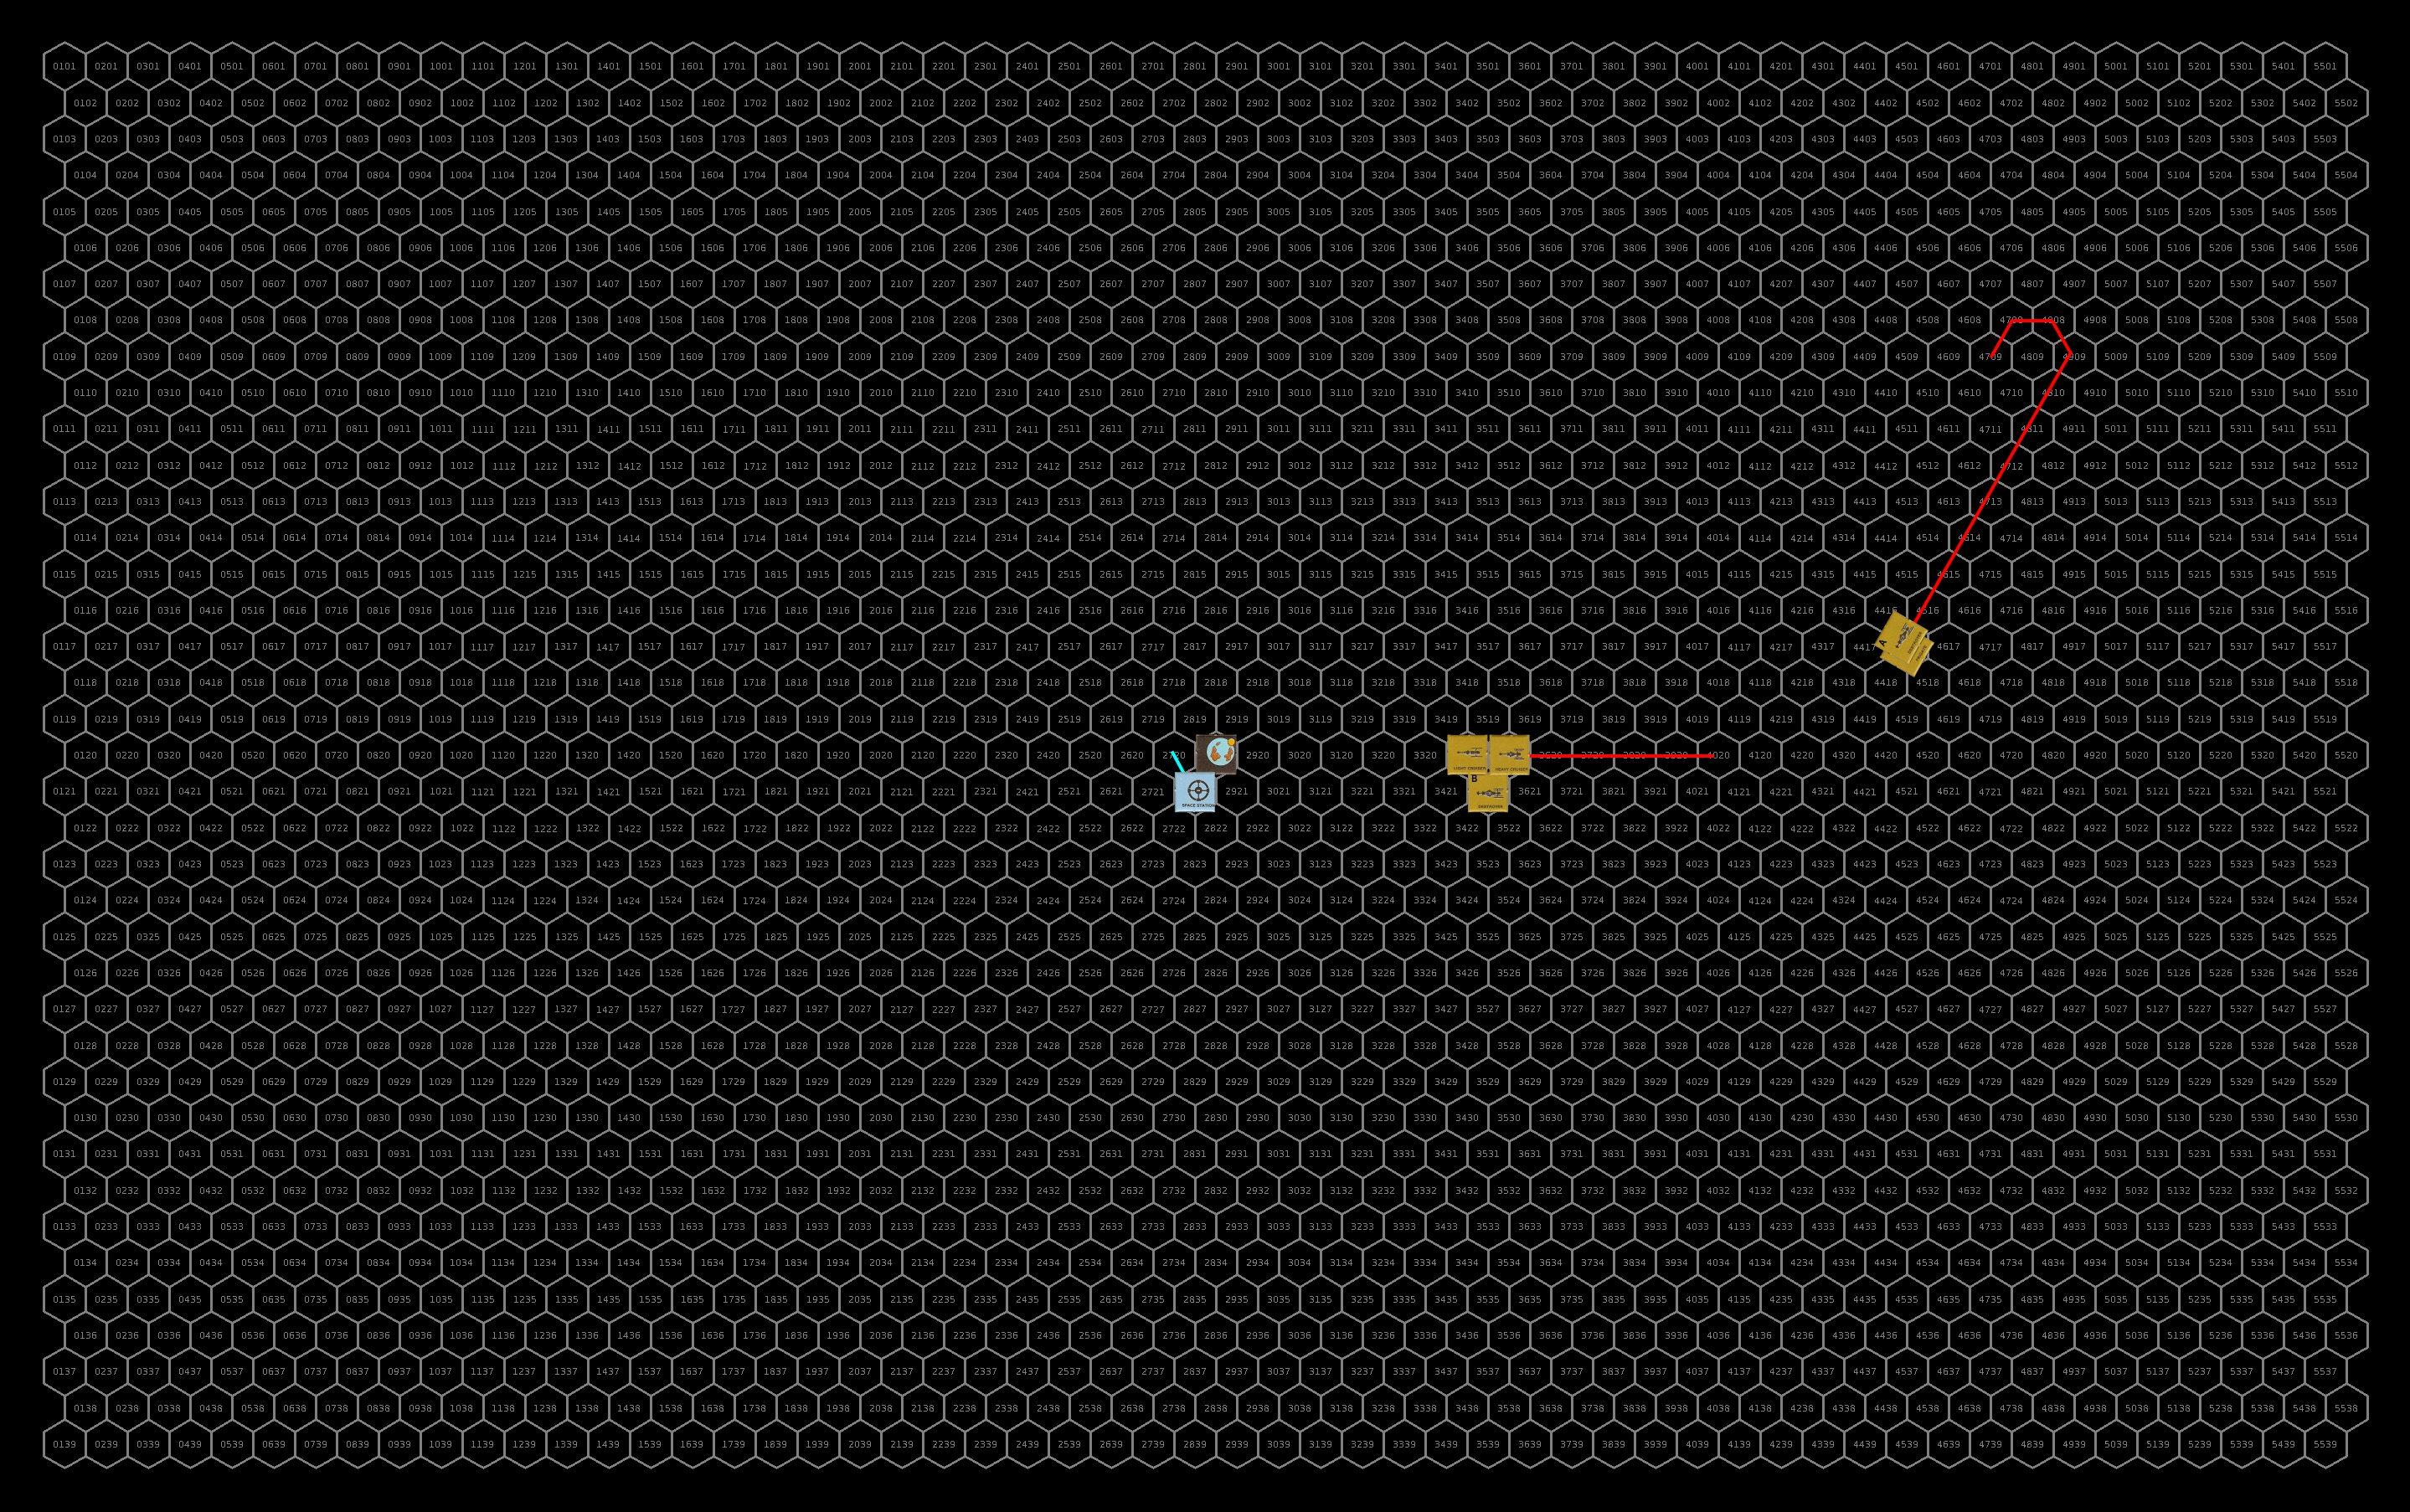
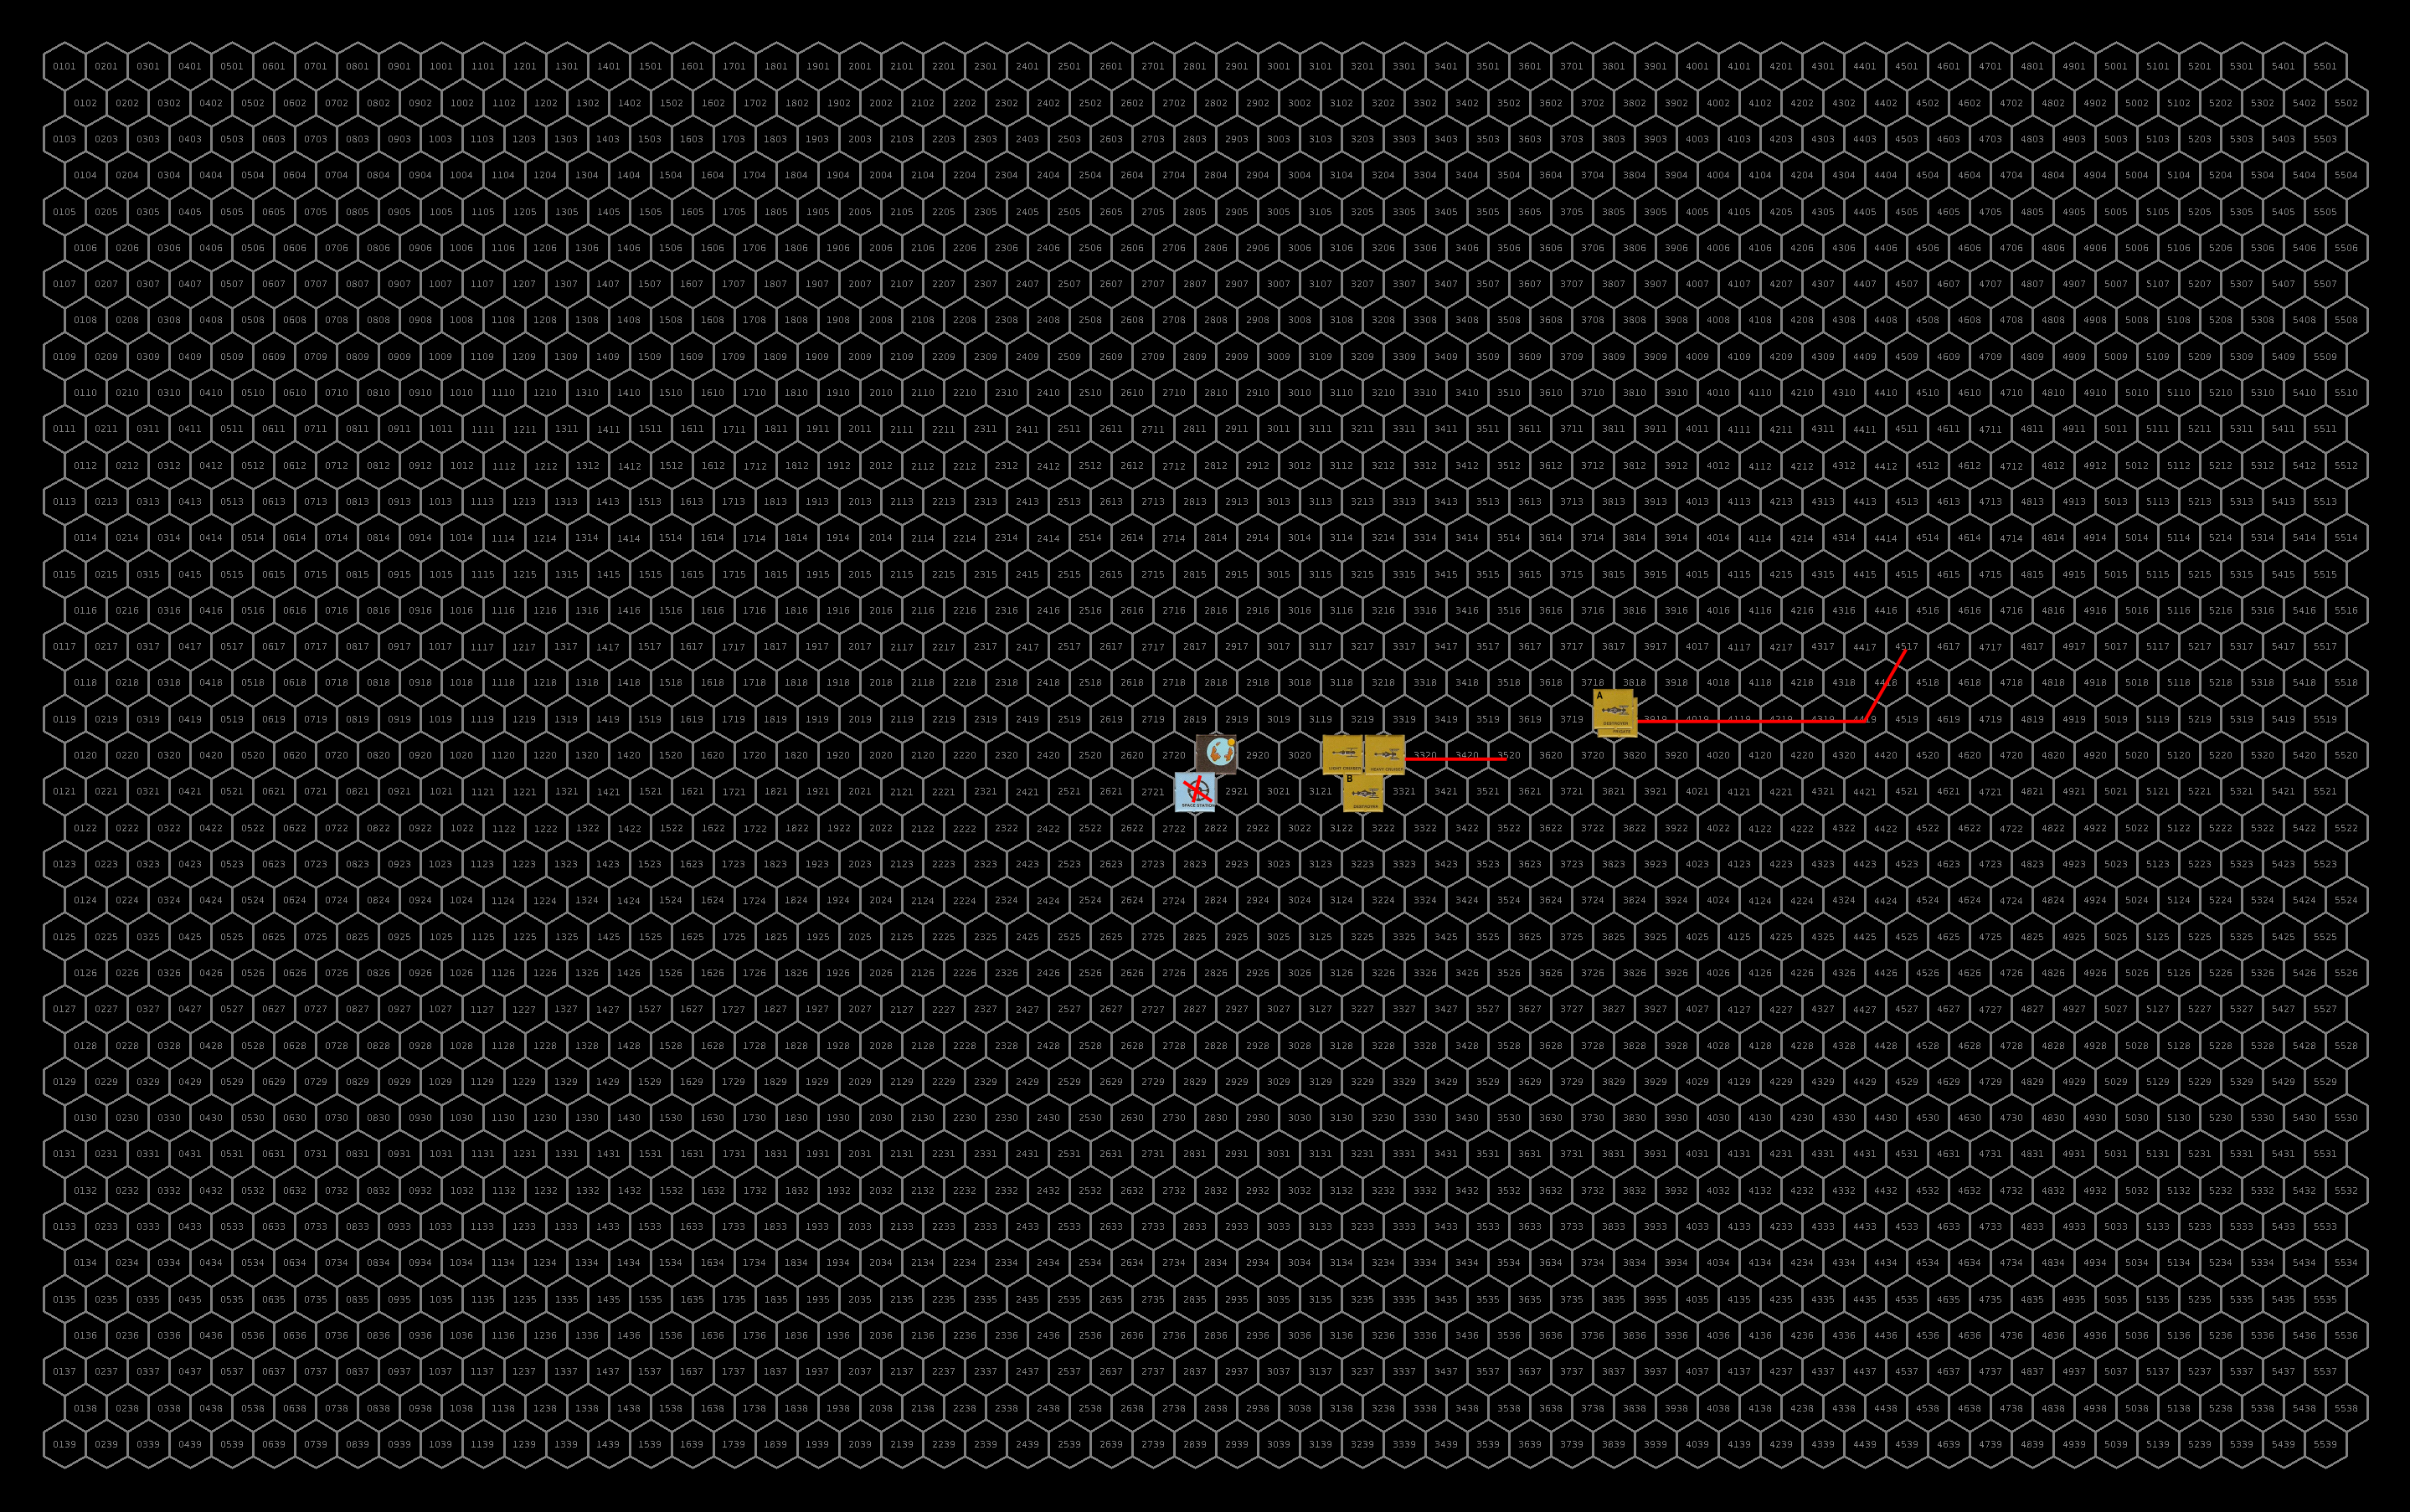
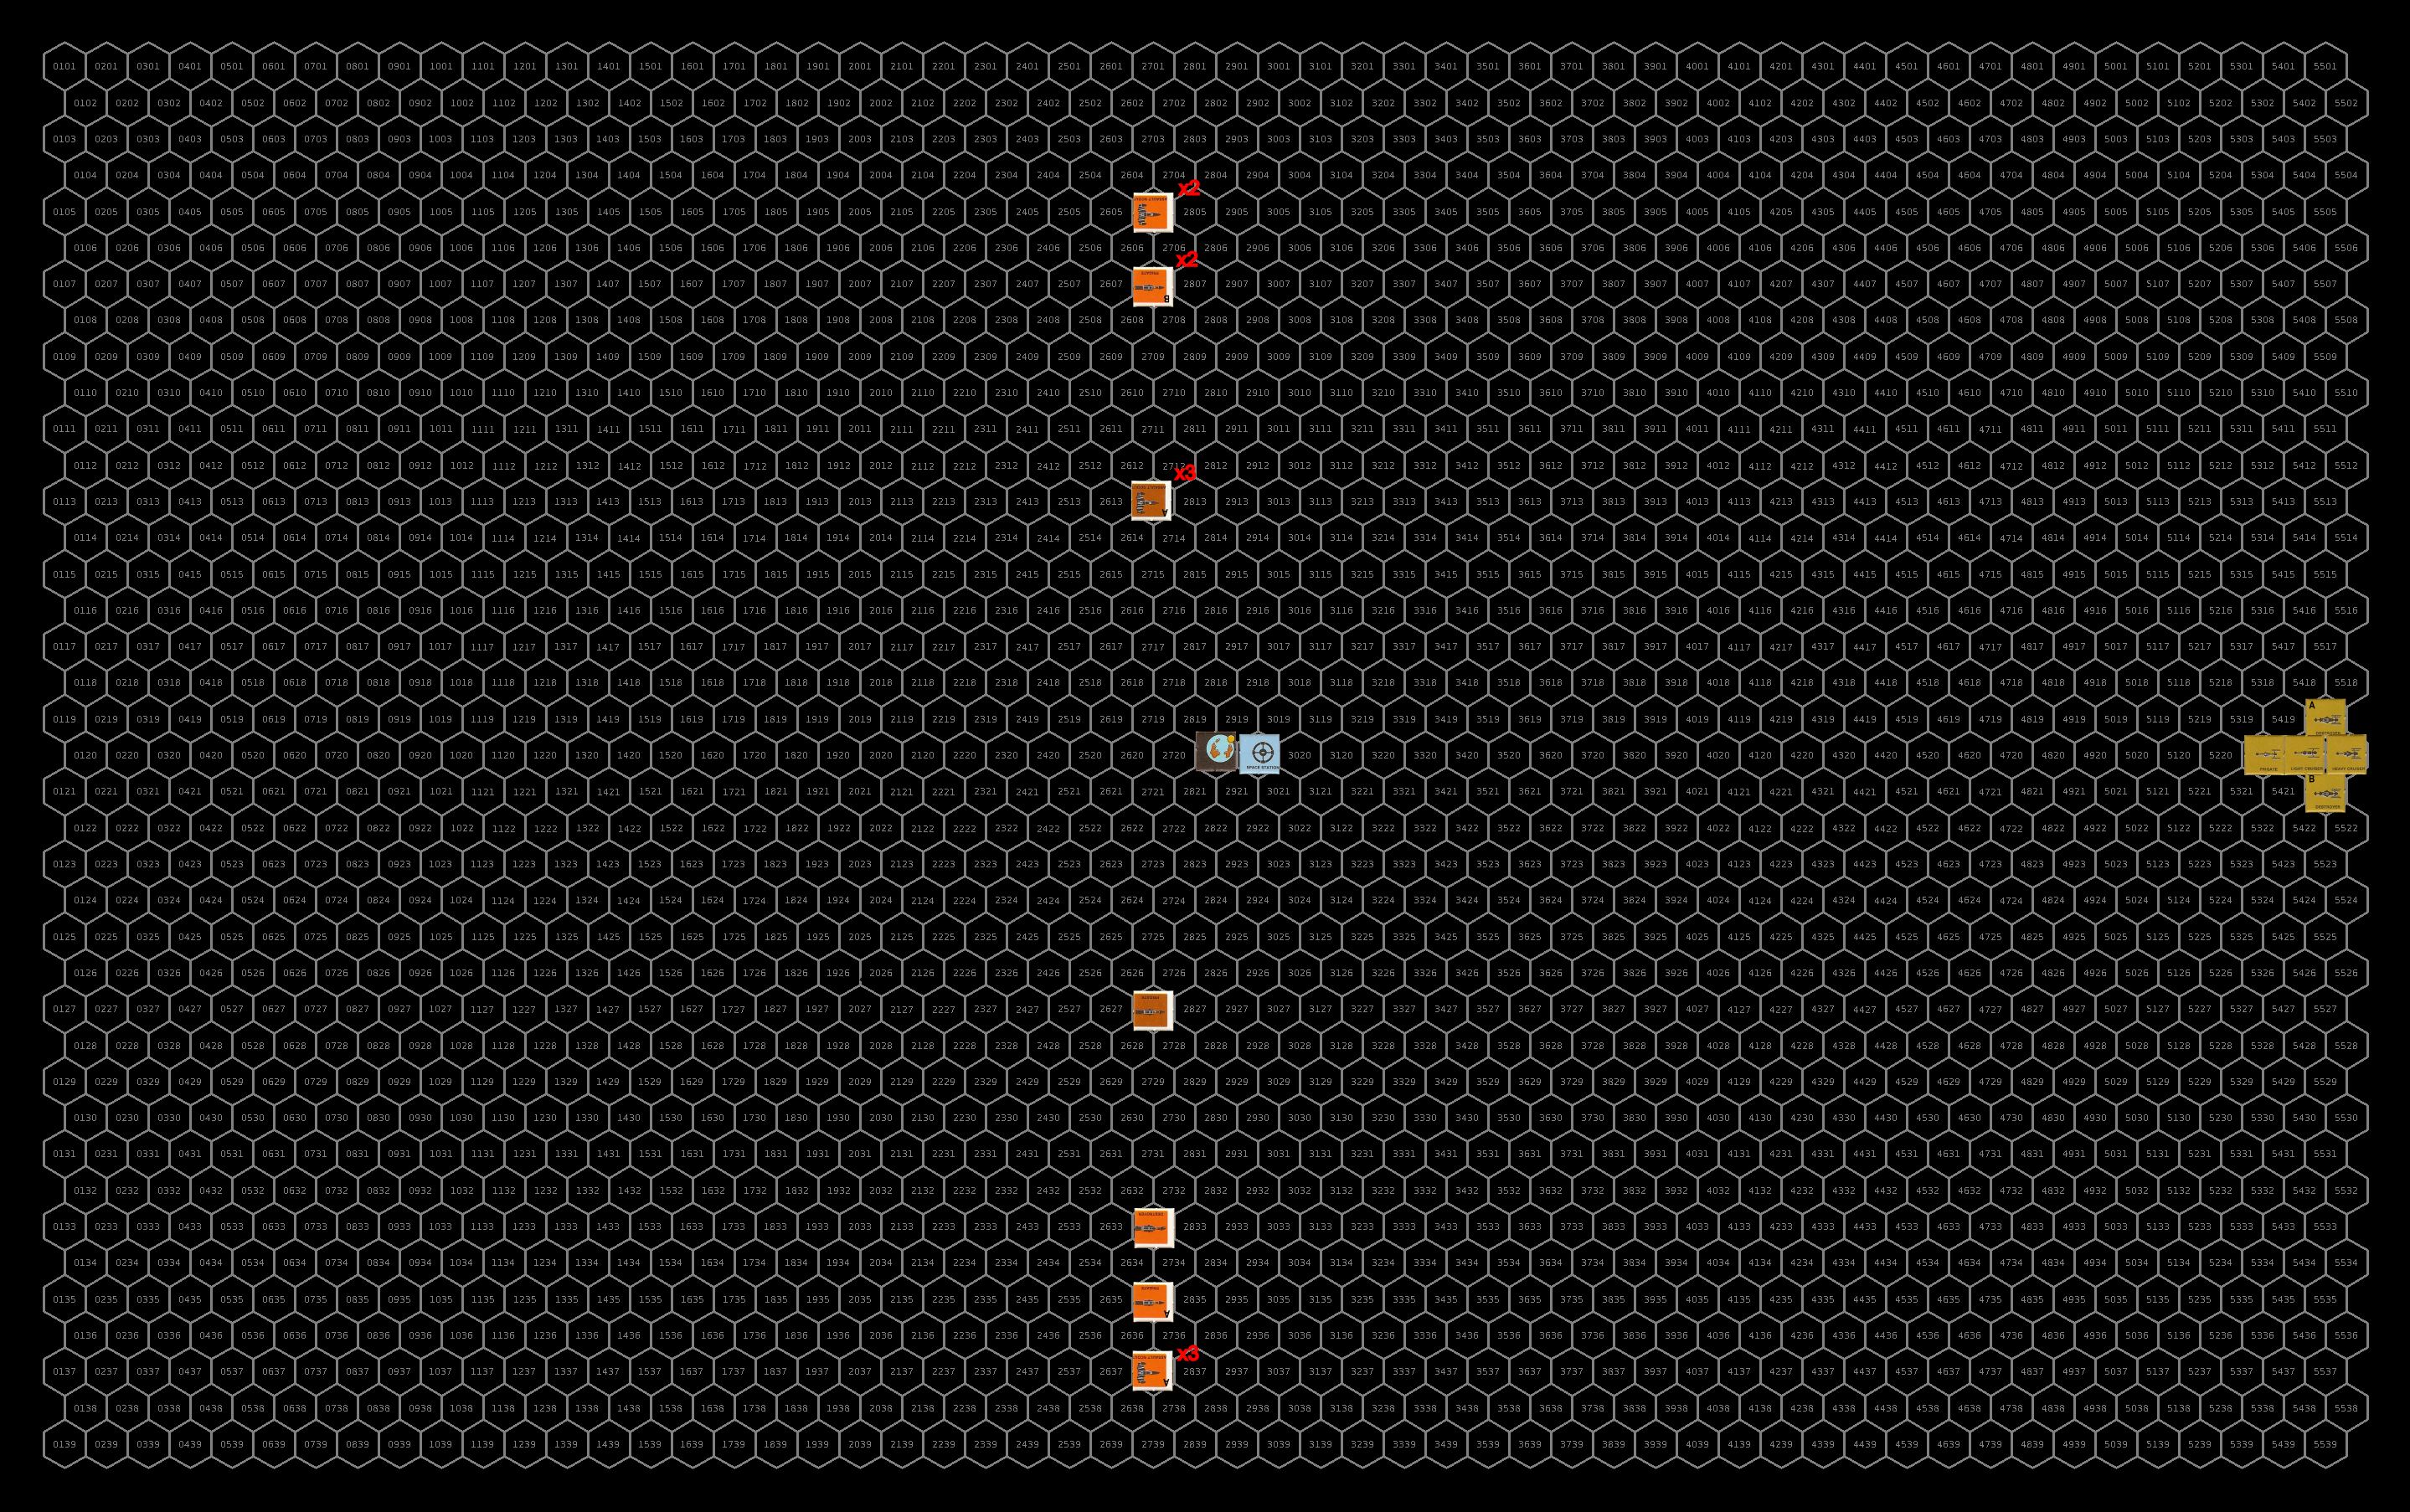
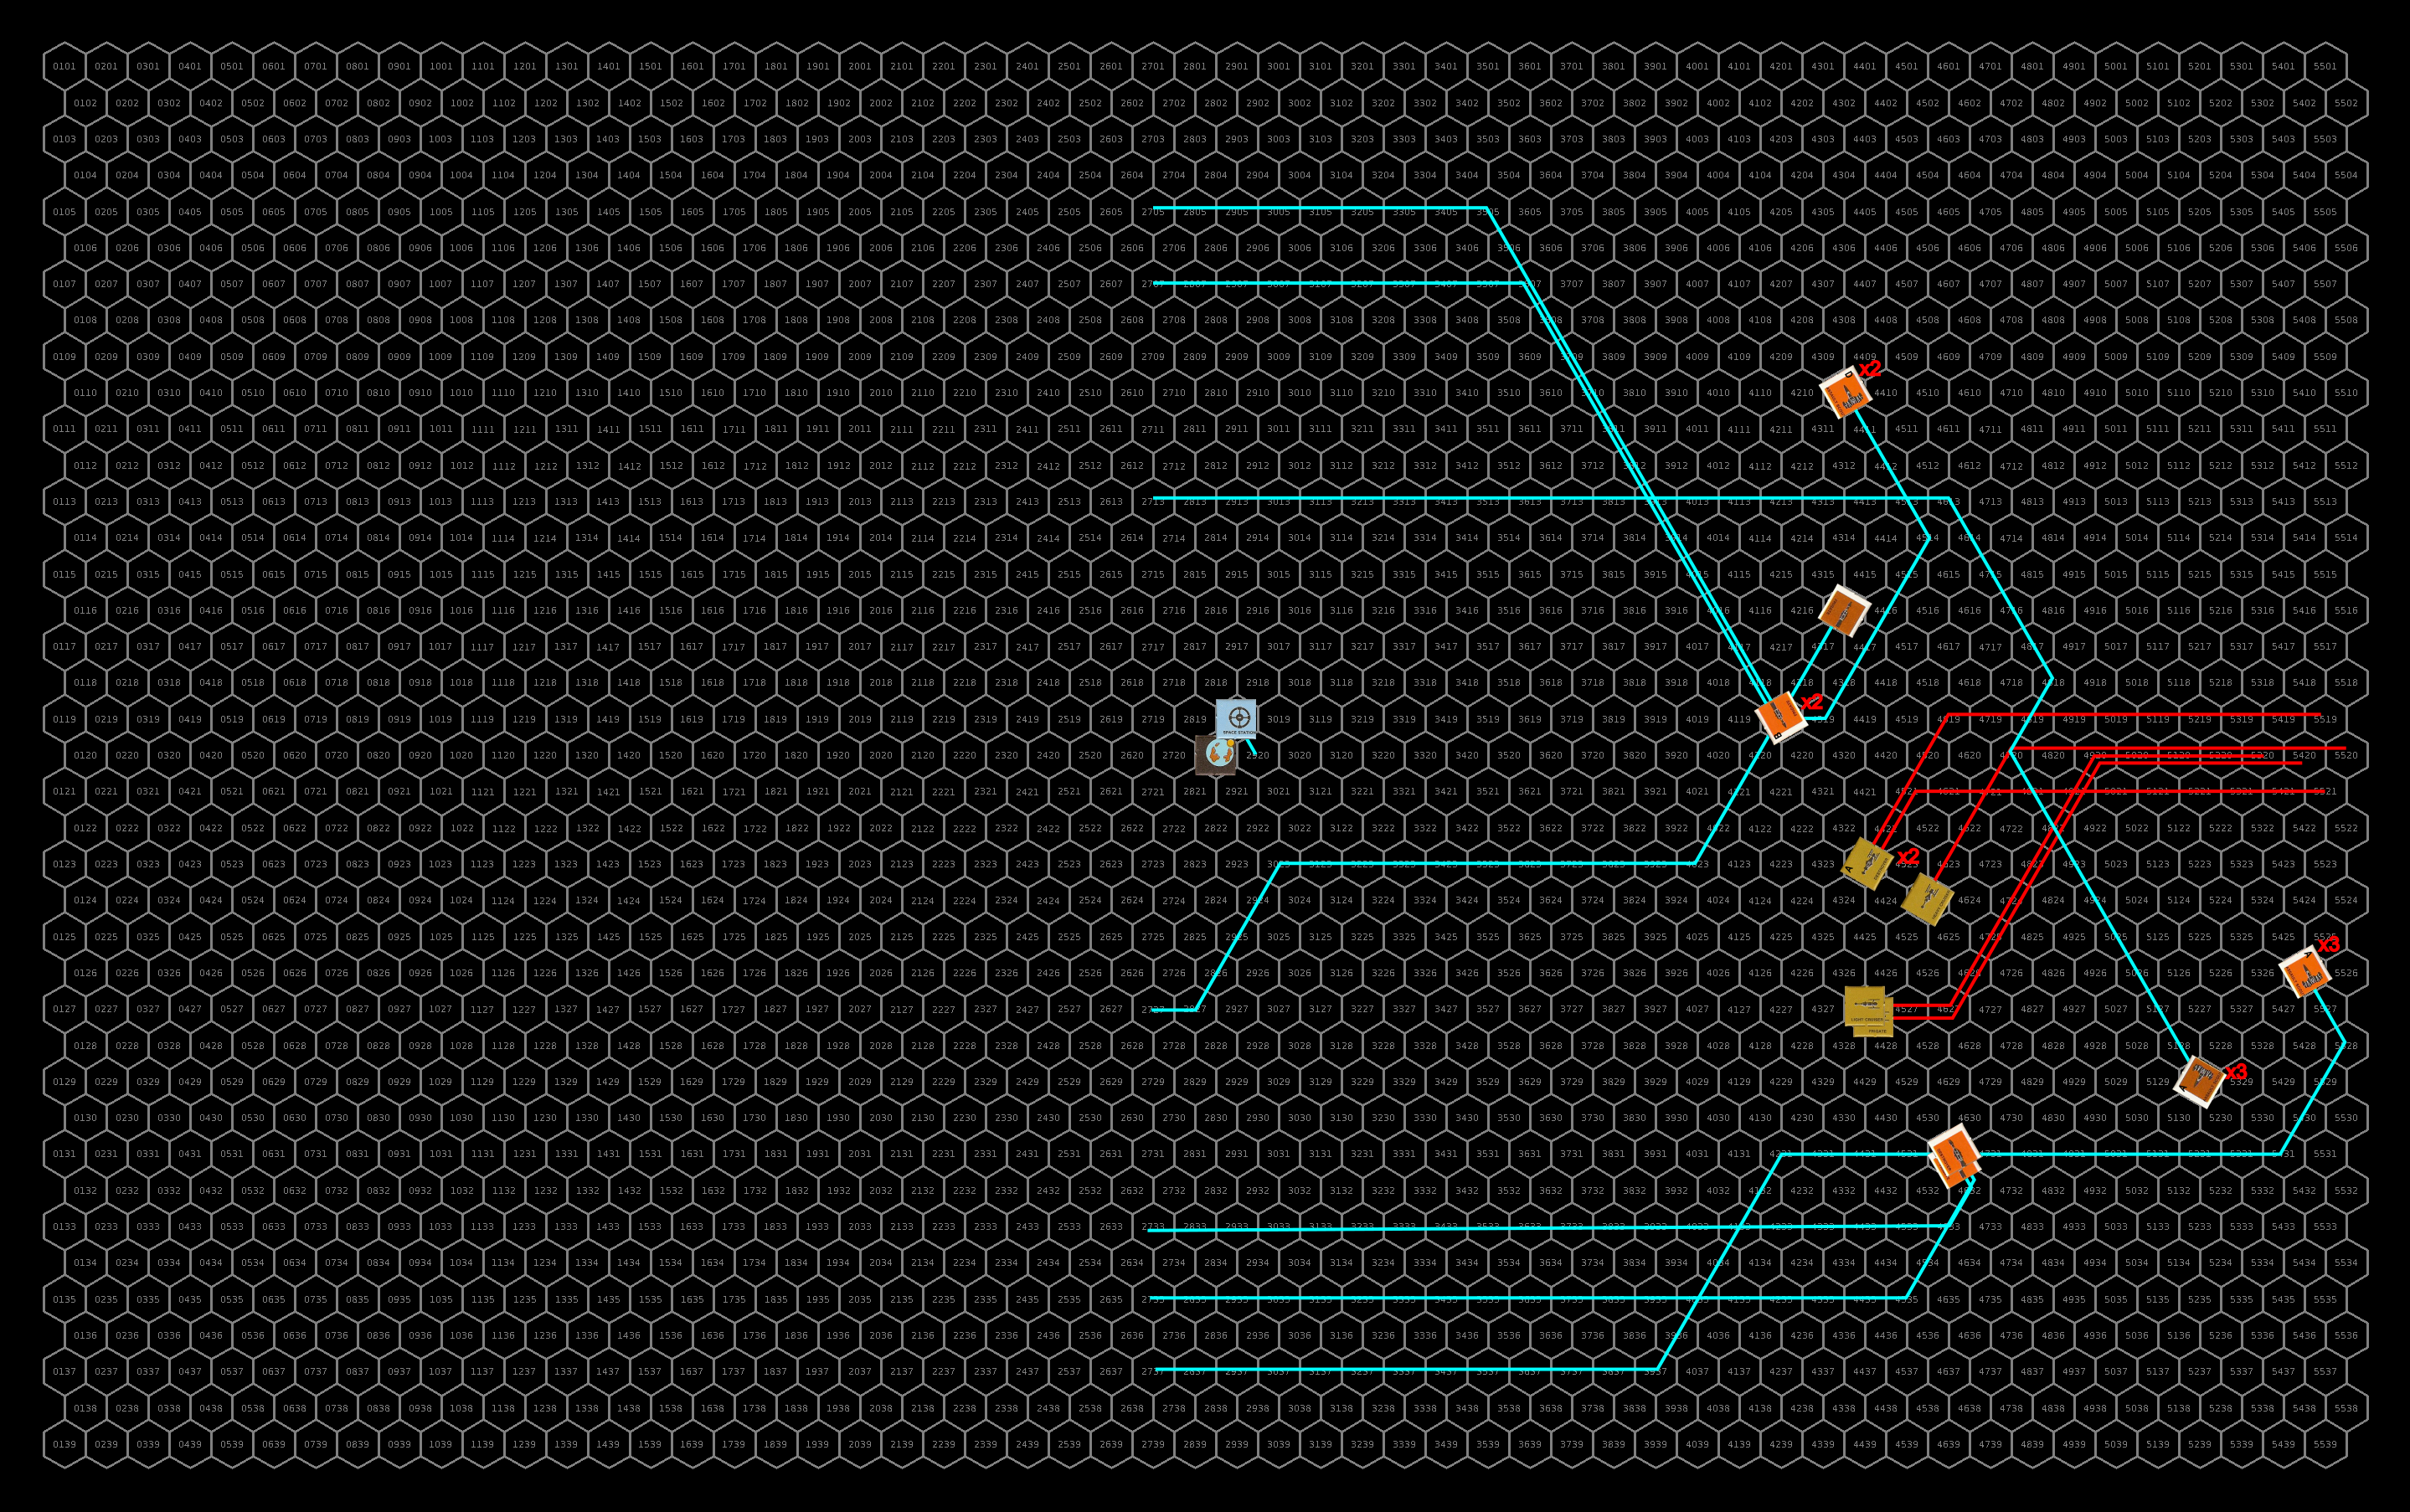
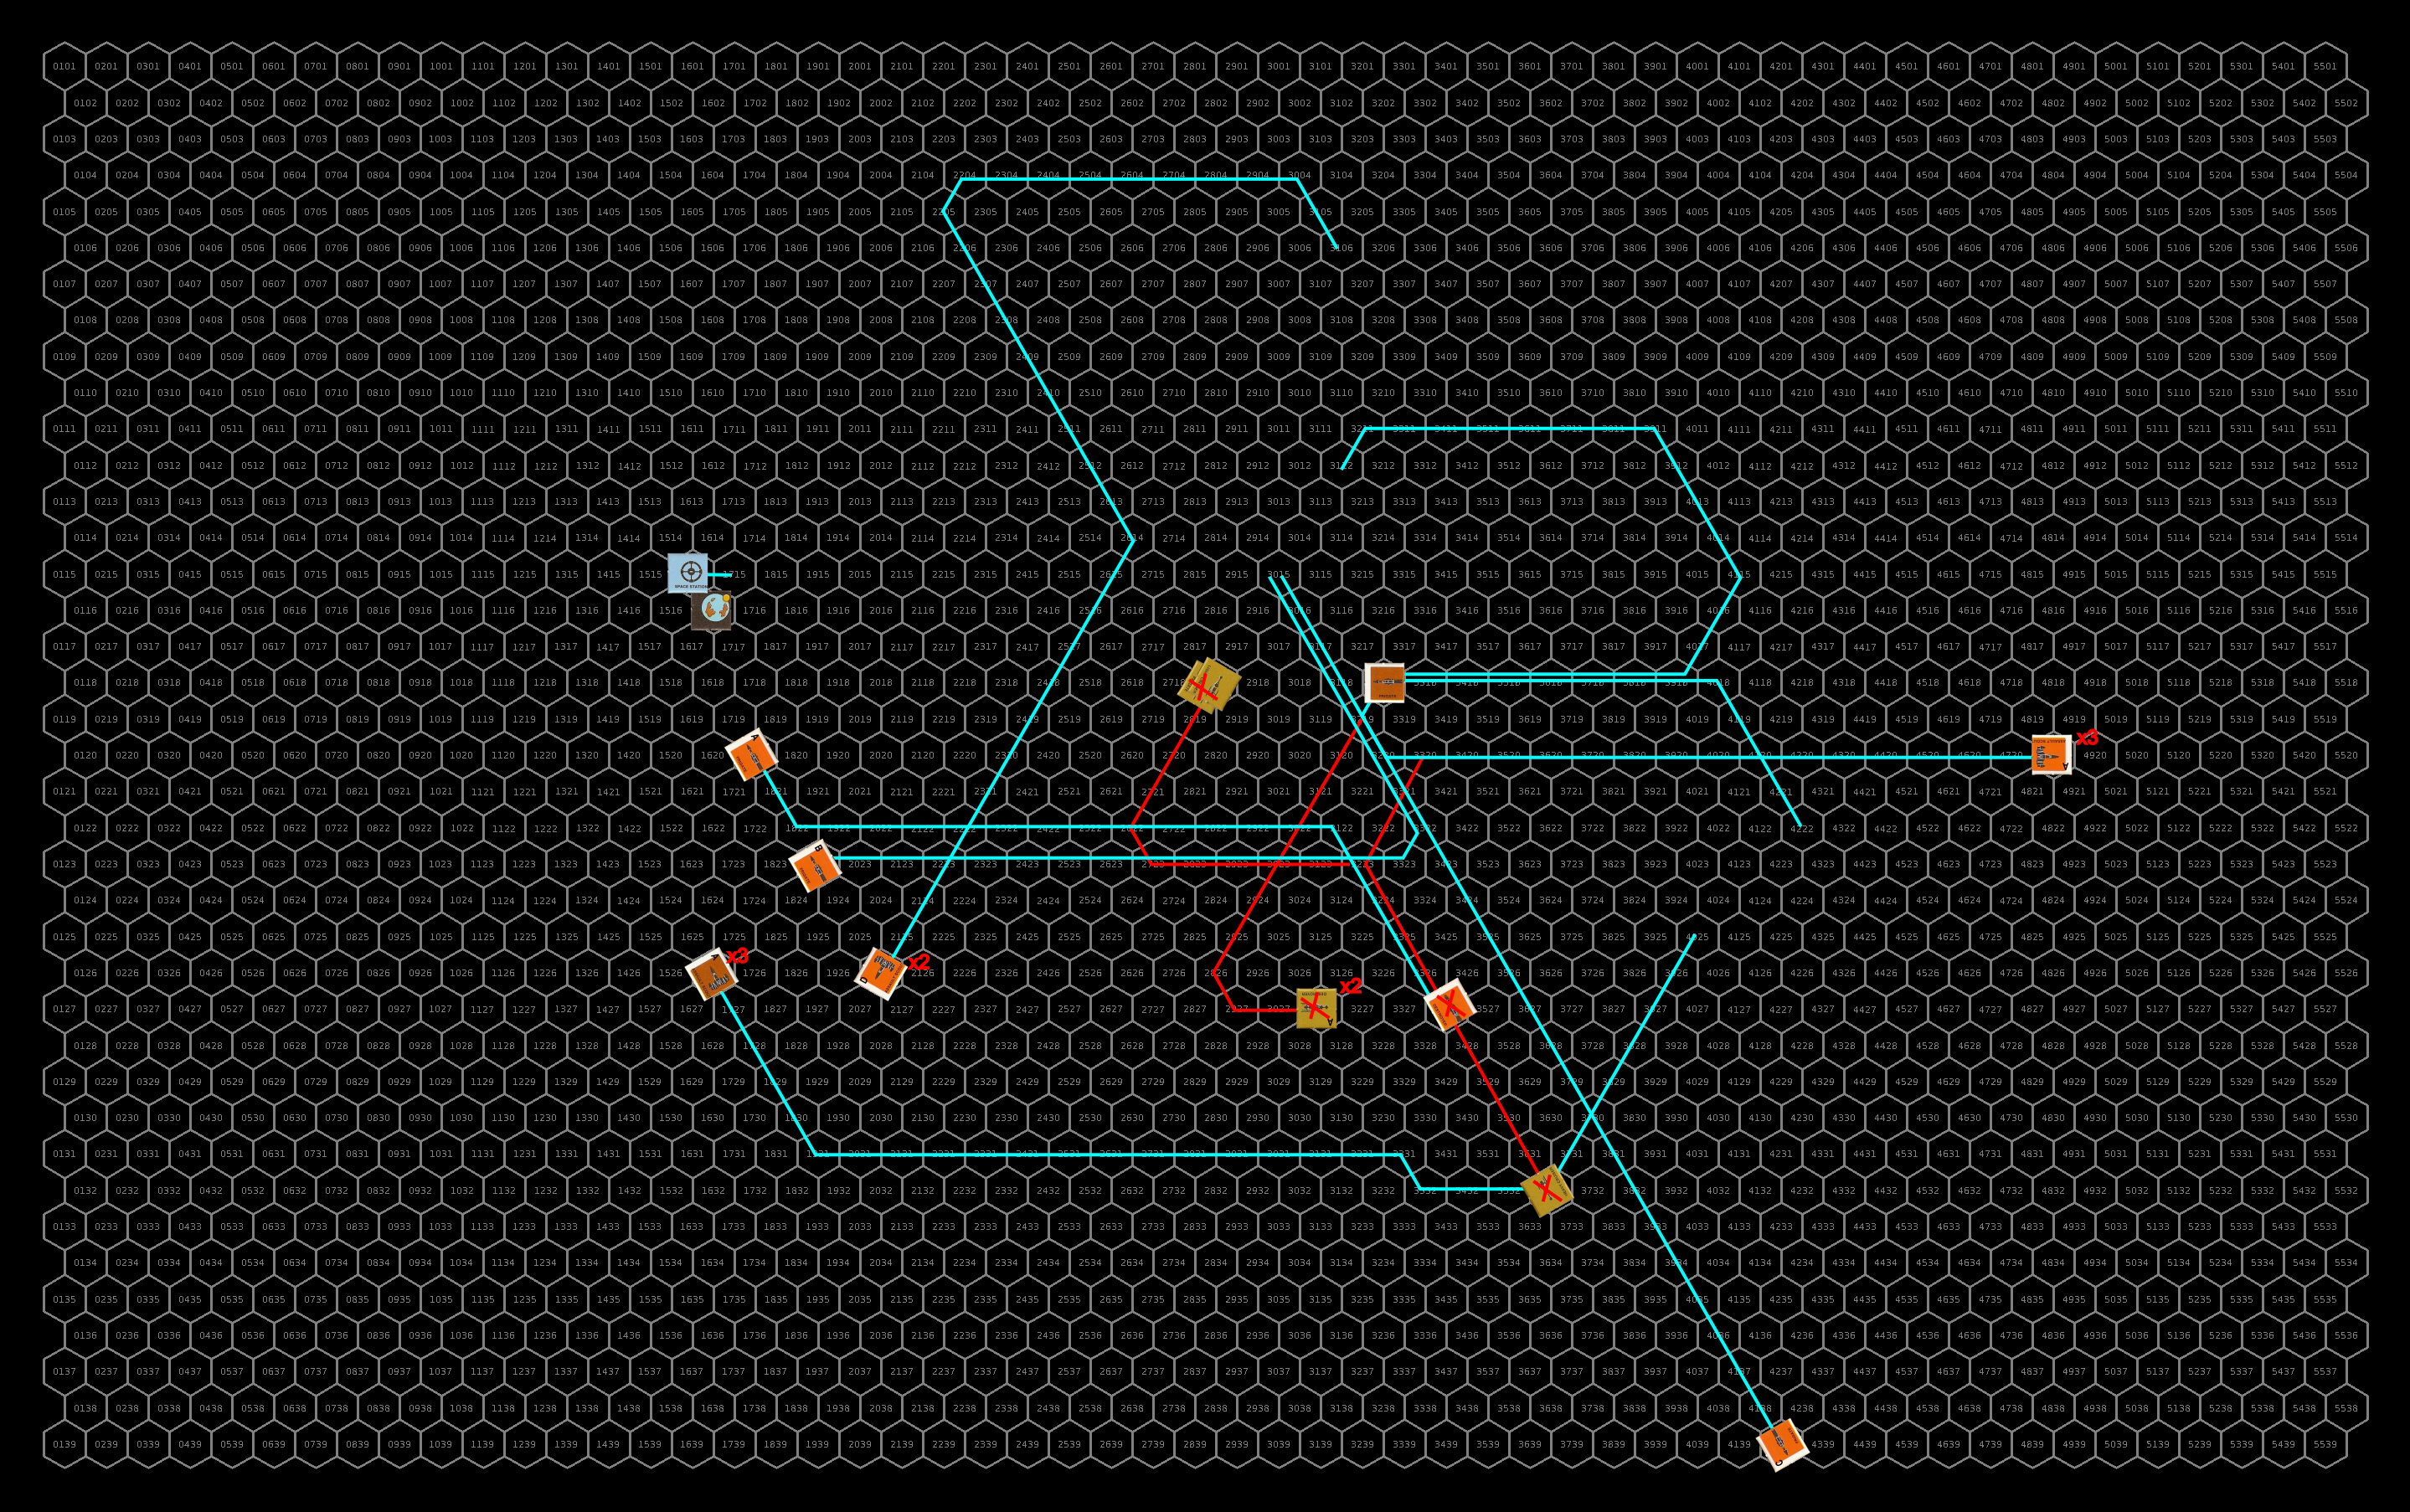


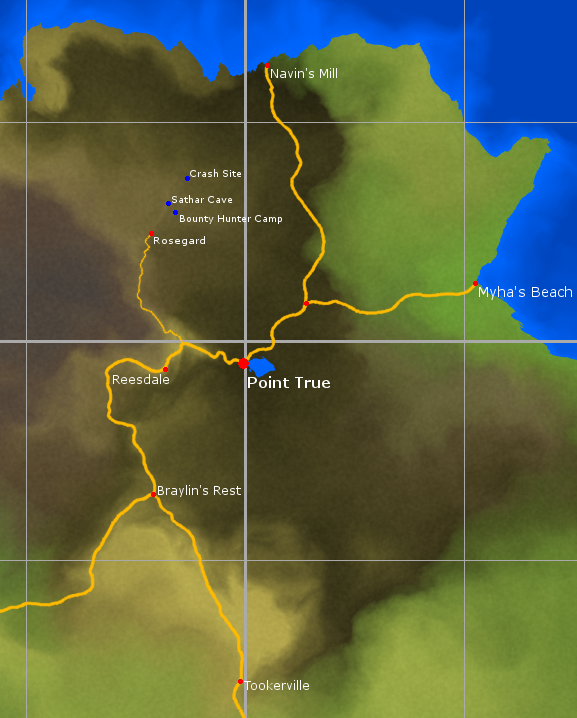
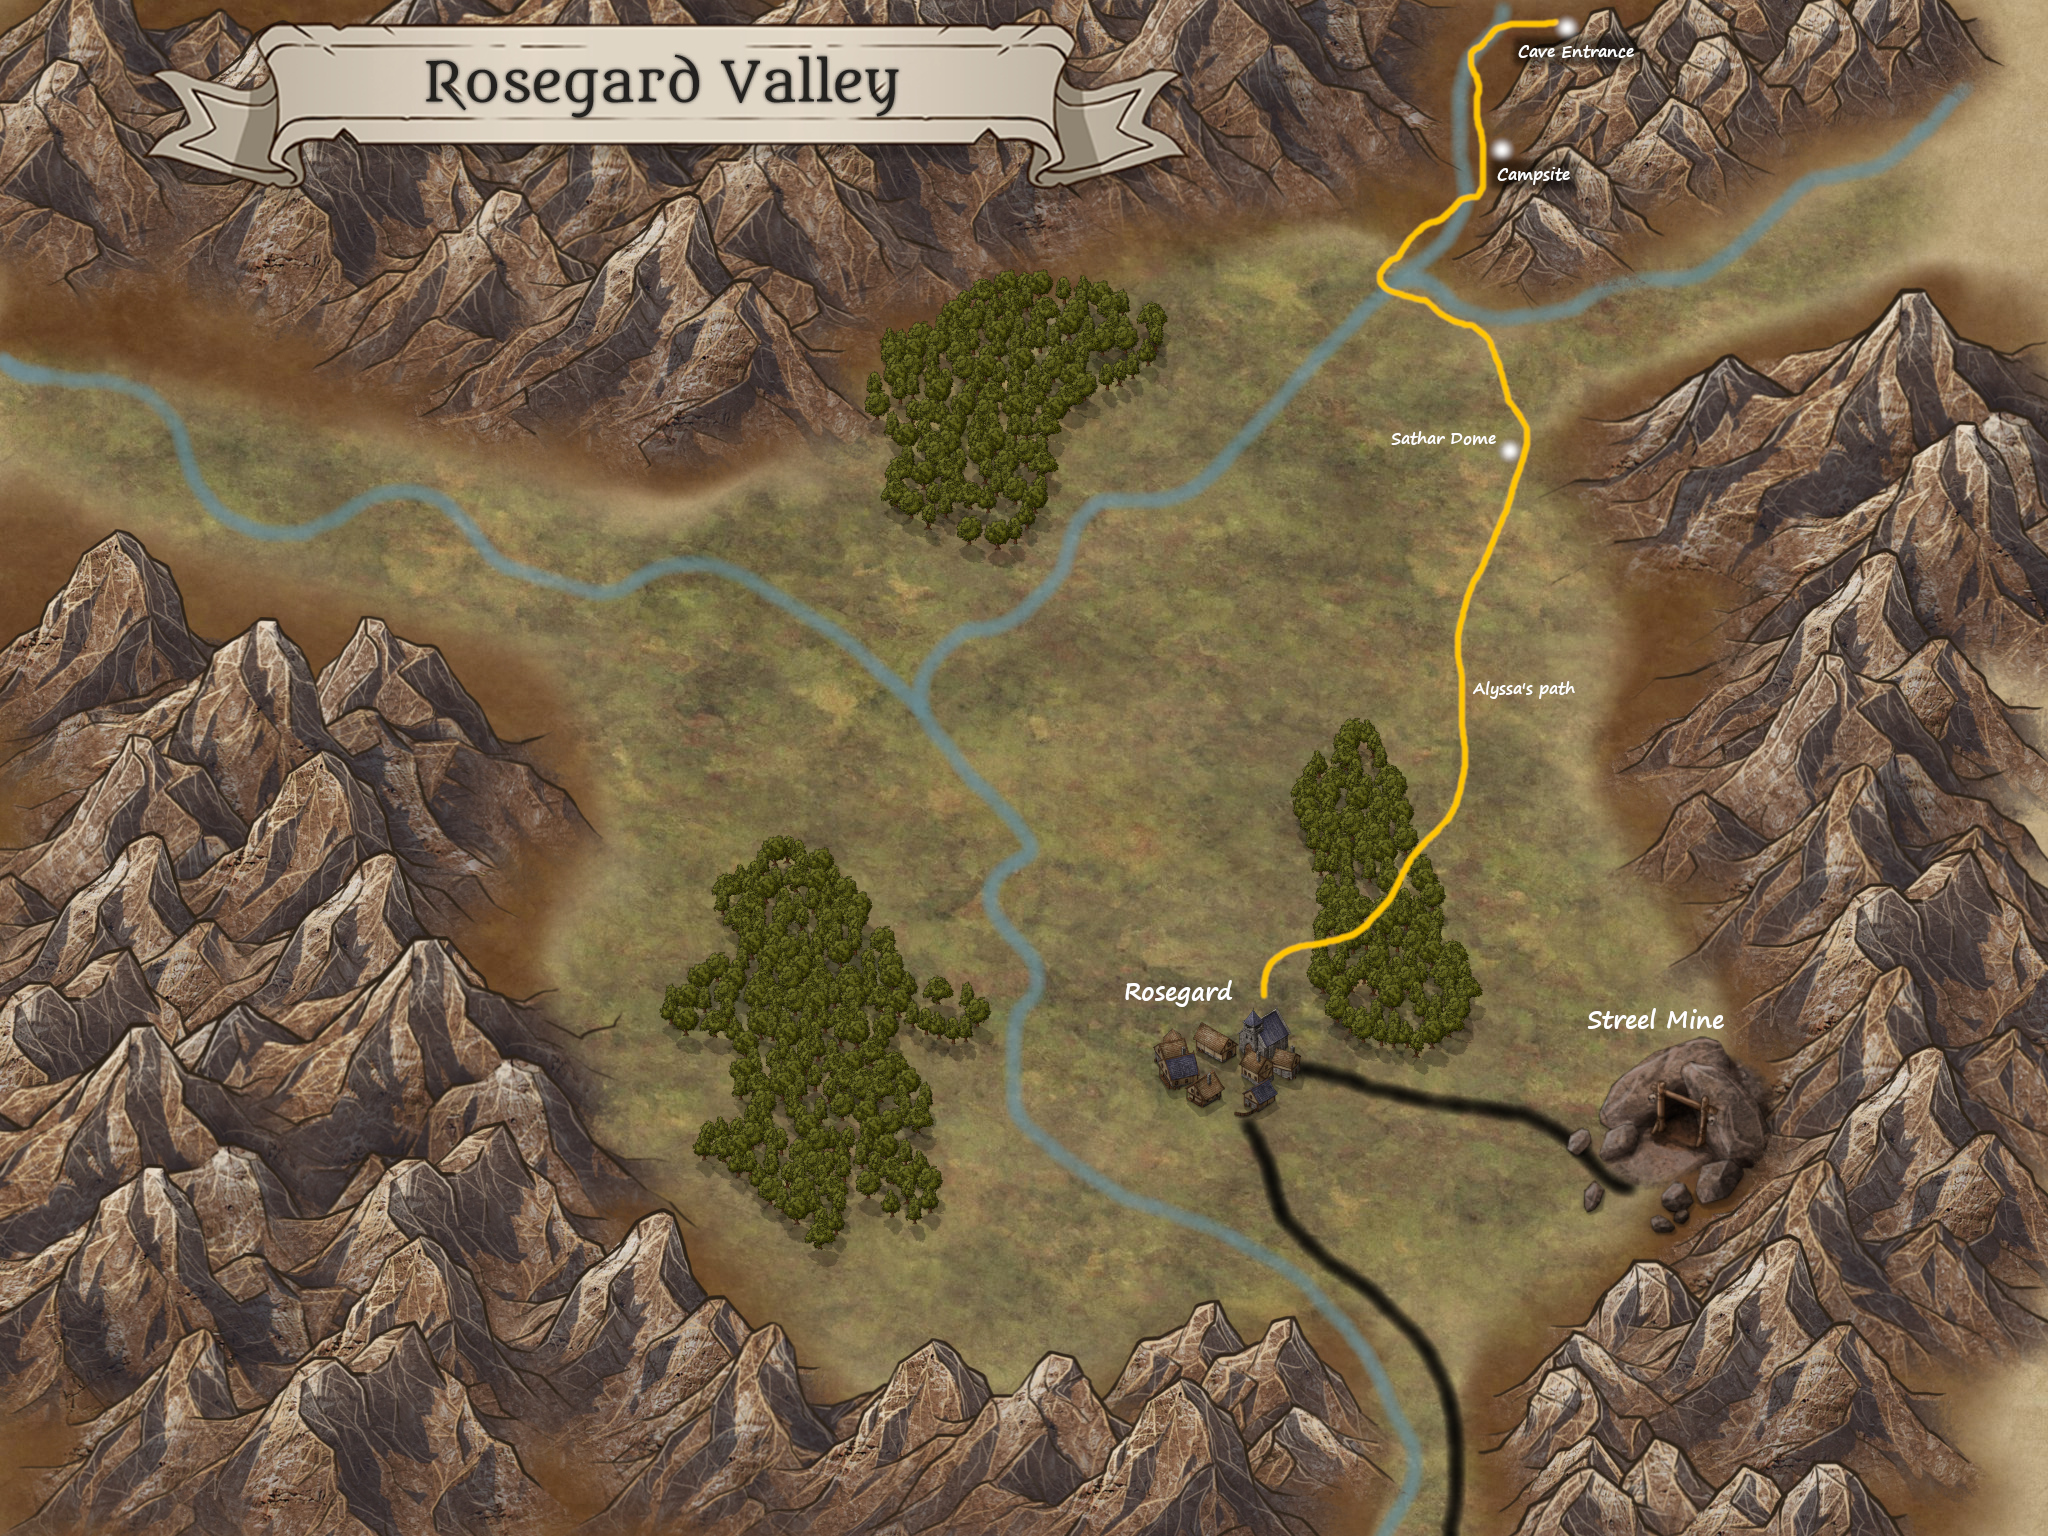

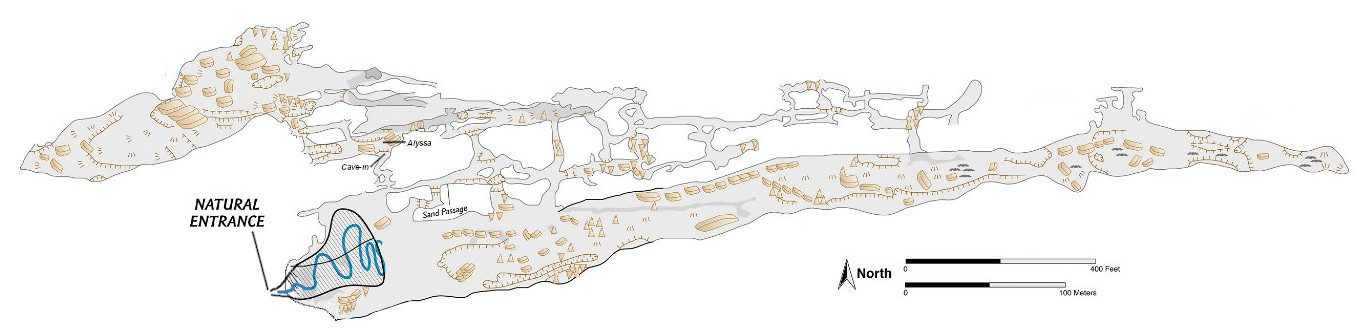
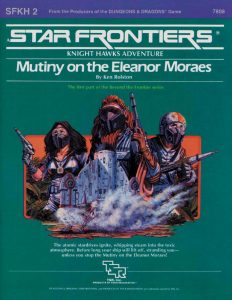
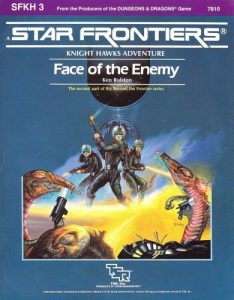
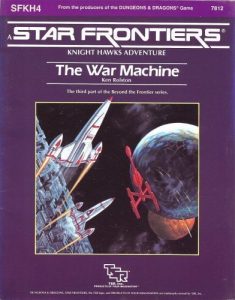
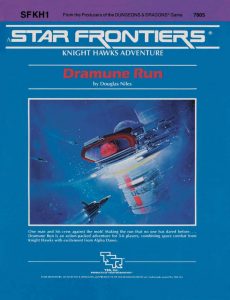
